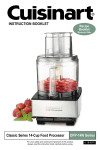
1
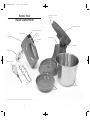
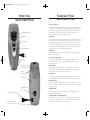
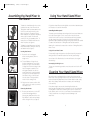
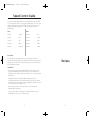
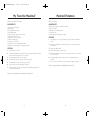
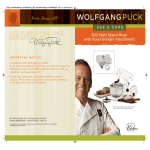
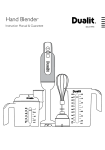
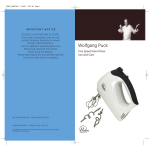
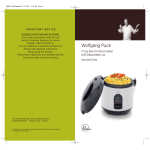
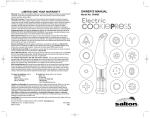
HSN_StandMixerManual_2
9/14/09
11:00 AM
Page 1
I M P O R TA N T N OT I C E
PLEASE DO NOT RETURN TO STORE.
If you have any problems with this unit,
contact Consumer Relations for service
PHONE: 1-800-275-8273 or
visit our website at www.wphousewares.com
Please read operating instructions
before using this product.
Please keep original box and packing materials
in the event that service is required.
W.P. APPLIANCES, INC. Toll Free (800) 275-8273
Model BHSM0020 Printed in China REV 1.0
All trademarks, service marks and trade names (collectively the “Marks”) are proprietary
to Wolfgang Puck World Wide.
Wolfgang Puck
Hand Stand Mixer
Use and Care
HSN_StandMixerManual_2
9/14/09
11:00 AM
Page 1
IMPORTANT SAFEGUARDS
When using electrical appliances, basic safety precautions should always
be followed, including the following:
1
Read all instructions carefully.
2
To protect against risk of electrical shock, do not put mixer body,
base, cord or plug in water or other liquid.
3
Close supervision is necessary when any appliance is used by or
near children.
4
Unplug unit from outlet when not in use, before putting on or taking
off parts, and before cleaning.
5
Avoid contact with moving parts. Keep hands, hair, clothing as well
as spatulas and other utensils, away from beaters, balloon whisk or
dough hooks during operation to reduce risk of injury to persons
and/or damage to the mixer.
6
Remove beaters, balloon whisk and dough hooks from mixer
before washing.
7
Do not operate any appliance with a damaged cord or plug or after
the appliance malfunctions or is dropped or damaged in any manner.
Return the appliance to an authorized service facility for examination, repair, or electrical or mechanical adjustment.
8
The use of attachments not recommended or sold by the appliance
manufacturer may cause fire, electric shock, or injury.
9
Do not use outdoors.
This appliance has a polarized plug (one prong is wider than the other).
To reduce the risk of electric shock, this plug will fit into a polarized
outlet only one way. If the plug does not fit fully into the outlet, reverse
the plug. If it still does not fit, contact a qualified electrician. Do not
modify the plug in any way. Do not attempt to defeat this safety feature by
modifying the plug in any way.
Before Your First Use
Carefully unpack the mixer and remove all packaging materials. Wash the
dough hooks, balloon whisk, beaters and bowls in warm, soapy water to
remove any dust that may have accumulated during packaging. Do not
immerse the mixer body, cord or plug in water. Wipe the mixer body with a
damp cloth. Place the turntable onto the platform of the stand. The bowl will
fit into the turntable.
During initial use, the mixer motor may emit a slight odor. This is normal and
will dissipate after a few uses.
10 Do not let cord hang over edge of table or counter or touch hot
surfaces, including the stove.
11
Do not place on or near a hot gas or electric burner or in a heated
oven.
12 Do not use this appliance for other than intended use.
13 To disconnect, turn unit off, grasp plug, and pull from the wall. Never
yank on cord.
14 When used as a Stand Mixer, make sure unit is completely assembled
before using. See instructions for assembly on page 9.
15 Do not place Hand Stand Mixer on an unstable stand. The mixer
may fall, causing injury to a child or adult, and serious damage to
the appliance. Use only the stand provided and recommended
by manufacturer.
SAVE THESE INSTRUCTIONS
HOUSEHOLD USE ONLY
1
2
HSN_StandMixerManual_2
9/14/09
11:00 AM
Page 3
Table of Contents
Important Safeguards
1
Before Your First Use
2
About Wolfgang Puck
3
Know Your Hand Stand Mixer
5
Features of Your Hand Stand Mixer
8
Assembling the Hand Mixer to the Stand
9
Using Your Hand Stand Mixer
10
Cleaning Your Hand Stand Mixer
10
Speed Control Guide and Helpful Hints
11
Recipes
12
Wolfgang Puck,
owner of the famous
Spago restaurants and
one of the most influential
chef-restauranteurs in
America, is credited with
reviving California’s rich
culinary heritage. His
cooking innovations, a
result of blending fresh
California ingredients with his classical French techniques, are
enjoyed by world leaders, stars and fellow chefs alike. He established
other trend-setting restaurants like Postrio, Chinois on Main in Santa
Monica, Trattoria del Lupo, Cut, and his latest creation, Jai, an Asian
fusion restaurant in San Diego. Home chefs can also share Mr. Puck’s
talents through his cookbooks, cutlery, cookware and, of course,
through his appliances!
3
Limited Warranty
Contact Information
30
back
HSN_StandMixerManual_2
9/14/09
11:00 AM
Page 5
Know Your
Hand Stand Mixer
Hand Mixer Release
Button
Tilting Mixer Head
Low/High Speed Switch
Speed
Selector
Eject Button
Mixer Body
Mixer Stand
Power Burst
Button
Tilt Button
Beater Set
Balloon Whisk
Dough Hook
Set
Mixing Bowl
Turntable
Photos throughout this manual may differ slightly from actual product
5
6
HSN_StandMixerManual_2
9/14/09
11:00 AM
Page 7
Know Your
Hand Stand Mixer
Features of Your
Hand Stand Mixer
10 Precision Speeds
Low/High Speed Switch
Eject Button
Speed Selector
Power Burst Button
Your 10 speed Hand Stand Mixer with optional Low/High Button can
handle all of your mixing tasks from bread dough to emulsifications. The
convenient Low/High Button provides the ability to have 10 different
speed settings. The control settings are indicated by speeds 1 - 5.
Each successive speed provides greater power.
Power Burst
The Power Burst feature is specially designed to handle tough mixing
tasks. It increases the mixing speed to the maximum power level from
any speed setting simply by pressing the Burst button. If the Mixer
seems to be slowing down or straining, use the Burst button to obtain
the maximum mixing performance. Upon release of the Burst button,
the mixer will return to the original speed setting.
Eject Button
The Mixer features a convenient Eject Button for easy release of the
Beaters or Dough Hooks.
No Center Post Flat Beaters
Heel Rest
No center post flat beaters means no clogging of ingredients in
your mixture. From tough cookie dough to chilled butter mixing
becomes effortless.
Hand Stand Locking
Receptacle - Front
Balloon Whisk
Beater
Receptacles
Rating Label
With a large 2" diameter this wire whisk provides thick, stiff peaks
for egg whites, the fluffiest whipped creams, and the most decadent
Chocolate mousse. (See recipe in this manual.)
Dough Hooks
From Wolfgang's famous pizza and bread doughs, to his signature
bacon wrapped meatloaf, the dough hooks provide effortless mixing.
Retractable Cord
The cord easily stows away within the mixer housing by the push of a
button. This feature provides hassle free storage with no more tangled
or hanging cords.
Retractable Cord
Lever
240 Watt Motor
With 240 watts of power the hand mixer easily handles a variety
of bread and pizza doughs.
Retractable Power Cord
3.5 Quart Stainless Steel Mixing Bowl
The stainless steel mixing bowl is non-reactive and will not alter the
flavor of your ingredients. The mirror polished exterior is an attractive
complement to any home kitchen counter top.
Hand Stand Locking
Receptacles - Rear
7
8
HSN_StandMixerManual_2
9/14/09
11:00 AM
Page 9
Assembling the Hand Mixer to
the Stand
figure 1
figure 2
To attach the Hand Mixer, align the notches
located at the rear of the mixer with the
Tilting Mixer Head. Press downwards on the
front of the mixer until mixer clicks into
place (See figure 1). To raise the Tilting
Mixer Head, press the Tilt Button and lift the
mixer up by the handle. The mixer will
securely lock into the upward position. To
lower, press the Tilt Button and lower the
mixer into place (See figure 2).
Lift the Mixer Head. Place the Mixing Bowl onto the Mixer Stand and press
the Tilt button to lower the Mixer Head.
To detach the Hand Mixer, press the Hand
Mixer Release Button and lift the mixer up
until detached. (See figure 3)
Warning: Do not attempt to scrape sides or bottom of Mixing Bowl while
Mixer is in use.
Inserting Attachments
1
figure 3
2
figure 4
3
Be sure the unit is unplugged
before inserting beaters, whisk or
dough hooks.
To insert Beaters or Dough Hooks,
the Mixer Head must be in the tilt-up
position (see fig. 2). Insert the beater
or dough hook with the hexagon collar
into the hexagon receptacle of the
mixing stand and the one with the
round collar into the round receptacle.
(See figure 4). Push each attachment
in as far as it will go; it will click as it
locks into place. If using the Whisk,
insert it into the hexagon hole.
Plug the mixer’s power cord into a 120
volt 60 Hz AC only outlet. Your mixer is
now ready to use.
Removing Attachments
figure 5
Using Your Hand Stand Mixer
1
Be sure your hand mixer is in the OFF
position and unplugged before
removing any attachments. Press the
Eject Button to easily remove beaters,
whisk or dough hooks (see figure 5).
9
Controlling the Mixer Speed
To operate your mixer, always start mixing at the lowest speed. Make sure
the Low/Hi Speed Switch is in the “Low” position. Move the Speed
Selector from the OFF position to the desired speed. During operation,
you may change the speed of the mixer by selecting a new speed.
Ingredients may be added slowly during mixing. Stop the Mixer as needed
to scrape sides and bottom of Mixing Bowl with a plastic spatula.
Using the Power Burst Feature
For especially tough mixing tasks, use the Burst to quickly increase the
mixing speed to the maximum power level from any speed setting.
Upon release of the Burst button, the mixer will return to the original
speed setting.
Interrupting the Mixing Process
To stop your mixer during operation, move the speed control to the OFF
position.
Cleaning Your Hand Stand Mixer
Be sure the mixer is unplugged before cleaning. Do not immerse the
Mixer Motor Housing or plug in water or any other liquid. Press the Eject
button to detach any attachments from the Mixer. Wash in warm, soapy
water. Note: Always handle and store the beaters, whisk and dough
hooks carefully.
Lift up Mixer Head to remove and clean Mixing Bowl. Wipe the
Mixer, Stand and Turntable with a clean, damp cloth. Do not use abrasive
scouring pads or cleansers, as scratching can occur. Do not allow the
bowls, beaters, whisk or hooks to soak in water for extended periods
of time (several hours or overnight) to prevent damage to the
metal finish.
10
HSN_StandMixerManual_2
9/14/09
11:00 AM
Page 11
Speed Control Guide
Your ten-speed Hand Stand Mixer with Low/High Button can handle all
of your mixing tasks from cookie dough to bread dough. The convenient
Low/Hi speed switch provides 10 different speed settings. The control
settings are indicated by speeds 1 - 5. Each successive speed has
greater power.
LOW
HIGH
Speed 1
Knead
Speed 1
Mix
Speed 2
Fold
Speed 2
Cream
Speed 3
Stir
Speed 3
Beat
Speed 4
Blend
Speed 4
Whip
Speed 5
Combine
Speed 5
Aerate
Power Burst
For especially tough mixing tasks, use the Turbo Boost to quickly
increase the mixing speed to the maximum power level from any speed
setting. Upon release of the Turbo Boost button, the mixer will return to
the original speed setting.
Recipes
Helpful Hints
• When using your mixer as a STAND MIXER, the bowl will turn freely
yet may need additional turning assistance to help incorporate the
ingredients when initially mixing them together. This is normal for Hand
Stand mixers.
• Virtually all stand mixers require additional assistance to fully
incorporate ingredients while mixing. Occassionally, stop the machine,
scrape down the sides and push the dry ingredients towards the center
of the whisk, beaters or dough hooks.
• When doubling recipes, use the hand mixer off the stand and a
separate large mixing bowl.
• Unless a recipe calls for cold butter, it is helpful to leave it at room
temperature for an hour or so before mixing.
11
12
HSN_StandMixerManual_2
9/14/09
11:00 AM
Page 13
Sugar Dough
Heavenly Chocolate Mousse
Makes about 1 1/2 pounds or two 9-inch tart shells
Serves 8
INGREDIENTS
INGREDIENTS
1 sleeve sugar-free chocolate wafers, crumbled
2 1/3 cups cake or pastry flour
1/3 cup sugar
1/2 pound (2 sticks) unsalted butter, chilled, cut into small pieces
2 egg yolks
1 or 2 tablespoons heavy cream
4 egg yolks
3/4 cup sugar
5 ounces bittersweet chocolate
5 ounces unsweetened chocolate
1/2 cup heavy cream
8 large egg whites
2 teaspoons lemon juice
METHOD
1
This recipe can be prepared on or off the stand. Attach the beaters.
Using speed 5, mix the chilled butter with the sugar in a medium
bowl. Add the egg yolks one at a time. Reduce speed to 1 and
gradually add the flour to the butter mixture, a third at a time. The
mixture should resemble crumbles. Add the cream. Increase the
mixer speed to 10 and mix dough until a ball is formed.
METHOD
1
Place your hand mixer to the stand and attach the beaters. In a large
bowl, mix the egg yolks with 1/4 cup sugar on speed 10 until they
become a pale yellow.
2
Melt chocolate over a bain-marie or in a heat-proof bowl over
simmering water.
2
Place dough ball onto a lightly floured surface, press down into a
circle. Wrap with plastic wrap and refrigerate for at least 1 hour.
3
In small saucepan, bring cream to a boil and stir it into the
melted chocolate.
3
Use as needed.
4
Stir the chocolate mixture into the egg yolks and sugar. Set aside.
5
With the mixer attached with the whisks, beat egg whites and lemon
juice until they reach soft peaks. Add remaining 1/2 cup sugar slowly
with the mixer on speed 3. Increase speed to 5 and continue to beat
until whites are stiff and very shiny, approximately 7 minutes.
6
Stir one third of the whites into the chocolate mixture to lighten it.
Fold in the remaining beaten egg whites, a third at a time.
7
Pour into individual serving glasses or bowls and chill at last six
hours or overnight.
Note: If the chocolate and egg yolk mixture should tighten, place
the mixture back over the bain-marie, and vigorously whisk in 3 or 4
tablespoons of the beaten egg whites. The chocolate will smooth
out so you can continue with the recipe.
PRESENTATION
Serve in individual glass dishes topped with whipped cream
and shaved chocolate.
13
14
HSN_StandMixerManual_2
9/14/09
11:00 AM
Page 15
My Favorite Meatloaf
Mashed Potatoes
Makes 1 loaf, about 5 servings
Makes 4 servings
INGREDIENTS
INGREDIENTS
1 pound lean ground beef
2 large eggs
1/2 cup crumbled crackers
1/4 cup BBQ sauce
1/4 cup ketchup, plus more for the top
2 tablespoons whole milk
1 small yellow onion, chopped
1 teaspoon dried sage
2 teaspoons kosher salt
1/2 teaspoon fresh cracked black pepper
1 tablespoon brown sugar, for topping, optional
4 large russet potatoes, peeled and cubed
8 cups cold water
4 tablespoons unsalted butter
1 cup whole milk
Kosher salt and fresh pepper, to taste
METHOD
1
In a large pot set over high heat, bring the potatoes and water to
a boil.
2
Reduce temperature to medium low and cook until potatoes are
fork-tender.
METHOD
3
Remove and drain well.
1
Preheat oven to 350° F.
4
Attach flat beaters to stand mixer.
2
Combine all ingredients together in the mixing bowl using the stand
mixer fitted with dough hooks on speed 5.
5
Add butter and half of the milk to the potatoes and mix on speed
5 for 20 seconds.
3
Spray bread pan with non-stick spray.
6
4
Pat meatloaf mixture into pan, smoothing the top.
Taste and adjust potatoes with more milk, salt and pepper as
needed.
5
Spread about 1/4 cup ketchup on top of loaf.
7
Do not over mix potatoes or they will become gluey in texture.
6
Sprinkle with the optional sugar, if desired.
7
Bake for about 1 hour or until internal temperature registers 165° F
on a meat thermometer.
Recipe courtesy Marian Getz, Wolfgang Puck Pastry Chef
Recipe courtesy Marian Getz, Wolfgang Puck Pastry Chef
15
16
HSN_StandMixerManual_2
9/14/09
11:00 AM
Page 17
Buttermilk Biscuits
Deb’s Spritz Cookies
Makes 20 to 22 biscuits
Makes approximately 6 dozen cookies
INGREDIENTS
INGREDIENTS
2 3/4 cups all-purpose flour
1 1/2 tablespoons sugar
1 tablespoon plus 1 teaspoon baking powder
2 teaspoons salt
1/4 teaspoon baking soda
10 tablespoons (5 ounces) chilled unsalted butter, cut into small pieces
1/4 cup minced onion
1 tablespoon chopped fresh or 2 teaspoons dried thyme
1 cup buttermilk
1 or 2 tablespoons milk or cream
1/4 cup grated Parmesan cheese, optional
3 1/2 cups all-purpose flour
1 teaspoon baking powder
1/4 teaspoon salt
1 1/2 cups unsalted butter
1 cup sugar
1 egg
1 teaspoon vanilla
1/2 teaspoon almond extract
2 teaspoons orange zest
Food coloring, if desired
METHOD
1
Preheat oven to 350 degrees.
1
2
Stir together flour, baking powder and salt. Set aside.
3
This recipe can be prepared on or off the stand. Attach the beaters
and beat the butter on speed 5 until softened. Add sugar and mix
until light and fluffy. Add egg, vanilla, almond extract, and orange
zest. Beat well.
4
Gradually add flour mixture and beat until well mixed. If desired,
you can tint the dough with food coloring.
5
Place parchment paper on a cookie sheet. Load the cookie
press with the dough, and turn out cookies 1 to 2 inches apart. If you
do not own a cookie press, roll dough into 1" logs, chill for 1 hour and
slice logs into 1/3" thick coins or circles, place on cookie sheets.
Add sprinkles or sprinkle with sugar if desired.
6
Bake at 350 degrees for 10 minutes
This recipe can be prepared on or off the stand. Attach the beaters
and mix the flour, sugar, baking powder, salt and baking soda in a
large bowl on speed 5.
2
Add the onion, thyme, and chilled butter pieces. Increase mixer speed
and blend chilled butter into batter. Reduce speed to 2 and slowly add
the buttermilk.
3
When dough comes together, remove the beaters and attach
the dough hooks. Continue to knead on speed 3 until a round ball
is formed.
4
Place dough ball onto well-floured surface and, with a rolling pin,
roll out dough to 1-inch thickness.
5
Cut biscuits with biscuit cutter, and place onto a parchment lined
baking sheet. Refrigerate for at least 1 hour before baking.
6
Preheat oven to 350°. Brush the tops of biscuits with milk or cream,
and then sprinkle with Parmesan cheese. Bake 25-30 minutes, or
until golden brown.
METHOD
TIP
To make the sprinkles stick better, brush dough with egg wash before
adding the sprinkles. To make an egg wash, beat 1 egg white with 2
teaspoons water.
To ensure easy passage through the cookie press, do not chill dough.
The Electric Cookie Press can be purchased at www.hsn.com or
www.wphousewares.com
Recipe courtesy Debra Murray, Wolfgang Puck HSN Host
17
18
HSN_StandMixerManual_2
9/14/09
11:00 AM
Page 19
Easy Lemon Kisses
Peanut Butter Spritz Cookies
Makes 48 cookies
Makes approximately 40 cookies
INGREDIENTS
INGREDIENTS
1 18.25-ounce box lemon cake mix
2 large eggs, beaten
1/4 cup canola oil
1 teaspoon fresh grated lemon zest
Sugar to sprinkle on cookies (optional)
1 18.25 ounce box butter recipe yellow cake mix
2 large eggs
1/2 cup creamy peanut butter
2 tablespoons cream
METHOD
1
Preheat oven to 350 degrees.
1
Preheat oven to 350 degrees.
2
2
This recipe can be prepared on or off the stand. Attach the beaters
and combine all ingredients and mix on speed 5. Fill cookie press to
fill line. Fit cookie press with star cookie disc (#6). If you do not own
a cookie press, roll dough into 1" logs, chill for 1 hour and slice logs
into 1/3" thick coins or circles, place on cookie sheets.
This recipe can be prepared on or off the stand. Attach the beaters
and combine cake mix, eggs, peanut butter and cream on speed 5.
Mix well.
3
Load the cookie press with the dough, and turn out cookies 1 to
2 inches apart on an ungreased cookie sheet. If you do not own a
cookie press, roll dough into 1" logs, chill for 1 hour and slice logs into
1/3" thick coins or circles, place on cookie sheets.
4
Bake at 350 degrees for 10 minutes.
3
4
Turn out cookies on cookie sheet one to two inches apart. If desired,
sprinkle with sugar.
METHOD
Bake at 350 degrees for 10 minutes. Let cool.
TIP
The Electric Cookie Press can be purchased at www.hsn.com or
www.wphousewares.com
To ensure easy passage through the cookie press, do not chill dough.
Recipe courtesy Debra Murray, Wolfgang Puck HSN Host
The Electric Cookie Press can be purchased at www.hsn.com or
www.wphousewares.com
Recipe courtesy Debra Murray, Wolfgang Puck HSN Host
19
20
HSN_StandMixerManual_2
9/14/09
11:00 AM
Page 21
Cheese Straws
Fat-Free Chocolate Chewies
Makes about 10 dozen
Makes 3 dozen cookies
INGREDIENTS
INGREDIENTS
1 1/2 cups butter, softened
8 ounces sharp cheddar cheese, shredded
8 ounces mild cheddar cheese, shredded
1 1/2 teaspoons salt
1 teaspoon freshly ground black pepper
3/4 teaspoon cayenne
4 cups all-purpose flour
1/3 cup cocoa powder
3 tablespoons unbleached all-purpose flour
2 1/4 cups powdered sugar
1/2 teaspoon kosher salt
1 teaspoon vanilla extract
2 large egg whites
METHOD
METHOD
1
Preheat oven to 325 degrees.
1
Preheat oven to 350 degrees.
2
2
1. This recipe should be prepared without the stand. Attach the
beaters and beat the first 5 ingredients on speed 5 until blended.
Gradually add flour, beating just until combined well.
This recipe can be prepared on or off the stand. Attach the beaters
and combine ingredients in order listed. Mix on speed 5.
3
Fill cookie press to MAX line. Attach a disk which has a large
opening (Try #5 or #6). If you do not own a cookie press, roll dough
into 1" logs, chill for 1 hour and slice logs into 1/3" thick coins or
circles, place on cookie sheets.
4
Press onto foil-lined cookie sheets.
5
Bake for 15-20 minutes or until surface of cookies is dry but soft in
the center when pressed.
6
Please note, these cookies will spread and will not keep the exact
shape of the disk.
3
Load the cookie press with the dough 2/3 full. Fit the cookie press
with the star-shaped disc (#6). If you do not own a cookie press, roll
dough into 1" logs, chill for 1 hour and slice logs into 1/3" thick coins
or circles, place on cookie sheets.
4
On parchment-lined baking sheets make long ribbons the length of
the cookie sheet with the dough. Cut the ribbons into 2-inch pieces.
5
Bake at 350 degrees for 12-15 minutes or until lightly browned.
Remove to wire racks to cool.
The Electric Cookie Press can be purchased at www.hsn.com or
www.wphousewares.com
TIP
To ensure easy passage through the cookie press, do not chill dough.
Recipe courtesy Marian Getz, Wolfgang Puck Pastry Chef
The Electric Cookie Press can be purchased at www.hsn.com or
www.wphousewares.com
Recipe courtesy Debra Murray, Wolfgang Puck HSN Host
21
22
HSN_StandMixerManual_2
9/14/09
11:00 AM
Page 23
Lemon Butter Cookies
Coconut Tea Cookies
Makes 6 dozen cookies
Makes 6 dozen cookies
INGREDIENTS
INGREDIENTS
2 1/4 cups unbleached all-purpose flour
3/4 cup powdered sugar
1/3 cup granulated sugar
1 cup unsalted butter, softened
1/2 teaspoon kosher salt
1/4 teaspoon baking soda
4 large egg yolks
1 tablespoon fresh lemon zest, very finely grated using a microplane
1 tablespoon fresh lemon juice
1 teaspoon pure lemon oil or extract
1/2 cup solid white shortening
1/2 cup unsalted butter, softened
4 tablespoons cream cheese, softened
1 cup granulated sugar
1 large egg
2 teaspoons coconut extract
1 teaspoon butter vanilla extract
1/4 teaspoon baking soda
1 teaspoon kosher salt
2 1/4 cups unbleached all-purpose flour
1/2 cup shredded sweetened coconut flakes, for topping
METHOD
METHOD
1
Preheat oven to 350 degrees.
2
This recipe can be prepared on or off the stand. Attach the beaters
and combine ingredients in order listed. Mix on speed 5.
3
Fill cookie press to MAX line. Attach a disk which has a large
opening (Try #5 or #6). If you do not own a cookie press, roll dough
into 1" logs, chill for 1 hour and slice logs into 1/3" thick coins or
circles, place on cookie sheets.
4
Press cookies onto foil-lined cookie sheets.
5
Bake 8-10 minutes.
The Electric Cookie Press can be purchased at www.hsn.com or
www.wphousewares.com
1
Preheat oven to 375 degrees.
2
This recipe can be prepared on or off the stand. Attach the beaters
and combine ingredients in order listed except for the coconut
flakes. Mix on speed 5 until a smooth dough forms.
3
Fill cookie press to MAX line. Attach a disk which has a large
opening (Try #5 or #6). If you do not own a cookie press, roll dough
into 1" logs, chill for 1 hour and slice logs into 1/3" thick coins or
circles, place on cookie sheets.
4
Press cookies onto foil-lined cookie sheets.
5
Sprinkle the coconut flakes evenly over cookies.
6
Bake for 10-15 minutes.
Recipe courtesy Marian Getz, Wolfgang Puck Pastry Chef
The Electric Cookie Press can be purchased at www.hsn.com or
www.wphousewares.com
Recipe courtesy Marian Getz, Wolfgang Puck Pastry Chef
23
24
HSN_StandMixerManual_2
9/14/09
11:00 AM
Page 25
Holiday Butter Cookies
Buttery Gingersnap Cookies
Makes 6 dozen cookies
Makes 7 dozen cookies
INGREDIENTS
INGREDIENTS
1 cup unsalted butter, softened
3/4 cup granulated sugar
1 large egg
1 teaspoon vanilla extract
1 teaspoon butter vanilla extract
1/2 teaspoon kosher salt
1/4 teaspoon baking powder
2 1/4 cups unbleached all-purpose flour
Food coloring, sprinkles, jimmies and colored sugar as desired
3/4 cup unsalted butter, softened
3/4 cup dark brown sugar, packed
3/4 cup molasses
1 large egg
2 teaspoons vanilla extract
1/2 teaspoon kosher salt
1 teaspoon baking soda
4 cups unbleached all-purpose flour
2 teaspoons ground cinnamon
1 teaspoon ground cloves
2 teaspoons ground ginger
1/2 teaspoon ground nutmeg
1 teaspoon ground allspice
METHOD
1
Preheat oven to 375 degrees.
2
This recipe can be prepared on or off the stand. Attach the beaters
and cream the butter and sugar on speed 5 until uniformly blended,
about 1 minute. Scrape bowl.
METHOD
1
Preheat oven to 375 degrees.
2
This recipe can be prepared on or off the stand. Attach the beaters
and cream the butter and sugar on speed 5 until uniformly blended,
about 1 minute. Scrape bowl.
3
Add molasses, egg and vanilla and mix for 1 minute. Scrape bowl
again.
4
Add remaining ingredients and mix on lowest speed just until dry
ingredients are incorporated.
5
The Electric Cookie Press can be purchased at www.hsn.com or
www.wphousewares.com
Fill cookie press to MAX line; attach desired disc; press cookies onto
foil-lined cookie sheets. If you do not own a cookie press, roll dough
into 1" logs, chill for 1 hour and slice logs into 1/3" thick coins or
circles, place on cookie sheets.
6
Bake for 10-15 minutes.
Recipe courtesy Marian Getz, Wolfgang Puck Pastry Chef
The Electric Cookie Press can be purchased at www.hsn.com or
www.wphousewares.com
3
Add egg, vanilla and butter vanilla and mix for 1 minute. Scrape
bowl again.
4
Add salt, baking powder and flour, and mix on lowest speed just
until dry ingredients are incorporated. Add a few drops of food
coloring, if desired.
5
Fill cookie press to MAX line; attach desired disk; press cookies out
onto foil-lined cookie sheets. If you do not own a cookie press, roll
dough into 1" logs, chill for 1 hour and slice logs into 1/3" thick coins
or circles, place on cookie sheets. Top with desired sprinkles.
6
Bake for 10-15 minutes.
Recipe courtesy Marian Getz, Wolfgang Puck Pastry Chef
25
26
HSN_StandMixerManual_2
9/14/09
11:00 AM
Page 27
Whipped Cream Frosting
Homemade Colored Decorator
Sugar Crystals
Makes 1 1/2 cups
INGREDIENTS
Makes 1 cup
1 cup heavy whipping cream
1/2 teaspoon vanilla extract
1/4 cup powdered sugar
Sprinkles, jimmies, coconut or colored sugar, for decorating, as desired
METHOD
1
Place your hand mixer to the stand and attach the whisks.
Whip cream, vanilla and powdered sugar on speeds 8 - 10 until
stiff peaks form.
INGREDIENTS
1 cup granulated sugar
4 - 8 drops desired food coloring
Zipper-top plastic bag
METHOD
1
Combine sugar and food coloring in zipper-top bag.
2
Close top and shake vigorously until sugar is uniformly colored.
3
If any spots of darker color remain, press bag between fingers to
incorporate into sugar.
2
Fill cookie press to MAX line.
3
Attach one of the pastry tips.
4
Decorate cookies with frosting as desired.
4
Shake again.
Top with sprinkles.
5
Use this sugar to decorate cookies
5
Recipe courtesy Marian Getz, Wolfgang Puck Pastry Chef
27
Recipe courtesy Marian Getz, Wolfgang Puck Pastry Chef
28
HSN_StandMixerManual_2
9/14/09
11:00 AM
Page 29
Recipe Notes
Limited Warranty
This warranty covers all defects in workmanship or materials in the
mechanical and electrical parts, arising under normal usage and care, in
this product for a period of 12 months from the date of purchase
provided you are able to present a valid proof-of-purchase. A valid
proof-of-purchase is a receipt specifying item, date purchased, and
cost of item. A gift receipt with date of purchase and item is also an
acceptable proof-of-purchase. Product is intended for household use only.
Any commercial use voids the warranty.
This warranty covers the original retail purchaser or gift recipient. During
the applicable warranty period within normal household use,we will
repair or replace, at our discretion, any mechanical or electrical part
which proves defective, or replace unit with a comparable model.
To obtain service under the terms of this warranty,
call Toll Free (800) 275-8273.
THIS LIMITED WARRANTY COVERS UNITS PURCHASED AND USED
WITHIN THE UNITED STATES AND DOES NOT COVER:
•
•
•
•
Damages from improper installation.
Defects other than manufacturing defects.
Damages from misuse, abuse, accident, alteration, lack of proper
care and maintenance, or incorrect current or voltage.
Damage from service by other than an authorized dealer or
service center.
This warranty gives you special legal rights and you may also have other
rights to which you are entitled which may vary from state to state.
29
30