1
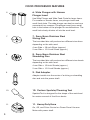
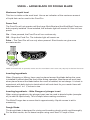
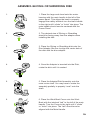
EXFP
Instruction Manual
Discover the complete line of Excalibur brand professional products at
www.drying123.com
TABLE OF CONTENTS
Introduction
Food Processor Safety ............................................................................................ 3
Electrical Requirements .......................................................................................... 3
Important Safeguards .............................................................................................. 4
Cleaning .................................................................................................................. 5
Features and Operations
Food Processor Features......................................................................................6-7
Mulitpurpose Blade and Dough Blade Assembly ................................................... 8
Mulitpurpose Blade and Dough Blade Disassembly .............................................. 8
Mulitpurpose Blade and Dough Blade Use ............................................................ 9
Slicing and Shredding Disc Assembly ................................................................... 10
Slicing and Shredding Disc Disassembly .............................................................. 11
Slicing and Shredding Disc Use ............................................................................ 12
Mini Chopper Assembly .........................................................................................13
Mini Chopper Disassembly ....................................................................................14
Mini Chopper Use ..................................................................................................15
Food Processing Tips............................................................................................... 16
Helpful Hints.......................................................................................................... 17-18
Recipes.................................................................................................................. 19-20
Warranty................................................................................................................. 21
Registration Form................................................................................................... 22
FOOD PROCESSOR SAFETY
Your safety and the safety of others are very important.We have provided many
important safety messages in this manual and on your appliance. Always read
and obey all safety messages.
This is the safety alert symbol. This symbol alerts you to potential
hazards that can kill or hurt you and others.
DANGER
WARNING
All safety messages will follow the safety alert symbol and either the word “DANGER”
or “WARNING.” These words mean: You can be killed or seriously injured if you don’t
follow the instructions.
All safety messages will tell you what the potential hazard is, how to reduce the
chance of injury, and what can happen if the instructions are not followed.
ELECTRICAL REQUIREMENTS
Volts: 120 V.A.C. only.
Hertz: 60 Hz
NOTE: This Food Processor has a polarized plug (one blade is wider than the other).
To reduce the risk of electrical shock, this plug will fit in a polarized outlet only one
way. If the plug does not fit fully in the outlet, reverse the plug. If it still does not fit,
contact a qualified electrician. Do not modify the plug in any way.
Do not use an extension cord. If the power supply cord is too short, have a qualified
electrician or service person install an outlet near the appliance.
3.
IMPORTANT SAFEGUARDS
When using electrical appliances, please follow these basic safety precautions:
1. Read all instructions.
2. To protect against risk of electrical shock do not put Food Processor in water or
other liquid.
3. Close supervision is necessary when any appliance is used by or near children.
4. Unplug from the outlet when not in use, before taking on or off parts, and
before cleaning.
5. Avoid contacting moving parts.
6. Do not operate any appliance with a damaged cord or plug, or after the appliance
malfunctions, or is dropped or damaged in any manner. Return appliance to the
nearest Authorized Service Facility for examination, repair, or electrical or
mechanical adjustment.
7. The use of attachments not recommended or sold by the manufacturer may cause
fire, electric shock, or injury.
8. Do not use outdoors.
9. Do not let cord hang over edge of table or counter.
10. Keep hands and utensils away from moving blades or discs while processing food
to reduce the risk of severe injury to persons or damage to the Food Processor.
A scraper may be used but must be used only when the Food Processor is not running.
11. Blades are sharp. Handle carefully.
12. To reduce the risk of injury, never place cutting blade or discs on base without first
putting bowl properly in place.
13. Be certain cover is securely locked in place before operating appliance.
14. Never feed food by hand. Always use the food plunger.
15. Do not attempt to defeat the cover interlock mechanism.
16. This product is designed for household use only.
4.
CLEANING
WARNING
Cut Hazard
Handle blades carefully.
Failure to do so can result in cuts.
First Cleaning
Before using your Excalibur Food Pro for the first time, wash all removable parts.
Cleaning the Food Processor
1. Make sure the Food Pro is unplugged.
2. Wipe the motor base and cord with a warm, sudsy cloth, and wipe clean with a
damp cloth. Dry with a soft cloth. Do not use abrasive cleansers or scouring pads.
3. All removable parts of the Food Pro are dishwasher safe. Top shelf is preferred for
parts that fit. If washing the Food Pro parts by hand, avoid the use of abrasive
cleansers or scouring pads. They may scratch or cloud the work bowl and cover.
Thoroughly dry all parts after washing.
4. Wrap the power cord around the work bowl.
5. Discs, shafts, and blades should be stored in the provided storage case or
assembled onto the Food Pro. Always keep out of the reach of children.
5.
FOOD PROCESSOR FEATURES
This food processor includes the following items:
• Large 11-Cup Work Bowl
• Large Chopping/Mixing Stainless Steel Blade
• Work Bowl Cover with Wide Feed Chute
• Stainless Steel Dough Blade
• Compact 4-Cup Mini Chopper
• Compact Chopping/Mixing Stainless Steel Blade
• Wide Plunger with Narrow Plunger Insert
• 2mm/4mm Stainless Steel Slicing Disc
• 2mm/4mm Stainless Steel Shredding Disc
• Disc Adapter
• Custom Spatula/Cleaning Tool
• Heavy-Duty Base
• Storage Container
1.
1. Large 11-Cup Work Bowl
Durable polycarbonate bowl large enough for most jobs.
2.
2. Work Bowl Cover with Wide Feed
Chute Handles large items with minimal preparation.
3.
3. Large Chopping/Mixing
Stainless Steel Blade
Multi-use blade for quick mincing, chopping, mixing, and
emulsifications.
4.
4. Stainless Steel Dough Blade
Mixes and kneads dough.
5.
5. Compact 4-Cup Mini Chopper
with Chopping/Mixing Stainless
Steel Blade
Instantly converts 11 Cup Processor to 4 Cup Mini
Chopper. Convenient for small everyday jobs.
6.
FOOD PROCESSOR FEATURES
6.
6. Wide Plunger with Narrow
Plunger Insert
Use Wide Plunger and Wide Feed Chute for larger items.
For smaller or slender items, use plunger insert and
small feed chute. The wide plunger can also be used as a
convenient 4 oz. measure. The plunger insert has a small
hole in the bottom of the plunger for emulsifications. The
small hole slowly drizzles oil into the work bowl.
7.
7. 2mm/4mm Stainless Steel
Slicing Disk
The two-sided disc will produce two different size slices
depending on the side used.
4 mm Side = 1/8-inch Slices (approx.)
2 mm Side = 1/16-inch Slices (approx.)
8.
8. 2mm/4mm Stainless Steel
Shredding Disc
The two-sided disc will produce two different size shreds
depending on the side used.
4 mm Side = 1/8-inch Shreds (approx.)
2 mm Side = 1/16-inch Shreds (approx.)
9.
9. Disk Adapter
Adapter installs into the center of a slicing or shredding
disc and onto the power shaft.
10.
10. Custom Spatula/Cleaning Tool
Spatula/Tool is designed for the shape of the work bowl
for easier removal of food from bowls.
11.
11. Heavy-Duty Base
On, Off, and Pulse Control on Power Panel. Houses
Motor with power shaft.
7.
ASSEMBLY – LARGE BLADE OR DOUGH BLADE
1.
1. Place the large work bowl onto the motor housing with
the main handle to the left of the power panel. This aligns
the bowl to properly engage the safety interlock. Turn
the main handle to the right until it “clicks” or “locks” into
place. The main handle should now be centered with the
Power Panel.
2.
2. Place the Large Blade or Dough Blade onto the main
motor shaft. You may have to rotate the blade partially to
properly “seat” onto the shaft.
3.
3. Place the Work Bowl Cover onto the Work Bowl with the
interlock “tab” to the left of the main handle. Turn the
Cover to the right until it “clicks” or “locks” into place. The
“tab” should now be aligned with the Main Handle.
DISASSEMBLY – LARGE BLADE OR DOUGH BLADE
1.
1. Rotate the Cover to the left until the “tab” is unseated.
2.
2. Remove the Blade by pulling upward. (If the blade is held
in place by ingredients, it may be removed with the Work
Bowl)
3.
3. Rotate the Main Handle to the left until it is unseated and
lift off of the motor housing.
8.
USING – LARGE BLADE OR DOUGH BLADE
Maximum Liquid Level
This line is visible on the work bowl. Use as an indication of the maximum amount
of liquid that can be used in the Food Pro.
Power Pad
The Food Pro will not operate until the Large Work Bowl and the Work Bowl Cover are
both properly installed. Once installed, the indicator light will remain lit if the unit has
power.
On – Once pressed, the Food Pro will run continuously.
Off – Stops the Food Pro. The indicator light will remain on.
Pulse – The Food Pro will run only when pressed. Short bursts can give more
accurate results.
OFF
ON
PULSE
NOTE: If the unit fails to operate, make sure the work bowl and cover are properly locked on the base.
Inserting Ingredients
When Chopping or Mixing, items may be placed around the blade before the cover
is installed or placed down the feed chute during operation. Most items will work best
when placed around the blade before the cover is installed, but not always. It is best to
experiment with both styles to decide which will work best for your needs. Items will
chop best when 1 to 1 ½ inches in size.
Inserting Ingredients – Wide Plunger w/plunger insert
When mixing ingredients, the plunger insert can be used to drizzle liquids (example:
oil) to add the liquid slowly. This is helpful when making emulsions.
The Wide Plunger has a recess that is approximately 4 liquid ounces to aid in
measuring.
Dough Blade
9.
The dough blade is designed for mixing and kneading dough quickly and thoroughly.
For the best results, do not knead recipes using more than 2-3 cups of flour.
ASSEMBLY–SLICING OR SHREDDING DISK
1.
1. Place the large work bowl onto the motor
housing with the main handle to the left of the
power panel. This aligns the bowl to properly
engage the safety interlock turn the main handle
to the right until it clicks” or “locks” into place. The
main handle should now be centered with the
Power Panel.
2.
2. The desired size of Slicing or Shredding
should be facing away from the adapter when
installing the disk.
3.
3. Place the Slicing or Shredding disk onto the
Disc Adapter. Be sure to align the center hole of
the disk with the disc adapter.
4.
4. Once the Adapter is inserted into the Disk,
rotate the disk until it is seated.
5.
5. Place the Adapter/Disk Assembly onto the
main motor shaft. You may have to rotate the
assembly partially to properly “seat” onto the
shaft.
6.
6. Place the Work Bowl Cover onto the Work
Bowl with the interlock “tab” to the left of the main
handle. Turn the Cover to the right until it “clicks”
or “locks” into place. The “tab” should now be
aligned with the Main Handle.
10.
DISASSEMBLY – SLICING OR SHREDDING DISK
1.
1. Rotate the Cover to the left until the “tab” is
unseated.
2.
2. Remove the Disk and Adapter by pulling
upward.
3.
3. Remove the Disk from the Adapter by rotating
the disk and/or adapter.
4.
4. Rotate the Main Handle to the left until it is
unseated and lift off of the motor housing.
11.
USING – SLICING OR SHREDDING DISK POWER PAD
The Food Pro will not operate until the Large Work Bowl and the Work Bowl Cover
are both properly installed. Once installed, the indicator light will remain lit if the unit
has power.
On – Once pressed, the Food Pro will
run continuously.
Off – Stops the Food Pro. The indicator light will remain on.
Pulse – The Food Pro will run only when pressed. Short bursts can give more
accurate results.
NOTE: If the unit fails to operate, make sure the work bowl and cover are properly locked on the base.
OFF
ON
PULSE
Inserting Ingredients – Wide Plunger w/plunger insert
Items should be placed into the Feed Chute. If needed, use the Wide
Plunger to push items down the feed chute. If more consistent slicing
is desired when slicing slender items, the Narrow Plunger Insert
can be used. Rotate the Plunger Insert partially to unlock the insert
from the Wide Plunger. Place the Wide Plunger into the Feed Chute.
Place slender items (example: carrots) into the narrow feed chute
and use the insert plunger to push the items down the feed chute.
12.
ASSEMBLY-MINI CHOPPER
13.
1.
1. Place the large work bowl onto the motor
housing with the main handle to the left of the
power panel. This aligns the bowl to properly
engage the safety interlock. Turn the main handle
to the right until it “clicks” or “locks” into place.
The main handle should now be centered with
the Power Panel.
2.
2. Inset the Min Chopper Bowl into the Large
Work Bowl. You may have to rotate the bowl until
it is properly seated. The Mini Chopper Bowl is
not properly inserted if it can still be rotated.
3.
3. Place the Mini Blade onto the main motor
shaft. You may have to rotate the blade partially
to properly “seat”onto the shaft.
4.
4. Place the Work Bowl Cover onto the Work
Bowl with the interlock “tab” to the left of the main
handle. Turn the Cover to the right until it “clicks”
or “locks” into place. The “tab” should now be
aligned with the Main Handle.
DISASSEMBLY-MINI CHOPPER
1.
1. Rotate the Cover to the left until the “tab” is
unseated.
2.
2. Remove the Mini Blade by pulling upward. (If
the blade is held in place by ingredients, it may
be removed with the Mini Chopper Bowl)
3.
3. Remove the Mini Chopper Bowl from the Large
Work Bowl. There are two finger tabs on inner
surface of the bowl. Using two fingers, the bowl
can be removed easier.
4.
4. Rotate the Main Handle to the left until it is
unseated and lift off of the motor housing.
14.
USING MINI CHOPPER
Power Pad
The Food Pro will not operate until the Large Work Bowl and the Work Bowl Cover are both
properly installed. Once installed, the indicator light will remain lit if the unit has power.
On – Once pressed, the Food Pro will run continuously.
Off – Stops the Food Pro. The indicator light will remain on.
Pulse – The Food Pro will run only when pressed. Short bursts can give more accurate results.
Inserting Ingredients
Place the items into the Mini Chopper bowl after the blade has been installed. Additional
ingredients can be placed down the feed chute.
NOTE: If the unit fails to operate, make sure the work bowl and cover are properly locked on the base.
OFF
15.
ON
PULSE
FOOD PROCESSING TIPS
Hard cheese
(Example: Parmesan, Romano)
If the cheese cannot be pierced with the tip of a sharp knife, it is too hard to process. Do not
use your Food Pro for processing.
If the cheese can be pierced with the tip of a sharp knife, it is okay to continue.
Soft Cheese can be shredded with the shredding disks, but when attempting to shred hard
cheese, you can use the multipurpose blade.
Place 1-inch pieces into the work bowl. Process, using short pulses, until coarsely chopped.
Process continuously until finely grated. Pieces of cheese can also added through the feed
chute while the processor is running.
Soft cheese
For best results with soft cheeses, such as mozzarella, freeze 10 to 15 minutes before
processing. Cut to fit feed chute. Process, using even pressure.
Julienne / Matchstick slices
Use the Slicing Disk to prepare julienne or matchstick style strips of produce. Place food into
feed chute horizontally. Using the plunger, push with even pressure to make plank like slices.
Place plank like slices into feed chute again. Position the planks vertically for shorter pieces
or horizontally for longer pieces. Process, using even pressure.
Slice uncooked meat or poultry
Cut or roll food to fit feed chute. Wrap and freeze food until hard to the touch, 30 minutes to
2 hours, depending on thickness of food. Check to be sure you can still pierce food with the
tip of a sharp knife. If not, allow items to thaw slightly. Process, using even pressure. Slice
cooked meat or poultry food should be very cold. Cut in pieces to fit feed chute. Process,
using even pressure.
16.
HELPFUL HINTS
1. Never process any food that is so hard or firmly frozen that it cannot be pierced with
the tip of a sharp knife. Hard food can cause damage to the blade or motor. If a piece of
hard food, such as carrot, becomes wedged or stuck on the blade, stop the processor and
remove the blade. Carefully remove food from the blade.
2. Do not overfill work bowl or mini bowl. For thin mixtures, fill work bowl up to 1⁄2 to 2/3 full.
For thicker mixtures, fill work bowl up to 3⁄4 full. For liquids, fill up to the maximum level as
described on page 9. When chopping, the work bowl should be no more than 1/3 to 1⁄2 full.
Use the mini bowl for up to 1 cup of liquid or 1⁄2 cup solids.
3. To capitalize on the speed of the processor, drop ingredients to be chopped through the
feed chute while the processor is running.
4. Different foods require varying degrees of pressure for best shredding and slicing results.
In general, use light pressure for soft, delicate foods (strawberries, tomatoes, etc.), moderate
pressure for medium foods (zucchini, potatoes, etc.), and firmer pressure for harder foods
(carrots, apples, hard cheeses, partially frozen meats, etc.).
5. Soft and medium-hard cheese may spread out or roll up on the shredding disc. To avoid
this, shred only well-chilled cheese.
6. Sometimes slender foods, such as carrots or celery, fall over in the feed chute,
resulting in an uneven slice. To minimize this, cut food in several pieces and pack the
feed chute with the food. For processing small or slender items, the small feed chute
in the two piece food plunger will prove especially convenient.
7. When preparing a cake or cookie batter or quick bread, use the multi purpose blade to
cream fat and sugar first. Add dry ingredients last. Place nuts and fruit on top of flour mixture
to prevent over-chopping. Process nuts and fruits, using short pulses, until blended with
other ingredients. Do not overprocess.
17.
HELPFUL HINTS
8. When shredded or sliced food piles up on one side of the bowl, stop the processor
and redistribute the food using a spatula.
9. When food quantity reaches the bottom of a slicing or shredding disc, remove the food.
10. A few larger pieces of food may remain on top of the disc after slicing or shredding.
If desired, cut these by hand and add to mixture.
11. Organize processing tasks to minimize bowl cleanup. Process dry or firm ingredients
before liquid ingredients.
12. To clean ingredients from the multipurpose blade easily, just empty the work bowl,
replace the lid, and pulse 1 to 2 seconds to spin the blade clean.
13. After removing the work bowl cover, place it upside down on the counter.
This will help keep the counter clean.
14. To remove the contents of the work bowl without removing the multipurpose blade,
grasp the work bowl from the bottom and place one finger through the center opening
to hold the blade in place. Then remove food from the bowl and blade with a spatula.
15. Your Food Processor is not designed to perform the following functions:
• grind coffee beans, grains, or hard spices
• grind bones or other inedible parts of food
• liquefy raw fruits or vegetables
• slice hard-cooked eggs or un-chilled meats.
18.
RECIPES
Avocado Spread
1 cup Chopped Avocado, peeled and seeded
1 tablespoon Fresh Lime Juice
1 tablespoon Olive Oil
Pinch Cumin
Salt
Pepper
Combine all ingredients until smooth. Serve with Chicken.
White Bean Artichoke Dip
1/2 lb cooked cannellini beans
7 oz Fresh Artichokes
1 Clove garlic, minced
½ tablespoon Plain Greek Yogurt
1/8 cup Lemon Juice
1/8 cup Feta Cheese
1 tablespoon Fresh Dill, minced
Place all ingredients into a food processor or blender. Pulse until chunky.
Refrigerate to serve cold. Bake in oven for 12 minutes in casserole pan to
serve warm.
19.
RECIPES
Garlic Red Pepper Sauce
3 Garlic Cloves, peeled
2-3 Strips of Lemon Zest (remove the white pith)
1½ teaspoon Salt
1½ teaspoon Herbs de Provence
2 tablespoons Lemon Juice
2 tablespoons Balsamic Vinegar
1/3 cup Extra Virgin Olive Oil
Roasted Red Peppers, 3 x 12 oz jars, drained
Add the garlic, lemon zest, salt, and Herbs de Provence; chop for 5 to 10
seconds. Add the lemon juice, vinegar, olive oil and peppers. Pulse, then process
for 15 to 20 seconds until smooth. Refrigerate for at least 30 minutes in a sealed
container. Perfect sauce for meat or vegetables.
Garlic Red Pepper Dip
Make half the GARLIC RED PEPPER SAUCE recipe. Add 2 ounces of low-fat
cream cheese and ¼ cup plain yogurt; chop for 10 to 15 seconds until
consistent.
20.
RECIPES
No Meat “Meat” Balls
1 cup raw walnuts, soaked
1 tablespoon Lemon Juice
1 teaspoon Extra Virgin Olive Oil
1 teaspoon Tamari
¼ teaspoon Garlic Powder
Salt
1 tablespoon Parsley
1 tablespoon Minced Onion
Place walnuts, lemon juice, olive oil, tamari, garlic powder & salt in food
processor. Process into a paste. Scoop into mixing bowl. Stir in the following
ingredients and mix well. Optional: 1/3 teaspoon curry powder. Roll mix
into balls. Store in the refrigerator in a sealed container for up to 4 days. Add
marinara sauce to the No “Meat” Balls and serve over pasta. ** You can use
the No “Meat” Balls in a variety of ways. Sandwich between two tomato slices,
top with olives or parmesan cheese for a nice appetizer or snack.
Serve immediately.
Gazpacho
1/2 - 1 Tomato
1/2 Cucumber
1/3 Green Pepper
1/2 - 1 Green Onion
1/2 - 1 Stalk Celery
1 handful Cilantro
1/2 Avocado
1 - 2 Tbsp Olive Oil
Dash of Garlic and Salt
2/3 cup Water or Chicken Broth
Simply blend the following ingredients to your desired consistency.
21.
REGISTRATION AND
GUARANTEE RECORD
Excalibur® EXFP300S
Serial Number _______________________________________________
Name______________________________________________________
Address____________________________________________________
City_________________ State__________________ Zip Code________
Phone _____________________________________________________
Purchased From_____________________________________________
City_________________ State__________________________________
Date of Purchase_____________________________________________
IMPORTANT
To protect your purchase, fill out and mail
this form within thirty (30) days of purchase.
22.
NOTES
23.
NOTES
24.
Excalibur
6083 Power Inn Road, CA 95824
1.877.368.2797 • www.drying123.com
Find us on Facebook
www.facebook.com/ExcaliburDehydrators