1
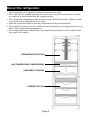
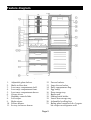
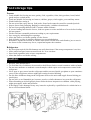
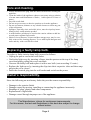
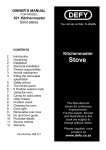
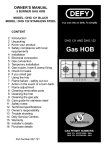
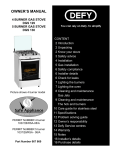
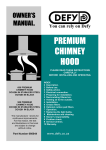
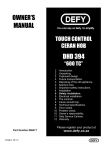
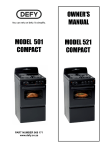
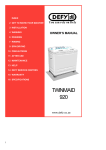
Owner's Manual
For C410 Premium Frost
Free
Refrigerator Freezer
You can rely on Defy
INDEX.
2
2
2
2
Introduction.
Unpacking.
Installation.
Electrical installation.
3 Reversing the doors.
4 About this refrigerator.
5 Feature diagram
6 Using the refrigerator
6 Control panel
7 Food storage tips.
7 Caution.
8 Care and cleaning.
8 Replacing a faulty lamp bulb.
8 Owner’s responsibility.
9 Service
9 Service Centres.
10 Warranty
www.defy.co.za
Page 1
Introduction.
Congratulations on the purchase of this quality product.
Please read these instructions carefully before use. They will provide you with information on how to operate and care for your refrigerator in order that you gain the maximum benefit from it and enjoy many years of trouble free use.
Unpacking.
• Please ensure that packaging material is disposed of in a responsible manner.
• Cardboard and foam packaging may be recycled
• Plastic bags should be cut up to prevent children playing with them and accidentally
suffocating.
• If the appliance is damaged in any way, do not use it. Report the damage to your
dealer, who will take the necessary corrective action.
Installation.
1. The refrigerator should be positioned in a dry, well aired place.
2. Position the refrigerator away from heat sources such as stoves and direct sunlight.
3. Allow an air-space of at least 50mm above the refrigerator for ventilation purposes.
4. If the floor beneath the refrigerator is uneven, the refrigerator must be levelled by turning the two adjustable levelling feet at the front of the unit either in or out.
5. The refrigerator should lean slightly backwards as this will ensure that the doors close
properly.
1
2
3
4
5
Electrical installation.
This appliance must be earthed and the manufacturer and the seller do not accept
responsibility for any damage due to incorrect electrical connection.
This product may not be used with a battery inverter power supply.
• Wait at least two hours after delivery before connecting the refrigerator
to the mains power supply. This will allow the compressor and system
fluids to settle .
• The refrigerator is fitted with a 15 A moulded plug and uses a 220250V/50 Hz power supply.
• Insert the plug into an earthed 15A wall socket and switch on the
power.
Page 2
Reversing the doors ……..if required.
• Should the refrigerator be located
where door opening from the left is
difficult or inconvenient, access may
be improved by reversing the doors
so that they open from the opposite
end.
• This operation is best performed by
two persons.
• Follow the steps sequentially 1 to 17
as shown in the three illustrations.
1. Remove the hinge cover and hinge.
Unplug the control panel wiring harness
2. Remove upper door.
3. Remove hinge
4. Remove lower door.
5. Remove kick panel.
6. Remove hinge
7. Reverse the position of the upper
hinge bush.
8. Move the upper left door handle to
the lower right handle position and
reverse the plastic plugs
9. Reverse the position of the lower
hinge bush.
10. Move the lower left door handle to
the upper right handle position and
reverse the plastic plugs.
11. Attach the lower hinge at the left.
12. Position the lower door on the hinge.
13. Reverse the position of the middle
hinge and cap the screw holes.
14. Position the upper door.
15. Fit the upper hinge pin into the upper
door bush, reconnect the control
panel wiring harness and attach the
hinge to the top left of the cabinet.
16. Reverse the position of the hinge
cover
17. Replace the kick panel.
Page 3
About this refrigerator.
• This refrigerator is designed for domestic household use only.
• The 4 star freezer compartment may be used to freeze fresh or cooked food, to make
•
•
•
•
ice cubes or to store frozen food for lengthy periods.
The refrigerator compartment may be used to store fresh food, drinks, and dairy products which will be consumed in a few days.
Both the refrigerator and the freezing compartment defrost automatically.
The multiflow system (cool air circulation) will maintain an even temperature on every
shelf of the refrigeration compartment.
The temperature may be adjusted by selecting the desired option on the control panel.
See page 6 for controls.
REFRIGERATOR SECTION
LOW TEMPERATURE COMPARTMENT
VEGETABLE CRISPERS
FREEZER SECTION
Page 4
Feature diagram.
1.
2.
3.
4.
5.
6.
7.
8.
9.
10.
11.
Adjustable glass shelves.
Multi air flow duct.
Low temp. compartment shelf.
Low temp. compartment front.
Low temp. compartment drawer.
Crisper cover.
Humidity control slides.
Left crisper.
Right crisper.
Freezer drawer.
Ice tray in freezer drawer.
12.
13.
14.
15.
16.
17.
18.
19.
20.
21.
Page 5
Freezer baskets.
Large freezer basket.
Dairy compartment flap.
Egg caddy.
Door storage tray.
Bottle rack.
Sliding bottle holder.
Lower door storage tray.
Adjustable levelling feet.
Rating plate located at left of vegetable crisper on refrigerator wall.
Using the refrigerator
•
•
•
•
•
•
Install all the shelves and accessories.
Clean the interior of any accumulated dust.
Connect the refrigerator to the mains and press the ON button on the control panel
Set the temperature to the coldest setting (SUPER) and allow to run for about one
hour.
Food may be stored after about 1 hour of cooling.
Set the controls to the desired temperature ( High, Middle or Low) as explained below.
SUPER
Instant cooling with a powerful supply of
cold air
HIGH
Compartment temperatures are slightly
colder than normal
MIDDLE
Normal storage temperatures
LOW
Compartment temperatures are slightly
warmer than normal
VACATION
Energy saving setting for when the door
will not be opened for a long period.
FUNCTION
Press this button repeatedly to select the
desired temperature level.
The pilot light below the selected level will
flicker for about 7 seconds and then stabilise.
The colours of the pilot lights is green except for SUPER which is blue.
ON / OFF
Pressing this button switches the refrigerator ON and OFF
•
•
•
•
SUPER
HIGH
MIDDLE
LOW
VACATION
FUNCTION
ON / OFF
Internal temperatures may be affected by factors such as the location of the refrigerator, ambient temperatures and the frequency of door openings.
The interior light will switch on every time the door is opened and switch off whenever the door is closed.
The Compressor switches on and off automatically as it maintains the selected temperature.
When the compressor is new, it requires a running in period of about 5 months. During this period the compressor may be slightly noisy.
Page 6
Food storage tips.
Freezer
•
•
•
•
•
•
•
•
•
•
•
•
Foods suitable for freezing are meat, poultry, fish, vegetables, fruits, dairy products, bread, baked
goods and pre-cooked meals.
Foods not suitable for freezing are lettuces, radishes, grapes, whole apples, pears and fatty meats.
Wash food before storing it
Do not exceed the expiry date on food packs. Some foods cannot be stored for extended periods..
Inspect frozen food packaging. Bulging or stained packs could have deteriorated.
Do not freeze partially thawed foods. Consume within 24 hours.
If you are loading bulk into the freezer, load one quarter at a time and allow to freeze before loading
the next quarter.
Divide food into reasonable portions according to your requirements.
Save energy by minimising door openings.
Allow hot food to cool before putting it in the freezer.
Seal all foods, or place in airtight containers to prevent dehydration.
Remember, liquids can increase in volume when frozen. Do not store sealed bottles, jars or cans in
the freezer as the contents may freeze, expand and rupture the container.
Refrigerator
•
•
•
•
Be aware that tropical fruit like bananas can easily deteriorate if the storage temperature is too low.
Allow sufficient space between stored foods for air to circulate.
Store fresh vegetables in the crisper compartments.
Allow hot food to cool before storing.
Caution.
•
•
•
•
•
•
•
•
Keep air vents unobstructed .
To avoid the risk of cold burn, do not touch or hold frozen foods or metal containers with wet hands.
Do not store medicine or academic research samples which require strict temperature control in the
refrigerator.
Never pour or spray water into the refrigerator and do not store liquids, pot plants or open containers
on top of the refrigerator as these might spill causing electrical shorting.
Do not allow children to hang on the refrigerator doors as the unit could topple forward risking personal injury.
Do not store or use flammable gas, benzene, petrol or volatile substances in or near the refrigerator.
When discarding an old refrigerator please render the doors inoperative as children ,while playing,
might get trapped inside and suffocate.
If the supply cord is damaged in any way it must be replaced by a qualified service technician in order to avoid accidental shock.
Page 7
Care and cleaning.
•
•
•
•
•
•
•
•
Always disconnect the plug from the mains socket before cleaning the
appliance.
Clean the inside of the appliance whenever necessary using a solution
of warm water and Bicarbonate of Soda. ( 1 table spoon to 2 litres of
water ).
Dry with a soft cloth.
Do not use pot scourers or abrasive powders to clean the appliance.
Do not use benzene, thinners or any volatile cleaners to clean any part
of the refrigerator
Spillages, especially citric and acidic juices, must be wiped up immediately as they could stain the product.
A mild furniture polish may be used on the exterior cabinet to add lustre and protect against finger marks.
Shelves, freezer drawers, crispers and door storage trays, may be carefully removed for cleaning purposes. Use a mild liquid detergent and
water and dry with a soft lint free cloth.
Replacing a faulty lamp bulb.
To replace a faulty interior lamp bulb, proceed as follows:
• Unplug the power cord at the wall socket.
• Unclip the light cover by inserting a finger into the aperture at the top of the lamp
cover and gently pulling the cover outwards.
• Unscrew the faulty bulb and replace it with a new bulb ( not exceeding 15 watts ).
• Replace the light cover by inserting the clips into their respective slots and then snapping in the cover closed
• Insert the electrical plug into the wall socket and switch on the power.
Owner’s responsibility.
Since the following are not factory faults they are the owners responsibility:
•
•
•
•
•
Damage to the exterior finish.
Damage caused by moving, installing or connecting the appliance incorrectly.
Breakage of glass, plastics and other components.
Replacement of light bulbs.
Damage caused through improper use of the appliance.
The Manufacturer strives for continuous improvements.
For this reason, the text and illustrations in this book are subject to change
without notice.
Page 8
Service.
Before calling a service technician to assist with a problem, please check:
• Is the thermostat in the OFF position? The thermostat should be set to an ON position.
• Is the power switched OFF? The power should be ON.
• Has a house fuse blown or a circuit tripped out? Repair or re-set as necessary.
• Is the 15-amp plug pushed firmly into the wall socket? Check another appliance such
as a toaster or kettle in the same socket.
• Has the door been left open for a long time? Close the door and monitor performance.
Remember that you may be charged for a service call,
even during the warranty period ,if the fault is caused by any of the above
Service Centres
If you have followed the instructions and still have a problem,
contact the nearest Defy Service Centre for advice or help.
BLOEMFONTEIN
160 Long Street, Hilton,
Bloemfontein 9301.
Tel. 051 400 3900
[email protected]
DURBAN
35 Intersite Avenue,
Umgeni Business Park, Durban 4051.
Tel. 031 268 3300
[email protected]
CAPE TOWN
5A Marconi Rd.
Montague Gardens, 7441.
Tel. 021 551 8314
[email protected]
POLOKWANE
87 Nelson Mandela Drive.
Superbia 0699.
Tel. 0152 92 1166 / 7 / 8 / 9.
[email protected]
EAST LONDON
16 Bowls Rd. Arcadia,
East London 5201.
Tel. 043 743 7100
[email protected]
PORT ELIZABETH
112 Patterson Road,
North End, Port Elizabeth 6001.
Tel. 041 401 6400
[email protected]
JOHANNESBURG
Commercial Head Office, Tel. Sales,
Administration, Distribution,
Commercial Head Office, National Groups,
Contracts and Credit.
PRETORIA
Block A1 Old Mutual Industrial Park.
Cnr. D.F.Malan Drive & Moot Str.
Hermanstad. 0082.
Tel. 012 377 0061
[email protected]
Cnr. Mimetes & Kruger Sts. Denver ext.12
Johannesburg. 2094.
Tel. 011 621 0200 or 011 621 0300
[email protected]
OTHER AREAS ARE SERVICED BY OVER 200 AUTHORISED SERVICE AGENTS.
PLEASE CONSULT THE NEAREST REGIONAL DEFY SERVICE CENTRE FOR DETAILS
Page 9
Warranty.
This certificate is issued by DEFY APPLIANCES LIMITED manufacturers of Defy and Ocean
products, hereinafter the Company, to the original purchaser only, of the appliance described on the
certificate and shall constitute the only warranty given in respect of this appliance.
The Company warrants to the original purchaser that for a period of TWO YEARS from date of purchase the appliance is free from defect under normal domestic use, both in workmanship and material, subject to the following conditions.
1. Repair or replacement of any part of this appliance, found by the Company to be defective, shall
be at the election of the Company. The Company reserves the right to effect such service through
any of its Service Divisions or Authorised Service Dealers. The cost of such service shall be borne
by the Company in full, provided that the appliance is located no further than 50 km from a Company Service Centre or an Authorised Service Dealer. Where the appliance is located beyond the
50 km radius, the purchaser shall be liable for the standard travelling charges, as determined by the
Company.
CARRY IN SERVICE Microwave ovens, Compact cookers, Ice makers and small appliances are
repaired in our service centres and are not collected from the customers home. Faulty units should
be delivered to the purchasing dealer or to the nearest Company Service Centre for warranty repairs.
2. Vitreous enamelware, fuses and lamps are specifically excluded from these warranties. It is an express condition of these warranties that the purchaser takes due care and attention in the use and
maintenance of the appliance. Abuse, misuse in conflict with operating instructions, connection to
incorrect voltages and subjection to commercial use shall release the Company from its obligations.
3. This warranty shall become void and cease to operate if the appliance is dismantled by, or any repairs to the appliance are effected by any persons not duly authorised by the Company, or if substitute parts not approved by the Company are used in the appliance, or if the serial number of the appliance is removed.
4. The Company shall not be responsible for damages resulting from fire, flood, civil disturbances or
any Act of God. The Company shall not, in terms of these warranties be responsible nor held liable
for any consequential loss or damage of any kind caused by or due to the failure or malfunction of
the appliance.
5. The Company shall not be responsible for transportation or other costs other than those incurred
within the provisions of Point 1 of this Certificate.
6. These warranties shall not apply to the appliance if it is purchased or used beyond the borders of
the Republic of South Africa, Namibia, Botswana, Swaziland and Lesotho.
7. Where service is requested under warranty and no fault or defect can be found by the Company,
all costs incurred will be for the purchaser's account.
8. This Certificate as well as your invoice will serve as proof of purchase. For the purpose of warranty, it will be essential to produce this Certificate and invoice. Failure to do so, will render the
purchaser liable for service costs.
KEEP THIS CERTIFICATE AND SALES INVOICE AS PROOF OF
PURCHASE FOR WARRANTY PURPOSES
Page 10