1
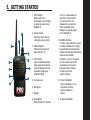
1. SAFETY INFORMATION
NOTE TO USER
■ Illegal operation is punishable by fine, imprisonment or both. Refer service to Advanced
Wireless Communications only.
SAFETY
■ It is important that the operator is aware of
and understands common hazards of operating
any two-way radio.
■ We do not guarantee safety while operating
the two-way radio when using accessories and
/ or attachments not sold by Advanced Wireless
Communications.
WARNING
KEEP OUT OF EXPLOSIVE ATMOSPHERES
(GASES, DUST, FUMES, etc.)
■ Turn off your two-way radio while taking
on fuel, or while parked in gasoline service
stations.
PRECAUTIONS
Observe the following precautions to prevent
fire, personal injury and two-way radio damage.
■ Do not modify or attempt to adjust this twoway radio for any reason.
■ Do not expose the two-way radio to long
periods of direct sunlight, nor place it close to
heating appliances.
■ Do not place the two-way radio in excessively
dusty, humid, and/or wet areas, nor on unstable
surfaces.
■ If an abnormal odor or smoke is detected
coming from the two-way radio, switch OFF the
power immediately and remove the battery pack
from the two-way radio. Contact your dealer.
2. UNPACKING AND CHECKING EQUIPMENT
Carefully unpack the two-way radio. We recommend that you identify the items listed in the following
table before discarding the packing material. If any items are missing or have been damaged during
shipment, file a claim with the carrier immediately.
ACCESSORIES INCLUDED
Item
Quantity
Antenna
1
Li-ion Battery
1
Belt Clip
1
User’s Manual
1
THANK YOU
Thank you for purchasing the MINI PRO two-way radio from Advanced Wireless Communications
(AWC). We appreciate your business and trust in our products.
Advanced Wireless Communications is a leader in the design and integration of wireless
communications solutions. Since 1992, we’ve been creating on site wireless systems that
help businesses communicate effectively.
Whether it’s a national chain of retail stores, a 50-story office tower, construction site, a
large distribution center, a college campus or a retirement home, AWC has the expertise
and experience to create the best solution possible.
We’re ready to partner with you to make your communications more effective and efficient.
Ken & Ben Coons
Founders / Owners
Advanced Wireless Communications
©2013 Advanced Wireless Communications. All rights are reserved.
CONTENTS
1. Safety Information
1
2. Unpacking and Checking Equipment
Supplied Accessories
3. Batteries
Transmitting [PTT]
8
2
Channel Scan Function
8
3-4
VOX Function
8
4. Preparation
7. Auxiliary Functions
Activating VOX Transmission Operation
9
Installing/Removing the Battery
5
QT (50 Groups)/DQT (107 Groups
Positive and Negative Position)
9
Installing the Antenna
5
Power Saving Function
9
5. Getting Started
6
Voice Annunciation
9
6. Basic Operations
7
Wired Clone
10
3. BATTERIES
CHARGING WARNINGS:
Initially charging the battery pack after purchase
or extended storage (greater than 2 months) will
not bring the battery pack to its normal operating capacity. After repeating the charge/discharge cycle two or three times, the operating
capacity will increase to normal.
AVAILABLE BATTERIES
Please use Advanced Wireless Communications’ branded batteries in the MINI PRO twoway radio only. Using other batteries causes a
risk of fire or damage.
Note:
1. Do not short the battery terminals or dispose
of the battery by fire. Never attempt to remove
the casing from the battery pack.
2. The ambient temperature should be between 5 and 40°C while charging is in progress. Out of the range, the battery may not be
charged fully.
3. Always power OFF the two-way radio
equipped with a battery pack before charging.
Using the two-way radio while charging its battery pack will interfere with correct charging.
4. Do not plug/unplug the AC adapter and
battery during charging, to avoid interference to
the charging program.
5. The battery pack life is over when its operating time decreases even though it is fully and
correctly charged. Replace the battery pack.
6. Do not recharge the battery pack if it is
already fully charged. It will shorten the life of
the battery pack or the battery pack may be
damaged.
7. Do not charge the two-way radio while the
battery or radios are wet. Dry them with a cloth
and allow to air dry thoroughly before charging.
3. BATTERIES
Note: All batteries can cause property damage
and/or bodily injury such as burns if conductive
materials such as jewelry, keys, or beaded
chains touch exposed terminals. The conductive material may complete an electrical circuit
(short circuit) and become quite hot. Carefully
handle any charged battery, particularly when
placing it inside a pocket, purse, or other container with metal objects.
CHARGE OPERATION
When installing the battery, the two-way
radio lights red. If three beeps sound each 30
seconds, it means low power, please start to
charge the two-way radio.
Please use the MINI PRO charger for battery
charging, the charger LED display charging
status:
LED Appears
Status
Red
Charging
Green
Fully Charged
TO CHARGE BATTERY PACK, PERFORM THE FOLLOWING STEPS:
1. Plug the AC adapter cable into the adapter
jack located on the rear of the charger.
2. Put the battery pack or two-way radio with a
battery pack into the charger.
3. Plug the AC adapter into AC outlet.
4. Make sure the battery pack contacts are in
contact with the charging terminals, the charger
LED lights red and charging begins.
5. The supplied charger LED lights green,
complete charged. Remove the two-way radio
or battery pack from the charger.
Note:
1. If the charger’s LED flashes - it means that
something is wrong.
2. The charger lights red while charging after
inserting the battery. Flashing means defective
battery or the temperature is too high or low.
4. PREPARATION
INSTALLING/REMOVING THE BATTERY
PACK
The battery pack is not charged at the factory.
Charge it before use.
1. Match the positive and
negative symbols on the
battery and radio. Slide
the battery in to the radio.
Once battery is in the radio
compartment push down on
battery near the bottom to
snap it in. Hearing the warning tone means the battery
contacts are normal.
2. Take the battery cover
and slide it on to the back of
the radio with the two tabs
facing towards the top of the
radio. Slide until tabs go in to
the radio and the cover is on.
3. On the bottom of the radio fasten the battery
latch by pushing it towards
the battery cover.
INSTALLING THE
ANTENNA
Screw the antenna into the
connector on the top of the
two-way radio by holding the
antenna at its base and
turning it clockwise until
secure.
Note: The antenna is
neither a handle, a key ring
retainer, nor a speaker/
microphone attachment point.
Using the antenna in these ways may damage
the antenna and degrade your two-way radio’s
performance.
5. GETTING STARTED
1. LED Flashlight
Press Power button
momentarily to turn flashlight
on; press key again to shut
flashlight off.
2. Volume Control
Adjust the volume level by
rotating the volume control.
2
1
11
3. Channel Selector
Rotate channel selector to
select channel 1-16.
3
10
4
5
9
8
7
6
4. LED Indicator
Lights red while transmitting.
Lights green while receiving
a signal. Flashing red when
the battery voltage is low
while transmitting.
5. Accessory Jack
6. Microphone
7. Speaker
8. Power Button
Press and hold for 3 seconds
to turn on - release when you
hear a tone. Press and hold
for 3 seconds to turn off release when you hear tone.
Press momentarily to turn
flashlight on; press key again
to shut flashlight off.
9. Scan/Monitor Button
For Scan - press button for 1 second
to enable or disable scan. A single
beep indicates that scan has been
enabled. A double beep indicates that
scan has been disabled.
For Monitor - press for 3 seconds,
then the squelch is turned off,
meanwhile you can hear the
background noise. Release
the side key, then the
squelch is opened.
10. Push-to-Talk Button
Press it and speak in to the
microphone to call the
receiver; release it to
receive.
11. Antenna (detachable)
6. BASIC FUNCTION
INSTALLING/REMOVING THE BATTERY
PACK
The battery pack is not charged at
the factory. Charge before use.
1. TURN ON THE RADIO
Install the battery and press side
key 2 (power key) for 3 seconds to
turn on (you should hear a tone).
Release the power key.
2. TURN OFF THE RADIO
Press side key 2 (power key) for 3 seconds.
After hearing the tone release the power key.
3. FLASHLIGHT
Press power key for a short time to turn the
flashlight on; and then press the power key to
turn the flashlight off.
4. VOLUME CONTROL
5. CHANGING
CHANNELS
Rotate the channel
selector to select
your desired
channel.
■ When you
receive an appropriate signal, you
will hear voice
from the speaker.
Note: Once the battery strength is too low, the
two-way radio will stop transmitting and sound
an alarm voice.
7. AUXILIARY FUNCTIONS
TRANSMITTING [PTT]:
■ Press PTT and speak to the microphone to
make a call, the LED lights red.
■ If this channel is empty or not programmed
into the radio the warning tone sounds and
does not light red.
■ Release PTT to listen. If there is a signal,
LED lights green and turn on the speaker.
VOX FUNCTION
When the radio is set at any channel, turn off
the power first, meanwhile press PTT button
and power key for 3 seconds. After hearing the
tone of opening radio and two beep sounds, release PTT button and power key, then the radio
enter into VOX opening mode.
Note: A VOX headset is required for VOX
operation.
CHANNEL SCAN / PRIORITY SCAN
The MINI PRO two-way radio can be
programmed with either common or priority
scan functions.
To use the Scan function press the Scan button
for 1 second to enable or disable it. A single
beep indicates that scan has been enabled.
A double beep indicates that scan has been
disabled.
8. BASIC OPERATIONS
ACTIVATE VOX TRANSMISSION
OPERATION
If you configured to an appropriate VOX gain
level, and activate VOX transmission, perform
the following steps.
■ Turn OFF power
■ Press and hold [PTT] switch and then turn
ON power.
■ A double-beep sounds, and then release the
[PTT] switch, the two-way radio sounds the
current channel number.
■ Press [PTT] switch to cancel VOX transmission, and press [PTT] switch to go on transmit.
Note: A VOX headset is required for VOX
operation.
QT(50 GROUPS) / DQT (107 GROUPS
POSITIVE AND NEGATIVE POSITION)
■ The sellers or manufacturers can use the
programmable software to set QT or DQT
code. When a channel set QT or DQT code,
the squelch function can be used only when
receiving the same QT or DQT signal. Similarly,
only when the QT/DQT signal mode is same as
yours, the radio station can receiver the signal
you transmit. If others use difference QT/DQT
at the same channel from yours to make a call,
the squelch function can’t work and it only has
yellow light indicates.
Note: the way to set QT or DQT refers to the
programmable software.
POWER SAVING FUNCTION:
Power saving: after turning on the two-way
radio for ten seconds and not receiving any
signals or operations, it will automatically be in
the power saving mode.
VOICE ANNUNCIATION
Turning on the two-way radio or rotating the
channel selector, the two-way radio has the
voice annunciation.
9. BASIC OPERATIONS
CLONE
Step 1: Verify the Master radio is properly
programmed.
Step 2: With the Master radio powered off,
select channel 8.
Step 3: Press and hold the monitor button
down then press and hold the power on button.
Power on tones are heard followed by a single
beep in the Master radio speaker. Do not
release the monitor and power on buttons until
the single beep is heard. After releasing the
monitor and power on buttons, verify the Master
radio indicator is a steady orange color.
Step 4: Plug one end of the clone cable into
the accessory jack of the Master radio. The
Master radio is now ready to clone.
Step 5: Power on the Slave radio by pressing
the power on button until the power on tones
are heard in the radio speaker. The Slave radio
indicator will occasionally flash green.
Step 6: Plug the other end of the clone cable
into the Slave radio accessory jack.
Step 7: On the Master radio press the power
on button. The Master radio indicator will begin
to flash orange and the Slave radio indicator will
flash green.
Step 8: When cloning is completed, the
Master radio will be a steady orange color and
the Slave radio indicator will occasionally flash
green. Unplug the clone cable from the Slave
radio. Verify the Slave radio has the cloned
program.
Step 9: To clone another Slave radio, repeat
Steps 5 thru 8. To end the cloning procedure,
remove the battery from the Master radio.