1
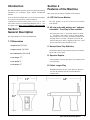
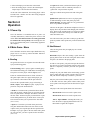
For More Information, Visit BMI Gaming | www.bmigaming.com | (800) 746-2255 | +1.561.391.7200 Series Operator’s Manual 6212 Material Avenue Loves Park, Illinois 61111 815-654-0212 or 800-435-8319 The Originator of Electronic Darts www.arachnidinc.com P/N 42850 Rev. A Software Version 204 Arachnid Limited Warranty for the Super Shuffle Shuffleboard Arachnid, Inc., thoroughly inspects and tests all products before they leave the facility and is therefore not responsible for any damages occurred during shipping. Report any damage, whether hidden or obvious, to the shipping company immediately and resolve it through them. 1. Definitions: As used herein, the term “Buyer” shall mean the purchaser of the goods, the term “Goods” shall mean all Super Shuffle shuffleboard products, equipment, accessories and any labor and services ordered by Buyer from Arachnid. 2. Warranty: During the warranty period, which is ninety (90) days for the Electronic Package and Cabinet, six (6) months on the 28” Flat Screen Monitor and one (1) year for the Hard Drive and Puck Return Belt, Arachnid will repair or replace at its plant in Loves Park, Illinois, any part of the Goods, which part has been manufactured by Arachnid, and which Arachnid determines to have failed because of defective design, material or workmanship under normal use and service. Electronic Package“ means only (i) the power supply chassis and the parts mounted directly thereon, (ii) the main computer printed circuit board, and the IOB. Arachnid shall have no warranty or other liability for any part not manufactured by it, but agrees to cooperate with Buyer in obtaining an assignment of Arachnid’s warranty rights against the manufacturer. Prior to repair or replacement, Arachnid shall have the right to examine the part at its option either at Buyer's location or at Arachnid’s plant in Loves Park, Illinois. For this warranty to apply, Buyer must give Arachnid written notice of any warranted defect within fifteen (15) days after discovery and, in any event, not later than the date on which this warranty expires, or Buyer will be barred from any remedy. Upon Arachnid’s written authorization, the Goods must be shipped to Arachnid freight prepaid within a reasonable time thereafter. This warranty shall not apply to any of the Goods or parts thereof repaired or altered by anyone but Arachnid, operated or installed contrary to instructions, subjected to misuse, negligence, vandalism, accident, fire or water damage and improper or faulty electrical power source. This warranty is not assignable and expires upon the earlier of Buyer's transfer, sale or other disposition of the Goods, or one (1) year from the date of shipment of the Goods by Arachnid to Buyer. Arachnid’s liability under this warranty shall be limited to repairing or replacing warranted Goods or, if such Goods cannot be repaired or replaced by Arachnid, to the return of the purchase price paid for the defective or nonconforming warranted Goods; provided, that Buyer shall first return to Arachnid those goods for which a refund of the purchase price is to be made. THE WARRANTIES PRINTED ABOVE ARE THE ONLY WARRANTIES APPLICABLE TO THE GOODS. ALL OTHER WARRANTIES, EXPRESSED OR IMPLIED, INCLUDING BUT NOT LIMITED TO THE IMPLIED WARRANTIES OF MERCHANTABILITY AND FITNESS FOR A PARTICULAR PURPOSE, ARE DISCLAIMED. 4. Limitation of Liability ARACHNID SHALL NOT BE LIABLE, WHETHER IN CONTRACT, IN TORT, UNDER ANY WARRANTY, IN NEGLIGENCE, OR OTHERWISE, FOR INCIDENTAL, CONSEQUENTIAL OR SPECIAL DAMAGES OR FOR COSTS OF REMOVAL OR SHIPMENT. UNDER NO CIRCUMSTANCES SHALL ARACHNID'S LIABILITY OR BUYER'S REMEDY FOR DAMAGES AGAINST ARACHNID EXCEED THE AMOUNT OF THE PURCHASE PRICE OF GOODS SOLD FOR WHICH OR RELATING TO WHICH CLAIM IS MADE. IN THE EVENT THAT ARACHNID'S WARRANTY, IF ANY, OR ANY OTHER OBLIGATION OF ARACHNID APPLICABLE TO THE GOODS FAILS OF ITS ESSENTIAL PURPOSE, BUYER'S EXCLUSIVE REMEDY SHALL BE LIMITED TO RETURN OF OR CREDIT FOR SO MUCH OF THE PURCHASE PRICE AS IS APPLICABLE TO THE GOODS WHICH ARE NONCONFORMING OR DEFECTIVE, PROVIDED SUCH GOODS ARE RETURNED TO ARACHNID. THE PRICE STATED FOR THE GOODS, AS SHOWN IN THE ORIGINAL INVOICE, IS BASED UPON AND IN CONSIDERATION FOR LIMITING ARACHNID'S LIABILITY. NO ACTION ARISING OUT OF THE GOODS MAY BE BROUGHT BY BUYER MORE THAN FIFTEEN (15) MONTHS AFTER THE DATE OF SHIPMENT OF THE GOODS BY ARACHNID TO BUYER. BUYER'S REMEDIES AS PROVIDED HEREIN ARE ITS SOLE AND EXCLUSIVE REMEDIES. Table of Contents Introduction 1 Section 1: General Description 1.1 Dimensions 1 1 Section 2: Features of the Machine 1 Section 3: 3.1 3.2 3.3 Super Shuffle Basics Super Shuffle Definations Using the Console Using the Tournament Mode 2 2 2 2 Section 4: 4.1 4.2 4.3 Operation Power Up Main Game Menu Setup Mode 3 3 3 4 Section 5: 5.1 5.2 5.3 5.4 Technical Description Monitor Power Supply Hardware Operating Conditions at 120VAC 6 6 6 6 6 Section 6: 6.1 6.2 6.3 Communications Setting up a Wired Network Setting up a Wireless Network Manually Setting up your Network 6 6 6 7 Section 7: 7.1 7.2 7.3 7.4 7.5 7.6 7.7 Maintenance Adjusting the Lasers Replacing the Laser Mount Brackets Replacing the Sensor Module Opening the Playing Surface Installing a Dollar Bill Accepter Puck Maintenance Playing Surface Maintenance 7 7 8 8 9 9 10 10 Section 8: 8.1 8.2 8.3 Service Menu Activating the Service Menu Accessing the Service Menu Using the Reports 10 10 10 10 Section 9: Parts List 11 Section 10: Troubleshooting 13 Super Suffle Operating Manual i The most current version of this manual is always available on the Arachnid website at: http://www.arachnidinc.com Note: This equipment has been tested and found to comply with the limits for a Class A digital device, pursuant to part 15 of the FCC Rules. These limits are designed to provide reasonable protection against harmful interference when the equipment is operated in a commercial environment. This equipment generates, uses, and can radiate radio frequency energy and, if not installed and used in accordance with the instruction manual, may cause harmful interference to radio communications. Operation of this equipment in a residential area is likely to cause harmful interference in which case the user will be required to correct the interference at his own expense. ii Super Shuffle Operating Manual Introduction This manual contains operation, parts lists and troubleshooting information for Arachnid’s Super Shuffle shuffleboard machine. If you encounter a problem that is not covered in this manual, or if you have any questions, contact Arachnid at 1-800-435-8319 (815-654-0212) from 8 a.m. to 5 p.m. CST. You can also reach us at [email protected] or visit our support site at http://www.arachnidinc.com/support.php Section 1 General Description The Super Shuffle is an electronic shuffleboard. 1.1 Dimensions Weight Boxed: 225 LBS Weight Unboxed: 190 LBS Boxed Dimensions: 69x32x40 Section 2 Features of the Machine This section lists the features available on the machine. A. LCD Flat Screen Monitor The color graphics on the 28” LCD Flat screen monitor look fantastic. B. All coin and credit settings are “software selectable.” Free Play is also available. The selection of coins (1 - 20) and the number of credits (1 - 50) allows a wide variety of coin-up options. Both these settings and a “Free Play” option are available in the test/setup mode. “Free Play” will not be reset when the board is rebooted, it must be toggled off. However, it will be reset when the Factory Defaults are reset. C. Normal Game Play Statistics The machine displays player statistics on the screen following the end of every game. D. Operator Reports Game Height: 53” Game popularity and coin slot reports are available in the test/setup mode. Game Width: 31” Game Depth: 65” E. Online League Play Shuffleboard leagues are now easier than ever. Stats are stored on the machine and can be downloaded into LeagueLeader. 31” 65” 53” Super Shuffle Operating Manual 1 During a game, you can use the Console buttons to view the playing field. Section 3 Super Shuffle Basics 3.1 Basic Super Shuffle Definitions 28” Widescreen Monitor - A 28” widescreen HD Monitor. Playing Field - Players slide their pucks down the playing field. Gutter - When a puck slides off (or is knocked off) the playing field, the pucks land here. Drink Holders - Place your frosty beverages in these while you play. Base - These plastic bases support the Super Shuffle and contain the coin mechanisms. Levelers- Allows for adjustment on uneven floors. 3.2 Using the Console The console contains three (3) buttons; Up, Down and Enter. These three buttons are used to navigate the menus on the Super Shuffle. They also have uses while playing a game. Up Down Enter Pressing the Blue “Up” Button will give you an overhead view of the playing field on the monitor. Pressing the Blue “Down” button will display the end of the playing field on the monitor. Pressing the Red “Enter” Button will display the menu page. From here you can exit the game or view instructions. 3.3 Using the Tournament Mode Want to run an local/inhouse tournament? The Super Shuffle has a tournament program built in. This plays between 3 and 8 people and is single elimination. Follow the instructions below to set up a mini tournament. 1. From the main menu, select Tournament. 2. Select the game you will play. Knock Off 11, Knock Off 15, Crazy Shuffle Jackpot Bowling and Split/Second Bowling are available in tournament mode. 3. Select the number of players playing in the tournament. 4. Choose to randomize the chart or not. a. Selecting YES will mix up the playing order. b. Selecting NO will use a default tournament chart. 5. Enter the player names. You will use the arrows to highlight the letters and the red button to select them. The letters are arranged alphabetically. 6. Choose Start Tournament to begin the tournament. The next page will display the tournament chart. Press the red button to continue. The first match will be brought up to be played. 7. Players will then need to insert enough money to play the game. Choose Start Match. Monitor Monitor Gutter Drink Holder Console Base 2 Drink Holder Super Shuffle Operating Manual Gutter playing field 8. Select which player will start first in the match. 9. Once the starting player is chosen, the match begins. Repeat steps 7 and 8 for the other matches. An Open mark means you knocked down no pins on the puck you threw. This is commonly referred as a “gutter ball”. No pins means no points. At the end of the tournament, the winning player will be awarded with a fanfare and his name being displayed above his opponents. The player with the most points at the end of the game wins. Section 4 Operation 4.1 Power Up Once the machine is assembled and set in place (see Assembly Instructions), connect the power cord to a wall outlet. Note: The outlet must have an earth ground and be wired for the correct polarity. The incoming line voltage is not switched and power is immediately applied to the computer 4.2 Main Game Menu This is the basic menu list on the Super Shuffle that every player can see. Use the Up, Down and Enter buttons to navigate the menus. A. Bowling We got the idea for this set of games from the old arcade style puck bowling games. Classic Bowling: This 1-4 player game essentially plays like traditional bowling you would find in a bowling alley. The point is to be the player with the highest score. Points are combined from frame to frame. A frame in this game equals a turn for a player. Each player gets up to 2 throws to knock down all the pins each turn. There are three possible marks you get in bowling. A Strike, a Spare, and an Open (no pins). A player scores points for each pin he knocked down. SplitSecond: SplitSecond is a one to six player game of skill and timing. For the most part it plays like Classic Bowling. You earn points for every pin knocked down except Strikes and Spares. The twist to this game is the Strikes and Spares. There is a display above the pins that scrolls through point combinations. These are the possible points you can get for Strikes and Spares. A Strike earns the top score while the spare earns the bottom score. You will need to time your shots so that you get the best points as possible. These points only count for Strikes and Spares. B. Shuffleboard These are the games that you might play on a normal shuffleboard. KnockOff: Players take turns sliding a puck down the playing field. Lasers on the side of the game detect where the puck is in relation to the playing field. In order to score points, your puck must pass the foul line. If it does not, it is removed (poofed) from play. Only pucks that have completely crossed a point line will get those points. Example: If your puck lands on the line dividing 3 points from 2 points, that puck is worth 2 points. This is because that puck has not completely crossed the 3 point line. Only the person whose farthest puck is closest to the end of the table will have their points counted. That person scores points on all his pucks that are ahead of his opponents. The player who scored points shoots first next round. A Strike is a feat that means you knocked down all the pins with one puck. A Strike earns you 10 points plus the next two pucks thrown. Example: You throw a strike on the first frame. On the next puck you knock down 2 pins. On the third puck thrown, you knock down 7 more pins. This in total will earn you 19 points for the first frame (10+2+7=19). Knock Off 11 The first to reach 11 points wins. Knock Off 15 The first to reach 15 points wins. You Vs. Super Shuffle: Selecting this menu, you have the choice of playing either Knock Off 11 or Knock Off 15 against the computer. A Spare is a feat where you knock down pins for the first puck and then knock down the rest on the second. A Spare earns you ten points plus the next puck thrown. Example: If you get a spare in the first frame and 3 points on your next turn, you earn 13 points for the first frame (10+3=13). Super Shuffle Operating Manual 3 Crazy Shuffle: This game plays similar to a Highscore game except that the playing area is vastly different. The end of the board has 16 squares with numbers listed between 2 and 9. Each player throws all of his pucks. Each square is worth 100 times the value listed (2=200, 9=900). Hangers are worth double! The puck needs to make it past the foul line to stay in play. A puck must completely cross into the 100 spot to score any points. At the end of a players turn, his score is tallied, and all pucks are removed and all the squares are shuffled for the next player. The player with the highest score after 8 rounds wins. Leader of the Puck: This is a classic count up game. The person with the most points at the end of 8 rounds wins. Unlike the KnockOff games, each player throws all of their pucks on their turn. First to 21: Play as a normal high score game, except, the first to 21 points wins. Unlike the KnockOff games, each player throws all of their pucks on their turn. C. League Play League: This menu will contain a list of leagues for players to choose from. The league is created by the League Coordinator in LeagueLeader. View League Standings: The players use this menu to view the standings for a specific league. The standings file is generated in LeagueLeader by the League Coordinator. View League Schedule: The players use this menu to view when and where their next match is and who they play. The league schedules found here will list the matches throughout the whole league. Like all league files, the schedules are generated by the League Coordinator in League Leader. D. Tournament The Super Shuffle shuffleboard has a built in tournament mode. It will play between 3 and 8 players. For more info see section 3.4. E. Return Selecting this menu will cause the Super Shuffle to enter Attract Mode. Attract Mode is where all the ads and attract screens are displayed and cycled through. 4.3 Setup Mode To enter the Setup Mode, unlock and slide back the playing field then press the Service Button in the coin door. You can also get into the Set Up Menu if you have an Operator Button (see HotButton Setup). All game options and hardware tests are selectable through software via the Setup Mode. The following are descriptions of the various options available in Setup mode. Use these descriptions as references and follow the instructions on the screen to make changes or view the settings. The up and down buttons are used to navigate menus and the enter button to make selections or changes. A. Machine Setup Menu Language Setup: Used to set the display language on the machine. Time Settings Menu: Used to access current date and time, Happy Hour and Hours of Operation time settings. Set Time/Date: Used to set the machine’s clock and internal calendar. Happy Hour Time Setup Allows the operator to offer reduced game pricing for a set period each day. To activate this feature, the time period must be set on this screen and Happy Hour set in the Price Settings screen. Hours of Operation Setup: Setting the location’s Hours of Operation will allow the machine to enter sleep mode outside normal business hours. In Sleep Mode the monitor screen will blank out. While in Sleep Mode, inserting a coin or pressing any button will return the machine to Normal Mode. Coin Slot Assignment: Used to set coins per credit and credits per coin. Adjust the number of coins that have to be inserted to register the number of credits shown or adjust the number of credits that will register for the number of coins shown. Default: 1 coin = 1 credit. Give This Machine A Name: Used to input a “human friendly” name for each machine. Free Play: Used to set free play on or off. Adjust Volume: Allows the operator to adjust the speaker volume. Collector Settings: By entering in a password in this menu, you will enable a collector to access their reports from the main game screen or attract screen by holding down all 3 buttons at the same time and entering in the correct pasword. 4 Super Shuffle Operating Manual Attract Setup: The items in this menu allow you to change the settings in the attract mode. Online Promotions: Turns on and off whether this shuffleboard can be used in any HotButton Promotions. Manage Operator Ads: Displays all operator ads on the board and allows you to delete specific ads. This is good for troubleshooting. Delete HotButton Configuration: Deletes the HotButton settings from the shuffleboard. Delete All Operator Ads: Used to delete ALL the graphic files from the machine. Write Settings to HotButton: Writes the machine configuration to an Operator HotButton. Display Arachnid Ads: This option allows you to turn on and off the attract screens created by Arachnid. Read Settings from a HotButton: Loads the settings to the Super Shuffle from an Operator HotButton. Display Oneliners: This option allows you to turn on and off the quotations that appear in the attract screen. Display Top Ten List : This option allows you to turn on and off the screens that show the top players for the games. Blue Light Special Setup: The Blue Light Special option lets you give away free 2 Player Kock Off 11 game while there is no play on the machine. Through this menu you can change the Frequency the Blue Light Special appears in attract mode and how long the Blue Light Special Ad appears. HotButton Setup: This menu allows you to change board related HotButton settings. Reset Menu: Reset to Factory Defaults: Resets all options to the original factory setting. Reset Popularity Counters: Resets all the counters back to zero. Reset Top Ten Lists: Resets all the Top Ten Lists. Reset Game Settings: Resets Game Round Limits and Price Settings to factory default. Clear Machine Credits: Clears any accumulated credits from the machine. Create HotButton: This menu allows you to create any one of the three HotButtons; Player Button, Collector Button, and Operator Button. Reset League Stats: Clears all stored match statistics. Warning: Once they have been cleared they cannot be retrieved. Make sure all stats have been collected from the machine prior to using this function! Erase HotButton: This option allows you to erase information off of an individual HotButton. Delete League Files: Used to delete ALL the league files from the machine. View HotButton Configuration: This menu displays all the HotButton settings on the shuffleboard. Maximum Credits: Displays the number of credits a Player Button can hold. Minimum Credits: Displays the minimum number of credits needed to be purchased before being stored on a Player Button. Credit Duration: Is the number of days that the credits on a Player Button are good for. A zero in this option means the credits are always good. Credit ID: This number is an identification number. This number basically means any credits bought on a machine with this ID can be used at another location with the same ID. Team Fees: This option turns on and off whether HotButton credits can be used for team fees. B. Game Setup Menu Price Settings: Used to set the number of credits required by each player in normal game mode, league play mode and happy hour mode, for each individual game. Team Fees: Used to have the machine automatically collect league dues from each team prior to a match. Can be turned “ON” or “OFF” The amount to collect is determined and sent by Arachnid’s League Management Software. Game Round Limits: Used to set round limits for each individual game. League Round Limits: Turns off and on the round limits for leagues. This uses the round limits set up for casual play. League Default for KnockOff 11 & 15 is 99 rounds. League Default for Crazy Shuffle is 8 rounds. Super Shuffle Operating Manual 5 Backup Turn Limit: You can change the limit of the “Back Up A Turn” feature of the Super Shuffle. C. Communications Setup Connection Type: Choose between LeagueComm (Modem), LeagueLeader (Highspeed) and LeagueLeader (Modem). Network Settings: In this menu, you can change the settings of the network. Network Device: This option allows you choose the device type you are using to communicate with the internet. The Super Shuffle has built in Ethernet capabilities and can be configured to use a WiFi card. Wireless Settings: If you have installed a Wireless network card, this menu allows you to change the settings of your wireless network. Password: If you are using LeagueLeader (Modem), the password is the ISP Password you get from Arachnid. If you are using LeagueComm (Modem), make sure you use the same password here as you have programmed in LeagueLeader. Disable Call Waiting: This will turn off the call waiting feature that may be on the phone system. Alternate PPP Login: A PPP log in is a protocol used by networks and web providers to communicate with other networks. This option changes how the Super Shuffle talks to the dialup network. Default is Off. LeagueComm Setup: This menu allows you to setup the Super Shuffle to accept calls from your computer. Auto Scan: Select this to automatically detect wireless access points in your area. Phone Number: This is the number that the Super Shuffle uses to call your computer. Access Point: This is the name of the wire less access point connected to your Knock Off machine. Password: This password isn’t the one we give you for LeagueLeader. You can make this one up yourself. Make sure that it is the same in the Super Shuffle as well as LeagueLeader. Encryption Type: This is the security type for your wireless access point. You can choose either WEP (Wired Equivalent Privacy) or WPA (Wi-Fi Protected Access). Encryption Key: This is the “password” used when connecting to your wireless net work. Both access point and Super Shuffle machine must have the same key in order to work. Incomming Call Window: Used to set the number of rings within the call window and outside the call window, after which the modem will pick up an incoming call. The call window is defined by the beginning time and ending time set on this screen. This feature is contingent on the machine having the correct time set. LeagueLeader Settings: This menu provides information concerning connecting with LeagueLeader. Use DHCP (Dynamic Host Configuration Protocol): This option, when turned on, will automatically set an IP (Internet Protocol) address for your Super Shuffle Machine. If you turn this option off, you will need to set an IP Address manually. Server: This is where LeagueLeader is located on the Internet. It is not adjustable. IP Address: This is the address that your Super Shuffle game uses to access the Internet. If you turned Use DHCP off, you will need to set an IP Address manually. FTP Password: This is necessary for communicating with LeagueLeader.These is given to your League Coordinator. IP Subnet: Provided by your Internet provider. Gateway: Provided by your Internet provider. DNS Server 1: Provided by your Internet provider. DNS Server 2: Provided by your Internet provider. Modem Settings: If you chose LeagueLeader (modem), this option will be available. 6 Phone Number: This is the dialup ISP number that you can get from LeagueLeader. Username: This is where you enter in your ISP login you get from Arachnid. Super Shuffle Operating Manual FTP Username: This is necessary for communicating with LeagueLeader. These is given to your League Coordinator. View Last Update: View Last Update Log: This displays the last time the Super Shuffle communicated with LeagueLeader. Clear Last Update Time: Use this option to clear the log of the last time the Super Shuffle communicated with LeagueLeader. Test Settings: Click this to test your network connections all the way to your LeagueLeader account. Connect Now: Use this option to communicate automatically. Section 5 Technical Descriptions D. Reports Game Popularity Counter: Displays a history of machine usage. Shows all games on the machine, the number of times each game was played, the number of credits collected toward each game, and the percentage of times each game was finished. Coin Slot Report: Displays the number of credits taken in by each of the coin slots individually. Credits Collection Report: Used by the collector to display credits taken in (since last reset) for game play and league dues. E. Diagnostics Hardware Test: This menu has all the programs that will help you troubleshoot the functions of the shuffleboard. Laser/Sensor Test: This option brings up a screen that will tell you if you are hitting a sensor and how bright the beam is. Ibutton Test: This option will test your HotButton and make sure it’s working properly. Below are technical descriptions of the many parts within the Super Shuffle. 5.1 Monitor 28” Wide LCD Monitor 5.2 Power Supply ATX Power Supply: 12 VDC, 120 - 264 VAC 5.3 Hardware PC Board: SATA 3GB/s DDR2 1066 RAM: 1024MB DDR2 Hard Drive: SATA 2.5” 40GB 5.4 Operating Conditions at 120VAC Max Current 2A - Maximum, 120.80 Volts, 186 Watts Reboot: This causes the shuffleboard to shut off then immediately turn back on. View Boot Log: This report shows the recent history of when the Super Shuffle was turned on and off. F. Transfer Settings Write Settings to USB Drive: This option loads the settings of the Super Shuffle to your USB Drive. Read Settings fro a USB Drive: This option takes saved settings on a USB drive and loads them onto the Super Shuffle. Write Settings to HotButton: Writes the machine configuration to an Operator HotButton. Read Settings from a HotButton: Loads the settings to the Super Shuffle from an Operator HotButton. Super Shuffle Operating Manual 7 Section 6 Communications You can network the Super Shuffle machine with other highspeed equipment in your locations. There are two networking types; Ethernet (wired) or Wireless. You will need a working router for any of these networking options to work. 6.1 Setting up a Wired Network Setting up a wired network, or ethernet, is fairly straight forward. The Super Shuffle’s mainboard has a built in network card. You will need to have a properly set up router first. 1. Run an ethernet cable from the router to the Super Shuffle. 2. Plug the ethernet cable into the ethernet port on the mainboard. 3. Go into the setup mode by pressing the Service Button on the IOB. 4. Select Communications Settings. 5. Select Connection Type. Choose LeagueLeader (Network). 6. Select Network Settings. 7. Select Built-In-Ethernet for the Network Device. This will allow you to make changes to the Use DHCP option. If you choose not to use DHCP see section 6.3. 8. Select Back to Network Setup Menu once finished. 6.2 Setting up a Wireless Network Setting up a wireless network is setup differently than an wired network. You will need to have a properly set up router first. 1. Unplug the Super Shuffle. 2. Install Kit# 42913-The PCI Bracket 3. Plug in the wireless card on to the motherboard. See A1 (page 15) for our list of recommended Wireless Cards. 4. Secure the PCI Card to the bracket with a screw. 5. Plug in the Super Shuffle. 6. Go into the setup mode by pressing the Service Button on the IOB. 7. Select Communications Settings. 8. Select Connection Type. Choose LeagueLeader (Network). 9. Select Network Settings. 10 Select Wireless for the Network Device. This will allow you to make changes to the Use DHCP option. If you choose not to use DHCP see section 6.3. 11.Select Wireless Network. 12.Choose Auto Scan. This will scan your area for any wireless access points. 13.Choose the accesspoint you intend to use. Depending on the area, more than one accesspoint may be dis played. Choose your accesspoint. 8 Super Suffle Operating Manual 14.Choose your Encryption Type. Currently we only support WEP and None. If you chose WEP, make sure to enter in your Encryption Key. 15.Select Network Settings. 16. Select Back to Network Setup Menu once finished. 6.3 Manually Setting up your Network If you choose to manually set up your IP Settings, you will have to input the IP Address, IP Subnet, Gateway, DNS Server 1, and DNS Server 2. These are provided by the internet provider. If the network in the location isn’t yours, contact the bar owner. 6.4 Setting up Dialup A Dialup connection uses existing analog phone lines to call a local server and log in to the internet. You will need a modem in the game, PCI or USB modems work. You will also need to connect a phone line to the modem and to the phone system in the location. 1. Select Communications Settings. 2. Select Connection Type. Choose LeagueLeader (Modem). 3. Select Modem Settings. 4. Enter in a Phone Number. This is the numbre the suffleboard uses to call into the internet. This number can be found at www.dialupusa.net. 5. Enter in your ISP Username in the Username text box. 6. Enter in your ISP Password in the Password text box. 7. Exit Modem Settings. 6.5 LeagueLeader Settings LeagueLeader is an online program that is used to create and run leagues on the Super Shuffle. With LeagueLeader you also get automatic software updates for the Super Shuffle. Call Arachnid for more info. 1. Press the service button in the coin door. 2. Select Communications Settings. 3. Select LeagueLeader SETTINGS. 4. Enter in your FTP Username. 5. Enter in your FTP Password. 6. Exit LeagueLeader Settings. 6.6 Making a Test Call Its a good idea to test your connection after you have setup the Super Shuffle communications. While in the communications menu, select Test Settings. The Super Shuffle will test all your settings and connections. Section 7 Maintenance There will be times when you will need to manipulate the hardware on the Super Shuffle. This section will explain how. 7.1 Adjusting the Lasers Good Alignment Poor Alignment The lasers are what the Super Shuffle uses to sense when 5. Once adjusted, close the laser access plate and screw it down. a puck has scored. From time to time, these may be knocked out alignment. Follow the instructions below: CAUTION: Do Not Over Tighten The Laser Brackets. 7.2 Replacing the Laser Sockets Sensor Laser You will need a 1/8” Allen Wrench for this task. The Laser Mount Sockets are what hold the laser “eye” in the Super Shuffle. 1. Unplug the Super Shuffle from the wall. 2. Unscrew the top screw to the laser cover plate. 3. Unplug the green ground wire and the laser cable. 4. Using a 5/16 nut driver, remove the three nuts holding the laser sockets together. 5. Unscrew the ground tab. Laser Cable 1. Remove the top allen screw and let the laser access plate hang loose. 2. Go to the Instruction menu. This will turn on the lasers for about 3 minutes. If you do not get the lasers adjusted in that amount of time, just go back into Instructions. Laser Adjustment Ball 3. Insert the same allen wrench you used in step 1 into the hole provided on the laser adjustment ball. 4. Adjust the lasers. They will have to be done by “eye balling” the correct position. There is a subtle change in color when the laser is on the sensor verses it being on the metal plate. Laser Socket Ground Tab Ground Cable Laser Ball 6. Remove the first half of the bracket by pulling it toward you. The laser will come out with it. Take note of how the bracket came out, you will have to put the new one in the same way. Laser Socket Laser Ball Super Shuffle Operating Manual 9 7. Remove the second half of the bracket. Take note of how the bracket came out, you will have to put the new one in the same way. 8. Install the new bracket and laser. Once the nuts are snug, give each one a quarter turn to tighten. DO NOT OVER TIGHTEN THE BRACKETS. Tightening them more will only damage the bracket. 9. Plug the Super Shuffle back in and turn on the game. 10.Go into Instructions from the main menu. This will turn the lasers on for three (3) minutes. 11.Adjust the lasers as needed. 5/32 Allen Wrench 7.3 Replacing the Sensor Module The Sensor Module of the Super Shuffle includes the laser and the sensor. 1. Unplug the Super Shuffle from the wall. 2. Remove the top allen screw, using the 1/8 allen wrench (3mm), from the Sensor adjustment plate. 7. Insert the new module. There are alignment pins in the top of the sensor module. Use those to place the sensor module in the correct position. 8. Replace and tighten the screws you removed in step 5. 9. Attach the green ground wire to the laser. 10. Plug in the communication cable into the laser port. Laser Ball 1/8 Allen Wrench Laser Adjustment Plate 3. Disconnect the green ground wire from the laser. 4. Disconnect the communication cable from the sensor port. Communications Port Laser Communication Cable 11. Repeat steps 2-10 for the opposite side if necessary. 12. Plug the Super Shuffle back into the wall. 13. Align the lasers so that the game will function properly. 14. Secure the laser adjustment plate. Green Ground Wire 5. Unscrew the two screws, using a 5/32” or 4(mm) allen wrench, from the top of the sensor module. 6. Remove the old sensor module. a. The module will be a snug fit. b. Gently wiggle the module back and forth to loosen it. 10 Super Suffle Operating Manual 7.4 Opening the Playing Surface In order to change components, add a modem, network card or get into the Setup Mode, you will need to open the playing surface. 1. Use your key and unlock the playing surface in the front. 2. Put both hands to the side of the playing surface.You should feel a hand hold on each side. 3. Carefully slide back the playing surface about an inch. 4. Lift up the playing surface and slide toward you. The Super Shuffle cabinet has notches that allow you to rest the playing surface on so that you don’t have to remove it completely from the game. Cabinet Playing Surface 7.7 Playing Surface Maintenance The Super Shuffle playing surface shouldn’t need much maintenance. Unlike other shuffleboard machines, you won’t need to wax, polish or put any kind of lubricating material on the playing surface. It will, however, need to be kept clear of any messes. Use any multi purpose cleaner and a paper towel to clean the playing surface. Section 8 Collector Menu The Collector Menu is a quick way to access several operator functions of the Super Shuffle. From this menu you will be able to force a call, access the setup menu and view colector reports. 8.1 Activating the Collector Menu Before the Service Menu can be used, you will need to activate it in the setup mode. 7.5 Installing a Dollar Bill Accepter 1. Enter Setup Mode (see 7.3 for more info). 2. Select Machine Setup. 3. Select Collector Settings. 4. Select Enter Collector Password. 5. Put in a password that you can remember. Make sure to tell the rest of the collectors. 6. Select Save. Once the password is saved you can exit setup mode. The Super Shuffle comes Bill Accepter ready. Simply plug the Bill Accepter wires into the coindoor harness and plug in the power cable into the Distribution Box. Dollar Bill Acceptor Super Shuffle Up Enter Down 8.2 Accessing the Collector Menu Accessing the Service Menu is pretty easy. While in any screen in Game Mode, press and hold the three buttons on the console for three (3) seconds. 7.6 Puck Maintenance The Super Shuffle puck shouldn’t need much maintenance. There are just a few considerations: Do Not Oil the Bearing. The Bearing does not need lubricant. Keep bearing free from desbris. Use rubbing alcohol and compresed air to clean the bearing. Keep the bearing dry. You will be prompted to enter in the Collector Password (see 8.1). After the password is entered, select Save. This will grant you access to the Service Menu. 8.3 Using the Reports The Game Popularity Counters, Coin Slot Report, and Credit Collection Report can all be accessed from this menu making it simple for the collector to get the information he needs. Information on these reports can be found on page 6. Super Shuffle Operating Manual 11 Section 9 Parts List The numbers listed are Arachnid part numbers. Please use the Arachnid numbers when placing an order. Some descriptions are followed by a number in parentheses. This number is the quantity used in that assembly. Return Band Assembly 42880 Left Laser/Sensor Assembly 42875 Right Laser/Sensor Assembly 42871 Playing Surface Assembly 42881 Monitor 42882 Monitor Board 42792 Ground Plane Assembly 42803 Tub Assembly 42915 Laser Plate Covers 42808 Back Base Assembly 42879 Front Base Assembly 42876 12 Super Suffle Operating Manual 9.1 Super Shuffle - 42798 9.6 Ground Plane Assembly - 42880 This is a list of the subassemblies and their part numbers. What will follow after this section is a broken down parts list of those sub assemblies. Part # 42822 42792 42880 42808 42875 42871 42881 42803 42915 42876 42879 Subassembly Monitor Monitor Board Return Band Assembly Laser Adjustment Cover Left Laser/Sensor Assembly Right Laser/Sensor Assembly Playing Surface Assembly Ground Plane Assembly Tub Assembly Front Base Assembly Back Base Assembly Section 9.1 9.1 9.2 9.1 9.3 9.4 9.5 9.6 9.7 9.8 9.9 9.2 Return Band Assembly - 42880 Part # 42765 42767 42766 Description Wooden Support for Return Band Band Mount Post (2) Retun Band 9.3 Left Leaser/Sensor Assembly - 42875 Part # 42809 42778 42825 42872 42873 Description Cover Plate Socket Laser Mount Left Sensor Mounting Bracket Laser Ball Assembly Sensor Assembly Part # 42828 42807 42688 42746 39370 42023 Description Motherboard w/Processor and RAM Programmed Hard Drive IOB ATX Power Supply 5x20mm Chassis Mount Fuse Holder 3.15A Slo-Blo 250V Fuse 9.7 Tub Assembly - 42915 Part # 19131 39753 34811 42763 42771 42770 42773 42772 42822 42823 42717 Description Red Push Button Blue Push Button 14V Incandecent Lamp GE658 Black Molding Right Side Grey Carpet Left Side Grey Carpet Bottom Right Grey Carpet Bottom Left Grey Carpet Right Post Grey Carpet Left Post Grey Carpet Upper Cabinet”Tub” 9.8 Front Base Assembly - 42876 Part # 42115 41883 42416 42718 Description Hot Button Reader Coin Door Leveler (2) Front Base Cabinet 9.9 Back Base Assembly - 42879 9.4 Right Leaser/Sensor Assembly - 42871 Part # 42809 42778 42824 42872 42873 Description Cover Plate Socket Laser Mount Right Sensor Mounting Bracket Laser Ball Assembly Sensor Assembly Part # 42416 42719 Description Leveler (2) Rear Base Cabinet 9.5 Playing Surface Assembly - 42881 Part # 41570 42800 Description Lock Playing Surface Super Shuffle Operating Manual 13 Section 9: Troubleshooting .Problem Unable to Communicate with IOB Lasers are blocked Left Laser Blocked Right Laser Blocked Both Lasers Blocked No Video Possible Cause Solution a. Parallel cable is unplugged either from a. Check connections. Reattach cable if the IOB or the Motherboard. necessary. a. Laser is blocked. a. Remove blockage. If none is evident check the laser and sensor ports. Clean the sensor and laser. b. Lasers unaligned. b. See 7.1 for instructions. c. Laser light is dim. c. Check connections for laser. Make sure the laser is plugged in to the IOB. If it is it could be a bad laser. Replace laser. a. VGA Cable is not attached. a. Check the connections at monitor and the motherboard. b. The power cable is not attached. b. Check the connections at monitor and the motherboard. c. The external powerswitch on the back of c. Flip the external power switch on the the Super Shuffle is not switched to on. back side of the Super Shuffle to ON. The Dollar Bill Accepter is not Functioning 14 Super Suffle Operating Manual d. The monitor is not plugged into the junction box in the rear of the Knock Off. a. The powercord to the Dollar Bill Accepter is not plugged in. d. Make sure all connections are inplace and secure. b. The Dollar Bill Accepter is not configured properly. b. Configure the Dollar Bill Accepter using it’s manual. a. Plug in the Dollar Bill Accepter powercord into the powersupply underneath the playing field. See Section 7.4. A1 Recommended Wireless PCI Cards Card Name/Model Documented Transmission Distance Protocol and Standards iMicro NT-PCI54M Up to 200m Indoor SABRENT PCI-G802 Up to 100m Indoor EdiMAX EW-7128G Up to 50m Indoor TRENDnet TEW423PI/A 35-100m Indoor EnGenius EPI-3601S Unknown Zonet ZEW 1605 Up to 100m Indoor HiRO H50170 Up to 50m Indoor Rosewill RNX-G300EX Up to 80m Indoor IEEE 802.11g IEE 802.11b IEEE 802.11g IEE 802.11b CSMA/CA w/ACK IEEE 802.11g IEE 802.11b IEEE 802.11g IEE 802.11b IEEE 802.11g IEE 802.11b IEEE 802.11g IEE 802.11b IEEE 802.11g IEE 802.11b IEEE 802.11g IEE 802.11b Super Shuffle Operating Manual 15