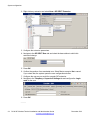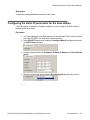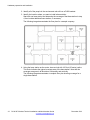
1
IP Office D100 SIP Wireless Terminal
Installation and Administration Guide
Issue 2.3
December 2012
© 2012 Avaya Inc.
All Rights Reserved.
Notice
While reasonable efforts have been made to ensure that the
information in this document is complete and accurate at the time of
printing, Avaya assumes no liability for any errors. Avaya reserves the
right to make changes and corrections to the information in this
document without the obligation to notify any person or organization of
such changes.
License types
Documentation disclaimer
“Documentation” means information published by Avaya in varying
mediums which may include product information, operating instructions
and performance specifications that Avaya generally makes available
to users of its products. Documentation does not include marketing
materials. Avaya shall not be responsible for any modifications,
additions, or deletions to the original published version of
documentation unless such modifications, additions, or deletions were
performed by Avaya. End User agrees to indemnify and hold harmless
Avaya, Avaya's agents, servants and employees against all claims,
lawsuits, demands and judgments arising out of, or in connection with,
subsequent modifications, additions or deletions to this documentation,
to the extent made by End User.
Link disclaimer
Avaya is not responsible for the contents or reliability of any linked
websites referenced within this site or documentation provided by
Avaya. Avaya is not responsible for the accuracy of any information,
statement or content provided on these sites and does not necessarily
endorse the products, services, or information described or offered
within them. Avaya does not guarantee that these links will work all the
time and has no control over the availability of the linked pages.
Warranty
Avaya provides a limited warranty on its hardware and Software
(“Product(s)”). Refer to your sales agreement to establish the terms of
the limited warranty. In addition, Avaya’s standard warranty language,
as well as information regarding support for this Product while under
warranty is available to Avaya customers and other parties through the
Avaya Support website: http://support.avaya.com. Please note that if
you acquired the Product(s) from an authorized Avaya reseller outside
of the United States and Canada, the warranty is provided to you by
said Avaya reseller and not by Avaya. “Software” means computer
programs in object code, provided by Avaya or an Avaya Channel
Partner, whether as stand-alone products or pre-installed on hardware
products, and any upgrades, updates, bug fixes, or modified versions
thereto.
Licenses
THE SOFTWARE LICENSE TERMS AVAILABLE ON THE AVAYA
WEBSITE, HTTP://SUPPORT.AVAYA.COM/LICENSEINFO/ ARE
APPLICABLE TO ANYONE WHO DOWNLOADS, USES AND/OR
INSTALLS AVAYA SOFTWARE, PURCHASED FROM AVAYA INC.,
ANY AVAYA AFFILIATE, OR AN AUTHORIZED AVAYA RESELLER
(AS APPLICABLE) UNDER A COMMERCIAL AGREEMENT WITH
AVAYA OR AN AUTHORIZED AVAYA RESELLER. UNLESS
OTHERWISE AGREED TO BY AVAYA IN WRITING, AVAYA DOES
NOT EXTEND THIS LICENSE IF THE SOFTWARE WAS OBTAINED
FROM ANYONE OTHER THAN AVAYA, AN AVAYA AFFILIATE OR AN
AVAYA AUTHORIZED RESELLER; AVAYA RESERVES THE RIGHT
TO TAKE LEGAL ACTION AGAINST YOU AND ANYONE ELSE
USING OR SELLING THE SOFTWARE WITHOUT A LICENSE. BY
INSTALLING, DOWNLOADING OR USING THE SOFTWARE, OR
AUTHORIZING OTHERS TO DO SO, YOU, ON BEHALF OF
YOURSELF AND THE ENTITY FOR WHOM YOU ARE INSTALLING,
DOWNLOADING OR USING THE SOFTWARE (HEREINAFTER
REFERRED TO INTERCHANGEABLY AS “YOU” AND “END USER”),
AGREE TO THESE TERMS AND CONDITIONS AND CREATE A
BINDING CONTRACT BETWEEN YOU AND AVAYA INC. OR THE
APPLICABLE AVAYA AFFILIATE ( “AVAYA”).
2
Avaya grants you a license within the scope of the license types
described below, with the exception of Heritage Nortel Software, for
which the scope of the license is detailed below. Where the order
documentation does not expressly identify a license type, the
applicable license will be a Designated System License. The applicable
number of licenses and units of capacity for which the license is granted
will be one (1), unless a different number of licenses or units of capacity
is specified in the documentation or other materials available to you.
“Designated Processor” means a single stand-alone computing device.
“Server” means a Designated Processor that hosts a software
application to be accessed by multiple users.
Designated System(s) License (DS). End User may install and use
each copy of the Software only on a number of Designated Processors
up to the number indicated in the order. Avaya may require the
Designated Processor(s) to be identified in the order by type, serial
number, feature key, location or other specific designation, or to be
provided by End User to Avaya through electronic means established
by Avaya specifically for this purpose.
Concurrent User License (CU). End User may install and use the
Software on multiple Designated Processors or one or more servers,
so long as only the licensed number of Units are accessing and using
the Software at any given time. A “Unit” means the unit on which Avaya,
at its sole discretion, bases the pricing of its licenses and can be,
without limitation, an agent, port or user, an e-mail or voice mail account
in the name of a person or corporate function (e.g., webmaster or
helpdesk), or a directory entry in the administrative database utilized
by the Software that permits one user to interface with the Software.
Units may be linked to a specific, identified Server.
Database License (DL). End User may install and use each copy of the
Software on one Server or on multiple Servers provided that each of
the Servers on which the Software is installed communicates with no
more than a single instance of the same database.
CPU License (CP). End User may install and use each copy of the
Software on a number of Servers up to the number indicated in the
order provided that the performance capacity of the Server(s) does not
exceed the performance capacity specified for the Software. End User
may not re-install or operate the Software on Server(s) with a larger
performance capacity without Avaya’s prior consent and payment of an
upgrade fee.
Named User License (NU). You may: (i) install and use the Software
on a single Designated Processor or Server per authorized Named
User (defined below); or (ii) install and use the Software on a Server so
long as only authorized Named Users access and use the Software.
“Named User”, means a user or device that has been expressly
authorized by Avaya to access and use the Software. At Avaya’s sole
discretion, a “Named User” may be, without limitation, designated by
name, corporate function (e.g., webmaster or helpdesk), an e-mail or
voice mail account in the name of a person or corporate function, or a
directory entry in the administrative database utilized by the Software
that permits one user to interface with the Software.
Shrinkwrap License (SR). You may install and use the Software in
accordance with the terms and conditions of the applicable license
agreements, such as “shrinkwrap” or “clickthrough” license
accompanying or applicable to the Software (“Shrinkwrap License”).
Heritage Nortel Software
“Heritage Nortel Software” means the software that was acquired by
Avaya as part of its purchase of the Nortel Enterprise Solutions
Business in December 2009. The Heritage Nortel Software currently
available for license from Avaya is the software contained within the list
of Heritage Nortel Products located at http://support.avaya.com/
LicenseInfo under the link “Heritage Nortel Products”. For Heritage
Nortel Software, Avaya grants Customer a license to use Heritage
Nortel Software provided hereunder solely to the extent of the
authorized activation or authorized usage level, solely for the purpose
specified in the Documentation, and solely as embedded in, for
execution on, or (in the event the applicable Documentation permits
D100 SIP Wireless Terminal Installation and Administration Guide
Comments? [email protected]
December 2012
installation on non-Avaya equipment) for communication with Avaya
equipment. Charges for Heritage Nortel Software may be based on
extent of activation or use authorized as specified in an order or invoice.
Copyright
Except where expressly stated otherwise, no use should be made of
materials on this site, the Documentation, Software, or hardware
provided by Avaya. All content on this site, the documentation and the
Product provided by Avaya including the selection, arrangement and
design of the content is owned either by Avaya or its licensors and is
protected by copyright and other intellectual property laws including the
sui generis rights relating to the protection of databases. You may not
modify, copy, reproduce, republish, upload, post, transmit or distribute
in any way any content, in whole or in part, including any code and
software unless expressly authorized by Avaya. Unauthorized
reproduction, transmission, dissemination, storage, and or use without
the express written consent of Avaya can be a criminal, as well as a
civil offense under the applicable law.
Contact Avaya Support
See the Avaya Support website: http://support.avaya.com for product
notices and articles, or to report a problem with your Avaya product.
For a list of support telephone numbers and contact addresses, go to
the Avaya Support website: http://support.avaya.com, scroll to the
bottom of the page, and select Contact Avaya Support.
Third Party Components
“Third Party Components” mean certain software programs or portions
thereof included in the Software that may contain software (including
open source software) distributed under third party agreements (“Third
Party Components”), which contain terms regarding the rights to use
certain portions of the Software (“Third Party Terms”). Information
regarding distributed Linux OS source code (for those Products that
have distributed Linux OS source code) and identifying the copyright
holders of the Third Party Components and the Third Party Terms that
apply is available in the Documentation or on Avaya’s website at: http://
support.avaya.com/Copyright. You agree to the Third Party Terms for
any such Third Party Components.
Preventing Toll Fraud
“Toll Fraud” is the unauthorized use of your telecommunications system
by an unauthorized party (for example, a person who is not a corporate
employee, agent, subcontractor, or is not working on your company's
behalf). Be aware that there can be a risk of Toll Fraud associated with
your system and that, if Toll Fraud occurs, it can result in substantial
additional charges for your telecommunications services.
Avaya Toll Fraud Intervention
If you suspect that you are being victimized by Toll Fraud and you need
technical assistance or support, call Technical Service Center Toll
Fraud Intervention Hotline at +1-800-643-2353 for the United States
and Canada. For additional support telephone numbers, see the Avaya
Support website: http://support.avaya.com. Suspected security
vulnerabilities with Avaya products should be reported to Avaya by
sending mail to: [email protected].
Trademarks
The trademarks, logos and service marks (“Marks”) displayed in this
site, the Documentation and Product(s) provided by Avaya are the
registered or unregistered Marks of Avaya, its affiliates, or other third
parties. Users are not permitted to use such Marks without prior written
consent from Avaya or such third party which may own the Mark.
Nothing contained in this site, the Documentation and Product(s)
should be construed as granting, by implication, estoppel, or otherwise,
any license or right in and to the Marks without the express written
permission of Avaya or the applicable third party.
Avaya is a registered trademark of Avaya Inc.
All non-Avaya trademarks are the property of their respective owners,
and “Linux” is a registered trademark of Linus Torvalds.
Downloading Documentation
For the most current versions of Documentation, see the Avaya
Support website: http://support.avaya.com.
D100 SIP Wireless Terminal Installation and Administration Guide
December 2012
3
4
D100 SIP Wireless Terminal Installation and Administration Guide
Comments? [email protected]
December 2012
Contents
Chapter 1: Overview........................................................................................................... 7
Phone functionality.................................................................................................................................... 8
Capacity and performance........................................................................................................................ 9
Chapter 2: Hardware and display elements...................................................................... 11
Base station.............................................................................................................................................. 11
Handset..................................................................................................................................................... 12
Repeater................................................................................................................................................... 13
Charge unit................................................................................................................................................ 14
Headset..................................................................................................................................................... 14
Upgrade Jig............................................................................................................................................... 15
Display properties..................................................................................................................................... 15
Chapter 3: System configuration....................................................................................... 19
IP Office deployment scenarios................................................................................................................ 19
Configuring the D100 using IP Office Manager......................................................................................... 21
Configuring the base station............................................................................................................. 22
Configuring the extensions............................................................................................................... 23
Configuring the static IP parameters for the base station................................................................ 25
Configuring the D100 using the Base Station Web Management Interface.............................................. 26
Chapter 4: Hardware preparation and installation........................................................... 29
Overview................................................................................................................................................... 29
Site planning..................................................................................................................................... 30
Base station installation.................................................................................................................... 36
Handset registration......................................................................................................................... 43
Signal strength survey...................................................................................................................... 46
Repeater installation......................................................................................................................... 47
Chapter 5: Coverage information...................................................................................... 53
Out of range.............................................................................................................................................. 53
Chapter 6: Administration and maintenance.................................................................... 55
Overview................................................................................................................................................... 55
System Status Application................................................................................................................ 56
Administration on the handset.......................................................................................................... 59
Base Station Web Management Interface........................................................................................ 71
Updating base station firmware........................................................................................................ 75
Updating handset firmware.............................................................................................................. 76
Chapter 7: Factory settings................................................................................................ 79
Resetting the base station to factory default............................................................................................. 80
Resetting the base station using System Status Application........................................................... 80
Resetting the base station using the Base Station Web Management Interface............................. 81
Resetting the base station using the base station............................................................................ 81
Chapter 8: Accessories...................................................................................................... 83
Chapter 9: Troubleshooting............................................................................................... 85
Changed IP parameters and lost connectivity to the base station............................................................ 85
Configuring parameters using the Base Station Web Management Interface.......................................... 85
Handset display reads “Duplicate IP Address”......................................................................................... 86
D100 SIP Wireless Terminal Installation and Administration Guide
December 2012
5
Handset display reads “No Service”.......................................................................................................... 86
Handset display reads “Searching”........................................................................................................... 86
Handset not recognized by the upgrade firmware.................................................................................... 87
Maintenance Mode.................................................................................................................................... 87
Repeater registration failure...................................................................................................................... 88
Unknown DECT PIN................................................................................................................................. 88
Unknown IP address................................................................................................................................. 88
Index..................................................................................................................................... 89
6
D100 SIP Wireless Terminal Installation and Administration Guide
December 2012
Chapter 1: Overview
The D100 SIP Wireless Terminal is a cordless phone system that is adapted for IP Office. The D100
solution delivers the productivity-boosting benefits of IP and wireless communications across multiple
offices in a convenient, lightweight handset. The D100 is a highly functional wireless solution with
scalability to support large numbers of users. A single base station can support up to eight handsets, with
each handset supporting five calls. Each IP Office can support up to four base stations.
The D100 base station and D160 handset extensions are configured using IP Office Manager. While some
administrative options are available using the handset, the preferred method of configuration is through
IP Office Manager. Use System Status Application to administer the D100 and view configuration
details.
The critical factor for installation is the location of the base station, which emits the wireless signal range
up to 350 feet (100 metres) indoors. You can extend this range using repeaters.
Before you begin, ensure that you have the required hardware and the latest firmware. Also ensure that
your users have an applicable license.
Licensing
Each D160 handset user requires an Avaya IP Endpoint license. Any additional license, such as a Power
or Mobile user license, determines the additional features available to that user. The user consumes the
D100 SIP Wireless Terminal Installation and Administration Guide
December 2012
7
Overview
license while they are logged in and they stop consuming the license when they log out. The user does
not require licensing specific to the base station.
Other factors
In ideal open field conditions, the range between a phone and a standard base station can be up to 700
feet (200 meters). However, in indoor conditions with obstacles absorbing signal strength and reflected
signals giving increased error rates, the range is more realistically between 100 to 350 feet (30 to 100
meters).
In practice, no rules or guarantees can be given for base station coverage. Too many factors that are
unique to each site can affect coverage. For more information, see Base station installation scenarios on
page 37. See also Site planning on page 30.
Phone functionality
The following table summarizes the phone functions available on the D100.
Category
Support
Telephony
• Account Code Entry
• Follow Me Here/To
• Automatic Callback
• Forward All
• Automatic Intercom - Dial
voice call
• Group Page
• After Call Work
• Button Programming
• Call Forward
• Call Log
• Call Pickup Any
• Call Park
• Call Record
• Conference
• Conference Meet Me
• Directed Call Pickup
• Do Not Disturb
• Emergency call
• Extension Login/Logout
8
• Group Pickup
• Hot Desking
• Make and drop call
• Mute
• Private Call
• Relay On/Pulse
• Redial
• Remote Park
• Retrieve Call
• Speed Dial
• Stamp Log
• Transfer
• Twinning
• Voicemail
D100 SIP Wireless Terminal Installation and Administration Guide
Comments? [email protected]
December 2012
Capacity and performance
Category
Support
Language
• English
• German
• French
• Spanish
• Italian
Ethernet
10/100 Mbps, half/full duplex, auto-negotiation
Network
TCP, UDP, IP, DHCP, HTTP (future support planned for VLAN, 802.1x
and SNMP).
DoS Attack
Protection
• LAND attack
• SYN flooding attack
• Ping Of Death
• ARP attack
Codec
G.711
Handset
You can connect up to eight handsets to a single base station.
Capacity and performance
Capacity and performance specifications for the D100 appear below.
Base station capacity and performance
Item
Value
Cell radius
100 to 350 feet (30 to 100 metres) indoors
Maximum number of base stations per IP
Office
4 base stations
Maximum number of handsets that can
belong to a base station
8 handsets
Maximum simultaneous calls per base
station
40 calls (5 calls per handset)
Maximum number of repeaters per base
station
6
Maximum number of entries for global
directory
100
Maximum number of entries for local
directory
100 entries per handset
D100 SIP Wireless Terminal Installation and Administration Guide
December 2012
9
Overview
Item
Value
Maximum number of call logs
100 logs per handset (for both incoming and
outgoing calls)
Handset capacity and performance
Item
Value
Maximum simultaneous calls per handset
5 calls
Average talk time (with new battery)
16 hours
Average standby time (with new battery)
168 hours
Repeater capacity and performance
Item
Value
Cell radius
100 to 350 feet (30 to 100 metres) indoors
Maximum number of repeaters per base
station
6
Maximum number of linked repeaters
3
Maximum number of channels per repeater
4
Note that calls carried from linked repeater
consumes channels.
Limitations
• There is currently no support for DTMF over SIP Info.
• There is currently no support for Account Code Entry using a soft key.
10
D100 SIP Wireless Terminal Installation and Administration Guide
Comments? [email protected]
December 2012
Chapter 2: Hardware and display elements
Base station
No.
Label
Description
1
Reset button hole
Press and hold for five seconds to reset the base
station.
2
Registration button
Press and hold until the base station LED flashes to
register the base station with IP Office.
Hold this button for three seconds when registering
handsets.
For more information, see the following:
• Capacity and performance on page 9
• Base station installation on page 36
D100 SIP Wireless Terminal Installation and Administration Guide
December 2012
11
Hardware and display elements
• Performing a base station survey on page 35
• Signal strength survey on page 46
• Reset base station on page 63
• Updating base station firmware on page 75
• Handset registration on page 43
Handset
No.
12
Label
Description
1
Up/Down keys
Use the Up/Down keys to control the speaker and ringer
volume.
You can also use these keys to correct name and number
entry when programming a speed dial button.
2
Mute key
Use the Mute key to mute the handset microphone.
3
Soft keys (S1–S4)
Use a soft key to activate the option listed directly above
the key on the display. The D160 has four soft keys.
D100 SIP Wireless Terminal Installation and Administration Guide
Comments? [email protected]
December 2012
Repeater
No.
Label
Description
4
Off-Hook/Handsfree
key
Use the Off-Hook/Handsfree key to answer a call or to
enter the handsfree mode.
5
On-Hook key
Use the On-Hook key to end a call or to exit a menu.
6
Dialpad
Use the Dialpad to make calls, to enter contact phone
numbers and names, and to navigate through contacts
and call logs.
7
Function keys (F1–F8) Use a function key to activate the feature assigned to that
function key. The D160 has eight configurable function
keys.
For more information, see the following:
• Capacity and performance on page 9
• Powering the handset on page 43
• Handset registration on page 43
• Updating handset firmware on page 76
Repeater
Repeaters effectively extend the range of the base station by 100 to 350 feet (30 to 100 metres)
indoors.
For more information, see the following:
• Capacity and performance on page 9
• Repeater installation on page 47
D100 SIP Wireless Terminal Installation and Administration Guide
December 2012
13
Hardware and display elements
• Repeater registration on page 48
• Signal strength survey on page 46
Charge unit
The following image shows the charge unit from three different angles. Note that you can leave
the handset in the charge unit when it is not in use.
No.
Label
Description
1
Rechargeable battery
slot
To recharge a spare D100 battery.
2
Cradle
To hold the handset upright while it charges.
3
Blue handset LED
To indicate when the handset is placed in the charge
unit.
4
Blue battery LED
To indicate when the battery slot is in use.
5
Battery slot tab
To lock the rechargeable battery in place. Press down on
this tab to unlock and remove the battery.
Headset
To use a headset, plug the headset into the headset jack during the talk or handsfree modes.
While using a headset, you can switch between the talk mode and the handsfree mode, but
the headset mode remains active until you unplug the headset.
14
D100 SIP Wireless Terminal Installation and Administration Guide
Comments? [email protected]
December 2012
Upgrade Jig
Upgrade Jig
You require the Upgrade Jig to update the handset firmware.
For more information, see Updating handset firmware on page 76.
Display properties
The following sections describe the display properties for the handset LCD as well as the base
station, charger, and repeater LEDs.
Handset LCD
The handset LCD consists of three rows. The top row consists of six icons while the remaining
two rows consist of 24 alphanumeric characters.
The following tables describe the icons and soft key options visible on the handset LCD.
D100 SIP Wireless Terminal Installation and Administration Guide
December 2012
15
Hardware and display elements
Status icon
Description
The handset talk mode icon.
This icon is on during an active call and flashes when a call is on hold.
The battery status icon. The number of bars visible on the icon indicates
the power level of the battery.
When the handset is on the charger, the battery status icon cycles through
each icon level from Low to Full until the phone is fully charged.
• Battery Full = Three bars indicate that the remaining capacity is between
70 and 100%.
• Battery Level 2 = Two bars indicate that the remaining capacity is
between 40 and 70%.
• Battery Level 1 = One bar indicates that the remaining capacity is
between 15 and 40%.
• Battery Low = Zero bars indicate that the remaining capacity is between
5 and 15%. The icon flashes intermittently.
• “Change Battery” Message = The phone is not functional. The
remaining capacity is between 0 and 5%.
The mute icon. Indicates that the ringer is set to Off. In the Vibrate mode,
the mute icon is not visible.
The mail icon. Indicates a new voicemail message.
The speaker icon. Indicates that the phone is in the handsfree mode.
The mute icon. Indicates that the microphone is muted.
Soft key
16
Description
Featur
To access the Feature mode.
Msgs
To access the Voicemail feature.
Redial
To call the most recently called number.
More..
To access more soft key item lists (see below).
CLog
To access the Call Log page.
D100 SIP Wireless Terminal Installation and Administration Guide
Comments? [email protected]
December 2012
Display properties
Soft key
Description
Dir
To display the system and local phone directories.
Time
To display the current time, accessed using the More.. soft key.
Config
To access the configuration menus, such as “User Settings”. See
Configuration overview for more information.
Use the More.. soft key to access the Config option.
123
To switch to numeric input mode, accessed using the More.. soft key.
abc
To switch to alphabetic input mode (the default), accessed using the More..
soft key.
Base station LED
The base station has two LEDs. The green LED indicates the connection status, and the blue
LED indicates the base station operating mode.
Green LED state
Connection status
On
Connected to IP Office
Off
Not connected to IP Office
Flashing
Trying to connect to IP Office
Blue LED state
Base station mode
On
The normal operating mode
Off
The base station is powered off
Flashing (300ms on,
300ms off)
The registration mode
Flashing (200ms on,
200ms off)
The maintenance mode
Flashing (300ms on,
100ms off)
The maintenance mode, or the default IP setting mode
Repeater LED
LED state
Repeater status
On
Connected to the base station
Off
Not powered or registered to a base station
Flashing
The searching mode, or attempting to connect to the base station
D100 SIP Wireless Terminal Installation and Administration Guide
December 2012
17
Hardware and display elements
18
D100 SIP Wireless Terminal Installation and Administration Guide
Comments? [email protected]
December 2012
Chapter 3: System configuration
The following sections contain all the information needed to configure IP Office for the D100 SIP wireless
terminal using IP Office Manager. Read the following instructions to determine scenarios, configure IP
Office, and create extensions and users. For information on powering and booting up the device,
discovering IP Office, registering DECT RF, and installing repeaters, see Hardware preparation and
installation on page 29.
Limitations:
The D100 base station can handle a maximum of 40 characters in the SIP URI.
In IP Office Manager, navigate to System > LAN1 > SIP Registrar and ensure that the parameter entered
in the Domain Name field is an appropriate length according to the 40 character SIP URI limitation.
IP Office deployment scenarios
When preparing IP Office for D100 deployment, you must configure the correct type of network
addressing. The location of the DHCP server and the number of IP Office servers in the subnet
determine the network addressing scenario.
By default, the base station is configured as a DHCP client and IP Office is the preferred DHCP
server. In this scenario, the system requires minimum configuration. The base station obtains
the IP address, subnet mask, default gateway, and configuration server address from the
DHCP server.
If the network uses a third-party DHCP server, the base station obtains the IP address, subnet
mask, and default gateway from the DHCP server and then runs an IP Office discovery
mechanism to obtain the configuration server address. The base station then registers to the
first IP Office that responds. In this situation, only one IP Office server can be available on the
subnet. Refer to Scenario 1.
If multiple IP Office servers are available on the subnet, the IP Office discovery mechanism
will not work properly. You must use static addressing where multiple IP Office servers exist
on the same subnet. Refer to Scenario 2.
When adding a new SIP DECT Line, IP Office Manager assumes that the base station acts as
the DHCP client. In some deployments, configuring the base station's IP parameters statically
might be desirable.
A single IP Office can support up to four base stations. If multiple base stations are connected
to an IP Office, you must configure the MAC Address parameter for each of the SIP DECT
D100 SIP Wireless Terminal Installation and Administration Guide
December 2012
19
System configuration
Lines using IP Office Manager. If only one base station is connected to the IP Office, you do
not need to configure the MAC Address.
Consider the following network configuration scenarios before you deploy the D100 terminal.
Network configuration
Scenario reference
A single IP Office in the subnet that hosts the DHCP
server.
Follow Scenario 1
A single IP Office in the subnet with DHCP hosted by a Follow Scenario 1
third-party server.
Multiple IP Office units with the DHCP located on an IP Follow Scenario 1
Office unit where the base station is configured.
All other network configuration scenarios require static Follow Scenario 2
IP addressing.
Scenario 1
You must configure the base station in IP Office Manager.
In this scenario, you can still configure the base station with static IP parameters. If you
configure static IP parameters, the base station uses and maintains these parameters after
rebooting the base station, or until you modify the IP parameters in IP Office Manager.
Procedure
1. Configure the base station in IP Office Manager:
• Configure the SIP DECT Line as described in Configuring the base station on
page 22.
• Configure the SIP DECT Extensions as described in Configuring the
extensions on page 23.
• Optional: Configure the static IP parameters for the base station. See
Configuring the static IP parameters for the base station on page 25.
Double-check the values you enter as you might inadvertently lose connectivity to
the base station by providing incorrect values.
2. Connect the base station to the subnet where the IP Office can be reached.
The base station downloads the configuration parameters and reboots if any
parameters were modified.
Scenario 2
You must use static IP addressing for the base station.
In static addressing, you must configure each base station individually in IP Office Manager
with network-specific addressing. In addition, you must configure static IP addressing on the
base station prior to installing it on the network.
Since static addressing requires DHCP to be off, the base station cannot retrieve the network
parameters from IP Office and you must turn off the DHCP client and configure the base
station's network parameters using the Base Station Web Management Interface.
20
D100 SIP Wireless Terminal Installation and Administration Guide
Comments? [email protected]
December 2012
Configuring the D100 using IP Office Manager
A base station is configured as a DHCP client by default, so you must access that base station
and configure the addressing parameters, otherwise the base station assigns an address
automatically. When there is no DHCP server in the subnet, the base station uses the following
addressing parameters:
• IP Address: 192.168.1.100
• Mask: 255.255.0.0
Once you know the IP address of the base station, enter this address in a web browser on a
PC connected to the subnet. Doing so provides access to the Base Station Web Management
Interface. For more information, see Base Station Web Management Interface on
page 71 .
Procedure
1. Configure the base station in IP Office Manager according to the instructions in
Configuring the D100 using IP Office Manager on page 21.
• Configure the SIP DECT Line as described in Configuring the base station on
page 22.
• Configure the SIP DECT Extensions as described in Configuring the
extensions on page 23.
• Mandatory: Configure the static IP parameters for the base station. See
Configuring the static IP parameters for the base station on page 25.
2. In the Base Station Web Management Interface, configure the static IP parameters
for the base station. See Configuring the D100 using the Base Station Web
Management Interface on page 26.
3. Connect the base station to the subnet where the IP Office resides.
The base station downloads the configuration parameters and reboots if any
parameters were modified.
Configuring the D100 using IP Office Manager
Using IP Office Manager, configure the D100 for use on IP Office.
You must configure the D100 components in IP Office prior to connecting and powering the
base station. Otherwise, if the base station is already connected and running, you will have to
reboot the base station after you configure IP Office.
The D100 SIP DECT system consists of two types of components:
• A SIP DECT Line that represents a D100 base station
• A SIP DECT Extension that links a specific user to a D100 base station
D100 SIP Wireless Terminal Installation and Administration Guide
December 2012
21
System configuration
Ensure that you associate a SIP DECT Extension with a single SIP DECT Line.
Before you begin
Install IP Office Manager and connect it to a fully functioning IP Office. Obtain an Avaya IP
Endpoint license for each D160 handset. The user consumes the license while they are logged
in and they stop consuming the license when they log out.
Obtain any licenses, such as Power user or Mobile user licenses, that provide the user with
additional features.
The user does not require licensing specific to the base station.
Related topics:
Configuring the base station on page 22
Configuring the extensions on page 23
Configuring the static IP parameters for the base station on page 25
Configuring the base station
Procedure
1. In IP Office Manager, open the Line menu for the desired IP Office control unit.
2. Right-click any line and select New > SIP DECT Line.
3. Configure Base Name and Base MAC Address. You do not need to configure the
MAC address if only one base station is configured.
22
D100 SIP Wireless Terminal Installation and Administration Guide
Comments? [email protected]
December 2012
Configuring the D100 using IP Office Manager
4. Click the VoIP tab and configure the VoIP parameters. You can modify the default
values if necessary.
Note that the D100 supports only G.711 codecs.
5. Press OK .
Next steps
Configure at least one extension to associate with the SIP DECT line. See Configuring the
extensions on page 23.
Configuring the extensions
Procedure
1. In IP Office Manager, open the Extension menu for the desired IP Office control
unit.
D100 SIP Wireless Terminal Installation and Administration Guide
December 2012
23
System configuration
2. Right-click any extension and select New > SIP DECT Extension.
3. Configure the extension parameters.
4. Navigate to the SIP DECT Base tab and select the base station to which this
extension belongs.
5. Press OK.
6. Confirm the creation of an associated user. Select Yes to accept or No to cancel.
If you select Yes, the system opens the user configuration window.
7. Configure the user as you would for a regular SIP extension.
8. Navigate to the Telephony > Supervisor Settings tab and configure the Login
code for the user.
9. Press OK.
24
D100 SIP Wireless Terminal Installation and Administration Guide
Comments? [email protected]
December 2012
Configuring the D100 using IP Office Manager
Next steps
If necessary, configure additional extensions and users.
Configuring the static IP parameters for the base station
If the base station IP address is statically assigned, you must configure IP Office with the
address of the base station.
Procedure
1. In IP Office Manager, open the Line menu for the desired IP Office control unit and
select the SIP DECT line dedicated to the base station.
2. In the SIP DECT Line window, enable the Configure Base IP settings and uncheck
the DHCP Client checkbox.
3. Configure the parameters for IP Address, IP Mask, IP Gateway, and Provisioning
Server.
4. Select the appropriate server from the Provisioning Server drop down menu.
D100 SIP Wireless Terminal Installation and Administration Guide
December 2012
25
System configuration
Configuring the D100 using the Base Station Web
Management Interface
In an IP Office deployment scenario that requires static addressing, you must configure the
static IP parameters of the base station using the Base Station Web Management Interface so
that the base station can connect to IP Office and download the necessary configurations.
For information on accessing the interface, see Base Station Web Management Interface on
page 71.
Procedure
1. Log into the Base Station Web Management Interface and select Configuration
Parameters from the side menu.
The Configuration Parameters window lists the base station details, as shown in
the following image:
2. Configure the parameters for IP Address, Subnet Mask, Default Gateway, and
Configuration Server.
3. For DHCP Setting, select the off radial button.
4. Click SAVE and confirm the operation.
If you modify any parameters, the base station reboots.
26
D100 SIP Wireless Terminal Installation and Administration Guide
Comments? [email protected]
December 2012
Configuring the D100 using the Base Station Web Management Interface
D100 SIP Wireless Terminal Installation and Administration Guide
December 2012
27
System configuration
28
D100 SIP Wireless Terminal Installation and Administration Guide
Comments? [email protected]
December 2012
Chapter 4: Hardware preparation and
installation
Overview
The following sections contain all the relevant information pertaining to installing the base
station, determining the installation scenarios, powering and booting the base station,
discovering IP Office, and more.
The first step toward successfully installing a base station is to consider the installation
scenarios. Once you determine the scenario that best suits your environment, plan the site for
deployment using a floor plan.
You can perform site surveys in the environment to assist you with the site and floor planning.
Using the handset, you can perform a DECT site survey to determine the number of slots
available in the 12–slot DECT frame. You can also perform a base station survey to count the
number of base stations that exist within range of the handset performing the survey.
After you plan the site, register the handsets to the correct base station as identified by your
floor plan. When registering repeaters, first determine the appropriate installation scenario.
You should register the repeaters prior to deployment to avoid unnecessary traveling between
repeater and base station. After you determine either long and narrow coverage or broad
coverage, and prior to mounting any repeaters, you can use a signal strength survey to test
the desired location. If you determine that the location receives an adequate signal from the
base station, test and mount the repeater.
Danger:
Never install electrical cords across traffic areas where they cause a trip hazard. If the cords
are damaged, they can create fire or electrical hazards.
Related topics:
Site planning on page 30
Base station installation on page 36
Handset registration on page 43
Signal strength survey on page 46
Repeater installation on page 47
D100 SIP Wireless Terminal Installation and Administration Guide
December 2012
29
Hardware preparation and installation
Site planning
Prior to deploying a base station and installing repeaters at a site, you must ensure that the
site is prepared to support the D100 and its DECT equipment. You must choose a location for
the base station that is central to the users and the coverage area. The best method to
determine the location of the DECT equipment is to use a floor plan. See Using a floor plan on
page 31.
You can perform a DECT site survey using the handset to confirm that the DECT RF spectrum
is not already fully in use by other equipment in the area. See Performing a DECT site
survey on page 34 and Performing a base station survey on page 35.
Empty site survey results differ from those of the same site once occupied. Perform the survey
during normal business hours in order to assess the areas of usage and the effect of operating
and moving equipment.
Repeater installation
If you want to extend the range of the base station by using repeaters, you require repeaters
for each base station in use. You should register repeaters prior to deployment to avoid
unnecessary travel between the base station and the repeater after the repeater is mounted.
The system supports handset roaming and hand-off between a base station and its repeaters.
A repeater must be within the cell radius of the base station to which the repeater registers,
and subsequent linked repeaters must be within the cell radius of the previous repeater.
A repeater can handle up to four channels, and you can register up to six repeaters to each
base station. Note that a chain of linked repeaters is also limited to four channels, since all
channels are carried by the first repeater in the chain.
You must place the repeaters in a location that maximizes the number of available channels,
while placing the initial repeater within the cell radius of its base station. Note that you can only
link up to three repeaters in a row and that each repeater must be within the cell radius of the
other repeater.
Repeater installation scenarios:
• Long and narrow coverage
In a situation where you are attempting to cover a long and narrow area with equal
coverage, you must place the base station in the middle of the coverage area and extend
repeaters in both directions outward. This reduces the amount of linking. If you find that
you require too many repeaters, or you have more than eight active channels, you might
install an additional base station.
For example,
- Scenario 1: RP3 — RP1 — BS — RP2 — RP4
is far preferable to
- Scenario 2: BS — RP1 — RP2 — RP3
30
D100 SIP Wireless Terminal Installation and Administration Guide
Comments? [email protected]
December 2012
Overview
because in the second scenario you can place, on average, only one channel per
repeater, whereas in the first scenario, you can place, on average, two channels per
repeater.
• Broad coverage
In situations that require broader coverage, for example if you require too many repeaters
to extend the range of coverage or you have too many users, you must use an additional
base station. Bear in mind that each base station requires its own repeaters.
Obvious causes of signal problems
The base station and its repeaters must be no closer than 17 feet (5 meters) from other DECT
base stations and repeaters, including other D100s on the same IP Office.
The repeaters registered to a particular D100 base station must be at least 35 feet (10 meters)
from the base station, and 35 feet (10 meters) from other repeaters. This range limitation is
particularly important in multi-floor deployments.
The following can also cause signal problems:
• Metal surfaces
• Concrete thickness greater than three feet (one meter)
• Windows with reflective film or specialized glass produce increased signal reflection and
reduced signal pass-through.
• Wire meshes and grills with apertures of less than 4cm (1.5 inches) obstruct signals as
effectively as continuous sheet metal.
• Fire doors can block the signal. In multi occupancy buildings, such as hotels, the high
number of fire doors might be a problem.
• Stairwells, such as in modern office buildings, frequently combine concrete building
supports, fire doors, and the intervening floor material. This can be especially
problematic.
• Screened rooms, such as those typically found in offices involved with TV, video, and
radio production, can cause signal interference.
Related topics:
Using a floor plan on page 31
Performing a DECT site survey on page 34
Performing a base station survey on page 35
Using a floor plan
To obtain the best possible performance, you must install all of the base stations in a location
that provides proper coverage. You should use a floor plan to determine the location for the
base stations. Perform the following steps:
Procedure
1. Draw a floor plan of your environment.
D100 SIP Wireless Terminal Installation and Administration Guide
December 2012
31
Hardware preparation and installation
2. Identify all of the people in the environment who will use a D160 handset.
3. Identify the location where you want to install a base station.
Start with one base station and determine the coverage of that base station in step
4, then include additional base stations, if necessary.
The following image demonstrates the floor plan for a sample company.
4. Using the base station as the center, draw a circle with 160 foot (50 meter) radius.
This circle indicates the typical coverage area of the base station. Note that the
coverage area goes in all directions, horizontally and vertically.
The following image demonstrates a complete floor plan showing coverage for a
single base station.
32
D100 SIP Wireless Terminal Installation and Administration Guide
Comments? [email protected]
December 2012
Overview
5. Verify whether the circle encompasses all of the areas that will use a handset. If the
circle does not encompass all of the areas, you must modify the floor plan to
accommodate another base station or a repeater.
The following image demonstrates a modified floor plan that accommodates a
repeater. Note that some areas still do not receive full coverage.
D100 SIP Wireless Terminal Installation and Administration Guide
December 2012
33
Hardware preparation and installation
Note:
The base station and its repeaters must be no closer than 17 feet (5 meters) from
other DECT base stations and repeaters, including other D100s on the same IP
Office.
The repeaters registered to a particular D100 base station must be at least 35
feet (10 meters) from the base station, and 35 feet (10 meters) from other
repeaters. This range limitation is particularly important in multi-floor
deployments.
Performing a DECT site survey
You can use the following procedure to confirm that the DECT RF spectrum is not fully used
by other DECT equipment in the area. Perform the site survey if there is likely to be a number
of other DECT systems in the area. Also, it is recommended that you perform the survey during
normal site operation.
The handset can measure the RSSI of all channels within one slot. If the RSSI value calculated
is under –60dBm for at least one channel, that slot is determined to be a clear slot. This process
is repeated for all slots, after which the handset displays the number of clear slots.
34
D100 SIP Wireless Terminal Installation and Administration Guide
Comments? [email protected]
December 2012
Overview
Procedure
1. Press and hold the * and # keys and insert the battery into the handset at the same
time.
2. Depending on your place of residence:
• Press soft key #1 to start the measurement for a North American site.
• Press soft key #2 to start the measurement for a European site.
The measurement occurs quickly and then the handset display shows the results.
The top line of the display shows the number of clear slots, and the second line of
the display shows the number of clear channels and the associated slots. For
example:
NA Clear Slot: 12 / 12
544333444555 49 / 60
This example indicates the following:
• The survey has completed on a North American site.
• All 12 slots had at least one free channel.
• All five channels were free on slots 1, 10, 11, and 12.
• Four channels were free on slots 2, 3, 7, 8, and 9
• Three channels were free on slots 4, 5, and 6.
Note:
The site should have at least 10 clear slots in order for the D100 to work
properly.
3. Press the soft key used in step 2 to restart the survey. In North America, you can
press soft key 3 to continue with a base station survey. See Performing a base
station survey on page 35.
Press the On-Hook key to return the handset to normal operating mode.
Performing a base station survey
Use the following procedure to confirm that the DECT RF spectrum is not fully occupied by
other DECT base stations in the area.
Note:
The D100 only supports survey mode on North American band frequency.
D100 SIP Wireless Terminal Installation and Administration Guide
December 2012
35
Hardware preparation and installation
Procedure
1. Press and hold the * and # keys and insert the battery into the handset at the same
time.
2. Press soft key #3.
The handset begins to count, or “rake”, the available RFPI and lists the results on
the display.
3. When complete, the handset reads Stop Raking RFPI followed by the number of
RFPIs detected.
Note:
In order for the D100 to work reliably, the number of RFPIs detected in the site
should be less than or equal to 40.
4. Press soft key #3 to restart the process.
Press the On-Hook key to return the handset to normal operating mode.
Base station installation
Install the base station in a location that provides the least amount of interference. See Site
planning on page 30. Before you install a base station, you must understand the usage
scenarios so that you can determine whether or not the environment is acceptable. Bear in
mind the following:
• Signal direction: The signal from a base station does not propagate evenly in all
directions. The signal typically propagates strongest in the horizontal plane. However, the
base station might be able to serve callers on other floors. You can then provide coverage
to areas not frequently used and so not meriting a dedicated local base station.
• Other radio signals: Receiving normal broadcast radio signals in an area is not an
indication that the base station will receive DECT signaling.
You can install the base station simply by plugging in the required connectors but you must
first determine the coverage area. Prior to installing the device, you can deploy various surveys
to detect the number of available channels in the environment as well as any pre-installed base
stations. See Performing a DECT site survey on page 34 and Performing a base station
survey on page 35.
Related topics:
Base station installation scenarios on page 37
Mounting the base station on page 39
Powering the base station on page 41
Booting up on page 42
36
D100 SIP Wireless Terminal Installation and Administration Guide
Comments? [email protected]
December 2012
Overview
Base station installation scenarios
You must install the base station in a proper environment. Consider the following deployment
scenarios prior to installing a base station.
Note that a single IP Office supports up to four base stations.
Isolated locations
In this installation scenario, base stations cover two separate areas. Users from one area do
not get coverage in the other. Note that both base stations register to the same IP Office.
Adjacent locations
In this installation scenario, base stations cover two adjacent areas. Repeaters provide
coverage for users outside of the cell radius of the base station. These repeaters must be within
the cell radius of the base station, and additional repeaters must be within the cell radius of
the linked repeater.
D100 SIP Wireless Terminal Installation and Administration Guide
December 2012
37
Hardware preparation and installation
Same location
In this installation scenario, an additional base station adds users to an existing coverage area,
where the number of users surpasses the number supported by a single base station. This
scenario might require repeaters, but a repeater can only register to a single base station.
Each base station in this scenario must be at least 17 feet (5 meters) away from each other.
38
D100 SIP Wireless Terminal Installation and Administration Guide
Comments? [email protected]
December 2012
Overview
Mounting the base station
You can mount the base station on a wall or ceiling, or set on a flat surface. Prior to mounting
the base station, consider the following:
• A location that is higher than cubicle wall height provides better coverage.
• The base station must be readily accessible for resetting and registration procedures.
• The base station receives power through PoE, so the base station must be within range
of the Ethernet cable providing the power.
Beware of metal surfaces or concrete thickness greater than 3 feet (1 meter) that might cause
signal interference.
Note that multiple base stations in the same location must be at least 17 feet (5 meters) away
from each other.
Ensure that you register the appropriate repeaters prior to mounting the base station in the
environment. Registering repeaters prior to mounting the base station helps to avoid signal
disruptions and unnecessary traveling between repeater and base station. See Repeater
registration on page 48.
Standing the base station on a flat surface:
• To stand the base station on a flat surface, first plug the Ethernet cable into the slot on the
back of the base station until you hear it click.
• With the Ethernet cable connected, snap the base attachment into the bottom of the base
station and route the cable through the slot in the stand.
D100 SIP Wireless Terminal Installation and Administration Guide
December 2012
39
Hardware preparation and installation
• Stand the base station vertically on its base and ensure that the Ethernet cable is not
disrupted.
Mounting the base station on a wall or ceiling:
To mount the base station on a wall or ceiling, use the following procedure. Note that you will
not require the base attachment.
Before you begin
Refer to the following diagram to determine the required mounting space for the base station,
which is 12 cm (4.7 in) by 20.3 cm (8 in).
40
D100 SIP Wireless Terminal Installation and Administration Guide
Comments? [email protected]
December 2012
Overview
Procedure
1. Screw the mounting screws directly into the wall or ceiling, or using the wall anchors
provided. Install the screws 8.3 cm apart vertically, in a space that has 4.5 cm
clearance above the top screw, 6 cm clearance to either side, and 7.5 cm clearance
below the bottom screw.
Leave the screw heads about 2 mm out from the mounting surface.
2. Plug the Ethernet cable into the slot on the back of the base station until you hear
it click.
3. Ensure that the cable is securely attached and not disrupted, then mount the base
station on the screws installed in step 1.
Next steps
After installing and connecting the base station to IP Office, register the handsets and install
the appropriate repeaters for that base station.
Powering the base station
The base station receives power through the Ethernet cable using Power over Ethernet (PoE).
Ensure that you plug the provided cable into a PoE-enabled switch that connects to the network
D100 SIP Wireless Terminal Installation and Administration Guide
December 2012
41
Hardware preparation and installation
where IP Office resides. Alternatively, you can use a PoE Power supply with a non-PoE
Ethernet interface.
Connect the Ethernet cable to the input on the back of the base station. The power LED should
turn on.
Booting up
The following sections identify the boot up sequence and the IP address decision schemes
that you require to install the D100 successfully. For information about LED behavior, which
can be of assistance when determining the device state, see Display properties on page 15.
Before you begin, ensure that you configure IP Office according to the appropriate deployment
scenario. For more information, see System configuration on page 19.
Related topics:
Boot up sequence on page 42
Boot up sequence
Use the following procedure to boot up the base station.
Before you begin
Ensure that you have the required components:
• D100 base station
• D160 handset
• Ethernet cable for PoE
Procedure
1. If DHCP is enabled, the base station obtains the IP address from the DHCP
server.
If DHCP is disabled, the base station begins to boot up with the IP address that was
provided in advance. The status LED flashes to indicate the booting status.
2. If the current IP parameters of the base station differ from those parameters
received from IP Office, the base station loads the new parameters and reboots.
If the firmware version number is different from the version of the base station, the
firmware is updated and then the base station reboots.
While setting up IP Office, the LEDs of the base station turn on to indicate that the
base station is setting up. After the IP Office setup is complete, the status LED turns
on to indicate that the base station is ready. Users can now log in.
42
D100 SIP Wireless Terminal Installation and Administration Guide
Comments? [email protected]
December 2012
Overview
Handset registration
The following sections explain how to perform DECT registration and de-registration directly
on the D160 handset, as well as de-registration using System Status Application. Note that
registration and de-registration will not affect registered phones or calls in progress.
Prior to registering a handset, ensure that other DECT equipment in the environment has
Registration mode disabled or the equipment could cause a disruption.
Related topics:
Powering the handset on page 43
Registering a handset using the handset on page 43
De-registering a handset using the handset on page 44
De-registering a handset using System Status Application on page 45
Powering the handset
Insert the D160 battery into the handset to begin handset operation.
• Use only the D160–compatible battery.
• Fully charge the battery before use.
• When the battery no longer holds a charge, dispose of the battery responsibly.
Registering a handset using the handset
You can register a D160 handset using the following procedure.
Before you begin
Ensure that your device is not connected to a base station. The handset display should read
Not Registered or Searching. If at any time the registration process fails, the handset display
reads Registration Failed and the device returns to an Unregistered or Searching state.
Procedure
1. While the handset is in an Unregistered or Searching state, press the Regist soft
key.
The handset display flashes a message that reads Press Reg. Key On Base.
• If the handset is in a Searching state, the handset is attempting to find a new base
station. Press the Regist soft key followed by the OK soft key to continue with
the registration procedure.
D100 SIP Wireless Terminal Installation and Administration Guide
December 2012
43
Hardware preparation and installation
2. Press and hold the Registration key on the front of the base station for
approximately three seconds until the LED blinks.
• Alternatively, you can use System Status Application to enable Registration mode
on the handset. See System Status Application on page 56.
The base station automatically exits registration mode when no handset or repeater
registrations have been performed for over two minutes.
3. After the handset finds the base station, you must enter the four-digit DECT PIN
code and press OK. If the base station uses the default DECT PIN code, you can
press the Deflt soft key.
The Cancel or On-Hook soft keys cancel the registration process.
Note:
You have 30 seconds to enter the four-digit DECT PIN code before the handset
returns to Unregistered mode. For more information, see Administrator
settings on page 60.
After registration is complete, the handset enters a logged-out state, ready for a
user to log in.
De-registering a handset using the handset
You can perform de-registration on the handset using the following procedure. Note that deregistration does not affect calls in progress.
Procedure
1. From either the Idle or logged-out state on the handset, press the Config soft
key.
The display reads Configuration... while the handset attempts to connect to the
base station.
Press the On-Hook key to quit de-registration at any time.
2. After connecting to the base station, the handset display provides a menu list that
you can navigate using the Next and Prev soft keys. Navigate to Administrator
Setting and press the Select soft key.
3. Enter the administrator password and press OK.
By default, the administrator password is 7 8 2 8 8 7 6 (or 'QUATTRO'). For more
information, see Administrator settings on page 60.
Only one handset per base station can enter the Administrator Setting menu at
any given time. Attempts to enter the menu on additional handsets result in the
message Denied.
44
D100 SIP Wireless Terminal Installation and Administration Guide
Comments? [email protected]
December 2012
Overview
4. After the password is authenticated, navigate to Deregistration and press
Select.
The display shows the handset information, which includes the handset number and
the user extension number, if a user is logged in.
5. Scroll through the list of handsets using the Next and Prev soft keys. Select one of
the handsets for de-registration using the Select soft key.
An asterisk (*) next to the handset number in the list identifies the handset in use.
The following table identifies the handset states relative to the Extension Number
field:
No.
Handset state
Extension Number field
1
Not registered
Not displayed on the handset deregistration list
2
Registered but not logged in * Empty
3
Registered and logged in *
<extension number> **
* You can de-register a handset whether or not its user is logged in, and whether
or not a user is associated with the device. Attempting to de-register a handset
that is not registered results in an error tone and you will not be able to proceed
to the next step.
** <extension number> represents the actual extension number of the user who
is logged in.
6. Select the handset you wish to de-register and press OK to execute de-registration.
Press Back to quit de-registration and return to the menu list.
7. After de-registration, the handset emits a confirmation tone and displays a message
for three seconds that reads Deregistered:#1 before returning to the menu list.
The handset, in this case handset #1, enters an unregistered state.
De-registering a handset using System Status Application
You can also perform handset de-registration using System Status Application (SSA). Use the
following procedure. Note that de-registration does not affect calls in progress.
Procedure
1. Open System Status Application and select the base station to which the handset
is registered under System > SIP DECT Base Stations.
2. Highlight the handset you wish to de-register.
3. Click the Unregister Handset button.
D100 SIP Wireless Terminal Installation and Administration Guide
December 2012
45
Hardware preparation and installation
Note:
You might have to expand the System Status Application window in order to view
all of the buttons.
Signal strength survey
The coverage determined during site planning was only an estimate based on the building
environment. The planned location of a device might need to change based on the actual
coverage. Use the following procedure to verify the coverage of the base station and the
repeaters using the Signal Strength Survey mode.
Use any of the handsets registered to a base station to survey the coverage of that base station
and its repeaters, and establish where the signal is strongest or strong enough.
Procedure
1. Using an idle handset that is registered to the base station being surveyed, press
1+2+3 simultaneously and hold for two seconds.
If the display only reads Searching..., then the handset is out of range. Otherwise,
the handset enters Signal Strength Survey mode and the display reads as follows:
S L– 0
RS22
LOCK
CH1
CR33
L00
0000
NORMAL
Note:
If the LOCK, SL, or RFPI fields show FF, then the handset is not connected to
the base station or repeaters being surveyed.
• SL: Locked Slot — Slot Number: 0–B
• CH: Channel — Channel Number: 0–4 (NA), 0–9 (EU)
• RS: RSSI average — Received Signal Strength Indicator (0x15 – 0x3B)
Install base stations and repeaters such that the RSSI for each device is at
least 22 everywhere within the coverage area.
• CR: CRC — (0x00 – 0x40). A value of 40 indicates an error-free signal
quality.
Install base stations and repeaters such that the signal quality for each device
is near 40 everywhere within the coverage area.
• LOCK: UCP state — LOCK (connected) or SRCH (searching)
46
D100 SIP Wireless Terminal Installation and Administration Guide
Comments? [email protected]
December 2012
Overview
• L: Lost Counter — Lost frame counter
• 0000: Base RFPI — If the last character is a '0' the survey is monitoring the
base station. Otherwise, it is monitoring a repeater. A unique value indicates
each repeater.
2. Press one of the following soft keys to enter the mode described:
• Soft key 1: The handset enters the Normal mode where the handset is handed
off to repeaters in the same way that would occur during normal use. This mode
is helpful in understanding hand-off areas on the site.
• Soft key 2: The handset enters the Hold mode. The Hold mode suspends
handset hand-offs to other repeaters or base stations and continues to monitor
the same signal source, regardless of strength or error rate. Use this mode to
determine a particular device's coverage area.
• Soft key 3: The handset enters the Peak Search mode, where the handset
connects to the device with the highest-strength signal. The handset then
enters the Normal operating mode. Use this feature to connect to the nearest
device immediately.
• Soft key 4: Press 4 to alternate between the Normal and Hold modes.
Repeater installation
A successful registration results in the blue LED on the repeater flashing three times, then the
LED turns solid to indicate that the repeater has connected to the base station. A failed
registration, which can occur if the repeater cannot find a base station to register with, results
in 10 fast flashes of the blue LED before the repeater returns to its original state. The blue LED
flashes slowly to indicate that the repeater is registered and is searching for the base station,
or that the repeater is in the process of connecting to the base station.
You do not need to de-register repeaters. The base station only keeps track of repeaters that
register to the base station. The base station overwrites repeater registration parameters each
time a repeater registers.
Note:
When a base station reboots, the base station determines the repeater topology. If you move
repeaters, you should reboot the base station so that it can adjust to the change in topology.
When you reboot a base station, all linked repeaters enter a searching mode and choose
the most appropriate master unit.
When a repeater is not registered, the repeater LED blinks once when the power is connected
and then stays off. To register a repeater to a base station, see Repeater registration on
D100 SIP Wireless Terminal Installation and Administration Guide
December 2012
47
Hardware preparation and installation
page 48. For instructions on performing the survey and determining the strength of the
available signals, see Signal strength survey on page 46.
Related topics:
Repeater registration on page 48
Testing the repeater location on page 48
Mounting repeaters on page 50
Repeater registration
Use the following procedure to register a repeater. Remember that each base station can
support a maximum of six repeaters, and that you can chain-link up to three repeaters. When
a repeater is powered, the repeater immediately attempts to find the base station it is registered
to. The repeater keeps track of the base station to which it is registered.
To avoid signal disruptions, you should register a repeater prior to deploying the repeater.
Procedure
1. Press and hold the Registration button on the front of the base station until the
base station power LED flashes.
2. Press and hold the Registration button on the back of the repeater until the repeater
LED flashes.
When the repeater successfully registers, the repeater LED flashes three times.
The repeater connects to the base station to which it was previously registered, and
the repeater LED changes from flashing to solid, indicating that the repeater is now
registered.
If the repeater fails to register with a base station, the repeater LED blinks 10 times
and the repeater returns to its previous registration state, i.e. Searching or
Connected if already registered with a base station, or Unregistered if not registered
with a base station.
3. Repeat step 2 for each repeater in the system.
4. Once all of the repeaters have registered, confirm the registration. Turn off the base
station to which the repeaters are registered by disconnecting the Ethernet cable,
and then confirm that the repeaters for that base station enter the Searching
mode.
Testing the repeater location
After registering but prior to mounting a repeater, you can test the location to see if the signal
from the base station is sufficient to handle calls. You should perform the test because the
48
D100 SIP Wireless Terminal Installation and Administration Guide
Comments? [email protected]
December 2012
Overview
repeater might be too far away from the base, electronic devices might cause an interference,
or thick walls or metal objects might block the signal.
Here are some tips:
• Place the repeater as high as possible, at least six feet off the ground.
• Allow at least 35 feet (10 meters) between repeaters, horizontally and vertically.
• Avoid sources of electrical interference, such as office equipment or microwave ovens.
• Avoid heat sources and direct sunlight.
• Avoid things that can interfere with radio signals, such as metal doors, thick walls,
screened rooms, niches, and cupboards.
• Ensure that the wall material can hold the weight of the repeater. Never install a repeater
in damaged or decaying wall material.
• Ensure that a standard 120V AC wall outlet is within reach of the repeater.
If you are installing multiple repeaters, perform the following test on each repeater.
Danger:
Never install electrical cords across traffic areas where they cause a trip hazard. If the cords
are damaged, they can create fire or electrical hazards.
Procedure
1. Plug the repeater's AC adapter into a standard 120V AC wall outlet.
2. Using a handset, perform a site survey to determine a location with adequate signal
strength to support the repeater.
The signal strength should be at least 22 and error free. See Signal strength
survey on page 46. If the signal strength or quality is too low, choose a location
closer to the base station or linked repeater, or one with less obstruction.
3. Hold the repeater in the place where you plan to mount it.
• If the repeater LED remains on and steady, the repeater is receiving a good
signal from the base. You can mount the repeater in that location.
• If the repeater LED flashes, the repeater is not receiving a good signal from
the base. Move the repeater to another location and repeat the test. If problems
persist, ensure that the repeater registers to the same base station as the
handset used for the signal strength survey.
D100 SIP Wireless Terminal Installation and Administration Guide
December 2012
49
Hardware preparation and installation
Mounting repeaters
You can mount the repeater on a wall or ceiling. Determine the following when choosing a
location to mount the repeater:
• A location that is higher than cubicle wall height provides better coverage.
• The repeater power supply cord is 2 metres (78 in) long, so you should mount the repeater
within 2 metres (78 in) of an outlet.
Beware of metal surfaces or concrete thickness greater than 3 feet (1 meter) that might cause
signal interference.
Note that a repeater must be no closer than 35 feet (10 meters) from the base station or another
repeater on the same base station. Also, the repeater must be no closer than 17 feet (5 meters)
from other DECT equipment.
Before you begin
Ensure that you have the necessary screwdriver to use with the two mounting screws supplied
with the repeater.
Refer to the following diagram to determine the required mounting space for the repeater, which
is 15 cm (6 in) by 11.4 cm (4.5 in).
50
D100 SIP Wireless Terminal Installation and Administration Guide
Comments? [email protected]
December 2012
Overview
Procedure
1. Screw the mounting screws directly into the wall or ceiling, or using the wall anchors
provided. Install the screws 6 cm apart horizontally, in a space that has 5 cm
clearance above the screws, 2.7 cm clearance to either side and 10 cm clearance
below.
Leave the screw heads about 2 mm out from the mounting surface.
2. Gently remove the adapter cover from the back of the repeater by pushing in and
up on the ribbed section, indicated by an arrow in the following image.
3. Plug the AC adapter connector into the yellow adapter opening, as in the following
image:
4. Without inserting the cover on an angle, carefully replace the adapter cover, and
press on it until you hear it click.
5. Mount the repeater on the mounting screws installed in step 1.
6. Plug the power supply into the nearby outlet and dress the power cable.
For EU models, install the appropriate plug into the repeater power supply
adapter.
7. If the repeater is registered, ensure that the repeater connects properly with the
base station. If it is not registered, see Repeater registration on page 48.
D100 SIP Wireless Terminal Installation and Administration Guide
December 2012
51
Hardware preparation and installation
If the repeater links from another repeater, ensure that the linking repeater is
installed, registered, and connected.
The repeater blue LED should be on, but not flashing.
52
D100 SIP Wireless Terminal Installation and Administration Guide
Comments? [email protected]
December 2012
Chapter 5: Coverage information
Out of range
When the handset is in an Idle state and the display reads Searching it means that the handset
cannot find its base station as it is most likely out of range. If you press the Regist soft key,
the handset enters the registration mode to register to the new base station. To complete
registration, the base station must also be put in registration mode. When the new registration
is successful the handset overwrites the previous registration information. If the new
registration is unsuccessful, nothing changes.
Use the following sections to troubleshoot various out of range scenarios.
Out of range while establishing an RF link
If you press a button but the handset cannot establish an RF link with the base station, the
handset emits an error tone and the display reads Out of Range.
Out of range while talking
If the handset does not receive a signal from the base station in approximately five seconds,
the handset terminates the call and the handset reverts to the Searching mode.
Likewise, if the base station does not receive a signal from the handset in approximately five
seconds, the base station terminates the call.
Out of range while configuring
If the handset cannot receive a signal and reverts to an out of range state while configuring
settings in the menu, the handset does not save any of the settings configured prior to
confirmation.
D100 SIP Wireless Terminal Installation and Administration Guide
December 2012
53
Coverage information
54
D100 SIP Wireless Terminal Installation and Administration Guide
Comments? [email protected]
December 2012
Chapter 6: Administration and
maintenance
Overview
The following sections contain all of the relevant information pertaining to the administration
and maintenance of a D100 device.
Use System Status Application (SSA) as the preferred method to monitor and check the status
of D100 systems after they register to IP Office. Prior to registration, you must use IP Office
Manager to administer the system. SSA provides real-time status, historic utilization, and alarm
information for ports, modules, and expansion cards on the system. Using SSA, you can
refresh the base station, reset to factory defaults, register handsets, and more.
You can also perform various administrative actions on the D160 handset. However, you
should only perform administration on the handset in troubleshooting scenarios where you
cannot reach IP Office Manager but you need to determine settings on the device. Some of
the administrative changes you make on the handset revert when the base station reboots.
You can use the Base Station Web Management Interface to access various management
functions on the D100, including configurations, logging information, rebooting, and updating
firmware. Note that you must be an administrator in order to view and utilize the Base Station
Web Management Interface due to the sensitivity of the information contained within. Much
like performing administrative actions on the handset, rebooting the base station overwrites
the changes made using the Base Station Web Management Interface.
Use the information in the following sections to administer and maintain the system, as well as
to update the base station and handset firmware.
Related topics:
System Status Application on page 56
Administration on the handset on page 59
Base Station Web Management Interface on page 71
Updating base station firmware on page 75
Updating handset firmware on page 76
D100 SIP Wireless Terminal Installation and Administration Guide
December 2012
55
Administration and maintenance
System Status Application
System Status Application (SSA) is a diagnostic tool for system managers and administrators
to monitor and check the status of IP Office systems, locally and remotely. Avaya recommends
using SSA as the preferred method for administering the D100 after the device is connected
and registered to IP Office.
System Status Application shows both the current state of an IP Office system and the details
of any problems that have occurred. The report consists of real-time events, historical events,
status data, and configuration data to assist in troubleshooting and diagnoses. SSA provides
real-time status, historic utilization, and alarm information for ports, modules, and expansion
cards on the system.
The following sections outline the status pages relevant to D100 administration.
56
D100 SIP Wireless Terminal Installation and Administration Guide
Comments? [email protected]
December 2012
Overview
SIP DECT Base Stations status page
Click the plus [+] icon next to System in the side menu and select SIP DECT Base Stations
to view a list of base stations connected to that IP Office.
This page contains detailed information about each base station and the related Line number,
IP address, and firmware version. Highlight a base station to reveal the six following options.
Note that you might have to scroll the page or expand the window to view all of the details and
options:
• Refresh: Refreshes the Base Station Status table.
• Select: Opens a Base Station Status page that lists the details of the base station
highlighted in the Base Station Status table (see the following section). Alternatively, you
can double-click a base station name in the table.
• Allow Registration: Enables the Registration mode on the highlighted base station.
• Reset Base: Reboots the base station.
• Reset Base To Default: Resets the base station to the factory defaults.
• Reset Base Admin Pass: Resets the Administrator password to the factory default (7 8
2 8 8 7 6).
Base Station Status page
When you double-click a base station listed in the SIP DECT Base Stations status page, a new
page opens with more detailed information for that base station. You can also click the plus [+]
D100 SIP Wireless Terminal Installation and Administration Guide
December 2012
57
Administration and maintenance
icon next to SIP DECT Base Stations in the side menu to expand a list of base stations. You
need not navigate to the SIP DECT Base Stations status page to obtain the details for each
base station.
Note:
You might have to scroll the page or expand the window to view all of the details and options
available for that base station. You must also highlight a handset for all of the options to
become available.
The following options are available, in addition to those described for the SIP DECT Base
Stations status page:
• Refresh: Refreshes the Base Station Status page and the handset table.
• Unregister Handset: Unregisters the selected handset from the base station.
• Reset Handset: Resets the highlighted handset.
• Unregister All Handsets: Unregisters all handsets from the selected base station.
• Reset All Handsets: Resets all the handsets registered to the selected base station.
58
D100 SIP Wireless Terminal Installation and Administration Guide
Comments? [email protected]
December 2012
Overview
Administration on the handset
While IP Office Manager is the preferred application for administering the D100, you can
perform certain administrative options as well as network configurations directly on the
handset. However, when the base station reboots, some of the modified settings revert.
You should only perform administration on the handset in troubleshooting scenarios where you
cannot reach IP Office Manager but you need to determine settings on the device.
The administrative settings available include, in order of appearance:
• DECT PIN change
• Administrator password change
• Diagnostics
• Reset base station
• Check firmware update
• Error information
The network settings available include, in order of appearance:
• MAC Address*
• IP Address*
• Subnet Mask*
• DHCP setting*
• Default Gateway*
• SIP Controller*
• Ping Reply setting
• Destination unreachable
• Ethernet information
• Statistics information
* An asterisk (*) indicates a network setting that reverts when the base station reboots.
Related topics:
Administrator settings on page 60
Network settings on page 64
D100 SIP Wireless Terminal Installation and Administration Guide
December 2012
59
Administration and maintenance
Administrator settings
Press the More.. soft key twice and press the Config soft key to enter the Administrator
Setting menu.
The Administrator Setting menu has configurable options and lists of information which only
an administrator can reach. Entering the menu requires the use of an administrator password.
Since many of the following procedures begin with the Administrator Setting menu, do not
misplace the administrator password.
By default, this password is 7 8 2 8 8 7 6. To change the password, see Administrator password
change on page 61.
Note:
The moment you enter the Administrator Setting menu on a handset, the system refuses
entry to all other handsets connected to that base station. Any attempt to enter the menu
on another device results in the message Denied.
Procedure
1. In the configuration menu, navigate to Administrator Setting and press the Select
soft key.
2. Enter the administrator password, and press the OK soft key. Press the Del soft key
to delete the last character entered.
By default, the administrator password is 7 8 2 8 8 7 6 (or 'Q U A T T R O').
3. If the password is correct, navigate to the desired menu.
If the password is incorrect, the display reads Failed and the handset emits an error
tone before returning to the main menu.
Related topics:
DECT PIN change on page 60
Administrator password change on page 61
Diagnostics on page 62
Reset base station on page 63
Check firmware update on page 63
Error information on page 63
DECT PIN change
You can change the DECT PIN using the following procedure. If the system has more than one
base station, you should assign each base station a unique DECT PIN to prevent registration
to an unintended base station.
60
D100 SIP Wireless Terminal Installation and Administration Guide
Comments? [email protected]
December 2012
Overview
Note:
Only the administrator can change the DECT PIN, using the administrator password and
the new 4-digit DECT PIN.
Procedure
1. From the Administrator Setting menu, use the Next and Prev keys to navigate to
DECT PIN Change and press the Select soft key.
2. Enter the new 4-digit DECT PIN, or press the Deflt soft key.
Note:
If you press the Deflt soft key, the handset provides the factory setting PIN (3 1
0 0) and requests confirmation. Select Yes to confirm or No to return to the menu
list.
3. If you entered a new PIN, press the OK soft key to save the PIN to the base
station.
If the PIN change is successful, the handset emits a confirmation tone and the
display reads Saved. Otherwise, the display reads Failed.
Administrator password change
Only an administrator can change the administrator password using the following procedure.
Procedure
1. From the Administrator Setting menu, use the Next and Prev keys to navigate to
Password Change and press the Select soft key.
The system provides a confirmation message.
2. Press Yes to change the password.
3. Enter the new administrator password.
The maximum password length is eight characters, but you can enter an empty
password. To change the password back to the default setting (7 8 2 8 8 7 6), press
the More.. soft key during password entry and select Deflt.
4. If you change the password, the handset prompts you to re-enter the password as
confirmation. Enter the password a second time and press the OK soft key. If you
change the password back to the default setting, confirm the change using the OK
soft key.
If successful, the display reads Saved for three seconds. Otherwise, the display
reads Failed for the same duration. You then return to the menu list.
D100 SIP Wireless Terminal Installation and Administration Guide
December 2012
61
Administration and maintenance
Diagnostics
The following table contains a summary of the diagnostics available for the D100 base station.
If any of the following diagnostic checks fail to complete, reboot the base station. If problems
persist, the hardware might need replacing.
The administrator performs the diagnostic checks on the handset through the Diagnostics
menu, which only the administrator can enter.
Item
Purpose/Behaviour
LED Check
To check the operation of the LED.
The Power LED flashes for three seconds, followed by the Status LED for
the same duration. The message Checking LED also flashes on the
display during the check.
If the check fails, the LED does not display the correct status.
KEY Check
To check the operation of the Registration Key on the base station.
The display reads Hold Reg. Key. When you hold the Registration key,
the base station detects the registration.
If the base station fails detection, the Registration key does not perform
registration.
RAM Check
To check the status of the RAM.
The message Checking RAM flashes on the display.
If the check fails, the base station might behave unexpectedly.
*Can be run in maintenance mode using the Base Station Web
Management Interface*
PHY Check
To check the status of the PHY register.
If the PHY check is successful, press the Details soft key to view more
information on Link, Duplex, and Speed.
If the check fails, the base station cannot connect to IP Office.
*Can be run in maintenance mode using the Base Station Web
Management Interface*
Flash Check
To check the status of the flash memory.
The message Checking Flash flashes on the display.
If the check fails, the base station might behave unexpectedly.
*Can be run in maintenance mode using the Base Station Web
Management Interface*
RF Check
To check the status of the RF register.
If the check fails, the base station cannot transmit data to the handset
correctly.
*Can only be invoked using the Base Station Web Management Interface*
Procedure
1. From the Administrator Setting menu, use the Next and Prev soft keys to navigate
to Diagnostics and press the Select soft key.
2. Navigate the diagnostics submenu and select the desired item using the Select soft
key.
62
D100 SIP Wireless Terminal Installation and Administration Guide
Comments? [email protected]
December 2012
Overview
Use the information in the above table to manage the diagnostics. Press the Back/
Cancel soft keys or press the Off-Hook button to return to the menu list.
Reset base station
Reset the D100 base station using the following procedure on the handset. This procedure
restarts the base station but does not reset the device to any factory defaults. To reset the
device to factory defaults, see Factory settings on page 79.
Procedure
1. From the Administrator Setting menu, use the Next and Prev keys to navigate to
Reset Base Station and press the Select soft key.
The handset display shows a confirmation message.
2. Press Yes to restart the base station.
Press No to return to the menu list.
Check firmware update
Use the following procedure to check for new firmware updates. You must be an administrator
to access the menu.
Procedure
1. From the Administrator Setting menu, use the Next and Prev soft keys to navigate
to Check Firmware Update and press Select.
The base station checks for a firmware update while the handset display reads
Connecting.... After a short amount of time, the handset display shows the latest
firmware version.
2. Press the Update soft key to update the firmware. Press the Back soft key to cancel
the firmware update.
3. Press Yes to confirm the firmware update. Press No to return to the menu list.
If the current firmware and the latest firmware are the same, the update will not
occur and the display will read The Same Version for three seconds prior to
returning to the menu list.
The base station reboots itself after updating the firmware.
Error information
You can access error information from the Administrator Setting menu. For more information
about error messages, see Handset display reads “No Service” on page 86.
D100 SIP Wireless Terminal Installation and Administration Guide
December 2012
63
Administration and maintenance
Procedure
1. From the Administrator Setting menu, use the Next and Prev keys to navigate to
Error Information and press the Select soft key.
The handset display lists the error message(s).
2. Press the Back soft key or the Off-Hook button to return to the menu list.
Network settings
Press the More.. soft key twice and press the Config soft key to enter the Network menu.
In the Network menu, you can view various network parameters in read-only mode. You can
only edit the network settings if you correctly enter the administrator password at the prompt.
You should only configure network settings in troubleshooting scenarios where IP Office
Manager and System Status Application are unavailable.
The following submenus are available under the Network menu:
• MAC Address
• SIP Controller
• IP Address
• Ping Reply Setting
• Subnet Mask
• Destination Unreachable
• DHCP Setting
• Ethernet Information
• Default Gateway
• Statistic Information
For the changes to take effect, reboot the base station after you make changes to the network
parameters.
Caution:
Do not attempt to change IP parameters on the D100 without careful instruction. Be cautious
when configuring network settings so as not to corrupt the configuration file.
Procedure
1. From the main menu, use the Next and Prev soft keys to navigate to Network and
press the Select soft key.
2. Enter the administrator password, if available.
If you input an incorrect password, the menu opens in read-only mode.
Related topics:
MAC address on page 65
64
D100 SIP Wireless Terminal Installation and Administration Guide
Comments? [email protected]
December 2012
Overview
IP address on page 65
Subnet mask on page 66
DHCP setting on page 66
Default gateway on page 67
SIP controller on page 67
Ping Reply setting on page 68
Destination Unreachable on page 68
Ethernet information on page 68
Statistics information on page 69
MAC address
View the MAC address using the following procedure.
Procedure
1. Access the Network submenu, navigate to MAC Address, and press the Select
soft key.
The handset display shows the MAC address.
For example: MAC: 00.1A.2B.3C.4D.5E
2. Press the Back soft key to return to the menu list.
IP address
View and edit the IP address using the following procedure.
Procedure
1. Access the Network submenu, navigate to IP Address, and press the Select soft
key.
The handset display shows the IP address.
For example: IP Addr: 192.168.100.200
2. Administrators have the option to edit the address using the Edit soft key.
Otherwise, you can only view and exit the IP address menu in read-only mode and
you will not be able to perform the following steps.
3. Press Edit and enter the IP address manually using the keypad. The << and >> soft
keys move the cursor in that direction. Press More.. to access the Dot soft key which
you can use to place a dot, or decimal, in the IP address.
4. When you are satisfied with the address, press the OK soft key.
If you enter an invalid IP address in step 3, the handset emits an error tone.
5. If the IP address is valid, the handset requests confirmation to complete the change.
Press Yes to complete the change or No to cancel the change.
D100 SIP Wireless Terminal Installation and Administration Guide
December 2012
65
Administration and maintenance
The handset returns to the menu list.
Subnet mask
You can view and edit the subnet mask using the following procedure.
Procedure
1. Access the Network submenu, navigate to Subnet Mask, and press the Select
soft key.
The handset display shows the subnet mask.
For example: Subnet: 255.255.255.0
2. Administrators have the option to edit the subnet mask using the Edit soft key.
Otherwise, you can only view and exit the subnet mask menu in read-only mode
and you will not be able to perform the following steps.
Similarly, if DHCP is enabled, the Edit soft key will not be available. In this case,
press the Back soft key to return to the previous menu.
3. If you press Edit you can enter the subnet mask manually using the keypad.
4. When you are satisfied, press the OK soft key.
The handset emits an error tone if you entered an invalid subnet mask in step 3.
5. If the subnet mask is valid, the handset requests confirmation to complete the
change. Press Yes to complete the change and No to cancel the change.
In either case, the handset returns to the menu list.
DHCP setting
View and edit (enable or disable) the DHCP setting using the following procedure.
Procedure
1. Access the Network submenu, navigate to DHCP Setting, and press the Select
soft key.
The handset display shows the DHCP setting. The default value is On.
Press the Back soft key or the Off-Hook button to return to the menu list.
2. Administrators can enable or disable DHCP by selecting either DHCP Enable or
DHCP Disable using the Select soft key. If you did not enter the administrator
password, you can only view the DHCP setting in read-only mode.
After selecting a new setting, a confirmation message displays on the handset for
three seconds.
The handset emits a confirmation tone before returning to the menu list.
66
D100 SIP Wireless Terminal Installation and Administration Guide
Comments? [email protected]
December 2012
Overview
Default gateway
View and edit the default gateway using the following procedure.
Procedure
1. Access the Network submenu, navigate to Default Gateway, and press the Select
soft key.
The handset display shows the default gateway.
For example: Gateway: 192.168.100.1
2. Administrators have the option to edit the address using the Edit soft key.
Otherwise, you can only view the default gateway menu in read-only mode and you
will not be able to perform the following steps.
3. If you press Edit, you can enter the default gateway manually using the keypad.
4. When you are satisfied with the address, press the OK soft key.
If you enter an invalid default gateway address in step 3, the handset emits an error
tone.
5. If the address is valid, the handset requests confirmation to complete the change.
Press Yes to complete the change, or press No to cancel the change.
In either case, the handset returns to the menu list.
SIP controller
You can view and edit the SIP controller settings using the following procedure.
Procedure
1. Access the Network submenu, navigate to SIP Controller, and press Select.
The handset display shows the SIP controller IP address.
For example: SIP: 192.168.100.100
2. Administrators can edit the SIP controller IP address using the Edit soft key. If you
are not an administrator, you can only view and exit the SIP controller menu in readonly mode and you will not be able to perform the following steps. Similarly, if DHCP
is enabled, the Edit soft key will not be available.
3. If you press Edit, you can enter the SIP controller IP address manually using the
keypad.
4. When you are satisfied, press the OK soft key.
If you entered an invalid address in step 3, the handset emits an error tone.
5. If the address is valid, the handset requests confirmation to complete the change.
Press Yes to complete the change, or press No to cancel the change.
D100 SIP Wireless Terminal Installation and Administration Guide
December 2012
67
Administration and maintenance
The handset returns to the menu list.
Ping Reply setting
The Ping Reply setting determines whether or not the handset responds to a ping. You can
effectively 'hide' a handset by disabling its Ping Reply setting. Use the following procedure to
enable or disable Ping Reply on a handset.
Procedure
1. Access the Network submenu, navigate to Ping Reply Setting, and press the
Select soft key.
The handset display shows the Ping Reply setting. The default setting is Ping On
(enabled).
2. Administrators have the option to enable or disable Ping Reply manually by
selecting either Ping On or Ping Off.
After selecting the Ping Reply setting, the handset display shows a confirmation
message for three seconds.
The handset emits a confirmation tone before returning to the menu list.
Destination Unreachable
View and edit (enable or disable) the Destination Unreachable Internet Control Message
Protocol (ICMP) using the following procedure.
Procedure
1. Access the Network submenu, navigate to Destination Unreachable, and press
the Select soft key.
The handset display shows the Destination Unreachable setting. The default setting
is On (enabled).
2. Administrators have the option to enable or disable Destination Unreachable by
selecting either On or Off.
After selecting the Destination Unreachable setting, the handset display shows a
confirmation message for three seconds.
The handset emits a confirmation tone before returning to the menu list.
Ethernet information
Use the following procedure to view the Ethernet information.
68
D100 SIP Wireless Terminal Installation and Administration Guide
Comments? [email protected]
December 2012
Overview
Procedure
1. Access the Network submenu, navigate to Ethernet Information, and press the
Select soft key.
The handset display shows the Ethernet port information as a list of menu items.
2. Navigate the list using the Next and Prev soft keys and select an item using the
Select soft key. The items include:
• Link: Up means that the Ethernet link is up. Down means that the Ethernet
link is down.
• Duplex: Full means that the Ethernet is configured for full duplex. Half means
that the Ethernet is configured for half duplex.
• Speed: 100 means that the Ethernet is configured for 100Mbps. 10 means that
the Ethernet is configured for 10Mbps.
• Back: Return to the menu list.
Statistics information
You can view statistics information using the following procedure.
Procedure
1. Access the Network submenu, navigate to Statistics, and press the Select soft
key.
The handset display shows the available statistics information as a list of menu
items.
2. Select an item according to the information below. Press the Back soft key to return
to the menu list.
Menu item
Description
Recv INVITE
Total INVITE messages received (including
retransmission)
Recv Resent
INVITE
INVITE retransmissions received
Recv Non-INVITE
Total non-INVITE requests received (including
retransmission)
Recv Resent NonINVITE
Non-INVITE retransmissions received
Recv SIP Res
Total SIP responses received
Recv Resent SIP
Res
SIP Responses retransmissions received
Sent INVITE
Total INVITE messages sent (including retransmission)
D100 SIP Wireless Terminal Installation and Administration Guide
December 2012
69
Administration and maintenance
Menu item
Description
Sent Resent INVITE INVITE retransmissions sent
Sent Non-INVITE
Total non-INVITE requests sent (including retransmission)
Sent Resent NonINVITE
Non-INVITE request retransmissions sent
Sent SIP Res
Total SIP responses sent
Sent Resent SIP
Res
SIP Responses retransmissions sent
Recv RTP
Total number of received RTP packets
Sent RTP
Total number of sent RTP packets
Recv IP
The total number of received IP packets
Sent IP
The total number of sent IP packets
Recv Ethernet
The total number of received Ethernet packets
Sent Ethernet
The total number of sent Ethernet packets
Recv Error Ethernet The total number of received error Ethernet packets
70
D100 SIP Wireless Terminal Installation and Administration Guide
Comments? [email protected]
December 2012
Overview
Base Station Web Management Interface
The Base Station Web Management Interface is a webpage that provides access to various
management functions on the D100, including configurations, logging information, rebooting,
and updating firmware.
You must be an administrator in order to view and utilize the Base Station Web Management
Interface due to the sensitivity of the information contained within. Note that rebooting the base
station overwrites the changes made to the configuration parameters using the Base Station
Web Management Interface.
To access the Base Station Web Management Interface, enter the IP address of the base
station into a web browser connected to the same network as the D100.
Despite the functionality of the Base Station Web Management Interface, the application does
not provide as many configuration options as IP Office Manager, which is used for the majority
of device configurations. While the functionality of the Base Station Web Management
Interface is similar to IP Office Manager, you should use the interface solely as a tool for
retrieving critical and system logs.
A limit of five administrators can access the Base Station Web Management Interface. You
can edit the list of administrators by selecting the User Menu link in the left frame of the
interface to open a page that contains the configurable user list table. Click Update when you
are satisfied with any changes you make to the user list table.
D100 SIP Wireless Terminal Installation and Administration Guide
December 2012
71
Administration and maintenance
The login screen requests user credentials. By default, the credentials are:
• Username: d100
• Password: d100
Related topics:
Obtaining log information on page 72
Rebooting the base station on page 74
Obtaining log information
As mentioned previously, the D100 base station can save log information that you can view
using the Base Station Web Management Interface. If the IP Office and the base station are
in a location that is remote from the administrator, then you must access the web interface
using a secure VPN tunnel. For more information, see Using SSL VPN on page 74.
To enter the log interface, click Retrieve Logs on the left frame of the Base Station Web
Management Interface. Using the log interface, you can set parameters, download logs, delete
logs, and view statistical information.
72
D100 SIP Wireless Terminal Installation and Administration Guide
Comments? [email protected]
December 2012
Overview
Setting log parameters
You can configure two types of logs: critical logs and system logs.
• Critical log (Critical.log):
The Critical log saves Reboot and Firmware update events. The size of the Critical.log
file is greater than 300Kb and you can save more than 600 events.
• System log (System.log):
According to the System.log parameter for Log Level, and whether or not saving the log
is enabled, you can save all kinds of system log information, such as network, SIP, RF,
etc. The size of the System.log file is approximately 1Mb.
The Log Level determines the corresponding system log parameters as follows:
- Level 1: INFO log saved.
- Level 2: INFO and ERROR logs are saved (Default).
- Level 3: INFO, ERROR and WARNING logs are saved. Set this level for heavy
testing and RF-related problems.
- Level 4: INFO, ERROR and WARNING and DEBUG logs are saved. Set this level
for system and SIP-related problems.
- Level 5: INFO, ERROR, WARNING, DEBUG and TRACE logs are saved.
Downloading statistical information
You can download statistical information using the Statistic Information link. Clicking on the
link downloads the StatisticInformation.log file that contains the parameters listed in the table
found under Statistics information on page 69.
Related topics:
Using SSL VPN on page 74
D100 SIP Wireless Terminal Installation and Administration Guide
December 2012
73
Administration and maintenance
Using SSL VPN
In some network deployment scenarios, the IP Office and the base station are located remotely
from the administrator. In this case, an administrator can obtain base station logs using a
Secure Sockets Layer Virtual Private Network (SSL VPN) to remotely access IP Office and
LAN devices.
For information on configuring a SSL VPN tunnel, see the IP Office SSL VPN Solutions
Guide.
In addition to setting up a SSL VPN, you must use the following procedure to configure Network
Address and Port Translation (NAPT) rules for each VPN tunnel using IP Office Manager. Note
that each base station receives an entry in the NAPT table.
Procedure
1. In the IP Office Manager navigation list, select Service.
2. In the Service list, select the SSL VPN service where you want to configure NAPT
rules.
3. In the details pane for the service, select the NAPT tab.
4. Under Application, open the drop down list and select Custom.
The Protocol and Internal Port Number fields are automatically filled with the
default values.
5. Modify the External Port Number field.
6. Repeat steps 4 and 5 to configure rules for additional base stations.
7. (Optional) To delete an NAPT rule, use the empty column on the left side of the
table. Right-click in the empty cell next to the rule you want to delete and select the
Delete option.
Next steps
Access each base station remotely using the VPN tunnel IP address and the external port
number configured in the NAPT rules table in IP Office Manager. The VPN tunnel address must
include the external port in the format:
http://<tunnel IP address>:<external port>
Log in to each base station and retrieve logs using the method described in Obtaining log
information on page 72.
Rebooting the base station
You can reboot the base station using the Base Station Web Management Interface such that
the base station reboots either normally or into Maintenance Mode.
74
D100 SIP Wireless Terminal Installation and Administration Guide
Comments? [email protected]
December 2012
Overview
The Reboot Base Station option is available under the Setting Menu in the left navigational
pane.
After rebooting the base station, the base station reverts to factory default settings. Rebooting
the base station clears the following parameters from the base station:
• Configuration file information (D100.cfg, D100settings.txt, D100prov.txt, Language file)
• User login information
• Log (System log)
• Local directory
• Call log
Updating base station firmware
IP Office automatically updates the D100 base station firmware, but only if IP Office Manager
is configured such that the system's memory card is the source for the files used by the
D100.
In IP Office Manager, navigate to the System > System tab and ensure that the Phone File
Server Type is set to Memory Card, as the following image demonstrates.
Once the correct Phone File Server Type is set, IP Office can automatically upgrade the base
station firmware when IP Office reboots. The firmware downgrade procedure uses the same
method and requires the same configuration in IP Office Manager.
D100 SIP Wireless Terminal Installation and Administration Guide
December 2012
75
Administration and maintenance
Updating handset firmware
To update the D160 handset firmware, you must install Microsoft .NET version 4 and you must
use the D160 Upgrade Jig.
To check your version of Microsoft .NET, click Control Panel > Add or Remove Programs.
If you do not have Microsoft .NET version 4, download it directly from Microsoft at:
http://www.microsoft.com/en-us/download/search.aspx?q=.net%204.0%20
If you update the handset firmware on a live system, you must reboot the base station to which
the handset registers once the update completes.
Before you begin
Ensure that the handset battery has enough power to last the duration of the upgrade, which
might be a few minutes. Also, ensure that you have the latest USB-UART driver installed for
the Upgrade Jig (CDM 2.04.06 WHQL Certified), which is also required. Locate the available
Upgrade Jig drivers for each operating system in the Upgrade Jig Drivers folder.
Note that the following procedure has been tested and successfully performed on Windows
XP and Windows 7.
Procedure
1. Connect the Upgrade Jig to the PC through an available USB port.
2. Extract the D160 Firmware Upgrade file to anywhere on your PC.
3. In the extracted folder, run the D160 Handset Writer application.
The D160 Handset Writer window appears:
76
D100 SIP Wireless Terminal Installation and Administration Guide
Comments? [email protected]
December 2012
Overview
Identify the status display in the D160 Handset Writer.
4. In the D160 Handset Writer, click the Port Scan button to populate the list of newly
available ports.
The Writer application highlights and selects the port number allocated in the
Upgrade Jig.
5. Connect the Upgrade Jig to the handset using the headset jack and remove the
battery from the handset.
6. Click the Start button on the Writer application, then reinstall the battery.
The writing begins. The writing process should take less than a minute to
complete.
If the handset was not detected by the application, the status display reads Handset
not detected.
7. If successful, the status display reads Update complete.
If unsuccessful, the status display reads Update failed. If the update fails:
• Check the connection between the Upgrade Jig and the handset.
• Ensure that the handset has a fully-charged and compatible battery.
D100 SIP Wireless Terminal Installation and Administration Guide
December 2012
77
Administration and maintenance
78
D100 SIP Wireless Terminal Installation and Administration Guide
Comments? [email protected]
December 2012
Chapter 7: Factory settings
The following table lists the default factory settings for the D160 handset and the D100 base station. You
can use multiple methods to reset the base station to factory default, but the preferred method is to use
IP Office System Status Application. To determine the appropriate method to use in your situation, see
Resetting the base station to factory default on page 80.
Item
Handset
Base station
Ringer Tone
Tone A
n/a
Ringer Volume
High
n/a
Ringer Mute
Off
n/a
Ear Speaker Volume
4
n/a
Hands Free Volume
4
n/a
Headset Volume
4
n/a
Range Alarm
On
n/a
DHCP
n/a
Enable
IP Address
n/a
192.168.1.100
Subnet Mask
n/a
255.255.0.0
Default Gateway
n/a
192.168.1.1
SIP Controller
n/a
192.168.1.1
Ping Reply
n/a
Enable
Destination Unreachable
n/a
Enable
DECT PIN ID
n/a
3100
Administrator Password
n/a
7828876
Login ID for the Base Station Web
Management Interface
n/a
d100
Login Password for the Base Station Web
Management Interface
n/a
d100
System Log Level
n/a
Level 2
Base DTMF Dial Output Time
n/a
100ms
Note:
Continuous DTMF signaling is not
available.
D100 SIP Wireless Terminal Installation and Administration Guide
December 2012
79
Factory settings
Resetting the base station to factory default
You can use multiple methods to reset the base station parameters to factory default. The
methods that follow are listed by order of preference. Read the methods and select the first
that applies to you.
• Preferred method: Use System Status Application to reset the base station.
• Alternative method: If you cannot see the base station in System Status Application,
use the Base Station Web Management Interface.
• Ulterior method: If the preferred and alternative methods do not apply to your situation,
see Resetting the base station using the base station on page 81.
Related topics:
Resetting the base station using System Status Application on page 80
Resetting the base station using the Base Station Web Management Interface on
page 81
Resetting the base station using the base station on page 81
Resetting the base station using System Status Application
Using System Status Application is the preferred method for resetting the base station to
factory default. Attempt the procedure below before you attempt any other factory reset
method.
Procedure
1. Run System Status Application, navigate to System > SIP DECT Base Station and
select the base station you want to reset.
2. On the status page that appears, highlight the desired base station.
3. Click the Reset Base To Default button on the bottom of the status page.
The base station resets to factory default.
80
D100 SIP Wireless Terminal Installation and Administration Guide
Comments? [email protected]
December 2012
Resetting the base station to factory default
Resetting the base station using the Base Station Web Management
Interface
Using the Base Station Web Management Interface to reset the base station to factory default
is an alternative method that you should only attempt when System Status Application fails, or
if the base station does not appear in System Status Application at all.
For more information, refer to Base Station Web Management Interface on page 71.
If this alternative method also fails, only then should you attempt the ulterior method described
in Resetting the base station using the base station on page 81.
Procedure
1. In the Base Station Web Management Interface, navigate to the Setting Menu in
the left navigational pane.
2. Select Reboot Base Station.
3. Select Execute (Factory Initialize).
The base station resets to factory default.
Resetting the base station using the base station
Only use this method to reset the base station to factory default when the preferred and
alternative methods fail. See Resetting the base station using System Status Application on
page 80 before you attempt the following method.
Procedure
1. Press and hold the Registration button located on the front of the base station and
insert a pin into the Reset button hole also located on the front of the base station.
Hold both buttons for five seconds.
The base station resets the following parameters to the default values indicated:
• IP Address: 192.168.1.100
• Subnet Mask: 255.255.0
• Default Gateway: 192.168.1.1
2. You can now use the Base Station Web Management Interface to reset the base
station. See Resetting the base station using the Base Station Web Management
Interface on page 81.
D100 SIP Wireless Terminal Installation and Administration Guide
December 2012
81
Factory settings
82
D100 SIP Wireless Terminal Installation and Administration Guide
Comments? [email protected]
December 2012
Chapter 8: Accessories
Uniden provides accessories for the Avaya D100 at http://www.uniden.com/ via the “Accessories” page.
You can use the “Refine by” navigation pane on the left side of the screen and select “Avaya” to list all
Avaya accessories available through Uniden. You can also enter “Avaya D100” in the search field at the
top of the page to list accessories specific to the D100 SIP Wireless Terminal.
The D100 accessories available include batteries, headsets, protective covers, and replacement parts.
D100 SIP Wireless Terminal Installation and Administration Guide
December 2012
83
Accessories
84
D100 SIP Wireless Terminal Installation and Administration Guide
Comments? [email protected]
December 2012
Chapter 9: Troubleshooting
Changed IP parameters and lost connectivity to the base
station
If you changed IP parameters and lost connectivity to the base station you may have entered
invalid values for the IP parameters.
Reset the base station to the factory defaults and follow the base station installation procedure
appropriate to your IP Office deployment scenario.
Configuring parameters using the Base Station Web
Management Interface
You can configure the following parameters using the Base Station Web Management
Interface. If necessary, obtain the base station IP address using the handset menu.
Parameter
Description
Default value
DHCP setting
DHCP On/Off
On
MAC address
The MAC address of the base station.
The MAC address parameter is readonly.
The MAC address of the
network interface.
IP address
The IP address of the base station. If
DHCP is disabled, you can change the
IP address.
192.168.1.100
Subnet mask
The subnet mask. If DHCP is disabled,
you can change the subnet mask.
255.255. 0.0
Default gateway
The IP address of the default gateway. If 192.168.1.1
DHCP is disabled, you can change the
default gateway IP address.
SIP server
The IP address of the SIP server. If
DHCP is disabled, you can change the
SIP server IP address.
D100 SIP Wireless Terminal Installation and Administration Guide
192.168.1.1
December 2012
85
Troubleshooting
Handset display reads “Duplicate IP Address”
The handset display reads Duplicate IP Address when the base station detects duplicate
addresses in the subnet. Verify your IP settings.
Handset display reads “No Service”
If the handset display reads No Service then the base station has lost connectivity to IP Office.
Navigate the Administrator Setting menu to view error information and attempt to resolve the
error using the information in the following table.
For more information, see Error information on page 63.
Error message
Resolution
No Configuration Server
The base station could retrieve configuration data from IP
Office.
Verify the IP connectivity.
No Connection
Verify the IP connectivity.
Not Configured
The base station is not configured on IP Office.
Verify the configuration in IP Office Manager. Specifically,
check that the base station's MAC Address is configured
correctly.
Wrong Market
The IP Office system companding law does not match the
market for the base station.
If the IP Office system operating mode uses companding law
of mu-law and market=Global, it is a match.
If the IP Office system operating mode uses companding law
of a-law and the market=EU, it is a match.
Any other configuration is a mismatch.
Handset display reads “Searching”
The handset display reads Searching when you are outside the range of the base station or
when the base station is out of service.
86
D100 SIP Wireless Terminal Installation and Administration Guide
Comments? [email protected]
December 2012
Handset not recognized by the upgrade firmware
Handset not recognized by the upgrade firmware
If the handset upgrade firmware does not recognize the handset when connected to the
upgrade jig, the connection might be experiencing some disruption. Ensure proper contact
between the upgrade jig and the headset jack by disconnecting and reconnecting the upgrade
jig several times and rotating the plug back and forth when it is inserted into the headset
jack.
Maintenance Mode
Administrators can use Maintenance Mode to maintain the base station using the following
software applications found in the Base Station Web Management Interface:
• Real Time OS
• Network Stack (TCP/IP)
• Web Server
During Maintenance Mode, the RF software component does not launch, and the base station
does not connect to the handsets. Also, the power and status LEDs are turned on. During
Maintenance Mode, the base station uses the last IP address used.
You can use one of the following methods to enter Maintenance Mode. Use the method that
works best for your installation:
1. While the base station is running, press and hold the Reset button on the front of
the base station for five seconds. After a short while, the base station automatically
begins to reboot.
2. Plug the Ethernet cable into the base station while pressing the Reset button.
3. Use the Base Station Web Management Interface to reboot the D100 to factory
default. See Rebooting the base station on page 74.
In Maintenance Mode, you can access most of the areas available in the Base Station Web
Management Interface, including configuration parameters, log information, base station
reboot, firmware update, and diagnostics. For more information, see Base Station Web
Management Interface on page 71.
The following scenarios illustrate typical uses for Maintenance Mode.
Scenario 1: Corrupted firmware
If the base station firmware is corrupt, the base station starts in Maintenance Mode and then
automatically requests a firmware update, which is stored in IP Office. After updating, the base
station reboots.
If the firmware cannot update, for example there is no firmware in IP Office, the base station
starts in Maintenance Mode, and only an administrator can upload the correct firmware onto
D100 SIP Wireless Terminal Installation and Administration Guide
December 2012
87
Troubleshooting
IP Office and perform an update manually using the Base Station Web Management Interface.
For more information, see Updating base station firmware on page 75.
Scenario 2: Bad firmware, but not corrupted
If the base station firmware is not corrupt, for example the CRC check passes successfully,
but the device still does not work correctly, the base station will not detect the problem by itself.
In this case, only an administrator can update the firmware in one of the following ways:
• If a handset can connect with the base station and the handset menu is operable, update
the base station using the handset. See Check firmware update on page 63.
• If the Base Station Web Management Interface is operable while the firmware is running,
use the Firmware Update button to update the base station. See Updating base station
firmware on page 75.
Repeater registration failure
If you experience failure while attempting to register a repeater, check the IP Office
environment for other DECT equipment with registration enabled as this could be causing the
interference.
Test the registration by turning off the base station to which the repeater is registered and watch
to see if the LED on the repeater changes from solid to a slow flash. A slow flash indicates that
the base station is either not detected or out of range.
Unknown DECT PIN
If the base station has an unknown DECT PIN, you can change it by navigating to the
Configuration > Administrator Settings menu on any handset that is registered to the base
station.
If there are no registered handsets, you must reset the D100 base station to the factory default,
thereby returning the DECT PIN to 3 1 0 0. See Resetting the base station to factory
default on page 80.
Unknown IP address
If the D100 base station has an unknown IP address and cannot connect to IP Office, you can
locate or change the address by performing the following procedure.
• On a registered handset, navigate to the Configuration > Network menu and view or
change the D100 base station IP address.
88
D100 SIP Wireless Terminal Installation and Administration Guide
Comments? [email protected]
December 2012
Index
A
accessories ................................................................83
administrator .........................................................60, 61
password ........................................................60, 61
settings .................................................................60
B
base station .........................12, 22, 26, 36, 37, 40, 42, 80
configuration ........................................................26
configure ..............................................................22
installation ......................................................36, 37
scenarios .......................................................37
mounting ..............................................................40
reset .....................................................................80
base station survey ....................................................36
Base Station Web Management Interface . 26, 72, 81, 86
base unit .......................................................................7
battery ...................................................................15, 43
boot up sequence .......................................................42
booting up ...................................................................42
C
capacity ........................................................................9
charge unit ..................................................................14
clear slot survey .........................................................35
codec ............................................................................9
configuration ....................................................19, 26, 86
base station ..........................................................26
IP Office ...............................................................19
configure .........................................................22, 23, 25
base station ..........................................................22
extension ..............................................................23
static IP parameters .............................................25
connecting ..................................................................15
D
D100.cfg .....................................................................42
D100prov.txt ...............................................................42
D100settings.txt ..........................................................42
DECT PIN ...................................................................61
DECT RF ....................................................................43
registration ...........................................................43
default .........................................................................75
default gateway ..........................................................67
deployment ...........................................................35, 36
deregister ...................................................................44
handset ................................................................44
destination unreachable .............................................68
DHCP ..............................................................20, 42, 66
setting ..................................................................66
DHCP ............................................................66
diagnostics .................................................................62
DoS attack protection ...................................................9
E
error information .........................................................64
ethernet ........................................................................9
Ethernet ......................................................................69
extension ....................................................................23
configure ..............................................................23
F
factory default .............................................................80
factory settings ...........................................................79
features ........................................................................9
firmware ................................................................63, 75
update ............................................................63, 75
check .............................................................63
update ...........................................................63
firmware ..................................................63
floor plan .....................................................................31
H
handset ..............................................7, 9, 13, 43, 44, 76
deregister .............................................................44
firmware ...............................................................76
register .................................................................43
headset .......................................................................15
I
icons ...........................................................................15
installation ..................................................................50
IP address ..................................................................65
IP Office ..............................................................7, 9, 19
D100 SIP Wireless Terminal Installation and Administration Guide
December 2012
89
configuration ........................................................19
L
power up ...............................................................42, 43
R
language ......................................................................9
LCD ............................................................................15
LED ............................................................................15
log information ............................................................73
M
MAC address ..............................................................65
maintenance mode ...............................................75, 87
Microsoft .NET ............................................................76
mounting ...............................................................40, 50
base station ..........................................................40
N
reboot .........................................................................75
register .......................................................................43
handset ................................................................43
registration failure .......................................................88
repeater ...........................................................14, 48–50
installation ............................................................48
registration ...........................................................48
reset ......................................................................63, 80
base station ....................................................63, 80
reset ..............................................................63
reset button ................................................................12
ROM ...........................................................................42
S
network ...................................................................9, 64
O
option 60 .....................................................................42
option 66 .....................................................................42
out of range ................................................................53
overview .......................................................................7
P
password ..............................................................60, 61
administrator ...................................................60, 61
performance .................................................................9
ping reply ....................................................................68
PoE .............................................................................42
power down ................................................................43
Power over Ethernet ...................................................42
settings .......................................................................60
administrator ........................................................60
signal strength ............................................................46
survey ..................................................................46
SIP controller ..............................................................67
site planning ...............................................................30
SSA ............................................................................57
SSL VPN ....................................................................74
static addressing ........................................................20
static IP parameters ...................................................25
configure ..............................................................25
statistics ......................................................................69
subnet mask ...............................................................66
System Status Application ..........................................57
T
telephony ......................................................................9
U
update ........................................................................75
firmware ...............................................................75
Upgrade Jig ..........................................................15, 76
V
vendor ........................................................................83
90
D100 SIP Wireless Terminal Installation and Administration Guide
December 2012