1
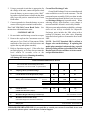
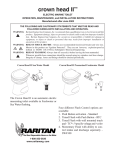
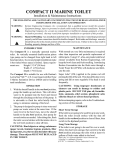
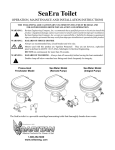
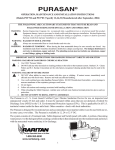
crown head™
CENTRIFUGAL DISCHARGE SERIES AUTOMATIC MARINE TOILET
INSTALLATION, OPERATION AND MAINTENANCE INSTRUCTIONS
THE FOLLOWING ARE CAUTIONARY STATEMENTS THAT MUST BE READ AND
FOLLOWED DURING BOTH INSTALLATION AND OPERATION.
WARNING:
Raritan Engineering Company, Inc. recommends that a qualified person or electrician install this
product. Equipment damage, injury to personnel or death could result from improperinstallation.
Raritan Engineering Company, Inc. accepts no responsibility or liability for damage to equipment,
injury or death to personnel that may result from improper installation operation of this product.
WARNING:
HAZARD OF SHOCK OR FIRE
Always use recommended fuse, circuit breaker and wire size.
Motors and relays used with this product are “Ignition Protected”. They are not however, explosion-proof as defined in 46CFR 110.15-65(e), Subchapter J-Electrical Engineering.
DO NOT run this system dry (without water).
DO NOT run continuously for more than 30 seconds.
WARNING:
HAZARD OF FLOODING - Always shut off seacock(s) before leaving the boat unattended.
Whenever possible hose connections should be secured using two (2) all-stainless steel hose
clamps. Integrity of clamps, hoses and fittings should be checked periodically.
MAINTENANCE
INTRODUCTION
The Crown Head is a powerful centrifugal
macerating toilet that thoroughly breaks down waste
in preparation for treatment or holding and requires
little maintenance. It can be ordered with a 90 degree
or straight discharge, a white marine-size bowl or
household-style bowl available in either white or
almond.
1. Refill the Concentrate reservoir when empty;
occasionally check that it has not run dry.
Concentrate helps minimize the need for
cleaning.
OPERATION
2. Using C.P. a bio-enzymatic toilet bowl cleaner
(available from Raritan Engineering) will keep
the bowl clean and fresh smelling.
Use only Raritan Concentrate as an additive in
the Concentrate tank. Other products may cause
damage to the internal parts of the toilet.
CAUTION: The Crown Head motor is designed
to be used as a toilet and is not rated for
continuous duty.
Do not use any chemical that contains ammonia,
ethyl acetate, phosphoric acid or concentrated
chlorine bleach as a cleaner. These may cause
damage to the toilet.
The Crown Head does not require special toilet
paper, however, hard objects or stringy substances
(paper towels, femine hygene products, filter
cigarettes, etc.) must not be thrown into the toilet as
they will cause damage.
Fig. #1 CROWN HEAD - Overall Dimensions
A. Momentary Operation Using Push-button
Switch (#PBS) - not included: Depress button
and hold. Water should appear in the bowl within
one to four seconds. Flush as necessary.
B. Timer-Controlled Operation Using Raritime
Module (#RTC - See instructions supplied) not included: Depress button and release. Water
should appear in the bowl within one to four
seconds. Unit will run for a preset time (0 to 30)
seconds.
14 3/8"(36.5)Household-style
13"(33cm)
Marine-size
20"(50.8cm) Household-style
17"(43.2cm) Marine-size
17 3/8"
(44.1cm)
Household-style
17"
(43.2cm)
Marine-size
6 1/4"
(15.9cm)
1/2" (1.3cm)
(approx.)
10 7/8" (27.6cm)
11 7/8" (30.2cm)
1
8 9/16"
(21.9cm)
13 7/8" (34.2cm)
2"
(5.1cm)
3. Make a periodic visual check for leaks at the base
RECOMMISSIONING
of the toilet and at hose connections.
1. Using the buckets, hoses and a gallon of clean
4. Check semiannually to ensure all wire terminals
water, flush the antifreeze out of the toilet. Dispose
and junctions are corrosion-free.
of antifreeze properly, in accordance with local
and federal regulations.
5. When boat is not in use, flushing the system with
fresh water will help minimize odors and reduce 2. Reconnect the hoses and open both seacocks.
mineral buildup.
3. Check all connections for leaks with several test
flushes.
WINTERIZING
SYSTEM COMPONENTS
WARNING: If connected to a Lectra/San or
Purasan treatment system there should not be
any antifreeze in the system when activating the
Lectra/San or Purasan. Injury to personnel or
damage to property could result if the Lectra/San
or Purasan is activated with antifreeze in the
system.
Before starting installation please be sure that all
parts that were ordered with your model have
been included: The complete Crown Head unit
includes: bowl, seat and cover, motor assembly,
shroud assembly, siphon and check valve assembly,
Concentrate tank, 2 oz. (59ml) of Concentrate, two
mounting strips and an owner’s manual.
Improper winter lay up is a major cause of marine
toilet failures.
Crown Head units purchased for use with 120/240
volt AC power will also include a rectified
1. Close the intake and discharge seacock. transformer unit (#RTCH24D), with instructions.
Disconnect and drain the intake and discharge
hoses. Winterize seacocks and hoses.
INSTALLATION
2. You will need two buckets, three feet of 3/4" Read This Entire Section Before Beginning
(19mm) hose, three feet of 1 1/2" (38mm) hose Installation.
and a quart (.95 liter) of non-toxic antifreeze.
Below water line installations must include vented
NOTE: Use only non-toxic antifreeze in this unit. loops. The top of the loop must be above the
3. Pour about one quart (.95 liter) of non-toxic waterline at maximum heel to prevent siphoning.
antifreeze into one of the buckets. Place intake (See Fig. #3.)
hose in this bucket. Place empty bucket under Additional parts required: Stainless steel fasteners,
discharge hose. To ensure antifreeze has a single pole push button switch (#PBS) and a
circulation through the entire toilet, flush until continuous duty solenoid (#CDS*) relay or Raritime
antifreeze is discharged.
timer (#RTC*), 1 1/2” (38 mm) I.D. discharge hose
4. Antifreeze should remain in the toilet until (#SH) and a reinforced 3/4” (19mm) I.D. intake hose,
recommissioning. This will protect both intake hose clamps, wire, fuse or circuit breaker (see Crown
and discharge sides of the pump. Pouring Head Specification chart).
antifreeze into the bowl will only protect the Mounting the Crown Head: Be sure Crown Head
discharge side of the pump, allowing the intake is on solid deck construction in a dry location. Never
side to possibly freeze.
mount the Crown Head where it may be subject
NOTE: Holding tanks, seacocks and treatment to shower spray or other sources of external water.
systems need to be independently winterized, Place the supplied rubber mounting strips between
stored and recommissioned (see manufacturer’s the base plate of the Crown Head and the deck,
allowing air to circulate under the motor to prevent
instructions).
moisture from accumulating. Use stainless steel
fasteners with a minimum size of 1/4” (6 mm). Allow
sufficient space at the side and rear to connect hoses.
2
* Specify Voltage
Connect a 3/4” (19 mm) I.D. reinforced suction
hose between the seacock and intake pump.
Crown Head with LECTRA/SAN® MC,
Holding Tank and "Y" Valve
NOTE: An intake In-Line strainer (#163000) is
recommended to help avoid the accumulation of
debris in the intake pump.
To
Deck
Pumpout
Crown Head
“Y” Valve
Intake
Thru-Hull
and Seacock
2. Discharge Lines: Connect quality sanitation rated
1 1/2” (38 mm) I.D. hose (#SH) to the discharge
fitting on the toilet and connect to the treatment
system, holding tank, or discharge thru-hull
fitting, as appropriate.
Holding Tank
Lectra/San EC
Treatment Unit
Discharge
Thru-Hull
and Seacock
TIP: To retain water in the bowl install a vented
loop in the discharge line.
Drawing Not to Scale
Fig. #2 Above Waterline Installation Shown
NOTE: Discharge of raw untreated sewage is
restricted in all U. S. waters inside the three-mile
limit. “Y” Valves, if installed, must direct toilet
discharge to a USCG approved treatment system
or holding tank and must be secured in that
position while inside the three-mile limit.
Crown Head with Lectra/San® MC
and Vented Loops
Vented
Loop
Vented Loop
Crown Head
WIRING
Intake
Thru-Hull and
Seacock
Lectra/San EC
Treatment Unit
Discharge
Thru-Hull
And Seacock
WARNING: RISK OF FIRE - The Crown Head
must be wired to a separately fused circuit with
no other electrical appliances on the circuit.
Drawing Not to Scale
Fig. #3 At or Below Waterline Installation Shown
1. Measure wire distance from power source to
toilet and back, refer to Specification Table for
proper wire gauge and circuit breaker/fuse sizes.
If space is limited, the bowl can be rotated 90 degrees
(a longer hose [#CH42] is required, contact Raritan
Technical Support).
12, 24 and 32 VDC Crown Head Units: Wire as
per Fig. #4. (For momentary push button switch
operation.)
PLUMBING
WARNING: If the toilet is mounted at or below
the waterline, install a vented loop in the discharge
line and between the pump and back of the bowl.
The top of the loop (see loop manufacture
specifications) should be at least 4” (10 cm) above
the waterline when the boat is at the greatest angle
of heel (see Fig. #3).
Pushbutton
Switch
(PBS)
#14 Awg
Wire
3 Amp Fuse or
Circuit Breaker
Main Fuse or
Circuit Breaker
(See Specification Chart)
Pos Voltage from
Battery or DC Power
Panel
Whenever possible hose connections should be
secured using two all-stainless steel hose clamps.
Integrity of clamps, hoses and fittings should be
checked periodically. Fittings and 90 degree bends
should be kept to a minimum to maintain proper
performance.
Solenoid Relay
(CDS)
Battery
Lug
+ (Pos)
Crown Head
1. Intake Lines: A 3/4” (19mm) thru-hull fitting
and seacock located in an accessible area is
required to supply flush water to the bowl.
- (Neg)
Ground
3
Fig. #4 Wiring the Crown Head (DC Unit
with Momentary Pushbutton Switch
2. Using a protected circuit that is appropriate for
the voltage of the unit, connect the positive lead
from the battery or power source to the “BAT”
lug on the relay and connect a lead from the other
relay lug to the positive terminal on the Crown
Head motor.
Crown Head Exchange Units
Crown Head Exchange Units are remanufactured
units available as a service to the customer. The old
pump and motor assembly (LBA) are taken in trade
on a remanufactured unit; the bowl, seat, lower cover
and discharge fittings are kept and reused. When
3. Connect ground wire from the battery or power ordering directly from Raritan, a core charge is
source to the negative terminal on the motor.
assessed until the old unit is received by Raritan.
For VAC 120/240 Crown Head Units: See Subject to parts and production availability, exchange
instructions with transformer units.
units are not always available for shipment.
Exchange units include the LBA along with a
SYSTEM START-UP
package of fasteners, new joker valve, mounting
1. Be sure intake and discharge seacocks are open. strips and a bowl gasket to remount the bowl to the
2. Remove the cap from the Concentrate reservoir LBA.
and pour in 2 oz. (59ml) of Concentrate; fill the NOTE: Pre-11/87 Standard LBA’s utilized a
remainder of the reservoir with fresh water and flapper valve on the discharge. If replacing this
replace the cap and siphon assembly.
model, please mention it when ordering; a special
3. Refer to Operation on page 1. If the toilet does discharge fitting will have to be added to the order.
not flush properly, or if water does not enter the Breaker and wire sizes will have to be increased bowl within 10 seconds, refer to the see Specifications below.
Troubleshooting Section. Running the unit dry
will damage the intake pump.
CROWN HEAD SPECIFICATIONS
A.
Nominal Voltage of Unit (Volts D.C.):
For 120/240 VAC units utilizing the rectified
transformer, refer to 24 Volt D. C. Specifications
12
24
32
B.
Amperage Draw @ Nominal Voltage
36
20
15
C.
Circuit Breaker /Fuse Requirement (Amps):
50
30
20
D.
Wire Gauge Sizes (AWG) Circuit Length,
Battery to Crown Head and Back:
0-15 Ft.
#6
#10
#10
16-25 Ft.
#4
#10
#10
26-50 Ft.
#2
#8
#10
Over 50 Ft. Refer to ABYC (E-9) Recommendations
E.
Switch Wire Size:
Switch Wire Fuse Size (Amps):
F.
Maximum Height of Discharge Vented Loop:
4 Ft. From Base of Toilet
H.
Maximum Suction of Inlet Pump
(Allowable Height of Toilet Above Waterline):
3 Ft. From Base of Toilet
I.
0-50 Ft.
#14
3
Duty Cycle:
#14
3
#14
3
30 Seconds On; 120 Seconds Off
ONBOARD FRESHWATER USE: If you would like to retrofit your current Crown Head for use with
pressurized freshwater please contact Raritan Technical Support.
4
TROUBLESHOOTING
WARNING: HAZARD OF ELECTRIC SHOCK - Before beginning any work on the Crown Head, be sure that all
power to the unit has been turned off and that the seacocks are in the CLOSED or OFF position.
NOTE:
The following information reflects the most probable causes and solutions to problems although not
every possible cause and solution is provided.
Any questions regarding servicing or operation of the Crown Head should be directed to our Technical Support Department
in Millville, NJ or Ft. Lauderdale, FL. Please have model and serial number available before calling.
PROBLEM
POSSIBLE CAUSE
SOLUTION
1. Poor pumpout, especially solids. 1A.Clogged discharge line.
1B.Plumbing restrictions, bends and ells
1C.Clogged vents.
1D.Mineral buildup in hoses and fittings.
1E. Low voltage.
1A.Be sure discharge seacock is open.
1B.Replumb to eliminate bends and ells.
1C.Clean holding tank vent and vented loop vents
1D.Clean or replace affected parts. Replace hose if needed.
1E. Check voltage at toilet while toilet is running. If less
than nominal voltage of toilet (12, 24, or 32), check condition of batteries and wire sizes. Check terminals and
wire connections for corrosion (heat at terminals and junctions indicates a bad or corroded connection).
1F. Discharge pump (#CH120) wall not 1F.Reposition pump wall behind macerating teeth cast in
intact.
housing cavity. Replace if necessary.
2. Poor water flow, especially
2A.Toilet not level.
2A.Raise rear of toilet; check with level.
at front of bowl (or no water
2B.Restriction in intake line.
2B.Be sure seacock is open. Clear line-remove clog.
flow).
2C.Check ball (#CH12) stuck.
2C.Remove intake hose - poke eraser end of pencil into intake nozzle of pump to free check ball.
2D.Pump sucking air.
2D.Check all connections from intake thru-hull to intake pump
to be sure no air leaks are present.
2E. Low voltage.
2E. See 1E, above.
2F. Intake pump impeller worn or broken 2F. Replace impeller.
loose from center bushing.
2G.Clogged strainer.
2G.Clean debris from strainer.
3.Foul odors from toilet area.
3A.“Marine life” lodged in rim of bowl. 3A.Remove and flush bowl with pressure hose to remove all
material. Install strainer in intake line to avoid recurrence.
Fill reservoir with Raritan concentrate and use regularly.
3B.Permeated discharge hose
3B.Replace hose with Raritan sanitation hose (#SH).
3C.Sewage remaining in discharge line. 3C.Flush toilet longer; replace hose if permeated; reroute hose
making a shorter run if possible.
3D.Concentrate reservoir empty.
3D.Refill with 2 oz. (59ml) Raritan Concentrate (#CON22)
and water.
4. Bowl fills while underway
4. Pressure buildup at seacocks.
4. Close intake, then discharge seacock to determine which
is causing problem. If intake, replace check ball and
spring. If discharge, be sure the vent or vented loop is
clean. If intake, there is too much pressure on seacock;
contact Raritan Technical Support.
5. Concentrate tank does not
5A.Check valve malfunctioning.
5A.Remove and rinse check valve in warm water and reinempty (or overflows).
stall. Should problem continue, replace check valve. See
page 7.
5B.Insufficient water flow from pump
5B.Check waterflow and correct as needed.
6. Water leaking from under unit. 6A.Leaking bowl gasket.
6A.Tighten (4) bowl mounting nuts (#1226B).
(CH15DD).
6B.Leaking front cover.
6B.Remov front cover (#CH18) and inspect “O”ring(#CH25)
for damage. Replace “O” ring if necessary using Super
Lube (#SL) to reassemble.
6C.Leak at shaft seal.
6C.Check #CH59 seal and motor shaft.
7. Loud noises from unit.
7A.Object jammed in macerator.
7A.Remove front cover and remove object.
7B.Motor bearings damaged by
7B.Return motor to factory for servicing or replacement.
seal leak or other water source.
8. Erratic operation/sluggish
8A.Worn motor brushes.
8A.Return motor to factory for servicing or replacement.
running.
8B.Motor bearings damaged by seal leak 8B.Return motor to factory for servicing or replace macerator seal. If bearings are bad, exchange lower base.
8C.Low or inconsistent voltage
8C.See 1E above.
5
CROWN HEAD PARTS LIST
(Quantities are one unless otherwise indicated)
Before ordering, locate required part on exploded parts view to be sure you are ordering the correct part for your CROWN HEAD.
Part No.
1118
1203B1
1222AW
1222B
1222BW
1226B
1341
31-102
C253
CH102MW
CH119MW
CH12
CH120
CH121
CH136
CH15DD
CH18W
CH2
CH25
CH26
CH27
CH291
CH291ALM
CH29A
CH29B
CH29A1W
CH336W
CH34
CH37
CH37E
CH38
CH42
CH43P
CH5VW
CH50CW
CH51
CH52
CH53
CH55A
CH57
CH58
CH59
CH6
CH7
CH8
CH90
CH92
CHM*
Description
Lockwasher (4)
“O” Ring
Discharge Ell and Flange
Straight Discharge
Straight Discharge Assembly (Incl. 1222B,
CH90, CH92, [2]1115, C253, [4]CH27)
Bowl Mounting Nut (4)
Discharge Screw (2)
Motor Shaft Seal
Joker Valve
Intake Pump Assembly, complete
Discharge Impeller Assy. (Incl. CH119M,
[2]F149VT)
Check Ball
Discharge Pump Wall
Macerator
Siphon Cap for Shroud Bottle
End Bell
Front Cover (w/”O” ring)
Pump Body (w/shaft seal)
Front Cover “O” Ring
Front Cover Screw (6)
Mounting Screw (4)
Shroud (2 pcs.)
Shroud, Bone (2 pcs.)
Shroud Bottle (Concentrate Reservoir)
Shroud Screw (2)
Shroud Assembly, Complete w/bottle, cap
and siphon
Siphon Assembly, Complete (Incl. CH136,
CH37, CH37E)
Woodruff Key
Siphon Tubing
Siphon Check Valve
Bowl Stud (4)
Hose
Hose Clamp (2)
Pump Plug, Vented(Incl. 1203B1 O Ring)
Bowl Elbow w/Siphon Intake
Base Screw (4)
Rubber Mounting Strip (2) not shown
Pump Mounting Screw (4)
Base Plate
Slinger
End Bell Screw (4)
Seal with Stainless Steel Spring
Pump Cover Plate
Pump Gasket
Check Valve Spring
Discharge Adapter
Adapter Gasket
Motor
Part No.
F149VT
G13
G15
G13W
G2M
M23
M30
M31
RNI
VCAP
Description
Set Screw (2)
Pump Impeller
Impeller Washer (2)
Pump Impeller w/(2) G15
Impeller Wear Plate
Lockwasher (4)
Hex Nut, Brass (2)
Flat Washer, Brass (2)
Nylon Bowl Mounting Washer (4)
Vinyl Cap (bowl nut cover)
MISCELLANEOUS RELATED PARTS
Part No.
1234
1236AW
1237W
1238A
1244W
163000
1PCP22
CDS*
CHTT9
CON22
CSRK
CDPUMPRK
CDDISRK
CR1
PBS
RHT4
RTCH24D
SH
SL
VL 3/4
VL 1 1/2
YV
6 *Specify Voltage
Description
Bowl Gasket (fits all Raritan toilets)
Bowl Spud Assembly
Marine-size Bowl, Round Top Rim (white
only), incl. 1236AW
Seat and Cover for Marine-size Bowl (white
only)
Household-style Bowl, Oval Top Rim
available in white or bone - other designer
colors, contact factory), includes 1236AW
1245 Seat and Cover for Household-style
Bowl
In-Line Strainer
C.P., Cleans Potties, Bio-enzymatic, 22 oz.
Continuous Duty Solenoid Relay
Hose Clamp for 1 1/2” I.D. Hose
Raritan Concentrate 22 oz.
Repair Kit (Centrifugal DischargeSeries)
Includes: CH25, CH92, 1234, CH12, G13,
CH8, CH37E, RNI, CH120, C253, CH59,
31-102, CH7, G15, 1203B1and CH57
Crown Head CD Series & CHII Intake Pump
Repair Kit (built before 4/95)
Includes:1203B1, CH12, G13, G2M, 31-102,
CH7 and G15
Crown Head CD Series Discharge
Repair Kit; Includes: 1234, CH120, CH57,
CH92, C253, CH25 and CH59
Discharge Impeller and Macerator Assy. (incl.
CH120, CH121, F149VT[2], and
CH119MW)
Pushbutton Switch
Inline Check Valve for 1 1/2” I.D. Hose RTC*
Raritan Off-delay Timer
Rectified Transformer (for 120 or 240 VAC
input)
Sanitation Hose (sold by the foot)
Super-Lube 1/2 oz. tube
Vented Loop 3/4”
Vented Loop 1 1/2”
“Y” Valve for 1 1/2” I.D. Hose
7
C253
CH37E
CH136
CH37
CH29A
CH291 or Ch291ALM
A
LIMITED WARRANTY
1.
2.
3.
4.
5.
6.
Raritan Engineering Company warrants to the original purchaser that this product is free of defects
in materials or workmanship for a period of one year from the product’s date of purchase. Should
this product prove defective by reason of improper workmanship and/or materials within the
warranty period, Raritan shall, at its sole option, repair or replace the product.
TO OBTAIN WARRANTY SERVICE, Consumer must deliver the product prepaid, together with
a detailed description of the problem, to Raritan at 530 Orange St., Millville, N.J. 08332, or 3101 SW
2nd Ave. Ft. Lauderdale, FL 33315. When requesting warranty service, purchaser must present a
sales slip or other document which establishes proof of purchase. THE RETURN OF THE OWNER
REGISTRATION CARD IS NOT A CONDITION PRECEDENT OF WARRANTY COVERAGE.
However, please complete and return the owner Registration Card so that Raritan can contact you
should a question of safety arise which could affect you.
THIS WARRANTY DOES NOT COVER defects caused by modifications, alterations, repairs or
service of this product by anyone other than Raritan; defects in materials or workmanship supplied
by others in the process of installation of this product; defects caused by installation of this product
other than in accordance with the manufacturer’s recommended installation instructions or standard
industry procedures; physical abuse to, or misuse of, this product. This warranty also does not cover
damages to equipment caused by fire, flood, external water, excessive corrosion or Act of God.
ANY EXPRESS WARRANTY NOT PROVIDED HEREIN, AND ANY REMEDY FOR BREACH
OF CONTRACT WHICH BUT FOR THIS PROVISION MIGHT ARISE BY IMPLICATION OR
OPERATION OF LAW, IS HEREBY EXCLUDED AND DISCLAIMED. ALL IMPLIED
WARRANTIES SUCH AS THOSE OF MERCHANTABILITY AND OF FITNESS FOR A
PARTICULAR PURPOSE, IF APPLICABLE, AS WELL AS ANY IMPLIED WARRANTIES
WHICH MIGHT ARISE BY IMPLICATION OF LAW, ARE EXPRESSLY LIMITED TO A
TERM OF ONE YEAR. SOME STATES DO NOT ALLOW LIMITATIONS ON HOW LONG A
LIMITED WARRANTY LASTS, SO THE ABOVE LIMITATION MAY NOT APPLY TO YOU.
UNDER NO CIRCUMSTANCES SHALL RARITAN BE LIABLE TO PURCHASER OR ANY
OTHER PERSONS FOR ANY SPECIAL OR CONSEQUENTIAL DAMAGES, WHETHER
ARISING OUT OF BREACH OF WARRANTY, BREACH OF CONTRACT, OR OTHERWISE.
SOME STATES DO NOT ALLOW THE EXCLUSION OR LIMITATION OF INCIDENTAL OR
CONSEQUENTIAL DAMAGES, SO THE ABOVE LIMITATION OR EXCLUSION MAY NOT
APPLY TO YOU.
No other person or entity is authorized to make any express warranty, promise or affirmation of fact
or to assume any other liability on behalf of Raritan in connection with its products except as
specifically set forth in this warranty.
This warranty gives you specific legal rights, and you may also have other rights which vary from
state to state.
530 Orange Street, P.O. Box 1157, Millville, NJ 08332 USA
Telephone: 856-825-4900 FAX: 856-825-4409
www.raritaneng.com
Southern Office and Plant:
3101 SW Second Avenue, Fort Lauderdale, FL 33315 USA
Telephone: 954-525-0378
FAX: 954-764-4370
L91 1002wmr
Specifications Subject to Change Without Notice
Printed in U.S.A.
8