1
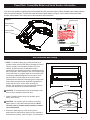
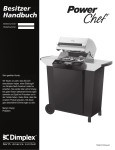
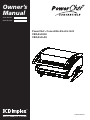
Owner’s
Manual
Serial Number:
Model Number:
PowerChef ® Convertible Electric Grill
CBQ-ELE-EU
CBQ-ELE-AU
7210040100rev01
PowerChef ® Convertible Features
Welcome and Thank You for purchasing a Dimplex
PowerChef ® Convertible Electric Grill.
The following introduction highlights the many features of the
PowerChef ® Convertible grill. Detailed operating instructions
are contained later on in this manual.
EvenSear ® Cooking System
Advanced Control System
The PowerChef ® Convertible provides precision cooking
control in your choice of either MANUAL or PROGRAM
modes.
Program Cooking
At the heart of your PowerChef ® Convertible grill is the
EvenSear ® Cooking System. The dual layer grill system
functions in two ways. The top grill sears your food, with
direct contact, and at the same time your food is cooked
gently and evenly by additional radiant heat from the lower
element. The EvenSear ® system ensures that all energy
supplied to the grill is directly used on cooking your food to
perfection. The EvenSear ® Cooking System applies energy
evenly and consistently throughout the entire grill area,
eliminating “hot spots” or “cool spots”.
The PowerChef ® Convertible advanced cooking technology
panel provide precision control for a wide choice of foods,
assuring they are cooked to perfection. The control panel
prompts you through easy steps to program the type of food
and how well you like it cooked. Once programmed, the
PowerChef ® Convertible grill prompts you when it is time to
start cooking, when it is time to turn your food over and when
it is done! Audible signals alert you to each step! If you miss
a signal, the PowerChef ® Convertible grill automatically
reduces the heat to a minimum heat setting to avoid
overcooking.
Portable and Convertible
Manual Cooking
The PowerChef ® Convertible features a locking lid design
that allows the lid bar to serve as the carrying handle should
you choose to move the grill or take it with you. In addition,
a range of optional accessories are available that allow the
standard tabletop unit to be used on a freestanding pedestal
or as a permanent wall-mount installation. Side shelves
are also available for either the pedestal or wall-mount
configurations.
No Combustion or Tanks
PowerChef ® Convertible grill utilizes your standard
household electric current and provides a safe source of heat
to cook your food. The PowerChef ® Convertible grill, with no
open flame or combustion, heats up quickly, and never needs
refueling! No gas or other fuel fumes will impart unwanted
tastes or odor to your food.
Easy to Clean
With its stainless steel upper grill, the EvenSear ® Cooking
System is easy to keep clean.
100% Usable Grill Surface
Because there are no variations in temperature or
performance, the EvenSear ® Cooking System provides
100% use of its grill area. The full 1394 cm² grill maintains a
consistent even temperature, even in the corners!
2
If pre-programmed cooking options don’t suit your taste, you
can of course prepare food your way using the manual mode.
Lid Down Cooking
To conserve energy and reduce cooking time, we
recommend that the PowerChef ® Convertible be used with
the lid down during cooking. A thermometer, featured in many
other grills, which reads only the air temperature inside the
cabinet, is unnecessary on the PowerChef ® Convertible.
The EvenSear ® Cooking System relies and utilizes direct
cooking rather than air temperature to cook your food.
Versatile
With no open flame, no combustion and no need to refuel
the PowerChef ® Convertible grill can be used safely in many
areas that other grills cannot.
Electrical Requirements
A Residual Current Device (RCD) outdoor outlet or a circuit
with a tripping current of 30 mA, 230 Volts is strongly
recommended. A dedicated circuit is preferred but not
essential in all cases. A dedicated circuit will be required if,
after installation, the circuit breaker trips or the fuse blows on
a regular basis when the electric grill is operating. Additional
appliances on the same circuit may exceed the current rating
of the circuit breaker.
Contents
Important Instructions...............................................................................Page 4
PowerChef ® Convertible Model and Serial Number Information..............Page 5
Site Selection and Installation...................................................................Page 5
Advanced Features of the PowerChef ® Convertible Control Panel..........Page 7
Operating Guide to Your PowerChef ® Convertible Control Panel.............Page 8
PowerChef ® Convertible Operation - Manual Mode.................................Page 9
PowerChef ® Convertible Operation - Program Mode...............................Page 10
Care and Cleaning....................................................................................Page 12
Warranty....................................................................................................Page 13
Guide to Your New PowerChef ® Convertible Electric Grill........................Page 7
Replacement Parts...................................................................................Page 13
The product complies with the following European Safety
Standards:
• EMC Directive 2004/108/EC
• Low voltage Directive 2006/95/EC
• Food Contact 1935/2004/EEC
• Energy Using Directive 2005/32/EEC with
implementing measure 1275/2008/EC
Recycling:
For electrical products sold in the European Community.
At the end of the electrical product’s useful life it
should not be disposed of with household waste.
Please recycle where facilities exist. Check with
your Local Authority or retailer for recycling advice
in your country.
3
IMPORTANT INSTRUCTIONS
Please Save This User’s Manual For Future Reference
! NOTE: Procedures and techniques that are considered
important enough to emphasize.
CAUTION: Procedures and techniques which, if not
carefully followed, will result in damage to the equipment.
WARNING: Procedures and techniques which, if not
carefully followed, will expose the user to the risk of fire,
serious injury, illness or death.
WARNING: Read all instructions and warning labels
prior to use. Failure to follow these safeguards may
result in serious personal injury or property loss. This
appliance is intended for outdoor household, noncommercial use only.
1. Warning: Do not use charcoal, or any other
combustible material in an electric grill.
2. Never touch hot surfaces, use handles or knobs. The
temperature of accessible metal surfaces may be high
when the appliance is operating. Use cooking tongs,
gloves, or cooking mitts at all times since the grill will
become very hot. Open hood carefully when cooking to
avoid burns from the hot air and steam trapped inside.
3. Wear clothing that does not have hanging shirt tails, frills,
or apron strings.
4. Use long-handle barbeque utensils to avoid personal injury caused by burns and splatters.
5. To protect against electric shock, never immerse cord, plugs or electric heating element in water or any other liquid.
6. Never leave the electric grill on when you are not
cooking.
7. Never operate any appliance with damaged electrical components or after the appliance has malfunctioned. Regularly inspect supply cord and connections. If cord,
element or control is damaged or worn, it must be
replaced by an authorized service facility as special
tools are required. Do not attempt to repair the appliance
yourself. Contact your authorized service agent for
installation of electrical replacement kit.
8. The use of non Dimplex accessory attachments is not
recommended and may cause damage to the unit or
injury.
9. Never let cord touch hot surfaces.
10.To avoid personal injury, lock and close hood before
moving.
11. Never move a hot grill or leave it unattended.
12.Never move an electric grill unless it is unplugged.
13.Never use an electric grill in the rain, sleet or snow.
14.Never use an electric grill near combustible or
flammable materials.
15.Turn the power off on the electric grill before
unplugging.
16. The use of longer detachable power supply cords or
extension cords is not recommended. Extension cords
may overheat and cause a risk of fire. If you must use an
extension cord, it must be intended for outdoor use and
have a rating of no less than 10 Amps and have 3
cores.
17.Store the electric grill out of reach of children.
18.Never allow other persons to be near the electric grill
while in use.
19.Do not use the electric grill or its accessories for anything
other than the intended use.
20.Always check that food is fully cooked before
consumption.
21.Do not attempt to remove the cooking grid from the unit.
22.This appliance is not intended for use by persons
(including children) with reduced physical, sensory or
mental capabilities or lack of experience and knowledge,
unless they have been given supervision concerning use
of the appliance by a person responsible for their safety.
Children should be supervised to ensure that they do not
play with the appliance.
23.This appliance is not to be operated by means of an
external timer or separated remote control device.
24.Turn off the grill and wait until it is cool to the touch (approximately 30 minutes) before moving, covering
or storing. Unplug the electric grill from outlet when not in
use or before cleaning. Allow grill to cool before cleaning
or adding or removing parts. Do not clean this product
with high pressure hoses.
25.Store products indoors when not in use - out of the reach
of children.
26.Do not clean this product with a water spray or the like.
27. When using your electric grill as a portable appliance
keep a minimum clearance on all sides of at least
200 mm.
SAVE THESE INSTRUCTIONS
4
PowerChef ® Convertible Model and Serial Number Information
If you have any questions regarding this product please have the model and serial numbers available upon calling customer
service or technical support. To locate the model and serial number labels see Figure 1 and 2 below. Record the model
number, serial number, on the front cover of this manual for future reference.
Figure 1
Figure 2
Model Number
Serial Number
Label
Model Number
Label
Serial Number
Site Selection and Setup
! NOTE: A suitable outdoor plug socket protected by a residual current device (RCD) having a tripping current of
30mA is strongly recommended. Connect only to an
earthed plug socket outlet. A dedicated circuit is
preferred but not essential in all cases. A dedicated circuit
will be required if, after installation, the circuit breaker trips
or the fuse blows on a regular basis when the electric grill
is operating. Additional appliances on the same circuit
may exceed the current rating of the circuit breaker.
Construction and electrical outlet wiring must comply with
local building codes and other applicable regulations to
reduce the risk of fire, electric shock and injury to
persons. Do not attempt to wire your own new outlets or
circuits, and always use a licensed electrician.
CAUTION: To avoid personal injury and damage to unit, never move or transport with the lid open.
Figure 3
554 mm
1. Select a suitable location away from puddles, pools,
ponds, and hot tubs.
294 mm
CAUTION: Do not place grill on surfaces covered by
paper, plastic or vinyl table cloths and the like. Wood,
concrete, steel, or outdoor plastic furniture surfaces
are recommended.
2. Ensure the sides and rear of the electric grill are
positioned more than 200 mm away from any material or
surface before cooking. Refer to Figure 3 for dimensions
513 mm
5
PowerChef ® Convertible Site Selection And Setup
Figure 4
Figure 5
i)
Knob
ii)
Legs Fully Extended
of the electric grill.
3. Ensure that there are no flammable or other volatile materials in the direct area before grilling.
4. For ease of electrical hook up you may wish to locate the
electric grill near an existing outlet (refer to NOTE above).
5. Stand the electric grill on its back.
6. Loosen but do not remove the two (2) knobs on either
side of the grill (Figure 4).
7. Pull out both support legs until the first stop tab is reached
(Figure 4-i). Tilt the support legs outward as shown in
Figure 4-ii to clear the stop tab and fully extend both
support legs as indicated in Figure 5.
8. Move the support legs inward so that they are flush
against the chassis and re-tighten the knobs to secure
support legs in place (Figure 5).
CAUTION: To maximize air flow under the grill and to
prevent unnecessary wear to grill components, ensure
support legs are fully extended before use.
9. Place grill on its feet and unwind the attached power cord
from underneath the front edge. Route power cord to a
power source (see NOTE above).
WARNING: Ensure the power cord is not pinched or
against a sharp edge. Ensure that the power cord is
stored or secured to avoid tripping or snagging to reduce
the risk of fire, electric shock or injury to persons.
Never route power cord underneath the electric grill.
Always route power cord directly out the side or front.
10.Unlock top lid by pressing each of the two (2) lid locks
6
Figure 6
Locked
Locking
Switch
Unlocked
inward, and sliding them towards the front, inside corners
of the lid (Figure 6). To lock the lid in place for storage or
transporting, close the lid, press the locks inward and
slide them towards the rear of the grill lid.
! NOTE: Once grill rests on fully extended legs, it will be
possible to slightly rock the grill forward and back. This is
normal and is due to the clearances required for moving
parts within.
Guide to Your New PowerChef ® Convertible Electric Grill
Lift to Open Lid
Knob
Lid Locks
EvenSear ® Cooking
System
Retractable
Legs
Touch Pad
Electronic Control
Panel
Main On/Off
Switch
Cord Wrap
Brackets
Advanced Features of the PowerChef ® Convertible Control Panel
Automatic Power Saver
Voltage Compensation
This feature activates immediately after a pre-programmed
selection is finished cooking and Cooking Complete Indicator
is shown on the display. The cooking system power will
reduce to low heat.
The electric grill automatically adjusts the cook times based
on any variance to input voltage. This insures food is grilled
to the desired wellness.
Safety Alert
This feature is useful in that it prevents accidental changes
to your cooking program by locking the control panel when
in use. When this feature is used all control panel functions
are disabled. To activate the key lock press the numbers
in sequence 1,2,3, LOC will appear on the display screen.
To deactivate the key lock press the numbers in sequence
1,2,3 and ULOC will appear on the display screen. Refer to
Control Panel Operating Guide.
This feature activates if the unit has been accidentally left on
after cooking. Four (4) hours after the last button has been
touched on the control panel an alarm will sound every few
seconds until responded to.
Sleep Mode
When using the program mode and the Select
button
is not pressed after an interval of cooking the power will
automatically reduce to the minimum one bar level after a
short period of time to prevent the food from burning.
Overcook Protection
After each stage of cooking during the program mode, an
alarm sounds indicating attention is required. If the Select
button is not pressed after the alarm sounds, the grill
temperature automatically reduces to a low setting after a
short period of time to prevent over cooking.
Key Lock
Preheat
Your PowerChef ® Convertible grill has an automatic eight (8)
minute Preheat function once you’ve finalized your method of
cooking. To skip the Preheat function press the Back button
after the program has started. A full preheat is recommended
when the grill is cold but may not be required if your grill is
still heated from previous use.
7
Operating Guide to Your PowerChef ® Convertible Control Panel
Power Level
3
5
2
1
6
1 Select
Use to confirm the selections, displayed.
5
2 Display
Displays selection and status of operation.
3 Cancel
Push twice to cancel current operation and return to low
heat and start up display.
4 Key Pad
Use the keypad to set cook timer when in manual
operation.
7
6
4
Power Level
Press up/down arrows to select desired power level. Use the power level up/down when in manual mode only.
6 Right/Left Arrows
Use to navigate display selections.
7 Back
Returns display to previous selection step and skips
preheat function with a single touch.
Program Mode
Indicator
Manual Mode
Indicator
Total Time
Counter
(Hrs : Mins)
Food Type Icons
Food Option Icons
Interval Time
Counter
(Mins : Secs)
Wellness Icons
Thickness Options
Preheat
Indicator
Legend
Beef
Steak
8
Pork
Ribs
Chicken
Fish
Turn Food
Indicator
Place Food
Indicator
Vegetables
Hot Dogs
Pieces
Sausages
Fish Steak
Hamburgers
Rare
Medium Rare
Cooking Complete
Indicator
Medium
Well Done
PowerChef ® Convertible Operation - Manual Mode
Operation
Display Reads
Action
PROGRAM is lit, MANUAL is flashing.
Grill goes to low heat setting and
display reads initial start-up.
To Use the Manual Feature
Turn the Main On/Off Switch to
the “ I “ position to turn grill on.
WARNING: Grill is always on and heated when Main On/Off Switch is in the On (“ I “) position. Heat will remain at low
setting until: a cooking action is selected; the switch is turned to the Off (“ O “) position; or the grill is unplugged.
MANUAL remains lit, PROGRAM
disappears, Power Level goes to full
power, and the Preheat icon luminates.
Total Time Counter and Interval Time
Counter displays an eight (8) minute
preheat count down sequence.
Grill emits an alarm every few
seconds.
Total Time Counter and Interval Time
Counter displays 00:00, Preheat icon
disappears, Place Food icon flashes.
Grill is ready for cooking. Place food.
Close hood and touch Select
button.
MANUAL remains illuminated, rest of
display is blank.
Cooking is underway.
Touch the up or down Power
Level buttons.
The Power Level defaults and remains
at 100%. The display and grill will rise or
lower as Power Level buttons are pressed.
Use the up and down Power Level
buttons to adjust the grill’s power as
desired.
Touch the Select
button.
Optional: Use the Total Time and Interval Time Counters as an alarm and to reduce grill to low heat when complete.
Total Time Counter will populate with
Touch Key Pad number buttons
numbers entered from Key Pad.
to enter desired time in hours
and minutes. Example: Press “5”
once for five minutes or “1, 3, 0”
for one hour, 30 minutes.
Enter the amount of time desired
before being alerted by grill.
The Total Time Counter begins to count
down time entered from key pad in
HRS:MINS, the Interval Time Counter
counts down in :SECS.
Timer is now activated.
Grill emits three (3) alarms.
Power Level drops to low heat, counters
go blank, Cooking Complete icon flashes.
Time has ended, grill turns to low heat
and emits an alarm every few seconds
until answered.
Touch the Cancel
button.
Total Time Counter flashes CANC.
Grill is waiting for confirmation to end
program.
Touch the Cancel
second time.
button a
Display returns to the start-up screen.
Grill is in low heat mode and display is
ready for a new program.
Screen is blank.
Grill is off.
Screen is blank.
Grill is off.
Touch the Select
button.
Turn Main On/Off Switch to the
“ O “ position.
To turn grill off:
Turn Main On/Off Switch to the
“ O “ position.
WARNING: Grill is always on and heated when Main On/Off Switch is in the On (“ I “) position. Heat will remain at low
setting until: a cooking action is selected; the switch is turned to the Off (“ O “) position; or the grill is unplugged.
9
PowerChef ® Convertible Operation - Manual Mode
Back Button
The Preheat stage can be skipped at any time by pressing
the Back
button once.
If a time was entered as a count down to an alarm and auto
heat reduction as described above, it can be skipped by
pressing the Back
button twice. Pressing once will
display and flash CANC in the Total Time Counter area, a
second pressing within four (4) seconds will cancel the timer
only. After being cancelled, the grill will blank out all time on
the counters but will remain cooking at the current power
level until manually turned off.
Pause
Pressing the Pause
button at any time during a timed
stage or cooking mode will reduce the heat to low and will
pause and flash the timer until the Pause button is pressed
again.
PowerChef ® Convertible Operation - Program Mode
Operation
Display Reads
Action
PROGRAM is lit, MANUAL is flashing.
Grill goes to low heat setting and
display reads initial start-up.
To Use the Program Feature
Turn the Main On/Off Switch to the
“ I “ position to turn grill on.
WARNING: Grill is always on and heated when Main On/Off Switch is in the On (“ I “) position. Heat will remain at low
setting until: a cooking action is selected; the switch is turned to the Off (“ O “) position; or the grill is unplugged.
Touch either of the arrow buttons
once.
MANUAL is lit, PROGRAM is flashing.
Touch the Select
PROGRAM remains lit, MANUAL
Program mode has been entered
disappears, All Food Type icons appear with and is waiting for further food
the Beef icon flashing.
selections.
button.
Switching to Program mode.
Touch either of the arrow buttons
repeatedly.
As arrow buttons are pressed, display will
cycle through and flash Food Type icons.
Use arrow buttons until desired Food
Type icon flashes.
Touch the Select
Food Type icon chosen remains lit, other
options may appear.
Food Type program is selected.
button.
Depending on the Food Type chosen, you may be prompted to highlight and select a secondary Food Option description
(e.g. Steak, Hamburgers, or Pieces). Use the arrow buttons and the Select
button to highlight and select.
Depending on the Food Type chosen, you may be prompted to select how you want your food prepared (e.g. Rare, Medium
Rare, Medium or Well Done). Use the arrow buttons and the Select
button to highlight and select.
Depending on your food choice, you may be prompted to select the thickness of the food to be cooked (10 to 50 mm). Use
the arrow buttons and the Select
button to highlight and select.
All options are entered, close
hood.
Options selected remain lit, Preheat
Indicator illuminates, TOTAL TIME counts
down total time for program required to
cook food, and INTERVAL TIME reads and
counts down an eight minute preheat stage.
Grill is preheating.
Power Level goes to full.
Alarm sounds.
10
Grill is preheated and ready to cook.
Preheat Indicator disappears, Place Food
Indicator illuminates and flashes, INTERVAL Place food on grill and close hood.
TIME ends, and TOTAL TIME stops.
PowerChef ® Convertible Operation - Program Mode
Food is placed and hood is closed.
Touch the Select
button.
Place Food Indicator disappears,
INTERVAL TIME reads time to end of next
stage and TOTAL TIME continues to count
down.
Cooking is underway.
Power Level goes to set program level.
Alarm sounds.
INTERVAL TIME ends, TOTAL TIME stops
and Turn Food Indicator flashes.
Grill is indicating it is time to turn
food over. Open hood, turn food and
close hood again.
Food is turned and hood is closed.
Touch the Select
button.
Turn Food Indicator disappears, INTERVAL
TIME ends and TOTAL TIME continues to
count down.
Cooking of reverse side of food is
underway.
Alarm sounds.
Both TOTAL TIME and INTERVAL TIME
ends. Cooking Complete Indicator flashes.
Food cooking program has
completed. Food is ready.
Power Level reduces to low heat.
Touch the Cancel
button.
TOTAL TIME displays CANC.
Display is waiting for confirmation to
end program.
Touch the Cancel
second time.
button a
Display returns to the start-up screen.
Grill and display are ready for the
next program.
Screen is blank.
Grill is off.
Turn Main On/Off Switch to the
“ O “ position.
WARNING: Grill is always on and heated when Main On/Off Switch is in the On (“ I “) position. Heat will remain at low
setting until: a cooking action is selected; the switch is turned to the Off (“ O “) position; or the grill is unplugge.
! NOTE: All program cooking times assume food is thawed
before cooking (except hamburger patties).
Back Button
The Preheat stage can be skipped at any time by pressing
the Back
button once.
Pause
Pressing the Pause
button at any time during a timed
stage or cooking mode will reduce the heat to low and will
pause and flash the timer until the Pause button is pressed
again.
Cancelling a Program
Any program can be cancelled by pressing the Cancel
button twice. Pressing once will display CANC in the
Total Time Counter area, a second pressing within four
(4) seconds will have the grill cancel the program entirely,
reduce to low heat setting, and the display return to the startup selection screen.
11
PowerChef ® Convertible Care and Cleaning
WARNING: Unplug the electric grill from outlet when not
in use or before cleaning. Do not clean this product with
high pressure water spray.
Allow electric grill to cool before covering. Cover the
electric grill when not in use.
Figure
Figure 77
Drip Tray
Control Panel Glass
To clean the control panel glass use a non abrasive glass
cleaner or damp, soft cloth or sponge with a mild detergent.
Follow with a clean damp cloth to remove any remaining
detergent residue.
Drip Tray
CAUTION: Allow the grill to cool before attempting to
clean the Drip Tray. Never use the electric grill without
the Drip Tray and Tray Liner in place.
Drip Tray
Release Tab
The Drip Tray is located under the cooking grid. We
recommend the Drip Tray be lined with aluminum foil or use
a non-stick cooking spray to make clean-up easier.
! NOTE: Although possible to clean the Drip Tray while the
Convertible Grill is sitting on it’s support legs, the following
procedure is recommended for ease of access.
To clean Drip Tray:
1. Lock the grill’s lid closed. (Refer to page 3 for instructions)
2. Stand the Convertible Electric Grill onto it’s back.
3. Keeping one hand to support the Drip Tray, use your other hand to pull the release tab as shown in Figure 7.
4. Use a paper towel or cloth to soak up any excess liquid.
Then, use a clean damp, soft cloth or sponge with a mild
detergent to clean any remaining debris. Follow with a
clean damp cloth or paper towel to removed any remaining detergent residue.
5. Relocate the Drip Tray into position by following steps 1
through 3 in reverse order.
Cooking Grid
To keep your electric grill operating at optimal performance
Dimplex recommends that you clean the cooking grid after
each use.
The cooking grid is permanently mounted into the body of the
electric grill and cannot be removed.
Do Not Attempt To Remove The Cooking Grill.
For best results when cleaning:
1. Clean grill after every use.
2. While grill is still warm, use a stiff wire brush and clear grill of all food particles. A scraper can be used to remove difficult particles.
WARNING: Never strike cooking grid to remove
residue.
12
3. After grill has cooled, follow up brushing and/or scraping
by wiping cooking surface with a damp, soft cloth or
sponge with a detergent or grill cleaner. Follow with a
clean damp cloth to remove any remaining detergent
residue.
4. To clean under the cooking grid, access from underneath
by lowering the Drip Tray as described in steps 1 through 3 under the Drip Tray cleaning section.
Surface Cleaning
To clean any metallic surface, Dimplex recommends using
a damp, soft cloth or sponge with a mild detergent. Follow
with a clean damp cloth to remove any remaining detergent
residue.
Do not use abrasive or strong cleaners or cleaning pads on
any surface of the electric grill. Doing so may diminish your
grill’s surface sheen.
Storage
For seasonal storage, cover and store in a dry location away
from the elements.
Warranty
1. Warranty Card
2. Guarantee
Period (in Years)
5. Stamp & Signature of retailer
6. Fault/Defect
7. Contact Number & Address
DE
3. Model(s)
4. Date of Purchase
LT
FR
NZ
Glen Dimplex France
UAB “Senuku prekybos centras”
ZI Petite Montagne Sud
Pramones pr. 6,
12 rue des Cévennes
38 Harris Road
Kundenservice
LT-51500,
Service-Hotline: 01805 / 398 346
(0,14 €/Min. aus dem deutschen
Festnetz; Mobilfunkpreise können
abweichen)
91017 EVRY - LISSES
Kaunas
East Tamaki
www.glendimplex-france.fr
Tel. : (8~800) 111 19
Glen Dimplex Deutschland Gmbh
Service-Fax: 01805 / 355 467
E-Mail: [email protected]
e-08010 BARCELONA
(+34) 93.238.61.59
Fax.
Millbrook House
(+34) 932384375
+64 9 274 8265
Fax. +64 9 274 8472
AU
[email protected]
Glen Dimplex Australia PTY Ltd
AT
Unit 2, 205 Abbotts Road
Dandenong
Firma Schurz
Melbourne
Merangasse 17
Victoria 3175
Grange Drive
Southampton
CH-5524 Niederwil
01489 773053
[email protected]
Fax.
Fax. +61 3 87873570
Im Emmet 8
0845 600 5111
+43 (316) 32 30 41
+61 3 87873567
Vamel AG
Hampshire. SO30 2DF
A-8010 Graz
Australia
CH
Hedge End
Fax.
New Zealand
ES
C/ Bailén, 20, 4º,2ª
Glen Dimplex UK Limited
Auckland
Tel. : (8~37) 21 21 46
Glen Dimplex España S.L.
UK
Glen Dimplex Australasia
+43 (316) 38 29 63
[email protected]
[email protected]
+41 (0) 56 619-70 90
Fax.
+41 (0) 56 619-70 99
[email protected]
UK / AU / NZ
1. Warranty Card
2. Guarantee Period (in Years)
3. Model(s)
4. Date of Purchase
5. Stamp & Signature of retailer
6. Fault/Defect
7. Contact Number & Address
DE
1.
2.
3.
4.
5.
6.
7.
Garantiekarte
Garantiezeitraum (in Jahre)
Modell(e)
Kaufdatum
Stempel & Unterschrift des
Einzelhändlers
Fehler/Defekt
Kontakt-Tel.-Nr. & - Anschrift
FR
1.
2.
3.
4.
5.
6.
7.
Bon de garantie
Période de garantie
(en années)
Modèle(s)
Date d’achat
Cachet et signature du
vendeur
Anomalie/Défaut
Nom et adresse du contact
IT
1.
2.
3.
4.
5.
6.
7.
Scheda di garanzia
Periodo di garanzia
(in anni)
Modello(i)
Data di acquisto
Timbro e firma del
rivenditore
Guasto/difetto
Indirizzo e numero
di contatto
ES
1.
2.
3.
4.
5.
6.
7.
Tarjeta de garantía
Período de garantía
(en años)
Modelo(s)
Fecha de adquisición
Sello y firma del distribuidor
Avería/Defecto
Número y dirección
de contacto
PT
1.
2.
3.
4.
5.
6.
7.
Cartão de garantia
Período de garantia
(em anos)
Modelo(s)
Data de compra
Carimbo e assinatura
do vendedor
Falha/defeito
Números e endereços
de contacto
Replacement Parts
Hood Arms. . . . . . . . . . . . . . . . . . . . . . . . . .
Hood with locks . . . . . . . . . . . . . . . . . . . . . .
Control Panel. . . . . . . . . . . . . . . . . . . . . . . .
Grill Assembly. . . . . . . . . . . . . . . . . . . . . . . .
Knob . . . . . . . . . . . . . . . . . . . . . . . . . . . . . . .
© 2010 Dimplex North America Limited
CBQ-HA-KIT
CBQ-HOOD-KIT
6101180300 RP
6101120500RP
8801240100RP
Bottom Pan. . . . . . . . . . . . . . . . . . . . . . . . . .
Left Side Leg . . . . . . . . . . . . . . . . . . . . . . . .
Right Side Leg. . . . . . . . . . . . . . . . . . . . . . . .
Hinges . . . . . . . . . . . . . . . . . . . . . . . . . . . . .
Release Tab Kit . . . . . . . . . . . . . . . . . . . . . .
1021420191RP
0440060191RP
0440060291RP
1021510100RP
1021550100RP
13