1
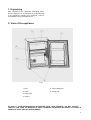
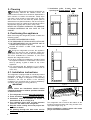
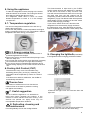
miniBar
R
RH 430LD
RH 430LG
RH 440LD
RH 440LG
RH 460LD
RH 460LG
!:/<+>38168=><?->398=
GB
Please read these operating instructions carefully before putting the
refrigeration unit into operation. If you later sell or dispose of it, please ensure
that the new owner receives these operating instructions.
Please follow the installation details below carefully Guarantee is valid for
products installed as described only. (See chapter 4.1)
Thank you for choosing our appliance. We are sure it will provide you with trouble-free use.
In the following, we would like to familiarise you with some symbols, which we bring to your attention to ensure
the safe and efficient operation of the appliance:
source of danger, in event of improper operation
suggested useful tips to read
information concerning environmental protection
Attention!
This product is designed to be operated by adults. Children should not be
allowed to tamper with the controls or play with the product.
Any electrical work required to install this appliance should be carried out by a
qualified electrician.
This product should be serviced by an authorised Service Engineer, and only
genuine spare parts should be used.
It is dangerous to alter the specifications or modify this product in any way.
Care must be taken to ensure that the appliance does not stand on the
electrical supply cable.
There are working parts in this product which heat up. Always ensure that there
is adequate ventilation as a failure to do this will result in component failure
and possible content loss. See installation instructions.
Parts which heat up should not be exposed. Wherever possible the back of the
product should be close to a wall but leaving the required distance for
ventilation as stated in the installation instructions.
Before defrosting, cleaning or maintenance work is carried out, be sure to
switch off the appliance and unplug it.
DO NOT USE SHARP INSTRUMENTS to scrape off frost or ice. Under no
circumstances should solid ice be forced off the cooling fins. Solid ice should
be allowed to thaw when defrosting the appliance. See defrost instructions.
This appliance is heavy. Care should be taken when moving it.
Under no circumstances should you attempt to repair the appliance yourself.
Repairs carried out by inexperienced persons may cause injury or more serious
malfunctioning. Refer to your local Service Centre and always insist on
genuine spare parts.
In this appliance the storage of any toxic or explosive substance is forbidden!
2
������� �
��
��
��
��
���������
���������������������
��������
�������������������������
���� ������������������������
�� �������������������
���� ����������������������
5.2. Energy saving tips
) / Thermo fuse
(
�� �������������������������
��
��
��
���
���
���
���
���
������������������
������������������������������������
����������������������
�����������������������
�������� ��� ������� �����
�����������������������������������
����� ���� ��� �������� �������
������������������������������
��� ������������������������������������
��� ���������
��� ��������� ����
����������
��������� ������������� ���� ��� ����������� ����� ��� ���������� ����������� ���� ���� ������
������������������������������������������������
���� ��������� ��� ������ ����������� ����� ��� ������������� ������� �������� ���� �������� �������
��������
�����������������������������������������������������������
���� ��������� ����� ���� ������ ���� �������������� ��� ���� ���������� ��� ���� ���� ��� ������������
��������������������
��������������������������������������������������������������������������������������������
������������������������������������������������������������������������������������������
������������������������������������������������������������������������������������
�
1. Unpacking
After removal from the cardboard packaging, make
sure the appliance is not damaged.If you find damage
to the appliance resulting from transport, report it
immediately to the transportation firm.
2. View of the appliance
Fig.1
1. Door
5. Thermostat knob
2. Lamp
6. Fixing foot
3. Evaporator
4. Sensor
lN CASE lF YOUR REFRIGERATOR IS EQUlPPED WlTH LOCK, DOMETIC DO NOT ACCEPT
LlABlLlTY FOR LOSS OR DAMAGE OF KEYS. HOWEVER WE WOULD BE HAPPY TO SUPPLY A
COMPLETE LOCK AND KEY REPLACEMENT.
4
3. Cleaning
Clean the refrigerator thoroughly at intervals, as
necessary. Remove the shelves; these, the
cabinet interior and the door should be washed with a
warm solution of sodium bi-carbonate. Finally wipe
over with a cloth rinsed in warm water only, and dry
with a clean cloth. Do not wash any plastic parts in
water that is more than hand warm, and do not expose
them to dry heat. The outside of the cabinet should be
wiped down regularly with a clean, damp cloth.
NEVER USE STRONG CHEMICALS OR ABRASIVE
CLEANING MATERIALS ON ANY PART OF THE
CABINET.
7. Ventilation grills, if used, must
openings of at least 200cm2 each
have
4. Positioning the appliance
When first using this refrigerator please consider the
following points:
ENSURE REFRIGERATOR IS LEVEL
THE PIPEWORK AT THE BACK GETS HOT IN USE
THE REFRIGERATOR HAS NO 'MOTOR' AND IS
THEREFORE VIRTUALLY SILENT
ALLOW AT LEAST 3 HRS. FOR SIGNS OF
COOLING
During the refrigeration process, the appliance
gives off heat from the condenser (under the
upper part of the rear cover) into the surrounding air.
The more ventilated the condenser is, the more
effective the refrigeration will be.
The other condition for satisfactory operation is that
the appliance stands on a flat surface. This is best
seen by placing a glass of water on top of the
appliance.
It is important that the appliance is not directly
exposed to radiated heat (sunlight, radiator, near an
oven, etc.).
Figure 2.
4.1. Installation instructions
The refrigerator is equipped with an electrically heated
absorption cooling unit which is virtually silent in
operation. The fridge is designed for free-standing
installation, but can be built-in if the following
conditions are complied with to ensure satisfactory
operation and maximum cooling efficiency.
IMPORTANT
Please follow the installation details below
carefully Guarantee is valid for products installed
as described only.
1. The refrigerator must be level both directions
2. There should be 20 mm clearance to the wall
3. Ventilation must be provided as shown in
alternatives A, B, C or D (fig 2-3)
4. The ventilation duct must at least measure
105 mm x the width of the refrigerator
5. Only the entire cooling unit must project into
the duct as shown
6. Air passing through the duct must not be
preheated by any source of heat
5
Figure 3.
Figure 4.
The refrigerator can be fixed to the bottom of the
furniture through its fixing feet using screws of an
appropiate length. (Fig. 4)
During installation, please ensure the mains
plug is accessible at all times.
'=381>2/+::63+8-/
To start the refrigerator,connect the plug to the socket
outlet and switch on the socket. The cooling fins should
show signs of cooling after about 3 hours.
The refrigerator needs about 6 hours at normal
ambient temperature to reach 6 °C in the storage
compartment.
&/7:/<+>?</</1?6+>398
You can set a temperature between max. and min. by
rotating the knob (Fig.5).
Turn to max. will produce a colder temperature and higher
energy consumption; and turn to min. will produce a warmer
temperature and lower energy consumption.
This frost-formation is kept back by the FUZZY
LOGIC system built into the appliance by switching
off the unit for two hours in every 24 hours. The
frost will melt and the defrost water will run through
the drain tube from the drip channel into an
evaporating vessel located at the bottom rear of the
refrigerator.( Fig.6) The defrost water will evaporate
automatically into the circulating air and the vessel
will not need emptying manually.
If you want to switch off the unit, disconnect the
refrigerator from the electricity supply and leave
the cabinet door open. After defrosting the cabinet
interior should be wiped out with a clean, damp cloth.
Fig.5
28/<1C=+@381>3:=
Choose a well ventilated installation location which is
protected against direct sunlight.
Allow warm food to cool down first before placing it in the
device to keep cool.
Do not open the cooling device more often than necessary.
Do not leave the door open for longer than necessary.
lf you want to set an increased energy efficiency and a
limited cooling capacity for the cooler unit,turn the knob to
min..
Figure 6.
2+81381>2/6312>,?6,
(If available)
If the lightbulb needs changing,proceed as follows:
)
(
996381'83>98><96'
The electronics carry out a CUC test after every
defrosting period (every 24 hrs) by measuring the
temperature at the evaporator by means of a second
sensor.
If the electronics detect a malfunction, the miniBar is
automatically switched off .
1.Pull the plug out of the power socket.
&2/<790?=/
One version of minibar has no CUC function but
a thermo fuse on the back to protect the cooling
unit against over heating.
'=/0?6=?11/=>398
2.Remove the light cover and unscrew down the
light case.
Do not overfill the appliance. It is advisable to
leave some space between the products in the
cabinet to ensure efficient and even cooling. If the
shelves are packed too tightly there may be
unacceptable temperature variations.
/0<9=>381-6/+8381+8.
7+38>/8+8-/
Frost will gradually form on the cooling surfaces.
3.Take the bracket out of the case and replace the
bulb with a new one that has the same rating
6
Distance to cupboard door (A)
1.
mm
4.Re-assemble the case in the reverse order.
A new 10-watt bulb can be obtained at Dometic.
$/@/<=381>2/.99<2+81 (Fig.7)
Lay the appliance on its back. Remove the 8
screws (1). Remove the door, together with the two
hinges (2), from the housing.
Remove the two cover caps (3) from the housing
and place them in the open hinge holes in the
housing. Place the bottom righthand hinge in the
top left of the door and the top righthand hinge in
the bottom left of the door and hang the door on its
hinges in the open cover cap holes in the housing.
Secure the hinges and cover caps with the 8
screws.
Check that the door closes easily and is sealed
properly.
Figure 7.
2+81381>2/%63.381381/
1.
2.
1.
2.
3.
4.
The length of the hinge stretching out of
the refrigerator door must be 80mm.
7
A
2.
mm
1. When closed, the cupboard door (A) must not lie
against the rest of the surrounding cupboard area
(distance 1-2mm).
2. There must be a distance of 6-8mm between
the cupboard door and the miniBar.
$/:6+-381>2/./-9<+>3@/
.99<:+8/6 (Fig. 8-10)
Remove the two screws (1) from the upper hinge of
the door.
Pull the door together with the hinge away from the
housing and up off the lower hinge bolt (2-3).
Remove screws (4) and pull off the frame edge (5).
Slide the decorative panel (6) out of the door frame
and insert the new panel (7), so that the upper edge
of the panel runs exactly parallel to the upper edge of
the frame. A new panel can be inserted more easily
into the upper edge of the frame when the two corners
are cut off by approx. 5× 5 mm (8). Put the frame edge
(5) back in place and secure with screws.
Place the door on the lower hinge (9), slot the upper
hinge into the opening, press together with the door
against the housing and secure with the two screws
(11).
Failure : No cooling (the cooling unit is warm).
Possible Cause Self Help
Authorised
Service
a.) The device is a.)
not level.
Leakage test ?
b.) The device was b.)
only switched
on a short while
ago.
c.) Defective
cooling unit.
Level the device
using a spirit
level.
Switch on the
device and let it
run for 5-6
hours.
c.) Exchange
device.
Failure : Poor cooling performance.
Possible Cause Self Help
Authorised
Service
Figure 8.
a.) Check that the
a.) The cooling
unit is
ventilation grids
not sufficiently
are not covered.
Check that
ventilated.
device has been
installed properly
(installation
instruction 4).
b.) The device is b.) Follow installation
instruction 4).
exposed to
direct sunlight.
c.) The fridge door c.) Check installation c.) Install new
does not close
in line 4.
doorseal,if
necessary.
tightly
d.) The fridge was d.) Check fridge after
stocked a short
5-6 hours for
while ago.
proper cooling
function.
Figure 9.
Failure : Frost formation in fridge.
Possible Cause Self Help
Authorised
Service
a.) The fridge door a.) Check installation a.) Install new
is in line with 4.
doorseal,
does not close
tightly.
if necessary.
Figure 10.
2/-5 63=> +8. -?=>97/< =/< @3-/
Before you call a service engineer, carry out the
tests as described in the check list:
Failure : No cooling (the cooling unit at the back
of the device is cold).
Possible Cause Self Help
Authorised
Service
a.) The device plug a.) Plug in device
is not plugged
plug.
in.
b.) No voltage in b.) Check main fuse.
socket.
c.) Install new
c.) The electronics
electronics or
or the sensor is
sensor.
faulty.
d.) The heating
element is faulty
If after checking all the above points, the
refrigerator is still not working satisfactorily, contact
your nearest service engineer. State the problem,
model, product- and serial-number.
(Details of the model, product- and serialnumber
are to be found on the data label in the top left of
the inside compartment.)
This refrigerator is equipped with a CUUC system.
An authorised service technician can check whether
this has been triggered or not.
In the event of a fault developing, contact your
nearest Service Centre-see local telephone
directory.
d.) Install new
heating element.
e.) The device is in
its defrosting
e.) See operating
phase.
instruction 8.
8
988/->381>9/6/-><3-+67+38=
The appliance may only be operated from
nominal voltage mains as shown on the data
plate. The appliance mains plug may be connected
to a mains socket earthed in accordance with
regulations.
Any electrical work required to install this appliance
should be carried out by a qualified electrician or
competent person.
&2/7+8?0+->?</<./-638/=+8C63+,363>C=29?6.
>2/=/=+0/>C7/+=?</=89>,/9,=/<@/.
8@3<987/8>+6
:<9>/->3983809<7+>398
)740??;80=243>4B=>C2>=C08=0=HB
B
<<>=80=0CDA0;7H3A>64=0=3=8CA>64=2><?>D=3
8BDB430B0A45A864A0C8=6064=C8=C74A45A864A0C8>=D=8C
)74 >I>=45A84=3;H 2H2;>?4=C0=4 8B 02C8E0C43 0B 0
<>C8E4064=C5>AC74&*5>0<8=BD;0C8>=
(>38D< 27A><0C4 8B DB43 5>A 2>AA>B8>= ?A>C42C8>=
;4BBC70=F4867C>5C742>>;0=C
�������������
/-><3-+6$/;?3</7/8>=
Before switching on, make sure the electricity
supply voltage is the same as that indicated on the
appliance rating plate.
!86C09<'
5C4AD=?02:8=6C740??;80=24C74?02:8=6<0C4A80;B
B7>D;3 14 34;8E4A43 C> 0 ;>20; 2>;;42C8>= B8C4 C C74
4=3 >5 8CB DB45D; ;854C8<4 C74 0??;80=24 B7>D;3 14
34;8E4A43C>0B?4280;8I432>;;42C8>=0=3A4?A>24BB8=6
58A<F7827A42;08<BC74DB01;4<0C4A80;B)74A4BC8B
?A>?4A;H34BCA>H43
&23= +::63+8-/ -97:63/= A3>2 >2/ 09669A381 .3</->3@/=
"+8A42C8E4
F8C7 0<4=3<4=C
#8A42C8E4 �7�� �� ��� �
)740??;80=248BBD??;843F8C700<??;D658CC43 =
C74 4E4=C >5 70E8=6 C> 270=64 C74 5DB4 8= C74 ?;D6
BD??;843 0 0<? () 0??A>E43 ( 5DB4
<DBC14DB43(7>D;3C74?;D6=443C>14A4?;0243
5>A 0=H A40B>= C74 F8A4B 8= C74 <08=B ;403 0A4
2>;>DA438=022>A30=24F8C7C745>;;>F8=62>34
A44=0=3.4;;>F
0AC7
;D4
$4DCA0;
A>F=
"8E4
Model
RH430LD RH430LG RH440LD RH440LG RH460LD RH460LG
30
Gross volume (L)
Usable capacity(L)
26
Input consumption (W)
3 - 12°C
Category
2 (Cellar)
260
connected to the terminal marked with the letter "E" or
Ambient temperature
1HC7440AC7BH<1>;
>A2>;>DA436A44=0=3H4;;>F
)74 F8A4 2>;>DA43 1;D4 <DBC 14 2>==42C43 C> C74
Refrigerant
terminal marked "N" or coloured black.
Noise emission (dB(A))
E
56
300
D
F
F
G
275
338
372
420
+16°C - +32 °C
N
Climate class
Test/Certificates
55
80
Temperature range
Energy consumption
(kWh/annum)
9
37
65
)74 F8A4 2>;>DA43 6A44= 0=3 H4;;>F <DBC 14
*?>= 2><?;4C8>= C74A4 <DBC 14 => 2DC >A BCA0H
BCA0=3B>5F8A4?A4B4=C0=3C742>A32;0<?<DBC14
B42DA4>E4AC74>DC4AB740C7
60
220 - 240VAC
D
terminal marked "L" or coloured red.
36
27
Mains operation
Energy efficiency class
)74 F8A4 2>;>DA43 1A>F= <DBC 14 2>==42C43 C> C74
40
82g NH3
101g NH3
0
Suites 2207-2211,22/F,Tower1,
2461 1386
Fax: (+852)2466 5553
www.dometic.com
Subject to change without notice.