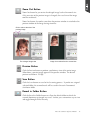
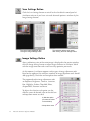
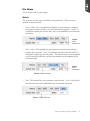
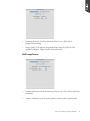
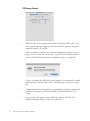
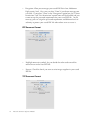
1
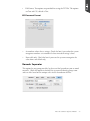
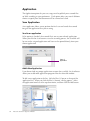
ScanPotter Reference Manual Copyright 2014 by Microtek International, Inc. All rights reserved. Trademarks Microtek, ScanMaker, ArtixScan, ScanWizard, ScanPotter and ColoRescue are trademarks or registered trademarks of Microtek International, Inc. Adobe and Acrobat are registered trademarks of Adobe Systems Incorporated. Windows is a registered trademark of Microsoft Corporation. All other trademarks or registered trademarks are the property of their respective holders. Software function or specifications are subject to change without notice. Not responsible for typographical errors. Important Documents that you scan may be protected under copyright law. The unauthorized use of such documents could be a violation of the rights of the copyright holder. Microtek bears no responsibility for the unauthorized use of copyrighted materials. To obtain optimal results from the Microtek scanning software and user's manual, you should be familiar with such Windows concepts as pointing, clicking, dragging, and selecting from menus and dialog boxed. If these things are new to you, refer to your Microsoft Windows User's Guide. I49-004586 C March 2014 Microtek International, Inc. 6, Industry East Road 3, Science Based Industrial Park, Hsinchu, 30077, Taiwan Tel: 886-3-5772155, Fax: 886-3-5772598, http://www.microtek.com ii Contents Introduction ................................................................................... 1 System Requirements ................................................................................. 2 Launching ScanPotter ................................................................................ 2 Exiting ScanPotter ...................................................................................... 2 Quick Guide to the User Interface .................................................. 3 Start Scanning Immediately ............................................................ 4 A. Scanning Photos .................................................................................... 4 B. Scanning Positive or Negative Films ........................................................ 6 A. Scanning a Stack of Paper ......................................................................8 B. Scanning a Single-sheet Document ....................................................... 10 Detailing the User Interface .......................................................... 12 Image Tool Buttons .................................................................................. 12 Zoom In Button ................................................................................ 12 Zoom Out Button ............................................................................. 13 Preview Button ................................................................................. 13 Scan Button ...................................................................................... 13 Reveal in Folder Button ..................................................................... 13 Scan Settings Button ......................................................................... 14 Image Settings Button ....................................................................... 14 Scanner Settings ...................................................................................... 17 Scan Source ...................................................................................... 17 Color Type ........................................................................................ 18 Resolution ........................................................................................ 18 Scan Frame ....................................................................................... 18 Transform ......................................................................................... 19 Flip the Image Left to Right ............................................................... 19 Flip the Image Upside Down ............................................................. 19 Calibrate Scanner ............................................................................. 20 Calibrating the Scanner Directly ................................................. 20 Calibration Settings Window ...................................................... 21 iii File Save Settings ...................................................................................... 22 Location ........................................................................................... 22 File Name ......................................................................................... 23 Method ...................................................................................... 23 File Format ....................................................................................... 24 JPEG Image Format .................................................................... 24 PNG Image Format .................................................................... 25 TIFF Image Format .................................................................... 26 HTML Document Format ........................................................... 27 PDF Document Format .............................................................. 27 RTF Document Format ............................................................... 28 TXT Document Format .............................................................. 28 XLS Document Format .............................................................. 29 Barcode Separator ............................................................................ 29 Application .............................................................................................. 30 Scan Application ............................................................................... 30 Send to an application ................................................................ 30 Add A New Application .............................................................. 30 Remove an Existing Application .................................................. 31 Copy Application .............................................................................. 31 E-Mail Apllication ............................................................................. 32 Web Application ............................................................................... 32 Reset to Default Button ............................................................................ 33 Preview Window ...................................................................................... 34 Create Frames .................................................................................. 34 Adjust the Size of Created Frames ..................................................... 35 Delete the Created Frames ................................................................ 35 iv Introduction ScanPotter is scanning software developed exclusively for Microtek scanners running on a Mac system. ScanPotter has a unique and clean interface that users will find productive and easy to use. • All-in-one and instinct control panel — ScanPotter’s single-page overall control panel gives you the power to scan photos, slides, films or documents without having to initiate a scanning session on the screen. It provides a simple and straightforward control over the scanning process. • Supports online software updating — ScanPotter allows you directly to check whether there is a newer version of the software for your scanner to use directly from its user interface. Simply link your computer to the Internet and choose the Check for Updates utility from the menu at the top of the user interface, the software will handle the rest steps for updating. • Supports multiple scan frames — ScanPotter allows you to assign several subframes on one scanned image and then save them under different files. This feature simplifies repeated boring steps into one simple and instant click action. • Supports the newest JPEG 2000 format — ScanPotter allows you to save the scanned materials in the JPEG 2000 format. JPEG 2000 format files have several distinguished advantages, such as superior compression performance, multiple resolution representation, lossless and lossy compression, and random code-stream access and processing. • Barcode Separator— With this feature, you can group your scanned files by the use of the barcode on your scanned materials. ScanPotter can identify the unique value of each barcode and use it to differentiate your scanned materials in groups. It offers you a simply but effective way to manage and organize piles of paper documents in a digital format. • Save multiple images as a single file — This advanced feature allows users to save multiple scanned images as a single file, depending on the number of the scanned images that are defined for document archival. Microtek ScanPotter Reference Manual 1 System Requirements • Mac OS X 10.6 or later • Mac computer with an Intel processor (strongly recommended) • 2GB RAM required • Free hard disk space as required by the size of your scanned images and for additional working files • CD-ROM or DVD-ROM drive • “Thousands of colors” display or better • Microtek scanners that support ScanPotter Launching ScanPotter Start ScanPotter from the Applications folder in your Mac OS X system. You will also see the ScanPotter menu at the top left portion of your desktop. Here, you will see commands for updating software version for your ScanPotter, hiding ScanPotter, quitting ScanPotter, etc. Exiting ScanPotter To exit ScanPotter, go to the File menu and choose the Quit command, or press the Command + Q keys simultaneously. 2 Microtek ScanPotter Reference Manual Quick Guide to the User Interface When the ScanPotter is launched, the user interface appears on the screen immediately. The user interface is the prominent window and includes the various commands and tools for controlling the scanner. 1. Image Tool Buttons - Click to manipulate the scanned image. 2. Scanner Settings - Specify scanning requirements. 3. File Saving Settings - Manage settings for scanned and saved image. 4. Applications - Add or remove application programs to view the scanned and saved image. 5. Reset to Default - Click to retrieve the default settings. 6. Preview Area: Display the preview image. Microtek ScanPotter Reference Manual 3 Starting Scanning Immediately This section provides two basic scanning scenarios with ScanPotter, including scanning a stack of paper and scanning a single-sheet document. A. Scanning Photos 1. Place the photo to be scanned face down on the scan bed. 2. Launch ScanPotter (either as a stand-alone by clicking on the program icon, or by selecting it from an application program). 3. Click the Scan Source drop-down menu to choose Reflective for photos. 4. Click the Preview button to perform a preliminary scan of the image, which will appear in the Preview window. 5. In the Preview window, you can resize the scan frame (floating dotted rectangle) around the image by dragging on the square spot on the edge or those on the corner of the scan frame to determine the final size of the actual scan. 6. Specify your scanning requirements in the Scanner Settings column. a) Select the appropriate image type (e.g., Color) in the Color Type as your image output type. – – – Select Color to scan the image in color. Select Grayscale to scan the image in grayscale. Select Black & White to scan the image in black-and-white. b) Select a desired resolution in the Resolution for your image output resolution. c) 4 Select a dimension in the Scan Frame your preview image size. 7. If necessary, use the File Saving Settings options to customize settings for the saved materials. 8. Click the Scan button to start canning. Microtek ScanPotter Reference Manual Preview image Microtek ScanPotter Reference Manual 5 B. Scanning Positive or Negative Films 1. Place the transparent materials to be scanned on the scan bed. 2. Launch ScanPotter (either as a stand-alone by clicking on the program icon, or by selecting it from an application program). 3. Click the Scan Source drop-down menu to choose Positive Film for transparencies and slides; choose Negative Film for negatives, depending on the film type you are using. 4. If you have more than one target to scan at one time, select the "Automatic Crop" in the Scan Frame drop-down menu. The system will detect numbers of scanned targets automatically. 5. Click the Preview button to perform a preliminary scan of the image, which will appear in the Preview window. 6. In the Preview window, you can resize the scan frame (floating dotted rectangle) around the image by dragging on the square spot on the edge or those on the corner of the scan frame to determine the final size of the actual scan. 7. Specify your scanning requirements in the Scanner Settings column. a) Select the appropriate image type (e.g., Color) in the Color Type as your image output type. – – – Select Color to scan the image in color. Select Grayscale to scan the image in grayscale. Select Black & White to scan the image in black-and-white. b) Select a desired resolution in the Resolution for your image output resolution. 6 8. If necessary, use the File Saving Settings options to customize settings for the saved materials. 9. Click the Scan button to start canning. Microtek ScanPotter Reference Manual Preview image Multi scan frame 1 Microtek ScanPotter Reference Manual 7 C. Scanning a Single-sheet Document 1. Place the single-sheet document to be scanned on either the scanner bed or on the ADF’s Document Feed Tray. 2. Launch ScanPotter (either as a stand-alone by clicking on the program icon, or by selecting it from an application program). 3. Select your image input device in the Scan Source drop-down menu. The default setting is Automatic. 4. – Select Flatbed if you place the document on the scanner’s glass surface. – Select ADF if the document is fed from the ADF’s Document Feed Tray. Specify your scanning requirements in the Scanner Settings column. a) Select the appropriate image type (e.g., Color) in the Color Type as your image output type. – – – Select Color to scan the image in color. Select Grayscale to scan the image in grayscale. Select Black & White to scan the image in black-and-white. b) Select a desired resolution in the Resolution for your image output resolution. c) 8 Select a dimension in the Scan Frame your preview image size. 5. Click the Preview button to perform a preliminary view of the entire image. When done, a preview image appears in the preview window. 6. In the Preview window, you can resize the scan frame (floating dotted rectangle) around the image by dragging on the square spot on the edge or those on the corner of the scan frame to determine the final size of the actual scan. 7. If necessary, use the File Saving Settings options to customize settings for the saved materials. 8. Click the Scan button to start canning. Microtek ScanPotter Reference Manual Preview image Microtek ScanPotter Reference Manual 9 D. Scanning a Stack of Documents 1. Place the stack of documents to be scanned on the ADF's Document Feed Tray. 2. Launch ScanPotter (either as a stand-alone by clicking on the program icon, or by selecting it from an application program). 3. Select ADF in the Scan Source drop-down menu as your image input device. 4. Specify your scanning requirements in the Scanner Settings column. a) Select the appropriate image type (e.g., Color) in the Color Type as your image output type. – – – Select Color to scan the image in color. Select Grayscale to scan the image in grayscale. Select Black & White to scan the image in black-and-white. b) Select a desired resolution in the Resolution for your image output resolution. c) 10 Select a dimension in the Scan Frame your preview image size. 5. If necessary, use the File Saving Settings options to customize settings for the saved materials. 6. Click the Scan button to start canning. Microtek ScanPotter Reference Manual For pr eview purposes only preview only,, take note of the additional notes below: 1. Load a piece of paper from the paper stack into the ADF’s document feed tray as step 1 (of the previous page). Do not load more than one sheet, as a single sheet is sufficient for preview purposes. 2. After finishing step 3 (of the previous page) and before proceeding to step 4, click the Preview button to perform a preliminary view of the entire image. When done, a preview image appears in the preview window. At this moment, the previewed page is delivered to the document tray from the ADF's document feed tray. Load the previewed page, along with the paper stack, on the ADF's document feed tray. You are now ready to scan. Preview image Microtek ScanPotter Reference Manual 11 Detailing the User Interface Image Tool Buttons You can find 7 Image Tool buttons at the top of the User Interface. These buttons are Zoom In, Zoom Out, Preview, Scan, Reveal in Folder, Scan Settings and Image Settings. Zoom In Button Zoom In button let you magnify the view of the image. Only your view of the preview image is changed; the actual size of the image remains unaffected. Zoom In button also works same when the preview window is switched to the preview window of the Image Settings interface. Click to enlarge the size of the preview image The original image view 12 Microtek ScanPotter Reference Manual Image view enlarged with Zoom In tool Zoom Out Button Zoom Out button let you resize the enlarged image back to the normal size. Only your view of the preview image is changed; the actual size of the image remains unaffected. Zoom Out button also works same when the preview window is switched to the preview window of the Image Settings interface. Click to reduce the size of the preview image The enlarged image view Image view reduced back to normal size Preview Button Click the Preview button to perform a preliminary view of the entire image. When done, a preview image appears in the preview window. The default preview resolution is 150 dpi. Scan Button Click the Scan button to start the final scanning process. If you do not assigned a desired folder, the scanned result will be saved in the user's Documents/ ScanPotter folder. Reveal in Folder Button Click the Reveal in Folder button to call out the default folder in which the scanned documents or imaged are saved. It offers you a convenient way to view and toggle through all files instantly. Microtek ScanPotter Reference Manual 13 Scan Settings Button Click the Scan Settings button to switch back to the default control panel of ScanPotter software if you have activated advanced options carried out by the Image Settings buttons. The control panel displayed after clicking the Image Settings button The retrieved default control panel after clicking the Scan Settings button Image Settings Button After a preliminary view of the entire image is displayed in the preview window, click the Image Settings button to adjust image attributes in ScanPotter. Work with the image correction tools to see how they optimize your results. At this moment, ScanPotter supports twelve types of image adjustment tools. Based on the update of the software, numbers of image adjustment tools should add up gradually. Check the on-line update when needed. The supported twelve image adjustment tools are Exposure, Brightness, Contrast, Satuation, Hue, Highlight, Shadow, Threshold, Effect, Sharpen/Blur, Descreen and Invert. To adjust the value for each option, use the slide bar, enter the desired value in the edit box or drop-down menu attached. A slide bar option (Or enter the value in the edit box) A drop-down menu 14 Microtek ScanPotter Reference Manual • Exposure: Represent the original status of scanned images. • Brightness: Control the brightness levels of the selected frame image, increasing the brightness makes all tones in the image lighter. • Contrast: Control the contrast levels of the selected frame image. Increasing the brightness makes all tones in the image lighter. Contrast is the range between the darkest and lightest shades in the image, and increasing the contrast makes for greater separation between the darkest and lightest areas of the image. • Saturation: Saturation is the intensity of a hue (deep red vs. a lighter red). • Hue: Hue is the aspect of color that distinguishes one color from another (red from green from blue). In the RGB color mode, hue can be distinguished by its position in the color bar. • Highlight: Move the slide bar, or enter the value in the edit box to control the highlight. Moving the slide bar to the right will emphasize highlights and create a lighter image. • Shadow: Move the slide bar, or enter the value in the edit box to control the shadows. Moving the slide bar to the right will emphasize shadows and create a darker image. • Threshold: Threshold is the dividing point between black and white. • Effect: Use the drop-down menu to select predefined image effects and apply to the scanned target. At this moment, the selectable effects are Vibrance, Sepia Tone and D-Range. Vibrance: Adjust the saturation of an image while keeping pleasing skin tones. Sepia Tone: Map the colors of an image to various shades of brown. D-Range: Capture the full tonal range of the image. • Sharpen/Blur: Use the drop-down menu to select predefined sharpening or blur effects to your selected frame images. At this moment, the selectable effects are Sharpen Luminance, Unsharp Mask, Blur and Gaussian Blur. Sharpen Luminance: Increase image detail by sharpening. Unsharp Mask: Increase the contrast of the edges between pixels of different colors in an image. Microtek ScanPotter Reference Manual 15 Blur: Decrease the contrast between adjacent pixels, making the image appear hazy and out of focus. Thus, you can get a softer and pretty image. • Descreen: This effect help you to remove moiré patterns in images and get a clearer and moiré patterns-free image after applied. Use the drop-down menu to select the predefined settings : Newspapers, Magazines and Art Magazines. • Invert: Check this option box to convert the brightness value of each pixel to the inverse value on the 256-step color values scale. This option brings you a negative film effect. • Embed ICC destination profile in scan image Check this option box to enable ScanPotter to embed the Destination ICC profile into the image data. The information will then be properly interpreted by any ColorSync-savvy applications. . 16 Microtek ScanPotter Reference Manual Scanner Settings Scanner Settings section let you specify scanning requirements in the ScanPotter control panel once ScanPotter is launched. Scan Source Depending on the scanner model you are using, you should see different groups of Scan Source. If you are using a scanner with a built-in ADF and a glass scanner bed, the Scan Source you see will let you select image input device, such as Automatic, ADF and Flatbed. When you select the "Automatic" as your scan source, the scanner will scan from the ADF if the system detects papers on the ADF; otherwise, it will scan from the scan bed. On the other hand, if your scanner equipped with only a glass scanner bed, the Scan Source you see will let you select scanned materials. For example, if you are using the ScanMaker i800XL Plus, you can select either Reflective, Positive Film or Negative Film as your scan source depending on which kinds of materials you use to scan. To select a scan source, click the drop-down menu in the Scan Source option and point the mouse (cursor) to the option desired. Microtek ScanPotter Reference Manual 17 Color Type Color Type shows the image type of the current scan job. Three options are available: Color, grayscale and black-and-white. To select a color mode, click the drop-down menu in the Color Type option and point the mouse (cursor) to the option desired. Resolution The Resolution list box provides predefined resolution values for easier selection of the resolution setting. The supported resolutions are based on the models of scanners used. To select a desired resolution, click the drop-down menu in the Resolution option and point the mouse (cursor) to the option desired. Scan Frame Scan Frame list box provides predefined sizes for easier selection of the scan job area. The supported sizes are based on the models of scanners used. To select a desired scan job area, click the drop-down menu in the Scan Frame option and point the mouse (cursor) to the option desired. 18 Microtek ScanPotter Reference Manual Please take note that if you select "Automatic Crop" in the Scan Frame option and click the Scan button to execute the final scan job directly without performing a preliminary preview job, the system will pop up a dialog box to ask about if you have the need to adjust the scan frame manually. If needed, click the Adjust scan frame manually button to resize the final scan frame for your scan job. If not, click the Scan button to carry out the finally scan job immediately. Transform Transform allows you to rotate the scanned image at a clockwise direction. Click the degree (90°, 180° and 270° ) you want, and the program will rotate the image automatically. The rotation effect is seen only after you click the Scan button and scan the image. The rotation effect is not shown in the preview window. Flip the Image Left to Right This feature allows you to flip the image horizontally. The flip effect is seen only after you click the Scan button and scan the image. The flip effect is not shown in the preview window. Flip the Image Upside Down This feature allows you to flip the image vertically. The flip effect is seen only after you click the Scan button and scan the image. The flip effect is not shown in the preview window. Microtek ScanPotter Reference Manual 19 Calibrate Scanner Calibrate Scanner button lets you calibrate your scanner before performing a scan job. The button will be activated only when the scanner you purchased supports the calibration function. Also, if the scanner connected support Smart Calibration, ScanPotter will enable a window of further calibration settings for you to select. Calibrating the Scanner Directly If your scanner does not support Smart Calibration function, when you click the Calibrate Scanner button, a window will pop up on the screen to check whether you like to calibrate your scanner. Depending on the scanner models purchased, you may see different styles of the calibration window. Just follow the instructions in the calibration window to finish the calibrating procedures step by step. Calibration window for ScanMaker s270 Calibration window for ScanMaker 3200XL 20 Microtek ScanPotter Reference Manual Calibrating Settings Window If your scanner support the Smart Calibration function, when you click the Calibrate Scanner button, you will see a window appear as below: Calibration Mode Smart When you check this option, the ScanPotter will memorize the calibration values generated by different scanning settings. Next time, when you perform a scan job with a same value of scanning settings, the scanner will skip the calibration step and directly perform a scan job. This mode enhances the scanning speed obviously when you often scan materials sharing same scanning settings. Calibration Mode Typical If this option is selected, the ScanPotter calibrates your scanner before performing a scan job if the scanning settings are changed. If not, the scanner will skip the calibration process and start scanning immediately. Reset all calibration data By clicking the Execute button after this option, the ScanPotter clear all saved calibration data; therefore, the program will need to re-calibrate your scanner and to re-memorize the calibration value when you perform the next scan job. Also, when you click the Execute button, a pop-up window appears to remind you if you are sure to clear all the saved calibration data. Reset current calibration data By clicking the Execute button after this option, the ScanPotter clear the calibration data with current scanning settings, which means that the program will need to re-calibrate your scanner and to re-memorize the calibration value if your next scan job carries the same scanning settings as the current values used. This option only delete the calibration data you are using presently. Other saved calibration data are not affected. Microtek ScanPotter Reference Manual 21 File Save Settings In the area of the File Save Settings, you are able to customize some settings for your scanned and saved files, such as where to store the files, files' names, saving formats, and so on. Location It is a specific place where the final scan is delivered to. By default, the software has picked up the user's Documents/ScanPotter folder to save all your scanned materials. To reassign a new location, simply click the Location button. A pop-up dialog window appears on the screen. 1) Pick up a desired destination folder from lists of the path. 2) Or you can create a new folder in the location you want by clicking the New Folder button. When done, press the Choose button to finish the selecting process. 22 Microtek ScanPotter Reference Manual File Name This is the file name to store images. Method This is where to name your saved file by your preference. There are three methods to name your file: • Date + Suffix - This is the default method the system names the saved files, using the date when the file is saved and the number together. “00001” is the default number put after the date and can be modified in the Suffix edit box below. Editable suffix number box • Text + Suffix - This method lets you customize a root file name and put a number after the name. “Scan” is the default root file name and "00001" is the default number put after the name. The root file name can be modified in the CustomText edit box, and the suffix number can be modified in the Suffix box aside. Editable suffix number box Editable root file name box • Text - This method lets you customize a root file name. “Scan” is the default root file name and can be modified in the Custom edit box below. Editable root file name box Microtek ScanPotter Reference Manual 23 File Format File Format lets you select a file format for a saving file. At the top column of the list, you can see lists of file format grouped by common compressed image format. At the half bottom of the list, you can see lists of file format grouped by common text file format. Accompanied with different kinds of file format, when you click the Settings button beside, you will see different File Format Settings windows for each set of file format. Sets of image file format Click to expand the File Format Settings window for each set of file format Sets of text file format JPEG Image Format When the "JPEG" is selected in the "File Format" option box and then you click the Settings button, the File Format Settings will appear as the following: 24 Microtek ScanPotter Reference Manual • Encoding Method: Check the box if you like to save a JPEG file in progressive encoding. • Image Quality: Five options are provided for saving the JPEG file. The options are Highest, High, Normal, Low and Lowest. PNG Image Format • Encoding Method: Check the box if you like to save a PNG file in interlaced encoding. • Gamma: Slide the bar to set up the gamma value for your saved material. Microtek ScanPotter Reference Manual 25 TIFF Image Format • Multiple Pages: If this option box is checked, the system allows you to save the scanned images to a single file. You can enable this option if the output image file format is TIF or PDF. When the option is checked, ScanPotter will prompt you to place the next page as you scan from the scanner bed. Then click the Continue button to scan; or click the Finish button to save multiple images as a single file. If you scan through the ADF, the scanning originals are sequentially scanned until paper out; when finished, all the scanned images are saved as a single file. 26 • Compression Method: Two options are provided for saving the compressed TIFF file. The options are LZW and PackBits. The default value is set as "None". • Image Quality: Five options are provided for saving the TIFF file. The options are Highest, High, Normal, Low and Lowest. Microtek ScanPotter Reference Manual HTML Document Format • OCR Language: If you select a text file format to be the format for your saved file, OCR Language drop-down menu will appear on the screen. This option allows you to select the language in which the original text document is written. • Encoding Method: Check the box if you like to save a HTML file in Unicode encoding. • Pictures: Check the box if you like to save pictures with your scanned text together. PDF Document Format • Multiple Pages: If this option box is checked, the system allows you to save the scanned images to a single file. • Export Mode: Specify the exported modes of recognized text into PDF file. Four option are provided for you to choose. They are Text only, Text in front of picture, Picture only and Picture in front of text. Microtek ScanPotter Reference Manual 27 • Encyption: Allow you to encrypt your saved PDF file in Low, Medium or High security level. Also, you can select "None" if you do not encrypt your saved file. If you select "None" in the "Encryption" option box, the "Owner Permissions" and "User Permissions" option boxes will be disabled and you cannot set up the password requirement for your saved PDF file. On the contrary, you can assign the password requirement and different levels of authority to protect your saved PDF file when others want to access it. RTF Document Format • Highlight uncertain symbols: Let you decide the color used to mark the uncertain text in the saved RTF file. • Pictures: Check the box if you want to write images together in your saved RTF file. TXT Document Format 28 Microtek ScanPotter Reference Manual • File Format: Two options are provided for saving the TXT file. The options are Text and CSV; default is Text. XLS Document Format • As numbers rather than as strings: Check the box if you rather the system recognizes numbers as its numberial values instead of strings' values. • From table only: Check the box if you want the system to recognize the value from a text block only. Barcode Separator This option let you group your files by the use of the barcode on your scanned materials. When this option is checked, the system will identify, group, name and save files based on the unique vales of each barcode on the files. Microtek ScanPotter Reference Manual 29 Application The Application options let you scan, copy, email or publish your scanned files on Web according to your preferences. Each option offers you several different choices to specify how the document will be scanned and saved. Scan Application Scan application allows you to perform the final scan and sends the scanned image to the application that you are using. Send to an application If this option is checked, the scanned file is sent to your selected application. When you click the Scan button to start the scanning process, the saved file will be sent to the assigned application and later can be opened directly from your chosen application. Lists of application Add A New Application If you do not find any proper applications to open the saved file, the ScanPotter allows you to add more application programs into the selectable window. To add a new application to the lists, click the Plus (+) button at the top of the application lists. When you click the Plus (+) button, a dialog appears. Select the application from lists of the up-down menu, and then click the Add button. 30 Microtek ScanPotter Reference Manual The newly added application is displayed immediately in the left-to-right movable application window. It is now ready to be selected to open your saved files. Remove an Existing Application You are also allowed to remove an application from the application listing window. To do so, click and highlight the application you wish to remove, and then click the Minus (-) button at the top right side of the application lists. Copy Application Copy application allows you to perform the final scan and send the scanned image to the specified printer. Also, you can select the proper paper size for the printed file at this layer. Please take note that if there is no printer connected with your computer, even when the Copy application is activated, the options for the setup of printers cannot be accessed until you connect a printer with your computer. The setup options are disabled when there is no printer connected with your computer system Microtek ScanPotter Reference Manual 31 E-Mail Application E-Mail application allows you to perform the final scan and attaches the scanned image to the E-mail application you assigned. Please take note that when you key in an E-Mail address in the recipient, the other parts, such as Subject and Content, will be available to be accessed and modified. Check the box of "Send the mail immediately" if you like to send out the scanned file once when it is done. Web Application Web application allows you to perform the final scan and uploads them to the web-based photo application. The selected Web browser will be opened automatically after a scan job is done. 32 Microtek ScanPotter Reference Manual Reset to Default Button Click the button to reset all of the image settings to default values. Microtek ScanPotter Reference Manual 33 Preview Window It is an area where the preview image displayed inside. Image preview window Create Frames The Create Frame function lets you create a new frame in the preview window. This feature allows you to create as many frames as you wish, and each frame can then be saved as an independent file. With the creation of a new frame, the new frame becomes the current selected frame. To create a new frame, 1. 34 Click the Preview button to see a preliminary view of the image. Microtek ScanPotter Reference Manual 2. Point the cursor to the place where you like to create a frame. There are two ways to create new frames: A. Press the Command key and mouse together and then a new frame with the same size as the previous one will appear on the screen. B. Or, press the Command key and mouse together and then drag the mouse to draw a new frame in a size you like. When a new frame is generated, you will see that the new added frame is selected and enclosed in red dotted lines. 3. Repeat steps 1 and 2 until you finish creating all frames wanted. Adjust the Size of Created Frames To resize the new scan frame, you can click and drag on the borders of the scan frame; or, drag the square spot on the edge or those on the corner of the scan frame. Delete the Created Frames The Delete Frame function lets you remove those frames that you previously created. To use the Delete Frame function: Click to delete the selected frame Microtek ScanPotter Reference Manual 35 1. Select the frame to be removed in the preview window. 2. Click the "x" button at the right corner of the frame. Or, press the del key on your keyboard. The system will pop up a confirmation window to ask about if you want to delete the selected frame. Click the Delete button to execute the final action. The selected frame will be removed from the Preview window. 36 Microtek ScanPotter Reference Manual