1
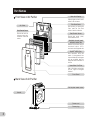
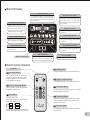
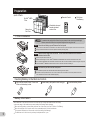
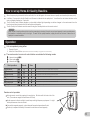
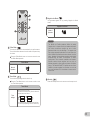
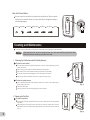
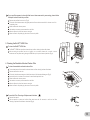
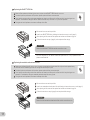
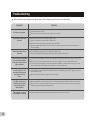
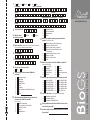
Rabbit Air
TM
User's Guide
www.RabbitAir.com
Model No. SPA-421A and SPA-582A
Safety Instructions
WARNING: When using electrical appliances, basic precautions should always be followed to
reduce the risk of fire, electric shock, and injury to persons, including the following:
1
•
Read all instructions before using the BioGSTM air purifier.
•
Use only as directed by the BioGSTM air purifier user's guide. To reduce the risk of electric shock, do not attempt to service the product
in any way other than in the manner described in this user's guide.
•
Please observe extreme caution when the BioGSTM air purifier is used by or near children.
•
The BioGSTM air purifier is for indoor use only.
•
BioGSTM air purifier operates at 120V AC and 60Hz only.
•
The BioGSTM air purifier is not intended for use in bathrooms, laundry areas and other damp indoor environments. Keep the BioGSTM
air purifier away from water at all times. Never place the unit anywhere near bathtubs or sinks.
•
Do not use the BioGSTM air purifier near fireplaces or in areas where flammable or combustible products or vapors may be present.
•
Turn off the BioGSTM air purifier before unplugging it from power outlet.
•
Always unplug the BioGSTM air purifier from power outlet when not in use and before servicing or cleaning the unit.
•
To reduce the risk of electric shock, the BioGSTM air purifier has a polarized plug. This plug will fit in a polarized outlet only one way. If
the plug does not fit into the outlet, reverse the plug. If it still does not fit, contact qualified personnel to install the proper outlet. Do
not alter the plug in any way.
•
To reduce the risk of electric shock, do not touch the BioGSTM air purifier or its power plug with wet hands.
•
Always keep the BioGSTM air purifier cord away from heated surfaces.
•
Do not operate BioGSTM air purifier if the plug or cord appears damaged or is damaged. Return the unit to authorized service facility
for examination and repair.
•
Any attempts to open or repair the BioGSTM air purifier without written permission from Rabbit Air will void the warranty and could
cause serious personal injury to the user and/or result in severe damage to the unit.
•
Do not use the power cord to lift, pull, carry or drag the BioGSTM air purifier. Avoid pulling the power cord against or around sharp
corners or edges.
•
Do not unplug the BioGSTM air purifier by pulling its power cord. Remove the power plug from its outlet by grasping the plug itself and
pulling gently.
•
When the BioGSTM air purifier plugs into the power outlet, do not put any object into the openings of the unit. Also keep all fingers,
body parts, hair, jewelry and loose clothing away from the openings.
Cautions Concering the Operation of BioGSTM Air Purifier
•
Do not block the intake and air outlet.
•
Do not use the unit near or on hot objects such as a stove.
•
Do not use the unit where it may come into contact with steam.
•
Do not use the unit on its side.
•
Do not install the unit in a location where there is heavy generation of oily residue such as kitchen.
•
Do not use detergent or soap to clean the unit.
•
Do not operate the unit without installing the filters.
•
Do not wash & reuse the BioGSTM HEPA filter.
•
When transporting the unit, always hold the handle on the back of the unit.
Remote Control Limitations
•
Do not use the remote control near inverter lighting equipment or electronic light fixtures.
•
Avoid leaving the remote control in direct sunlight. Heat may interfere with remote control signals.
Installation Guidelines
•
Keep a distance of at least 3 feet of space between air purifier and any equipment which involve electric wave such as televisions,
radios or wave clocks.
•
Leave at least 2 inches of space between the wall and the BioGSTM air purifier.
•
Avoid locations where BioGSTM air quality sensors are exposed to direct wind.
•
Avoid locations where excessive dirt comes into contact with the intake or air outlet.
2
Part Names
Front View of Air Purifier
Air Outlet
Main Unit Display
Indicator lights and main control
button for the air cleaner.
Filter Reset Button
Odor/Chemical Sensor
After replacing or cleaning the
filters, press the filter reset
button to reset the indicators.
Detects odor such as
tobacco smoke, pets,
household chemicals
and etc.
Detects dust, smoke, pollen,
animal dander and etc.
Dust/Particle Sensor
Washable charcoal based
activated carbon filter
Absorbs and removes common
household odors, VOCs,
chemical smells & cigarette odor.
TM
BioGS HEPA Filter
"Next Generation" HEPA filter
made of bio-engineered fiber
traps and destroys the allergens
such as pet dander, dust mite
and pollen which accumulate on
the filter.
Nano-Silver Pre-Filter
Aids in Sterilization and collects
pet hair, Large size allergens
and dust.
Front Panel
Back View of Air Purifier
Slot to place remote control
Handle
Power cord
Power plug
3
Main Unit Display
Unit Status Indicator
Unit status indicator will stay on when the air purifier
is on standby or is operating. The indicator will flash
for 15 seconds when the air purifier is detecting the
air quality baseline.
Particle/Dust Level Indicator
Odor/Chemical Level Indicator
Indicates level of dust or particles by
changing color in five steps from light green,
green, yellow, orange to red. (Light Green
represents good air quality & Red represents
poor air quality)
Indicates chemical and odor levels by
changing color in five steps from light
green, green, yellow, orange to red.
(Light Green represents good air quality
& Red represents poor air quality)
Unit will generate negative ion when this
indicator is on.
Negative Ion Indicator
Filter Cleaning Indicator
Operation Mode Indicators
The filter cleaning indicator will illuminate
when it is time to clean the filters and reset
the indicator.
Indicator lights for Auto Mode, Turbo
Mode, Sleep Mode and Pollen Mode.
Timer Display Indicator
Filter Replacement Indicator
Unit will turn off automatically after preset time duration.
The filter replacement indicator will illuminate
when it is time to replace the filters and reset
the indicator.
Remote Control Receiver
Main Control Button
Fan Level Indicator
You can change operation modes, turning
the unit on and off or changing the fan
speed of the unit by using this control button.
Indicates the fan speed of the air purifier.
Remote Control Operation
Transmitter
Standby Button
Pressing this button will put the unit to standby mode.
Auto Mode Button
The fan speed of the air cleaner will
change automatically depending on the
amount of impurities in the air as detected
by the dust and odor sensors.
Negative Ion Mode Button
Unit will generate negative ion by pressing this button.
Silent or Sleep Mode Button
Turbo Mode Button
Unit will operate at a lower fan speed and
the operation is totally silent.
Unit will operate at the highest fan speed for 10 minutes
and then changes to Auto mode.
Timer Button
Pollen Mode Button
Used to set the Off Timer.
The set time switches every time the button
is pressed as shown below.
1 hours
2 hours
off timer
4 hours
The indicator light shows the remaining time.
The unit stops operating when the timer is up.
This mode of operation is good for the pollen season.
The unit will alternate between low and medium fan
speed every 10 minutes
Rabbit Air
Fan Level Button
The fan speed can be switched between Low, Medium,
High and Turbo.
4
Preparation
List of Parts
Remote Control
BioGSTM HEPA
Filter
Washable charcoal
based activated
carbon filter
Nano-silver
Pre-Filter
3V Lithium
Coin Battery
Rabbit Air
1. Filter Installation
CAUTION
To maintain the quality of the filters, they are placed in the unit within plastic bags.
Please remove the filters from the plastic bags before using the unit.
Step 1 Place the unit facing up and Remove the front panel
1
2
Lay the unit on a flat surface such as table or floor. Make sure not to pinch the power cord on the rear of the unit.
Put your hands at the bottom of the front panel and lift the panel up gently.
TM
Step 2 Remove Plastic bags from the BioGS HEPA filter and Washable charcoal based
activated carbon filter.
1
2
3
4
Remove the pre-filter from the unit.
TM
Remove Plastic bags from the BioGS HEPA filter and Washable charcoal based activated carbon filter.
First, install the Washable charcoal based activated carbon filter. The filter handle should be facing the front panel.
Install the BioGSTM HEPA filter with the word "Front" on the filter frame face toward you.
Step 3 Re-insert the pre-filter and the front panel.
1
2
First, install the pre-filter. The filter handles should be facing the front panel.
Re-insert the front panel back to the unit. Press in the hooks on the bottom of the front panel into the unit.
You should hear a "click" sound if installed properly.
Inserting Battery in the Remote Control.
1 Flip over the remote control. Press and
2 Insert battery with positive side facing up.
slide out the battery holder
Battery Information
5
The batteries for this remote control are for initial use only. Change the batteries when necessary.
Incorrect usage of the batteries may cause battery fluid leakage and/or damage.
When replacing battery, replace battery with new one of the same type (Use 3V Lithium Coin Battery).
When not using the unit or remote control for an extended period, remove the batteries.
(This prevents malfunction of the remote control from battery fluid leakage.)
The batteries are for initial use only and may be depleted within 1 year.
3 Close the battery holder.
How to set up Home Air Quality Baseline.
When the power plug is inserted into the wall outlet, the unit will register the current home air quality as a baseline (reference point).
It will take 15 seconds for the Air Quality Level Sensors to indicate the air quality level. You will see the unit status indicator on the
main unit display flashing for 15 seconds.
The Air Quality Level Indicator displays a color-coded indicator light depending on relative changes to the environment from the
time the power plug is inserted into the wall outlet and thereafter.
The Air Quality Level Indicator can be turned off using the Standby button on the remote control.
Important
When the air is heavily polluted at the time the power plug is inserted, the unit may not work properly in auto mode because
the baseline or reference point is too high. To reset the air quality baseline, unplug the unit and re-insert it when the air
quality is in normal condition.
Operation
Unit can operate by using either:
1.
2.
Remote Control
Main Unit Control Button. (Some features will not be available by using just the unit control button.)
The remote control or main unit control button can activate the following modes.
1
2
3
Automatic mode
Silent mode
Manual mode
Start operation.
1
2
3
4
5
6
7
Auto mode
Turbo mode
Silent mode
Manual mode
Pollen mode
Timer mode
Negative Ion mode
Remote
Main
Unit automatically select fan speed based on air quality.
Unit operates at turbo speed for 10 minutes and then returns to auto mode.
Unit operates at the lowest and the quietest fan speed.
Unit operates at the pre-set fan speed.
The unit will alternate between low and medium fan speed every 10 minutes.
Unit operates for a pre-determined time, then shuts off.
Turns negative ion generator on/off.
Remote control operation
Activate remote control by pressing the any button. Be inline with the front side of the
unit. (The maximum range of effectiveness is 23 feet)
Avoid exposure to direct sunlight; inverter lamp and high frequency equipment. It might
affect performance of remote control.
If air purifier responds properly, a short beep will sound and operation will start.
Please try to replace the battery if the remote control does not work properly.
r
Ai
bit
Rab
6
1 Auto Mode
The fan speed of the air cleaner will change automatically depending on the amount of impurities in the air as
detected by the dust and odor sensors.
Press the Auto Mode button on the remote control to start the Auto Mode operation.
Strat operation
Air Quality
Level Indicator
Fan Speed
Silent
Low
Med
High
Turbo
Mode of Operation
Rabbit Air
ATTENTION
When the air is heavily polluted at the time the power plug is inserted, the unit may not work properly in
auto mode because the baseline or reference point is too high. To reset the air quality baseline, unplug
the unit and re-insert it when the air quality is in normal condition.
The unit will operate at silent fan speed when the air quality level is normal or is below the baseline level.
2 Turbo Mode
The air purifier operates at turbo fan speed for 10 minutes and
then changes to Auto mode.
Press the Turbo Mode button on the remote control to start
the Turbo Mode operation.
Turbo Mode
First 10 Minute
4 Manual Mode
The air purifier operates at the selected fan speed continuously.
Press the Fan Level Button on the remote control to start the
Manual Mode operation.
After 10 Minute
Manual Mode
Mode of
Operation
3 Silent Mode
The air purifier operates at silent fan speed continuously.
Press the Silent Mode button on the remote control to start
the Silent Mode operation.
Silent Mode
Mode of
Operation
7
Low
Medium
Turbo
High
Mode of
Operation
7 Negative Ion Mode
Unit generates negative ion by pressing Negative Ion Mode
button.
Negative Ion Mode
Mode of
Operation
Rabbit Air
ATTENTION
5 Pollen Mode
This mode of operation is recommended for the pollen season.
The unit will alternate between low and medium fan speed every
10 minutes.
Press the Pollen Mode button on the remote control to start
the Pollen Mode operation.
Pollen Mode
Mode of
Operation
The BioGSTM Air Purifier produces millions of healthy
"negative ions" to improve the air you breathe and freshen
your indoor environment through the use of anion
generator inside of the unit discharge. The negative ions
help reduce suspended particulate, and at the same time,
make it difficult for pollutants to become airborne in the first
place. Negative ions are odorless, tasteless, and invisible
molecules that we inhale in abundance in certain
environments. Think mountains, waterfalls, and beaches.
Scientific research shows negative ions may help to
alleviate depression, relieve stress, and boost our daytime
energy. The Rabbit Air BioGSTM air purifier uses non-ozone
clusters to produce negative ions, therefore, our unit has
zero ozone emission and it is harmless to human and the
environment.
6 Timer Mode
The unit will stop operating when the timer is up.
Press the Timer Mode button on the remote control to start
the Timer Mode operation.
8 Standby
Press the Standby button on the remote control to stop the unit.
Timer Mode
Used to set the Off Timer.
The set time switches every time the button is
pressed as shown below.
Timer
settings
1 hours
2 hours
off timer
4 hours
The indicator light shows the remaining time.
The unit stops operating when the timer is up.
8
Main Unit Control Button
You can control the air purifier by the main unit control button. When you press
the button, the operation mode of the air purifier will be changed according to
the following diagram.
Auto Mode
Silent Mode
Low Speed
Medium Speed
High Speed
Turbo Speed
Standby
Cleaning and Maintenance
To maintain optimum performance of this product, please clean the unit and filters as recommended.
CAUTION
When cleaning the unit, be sure to unplug the power cord, and never handle the plug with wet hands.
Electrical shock and/or bodily injury may occur as a result.
1. Cleaning the Unit Surface and Air Quality Sensors
To clean the unit surface:
The unit surface should be cleaned at least once a month or sooner depending on the air
quality of the room.
Use a clean, dry cloth to wipe the external surfaces of the air purifier.
Use a damp cloth to remove stubborn stains and dirt build up if necessary.
Do not use commercial cleaning agent as it may damage the unit surface.
Clean the air inlet and outlet with a dry cloth or a vacuum cleaner. (Fig. 1)
To clean air quality sensors:
The air quality sensors should be cleaned at least once a month or more depending on
the air quality of the room.
Take off the front panel.
Clean the surface of the sensor opening with a vacuum cleaner.
(Fig. 1)
2. Cleaning the Pre-Filter
To clean the pre-filter:
The pre-filter should be cleaned at least once a month or when the filter cleaning indicator
illuminates.
After removing the front panel from the air purifier, run a vacuum cleaner with a nozzle or
brush attachment on low power setting along the filter to pick up the pet hairs or particles.
(Fig. 2)
9
(Fig. 2)
If your pre-filter appears to have dirt that has not been removed by vacuuming, please follow
the steps below to wash the pre-filter.
Remove the pre-filter from the unit. (Fig. 3)
Fill the sink with lukewarm water and gently wash the filter under the water for 2-3 minutes or until it is
completely clean.
Rinse the filter with clean tap water.
Use towel to remove any excess water from the filter.
Allow the filter to dry for a few hours or overnight.
When the filter is completely dry, place back into the air purifier.
(Fig. 3)
3. Cleaning the BioGSTM HEPA Filter
To clean the BioGSTM HEPA filter:
The BioGSTM HEAP filter should be cleaned when the filter cleaning indicator illuminates.
After removing the pre-filter from the air purifier, run a vacuum cleaner with a nozzle or brush
attachment on low power setting along the HEPA filter to pick up the dust and particles (Fig 4).
4. Cleaning the Washable Activated Carbon Filter
(Fig. 4)
To clean the washable activated carbon filter:
The activated carbon filter should be cleaned when the filter cleaning indicator illuminates.
Remove the filter from the unit.
Fill the sink with lukewarm water and add a few drops of mild household detergent (Fig. 5).
Soak the filter for 10 minutes. Do not leave for an extended period of time.
Rinse the filter with clean tap water.
Use towel to remove any excess water from the filter.
Allow the filter to dry for a few hours or overnight.
When the filter is completely dry, place back into the air purifier.
(Fig. 5)
To reset the Filter Cleaning or Replacement Indicator
Remove front panel.
With the power on, press and hold the filter reset button for 3-5 seconds, or until the "red" filter
cleaning or replacement indicator clears itself (Fig.6).
(Fig. 6)
10
Replacing the BioGSTM HEPA filter
When the filter replacement indicator light comes on, replace the old BioGSTM HEPA filter with a new one.
To maintain optimum performance of this product, please replace the filters as recommended.
The air quality and surrounding environment determines the duration and life span of the filter and while it may last longer than
expected, it is advisable to change the BioGSTM HEPA filter at least every 18 months or 1.5 year of unit operation.
The higher the level of pollutants, the shorter the lifespan of the filter.
1
Remove the front cover and the pre-filter
2
Install a new BioGSTM HEPA filer by following the instructions on step 1 and 2 (page 5).
3
After replacing the filter, reset the filter replacement indicator as indicated in page 10.
4
Follow the instruction on step 3 (page 5) and complete the filter change.
ATTENTION
Discard the used BioGSTM HEPA filter and do not store for re-use.
For more information on the BioGSTM HEPA filter replacement or to buy replacement filter,
please contact Rabbit Air.
Replacing the washable activated carbon filter
Replacement indicator light will come on every 18 months, the washable activated carbon filter only need to be replaced every
other time when the indicator light comes on. A single filter can last up to 3 years.
To maintain optimum performance of this product, please replace the filters as recommended.
The air quality and surrounding environment determines the duration and life span of the filter and while it may last longer than
expected, it is advisable to change the washable activated carbon filter every 3 years.
The higher the level of pollutants, the shorter the lifespan of the filter.
1
Remove the front cover and the pre-filter
2
Install a new washable activated carbon filter by following the instructions on step 1 and 2 (page 5).
3
After replacing the filter, reset the filter replacement indicator as indicated in page 10.
4
Follow the instructions on step 3 (page 5) and complete the filter change.
ATTENTION
Discard the used washable activated carbon filter and do not store for re-use.
11
TM
Rabbit Air
Ultra Quiet Air Purifier
SPA-421A/582A
LIMITED WARRANTY
TM
Rabbit Air warrants that your BioGS Air Purifier will be free from defects in material or workmanship for a period of Five (5) years
from the date of purchase. To activate the warranty, please complete and return your warranty registration within 30 days of purchase
TM
of your air purifier to Rabbit Air. In order to ensure unit performance, the filters should be replaced with original BioGS replacement
filters as recommended in this manual (the 'Limited Warranty'). Otherwise the standard warranty time in your country applies.
Within the first 30 days of purchase, Rabbit Air will replace the defective unit at no additional cost and reimburse any shipping
charges. After 30 days, Rabbit Air's obligation and liability under this Limited Warranty is limited to repairing or replacing (at its sole
discretion) the defective unit. The Limited Warranty does not cover replacement filters.
TM
In the event of a malfunction or failure of your Rabbit Air BioGS Air Purifier, please contact Rabbit Air to obtain a return authorization
number and the address of the service center. The return authorization number must be clearly written on the outside of the shipping
box or the shipment may be refused.
Your Limited Warranty remains in effect only if your BioGSTM Air Purifier:
1. Is operated in accordance with the instruction provided.
2. Is connected to a proper power supply (see voltage label on machine).
TM
3. There is no evidence of tampering, mishandling, neglect, accidental damage, modification, and/or repair done to the BioGS Air
TM
Purifier by anyone other than authorized BioGS service personnel.
4. Your warranty registration has been completed and returned to Rabbit Air.
LIMITS AND EXCLUSIONS
There are no express warranties except as listed above.
THE WARRANTOR SHALL NOT BE LIABLE FOR INCIDENTAL OR CONSEQUENTIAL DAMAGES RESULTING FROM THE USE OF
THIS PRODUCT, OR ARISING OUT OF ANY BREACH OF THIS WARRANTY. ALL EXPRESS AND IMPLIED WARRANTIES, INCLUDING
THE WARRANTIES OF MERCHANTABILITY, AND FITNESS FOR A PARTICULAR PURPOSE, ARE LIMITED TO THE APPLICABLE
WARRANTY PERIOD SET FORTH ABOVE.
Some states do not allow the exclusion or limitation of incidental or consequential damages, or limitation of incidental or
consequential damages, or limitations on how long an implied warranty lasts, so the above exclusions or limitations may not apply to
you.
This warranty gives you specific legal rights and you may also have other rights which vary from state to state.
If a problem with the product develops during the warranty period, we will repair or replace it without charge to you. A shipping and
processing fee may apply. To obtain service under warranty, please contact Rabbit Air at 1-888-866-8862 or by email at
[email protected]
12
Troubleshooting
Before calling for repair, please review the list below. The problem may not be due to unit malfunction.
Symptom
Unit does not operate.
Solution
Check if power plug is loose.
Press the main unit control button or any buttons on the remote
The remote control does
not work.
Check if the battery has been depleted. (Refer to P.5)
Check if the battery is inserted correctly. (Refer to P.5)
Point the remote control directly towards the main unit display.
Fluorescent lighting flickering in the room may affect the signal of the remote control. Please service the
fluorescent lights.
Odors and smoke are not
removed.
The unit does not operate
when cigarette smoke is
in the air or when the air is
highly polluted.
In auto mode, the unit
operates at high speed
even when the air is
clean.
The filter replacement
indicator light remains
activated even after
replacing filter.
The negative ion mode
indicator light is flashing.
13
Clean the filters if they appear to be heavily soiled. (Refer to P.9)
Check if all the plastic bags that wrap the filters are being removed. (Refer to P.5)
Check if the unit is installed in a location that is difficult for the sensors to detect the smoke or the air quality.
Check if the odor or dust sensor openings are blocked or clogged. Clean the sensors (Refer to P.9)
The unit may not work properly in auto mode because the baseline or reference point is too high. To reset
the air quality baseline, unplug the unit and re-insert it in a well-ventilated area.
The sensitivity of the sensor becomes unstable when the sensor opening is blocked or clogged. Clean the
sensors (Refer to P.9).
Reset the air quality baseline, unplug the unit and re-insert it.
After replacing filters, connect the power cord to an outlet and press the filter reset button on the main unit.
With the power on, press and hold the filter reset button for 3-5 seconds, or until the "red" filter cleaning or
replacement indicator clears itself (Refer to P.10).
Clean the negative ion generator inside the discharge outlet with a vacuum cleaner.
1.
Mr. 2.
First Name
Mrs. 3.
Ms.
4.
Miss
Initial Last Name
Street
Apt. No.
City
State/Province ZIP/Postal Code
Country
www.RabbitAir.com
E-mail
Your date of birth:
Month
3.
4.
Marital status: 1.
Date of purchase:
5.
Model number: (please refer to owner's manual or the back
Month
Day
Married
Name of store where purchased:
5.
6.
7.
8.
12.
Own
Rent
Where did you first learn about Rabbit Air
products?
1.
2.
3.
4.
5.
6.
7.
8.
9.
Received as a gift
Newspaper
Salesperson
Friend/Relative
Online
Magazine
Prior experience with Rabbit Air brand
TV
Other
13.
(check up to 3)
Rabbit Air reputation
Prior experience with Rabbit Air
Value for the price
Quality
Size/dimension
Living Room
Bedroom
Child's Room
Family Room
Kitchen
6.
7.
8.
9.
10.
Office
Hallway
Bathroom
Home workshop area
Other
Which group describes your annual family income?
Under $29,999
$30,000-$39,999
$40,000-$49,999
$50,000-$59,999
$60,000-$74,999
$75,000-$99,999
7.
8.
9.
10.
11.
12.
$100,000-$124,999
$125,000-$149,999
$150,000-$174,999
$175,000-$199,999
$200,000-$249,999
$250,000 & over
Level of education: (check highest level completed)
1.
2.
3.
What factors most influenced your decision to
purchase this Rabbit Air product?
1.
2.
3.
4.
5.
Where do you plan to use this Rabbit Air product?
1.
2.
3.
4.
5.
6.
14.
Relieve Allergy or Asthma Symptoms
Improve Air Quality for Kids
Improve Home Comfort in general
Germicidal Protection/Relieve Cold &
Flu Symptoms.
Reduce Smoking Odors in House
Reduce Pet Odors
Reduce Cooking Odors
Other
(Check all that apply)
1.
2.
3.
4.
5.
Do you own a house or rent?
Style/appearance
Product availability
Advertisement
Other
What is the primary reason you purchased this
product? (Check only one)
1.
2.
3.
4.
of your product to locate the model number)
7.
10.
Single
Year
Serial number:
9.
2.
11.
6.
8.
6.
7.
8.
9.
Year
Completed High School
Completed College
Completed Graduate School
15.
If this product was available in different color, which
color would you prefer?
16.
Are there other features that you would like to see on
this product?
Ultra Quiet Air Purifier
2.
Rabbit Air
TM
1.
Please do not send products or
other correspondences to this address
First-Class
Postage
Required
Post Office will
not deliver
without proper
postage.
Rabbit Air
201 West Garvey Ave., Suite 102-168
Monterey Park CA 91754-7418
TM
WARRANTY REGISTRATION FOR
Ultra Quiet Air Purifier
RETURN THIS CARD NOW FOR:
Product Protection
With the information you provide we can confirm the date of purchase of your product.
This confirmation is of benefit to you, especially if your original proof of purchase is lost.
Proof of Ownership
Your model number, serial number, and other information will be kept in our files.
Please complete and return this registration within 30 days at purchase in order to receive
your 5 year Limited Warranty.
Or register online at: www.RabbitAir.com
Copyright © 2007 All Rights Reserved
Please fold and seal with tape before mailing. Do not staple.