1
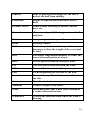
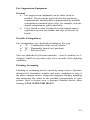
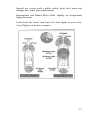
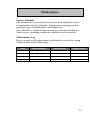
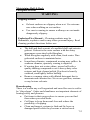
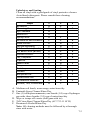
Thank you for choosing WARRIOR BOATS For your boating and fishing enjoyment Please read the Owner’s Manual completely before operating your new Warrior Boat. It will aid you in understanding the operation and maintenance of the many unique features of your boat. If you need further assistance with any special applications or problems, please contact your Warrior Dealer or Warrior Boats. We wish you many happy hours of boating and fishing fun in your new Warrior Boat. 2012 Certifications and Specifications Boat Model:_________________________ Side Console Dual Console Backtroller Serial #:_____________________________ Color:_______________________________ Outboard Engine: Brand:_____________Horsepower:___________ Outboard 2 Stroke 4 Stroke Serial #:_________________________________ Engine #:________________________________ Drive #:_________Transom Plate #:___________ Gasoline Kicker Engine: Brand:______________Horsepower:__________ 2 Stroke 4 Stroke Serial #:____________ Trolling Motors – Electric Bow Brand:_______________________________ Model:_________________Serial #:____________ Transom Brand:____________________________ Model :________________Serial #_____________ Trailer Model:_____________________________ Single Axle Tandem Axle Serial #:__________________________________ Table of Contents 1 Introduction/Warranty 2 Safety 3 Navigation 4 Livewell's 5 Wiring 6 Steering 7 Maintenance 8 Trailers Introduction This manual has been compiled to help you operate your craft with safety and pleasure. It contains details of the craft; typical equipment supplied or fitted in its systems and information on its operation and maintenance. Please read it carefully, and familiarize yourself with the craft before using it. If this is your first craft, or you are changing to a type of craft you are not familiar with, for your own comfort and safety, please ensure that you obtain handling and operating experience before “assuming command” of the craft. Please keep this manual in a secure place, and hand it over to the new owner when you sell the craft. Warranty & Construction Standards Your boat manufacturer may provide a Warranty Statement describing terms and conditions under which defects in your boat will be repaired. Familiarize yourself with the warranty and follow instructions regarding proper operation and maintenance. Lack of attention to instructions can void the warranty. Specific Data You need to know specific data about your boat’s capabilities and requirements. This type of information is available from the manufacturer and/or dealer. Before operating equipment associated with your boat, particularly the engine, read the owner’s manual accompanying the equipment. Registration Register your boat in the area where it is used most frequently. Many areas require additional registration when an out-of-area boat is used within their boundaries. Contact boating authorities or your marine dealer for registration requirements and forms. 1-1 Education Learn how to operate your boat safely. This book is not intended to teach everything you need to know. We strongly urge you to get training in proper boat handling and navigation before taking command. Some agencies which offer boating courses are: U.S. Coast Guard Auxiliary United States Power Squadrons Canadian Power and Sail Squadrons Red Cross State Boating Offices Yacht Clubs Ask your marine dealer or check your local telephone directory for agencies near you. Information is also available from the Boat U.S. Foundation by calling 1-800-336-BOAT. International: Consult your dealer. 1-2 Owner/Operator Responsibilities The law requires the owner/operator to assist any person or boat in distress as long as he does not endanger his boat. The owner/operator is also responsible for understanding and complying with the following procedures and operational requirements: State registration Insurance Warranty registration Warranty terms and conditions Rules of the road Break-in procedure Proper maintenance of boat and its systems Safety equipment Safety training of passengers and crew Knowledge of boat systems Seaworthiness/operational inspection Safe operating practices Avoiding use of drugs/alcohol Environmental regulations Accident reports Nautical Terms Aft Beam Bow Bulkhead Chine Cleat Cockpit Deck Draft Toward the rear or stern of the boat. The width of a boat. The fore part of a boat. Vertical partition in a boat. Meeting juncture of side and bottom of boat Deck fitting with arms or horns on which lines may be made fast. An open space from which a boat is operated. Upper structure which covers the hull between gunwales. Depth of water required to float boat and its propulsion system. 1-3 Fenders Rope or plastic pieces hung over the side to protect the hull from chafing. Freeboard Height of exposed hull from water line to deck. Ground Tackle General term referring to anchor, anchor lines, etc. Gunwale (Pronounced gun’l) Meeting juncture of hull and deck Hatch An opening in deck to provide access below. Helm Steering console. Hull The basic part of a boat that provides buoyancy to float the weight of the vessel and its load. Keel The major longitudinal member of a hull; the lowest external portion of a boat. Knot Unit of speed in nautical miles per hour. Lee The side that is sheltered from the wind. PFD Personal flotation device; live preserver. Port Term designating the left side of the boat. Sheer Curve of sweep of the deck as viewed from the side. Stern The aft end of a boat. Transom Transverse part of the stern. Wake Disturbed water that a boat leaves behind as a result of forward motion. Windward Toward the direction from which the wind is blowing. 1-4 Safety The freedom of boating is a magnificent feeling. However, fun can be overtaken by disaster if you ignore safety precautions. This book presents basic guidelines, but it cannot describe every possible risk you may encounter. You are strongly urged to: Take a boating safety course and get hands-on training from your boat dealer. Regularly review safety requirements. Maintain your boat and its systems. Have your boat inspected at least annually by a qualified mechanic or dealer. Fire Fire is always serious, but it usually can be brought under control if you are prepared and act quickly. Extinguishers required by the Coast Guard or other boating law enforcement agencies are only the minimum needed. Install fire extinguishers where they might be needed, and test equipment and emergency plans regularly. Prevention is the safest method of fighting fire. Remember: Use extreme caution and refrain from smoking while fueling. Run exhaust blowers at least 4 minutes before starting engines. Use “sniff test” to check for fumes in bilge and engine compartment. Store flammable material in safety-approved containers. Ensure ventilation systems are unobstructed. Remove canvas before starting engine. Extinguish smoking material carefully. Disconnect electrical system from its power source before performing maintenance. Observe the boat carefully while the electrical system is energized. Only a qualified marine electrical technician may service the boat’s electrical system. 2-1 Fire Suppression Equipment General Fire suppression equipment can be either fixed or portable. Fixed systems are located in the machinery compartments, and should be supplemented by portable extinguishers mounted at key sites, for example, near the engine compartment, galley and helm. Coast Guard or other boating law enforcement agency regulations govern the number and type of devices on board. Portable Extinguishers Fire extinguishers are classified according to fire type: “A” – Combustible solids (wood, plastic) “B” – Flammable liquids (oil, gasoline) “C” – Electrical fires Sizes are identified by Roman numerals – from I (smallest) to V (largest). Small size provides only a few seconds of fire-fighting capability. Flooding, Swamping Flooding or swamping can be caused by many factors. Operator disregard for hazardous weather and water conditions is one of the most common causes, along with improper loading, handling and anchoring. Be aware of the possible consequences of your actions. Have everyone wear a personal flotation device when boating. STAY WITH THE BOAT! 2-2 Remember: Certification plate states maximum weight/number of persons the boat will handle safely under normal conditions. Give yourself an extra margin in rough water. Install drain plugs before launching. Ensure proper bilge pump operation. Anchor from bow if using only one anchor. Match speed to sea conditions. Adjust trim and close openings in rough weather. Reverse engine only when headway slows to prevent following sea from swamping boat. Operate boat within maneuvering speed limitations. Lifesaving Equipment Wear a personal flotation device (PFD) when boating. Boat operators are required to carry one wearable personal flotation device (Type I, II, III or V) for every person on board. Boats must also have at least one throwable device (Type IV). Classifications of PFD’s are: Off-Shore Life Jacket (Type I) – most buoyant, it is designed to turn an unconscious person face up; used in all types of waters where rescue may be slow. Near-Shore Life Vest (Type II) – “keyhole” vest with flotation-filled head and neck support is also designed to turn a person face up, but the turning action is not as pronounced; used in calm, inland waters or where quick rescue is likely. Flotation Aid (Type III) – vest is designed so conscious wearers can turn face up; often designed for comfort while engaged in sports such as skiing. Throw Devices (Type IV) – horseshoe buoys, ring buoys, and buoyant cushions are designed to be grasped, not worn. Special-Use Devices (Type V) – sailboat harnesses, white-water vests, float coats, and hybrid vests. 2-3 When purchasing PFDs, look for a tag saying they are approved by the national boating law enforcement agency. Children and non-swimmers must wear PFDs at all times when aboard. All passengers and crew should wear them, since an unworn PFD is often useless in an emergency. The law requires that PFDs if not worn, must be readily accessible, that is, removed from storage bags and unbuckled. Throwable devices must be readily available, that is, right at hand. The operator is responsible for instructing everyone on their location and use. Size PFDs for the wearer. Children require special attention. Test PFD buoyancy at least once a year. Dry before storage. 2-4 Impaired Operation WARNING CONTROL HAZARD – Federal laws prohibit operating a boat under the influence of alcohol or drugs. These laws are vigorously enforced. Give special attention to the effects of alcohol and drugs while boating. No other single factor causes so many marine accidents and deaths. Wind, waves and sun heighten the effects of alcohol and drugs, so your reactions may be quickly impaired. Load Capacity The U.S. Coast Guard requires boats less than 6.4 meters (20 feet) to have a certification plate stating the maximum number of persons and the maximum weight the boat will handle safely under normal conditions. ISO international directives require a certification plate on boats up to 24 meters (78.7 feet). Certification plate is attached to the hull near the helm or transom. Overloading violates regulations. Do not carry more weight or passengers than indicated on the certification plate. The number of seats is not necessarily an indication of the number of persons a boat can carry safely. When boating on plane (above idle speed), carry no more passengers than there are real seats, and insist that passengers sit down in those seats. The presence of the certification plate does not relieve the owner/operator from responsibility for using common sense and sound judgment. Overloading, improper loading and distribution of weight are significant causes of accidents. Give yourself an extra margin of safety in rough water. 2-5 Propulsion CAUTION Boat power capacity has been rated for maximum performance and safety. Do not exceed the engine rating posted by the manufacturer. Exceeding power capacity is illegal in many areas. Never use a propeller which allows the engine to exceed recommended RPM under normal wideopen throttle operation. Propulsion system consists of an engine turning a shaft, which transfers power to a propeller. Mounting may be outboard, stern drive (inboard engine/outboard propeller), or inboard. WARNING PERSONAL INJURY HAZARD – Failure to securely install and maintain outboard motor may cause engine to eject `` during operation, causing death, serious injury or property damage. Stability Loose fluids or weight within the hull substantially reduces stability. Keep bilge area as dry as possible and close openings in rough weather. 2-6 Weather Learn to understand weather patterns and signs of change. Bad weather and sea conditions can cause an uncomfortable and unsafe situation. Here are a few basic weather-related rules: Check the forecast and sea conditions before leaving and while underway. A sudden change in wind direction or speed or an increase in wave height indicates deteriorating weather. Wear a personal flotation device. If a storm approaches, immediately seek a safe harbor. If a storm hits, head the bow of your boat into the wind. If you encounter fog, determine your position, set a safe course, slow down and alert other boats of your presence with a sound signal. Accident Report The U.S. Coast Guard and state agencies require a report to be filed by the operator of a boat involved in an accident involving loss of life, disappearance, injury requiring treatment beyond first aid, loss of boat or property damage exceeding $500. Contact the state boating agency where the accident occurs for a copy of the state’s accident report form. In the absence of a state enforcement agency, contact the Coast Guard office nearest the accident site. Other countries have other reporting requirements. Consult your nation’s boating law enforcement agency. 2-7 Recommended Equipment A wise boater will include many of the following items: Visual distress signals for day and night use (required in some areas; consult local regulations) Marine radio Compass Depth sounder Charts Spare keys Portable radio with weather band Waterproof flashlight Batteries Mooring lines Fenders Extra propeller Ground tackle (at least 2 anchors, rope, shackles) Paddles or oars Boat hook Safety approved gas can, properly stowed Bailer Spare parts kit (spark plugs, fuses, etc.) Tool kit First aid kit Wake/Wash CAUTION Reduce speed in congested waterways. The time to think about emergencies is before they happen. Plan ahead. Know what to do before you encounter any of these situations. Wear a PFD when boating. 2-8 ` WARNING BURN HAZARD – Swim against the current or wind if you abandon ship. Leaking fuel will float with the current and may ignite. Explosion If explosion is imminent, put on PFDs, grab distress signals and survival gear, and immediately abandon ship. Fire Turn off engines, generators, stoves and blowers. Extinguish smoking materials. Have portable fire extinguishers ready. Do not breathe fumes or vapors caused by fire or extinguisher. If fire is in engine compartment, discharge portable fire extinguishers through engine compartment access plate, if equipped. Do not open engine hatch as this feeds oxygen to the fire. If you have access to fire, direct contents of extinguishers at base of flames, not at the top. Throw burning materials overboard if possible. Move anyone not needed for firefighting operations away from the flames. Signal for help. Put on PFDs, grab distress signals and survival gear, and prepare to abandon ship. Abandoning Ship When clear of danger, account for all who were on board, and help those in need. Use distress signal. Keep everyone together to make rescue easier. 2-9 Flooding, Swamping or Capsizing STAY WITH THE BOAT! A boat will usually float even if there is major hull damage. Rescuers can spot a boat much easier than a head bobbing in the water. Signal for help. Collision Account for everyone on board. Check for injuries. Inspect structural damage. Reduce flooding. Signal for help. STAY WITH THE BOAT! Person Overboard Immediately sound an alarm and keep pointing to the person overboard. Throw a life preserver even if the person is wearing a PFD. It will serve as a marker. If equipped with a GPS with “man overboard” features immediately depress “man overboard” button to mark location. Immediately stop or slow boat, then circle toward victim. Keep person overboard on helm side so operator has the person constantly in sight. Approach from downwind and move alongside into the wind for pickup. When almost alongside, stop the engine in gear to prevent dangerous propeller “wind milling”. As part of your emergency plan, consider what to do if you were alone and fell overboard (e.g., wear PFD, keep signal device in PFD, attach emergency stop switch lanyard to yourself). 2-10 Drowning Swim to rescue a drowning victim only as a last resort. Immediate resuscitation is critical! At least two people on board should be certified in CPR. Keep the victim warm. Use care in handling. Spinal injury may exist if the victim fell overboard. Signal for help. Medical Emergency In an emergency, you may be far from professional medical assistance. Be prepared. Take a first aid course, and carry a first aid kit. Be aware of special conditions that may affect anyone on board. Radio Communication Radio is the boat operator’s main method of receiving safety information and summoning aid. VHF-FM radio is the primary means of short-range communication. VHF-FM Channel 16 is designated for emergency use. Such situations can be categorized as: Emergency – “MAYDAY, MAYDAY, MAYDAY” – Used when a life or vessel is in imminent danger. Urgency – “PAN-PAN, PAN-PAN, PAN-PAN” (Pronounced PAHN-PAHN) – Used when a person or vessel is in some jeopardy, less than indicated by a Mayday call. Safety – “SECURITY, SECURITY, SECURITY” (Pronounced SAY-CURE-IT-TAY” – Used for navigational safety or weather warning. An emergency situation will be hectic and there will not be time to learn proper radio procedure. LEARN WHAT TO DO BEFORE YOU NEED TO DO IT. 2-11 If you hear a distress call, stop all radio transmissions. If you can directly assist, respond on the emergency frequency. If you cannot assist, do not transmit on that frequency. However, continue to monitor until it is obvious that help is being provided. Seaworthiness / Operational Inspection Update checklists when equipment is added or modified. Before Departure: Weather – forecast safe Required documents – on board Navigation charts and equipment – on board Safety equipment – on board Safety training – passengers and crew instructed on safety procedures and location and use of safety equipment Drain plugs – installed Bilge pumps – working and clean Blower – working Navigation lights – working Horn – working Fuel tank(s) – filled; less than rated capacity (allow for expansion) Fuel system – no leaks Fuel filter – tight and clean Power steering fluid – filled Steering system – working smoothly and properly Crankcase oil – level within range Battery – electrolyte level within range Float plan – filed with friend or relative 2-12 Trailering (if applicable): Boat position – secure on trailer Tiedowns – tight Winch – locked Trailer hitch – connected Engine clearance – in trailering position Safety chains – attached Electrical – lights, brake lights, turn signals working Mirrors – adjusted for trailering After Return PFDs and other safety gear – dry, stored for next use Fuel tanks – filled (allow for expansion) to prevent condensation EXPLOSION/FIRE HAZARD Store flammable materials in safety-approved containers. Keep containers in a locker designed by the boat manufacturer for that purpose. Never store flammable material in a non-vented space. Observe “No Smoking” while fueling. Run exhaust blower at least 4 minutes before starting engine. Check bilge and engine compartment for fumes. Keep ventilation system free of obstructions. Never modify the vent system. Fill less than rated capacity of tank. Allow for fuel expansion. If fuel enters bilge, do not start engine. Determine cause and severity. Contact a knowledgeable marine service to remove fuel. Do not pump bilge overboard. Inspect fuel system regularly for leaks. 2-13 Operation Fueling: Fuel system – no leaks Bilge pump – operating properly Bilge – clean, no leaks Float plan – notify person with whom you filed plan Follow engine manufacturer’s recommendations for types of fuel and oil. Use of improper products can damage the engine and void the warranty. NOTICE Use fresh fuel. Fuel that has been in a tank too long can form gum and varnish, which may affect performance. General Fuel during daylight. Check fill plate label to ensure fuel is placed only in fuel tank. Avoid spills. Know your fuel capacity and consumption. Record the amount of fuel used since your last fill-up, and compute the engine’s hourly fuel usage. As a backup check to your fuel gauge, deduct the average hourly fuel usage from fuel tank capacity. Observe the “rule of thirds”: one-third fuel for trip out, one-third for return, one-third for reserve. Allow an additional 15 percent fuel reserve when operating in rough seas. 2-14 Starting Engine – General Checklist: Fuel – supply adequate, including reserve Oil – level adequate Battery (s) – power adequate Drain Plugs – installed Gear – neutral Bilge Blower – run at least 4 minutes before starting “Sniff Test” – no leaks or fumes Emergency Stop Switch – attached to operator and stop switch Gauges (after ignition and warm-up) – readings normal (see engine operator’s manual) 2-15 Navigation Rules of the Road CAUTION Follow navigation rules to avoid collisions. Less maneuverable boats generally have the right of way. Steer clear of the stand-on (right-of-way) boat and pass to its stern. If a collision appears unavoidable, both vessels must act. Prudence takes precedence over rightof-way rules if a crash is imminent. Navigational rules are commonly called Rules of the Road. There are two types: Inland Rules apply to vessels on Unites States inland waters; International Rules apply to vessels on the high seas. Basic principles agree, but some differences exist. Learn and follow the rules that apply to your area. It is impossible to establish rules for every situation. Therefore, it is important to act prudently. This book is not intended to teach all the rules of navigation. We present a general overview, and strongly urge you to get training before taking command of your boat. Understand important terminology distinctions: Power-Driven Vessel – A boat propelled by an engine (including a sailboat propelled by engine and sail). Sailing Vessel – A boat propelled by sail only, with no engine in operation. Underway – A boat not anchored, not made fast to shore and not aground. Vessel engaged in fishing – A commercial fishing boat with gear that restricts maneuverability (does not include trolling lines or other gear that does not restrict maneuverability) 3-1 WARNING STABILITY HAZARD Load boat properly. The manufacturer’s load rating is the maximum under normal conditions. Adjust downward if weather, water or other conditions are adverse. Allow passengers to ride only in areas that do not pose a hazard to themselves or the boat. Do NOT allow passengers to ride on the bow of a closed bow boat. Observe manufacturer’s recommended on-plane seating locations. Passengers should remain seated while boat is moving. Personal Injury Hazard – Stay alert. Use of drugs, alcohol or other substances, which impair judgment, poses a serious threat to yourself and others. The boat operator is responsible for the behavior of passengers. Drowning Hazard – Boats must carry one wearable personal flotation device (PFD) for every person on board. Boats must also have at least one throwable life preserver. Slipping Hazard – Wet decks are slippery. Wear proper footwear and use extreme caution on wet surfaces. 3-2 Boarding (Wear a PFD) Board only one person at a time. Step or climb into the cockpit. Never jump into a boat. Load gear after you are aboard. Carrying gear while boarding can cause you to lose balance. Distribute weight evenly. Instruct passengers where to sit during on-plane operation to reduce possibility of falling overboard during high-speed maneuvers. If gear is not immediately needed, stow it in secure area. Safety gear must be immediately accessible at all times. Children and non-swimmers must wear personal flotation devices at all times when aboard. All passengers and crew should wear them since an unworn PFD is often useless in an emergency. The law requires that PFDs, if not worn, must be readily accessible, that is, removed from storage bags and unbuckled. Throwable devices must be readily available, that is, right at hand. The operator is responsible for instructing everyone aboard on their location and use. The best precaution is to wear a PFD when boating. 3-3 Starting, Stopping WARNING Control Hazard The operator must be in correct position – seated, facing forward, hands on controls – when engine is running. Ensure all items are secured. Loose objects can become dislodged. Personal Injury Hazard Shift to neutral before starting. Keep hands, feet, hair and clothing away from the engine and propulsion system. Attach emergency stop switch lanyard to operator. CAUTION Stop engine immediately if oil pressure is lost or engine temperature rises above normal. Do not restart engine until problem is corrected. See the engine operator’s manual for detailed instructions. Do not ignore any alarm! Correct problem before casting off. 3-4 Basic Rules Power-Driven Vessels must keep out of the way of: A vessel unable to maneuver A vessel whose maneuverability is restricted A vessel engaged in commercial fishing A sailing vessel Sailing Vessels must keep out of the way of: A vessel unable to maneuver A vessel whose maneuverability is restricted A vessel engaged in commercial fishing Vessels Engaged in Commercial Fishing must keep out of the way of: A vessel unable to maneuver A vessel whose maneuverability is restricted 3-5 Boat Navigational Lights Boats must display navigational lights when operating between sunset and sunrise and during periods of reduced visibility, e.g., fog or rain, to alert other boats to their presence and course. Although boat manufacturers usually provide lights to comply with these rules, it is the operator’s responsibility to know and comply with local laws. Learn to recognize light groupings from different positions: Masthead Light – white light forward 8 o’clock to 4 o’clock (approximate) Sidelight – green light starboard 12 o’clock to 4 o’clock (approximate); red light port 8 o’clock to 12 o’clock (approximate) Sternlight – white light aft 4 o’clock to 8 o’clock (approximate) All-Round Light – white light showing in all directions Anchor Light – white all-round light. Inland Rules exempt boats in special anchorage areas. Some other types of navigational lights include: Sailboats operating under engine power must display the same lights as other power-driven vessels. Sailboats under sail only must display green and red sidelights and a white sternlight, but not a white masthead light. Boats under sail may display two allround lights, red over green, near the top of the mast. Sailboats under 7 meters (23 feet) should display such lights if possible, but if not, the boat must have an electric torch or lighted lantern to show a white light in time to prevent collision. Commercial fishing vessels stopped while trawling must display a green all-round light over a white all-round light. Commercial fishing vessels stopped while engaged in other than trawling operations must display a red allround light over a white all-round light. Towing vessels may display a yellow flashing or fixed light. Enforcement vessels may display a flashing blue light. White strobe light is used as a distress signal. 3-6 Special use vessels such a public safety, pilot, dive boats and dredges have other light requirements. International and Inland Rules differ slightly on navigational light placement. Understand the basics and learn the boat lights in your area. Avoid lights you do not recognize. 3-7 Charts & Aids to Navigation A vast expanse of open water off your bow might appear to be a go anywhere playground or a place to become hopelessly lost. It is neither. How do you know where to go? Just as maps and signs guide you on land, nautical charts and buoys guide you afloat. Nautical Charts provide vital information on water hazards and safe channels. Several government agencies are responsible for charts for different types of waterways: National Ocean Service, U.S. Army Corps of Engineers, Defense Mapping Agency, and Canadian Hydrographic Service. Charts are available at retail stores in many boating areas. We strongly urge you to attend boating classes to learn charting and navigation skills before taking the helm of your vessel. Buoys are strategically placed to keep you on course and out of hazardous areas. Know their meaning and use them appropriately. Buoys are identified by shape, color, light, and in reduced visibility by sound. There are two international buoyage systems, one using Red Right Returning as a guide (Region B) and the other using Green Right Returning (Region A). The map below indicates regions using each system. The illustration on the next page indicates placement of basic navigational aids and colors for each region. Example: Red Right Returning – when returning from sea or going upstream, keep red markers to starboard (right) and green markers to port (left). When outbound, reverse the colors – red to port and green to starboard. Buoys are sometimes not on station due to currents, heavy seas or other conditions. Consult Notice to Mariners publication for information on buoys off station and light outages. 3-8 3-9 LIVE WELL CONTROL CENTER Livewell System a. Filling a livewell Eagle/Falcon models a. Depress “Aerator” switch b. Depress either “Auto” or “Manual” switch Auto Mode – When “Auto” is depressed, the aerator pump will run on the adjustable timer. The more the timer is turned up, the longer the run time will be. Manual Mode – The aerator pump will run continuously. b. Recirculation a livewell Eagle/Falcon models a. Depress “Recirculate” switch b. Depress either “Auto” or “Manual” switch Auto Mode – When “Auto” is depressed, the recirculator pump will run on the adjustable timer. The more the timer is turned up, the longer the run time will be. V166/V177 Backtroller Hawk Aerator switch on stern panel fills stern livewells. V166/V177 Side Console Hawk Aerator switch on dash panel fills stern livewells. V1783/V1890 Backtroller Falcon V1783/V1890 Side Console Falcon V1783/V1890 Backtroller Eagle V2090 Backtroller Eagle and Tournament Series Aerator switch on dash/stern panel fills stern livewells. Recirculator switch on dash/stern panel recirculates stern livewell on port side. Aerator switch on stern panel (unmarked) fills bow livewell. Aerator switch on bow panel fills bow livewell. Recirculator switch on bow panel recirculates bow livewell. 4-1 V1783/V1890 Side Console Falcon Aerator switch on dash panel fills stern livewells. Recirculator switch on dash panel recirculates stern livewell on port side. Aerator switch on bow panel fills bow livewell. Recirculator switch on bow panel recirculates bow livewell. V1800 Side Console & Dual Console Eagle Aerator switch on dash panel fills stern livewell, bow livewell, and baitwell in front of console. Recirculator switch on dash panel recirculates stern livewell on port side. Aerator switch on bow panel fills bow livewell and baitwell in front of console. Recirculator switch on bow panel recirculates bow livewell. V1898/V193/S21-21 Dual Console Eagle O/B Aerator switch on dash panel fills stern livewells. Recirculator switch on dash panel recirculates stern livewell on port side. Aerator switch on bow panel fills bow livewell and bow baitwell. Recirculator switch on bow panel recirculates bow livewell. Air Locking Sometimes livewell pumps tend to airlock, making them inoperable. You will hear the pump run, but no water will be pumped. Turn pump off. Put boat in reverse. After a few seconds turn the pump on again. 4-2 4-Wire boat Wiring Devices The Marinco system provides a convenient way of connecting a trolling motor or a battery charger to your boat’s batteries. The Marinco 4-wire 12V battery charger plug (red) is used to charge two (2) 12V batteries from a single 12V-battery charger. It can also be used to connect a 12V motor to two (2) 12V batteries. It can also be used to connect a 24V only motor. Both of these plugs are used with the 4-wire receptacle. Electrical wire has resistance. The smaller the wire, the more resistance there is. That is why trolling motor manufacturer’s recommend 6 AWG wire between the trolling motor and the batteries. A 6 AWG wire has about one-fourth the resistance of the commonly used 12 AWG wire. Also, wires should be kept as short as possible to keep resistance to a minimum. The Marinco line of plugs and receptacles are engineered specifically for marine use. All the electrical contacts, blades and terminals are nickel plated copper alloy for maximum conductivity and corrosion protection. Connecting Troll Harness to Battery All Warrior Eagle and Falcon models have two troll motor harnesses, each containing 4 wires. One harness comes from the Power Charge Panel, the other from the Bow Panel. The solid red and black wires go to battery #1. The red and black wires with the blue tracer strips go to battery #2. This 4-wire system does not require an external jumper wire for 24 volt. The 24 volt jumper is contained in the 12/24 Marinco plug (red). 5-1 Plugs and Receptacles – 12/24V Locking Charge plug (red) connects to a 12V-battery charger to allow simultaneous charging of two (2) 12V batteries when plugged into receptacle. Trolling Motor Plug connects to the trolling motor. Jumpered internally to supply 12V or 24V power to the trolling motor when plugged into the receptacle. Corrosion resistant receptacle made of glass reinforced nylon. Will accept 8 gauge stranded wire, or up to 6 gauge with ring terminals. Plug Wiring – Charger/12 Volt trolling motor Prepare the wires on the battery charger or trolling motor by stripping 5/8” of insulation off the ends. On the battery charger, the clamps must be cut off the wires. Feed the wires through the plug housing. On the 12V charger plug (red) connect the positive wire toa the terminal marked “12” and connect the negative wire to the terminal marked “-“. 12 Volt Trolling Motor On the 12 volt trolling motor plug (red), connect to positive 12 volt wire to the terminal marked “12”, and the negative wire to the terminal marked “-“. 12 Volt Troll Plug (Red) Use this plug for 12-volt trolling motors or chargers. Attach red wire to port marked “12”. Attach black wire to port marked “-“. Make sure all fasteners are tight. 5-2 24 Volt Trolling Motor On the 12/24V trolling motor plug, connect the positive 24V wire to the terminal marked “24”, and the negative wire to the terminal marked “-“. Tighten all terminal screws to 14-20 in.-lb torque. Attach the body of the plug to the housing by the two assembly screws. Tighten the two strain relief screws at the rear of the housing. 12/24 Volt Troll Plug (Black) Use this plug for 24 volt trolling motors. Attach red wire to port marked “24”. Attach black wire to port marked “-“.Make sure all fasteners are tight. Power Charge Panel The Warrior Power Charge Panel is a multi functional electrical system. It can perform 5 different functions that include: a. 12/24-Volt-trolling motor plug in. b. 12-Volt accessory plug in. c. “On Board” battery maintainer. d. Emergency Power Supply e. Battery charger plug in 12/24 Volt trolling motor plug in Attach the proper plug to your trolling motor: Black plug – 24 Volt Red plug – 12 Volt Plug trolling motor into “Troll” port. 12 Volt accessory plug in Attach a red plug – 12 Volt to an accessory, i.e. spotlight, and plug into either the “start” port of “Troll” port. 5-3 On board battery “Maintainer” Plug Power Charge jumper into “start” and “Troll” ports. Start outboard. As the outboard runs, it will charge the cranking battery and the trolling motor batteries simultaneously. Important: Do not leave jumper plugged into Power Charge Panel when boat is not being used. Over extended periods the outboard will drain all batteries if jumper is installed. Emergency Power Supply If Power Charge Jumper Wire is connected to the “troll” port and the “start” port, and then the bow mount trolling motor is plugged in, the circuit breakers will trip. Jumper Wire needs to be removed before plugging in trolling motor. If the cranking battery does not have enough power to start the outboard, the Power Charge jumper can be installed to get a jump-start from the trolling motor batteries. Important: Do not leave jumper plugged into Power Charge panel when boat is not being used. Over extended periods the outboard will drain all batteries if jumper is installed. Battery Charger Plug-In The battery charger can be plugged into the “start” port to charge the cranking battery; or, the charger can be plugged into the “Troll” port to charge the trolling motor batteries. The cranking battery and trolling motor batteries can be charged all at once by installing the jumper into the Power Charge Panel, and then plugging charger into the bow panel. 5-4 Wiring Color Code Red Purple Orange Black Gray Gray/White 14 Gauge Wire 12 volt positive Keyed 12 volt positive Fused 12 volt positive or horn Ground Bow light Stern light Blue/White Blue Brown Brown/White Brown/Yellow Brown/Orange Pink Yellow Courtesy light Livewell light Bilge pump Aerator Wiring Color Code Red Black Red/Blue Black/Blue Aerator Recirculator Fuel sender Blower 6 Gauge Wire 12/24 positive 12/24 ground 12/24 positive 12/24 ground 5-5 Battery Energy Gauge – Bow Panel Depress “Test” – monitor will display battery status Battery Energy Gauge – Stern Panel (Backtroller Models) Depress “Test” – monitor will display battery status Trolling Motor Circuit Protection The two trolling motor wire harnesses (one from the bow, one from the stern) are protected with inline circuit breakers. They are located on the positive leads of the trolling motor wiring harness about 8” from the battery terminal end. The circuit breakers are the automatic reset type. If tripped they automatically reset. They are 50 amp circuit breakers. The Power Charge Panel also has a 50 amp circuit breaker. It is on the positive wire from the “start” port on the Power Charge Panel. The circuit breaker is located about 8” from the battery terminal end. Tilt Harness Attach tilt harness at the engine. Purple wire is hot lead; green wire is down mode and blue wire is up mode. These colors should correspond to pre-existing wires if not, further testing with a continuity tester is necessary. 5-6 *****************CAUTION***************** Disconnecting the battery(s) while the engine is running by either removing the battery cable(s) from the battery post(s) or by inadvertently turning a battery switch to the “off” position will cause extremely high voltage to be produced on the 12 volt line to your tachometer and other 12 volt powered electrical/electronic equipment that may be operating at the time. This high voltage will almost surely cause immediate failure (component burnout) of the tachometer and other equipment. Less obvious, yet just as destructive, are bad connections between the battery cable and the battery post caused by corrosion or frayed cables, along with defective, cracked, or corroded battery switches and isolators. Battery terminals and clamps should be cleaned and tightened periodically. Cracked, corroded, or otherwise defective battery switches and isolators should be replaced. Master Switch – Located on dash Dual Fuel Pickup – All Models Except 166 Hawk/Falcon A second dual pickup tube has been provided on the fuel tank. It has an Allen head plug installed in it, simply remove plug and install a 3/8” fuel barb in pickup, Part # 1438 aluminum. Then install the thru-hull fitting, Part #3638 aluminum or 3838-B brass, in splashwell and connect fuel line from kicker engine. Fuel fittings available from Warrior Boat dealers. Fuel Tank ID Tag The fuel tank identification tag is located on top of the tank at the back, in front of the sending unit. ***************WARNING**************** If replacement of fuel hose is necessary, use only marine fuel hose marked “USCG Type A”. Improper hose may be dissolved by gas. 5-7 Drain Plugs WARNING SINKING HAZARD – Install drain plugs before launching. One plug is located in the transom to allow water to drain before trailering or storing. Hull Drain Plug The screw-type drain plug is constructed of black nylon and features an “O” ring for positive sealing. Fine threads maintain sealing under high vibration conditions. The plug is retained in drain plughole with a retaining strap. Ventilation Ventilation system on stern drive boats removes gasoline fumes from the bilge and engine compartment. Keep vents free from obstruction. Bilge Blowers WARNING Explosion/Fire Hazard – Run blower at least 4 minutes before starting engine. Check engine compartments for fumes. 5-8 Seat Pedestals The ABYC (American Boat and Yacht Council) recommended seating standards for the marine industry. has Warrior boats use two types of Class A Pedestals. They are: AD Driver Pedestal – Seat mount must incorporate a “mechanical interference lock” and resist 150 foot pounds of torque. The AD Pedestals are marked with a green decal that says “AD” in the center. These pedestals are to be used for the driver only. AP Passenger Pedestal – Seat mount must resist 30 foot pounds of torque. The AP Pedestals are marked with a blue decal that says “AP” in the center. These pedestals are to be used for passengers only. To raise the seat, simply lift your weight slightly off of the seat and move the lever up. To lower the seat, keep your weight in the seat and lift lever up. The power unit is equipped with a shock-absorbing cylinder for boating comfort. DO NOT abuse the pedestal by putting excessive strain on the seat and power unit when it is in the full up position. Always lower the seat to its full down position when the boat is underway and during storage. *****************WARNING**************** When boat is in motion, all passengers must be seated with seat locked in the forward position. Do not swivel seat to stern when boat is in motion as it may cause passenger to be ejected from seat. To avoid obstruction of driver’s view, no one should be seated in bow area when boat is in motion. Seat back rest should be folded down and snapped in place. All seat pedestals should be lowered to full down position when boat is underway. Do not allow passengers to sit on gunnels when boat is in motion as they may be ejected from boat. To avoid personal injury, do not sit on seat back rests. 5-9 36 Volt Trolling Motor Wiring: Red Plug – The red plug is connected to the red wire from the trolling motor. Insert the wire into the opening marked “+”. Make sure that all terminals are tight. Install plug body onto plug base. Black Plug – The black plug is connected to the black wire from the trolling motor. Insert the wire into the opening marked “12”. For Minnkota Vantage, insert the yellow 12 volt wire in the same opening (marked “24”) as the black jumper wire. Make sure that all terminals are tight. Install plug body onto plug base. Operation: Both the Bow Panel and the Power Charger Panel (at stern) are wired for 12, 24, or 36 volts. Bow Panel – To operate the trolling motor, insert the red plug into the receptacle on the right. And then insert the black plug into the receptacle on the left. This is the only way the system will work. If the plugs are reversed, the trolling motor will not operate. The complete circuit is protected with 50 amp circuit breakers. Make sure that Power Charge Jumper Wire is not installed before connecting trolling motor on the bow. Power Charge Panel (at stern) – To operate the trolling motor, insert the red plug into the receptacle marked “Troll”. Then insert the black plug into the receptacle marked “Start”. If plugs are reversed, the trolling motor will not operate. Make sure that bow mount trolling motor is not plugged in before connecting trolling motor on transom. Power Charge Panel – the Power Charge Panel will operate as normal. With this system, the cranking battery and all three trolling motor batteries can be charged by running the main engine. Insert the Power Charge Jumper wire, and run the main engine. Make sure that bow mount trolling motor is disconnected before installing Power Charge Jumper Wire. 5-10 Controls WARNING Control Hazard See engine operator’s manual and warning label posted on boat if maneuvering speed is less than top speed. Maneuverability is limited above specified speed. Sudden turns may cause loss of control. Inspect and maintain steering system regularly. An improperly maintained system may fail, causing sudden loss of steering control, resulting in personal injury and property damage. Steering In a hydraulic system, steering wheel movement pumps hydraulic fluid through lines to a cylinder, which transfers movement to the outboard. A reservoir holds extra fluid; a valve protects against overpressure. In a mechanical system, the steering wheel connects to a cable, which transfers movement to the outboard or stern drive. The operator must inspect the entire steering system frequently for smooth, free, full range operation. Steering cables, lines, and connections are critical to safe operation. It is important to thoroughly check all hardware, especially the self-locking nuts used to fasten the steering link rod between the steering cable(s) and the engine. Never replace these nuts with common or non-self-locking nuts, which can vibrate off. A loose connection can result in sudden loss of steering and control. 6-1 Steering WARNING Control Hazard Boat steering usually is not self-centering. Steering is affected by engine and propeller torque, trim plane, wave and current action, and the speed of the hull through the water. Constant attention and control of the boat’s direction is required for safe operation. Some steering systems are especially sensitive to engine torque and operator seating. Practice under varying conditions to prevent accidents. Boat steering differs from automobile steering in several important ways: Turn the boat steering wheel in the direction you want the bow to go, but remember that the boast actually turns at the stern. Boat steering is not self-centering. Boat steering is affected by engine and propeller torque, trim setting, waves, current, and the speed of the hull through the water. Boat steering may be less precise in reverse. Boats need headway for proper control. At low speed on some boats, steering tends to veer from side to side. Keep steering wheel centered to avoid overcorrecting. Under certain engine trim positions and/or bow-up attitude, such as when getting up on plane. The effect may be limited or reduced by changing engine trim so that the propeller shaft is more parallel to the water surface. In any case, the operator must always keep a firm grip on the steering wheel, or tiller handle. 6-2 WARNING Control Hazard Tiller Steering Avoid serious injury or death from loss of boat control due to excessive steering forces. Always maintain a firm grip on the tiller handle. Adjust engine trim and trim tab per instructions in the installation guide. Gear Shift & Throttle WARNING Personal Injury Hazard – Shift to neutral before starting. CAUTION Shift only when engine is running. Some manufacturers recommend NOT stopping engine in gear. Pause in neutral while shifting, wait for boat to lose headway, and then shift quickly. Easing into gear can damage transmission. Handle throttle and shift cables with care when performing maintenance to avoid kinking or twisting. 6-3 With common single lever control, gear shift/throttle lever controls engine thrust direction and speed. Moving the lever forward engages the forward gear and then the throttle advance. To reverse propeller direction, bring the lever back to the neutral (middle) position, then move it further back to engage reverse gear and increase reverse thrust. A release on the lever prevents accidental shifting. The “throttle only” option disengages the throttle from the shift mechanism for starting. Some engine manufacturers recommend NOT stopping engine in gear. See your engine operator’s manual. Test operation of system before getting underway. Visually inspect condition of cable or hydraulic lines at least twice a year. Ignition Key-operated switch on the dash panel or control box allows engine startup. A buzzer may indicate power is ready before ignition. Start-in-gear protection prevents engine ignition unless gear is in neutral. Inspect and test periodically to ensure system works. 6-4 Emergency Engine Stop Switch With Lanyard WARNING Personal Injury Hazard – Wear the lanyard at all times when operating boat but use it only in an emergency. Do not use it to shut off the engine during normal operations. An emergency engine stop switch turns off the engine when the operator leaves the helm a sufficient distance in an unsafe situation, for example by falling. Familiarize yourself with its operation and always use it. Before operating boats, attach one end of the lanyard to the operator and the other end to the stop switch, usually located on the control or dashboard. The lanyard should be long enough to prevent inadvertent activation. Do not let lanyard become entangled. Accidental loss of power can be hazardous, particularly when docking or in heavy seas, strong current, or high winds. Passengers and crew may lose balance and the boat may lose steering control. Should the operator fall out of the boat at planing speed, it may take several seconds for the engine and propeller to stop turning. The boat may continue to coast for several hundred feet, causing injury to anyone in its path 6-5 Power Trim & Tilt Power trim and tilt adjust a stern drive or outboard propeller’s angle to the hull. The switch is on the gear shift/throttle lever. Trim generally refers to an approximate 20 degree range used for normal in-water operation. Tilt refers to more extreme angles of adjustment. CAUTION Operating boat with the outboard engine tilted up may expose cooling water intake holes, causing the engine to overheat or the water pump to fail. To avoid damage due to overheating, keep water intake holes below the water line. 6-6 Trimming WARNING Maneuvering/Control Hazard Ensure continuous visibility of other boats, swimmers, and obstacles during bow-up transition to planning. Adjust engine to an intermediate trim as soon as boat is on plane to avoid possible ejection due to boat spinout. Do not attempt to turn boat when engine is trimmed extremely down/under/in. Most stern drive and outboard engines have a power trim, which enables you to change the angle of your drive unit by pressing a button. See your engine operator’s manual for a complete discussion of characteristics resulting from different trim settings. Power trim is designed to give quick acceleration with minimum time in the bow-up transition to planing. This is most easily accomplished by trimming the engine fully down/under/in and setting the throttle at moderate to maximum. Once on plane, trim the engine up/out slightly to avoid a bow-down condition called “plowing”. Plowing can cause inefficient and unpredictable “bow steering” or “oversteering”. In this condition, attempting to turn or encountering a moderate wave may result in an abrupt turn or spinout. Trimming the engine too far up/out can cause a bow-up condition leading to “porpoising” (bouncing) or propeller ventilation. If you notice a sudden increase in propeller speed, reduce engine RPM and trim the drive unit down/under/in until propeller ventilation stops. 6-7 In most cases, best performance is obtained with the unit positioned so that the boat runs at a 3 to 5 degree angle to the water (front of hull just slightly out of the water). Outboard engines may have a trim tab to compensate for steering torque, which causes the boat to pull to one side. Torque is a result of the propeller shaft not being parallel to the water surface. See you engine operator’s manual if adjustment is necessary. Visibility WARNING Visibility Hazard Designate a lookout to watch for obstacles and other vessels when the field of vision from the helm is limited due to operating conditions. Keep visibility clear. Move passengers if they obstruct operator’s vision. Law requires the operator to maintain a proper lookout by sight and hearing. Operator must insist on unobstructed vision, particularly to the front. Move passengers if they block the view when boat is above idle speed. 6-8 Post a lookout to watch for obstacles when visibility from the helm is limited due to operating conditions. General Considerations You are responsible for passengers’ actions. If they place themselves or the boat in danger, immediately correct them. Know how your boat handles under different conditions. Recognize your limitations and the boat’s limitations. Modify speed in keeping with weather, sea and traffic conditions. Instruct at least on passenger on the proper operation of your boat in case something should happen to you. At least one passenger must know how to override the emergency stop switch and restart the engine if the operator should fall overboard with the stop switch lanyard attached. Instruct passengers and crew on location and use of safety equipment and procedures. Casting Off Procedures vary depending on wind, current and traffic. Some general guidelines are: Star engine before casting off. Put adequate space between boat and dock before trying to move away. Two secrets of successful maneuvering: A. Since a boat turns at its stern, the stern must have enough clearance to move back toward the dock as the bow moves away from the dock B. Use wind and current to move a boat whenever possible. Approaching Dock Procedures vary depending on whether you tie up at a: Pier (parallels to shore) or wharf (not parallel) Slip (between piles, at right angle to pier or wharf) Mooring (anchoring buoy away from shore) 6-9 Some procedures apply in all situations: Move slowly. Plan maneuvers ahead of time. Use wind and current whenever possible to move or slow the boat. If there is more than one way to approach a berth, use the most conservative maneuver: High Wind/Current – Approach against the wind or current Mild Wind/Current – Approach against the stronger of wind or current. Boats do not have brakes. To slow forward motion, back off on the throttle. After the boat slows and the engine idles, shift to reverse and gradually increase throttle until the boat stops. Use fenders to protect the boat. Never use arms or legs to try to stop a boat’s movement. 6-10 WARNING Speed Hazard Operate boat at speeds within the operator’s ability to maintain control and react if an emergency occurs. Reduce speed in congested waterways. Avoid showboating! Turning suddenly, jumping waves, or steering close to other boats, docks or obstacles can cause personal injury and boat damage. Collision Hazard Turn on navigation lights at night and in other reduced visibility situations, and cruise at a reduced speed to allow time to avoid dangerous situations. Use extra caution when underwater/floating objects may be present. Hitting an object at high speed or severe angle can seriously injure people and damage your boat. Use extreme care when operating in shallow water or when operating in reverse. CAUTION If Stern Drive is equipped with power tilt for trailering, use it only for that purpose. Tilting drive unit into the trailering zone while underway may damage the drive unit or engine. 6-11 Operating In Shallow Water WARNING Collision Hazard – Use extra caution in shallow water of where underwater/floating objects may be present. Hitting an object at high speed or severe angle can seriously injure people and damage your boat. Shallow water presents obvious hazards. In addition to insufficient draft, shallow means sand bars, stumps, or other unmarked obstructions in deep water. Other hazards in shallow water include mud, sand, weeds and debris, which can foul your engine’s cooling water intakes. Know the area in which you are operating. Consult charts and ask local boaters. If you know or suspect shallow water, post a lookout and proceed slowly. When beaching, be aware how tide can affect the boat. Never leave a beached boat unattended or unanchored. Boat will handle differently when towing a skier; experiment carefully to learn the differences. Skiers may start from shore or dock if boat traffic allows. When returning, pick up skiers from water; do not ski back to shore or dock. Give immediate attention to fallen skier. Approach skier in the water from helm side so operator can keep skier in sight. Turn off engine in gear (to prevent propeller “windmilling”) before picking up skier. Never back up to anyone in the water. Swimming Do not swim from a moving boat. Many areas prohibit swimming from boats except in designated areas. Turn off engine and leave in gear (to prevent propeller “wind milling”) while swimming. 6-12 Meets all the requirements as set forth by The American Boat and Yacht Council as published in “Standards and Recommended Practices for Small Craft”. ABYC Requirements: ABYC E-9 DC Electrical Systems under 50 Volts ABYC H-30 Hydraulic Systems ABYC P-17 Steering Systems for Outboard, Inboard/Outboard, and Jet Drive Boats ABYC P-21 Hydraulic Systems 6-13 Operation Instructions WARNING! The boat owner/operator is responsible to make passengers aware of basic operations of the boat so passengers can operate, maneuver the boat in the event of an emergency. The operator should make passengers aware of the location of emergency equipment, such as throwable life preserver, fire extinguisher, etc. Passengers must know how to override the emergency stop switch should the operator fall overboard with the stop switch lanyard attached. Instruct passengers as to starting the motor, shifting into forward gear, neutral, reverse. Wheel steering, tiller steering or Pro-Tiller® Steering if so equipped ETC. The Pro Tiller Steering System was designed to make high horsepower tiller engines safer to handle and more drivable. In the “off” position, the engine is driven manually. The steering is dampened. The Pro Tiller Steering System also has an “on” position, which eliminates steering torque to the driver. In the “on” position, the engine is steered hydraulically, which is controlled with the steering switch on the feather trim grip. CAUTION! The Pro Tiller Steering System eliminates steering torque to the driver. The driver should always keep a hand on the tiller/throttle for safe operation. OFF MODE In the off mode, the engine is steered manually; however you will also experience some steering torque from the engine. When steering the engine in the “off mode” hydraulic fluid is being moved through the pump and steering cylinder. This will dampen the steering, but will not eliminate steering torque. The primary use of the “off mode” is for launch and retrieval of the boat, and maneuvering in bays or harbors, or around heavy traffic. 6-14 ON MODE In the “on mode”, the engine is steered hydraulically and controlled with the steering switch on the Feather Trim grip. The steering torque in the “on mode” is eliminated giving the driver push button steering control. To operate the “on mode”, turn the on/off switch to the “on” position. Then press steering switch right or left to steer the engine. It is highly recommended that your first time driving the boat with the Pro Tiller Steering System, that you spend some time driving the boat in both modes at different speeds to get the feel of how the Pro Tiller operates. Start slowly, drive around and turn the engine several times to get the feel of the system. WARNING! Never operate the Pro Tiller Steering System in the off position above 1500 RPM. Over powering steering torque may occur. To avoid personal injury, always maintain a firm grip on the tiller handle, and wear an approved life jacked (PFD) and lanyard cord. Never operate your boat under the influence of drugs or alcohol. Steering Controls for Pro Tiller 3-Switch Feather Trim Grip Front Switch – On/Off, Top Switch – Steering control left/right turn, Bottom Switch – Trim control for engine IMPORTANT Right Turn – tiller handle will move away from the driver. Left Turn – tiller handle will move toward the driver. 6-15 Maintenance Service Schedule The manufacturer of each system in your boat should provide a recommended service schedule, listing items requiring routine attention, type of maintenance, and frequency. The schedule is a guide based on average operating conditions. Under severe operating conditions, shorten service intervals. Maintenance Log Keep a record of all maintenance performed on your boat, using a form similar to the following: Date Maintenance Description Engine Hours 7-1 Maintaining Hull & Deck Fiberglass/Gelcoat WARNING Slipping Hazard Gelcoat surfaces are slippery when wet. Use extreme care when walking on wet surface. Use care in waxing to ensure walkways are not made dangerously slippery. Explosion/Fire Hazard – Cleaning products may be flammable, explosive and/or may cause personal injury. Read cleaning product directions before use. The hull and deck consist of a molded shell and exterior gelcoat. Gelcoat is the outer surface with the shiny appearance associated with fiberglass. Wash fiberglass regularly with clean, fresh water. Wax gelcoated surfaces to maintain luster. In northern climates, semiannual waxing may suffice. In southern climates, quarterly waxing is required. If waxing does not restore shine, power buff with a quality rubbing compound or use a heavy-duty color restorer and boat cleaner/polish. If gelcoat is heavily oxidized, sand lightly before buffing. Remove common stains with diluted detergent that is ammonia and chlorine free. Never use gasoline, acetone or any ketone solvents. Housekeeping There is a reason any well-organized and cared for area is said to be “ship-shape”. Order and cleanliness are important elements of boating safety and pleasure. Put items in their proper place to ensure you can find them when you need them. Coil lines to keep them snarl-free and reduce the possibility of tripping. Clean and inspect systems to find and fix loose or damaged parts before they become a critical need. 7-2 Upholstery and Seating Clean all vinyl with a good grade of vinyl protective cleaner. Avoid harsh detergents. Please consult these cleaning recommendations: Steps Betadine Chewing Gum Eye Shadow Motor Oil Spray Paint Mildew or Wet Leaves* Shoe Polish* Yellow Mustard Oil Base Paint (fresh) Oil Base Paint (dried) Suntan Lotion* Tar / Asphalt Lipstick Latex Paint Crayon Ketchup Grease Ballpoint Ink* Household Soil Permanent Marker* Coffee, Tea, Chocolate 1 B D B B B C D A D D A D A A D A D A A B B 2 A A E A B B B A B A B B B B B B B B C 3 B B E C E B E B E E E E A. Medium-soft brush, warm soapy water/rinse/dry B. Fantastik Spray Cleaner/Rinse/Dry C. One (1) tablespoon ammonia, one-fourth (1/4) cup of hydrogen peroxide, three-fourths (3/4) cup of water/rinse/dry D. Wipe or scrape off excess (chill gum with ice) E. 3M Citrus Base Cleaner/Rinse/Dry (617-733-1110’55) F. Denatured Alcohol/Rinse/Dry Note: All cleaning methods must be followed by a thorough rinse with water. 7-3 *Suntan lotion, shoe polish, wet leaves, and some other products contain dyes that stain permanently. Certain household cleaners, powdered abrasives, steel wool and industrial cleaners can cause damage and discoloration and are not recommended. Dry cleaning fluids and lacquer solvents should not be used as they will remove the printed pattern and gloss. Waxes should be used with caution. Many contain dyes or solvents that can permanently damage the protective coating. Always remove stains immediately. For maximum protection of your vinyl upholstery, keep a storage cover on your Warrior Boat when not in use. Windshields ACRYLITE Acrylic sheet is a beautiful, lustrous material that is outstanding in durability and resistance. Improper cleaning materials can break down the integrity of acrylic materials, causing breakage. DO NOT USE: WINDOW CLEANING SPRAY, KITCHEN SCOURING COMPOUNDS, OR SOLVENTS SUCH AS ACETONE, GASOLINE, BENZENE, CARBON TETRACHLORIDE, OR LACQUER THINNER. Washing: Wash Acrylic windshield with a dishwashing detergent and plenty of lukewarm water. Use a clean soft cloth, applying only light pressure. Rinse with clear water and dry by blotting with a damp cloth or chamois. Dusting: Dust with a soft, damp cloth or chamois. Dry or gritty cloths may cause surface scratches. Anti-Static Coating: Several anti-static cleaners for plastics such as Mequiars #17 Plastic Cleaner are available which will reduce static electricity and dust attraction. Wiping with a soft damp cloth or chamois is all that is necessary to keep Acrylic windshield dust free between applications of these cleaners. 7-4 Batteries a. b. c. d. a. b. c. d. e. The manufacturer selects batteries for their ability to furnish power for starting and operating the DC system. Refer to the manufacturer’s specification when replacing a battery. Disconnecting battery: Turn off items drawing power. Turn off battery switch, if equipped. Remove negative (-) cable first, then positive (+) cable. To replace cables, replace positive (+) first, then negative (-). Battery maintenance includes: Inspect battery and charging system before every use. Inspect cell fluid level monthly, more often in hot weather. Replenish with distilled water. Coat terminal posts with silicone grease. Keep batteries clean and dry. Remove battery during cold weather or long term storage. See engine operator’s manual for safeguards if boat is equipped with battery switches. 7-5 WARNING Shock/Fire Hazard Disconnect electrical system from its power source before performing maintenance. Never work on the electrical system while it is energized. Electrical appliances must not exceed the rated amperage of the boat circuits. Observe the electrical system carefully while it is energized. Only a qualified marine electrical technician may service the boat’s electrical system. CAUTION Turn off engine before inspecting or servicing battery. Disconnect battery cables before working on electrical system to prevent arcing or damage to alternator. Disconnect negative (-) cable first, then positive (+) cable. Breakers and/or Fuses WARNING Shock/Fire Hazard – Replace breaker or fuse with same amperage device. Never alter overcurrent protection. Breakers and/or fuses are usually located under or near the dash panel. If a breaker trips, determine and correct the fault, then reset by pushing the breaker button. If a fuse blows, determine and correct the fault, then replace the fuse. 7-6 Alarms & Monitors WARNING Personal Injury Hazard – Alarm systems are intended to warn of unsafe conditions. Do not ignore any alarm! NOTICE If an engine overheating leaves you stranded, shut off motor and allow it to cool. After motor has cooled, restart and operate at low idle speed to make headway until it starts to overheat again. Repeat process as necessary. Some boats have alarms to indicate problems with high engine water temperature, low oil pressure, carbon monoxide, flooding, or explosive fumes. The manufacturer will provide information on those features, if available, as well as on monitors or gauges not provided as standard equipment. 7-7 Navigational Equipment Compass A marine compass is optional on some boats. However, a compass is invaluable in determining position and course. A qualified technician must adjust the compass for errors caused by nearby iron, steel, magnets, or electric wires. Since a compass seldom can be corrected to zero deviation on all headings, the technician who services your compass will give you a deviation card showing the correction to be applied in navigational calculations. Keep this card at the helm at all times. Horn A horn is considered an accessory, but is often included as standard equipment. The horn button or switch is usually on the dash panel. Test the horn periodically to ensure proper operation. Avoid spraying water directly into the horn. Other If the boat is equipped with navigational equipment, such as Depth Sounder, Radar, Loran, or Global Positioning System, the manufacturer of that equipment will provide operation and maintenance information. Communication Equipment Communication equipment is optional but an important safety feature. VHF-FM is the primary short-range (32 kilometers [29 miles]) radio/telephone service. Some areas may require a license to operate radiotelephone equipment. Consult your marine dealer. The radiotelephone manufacturer provides information on its operation and maintenance. Anchor Anchors are available in different shapes, sizes and weights to suit different boats, uses and conditions. Consult your marine dealer. 7-8 Winterizing/Storing CAUTION Remove battery when boat is in long term storage. Storing Boat on Land/Trailer – Checklist Boat: a. Hull drain plugs – remove b. Bow – store higher than stern c. Cover – support to prevent pooling of water d. Ventilation – allow air flow to prevent mildew e. Tiedowns – slack off to reduce hull strain f. Inspection – regularly during storage Engine: a. Cooling system – drained b. Exhaust system – drained c. Refer to engine operator’s manual for detailed information on preparing for winter storage. Batteries: a. Batteries – remove from boat; remove negative (-) cable, then positive (+) cable b. Surface – clean c. Terminal bolts – grease d. Storage site – wood pallet or thick plastic in a cool, dry place; do not store on concrete e. Trickle charge – on 7-9 A Fuel System: WARNING Explosion/Fire/Pollution Hazard – Fill less than rated capacity of tank. Filling until fuel flows from vents can cause explosion, fire, or environment pollution. Allow for fuel expansion. Gasoline: a. Fuel tank – filled with gasoline and a gasoline stabilizer and conditioner b. Engine – run for 10 minutes to ensure that gasoline in carburetor and fuel lines is treated Trailer (if used): a. Security – protect against theft; install a lock on the trailer coupling b. Support – jack up trailer and install blocks to take weight off wheels and springs 7-10 Recommissioning Boat Stored on Land/Trailer – Checklist Boat: a. Components – inspect and clean b. Hull drain plugs – install Engine: a. Refer to engine operator’s manual for detailed information on fitting out after winter storage Batteries: a. Terminal posts – clean with wire brush or steel wool b. Cable clamps – attach positive (+) cable first, then negative (-) cable; tighten c. Terminals and clamps – apply protective grease d. Wiring – inspect for deterioration Fuel System: a. System – inspect for loose connections, worn hoses, leaks, etc.; repair as necessary Miscellaneous: a. Thru-hull fittings – check to ensure water passage is unobstructed and hoses/fittings are serviceable b. Navigation lights – check for proper operation c. Wiring – check for loose connections d. Switches – check for proper operation e. Equipment – check for proper operation f. Bilge blowers – check for proper operation; turn on blowers and place hand over hull blower vent to make sure air is coming from vent. g. Anchor lines and gear – inspect and replace if necessary h. Hull drain plugs – installed i. Bilge – clean thoroughly j. Engine – check for proper levels 7-11 Trailering Securing Outboard When Trailering NOTICE Use outboard support bar if engine must be tilted up for ground clearance. Outboard tilt support lever is not intended to support the engine when trailering. Place outboard in vertical operating position if ground clearance is adequate. If additional ground clearance is needed, use an outboard support bar to secure motor. Do not rely on tilt support lever for trailering. Shift outboard to forward gear to prevent propeller from spinning freely in wind while vehicle is moving. See engine operator’s manual for other precautions and instructions related to trailering. 8-1 Securing Boat To Trailer CAUTION Use adequate tiedowns for load and trip conditions. Attach bow to trailer with safety chain or U-bolt. Winch line should be tight, but do not rely on winch line to fasten bow to trailer. Use at least two nylon web tiedowns to secure transom to trailer. Add tiedowns on side of boat if load or road conditions require. Place side tideowns near the stern where most of the boat’s weight is located. Pad tiedowns where they contact the boat to prevent damage to the finish. If boat cover is used, ensure drawstring is drawn tight. Add ropes if necessary. Stow any loose gear whether or not you use a boat cover. Wheel Bearings The Accu-Lube system manufactured by Quality Trailer Products is a patented design, which affords the privilege of lubricating both the inner and outer bearing without removing the hub/drum from its normal operating setting. Usage of the Accu-Lube system will not eliminate the need for general maintenance and inspection of the hub/drum assembly. Recommended maintenance of this system is to insert Lithium wheel bearing grease through the “Zerk” fitting provided in the end of the dust cap until it flows freely from the vent hole located in the rear of the spindle arm. The recommended service schedule is as follows: After the first 250 miles it is very important to grease the bearings to exhaust the metal shavings from the bearing break-in period. After break-in period, grease bearings every 1,000 miles. Check tire pressure and brake fluid every 1,000 miles. 8-2 NOTICE Aluminum Rims – It is very important to re-torque lug nuts to 95 ft. lbs. every 1,000 miles. Pre-trip Checklist: Trailer wheel bearings – greased Trailer and tow vehicle tires – correct pressure Trailer and tow vehicle lights and brakes – operating Spare tires, jacks, parts – usable Boat steering mechanism – lubricated Boat connections and linkages – tight Tiedowns – secured Winch line – taut Winch anti-reverse gear – engaged Turnbuckle/safety hook – secured Motor – in traveling position Coupler – tight Hitch ball – greased lightly to reduce friction Safety chains – crossed under trailer tongue and secured Tongue jack – raised Boat canvas – down and secured Boat cover – secured Boating gear – secured Registration, proof of insurance, other documentation – present 8-3 Pre-launch Checklist: Drain plugs – installed Boat cover – removed Equipment – loaded for proper trim Bow and stern lines – fastened Fenders – rigged Tiedowns – removed Fuel and water tanks – filled Outboard or stern drive – tilted up Electrical connection to tow vehicle – unplugged Trailer wheel bearings – cooled Ramp conditions, water depth, current – checked (watch other boats) Drain plugs – check again to be sure they are installed Launching: Station someone to help direct Back straight down the ramp Pull bow of boat to pier or float and secure Lower outboard or stern drive unit Connect fuel lines (outboard engine) Start engine and allow to warm up Depart launch area slowly Hauling Out: Prepare before approaching ramp Secure fuel lines (outboard) Tilt outboard or stern drive unit up Back trailer down ramp Guide boat onto trailer; use bow lines to help Hook winch cable to boat’s bow eye 8-4 WARNING Personal Injury Hazard – Severe injury is possible if winch system malfunctions or cable breaks. Do not let anyone stand near the winch or cable. Keep clear as boat is cranked onto trailer Open drain plugs while boat is tilted Inspect propeller for nicks or other damage Wipe hardware, including canvas snaps, with clean, soft cloth and spray with demoisturant. Complete tiedown and secure gear for road 8-5 Maneuvering With Trailer Start with basics – accelerating, slowing, stopping smoothly and steadily Increase distance from vehicle ahead Do not pass other vehicles until you feel comfortable pulling trailer Maintain steady control in the wake of large trucks and buses When turning, signal your intention well ahead of time Swing a little wider than you would without a trailer Stop every hour or so to inspect wheel bearings, connections, tiedowns, cover and other fastenings Back up slowly with a trailer: Practice with an empty trailer in an empty parking lot Get the feel of backing straight. Small, S-shaped steering corrections will be needed When you’re ready to turn while going backward, put your hands on the bottom of the vehicle’s steering wheel. The trailer turns opposite the towing vehicle’s direction. By moving the bottom of the steering wheel in the direction you want the trailer to go, the towing vehicle will go the opposite way. As the trailer starts to turn, move the bottom of the steering wheel back to center. The trailer will continue to turn at an increasing rate. Move the bottom of the steering wheel opposite the direction of the trailer in order to slow the turning rate. If the trailer turns too sharply (“jackknifes”) or does not turn enough, stop, pull ahead and try again. Practice, practice, practice! 8-6 8-7