1
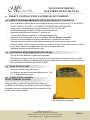
M UGNAI N I ITALY’S ORIGINAL PIZZA OVEN Mugnaini Series ® COMMERCIAL GAS FIRED OVEN INSTALLATION, OPERATION AND MAINTENANCE MANUAL Mugnaini Commercial Gas Fired Ovens have been tested to: ANSI Z83.11 & CAN/CGA–1.8 UL Subject 2162–2001 Safety Standards NSF–4 Sanitation Standards A MAJOR CAUSE OF OVEN-RELATED FIRES IS FAILURE TO MAINTAIN REQUIRED CLEARANCES (AIR SPACES) TO COMBUSTIBLE MATERIALS. IT IS OF UTMOST IMPORTANCE THAT THIS OVEN BE INSTALLED ONLY IN ACCORDANCE WITH THESE INSTRUCTIONS. M UGNAI N I ® Mugnaini Imports, Inc. 11 Hangar Way, Watsonville CA 95076 888.887.7206 │ 831.761.7167 │ Fax: 831.728.5570 www.mugnaini.com │ [email protected] READ ALL INSTRUCTIONS BEFORE INSTALLING AND USING THIS OVEN THIS MANUAL COVERS THE FOLLOWING TUSCANY SERIES MODELS: G100 PA ♦ G120 PA ♦ G140 PA ♦ G160X140 PA ♦ G180X140 PA WARNING WHEN THIS OVEN IS NOT PROPERLY INSTALLED, A FIRE MAY RESULT. TO REDUCE THE RISK OF FIRE, FOLLOW THE INSTALLATION INSTRUCTIONS. PLEASE READ THIS ENTIRE MANUAL BEFORE YOU INSTALL THE OVEN. FAILURE TO FOLLOW INSTRUCTIONS MAY RESULT IN PROPERTY DAMAGE, BODILY INJURY AND EVEN DEATH. WARNING DO NOT PACK THE REQUIRED 1” AIR SPACES WITH INSULATION OR OTHER MATERIAL. INSTALLATION OF THE EXHAUST VENT SHALL BE IN ACCORDANCE WITH THE STANDARD FOR VENTILATION CONTROL AND FIRE PROTECTION OF COMMERCIAL COOKING OPERATIONS, NFPA96. SEEK OUT QUALIFIED INSTALLERS IN YOUR AREA AND OBTAIN THE PROPER PERMITS. IN THE ABSENCE OF LOCAL CODES; USE NATIONAL FUEL GAS CODE ANSI Z223.1. CONTACT LOCAL BUILDING OR FIRE OFFICIALS CONCERNING ANY INSTALLATION RESTRICTIONS OR NEED FOR INSPECTION OF THE INSTALLATION. FOR YOUR SAFETY DO NOT STORE OR USE GASOLINE OR OTHER FLAMMABLE VAPORS OR LIQUIDS IN THE VICINITY OF THIS OR ANY OTHER APPLIANCES. SAVE THESE INSTRUCTIONS FOR FUTURE USE Mugnaini Imports, Inc. 11 Hangar Way, Watsonville CA 95076 888.887.7206 │ 831.761.7167 │ Fax: 831.728.5570 www.mugnaini.com │ [email protected] TABLE OF CONTENTS INSTALLATION INSTRUCTIONS 1. RECEIVING THE OVEN 2. 3. 4. 5. 6. 7. 1.1 DELIVERY LOCATION 4 1.2 CRATE CONTENTS 4 1.3 FORKLIFT AND PALLET JACK REQUIREMENTS 4 UNLOADING, MOVING AND SETTING THE OVEN 2.1 UNLOADING THE OVEN: FORKLIFT REQUIRED! 5 2.2 OPENING THE CRATE 5 2.3 TOOLS REQUIRED 5 2.4 MOVING THE OVEN 6 CLEARANCES AND FACADES 3.1 SETTING THE OVEN 7 3.2 CLEARANCES TO COMBUSTIBLE CONSTRUCTION 7 3.3 INSTALLATION ACCESSORIES 8 3.4 FINISH MATERIALS 8 3.5 COVERING THE ARCH 8 VENTING THE OVEN 4.1 OVERVIEW 9 4.2 EXHAUST VENT REQUIREMENTS 9 DIRECT VENTING WITH FACTORY BUILT CHIMNEY 5.1 DIRECT VENT REQUIREMENTS USING FACTORY BUILT CHIMNEYS 10 5.2 ADDITIONAL REQUIREMENTS FOR CANADA 10 5.3 OVEN FLUE OUTLET 10 5.4 CONNECTING FACTORY BUILT CHIMNEY TO OVEN 10 DIRECT VENTING WITH FACTORY BUILT GREASE DUCT 6.1 DIRECT VENT REQUIREMENTS USING FACTORY BUILT GREASE DUCT 11 6.2 ADDITIONAL REQUIREMENTS FOR CANADA 11 6.3 OVEN FLUE OUTLET 11 6.4 CONNECTING FACTORY BUILT GREASE DUCT TO OVEN 11 INDIRECT VENTING 7.1 INDIRECT VENTING REQUIREMENTS 12 7.2 TYPE 1 HOOD 12 OPERATING AND MAINTENANCE INSTRUCTIONS 8. CURING THE OVEN 8.1 CURING PROCESS 13 9. FIRING THE OVEN 10. MAINTENANCE INSTRUCTIONS 11. LIMITED WARRANTY 9.1 OVEN TOOLS REQUIRED FOR OPERATING YOUR MUGNAINI WOOD FIRED OVEN 14 9.2 CONTROL BOX 15 9.3 DAILY OPERATIONS 16 9.4 DAILY START UP 16 9.5 PRE-HEAT 16 9.6 AUTOMATIC MODE 16 9.7 MANUAL MODE 16 9.8 DAILY SHUT DOWN 16 9.9 COOKING ENVIRONMENTS 17 9.10 PIZZA OVEN ENVIRONMENT 17 9.11 ROASTING OVEN ENVIRONMENT 17 9.12 BAKE OVEN ENVIRONMENT 17 10.1 10.2 10.3 10.4 GREASE FORMATION AND THE NEED FOR REMOVAL 18 DAILY MAINTENANCE 18 MONTHLY MAINTENANCE 18 DIRTY FLOOR MAINTENANCE 18 Mugnaini Imports, Inc. 11 Hangar Way, Watsonville CA 95076 888.887.7206 │ 831.761.7167 │ Fax: 831.728.5570 www.mugnaini.com │ [email protected] M UGNAI N I ® MUGNAINI SERIES GAS FIRED OVEN MANUAL INSTALLATION INSTRUCTIONS 1. RECEIVING THE OVEN Your oven will be shipped via Common Carrier from our Watsonville, California facility. You will need a forklift to remove the crated oven from the truck. Once off the truck the oven can be moved with a pallet jack. We will notify you when your oven is shipped and provide you with the PRO number (tracking number) and the trucking company’s contact number. It is always important to call the trucking company in advance to coordinate the delivery. NOTE: Once your oven is loaded onto a truck you have created a contract between you and the trucking company. Mugnaini Imports does not control the delivery of your oven. 1.1 DELIVERY LOCATION Proper planning is essential to a successful delivery. Be realistic about where you plan to take delivery of your oven; commercial ovens are large and top heavy! Be sure to take into account the size of your oven and entry into your building. It is common to remove doors, windows or open walls to gain access. Seek out a qualified professional to ensure you are prepared for your installation. The trucker will require a flat, level surface safe from traffic. A forklift will need to maneuver to remove the crated oven from the truck and place it on the ground for uncrating. NOTE: It is your responsibility to have a safe delivery location for the trucking company. Redelivery and re-consignment fees may be assessed if the oven cannot be off loaded. If you do not have a safe or convenient location for unloading the truck, consider receiving the oven at another location and having a professional deliver the oven to your location. 1.2 CRATE CONTENTS • Fully assembled gas fired oven on steel stand • Spitfire gas burner with control box (to be mounted on front of oven enclosure) • Stainless steel shelf (loose, bolt in place) • Metal door (loose) 1.3 FORKLIFT AND PALLET JACK REQUIREMENTS Model Approx. Forklift Fork Length Wt. Req’d 100 PA 2300 lb.. 5000 lb.. 48 inches min. 120 PA 2750 lb.. 6000 lb.. 48 inches min. 140 PA 3600 lb.. 8000 lb.. 72 inches min. 160 PA 3950 lb.. 10000 lb.. 72 inches min. 180 PA 4450 lb.. 10000 lb.. 72 inches min. Mugnaini Imports, Inc. 11 Hangar Way, Watsonville CA 95076 888.887.7206 │ 831.761.7167 │ Fax: 831.728.5570 www.mugnaini.com │ [email protected] PAGE 4 M UGNAI N I ® MUGNAINI SERIES GAS FIRED OVEN MANUAL WARNING ONLY PROPER HEAVY LIFTING MACHINERY AND HEAVY LIFTING EQUIPMENT SHOULD BE USED FOR UNLOADING, MOVING AND INSTALLING THE OVEN. THIS DUTY SHOULD BE PERFORMED BY PROFESSIONALS TRAINED IN THIS KIND OF WORK. IMPROPER HANDLING OF THE EQUIPMENT COULD RESULT IN DAMAGING THE OVEN OR PERSONAL INJURY AND EVEN DEATH. 2. UNLOADING, MOVING AND SETTING THE OVEN 2.1 UNLOADING THE OVEN: FORKLIFT REQUIRED! The oven is shipped bolted to a sturdy pallet with open slat walls on all sides to allow for visual inspection. Remove the crated oven from the truck using the appropriate forklift (see Receiving the Oven). Be sure the forks are long enough to reach the rear supporting members of the crate. IF THE FORKS ARE NOT LONG ENOUGH TO SUPPORT THE ENTIRE CRATE DO NOT ATTEMPT TO MOVE THE OVEN - IT WILL TIP OVER. OBTAIN ANOTHER FORKLIFT OR USE FORK EXTENSIONS. Once the oven is lifted from the truck immediately lower it to the ground, do not attempt to move the oven while crated. Remove the plastic wrap and inspect the oven. Note any damage to the crate, oven or accessories. DO NOT SIGN THE DELIVERY BILL UNTIL THE OVEN HAS BEEN INSPECTED AND ANY DAMAGE NOTED ON THE DELIVERY BILL. CALL OUR OFFICE IMMEDIATELY IF THERE ARE ANY SIGNS OF DAMAGE: 888.887.7206. 2.2 OPENING THE CRATE The oven crate is wrapped in plastic and metal banding. Parts and any accessories will be strapped to the base and sides of the crate. The wooden slats that form the walls and roof are attached with screws, nails and staples. The oven feet are lag bolted to the pallet base. Remove all strapping, parts and accessories and disassemble the crate. Remove the lag bolts. The oven is now ready to be moved. 2.3 TOOLS REQUIRED • Diagonal cutters and razor knife • Hammer and pry bar • Screw gun and bits • Socket set Mugnaini Imports, Inc. 11 Hangar Way, Watsonville CA 95076 888.887.7206 │ 831.761.7167 │ Fax: 831.728.5570 www.mugnaini.com │ [email protected] PAGE 5 M UGNAI N I ® MUGNAINI SERIES GAS FIRED OVEN MANUAL 2.4 MOVING THE OVEN Use the forklift to move the oven (paying careful attention to the grade) to the entry point of the restaurant. You may lift from any side but make sure to lift at the base of the oven body letting the steel stand hang below. The stand can be removed if necessary. Once the oven has been placed near or inside of the restaurant, use the pallet jack to move the oven to the installation location. It may be necessary to place steel bars or heavy wood beams across the forks of the pallet jack to fully engage the pallet jack. Move into place and slowly lower. You can make fine adjustments using a long pry bar or length of wood against the stand to nudge the oven into place. Shim as necessary to level oven. Lift from under the body of the oven Move with pallet jack under stand Use bar across pallet jack to support oven Mugnaini Imports, Inc. 11 Hangar Way, Watsonville CA 95076 888.887.7206 │ 831.761.7167 │ Fax: 831.728.5570 www.mugnaini.com │ [email protected] PAGE 6 M MUGNAINI SERIES GAS FIRED OVEN MANUAL UGNAI N I ® 3. CLEARANCES AND FACADES 3.1 SETTING THE OVEN Secure oven to floor with four [4] fasteners a minimum of 3/8” diameter. Insert at least one fastener, appropriate for the floor, per steel mounting foot embedded 2 ½” minimum. 3.2 CLEARANCES TO COMBUSTIBLE CONSTRUCTION The oven requires a 1” clearance on back wall and side walls to any combustible materials. Do not pack the air gap with insulation or other material. You may bridge the gap between the oven and façade wall with metal stud framing and concrete board. A metal stud may be fastened directly to the steel sides of the oven. Use ½” Durock brand concrete board,or similar, to transition to any wood framing. Wood stud 1/2” Concrete board 30” Metal stud 1” Min 36” Oven front 1” Min 30” 1” Min Non-combustible floor or floor covering Clearances to Combustible Construction Mugnaini Imports, Inc. 11 Hangar Way, Watsonville CA 95076 888.887.7206 │ 831.761.7167 │ Fax: 831.728.5570 www.mugnaini.com │ [email protected] PAGE 7 M UGNAI N I ® MUGNAINI SERIES GAS FIRED OVEN MANUAL 3.3 INSTALLATION ACCESSORIES Side panels are available from Mugnaini to frame in the stand on freestanding ovens. If the base of the oven is to be completely enclosed; use the optional Gas Cover Panel Kit to ensure adequate combustion air reaches the burner. 3.4 FINISH MATERIALS Use only non-combustible materials such as tile, brick or stone, to finish your installation. You may attach 1/2” concrete board directly to the oven’s metal enclosure. Use metal framing braced to the oven in order to build a facade wall or transition to combustible construction. Framing for a facade wall or site built side panel should be assembled using metal studs and 1/2” concrete board. Non-combustible finish materials may be applied to the concrete board. Optional side panels Optional Gas Cover Panel Kit Optional Gas Cover Panel Kit Side panels for free standing ovens attach to the oven stand. 1/2” Concrete board Metal stud framing Metal stud framing with 1/2” concrete board 3.5 COVERING THE ARCH The arch is not removable but may be covered with ceramic tile or similar non-combustible material. Remove the paint on the arch to create a proper bonding surface. Use Thinset or other cement based product to mount tiles. Do not use adhesives or glue to attach finish materials to front panel or arch. CHECK WITH LOCAL HEALTH DEPARTMENT REGARDING ACCEPTABLE MATERIALS FOR THE ARCH OR FRONT PANEL. Mugnaini Imports, Inc. 11 Hangar Way, Watsonville CA 95076 888.887.7206 │ 831.761.7167 │ Fax: 831.728.5570 www.mugnaini.com │ [email protected] PAGE 8 M UGNAI N I ® MUGNAINI SERIES GAS FIRED OVEN MANUAL 4. VENTING THE OVEN 4.1 OVERVIEW The oven may be vented in a variety of ways depending upon the usage, the building the oven is installed in and restrictions due to local codes. It is very important to take into consideration the complete venting system, including maintenance, before committing to a location. SEEK OUT QUALIFIED INSTALLERS IN YOUR AREA AND OBTAIN THE PROPER PERMITS. MANY BUILDING AND PLANNING DEPARTMENTS REQUIRE MECHANICAL DRAWINGS OF THE VENTING SYSTEM DEMONSTRATING CODE COMPLIANCE. 4.2 EXHAUST VENT REQUIREMENTS Installation of the exhaust vent shall be in accordance with the Standard for Ventilation Control and Fire Protection of Commercial Cooking Operations, NFPA 96. This code references UL 737 for direct venting and UL 2162 for indirect venting. The oven may be vented in either of the following methods: 1. Direct vent by connecting the oven to an approved 8” factory built chimney pipe per UL 737. 2. Indirect vent by installing the oven under a Type 1 Grease Hood per UL 2162. SINGLE WALL AND B-TYPE VENT PIPES ARE NOT ACCEPTABLE FOR THIS TYPE OF APPLIANCE! IT IS IMPORTANT FOR THE INSTALLER TO CONTACT THE LOCAL BUILDING OR FIRE INSPECTOR TO DETERMINE WHICH VENTING METHOD IS ACCEPTABLE. Mugnaini Imports, Inc. 11 Hangar Way, Watsonville CA 95076 888.887.7206 │ 831.761.7167 │ Fax: 831.728.5570 www.mugnaini.com │ [email protected] PAGE 9 M UGNAI N I ® MUGNAINI SERIES GAS FIRED OVEN MANUAL 5. DIRECT VENTING WITH FACTORY BUILT CHIMNEY 5.1 DIRECT VENT REQUIREMENTS USING FACTORY BUILT CHIMNEYS • • • • • • • • • • Oven installations utilizing direct vent insulated chimneys must comply with UL 737 and NFPA 96 DO NOT CONNECT THIS UNIT TO A CHIMNEY FLUE SERVING ANOTHER APPLIANCE Factory built insulated chimneys must be listed to UL 103 HT or ULC S627. Example chimney pipe: Simpson DuraTech www.duravent.com Applicable for building with chimneys 3 stories or less 2 sets of offsets (elbows) allowed (15 or 30 degree angles only) Attach chimney anchor plate to oven using Direct Vent Flue Adaptor - part# DVA Chimney must be installed per chimney manufacturer’s installation instructions Chimney must terminate to an approved chimney cap with spark arrestor (screen mesh) Chimney lengths 25 feet or longer may require an exhaust fan. The Enervex GSV series fan is listed for use with a wood burning pizza oven see: http://www.greasefans.com • Applicable for pizza and bread products only 5.2 ADDITIONAL REQUIREMENTS FOR CANADA • The use of smoke detectors is highly recommended • The chimney connector shall not pass through an attic, roof space, closet floor, ceiling, or similar concealed space. Where passage through a wall or partition of combustible construction is desired, the installation shall conform with CAN/CSA-B365 5.3 OVEN FLUE OUTLET • Flue size: 8” round (internal diameter) • Flue location: on top of oven centered above arch, 7 3/8” (+/- 1”) behind the front panel 5.4 CONNECTING FACTORY BUILT CHIMNEY TO OVEN Mugnaini offers an optional Direct Vent Flue Adaptor for installation in the factory. Part# DVA is a flush mount adaptor designed to accept a standard Anchor Plate used with UL 103 double wall insulated chimney. Part# DVA with anchor plate adaptor (anchor plate not supplied) Mugnaini Imports, Inc. 11 Hangar Way, Watsonville CA 95076 888.887.7206 │ 831.761.7167 │ Fax: 831.728.5570 www.mugnaini.com │ [email protected] PAGE 10 M UGNAI N I ® MUGNAINI SERIES GAS FIRED OVEN MANUAL 6. DIRECT VENTING WITH FACTORY BUILT GREASE DUCT 6.1 DIRECT VENT REQUIREMENTS USING FACTORY BUILT GREASE DUCT • • • • • • • • • Oven installations utilizing direct vent grease duct must comply with NFPA 96 DO NOT CONNECT THIS UNIT TO A CHIMNEY FLUE SERVING ANOTHER APPLIANCE Factory built grease duct assemblies must be listed to UL 1978 Example grease duct: Metal Fab G-Series www.metal-fabinc.com Ideal for complicated runs, long lengths or horizontal runs Weld grease duct starter piece to oven using Direct Vent Flue Adaptor - part# GDV Chimney must be installed per chimney manufacturer’s installation instructions Chimney must terminate to an approved chimney cap with spark arrestor (screen mesh) Chimney lengths 25 feet or longer may require an exhaust fan. The Enervex GSV series fan is listed for use with a wood burning pizza oven see: http://www.greasefans.com • Applicable for any menus including cooking meat 6.2 ADDITIONAL REQUIREMENTS FOR CANADA • The use of smoke detectors is highly recommended • The chimney connector shall not pass through an attic, roof space, closet floor, ceiling, or similar concealed space. Where passage through a wall or partition of combustible construction is desired, the installation shall conform with CAN/CSA-B365 6.3 OVEN FLUE OUTLET • Flue size: 8” round (internal diameter) • Flue location: on top of oven centered above arch, 7 3/8” (+/- 1”) behind the front panel 6.4 CONNECTING FACTORY BUILT GREASE DUCT TO OVEN Mugnaini offers an optional Direct Vent Flue Adaptor for installation in the factory. Part# GDV has a 2” weldable stainless stub for a field welded grease duct adaptor. Part # GDV Grease duct adaptor Mugnaini Imports, Inc. 11 Hangar Way, Watsonville CA 95076 888.887.7206 │ 831.761.7167 │ Fax: 831.728.5570 www.mugnaini.com │ [email protected] PAGE 11 M UGNAI N I ® MUGNAINI SERIES GAS FIRED OVEN MANUAL 7. INDIRECT VENTING 7.1 INDIRECT VENTING REQUIREMENTS • DO NOT CONNECT THIS UNIT TO A CHIMNEY FLUE SERVING ANOTHER APPLIANCE • Oven installations using indirect venting require a Type 1 Hood listed to UL 710 • The hood shall allow adequate clearance for removal and cleaning of the grease baffles (Captive Aire model SND is a low profile hood that enhances access) • Fire suppression system shall be used in the hood only and not pointed into the oven • Flue outlet temperatures reach 550 F so be sure to place fusible link appropriately • May be vented with single wall grease duct or insulated factory built grease duct list to UL 1978 • Example grease duct: Metal Fab G-Series www.metal-fabinc.com • Exhaust fan listed for use with a wood burning oven is recommended. The Enervex GSV series fan is listed for use with a wood burning pizza oven see: http://www.greasefans.com 7.2 TYPE 1 HOOD • • • • Minimum Type 1 Hood dimensions: 36” wide x 42” deep Example: Captive Aire model SND Exhaust Hood www.captiveaire.com Install hood directly on top of oven using ceiling supports The hood shall extend 12” beyond the front of the oven opening (arch/mouth) and extend 6” beyond the sides of the oven opening. See diagrams on following page. Type 1 Hood Placement SEEK OUT A QUALIFIED PROFESSIONAL TO DESIGN AND INSTALL YOUR VENTING SYSTEM. CHECK WITH LOCAL AUTHORITIES FOR SPECIFIC CODE REQUIREMENTS Mugnaini Imports, Inc. 11 Hangar Way, Watsonville CA 95076 888.887.7206 │ 831.761.7167 │ Fax: 831.728.5570 www.mugnaini.com │ [email protected] PAGE 12 M UGNAI N I ® MUGNAINI SERIES GAS FIRED OVEN MANUAL OPERATING AND MAINTENANCE INSTRUCTIONS 8. CURING THE OVEN Once the installation of your gas-burning oven is complete, it is necessary to “CURE” the oven to eliminate any potential moisture within the walls and floor. The task is to slowly increase the heat inside the oven without using high heat. As you begin to use your oven, fine shallow cracks will become noticeable in the inner lining of the walls. This is to be expected as a result of the thermal expansion and does not indicate a failure of the material. However, if excessive moisture is allowed to migrate into the walls, deep and potentially damaging cracks in the clay elements could result at high temperatures. IT IS IMPORTANT TO COMPLETE THE CURING PROCESS BEFORE USING THE OVEN AT MAXIMUM HEAT. 8.1 CURING PROCESS Day 1: Fire the oven on the lowest setting for 4 hours • After 4 hours turn the power off and place the door in the fully closed position. • Leave overnight to allow heat to saturate oven components. • Do not continue to fire the oven for more than 4 hours or at a higher temperature. Day 2: Fire the oven on the lowest setting and then raise temperature hourly for 6 hours • Turn the power on and select Min setting. Fire for one hour. • Select Auto, press Set button and use arrows to change set point to 65 C, press Set. • Use the FIRE CONTROL arrows to set the power between 20-40%. • Every hour, increase the set point 25 C. • Fire for 6 hours or more. • Turn the power off and place the door in the fully closed position. Day 3: Fire the oven on the lowest setting and then raise to operating temperature • • • • • • Turn the power on and select the Min setting. Fire for 20 minutes. Select Auto, press Set button and use arrows to change set point to 125 C, press Set. After the oven has come up to temperature raise set point to 250 C. Use the FIRE CONTROL arrows to set the power between 20-40%. Allow oven to come up to pizza temperature and maintain for 6 hours. You may now cook as soon as the oven is up to temperature. Your Mugnaini gas fired oven is now fully cured and ready for service! Mugnaini Imports, Inc. 11 Hangar Way, Watsonville CA 95076 888.887.7206 │ 831.761.7167 │ Fax: 831.728.5570 www.mugnaini.com │ [email protected] PAGE 13 M UGNAI N I ® MUGNAINI SERIES GAS FIRED OVEN MANUAL 9. FIRING THE OVEN The Mugnaini Gas Fired Pizza Oven is an open hearth appliance designed to cook with high heat and a live fire. The oven may be utilized for a variety of cooking techniques such as high heat roasting, as a bake oven and of course a pizza oven. No matter what style of cooking you intend on using, the oven must always be pre-heated and then regulated to the desired operating temperature following these instructions. PRECAUTIONS READ ALL INSTRUCTIONS CAREFULLY. IMPROPER USE OF THIS APPLIANCE MAY RESULT IN A BUILDING FIRE OR PERSONAL INJURY. INSTRUCTIONS SHOULD BE THOROUGHLY UNDERSTOOD BY ALL OPERATING AND SUPERVISING PERSONNEL. THIS OVEN IS INTENDED FOR OPERATION BY TRAINED AND QUALIFIED PERSONNEL ONLY. DO NOT OVER FIRE. IF FLAMES EXTEND BEYOND THE OVEN DOOR OPENING, YOU ARE OVERFIRING. DO NOT USE PRODUCTS NOT SPECIFIED FOR USE WITH THIS OVEN. NEVER USE WATER OR ICE TO LOWER TEMPERATURE INSIDE THE OVEN. 9.1 OVEN TOOLS REQUIRED FOR OPERATING YOUR MUGNAINI GAS FIRED OVEN • • • • • Long handle metal peel with 8” round head Long handle floor brush with brass bristles Pizza peel of choice, metal or wood Hand held infrared thermometer rated to 750 F and set to .95 emmissivity Metal door (included with oven) Mugnaini Imports, Inc. 11 Hangar Way, Watsonville CA 95076 888.887.7206 │ 831.761.7167 │ Fax: 831.728.5570 www.mugnaini.com │ [email protected] PAGE 14 M UGNAI N I ® MUGNAINI SERIES GAS FIRED OVEN MANUAL 9.2 CONTROL BOX The Spitfire gas burner system is a sophisticated controller that can be used in either a Manual mode or an Automatic mode with Set Point. In addition, the size of the flame can be regulated independently of the oven temperature. 9.2.1 POWER BUTTON The power switch is the button in the top left corner of the control box. A green light will be illumined when the burner is on. 9.2.2 OVEN TEMPERATURE The oven temperature is display with LED numbers in the middle of the control box. The Spitfire burner system reads the oven temperature in front of the burner using a thermal couple. While this number is accurate, it is primarily used as a guide for setting the burner not for cooking. See Cooking Environments for details. 9.2.3 SET POINT The Set button is pressed to change the ‘Target temperature’ or set point of the burner when in Auto mode. Press Set and then use the up and down arrows to change the set point. Press Set again to lock in the set point. The Spitfire burner will automatically raise and lower the flame to maintain that temperature. NOTE: The actual temperature inside the oven will be different than the temperature displayed on the control box. This Set Point should be used in conjunction with an infrared thermometer to balance the oven for the desired cooking environment. Test various set points in 10 degree increments to determine the set point that achieves the desired floor temperature. 9.2.4 RESET BUTTON If the oven loses its flame, the Reset button will be illumined. Press the Reset button to relight the burner. If the burner goes out three times in a row contact Mugnaini service department to rectify the problem. 9.2.5 FIRE CONTROL The size or intensity of the flame can be changed by pressing the up or down arrows to achieve the desired flame. 9.2.6 MAX BUTTON Press the Max button to allow the oven to run at maximum power. The flame can be adjusted manually by using the Fire Control up and down arrows. 9.2.7 AUTO BUTTON Press the Auto button to manage the oven based on the set point. See Set Point for details. 9.2.8 MIN BUTTON Press the Min button to run the oven with the smallest flame. Use this mode when pre-heating an oven or to keep a hot oven stable between lunch and dinner service. Mugnaini Imports, Inc. 11 Hangar Way, Watsonville CA 95076 888.887.7206 │ 831.761.7167 │ Fax: 831.728.5570 www.mugnaini.com │ [email protected] PAGE 15 M UGNAI N I ® MUGNAINI SERIES GAS FIRED OVEN MANUAL 9.3 DAILY OPERATIONS The goal for daily service is to have an oven that is pre-heated with a live flame regulated to the manner in which you wish to cook. The oven can be used in the Manual mode or in the Automatic mode by pressing the appropriate button. Either mode requires a handheld infrared thermometer set to read Fahrenheit to accurately read the floor temperature where you are cooking. 9.4 DAILY START UP Remove oven door and remove any debris using the floor brush. 9.5 PRE-HEAT Press the power button to turn the oven on. The ambient air temperature is shown in Celsius. It is a good practice to use the Min setting to pre-heat the oven for 20 minutes prior to using the automatic or manual modes. 9.6 AUTOMATIC MODE Press the Auto button to put the oven in automatic mode. The oven will now self regulate according to the ‘Target Temperature’ or set point. Pressing the Set button will display the set point. Press and hold the Set button to change the set point using the up and down arrows. Press Set again to lock in the set point. Remember, the set point is used to regulate the burner and is not an accurate measurement of the cooking surface so just use it as a guide. 9.7 MANUAL MODE Press the Min button to fire the oven with the lowest flame setting. Press the Max button to fire the oven with the highest flame setting. Use the up and down arrows to ramp the flame up or down to the desired size. Spitfire rates the size of the flame as a percentage of the maximum flame. NOTE: At any time you may press the up and down arrows to change the size of the flame 9.8 DAILY SHUT DOWN At the end of service simply press the power button to turn off the burner system and place the door inside the arch in the fully closed position. To close the door, angle the door as you insert it inside the arch and then straighten it up and push it back all the way in an upright position. Photo instruction and oven accessories are available on our website: www.mugnaini.com Please call our office 888.887.7206 for more personalized instruction, to schedule a class or to purchase any accessories you may need. Mugnaini Imports, Inc. 11 Hangar Way, Watsonville CA 95076 888.887.7206 │ 831.761.7167 │ Fax: 831.728.5570 www.mugnaini.com │ [email protected] PAGE 16 M MUGNAINI SERIES GAS FIRED OVEN MANUAL UGNAI N I ® 9.9 COOKING ENVIRONMENTS Once your oven has been pre-heated, you will need to regulate it for the style of cooking you will be doing. All cooking methods in an open hearth pizza oven are based on floor temperature and the size of the flame. Floor temperatures are best measured with a handheld infrared thermometer. Regardless of the target temperature (set point) on the gas control box; you will always want to read the floor temperature with the infrared thermometer and adjust the set point to achieve the desired cooking environment. 9.10 PIZZA OVEN ENVIRONMENT This is defined as a hot oven having a floor temperature of 650-750 F and a live flame reaching the middle of the oven or further. Naturally, your product will determine the temperature you can bake at but you can think of the floor temperature and the flame size as a ratio. Then you can adjust your dough and toppings to work for either a bake time or a floor temperature. Expect to adjust the flame manually or use the automatic system as service changes throughout the day. The door is removed for pizza service. FLOOR TEMP (use infrared thermometer) 750 F or more 650 F 550 F FLAME SIZE (use Fire Control arrows to adjust) Reaching past the middle of dome Reaching the middle of dome Reaching up the side dome PIZZA BAKE TIME (approx. range) 1 ½ minutes 2 ½ minutes 4-5 minutes 9.11 ROASTING OVEN ENVIRONMENT High heat roasting of meats and vegetables is achieved with a floor temperature of 550 -600 F and a maintenance flame that reaches just up the side of the oven but not across the top. The door may be placed at a slight angle on the shelf in front of the arch. If black soot accumulates on the oven dome then either turn down the flame or open the door to allow more air into the oven. 9.12 BAKE OVEN ENVIRONMENT You can still cook in your oven using only the retained heat stored deep in the oven walls and floor. Bread can be baked the next morning or meats roasted between and after service with no flame. The door is placed in the fully closed position: an upright position fully inserted behind the arch to close off the bake chamber. WARNING THE BURNER SYSTEM MUST BE TURNED OFF IF THE DOOR IS FULLY CLOSED.NEVER USE WATER OR ICE TO LOWER TEMPERATURE INSIDE THE OVEN. Mugnaini Imports, Inc. 11 Hangar Way, Watsonville CA 95076 888.887.7206 │ 831.761.7167 │ Fax: 831.728.5570 www.mugnaini.com │ [email protected] PAGE 17 M UGNAI N I ® MUGNAINI SERIES GAS FIRED OVEN MANUAL 10. MAINTENANCE INSTRUCTIONS WARNING READ ALL INSTRUCTIONS CAREFULLY. IMPROPER USE OR MAINTENANCE OF THIS OVEN MAY RESULT IN A BUILDING FIRE OR PERSONAL INJURY. 10.1 GREASE FORMATION AND THE NEED FOR REMOVAL When exhaust air is drawn through the flue, grease laden vapors may be present. These grease laden vapors condense in the relatively cool oven flue or exhaust hood duct and residue accumulates on the flue lining or ducting. When ignited this grease residue makes an extremely hot fire. The exhaust hood ducting should be inspected at least once a month or until a schedule of cleaning has been determined by a qualified technician. 10.2 DAILY MAINTENANCE The oven, exhaust hood and grease filters (if Type 1 hood is used) should be cleaned on a daily basis. The grease filters can be removed and cleaned in a dishwasher or sink. Follow exhaust hood manufacturer’s recommendations or NFPA 96 requirements for inspection, maintenance and cleaning. 10.3 MONTHLY MAINTENANCE Seek out a qualified chimney sweep or exhaust duct service technician to inspect and clean the flue system on a regular schedule starting monthly and adjust according to build up. 10.4 DIRTY FLOOR MAINTENANCE Stains can be burned off the oven floor at the end of the day by using the Max setting for 30 - 45 minutes. This is similar to a conventional oven’s self cleaning mode. Allow the oven floor to raise to over 750 F and brush off any debris. Be careful to not over fire the oven. Note: The scheduled maintenance cycle may change according to oven usage, the products cooked and seasonal weather/HVAC changes. Mugnaini Imports, Inc. 11 Hangar Way, Watsonville CA 95076 888.887.7206 │ 831.761.7167 │ Fax: 831.728.5570 www.mugnaini.com │ [email protected] PAGE 18 M UGNAI N I ® MUGNAINI SERIES GAS FIRED OVEN MANUAL 11. LIMITED WARRANTY MUGNAINI IMPORTS, INC. (“Mugnaini”), a California corporation, is a distributor of Italian woodburning residential and commercial ovens (the “Oven(s)”). Mugnaini warrants to the original purchaser only (“Original Purchaser”) that the Oven will be free from defects in materials and workmanship for a period of five (5) years from the date of delivery (“Warranty Period”). Remedies available to the Original Purchaser against Mugnaini under this warranty are limited to: (i) repair and replacement of parts and/or the necessary labor and services required to repair the Oven; or, (ii) at Mugnaini’s option, refund of the purchase price. Information in Mugnaini’s catalog or other information provided by Mugnaini is given after the exercise of due care in its compilation, preparation, and issuance; however, Mugnaini disclaims any liability resulting from such information, except for the obligation under the warranty provided herein. NO OTHER EXPRESS WARRANTY IS GIVEN, AND NO AFFIRMATION OF MUGNAINI, BY WORDS OR ACTION, SHALL CONSTITUTE AN ADDITIONAL WARRANTY. THIS WARRANTY IS NON-TRANSFERRABLE. THIS WARRANTY IS EXPRESSLY IN LIEU OF AND EXCLUDES ALL OTHER EXPRESS OR IMPLIED WARRANTIES WITH RESPECT TO THE OVEN OR ANY RELATED EQUIPMENT OR ACCESSORY, INCLUDING, BUT NOT LIMITED TO, WARRANTIES OF MERCHANTABILITY AND OF FITNESS FOR PARTICULAR PURPOSE, USE OR APPLICATION AND ALL OTHER OBLIGATIONS OR LIABILITIES ON THE PART OF MUGNAINI, UNLESS SUCH OTHER WARRANTIES, OBLIGATIONS OR LIABILITIES ARE EXPRESSLY AGREED TO IN WRITING BY MUGNAINI. This warranty shall not apply: (a) to any Oven or related equipment or accessory that is improperly installed or maintained (b) to products resold in other than Mugnaini original packaging or to Ovens modified or altered by the Original Purchaser; (c) to failure or malfunction of the Oven or any related accessories that is caused by improper use or any failure to assemble or install pursuant to factory instructions; to any Oven or related accessories that have been materially altered from the condition in which they were shipped to the Original Purchaser; (e) to any cracking caused by overfiring, by failure to follow a proper curing schedule, or by expansion or contraction in either refractory mortar or refractory Oven component; (f ) to normal wear and tear; and, (g) to freight and shipping charges for sending an Oven to Mugnaini for repair. All claims under warranty (“Warranty Claim(s)”) must be made within fifteen (15) days after occurrence of circumstances giving rise therein and all Warranty Claims must be received within the applicable Warranty Period by Mugnaini or its authorized representative. Any and all rights under this warranty or at law of Original Purchaser against Mugnaini shall terminate and be void in the event Warranty Claims are not submitted within the time set forth in the immediately preceding sentence. Such Warranty Claims must be in writing and include the Oven type, the model and serial number of the Oven, the purchase date and a full description of the circumstances giving rise to the Warranty Claim. Warranty Claims under this warranty are to be mailed to: Mugnaini Imports, Inc. 11 Hangar Way, Watsonville CA 95076 888.887.7206 │ 831.761.7167 │ Fax: 831.728.5570 www.mugnaini.com │ [email protected] PAGE 19 M UGNAI N I ® MUGNAINI SERIES GAS FIRED OVEN MANUAL MUGNAINI IMPORTS, INC. 11 Hangar Way Watsonville, California 95076 Before any Oven is returned for repair, written authorization must be obtained from Mugnaini or its authorized representative for the return and instructions, as to how and where the Oven should be shipped. Any Oven returned to Mugnaini for examination shall be shipped with all shipping charges prepaid, at Original Purchaser’s expense, via the means of transportation indicated as acceptable by Mugnaini. Mugnaini reserves the right to reject any Warranty Claim not promptly reported and any Warranty Claim on any Oven that has been altered or has been shipped by non-acceptable means of transportation. When an Oven is returned for examination and inspection or for any other reason, Original Purchaser shall be responsible for all damages resulting from improper packing or handling and the risk of loss in transit, notwithstanding any defect or nonconformity in the Oven. In all cases, Mugnaini has sole responsibility in its reasonable judgment for determining the cause and nature of failure, and Mugnaini’s determination with regard thereto shall be final and binding upon the Original Purchaser. If it is found that Mugnaini’s Oven has been returned without cause and is still serviceable, Original Purchaser will be notified and the Oven returned at Original Purchaser’s expense. In addition, a charge for testing and examination may, in Mugnaini’s sole and reasonable discretion, be made on any Oven so returned. THE LIABILITY OF MUGNAINI FOR WARRANTY CLAIMS (REGARDLESS OF THE LEGAL THEORY ASSERTED, SUCH AS BREACH OF CONTRACT, BREACH OF WARRANTY, NEGLIGENCE, TORT, VIOLATION OF STATUTE OR REGULATION, STRICT PRODUCTS LIABILITY, CONSUMER PROTECTION STATUTES OR DECEPTIVE TRADE PRACTICES STATUTES); OR (2) DAMAGES (INCLUDING SETTLEMENTS, JUDGMENTS AND AWARDS, AND COSTS, INCLUDING ATTORNEYS’ FEES AND EXPENSES INCURRED IN DEFENDING CLAIMS) ARISING OUT OF THE OVEN, SHALL NOT BE GREATER THAN THE ACTUAL PRICE OF THE OVEN WITH RESPECT TO WHICH THE WARRANTY CLAIM OR DAMAGES ARISES. UNDER NO CIRCUMSTANCES IS MUGNAINI LIABLE FOR CONSEQUENTIAL, SPECIAL, INCIDENTAL OR INDIRECT DAMAGES OF ANY KIND OR TYPE INCLUDING WITHOUT LIMITATION, CLAIMS FROM ORIGINAL PURCHASER, OR OTHER THIRD PARTIES, PROSPECTIVE OR PRESENT LOSS OF PROFITS, BUSINESS REPUTATION OR GOODWILL, EVEN IF MUGNAINI WAS AWARE OF A POTENTIAL FOR SUCH DAMAGE. If Original Purchaser is not satisfied with the warranty service, the Original Purchaser must submit a Warranty Claim in writing to Mugnaini’s Dispute Settlement Representative at 11 Hangar Way, Watsonville, California 95076. The written notice must include the Oven type, the model and serial number of the Oven, the purchase date, a detailed description of the problem and the address at which the Original Purchaser can be reached. Mugnaini will review each notice and respond to the Original Purchaser in an effort to settle such dispute. Under federal law, no lawsuit may be initiated unless and until the dispute settlement procedures outlined in this warranty have been exhausted. Any Warranty Claim shall be governed by and construed in accordance with the internal laws of the State of California. Original Purchaser consents to the jurisdiction and venue of any court, federal or state, sitting in the State of California, County of Santa Cruz, for the resolution of any dispute arising out of the Warranty Claim. This warranty gives Original Purchaser specific legal rights, and Original Purchaser may also have other rights that vary from state to state. Some states do not allow the exclusion or limitation of incidental or consequential damages, so the above limitation or exclusion may not apply. Mugnaini Imports, Inc. 11 Hangar Way, Watsonville CA 95076 888.887.7206 │ 831.761.7167 │ Fax: 831.728.5570 www.mugnaini.com │ [email protected] PAGE 20