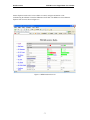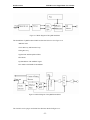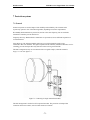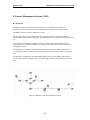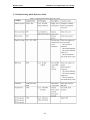
1
L54 Series Digital STL Radios User Manual Ver 1.0.1 DTS Broadcast PDH Microwave Digital Radio User Manual 1 Safety Precautions PLEASE READ THESE SAFETY PRECAUTIONS! RF Energy Health Hazard This symbol indicates a risk of personal injury due to radio frequency exposure. The radio equipment described in this guide uses radio frequency transmitters. Do not allow people to come in close proximity to the front of the antenna while the transmitter is operating. The antenna will be professional installed on fixed-mounted outdoor permanent structures to provide separation from any other antenna and all persons. WARNING: RF Energy Exposure Limits and Applicable Rules for 6-38 GHz. It is recommended that the radio equipment operator refer to the RF exposure rules and precaution for each frequency band and other applicable rules and precautions with respect to transmitters, facilities, and operations that may affect the environment due to RF emissions for each radio equipment deployment site. Appropriate warning signs must be properly placed and posted at the equipment site and access entries. Protection from Lightning Article 810 of the US National Electric Department of Energy Handbook 1996 specifies that radio and television lead-in cables must have adequate surge protection at or near the point of entry to the building. The code specifies that any shielded cable from an external antenna must have the shield directly connected to a 10 AWG wire that connects to the building ground electrode. Do not turn on power before reading documentation. This device has a -48 VDC direct current input. Protection from RF Burns It is hazardous to look into or stand in front of an active antenna aperture. Do not stand in front of or look into an antenna without first ensuring the associated transmitter or transmitters are switched off. Do not look into the waveguide port of an ODU (if applicable) when the radio is active. Risk of Personal Injury from Fiber Optics DANGER: Invisible laser radiation. Avoid direct eye exposure to the end of a fiber, fiber cord, or fiber pigtail. The infrared light used in fiber optics systems is invisible, but can cause serious injury to the eye. WARNING: Never touch exposed fiber with any part of your body. Fiber fragments can enter the skin and are difficult to detect and remove. -2- DTS Broadcast PDH Microwave Digital Radio User Manual Warning – This is a Class A product Warning – This is a Class A product. In a domestic environment this product may cause radio interference in which case the user may be required to take adequate measures. Warning – Turn off all power before servicing Warning – Turn off all power before servicing. Safety Requirements Safety requirements require a switch be employed between external and internal power supplies. Proper Disposal The manufacture of the equipment described herein has required the extraction and use of natural resources. Improper disposal may contaminate the environment and present a health risk due to the release of hazardous substances contained within. To avoid dissemination of these substances into our environment, and to lessen the demand on natural resources, we encourage you to use the appropriate recycling systems for disposal. These systems will reuse or recycle most of the materials found in this equipment in a sound way. Please contact CarrierComm or your supplier for more information on the proper disposal of this equipment. -3- DTS Broadcast PDH Microwave Digital Radio User Manual 2 System Descriptions 2.1Overview L54 series of PDH digital microwave radios, and integrated design incorporating high & new technology such as FPGA, ASIC and digital signal processor (DSP). The L54 is designed for short-haul, high-reliability, easy-toinstall, and low-cost point-to-point communication links. Applications include PCS/PCN micro-cell fixed network infrastructure, cellular back-haul interconnections. And now the L54 has been used in applications such as military and private networks for government, educational institutions, banks and commercial organizations. The L54 is designed for data rates including 4x 2.048 Mb/s (4E1), 8x 2.048 Mb/s (8E1), 16x 2.048 Mb/s (16E1), 10/100BASE-T+ 1/2/4 E1 (14MHz or 28MHz) in protected and unprotected configurations. Indoor Units (IDUs) are muilti fuctional; configure flexial, small, and reliable, support capacities including 4E1, 8E1, 16E1, 10/100BASE-T+1/2/4E1. And IDU supports 2 auxialy data channels, a phone channel, a 10BASE-T and RS232 network management channel. Meanwhile, we can get the BER, RSL and working status of equipment, and control the working status by NMS or LCD panel. -4- DTS Broadcast PDH Microwave Digital Radio User Manual 2.2 Features • • • • • • • • • • • • • • • • • • • • • • • • High perfermance and integrated design incorporating high & new technology Minimal installation time Single coaxial cable connection between Indoor and Outdoor Units Adjustable transmit output power Frequency/channel setting via LCD panel or NMS Diagnostic loopbacks accessible via LCD panel or NMS 253 different Device ID codes Selectable traffic capacity The same IDU support all different service pulgin, such as 4/8/16E1, 10/100BASE-T Software adaptive service pulg in Auxiliary Alarm input and Relays output Digital Modulator and Demodulator, Forward-Error-Correction (FEC) High sensitivity and high system gain Low power consumption, use 3.3V and 1.5V working voltage Standard radio IF frequencies on the cable: 310MHz/70MHz No cable length settings or adjustments required, RG-6/U cable up to 100m Protection Switch Option available SNMP (NMI) Option available WEB Server supported for network management 1 Rack Unit (RU) high, 19” wide The same IDU support all different service pulgin 4 external alarm input sensor as standard 5 alarm relay outputs as standard Front panel keypad access to control and diagnostics features Control: • Link Capacity select • Frequency of operation • Transmitter Power adjustment • Dvice ID • Tributary status • Transmitter On/Off • ATPC Diagnostics: • Beep and Light Alarm • RSSI • Current BER • Alarm summary status • Transmitter Power Status • Auto Locate Alarm and display -5- DTS Broadcast PDH Microwave Digital Radio User Manual 2.3 Software Controlled Features The L54 is based on full software control and system configuration. Use of the software-based features is through the front LCD panel keypad and display on each IDU, or through Internet Explorer running in PC. The RJ-45 connector on the IDU front panel provides a 10BASE-T interface to a standard IBM compatible PC running Microsoft Windos@. The software functions include all commands to configure a terminal, the alarms and monitor performance. The configuration of both the local and remote terminals can be displayed and changed from one end of the link. In additional, if connect network interfaces together, multi terminals are managed from one terminal. We can monitor transmit/receive frequencies, transmit power level, device ID code, receive level alarm points, remote and local loopbacks, etc. See Figure 2.1 for LCD panel. Figure 2-1 LCD Panel The IDU keys are Up, Down, Left, Right, Clear and Enter. These front panel keys provide all of the on-site controls required to install, test, and commission a link. This can be done without any external test equipment, resulting in major time and cost savings. -6- DTS Broadcast PDH Microwave Digital Radio User Manual Internet Explorer based on PC is also available to control, configure and monitor a L54 terminal using the 10BASE-T interface WEB based on the IDU. The WEB Server based Internet Explorer main screen is shown in Figure 2-2. Figure 2-2 WEB based main screen -7- DTS Broadcast PDH Microwave Digital Radio User Manual 2.4 Basic Structure A universal radio basic structure concept has been implemented for the L54 product line. A radio terminal consists of three components: IDU, ODU and Antenna. A single coaxial cable is required to interconnect the IDU with the ODU. This single cable feeds DC power to the ODU from the IDU and supports bi-directional traffic, alarm and control signals. This basic structure is used for the full frequency range from 1 to 23 GHz to maximize flexibility, commonality of spare parts and interchangeability. This universal radio basic structure is illustrated in Figure 2-3. The primary frequency dependent components are the antenna and several modules within the ODU including the transmit hybrid, receive hybrid and diplexer. The IDU is frequency independent and the ODU is capacity independent. The network management system supports digital microwave radios of all bands. NMS interface and auxiliary data interfaces are available in the IDU to support Network Management, Auxiliary Data Channels, 1+1 Protection Interface or other custom interfaces. Figure 2-3 L54 Product Basic Structure Tributary data and service channels, radio overhead and network management information at the local terminal are fed to the IDU. The IDU DSP converts the tributary data to TTL level signals and multiplexes them with the service channels onto an aggregate data stream. The IDU digital modem modulates the aggregate signal to create an Intermediate Frequency (IF) signal. The IF signal is superimposed with DC power and sent to the ODU on a coaxial cable. The ODU converts the IF signal to a Radio Frequency (RF) signal to the antenna of the remote terminal. At the remote terminal ODU, the received signal is converted back to an IF signal. The IF signal is fed through the coaxial cable to the IDU, where it is demodulated and de-multiplexed into tributary data and the auxiliary service channels. The link is full duplex (bi-directional), fully symmetrical and transparent to the data stream. -8- DTS Broadcast PDH Microwave Digital Radio User Manual 2.4.1 IDU The L54 IDU is a 1RU rack-mountable assembly designed for 19-inch rack/cabinet installations. All IDUs are compatible with standard 19-inch EIA and ETSI rack mount standards. Each IDU is designed to support one of four capacities: 4E1/8E1/16E1, and 10/100BASE-T+1/2/4E1data rates. Different services have different interface, another way, different service should configure different service plug-in. The IDU is independent of any frequency band thus simplifying maintenance and lowering the overall cost of sparing. Figure 2-4 IDU for 4/8/16 E1(75ohm unbalnaced) service card Figure 2-5 IDU for 10/100BASE-T+1/2/4 E1 (75ohm unbalnaced) service card Figure 2-6 IDU for 4/8/16 E1 (120ohm balnaced) service card Figure 2-7 IDU for 10/100BASE-T+1/2/4 E1 (120ohm balnaced) service card Figure 2-8 IDU for 1 +1 -9- DTS Broadcast PDH Microwave Digital Radio User Manual See Figure 2-9 for IDU panel with no plug-in card. See Figure 2-10 for 4/8/16E1 75ohm unbalanced plug-in. See 2-11 for 4/8/16E1 120ohm balanced plug-in. See Figure 2-12 for 10/100BASE-T+1/2/4E1 120ohm balanced plug-in. Position of service card Figure 2-9 IDU without service card Figure 2-10 4/8/16 E1 (75ohm unbalanced)service card Figure 2-11 4/8/16E1 (120ohm balanced) service card Figure 2-12 10/100BASE-T+1/2/4E1 (120ohm balanced) service card • The SC4E1-Be for service card of 2E1, plugin port 1,2 of TRIBS to connect, the others not effectively. -10- DTS Broadcast PDH Microwave Digital Radio User Manual See Figure 2-13 for IDU 1+1 mode panel with no plug-in card. See Figure 2-14 for 4E1 120ohm balanced plug-in. See 2-15 for 4 ports 10/100BASE-T plug-in. Figure 2-13 IDU 1+1 without service card Figure 2-14 4E1 (120ohm balanced) service card Figure 2-15 4 Prots 10/100BASE-T service card The main functions of the IDU are data interface card (plug-in), frame multiplexing, diplexer, modulator, demodulator, DC-DC converter, and CPU alarm/status monitoring and site-to-site communications. See Figure 2-16 for block diagram of the IDU. The optional service plug-in cards are carried Tributary Service Data, multiplexed with Auxiliary Data, EOW Data and CPU site-to-site communication messages in Frame-Mux block. The multiplexed data will be modulated, forms QPSK signal with 310MHz carrier, and send to ODU by IF cable through diplexer. -11- DTS Broadcast PDH Microwave Digital Radio User Manual The QPSK IF signal with 70MHz carrier received by ODU will be demodulated required frame data. And the frame data will be demultiplexed by frame-diplexer to EOW signal, Auxiliary Data, CPU site-to-site communication messages and service data. The EOW signal is sent to phone interface, the Auxiliary Data is sent to Auxiliary Data interface, the CPU messages is sent to CPU for management, and the service data send to service plug-in card. The CPU in IDU monitors the device running, and communicates with NMS. The DC-DC module in IDU is feed by -48V and supports 3.3V, 5V and 1.5V for system The IDU-ODU communicating module supports communication between IDU and ODU. The IDU can configure frequency and monitors status of ODU by this module. Figure 2-16 Block diagram of the IDU The modulator of QPSK modem in IDU has functions list below: See Figure 2-17. Convolutive Coder with 7/8 puncture rate. Digital interpolation filters I/Q modulater with 310MHz IF signal. IF signal amplifier. PLL module with 310MHz for modulate -12- DTS Broadcast PDH Microwave Digital Radio User Manual Figure 2-17 Block diagram of the QPSK modulator The demodulator of QPSK modem in IDU has functions list below: See Figure 2-18. 70MHz IF AGC Carrier Recovery and Derotator Loop Timing Recovery Nyquist Root and Interpolation Filters FEC Modes I/Q demodulater with 70MHz IF signal PLL module with 70MHz for demodulate Figure 2-18 Block diagram of the QPSK demodulator The 4/8/16E1 Service pulg-in card in IDU has functions detailed in Figure 2-19. -13- DTS Broadcast PDH Microwave Digital Radio User Manual 16 trabutary datas are fed to the 4/8/16E1 service card in IDU. The DSP in service card converts the tributary datas to TTL level signals and multiplexes them onto four E2 data streams. The 4 E2 data streams are fed to mother board of IDU througth a connector. Samely, the 4 E2 data streams received from remote by IDU mother board are de-multiplexed into 16 tributary datas by the DSP in service card. And also, the sevice card monitors alarms of tribs, and controls tributary loopback. The interface of tributary has two types, such as 120ohm balanced and 75ohm unbalanced. Figure 2-19 Block diagram of the 4/8/16E1 service card The 10/100BASE-T+1/2/4E1 Service pulg-in card in IDU has functions detailed in Figure 2-20. 4 tributary datas and 1 10/100base-t data are fed to this service card in IDU. The DSP in service card converts the tributary datas and 10/100base-t data to TTL level signals, and multiplexes them onto four E2 data streams. The 4 E2 data streams are fed to mother board of IDU througth a connector. Samely, the 4 E2 data streams received from remote by IDU mother board are de-multiplexed into 4 tributary datas and 1 10/100base-t data by the DSP in service card. And also, the sevice card monitors alarms of tribs, and controls tributary loopback. The interface of tributary has two types, such as 120ohm balanced and 75ohm unbalanced. -14- DTS Broadcast PDH Microwave Digital Radio User Manual Figure 2-20 Block diagram of the 10/100BASE-T+1/2/4E1 service card The Tx IF signal is superimposed with DC power and sent to the ODU on a coaxial cable. The Rx IF signal is fed through the coaxial cable to the IDU. And the communicating between IDU with ODU is an OOK signal fed into the coaxial cable. See figure 2-21. Figure 2-21 Signals in IF Cable -15- DTS Broadcast PDH Microwave Digital Radio User Manual 2.4.2 ODU Figure 2-22 ODU and Connector • • • • • • Antenna Alignment Indicator: If there is no electric meter during set up, this indicator helps to define the antenna alignment. Higher the signal strengh indicates better antenna alignment. B. ACT Indicator (ACT): This indicator lights up on receiving signal from the IDU. C. Power Indicator: ODU’s power indicator light. When all the connection cables are well connected, switch ON the IDU’s power. The ODU will be provided a power of -48VDC through the IF cables by the IDU. D. Receive Signal Strength Indicator (RSSI): For better antenan alignment between two terminals at a longer distance, please rotate and open the BNC 50_. Use muilt-meter to measure the RSSI voltage. Weak voltage indicates weak signal received, strong signal indicates the most accurate andle position. E. Antenna Interface (TO ANT): Use N-type coaxial cable to connect the Antenna. F. IP Port (N-Type 50_): Transmission includes transmitter 310MHz, receiver 70MHz, telemetry signal, and DC -48V. Maximum transmitter of 100M possible when using RG-6 cable. Maximum transmission 200M possible when using RG-8 cable. • At E & F interface, please entwine waterproof tape at the connection point so as to prevent rainwater or mositure from the device. Narural damage is not warranted. -16- DTS Broadcast PDH Microwave Digital Radio User Manual 3 Options 3.1 Protection Systems The L54 Digital Microwave Radio linking is operated in protected configuration by the addition of an indoor rack-mounted protection switching shelf and another standby radio terminal. The ODU arrangements may use either one antenna with a waveguide coupler or two antennas. The switching protection shelf may be operated in one of three modes: Hot-Standby Only one transmitter is on-line at any one time. Both main and standby terminals are tuned to the same frequency. A fault detected in the on-line radio terminal results in a switch of traffic to the off-line radio terminal. The ODU arrangements may use either one antenna with a waveguide coupler or two antennas. Frequency Diversity The main and standby radios are transmitting simultaneously and are tuned to different frequencies to avoid interference. A fault detected in a traffic-carrying radio terminal results in a switch of customer traffic to the standby radio link. The ODU arrangements may use either one antenna with a waveguide coupler or two antennas. Space Diversity The main and stand-by radios are set up in Hot Stand-by mode, but are connected to their own antennas. The spatial separation of the antennas, combined with hitless receive switching, provides the Space Diversity function on the receiving end of the link. -17- DTS Broadcast PDH Microwave Digital Radio User Manual 3.2 Network Management Since all control, configuration and monitoring functions of the radio are already software controlled from the 10BASE-T port; the radio is ideally suited to interface with external Network Management Systems. The standard NMI option offers SNMP compatibility for management of radio systems. With the use of a browser such as “HP Openview” or “SNMPc”, the operator may view and configure any radio terminal in a network from a single point. Options to support other Network Management protocols can also be easily accommodated as the NMI is built on a powerful hardware platform. For details regarding installation of NMI option, refer to Section 9. 3.3 110~220VAC to -48VDC converter -18- DTS Broadcast PDH Microwave Digital Radio User Manual Figure 3-1 110~220VAC to -48VDC converter We also support a 110~220VAC to -48VDC convertor for 100~240VAC power input. See Figure 3-8. Features: 3KA surge protection Output Over current protection Output Over voltage protection Wide AC input voltage range: 100VAC~240VAC Table 3-1 110~220VAC to -48VDC converter technical data: -19- DTS Broadcast PDH Microwave Digital Radio User Manual 4 Installations 4.1 General This Section assumes that pre-planning of the link has occurred; i.e. path budgeting and survey to ensure good line-of-sight between the two link ends and cable run estimations. Installation task is listed below: • • • • • Equipment and Tools Required Equipment Inventory Cable Installation ODU Installation IDU Installation 4.2 Required Installation Equipment 4.2.1 Tools The only tools needed to install the L54 Digital Microwave Radio are: • • • Basic electrician toolkit (incl. voltmeter) Adjustable wrench (5-20mm) Tools suitable for IF cable, ground line, service data line.i.e. nipper, plier, iron, and so on. 4.2.2 Equipment Assuming the installer has the necessary radio equipment and antenna, the only other items needed are: • RG-6/U length cable that to suit installation. See Section 4.5 for advice on which cable to use. • At least two N-type connectors is suitable for termination of the RG-6/U cable. • To ground the IDU, a suitable length of green PVC insulated 14gauge wire (1.5 mm2 conductor) minimum is required, plus a suitable crimp lug to attach wire to the IDU ground post (4 mm / 0.064 in. diameter). • To power the IDU, suitable lengths of different colored PVC insulated 14 gauge wire (1.5mm2 conductor) are required. Recommend the use of red for 0 V power connections and black for negative power connection. • To connect alarm relay outputs and external input sensor from IDU to other co-located equipment; a suitable length of 25-pin tin-plated PVC insulated copper cable, a male DB25 connector and cover._ enough cable ties to secure all cable runs. -20- DTS Broadcast PDH Microwave Digital Radio User Manual 4.3 Equipment Inventory Check Verify inventory of L54 Digital Microwave Radio components before beginning installation. Ensure the part description detailed on the outside of each box corresponds to the components required for the installation; i.e. correct ODU frequency band, T-R spacing, capacity, service interface, and IDU configuration. The radio configuration is determined by the Customer Specific Data Sheet that has been agreed upon by the customer. See 10.2 for an example showing the factory default settings. The basic components of IDU required are contained in a box: refer to table 4-1 Table 4-1 Package List -21- DTS Broadcast PDH Microwave Digital Radio User Manual 4.4 Requirement of room The room fitment should be finished and dry. The line-slot or line-through-slot, illuminance, AC power, DC power should be ready. Airiness, air-condition establishment should be supplied. Temperature and humidity should be accord with installation conditions. Earthing of the building should be finished and checked out. 4.5 Cable Installation Only one cable is required to connect the IDU to the ODU. TNC to N-type of the cable must be terminated with male connectors. The TNC to N-type male connectors for RG/6U cable are supplied with radio equipment. Cable length required by the customer as the length required depends upon cable length used for each installation, and limited with cable type used and power supply voltage as follows: Table 5-2 Cable Length Limitations: Caution: Power for the ODU is carried on the coaxial cable connecting the IDU and ODU. Ensure that power to the IDU is turned off before connecting or removing the cable from the ODU. -22- DTS Broadcast PDH Microwave Digital Radio User Manual 4.6 ODU Installation Figure 5-4 Connectors and Mounting of ODU -23- DTS Broadcast PDH Microwave Digital Radio User Manual 4.7 IDU Installation The IDU requires only 1RU of vertical rack space and 254 mm rack depth. No space above or below the IDU is required for ventilation purposes. IDUs may be stacked adjacently in racks. The connections of 4/8/16E1 (75ohm unbalanced) IDU are descripted in Figure 4-4. The deffrents between diffrent service-type connections only are main services; refer to service card descriptions in section 1. Figure 4-5 Connectors of IDU for 4/8/16E1 75ohm unbalanced Service card IDU Installation Procedure Step 1. Position the IDU as required in the equipment rack. Step 2.Lay in, secure with cable ties and terminate ground cable. Step 3. Tighten the TNC connector on the IDU “ODU” connectors. Step 4. Install tributary data signal cables on the IDU “TRIB” connectors. Use 75ohm CC4 male connectors and CC4-8G or CC4-16G connectors for 4/8/16E1 unbalanced systems, RJ-45 plugs for 4/8/16E1 balanced systems and 10/100BASE-T system. Refer to the Table 4-4 for RJ-45 and DB37 wiring details. Step 5. If required, install alarm relay wiring to female DB15 connector on IDU front panel. Refer to the Table 4-3. Step 6. If required, install auxally data wiring to RJ-45 connector on IDU front panel. Refer to the Table 5-3. Step 5. Install phone wiring to RJ-11 phone connector on IDU front panel. Step 8. The L54 requires DC power -48V ( -40VDC ~ -60VDC) via a 2-pin connector. Ensure that the plug provided in the installation kit is wired as detailed in table 5-3. Recommend use of 1.5mm 2 conductor wire. Make sure power is off before power on the device. -24- DTS Broadcast PDH Microwave Digital Radio User Manual Table 4-3 IDU External Connection Pins Detailed Description -25- DTS Broadcast PDH Microwave Digital Radio User Manual Continuous Table 4-4 IDU External Connection Pins Detailed Description Continuous Table 4-4 IDU External Connection Pins Detailed Description -26- DTS Broadcast PDH Microwave Digital Radio User Manual -27- DTS Broadcast PDH Microwave Digital Radio User Manual Continuous Table4-4 IDU External Connection Pins Detailed Description -28- DTS Broadcast PDH Microwave Digital Radio User Manual Continuous Table 4-4 IDU External Connection Pins Detailed Description -29- DTS Broadcast PDH Microwave Digital Radio User Manual Continuous Table 5-4 IDU External Connection Pins Detailed Description -30- DTS Broadcast PDH Microwave Digital Radio User Manual Continuous Table 4-4 IDU External Connection Pins Detailed Description -31- DTS Broadcast PDH Microwave Digital Radio User Manual 5 Commissioning 5.1 General This section assumes that the L54 Digital Microwave Radio terminal has been successfully installed, following the guidelines outlined in Section 5. This section descripts L54 commissioning procedures, including connection, power on, setup and antenna alignment. 5.2 Commissioning Tools Required The only tools needed to commission the L54 are: • Voltmeter (customer supplied) • BNC cable for connection to ODU AGC monitoring point (customer supplied) • Appropriate tool for securing the antenna azimuth and elevation adjustment mechanisms (customer supplied) 5.3 Connections Step 1: Ensure the following connections are made to the IDU before applying power. See Figure 6-1 for connection illustration. main service cables, note: main service cables have different cable type depend upon service type, figure 6-1 lists interface for 4/8/16e1 75ohm non-balanced servce, others interface cable type illusted in section 1. IDU chassis ground, ODU cable If required, connections for Alarm Relays and External Alarm Input Sensor may be connected to other monitoring equipment at the site, and Auxiliary Data Channels. Figure 5-1 Connectors of IDU for 4/8/16E1 75ohm unbalanced Service card -32- DTS Broadcast PDH Microwave Digital Radio User Manual Step 2: Once all connections have been made, apply power to the IDU by connecting energized power connector. The L54 will now begin the start up self-diagnostic sequence. If the L54 does not appear to power up, check the applied voltage and power line, ground line. Be care the poritor of 2-pin power connector, do not make wrong position. 5.4 Power on For your personal safety when handling, installing, or replacing ODUs, you must Switch off the IDU and disconnect the IDU/ODU cable from the ODU before removing the ODU. When an ODU/IDU pair is powered up together, the IDU front panel “CABL” LED will light on, while the system performs its self-diagnostics. If IDU and ODU are properly connected, “CABL” LED will be light off. If “CABL” led remains on the display after a few seconds, verify that the ODU is present and check continuity of the IDU/ODU cable connection. When an ODU/IDU pair is powered up together, the IDU LCD panel will display ” ”, while the system performs its self-diagnostics. Caution. Once power has been applied to the IDU, the N-type connector marked “ODU” on the IDU front panel will be energized. Ensure that the power is off before connecting or disconnecting cable to the IDU or ODU. 5.5 Setup Routine This setup routine need only be performed when an IDU/ODU pair is first powered up together. The follow setup procedures are run by LCD panel, no computer and network management system needed. Serveral parameters are not necessary to configure. See section 6 for a more detailed account of keypad operations and other common operating procedures. 5.5.1 Power on The L54 requires DC power via a 2-pin connector. When an IDU/ODU pair is powered up for the first time, “CABL” on the front panel LED will light on while the unit performs a self-check for ODU-IDU compatibility. If the units are correctly installed, “CABL” will light off. If “CABL” remains light on after a few seconds, check for one of the following: • ODU not installed • Improper cable connection -33- DTS Broadcast PDH Microwave Digital Radio User Manual 5.5.2 Login After powering up, the front panel will display ‘‘ ” Note: The L54 logs the operator out of the front panel after a period of inactivity longer than 30 minutes. 5.5.3 Device ID Code • When the panel display ,use the , Use the keys on the IDU ”press ENT to ready set the device ID until the panel display “ code. • and and _keys on the IDU to select a different link ID code in the range 1-255. • Press ENT to set the link ID code. • The IDU will display the new setting. The Local ID’s number and the IP adress of device is this same. 5.5.4 Capacity configure This RF bandwidth is 28MHz, note the frequency plan. The IDU will display . 4/8/16E1 service card configure: • Use the and • Use the • Use the _key on the IDU to select display press ENT. • Use the _keys on the IDU until the panel display “ _keys on the IDU to select SET menu, press ENT. and _keys on the IDU to select the required capacity. -34- ”. DTS Broadcast PDH Microwave Digital Radio User Manual • Press ENT to set the traffic capacity. • The IDU will display the new setting. The RF bandwidth is 7MHz for 4E1, 14MHz for 8E1, 28MHz for 16E1, note the frequency plan. 10/100BASE-T+1/2/4E1 service card configure: • Use the • Use the • Use the • Use the and _keys on the IDU until the panel display “ ”. keys on the IDU to select SET menu, press ENT. _key on the IDU to select display , press ENT. keys on the IDU to select E1 menu, press ENT. _keys on the IDU to select the E1 required capacity. The avalible capacity is • Use the and 0x2M, 1x2M, 2x2M and 4x2M. • Press ENT to set the E1 capacity, and the LAN capacity will auto change. • The IDU will display the new setting. • Use the keys on the IDU to select LAN menu, press ENT. _keys on the IDU to select the LAN required capacity. The LAN avalible • Use the and capacity is based n*2M. The active rate of 2M is 2.112Mbps, i.e. n=5, the LAN capacity is 10.56Mbps.The LAN rate will be selectable with 8E1(14MHz RF bandwidth) and 16E1(28MHZ RF bandwidth),i.e. if E1 capacity is 2x2M, then the LAN capacity can be set to 12M or 28M. • Press ENT to set the LAN capacity. • The IDU will display the new setting. The RF bandwidth is 14MHz when E1 capacity plus LAN capacity is 16M. The RF bandwidth is 28MHz when E1 capacity plus LAN capacity is 32M. -35- DTS Broadcast PDH Microwave Digital Radio User Manual 5.5.5 Transmit Frequency • Use the press ENT. and _keys on the IDU until the panel display “ ”, • Use the • • • , and _ keys on the IDU to select the required transmit frequency Channel. Use the Press ENT to set the transmit frequency Channel. The IDU will display the new setting. keys on the IDU to select T menu, press ENT. Note: The T-R spacing is set in the channel plan installed in the factory so that receiver frequency changes to track the transmitter; therefore, changing frequency on one end of the link automatically changes the frequency at the other end of the link. 5.5.6 Transmit Power • Use the press ENT. and _keys on the IDU until the panel display “ • Use the • • • Use the .keys on the IDU to select the required transmit power. Press ENT to set the transmit power. The IDU will display the new setting. • • • • keys on the IDU to select “OFF/ON” menu, press ENT. Use the Use the . and . keys on the IDU to select ON. Press ENT to set the transmit power is ON. The IDU will display the new setting. keys on the IDU to select “dBm” menu, press ENT. -36- ”, DTS Broadcast PDH Microwave Digital Radio User Manual 5.5.7 Tributary Configuration Configurations for 4/8/16E1 service card and 10/100BASE-T+1/2/4E1: Step 1: Configure tributarys of Group A • Use the press ENT. • Use the and _keys on the IDU until the panel display “ ”, keys on the IDU to select “1” menu. _keys on the IDU to select the required status of tributary #1. If tributary #1 • Use the and should be used, select US, otherwise select NO. • Use the keys on the IDU to select “2” menu. _keys on the IDU to select the required status of tributary #2. If tributary #2 • Use the and should be used, select US, otherwise select NO. • Use the keys on the IDU to select “3” menu. _keys on the IDU to select the required status of tributary #3. If tributary #3 • Use the and should be used, select US, otherwise select NO. • Use the keys on the IDU to select “4” menu. _keys on the IDU to select the required status of tributary #4. If tributary #4 • Use the and should be used, select US, otherwise select NO. • Press ENT to set the tributary #1 to #4 of group A. The L54 terminal is now set up and running. The operator may leave the keypad as the L54 will automatically log out the keypad if no activity has taken place within a 30 minute period. Set up the remote L54 terminal in the same manner as described above. When the antennas are aligned, the L54 link will be ready to pass operational traffic. -37- DTS Broadcast PDH Microwave Digital Radio User Manual 5.6 Antenna Alignment For antenna installation, follow the instructions provided by the manufacturer; instructions should be packaged with the antenna. • RSSI voltage measurement via the BNC connector on the ODU, used for fine alignment, • When the ODU BNC weatherproof cap is removed, the ODU will emit an audible “chirping” to aid antenna alignment. The rate of “chirps” is proportional to the RSSI voltage and therefore the receive signal level. The tools required to fine-align the antennas: • Appropriate tool to adjust the azimuth and elevation mechanism securings • Voltmeter • Cable connected ODU monitoring point (BNC) and Voltmeter. Figure 5-2 Connectnig of Single Anttena -38- DTS Broadcast PDH Microwave Digital Radio User Manual 6 Operations 6.1 General Use of the LCD panel The keypad composed with 6 keys and 1 LCD and 10 LEDs of the LCD panel enable the operator to configure the terminal and diagnose terminal faults by displaying unambiguous alarms and clear real-time system status. Figure 6-1 LCD Panel LCD display: This LCD display can display 2*16 symbols, used for display parameters and working status of L54 radio. LEDs: The LEDs are TEST, TLOS, RAS, FLO, BER, ODU, CABL, IDU, WORK, PWR TEST LED is yellow, WORK and PWR are green, and others are red when light on. 6 keys: Menu selection to set parameter. -39- DTS Broadcast PDH Microwave Digital Radio User Manual The beeper will beep up one time when press key is valided, otherwise beep up 2 times. There have two status of operating in LCD panel, one is displaying status, and another one is modifying status. Displaying Status The L54 enters displaying status after power on first. At this time, press the and keys on the IDU to scroll screen up or down; Press the keys on the IDU to display local or remote screen or to display other screens of defferent parameters in same group. And hold if no more screens can be scrolled, beeps two times for indicating. When press CLR key, it will back to the first screen. The values of parameter will be refreshed every two seconds. And will be displayed as “xxx” if value is not valid when interrupted with remote terminal or interrupted with ODU. The screen has options for selecting or modifying when cursor is flickering. And use the keys on the IDU to select or modify one of multi options. The screen will jumps to the selected option when prees ENT key at cusor indicated option. If cursor is on the modifying option, and we press ENT key, the screen will enters modifying status. Backlight of LCD: Backlight will on and remains 20 seconds when prees anykey for enhances the readbality of LCD unit in offices with even brighter service environments. The backlight will flicker when alarm accored (prefer to section 9.3). After one hour for no press any key, the LCD will off for more life, at this time, the LCD will display nothing. And the LCD will on and display again when pressing any key. Sometimes, the LCD may display wrong symbol, so we correct this display by press CLR key for 6 times. -40- DTS Broadcast PDH Microwave Digital Radio User Manual The Device ID and LCD panel menu options: The LCD display screens are descripted list below: The initial screen is displayed after power on, or press CLS key on another screen. Press _keys to appear similar following message: This screen display device type, software version, local or remode device ID. The ID is used for identifying device; it can be modified for monitor. The ID code is same as the last code of IP addr in IDU. The IP address will be modified when modifying the ID. So The ID code and the device IP address is this same. And then press _keys to appear similar following message: This screen displays a menu: INFOR for status message screen, SET for editing message screen, OTHER for auxilialy message screen. Move the cursor to a menu, and press ENT key to enter. -41- DTS Broadcast PDH Microwave Digital Radio User Manual 6.1.1 INFO This screen displays IDU IFRSSI gain from IDU for RX IF signal. This gain indicates RX IF signal in coxial cable fed to IDU is correct. Press <- or -> keys to view remote message. Press keys to appear similar following message: This screen displays inner C/N received IFsignal in IDU. The value displays between 10dB with 19dB, displays as “<10” when smaller than 10, and displays as “>19” when greater than 19 Press Press keys then view remote message. keys to appear similar following message: This screen displays BER with FEC, i.e. BER=1.40x10⁻⁶ for this screen. Press remote message, and press Press key to view keys to view viterbi BER message similary as below. keys to appear similar following message: This screen displays error bit count with FEC. The error bit number displays between 0 with 65535. The time of count displays as Hours: Minutes: Seconds; and the miximum hours is 255. These parameter can be cleared to 0. -42- DTS Broadcast PDH Microwave Digital Radio User Manual Press ENT _key to appear similar following message: Use the and count timer. _keys on the IDU to select “Y ”, and press ENT key to clear counter and Press key several times to appear similar following messages: Press _keys to appear similar following message: This screen displays frequency of local frequency, the “ A ” shows A site frequency, and the “ B” shows the B site frequency. “ 001” show frequency channel number, channel number define by factory set, i.e. 001 ~ 002 or more .These values are read from ODU, if read falure, will display “XXXXXGHz A xxx” Press _keys to appear similar following message: This screen displays RSSI of ODU, These values are read from ODU, if read falure, will display “XXXdBm” Press _keys to appear similar following message: This screen displays TX output power of ODU, These values are read from ODU, if read falure, will display “XXXdBm” -43- DTS Broadcast Press PDH Microwave Digital Radio User Manual _keys to appear similar following message: This screen displays PLL status of ODU. The RF indicates the RFLO is locked or not; the TX indicates the TX LO is locked or not, and the RX indicates the RX LO is locked or not. These display “L” for locked or “N” for not locked. These values are read from ODU, if read failure, will display “X”. Press _keys to appear similar following message: This screen displays loop back testing status of ODU. For message descriptions list below: Normal: Normal operating Frame: Frame loop back testing Port:Port loopback (from service card)testing. IDUIF: IDU IF loopback testing, test the modem is operating correctly or not. ODU_L: ODU Local loopback testing, test the ODU is operating correctly or not. Press __keys to appear service card message. The messages of different service cards displayed in LCD are different. See 6.1.1.1~6.1.1.2 -44- DTS Broadcast PDH Microwave Digital Radio User Manual 6.1.1.1 Messages of 4/8/16E1 service card Three E1 service cards are current available: a 4E1 version, an 8E1 version and a 16E1 version. And two interfaces for E1 service card are current available: a 75ohm unbalanced and a 120ohm balanced. All E1 service cards have same messages for displaying list below: This screen displays alarm messages of service card. Four tributaries of E1 data form a group data. And so 16 tribs of E1 data form 4 groups: E1-A, E1-B, E1-C and E1-D. Every group have there own keys then display local or remote alarm messages of 4 groups. But alarm message. Press group E1-C and group E1-D will not be displayed if rate is set to 8E1 or 4E1, and also group E1-B will not be displayed if rate is set to 4E1. The alarm will be displayed if alarm accured. Alarm messages are: RAD (Remote alarmed for this group), AIS (This Group of Remote is all “1” alarm), or OOF (This group of local is frame loss) and GLOS (This group of local is all “1”). Press _keys to appear similar following message: This screen displays status of use 4 E1s of group: Displaying “IN” means data fed in this tributary; displaying “LS” means no data in this tributary; displaying “NU” means this tributary is configured to be unused. Applying data to a tributary whose configuration has been set to “NU” WILL not cause a tributary LOS alarm; however, the tributary will pass traffic. -45- DTS Broadcast PDH Microwave Digital Radio User Manual 6.1.1.2 Messages of 10/100BASE-T+1/2/4E1 service card Two interfaces for 10/100BASE-T+1/2/4E1 service card are current available: a 75ohm unbalanced of E1 interface and a 120ohm balanced or E1 interface. All 10/100BASE-T+1/2/4E1 service cards have same messages for displaying list below: The E1 avalible capacity is 0x2M, 1x2M, 2x2M and 4x2M. When set the E1 capacity, the LAN capacity will auto change. The LAN avalible capacity is based n*2M. The active rate of 2M is 2.112Mbps, i.e. n=5, the LAN capacity is 10.56Mbps.The LAN rate will be selectable with 8E1(14MHz RF bandwidth) and 16E1(28MHZ RF bandwidth),i.e. if E1 capacity is 2x2M, then the LAN capacity can be set to 12M or 28M. This screen displays E1 alarm messages of LAN service card. Four tributaries of E1 data form a sigle group data. The alarm will be displayed if alarm accured. Alarm messages are same as E1 service cards. Press _keys to appear similar following message: This screen displays status of use 4 E1s of a single group, and means are same as E1 service card. -46- DTS Broadcast PDH Microwave Digital Radio User Manual 6.1.2 SET These parameters in the screens under SET menu can be edited, including local and remote IDU or ODU. Press ENT key when move cursor to SET menu in the screen “ enter the screens under SET menu. ” to Failure will be occurred for modifying remote parameters, because communication of local to remote are failed when changing several parameters of local. And most parameters will be stored in EEPROM for Power-Down-Store. The following screens descript how to edit parameters under SET menu. This screen shows parameter of loopback configure. The parameter will be lost when power off and is “Normal” when power on. Press ENT key if modifying required. Use the and keys to select the required loopback mode. Press ENT to set loopback mode. Now the screen displays new loopback mode. The options of loopback mode are descripted in table 6-1. Note: Tributaries will be interrupted when loop back is configured. And the remote configure may be restoring impossible when set one of remote loop back modes such as IDUIF, ODU_L at local. Table 6-1 loop back items -47- DTS Broadcast PDH Microwave Digital Radio User Manual This screen shows parameter of system capacity when use 4/8/16E1 service card. The options are shown as rates such as 4x2M, 8x2M and 16x2M. And the RF bandwidths are 7MHz for 4x2M, 14MHz for 8x2M and 28MHz for 16x2M. The link will be lost, if the rates are different between local and remote. At this time, the link is recovered when set the local rate to the rate as same as remote. The rates are stored in EEPROM. This screen shows tow parameters of system capacity when use 10/100BASE-T+1/2/4E1 service card. The first parameter is the option for using E1 tributaries. The second parameter is the option LAN capacity. The E1 avalible capacity is 0x2M, 1x2M, 2x2M and 4x2M. The LAN avalible capacity is based n*2M. The active rate of 2M is 2.112Mbps, i.e. n=5, the LAN capacity is 10.56Mbps.The LAN rate will be selectable with 8E1(14MHz RF bandwidth) and 16E1(28MHZ RF bandwidth),i.e. if E1 capacity is 2x2M, then the LAN capacity can be set to 12M or 28M. The following steps may be operated for changing these parameters. • Use the • • • _keys on the IDU to select the E1 required capacity. The avalible capacity Use the and is 0x2M, 1x2M, 2x2M and 4x2M. Press ENT to set the E1 capacity, and the LAN capacity will auto change. The IDU will display the new setting. • Use the • • • keys on the IDU to select the LAN required capacity. Use the and Press ENT to set the LAN capacity. The IDU will display the new setting. keys on the IDU to select E1 menu, press ENT. keys on the IDU to select LAN menu, press ENT. -48- DTS Broadcast PDH Microwave Digital Radio User Manual This screen shows RF channel number. The parameter is the option for RF channel , and the channel number depend on factory or customize. Note: In systems of 7/8GHz 13GHz and 15GHz frequency, the spacing is set in the channel plan installed in the factory so that receiver frequency changes to track the transmitter; therefore, changing frequency on one end of the link automatically changes the frequency at the other end of the link.The frequency is no used in systems of 7/8GHz 13GHz and 15GHz frequency. These parameters are stored in EEPROM of IDU. The following steps may be operated for changing these parameters. • Use the • • • keys on the IDU to select the required transmit channel. Use the and Press ENT to set the transmit channel. The IDU will display the new setting. keys on the IDU to select menu, press ENT. The number of tributaries in 4/8/16E1 service card is 16 maximum. Every 4 tribs makes a gourp. The 16E1 service card has 4 groups defined as group A, group B, group C and group D. The 8E1 service card has 2 groups defined as group A, group B. The 4E1 service card has only 1 group defined as group A. The group A is shown as “E1-A” in the screen of setting, and the group B as “E1-B”, the group C as “E1-C”, and the group D as “E1-D”. The parameters in these screens are options of 4 tribs for according group. Every trib can be configured with one of options sucha as “US”, “NO”,”LR”. “US” means the trib will be apply data. “NO” means the trib will not be apply data. “LR” means the trib will be loopbacked to remote. Note: Applying data to a tributary whose configuration has been set to “NO” WILL not cause a tributary LOS alarm; however, the tributary will pass traffic. These parameters are stored in EEPROM. -49- DTS Broadcast PDH Microwave Digital Radio User Manual Configure group A: • Use the press ENT. • Use the and keys on the IDU until the panel display “ ”, keys on the IDU to select “1” menu. and _keys on the IDU to select the required status of tributary #1. If tributary • Use the #1 should be used, select US, otherwise select NO. • Use the keys on the IDU to select “2” menu. _keys on the IDU to select the required status of tributary #2. If tributary • Use the and #2 should be used, select US, otherwise select NO. • Use the keys on the IDU to select “3” menu. _keys on the IDU to select the required status of tributary #3. If tributary • Use the and #3 should be used, select US, otherwise select NO. • Use the keys on the IDU to select “4” menu. _keys on the IDU to select the required status of tributary #4. If tributary • Use the and #4 should be used, select US, otherwise select NO. Press ENT to set the tributary #1 to #4 of group A. Configure Group B, C, D: • Use the key on the IDU until the panel display “ And “ ” and “ configure group A to configure group B, C and D. ” ”, use the same way of For 10/100BASE-T+1/2/4E1 service card, the number of tributaries in 4/8/16E1 service card is 4 maximum. Only one group of tribs should be configured. The group is shown as “E1” in the screen of setting. The parameters and options defined for 10/100BASE-T+1/2/4E1 service card are same as defined for 4/8/16E1 service card. -50- DTS Broadcast PDH Microwave Digital Radio User Manual These parameters are stored in EEPROM. • Use the and _keys on the IDU until the panel display ”, press ENT. “ • Use the • • • Use the keys on the IDU to select the required transmit power. Press ENT to set the transmit power. The IDU will display the new setting. • Use the • • • _keys on the IDU to select ON or OFF. Use the and Press ENT to set the transmit power is ON or OFF. The IDU will display the new setting. keys on the IDU to select “dBm” menu, press ENT . keys on the IDU to select “OFF/ON” menu, press ENT. This screen shows two parameters of ATPC. The first parameter is the option of the value of ATPC level. The second parameter is the option of switching the ATPC on or off. The local IDU sets remote transmission power to control local RSSI is in range of ATPC level +/-5dB. These parameters are stored in EEPROM. -51- DTS Broadcast • Use the press ENT. PDH Microwave Digital Radio User Manual and • Use the keys on the IDU until the panel display “ ”, keys on the IDU to select “dBm” menu, press ENT. • Use the . keys on the IDU to select the required ATPC level. • Press ENT to set the ATPC level. • The IDU will display the new setting. • Use the keys on the IDU to select “OFF/ON” menu, press ENT. _keys on the IDU to select ON or OFF. • Use the and • Press ENT to set the ATPC is ON or OFF. • The IDU will display the new setting. This screen shows the parameter of BER alarm threshold. The options are 1E-3, 1E-4, 1E-5 and 1E-6(prefer to section 9.2). These parameters are stored in EEPROM. • Use the press ENT. • • • and keys on the IDU until the panel display “ _keys on the IDU to select 1E-3, 1E-4, 1E-5 or 1E-6. Use the and Press ENT to set the BER alarm threshold. The IDU will display the new setting. This screen shows transmit power alarm threshold. Alarm will occurs when transmit power is lower than alarm threshold. These parameters are stored in EEPROM. -52- ”, DTS Broadcast • Use the press ENT. • • • PDH Microwave Digital Radio User Manual and _keys on the IDU until the panel display “ ”, keys on the IDU to select the transmit power alarm threshold. Use the Press ENT to set the threshold. The IDU will display the new setting. This screen shows RSL alarm threshold. Alarm will occurs when RF received level is lower than the alarm threshold. These parameters are stored in EEPROM. • Use the press ENT. • • • and _keys on the IDU until the panel display “ ”, keys on the IDU to select the RSL alarm threshold. Use the Press ENT to set the threshold. The IDU will display the new setting. This screen shows two parameters of alarm options: J-LCD Alarm and Beep Alarm. The LCD will show and flicker the screens witch alarm occurred when the option of J-LCD Alarm is ON and no press any key for 20 seconds. And the LCD will show resently screen for J-LCD Alarm is OFF. The Beeper can be closed when Beep Alarm is OFF. These parameters are stored in EEPROM. -53- DTS Broadcast PDH Microwave Digital Radio User Manual 6.1.3 OTHERS The Others menu has serveral screens for displaying or modifying the other parameters listed below: This screen shows 4 alarm inputs. The alarm input is located in the local IDU DB25 ALARM RELAYS connector (see Table 4-5). “IN” means alarm condition occurred. “NO” means alarm condition not occurred. This screen shows 5 relay outputs. The relay output is located in the local IDU DB25 ALARM RELAYS connector (see Table 4-5). “On” means the relay is open. “Of” means the relay is closed. This screen shows temperature of IDU and ODU, O: (ODU) and I: ( IDU).. There have 5 screens to show alarm relays configure in local: Relay 1, Relay 2, Relay 3, Relay 4 and Relay 5. The relay output can be configured with multi alarm conditions. These conditions are relative of “OR”. The alarm conditions are listed in Table 6-2. -54- DTS Broadcast PDH Microwave Digital Radio User Manual The alarm condition is no affectivity to the relay output if select “N”. To set relay 1 output: • Use the press ENT. and _keys on the IDU until the panel display “ ”, keys on the IDU to select the alarm condition, and use the and _keys to select Y or Use the N. • Press ENT to set the relay1 output when all required alarm conditions are configured. Table7-2 Discrete Alarm Descriptions -55- DTS Broadcast PDH Microwave Digital Radio User Manual To set Web Modify: Eable/Disable browser function Use the and _keys on the IDU until the panel display “ • Use the keys on the IDU to select the alarm condition, and use the select Enable or Disable. • ”, and _keys to Press ENT to set the relay1 output when all required alarm conditions are configured. This screen displays IP address. The parameter can be modified, used for WEB server and SNMP. This screen displays Subnet Mask. The parameter can be modified, used for WEB server and SNMP. This screen displays Default Getway IP address. The parameter can be modified, used for WEB server and SNMP. This screen displays Agent IP address. The parameter can be modified, used for SNMP. This screen displays Mac address. The parameter can be modified,used for WEB server and SNMP. This screen displays Broadcast Mac address.The parameter used for WEB server and SNMP. -56- DTS Broadcast PDH Microwave Digital Radio User Manual This screen displays current time. The parameter can be modified, used for counter, log, etc. This screen displays current date. The parameter can be modified, used for counter, log, etc. 6.2 Configure with WEB server We can monitor and contoll the terminal by using Internet Expoler to access WEB server included in the IDU. Enter the web address of terminal in the address column of Internet Expoler (See Figure 7-2), then touch to the web page of login (See Figure 7-3). Figure 6-2 Enter IP address of device in IE The initial screen is displayed after power on, or press CLS key on another screen. -57- DTS Broadcast Press PDH Microwave Digital Radio User Manual _keys to appear similar following message: This screen display device type, software version, local or remode device ID. The ID is used for identifying device; it can be modified for monitor. The ID code is same as the last code of IP addr in IDU. The IP address will be modified when modifying the ID. And The ID code will be modified when modifying the IP address. Figure 6-3 WEB page of Login -58- DTS Broadcast PDH Microwave Digital Radio User Manual There are ADMIN users can operate this WEB page: The ADMIN can modify parameters of terminal. Enter the User name and password. The passwords are “ ADMIN ” default(must be this same), can be modified by the access PAGE. If the passwords are lost, please call service. After login successfully, the Run-status WEB page will be displayed. Run Status: This is the main screen to monitor all parameters of local and remote terminal. The parameters are defined as same as LCD panel in IDU. The LEDs in WEB page indicates the LEDs on the front panel in IDU except LEDs such as TEST, WORK, PWR. See Figure 6-4. The sumbols are colored as green when normal or red when alarm. The parameters are colored as black for configured value by system or user. Figure 6-4 Web page of Run Status -59- DTS Broadcast PDH Microwave Digital Radio User Manual Frequency Configuration: Two parameters are list below for configure in this web page: TX and RX Frequency. In systems of 7/8GHz 13GHz and 15GHz frequency, the T-R spacing is set in the channel plan installed in the factory so that receiver frequency changes to track the transmitter; therefore, changing frequency on one end of the link automatically changes the frequency at the other end of the link.The RX frequency is no used in systems of 7/8GHz 13GHz and 15GHz frequency. Figure 6-5 Frequency Configuration -60- DTS Broadcast PDH Microwave Digital Radio User Manual Transmit Configure: There are 4 parameters for transmit configuration: ¾ Transmit power; Transmit on/off; ATPC monitor level ATPC on/off; (It’s unvalidity.) See Figure 6-6. Figure 6-6 Transmit Configuration -61- DTS Broadcast PDH Microwave Digital Radio User Manual Station configuration For site management, the IDU contains two names each consisted with 12 symbols: Station Name and Company Name. See Figure 6-7. Figure 6-7 Station Name Configuration -62- DTS Broadcast PDH Microwave Digital Radio User Manual Traffic capacity configuration The traffic capacity can be configured with required rate by this web page. The options are shown as rates such as 7MHz, 14MHz, 28MHz and 56MHz. When use 4/8/16E1 service card, the RF bandwidths are 7MHz for 4x2M, 14MHz for 8x2M, 28MHz for 16x2M, and 56MHz is not used. The RF bandwidths should be set to 14MHz or 28MHz for 10/100BASE-T+1/2/4E1 or 4/8/16E1 servicr card. Figure 6-8 Rate Configuration (capacity) -63- DTS Broadcast PDH Microwave Digital Radio User Manual Configure thresholds of alarms: See Figure 6-9 for configure thresholds of BER alarm and RSL alarm. Figure 6-9 Alarm Configurations -64- DTS Broadcast PDH Microwave Digital Radio User Manual Tributary configuration: See Figure 6-10 GA1~GA4: The Tribs 1 to 4 for group A GB1~GB4: The Tribs 1 to 4 for group B GC1~GC4: The Tribs 1 to 4 for group C GD1~GD4: The Tribs 1 to 4 for group D Configurations of GA1~GA4 are valid for 4E1 servicr card. Configurations of GA1~GA4 and GB1~GB4 are valid for 8E1 servicr card. Configurations of all tribs are valid for 16E1 servicr card. Configurations of GA1~GA4 are valid for 10/100BASE-T+1/24E1 servicr card. Applying data to a tributary whose LOS alarm has been set to “NO” will not cause a tributary LOS alarm; however, the tributary will pass traffic. Figure 6-10 Tribs use configuration -65- DTS Broadcast PDH Microwave Digital Radio User Manual Alarm Relays configuration: See Figure 6-10 to configure alarm relays, i.e, and Cable alarm to relay 1. Figure 6-10 Alarm Relays Configuration -66- DTS Broadcast PDH Microwave Digital Radio User Manual Protection Configuration: The function is valid as save as the panel of protected switch when the IDU work in protection mode, prefer to section 7.2. Figure 6-11 Protection system Configuration -67- DTS Broadcast PDH Microwave Digital Radio User Manual Device Date time configuration: Two parameters can be configured: Device Date time and Count-time for Stat… Figure 6-12 Device Time Configurations -68- DTS Broadcast PDH Microwave Digital Radio User Manual Testing: Used for LOOP back testing. See Figure 6-13. Figure 6-13 Loop Test Configurations -69- DTS Broadcast PDH Microwave Digital Radio User Manual Access Modifying: Use this Access Modifying to modify password. See figure 6-14. Figure 6-14 Access Modifying -70- DTS Broadcast PDH Microwave Digital Radio User Manual Log: The Log records parameters configuration, login, etc. See 6-15. Figure 6-15 Logs -71- DTS Broadcast PDH Microwave Digital Radio User Manual Stat.: Stat. is used for link performance stat. The records of Stat. are: BER, RSL and transmit power every count-time of Stat. See Figure 6-16. Figure 6-16 Stat. -72- DTS Broadcast PDH Microwave Digital Radio User Manual 7 Protection systems 7.1 General Protection Systems are used to improve link reliability and availability. The L54 Protection System may operate in one of the following modes, depending on customer requirements: Hot Standby: Both terminals are powered on, and set to the same frequency, but one terminal’s transmitter is muted to prevent interference. Frequency Diversity: Both terminals’ transmitters are powered on, but use different frequencies to avoid interference. Space Diversity: The main and stand-by radios are set up in Hot Stand-by mode, but are connected to their own antennas. The spatial separation of the antennas, combined with hitless receive switching, provides the Space Diversity function on the receiving end of the link. The ODU arrangements may use one antenna with a waveguide coupler, when the antenna is larger, i.e. 1.8m. See figure 8-1. Figure 7-1 Connectnig of Single Anttena/Dual ODUs The IDU arrangement is similar for all four protection modes. The protection switch provides connection between two IDUs, each of which connects to an ODU. -73- DTS Broadcast PDH Microwave Digital Radio User Manual 7.2 Switching Conditions and Operation The protected system provides link continuity in the event that a fault occurs in the primary radio. The switch is activated by an alarm condition in the primary link. The following alarm conditions will trigger a switch from primary to secondary IDU: 1. Loss of lock on transmit signal 2. Loss of transmit power 3. Frame loss (Receive) 4. BER alarm 5. DC power loss 6. Cable fault 7. Low receive level The switch is activated by an alarm condition in the primary link. See table 7-1 switch alarm Condition Table 7-1 switch alarm condition 7.3 Protection switch The key component to protected system operation is the Protection Switch. All service cards (4E1, 8E1, 16E1 and 10/100base-t) are mounted in protection system.See Figure 7-2. Figure 7-2 IDU protection systems -74- DTS Broadcast PDH Microwave Digital Radio User Manual The service card in IDUs will be replaced by switch-connection card. And the service card will mounted in protection switch. Traffic connections between the protection shelf and IDUs are made on the front panel. The traffic interfaces are SCSI68 and RJ-45. The protection switch monitors both co-located IDUs and, upon an alarm status change in either IDU, makes a decision as to which of the IDU should be on-line (carrying traffic). Alarm, status, and power connections to the controller from IDUs are made at the snmp of each unit. The choice of operation in Hot Standby or Frequency Diversity or Space diversity protection mode is suit for all service card, including 4E1,8E1,16E1, and 10/100BASE-T services. The choice of operation in Hot Standby or Frequency Diversity is set by the redundant system controller. 7.4 Protected system theory Except the service card, the IDU in unprotected system is same as in protected system. In unprotected system, the service card is mounted in IDU. In protected system, the switch-connect card is mounted in IDU, and the service card is mounted in Protection Switch to supplying services such as 4E1,8E1,16E1,10/100BASE-T+1/2/4E1 and 1E3 services. See Figure 7-13, it descripts the based theory of protection switch. The Protection Switch consists of DC/DC power, hitless switch system, switch state mechanical, service connector, and auxiliary data connector. Figure 7-13 Bbased theory of protection switch -75- DTS Broadcast PDH Microwave Digital Radio User Manual 7.5 ODU configuration A protected configuration typically consists of redundant IDUs and ODUs and a waveguide coupler to connect the two ODUs to a single antenna port. If desired a second antenna may be used instead of the waveguide coupler, providing protection against an antenna falling out of alignment. The dual ODU/dual antenna configuration is required for Space Diversity systems. The following descriptions assume all protected systems are configured with a single antenna and a waveguide coupler. 7.6 Protected Mode 7.6.1 Hot Standby Protection Mode The main and standby radios are tuned the same frequency. Transmitters of the off-line radio are muted. When a fault is detected, the on-line terminal is muted, the standby terminal is unmuted, and traffic is switched to the newly unmuted terminal. This system can be dual ODU/dual antenna configuration or dual ODU/single antenna configuration. 7.6.2 Frequency Diversity Protection Mode The main and standby radios are typically set up at least two channels apart to avoid interference. Both radios are unmuted and ready to pass data. When a fault is detected on the active radio, the traffic is switched to the stand-by radio. This system can be dual ODU/dual antenna configuration or dual ODU/single antenna configuration. 7.6.3 Space Diversity Mode The main and stand-by radios are set up in Hot Stand-by mode, but are connected to their own antennas. Both antennas, separated by a specific distance, are receiving the signal transmitted from the on-line radio at the other end of the link. If a fault occurs in the receiving end of the link, the traffic is switched to the stand-by radio without causing errors (hitless receive switching). As in Hot Stand-by mode, a fault detected in the on-line transmitter causes that transmitter to mute and the stand-by radio to un-mute. -76- DTS Broadcast PDH Microwave Digital Radio User Manual 7.7 System Installation 7.7.1 General This section covers only procedures unique to installing a protection system. Where necessary, references to Section 4 (Installation) are made for specific guidelines on how to install ODUs, IDUs, and cables. 7.7.2 Installation Equipment Required 7.7.2.1 Tools Same is unprotected installation. Refer to section 4.2.1. 7.7.2.2 Equipment Hot-standby, frequency diversity, space diversity protection system: Protection switch installation kits, See table 7-3. Refer to section 5. Table 7-3 Protection Switch Installation Kit Parts List 7.7.3 Requirement of room: Same as section 4-4 7.7.4 Cable Installation Same as section 4-5 7.7.5 ODU Installation Same as section 4-6 -77- DTS Broadcast PDH Microwave Digital Radio User Manual 7.7.6 IDU and Protection Switch Installation The protected IDUs and protection switches require only 254mm rack depth and 1RU of vertical rack space. No space above, below or between the units is required for ventilation purposes as the whole system dissipates less than 25 W. Step 1: Install each IDU in a rack with a 1RU space between them for 1+1 Protection System. Follow the guidelines given in Section 4.6.1. Step 2: Position the protection switch in between the IDUs. Step 3: Install the cables. Step 4: Connect cable from ODU nearest coupler flange to the upper IDU to ODU port of RF and cable from ODU farthest from coupler flange to the lower IDU to ODU port of RF . This provides the least amount of insertion loss to the primary side. Step 5: Install customer’s data signal cables to the tributary connectors on the protection switch using CC4 connectors and DB37-CC4 adaptors (for 75ohm E1s ), RJ-45 connectors(for 10/100BASE-T and 120ohm E1s). Step 6: Install DC power to IDU via the 2-pin connectors. Note: The protection switch has code download capability through the “A” protection connector. This enables code to be downloaded to the controller without disturbing traffic on “B”. And LCD panel is option by customer need. -78- DTS Broadcast PDH Microwave Digital Radio User Manual 7.8 Commissioning The Protection System Before applying power to the system, select the relevant protection mode of operation for the installation on the redundant system controller front panel using the two-position rocker switch located on the right side of the shelf. Select “A” on-line using the three-position rocker switch located on the protection switch front panel. 7.8.1 Hot Standby Protection Mode Use Section 5 as a general guide, but read the following instructions first: 1. Verify that all interconnect cables are installed. Power up IDU. Set upper IDU Traffic Capacity, Frequency, Transmit Power, Link ID Code and Tributary Configuration per section 5.5. 4. Press HS key in the switch. Select “B” on-line using the three position rocker switch located on the protection switch front panel. Set lower IDU Traffic Capacity, Frequency, Transmit Power, Link ID Code and Tributary Configuration per section 4.5. Note The setup of the both upper and lower L54’s must be identical for correct system operation. 7. Align the antenna using the guidelines given in Section 5.6. Select “A” then “AUTO” function on the switch using the three position rocker switch located on the front panel. LEDs for IDU should be normal: WORK led flicker, POWER led light on, and the other leds light off. The B, B TX and FD LEDs for switch should be light off, the others should be light on. This indicates that B is functional and standing by. The Hot Standby Protection System is now ready to carry traffic. -79- DTS Broadcast PDH Microwave Digital Radio User Manual 7.8.2 Frequency Diversity Mode Use Section 5 as a general guide, but read the following instructions first: 1. Verify that all interconnect cables are installed. Power up the upper IDU only. Set upper IDU Traffic Capacity, Frequency, Transmit Power, Link ID Code and Tributary Configuration per Section 6.5. 3. Press FD key in the switch. 4. Power up the lower IDU and select “B” on-line using the three position rocker switch located on the protection switch front panel. 5. Set lower IDU Traffic Capacity, Frequency, Transmit Power, Link ID Code and Tributary Configuration per Section 6.5. Note: The setup of the lower L54 must be identical to the upper except for frequency. Frequencies used on “A” and “B” terminals must be different for system to operate. Frequencies will have been assigned by the customer’s frequency planning department. 6. Align one antenna system at a time using the guidelines given in Section 6.6. 7. Select “A” then “AUTO” function on the controller using the three position rocker switch located on the front panel. LEDs for 2 IDUs should be normal: WORK led flicker, POWER led light on, and the other leds light off. The HS and B LEDs for switch should be light off, the others should be light on. This indicates that B is functional and standing by. The Frequency Diversity Protection System is now ready to carry traffic. -80- DTS Broadcast PDH Microwave Digital Radio User Manual 7.8.3 Space Diversity Mode Space Diversity requires the dual ODU/dual antenna configuration. Use Section 5 as a general guide, but read the following instructions first: 1. Verify that all interconnect cables are installed. Power up the upper IDU only. Set upper IDU Traffic Capacity, Frequency, Transmit Power, Link ID Code and Tributary Configuration per Section 6.5. 3. Press HS key in the switch. Select “B” on line using the three position rocker switch located on the protection switch front panel. Set lower IDU Traffic Capacity, Frequency, Transmit Power, Link ID Code and Tributary Configuration, section 5.5. Note the setup of the both upper and lower L54’s must be identical for correct system operation. 6. Align the antenna using the guidelines given in Section 5.6. Select “A” then “AUTO” function on the switch using the three position rocker switch located on the front panel. LEDs for 2 IDUs should be normal: WORK led flicker, POWER led light on, and the other leds light off. The B, B TX and FD LEDs for switch should be light off; the others should be light on. This indicates that B is functional and standing by. The Space Diversity Protection System is now ready to carry traffic. -81- DTS Broadcast PDH Microwave Digital Radio User Manual 8 Network Management Systems (NMS) 8.1 Overview The NMS of microwave radio is used for monitor device’s operating status, calculate the performance of microwave link, locate fault and control operating mode of microwave radio. The NMS of microwave radio is divided into 3 stages. The first stage is device stage, completed by CPU in the IDU, which monitors and controls the device modules including collecting alarms, calculating performances, configuration, safety protection, etc. The second stage is completed by IBM compatible PC, which connects IDU with RJ-45 cable using the protocol of TCP/IP. In this stage, we can monitor and contorl the microwave link by a PC with graphic interface. The third stage is completed by PC which running NMS software such as SNMPc, HP OpenView etc. This stage is used for monitor all devices by monitor PCs connected with the IDU of microwave link. The third stage is completed by PC which running NMS software such as SNMPc, HP OpenView etc. This stage is used for monitor all devices by monitor PCs connected with the IDU of microwave link. Figure 8-1 Microwave links of Transmission network -82- DTS Broadcast PDH Microwave Digital Radio User Manual 8.1.1 Connections of NMS The IDU have two interfaces for NMS connection: Ethernet and RS232. The RS232 is used for software update, here is reserved. The Ethernet is used for SNMP/NMS. The protocols are: ¾ Ethernet: TCP/IP, SNMP, HTTP ¾ RS232: TTY, SLIP(reserved) The SNMP protocol is in the IDU connects PC by Ethernet with RJ-45 port in IDU. 8.1.2 Configuration for NMS’s IP The configurations for NMS IP in IDU are: IP address of IDU Subnet Mask of IDU Netgate of IDU Agent IP address: The IP address is used for SNMP TRAP message. This message is generated by IDU and send to NMS PC. So the IP address is address of NMS PC. MAC address: The MAC address is located on the IDU. It is set at the factory and can be changed. Broadcase address: The MAC address is located on the IDU. It is set at the factory and can be changed. If the addresses listed above needs to be verified or changed, please use the LCD panel on the IDU as described in Section 5. -83- DTS Broadcast PDH Microwave Digital Radio User Manual 8.2 Connectors The connectors of NMS in IDU are: RS232 and Ethernet listed below: Figure 8-3 NMS connector on IDU The RS232 for software update use RJ-45 connector. The Ethernet for SNMP/NMS use RJ-45 connector. 8.3 Installation 8.3.1 Installation Equipment Required 8.3.1.1 Tools A basic electrician’s toolkit. 8.3.1.2 Equipment Items included with SNMP/WEB NMS: Standard Ethernet cable 8.3.2 Installation Procedure Connect the Ethernet cables to the Ethernet port on the IDU. For management via a network, a standard Ethernet cable is used to connect to a hub, switch or any other Ethernet equipment. For a laptop computer, a standard Ethernet cable with an RJ45 connector is used. -84- DTS Broadcast PDH Microwave Digital Radio User Manual 9 Troubleshooting 9.1 General This section describes the features available to assist the operator in tracking and correcting L54 radio problems. These features include a series of discrete alarm functions that will assist in tracking both configuration errors and radio failure conditions using the front panel controls at one end of a working radio link. The five multi-function LED alarm indicators on the front panel can be mapped to five alarm relays for connecting to external alarm reporting systems. The factory default mapping of the relays is shown in Table 7- 1 9.2 Discrete Alarm Descriptions Trib fault Alarm condition indicates LOS (loss-of-signal) condition detected on the tributary input. If alarm occurs, check continuity of data connections to L54 IDU. Note. Set tributary configuration to “NO” if data is not applied to a tributary whose tributary is unused as detailed in Section 6.1.2 & 6.2.2 Service Card Alarms Alarm condition indicates alarm conditions detected on the service card. There have different alarm depend on different service card. For 4/8/16E1 service card, alarms list below: RAD, Frame loss in remote service card AIS, all one in remote service cards OOF: Frame loss in local service card GLOS: All one in local service card. The action required to resolve the fault will depend upon all the accompanying alarms. Recommend use of loopback features in LCD panal to locate the problem. Remote alarm The remote terminal has detected alarms. To correct them please check remote terminal. Frame loss: Alarm condition indicates the remote terminal has detected alarms. To correct them please check remote terminal. The action required to resolve the fault will depend upon all the accompanying alarms in remote terminal. Recommend use of loopback features to locate the problem. -85- DTS Broadcast PDH Microwave Digital Radio User Manual Note. The most common reason for this alarm occurrence will be due to a link fade, such as that occurring during excessive rainfall. BER alarm Alarm condition indicates the received BER has exceeded the preset Alarm threshold. The action required to resolve the fault will depend upon all the accompanying alarms. Recommend use of loopback features to locate the problem. Note. The most common reason for this alarm occurrence will be due to a link fade, such as that occurring during excessive rainfall. Cable Fault Alarm condition indicates microprocessor communications between the IDU and ODU have failed. The fault is most probably with the cable connection, it may be either open or shorted. Use of a multi-meter to measure DC cable resistance will determine if the cable is open or shorted: 1. Disconnect power to the IDU 2. Remove the N-type ODU connector from the IDU 3. Measure the DC resistance between the centre pin and the outer of the N-type connector terminating the cable; If resistance is between 1 M and 10M • • • • This is correct Suspect IDU or ODU circuitry Replace IDU If alarm persists, swap replacement IDU for original and replaces ODU. If resistance is less than 1M : • Check the cable thoroughly over whole length and at both ends for damage or reasons that would cause low cable resistance. • If in doubt reterminate both ends of cable with new N-type connectors. • Remeasure cable resistance (with it disconnected at both ends), resistance should be unmeasurable or open circuit. • If cable resistance is unchanged, replace entire cable run, terminating with new N-type connectors. -86- DTS Broadcast PDH Microwave Digital Radio User Manual If resistance is unmeasurable: • Cable is open circuit • Check the cable thoroughly over whole length and at both ends for damage or reasons that would cause an open circuit condition (e.g. connector not terminated correctly and/or badly corroded or cable cut) • If in doubt re-terminate both ends of cable with new connectors. Re-measure cable resistance (with it disconnected at both ends), resistance should be unmeasurable or open circuit. • If cable resistance is unchanged; replace cable, terminating with new connectors. • If cable is cut, replace entire cable run, terminating with new connectors. Transmit power Alarm condition indicates low power output from final stage of microwave power amplifier. If this alarm occurs, please confirm transmit power is on first, and then replace the ODU if the alarm is not dispeared. TX PLL Alarm condition indicates the transmitter phase-locked-loop has lost lock. If this alarm occurs on its own, replace the ODU. If this alarm occurs in conjunction with the RX PLL and RF PLL, replace the IDU (reference source failure). Receive PLL Alarm condition indicates the receiver phase-locked-loop has lost lock. If this alarm occurs on its own, replace the ODU. If this alarm occurs in conjunction with the TX PLL and RF PLL, replace the IDU (reference source failure). RF PLL Alarm condition indicates the receiver phase-locked-loop has lost lock. If this alarm occurs on its own, replace the ODU. If this alarm occurs in conjunction with the TX PLL and RX PLL, replace the IDU (reference source failure). -87- DTS Broadcast PDH Microwave Digital Radio User Manual Receive Level Alarm condition indicates the receive RF level is below the preset threshold. If alarm occurs on its own, verify RSL, RF path between L54 terminals, antenna alignment and remote terminal transmitter power output setting. If alarm occurs in conjunction with others, the action required to resolve the fault will depend upon the activated alarm. Use of the loopbacks in LCD panel is recommended to locate the problem Note. The most common reason for this alarm occurrence will be due to a link fade, such as that occurring during excessive rainfall. IDU temperature: Alarm condition indicates the IDU temperature is over range, check local temperature conditions of IDU are over range or not. IDU inner voltage: Alarm condition indicates the inner voltages in IDU are over range, check local DC power fed to the IDU. If the DC pwer connections are no problem, please replace IDU. -88- DTS Broadcast PDH Microwave Digital Radio User Manual 9.3 Troubleshooting Using the Front Panel LCD &LED 9.3.1 Summary LED Alarm Display 10 LEDs are list below: The TEST LED is yellow. The WORK LED and PWR LED are green. And the others are red. See Table 9-1. Table 9-1 LED status -89- DTS Broadcast PDH Microwave Digital Radio User Manual 9.3.2 LCD screens of ALARMS The LCD will show and flicker the screens witch alarm occurred when the option of J-LCD Alarm is ON and no press any key for 20 seconds or press CLR first and then press ENT. See Table 9-2. Table 9-2 LCD screens of ALARMS The parameters of these screens are defined in section 6.When multi alarms are generated, the stage of lowest number will displayed first. -90- DTS Broadcast PDH Microwave Digital Radio User Manual 9.4 Troubleshooting Quick Reference Guide Table 9-3 Troubleshooting Quick Reference Guide -91- DTS Broadcast PDH Microwave Digital Radio User Manual 9.5 Alarm Relays The alarm relays are presented on the front panel of the IDU. “Form C” relay outputs are presented on the L54 IDU front panel ALARM RELAYS DB25 connector. • Each relay output is mapped to provide an alarm summary of discrete alarm conditions within the L54 terminal. • The relays are intended for use with a customer’s existing external alarm collection and monitoring system (e.g. SCADA) when the NMI feature is not used. The pinout of the ALARM RELAYS connector is as detailed table 4-4 The default alarm relays configuration is as detailed table 10-6. 9.6 Loopbacks For additional troubleshooting, local &remote loopback paths can be configured. 9.6.1 Local Loopback Local Port Loopback: This loopback is used for locating faults in equipment and cable connections to the local L54 by routing each tributary input (data from customer) directly to the corresponding tributary output (data to customer). Any combination of tributaries may be configured for loopback. Figure 9-1 shows the loopback path. The incoming data stream from the remote terminal for the tributaries configured in loopback will be affected. Figure 9-1 Local Port Loopback -92- DTS Broadcast PDH Microwave Digital Radio User Manual Local Frame Loopback: This loopback is used for locating faults in equipment by routing a tributary input (data from customer) directly to the corresponding tributary output (data to customer). Any combination of tributaries may be configured for loopback. Figure 9-2 shows the loopback path. The incoming data stream from the remote terminal for the tributaries configured in loopback will be affected. Figure 9-2 Local Frame Loopback -93- DTS Broadcast PDH Microwave Digital Radio User Manual 9.7 Maintenance No regular maintenance of the L54 installation is necessary. If a fault occurs, the system is sufficiently well alarmed and has diagnostics to allow the operator to rapidly and precisely locate the source of the fault condition. 9.8 Repairing Once the fault has been identified, repairing it refer to prohotol of repairing and description in technical support. Also, see the Troubleshooting Quick Reference Guide in section 9.4. -94- DTS Broadcast PDH Microwave Digital Radio User Manual 10 Technicaal data 10.1 Specification Table 10-1 General Specification -95- DTS Broadcast PDH Microwave Digital Radio User Manual Table 10-2 Controlling ODU specifications Table 10-3 Mechanical specifications -96- DTS Broadcast PDH Microwave Digital Radio User Manual Table 10-4 Transmitter & Receiver -97- DTS Broadcast PDH Microwave Digital Radio User Manual Table 10- 5 Others specifications -98- DTS Broadcast PDH Microwave Digital Radio User Manual 10.2 Default configuration Table 10- 6 Default software configuration -99- DTS Broadcast PDH Microwave Digital Radio User Manual Continuous Table 10- 7 Default software configuration -100- DTS Broadcast PDH Microwave Digital Radio User Manual Table 10- 8 Alarm Relay Configuration -101- DTS Broadcast PDH Microwave Digital Radio User Manual Table 10- 9 LCD Configuration -102- DTS Broadcast PDH Microwave Digital Radio User Manual 11 Symbols and abbreviations 11.1 Symbols • • • • • • • dB dBm GHz kHz Mbit/s MHz ppm deciBel deciBel relative to 1 milliwatt GigaHertz kiloHertz Megabits per second MegaHertz parts per million 11.2 Abbreviations • • • • • • • • • • • • • • • • • • • • • • • • • • • • AC ACAP ACCP ATPC BBER BER C/I CMI CSmin alternating current Adjacent Channel Alternate Polarization Adjacent Channel Co-Polarization Automatic Transmit Power Control Background Block Error Rate Bit Error Rate Carrier to Interference ratio Coded Mark Inversion minimum practical Channel Separation (for a given radio-frequency channel arrangement) CW Continuous Wave DRRS Digital Radio Relay Systems EMC ElectroMagnetic Compatibility ERC European Radiocommunications Committee ESR Errored Seconds Ratio IF Intermediate Frequency IPI Inter-Port Isolation LO Local Oscillator NFD Net Filter Discrimination PDH Plesiochronous Digital Hierarchy PRBS Pseudo Random Binary Sequence RBER Residual BER RF Radio Frequency RFC Remote Frequency Control RSL Receive Signal Level RTPC Remote Transmit Power Control Rx Receive TMN Telecommunications Management Network TX Transmit -103-