1
User’s manual
Lapsejay VX v. 1.0.1
Page 1
Table of contents
About Lapsejay ..................................................................................................................3
Quickstart: Lapsejay initial setup.....................................................................................5
Chapter 1: The recording module .......................................................................................6
The recording window .....................................................................................................6
Lapsejay settings...........................................................................................................12
Lapsejay settings - Audio/video detector .......................................................................13
Lapsejay settings - Frame capture ................................................................................13
Lapsejay settings - Timestamp overlay .........................................................................14
Lapsejay settings - Recording settings ..........................................................................14
Lapsejay settings - Audio device settings ......................................................................15
Lapsejay settings - Video device settings ......................................................................15
Lapsejay settings - AVI settings.....................................................................................16
Lapsejay settings - ASF settings ...................................................................................17
Lapsejay settings - Recording options...........................................................................17
Lapsejay settings - Logo overlay ...................................................................................19
Lapsejay settings - Internet time synchronizer...............................................................20
Lapsejay settings - Misc settings ...................................................................................20
Lapsejay settings - Password section............................................................................21
Lapsejay settings - Layout settings................................................................................21
Lapsejay settings - Alarm settings .................................................................................22
Lapsejay settings - Skin selection..................................................................................23
Lapsejay settings - Audio monitor..................................................................................23
Lapsejay settings - Scheduling section..........................................................................24
Chapter 2: The player module...........................................................................................29
Appendix: .........................................................................................................................38
Choosing the audio/video codec....................................................................................38
End user licence agreement ..........................................................................................39
Page 2
About Lapsejay
Based on the largely tested technology of its audio counterpart Logjay, Lapsejay has been
improved into a comprehensive non-stop audio and video logging software that fully takes
advantage from today's PCs digital technology to store massive amounts of audio and video
with fast access and retrieving features. You can finally get rid of those old time-lapse video
recorders of questionable quality and reliaibility, and with high maintainance costs (you have to
periodically check machines, other than purchasing and periodically replace tapes).
Lapsejay automatically stores and indexes recorded video by date and time. Lapsejay can
be set to automatically rotate logged files to keep track of a desider number of days
(according to your local regulations) and if you wish, can automatically erase older days to
make room for the new ones.
Lapsejay offers an instant access to recorded video thanks to its exclusive indexing and
locating system. Gone are the days of rewinding through miles of tapes for hours (or days)
to locate the desired passage! With Lapsejay you just select desired date and time, and
press play to view the exact passage.
Lapsejay has been carefully engineered on building blocks, so you may purchase just the
needed channels and features and save money on your initial purchase; for example, you
may initially purchase just 1 of the 10 available channels, and later upgrade to 2, 4, 8 or
even 10 channels if needed. Likewise, you may add later various optional plug-ins, like
scheduling, audio/video detector, or the "Pro Pack" which includes a bunch of handy
features like Internet Time Synchronizer, SMS alarms, CD/DVD burning feature, and more.
Thanks to its powerful scheduling features, Lapsejay allows to automatically start and stop
recording according to a preset schedule for each day of the week or by means of external
triggering from a satellite receiver: this way, tasks like capturing satellite news feeds or
activating recording just when needed are easily performed, saving valuable hard disk
space.
It is possible to play the recorded video instantly on any workstation in your LAN: more
than one copy of the player module can access to the same recordings across a local
network, while recorder module simultaneously carries on recording. You don't need to
stop recording if you wish to watch any previously recorded passage!
Page 3
Lapsejay key features:
•
•
•
•
•
•
•
•
•
•
•
•
Multichannel structure: up to 10 indipendent recording channels on the same video
server.
Automatically indexes recorded video by date and time
Full customizable timestamp superimpose on logged video, both on the recording than
on-the-fly while playing the logged video.
Dedicated player module allows to play logged video from LAN, while recorder module
simultaneously carries on recording.
Scheduling features allow to manage recording according to your schedule or by
means of external triggering.
Internet Time synchronizer: keeps your system clock always updated via your internet
connection.
Multiple frame capture feature allows capturing JPG frame-shots to disk while
recording or while playing previous recordings.
Built-in file purge feature removes older recordings to make space for the new ones.
Allows choosing recording quality depending on your needs and available hard disk
space indipendently for each of the 8 channels: audio and video codecs, frame per
second, audio sampling frequency, image size, etc.
Protects access to software settings with supervisor password.
Works with consumer grade hardware components.
Multilanguage software.
Lapsejay: more power and more feature at a fraction of the cost of a conventional tapebased jogging system!
Page 4
Quickstart
Here is a short summary of basic operations for speeding up Lapsejay initial setup. For
further details we strongly suggest you to carefully read the user’s manual!
The software is bundled with a dongle which constitues your software licence and allows
the software to run. This way, you are not bound to software unlock codes, instead,
performing hardware upgrades or moving your software licence on another workstation is
as simple as moving the dongle to your new PC.
Installing your customized USB dongle: Before you insert the key, run the “install_usb”
batch file found in the “drivers\smartkey3” folder of your setup CD. Then, insert the USB
dongle in one of the available USB ports. If Windows is running, the dongle is
automatically recognized and you’ll be asked for the driver path. Select the “install driver
automatically” option, then follow the on-screen instruction which will guide you until the
end of the setup.
Recording workstation:
1. Insert the installation CD in your CD-ROM drive.
2. To run Lapsejay setup procedure, open Windows Expoler and double click on the
setup.exe file found in the “lapsejay” folder.
3. Follow the on-screen guided instructions which will guide you for the rest of the setup
process.
4. Copy the wjlogo.bmp file from the main folder of your installation CD to Winjay
installation folder (usually c:\program files\lapsejay if you choose the default one). This
file is your station logo which is needed for software customization.
5. Click on “Start”, “Lapsejay”, “Lapsejay recording module” to run Lapsejay, the main
window should appear in a matter of seconds.
6. To perform software settings, please read chapter 1 on this same manual: Lapsejay
settings”.
Networked player workstations:
Follow items 1-5 for the recording workstation setup, then:
1. Start Lapsejay Player, then open its setup window: you’ll have to edit the database
path where the player module should search for informations concerning the logged
audio: just browse for the path to the database on the recording workstation (for
example \\logger\c\program files\lapsejay).
2. When setting the storage path in the recording module, change any local path with the
corresponding network path (for example \\LOGGER\C instead of C:\).
3. Remember to share drives on the recording workstation with full read/write access!
Page 5
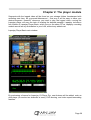
Chapter 1: The recording module
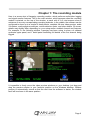
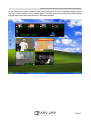
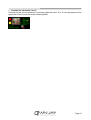
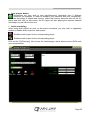
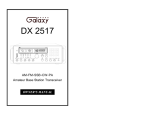
Here is a screen shot of Lapsejay recording module, which performs audio/video logging
and signal monitor features. This is the main window, which appears when the recording
module is started; on the top of the window, a panel with 4 or 8 mini-screens show a
miniature of as many corresponding recording channels, in the middle, the software can be
configured to show up to a couple of detail panels, complete full-size video preview, audio
VU-meters, audio spectrum analyzer, motion-detector meter, and other details. Of course,
details may slightly differ depending on your setup and/or enabled channel and features.
For example, in the following window, Lapsejay has been setup to show a 4-chhanel
synthesis upper panel, and 1 detail panel containing full details of the first channel being
logged.
It is possible to freely move the video preview windows on your desktop: just drag and
drop the preview window in your favourite position on the Windows desktop. Window
position is automatically stored so that the next time the software is starter, the window
itself will be shown in the same position.
Page 6
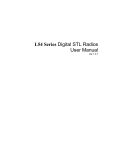
In the following example, Lapsejay has been configured to show 1 synthesis panel on the
top with 4 mini-screens, and no detail panel. Preview windows with the input video being
logged have been freely positioned on Windows desktop.
Page 7
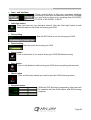
Detailed description:
Record buttons
Click the Record button corresponding to the desired channel to manually start
recording.
Stop buttons
Click the Stop button corresponding to the desired channel to manually stop
recording.
Preview buttons
Press the Preview button corresponding to the desired channel to preview the
incoming audio/video signal.
Frame capture buttons
Press the button to capture the current frame on Hard Disk as BMP or JPG
picture, depending on settings made in the software setup window.
Setup button
Shows the setup window, which allows to set Lapsejay operating defaults and
scheduling options. All channels must be in stop mode, otherwise the window
will not be opened.
Exit button
Terminates program execution. You’ll see a dialog box asking for confirmation.
Page 8
•
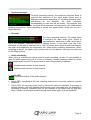
Spectrum analyzer
For each recording channel, the spectrum analyzers show in
real-time the spectrum of the input audio (audio level at
different frequencies depending on recording sampling rate).
Left-clicking on the analyzer, the exact frequency
corresponding to each bar will be shown. The analyzer also
features a peak-hold feature: the peak level segments are temporarily left visible before
resetting themselves. When recording in stereo, the signal shown is the sum of Left +
Right channels.
•
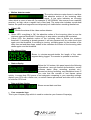
VU-meter
For each recording channel, VU-meters show
in real-time the input audio level. Signal is
represented as peak level in dBs, where the 0
dB is the absolute maximum before a clipping occurs: in this latter case the “Clip”
indicators on the right of each bar will lit. The VU-meters also include a peak-hold feature:
the peak level segments are temporarily left visible before resetting themselves. When
recording in stereo, the upper meter shows level for Left channel, the lower one the level
for the Right channel.
• Audio monitoring
When using a multichannel capture card for audio recording, usually it is not possible to
pass the audio signal from Line-in to Line-out directly, Instead, Lapsejay allows to render
the sampled audio on the PC’s sound card for each of the incoming channels.
Disables audio monitor for that channel
Enables audio monitor for that channel
•
Audio LED
Shows the status of the audio detector:
•
Green LED: everything is OK, the incoming audio level is over the minimum user-set
threshold.
Yellow LED: the incoming audio level is below the minimum threshold, if recording is
already paused, it will stay paused until the audio level rises again over the threshold, if
recording is running, recording goes for the duration of the delay time set and then
stops, unless in the meantime the incoming audio raises again over the threshold.
•
Page 9
•
Motion detector meter
The motion detector meter shows in real-time
the absolute motion of the incoming video
signal. A low value indicates an incoming
video which is more or less still (for example a “NO SIGNAL” blue screen from a satellite
receiver), an high value a regular lively video feed. The meter also includes a peak-hold
feature: the peak level segments are temporarily left visible before resetting themselves.
•
Video LED
Shows the status of the video motion detector:
•
Green LED: everything is OK, the absolute motion of the incoming video is over the
minimum user-set threshold. If recording is in stop status, recording will be started.
Yellow LED: the absolute motion of the incoming video is below the minimum
threshold, if recording is already paused, it will stay paused until the video level rises
again over the threshold, if recording is running, recording goes for the duration of the
delay time set and then stops, unless in the meantime the motion of the incoming video
raises again over the threshold.
•
•
File elapsed time
Shows in minutes:seconds.tenths the length of the video
segment being logged. The counter is updated in real-time.
•
Status display
Below the VU-meters, this panel reports the following
informations: user-set channel denomination, current
software status (Stop, recording, preview, etc.),
frames lost during recording, next scheduled event. If
you note that the number of lost frames raises
quickly, it means that CPU power is not adeguate comparing to your recording settings:
replace your CPU with a faster one, or reduce frames per second and video size in order
to minimize CPU load.
•
Date and time display
Shows current date and time.
• Your corporate logo
This is your company logo which is used to customize your licence of Lapsejay.
Page 10
• Controls for channels 3 to 10
Controls for the second group of 8 recording channels (from 3 to 10) are grouped into the
upper part of the screen as in the following detail:
Page 11
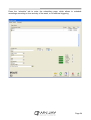
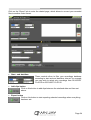
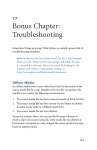
Chapter: Lapsejay configuration
Press the setup button from the main Lapsejay screen to enter the setup window shown
below. As always, details may slightly differ depending on your setup and on purchased
plug-ins and selected skin.
For each of the available channels, a bunch of operating switches may be set according to
your specific requirements.
Though full setup of configuration is allowed, settings related to features not included in
your purchased package will not be working.
Page 12
Detailed description :
Audio/video detector section
Lapsejay features an audio/video motion detector allowing to start and stop recording
depending on the incoming audio level and image motion. This turn very useful when the
software is used to video surveillance purposes, so you can capture only what and when
needed. It is possible to check only the video, only the audio, or both of them: in this latter
case, recording is started only when both audio and video are valid.
• Enable motion detector checkbox
If checked, the incoming video motion is checked in order to start and stop recording.
• Motion detector threshold
The cursor sets the threshold value for the video motion detector: values under the
threshold are considered as invalid (i.e. still image), values above as valid ones (lively
image).
• Audio detector checkbox
If checked, the incoming audio level is checked in order to start and stop recording.
• Audio detector threshold
The cursor sets the threshold value for the incoming audio level: values under the
threshold are considered as invalid (silence), values above as valid ones.
• Stop delay
Sets the delay time (in seconds) for the audio and video detectors: when the time expires,
audio and video are not valid, recording is stopped.
Frame capture section
Lapsejay includes a powerful frame capture feature on the incoming signal being logged.
The player module allows to perform the same capture feature from video segments
already logged on disk.
• Picture type
Sets the format to use for captured frames: JPG or Windows Bitmap (BMP).
• Capture Path
Sets the path where the captured frames will be saved. Pictures are saved to disk
according to the date-hour format and with the extension corresponding to picture type
(JPG or BMP), for example 20041230-223508.bmp means a BMP picture captured on
30/12/2004 at 22.35.08.
Page 13
Timestamp overlay section
• Timestamp position
Lapsejay allows to automatically overlay to logged video the date and time which are
updated in realtime while recording. This box allows to set the timestamp position on the
video window. If you wish to disable this feature, set the “disabled” option: it is also
possible to record clean without overlays, and superimpose the timestamp while playing
the logged video with the Lapsejay Player module.
• Transparent background checkbox
If checked, the timestamp is overlayed without any background. Otherwise, the colour set
with the “background color” button will be used.
• Overlay shadow checkbox
If checked, the time stamp will be painted with a slightly dark edge in order to improve
readability.
• Font button
Opens the font settings window, to set font, color and font size for timestamp overlay.
• Background color button
Opens a dialog window to set the color to use for the timestamp background.
Recording settings
• Video source
-
Video capture device: the video signal is captured from the selected video capture
card.
Screen recording: the video signal is a real-time capture of Windows screen. This
mode turns useful to record presentations, etc.
Streaming URL: the video signal is captured from a URL. Select this mode if yo uwish
to log a Web TV which is straming live.
• Recording format
-
AVI: clips are captured in AVI format, using the audio/video codec set in the related
section “AVI settings”
ASF: clips are captured in ASF format, using the recording profile set in the related
section “ASF settings”
• Source URL
If the video source is set on Streaming URL, here you must specify the Internet address
where the signal is streamed from.
Page 14
Audio device settings
• Capture Audio checkbox
If checked, Lapsejay also captures incoming audio signal from the user-set sound card.
Otherwise, video recording will be without any audio track.
• Enable VU-meters checkbox
If checked, enables the audio spectrum analyzer and VU-meters. Should you notice any
sound card sharing issues (“device already in use” messages or similar), then you may
disable this feature.
• VU-meters audio device
Select here the sound card to use for VU-meters among the available ones. It should
usually match the audio capture card set in the box below.
• Audio device
Select here the sound card to use for audio capture among the available ones.
• Audio input
Allows to select the desired input channel from the audio capture sound card mixer, for
example “Line In”.
• Audio input level
Sets the audio input level depending on your incoming audio signal. Once you set the
cursor, try to perform a short capture in order to check your settings. If needed, perform
you adjustments and try again until you get your desired results.
• Audio balance
Sets the audio input balance, for example, if you just need to capture the Left or the Right
channels. Usually, you may leave the cursor in the center position.
• Center button
Use the Center button to quickly set the input audio balance to center.
Page 15
Video device settings
• Video standard
Sets the video standard to use for video capture, for example PAL or NTSC.
• Video input
Sets the capture card video input to use for the incoming signal (for example Composite or
S/Video).
• TV channel
If the capture card installed features a terrestrial analog TV tuner, it is possibile to capture
directly from a TV aerial. You have to set the video input on “TV Tuner” and set here the
channel to tune in. Note: this feature depends on the channel assignment and may no
work for all countries.
• Video device
Sets the video capture card to use for the current channel. Just select the right one from
the drop-down box.
• Video size
Sets the captured video size. Values around 320x240 pixels have proved appropriate for
jogging purposes. Higher values guarantee better image definition but need more CPU
power and more Hard Disk space.
• Video subtype
If needed, sets the video subtype for capturing. In most cases, the default option will work
is fine.
• Frames per second
Sets the number of frames per second to capture. Any value from 1 to 25 (or 30,
depending on the video standard in use) is allowed.
AVI settings
• Audio format
Allows to set the audio sampling frequency / bits to use for audio capture, for example
8000 Hz 16 Bit.
•
Audio compressor
Allows to set audio codec for audio compression. Click the button on the right of the box,
select your desired codec, and press OK to continue.
In order to get the best quality/compression ratio, we suggest to use the Windows Media
Audio codec, just be careful not to use 8 bit formats, which are not supported.
Page 16
• Video compression
Sets the codec to use for video compression, for example xVid or DivX. The two buttons
below allow to manage the codec specific settings (bitrate, etc.).
ASF settings
• Streaming mode
Sets streaming mode:
- Disabled: audio/video captured on the current channels is not streamed
- Direct network streaming: the current channel is streamed directly to the Internet
- Stream to VM publishing point: to save on CPU load and bandwidth on your Internet
connection, especially should you plan more concurrent users connected, select this
option to stream to a Windows Media Server Publishing Point hosted by an Internet
streaming service provider, to which users will connect to in order to receive your
broadcast.
• Max users
Sets the maximum number of users that may simultaneously connect to your streaming
service (should you stream directly to the Internet)
• Publishing URL
If the streaming mode is set to VM publishing point, sets the Windows Media Server
address used as streaming publishing point.
• Publishing username - publishing password
If the streaming mode is set to VM publishing point, sets username and password to
access to the Windows Media Server used as streaming publishing point.
• Record in native format
If checked, if the capture source is set to Streaming URL and the capture format is set to
ASF, recording will be done in native format, i.e. incoming streaming will be captured to
disk as-is, without any audio/video recompression.
• ASF profiles
Sets the ASF profile to use for audio/video compression.
Recording options settings
• Storage folders
It is possible to set one or more folders which will be used in sequence for the storage of
captured video: when the available space on the first folder is over, Lapsejay will
automatically switch to the next folder in the list, and so on. To add a new folder to the list,
press the button with the + icon, select a local or network folder, then press OK to confirm.
To delete a folder from the list, highlight the folder and press the button with the - icon.
Page 17
• File size box
Sets the file size in minutes for each logged segment. Taking into account that you may
not play a file until recording ends (or you stop recording manually), and that there’s a
small time gap between closing a file and starting the next one, this is clearly a
compromise between file size and time you’ll have to wait before it is possible to play the
logged segment. Except for specific circumstances, we usually suggest a value of 60
minutes (1 hour) for each file.
• Days to store
Lapsejay can be set to automatically rotate logged files to keep track of a desired number
of days and if you wish, can automatically erase older days to make room for the new
ones. Type here how many days you wish to store before the oldest day of recording is
erased to make room for the new ones (usually 90, 30, 42, depending on your local
regulations or your requirements).
• Max deleted files
Here you may set the maximum number of video segments to delete each time the purge
routine is fired. Taking into account that Lapsejay runs an obsolete recordings purge each
hour, and supposing segments of 1 hour each, you should set this value to 1 (i.e. each
hour, Lapsejay deletes not more than 1 segment). Thus, if the system clock is accidentally
moved forward, deletion of huge quantities of video segments which should be kept into
the archive is avoided. To disable this feature, set the value to 0.
• Process mode
For obsolete clips whose date is older than maximum days to store, sets action to execute:
- Delete files: clips are deleted to create space for the new ones
- Move files: clips are moved to a backup folder
• Backup folder
If the storage management mode is set to “move files”, browse your hard disk to specify
here the folder where obsolete clips will be archived, once maximum on-line days to are
expired.
• Recording time range
If you don’t need to run video jogging 24 hours a day, here you may specify a time range
where recording will be automatically started. Outside this interval, recording is
automatically stopped. For example, the string 09.30.00-10.15.00 enables recording from
9,30 to 10,15. To disable this feature, just clear this box.
• Channel name
Sets the input channel name, which is shown on the main recording window to identify the
channel.
• Record at startup
If checked, recording is started automatically at Lapsejay startup. Otherwise, once
Lapsejay is started, you’ll have press the record button to start recording manually. Except
for specific circumstances, we usually suggest to enable the autostart feature, so
recording will be restart automatically at each startup (for example, after a power failure
has occurred).
Page 18
Logo overlay section
• Logo filename
Lapsejay allows to overlay a static pitture to the logged video. Use this box to browse your
Hard Disk and select the filename with the BMP picture to overlay. To disable this feature,
just clear the contents of the box.
•
Logo position
These cursors allow to position the logo
on the video window. Values in the boxes
just right of the cursors show the absolute
position in pixels.
•
Channel 1 / 2 / 3 / 4 / 5 / 6 / 7 / 8 buttons
Select the channel on which you are doing software settings (settings are
separate for each channel).
•
Cancel button
Cancels updates and closes the setup window. You’ll see a dialog box asking
for confirmation.
•
OK button
Confirms updates and closes the setup window.
Page 19
Time Synchronizer section
Lapsejay features a built-in time synchronizer which allows to keep your system clock
always updated thanks to time servers on the Internet. An “always-on” connection to the
Internet is required, Lapsejay will not attempt to make a connection itself (you may share
your Internet connection on your LAN, for example).
• Time Server
Here, you’ll have to specify the time server to use. Just select your server from the dropdown box.
• UTC difference
Time servers on the Internet always work on the UTC time, so here you’ll have to specify
the time shift between UTC and your local time.
• Get Time Now
Press the button to attempt a connection to the specified time server: if this is successfull,
in a matter of seconds the system time will be automatically updated according to the
server time.
Various section
• Language
Lapsejay is multilinguage and any caption used in the software is read from a text file you
can easily tailor to your needs, or copy-and-paste to create new languages. The software
comes with English and Italian LNG language files, found in the software setup folder. To
edit your default language, just select your favourite one from the available languages in
the drop-down box.
• Database path
Sets the path to the centralized database which is going to retain all the informations about
logged segments, scheduling, etc. Except for specific requirements, we suggest to leave
the default settings.
• Log File
Sets a filename with full path where Lapsejay will write its operation log (for example
timestamp of recording start and end, software startup and shutdown, etc.). This is a plain
text file, which you can open with Windows Notepad.
Page 20
Password section
Optionally, you may set a password to limit access to the setup window only to authorized
personnel. You will be requested to type this same password whenever you press the
“Rec” and “Stop” buttons on the main recording window.
• Old password
To edit the current password, type the old password in this box. If the password is the right
one, the icon
changes into
and you will be allowed to type the new password
into the other.
Otherwise,
you will not be allowed to make changes. The
default password set on the system is “winjay”, without quotes. With this default settings,
access is granted to everybody and no password request is performed.
• New password
Once you typed the old password in the first box, just type here the new password to set.
Layout section
As already descripted, Lapsejay main recording window layout can be freely user-set
depending on the available channels and/or your specific requirements.
• Index panels
Sets the number of synthesis panels (from 0 to 2), each of them contains 4 mini-screen
related to as many logging channels.
• Detail panels
Sets the number of detail panels (from 0 to 2), each of them show details related to as
many logging channels.
Page 21
Alarm section
• Alarm mode
Sets the alarm mode when a loss or frozen incoming signal is detected:
1. Disabled: no action will be undertaken.
2. LPT: the bit on the parallel port corresponding to the blank channel will be triggered.
This is a TTL signal available on the parallel port determined by the user settings.
Channel 1 triggers pin 2, Channel 2 triggers pin 3, Channel 3 triggers pin 4, Channel 4
triggers pin5. Common ground is pin 18.
3. SMS: Lapsejay will send an SMS to the specified numbers.
4. LPT + SMS: both actions will be undertaken.
• Box Phone COM port
If you wish the blank detector warns your tech personnel via SMS, here you’ll have to
specify the COM port where your phone is connected. Lapsejay currently supports the
following Nokia phones: 3210, 3310, 3330, 3390, 3350, 3410, 3510, 5110, 5130, 5190,
5210, 6110, 6130, 6150, 6190, 6210, 6250, 6310, 6310i, 6360, 6510, 7110, 7190, 8210,
8290, 8250, 8310, 8390, 8810, 8850, 8855, 8890, 8910.
• Interface type
Allows to select the interface type used to connect the phone.
• LPT address
If you wish the blank detector triggers an external device via the parallel port, just type the
hex addess of the parallel port used for this purpose. For example, $378 for the LPT1,
$278 for the LPT2.
• Alarm SMS numbers
If you have set Lapsejay to alert your tech personnel via SMS in case of blank, just add
their SMS numbers in this box. More than one number may be added, separated by a
semicolon, for example: 3391234546;348123456
Page 22
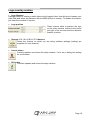
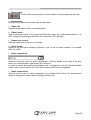
Skin selection
Graphic layout of Lapsejay is based on “skins”: these are packages of graphics
components which are used to customize software appearance, from dialog windows to
buttons, menus, labels, etc. Thanks to skins, the user interface can be made good looking
according to your own taste. Lapsejay includes a folder with several “skins”: click on the
button to the right of the edit box and browse your skin folder to select your favourite one.
Some examples of skins:
Audio monitoring section
• Enable audio monitoring audio
If checked, enables audio monitoring feature. The sampled audio from the capture card
will be rendered on the PC’s sound card.
• Audio monitoring volume
Sets audio monitoring output volume.
• Audio device
Sets the sound card to use for the audio monitor output.
Page 23
Press the “schedule” tab to enter the scheduling page, which allows to schedule
recordings according to time and day of the week, or via external triggering.
Page 24
Quickstart (scheduling a clock driven recording):
In the following example we’re going to schedule a recording each Monday, Wednesday
and Friday, starting at 10.00.00 AM up to 10.30.00 AM. Each time, the existing file (if any)
will be overwritten by the new recording.
1. Press the “New” button to switch the database to insert mode.
2. Insert a name for your new scheduling, set 10.00.00 as start time and 10.30.00 as
ending time, then check the Mon, Wed and Fry boxes.
3. In the “trigger” box, select the “clock driven” item to schedule your recording according
to your start and ending time.
4. In the “channel” box, select the channel where you want to schedule your recording, for
example channel number 1.
5. The “action” box will have no effect, since it is only used to associte an action to a
trigger. In the “recording mode” box, select the “file name” item, browse your Hard Disk
to set your storage folder, then type the file name which will be used for your recording.
6. Finally, press the OK button to confirm when done.
Quickstart (scheduling a triggered recording):
In the following example we’re going to schedule a recording each Tuesday and Thursday,
starting will be triggered by the closure of Trigger 1 but only between 10.00.00 AM up to
10.05.00 AM. This time, files will be named each with its own timestamp according to the
recording start time, and put in the specified folder. To stop recording according to another
trigger, you’ll just have to add a similar scheduling.
1. Press the “New” button to switch the database to insert mode.
2. Insert a name for your new scheduling, set 10.00.00 as start time and 10.05.00 as
ending time, then check the Tue and Thu boxes.
3. In the “trigger” box, select the “Trigger 1 close” item.
4. In the “channel” box, select the channel where you want to schedule your recording, for
example channel number 1.
5. In the “action” box, select the “start” item. In the “recording mode” box, select the
“folder name” item, then browse your Hard Disk to set your storage folder.
6. Finally, press the OK button to confirm when done.
Page 25
Detailed description
• Schedules grid
Contains the list of schedules in the database. You can navigate the list with the arrows on
the right. Left-clicking on each item on the grid, related details are shown in the
corresponding controls below in the window.
• Schedule name box
Contains a name for the current schedule, for faster recalling. For example, “morning
news”.
• Trigger box
Sets the trigger which will activate the current schedule. For example: “Trigger 1 Close”
will activate the schedule when trigger 1 closes, “Trigger 2 Open” will do the same when
trigger 2 opens, and so on. Setting the “clock driven” item, recording will start and stop
according to scheduled start and stop time, triggers will be ignored.
• Channel box
Sets the channel (from channel 1 to channel 4, depending on your purchase) where you
want to schedule your recording.
• Action box
Sets the action which a trigger will undertake:
1. Start: recording will start with the previously loaded profile.
2. Stop: recording will stop.
3. Load Profile: Logjay will load the specified recording profile and start recording.
If the current schedule is clock drive, this setting is ignored.
• Recording mode
Two recording modes are available:
1. Date/time: files with the logged audio will be named according to recording start date
and time: this mode should be used for long-time logging purposes, since each
recording will be assigned a different file.
2. Specify file name: the audio file will be always named the same way, according to your
settings. Each new recording will overwrite the previous ones, which will be lost, of
course.
Page 26
• Storage folder / filename
If recording mode has been set on date/time, just click on the icon and browse your hard
disk to select the folder (local or LAN) where the logged audio will be stored.
Otherwise, if recording mode has been set on a specific file name, this box will allow
browsing for your desired path and file name which will be overwritten for each new
recording.
• Start time
If the current schedule is “clock driven” type, you’ll have to type here the start time of your
recording. Otherwise, when external triggering is used, the start time is considered as
trigger enable start time, meaning that the trigger event is taken into account only if
between the start and end time specified. This way, you may restrict your recording just to
your desired schedule, ignoring unwanted triggering.
• End time
As above, this is the end time for your recording in the case of “clock driver” events, or
trigger enable end time when external triggering is used.
• Days enabled
This group of checkboxes from Sunday to Saturday allow to enable the current schedule
for each day of the week. This way, you may also add totally different schedules for each
day of the week.
•
New button
Switches the database to insert mode to add a new schedule.
•
Edit button
Switches the database to edit mode, to edit settings for the current schedule.
•
Cancel button
Deletes the current scheduling. You’ll see a dialog box asking for confirmation.
Page 27
•
Cancel button
Cancels updates and switches to browse mode. You’ll see a dialog box asking
for confirmation.
•
OK button
Confirms updates and switches to browse mode. If the database is already in
browse mode, closes the setup window.
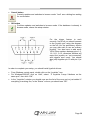
For the trigger feature to work
correctly, first of all you should connect
to the joystick port using the diagram
on the left (for the preliminary checks
you may also wish to use an ordinary
joystick). You also have to add some
100 K-Ohm resistors between pins 1-3,
1-6, 9-11, 9-13: otherwise Window will
report the joystick as “not connected”
and triggers won’t work. You should
also jump together pin 12 with pin 4 (or
5).
In order to complete your setup, you should install joystick drivers:
•
•
•
From Windows control panel, double click on the “joysticks” icon.
For Windows2000/XP, click on “Add”, select “2 Joysticks 2-axys 2-buttons on the
same port”, then click “OK”.
In the “Joysticks” window you should now see the list of the ones you’ve just added. If
everything is working fine, in the “Status” column you should see “OK”.
Page 28
Chapter 2: The player module
Segments with the logged video will be found on your storage folders timestamped with
recording start time, as yyyymmdd-hhmmss.avi – that way it will be easy to trace your
desired segment. However, whenever you need to play the logged video, running the
Lapsejay player will easy the task of locating the desired passage. Lapsejay includes a
free licence of Lapsejay Player Basic, which runs on the same PC as Lapsejay recording
module as well as any workstation in your LAN, without any added cost.
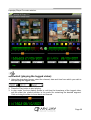
Lapsejay Player Basic main window:
By purchasing a licence for Lapsejay VX Player Pro, new features will be added, such as
dual player (to monitor two channels at once), DVD burning, and video export/reencoding
features.
Page 29
Lapsejay Player Pro main window:
Quickstart (playing the logged video):
1. Using the drop-down boxes, select the channel, date and time from which you wish to
start playing the logged video.
2. Press the Play button to start playing.
3. In play mode, the time display shows in real time the timestamp of the logged video,
and the slider the relative position in the audio file containing the desired segment.
Click and drag the slider to move back and forward.
Page 30
•
Frew button
In play mode, switches to fast rew seek mode.
•
Rew button
In play mode, switches to rew seek mode.
•
Play button
Starts playing the desidered logged segment according to selected channel and
date/time.
•
Pause button
In play mode, switches to pause mode.
•
Stop button
Stops playing the logged audio.
•
Fwd button
In play mode, switches to forward seek mode.
•
FFwd button
In play mode, switches to fast forward seek mode.
Page 31
•
Sync players button
Sometimes you may wish to play simultaneously recordings from 2 different
channels (for example, in order to compare your schedule and your competitors).
Once the first player is started and running, select the channel, date and time on the 2nd
player and then click on this button: the 2nd player will start playing the selected channel
and keep in synch with the first one.
• Audio monitoring
When using both players at once on the same soundcard, you may wish to separately
enable or disable audio output for each player:
Disables audio output for the corresponding player.
Enables audio output for the corresponding player.
Click on the “DVD burning” tab to enter the related page, which allows to burn DVDs with
your recorded files:
Page 32
•
Start - end date/time
These controls allow to filter your recordings database
according to start and end date/time interval, for example
you may wish to select only recordings from 02/10/2007
10.00.00 to 05/10/2007 12.00.00
•
Add clips button
Once you have set your date/time interval, click the “Add clips” button to add
selected clips into the filelist for burning your DVD.
•
Drive setting
Sets the DVD drive to use for burning your DVD.
•
Speed setting
Sets the speed for burning your DVD
•
Erase button
Click on this button if you wish to erase your DVD-RW before burning
•
Burn button
Click on this button to start burning your DVD when everything has been set.
•
Abort button
Click on this button should you wish to abort the DVD burning process.
•
Progress status
While the DVD burning is progressing, these bars will
be updated with the buffer status and DVD burning
progress.
Page 33
Click on the “Export” tab to enter the related page, which allows to convert your recorded
files to another video format:
•
Start - end date/time
These controls allow to filter your recordings database
according to start and end date/time interval, for example
you may wish to select only recordings from 02/10/2007
10.00.00 to 05/10/2007 12.00.00
•
Add clips button
Click on this button to add clips between the start/end date and time set
above.
•
Export button
Click on this button to start exporting selected recordings when everything
has been set.
Page 34
•
Abort button
Click on this button should you wish to abort a running exporting process.
• Export folder
Sets the folder where re-encoded clips will be stored.
• Video size
Sets the target video size for re-encoded clips.
• Video format
Sets re-encoding format, AVI (using the audio/video codec set in the related boxes) or or
ASF (using the recording profile set in the related bix “ASF settings”).
• Frames per second
Sets the frame rate to use for re-encoding.
• Audio format
Allows to set the audio sampling frequency / bits to use for audio capture, for example
8000 Hz 16 Bit.
•
Audio compressor
Allows to set audio codec for audio compression. Click the button on the right of the box,
select your desired codec, and press OK to continue.
In order to get the best quality/compression ratio, we suggest to use the Windows Media
Audio codec, just be careful not to use 8 bit formats, which are not supported.
• Video compression
Sets the codec to use for video compression, for example xVid or DivX. The button below
allows to manage the codec specific settings (bitrate, etc.).
Page 35
Click on the “Setup” tab to enter the setup page, which allows to set the various player’s
options.
• Timestamp position
Should your clips have been recorded without any timestamp overlay, Lapsejay Player
allows to automatically perform a realtime timestamp overlay to the played video while
watching. This box allows to set the timestamp position on the video window. If you wish to
disable this feature, select the “disabled” option.
• Transparent background checkbox
If checked, the timestamp is overlayed without any background. Otherwise, the colour set
with the “background color” button will be used.
• Font button
Opens the font settings window, to set font, color and font size for timestamp overlay.
• Background color button
Opens a dialog window to set the color to use for the timestamp background.
Page 36
• Soundcard player 1
Sets the sound card to use for the player audio output.
• Soundcard player 2
Sets the sound card to use for the player audio output.
• Language
Lapsejay is multilinguage and any caption used in the software is read from a text file you
can easily tailor to your needs, or copy-and-paste to create new languages. The software
comes with English and Italian LNG language files, found in the software setup folder. To
edit your default language, just select your favourite one from the available languages in
the drop-down box.
• Database path
Sets the database path where each player module should read search for informations
concerning the logged video. If the player module runs on the same workstation as the
recording module, just leave the default setting, otherwise please specify the path to the
database on the recording workstation (for example \\logger\c\program files\lapsejay).
•
Skin select
Click on the button to the right of the edit box and browse your skin folder to select your
favourite skin.
•
Cancel button
Cancels changes and closes the setup window.
•
OK button
Confirms changes and closes the setup window.
Page 37
Appendix
Choosing the audio/video codec
It would be quite far from feasible building a long-time logging system without using any
form of audio/video compression: the space needed to store a few days of recordings will
overcome the space available on the biggest Hard Disk now on the market. Luckily, on the
Windows platform a quite large number of audio/video codecs (codec = coder-decoder)
are available to compress and uncompress audio/video data in real time, minimizing hard
disk space needed for data storage while maintaining at the same time a quite fine quality.
Lapsejay can handle most of Windows preinstalled codecs, or other ones which can be
user installed later: so, you may set recording quality according to desired quality and
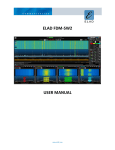
available disk space. To summarize, in the following table we have computed the hard disk
space needed for logging 30 days, depending on the frame rate and video size. Values
have been obtained with DivX5 video codec, and Windows Media Audio V2 audio codec
set at 8000 Hz, 16 bit. Please note that values are approximate, since actual video bitrate
depends on the incoming video signal characteristics.
Video
size
Frames
per second
Hard Disk space Video bitrate
for 30 giorni
in kBit/s
320 x 240
320 x 240
320 x 240
320 x 240
25 (full motion)
15
10
5
~ 250 Gbytes
~ 85 Gbytes
~ 50 Gbytes
~ 40 GBytes
codec DivX 5.05 set to 600 Kbps (VHS quality)
codec DivX 5.05 set to 256 Kbps
codec DivX 5.05 set to 192 Kbps
codec DivX 5.05 set to 64 Kbps
As you may notice, the storage requirements vary depending on the video size and frames
per second, though not necessarily in a proportional way.
With a low video size, image will tend to appear pixelized, especially if resized to full
screen; on the other hand, with a bigger video size, the overall image resolution will surely
improve, though a greater video bitrate is required. With low frame rates, the video will
play by steps, while values of 15 fps or higher will return smooth recordings.
Obviously it is possibile to record in higher quality, but of corse the Hard Disk space
requirements will be higher. The final choice is up to the final user, according to his own
requirements vs. available storage space.
Page 38
End user licence agreement
NOTICE TO USER: THIS IS A CONTRACT. PLEASE READ THIS DOCUMENT
CAREFULLY BEFORE INSTALLING THIS SOFTWARE. THE INDIVIDUAL OR ENTITY
INSTALLING THIS SOFTWARE (THE "END USER") AGREES TO BE BOUND BY THE
TERMS OF THIS LICENSE. IF YOU DO NOT AGREE TO THE TERMS OF THIS
LICENSE, YOU WILL NOT BE ABLE TO USE THE SOFTWARE.
LAPSEJAY SOFTWARE END USER LICENCE AGREEMENT
FOR 1 (ONE) COMPUTER
WINJAY S.R.L.
End user licence agreement
The enclosed computer program(s) and the accompanying documentation are provided to
the End-User by Winjay S.R.L. ("Licensor") for use only under the following terms.
Licensor reserves any right not expressly granted to the End-user. The End-User owns
the disk on which the Software is recorded, but Licensor retains ownership of all copies of
the Software itself. The End-User assumes sole responsibility for the installation, use and
results obtained from use of the Software.
This Winjay S.R.L. End User License Agreement (the "Agreement") accompanies software
("Software") and related explanatory written materials ("Documentation"). The term
"Software" shall also include any upgrades, modified versions, updates, additions, and
copies of the Software licensed to you by Winjay S.R.L. - Winjay S.R.L. grants to you a
nonexclusive license to use the Software and Documentation, provided that you agree to
the following:
1.
Use of the Software. You may:
- Install the Software in a single location on a hard disk or other storage device of up to the
number of computers indicated in the the header at the beginning of this Agreement.
- Provided the Software is configured for network use, install and use the Software on a
single file server for use on a single local area network for either (but not both) of the
following purposes:
(a) permanent installation onto a hard disk or other storage device of up to the Permitted
Number of Computers; or
(b) use of the Software over such network, provided the number of different computers on
which the Software is used does not exceed the Permitted Number of Computers. For
example, if there are 100 computers connected to the server, with no more than 15
computers ever using the Software concurrently, but the Software will be used on 25
different computers at various times, the Permitted Number of Computers for which you
need a license is 25.
Page 39
End user licence agreement
- Display, modify, reproduce and distribute any photographs, clip art or other artistic works,
in whole or in part, that are included with the Software (unless a specific notice to the
contrary is indicated), provided such photographs, clip art or artistic works are not
distributed on a stand-alone basis. Such photographs, clip art and artistic works may not
be used in the production of lewd, obscene or pornographic material.
- Make one backup copy of the Software, provided your backup copy is not installed or
used on any computer.
HOME USE. The primary user of each computer on which the Software is installed or
used may also install the Software on one home or portable computer. However, the
Software may not be used on the secondary computer by another person at the same time
the Software on the primary computer is being used.
2. Copyright. The Software is owned by Winjay S.R.L. and its structure, organization and
code are the valuable trade secrets of Winjay S.R.L.. The Software is also protected by
United States Copyright Law and International Treaty provisions. You must treat the
Software just as you would any other copyrighted material, such as a book. You may not
copy the Software or the Documentation, except as set forth in the "Use of the Software"
section. Any copies that you are permitted to make pursuant to this Agreement must
contain the same copyright and other proprietary notices that appear on or in the Software.
Except for font software converted to other formats as permitted in the "Use of the
Software" section, you agree not to modify, adapt or translate the Software. You also
agree not to reverse engineer, decompile, disassemble or otherwise attempt to discover
the source code of the Software. Trademarks shall be used in accordance with accepted
trademark practice, including identification of trademark owner's name. Trademarks can
only be used to identify printed output produced by the Software. Such use of any
trademark does not give you any rights of ownership in that trademark. Except as stated
above, this Agreement does not grant you any intellectual property rights in the Software.
3.
Transfer.
You may not rent, lease, sublicense or lend the Software or
Documentation. You may, however, transfer all your rights to use the Software to another
person or legal entity provided (1) that you transfer this Agreement, the Software, including
all copies, updates and prior versions and all copies of font software converted into other
formats, and all Documentation to such person or entity, (2) that you retain no copies,
including copies stored on a computer, and (3) that the receiving party accept the terms
and conditions of this Agreement.
Page 40
End user licence agreement
4.
Multiple Environment Software/Multiple Language Software/Dual Media
Software/Multiple Copies/Upgrades. If the Software includes, or, in connection with the
acquisition of the Software you receive, two or more operating environment versions of the
Software (e.g., Macintosh and Windows® ), two or more language translation versions of
the Software, the same Software on two or more media (e.g., diskettes and a CD-ROM),
and/or you otherwise receive two or more copies of the Software, the total aggregate
number of computers on which all versions of the Software are used may not exceed the
Permitted Number of Computers. You may make one back-up copy, in accordance with
the terms of this Agreement, for each version of the Software you use. You may not rent,
lease, sublicense, lend or transfer versions or copies of the Software you do not use, or
Software contained on any unused media, except as part of the permanent transfer of all
Software and Documentation as described above. If you acquire an upgrade or update for
Software, you may use the previous version for ninety (90) days after you receive the new
version in order to assist you in the transition to the new version, after which time you no
longer have a license to use the previous version.
5.
Limited Warranty. Winjay S.R.L. warrants to you that the Software will perform
substantially in accordance with the Documentation for the ninety (90) day period following
your receipt of the Software. To make a warranty claim, you must return the Software to
the location where you obtained it along with a copy of your sales receipt within such
ninety (90) day period. If the Software does not perform substantially in accordance with
the Documentation, the entire and exclusive liability and remedy shall be limited to either,
at Winjay S.R.L.'s option, the replacement of the Software or the refund of the license fee
you paid for the Software. Winjay S.R.L. AND ITS SUPPLIERS DO NOT AND CANNOT
WARRANT THE PERFORMANCE OR RESULTS YOU MAY OBTAIN BY USING THE
SOFTWARE OR DOCUMENTATION. THE FOREGOING STATES THE SOLE AND
EXCLUSIVE REMEDIES FOR Winjay S.R.L.'S OR ITS SUPPLIERS' BREACH OF
WARRANTY. EXCEPT FOR THE FOREGOING LIMITED WARRANTY, Winjay S.R.L.
AND ITS SUPPLIERS MAKE NO WARRANTIES, EXPRESS OR IMPLIED, AS TO
NONINFRINGEMENT OF THIRD PARTY RIGHTS, MERCHANTABILITY, OR FITNESS
FOR ANY PARTICULAR PURPOSE. Some states or jurisdictions do not allow the
exclusion of implied warranties or limitations on how long an implied warranty may last, so
the above limitations may not apply to you. To the extent permissible, any implied
warranties are limited to ninety (90) days. This warranty gives you specific legal rights. You
may have other rights which vary from state to state or jurisdiction to jurisdiction.
Should the end user experiences failure of his customized hardware key, Winjay S.R.L.
sole responsibility will be the repair or replacement of the "hardware key" which should be
returned to Winjay S.R.L. together with a copy of the receipt invoice received when you
purchased the software. This warranty is not valid if the malfunction has raised from
accident or improper use. In no event the end user may pretend a second "hardware key".
Page 41
End user licence agreement
6.
Limitation of Liability. IN NO EVENT WILL Winjay S.R.L. OR ITS SUPPLIERS BE
LIABLE TO YOU FOR ANY CONSEQUENTIAL, INCIDENTAL OR SPECIAL DAMAGES,
INCLUDING ANY LOST PROFITS OR LOST SAVINGS, EVEN IF A Winjay S.R.L.
REPRESENTATIVE HAS BEEN ADVISED OF THE POSSIBILITY OF SUCH DAMAGES,
OR FOR ANY CLAIM BY ANY THIRD PARTY. SOME STATES OR JURISDICTIONS DO
NOT ALLOW THE EXCLUSION OR LIMITATION OF INCIDENTAL, CONSEQUENTIAL
OR SPECIAL DAMAGES, SO THE ABOVE LIMITATIONS MAY NOT APPLY TO YOU.
7.
Governing Law and General Provisions. This Agreement will be governed by the
laws in force in Italy excluding the application of its conflicts of law rules. This Agreement
will not be governed by the United Nations Convention on Contracts for the International
Sale of Goods, the application of which is expressly excluded. If any part of this
Agreement is found void and unenforceable, it will not affect the validity of the balance of
the Agreement, which shall remain valid and enforceable according to its terms. You agree
that the Software will not be shipped, transferred or exported into any country or used in
any manner prohibited by the United States Export Administration Act or any other export
laws, restrictions or regulations. This Agreement shall automatically terminate upon failure
by you to comply with its terms. This Agreement may only be modified in writing signed by
an authorized officer of Winjay S.R.L.
Macintosh is a trademark of Apple Computer, Inc. registered in the U.S. and other
countries. Windows is either a registered trademark or a trademark of Microsoft
Corporation. Any other trademark belongs to the respective owner.
Page 42