1
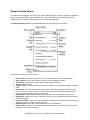
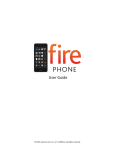
New to Kindle 2nd Generation? Start Here © 2015 Amazon.com, Inc. or its affiliates. All rights reserved. New to Kindle 2nd Generation? Start Here Charging and Powering Up Your Kindle Registering Your Kindle Setting a Password on Kindle Setting Your Payment Method Using the Controls Using the Home Screen Shopping for Kindle Content Charging and Powering Up Your Kindle Kindle ships with a U.S. power adapter and a Kindle micro-USB cable. You can charge your Kindle by connecting it to your computer via the Kindle micro-USB cable or by connecting it to a wall socket using the Kindle micro-USB cable and the Kindle U.S. power adapter plug. The light on your Kindle next to the USB socket will appear yellow when charging and change to green when Kindle is fully charged. Note on third-party charging devices (not included with your Kindle): Third-party charging devices, power converters, USB wall chargers, and other charging hubs are not supported nor recommended for your Kindle. Charging from Your Computer via Kindle Micro-USB Cable When using the Kindle micro-USB cable to charge your Kindle via your computer, charging time will normally take 4 to 6 hours. To charge your Kindle from a computer via Kindle micro-USB cable: Connect Kindle directly to a USB port on your computer. Do not connect through a hub, keyboard, or monitor. Connect Kindle to a computer plugged into a power outlet. We recommend keeping your computer plugged into a power outlet while charging your Kindle. Your computer may not supply sufficient power to the USB port if it is not plugged in. Make sure your computer stays on during the entire charging process. Disable Standby, Hibernate or Sleep mode, if necessary. Verify Kindle recognizes the USB connection. You can verify your Kindle is charging if you see the USB drive mode screen. If you do not see this screen, unplug and reconnect your Kindle. You may also need to select an alternate USB port. © 2015 Amazon.com, Inc. or its affiliates. All rights reserved. Using Kindle while Charging via Kindle Micro-USB Cable You can use your Kindle while it is connected via USB and charging from your computer by unmounting or ejecting it so Kindle exits USB drive mode. Windows Vista and 7: Click on the Start button, select "Computer" from the options, right-click on the Kindle drive icon and select "Eject" from the pop-up menu. Windows XP: Right-click on the "Safely remove hardware" icon in the lower right-hand corner of the task bar and follow the on-screen instructions to remove Kindle. Mac OS: Control-click on the Kindle device icon and choose "Eject." Kindle will then exit USB drive mode and display the Home screen. You'll see a lightning bolt on the battery status icon that indicates your Kindle is still charging. Using Kindle's Power Switch The Power switch on top of Kindle puts it to sleep, wakes it up, and turns your Kindle on or off. To wake up or turn on your Kindle: Slide and release the power switch again. To put your Kindle to sleep: Slide and release the power switch. (Other keys and buttons are locked in Sleep mode.) To turn your Kindle off: Slide and hold the power switch for four seconds until the screen goes blank and then release. To reset your Kindle: Disconnect your Kindle from any power source, and then slide and hold the power switch for 15 seconds before releasing. © 2015 Amazon.com, Inc. or its affiliates. All rights reserved. Tip: Your Kindle will also go to sleep by itself after ten minutes if you are not using it. If your Kindle had wireless on prior to going to sleep, it will continue to receive your regularly scheduled subscriptions while in sleep. Registering Your Kindle Register your Kindle to access features such as purchasing and downloading content. If you no longer have access to your Kindle or transferred it to another user, you should deregister your Kindle from your account. To register or deregister your Kindle: 1. 2. 3. 4. 5. If you are not already on the Home screen, press the Home button. Press the Menu button. Make sure that Whispernet is turned on. Move the 5-way down until "Settings" is underlined and press to select. Press the 5-way to select "register" or "deregister" from the Settings screen. If you're registering Kindle, enter your Amazon.com user name and password (the e-mail address and password associated with your Amazon account) using the keyboard. 6. Navigate the 5-way to select "OK" to finish the process or "Cancel" to abort. Tip: If your Amazon user name or password contains characters not present on the Kindle keyboard, press the Symbol key to see a menu of additional characters. Registering if You Don't Have an Amazon.com Account If you don't already have an Amazon.com account, you can create an account at the Manage Your Content and Devices page (http://www.amazon.com/mycd), then register your Kindle from the device. Here's how: 1. Visit the Manage Your Content and Devices page. 2. On the sign-in screen, enter the e-mail address you want to use for your Amazon.com account. This e-mail address will be the one we use to send you updates about your orders. 3. Don't enter a password. Check the button next to "No, I am a new customer." and then click the Sign in using our secure server button to continue. 4. Enter your name and verify your e-mail address on the Registration screen. 5. Enter a password for your new account and click the Continue button. We'll ask you to enter the same password twice to make sure it is correct. (You might also want to write your login information so you'll have it later.) 6. Register your Kindle from the device following the Registering Your Kindle instructions above. © 2015 Amazon.com, Inc. or its affiliates. All rights reserved. Setting a Password on Kindle Available with the 2.5 software release. If you want to make sure that only authorized users will have access to your Kindle, you can set a password on the Settings screen. You'll then need to enter the password to access your Kindle if it enters sleep mode or is turned off. To set your Kindle password: 1. 2. 3. 4. 5. Navigate to Kindle's Home screen and press the Menu button. Select "Settings" from the Home screen menu. Select the "turn on" option next to Device Password on the Settings page. Enter your new password twice and also enter a hint to help you remember the password. Select "Submit" when you're finished. If you wish to change or turn off your password in the future, navigate to the Settings menu again and select the available options. Note: If you forget your password, move the 5-way controller down to view your password hint. Your Kindle will also give you the Kindle Support phone number so we can help reset your Kindle password. Setting Your Payment Method When you buy books or other items directly from your Kindle 2nd Generation, you're paying with the default 1-Click Payment Method on your Amazon.com account. Typically, this is the payment method associated with your default shipping address. To check or change your payment method: 1. Visit Manage Your Content and Devices. 2. Click the Settings tab. 3. Under Kindle Payment Settings, click Edit Payment Method to review or edit your 1-Click payment settings. 4. Select the desired credit card information, and then select "Continue". You may need to add the information for a new card. 5. Enter the desired billing address, and then select "Continue". You will be taken to the Kindle Payment Settings page where you can view your edited 1-Click payment method. Using a gift card as your payment method You are not required to have a credit or debit card on your Amazon.com account to make digital purchases such as Kindle books, but you must establish a default 1-Click billing address on your Amazon.com account to use Amazon.com gift cards for digital purchases. If you don't already have a 1Click billing address on your account, follow the instructions below to add an address without entering a credit or debit card to your account. To add a 1-Click billing address for gift card purchases: 1. Visit the Manage Addresses and 1-Click Settings page in Your Account. © 2015 Amazon.com, Inc. or its affiliates. All rights reserved. 2. Click the Enter a new address button. 3. Enter the address information and click the Save & Continue button. 4. Select the “Click here to make this your 1-Click default address” link. Entering Amazon.com Gift Card claim codes You must first enter your gift card claim code into Your Account so the balance is available for use. The funds will then be applied automatically to your next purchase, including digital items. To add a gift card balance to Your Account: 1. 2. 3. 4. Visit the Your Account page. In the Payment section under Gift Cards, click "Apply a Gift Certificate/Card to Your Account." If prompted, sign in with your e-mail address and password. Enter your claim code and click "Apply to Your Account." Using the Controls To get around on your Kindle, you use the buttons, menus, and the keyboard-all of which are explained here. All of the information you'll need about getting around on your Kindle can be found on the Navigating Your Kindle Help page. © 2015 Amazon.com, Inc. or its affiliates. All rights reserved. Using the Home Screen Your Home screen displays a list of all of your Kindle reading materials—books, newspapers, magazines, blogs, personal documents, as well as audiobooks. It serves as a personal bookshelf for all of your reading material, as well as a starting point to access other Kindle features. To display the Home screen: Press the Home button on the right edge of your Kindle. Here's what you'll see on the Home screen: Device name: The name of your Kindle. You can edit this name on the Settings screen. Show options: Choose which types of content you want displayed in Home. Sort options: Choose the order you want content displayed in Home. Title: the title of the item. Author or Date: For books, the author of the item is listed. For periodicals and blogs, the date is listed. Unread title: The "new" label indicates the item has never been opened and is less than 24 hours old. Once you open a new document or more than 24 hours has passed since the item arrived on your Kindle, the "new" label is removed. Archived Items: Downloadable items stored at Amazon.com not currently on your device. Sample title: Indicates the book is a sample. If you like it, you can purchase the full book when viewing the sample. Progress indicator: The series of dots below the item shows how long the book is and bold dots show how far you have read in a particular item. Audiobook title: the "audio" label indicates the book is an audiobook. Pages in Home: Indicates the total number of pages in Home. Use the Next Page or Previous Page button to navigate the pages. © 2015 Amazon.com, Inc. or its affiliates. All rights reserved. Periodicals: Select to access older issues of newspapers and magazines. Shopping for Kindle Content After you've set up the payment method for your purchases from the Kindle store (see Setting Your Kindle Payment Method), you're ready to shop for content. If your Kindle is connected wirelessly to Whispernet you can start shopping from your Kindle right away. You can also visit the Kindle Store on Amazon.com and send your purchases wirelessly to your Kindle or download to your Computer and transfer content using the USB Connection. These Help pages will get you started: Shopping for Kindle Content Transferring, Downloading, and Sending Files to Kindle © 2015 Amazon.com, Inc. or its affiliates. All rights reserved.