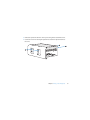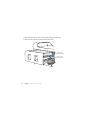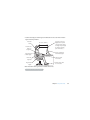
1
Congratulations, you and your Mac Pro were made for each other. Finder Browse the contents of your computer using Cover Flow. Back to My Mac Access files on your Mac at home via the Internet — from anywhere. www.apple.com/macosx www.apple.com/macosx Mac Help Mac Help finder Spaces Arrange windows in different spaces to unclutter your desktop. www.apple.com/macosx Mac Help spaces .mac Time Machine Automatically back up your files to an extra hard drive. www.apple.com/macosx Mac Help time machine iMovie Collect all your video in one library. Create and share movies in minutes. iPhoto Organize all your photos with Events. Publish to a Web Gallery with a click. www.apple.com/ilife/imovie www.apple.com/ilife/iphoto iMovie Help iPhoto Help movie GarageBand Create music by adding musicians to a virtual stage. Enhance your song to sound like a pro. www.apple.com/ilife/garageband GarageBand Help record photo iWeb Create beautiful websites with photos, movies, blogs, podcasts, and dynamic web widgets. www.apple.com/ilife/iweb iWeb Help website Contents Chapter 1: Ready, Set Up, Go 11 Setting Up Your Mac Pro 19 Putting Your Mac Pro to Sleep or Shutting It Down Chapter 2: Life with Your Mac Pro 24 26 28 30 32 34 Basic Features on the Front of Your Mac Pro Features of Your Apple Keyboard Ports and Connectors on the Back of Your Mac Pro More Ports and Connectors on the Back Internal Expansion Options Getting Answers Chapter 3: Making a Good Thing Better 39 43 51 60 64 Opening the Mac Pro Installing Memory Installing Internal Storage Devices Adding PCI Express Cards Replacing the Internal Backup Battery Contents 5 Chapter 4: Problem, Meet Solution 68 70 71 72 72 75 78 79 80 81 83 Problems with Your Mac Pro Problems with Software Keeping Your Software Up to Date Problems with AirPort Wireless Communication Problems with Your Display Problems with Your Internet Connection Using Apple Hardware Test Reinstalling the Software That Came with Your Computer Maximizing Ethernet Performance Learning More, Service, and Support Locating Your Serial Number Chapter 5: What’s Under the Hood 86 Specifications Chapter 6: Last, but Not Least 96 97 100 102 102 103 6 Important Safety Information General Maintenance Understanding Ergonomics Avoid Hearing Damage Apple and the Environment Regulatory Compliance Information Contents Looking for Something? 110 Index Contents 7 1 1 Ready, Set Up, Go www.apple.com/macpro Mac Help Migration Assistant Your Mac Pro features the latest computer technology, including advanced 64-bit multicore processor technology, high-speed FB-DIMM memory, PCI Express graphics and expansion slots, and internal storage, all in an anodized aluminum chassis with easy access to internal components. Important: Read all the installation instructions (and the safety information starting on page 95) carefully before you first use your Mac Pro. Before you begin, remove any protective film from the outside of your Mac Pro and from the inside of the side panel. For information about opening the side panel, see “Opening the Mac Pro” on page 39. Make sure you look over the information in Chapter 2, “Life with Your Mac Pro,” to find out about the new features of this Mac Pro. Many answers to questions can be found on your Mac Pro in Mac Help. For information about Mac Help, see “Getting Answers” on page 34. Apple may release new versions and updates to its system software, so the images shown in this book may be slightly different from what you see onscreen. 10 Chapter 1 Ready, Set Up, Go Setting Up Your Mac Pro Your Mac Pro is designed so that you can set it up quickly and start using it right away. Follow the steps on the next few pages to get started. Step 1: Position your Mac Pro and display Pick up your Mac Pro by both of its handles using correct lifting techniques. If your display is heavy, use correct lifting techniques when positioning it as well. Position your Mac Pro and display so that:  They are each on a sturdy, flat surface  The power cable connectors don’t press against a wall or other object  The airflow in front of, behind, and below your Mac Pro and the display is not obstructed  The computer’s optical drive trays have space to open in front The only way to shut off power completely to your Mac Pro and display is to disconnect their power plugs from the power source. Make sure the power cords for your Mac Pro and display are within easy reach so that you can unplug them. Chapter 1 Ready, Set Up, Go 11 Step 2: Plug in the power cord Plug the power cord completely into the recessed power cord socket on the back of your Mac Pro and plug the other end into a grounded outlet or a grounded power strip. Power cord socket Power cord plug 12 Chapter 1 Ready, Set Up, Go Step 3: Connect the display Connect your display as shown in the illustration below. Depending on the display, you may have one or more cables to connect. Check the instructions that came with the display for additional setup information. Display ports USB port FireWire 400 port Display cable You can connect two displays with Digital Visual Interface (DVI) connectors to the display ports on the back of your Mac Pro. Chapter 1 Ready, Set Up, Go 13 You can connect an Apple Cinema Display to either port. DVI display port DVI display ports DVI to VGA Display Adapter VGA connector on display cable You can also connect displays that have an Apple Display Connector (ADC) or a video graphics array (VGA) connector using one of the following adapters:  To connect a VGA display, use the Apple DVI to VGA Display Adapter included with your Mac Pro to connect the display to the DVI port.  To connect an ADC display, use an Apple DVI to ADC Display Adapter, not included, to connect the display to the DVI port. To purchase an Apple DVI to ADC Display Adapter, contact an Apple Authorized Reseller, visit an Apple Store retail location, or go online to the Apple Store at www.apple.com/store. 14 Chapter 1 Ready, Set Up, Go Step 4: Connect an Ethernet cable To access the Internet or a network, connect one end of an Ethernet cable to either of the gigabit Ethernet ports on the back of your Mac Pro. Connect the other end to a DSL modem, cable modem, or Ethernet network. Gigabit Ethernet ports Chapter 1 Ready, Set Up, Go 15 Step 5: Connect the keyboard and mouse Connect the keyboard cable to one of the USB (d) ports on your Mac Pro or on the display. Plug the Mighty Mouse cable into a USB port on the keyboard. Plug the mouse into a USB port on the keyboard Keyboard 16 Chapter 1 Ready, Set Up, Go Mouse If the keyboard cable isn’t long enough, use the keyboard extension cable that came with your Mac Pro. Apple keyboard extension cable Using a Wireless Keyboard and Mouse If you purchased an Apple Wireless Keyboard and Mouse with your Mac Pro, follow the instructions that came with the keyboard and mouse to set them up. Step 6: Turn on your Mac Pro Press the power (®) button on the front of your Mac Pro to turn it on. If your display must be turned on separately, turn it on by pressing its power button. Step 7: Use Setup Assistant The first time you turn on your Mac Pro, Setup Assistant starts. Setup Assistant helps you enter your Internet and email information and set up a user account on your Mac Pro. If you already have a Mac, Setup Assistant can help you automatically transfer files, applications, and other information from your previous Mac to your new Mac Pro. Step 8: Customize Your Desktop and Set Your Preferences You can quickly make your desktop look the way you want using System Preferences. Choose Apple () > System Preferences from the menu bar. As you get to know your Mac Pro, explore System Preferences—it’s your command center for most computer and display settings. For more information, open Mac Help and search for “System Preferences” or for the specific preference you want to change. Chapter 1 Ready, Set Up, Go 17 Need Help Setting Up? If you don’t see anything on your screen or you think your Mac Pro didn’t start up properly, check the following:  Is your Mac Pro plugged into a power source? If it’s plugged into a power strip, is the power strip turned on?  Is the power cord securely plugged into the back of your Mac Pro?  Are the keyboard and display cables connected correctly?  Is the display turned on? Are the brightness and contrast of the display adjusted correctly? If the display has brightness controls, adjust them.  If you still don’t see anything on your screen, restart your Mac Pro. Press and hold the power (®) button on your Mac Pro for 5 or 6 seconds, until it turns off. Press the power (®) button again to restart.  If you see a blinking question mark on the screen or a series of flashes from the status light, see Chapter 4, “Problem, Meet Solution,” on page 67. 18 Chapter 1 Ready, Set Up, Go Putting Your Mac Pro to Sleep or Shutting It Down When you finish working, you can put your Mac Pro to sleep or shut it down. Putting Your Mac Pro to Sleep If you will be away from your Mac Pro for only a short time, put it to sleep. When your Mac Pro is in sleep, the display’s screen is dark. You can quickly wake your Mac Pro from sleep and bypass the startup process. To put your Mac Pro to sleep, do one of the following:  Choose Apple () > Sleep.  Press the power (®) button on the front of your Mac Pro and click Sleep in the dialogue box that appears.  Choose Apple () > System Preferences, click Energy Saver, and set a sleep timer. To wake your Mac Pro from sleep, do one of the following:  Press any key on the keyboard.  Click the mouse.  Press the power (®) button on the front of your Mac Pro. Chapter 1 Ready, Set Up, Go 19 Shutting Down Your Mac Pro If you will not be using your Mac Pro for a day or more, you should turn it off. To turn off your Mac Pro, do one of the following:  Choose Apple () > Shut Down.  Press the power (®) button on the front of your Mac Pro and click Shut Down in the dialogue box that appears. NOTICE: Do not turn off your Mac Pro by turning off the switch on a power strip or by pulling out your Mac Pro’s power plug (unless you can’t turn off your Mac Pro any other way). Your files or system software could be damaged if your Mac Pro is not shut down properly. NOTICE: Shut down your Mac Pro before moving it. Moving your computer while the hard disk is spinning can damage the hard disk, causing loss of data or the inability to start up from the hard disk. 20 Chapter 1 Ready, Set Up, Go 2 2 Life with Your Mac Pro www.apple.com/macpro Mac Help ports Read on for an overview of the features and ports of your Mac Pro. The Apple website at www.apple.com links you to the latest Apple news, free downloads, and online catalogs of software and hardware for your Mac Pro. You can also find the manuals for many Apple products, and technical support for all of Apple’s products, on the Apple Support website at www.apple.com/support. Chapter 2 Life with Your Mac Pro 23 Basic Features on the Front of Your Mac Pro Optical drive 24 Status light Second optical drive (optional) f Headphone jack ® Power button USB 2.0 ports (2) FireWire 800 port FireWire 400 port Chapter 2 Life with Your Mac Pro Optical drive Your Mac Pro has a DVD+R DL/DVD±RW/CD-RW SuperDrive, which can read CD-ROM, photo CD, audio, and DVD discs. It can write music, documents, and other files to CD-R, CD-RW, DVD±R, DVD±RW, and DVD+R Double Layer (DL) discs. To open the drive, press the Media Eject (C) key on your Apple Keyboard. If your Mac Pro has a second optical drive, press the Option and Media Eject (C) keys to open it. ® Power button Press this button to turn on your Mac Pro, put it to sleep, or wake it from sleep. To restart, press and hold this button for 5 or 6 seconds until your Mac Pro turns off, and, then press it again to turn it on. H FireWire 400 and 800 ports Connect your Mac Pro to FireWire digital video (DV) cameras, scanners, and external hard disk drives. Connect and disconnect FireWire devices without restarting. The FireWire 400 port supports data rates up to 400 megabits per second (Mbit/s). The FireWire 800 port supports data rates up to 800 Mbit/s. d USB 2.0 ports Connect your Mac Pro to USB keyboards, mice, printers, scanners, iPods, speakers, microphones, and hubs. Your display may also have USB ports. f Headphone jack Connect headphones to your Mac Pro through the headphone minijack. Status light A white light indicates your Mac Pro is on; a pulsing light indicates it’s in sleep. Chapter 2 Life with Your Mac Pro 25 Features of Your Apple Keyboard Escape Fast Forward Decrease brightness Mute Increase brightness Volume Down Exposé Volume Up Dashboard Media Eject Caps Lock Function Play/Pause Rewind USB port (both sides) 26 Chapter 2 Life with Your Mac Pro Escape (esc) key Press the Escape (esc) and Command (x) keys simultaneously to open Front Row. Press the Escape (esc) key to exit Front Row. Brightness keys (F1, F2) Increase ( ) or decrease ( ) the brightness of your Apple display. Exposé All Windows key (F3) Open Exposé for quick access to all your open windows. Dashboard key (F4) Open Dashboard to access your widgets. — Mute key (F10) Mute the sound coming from the built-in speakers and headphone port. - Volume keys (F11, F12) Decrease (–) or increase (-) the volume of sound coming from the speakers or headphone port on your Mac Pro. C Media Eject key Press and hold the Media Eject (C) key to remove a disc. Function (fn) key Hold down to activate customized actions assigned to the function keys (F1 to F19). To learn about customizing function keys, choose Help > Mac Help from the menu bar and search for “function keys.” ’ Media keys (F7, F8, F9) Fast-forward (‘), play or pause (’), or rewind (]) a song, movie, or slideshow. Caps Lock key Press the Caps Lock key to engage caps lock so you can type capital letters. d Two USB 2.0 ports Connect a mouse and sync your iPhone, iPod, or digital camera. Chapter 2 Life with Your Mac Pro 27 Ports and Connectors on the Back of Your Mac Pro Power socket ¥ Locking latch d USB 2.0 ports (3) H FireWire 400 port H FireWire 800 port G Gigabit Ethernet ports (2) 28 Chapter 2 Life with Your Mac Pro Power socket Connect the power cord that came with your Mac Pro. Don’t use ordinary power or extension cords. ¥ Locking latch Lift the latch to open the side panel and access the internal components in your Mac Pro. If you are working inside your Mac Pro and the latch is down, the optical and hard drives are locked in place. You can attach a security lock to the latch to prevent access and secure the internal components. You can also attach a security cable to the latch or through the handles and feet to protect your Mac Pro. d USB 2.0 ports Connect your Mac Pro to USB devices, such as keyboards, mice, printers, scanners, speakers, USB microphones, and USB hubs. Your display may also have USB ports. H FireWire 400 and 800 ports The FireWire 400 port supports data rates up to 400 Mbit/s. The FireWire 800 port supports data rates up to 800 Mbit/s. G Dual Gigabit Ethernet ports with jumbo frame support Connect your Mac Pro to a high-speed Ethernet network to access the Internet or network resources such as printers and servers, and share information over the network using a CAT 5e cable. Chapter 2 Life with Your Mac Pro 29 More Ports and Connectors on the Back PCI Express expansion slots £ DVI display port 1 £ DVI display port 2 Optical digital audio out port Optical digital audio in port , Audio line-in port - Audio line-out port 30 Chapter 2 Life with Your Mac Pro PCI Express expansion slots (3) Expand your Mac Pro by installing up to three Peripheral Component Interconnect (PCI) Express cards in the covered slots labeled 2, 3, and 4. £ DVI display ports Connect displays that use a Digital Visual Interface (DVI) connector to the DVI display ports. Connect an Apple display, such as the 20-, 23-, or 30-inch Apple Cinema Display, to either port. You can also connect displays that use a video graphics array (VGA) connector using the Apple DVI to VGA Display Adapter that came with your Mac Pro. Optical digital audio in and audio out ports Connect to decks, receivers, digital instruments, and 5.1 surround-sound speaker systems using standard TOSLINK cables or fiber-optic cables with a 3.5 mm plastic or nylon optical plug. You can transfer stereo or encoded 5.1 audio using the S/PDIF (Sony/Philips Digital Interface) protocol and TOSLINK cables. , Analog audio line-in port Connect self-powered microphones, MP3 and CD players, and other devices with analog capability. - Analog audio line-out port Connect self-powered analog speakers and other devices with analog capability. Chapter 2 Life with Your Mac Pro 31 Internal Expansion Options Optical drive carrier Hard disk drive carriers (4) Slots 2–4: PCI Express Battery Slot 1: Double-wide PCI Express graphics (graphics card installed) Top memory card Bottom memory card 32 Chapter 2 Life with Your Mac Pro Optical drives Your Mac Pro comes with one or two DVD+R DL/DVD±RW/CD-RW SuperDrives in the optical drive carrier. To replace an optical drive, see “Replacing the Optical Drive” on page 55. Hard disk drive Your Mac Pro comes with up to four hard disk drives installed in the drive carriers. To install or replace the hard disk drives, see “Installing Internal Storage Devices” on page 51. PCI Express slots Your Mac Pro has three PCI Express expansion slots. To install PCI cards in slots 2 through 4 to expand the capabilities of your Mac Pro, see “Adding PCI Express Cards” on page 60. Battery Your Mac Pro uses an internal backup battery. If your Mac Pro has trouble starting up, or if the system date and time are frequently incorrect, you may need to replace the battery. See “Replacing the Internal Backup Battery” on page 64. Double-wide PCI Express graphics slot Connect up to two displays to the graphics card in the PCI Express graphics slot (slot 1). You can replace the card in this slot and install additional graphics cards in PCI slots 2 through 4. See “Adding PCI Express Cards” on page 60. Memory cards Your Mac Pro has two memory cards. Each card holds up to four FB-DIMMs, for a total of eight DIMMs. To add more memory, install 800 MHz FB-DIMMs in matched pairs on the memory cards. See “Installing Memory” on page 43 for information about the specific type of memory used in Mac Pro. Chapter 2 Life with Your Mac Pro 33 Getting Answers Much more information about using your Mac Pro is available in Mac Help and on the Internet at www.apple.com/support/macpro. To open Mac Help: 1 Click the Finder icon in the Dock (the bar of icons along the edge of the screen). 2 Click the Help menu in the menu bar and type a question or term in the Search field. 3 Choose a topic from the list or choose Show All Results to see all of the topics. More Information For more information about using your Mac Pro, see the following: 34 To learn about See Installing additional drives, memory, expansion cards, or changing the battery Chapter 3, “Making a Good Thing Better,” on page 37. Troubleshooting your Mac Pro if you have a problem Chapter 4, “Problem, Meet Solution,” on page 67. Finding service and support for your Mac Pro “Learning More, Service, and Support” on page 81. Or the Mac Pro Support website at www.apple.com/support/macpro. Using Mac OS X The Mac OS X website at www.apple.com/macosx. Or search for “Mac OS X” in Mac Help. Moving from a PC to a Mac “How to move to Mac” at www.apple.com/getamac/movetomac. Using iLife applications The iLife website at www.apple.com/ilife. Or open an iLife application, open Mac Help, and then type a question in the search field. Chapter 2 Life with Your Mac Pro To learn about See Changing System Preferences Open System Preferences by choosing Apple (K) > System Preferences. Or search for “system preferences” in Mac Help. Using your mouse or keyboard Open System Preferences and choose the Keyboard & Mouse preference. Or open Mac Help and search for “mouse” or “keyboard.” Using AirPort Extreme wireless technology The AirPort Support page at www.apple.com/support/airport. Or open Mac Help and search for “AirPort.” Using Bluetooth® wireless technology The Bluetooth Support page at www.apple.com/support/ bluetooth. Or open the Bluetooth File Exchange application, located in the Utilities folder within the Applications folder, and choose Help > Bluetooth Help. Connecting a printer Search for “printing” in Mac Help. FireWire and USB connections Search for “FireWire” or “USB” in Mac Help. Connecting to the Internet Search for “Internet” in Mac Help. Connecting an external display Search for “display port” in Mac Help. Using Front Row Search for “Front Row” in Mac Help. Burning a CD or DVD Search for “burn disc” in Mac Help. Mac Pro specifications Chapter 5, “What’s Under the Hood,” on page 85. Or the Mac Pro specifications page at www.apple.com/macpro/specs.html. Or open System Profiler by choosing Apple (K) > About This Mac from the menu bar, and then clicking More Info. Chapter 2 Life with Your Mac Pro 35 3 3 Making a Good Thing Better www.apple.com/store Mac Help RAM Use the information in this chapter to customize and expand your Mac Pro to fit your needs. You can find information about important procedures in the following sections:  “Opening the Mac Pro” on page 39  “Installing Memory” on page 43  “Installing Internal Storage Devices” on page 51  “Adding PCI Express Cards” on page 60  “Replacing the Internal Backup Battery” on page 64 NOTICE: Apple recommends that you have an Apple-certified technician install memory, PCI Express cards, and internal storage devices. To contact an Apple Authorized Service Provider or Apple for service, see “Learning More, Service, and Support” on page 81. If you install these items yourself, you risk damaging your equipment, and such damage is not covered by the limited warranty on your computer. See an Apple Authorized Reseller or Apple Authorized Service Provider for additional information about this or any other warranty question. 38 Chapter 3 Making a Good Thing Better Opening the Mac Pro 1 Before you open your Mac Pro, shut it down by choosing Apple () > Shut Down. NOTICE: Always shut down your Mac Pro before opening it to avoid damaging its internal components or the components you want to install. Do not open your Mac Pro or attempt to install items inside it while it is on. 2 Wait 5 to 10 minutes to allow the internal components of your Mac Pro to cool. · WARNING: Let your Mac Pro cool down before you touch the internal components, which may be very hot. Chapter 3 Making a Good Thing Better 39 3 Touch the metal on the outside of your Mac Pro to discharge any static electricity. Important: Always discharge static before you touch parts or install components inside your Mac Pro. To avoid generating static, do not walk around the room until you finish installing the cards, memory, or internal storage device and replace the side panel. Touch the metal case to discharge static. 40 Chapter 3 Making a Good Thing Better 4 Unplug all the cables and the power cord from your Mac Pro. NOTICE: To avoid damaging internal components or the components you want to install, always unplug your Mac Pro. Don’t attempt to install items while it’s plugged in. 5 Hold the side panel and lift the latch on the back. Chapter 3 Making a Good Thing Better 41 6 Remove the side panel by pulling the top away from your Mac Pro and lifting up. Important: When you remove the side panel, hold it securely. 42 Chapter 3 Making a Good Thing Better Installing Memory Your Mac Pro has two memory cards with four memory slots on each card (in four banks of two each). Your Mac Pro comes with a minimum of 2 GB of memory, installed as a pair of 1 GB fully buffered dual inline memory modules (FB-DIMMs) in two of the DIMM slots. You can install additional pairs of 1 GB, 2 GB, or 4 GB FB-DIMMs in the open DIMM slots on the memory cards, for a total of 32 GB of memory. DIMMs must be installed in matched pairs and fit these specifications:  800 MHz, DDR2, FB-DIMMs  72-bit wide, 240-pin modules  36 memory ICs maximum per DIMM  Error-correcting code (ECC) Important: Apple recommends that you use Apple-approved FB-DIMMs. Other FB-DIMMs may cause your Mac Pro to operate louder or decrease performance to conserve heat. DIMMs from older Mac computers cannot be used in your Mac Pro. Note: When purchasing DIMMs for use in Mac computers, make sure that the memory vendor conforms to the Joint Electron Device Engineering Council (JEDEC) specification. Check with your memory vendor to ensure that the DIMMs support the correct timing modes and that the Serial Presence Detect (SPD) feature has been programmed properly, as described in the JEDEC specification. To check the compatibility of your DIMMs, see the Macintosh Products Guide on Apple’s website at www.apple.com/guide. You can purchase Apple-branded memory online from the Apple Store at www.apple.com/store. Chapter 3 Making a Good Thing Better 43 It’s important to install FB-DIMMs in matched pairs of equal size and equal specification. Use the table below and the instructions that follow as guidelines for DIMM placement. If you have Install Two DIMMs (standard configuration) One on the top memory card and one on the bottom card Four DIMMs One pair on the top memory card and one pair on the bottom card Six DIMMs Two pairs on the top memory card and one pair on the bottom card Eight DIMMs Two pairs on the top memory card and two pairs on the bottom card To install memory: 1 Shut down your Mac Pro, open it, and remove the side panel, following the instructions on page 39. · 44 WARNING: Let your Mac Pro cool down for 5 to 10 minutes before you touch the internal components. The components on the memory cards may be very hot. Chapter 3 Making a Good Thing Better 2 Using the two finger holes, pull on the memory cards to remove them, and then place them on a soft, clean cloth with the DIMMs facing up. Chapter 3 Making a Good Thing Better 45 3 On the bottom memory card, open the ejectors on the DIMM slot and push them out to the sides, and then remove the DIMM from slot 1. Important: When installing or removing DIMMs, don’t touch the gold connectors on the DIMMs or the memory cards. 4 Reinstall the DIMM you removed on the top memory card by aligning it in DIMM slot 2, as shown in the illustration, and pushing both ends of the DIMM down until the tabs are vertical and the ejectors snap into place. 5 Install the first pair of additional DIMMs on the bottom memory card in DIMM slots 1 and 2, the slots closest to the card’s gold connectors. Important: Always install DIMMs as matched pairs and in the order shown here. 1a Move one DIMM from bottom card to top card Top memory card Bottom memory card 46 Chapter 3 Making a Good Thing Better 1b First pair of additional DIMMs 6 If you add a second pair of additional DIMMs, install them on the top memory card in DIMM slots 3 and 4, the last two slots. 2 Second pair of additional DIMMs 3 Third pair of additional DIMMs Top memory card Bottom memory card 7 If you add a third pair of additional DIMMs, install them on the bottom memory card in DIMM slots 3 and 4. Chapter 3 Making a Good Thing Better 47 8 Lay your Mac Pro down on a soft, clean cloth on the desk or work surface to avoid scratching the work surface or your Mac Pro. 9 Reinstall each memory card, pushing it straight down until it’s seated in the memory slot. Memory slots 48 Chapter 3 Making a Good Thing Better 10 Stand your Mac Pro up and replace the side panel. Important: When you replace the side panel, make sure the latch is up. Hold the side panel securely so it stays in place as you push the latch down. Place the side panel in the slot and then push to close. Chapter 3 Making a Good Thing Better 49 11 Hold the side panel against your Mac Pro and push the latch down to secure the side panel. 12 You can attach a lock or cable through the metal loop to secure your Mac Pro. Flip the lock tab down before you close the latch. 50 Chapter 3 Making a Good Thing Better Installing Internal Storage Devices Your Mac Pro has room for six internal drives: two optical drives and four hard disk drives. In most configurations, a single hard disk drive occupies the first hard drive bay and an optical drive is located in the top optical drive bay. You can add up to three additional Serial ATA (SATA) hard disk drives to the empty hard drive bays or up to four Serial Attached SCSI (SAS) drives. The drives must meet these specifications:  Type: SAS or SATA 3 Gb/s  Width: 3.9 inches (102 mm)  Depth: 5.7 inches (147 mm)  Height: 1.0 inch Important: To install SAS drives in your Mac Pro, you must also install the optional Mac Pro RAID Card. For more information about requirements or devices supported, visit an Apple Authorized Reseller, the Apple Store at www.apple.com/store, or the Mac Pro Support site at www.apple.com/support/macpro. Installing SAS or SATA 3 Gb/s Hard Disk Drives Your Mac Pro can accommodate up to four internal 1-inch-high SATA or SAS 3 Gb/s hard disk drives in the hard drive bays. If your Mac Pro comes with a single drive installed, it’s in the first bay. You can install drives in the second, third, and fourth hard drive bays. Chapter 3 Making a Good Thing Better 51 To install a hard disk drive: 1 Open your Mac Pro and remove the side panel following the instructions that begin on page 39. 2 Lift the latch to unlock the hard drive carriers. Important: When the latch is down, the carriers are locked in the drive bays and can’t be removed. 3 Pull the hard drive carrier out of the drive bay. Hard drive carrier 52 Chapter 3 Making a Good Thing Better 4 Position the carrier over the hard disk drive with the connectors at the rear. 5 Use the four screws on the carrier to attach the hard disk drive to the carrier. Important: If the printed circuit board is exposed on the bottom of the hard disk drive, hold the drive by its sides. To avoid damaging the drive, don’t touch the printed circuit board. Connectors Chapter 3 Making a Good Thing Better 53 6 Lift the latch and slide the carrier over the guides and into the drive bay, until it’s seated in the bay and snaps into the hard drive connectors. Hard drive connectors 7 Replace the side panel and push the latch down to secure it. 54 Chapter 3 Making a Good Thing Better Replacing the Optical Drive Your Mac Pro comes with one or two SuperDrives installed in the optical drive bays. Follow these instructions to replace your optical drive. Important: Contact your drive manufacturer or consult the manufacturer’s website to determine if your drive is set to cable select mode. Before installation, set the drive to cable select mode if the manufacturer hasn’t already done so. To replace the optical drive: 1 Open your Mac Pro and remove the side panel following the instructions on page 39. 2 Lift the latch to unlock the optical drive carriers. Important: When the latch is down, the drives and carriers are locked in the drive bays and can’t be removed. 3 Pull the optical drive carrier halfway out of the optical drive bay. Chapter 3 Making a Good Thing Better 55 4 Disconnect the power and ribbon cables from the optical drive and remove the carrier. Important: When you install or replace the optical drives, use the original Apple cables that came with your Mac Pro. 56 Chapter 3 Making a Good Thing Better 5 Remove the optical drive from the carrier by unscrewing the four attachment screws. 6 Use the four screws from the original optical drive to attach the replacement drive to the carrier. Chapter 3 Making a Good Thing Better 57 7 Slide the optical drive and carrier over the guides halfway into the drive bay, 8 Attach the power and ribbon cables to the back of the drive. Power cable middle connector Ribbon cable end connector 58 Chapter 3 Making a Good Thing Better 9 Lift the latch and then slide the optical drive carrier into the drive bay, pushing it into place. 10 Replace the side panel and push the latch down to secure it. Chapter 3 Making a Good Thing Better 59 Adding PCI Express Cards You can expand the capabilities of your Mac Pro by installing cards in the Peripheral Component Interconnect (PCI) Express slots. Your Mac Pro has one double-wide PCI Express graphics slot and three PCI Express expansion slots, for a total of four slots. These slots accommodate PCI Express graphics cards and expansion cards. About PCI Express Cards Your Mac Pro comes with a high-performance PCI Express graphics card, which contains the graphics processor unit (GPU) and provides the computer’s display ports. The graphics card is installed in slot 1. You can install additional PCI Express graphics and expansion cards. Before installing a card, refer to the table below and check its specifications to make sure it can operate in your Mac Pro. Slot Type Bandwidth 4 PCI Express 1.1 4-lane 3 PCI Express 1.1 4-lane 2 PCI Express 2.0 16-lane 1 (double-wide) PCI Express 2.0 16-lane Important: Combined maximum power consumption for all four PCI Express slots must not exceed 300 watts (W). 60 Chapter 3 Making a Good Thing Better To install a PCI Express card: 1 Open your Mac Pro and remove the side panel (see page 39). · WARNING: To avoid damaging internal components or the components you want to install, always turn off and then unplug your Mac Pro. Do not attempt to install items while it is plugged in. Let your Mac Pro cool down for 5 to 10 minutes before you touch the internal components, which may be very hot. 2 Lay your Mac Pro down on a soft, clean cloth to avoid scratching it or the work surface. 3 Unscrew the captive screws in the PCI bracket and remove the bracket. Chapter 3 Making a Good Thing Better 61 4 Remove the port access cover from the slot in which you plan to install the card. PCI bracket Port access cover Tab 5 Remove your new card from its static-proof bag and hold it by its corners. Don’t touch the gold connector or the components on the card. 62 Chapter 3 Making a Good Thing Better 6 Align the card’s connector with the expansion slot and press the card into the slot. Did You Know?—Installing a Full-Length PCI Card It may be easier to install a PCI card if you remove the hard disk drives and carriers, and remove adjacent cards. Make sure the end of the card goes in the appropriate card guide before aligning the card with the PCI slot and completing the installation. PCI bracket Brace Port access opening PCI Express slot Card guides Chapter 3 Making a Good Thing Better 63 7 Press the card gently but firmly until the connector is fully inserted. Press only on the bare areas of the card to avoid damaging the components. Note: Don’t rock the card from side to side or force it. If you meet resistance, check the connector and slot for damage or obstructions, and then try inserting the card again. 8 Pull the card gently to see if it is properly connected. If it stays in place and its gold connectors are barely visible, the card is connected. 9 Replace the PCI bracket under the brace and tighten the screws to secure the card. NOTICE: If you remove a card and don’t install a replacement, place a port access cover over the empty slot to keep foreign objects out of the enclosure. An uncovered slot affects the airflow that cools the internal components and may cause damage. 10 Replace the side panel and push the latch down to secure it. Replacing the Internal Backup Battery Your Mac Pro uses a CR 2032 Lithium battery that preserves settings, such as the date and time, when your Mac Pro is off. If you notice intermittent problems when your Mac Pro starts up or changes in the date and time settings, replace the battery. Important: Dispose of the old battery according to your local environmental laws. To replace the battery: 1 Open your Mac Pro and remove the side panel, following the instructions on page 39. 2 Remove any PCI Express cards that block access to the battery. See “Adding PCI Express Cards” on page 60 for instructions. 64 Chapter 3 Making a Good Thing Better 3 Remove the old battery from the holder. · WARNING: Installing the battery incorrectly may cause an explosion. Use only the same type of battery or an equivalent recommended by the manufacturer of the original. 4 Insert the new battery in the holder with the positive (+) side facing up. Tab 5 Replace the PCI Express cards that you removed (see page 60). 6 Replace the side panel and push the latch down to secure it. Chapter 3 Making a Good Thing Better 65 4 4 Problem, Meet Solution www.apple.com/support Mac Help help Occasionally you may have a problem while working with your Mac Pro. This chapter gives you some solutions to try. Problems with Your Mac Pro If your Mac Pro won’t respond or turn on, you have trouble ejecting a disk, or the status light is flashing, try the steps in this section. If the computer won’t respond or the pointer won’t move First, make sure the mouse and keyboard are connected by unplugging and then plugging in the connectors, and make sure they are firmly seated. Then try to cancel what the computer is doing.  Press the Command (x) and Q keys at the same time to try to quit the current application.  Press the Command (x) and period keys at the same time. If a dialog appears, click Cancel.  Choose Apple () > Force Quit and select the application you want to quit. You can also force quit by pressing the Esc, Option, and Command (x) keys at the same time. Restart your Mac Pro by choosing Apple () > Restart to be sure the problem is entirely cleared up. You can also restart by pressing the power (®) button for about 5 or 6 seconds until your Mac Pro shuts down. Press the power (®) button again to start up your Mac Pro.  If the problem occurs only when you use a particular program, check with the program’s manufacturer to see if it is compatible with your computer.  If the problem occurs frequently, choose Help > Mac Help and search for “problems. “ 68 Chapter 4 Problem, Meet Solution If the computer won’t turn on or start up  Make sure the power cord is connected to a working power source. The plug on the power cord must be completely inserted into the computer’s power socket and firmly seated.  If your computer still does not start up, try resetting the parameter random access memory (PRAM). Turn on the computer and immediately hold down the Command (x), Option, P, and R keys until you hear the startup sound a second time. Release the keys. Set your hard disk as the computer’s startup disk, by doing the following: 1 Choose Apple () > System Preferences. 2 Click Startup Disk. 3 Select your hard disk. The PRAM is reset to the default values and your clock settings may need to be reset.  If your computer does not start up after resetting the PRAM, restart your computer while holding down the Option key to select your startup disk.  If this doesn’t work, restart your computer while holding down the Shift key. If you are unable to eject a disc A file on the disc may be in use. Quit applications that are open, and then try again. If that doesn’t work, choose Apple () > Restart and hold down either the mouse button or the Media Eject (C) key on your Apple Keyboard. If that doesn’t work: 1 Shut down the computer and remove the side panel, see the instructions on page 39. 2 Pull optical drive carrier out of the optical drive bay, see page 55. Chapter 4 Problem, Meet Solution 69 3 Carefully insert the end of a straightened paper clip into the small hole on the front of the optical drive. 4 Push firmly until the tray opens, remove the disc, and push the tray to close it. 5 Replace optical drive carrier and the side panel, see page 59. If the status light flashes and the computer won’t start up  If you recently installed memory, a PCI expansion card, or another internal component, make sure that it is correctly installed and that it is compatible with your computer. See if removing it allows the computer to start up.  If the status light still flashes, determine the number of flashes to identify the problem:  One short flash followed by a longer off period: No valid memory.  Three short flashes followed by a longer off period: Failed memory. Problems with Software When an application freezes or does not respond, Mac OS X provides a way to quit the application without restarting your computer. Quitting a frozen application may allow you to save your work in other open applications. To force an application to quit: 1 Press Command (x)-Option-Esc or choose Apple () > Force Quit from the menu bar. 2 Select the name of the application you want to quit in the Force Quit Applications dialogue. 3 Click Force Quit. The application quits, leaving all other applications open. 70 Chapter 4 Problem, Meet Solution If you have a problem with a software program  Use Software Update to ensure that you have the latest drivers, bug fixes, and other updates.  For problems with software from a manufacturer other than Apple, contact the manufacturer. If you have a problem using your computer or working with Mac OS X  Look in Mac Help (in the Help menu) for instructions and troubleshooting information.  For the latest troubleshooting information and software updates, go to the Apple Support website at www.apple.com/support. Keeping Your Software Up to Date You can connect to the Internet and automatically download and install the latest free software versions, drivers, and other enhancements from Apple. When you are connected to the Internet, Software Update checks Apple’s Internet servers to see if any updates are available for your computer. You can set your Mac to check the Apple servers periodically and download and install updated software. To check for updated software: 1 Choose Apple () > Software Update. 2 Follow the onscreen instructions.  For more information, search for “Software Update” in Mac Help.  For the latest information about Mac OS X, go to the Mac OS X website at www.apple.com/macosx. Chapter 4 Problem, Meet Solution 71 Problems with AirPort Wireless Communication If you have a problem using AirPort wireless communication:  Make sure you have properly configured the software according to the instructions that came with your base station.  Make sure the computer or network you are trying to connect to is running and has a wireless access point.  Make sure you are within antenna range of the other computer or the network’s access point. Nearby electronic devices or metal structures can interfere with wireless communication and reduce this range. Repositioning or rotating the computer may improve reception.  Check the AirPort signal level. You may have up to four bars in the AirPort status icon in the menu bar.  For more information, see the instructions that came with the wireless device or search for “AirPort” in Mac Help. Problems with Your Display NOTICE: If you have a problem with your Apple display and nothing in this manual solves it, contact an Apple Authorized Service Provider or Apple for assistance. If you attempt to repair the display yourself, any damage you may cause to the display will not be covered by the limited warranty on your display. Contact an Apple Authorized Reseller or Apple Authorized Service Provider for additional information about this or any other warranty question. 72 Chapter 4 Problem, Meet Solution If no image appears on the screen  Make sure the display and computer are turned on.  Make sure the cables are connected properly to your computer and the display.  If your graphics card has an internal power cable, make sure it’s connected to the card and the logic board.  Make sure your computer is not in sleep. Press the power button or any key to see if the computer wakes.  Make sure the display brightness and contrast are set properly. Use the brightness keys on the Apple Keyboard. Some displays also have brightness and contrast controls on or under their front edge or on the side.  Reset the PRAM by restarting the computer while holding down the Command (x), Option, P, and R keys until you hear the startup sound a second time. Then start up using the software installation disc that came with your computer. If the screen image appears dim or flickers  Adjust the display brightness and contrast settings. Use the brightness keys on the Apple Keyboard. Some displays also have brightness and contrast controls on or under their front edge. Or you may be able to adjust brightness or contrast using the Displays pane of System Preferences.  Calibrate the display by choosing Apple () > System Preferences. Click Displays, select Color, and click Calibrate. For more information on color and your display, see Mac Help. Chapter 4 Problem, Meet Solution 73  The flickering may be caused by interference from a nearby power line, a fluorescent light, or an electrical device—for example, a radio, a microwave oven, or another computer. Try relocating nearby electrical devices or moving your computer and display. If no colors appear on the screen or the colors don’t look right  Make sure the display is connected firmly to the computer.  Open the Displays pane of System Preferences and make sure the display is set to display millions of colors. For more information about color and your display, see Mac Help.  Calibrate the display, as described on page 73. If after you change the screen resolution, desktop icons move Changing the screen resolution affects the display of information on your screen. The operating system may reposition icons when you change the screen resolution. If the screen freezes  Force the frozen application to quit. Choose Apple () > Force Quit and select the application.  If that doesn’t work, force the computer to restart by pressing the power (®) button for 5 or 6 seconds until your Mac Pro shuts down. Press the power (®) button again to start up your Mac Pro. 74 Chapter 4 Problem, Meet Solution If the light on the front of the display is flashing On some Apple flat panel displays, the power light displays a series of short flashes when an error is detected.  If you see a repeating sequence of three short flashes, the display is detecting input in the wrong video format. Make sure your display is compatible with your graphics card and that you’ve installed the correct display software, if your display came with installation software.  If you see a sequence of two short flashes and a long flash, the display is detecting a problem with a backlighting lamp. Contact an Apple Authorized Reseller or Apple Authorized Service Provider. Problems with Your Internet Connection If you have trouble with your Internet connection, you can try the steps in this section starting with Network Diagnostics. To use Network Diagnostics: 1 Choose Apple () > System Preferences. 2 Click Network and then click “Assist me” at the bottom of the page. 3 Click Diagnostics to open Network Diagnostics. 4 Follow the onscreen instructions. If Network Diagnostics can’t resolve the problem, there may be a problem with the Internet service provider (ISP) you are trying to connect to, with an external device you are using to connect to your ISP, or with the server you are trying to access. You can also try the steps in the following section. Chapter 4 Problem, Meet Solution 75 Cable Modem, DSL, and LAN Internet Connections Make sure all modem cables are fully plugged in, including the modem power cord, the cable from the modem to the computer, and the cable from the modem to the wall jack. Check the cables and power supplies for Ethernet hubs and routers. Turn the modem off and on to reset the modem hardware. Turn off your DSL or cable modem for a few minutes, and then turn it back on. Some ISPs recommend that you unplug the modem’s power cord. If your modem has a reset button, you can press it either before or after you turn the power off and on. PPPoE Connections If you are unable to connect to your Internet service provider using PPPoE, make sure you have entered the correct information in Network preferences. To enter PPPoE settings: 1 Choose Apple () > System Preferences. 2 Click Network. 3 Click Add (+) at the bottom of the network connection services list, and choose PPPoE from the Interface pop-up menu. 4 Choose an interface for the PPPoE service from the Ethernet pop-up menu. Choose Ethernet if you are connecting to a wired network, or AirPort if you are connecting to a wireless network. 5 Enter the information you received from your service provider, such as the account name, password, and PPPoE service name (if your service provider requires it). 6 Click Apply to make the settings active. 76 Chapter 4 Problem, Meet Solution Network Connections Make sure the Ethernet cable is plugged into your computer and into the network. Check the cables and power supplies to your Ethernet hubs and routers. If you have two or more computers sharing an Internet connection, be sure that your network is set up properly. You need to know if your ISP provides only one IP address or if it provides multiple IP addresses, one for each computer. If only one IP address is used, then you must have a router capable of sharing the connection, also known as network address translation (NAT) or “IP masquerading.” For setup information, check the documentation provided with your router or ask the person who set up your network. You can use an AirPort Base Station to share one IP address among multiple computers. For information about using an AirPort Base Station, search for “AirPort” Mac Help or visit the AirPort support website at www.apple.com/support/airport. If you cannot resolve the issue using these steps, contact your ISP or network administrator. Chapter 4 Problem, Meet Solution 77 Using Apple Hardware Test You can use Apple Hardware Test to help determine if there is a problem with your computer’s hardware. To use Apple Hardware Test: 1 Disconnect all external devices from your computer except the keyboard and mouse. If you have an Ethernet cable connected, disconnect it. 2 Restart your Mac Pro while holding down the D key. 3 When the Apple Hardware Test chooser screen appears, select the language appropriate for your location. 4 Press the Return key or click the right arrow button. 5 When the Apple Hardware Test main screen appears (after about 45 seconds), follow the onscreen instructions. 6 Apple Hardware Test displays an error code if it detects a problem. Make a note of the error code before pursuing support options. If Apple Hardware Test doesn’t detect a hardware failure, the problem may be with your software. For more information, see the Apple Hardware Test Read Me file on the Mac OS X Install Disc 1. 78 Chapter 4 Problem, Meet Solution Reinstalling the Software That Came with Your Computer Use the software installation discs that came with your computer to reinstall Mac OS X and the applications that came with your computer. NOTICE: Apple recommends that you back up the data on your hard disk before restoring software. Apple is not responsible for any lost data. Installing Mac OS X To install Mac OS X: 1 Back up your important files, if possible. 2 Insert the Mac OS X Install Disc 1 that came with your computer. 3 Double-click “Install Mac OS X and Bundled Software.” 4 Follow the onscreen instructions. 5 Select the destination disk for installation and continue following the onscreen instructions. Your computer may restart and ask you to insert the next Mac OS X disc. NOTICE: Because the “Erase and Install” option erases your destination disk, you should back up your essential files before installing Mac OS X and other applications. Installing Applications To install the applications that came with your computer, follow the steps below. Your computer must have Mac OS X already installed. To install the applications: 1 Back up your important files, if possible. Chapter 4 Problem, Meet Solution 79 2 Insert the Mac OS X Install Disc 1 that came with your computer. 3 Double-click “Install Bundled Software Only.” 4 Follow the onscreen instructions. 5 Select the destination disk for installation and continue following the onscreen instructions. Note: iCal, iChat, iSync, iTunes, and Safari are part of Mac OS X. To install these applications, follow the “Installing Mac OS X” instructions above. Maximizing Ethernet Performance Your computer performs best when the Ethernet port to which it is connected is set to autonegotiate. Ask your network administrator to verify this setting. Important: If you experience connection problems on your network, make sure your network switch is set to autonegotiate, if possible. If a switch’s port is not autonegotiating, your computer detects the appropriate speed but defaults to halfduplex mode. If the switch’s port at the other end of the link is configured for fullduplex mode, a large number of late events can occur on the link. If it isn’t possible to set the switch to autonegotiate, then set the switch’s port to half-duplex. For more information, see the documentation that came with the Ethernet switch. Note: If you connect your computer directly to a configurable Ethernet switch, have your network administrator disable the spanning tree protocol on that port. Otherwise your computer may duplicate the AppleTalk address of another computer on the same network and both network connections may become unreliable. 80 Chapter 4 Problem, Meet Solution Learning More, Service, and Support If your Mac Pro needs service, take it to an Apple Authorized Service Provider or contact Apple for service. You can find more information about your Mac Pro through online resources, onscreen help, System Profiler, or Apple Hardware Test. If you didn’t order AirPort wireless technology with your Mac Pro, contact an Apple Authorized Service Provider or an Apple Store to purchase it and have it installed. Online Resources For online service and support information, go to www.apple.com/support. Choose your country from the pop-up menu. You can search the AppleCare Knowledge Base, check for software updates, or get help from Apple’s discussion boards. Onscreen Help You can often find answers to your questions, as well as instructions and troubleshooting information, in Mac Help. Choose Help > Mac Help. System Profiler To get information about your computer, use System Profiler. System Profiler shows you which hardware and software is installed, the serial number and operating system version, how much memory is installed, and more. To open System Profiler, choose Apple () > About This Mac from the menu bar and then click More Info. Apple Hardware Test You can use Apple Hardware Test to diagnose hardware problems on your Mac Pro. For more information, see “Using Apple Hardware Test” on page 78. Chapter 4 Problem, Meet Solution 81 AppleCare Service and Support Information Your Mac Pro comes with 90 days of telephone support and one year of service coverage at an Apple-authorized repair center. You can extend your coverage by purchasing the AppleCare Protection Plan. For more information, visit the website address for your country listed below. If you need further assistance, AppleCare telephone support representatives can help you with installing and opening applications, and with basic troubleshooting. Call the support center number nearest you (the first 90 days are complimentary). Have the date of purchase and your Mac Pro serial number ready when you call. Note: Your 90 days of complimentary telephone support begins on the date of purchase. Telephone fees may apply. Country Phone United States 1-800-275-2273 Website www.apple.com/support Australia (61) 133-622 www.apple.com/au/support Canada (English) (French) 1-800-263-3394 www.apple.com/ca/support www.apple.com/ca/fr/support Ireland (353) 1850 946191 www.apple.com/ie/support New Zealand 00800-7666-7666 www.apple.com/au/support United Kingdom (44) 0870 876 0753 www.apple.com/uk/support For a complete list, go to www.apple.com/contact/phone_contacts.html. Telephone numbers are subject to change, and local and national telephone rates may apply. 82 Chapter 4 Problem, Meet Solution Locating Your Serial Number System Profiler shows the serial number of your Mac Pro. Open System Profiler, located in the Utilities folder in the Applications folder, and click the System Profile tab. The serial number is also on the configuration label, which is located on the back of your Mac Pro near the video ports. Chapter 4 Problem, Meet Solution 83 5 5 What’s Under the Hood www.apple.com/macpro Mac Help System Profiler The technical specifications of your Mac Pro are included in the information that follows. Specifications Use System Profiler to find detailed information about your Mac Pro, including the amount of installed memory, hard disk size, connected devices, and product serial number. To open System Profiler, choose Apple () > About This Mac from the menu bar, and then click More Info. Processor and Memory Specifications Processor  One or two Quad-Core Intel Xeon 5400 Series processors  12 MB of on-chip L2 cache per processor  1600 MHz dual independent frontside buses Random-access memory (RAM)  Fully buffered dual inline memory modules (FB-DIMMs)  PC2-6400, 800 MHz, DDR2, FB-DIMMs  DIMMs must be installed in matched pairs of equal size and equal specification (an equal number of ICs per DIMM)  Eight DIMM slots available (four slots per memory card)  Error-correcting code (ECC)  72-bit wide, 240-pin modules  36 ICs maximum per DIMM 86 Chapter 5 What’s Under the Hood  Must contain an Apple-approved heat sink (for best acoustic performance)  Must conform to JEDEC specification (see page 43)  Maximum height of 31 mm  Nonparity Graphics Card PCI Express or PCI Express 2.0 graphics card with two dual-link Digital Visual Interface (DVI) connectors. Video Display Modes For technical specifications for your display:  Apple displays: Go to www.apple.com/displays  Non-Apple displays: Go to www.apple.com/guide Storage  Four independent 3 Gb/s Serial ATA (SATA) or Serial Attached SCSI (SAS), cable-free, direct-attach hard drive bays  Type: SAS or SATA 3 Gb/s  Width: 3.9 inches (102 mm)  Depth: 5.7 inches (147 mm)  Height: 1.0 inch  Four internal hard drive carriers Chapter 5 What’s Under the Hood 87 PCI Express Expansion  Four full-length PCI Express expansion slots (slot 1 contains the graphics card)  Slots 1 and 2 are 16-lane, PCI Express 2.0 slots  Slots 3 and 4 are 4-lane, PCI Express 1.1 slots  300 W combined maximum for all PCI Express slots SuperDrive (DVD+R DL/DVD±RW/CD-RW) Specifications  Disc diameters supported: 12 cm and 8 cm Data formats  CD-ROM  CD-Audio  CD-R  CD-RW  CD-I  CD-I Bridge  CD Extended  CD Mixed Mode  Photo CD  Video CD  Enhanced CD  DVD-Video  DVD±R  DVD±RW 88 Chapter 5 What’s Under the Hood  DVD+R DL USB Specifications  Support for Universal Serial Bus (USB) 2.0 and 1.1  Seven external USB Type A ports  Two USB 2.0 ports on the front  Three USB 2.0 ports on the back  Two USB 2.0 ports on the Apple Keyboard  Each USB port (front and rear) is on a separate 480 megabit-per-second (Mbit/s) USB channel  500 milliamperes (mA) available for a total of 1.5 A on the rear and 1.0 A on the front FireWire Specifications  Support for FireWire 400 and FireWire 800  Four external FireWire ports: one FireWire 400 port (6-pin) and one FireWire 800 port (9-pin) on both the front and back  Data transfer speed:  FireWire 400: 100, 200, and 400 Mbit/s  FireWire 800: 100, 200, 400, and 800 Mbit/s Power  Output voltage: Approximately 12 V  Output power: Up to a maximum of 28 W for all 4 ports or 12 W for any one port Chapter 5 What’s Under the Hood 89 Ethernet Specifications  IEEE 802.3 compliant  Maximum cable length: 100 meters (m)  Protocols: Open Transport, AppleShare, AppleTalk, NetWare for Macintosh, TCP/IP  Connector: RJ-45 for 10Base-T, 100Base-TX, and 1000Base-T  Media, 10Base-T: Category (CAT) 3 or higher UTP on 2 pairs up to 100 m  Media, 100Base-TX: CAT 5e UTP on 2 pairs up to 100 m  Media, 1000Base-T: CAT 5e UTP on 4 pairs up to 100 m  Channel speeds: IEEE Autonegotiation of 10Base-T, 100Base-TX, and 1000Base-T Bluetooth 2.0+EDR Specifications  Wireless data rate: Up to 3 Mbit/s  Range: Up to 10 meters or 33 feet (data rates may vary depending on environmental conditions)  Frequency band: 2.4 gigahertz (GHz) AirPort Extreme Specifications (Optional)  Frequency band: 2.4 and 5 gigahertz (GHz)  Radio output power: 20 dBm (nominal) Compatibility  802.11a, b, g, and draft n 90 Chapter 5 What’s Under the Hood Optical Digital Audio Specifications  Data format: Sony/Phillips Digital Interface (S/PDIF) protocol (IEC60958-3)  Connector type: TOSLINK optical (IEC60874-17)  Bits per sample: 16-bit or 24-bit Optical digital audio out Based on a typical situation with playback of 1 kHz, 0dBFS 24-bit sine wave, 44.1 kHz output sample rate, unless otherwise specified below.  Output sample rate: 44.1 kHz, 48 kHz, or 96 kHz  Signal-to-noise ratio: Greater than130 dB  Total harmonic distortion + noise: Less than -130 dB (0.00003 percent) Optical digital audio in Based on a typical situation with playback of 1 kHz, 0dBFS 24-bit sine wave, unless otherwise specified below.  Input sample rate: 44.1 kHz, 48 kHz, or 96 kHz  Signal-to-noise ratio: Greater than130 dB  Total harmonic distortion + noise: Less than -130 dB (0.00003 percent) Chapter 5 What’s Under the Hood 91 Analog Audio Specifications  Sample rate: 44.1 kHz, 48 kHz, or 96 kHz  Jack type: 1/8” mini  Bits per sample: 16-bit or 24-bit  Frequency response: 20 Hz to 20 kHz, +0.5 dB/-3 dB Analog audio out using the headphone jack (typical values) Based on a typical situation with playback of 1 kHz, -3dBFS 24-bit sine wave, 44.1 kHz output sample rate into 150 ohms unless otherwise specified below.  Output voltage: 1.4 volts (root mean square) (Vrms) (+5.1 dBu)  Output impedance: 24 ohms  Output power: 90 milliwatts (mW)  Signal-to-noise ratio: Greater than 90 dB  Total harmonic distortion + noise: Less than -75 dB (.02 percent)  Channel separation: Greater than 50 dB Analog audio line in (typical values) Based on a typical situation with playback of 1 kHz, -3dBFS 24-bit sine wave, 44.1 kHz output sample rate unless otherwise specified below.  Maximum input voltage: 2 Vrms (+8.2 dBu)  Input impedance: Greater than 20 kilohms  Signal-to-noise ratio: Greater than 90 dB  Total harmonic distortion + noise: Less than -85 dB (.006 percent)  Channel separation: Greater than 80 dB 92 Chapter 5 What’s Under the Hood Analog audio line out (typical values) Based on a typical situation with playback of 1 kHz, -3dBFS 24-bit sine wave, 44.1 kHz output sample rate into 100 kilohms unless otherwise specified below.  Output voltage: 1.6 Vrms (+6.3 dBu)  Output impedance: 24 ohms  Signal-to-noise ratio: Greater than 90 dB  Total harmonic distortion + noise: Less than -85 dB (.01 percent)  Channel separation: Greater than 90 dB Power Supply AC line input  Voltage ranges: 100–240 V alternating current (AC)  Current: Maximum of 12 A (low voltage range) or 6 A (high voltage range)  Frequency: 50–60 Hz Power Requirements for Expansion Cards and Peripherals Expansion cards Combined maximum power consumption for all four PCI Express slots should not exceed 300 watts (W). USB devices Each of the computer’s built-in USB ports is allotted 500 mA. FireWire devices The computer can provide up to 28 W total to the FireWire ports. Chapter 5 What’s Under the Hood 93 System Clock and Battery Your computer has CMOS custom circuitry with a long-life battery. Battery Use a 3-volt, CR 2032 Lithium coin cell replacement battery (see “Replacing the Internal Backup Battery” on page 64). Dimensions and Operating Environment Dimensions  Weight: 42.4 lbs. (19.2 kg) Weight depends on configuration. The weight above is for a basic configuration and may be greater if optional devices are installed.  Height: 20.12 inches (511 mm)  Width: 8.11 inches (206 mm)  Depth: 18.70 inches (475 mm) Operating environment  Operating temperature: 50° to 95° F (10° to 35° C)  Storage temperature: –40° to 116° F (–40° to 47° C)  Relative humidity: 5% to 95% (noncondensing)  Altitude: 0 to 10,000 feet (0 to 3048 meters) 94 Chapter 5 What’s Under the Hood 6 6 Last, but Not Least www.apple.com/environment Mac Help ergonomics This chapter provides important information about safety procedures, routine maintenance, and ergonomic considerations for using your Mac Pro and display. For your safety and that of your equipment, follow these rules for handling and cleaning your Mac Pro and for working more comfortably. Keep these instructions handy for reference by you and others. Important Safety Information WARNING: Failure to follow these safety instructions could result in fire, electric shock, or other injury or damage. The only way to disconnect power completely from your Mac Pro is to unplug the power cord from the main power supply. To disconnect your display completely, you must also unplug its power cable from the computer or power outlet. Make sure that at least one end of the device’s power cord is within easy reach so that you can unplug the computer or display when necessary. Always take the following precautions. Disconnect the power plug (by pulling the plug, not the cord), from your computer or display and disconnect the phone cord if any of the following conditions exists:  The power cord or plug becomes frayed or otherwise damaged  You spill something into the case  Your computer or display is exposed to rain or any other excess moisture  Your computer or display has been dropped or the case has been otherwise damaged 96 Chapter 6 Last, but Not Least  You suspect that your computer or display needs service or repair  You want to clean the computer or the case or screen of the display  If you plan to store your computer for an extended period of time, remove the battery. For service or questions about your warranty, contact an Apple Authorized Service Provider or Apple. Service and support information is included with your computer’s documentation. General Maintenance If you need to clean the computer or display by doing more than wiping it down with a clean cloth, follow these instructions: 1 Turn off your computer and display. 2 Disconnect the computer power cable from the electrical outlet or power strip. If your display is connected to an outlet, disconnect it as well. 3 Disconnect the display’s cables from the computer. 4 Clean the display screen with soft, lint-free paper or cloth dampened with mild soap and water. · WARNING: Do not spray liquid directly onto the display screen. Liquid could drip inside the display and cause electrical shock. Chapter 6 Last, but Not Least 97 5 Wipe the computer or display case surfaces lightly with a clean, soft cloth dampened with water. NOTICE: Don’t use alcohol, aerosol sprays, solvents, or abrasives that might damage the finish on the case. Protecting Your Optical Drive To keep your optical drive working properly:  Position your computer so that the drive tray doesn’t bump into anything when it opens.  Close the drive when you’re not using it.  Do not put anything on the drive tray when it is open.  Do not touch the optical drive lens with your fingers. Do not wipe the lens with a paper towel or other abrasive surface. If you need to clean the lens, see an Apple Authorized Service Provider for a lens cleaner.  Keep your computer away from any source of moisture. Laser Information for Optical Disc Drive · WARNING: Making adjustments or performing procedures other than those specified in your equipment’s manual may result in hazardous radiation exposure. The optical disc drive in your computer contains a laser that is safe in normal use but that may be harmful to your eyes if disassembled. For your safety, have this equipment serviced only by an Apple Authorized Service Provider. 98 Chapter 6 Last, but Not Least Maintaining Your Display To maintain your display and ensure its long life:  Do not press on the surface of the display screen.  Do not write on the screen or touch the screen with a sharp object.  If you will not be using your computer for a day or more, turn off the computer and display or use Energy Saver. Turn off your display, turn down the brightness, or use a screen saver program that dims or varies the image on the screen when the computer is idle for a prolonged time. Cleaning Your Mighty Mouse You may need to clean your mouse from time to time to remove dirt and dust that has accumulated in the scroll ball area. Hold the mouse upside-down and roll the scroll ball vigorously using a clean, soft, lint-free cloth to help dislodge any particles that may interfere with proper scrolling. Chapter 6 Last, but Not Least 99 Understanding Ergonomics Here are some tips for setting up a healthy work environment.  Use an adjustable chair that provides firm, comfortable support. Adjust the height of the chair so your thighs are tilted slightly and your feet are flat on the floor. The back of the chair should support your lower back (lumbar region). Follow the manufacturer’s instructions for adjusting the backrest to fit your body properly.  When you use the computer keyboard, your shoulders should be relaxed. Your upper arm and forearm should form an approximate right angle, with your wrist and hand in roughly a straight line. You may have to raise the chair so that your forearms and hands are at the proper angle to the keyboard. If this makes it impossible to rest your feet flat on the floor, you can use a footrest with adjustable height and tilt to make up for any gap between the floor and your feet. Or you can lower the desktop to eliminate the need for a footrest. Another option is to use a desk with a keyboard tray that’s lower than the regular work surface.  Position the mouse at the same height as the keyboard and within comfortable reach.  Arrange the display so that the top of the screen is slightly below eye level when you’re sitting at the keyboard. The best distance from your eyes to the screen is up to you, although most people seem to prefer 18 to 28 inches (45 to 70 cm). 100 Chapter 6 Last, but Not Least  Position the display to minimize glare and reflections on the screen from overhead lights and nearby windows. Shoulders relaxed Top of the screen at or slightly below eye level (You may need to adjust the height of your display by raising or lowering your work surface.) 45–70 cm (18–28 in.) Forearms and hands in a straight line Screen positioned to avoid reflected glare Forearms level or tilted slightly Clearance under work surface Lower back supported Feet flat on the floor or on a footrest Thighs tilted slightly More information about ergonomics is available on the web: www.apple.com/about/ergonomics Chapter 6 Last, but Not Least 101 Avoid Hearing Damage WARNING: Permanent hearing loss may occur if earbuds or headphones are used at high volume. You can adapt over time to a higher volume of sound that may sound normal but can be damaging to your hearing. If you experience ringing in your ears or muffled speech, then stop listening and have your hearing checked. The louder the volume, the less time required before your hearing can be affected. Hearing experts suggest that to protect your hearing:  Limit the amount of time you use earbuds or headphones at high volume  Avoid turning up the volume to block out noisy surroundings  Turn the volume down if you can’t hear people speaking to you Apple and the Environment Apple Inc. recognizes its responsibility to minimize the environmental impacts of its operations and products. More information is available on the web: www.apple.com/environment 102 Chapter 6 Last, but Not Least Regulatory Compliance Information Compliance Statement This device complies with part 15 of the FCC rules. Operation is subject to the following two conditions: (1) This device may not cause harmful interference, and (2) this device must accept any interference received, including interference that may cause undesired operation. See instructions if interference to radio or television reception is suspected. L‘utilisation de ce dispositif est autorisée seulement aux conditions suivantes : (1) il ne doit pas produire de brouillage et (2) l’utilisateur du dispositif doit étre prêt à accepter tout brouillage radioélectrique reçu, même si ce brouillage est susceptible de compromettre le fonctionnement du dispositif. Radio and Television Interference This computer equipment generates, uses, and can radiate radio-frequency energy. If it is not installed and used properly—that is, in strict accordance with Apple’s instructions—it may cause interference with radio and television reception. This equipment has been tested and found to comply with the limits for a Class B digital device in accordance with the specifications in Part 15 of FCC rules. These specifications are designed to provide reasonable protection against such interference in a residential installation. However, there is no guarantee that interference will not occur in a particular installation. You can determine whether your computer system is causing interference by turning it off. If the interference stops, it was probably caused by the computer or one of the peripheral devices. If your computer system does cause interference to radio or television reception, try to correct the interference by using one or more of the following measures:  Turn the television or radio antenna until the interference stops.  Move the computer to one side or the other of the television or radio.  Move the computer farther away from the television or radio.  Plug the computer into an outlet that is on a different circuit from the television or radio. (That is, make certain the computer and the television or radio are on circuits controlled by different circuit breakers or fuses.) If necessary, consult an Apple Authorized Service Provider or Apple. See the service and support information that came with your Apple product. Or, consult an experienced radio/television technician for additional suggestions. Important: Changes or modifications to this product not authorized by Apple Inc. could void the EMC compliance and negate your authority to operate the product. This product has demonstrated EMC compliance under conditions that included the use of compliant peripheral devices and shielded cables between system components. It is important that you use compliant peripheral devices and shielded cables (including Ethernet network cables) between system components to reduce the possibility of causing interference to radios, television sets, and other electronic devices. 103 Responsible party (contact for FCC matters only): Apple Inc. Corporate Compliance 1 Infinite Loop M/S 26-A Cupertino, CA 95014-2084 Europe–EU Declaration of Conformity See www.apple.com/euro/compliance. Korea Statements Wireless Radio Use This device is restricted to indoor use due to its operation in the 5.15 to 5.25 GHz frequency range to reduce the potential for harmful interference to cochannel Mobile Satellite systems. Mac Pro (A1186) APL-A1186 (B) Cet appareil doit être utilisé à l’intérieur. Exposure to Radio Frequency Energy The radiated output power of the AirPort Card in this device is below the FCC radio frequency exposure limits for uncontrolled equipment. This device should be operated with a minimum distance of at least 20 cm between the AirPort Card antennas and a person’s body and must not be co-located or operated with any other antenna or transmitter. FCC Bluetooth Wireless Compliance The antenna used with this transmitter must not be colocated or operated in conjunction with any other antenna or transmitter subject to the conditions of the FCC Grant. Apple Inc / Keyboard (A1243) APL-A1243 (B) Apple Inc / Mighty Mouse Bluetooth Industry Canada Statement This Class B device meets all requirements of the Canadian interference-causing equipment regulations. Apple Inc / Cet appareil numérique de la Class B respecte toutes les exigences du Règlement sur le matériel brouilleur du Canada. 104 Industry Canada Statement Mighty Mouse Complies with the Canadian ICES-003 Class B specifications. Cet appareil numérique de la classe B est conforme à la norme NMB-003 du Canada. This device complies with RSS 210 of Industry Canada. Apple Inc / Taiwan Statement VCCI Class B Statement Singapore Wireless Certification Taiwan Wireless Statements Mouse Class 1 LED Information The Apple Mighty Mouse is a Class 1 LED product in accordance with IEC 60825-1 A1 A2. It also complies with the Canadian ICES-003 Class B Specification. External USB Modem Information When connecting your Mac Pro to the phone line using an external USB modem, refer to the telecommunications agency information in the documentation that came with your modem. 105 Disposal and Recycling Information This symbol indicates that your product must be disposed of properly according to local laws and regulations. When your product reaches its end of life, contact Apple or your local authorities to learn about recycling options. For information about Apple’s recycling program, go to www.apple.com/environment/recycling. Battery Disposal Information Dispose of batteries according to your local environmental laws and guidelines. California: The coin cell battery in your product contains perchlorates. Special handling and disposal may apply. Refer to www.dtsc.ca.gov/hazardous waste/ perchlorate. Nederlands: Gebruikte batterijen kunnen worden ingeleverd bij de chemokar of in een speciale batterijcontainer voor klein chemisch afval (kca) worden gedeponeerd. Deutschland: Das Gerät enthält Batterien. Diese gehören nicht in den Hausmüll. Sie können verbrauchte Batterien beim Handel oder bei den Kommunen unentgeltlich abgeben. Um Kurzschlüsse zu vermeiden, kleben Sie die Pole der Batterien vorsorglich mit einem Klebestreifen ab. 106 Taiwan: European Union—Disposal Information The symbol above means that according to local laws and regulations your product should be disposed of separately from household waste. When this product reaches its end of life, take it to a collection point designated by local authorities. Some collection points accept products for free. The separate collection and recycling of your product at the time of disposal will help conserve natural resources and ensure that it is recycled in a manner that protects human health and the environment. 107 Looking for Something? Index A adapter 14 DVI to ADC 14 DVI to VGA 14 AirPort Extreme 35, 90 specifications 90 analog audio 92 line in 31, 92 line out 31, 92 AppleCare Service and Support 82 Apple Hardware Test 81 Apple Keyboard 27 applications Bluetooth File Exchange 35 force quit 68 freezing 70 Front Row 35 installing 79 problems 70 assistants Setup Assistant 17 audio 91 B battery 94 disposal 106 110 Looking for Something? internal backup battery 33 replacing 64 specifications 94 Bluetooth 35, 90 specifications 90 Bluetooth File Exchange 35 brightness keys 27 C CD-RW 88 changing the desktop 17 System Preferences 17 cleaning computer 97 display 97 mouse 99 computer disposal 106 computer won’t turn on 69 controls brightness 27 eject CD or DVD 27 Front Row 27 media 27 mute 27 volume 27 D Dashboard key 27 desktop, customizing 17 dimensions 94 DIMMs 33, 43, 44, 86 discharging static 40 disconnect power shut off power 96 display 14, 31, 73, 87 disposal of batteries 106 computer 106 Dock 34 downloading software 71 DVD 88 DVI display port 14, 31 E environmental impact 102 ergonomics 100 Escape key 27 Ethernet 29, 90 maximizing performance 80 specifications 90 expansion cards 93 Exposé All Windows key 27 F F1 to F19 function keys 27 FB-DIMMs 33, 43, 86 Finder 34 FireWire 25, 29, 89 connections 35 devices 93 specifications 89 Force Quit 70, 74 Front Row application 35 key 27 frozen application 70 function (fn) key 27 SuperDrive 55 Internet problems connecting 76 J JEDEC specification 43, 87 K maintenance 97 Media Eject key 27 media keys 27 memory 43 installing 43 location 33 memory cards 43 specifications 86 Mighty Mouse cleaning 99 connecting 16 Mute key 27 hand positions 100 hard disk drive 33, 51 headphone jack 25, 92 keyboard 26 connecting 16 function keys 27 keyboard extender cable 17 keys brightness 27 Dashboard 27 Escape 27 Exposé 27 Front Row 27 function 27 media 27 Media Eject 27 Mute 27 volume 27 I L P iLife 34 installing applications 79 hard disk drives 51 Mac OS X 79 memory 43 PCI Express cards 60 latch 29, 50 PCI Express expansion slots 31, 33 graphics card 33 installing cards 60 specifications 93 peripherals 93 ports 93 G general maintenance 97 graphics card 87 H M Mac Help 34 Mac OS X 34 installing 79 keeping up to date 71 N network connections 77 no image on screen 73 O online resources 81 opening your Mac Pro 39 operating environment 94 optical digital audio 31, 91 optical drive 25, 33, 51, 88 Looking for Something? 111 audio 31 display 13, 31 Ethernet 15, 29 FireWire 25, 29, 89 power 89 USB 16, 25, 29, 89 power button 17, 25 power cord 12 power requirements 93 power socket 29 power supply 93 problems connecting to Internet 76 processor 86 protective film 10 R RAM 33, 43, 86 reset the PRAM 69 S SAS drive 51 screen setting brightness 27 screen freezes 74 Serial ATA drive 51 Serial Attached SCSI drive 51 serial number 83 service and support information 82 setting up 11 shutting off power 11, 20, 39 112 Looking for Something? sleep 19, 25 software updating 71 specifications 35, 86 AirPort Extreme 90 analog audio 92 audio 91 battery 94 Bluetooth 90 Ethernet 90 expansion cards 93 FireWire 89 graphics card 87 JEDEC 43 memory 86 optical digital audio 91 optical drive 88 PCI Express cards 93 peripherals 93 power supply 93 processor 86 SuperDrive 88 system clock 94 static, discharging 40 status light 25, 70 stopping an application 70 SuperDrive 25, 33, 55, 88 system clock 94 System Preferences customizing the desktop 17 Software Update 71 System Profiler 35, 86 T technical specifications 86 telephone support 82 troubleshooting 67 typing position 100 U unable to eject a disc 69 updating software 71 USB 16, 25, 29, 89 connections 35 devices 93 specifications 89 V video display modes 87 Volume keys 27 W wireless technology 35 K Apple Inc. © 2008 Apple Inc. All rights reserved. Under the copyright laws, this manual may not be copied, in whole or in part, without the written consent of Apple. The Apple logo is a trademark of Apple Inc., registered in the U.S. and other countries. Use of the “keyboard” Apple logo (Option-Shift-K) for commercial purposes without the prior written consent of Apple may constitute trademark infringement and unfair competition in violation of federal and state laws. Every effort has been made to ensure that the information in this manual is accurate. Apple is not responsible for printing or clerical errors. Apple 1 Infinite Loop Cupertino, CA 95014-2084 408-996-1010 www.apple.com Apple, the Apple logo, Apple Cinema Display, AirPort, AirPort Extreme, AppleShare, AppleTalk, Cover Flow, Exposé, FireWire, GarageBand, iCal, iLife, iMovie, iPhoto, iPod, iTunes, Mac, Mac OS, Macintosh, Macintosh Products Guide, and SuperDrive are trademarks of Apple Inc., registered in the U.S. and other countries. Finder, the FireWire logo, iPhone, iWeb, and Safari are trademarks of Apple Inc. AppleCare and Apple Store are service marks of Apple Inc., registered in the U.S. and other countries. Mighty Mouse™ & © 2007 CBS Operations Inc. All rights reserved. The Bluetooth word mark and logos are owned by the Bluetooth SIG, Inc. and any use of such marks by Apple Inc. is under license. This product includes software developed by the University of California, Berkeley, and its contributors. Intel, Intel Core, and Xeon are trademarks of Intel Corp. in the U.S. and other countries. Other company and product names mentioned herein are trademarks of their respective companies. Mention of third-party products is for informational purposes only and constitutes neither an endorsement nor a recommendation. Apple assumes no responsibility with regard to the performance or use of these products. Manufactured under license from Dolby Laboratories. “Dolby,” “Pro Logic,” and the double-D symbol are trademarks of Dolby Laboratories. Confidential Unpublished Works, © 1992–1997 Dolby Laboratories, Inc. All rights reserved. The product described in this manual incorporates copyright protection technology that is protected by method claims of certain U.S. patents and other intellectual property rights owned by Macrovision Corporation and other rights owners. Use of this copyright protection technology must be authorized by Macrovision Corporation and is intended for home and other limited viewing uses only unless otherwise authorized by Macrovision Corporation. Reverse engineering or disassembly is prohibited. Apparatus Claims of U.S. Patent Nos. 4,631,603, 4,577,216, 4,819,098 and 4,907,093 licensed for limited viewing uses only. Simultaneously published in the United States and Canada.