1
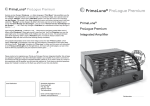
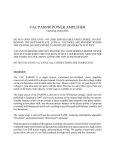
Owner’s Manual
Designed and Engineered by
Blackstar Amplification UK
IMPORTANT SAFETY INSTRUCTIONS
1. Read these instructions.
USA / Canada
2. Keep these instructions
3. Heed all warnings.
4. Follow all instructions.
5. Do not use this apparatus near water.
6. Clean only with dry cloth.
7. Do not block any ventilation openings.
Install in accordance with the manufacturer's instructions.
8. Do not install near any heat sources such as radiators, heat registers, stoves, or
other apparatus (including amplifiers) that produce heat.
9. Do not defeat the safety purpose of the polarized or grounding-type plug. A
polarized plug has two blades with one wider than the other. A grounding type
plug has two blades and a third grounding prong. The wide blade or the third
prong are provided for your safety. If the provided plug does not fit into your
outlet, consult an electrician for replacement of the obsolete outlet.
10. Protect the power cord from being walked on or pinched particularly at plugs,
convenience receptacles, and the point where they exit from the apparatus.
11. Only use attachments/accessories specified by the manufacturer.
12. Unplug this apparatus during lightning storms or when unused for long periods
of time.
13. Refer all servicing to qualified service personnel. Servicing is required when the
apparatus has been damaged in any way, such as power-supply cord or plug is
damaged, liquid has been spilled or objects have fallen into the apparatus, the
apparatus has been exposed to rain or moisture, does not operate normally, or
has been dropped.
“TO COMPLETELY DISCONNECT THIS APPARATUS FROM THE AC MAINS,
DISCONNECT THE POWER SUPPLY CORD PLUG FROM THE AC RECEPTACLE”.
“WARNING: TO REDUCE THE RISK OF FIRE OR ELECTRIC SHOCK, DO NOT
EXPOSE THIS APPARATUS TO RAIN OR MOISTURE AND OBJECTS FILLED
WITH LIQUIDS, SUCH AS VASES, SHOULD NOT BE PLACED ON THIS
APPARATUS”.
This symbol is intended to alert the user to the presence of important
operation and maintenance (servicing) instructions in the literature
accompanying the appliance.
This symbol is intended to alert the user to the presence of
uninsulated “dangerous voltage” within the product's enclosure that
may be of sufficient magnitude to constitute a risk of electric shock
to persons.
3
Warning!
If the product does not operate normally, when the operating instructions are
followed, then refer the product to a qualified service engineer.
English
READ THE FOLLOWING INFORMATION
INSTRUCTIONS FOR FUTURE REFERENCE!
CAREFULLY.
SAVE
English
Important safety information!
ALL
The U.S. Government´s Occupational Safety and Health Administration (OSHA) has
specified the following permissible noise level exposures:
Follow all warnings and instructions marked on the product!
Duration Per Day In Hours
Sound Level dBA, Slow Response
Danger! High internal operating voltages
8
90
Do not open the equipment case. There are no user serviceable parts in this
equipment. Refer all servicing to qualified service personnel.
6
92
4
95
3
97
2
100
Condensation can form on the inside of an amplifier if it is moved from a cold
environment to a warmer location. Before switching the unit on, it is recommended
that that the unit me allowed to reach room temperature.
1½
102
1
105
½
110
Unauthorised modification of this equipment is expressly forbidden by Blackstar
Amplification Ltd.
¼ or less
115
Clean only with a dry cloth.
Never push objects of any kind into ventilation slots on the equipment casing.
Do not expose this apparatus to rain, liquids or moisture of any type.
Follow all warnings and instructions marked on the product!
Do not place this product on an unstable trolley, stand or table. The product may fall,
causing serious damage to the product or to persons!
Do not cover or block ventilation slots or openings.
According to OSHA, any exposure in excess of the above permissible limits could
result in some hearing loss.
Ear plug protectors in the ear canals or over the ears must be worn when operating
this amplification system in order to prevent a permanent hearing loss if exposure is
in excess of the limits as set forth above. To ensure against potentially dangerous
exposure to high sound pressure levels, it is recommended that all persons exposed
to equipment capable of producing high sound pressure levels such as this
amplification system be protected by hearing protectors while this unit is in operation.
This product should not be placed near a source of heat such as a stove, radiator,
or another heat producing amplifier.
Use only the supplied power cord which is compatible with the mains voltage supply
in your area.
Power supply cords should always be handled carefully and should be replaced if
damaged in any way.
Never break off the earth (ground) pin on the power supply cord.
The power supply cord should be unplugged when the unit is to be unused for long
periods of time.
Before the unit is switched on, the loudspeaker should be connected as described
in the handbook using the lead recommended by the manufacturer.
Always replace damaged fuses with the correct rating and type.
Never disconnect the protective mains earth connection.
High loudspeaker levels can cause permanent hearing damage. You should therefore
avoid the direct vicinity of loudspeakers operating at high levels. Wear hearing
protection if continuously exposed to high levels.
4
All electrical and electronic products should be disposed of separately
from the municipal waste stream via designated collection facilities
appointed by the government or the local authorities.
5
English
Features
Thank you for purchasing this Blackstar Series One amplifier. Like all our products,
this amp is the result of countless hours of painstaking Research and Development
by our world-class design team. Based in Northampton (UK), the Blackstar team
are all experienced musicians themselves and the sole aim of the development
process is to provide guitarists with products which are the ultimate tools for self
expression.
The S1-200 sees the distillation of decades of guitar amplifier design experience into
the ultimate 200W valve head. Every control has been honed for maximum sonic
benefit through hundreds of hours of listening.
All Blackstar products are subjected to extensive laboratory and road testing to
ensure that they are truly uncompromising in terms of reliability, quality and above all
TONE.
The S1-200’s highly flexible four channel design features the unique DPR (Dynamic
Power Reduction) and ISF (Infinite Shape Feature) controls and although it has a
comprehensive control set, it is still simple and intuitive to use. Please read through
this handbook carefully to ensure you get the maximum benefit from your new
Blackstar product.
If you like what you hear and want to find out more about the Blackstar range of
products please visit our website at www.blackstaramps.com.
Thanks!
The Blackstar Team
English
Introduction
The S1-200 Clean Channel sets the precedent for no-compromise design, by
featuring the unique Bright / Warm switch. This modestly named control actually
reconfigures the pre-amplifier voicing and power amplifier damping to reproduce
either ringing Class A performance in the Bright mode, or crunchy Class AB tones
in the Warm setting.
Careful attention was paid to the levels of overdrive available when designing the
S1-200 Crunch Channel. We thought it important to cover the widest range of
crunch gain levels from just on the edge clean break-up, to crushing modern rhythm
tones. To this end the Crunch / Super Crunch switch alters both gain levels and tonal
shaping for maximum crunch flexibility.
The overdrive channels are characterised by a tone which is high in gain, but lacks
any of the detached top-end often found in many similar designs. This is a result of
unique preamplifier and power amplifier shaping techniques, which also benefit the
player in the way the overdrives clean up beautifully as the guitar volume is reduced.
Even at the most extreme settings, the overdrive channels remain natural sounding.
The Patent-Applied-For ISF control is unique to Blackstar Amplification and
represents a major step forward in tone shaping flexibility. The ISF control shifts the
response of the three control tone stack between at one end a US response and at
the other a UK response. Importantly, an infinite number of alternative tone choices
lies in between that would be otherwise unavailable.
Completing the tonal feature set is another unique Patent-Applied-For Blackstar
innovation – the DPR (Dynamic Power Reduction) system. DPR reduces the power
of the output stage from full power (200W) down to 10% (20W) and any power
output in between. This means that the full tonal depth of the KT88 power amplifier
can be enjoyed at any volume, making the S1-200 ideal for recording, smaller gigs
and even home practice use. Working in conjunction with the power amplifier
voltages, this method of power reduction suffers none of the loss in tone of other
power reduction systems.
The tonal flexibility of the S1-200 is augmented by full MIDI implementation of the
main channel switching functions. Used in conjunction with outboard gear such as
multi-effects units, MIDI allows a whole new level of creative performance to be
explored.
6
7
English
English
Front Panel
8. Crunch Select
Press this switch to select the Crunch Channel.
1. Input
Plug your guitar in here. Always use a good quality screened guitar lead.
9. Crunch Gain
The Crunch Gain control adjusts the amount of the Crunch Channel’s overdrive or
distortion. Low settings, counter clockwise, will deliver a clean sound on the edge
of break-up. As the Crunch Gain control is increased clockwise the sound will
become more overdriven, moving through beautiful crunch tones.
Clean Channel
2. Clean Indicator
When the green LED is on the Clean Channel is selected.
10. Super Crunch Switch
3. Clean Select
The Super Crunch switch allows the selection between a lower gain crunch with a
looser bass response (Super Crunch – out) and a higher gain crunch setting (Super
Crunch – in), which has a tighter bottom-end for modern rhythm playing.
Press this switch to select the Clean Channel.
4. Clean Gain
The Clean Gain control adjusts the amount of the Clean Channel’s overdrive or
distortion. Low settings, counter clockwise, will deliver a clean sound. As the Clean
Gain control is increased clockwise the sound will begin to break-up, delivering a
subtle overdrive.
11. Crunch Volume
This controls the volume of the Crunch Channel. Turning it clockwise increases the
volume.
Clean and Crunch Channel EQ
5. Bright / Warm Switch
The Bright / Warm Switch reconfigures both preamplifier and power amplifier circuits
to deliver Class A or Class AB style tones.
The table below describes the operation of the two modes:
Mode
Preamp Character
Power Amp Damping
Use For
Bright
Tighter bass,
chiming mids and highs
Low (greater emphasis
on lows and highs)
Ringing clean and jangly
rhythm
Warm
Looser bass, glassy
highs
Medium (tighter bottomend for crunch)
Warm cleans and crunchy
rhythms
6. Clean Volume
This controls the volume of the Clean Channel. Turning it clockwise increases the
volume.
Crunch Channel
7. Crunch Indicator
When the yellow LED is on the Crunch Channel is selected.
8
12. Bass
The Bass control adjusts the amount of low-end frequencies in your tone. This amp
has an advanced tone shaping circuit which allows the tone to be tight and cutting,
counter clockwise, to warm and thumping, clockwise.
13. Middle
The Middle control adjusts the amount of middle frequencies in your tone. The middle
frequencies are particularly important in setting the amount of ‘body’ your tone has.
With the Middle control set to its minimum position (fully counter clockwise) the
sound will be aggressive and scooped, a tone ideal for aggressive rhythm playing.
As the Middle control is increased (clockwise) the amount of ‘body’ is increased,
which is more suitable for sustained lead guitar tones.
14. Treble
The Treble control allows exact adjustment of the treble frequencies within the sound.
At low settings (counter clockwise) the sound will be warm and darker in character.
As the Treble control is increased (clockwise) the sound will become brighter. At the
maximum settings the sound will be aggressive and cutting.
9
English
Overdrive 1 and Overdrive 2 Channel EQ
The ISF control works in conjunction with the Bass,
Middle and Treble controls. It allows you to choose
the exact tonal signature you prefer. Fully counter
clockwise has a more American characteristic with a
tight bottom-end and more aggressive middle, and
fully clockwise has a British characteristic which is
more ‘woody’ and less aggressive.
24. Bass
USA
UK
Unlike conventional ‘contour’ controls and parametric equalisation systems, the
Bass, Middle and Treble controls remain interactive with each other just like in a
traditional guitar amplifier tone stack. This leads to a very familiar, musical response.
Overdrive 1 Channel
16. Overdrive 1 Channel Indicator
The Bass control adjusts the amount of low-end frequencies in your tone. This amp
has an advanced tone shaping circuit which allows the tone to be tight and cutting,
counter clockwise, to warm and thumping, clockwise.
25. Middle
The Middle control adjusts the amount of middle frequencies in your tone. The middle
frequencies are particularly important in setting the amount of ‘body’ your tone has.
With the Middle control set to its minimum position (fully counter clockwise) the
sound will be aggressive and scooped, a tone ideal for aggressive rhythm playing.
As the Middle control is increased (clockwise) the amount of ‘body’ is increased,
which is more suitable for sustained lead guitar tones.
When the orange LED is on, the Overdrive 1 Channel is selected.
26. Treble
17. Overdrive 1 Select
The Treble control allows exact adjustment of the treble frequencies within the sound.
At low settings (counter clockwise) the sound will be warm and darker in character.
Press this switch to select the Overdrive 1 Channel.
18. Overdrive 1 Gain
The Overdrive 1 Gain control adjusts the amount of the Overdrive 1 Channel’s
overdrive or distortion. Low settings, counter clockwise, will deliver a clean sound on
the edge of break-up. As the Gain control is increased clockwise the sound will
become more overdriven, moving through crunch tones until, at its maximum
position, a full distorted tone is arrived at.
19. Overdrive 1 Volume
This controls the volume of the Overdrive 1 Channel. Turning it clockwise increases
the volume.
Overdrive 2 Channel
20. Overdrive 2 Indicator
As the Treble control is increased (clockwise) the sound will become brighter. At the
maximum settings the sound will be aggressive and cutting.
27. ISF (Infinite Shape Feature)
The ISF control works in conjunction with the Bass,
Middle and Treble controls. It allows you to choose
the exact tonal signature you prefer. Fully counter
clockwise has a more American characteristic with a
tight bottom-end and more aggressive middle, and
fully clockwise has a British characteristic which is
more ‘woody’ and less aggressive.
USA
UK
Unlike conventional ‘contour’ controls and parametric equalisation systems, the
Bass, Middle and Treble controls remain interactive with each other just like in a
traditional guitar amplifier tone stack. This leads to a very familiar, musical response.
When the red LED is on, the Overdrive 2 Channel is selected.
Master
21. Overdrive 2 Select
28. Resonance
Press this switch to select the Overdrive 2 Channel.
The Resonance control sets the overall bass response of the S1-200. At lower
settings the cleans will be tight and funky and overdrives will be focussed in their
bass response. At increased settings the clean sounds will be become full and warm,
whilst the crunch and overdrive tones will be more bass heavy and resonant.
22. Overdrive 2 Gain
The Overdrive 2 Gain control adjusts the amount of the Overdrive 2 Channel’s
overdrive or distortion. Low settings, counter clockwise, will deliver a clean sound on
the edge of break-up. As the Gain control is increased clockwise the sound will
become more overdriven moving through crunch tones until, at its maximum
position, there is a full distorted lead tone.
English
15. ISF (Infinite Shape Feature)
29. Presence
The Presence control sets the overall treble response of the S1-200. Percussive
high-end can be accentuated on clean sounds and the amount of aggressive treble
controlled with crunch and overdrive settings.
23. Overdrive 2 Volume
This controls the volume of the Overdrive 2 Channel. Turning it clockwise increases
the volume.
10
30. Volume
This controls the overall volume of your amplifier. Turning it clockwise increases the
volume.
11
English
Crunch DPR Operation
The DPR control allows the output power of the S1-200 to be reduced anywhere
from 200W (100%) down to 20W (10%) of the rated power.
The DPR control allows you to pin-point exactly how much valve overdrive you want
to come from the preamplifier section and how much is coming from the KT88s in
the power amplifier section.
DPR works by controlling the power supply voltages to the KT88
output valves and also the level of drive signal into the power
amplifier stage. Importantly, there are no components placed in
between the output valves, the output transformer and the
loudspeaker – a relationship which is essential in the delivery of
valve tone.
In addition to reducing the output power of the S1-200, the DPR
system actually controls the amount of power amplifier
compression too. Power amplifier compression is a key
ingredient in the characteristics of low powered valve amplifier
tone and gives a very playable ‘feel’ to the S1-200 at reduced
power settings.
Channel
Channel
Gain
Channel
Volume
Master
Volume
DPR
Description/
Sound Character
Crunch
Low/Mid
Mid
Mid
High
Lower gain settings provide a dynamic
crunch utilising the full 200W of
available headroom.
Crunch
Mid
High
High
Mid
At these settings there is a blend of the
distortion and compression generated
in the preamplifier and power amplifier
valves. We recommend that you
experiment to find your ‘sweet-spot’.
Crunch
High
Mid
Mid
Low
Here maximum preamplifier gain is
combined with the lowest power
amplifier output for maximum valve
saturation.
We would recommend experimenting with the channel Gain and Volume, Master
Volume and DPR Control to achieve various combinations of preamplifier and power
amplifier distortion / compression.
English
31. DPR (Dynamic Power Reduction)
Overdrive DPR Operation
Note: Generally speaking the more DPR is applied (i.e. power is reduced) the more
dynamic compression and power amp clipping will be experienced at any given
volume.
Clean DPR Operation
The DPR control is extremely powerful in fine-tuning the exact dynamic compression
characteristics of the power amplifier.
Channel
Channel
Gain
Channel
Volume
Master
Volume
DPR
Description/
Sound Character
Clean
Low
Mid
Mid
High
Maximum pre and power amplifier
headroom yields extremely dynamic
clean sounds.
Clean
Low
High
High
Low
Increasing drive to the power amplifier
and reducing output power gives a
compressed clean sound rich in power
amplifier induced harmonics.
Clean
High
High
High
Low
Higher channel gain further increases
the power amplifier drive producing a
‘full stack’ crunch tone at only 20W
output power.
The DPR control allows you to add power amplifier compression to your high gain
lead and rhythm tones. This is superb for encouraging really fluid lead playing rich in
power amplifier sustain and feel.
Channel
Channel
Gain
Channel
Volume
Master
Volume
DPR
Description/
Sound Character
Overdrive
Mid
Mid
Mid
High
The maximum headroom from the
KT88 power amplifier will yield
incredibly tight and dynamic overdrive
at extreme volume settings.
Overdrive
High
Mid
Mid
Low
With maximum overdrive gain there is
loads of sustain from the preamplifier
which is augmented by the increased
power amplifier compression as the
DPR is set to minimum. Again, we
recommend that you experiment to find
your ‘sweet-spot’.
32. Power Indicator Light
The power indicator will light when the amplifier is switched on.
33. Standby
This switch enables the output stage. Always turn this switch on at least 30 seconds
after the Power switch (34). During short breaks in playing use just this switch to
turn ‘off’ and ‘on’ the amplifier’s output.
34. Power
This switch is used to turn the amplifier on and off. You should always turn this switch
on before turning on the Standby switch (33).
12
13
English
Program Change Assignment
The Series One offers the ability to control channel selection via MIDI Program
Change messages and interfacing with most MIDI controllers is a straight forward
process. The Series One can be placed in a MIDI chain allowing you to
simultaneously select a channel on the amplifier and change the patch on a MIDI
effects processor connected to the effects loop. There are 128 available Program
Changes, giving you the possibility to access a vast number of tonal combinations.
To change the default assignments and set the amp up to respond to a different set
of Program Changes:
To set-up MIDI channel switching, simply connect the MIDI controller’s MIDI Out
socket to the MIDI In socket on the rear of the amplifier. The controller should be set
to transmit Program Change messages (this is usually the case). From new, a Series
One amplifier is set to OMNI mode and responds to Program Change messages on
all MIDI channels. Changing ‘patches’ on the controller will change the selected
channel on the amp. The default settings for each Program Change number are
shown in the table below:
3. Press and hold in the appropriate front panel Channel Select switch for
2 seconds.
CLEAN
CRUNCH
OVERDRIVE
OVERDRIVE
CLEAN
CRUNCH
OVERDRIVE
OVERDRIVE
CLEAN
CRUNCH
OVERDRIVE
OVERDRIVE
CLEAN
CRUNCH
OVERDRIVE
OVERDRIVE
CLEAN
CRUNCH
OVERDRIVE
OVERDRIVE
CLEAN
CRUNCH
OVERDRIVE
OVERDRIVE
CLEAN
CRUNCH
OVERDRIVE
OVERDRIVE
CLEAN
CRUNCH
OVERDRIVE
OVERDRIVE
1. The amp must be powered on with either the Standby switch set to on, a jack
in the Input socket, or both.
2. Send the appropriate Program Change message to the amp.
The corresponding channel will be selected and its LED will flash three times in quick
succession to indicate it has been assigned to the last received Program Change.
The amplifier will now remember the selection. Repeat the operation until all your
Program Changes have the desired amp channel assigned to them.
MIDI Receive Channel Selection
Program Channel
Change
1
2
3
4
5
6
7
8
9
10
11
12
13
14
15
16
17
18
19
20
21
22
23
24
25
26
27
28
29
30
31
32
English
MIDI Channel Switching
1
2
1
2
1
2
1
2
1
2
1
2
1
2
1
2
33
34
35
36
37
38
39
40
41
42
43
44
45
46
47
48
49
50
51
52
53
54
55
56
57
58
59
60
61
62
63
64
CLEAN
CRUNCH
OVERDRIVE
OVERDRIVE
CLEAN
CRUNCH
OVERDRIVE
OVERDRIVE
CLEAN
CRUNCH
OVERDRIVE
OVERDRIVE
CLEAN
CRUNCH
OVERDRIVE
OVERDRIVE
CLEAN
CRUNCH
OVERDRIVE
OVERDRIVE
CLEAN
CRUNCH
OVERDRIVE
OVERDRIVE
CLEAN
CRUNCH
OVERDRIVE
OVERDRIVE
CLEAN
CRUNCH
OVERDRIVE
OVERDRIVE
1
2
1
2
1
2
1
2
1
2
1
2
1
2
1
2
65
66
67
68
69
70
71
72
73
74
75
76
77
78
79
80
81
82
83
84
85
86
87
88
89
90
91
92
93
94
95
96
CLEAN
CRUNCH
OVERDRIVE
OVERDRIVE
CLEAN
CRUNCH
OVERDRIVE
OVERDRIVE
CLEAN
CRUNCH
OVERDRIVE
OVERDRIVE
CLEAN
CRUNCH
OVERDRIVE
OVERDRIVE
CLEAN
CRUNCH
OVERDRIVE
OVERDRIVE
CLEAN
CRUNCH
OVERDRIVE
OVERDRIVE
CLEAN
CRUNCH
OVERDRIVE
OVERDRIVE
CLEAN
CRUNCH
OVERDRIVE
OVERDRIVE
1
2
1
2
1
2
1
2
1
2
1
2
1
2
1
2
97
98
99
100
101
102
103
104
105
106
107
108
109
110
111
112
113
114
115
116
117
118
119
120
121
122
123
124
125
126
127
128
CLEAN
CRUNCH
OVERDRIVE
OVERDRIVE
CLEAN
CRUNCH
OVERDRIVE
OVERDRIVE
CLEAN
CRUNCH
OVERDRIVE
OVERDRIVE
CLEAN
CRUNCH
OVERDRIVE
OVERDRIVE
CLEAN
CRUNCH
OVERDRIVE
OVERDRIVE
CLEAN
CRUNCH
OVERDRIVE
OVERDRIVE
CLEAN
CRUNCH
OVERDRIVE
OVERDRIVE
CLEAN
CRUNCH
OVERDRIVE
OVERDRIVE
1
2
1
2
As mentioned previously, the default mode is set to OMNI and the amplifier will
respond to MIDI Program Changes on all MIDI channels. You may wish to set the
amplifier to respond to Program Changes on just a single MIDI channel. The Series
One can be set to respond in this way for any of the first seven MIDI channels as
follows:
1. The unit must be in standby (Power (34) on and Standby (33) off), and no lead
connected to the Input jack.
1
2
2. Simultaneously press and hold the Clean (3) and OD1 (17) Select switches.
1
2
3. After 2 seconds the LED for OD2 (20) will begin to flash continuously (2 flashes
per second) to indicate that the unit is in MIDI Receive Channel Program Mode.
1
2
4. Release the Clean (3) and OD1 (17) Select switches and select the required MIDI
channel by using the Channel Select switches as shown in the table below:
1
2
1
2
1
2
Clean
Crunch
OD1
MIDI CHANNEL
OFF
OFF
OFF
OMNI
ON
OFF
OFF
1
OFF
ON
OFF
2
ON
ON
OFF
3
OFF
OFF
ON
4
ON
OFF
ON
5
OFF
ON
ON
6
ON
ON
ON
7
The corresponding Channel Select LEDs will illuminate to show the selection and
each press of the Channel Select switches will toggle the state of its associated
LED.
5. To store the desired selection press the OD2 (21) Select switch. The OD2 (20)
Select LED will flash quickly four times when the operation is complete. The unit
will then revert to normal operation, and will respond only to Program Changes
on the newly selected MIDI Channel.
14
15
CAUTION!: TO REDUCE THE RISK OF ELECTRIC SHOCK DO NOT REMOVE COVER. NO USER
SERVICEABLE PARTS INSIDE. REFER SERVICING TO QUALIFIED SERVICE PERSONNEL.
ATTENTION!: POUR EVITER LES RISQUES DE DECHARGES ELECTRIQUES, NE PAS OUVRIR LE
COUVERCLE. CET APPAREIL NE COMPORTE AUCUNE PIECE SUSCEPTIBLE D’ETRE REPAREE PAR
VOS SOINS. FAITES TOUJOURS APPEL A UN TECHNICIEN QUALIFIE POUR TOUTE REPARATION.
WARNING!: SHOCK HAZARD. DO NOT OPEN. TO REDUCE THE RISK OF FIRE OR ELECTRIC SHOCK
DO NOT EXPOSE THIS EQUIPMENT TO RAIN OR MOISTURE. THIS APPARATUS MUST BE EARTHED.
AVIS!: RISQUE DE CHOC ELECTRIQUE. NE PAS OUVRIR. POUR EVITER LES RISQUES D’INCENDIE ET
DE DECHARGES ELECTRIQUES, N’EXPOSEZ JAMAIS CET APPAREIL A L’HUMIDITE OU A LA PLUIE.
CONNECTER CET APPAREIL A LA TERRE.
MODEL: S1-200
EMULATED OUTPUT
MIDI
IMPEDANCE
4Ω
MAINS FUSE H.T. FUSE
8Ω
Designed and Engineered by
16Ω
Blackstar Amplification Ltd
OUTPUT
VALVES FUSE
Made under license in Korea
FOOTSWITCH
THRU
N16549
100V~50/60Hz
500 WATTS
1
T1AL 250V
230V/240V - T3.15AL 250V
100V/120V - T6.3AL 250V
2
3
F1A 250V
LEVEL
Northampton, England
IN
5
6
MIDI Dump Out
You may wish to back up the MIDI channel select settings so you can transfer them
to another amplifier, for example. To do this you will need a MIDI Sysex librarian,
which is usually a piece of software running on a PC or MAC with a suitable MIDI
interface.
1. The unit must be in standby (Power (34) on and Standby (33) off), with no lead
connected to the Input jack and the MIDI Thru on the rear of the amplifier
connected to the MIDI In of the recording device.
2. Simultaneously press and hold the Crunch (8) and OD2 (21) Select switches.
After 2 seconds the LED for OD1 (16) will flash continuously to indicate that the
unit is in MIDI Dump Mode.
3. Prepare the receiving equipment for the transfer. For example, if using a MIDI
Sysex librarian this must be put into file receive mode.
4. Start the file transfer by pressing and quickly releasing the OD1 (17) Select
switch. During the file transfer the OD1 (16) Select LED will flash quickly. When
the flashing stops the transfer operation is complete and the amplifier will revert
to normal operation. The file should be saved as a MIDI System Exclusive file.
7
+4dBV
-10dBV
CONNECT SPEAKERS BEFORE USE
OUTPUT: 200 WATTS RMS
This device complies with Part 15 of the FCC Rules. Operation is subject to thefollowing two
conditions: (1) this device may not cause harmful interference, and (2) this device must accept
any interference received, including interference that may cause undesired operation.
This Class B digital apparatus complies with Canadian ICES-003.
Cet appareil numérique de la classe B est conforme à la norme NMB-003 du Canada.
4
English
English
MAINS INPUT
EFFECTS LOOP
SPEAKER OUTPUTS
WARNING!: RISK OF HAZARDOUS ENERGY
AVIS!: ENERGIE ELECTRIQUE DANGEREUSE!
8
9
RETURN
SEND
WARNING!: DO NOT OBSTRUCT VENTILATION GRILLES
ATTENTION!: NE PAS OBSTRUER LES GRILLES DE VENTILATION
10
11
12
13
Rear Panel
1. Mains Input
The supplied detachable mains lead is connected here. The lead should only be
connected to a power outlet that is compatible with the voltage, power and
frequency requirements stated on the rear panel. If in doubt get advice from a
qualified technician.
2. Mains Fuse
The value of the Mains Fuse is specified on the rear panel. Never use a fuse of the
incorrect value or attempt to bypass it.
3. H.T. Fuse
The value of the H.T. Fuse is specified on the rear panel. Never use a fuse of the
incorrect value or attempt to bypass it.
4. Output Valves Fuse
The value of the Output Valves Fuse is specified on the rear panel. Never use a fuse
of the incorrect value or attempt to bypass it.
MIDI Dump In
5. Footswitch
To load in previously saved Program Change assignments:
The supplied footswitch is connected here. The footswitch enables you to switch
between the Clean, Crunch, Overdrive 1 and Overdrive 2 channels.
1. Connect the MIDI Out of the MIDI recording device to the MIDI In on the rear of
the amplifier and use the MIDI Sysex librarian to send the previously stored MIDI
System Exclusive file.
6. MIDI Thru
The amplifier overwrites the current Program Change assignments with the new
ones. If the operation completes successfully all four channel LEDs flash quickly four
times. If the dump is unsuccessful or incomplete the four LEDs will flash slowly in an
alternating pattern and then the unit will revert to normal operation.
Any MIDI data received at the MIDI In socket is passed out of the MIDI Thru socket
so that other MIDI devices can be placed in a chain. The MIDI Thru socket also
serves as a way of dumping Channel Select/Program Change data to a suitable MIDI
storage device. Refer to the MIDI Channel Switching section for more details. Always
use a good quality MIDI lead.
Note: During reception of the System Exclusive file the amplifier will temporarily
cease to pass data to the MIDI Thru socket.
7. MIDI In
Restoring Factory Settings
If channel switching using MIDI is required, connect the MIDI device here. Refer to
the MIDI Channel Switching section for more details. Always use a good quality MIDI
lead.
To return the amplifier to its factory default state:
1. With the amplifier Power off, press and hold in the Crunch (8) and OD2 (21)
Select switches.
2. While holding in the switches turn on the amplifier. After 2 seconds all channel
select LEDs flash once to confirm the factory defaults have been restored.
16
17
English
Technical Specification
This control matches the amplifier’s impedance to that of the connected speakers.
Always ensure that the selected impedance matches that of the speaker cabinets
connected. See table below.
Power (RMS): 200 Watts
English
8. Impedance Selector
Valves: 4 x KT88, 4 x ECC83, 1 x ECC82
Cabinets Connected
Impedance Selected
1 x 16 Ohm cabinet
16 Ohms
2 x 16 Ohm cabinets
8 Ohms
Dimensions (mm): 705 x 285 x 278.5
1 x 8 Ohm cabinet
8 Ohms
Footswitch: FS-3 supplied
2 x 8 Ohm cabinets
4 Ohms
1 x 4 Ohm cabinet
4 Ohms
Weight (kg): 27.2
A speaker cabinet of less than 4 Ohms, or 2 x 4 Ohm cabinets, should not be used
together with this amplifier.
WARNING: The amplifier must always be completely powered down before
adjusting the setting of the Impedance Selector. Failure to do this, or to correctly
match the impedance of the amplifier and speakers, will damage the amplifier.
9. Speaker Outputs
There are two parallel speaker outputs for connecting external speaker cabinets.
When connecting speakers always ensure that the Impedance Selector (8) is set
correctly.
10. Speaker Emulated Output
This output emulates the tonal characteristics of a guitar speaker cabinet and
provides a natural valve overdrive tone for connection to a recording device or mixing
desk. Always use a good quality screened lead. There is both a jack and a balanced
XLR output.
NOTE: To ‘silently’ record, turn the amp to standby mode. You may also record from
this output while in standby mode without a loudspeaker connected, but ensure that
no loudspeaker leads are connected to either of the loudspeaker output jack sockets
of the amplifier, as this will defeat the load protection circuit and cause damage to
the amplifier.
11. Effects Loop Level
The Effects Loop Level switch sets the effects loop to either +4dBV/-10dBV, which
enables you to use it with either professional equipment (+4dBV setting), or with
guitar level effects such as effects pedals (-10dBV setting).
12. Effects Loop Return
Connect the (mono) output of an external effects unit here.
13. Effects Loop Send
Connect the (mono) input of an external effects unit here.
18
19
Español
English
Deutsch
Français
Español
Français
Japanese
Japanese
Deutsch
82
English
Manufacturer: Blackstar Amplification
Date: 18-03-09
Model: Series One
Version: 1.0
+------------------------------------------------------------------------+
:
: Transmitted
:
Recognized
:
Remarks
:
:
Function ...
:
:
:
:
:---------------------+-----------------+----------------+---------------:
:Basic
Default
: : Omni
:
:
:Channel Changed
:
: 01-07
:
:
:---------------------+-----------------+----------------+---------------:
:Mode
Default
:
:
:
:
:
Messages
:
:
:
:
:
Altered
:
:
:
:
:---------------------+-----------------+----------------+---------------:
:Note
:
:
:
:
:Number
True Voice : :
:
:
:---------------------+-----------------+----------------+---------------:
:Velocity Note On
: : :
:
:
Note Off
: :
:
:
:---------------------+-----------------+----------------+---------------:
:Touch
:
:
:
:
:
Keys Chans : : :
:
:---------------------+-----------------+----------------+---------------:
:Pitch Bender
: : :
:
:---------------------+-----------------+----------------+---------------:
:Control
:
:
:
:
:Change
:
:
:
:
:---------------------+-----------------+----------------+---------------:
:Program
:
:
:
:
:Change True#
:
: 0-127
:
:
:---------------------+-----------------+----------------+---------------:
:System Exclusive
: File Dump
: File Dump
:
:
:---------------------+-----------------+----------------+---------------:
:System Song Pos.
:
:
:
:
:Common Song Sel.
:
:
:
:
:
Tune
:
:
:
:
:---------------------+-----------------+----------------+---------------:
:System Clock
:
:
:
:
:Real Time Messages
:
:
:
:
:---------------------+-----------------+----------------+---------------:
:AUX
Local Control:
:
:
:
:
All Notes Off:
:
:
:
:
Active Sense :
:
:
:
:
Reset
:
:
:
:
:---------------------+-----------------+----------------+---------------:
:Notes
:
:
:
:
:
:
:
:
:
:
:
:
:
:
:
:
:
:
:
:
:
:
:
:
:
:
+---------------------+-----------------+----------------+---------------+
83
HBK-1017
01/09
Blackstar Amplification Ltd, Beckett House, 14 Billing Road, Northampton, NN1 5AW, UK
For the latest information go to: www.blackstaramps.com
Whilst the information contained herein is correct at the time of publication, due to our policy of constant improvement
and development, Blackstar Amplification Ltd reserves the right to alter specifications without prior notice.