1
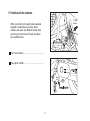
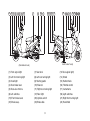
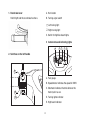
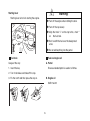
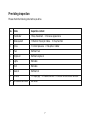
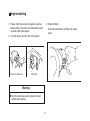
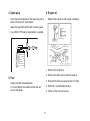
BT49QT-9 – User Manual, Service Schedule & History
Introduction
Welcome to your new BAOTIAN BT49QT-9, which has been developed by BAOTIAN MOTORCYCLE
INDUSTRIAL CO. LTD. We hope you enjoy your new Baotian BT49QT-9.
This owner’s handbook contains information necessary:
• to enable you to get to know your Baotian BT49QT-9, to use it to the best advantage and to benefit from
all the latest developments which it incorporates.
• to ensure that it always give the best performance by following the simple, but strict, advice concerning
regular maintenance.
• to enable you to deal quickly with minor faults not requiring specialist attention.
It is well worth taking a few minutes to read this handbook to familiarise yourself with the information and
guidelines it contains about the BT49QT-9 and its features. If certain points are still unclear, the technicians at
your local Baotian dealer will be only too pleased to provide you with any additional information you require.
IMPORTANT
Please make sure that an initial inspection is conducted after the first 300 km
and thereafter in accordance with service schedule.
This motorcycle has been designed and manufactured in full compliance with EU Safety Standards.
The maximum speed is 45km/h. Do not change any parts without professional advice.
CONTENTS
Guidance............................................................................................................................................................1
Names of parts...................................................................................................................................................4
Controlling parts.................................................................................................................................................5
Starting lever......................................................................................................................................................6
Fuel tank ............................................................................................................................................................6
Fuel and oil .......................................................................................................................................................6
Pre-riding inspection ..........................................................................................................................................7
Engine starting .................................................................................................................................................. 8
Running-in..........................................................................................................................................................9
Regular maintenance.......................................................................................................................................10
Technical Parameters .....................................................................................................................................15
Electrical Circuit Chart .....................................................................................................................................17
Guidance
Please keep safety in mind and observe the regulations of transportation while enjoying your ride.
Pay attention to the following rules:
1. Pre-riding inspection
Please read the details in the relevant chapter for
your safety.
IMPORTANT
It is dangerous to drive on wet roads.
Do not make any abrupt turning while
accelerating and keep a safe distance from
other vehicles on the road.
2. Helmet
Do wear a helmet at all times while riding the
motorcycle.
3. Being familiar with motorcycle operation
It is of great importance to ensure your safety at
all times, especially whilst becoming familiar with
your motorcycle .
4. Speed limitation
Drive at appropriate speed for the road
conditions, the weather and your driving skill.
1
5. Positions of the numbers
Frame
number
When your motorcycle needs to be inspected,
repaired or undertake any service, these
numbers will assist your Baotian Dealer when
servicing your motorcycle. Please note down
your numbers here:
The frame number: ................................................
The engine number: .............................................
139QMB
¡ îXXXXXX
XXX¡
2
î
22 23
1 2 3 4 5 6
7
8
24
10 11 12 13
9
drum brake/1 seat)
(Disk brake/2 seat)
(1) Front signal light
(2) Left front turning light
(3) Head light
(4) Rear brake lever
(5) Rear-view mirrors
(6) Left switches
(19) Front brake lever
(22) Brake assy.
14 15 16 17 18 19
(7) Seat lock
(8) Left rear turning light
(9) Starting pedal
(10) Silencer
(11) Right rear turning light
(12) Rear light
(20) Ignition switch
(23) Brake disk.
3
(13 Rear signal light)
(14) Stand
(15) Helmet hook
(16) Throttle control
(17) Instruments
(18) Light switches
(21) Right front turning light
(24) Hand-hold
1. Rear brake lever
A. Horn button
Hold it tight and the rear brake functions
B. Turning signal switch
Left turning light
➯
➯ Right turning light
C. Switch for high/low beam lights
3 Instruments and indicating lights
A
2. Switches on the left handle
40
F
50
10
E
60
30
70
20
E
D
C
B
30
20
80
40
10
50
km/h
Mph
0
C
A. Fuel gauge.
B. Speedometer indicates the speed in KM/H.
C. Odometer indicates the total distance the
motorcycle has run.
B
A
D. Turning lights indicator.
E. High beam indicator.
4
4. Front brake lever
6. Ignition switch
Press it tightly and the front brake functions.
5. Switches on the right handle
OFF
A
B
ON
A. Head light switch
B. Ignition button
The whole circuit is cut. Engine and lights
cannot be operated and the key can be
withdrawn.
Engine can be started and all the lights can
be operated. The key cannot be withdrawn.
LOCK Turn the steering handle fully to the left,
slightly press the key and turn it to the
position lock . Then the key can be taken
out.
When the ignition switch is at ON position, hold
the brake and push the button ,and then the
engine starts.
5
Warning:
Starting lever
Starting lever is for kick starting the engine.
◆ Turn off the engine when refilling the tank.
◆ Turn off the cap slowly.
◆ Align the mark “△” on the cap to the , mark“ ”
on the fuel tank.
◆ Don’t overfill the fuel over the designated
scale
◆ Do not add anything into the petrol.
①
Fuel tank
Fuel and engine oil
Usage of the cap:
A. Petrol
1. Insert the key.
Ensure unleaded petrol is used at all times.
2. Turn it clockwise and take off the cap.
3. Fix the notch and then press the cap on.
B. Engine oil
SAE-15w/40
6
Pre-riding inspection
Please check the following parts before you drive.
No.
Items
Inspection content
2
Brake system
1.Check for fraying of cables.
1
3
Handle bar
Tyres
4
Fuel
6
Lights
5
7
8
9
10
1.Easy movement. 2. No loose appearance
1. Correct pressure. 2. No splits in rubber
Sufficient fuel
Engine oil
Sufficient engine oil
Horn
Workable
Workable
Gear oil
Sufficient oil
All the bolts and nuts
Not loose.
Throttle
2. Easy function
1. Proper gap
2. Flexible function 3. Smooth throttle control function.
7
Engine starting
1. Please check the volume of engine oil and fuel
before starting. The main stand should be stood
up while starting the engine.
3. Engine Starting
Push the starter button and then the engine
starts.
2. Turn the ignition switch to the “ON” position.
Press the rear brake lever
“ON” position
Warning:
◆ Grip the rear brake lever to prevent forward
motion whilst starting
8
Warning:
Warning:
◆ 5 seconds is the maximum limit for each
starting and 10 seconds is the minimum
interval.
◆ After the engine has started, the kick start
pedal should be taken back to its original
position. Otherwise, it will affect the driver’s
safety.
◆ Stop pressing the starting button immediately
after the engine starts.
◆ Don’t start the engine in enclosed spaces, as
this can create Carbon Monoxide which can
cause loss of life.
◆ Do not press the starting button while the
engine is running, or the starter motor will be
damaged.
◆ The electric start will not operate without the
brake lever applied firmly.
Running in
To maintain your motorcycle running in a good
condition, please follow the below rules during the
new running-in period.
◆ When using electric starting, don’t operate the
starting motor continually, or it may cause
damage to the starter motor and the battery.
◆ Warm up the engine after cold starting (about
3 minutes).
Distance (km)
Speed limitation (km/h)- (mph)
200-1000
35
0-200
4. Kick Starting
Grip the brake lever, kick the kick start pedal
downwards 2 or 3 times in rapid succession.
1000——-
9
25
≤45
3. Air cleaner
1. Battery
•
12V/4Ah battery
•
Place the ignition switch to OFF position before
battery replacement.
•
•
•
When the voltage is less than 11.5V, please use
kicking start in stead of electric starting.
Electrode identification: “+”-red line, “-“-black line.
Replace the battery every 4 years.
•
2. Carburetor and idle speed adjustment
•
•
Keep the engine warmed up for 2-3 minutes.
•
Adjust the idling speed screw to set the engine at
speed if abort 1800rpm.
•
•
Idling speed adjusting screw
10
Pour a non-inflammable detergent into a basin
and immerse the core of air cleaner into the
detergent for cleaning.
Press the core to squeeze the detergent out of it
by the palms. Never twist it in case that it is
broken.
Immerse the core into engine oil.
Squeeze excessive oil out, but keep it lightly oil
immersed.
4. Spark plug
•
Clean the carbon deposit on the spark plug with a
piece of hard wire or steel needle.
•
Use (NGK) C7HSA when replacement is needed.
•
6. Engine oil
Replace the engine oil with engine warmed up.
Adjust the gap to 0.6-0.7mm with a feeler gauge.
1. Remove the oil dipstick.
2. Remove the drain plug to drain the used oil.
5. Fuel
3. Reinstall the drain plug ensuring that it is tight.
Always refill with unleaded petrol.
Try to refill before the needle reaches the red
zone of the gauge.
4. Refill 0.8 L recommended fresh oil.
5. Fasten all the nuts and screws.
11
7. Brake system
_
Normal free travel of the brake lever is about
10-20mm.
Warning:
IMPORTANT
Please make sure that an initial inspection is
conducted after the first 300 km and thereafter
every 1000km for regular servicing.
1. The front brake (disk brake)
Disk brake
•
2. The rear brake (drum brake)
Turn the adjusting nut to get a proper travel.
•
•
•
•
12
Grip the brake lever and check the wear and tear
indicator. If the indicator nearly touched the brake
disc, please ask your Baotian Dealer to change
the brake pads.
Check the following items of brake system before
driving the motorcycle:
Check if there are any leakages.
Check if there are any leakages or cracks on the
hydraulic hose.
The brake lever should be kept with a certain free
travel of 10_20mm.
Wear of the brake pads..
8. Tyres
Brake fluid level
•
•
It has been filled with the special brake fluid
before the motorcycle leaves the factory. Fluid
should only ever be replace or filled with DOT4
brake fluid. Never replace or mix other fluids,
otherwise it will damage the brake system.
Insufficient tyre pressure increases wear to them
and affects the riding stability. Please check the tyre
pressure and tread depth when carrying out regular
maintenance.
•
If the brake fluid level is insufficient, it might be
possible for air to enter into the brake system and
result in brake failure
•
Tyre pressure: front 250 KPa, rear 250 KPa.
Tread depth: It is suggested to replace a tyre
when the tread depth is less than 1.6mm.
Warning:
Warning:
◆ The standard tyre is 120/70-12 56J for front
and 130/70-12 58J for rear tyres. Another type
of tyre may cause instability
◆ Brake fluid is a corrosive material. It causes
damage to all painted material.
◆ If fluid is sprayed on the skin or eyes, it should
be washed immediately with clean cold water
and medical advice sought.
◆ Tyre inflation pressures and the general tyre
condition are extremely important to the
performance and safety of the motorcycle.
13
How to change gear oil
9. Starter motor
Check the fastening bolts and the contact
brushes, and replace them if necessary.
An inline fuse is located in the live wire from the
battery. When a light or circuit fails suddenly,
please check the fuse first.
•
•
Take out the oil drain plug, let out all the dirty
gear oil.
•
•
11. Gear oil
•
Stand up the main stand.
•
10. Fuse
•
•
Please use the recommended gear oil:
SAE 5W/90
Take off the oil plug for refill.
Tighten the oil drain plug.
Refill with fresh gear oil and tighten the oil refill
plug.
After supplement, please make sure you have
locked the oil screw.
Total capacity: 110ml
Replacing capacity: 100ml
14
Technical Parameters
Size
Weight
Capacity
Circuit system
Length
Width
Height
Wheel base
Min. distance above ground
1660mm
680mm
1070mm
1195mm
80mm
Unloaded weight
Loaded weight
Mass weight
85kg
75km / 150kg (1 seat / 2 seats)
165kg / 235kg (1 seat / 2 seats)
Spark plug
Battery
Fuse
Headlight
Turning lights
Brake light
Indicating lights
(NGK) C7HSA
12V / 4AH
10A
12V 35W
12V 10W
12V 21W / 8W
12V 5W
Max. Speed
Min Speed
Slope
Turning Circle
Dia. of turning circle
45km/h (e-mark) or 60 km/h
≤1.8km/h
≥6º
≥45º
≤ 3200mm
15
Volume of the fuel tank
Volume of the engine oil tank
Engine
Frame
Suspension
Regular maintenance
6.5L
1L
Model
Type
Cylinder
Bore and stroke
Cylinder volume
Compression ratio
Max. power
Max. torque
Carburetor
Air cleaner
Ignition type
Starting mode
Cooling mode
Lubrication
BT139QMB
4 stroke
1
39 x 41.5mm
49.5ml
10.5:1
2.2 kW / 7500 (r/min)
2.9 NM / 7000 (r/min)
PZ18J
Polyurethane plastic core
CDI
Electric / kick start
Forced air-cooled
Pressure / splash
Front absorber
Rock-arm variable-pitch spring &
hydraulic damping shock absorber
Single damping shock absorber
Variable-pitch spring & hydraulic
damping shock absorber
Steel tube frame
Rear cushion
Brake system
Expansion braking shoe
Tyres
3.00-10 42J
16
Electrical Circuit Chart
Lights switch
Electric starting button
Clutch switch
Ignition switch
Fuel oil
Rectifter
Carbueretor
Starting Motor relay
R
R
Br Y L/W G
Y/R B
G/Y
R B
B
B
Front right turning signallight
Lb
G/Y
G/Y
Y/R
Y
Br
G
Lb
G
G
Br
Meter light
Turning indicating light
Front position light
G
G
Br
Br
L
G
W
L
G
W
O
Head light
G
O Gr Lb Lg B
G
Decorative light
G
Lb
Right turning signal light
G
R
Lb
G/Y
B
G
Br
G
Br
O
Brake light/Rear light
G/Y
G
O
G
G
Lg
W
L/W
L
Lb
Gr
O
Lg
B
W L/W L
R
Y/R G/Y
G Y
G/Y
O
G
L/W
Front left turning signal light
Y
G
Battery
Starting Motor
R/W Y/W
G
R/W
Y/W
B
R/W
Y/W
B
Fuel gauge
G
R
Br
G
L
Lb
O
G
L
Lb
O
Hight beam light
G G
G
Gr
B
W Y B/R
G G L/Y B/Y
G
Horn
B G/Y
Flasher Ignition Starter
Rear left turning signal light
B/Y
C.D.I
Ignition coil
B-BLACK
Br-BROWN
G-Green
Gr-Grey
L-Blue
Lb-Light blue
Y-Yellow
R-Red
Lg-Light green
W-White
O-Orange
Clutch switch
Turning light switch
light Dimmer switch
Horn button
17
Baotian Warranty
EXCLUSIONS:
1. No liability will be accepted:
In the event of a sudden mechanical or electrical failure please contact your supplying
dealer.
a. For faults reported after 14 days of being discovered.
b. For machines used in competition or time trials.
Your 24-month warranty covers your scooter/motorcycle in the event of mechanical
breakdown or component failure. The first 12 months of cover extends to the entire
scooter with the exceptions detailed below. For the second year, warranty is limited to
the covered engine and transmission components only.
c. For machines used for hire or rewards, including taxi, riding schools, couriers
etc.
d. For machines where non-standard parts have been fitted and customisation
made.
This cover is extended to the registered owner. In the event of change of ownership,
please send written advice within 14 days of change to Baotian UK, Casino Industrial
Estate, Canterbury Road, Wingham, Kent CT3 1NL. Please enclose copies of service
history to verify validity of warranty.
2. No liability will be accepted for damage caused by:
a. Neglect.
b. Corrosion.
c. Intrusion of foreign matter.
All parts are covered subject to the following exclusions:
d. Lack of servicing.
GENERAL
e. The effects of overheating.
All body panels including covers, cowlings, fairings, windshield, paintwork, trims and
seat. Routine replacement of parts such as lubricants, tyres and control cables.
f. Freezing.
g. Consequential damage, how so ever caused.
Electrical fuses, lights, lenses and bulbs, indicator assemblies, drive unit [variators],
drive belts and chains, sprockets, rubber gaiters, suspension, wheels, fuels hoses and
tank cap.
h. The use of incorrect grade fuel, incorrect lubricant or incorrect anti-freeze.
i. Neglect, abuse or wilful damage including continuing to ride the machine when
it is not mechanically sound.
Frame and stands, accident damage, corrosion. Steering locks, brake friction material,
brake levers.
j. Subjecting the machine to loads greater than manufacturer’s recommendation.
k. Fire, explosion, flood water damage, theft or attempted theft and any such
extreme cause.
ENGINE
Engine tuning and adjustments or any other parts, which deteriorate during normal
usage.
3. No liability will be accepted for:
a. The affects of poor repair.
Lubricants, coolant additives, filters and breathers, spark plugs and caps, brackets and
mountings, hoses and hose clips.
b. Parts that have been fitted incorrectly.
c. Parts not fitted as standard by the manufacturer.
CLUTCH
d. Investigatory or remedial work commenced prior to the replacement of
defective covered parts.
CONDITIONS & EXCLUSIONS
f. Any parts that have been previously reported during routine service as to be
requiring replacement.
Frictional material where the condition is related to wear and tear.
e. Routine servicing or repair.
The scooter/motorcycle must be serviced in accordance with the manufacturer’s
schedule. Services may only be carried out to a maximum of 150km before or after the
due distance. VAT receipts must be retained.
The rights as set out in this document are in addition to your legal rights and subject to
English law.
g. Death, bodily injury or loss of use or any consequential loss of whatever nature.
18
4. No liability is accepted for any damage caused by a road traffic accident or
collision or any road hazard whether or not insured under any motor insurance
or accidental damage policy caused by mechanical or electrical failure.
INITIAL INSPECTION
SERVICE 2
Date:
Date:
Mileage:
Mileage:
Dealer stamp:
Dealer stamp:
SERVICE 1
SERVICE 3
Date:
Date:
Mileage:
Mileage:
Dealer stamp:
Dealer stamp:
19
SERVICE 4
SERVICE 6
Date:
Date:
Mileage:
Mileage:
Dealer stamp:
Dealer stamp:
SERVICE 5
SERVICE 7
Date:
Date:
Mileage:
Mileage:
Dealer stamp:
Dealer stamp:
20
SERVICE 8
SERVICE 10
Date:
Date:
Mileage:
Mileage:
Dealer stamp:
Dealer stamp:
SERVICE 9
SERVICE 11
Date:
Date:
Mileage:
Mileage:
Dealer stamp:
Dealer stamp:
21
SERVICE 12
SERVICE 14
Date:
Date:
Mileage:
Mileage:
Dealer stamp:
Dealer stamp:
SERVICE 13
SERVICE 15
Date:
Date:
Mileage:
Mileage:
Dealer stamp:
Dealer stamp:
22
Maintenance Schedule
Engine Oil
PDI
Gear Oil
Battery
Spark Plug
Fuel Filter
Carb
Odometer Cable
Control Cables
Tyre Pressure
Tyres / Wheels
Brake Fluid
Brake System
Drive Belt
Replace
Replace
Oil Strainer
Air Filter
300 KM
Charge
Replace
Clean
Clean
Inspect
Inspect
Inspect
Inspect
Inspect
Adjust
Inspect
Inspect
Inspect
Replace
3,000 KM
Clean
Adjust
Lubricate
1,000 KM
Adjust
Inspect
Inspect
Clean
Adjust
Clean
Inspect
Adjust
Inspect
Inspect
Replace
Inspect
Replace
Clean
Clean
Inspect
Adjust
Replace
Replace
Inspect
Replace
Replace
Clean
Inspect
Inspect
Inspect
Inspect
Inspect
Adjust
Adjust
Inspect
Inspect
Inspect
Inspect
Lighting
Inspect
Inspect
Inspect
Inspect
Clean
Replace
Inspect
Inspect
Inspect
Inspect
Inspect
Inspect
23
Adjust
Inspect
Adjust
Inspect
Inspect
Inspect
Replace
Inspect
Replace
Inspect
Inspect
Inspect
Inspect
Inspect
Inspect
Inspect
Inspect
Inspect
Every 2
Years
Replace
Lubricate
Inspect
Suspension
Replace
Replace
Lubricate
Inspect
Inspect
Replace
Lubricate
Inspect
Inspect
Replace
12,000 KM
Lubricate
Headstock Bearings
All Bolts & Fixings
Replace
9,000 KM
Lubricate
Vaiator Rollers
Clutch
6,000 KM
Adjust
Inspect
Inspect
Replace
Replace
Inspect
Inspect
Inspect
Inspect
Inspect
Replace