1
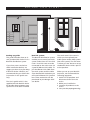
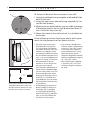
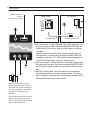
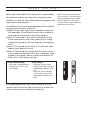
BeoLink® Active
Setting-up Guide
CAUTION
RISK OF ELECTRIC SHOCK
DO NOT OPEN
CAUTION: To reduce the risk of
electric shock, do not remove
cover (or back).
No User-serviceable parts inside.
Refer servicing to qualified service
personnel.
WARNING: To reduce the risk of fire or
electric shock, do not expose this appliance
to rain or moisture. Do not expose this equipment to dripping or splashing and ensure
that no objects filled with liquids, such as
vases, are placed on the equipment.
To completely disconnect this equipment
from the AC Mains, disconnect the mains
plug from the wall socket. The disconnect
device shall remain readily operable.
The lightning flash with arrowhead symbol
within an equilateral triangle, is intended
to alert the user to the presence of uninsulated “dangerous voltage” within the
product’s enclosure that may be of sufficient
magnitude to constitute a risk of electric
shock to persons.
The exclamation point within an equilateral
triangle is intended to alert the user to the
presence of important operating and maintenance (servicing) instructions in the
literature accompanying the product.
For the US-market only!
NOTE: This equipment has been tested and
found to comply with the limits for a class B
digital device, pursuant to part 15 of the FCC
Rules. These limits are designed to provide
reasonable protection against harmful interference in a residential installation.
This equipment generates, uses and can
radiate radio frequency energy and, if not
installed and used in accordance with the
instructions, may cause harmful interference
to radio communications. However, there is
no guarantee that interference will not occur
in a particular installation. If this equipment
does cause harmful interference to radio or
television reception, which can be determined
by turning the equipment off and on, the user
is encouraged to try to correct the interference
by one or more of the following measures:
– Reorient or relocate the receiving antenna.
– Increase the separation between the equipment and receiver.
– Connect the equipment into an outlet on a
circuit different from that to which the receiver is connected.
– Consult the dealer or an experienced radio/
TV technician for help.
Note: Building and electrical codes may vary
from locality to locality. Make sure that the
installation is in compliance with applicable
codes. Bang & Olufsen shall not be legally
responsible for injury or damage caused by improper installation.
For the Canadian market only:
This class B digital apparatus meets all requirements of the Canadian Interference-Causing
Equipment Regulations.
B E F O R E
Setting-up guide
This guide describes how to install your BeoLink Active kit in a
BeoLink distribution system.
If you have never carried out
cable installation before, we
suggest you leave it to your Bang
& Olufsen dealer. Likewise, we
recommend that you follow the
instructions in this guide carefully.
The User’s guide which is also
supplied with the BeoLink Active
kit describes how to operate your
system once it has been installed.
Y O U
S T A R T …
BeoLink system
The BeoLink distribution system
enables you to control your main
system and to hear it in the Link
room. Your Link room must be
connected to the main room via
a special (Master Link) cable. To
join the Master Link cable from
the main system and the cable
from the BeoLink Active box you
will need a Master Link junction
box. These accessories can be
purchased at your Bang & Olufsen dealer.
The main room is the room in
which you have placed your
audio system and/or video system
(the main system). The link room
is where you are about to set up
the Beolink Active with a pair of
active speakers.
When you set up your BeoLink
Active kit, we recommend the
following sequence:
1 Switch off all products and
disconnect them from the
mains.
2 Make your installation.
3 Connect all products to the
mains.
4 Carry out the preprogramming.
4
P L A C E M E N T
A
A
To fasten the BeoLink Active receiver to the wall:
1 Using the wall bracket as a template, mark and drill the
holes in the wall.
2 Using the two screws and wall plugs supplied (A), fasten the wall bracket.
3 When you have mounted the receiver cable (see page
5) hang the receiver on the wall bracket and then secure it with the tiny screw (B).
4 Fasten the cable to the wall and run it to the BeoLink
Active box.
In the following we have listed some advice and requirements for the placement of the BeoLink Active:
B
3
2
1
If you have installed more units
throughout the house, make sure
that the remote control can only
activate one receiver at a time.
• The units in the system must
all be placed in a dry place,
i.e. not outdoors (the Master
Link cable, however, may very
well be run outdoors). Once
connected, the BeoLink Active
box should be fastened to the
wall – e.g. concealed behind a
curtain or a piece of furniture.
• Place the BeoLink Active
receiver so it can receive the
remote control signals.
• If the receiver is placed next to
a door and at a suitable height,
you can easily switch on or off
by close-up operation when
entering or leaving the room.
Likewise, if it is placed near
your telephone, you can switch
off the speakers while you are
on the phone.
• Avoid placing the receiver in
direct sunlight or direct artificial light, e.g. a spotlight,
or near objects generating
electrical noise, e.g. light dimmers, as this will reduce the
sensitivity of the receiver.
• The receiver is designed to
function within a temperature
range of 0 – 55°C (32 – 130°F).
If it is exposed to higher or
lower temperatures, it may
block the whole system.
The box is designed to function
within a temperature range of
10 – 40°C (50 – 105°F).
• The receiver cable supplied
is 5 metres (15’). This is the
maximum lenght of cable to
be used.
5
C O N N E C T I O N S
Cables should always be handled with great care. When
running the cables, avoid bending them too sharply and
be careful not to twist them. Avoid subjecting the cables
to pressure or impact.
Using the cable supplied, connect the BeoLink Active receiver as follows:
1 Detach the rear cover of the BeoLink Active receiver
(unscrew the two screws (C) and loosen the two screws
(D), then lift off the cover).
2 Cut the cable to the required length (from the BeoLink
Active box to the receiver) and strip it as shown.
3 Insert the cable end through the cable clamp (E) and
connect the leads to the terminals inside the receiver in
the order indicated. Then tighten the clamp (E).
4 Attach the rear cover again and fasten the BeoLink Active receiver to the wall (see page 4).
5 Plug the cable into the socket marked IR on the BeoLink Active box.
C
D
C
D
1 / 2"
m
5m
-1
3
5 mm - 1/4"
Strip the cable end. Twist the
cores in each lead and bend
them back.
1
2
3
4
5
E
NOTE! Disconnect your entire
Bang & Olufsen system from the
mains while you make the connections!
Connect the leads in the receiver
cable to the terminals inside the
receiver in this order:
1 = Yellow
2 = Grey
3 = Green
4 = White
5 = Brown
>
6 > Connections
Master Link connection
to the main system
Main System
Junction box
PC*
Connect one speaker to the
socket marked Power Link and
then loop the signals through to
the other speaker as described
in the User’s guide for your
speakers.
*The socket marked PC is used in
BeoLink PC setups only. Please
refer to the User’s guide enclosed
with the BeoLink PC kit.
Link System
BeoLink Active box
In the link room: Using a Master Link cable, connect the
multi-pin plug to the socket marked MASTER LINK on
the BeoLink Active box, and run the cable to the junction box.
Using Power Link cables (8-pin DIN), connect your active speakers to the sockets marked POWER LINK. Remember to set the L • R • LINE switch on each speaker to
L and R (left and right channel), respectively.
In the main room: Using a Master Link cable, connect the
flat multi-pin plug to the socket marked MASTER LINK
on the main system, and run the cable to the junction
box.
Inside the junction box: Join the cables as explained in
the documentation enclosed with the box. This document contains information of the many possibilities of
the box and how to join the cables.
R E A D Y
F O R
U S E …
When you have made all the connections as described in
the previous chapter you may start using the system.
However, in order for your setup to function properly, you
may need to preprogram it.
Your BeoLink Active can be preprogrammed for the following setup situations (Options):
Option 0: To be used if you want to disable remote control operation of the BeoLink Active (to re-enable remote control, select one of the other options).
Option 4: To be used if you install the BeoLink Active
in the same room as your main system (e.g. in a large
L-shaped living room with two separate listening positions).
Option 5: To be used if you install a TV set in the same
room as your BeoLink Active.
Option 6: To be used for a setup with the main system
in one room and the BeoLink Active in another, as described in this guide, and in a setup with BeoLink PC
Office (this is the factory setting).
Using a Beolink 1000:
– Press LINK, the appropriate
number (0, 4, 5 or 6), and
then STORE.
Using a Beo4:
– Hold the • button while
pressing LIST. When the Beo4
display reads OPTION?, press
GO.
– Press LIST twice to display
L.OPT and then key in the
appropriate number (0, 4, 5
or 6).
The preprogramming is done with a Bang & Olufsen
remote control, and must be carried out with both the
main and link system switched to stand-by!
NOTE! To ensure correct function
of your setup, it is essential that
you connect both the main system
and the speakers to the mains
– before connecting the BeoLink
Active box to the mains!
7
3500926
0702