1
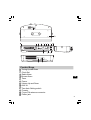
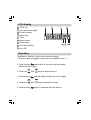
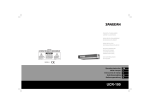
UCR-100
GB
Version 1
Important safety instructions
1. Read and understand all safety and operating instructions before
the radio is operated.
2. Retain instruction: The safety and operating instructions should
be retained for future reference.
3. Heed warnings. All warnings on the appliance and operating
instructions should be followed.
4. Follow all operations and use instructions.
5. Water and moisture: The appliance should not be used near
water. Do not use near a bathtub, washbowl, laundry tub,
kitchen sink, wet basement, swimming pool, etc.
6. Unplug the radio from the AC power outlet before cleaning.
Use only a damp cloth for cleaning the exterior of the radio.
Clean the radio only with dry cloth.
7. Do not place the radio on an unstable cart, stand, bracket or
table. The radio may fall, causing serious personal injury and
damage to the radio.
8. Ventilation: This radio should be situated
so that its
location or position does not interfere with its proper ventilation.
For example, the radio should not be used on a bed, sofa, rug or
other soft surfaces that may block the ventilation openings.
It should not be placed in a built-in situation like a cabinet that
may reduce air flow through the ventilation openings.
9. Don’t install near any heat sources such as radiators,
heat registers, stoves, or other apparatus (include amplifiers)
that produce heat.
1
10. Don’t install defeat the safety purpose of the polarized or
grounding-type plug. A polarized plug has two blades with one
wider than the other. A grounding-type plug has two blades and
a third grounding prong. The wide blade or the third prong are
provided for your safety. If the provided plug doesn’t fit into
your outlet, consult an electrician for replacement of the
obsolete outlet.
11. Power sources: The radio should be operated only from the
type of power source indicated on the marking label. If you are
not sure of the type of power supply to your home,
consult your radio dealer or power company.
12. Power cords: The power cord should be positioned so it is not
walked on, pinched, or items placed on top of it. Pay particular
attention to cords at plugs, convenience receptacles, and the
point where they exit from the unit. Unplug the power cord by
gripping the power plug, not the cord. Operate the radio using
only the current type of power source indicated. If you are not
sure of the type of power supply to your home, consult your
dealer or local power company.
GB
13. Do not overload wall outlets or extension cords. This can result
in a risk of fire or electrical shock. Never insert objects of any
kind into the radio through opening. The objects may touch
dangerous voltage points or short out parts. This could cause
a fire or electrical shock.
2
14. Only use attachment/accessories specified by the manufacture.
15. If the radio is left attended and unused for long periods of time,
unplug it form the wall outlet. This will prevent damage caused
by lightning or power line surges.
16. If the radio is left unattended and unused for a long period
of time, remove the batteries. The batteries may leak and
damage furniture of your radio.
17. Do not attempt to service the receiver yourself. Removing the
cover may expose you to dangerous voltage, and will void the
warranty. Refer all servicing to authorized service personnel.
18. Object and Liquid Entry-Never push objects of any kind into this
radio through opening as they may touch dangerous voltage
points or short-out parts that could result in a fire or electric
shock. Never spill liquid of any kind of product.
19. The appliance should be serviced by qualified service
personnel when:
A. The power supply cord or the plug has been damaged.
B. Objects have fallen or liquid had been spilled into the radio.
C. The radio has been exposed to rain or water.
D. The radio does not appear to operate normally or exhibits a
marked change in performance.
E. The radio has been dropped, or the enclosure damaged.
3
Installing the appliance
GB
4
Your clock radio is designed for substructure-installment under
shelves, kitchen cupboards etc. The speaker must point
downwards and be unobstructed to offer the best possible sound
quality. Please don’t install this appliance close to stove or other
cooking appliance so that is not subjected to damaging steam.
The clock radio is to be mounted in the desired position with the
bracket A , on the appliance. To simplify the installment,
the bracket can be removed from the appliance by loosening the
two knurled screws B and C from the appliance. We recommend
using the following helpful trick for the installment, to enable the
mounting of the bracket without having to measure:
1. Stick a piece of industrial strength adhesive tape on the left and
right sides of the bracket.
2. Press the appliance against the surface where it is to
be installed.
3. Without letting go of the appliance, remove the two holding
screws B and C and remove the radio carefully from the
bracket A .
4. Now you can screw on the bracket with the four screws.
5. Slide the radio onto the bracket and tighten the knurled
screwdriver to tighten screw B and C .
6. Completely unwind the short-wave cable antenna.
Fasten the antenna onto the underside of the cupboard or
shelf with a reliable adhesive tape.
Installment material (with delivery):
4 short screws
4 long screws
4 spacers
5
Control Keys
1
2
3
4
5
6
7
8
9
10
11
12
Tuning Up and Down
Clock Set
Radio Alarm
Buzzer Alarm
Timer
Power
Volume Up and Down
AUX IN
Time Auto Setting switch
Presets
F-type FM antenna connector
Power jack
GB
6
LCD display
a
b
c
d
e
f
g
h
i
Clock set
Hour and minute digits
Preset memory
Alarm time
Timer
Buzzer alarm
Radio alarm
Time Auto Setting
Auto Off
Operation
Time Manual Setting (if there is no automatic setting)
1. After the radio is plugged in the power, the display shows ‘ -:—‘
2. Touch the key
and hold for 2 seconds, and the display
flashes the hour digits.
3. Touch the
and
4. Touch the key
5. Touch the
6. Touch the key
7
keys to adjust the hour.
and the display flashes the minute digits.
and
keys to adjust the minute.
again to complete the time setting.
Time Auto Setting
When the radio is off, touch and hold the key
for 2 seconds.
The display will flash . And the clock will be set automatically.
When the clock is not corrected by Time Auto Setting yet,
the radio will operate the Auto Time Setting function for
15 minutes in every hour.
When the clock is corrected by Time Auto Setting already,
the radio will operate the Auto Time Setting function for
6 minutes in every hour.
When the Time Auto Setting signal is not good enough, open the
DCF/AUX IN cover to switch 1 to 2, or 2 to 1. This switch
controls the direction of Time Auto Setting receiving.
Alarm Operation
There are 2 ways of alarm, which are Buzzer alarm and Radio
alarm. The initial Buzzer alarm time is 7:00. The initial Radio alarm
time is 6:00.
GB
8
Alarm setting:
1. Touch the key (or ), to check the Buzzer alarm time
(or Radio alarm time). The display will show back the present
time after 7 seconds. Or you can touch the same key to go
back to the present time.
2. While the display is showing the alarm time (after the key
is touched), touch the key
for 2 seconds to enter
the alarm time adjustment.
3. Now the hour digits are flashing. Touch the key
to adjust the hour.
4. Touch the key
Touch the key
or
and
then the minute digits are flashing.
and
to adjust the minute.
5. If you are setting the Buzzer alarm, press the key
to
complete the setting. If you are setting the Radio alarm,
touch the set key, adjust the alarm radio frequency by touching
the TUNING UP/DOWN keys, then press the key
to
complete the setting.
* When the radio station signal is too weak when the Radio alarm
is activated, the alarm will become Buzzer alarm.
9
Activate/deactivate:
1. Touch the key or for 2 seconds to activate the
Buzzer alarm (or Radio) alarm. And the display shows “ ” or
“ ” with the alarm time. (When Buzzer alarm and Radio alarm
are both activated, it shows the incoming alarm time)
2. Touch the key or for 2 seconds again to deactivate the
Buzzer alarm (or Radio alarm). And “ ” (or “ ”)
will disappear.
When the alarm is sounding:
Touch the key
to stop the alarm.
Radio Operation
Frequency Tuning
1. Touch the key
2. Touch the key
3. Touch the key
the next station.
to turn on the radio.
or
or
to adjust the frequency.
for 0.5 second and the radio will go to
GB
10
Station Preset
1. Tune into the station that you would like to store.
2. Touch the PRESET STATION key (number 1, 2, 3,4, 5 or 6)
for 2 seconds to store the station into the desired preset (1-6).
3. To recall the preset station, touch the STATION PRESET
key 1-6 for less than 2 seconds.
AUTO OFF timer – auto shut off
1. Continuously touching the POWER key
will activate the
sleep function , the radio will switch off automatically in
60, 45, 30, 15, 120, 90, 60 minutes.
2. Release the POWER key when the desired AUTO OFF minutes
is shown on the display.
3. The radio will turn itself off automatically when the time
selected is elapsed.
4. If you wish to turn off the radio beforehand,
press POWER button. And the AUTO OFF timer symbol will
disappear. And the AUTO OFF function is deactivated.
11
Timer
1. Touch the key , and touch the TUNING UP or DOWN key
(
or
) to adjust the time.
2. Touch the key again to complete the setting. It will beep for
3 minutes when the set time is elapsed.
3. When the timer is beeping, touch the key or
to stop it.
4. To deactivate the Timer before the time is elapsed,
touch the key again.
5. The Timer function works both when the radio is on and off.
When the time is elapsed while the radio is on,
6. When the Timer is been setting, touch the key 1-6 for more than
2 seconds to store the time. Touch the key 1-6 for less than
2 seconds to recall the saved time set.
AUX IN socket
Open the DCF/AUX IN cover and plug in external audio devices
such as CD player to the AUX IN socket, then play your device,
the radio will amplify and play out the signal form your device.
GB
12
Technical data
Power: 230 Volt/50 Hz, 7 Watts
Frequency coverage: FM 87.5 – 108.0 MHz
If at any time in the future you should need to dispose of this product please
note that: Waste electrical products should not be disposed of with household
waste. Please recycle where facilities exist. Check with your Local Authority or
retailer for recycling advice. (Waste Electrical and Electronic Equipment Directive)
13