1
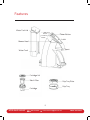
®
COFFEE MAKER
USER GUIDE
Now that you have purchased a
Chefman® product you can rest
assured in the knowledge that as well
as your 1-year parts and labor warranty
you have the added peace of mind of
dedicated helplines and web support.
AFTER SALES SUPPORT
USA
888-315-8407
[email protected]
MODEL: RJ30 SERIES
READ ALL INSTRUCTIONS BEFORE USE
For your safety and continued enjoyment of this product, always read the instruction manual before using.
Contents
1Introduction
2 Important Safeguards
5Features
6 Getting Started
7 Operating Instructions
10 Cleaning and Maintenance
15 Terms and Conditions
16 Warranty Card
AFTER SALES SUPPORT
USA
888-315-8407
[email protected]
MODEL: RJ30 SERIES
Introduction
Congratulations!
You have made an excellent choice with the purchase of this quality Chefman®
product. By doing so you now have the assurance and peace of mind which comes
from purchasing a product that has been manufactured to the highest standards
of performance and safety, supported by the high quality standards of Chefman® .
We want you to be completely satisfied with your purchase so this Chefman®
product is backed by a comprehensive manufacturer’s 1-year warranty and an
outstanding after sales service through our dedicated Helpline.
We hope you will enjoy using your purchase for many years to come.
If you require technical support or in the unlikely event that your purchase is
faulty please telephone our Helpline for immediate assistance. Faulty product
claims made within the 1-year warranty period will be repaired or replaced free of
charge provided that you have satisfactory proof of purchase (keep your receipt).
This guarantee is in addition to your statutory rights. Your statutory rights are
not affected. This limited warranty does not apply in cases of damage caused by
accident, improper use, abuse and force majeure.
This limited warranty will be invalidated if the appliance is tampered with in any way
whatsoever. In case of questions or technical problems please call the following
toll-free help line number: 888-315-8407, Monday – Friday 9am to 5pm EST.
If the appliance has to be returned to us, it must be packed correctly as we cannot
accept any responsibility for damage caused in transit.
1
AFTER SALES SUPPORT
USA
888-315-8407
[email protected]
MODEL: RJ30 SERIES
IMPORTANT SAFEGUARDS
FOR HOUSEHOLD USE ONLY
WARNING: When using electrical appliances especially when children are present,
basic safety precautions should always be followed to reduce the risk of fire,
electric shock, and/or injury to persons, including the following:
1. Read all instructions before using.
2. Do not touch hot surfaces. Use handles and knobs when available.
3. This appliance must be properly installed and located in accordance with these
instructions before it is used.
4. To protect against electrical shock, do not immerse the power cord, power plug or
coffee maker in water or in any other liquid.
5. Do not overfill the Water Tank with water.
6. Use only water in this appliance! Do not put any other liquids or foods in the Water
Tank except as instructed in the Cleaning and Maintenance section in this guide.
7. Turn off and unplug the Brewer before cleaning or maintenance. Allow to cool
before putting on or taking off parts and before cleaning the appliance.
8. For best operation, plug the appliance into its own electrical outlet on a dedicated
circuit to prevent flickering of lights, blowing of fuses or tripping a circuit breaker.
9. Close adult supervision is necessary when any appliance is used by or near
children.
10. Turn the Brewer off and unplug the power cord from the power source when
the Brewer is not in use and before cleaning. Allow the Brewer parts to cool
before putting on or taking off parts and before cleaning the appliance.
11. Do not operate any electrical appliance with a damaged power cord or power
plug or operate it after the appliance malfunctions, or has been dropped or
damaged in any manner. Return this appliance to nearest authorized service
facility for examination, repair or adjustment.
12. The use of accessory attachments not recommended by the appliance
manufacturer may result in fire, electrical shock or injury to persons.
13. Do not use outdoors or for commercial purposes.
14. Do not let cord hang over edge of table or counter, or allow it to come into
contact with hot surfaces including stove.
15. Do not place appliance on or near a hot gas or electric burner, or in a heated
oven or microwave.
16. Do not lift the Latch to open the Brewer Head while brewing is in progress.
17. Always keep the Water Tank Lid closed unless you are refilling it.
2
AFTER SALES SUPPORT
USA
888-315-8407
[email protected]
MODEL: RJ30 SERIES
IMPORTANT SAFEGUARDS (cont'd)
18. This appliance is equipped with a power cord having a grounding wire with
a grounding plug. The appliance must be grounded using a 3-hole properly
grounded outlet. In the event of an electrical short circuit, grounding reduces
the risk of electrical shock.
19. If the outlet is a standard 2-prong wall outlet, it is your personal responsibility
and obligation to have it replaced with a properly grounded 3-prong wall outlet.
20. Do not, under any circumstances, cut or remove the third (ground) prong from
the power cord or use an adapter.
21. Consult a qualified electrician if the grounding instructions are not completely
understood, or if doubt exists as to whether the appliance is properly grounded.
22. To disconnect the Brewer, turn it off, then remove the power plug from the
power supply.
23. Place the appliance on a hard, flat level surface to avoid interruption of airflow
underneath the coffeemaker.
24. Do not leave appliance unattended while in use.
25. Do not use the appliance for other than its intended use.
SAVE THESE INSTRUCTIONS
WARNING TO USERS AND PARENTS
1. DO NOT permit children to use the Brewer unless there is adult supervision.
Brewer dispenses very hot water.
2. SPECIAL NOTICE FOR PORTION PACKS WITH SUGAR OR HOT COCOA USERS:
Immediately after using a portion pack with sugar or hot cocoa portion pack, run
a Rinse Cycle (as noted on page 12) without a portion pack or coffee grounds to
avoid the possibility of clogging the exit needle and Spout. DO NOT assume the
next user will do this.
CAUTION: There are two sharp needles that puncture the portion pack, one above
the cartridge and the other in the bottom of the cartridge. To avoid risk of injury, do
not put your fingers in the cartridge housing.
CAUTION: There is extremely hot water flowing through the cartridge during the
brew process. To avoid risk of injury, do not lift the Latch or open the Brewer Head
during the brewing process.
This appliance is for HOUSEHOLD USE ONLY. It may be plugged into an AC electrical
outlet (ordinary household current). Do not use any other electrical outlet.
3
AFTER SALES SUPPORT
USA
888-315-8407
[email protected]
MODEL: RJ30 SERIES
IMPORTANT SAFEGUARDS (cont'd)
SHORT CORD INSTRUCTIONS
A short power supply cord is provided to reduce the hazards resulting from
entanglement or tripping over a longer cord. Longer detachable power-supply cords
or extension cords are available and may be used if care is exercised in their use. If
a longer detachable power-supply extension cord is used:
1. The marked electrical rating of the cord set or extension cord should be at least
as great as the electrical rating of the appliance, and:
2. The cord should be arranged so that it will not drape over the counter top or
tabletop where it can be pulled on by children or tripped over unintentionally.
LINE CORD SAFETY TIPS
1. Never pull or yank on cord or the appliance.
2. To insert plug, grasp it firmly and guide it into outlet.
3. To disconnect appliance, grasp plug and remove it from outlet.
4. Before each use, inspect the line cord for cuts and/or abrasion marks. If any
are found, this indicates that the appliance should be serviced and the line cord
replaced. Please return it to an authorized service representative.
5. Never wrap the cord tightly around the appliance, as this could place undue
stress on the cord where it enters the appliance and cause it to fray and break.
DO NOT OPERATE APPLIANCE IF THE LINE CORD SHOWS ANY DAMAGE OR
IF APPLIANCE WORKS INTERMITTENTLY OR STOPS WORKING ENTIRELY.
IMPORTANT
During the first few minutes of initial use, you may notice smoke and/or a slight
odor. This is normal and should quickly disappear. It will not recur after appliance
has been used a few more times.
This appliance is not intended for use by persons (including children) with reduced
physical, sensory or mental capabilities, or lack of experience and knowledge,
unless they have been given supervision or instruction concerning use of the
appliance by a person responsible for their safety.
4
AFTER SALES SUPPORT
USA
888-315-8407
[email protected]
MODEL: RJ30 SERIES
Features
Water Tank Lid
10 oz. Brew
Button
8 oz. Brew
Button
Power Button
Latch
Brewer Head
Spout
Water Tank
Cartridge Lid
Mesh Filter
Drip Tray Plate
Drip Tray
Cartridge
5
AFTER SALES SUPPORT
USA
888-315-8407
[email protected]
MODEL: RJ30 SERIES
Getting Started
1. Plug the My Barista™ into its own grounded outlet. If the electric circuit is
overloaded with other appliances, your Brewer may not function properly. The
Brewer should be operated on its own circuit, separate from other appliances.
2. For the best tasting gourmet coffee or tea, Chefman® recommends using
bottled or filtered water. Water quality varies from place to place. If you notice
an undesirable taste in your cup of coffee, such as chlorine or other mineral
tastes, we recommend you consider using bottled water or water from a
filtration system.
3. To brew into a travel mug, simply remove the Drip Tray and place the travel mug
on the Drip Tray Base.
4. De-scale your Brewer regularly. Please see the Cleaning and Maintenance
section for instructions.
UNPACKING INSTRUCTIONS
1. Place your Chefman® My Barista™ Brewer box on a large steady surface (such as
a table or countertop) or on the floor. Open the box.
2. Remove enclosed literature.
3. Turn the box on its side with front of box face down.
4. Reach into the box and grasp the plastic bag that contains the Brewer.
5. Carefully pull the plastic bag (and packaging materials) toward you and out of the
box. The Brewer will still be encased in the cardboard and be on its side.
6. Remove the top cardboard packaging material.
7. Carefully lift Brewer off of the bottom cardboard and place it upright on a flat,
steady surface.
8. Lift plastic bag off of Brewer.
9. Place the Brewer upright on a flat, steady surface. Remove tape holding Water
Tank and brewer head in place.
We recommend you save all packing materials in case future shipping of the
product is necessary.
WARNING: Keep all plastic bags away from children.
6
AFTER SALES SUPPORT
USA
888-315-8407
[email protected]
MODEL: RJ30 SERIES
Operating Instructions
SET-UP & FIRST BREW
IMPORTANT: Before using your Chefman® My Barista™ Brewer please follow the
instructions below. The Brewer will not function properly unless these steps are
followed.
NOTE: If Brewer has been exposed to temperatures below freezing, allow Brewer at
least two hours to reach room temperature before brewing. A frozen or extremely
cold Brewer will not operate.
SETTING UP YOUR BREWER
1A
1B
8 oz.
Figure 1A & 1B
10 oz.
Figure 2
8 oz.
10 oz.
Figure 3
1. Unwrap cord and plug the Brewer into a grounded outlet. Remove all pieces of
packing tape and plastic stickers.
2. Place a mug (10 oz. minimum) on the Drip Tray.
3. Remove the Water Tank from Brewer by firmly grabbing the tank, then lifting the
Water Tank straight up. Rinse with fresh water.
4. Fill Water Tank with bottled or filtered water so that the water level does not
exceed the ”MAX” fill line (fig. 1A).
5. Place Water Tank base into the back of the Brewer and be sure the Water Tank is
securely in place. (fig. 1B)
6. Simultaneously press the small and large Brew Buttons for 1 second (fig. 2),
then release. Both small and large Brew Buttons will now flash alternately while
water comes out from the Spout.
7. Press and release the Power Button, and wait until the Brew Buttons stop
flashing. (fig. 3)
Your Chefman® My Barista™ is now ready to use.
7
AFTER SALES SUPPORT
USA
888-315-8407
[email protected]
MODEL: RJ30 SERIES
Operating Instructions (cont'd)
READY TO BREW YOUR FIRST CUP
1
2
4
7A
1
coffee
grounds
Twist
2
7B
3
Figure 5
Figure 6
Figure 7A & 7B
1. Place a cup or mug on the Drip Tray.
2. Select a portion pack or coffee grounds. NOTE: Do not remove the foil lid or
puncture the portion pack.
3. Place portion pack or coffee grounds in cartridge; be sure to use the mesh filter
when using coffee grounds. (fig. 5).
CAUTION: There are two sharp needles that puncture the portion pack, one above
the cartridge and the other in the bottom of the cartridge. To avoid risk of injury,
do not put your fingers in the cartridge.
4. Lift latch and place cartridge into compartment. (fig. 6)
5. Firmly press down on Brewer Head (fig 7A), and then close the latch. (fig. 7B)
6. Press and release the Power Button, and wait until the Brew Buttons stop
flashing.
7. Select your preferred brew size; small (8 oz.) or large (10 oz.).
8. Once brew size is chosen the selected Brew Button will remain flashing until
brewing is completed.
9. When the Power and Brew Buttons are steadily lit the Brewer has completed
brewing. CAUTION: There is extremely hot water in the portion pack cartridge
during the brew process. To avoid risk of injury, do not lift the Latch or open
Brewer Head during the brew process.
10. Lift the latch, remove and dispose of the used portion pack or coffee grounds.
CAUTION: Portion pack will be hot. Wait at least 5 minutes before removing the
portion pack or coffee grounds.
Enjoy Your First Cup from the Chefman® My Barista™
8
AFTER SALES SUPPORT
USA
888-315-8407
[email protected]
MODEL: RJ30 SERIES
Operating Instructions (cont'd)
STOPPING THE BREW PROCESS
If you need to stop the brewing after the process has started, press and release the
Power Button to turn the Brewer ”OFF”, or press and release either Brew Button to
stop the brewing. The flow of coffee, tea or hot cocoa will stop; the heating element
will shut off.
ADDING WATER
When the Power and Brew Buttons begin to flash simultaneously this indicates
the water level in the tank is low or the Water Tank is not securely in place. The
Brewer will not allow you to brew when the Power and Brew Buttons are flashing
simultaneously.
The Water Tank can be filled in two ways.
1. Lift up the Water Tank Lid and pour water directly into the Water Tank while it is
still attached to the Brewer, then close the Lid.
2. Remove the Water Tank from Brewer by firmly grabbing the tank, then lifting the
Water Tank straight up. Fill with water. Place the Water Tank back on the Brewer
and close the Water Tank Lid.
IMPORTANT: Do not remove the Water Tank during the brewing process.
BREWING ICED BEVERAGES
Your iced tea and iced coffee taste best when fresh-brewed hot over ice. Try it by
placing a tall cup filled with ice on the Drip Tray, select the brew size and press the
Brew Button. Also, look for specially marked portion packs that are specially crafted
to brew over ice!
IMPORTANT: Do not brew into a cup made of glass. Doing so may cause the glass
to crack or break.
TURNING OFF YOUR BREWER
The Brewer is programmed to automatically power itself off after 5 minutes of
inactivity. To turn your Brewer off manually simply press and release the Power
Button.
9
AFTER SALES SUPPORT
USA
888-315-8407
[email protected]
MODEL: RJ30 SERIES
Cleaning and Maintenance
Regular cleaning of the Brewer’s external components is recommended.
1. Never immerse the Brewer in water or other liquids. The housing and other
external components may be cleaned with a soapy, damp, non-abrasive cloth.
2. The Drip Tray can accumulate up to 5 ounces of overflow. The Drip Tray and Drip
Tray Plate should be periodically inspected and rinsed clean.
REMOVING THE DRIP TRAY ASSEMBLY
Slightly lift tray while keeping it leveled at all times to avoid spilling.
The Drip Tray and Drip Tray Plate may be placed in the dishwasher.
They may also be cleaned with a damp, soapy, non-abrasive cloth
and rinsed thoroughly.
CLEANING THE CARTRIDGE
The cartridge can be placed onto the top shelf of a dishwasher.
NOTE: Use low temperature cycles in the dishwasher. To remove
from the Brewer, open the Brewer Head by lifting the Latch.
Grasp the top of the cartridge with one hand, pull upward until it
releases. After cleaning, simply insert the cartridge back into the
compartment, be sure the cartridge is firmly in place.
CLEANING THE EXIT NEEDLE
The exit needle is located on the inside bottom of the cartridge.
Should a clog arise due to coffee grinds, it can be cleaned using a
paper clip or similar tool. Remove cartridge, insert the paper clip (as
shown left) into the needle to loosen the clog and push it out.
CAUTION: There are sharp needles that puncture the portion
pack above the cartridge and in the bottom of the cartridge. To avoid risk of injury,
do not put your fingers in the cartridge.
CLEANING THE SPOUT
Should a clog arise due to coffee grinds, it can be cleaned using a paper clip or
similar tool. Remove cartridge, insert the paper clip into the Spout to loosen the
clog and push it out.
10
AFTER SALES SUPPORT
USA
888-315-8407
[email protected]
MODEL: RJ30 SERIES
Cleaning and Maintenance (cont'd)
CLEANING THE WATER TANK & WATER TANK LID
The Water Tank and Water Tank Lid should be periodically inspected and cleaned.
The Water Tank and Water Tank Lid may be put into the dishwasher or they may be
cleaned with a damp, soapy, non-abrasive cloth and rinsed thoroughly. Do not dry the
inside of the Water Tank with a cloth as lint may remain.
CAUTION: Please rinse the Water Tank thoroughly after cleaning to ensure that no cleaners
or cleaning solutions remain as they may contaminate the water supply in the Brewer.
DE-SCALING YOUR BREWER
Mineral content in water varies from place to place. Depending on the mineral
content of the water in your area, calcium deposits or scale may build up in your
Brewer. Scale is non-toxic, but left unattended, it can hinder Brewer performance.
De-scaling your Brewer helps maintain the heating element and other internal
parts of the Brewer that come in contact with water.
The Brewer should be de-scaled every 1-2 months to ensure optimal performance.
It is possible for calcium deposits to build up faster, making it necessary to de-scale
more often.
1. To begin, you will need the following:
• At least 28 ounces of undiluted white vinegar
• Access to an empty sink, a large ceramic mug (do not use a paper cup)
2. Empty the water in the Water Tank.
STEP 1: FILL AND CLEAN
Step 1: Pour approximately 28 ounces of vinegar into the Water Tank.
Step 2: Place a large mug on the Drip Tray.
Step 3: Press and release the Power Button, and wait until the Brew Buttons stop flashing.
Step 4: Run a brew cycle. DO NOT USE A PORTION PACK OR COFFEE GROUNDS, just
press the LARGE (10 OZ.) Brew Button. Once the Brewer has finished dispensing
pour the contents of the large mug into the sink.
Step 5: Repeat the brew process without a portion pack or coffee grounds until the
Power and Brew Buttons begin to flash.
Step 6: Discard any residual vinegar and rinse the Water Tank thoroughly.
11
AFTER SALES SUPPORT
USA
888-315-8407
[email protected]
MODEL: RJ30 SERIES
Cleaning and Maintenance (cont'd)
STEP 2: RINSE
Step 1: Ensure the Water Tank is filled with fresh water.
Step 2: Place a large mug on the Drip Tray.
Step 3: Press and release the Power Button, and wait until the Brew Buttons stop flashing.
Step 4: Run a brew cycle. DO NOT USE A PORTION PACK OR COFFEE GROUNDS, just
press the LARGE (10 OZ.) Brew Button. Once the Brewer has finished dispensing
pour the contents of the large mug into the sink.
Step 5: Repeat the brew process without a portion pack or coffee grounds until the
Power and Brew Buttons begin to flash.
Step 6: You may need to perform additional Rinse cycles if you notice any residual
taste.
SERVICE
Beyond these recommended cleaning and maintenance procedures this Brewer is
not user serviceable. For service, please refer to the Warranty section of this guide.
STORAGE
Empty the Water Tank before storing, and take care to ensure that you store your
Brewer in a safe and frost free environment. Please be sure to store your Brewer
in its upright position to avoid water leakage from the inner tank. If you store the
Brewer in a cold environment, you run the risk of water freezing inside the Brewer
and causing damage. When you prepare to use it after storage, we recommend
rinsing the Water Tank with fresh water and running three cleansing brews
without a portion pack or coffee grounds.
If you plan to move your Brewer to a different location, turn the Brewer off, unplug
it, and empty the Water Tank. If your Brewer has been in an environment below
freezing, please be sure to let it warm to room temperature for at least 2 hours
before using.
Transport Brewer in the upright position to ensure inner tank does not leak
through vent.
12
AFTER SALES SUPPORT
USA
888-315-8407
[email protected]
MODEL: RJ30 SERIES
Notes
13
AFTER SALES SUPPORT
USA
888-315-8407
[email protected]
MODEL: RJ30 SERIES
Notes
14
AFTER SALES SUPPORT
USA
888-315-8407
[email protected]
MODEL: RJ30 SERIES
Terms and Conditions
CHEFMAN LLC warrants, subject to the conditions stated below, that from the date of purchase, this product will
be free from mechanical defects for a period of ONE (1) year. CHEFMAN LLC, at its option, will repair or replace
this product found to be defective during the warranty period. Should this product become defective by reason
of improper workmanship or material defect during the specified warranty period, CHEFMAN LLC will repair or
replace the same effecting all necessary parts replacements for a period of three years from the date of purchase.
Transportation charges on parts, or products in whole, submitted for repair or replacement, under this warranty,
must be borne by the purchaser.
This warranty is available to consumers only. You are a consumer if you own a Chefman® My Barista™ Coffeemaker
that was purchased at retail for personal, family or household use. Except as otherwise required under applicable
law, this warranty is not available to retailers or other commercial purchasers or owners.
CONDITIONS: This warranty is valid for the original USA retail purchaser from the date of initial retail purchase
and is not transferable. Keep the original sales receipt. Proof of purchase is required to obtain warranty service or
replacement. Dealers, service centers, or retail stores do not have the right to alter, modify or in any way, change the
terms and conditions of this warranty. Warranty registration is not necessary to obtain warranty on CHEFMAN LLC
Products. Save your proof of purchase receipt.
ABOUT YOUR PRODUCT WARRANTY: Most warranty repairs are handled routinely, but sometimes requests for
warranty service may not be appropriate. For example, warranty service would NOT apply if the product damage
occurred because of misuse, lack of routine maintenance, shipping, handling, warehousing or improper installation.
Similarly, the warranty is void if the manufacturing date or the serial number on the product has been removed or
the equipment has been altered or modified. During the warranty period, the authorized service dealer, at its option,
will repair or replace any part that, upon examination, is found to be defective under normal use and service.
NORMAL WEAR: This warranty does not cover normal wear of parts or damage resulting from any of the following:
negligent use or misuse of the product; improper voltage or current; use contrary to the operation instructions;
deviation from instructions regarding storage and transportation; repair or alteration by anyone other than
CHEFMAN LLC or an authorized service center. Further, the warranty does not cover Acts of God, such as fire,
flood, hurricanes and tornadoes. CHEFMAN LLC shall not be liable for any incidental or consequential damages
caused by the breach of any express or implied warranty. Except to the extent prohibited by applicable law, any
implied warranty of merchantability or fitness for a particular purpose is limited in duration to the duration of the
above warranty. Some states, provinces or jurisdictions do not allow the exclusion or limitation of incidental of
consequential damages or limitations on how long an implied warranty lasts, so the above limitations or exclusion
may not apply to you. This warranty gives you specific legal rights, and you may also have other rights that vary from
state to state or province to province.
HOW TO OBTAIN WARRANTY SERVICE: If your Chefman® My Barista™ Coffeemaker should prove to be defective
within the warranty period, we will repair it, or if we think necessary, replace it. To obtain warranty service,
simply call our toll-free number 1-888-315-8407 Ext: 400 for additional information from our Customer Service
Representatives, or send the defective product to Customer Service at Chefman, 873 Route 45, Suite 101, New City,
NY 10956.
To facilitate the speed and accuracy of your return, please enclose $15.00 for shipping and handling of the product.
Please only pay by money order.
This warranty is effective for the time periods listed above and subject to the conditions provided for within this
policy.
CHEFMAN is a registered trademark of PLUS ITS CHEAP, LLC.
15
AFTER SALES SUPPORT
USA
888-315-8407
[email protected]
MODEL: RJ30 SERIES
Warranty Card
®
MY BARISTA™ COFFEE MAKER
Your details:
Name
Address
E mail
Date of purchase*
* We recommend you keep the receipt with this warranty card
Location of purchase
Description of malfunction:
Return your completed warranty card to :
RJ Brands
873 Route 45
Suite 101
New City, New York
10956
[email protected]
AFTER SALES SUPPORT
888-315-8407
AFTER SALES SUPPORT
USA
888-315-8407
[email protected]
MODEL: RJ30 SERIES
Phone lines available Monday to Friday, 9am-5pm EST
1-YEAR LIMITED WARRANTY
[email protected]
MODEL: RJ30 SERIES
®
888-315-8407 • [email protected]
MODEL: RJ30 SERIES