1
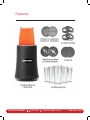
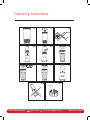
®
ULTIMATE
BLENDER
17 PIECE SET
USER GUIDE
Now that you have purchased a
Chefman® product you can rest
assured in the knowledge that as well
as your 3-year parts and labor warranty
you have the added peace of mind of
dedicated helplines and web support.
AFTER SALES SUPPORT
USA
888-315-8407
[email protected]
MODEL: RJ28-17 SERIES
READ ALL INSTRUCTIONS BEFORE USE
For your safety and continued enjoyment of this product, always read the instruction manual before using.
Contents
1Introduction
2 Safety Instructions
4Features
6 Operating Instructions
8 Cleaning and Maintenance
9Recipes
15 Terms and Conditions
16 Warranty Card
AFTER SALES SUPPORT
USA
888-315-8407
[email protected]
MODEL: RJ28-17 SERIES
Introduction
Congratulations!
You have made an excellent choice with the purchase of this quality Chefman®
product. By doing so you now have the assurance and peace of mind which comes
from purchasing a product that has been manufactured to the highest standards
of performance and safety, supported by the high quality standards of Chefman® .
We want you to be completely satisfied with your purchase so this Chefman®
product is backed by a comprehensive manufacturer’s 3-year warranty and an
outstanding after sales service through our dedicated Helpline.
We hope you will enjoy using your purchase for many years to come.
If you require technical support or in the unlikely event that your purchase is
faulty please telephone our Helpline for immediate assistance. Faulty product
claims made within the 3-year warranty period will be repaired or replaced free of
charge provided that you have satisfactory proof of purchase (keep your receipt).
This guarantee is in addition to your statutory rights. Your statutory rights are
not affected. This limited warranty does not apply in cases of damage caused by
accident, improper use, abuse and force majeure.
This limited warranty will be invalidated if the appliance is tampered with in any way
whatsoever. In case of questions or technical problems please call the following
toll-free help line number: 888-315-8407, Monday – Friday 9am to 5pm EST.
If the appliance has to be returned to us, it must be packed correctly as we cannot
accept any responsibility for damage caused in transit.
1
AFTER SALES SUPPORT
USA
888-315-8407
[email protected]
MODEL: RJ28-17 SERIES
Safety Instructions
IMPORTANT SAFEGUARDS
This appliance is for HOUSEHOLD USE ONLY.
When using electrical appliances, basic safety precautions should always be
followed to prevent the risk of fie, electric shock, burns, or other injuries or
damages.
• Read all instructions.
• To protect against risk of electrical shock do not put the cord or the blender’s
power base in water or other liquid.
• Close supervision is necessary when any appliance is used by or near children.
• Unplug from outlet when not in use, before putting on or taking off parts, and
before cleaning.
• Avoid contacting moving parts.
• Do not operate appliance with a damaged cord or plug, or after the appliance
malfunctions or is dropped or damaged in any manner. Call our toll-free customer
assistance number for information on examination, repair, or adjustment.
• The use of attachments, including cups, not recommended by the manufacturer
may cause injury to persons.
• Do not use outdoors or in a damp area.
• Do not let cord hang over edge of table or counter.
• Keep hands and utensils out of container while blending to reduce the risk of
severe injury to persons or damage to the blender. A scraper may be used but
must be used only when the blender is not running.
• Blades are sharp. Handle carefully.
• Always operate blender with lid in place.
• Do not blend hot liquids.
• Cup must be properly tightened and in place before operating the appliance.
• Do not use appliance for other than intended use.
• Do not attempt to defeat the interlock mechanism.
SAVE THESE INSTRUCTIONS
2
AFTER SALES SUPPORT
USA
888-315-8407
[email protected]
MODEL: RJ28-17 SERIES
Safety Instructions (cont'd)
ds
If a
as
d
ess
R IF
odor.
een
d
ess
by a
SHORT CORD INSTRUCTIONS
A short power supply cord is provided to reduce the hazards resulting from
entanglement or tripping over a longer cord. Longer detachable power-supply cords
or extension cords are available and may be used if care is exercised in their use. If
a longer detachable power-supply extension cord is used:
1. The marked electrical rating of the cord set or extension cord should be at least
as great as the electrical rating of the appliance, and:
2. The cord should be arranged so that it will not drape over the counter top or
tabletop where it can be pulled on by children or tripped over unintentionally.
LINE CORD SAFETY TIPS
1. Never pull or yank on cord or the appliance.
2. To insert plug, grasp it firmly and guide it into outlet.
3. To disconnect appliance, grasp plug and remove it from outlet.
4. Before each use, inspect the line cord for cuts and/or abrasion marks. If any
are found, this indicates that the appliance should be serviced and the line cord
replaced. Please return it to an authorized service representative.
5. Never wrap the cord tightly around the appliance, as this could place undue
stress on the cord where it enters the appliance and cause it to fray and break.
DO NOT OPERATE APPLIANCE IF THE LINE CORD SHOWS ANY DAMAGE OR
IF APPLIANCE WORKS INTERMITTENTLY OR STOPS WORKING ENTIRELY.
This appliance must be grounded while in use.
CAUTION: To ensure continued protection against risk of electric shock, connect to
properly grounded outlets only.
IMPORTANT
During the first few minutes of initial use, you may notice smoke and/or a slight
odor. This is normal and should quickly disappear. It will not recur after appliance
has been used a few more times.
This appliance is not intended for use by persons (including children) with reduced
physical, sensory or mental capabilities, or lack of experience and knowledge,
unless they have been given supervision or instruction concerning use of the
appliance by a person responsible for their safety.
3
AFTER SALES SUPPORT
USA
888-315-8407
[email protected]
MODEL: RJ28-17 SERIES
Features
4
AFTER SALES SUPPORT
USA
888-315-8407
[email protected]
MODEL: RJ28-17 SERIES
Operating Instructions
a
b
c
d
e
f
g
h
i
j
k
Seal ring
5
AFTER SALES SUPPORT
USA
888-315-8407
[email protected]
MODEL: RJ28-17 SERIES
Operating Instructions (cont'd)
BEFORE FIRST USE
• Remove all packaging materials, labels and/or stickers from your blender.
• Check that all parts are enclosed and that the unit is not damaged. Clean the
appliance and all accessories.
Warning: Do not immerse the power base in water or any other liquids. This may
result in electrical shock or damage to the appliance (fig. j).
OPERATING INSTRUCTIONS
Before starting any operation, always make sure the power cord is unplugged.
• Place the power base on a flat surface. Make sure that the power cord is
disconnected from power.
• Peel or core any fruits/vegetables and cut them into small chunks. Do not overfill
the cups to avoid spillage:
CUP
MAXIMUM CAPACITY
Tall cup
13.5 oz.
Small cup
2 oz. (solid food)
• Choose the desired cup and fill with prepared food (figs. a / b).
Warning: The blades are very sharp. Always handle blade assemblies with care. Do
not touch the blades, this may cause injuries (fig. c).
Warning: Do not fill cups with hot liquids or run appliance empty.
Hint: For best results, cut solid food into approximately 0.5 inch to 1 inch cubes.
Cut cheese into pieces no larger than 0.5 inch.
• Assemble the appliance according to the food type you would like to process.
CUP & BASE
SUITABLE FOR
Tall cup with Blending base
Blending juices and shakes
Small cup with Grinding base
Grinding coffee beans
6
AFTER SALES SUPPORT
USA
888-315-8407
[email protected]
MODEL: RJ28-17 SERIES
Operating Instructions (cont'd)
Warning: Always ensure the blending base or the grinding base is securely screwed
on and tightened onto the cup or before activating the appliance.
• Connect the power plug to a wall outlet.
• Position the cup with base on the drive shaft (fig. d). To activate the blender, align
the tabs on the cup with the blending base or grinding base and twist clockwise
until it locks in place (fig. e).
• To switch off the blender, turn it counterclockwise until it stops. Disconnect the
plug from the wall outlet before removing the cup from the power base.
Hint: Operate the blender for only as long as needed to reach the right consistency.
Never use the blender for more than 3 minutes at a time. After use, let it cool for at
least 3 minutes before you start using it again.
• Turn the cup around, so that the blending base or grinding base faces upwards.
Unscrew the blending base or grinding base of the cup.
• To ensure that the content stays fresh, screw supplied solid lid on the cup (fig. f).
Hint: Store any unused portions using the solid lid in the refrigerator.
• To remove pulp or larger food particles from your drink, screw either shaker lid
with small holes or shaker lid with large holes onto the cup (fig. g).
• Cover cups with the lip rings to enjoy the freshly made drink directly out of the
cup (fig. h).
7
AFTER SALES SUPPORT
USA
888-315-8407
[email protected]
MODEL: RJ28-17 SERIES
Cleaning and Maintenance
CLEANING
Clean the single server blender after every use. This appliance contains no user
serviceable parts and requires little maintenance. Leave any servicing or repairs to
qualified personnel.
• Always unplug the appliance from the outlet before cleaning:
PART
HOW TO CLEAN
Power base
Power cord with
plug
Clean the outside of the power base with a slightly damp soft
cloth.
Warning: Never immerse the power base in water or other liquids
(fig. j). Never disassemble the power base.
Blades
Caution: The blades are very sharp. Clean carefully. Danger of
injuries!
Blending base
Tall cups
Small cup
Grinding base
Other accessories
Remove the parts from the power base. Rinse under warm
running water, or in the dishwasher. Do not immerse any of
these parts in boiling water. Be careful not to damage or lose the
sealing ring (fig. k).
• Do not use abrasive cleansers.
• Dry all parts and reassemble the appliance (fig. i ).
STORAGE
Clean and dry all parts before storing. Store the blender in its box or in a clean, dry place.
Never wrap the power cord around the blender.
8
AFTER SALES SUPPORT
USA
888-315-8407
[email protected]
MODEL: RJ28-17 SERIES
Recipes
SPICY JALAPEÑO SALSA
½
½ jalapeño pepper; seeds removed
1 fresh tomato; core removed and cut into 4 pieces
1 clove garlic
½ small onion
2 tbsp lime juice
1 tsp salt
⅛ tsp pepper
¼ cup extra virgin olive oil
Combine all ingredients in the tall blending cup. Align cup tabs with base, press down
and twist to begin blending. If necessary, remove cup and shake ingredients in cup to
re-distribute.
SALSA
½
¼ medium onion
½ jalapeño pepper (increase or decrease to taste)
¼ bell pepper (seeds removed)
2 Roma tomatoes
½ peeled clove of garlic (increase or decrease to taste)
1 tbsp fresh cilantro (stems removed)
1 tbsp lemon juice
½ tsp lemon zest
Cut onion into quarters and distribute evenly in tall blending cup. Cut ½ jalapeño pepper
in quarters and distribute evenly in the cup. Cut bell pepper into quarters and distribute
9
AFTER SALES SUPPORT
USA
888-315-8407
[email protected]
MODEL: RJ28-17 SERIES
Recipes (cont'd)
TRADITIONAL BASIL PESTO
½
½ jalapeño pepper; seeds removed
1 cup packed basil leaves
1 clove garlic
2 tbsp pine nuts
⅓ cup parmesan cheese
⅓ cup extra virgin olive oil
Combine all ingredients in the tall blending cup. Align cup tabs with base, press down
and twist to begin blending. If necessary, remove cup and shake ingredients in cup to
re-distribute. Turn cup counterclockwise to stop when desired consistency is reached.
Hint: Replace basil with one cup of sun dried tomatoes to make a delicious tomato
pesto!
FAST AND EASY BEAN DIP
½
1½½ cups into canned or dry cooked beans
3 tbsp mayonnaise or salad dressing
1 clove garlic; finely chopped
Salt and pepper to taste
Combine all ingredients in the tall blending cup. Do not exceed the MAX fill line. Align
cup tabs with base, press down and twist to begin blending. If necessary, remove cup
and shake ingredients in cup to re-distribute. Add water to thin dip, if needed. Turn cup
counterclockwise to stop when desired consistency is reached.
Hint: Add chili or cayenne pepper for an extra kick!
10
AFTER SALES SUPPORT
USA
888-315-8407
[email protected]
MODEL: RJ28-17 SERIES
Recipes (cont'd)
GUACAMOLE
½
1 avocado
¼ cup onion
½ clove garlic, peeled
1 tbsp fresh cilantro (remove stems)
1 tbsp lemon juice
½ tsp salt
Cut avocado in half and remove the seed. Using a spoon, scoop the avocado out of the
shell and place in the tall blending cup. Do not discard the seed. Combine remaining
ingredients in the tall blending cup. Do not exceed the MAX fill line. Align cup tabs with
base, press down and twist to begin blending. If necessary, remove cup and shake
ingredients in cup to re-distribute. Turn cup counterclockwise to stop when desired
consistency is reached. Remove to small serving bowl. Place avocado seed in the
guacamole. The seed will help to keep the guacamole fresh.
CAESAR DRESSING
½
½ cup mayonnaise
½ tbsp lemon juice
½ tsp worcestershire sauce
1 clove garlic
¼ cup parmesan cheese
½ tbsp milk or cream
Salt and pepper to taste
Combine all ingredients in the tall blending cup. Align cup tabs with base, press down
and twist to begin blending. If necessary, remove cup and shake ingredients in cup to
re-distribute. Turn cup counterclockwise to stop when desired consistency is reached.
11
AFTER SALES SUPPORT
USA
888-315-8407
[email protected]
MODEL: RJ28-17 SERIES
Recipes (cont'd)
CREAMY ALFREDO SAUCE
½
½ cup cream cheese
1 cup milk
3 tbsp grated parmesan cheese
1 clove garlic
1 tbsp pepper
½ tsp salt
½ cup fresh parsley
Combine all ingredients in the tall blending cup. Align cup tabs with base, press down
and twist to begin blending. If necessary, remove cup and shake ingredients in cup to
re-distribute. Turn cup counterclockwise to stop when desired consistency is reached.
Place contents into a microwavable bowl and heat to desired temperature. Stir and
serve over hot pasta.
CREAMY EGG-NOG
½
2 egg yolks
¼ cup sugar
¼ tsp salt
¼ tsp vanilla
1¼ cups milk
Add a sprinkle of nutmeg
Combine all ingredients in the tall blending cup. Do not exceed the MAX fill line. Align
cup tabs with base, press down and twist to begin blending. Turn cup counterclockwise
to stop when desired consistency is reached. Serve at desired temperature.
12
AFTER SALES SUPPORT
USA
888-315-8407
[email protected]
MODEL: RJ28-17 SERIES
Recipes (cont'd)
CREAM OF ASPARAGUS SOUP
½
1 cup asparagus heads
1 clove garlic
2 tbsp chopped onions
½ cup chicken or vegetable stock
3 tbsp milk (or cream)
Salt and pepper to taste
Add asparagus, garlic, onion and chicken stock to a microwavable bowl and heat until
asparagus is soft. Combine all ingredients in the tall blending cup. Do not exceed
the MAX fill line. Align cup tabs with base, press down and twist to begin blending.
If necessary, remove cup and shake ingredients in cup to re-distribute. Turn cup
counterclockwise to stop when desired consistency is reached.
CREAM OF SPINACH SOUP
½
1 tsp butter
½ cup onion (chopped)
¾ cup chopped spinach, frozen (thawed to room temperature)
¼ tsp salt
¼ tsp black pepper
1 cup chicken broth
½ cup half-and-half
In a saucepan, sauté onion in butter. Reduce heat to medium and add spinach until
evenly cooked. Add salt, pepper and chicken broth. Bring to boil stirring frequently.
Reduce heat and simmer 5 minutes. Place in refrigerator and allow to cool. Before
serving, add cooled mixture to tall blending cup. Do not exceed the MAX fill line. Align
cup tabs with base, press down and twist to begin blending. If necessary, remove cup
and shake ingredients in cup to re-distribute. Turn cup counterclockwise to stop when
desired consistency is reached. Return soup to saucepan and add half-and-half. Heat
on low to medium heat, stirring until mixture is evenly heated for serving.
13
AFTER SALES SUPPORT
USA
888-315-8407
[email protected]
MODEL: RJ28-17 SERIES
Recipes (cont'd)
CHOCOLATE-BANANA MILKSHAKE
½
1 scoop vanilla ice cream
1 banana
½ cup chocolate milk
Combine all ingredients in the tall blending cup. Do not exceed the MAX fill line. Align
cup tabs with base, press down and twist to begin blending. If necessary, remove cup
and shake ingredients in cup to re-distribute. Turn cup counterclockwise to stop when
desired consistency is reached.
Hint: Add chocolate syrup to make your milkshake even richer!
BANANA-BERRY SMOOTHIE
½
1 banana
½ cup blueberries
⅛ tsp vanilla
½ cup yogurt
½ cup previously finely crushed ice
Splash of orange juice or milk
Combine all ingredients in the tall blending cup. Do not exceed the MAX fill line. Align
cup tabs with base, press down and twist to begin blending. If necessary, remove cup
and shake ingredients in cup to re-distribute. Turn cup counterclockwise to stop when
desired consistency is reached.
STRAWBERRY-BANANA-MANGO SMOOTHIE
½
1 banana
½ cup sliced mango
3-4 strawberries
1 tbsp of orange juice
½ cup yogurt
½ cup previously finely crushed ice
Combine all ingredients in the tall blending cup. Do not exceed the MAX fill line. Align
cup tabs with base, press down and twist to begin blending. If necessary, remove cup
and shake ingredients in cup to re-distribute. Turn cup counterclockwise to stop when
desired consistency is reached.
14
AFTER SALES SUPPORT
USA
888-315-8407
[email protected]
MODEL: RJ28-17 SERIES
Terms and Conditions
CHEFMAN LLC warrants, subject to the conditions stated below, that from the date of purchase, this product will
be free from mechanical defects for a period of THREE (3) years. CHEFMAN LLC, at its option, will repair or replace
this product found to be defective during the warranty period. Should this product become defective by reason
of improper workmanship or material defect during the specified warranty period, CHEFMAN LLC will repair or
replace the same effecting all necessary parts replacements for a period of three years from the date of purchase.
Transportation charges on parts, or products in whole, submitted for repair or replacement, under this warranty,
must be borne by the purchaser.
This warranty is available to consumers only. You are a consumer if you own a CHEFMAN® Ultimate Blender - 17
Piece Set that was purchased at retail for personal, family or household use. Except as otherwise required under
applicable law, this warranty is not available to retailers or other commercial purchasers or owners.
CONDITIONS: This warranty is valid for the original USA retail purchaser from the date of initial retail purchase
and is not transferable. Keep the original sales receipt. Proof of purchase is required to obtain warranty service or
replacement. Dealers, service centers, or retail stores do not have the right to alter, modify or in any way, change the
terms and conditions of this warranty. Warranty registration is not necessary to obtain warranty on CHEFMAN LLC
Products. Save your proof of purchase receipt.
ABOUT YOUR PRODUCT WARRANTY: Most warranty repairs are handled routinely, but sometimes requests for
warranty service may not be appropriate. For example, warranty service would NOT apply if the product damage
occurred because of misuse, lack of routine maintenance, shipping, handling, warehousing or improper installation.
Similarly, the warranty is void if the manufacturing date or the serial number on the product has been removed or
the equipment has been altered or modified. During the warranty period, the authorized service dealer, at its option,
will repair or replace any part that, upon examination, is found to be defective under normal use and service.
NORMAL WEAR: This warranty does not cover normal wear of parts or damage resulting from any of the following:
negligent use or misuse of the product; improper voltage or current; use contrary to the operation instructions;
deviation from instructions regarding storage and transportation; repair or alteration by anyone other than
CHEFMAN LLC or an authorized service center. Further, the warranty does not cover Acts of God, such as fire,
flood, hurricanes and tornadoes. CHEFMAN LLC shall not be liable for any incidental or consequential damages
caused by the breach of any express or implied warranty. Except to the extent prohibited by applicable law, any
implied warranty of merchantability or fitness for a particular purpose is limited in duration to the duration of the
above warranty. Some states, provinces or jurisdictions do not allow the exclusion or limitation of incidental of
consequential damages or limitations on how long an implied warranty lasts, so the above limitations or exclusion
may not apply to you. This warranty gives you specific legal rights, and you may also have other rights that vary from
state to state or province to province.
HOW TO OBTAIN WARRANTY SERVICE: If your CHEFMAN® Ultimate Blender - 17 Piece Set should prove to be
defective within the warranty period, we will repair it, or if we think necessary, replace it. To obtain warranty service,
simply call our toll-free number 1-888-315-8407 Ext: 400 for additional information from our Customer Service
Representatives, or send the defective product to Customer Service at Chefman, 873 Route 45, Suite 101, New City,
NY 10956.
To facilitate the speed and accuracy of your return, please enclose $15.00 for shipping and handling of the product.
Please only pay by money order.
This warranty is effective for the time periods listed above and subject to the conditions provided for within this
policy.
CHEFMAN is a registered trademark of PLUS ITS CHEAP, LLC.
15
AFTER SALES SUPPORT
USA
888-315-8407
[email protected]
MODEL: RJ28-17 SERIES
Warranty Card
®
ULTIMATE BLENDER - 17 PIECE SET
Your details:
Name
Address
E mail
Date of purchase*
* We recommend you keep the receipt with this warranty card
Location of purchase
Description of malfunction:
Return your completed warranty card to :
RJ Brands
873 Route 45
Suite 101
New City, New York
10956
AFTER SALES SUPPORT
USA
888-315-8407
[email protected]
MODEL: RJ28-17 SERIES
Phone lines available Monday to Friday, 9am-5pm EST
AFTER SALES SUPPORT
888-315-8407
3-YEAR LIMITED WARRANTY
[email protected]
MODEL: RJ28-17 SERIES
®
888-315-8407 • [email protected]
MODEL: RJ28-17 SERIES