1
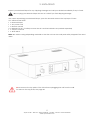
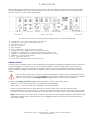
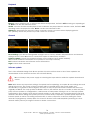
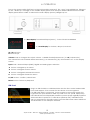
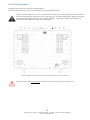
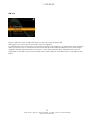
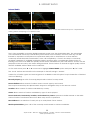
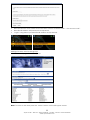
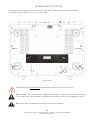
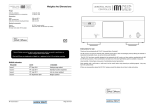
ayon S-3 Vacuum Tube Class-A Network-Player with DAC & Preamplifier Owner’s Operating Manual Ayon Audio – Hart 18 – 8101 Gratkorn – Austria – Phone: +43 3124 24954 www.ayonaudio.com INTRODUCTION Thank you for your purchase of the Ayon Audio S-3 Class-A vacuum tube Network-Player. With this Network-Player, you have entered into the world of exclusive design which will give you great satisfaction and privilege of enjoying the advanced technology of Ayon Audio products. It is designed to serve as a high standard of truthful real musical performance. The care in engineering and manufacturing of this product anticipates a long time of enjoyment. We also encourage you to enlist the aid of the dealer from whom you purchased this Ayon Network-Player. Your dealer is an excellent source of information on compatibility, installation, and troubleshooting, and should be capable of helping ensure that your overall music system provides you with maximum performance and satisfaction. SAFETY INFORMATION Please read this owner’s manual to obtain the full benefit of the S-3 Network-Player in your system. This manual provides you with necessary safety information and operation procedures for this unit. Keep the manual always handy that you can read it at any time. To prevent shock or fire hazard do not open the unit or expose to rain or moisture. Refer all service to Ayon Audio or an Ayon Audio authorized service facility. There are no user’s serviceable parts inside the S-3. Refer all internal service, updates, or modifications to qualified service personnel. High voltage is present inside an operating S-3. Do not remove bottom plate or insert any objects through openings in the case. OPERATING VOLTAGE The operating voltage is factory set for the destination country and is not user adjustable. Unauthorized attempts to modify the operating voltage may damage the unit and will void the manufacturer warranty. FUSE The AC power line fuse is located in a snap-out receptacle on the underside of the power inlet (rear panel). The correct value of “slow-blow” fuse is 1A (2A for 120V version). Do not replace the fuse with a higher than indicated. Disconnect the power cord before changing fuse. A blown fuse in your unit can be an indication of a serious problem. If a replacement fuse fails as well, no further attempts should be undertaken. Please contact the factory for professional service. Serial Number: Voltage: Ayon Audio Distributor: In normal operation, the unit dissipates a small quantity of power at all times, and it is important that it is 2 Ayon Audio – Hart 18 – 8101 Gratkorn – Austria – Phone: +43 3124 24954 www.ayonaudio.com TABLE OF CONTENTS 1. Precautions, Installation & User Information 2. Unpacking 3. Installation 4. Network – Settings (first time) 5. General - Settings 6. Operation 7. USB Rear 8. Internet Radio Analog connection Digital connection Network connection „Direct“ connection on power amplifiers 1st setup for wired installations 1st setup for wireless installations Scan WPS Manual Time User interface Playback General Software update USB front – stick or hard drive Turn off procedure vTuner favorite radio station list 9. Media Server 10. Remote Control Enter text with the number character buttons 11. Ayon Audio Control App 12. Break-in 13. Signal Vacuum Tubes Tube life expectancy Note some special properties of the 6H30 Why vacuum tubes Ayon tube testing process 14. General Specifications 15. Software Feature List 16. Network Specification List 17. Troubleshooting 18. Remove - Top Plate 19. Warranty & Service 3 Ayon Audio – Hart 18 – 8101 Gratkorn – Austria – Phone: +43 3124 24954 www.ayonaudio.com 1. PRECAUTIONS, INSTALLATION & USER INFORMATION 1. Always make sure your hands are clean and free of any dirt or oils before carrying. 2. Carry the Network-Player with both hands by gripping the sides of the unit. 3. Never hold the face plate against your clothing as coarse materials such as stitching, belts, and the rivets from denim pants can mar the surfaces. 4. Never put any objects directly on top of the unit. 5. Use a soft cloth with non-abrasive cleaning product to clean your Network-Player. 6. Take care of the precision toggle switch selectors at the rear panel when moving or transporting the S-3. 7. The unit should be put on an adequate ventilated place; it is normal for a vacuum tube Network Music Player to runs warm if used for prolonged periods. 8. Avoid prolonged exposure of the appliance to direct sunlight. 9. The power cord must be earthed . Never touch power plug with wet hands. 10. Disconnect from power before removing top plate is mandatory. 11. Important: To switch on or off always use the power switch of the equipment, the power switch (on/off) is located at the front left corner of the bottom plate. 12. The S-3 must be protected from humidity – if the unit is moved from a cold place to a warm room, leave the unit for 3 hours or so to allow sufficient time for the moisture to evaporate. 13. The electronics in modern hi-fi equipment is complex and may, therefore, be adversely affected or damaged by lightning. For protection of the audio system during electrical storms, remove the mains plugs. 14. Important: Never remove the bottom plate; all electronic components are mounted on it. 15. For best performance, place the S-3 on a solid, horizontal and non-resonant shelf where there is no risk of being knocked or subjected to vibration such as from loudspeakers. 16. The S-3 should not be left running when not in use. If you will not be listening to the Network Music Player for more than an hour, it is advised that the player be turned off. Unlike solid state players, tube output stage players should be shut down when not being used. This will greatly prolong tube life. 17. Reseating Tubes: Normally, reseating tubes upon delivery is not required. However, if any tubes have noticeably drifted out of position due to high transportation stress, it will be advisable to reseat the tubes. 18. Unauthorised opening of the equipment will invalidate any warranty claim. 19. Warning: Never attempt any measurement or adjustment yourself as voltages inside the NetworkPlayer can be lethal. Do not work inside a tube Network-Player when you are not qualified to do so. 4 Ayon Audio – Hart 18 – 8101 Gratkorn – Austria – Phone: +43 3124 24954 www.ayonaudio.com 2. UNPACKING Inspect your Network-Player for any shipping damage and call your dealer immediately if any is found. Do not plug your Network-Player into an AC outlet if you find shipping damage. Use care in unpacking your Network-Player, open the box and remove the top layer of foam. You will see these items: 1 1 1 2 1 1 x x x x x x Network-Player AC power cord Remote control Batteries for RC, for safety reasons the RC and the batteries are packed separately Owner’s manual Wi-Fi aerial Note: We advise saving all packing materials so that the unit can be easily and safely shipped if the need arises. Never remove the top plate of the S-3 before unplugging the unit from the wall. For remove the top plate, see page 40. 5 Ayon Audio – Hart 18 – 8101 Gratkorn – Austria – Phone: +43 3124 24954 www.ayonaudio.com 3. INSTALLATION When making any connections to this component or any other device, make sure the power amplifier and the preamplifier are OFF and disconnected from the AC current. Switch off the S-3 whenever you need to connect or disconnect any cables! Rear panel ► All input and output connectors are clearly marked on the rear panel ◄ ● ● ● ● ● ● ● ● ● ● ● ● Analog OUT / main – RCA or XLR (right & left channel) Analog Line – IN1 / IN2 & OUT (preamp section) USB – Input ( Type “A” ) Ethernet – Connetor WiFi – Antenna Gain - toggle switch / High (+6dB) or Low (0dB) Analog Out mode - toggle switch / Normal or Direct amp Analog Out - toggle switch / switchable between RCA & XLR mode Digital In – Coaxial, BNC, I2S, Optical ( TosLink) & AES/EBU (DAC section) Digital Out – Coaxial (DAC section) AC In - power inlet with fuse Power Phase - indicating lamp, 230V Schuko only ANALOG OUTPUT Connect the S-3 analog output to the appropriate preamplifier or integrated amplifier input or directly to a power amplifier. To connect your S-3 to a power amplifier or active-loudspeaker, ensure that your power amplifier or active-loudspeaker is turned off then connect your analog interconnects from the Network-Player analogue outputs to the amplifier’s inputs. We recommend to use RCA interconnect cables. If you use the S-3 directly to amp(s) or active-loudspeaker, caution must be exercised that the volume is down to the “min” setting. Note: On the player’s display -60 is mute and 0 is maximum volume. Or you select via analog out mode toggle switch to “direct amp” operation. ● Select via analog out mode toggle switch between “normal” and “direct amp”. “Normal” – If you connect the S-3 to an integrated or preamplifier. “Direct amp” – If you connect the S-3 directly to a power amplifier. Please use this mode when to drive directly your power amp. In this case the volume level is automatically down to -40 (every time - power on) and the function “fixed”– bypassed / max. volume (VOL SEL at the RC Handset) is turned off for security reason to protect your power amp and speaker. Note: “Fixed” mode: (VOL SEL button at the RC Handset); the audio signal is bypassed (the electricallycontrolled analog volume control system is not engaged) and runs directly to the analog vacuum tube output stage. 6 Ayon Audio – Hart 18 – 8101 Gratkorn – Austria – Phone: +43 3124 24954 www.ayonaudio.com The S-3 is equipped with two analogue output configurations: Single-ended via RCA connectors and balanced via XLR connectors. Note: The output in balanced (XLR) mode is 6dB higher than for single-ended (RCA) mode. The XLR pin configuration is: Pin 1 Ground Pin 2 Non-inverting ( plus + ) Pin 3 Inverting ( minus - ) ● Select via analog out toggle switch between “RCA” or “XLR” mode. When you have a RCA connection you must put the analog-output-toggle switch (analog out) on position RCA. When you have a XLR-connection you must put the analog-output-toggle switch (analog out) on position XLR. ● Select via gain toggle switch between “low” and “high” gain. ANALOG LINE (Preamp / input & out) The S-3 is equipped with 2 pair (In 1 and In 2) analog inputs (RCA) to connect analog sources to Line 1 or Line 2 and with an output (Out/ 2V fixed /RCA) for connection to a tape, headphone or other device. Note: The analog inputs are pure analog from beginning to end. DIGITAL OUTPUT (DAC) The S-3 is equipped with one S/PDIF (75 Ω) coaxial digital output in order to send this output to a digital recording device or external D/A processor. DIGITAL INPUT (DAC) The S-3 is equipped with one S/PDIF (up to 24/192kHz) coaxial digital inputs, one BNC (up to 24/192kHz), one I2S (up to 24/192kHz), one Toslink (up to 24/192kHz) and one AES/EBU (up to 24/192kHz) to receive digital signals from separate digital components. All digital inputs automatically adjust to any of the standard digital-audio data-rates from 16/44.1 kHz to 24/192 kHz. The internal DAC also up sample any digital-audio input signal to 24/192 kHz when this function is activated. (24/192 symbol – illuminate red) If connecting digital input(s) to Home Theatre Processor, TV or DVD, or similar Home Theatre sources, it may be necessary to change the digital output of that source to “16 bit stereo PCM”, or similar, which is the format the S-3 will understand. Please refer to the source unit’s manual for information on how to do this. This is because the S-3 does not recognize multi channel (e.g. 5.1 surround) digital audio streams. USB INPUT ( Networkplayer ) The S-3 is equipped with two USB (type ‘A’) inputs, one on the rear panel and one on the front panel. ETHERNET: Connect the unit to the network permanently with RJ45-RJ45 “straight through” (not “crossover”) networking cable. Use cable suited to the network type, e.g. 10/100 base-T (most home networks). This allows the unit to be plugged into a computer network, and is strongly recommended where a wired connection is already available or can be installed. Standard UTP RJ45 networking cable should be used to connect the unit to the networking router. WIRELESS: Connect the supplied aerial to the SMA connector on the rear panel. An RP-SMA threaded socket is provided to attach the supplied Wi-Fi aerial to the unit. Make sure that the nut on the aerial lead is tightly screwed to the SMA (threaded) plug on the rear of the S-3. For this wireless connection a Wi-Fi network (Wi-Fi router) is required. Wi-Fi signal reception and reliability depend on local conditions and placement. Place the aerial for best possible signal strength. If signal strength is weak or erratic, try moving the aerial or unit for best reception. Also make sure no nearby electrical/electronic equipment is causing interference as this could affect reception. Note: That concrete and/or reinforced wall will always reduce a Wi-Fi signal considerably. In particularly difficult reception circumstances, it may be necessary to switch to wired networking, for best reliability. 7 Ayon Audio – Hart 18 – 8101 Gratkorn – Austria – Phone: +43 3124 24954 www.ayonaudio.com POWER INLET (AC IN): Plug the S-3 into a standard wall AC receptacle. Never connect the digital input or output on a non-digital input of an amplifier, such as AUX, CD, TAPE, PHONO, etc. Damage may occur! PHASE INDICATOR: When the power phase control indicator glows red the Phase polarity is wrong. Reverse the AC plug! This feature was developed only for the safety plug version (EU). For non-EU-countries it can be switched off. The phase-light can always glow in the following cases even if the phase is applied correctly: ● in an old electrical installation (old buildings) where the neutral conductor voltage mostly is higher than 0V and this is already sufficient to bring the lamp to glow. ● when an external AC generator is used with a 2 x 115 V balanced output or with a so-called external isolation transformer or power line conditioner. Some proprietary general particularities concerning the „direct“ connection on tube and solidstate power amplifiers respectively When connecting the NW-player* “directly” with the power amplifier usually the basic noise of the tubes will be audible a little more than when connected via a preamplifier (additional buffer stages etc.). This characteristic is absolutely normal. Of course, it depends upon the input sensitivity of the power amp and the efficiency of the speakers (e.g. with horn designs of 95-105 dB and more the noise is more audible than with conventional speakers of 80-91 dB). Furthermore you really should set the “gain”-switch of the NW-player to “low” and, if feasible, reduce the input sensitivity of the power amp to minimum. Please consider also that the output level is +6dB higher when using XLR than with RCA/Cinch. Exceptions for the „direct“ connection of the NW-Player with solid-state power amplifiers or active loudspeakers: There are some solid-state power amplifiers or active loudspeakers, with which you rather should not use the symmetrical connection, or where, as the case may be, a loud hum modulation, high-frequency interference signals or a so-called “oscillation” can occur. The Ayon 6H30-tube output stage* is designed extremely puristical and “short”; i.e. absolutely no negative feedback, no correcting or compensating devices and no filter in the circuit. (See also the note about the special properties of the 6H30 tube). But “pure tube” design also means a big and difficult challenge in realization for our engineers; and also e.g. we would respect some non-important measuring data to a much lesser extent. All these puristical sound-techniques require that the electrical interface parameters of the subsequent power amplifiers should match the ones of the NW-Player in accordance with the standards. Typically the input impedance of power amplifiers is 47k or above. However, there are solid-state power amplifiers with a lower value (down to only 1.8k). I.e., there is a significant matching problem between the NW-Player and the solid-state power amplifier (impedance, capacity, phase rotation etc.; in special cases there may also be a problem of a difference in the grounding-potential of the connection). Furthermore some solid-state power amplifiers possess not too big an input override rigidity (but paradoxically in addition a high input sensitivity); therefore additionally they quickly are overcharged by the “strong puristic” symmetrical output stage of the NW-Player. Therefore, in case of symmetrical input values below 47k we strongly recommend to use the asymmetric RCA/cinch connection or a classic separate preamplifier. Note: in case you really wish to use the symmetric “direct” connection, we can adapt the NW-Player to the special electric properties (power amplifier or active speaker) to a large extent at your costs. Please note that then the NW-Player can only be operated at optimal conditions with this particular solid-state power amplifier or another with very similar electrical input parameters. 8 Ayon Audio – Hart 18 – 8101 Gratkorn – Austria – Phone: +43 3124 24954 www.ayonaudio.com 4. NETWORK - SETTINGS Network Setup – (first time) Networking introduction When unit is turned on for the first time or when the network is changed, e.g. from wired to wireless or vice versa, the unit will require set-up before network functions such as internet radio or media streaming are available. This has to be done only once for a specific network configuration, as the unit will remember the settings even when switched off and unplugged. 1st setup for wired installations: (recommended, when a wired network RJ45 plug is available) Switch off your S-3 and plug the supplied 10/100 RJ45 (also called UTP) cable into the NETWORK socket on the rear panel. Plug the other end into the router or wall socket of your local network. Switch the unit on and wait for it to start up. Once the unit is on, press the ►/OK button to go to the top of the main menu (“Favorites” should be highlighted). Use the “navigate down” ▼ button to go to the bottom of the list so “Settings” is highlighted. Press the “►/OK” button. Now “Network” is highlighted. Press the “►/OK” button again. Now “Network setup” is highlighted. Press the “►/OK” button and now “Wired” is highlighted. Press the “OK” button again and the system will flash up a message on white background asking to confirm wired mode operation. (Also in case wireless was previously selected). Press “►/OK” or “►” to confirm, or “◄” to back out. The unit will now set itself to run in wired mode. Under “Wired”, “Network Settings”, “Settings” the most common setting should be selected automatically: “Automatic (DCHP)”. This should be suitable for most home networks. We do not recommend changing this setting, unless the network administrator or provider advises that changing it is necessary. Note: The wire LAN connection can stream audio files up to 24 bit/192 kHz depending on computer network settings. 9 Ayon Audio – Hart 18 – 8101 Gratkorn – Austria – Phone: +43 3124 24954 www.ayonaudio.com Possible configurations of the S-3 in the network and for internet access (1) integration into the network o the setting „automatic (DHCP)“ automatically integrates the unit into the network. o if you want to integrate the unit manually using a static IP-address and all other related you need to select “static IP-address”. In subsequent windows you thwen can enter the IP-address, the subnet-mask, the gateway-address, the DNS-server, and an alternate DNS-server. Entering the respective data is only possible by means of the keypad of the remote control. Sequence of entering the static IP-address and all subsequent: Press “►/OK” or “►” to confirm, or “◄” to back out. (2) internet access o with „Proxy OFF“ (default) the unit accesses the internet without a proxy. o selecting „Proxy ON“ you can define a proxy for internet access. Press “►/OK” or “►” to confirm, or “◄” to back out. 10 Ayon Audio – Hart 18 – 8101 Gratkorn – Austria – Phone: +43 3124 24954 www.ayonaudio.com 1st setup for wireless installations: Switch off your S-3 and plug the supplied aerial into the gold ANTENNA SMC threaded plug on the rear panel. Make sure the pin in the plug is straight, and then place the socket of the aerial lead over the plug. Tighten the nut on the aerial lead (by hand, do not use tools) and make sure the aerial is placed as high as possible, in direct line of sight of the wireless router/hub. Switch the unit on, and wait for it to start up. Once the unit is on, press ►/OK button to go to the top of the main menu (“Favorites” should be highlighted). Use the “navigate down” ▼ button to go to the bottom of the list so “Settings” is highlighted. Press the “►/OK” button. “Network” is now highlighted. Press the “►/OK” button again. “Network setup” is now highlighted. Press the “►/OK” button and select “Wireless”. Press the “►/OK” button again and the system will flash up a message on white background asking to confirm wireless mode operation. (Also in case wired was previously selected). Press “►/OK” or “►” to confirm, or “◄” to back out. The unit will now set itself to run in wireless mode. Scan Select “Scan” to view the locally available wireless networks. Take care, as other people’s networks nearby may also be shown in this list; please make sure that your correct network is chosen. Using the up/down arrow keys to enter the required key. Press “►/OK” when done. If successful, the unit will revert back to “network setup”. Correct setup may be checked by selecting “network info”. The unit should report back with an IP address e.g. “192.168.0.254” (Note: these numbers are different in different network setups). Make sure that the required wireless network’s name (also referred to as “SSID”) is known. The network access key ”WEP”, “WEP/PSK”, “WPA” or “WPA2” will also be required. The network/internet provider should be able to help if required. When using wireless, please note that for reliable and sound audio performance a strong signal is required, usually 2 bars on the signal strength meter. Move and position the aerial for best possible reception. External interference and/or signal absorption will still affect performance of the receiver and in extreme cases a wired connection should be considered. Note: WLAN keys are case sensitive; this means that the system distinguishes between lowercase and uppercase characters. The S-3 will remember all user logins and passwords. It will also remember the previous text entered in search fields. Note: The wireless WLAN connection can stream audio files up to 24/96 kHz depending on computer network settings. 11 Ayon Audio – Hart 18 – 8101 Gratkorn – Austria – Phone: +43 3124 24954 www.ayonaudio.com WPS The Wi-Fi Protected Setup method can be done either by the "PIN Code" procedure or the "Push Button" procedure. Choose the procedure which fits your environment. PIN Code Move the cursor on the "PIN Code" entry and press “►/OK” to continue. A list with available WLAN networks will appear supporting the WPS - PIN Code method. Choose the one you want to connect to and press “►/OK”. A window will pop-up with a PIN code in it. Enter that PIN into the access point’s system administration or give it to the administrator of the network. You have a time period of 2 minutes to enter the key. When entering the key was successful the connection will be established. Push Button Move the cursor on the "Push Button" entry and press “►/OK” to continue. A new window will pop-up with the advice to press the button on the target access point (router). You have a time period of 2 minutes to press the button on the desired access point. Press the WPS button of your access point (router) and wait until the WPS procedure has been completed. 12 Ayon Audio – Hart 18 – 8101 Gratkorn – Austria – Phone: +43 3124 24954 www.ayonaudio.com 5. GENERAL – SETTINGS Settings Network The settings options are available at the bottom of the main menu. These settings should only need to be made after first power-up and should remain until unit is updated, where upon they may need to be reset. There are various settings which allow the unit to be prepared for day to day use. Scroll up and down the list and select the chosen option with the ►/OK key. A green tick will show which option is in force. The first settings for Networks are described in proper detail under Network setup, see pages 9 - 12. Time Time Zone allows the local time zone to be set. This ensures correct automatic operation of the clock functions for the locality, for example daylight saving. Select the closest local time zone possible to ensure the time functions are correctly implemented. Note: an internet connection is required for displaying the correct time. Daylight Saving switches on or off the daylight saving feature. Show Clock gives current time and date as set in the S-3. User Interface Language allows menu items to be displayed in local language. Options are English & German. Themes give a choice of four background themes. Display Timeout allows the display to be switched off after a selected period of time since last remote button press. The default is OFF, but can be set to various times between 10 seconds and 1 hour inclusive. When display goes blank, pressing any key on the remote (apart from the CD player, DAC… keys) will bring the display back. 13 Ayon Audio – Hart 18 – 8101 Gratkorn – Austria – Phone: +43 3124 24954 www.ayonaudio.com Playback Repeat selects whether one, or all no tracks listed are repeated, default is OFF meaning no repeating at all. Note: can also be selected via RC. Shuffle chooses whether media player tracks or albums are played back in random order, default is OFF meaning tracks are played in order. Note: can also be selected via RC. Slideshow determines the amount of time a picture is shown on screen when displaying photos. OFF (default) means the picture stays until a new one is chosen. General Reset Settings puts all user changeable settings back to factory defaults. All preferences and network settings are lost. Press ◄ button to cancel if this option is selected by accident. Software update checks for updated software on the internet (Ayon Audio website). Will not work if internet connection is not present or not setup correctly. Info Product hardware and software version information. Legal notices and comments. Software update The S-3 has a flexible design that allows updates to be issued from time to time. These updates are downloaded via the network and into the unit itself directly. Do not interrupt the power supply or switching the input selector while the update download is active. Note: Write down any important settings, if required, before updating, as maybe all user settings are reset during this process. The nature of these updates will not normally affect the sound quality, but functionality to a greater or lesser degree, and may or may not provide further features that were not originally available. The only update available is that on the website. We do not make or allow any third party custom updates or configurations, and beware of third parties offering to do so. The only update supported by Ayon Audio is that which currently resides on the website. It is recommended the unit and network is left alone during the update process to ensure timely completion. Update speed depends on internet speed as well as coinciding network traffic to other computers or devices sharing the same network router/gateway. Always allow for at least 5 minutes for broadband/ADSL (assuming no other network traffic present) or longer for slower or busier connections. 14 Ayon Audio – Hart 18 – 8101 Gratkorn – Austria – Phone: +43 3124 24954 www.ayonaudio.com 6. OPERATION Turn on the power switch (left-front on the bottom plate mounted). The “ayon” logo will light up, followed by the “Warm Up” message on the smaller display panel. Then an input will be indicated on the smaller display panel. When “NWP” is selected the main display (screen) will light up too. ← Main Display for Network Player (menu) - Color LCD QVGA 320x240 ← Small Display for Volume, all Inputs, Mute etc. 24/192 indicator IR receiver eye Volume Knob: It changes the output volume - variable from 0 (Volume max.) to -60 (Volume min.). The volume for both channels will be increased (+) or decreased (-) by an increment of 1 on the display screen. Input Knob: Network Player (NWP), Digital and analog input selection. ▲ button: Navigate up in menus ▼ button: Navigate down in menus ◄ button: Navigate backwards in menus ► button: Navigate forward in menus ►/OK button: Confirm / selects item Return button: Return to playback USB Front Plug in a USB stick drive or USB hard drive into the front socket marked USB Front. Wait approx. 5-10 seconds for the device to be recognized. If a USB hard drive is connected, it may require its own power supply too. In general, the port should be able to power most 2.5” (small, laptop size) hard disk drives but will probably need the power supply originally supplied with hard drive to power 3.5” hard drives (desktop size). USB RAID boxes are not supported on the USB socket. From the Main Menu select USB Front. The directories on the USB pen are listed. 15 Ayon Audio – Hart 18 – 8101 Gratkorn – Austria – Phone: +43 3124 24954 www.ayonaudio.com Other USB storage devices Some mobile devices and modern phones can also be read as if they were USB storage. The device or phone will need to be setup for “Mass Storage” or “Hard Disk” mode or similar (see device documentation). It can then be plugged into the USB Front socket on the front, using original USB cable supplied with the mobile device. It should then be recognized by the USB host controller in the S-3. Navigation is then the same as with any other USB Drive. See also note below about USB drive formatting. A note about storing music on computer and USB drive. For best usability with USB storage, it is recommended that the music is organized on the USB pen/drive in an orderly manner. For example: <USB driver letter>\<Artist name>\<Album name>\<song title>.type or if the USB drive letter is e: on the computer: This is the way most libraries are kept in computer internal hard drives by default, so should be easy to maintain. USB drive formatting The S-3 will recognize FAT16 or FAT32 formatted USB pen/disk drives. No other formats are supported. If required, any information on the drive should be backed up to a host computer, and the drive reformatted to suit (FAT32 recommended as it handles larger storage more effectively). Then the files may be replaced onto the drive and should then be readily recognized. Note: The S-3 will only recognize the FIRST partition on drives or devices that are formatted or appear as multiple partitions/memories. Formatting of hard disks with FAT32 By default Windows XP and Windows 7 format hard disks larger than 32 GB with NTFS. To format larger hard disks with FAT32 small and easy to use programs are required, e.g.: HP USB Disk Storage Format Tool (freeware, http://www.softpedia.com/get/System/Hard-Disk-Utils/HP-USBDisk-Storage-Format-Tool.shtml) Start the program as administrator. 16 Ayon Audio – Hart 18 – 8101 Gratkorn – Austria – Phone: +43 3124 24954 www.ayonaudio.com After selecting File system FAT32 and pressing Start the disk is formatted with FAT32. Another choice is format32 in the GUI-version. (freeware, http://www.ridgecrop.demon.co.uk/guiformat.htm) Select the drive, enter a volume label and press start. 17 Ayon Audio – Hart 18 – 8101 Gratkorn – Austria – Phone: +43 3124 24954 www.ayonaudio.com Turn OFF procedure ● Always turn down the volume to minimum first. ● When powering down your system, always turn the amplifier off first. If the S-3 was turned OFF even for a short period of time, you should wait at least 30 seconds before turning it back ON. Do not turn it ON then OFF and then ON again in quick succession. This precaution will minimize the stress (high voltages) on internal components. Follow this procedure each time you turn your S-3 OFF/ON. Bottom plate - power switch (left-front on the bottom plate mounted) Never remove the bottom plate; all electronic components are mounted on it. 18 Ayon Audio – Hart 18 – 8101 Gratkorn – Austria – Phone: +43 3124 24954 www.ayonaudio.com 7. USB REAR USB rear Plug in a USB stick drive or USB hard drive into the rear socket marked USB. Wait approx. 5-10 seconds for the device to be recognized. If a USB hard drive is connected, it may require its own power supply too. In general, the port should be able to power most 2.5” (small, laptop size) hard disk drives but will probably need the power supply originally supplied with hard drive to power 3.5” hard drives (desktop size). USB RAID boxes are not supported on the USB socket. From the Main Menu select USB rear. The directories on the USB pen are listed. 19 Ayon Audio – Hart 18 – 8101 Gratkorn – Austria – Phone: +43 3124 24954 www.ayonaudio.com 8. INTERNET RADIO Internet Radio The Internet Radio function requires an internet connection. Please ensure that network setup on is completed and working before attempting to use internet radio. The S-3 has capability to receive digital broadcasts made over the World Wide Web. The advantage over normal radio is that any radio station (that transmits on the internet, and most now do) can be listened to anywhere on the planet in crystal clear clarity with no interference or other artifacts commonly associated with normal radio. It uses a list compiled by “vTuner” who keep a constantly updated catalogue of available worldwide stations and thus gives a considerably wider choice of listening over FM or even DAB! The quality and bit rate is determined by the radio station, and the S-3 will playback at the rate set by the station being received. Some stations do transmit a higher quality service which if available, will be visible on the station list. On the main menu press ▲ or ▼ on remote to highlight Internet Radio option and press “►/OK” or ►. The “local” stations are listed first in the example to the left, being in “Austria”. A selection of station types and musical genres is available under this option for quick selection of desired choice of listening. Recently Played gives a list of recently played radio stations for easy recall. Search Stations allows search of station name or music type by text search. Text may be entered by the alphanumeric keypad or navigation keys on the remote control. Location allows search of stations worldwide by country. Genre allows search of stations worldwide by type of music played. Search Podcasts, Podcasts by location, and Podcasts by Genre operates in similar manner to the radio station functions mentioned above but allow easy access to podcasts. New Stations lists a selection of newly set up or newly listed vTuner stations. Most Popular Stations gives a list of the currently most listened to stations worldwide. 20 Ayon Audio – Hart 18 – 8101 Gratkorn – Austria – Phone: +43 3124 24954 www.ayonaudio.com vTuner favorite radio station list. Internet radio service provider vTuner also allows a custom list of stations to be generated, so it is not necessary to wade through thousands of stations to find old favorites. To take advantage of this feature (it’s free and available worldwide), a unique access code is required. The access code is given under the option Get access code under Internet Radio; as highlighted to the left. Note: Each time this function is accessed a different access code will be given. Make a note of the access code displayed on the screen (do not use the one shown here in the manual). On a computer (PC or Mac), bring up the internet browser and type the following into its address bar: http://streamunlimited.vtuner.com (using all small letters and no spaces). The vTuner website should appear. If this is the first time, it is necessary to “register”. Press the “register here” button on screen and follow the onscreen instructions to create a user account. See page 19. As the vTuner service website may change it is politely requested that the instructions from the website itself are followed, as they will be the most up-to-date. If the user already has an existing vTuner account setup with a different product; it is possible to add the S-3 as another media player on the vTuner personal account page. Once set up, the vTuner stations can be browsed and favorites stored in a personal favorites folder. This folder will also appear on the S-3 under My Favorites in Internet Radio and will also show the stored favorites as chosen online. It is then a much easier task to select and play the desired radio station from a smaller favorites list. Summary of available functions & Instructions for customisations via a web-portal The vTuner menu supports the selection of internet radio stations and podcasts in various ways. → Based on the S-3 IP address local stations are listed. → Stations or Podcasts visited recently are listed → Stations can be found by name → Stations can be found based on their location (continent, country) → Stations can be found via music genre → Podcasts can be found by name → Podcasts can be found based on their location (continent, country) → Podcasts can be found via genre → Stations recently added to vTuner are displayed → Stations most frequently listened to by the vTuner community → For setting up a vTuner account – see further below → All favorite settings are deleted What can be done via the web-portal Stations can be organised via freely definable favorite groups. Stations not listed by vTuner can be added. Preparation A PC or Mac with an internet browser and the S-3 connected to the internet is required. In order to manage your stations an account needs to be created via the web-portal as a first step. Go to http://streamunlimited.vtuner.com Click “Register here” – following page is presented. 21 Ayon Audio – Hart 18 – 8101 Gratkorn – Austria – Phone: +43 3124 24954 www.ayonaudio.com Enter the access code, which is found in the S-3 menu “Internet Radio – Get access code”. Enter Email address and password as requested. “Login” using above provided Email address and password. Adding favorites and favorite groups The “home” page of the web-portal. Note: To return to this view press the “home” button on the left upper corner. 22 Ayon Audio – Hart 18 – 8101 Gratkorn – Austria – Phone: +43 3124 24954 www.ayonaudio.com Select any listed station – via search function, browsing filter or genre – by pressing As a next step a favorite groups name has to be entered. The created favorite group (together with the favorite station(s)) appears on the home page and as first line in the Internet radio menu of the S-3. Adding unlisted radio stations Select “My added stations”, following page is shown. Enter all requested information. Press to add station to favorites. Remark: In addition to the “favorites” provided by vTuner any selected station (listed stations or manually added station) can be defined as “favorite” on S-3 level by pressing the ►/OK button. Those “favorites” are shown in the main menu: 23 Ayon Audio – Hart 18 – 8101 Gratkorn – Austria – Phone: +43 3124 24954 www.ayonaudio.com 9. MEDIA SERVER The media server function allows playback of music (and pictures) stored on a personal computer or a DLNA NAS (Network Attached Storage with an installed media server) connected to the same network as the S-3. The Media server Function requires a connected network. Please ensure that network setup is completed and working before attempting to use media server. From the Main Menu select Media Server. A list of available music servers on the network will be shown. If none are shown, media sharing must be enabled on the required computer. For example, on a PC running Windows XP, Vista or 7, enable media sharing in Windows Media player or some other 3rd party software applications. Please go to “help” in the Media Player application for more information. For Apple computers, a 3rd party application such as “Twonky Media” or similar is necessary. N.B. “iTunes” does not support streaming music by itself directly to the S-3. Media Server Picture 1 Picture 2 Picture 3 ► Button: For scroll forward to Picture 2 or to Picture 3, respectively back again to Picture 1. 24 Ayon Audio – Hart 18 – 8101 Gratkorn – Austria – Phone: +43 3124 24954 www.ayonaudio.com Select the music server required. For shared music, select Music. MUSIC All Music lists all the songs in alphabetical order. Genre lists all songs by musical type e.g. classical, jazz etc. All Artists allows selection of music by artist name in alphabetical order. Contributing Artists allows selection of music by contributing artist name in alphabetical order. Album Artists allows selection of music by album artist name in alphabetical order. Composers lists all music by composer. Albums list music by album name in alphabetical order. Ratings lists music by ratings. Music Playlist lists custom play lists. Folders Shows folders in the shared location. Using remote control navigation keys navigate the playlist/artist/album listings and select the track required. Press “►/OK” to start playing. PICTURES The color screen can also be used for shared photos on the computer under the “Pictures” option. All Pictures lists pictures in alphabetical order. Pictures by date taken lists pictures by date taken. Albums list picture albums if present. Keywords lists picture by tagged keywords. Rating lists picture by rating. Picture Play lists picture play list for slideshow effect. Folders allow access to further folders in the shared directory. PLAYLISTS The last option shows both picture and music play lists by name in alphabetical order. Using navigation keys highlight the required playlist and press “►/OK”. 25 Ayon Audio – Hart 18 – 8101 Gratkorn – Austria – Phone: +43 3124 24954 www.ayonaudio.com 10. REMOTE CONTROL Remote control Equivalent buttons on the remote control have the same functions as those on the front panel of the unit. Other functions are only available by remote control. As the handset uses an invisible infra-red light beam, the front edge must be pointed directly towards the receiver window at the front of the player, without visual obstruction between them. Avoid allowing direct sunlight or florescent lighting to fall directly on the IR receiver (in the unit) as this could cause range and reliability issues. Also be aware of internal security systems which can also transmit strong infra-red interference. Battery You need two new batteries 1,5V type AAA. Remove the cover of the battery compartment on the backside of the remote control by pushing (slide) the corrugated cover a little bit upwards to unlock. Remove the old batteries and insert the new ones. The correct polarity is indicated in the battery compartment. Replace the cover and push it a little bit downwards to lock. Do not mix old and new batteries. Please dispose of used batteries in accordance to local regulations. RC Handset 1. The Remote Control can be used also for other Ayon equipment. “PREAMP” (only Volume and Mute function) “DAC” (only Volume, Input, Display, 24/192 and Mute function) “AMP” (only Volume and Mute function) “CD” (only title 1-9 (0), Repeat, Forward, Backward, Stop, Vol Sel, Input, Volume, 24/192, Display, Dimmer & DSP) ● To you use your S-3 Network-Player please press “NWP” button first. 26 Ayon Audio – Hart 18 – 8101 Gratkorn – Austria – Phone: +43 3124 24954 www.ayonaudio.com 2. ALPHANUMERIC keypad 0-9 buttons: Used to select track, or input numbers, letters and characters Alternatively the letters and characters may be directly accessed by pressing the relevant numeric keypad. For example, to get small letter “c” press the “2” button 3 times (for capital “C” press it 7 times). If the wrong number is accidentally entered it may be edited using ◄ (delete). Press ► for next position. 3. REPEAT button: This button once causes the currently selected or playing track to be repeated over and again. Pressing a second time causes the whole album/playlist etc. to be repeated. Pressing button a third time causes the function to be cancelled. 4. SHUFFLE button: Plays current list in random order (does not work on internet radio). Shuffle causes the whole album/playlist etc to be played back in random order. Pressing a second time causes the SHUFFLE function to be cancelled. 5. ▲ button: Navigate up in menus 6. ▼ button: Navigate down in menus 7. ◄ button: Navigate backwards in menus 8. ► button: Navigate forward in menus 9. ►/OK button: Confirm / selects item The navigation buttons on the remote control are used to choose and confirm options. ▲▼ ◄► buttons allow movement up and down options or lists, left and right are useful when entering characters. The ►/OK button confirms character input and/or selection of the highlighted option. The navigation buttons may be used to select number, letter, and symbol characters by rolling through the list, when offered. The current selection in a list is highlighted by either a yellow bar or character. Pressing ►/OK then selects the highlighted character or option. 10. FAVORITE button: Adds currently playing to favorites list of the main menu. 11. MENU button: Toggles between menu and playlist if in play. Switches display between currently playing (station or stored music) and the main menu, to allow user to look at other options or change options while music is still playing. 12. RETURN button: Return to playback 13. RESUME button: Pause function 14. STOP ■ button: During normal playback, press this button to stop the playback. 15. SKIP PREVIOUS TRACK I◄◄ button: Selects previous track (playlist) / page up (browse view). Be used to edit or delete the previous character (or more if repeatedly pressed) to correct any character input mistake. It also allows direct navigation to the previous track (if available) whilst playing stored music. SEARCH BACK ◄◄ When pressing and hold this button during playback, the system will play the track reversely at twice speed. Once the track is finished, the system will play the previous track normally. 16. SKIP NEXT TRACK ►►I button: Selects next track (playlist) / page down (browse view) or replace next character in input. Deletes the following character and allows it to be re-entered. It also allows direct navigation to the next track (if available) whilst playing stored music. SEARCH FORWARD ►► When pressing and hold this button, the system will play at twice speed. Once the track is finished, the system will play the next track normally. 27 Ayon Audio – Hart 18 – 8101 Gratkorn – Austria – Phone: +43 3124 24954 www.ayonaudio.com 17. VOL SEL button: (Volume selection – “variable” or “fixed”); It changes the output volume function between “variable” or “fixed” mode. In the “fixed” mode the audio signal is bypassed directly to the analog output stage and can’t be regulated anymore. 18. VOLUME buttons: Whenever the volume control buttons are pressed, the volume for both channels will be increased ( + ) or decreased ( - ) by an increment of 1 on the display screen. The range of the volume control is from 0 ( Volume max. ) to -60 ( Volume min. ). Note: On the display -60 is mute and 0 is maximum volume. 19. 24/192 button: This button enables you to increase the sampling rate to 24 bit/192 KHz and simultaneously lights up the 24/192 symbol in the display. 20. DISPLAY button: Set the main display brightness. 21. MUTE button: Press this button, mute all outputs, press again to unmute. If the output is muted, the display will indicate this by showing, “MUTING”. 22. INPUT button: This button is for digital input selection. Digital inputs allow independent use of the processor section for external sources to enjoy music reproduction with the same superb quality. 23. DIMMER button: Set the smaller display brightness. 24. DSP button: (Digital Signal Processor); A digital source (room correction processor etc.) can be connected between the digital output and digital inputs of the S-3. Enter text with the number character buttons (SMS style) The method which we recommend is to use the number and character buttons of your remote control (like on mobile phones). To enter a character, choose the button with the desired character in his caption right above it. A list with the available characters related to the button will appear on the screen. The list consists of lowercase, number and uppercase character for the button "2" - "9". Button " 1" begins with some special characters and ends with the char 1. Button "0" begins with whitespace, mathematical chars and number. If you wait two seconds after choosing the character, the cursor will go to the next position. To avoid waiting two seconds for the next char, press ►. Use ▲ and ▼ to choose the character you want. Use the ◄ button to delete characters. The list of chars will begin again with whitespace. Press ►/OK to commit your changes. Note: The list of characters consists of lowercase, uppercase numbers and special characters. If you are at the bottom of the list (begins with whitespace) and press ▼, you will get at the top and vice versa. 28 Ayon Audio – Hart 18 – 8101 Gratkorn – Austria – Phone: +43 3124 24954 www.ayonaudio.com 11. Ayon Audio Controller App for iPhone/iPod or iPad For the operation of an Ayon S-3 player with an iPhone/iPod or iPad we recommend the Ayon Controller App you can find under iTunes – App Store. Use the Ayon App for the iPhone/iPod and the Ayon HD App for the iPad respectively. They are for free and especially tailored to the S-3. With them you can also play music or operate the internet radio via the USB interfaces. The installation is the same as for any other app. You start the “app store”-app and search for Ayon. As an example, on an iPod it looks like this: select ‚Ayon Audio’: 29 Ayon Audio – Hart 18 – 8101 Gratkorn – Austria – Phone: +43 3124 24954 www.ayonaudio.com select and install ‚Ayon Audio’. Enter the information of the App Store-account. Start the app after installation. The following screen will appear, when an switched-on S-3 player was found in the network with its related ID. select ‚ayon S-3’. 30 Ayon Audio – Hart 18 – 8101 Gratkorn – Austria – Phone: +43 3124 24954 www.ayonaudio.com Now you have the possibility to select the media server (=UPnP-server). In our case it is called “DiskStation”. Besides playback via UPnP-server you can select here and also on the player itself one of both USB-interfaces and the internet-radio respectively. Furthermore the settings of the player can be modified. 31 Ayon Audio – Hart 18 – 8101 Gratkorn – Austria – Phone: +43 3124 24954 www.ayonaudio.com Depending upon the filing system of the UPnP-server you can browse now in the music albums, e.g. here searching for an interpreter of an album and ‚Allan Taylor’ in detail. After the selection of the album the track list will be shown. Select a track and the player starts the playback. Remark about the deliberate absence of a „digital” volume control via iPad and iPhone/iPod respectively: The S-3 combines three sophisticated “units” in one device: streamer, preamp with analogue volume control and DAC. For maximum sound reproduction we separated them and even designed the S-3 with two separate displays. I.e. to control the volume via an app (iPad, iPhone/iPod) we would have to activate a digital volume control directly to/in the streamer. This would be very easy but it would result in a deterioration of sound. Therefore we deliberately abandoned this “app”-feature and continue to use the electronic-analogue volume control in the preamp-section of the S-3. Please use the original RC or the volume control directly on the S-3. 32 Ayon Audio – Hart 18 – 8101 Gratkorn – Austria – Phone: +43 3124 24954 www.ayonaudio.com 12. BREAK-IN PERIOD Your new Ayon Audio S-3 tube Network-Player has an initial break–in period. The unit will not perform to its full sonic potential when first installed in your system. This is partially due to a residual polarization of the dielectric materials used in the PCB, like resistors, capacitors, chokes, transformers and internal wiring. As music is played through the unit, the electrical signal will gradually anneal these materials. Only after the break-in period will the full performance of your Ayon Audio S-3 is fully realized. The break-in process will occur naturally as music is played through the system. During the break-in period, the sonic properties of your electronics may undergo several gradual shifts as the various components break–in at different rates. It is therefore suggested that the fine tuning of the system be delayed until after the break–in period is completed. However, during the final phases of the break–in period, the sonic image will open up, the sound stage will bloom to perfection, the bass control and impact will increase and the overall sound will have a more involving soundstage presentation. ○ Break- in: 30 to 50 hours Do not use any CD Break-in Disc or Break-in device. Use natural music only. We have found that certain "break in" CD’s can actually have a detrimental effect on the performance of the system. 13. SIGNAL VACUUM TUBES It is a fact that each brand of tube sounds different in a particular high resolution circuit. This is because no two manufacturers make a tube type in quite the same way, and the central tendencies of the performance parameters will differ slightly with each maker. To emphasize the point, examine the plate structure of any two signal tubes of the same type from different manufacturers. You will probably find that they may not even the same shape and size. Ayon Audio strongly discourages changing tubes (tube rolling) for the purpose of “improving sonic performance”. Tubes of the same part number from different manufacturer’s and lots generally vary considerably in many operating parameters. The Ayon Audio Class-A S-3 Network-Player has been sonically and precisely optimized for the tubes installed at the factory in Austria, by Ayon Audio. The 6H30 tubes are highly selected and matched tubes by our experts at Ayon Audio. The original signal tubes will provide for many years of excellent audio performance. Tube life expectancy Average power tube life will depend on several parameters: product type, how the product is installed, loudspeaker efficiency, room size and acoustic damping, listening habits or average sound pressure levels, A.C. line stability and purity, and other circumstances. When tubes are new they are at slightly greater risk of going bad during their break in period. This is called infant mortality. After the break in time period the tubes will stabilize and last for the several thousand hours of operation unless traumatized by being jarred or dropped. The vacuum signal tubes used in the S-3 are high quality 6H30 tubes rated for approximately 8000 hours of use. For maximum audio quality however we recommend replacing the tubes after 5000 – 6000 hrs of operation. As with all tubes, their quality degrades with age. This is due to cathode emission, a natural process found in all tubes. Note: Some tubes of the same brand and type glow at different brightness levels, some variation in brightness is normal – having to do with the amount and positioning of the internal silvering on the glass. You need not be concerned if one tube glows brighter than another. Note some special properties of the 6H30 tube In all our CD-Players/Network-Player the Ayon 6H30 output stage is designed in an extremely puristic and “short” manner, i.e. absolutely zero-feedback, no corrective or compensating elements and no filter in the circuit. Furthermore in the output stage we use “big volume” coupling capacitors that provide a maximum current transmissibility due to their negligible “capacitor resistance”. Resulting from all these puristical measures a short “tube-ping/pop” may be audible occasionally or always when switching on the device or when changing the source (input: line 1, line 2, coax etc.) due to initial voltage flowing through the wide 6H30 grid – and is being biased. Of course, this effect depends upon the input sensitivity of your power amplifier and/or your speakers respectively. The 6H30 tube is not defective but this is its property in this specific circuitry. We could eliminate this effect with only 2dB negative feedback or using so-called coupling capacitors of “small volume”, but then the sound image would no longer be so “light” and “airy”. This way we provide the best possible sound for our customers. 33 Ayon Audio – Hart 18 – 8101 Gratkorn – Austria – Phone: +43 3124 24954 www.ayonaudio.com Why vacuum tubes The output level of studio microphones under typical recording conditions contain peaks far in excess of what VU meters display. Everyone knows that, but the peaks, as measured with an oscilloscope, are really quite high, easily exceeding 1 volt! The tube or transistor used in a condenser microphone, or in a microphone preamplifier, often will be driven into severe overload by these peaks. The peaks are short, so the sound isn't grossly distorted-sounding; but the distorted peaks do affect what we hear. All preamps (and condenser microphone electronics) are overloaded by these peaks, but tubes handle it differently than solid-state devices. When transistors overload (in a discrete circuit or in an OP amp), the dominant distortion product is the third harmonic. The third harmonic "produces a sound many musicians refer to as blanketed”. Instead of making the tone fuller, a strong third actually makes the tone thin and hard. On the other hand, with tubes (particularly triodes) the dominant distortion product is the second harmonic: “Musically, the second is an octave above the fundamental and is almost inaudible, yet it adds body to the sound, making it fuller”. Tubes sound better because their distortion products are more musical. Tubes provide a more appropriate load to transducers. These are the fundamental reasons why tubes simply sound better. Ayon tube testing process Every power and signal tube is visually examined and tested by our own special custom made tube testing machine with burn in feature and add on the industry's most advanced computerized electron tube testing system – Amplitrex AT1000 tube tester, for all 5 specs: Plate current, trans-conductance, heater-to-cathode leakage, internal gas and microphonics. Actually tube manufacturer only tests mostly one spec – the plate current in their factory QC process; we test all 5. For tubes with multiple sections such as “dual triode” types, we test all sections of the tube and match the sections as close as possible. ® ayon is a registered trademark 34 Ayon Audio – Hart 18 – 8101 Gratkorn – Austria – Phone: +43 3124 24954 www.ayonaudio.com 14. GENERAL SPECIFICATIONS Network-Player Conversion rate Streamer Tube complement Dynamic range Channel separation Volume control system Volume control mode Output level @1 kHz / 0,775V -0dB /RCA/LOW Output level @1 kHz / 0,775V -0dB /RCA/HIGH Output level @1 kHz / 0,775V -0dB /XLR/LOW Output level @1 kHz / 0,775V -0dB /XLR/HIGH Output impedance Single-Ended-RCA / XLR Digital output Digital inputs Network inputs S/N ratio Total correlated jitter Frequency response Total harmonic distortion @ 1kHz Analog – Line Inputs & output (Preamp) Analog – Main outputs Power consumption Dimension (Wide x Deep – incl. terminals x High – incl. feet) cm Dimension – shipping carton Weight, unit only Weight (in shipping carton & incl. accessories) Ayon S-3 192kHz / 24 bit Stream Unlimited - Austria 2 x 6H30 (Triode), 1 x 6Z4 (Rectifier) > 118dB >105dB 20 Hz to 20 kHz Electrically-controlled analog volume control Variable or fixed* (bypass* - the audio signal goes directly to the analog output stage) 2.2V fixed or 0 – 2.2V rms variable 4.4V fixed or 0 – 4.4V rms variable 4.4V fixed or 0 – 4.4V rms variable 8.8V fixed or 0 – 8.8V rms variable 800 Ω / 950 Ω 75 Ω S/PDIF (RCA) 75 Ω S/PDIF (RCA & up to 24/192kHz), TosLink (up to 24/192kHz) 110 Ω AES/EBU (up to 24/192kHz) 75 Ω BNC (up to 24/192kHz) I2S (up to 24/192kHz) Front mounted USB type ‘A’ socket for USB “pen”/hard disk drive Rear mounted USB type ‘A’ socket for USB “pen”/hard disk drive RP-SMA plug Wi-Fi Aerial input (“wireless” network connection) 802.11b/g UTP RJ45 10/100Mbps socket (“wired” network connection) > 110 dB <10 picoseconds peak to peak 20Hz – 20kHz +/- 0.3dB < 0.002% 2 pair RCA and 1 pair RCA out (2V fixed) 1 pair / RCA & 1 pair / XLR 50W 48 x 39 x 12 cm 60 x 50 x 25 cm 12 kg 15 kg Ayon reserves the right to make improvements which may result in specification or feature changes without notice. CE DECLARATION OF CONFORMITY We declare under our sole responsibility that this product is in conformity with the following standards or standardized documents: BS EN 60065 in accordance with the regulations 73/23/EEC, 89/336/EEC (from 1 January 1997) CE 94ECLA DISPOSAL The crossed out wheeled bin label that appears on the back panel of the product indicates that the product must not be disposed of as normal household waste. To prevent possible harm to the environment please separate the product from other waste to ensure that it can be recycled in an environmentally safe manner. Please contact local government office or retailer for available collection facilities. ayon® is a registered trademark 35 Ayon Audio – Hart 18 – 8101 Gratkorn – Austria – Phone: +43 3124 24954 www.ayonaudio.com 15. SOFTWARE FEATURE LIST UPnP Media Player Discovers and plays from UPnP Media Servers on the network Internet Radio "services" Network - Ethernet 10/100 Base-T Network – Wi-Fi Wireless-LAN - IEEE 802.11b/g Graphical User Interface via QVGA TFT Show album art any format provided by iPod, jpg in mp3, jpg from selected media server Currently supported media server: Twonky Picture viewer/slide show Play from USB Play from USB mass storage device formatted as FAT16 or 32 Stream700 firmware update Via Internet upgrade (HTTP server) Random playback (shuffle play) Repeat single, repeat all Fast forward, fast rewind Available for all Codec’s, with sound Gapless playback Play lists Recently played list Favorites list Streaming audio source detection UPnP UPnP digital media player (DMP) UPnP digital media renderer (DMR) Twonky Vision compatible - provides also iTunes content Windows Media Player (WMP 11 Vista & XP and WMP 12 Windows 7) compatible Philips Media Manager 3.3 compatible Intel Media Server compatible Elgato EyeConnect compatible Mediatomb compatible Simple Centre compatible Control point Cidero V1.5.3 Control point PlugPlayer V3.2.1 vTuner & iRadio database management service and PodCast support MP3 Supported containers: MP3 Support sampling rates: 8-48 kHz Resolution: 16 bit Quality: 8-320 kbit/s Tags: ID3 V2.4 (including album art) Channels: stereo/mono AAC Supported containers: AAC, M4a Support Sampling rates: 24-96 kHz (Output sampling rate = max 48kHz) Resolution: 16 bit Quality: 8-320 Kbit/s Channels: stereo AAC+ v1/HE-AAC Ogg Vorbis 1.0 Supported containers: OGG Support sampling rates: 32-48 kHz Resolution: 16 Bit Quality: Q1-Q10 Tags: Ogg comments/tags Channels: stereo 36 Ayon Audio – Hart 18 – 8101 Gratkorn – Austria – Phone: +43 3124 24954 www.ayonaudio.com FLAC Supported containers: FLAC Support sampling rates: 44.1-96 kHz Resolution: 16/24 bit Quality: L0-L8 Tags: FLAC tags Channels: stereo/mono FLAC 192 kHz/24 bit; Supported containers: FLAC Support sampling rates: 192 kHz Resolution: 16/24 bit Quality: L4-L8 Tags: FLAC tags Channels: stereo/mono LPCM Supported containers: WAV Support sampling rates: 22-96 kHz Resolution: 16/24 bit (16Bit Integer, 24 Bit integer packed type1, 32Bit integer, IEEE – 0, 24 float type3) Tags: WAV tags Channels: stereo/mono LPCM (192 kHz/24 bit; available through USB and wired network only Supported containers: WAV Support sampling rates: 192 kHz Resolution: 16/24 bit (16Bit Integer, 24 Bit integer packed type1, 32Bit integer, IEEE – 0, 24 float type3) Tags: WAV tags Channels: stereo/mono WMA-9 Supported containers: WMA Support sampling rates: 8-48 kHz Resolution: 16 Bit Quality: 5-320 Kbit/s Tags: WMA tags Channels: stereo/mono WMA-9 lossless and WMA-9 pro Support through transcoding of unprotected tracks by Windows Media Connect only File Formats MP3 (MPEG-I Layer 3) MPEG Audio Layer-3 (.mp3) AAC (MPEG-4 Advanced Audio Coding File) .aac, .m4a WAV Audio for Windows (.wav) LPCM 24 bit packed/unpacked WMA Windows Media Audio 9 WAX Windows Media audio metafiles ASX Advanced Stream Redirector (.asx) Direct to streaming media content M3U An .m3u file is a special type of metafile playlist that is used with Windows Media files that have an mp3 file extension Via UPnP media server PLS Shoutcast/Winamp format Via UPnP media server AIFF Gapless NetAPI 37 Ayon Audio – Hart 18 – 8101 Gratkorn – Austria – Phone: +43 3124 24954 www.ayonaudio.com 16. NETWORK SPECIFICATION LIST WPL Windows Play List via UPnP media server JPEG Still picture files HTTP/1.1 Audio Transport Shoutcast ICY Metadata support WMA Streaming (including MMS and WMS) RTSP/SDP (Real Time Streaming Protocols) over TCP Microsoft Network Device DRM-10 (Cardea) - Ethernet Ethernet - 10Base-T Ethernet - 100Base-T Ethernet PHY - Realtek Wireless-LAN - IEEE 802.11b/g Module HW is IEEE 802.11n prepared, FW Wi-Fi 802.11 compliant Infrastructure mode SSID -Site Survey WPA WPS Wi-Fi Protected Setup Pin and push button supported n- IP DHCP Auto-IP Static IP address Proxy Support Web server TFTP server LLTD Reports device properly on Vista and Windows 7 PC Network API Remote control protocol (via IP network), USB 2.0 HS - Host Content on FAT-16/32 USB Mass Storage Devices can be played (no FAT12) Only 1st partition is supported on multi partitioning. No Secure USB is supported Connectivity - iPodI - Language Support English Default language German Supported character sets ISO8859-N Supported character encodings UTF8 S-JIS detection and conversion to UTF-8 Clock Clock - Network Time Network Time Protocol (RFC-1305) Clock - Auto DST setting Real time clock only available with internet connection Web server Embedded web server for device management and configuration through a web browser on a PC in the local network Status page Configuration page Favorites page Manage favorites stored on device Language support for all device languages Browser compatibility Internet Explorer 7 and 8 Mozilla (Firefox 3) Opera 10 38 Ayon Audio – Hart 18 – 8101 Gratkorn – Austria – Phone: +43 3124 24954 www.ayonaudio.com 17. TROUBLESHOOTING Symptoms / Proposed procedure to solve ► No WLAN network is listed after scanning Check if the antenna of your device is connected to the board ► My WLAN network won't appear Check if the target access point is active and within a reasonable range ► My WLAN network won't appear but access point is working properly Check if "SSID Hiding" is disabled or use the "Manual" wireless configuration method to manually define the SSID ► Can't connect to a given WLAN network Enter the correct WEP/WPA/WPA2 key otherwise the connection will be refused. Note: WLAN keys are case sensitive; this means the system distinguishes between lowercase and uppercase characters ► I can't access my manually copied music files from iPod/iPhone This is not possible since the iPod/iPhone will not be recognized as a Mass Storage Device. The device uses the inbuilt database of the iPod/ iPhone, so you have to use a management tool (like iTunes, Songbird, ...) to copy them ordinary on it. ► Can't play music files which normally should play Try to reset your settings by following the "Reset settings" section ► I'm encountering problems with strange behavior Try to reset your settings by following the "Reset settings" section 39 Ayon Audio – Hart 18 – 8101 Gratkorn – Austria – Phone: +43 3124 24954 www.ayonaudio.com 18. REMOVE THE TOP PLATE For remove the top plate use an Allen-key 3mm, pass thru the Allen-key to the top plate screws (10 screws in total – marked via red arrows and 1-10). Bottom plate Never remove the bottom plate; all electronic components are mounted on it. Never attempt any measurement or adjustment yourself as voltages inside the Network-Player can be lethal. Do not work inside a tube Network-Player when you are not qualified to do so. Disconnect from power before removing top plate is mandatory. 40 Ayon Audio – Hart 18 – 8101 Gratkorn – Austria – Phone: +43 3124 24954 www.ayonaudio.com 19. WARRANTY & SERVICE LIMITED WARRANTY Ayon Audio electronic components are warranted by the manufacturer to be free of defects in materials production for a period starting 2 years (except for wear parts like all types of signal*, rectifier* and power tubes*; AA52B or AA62B power tubes***, CD-mechanism**, laser pick up** and CD-acrylic-lid**), from the date of dispatch (factory). Under this warranty defects are repaired free of charge. The purchaser is responsible for transportation from their location to the original sales agent, national distributor, or international distributor, whoever is closest. This warranty applies to the original purchaser only and it is non-transferable to subsequent purchasers within the original 2 year period. Contact your dealer or Ayon Audio for commercial warranty policies. Request for repair under this warranty must be accompanied by an unaltered copy of the original purchase receipt. (3 month*), (6month**) & (1 year***). IN THE EVENT OF A PROBLEM In the unlikely event of a problem with any Ayon Audio product, if any replacement part is required, you must contact your Ayon Audio dealer first. Ensuring continued operation at the highest level of performance, the defective parts must then be returned to the factory for inspection to determine the status of the warranty claim. This on-site replacement of the parts eliminates the time and expense of shipping the entire unit to the factory for repair. All warranty claims must be made through an authorized Ayon Audio dealer, distributor or Ayon Audio. CONDITIONS This warranty is subject to the following conditions and limitations. The warranty is void and inapplicable if the product has been used or handled other than in accordance with the instructions contained within the Owner’s Manual. Units which are abused, misused, suffer electrical damage from lightning, overloaded wall power outlets, serial identification plate and serial number defacing, damage by accident or neglect during transport, tampering or unauthorized repair by anyone other than Ayon Audio or an authorized service center will void all warranties offered by Ayon Audio. ▪ the device was sold by an unauthorized dealer or sales organization. ▪ the device is operated without ground connection (unearthed). ▪ the device is sent back inappropriately packaged. ▪ Unauthorised opening of the equipment will invalidate any warranty claim. Ayon reserves the right to modify the design of any product without obligation to purchasers of previously manufactured products and to change the price or specifications of any product without notice or obligation to any person. OWNERS MANUAL All rights ® reserved. Reproduction of this manual in any manner without written approval by Ayon is strictly prohibited. Additional copies may be requested from Ayon. Information in this manual is subject to change without notice; Ayon is not liable for any mistakes. This manual has been established to help you. When you think that we could improve something or that we forgot something please let us knows: [email protected] Release: 4th Issue Date: 15th August 2012 ayon® is a registered Trademark 41 Ayon Audio – Hart 18 – 8101 Gratkorn – Austria – Phone: +43 3124 24954 www.ayonaudio.com