1
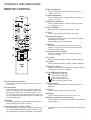
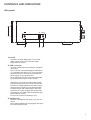
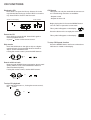
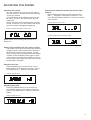
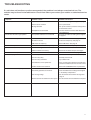
Stereo Zero
(ENG) OPERATING INSTRUCTIONS
1
2
CONTENTS
4
Before connecting to power source
5
Security
6
Controls and indicators
6 The front panel
7 The remote control
8 Connections on the rear panel
9 Connections on the side panel
10 Installation
10 Connecting the speakers
10 Connecting a subwoofer
11 Using the remote control
11 Connecting the FM and AM antennas
11 Connecting an external audio source
12 CD functions
12 Playing a CD
12 CD replay
13 Tuner functions
13 Automatic search of radio stations
13 Radio station pre-sets
14 Radio Data System [RDS] functions
15 Adjusting the sound
16 Other important information
17 Troubleshooting
18 Technical data
3
BEFORE CONNECTING TO POWER SOURCE
Unpacking
Carefully unpack the unit, making sure that all the accessories are included in the packaging (see below). Examine the
receiver to make sure that it has not been damaged during transport. If your unit is damaged or it does not work, inform
your dealer immediately. If the unit was delivered directly to you, contact the shipping company immediately. Only the
recipient (the person or company that received the item) can file a complaint with the shipping company regarding damage incurred during transport.
Keep the box and packaging material for future shipping or transport.
Make sure you also keep these operating instructions close by for future reference.
Accessories included:
The following accessories should be included in the packaging:
Power cable
AM antenna
FM indoor antenna
Remote control
Batteries x 2
Instructions
NOTE! THIS UNIT IS DESIGNED FOR 230-VOLT CAPACITY
WARNING!
To eliminate the risk of electric shock, never open this unit. Do not subject it to
humidity or moisture of any kind. If the unit is not functioning properly, take it to a
qualified service technician.
A lightning bolt inside an equilateral triangle
warns the user that uninsulated voltage within the unit may have sufficient magnitude to cause electric shock.
An explanation point inside an equilateral triangle
alerts the user that important literature concerning the operation and maintenance of this unit has been included.
Labeling on products that use lasers
(Does not apply to some countries)
The label, placed on the back panel, indicates that the products use Class 1 laser
beams. This means that there is no risk for radiation on the product’s exterior.
4
SECURITY
Power source
Cabinet
This unit is intended for use with a 230 V AC power supply only. Connecting to a different power source may lead
to accidents or fire and can damage the unit. Check the
voltage of the power source before you connect this unit.
Do not open the unit’s cabinet. There are no parts inside
the cabinet that you can repair yourself. Only an
authorized service technician can carry out repairs. Every
change in the product alters the terms of the warranty.
If a foreign object falls inside the cabinet, disconnect
the power cable immediately and contact an authorized
service center.
Power cable
This unit has a detachable power cable. Plug it into the
appropriate outlet on the rear panel. Make sure that the
unit is completely turned off until all other connections
have been completed. Make sure that the power cable is
routed so that it is not pinched or in the way of foot traffic.
Abnormal odor
If the unit emits an abnormal odor or smoke, turn it off immediately and disconnect the power cable. Contact your
retailer or the nearest service center.
A damaged power cable should be replaced immediately.
Overloading
Placement
Place the unit on a stable, even surface. If it is placed on
a shelf, make sure that the shelf and its brackets will be
able to bear the unit’s weight. Do not place the unit in a
humid or extremely hot or cold place or on a soft surface,
such as a rug. Make sure that the unit is well-ventilated.
We recommend at least 10 cm [four inches] of space on
all sides, as well as on top. See the figure below. In order
to insure that the unit is always properly ventilated, never
cover the ventilation holes in the cabinet.
Cleaning
Before cleaning, disconnect the power cable. The unit
can be cleaned with a soft cloth. Never use strong solvents or other liquids.
Do not overload wall outlets or the fuse box, as this can
result in a risk of fire or electric shock.
Connections
Use only the enclosed or recommended connection cables and accessories.
Replacement parts
When replacements are required, be sure to use parts
specified by the manufacturer or that have the same
properties as the original part. Unauthorized substitutions
may result in fire, electric shock, or other hazards.
When to contact your service representative
Water and humidity
Do not use the unit near water (for example, a bathtub,
bathroom or kitchen sink), damp basements, wet rooms,
or a swimming pool.
Temperature
The unit needs to be inspected by qualified service personnel if:
- The unit has been dropped on a hard surface or been
damaged in any way.
- The unit has been exposed to rain or water.
- A foreign object has fallen inside the cabinet.
- The unit is not operating properly.
- The unit’s performance has become impaired.
Do not use the unit in extremely high or low temperatures.
The ideal temperature is above +5º C [41º F].
10 cm
10 cm
10 cm
5
CONTROLS AND INDICATORS
FRONT PANEL
1 2
8
3
9
4
6
5
10
11
1) Power switch
Press this button to turn on the receiver, assuming that
it is in standby mode (the indicator LED on the front
panel is red). If it is not red, the receiver is off. Turn on
the receiver with the Main ON/OFF switch on the rear
panel. Press the button again to put the receiver in
standby mode.
2) Stop
Press the button to stop playback of CD or USB memory.
3) Play/Pause
Press this button to start playback of a CD or USB
memory. Make sure there is a CD in the tray (5). Press
the Play button again to pause the CD/USB. By pressing the Play button again, the CD/USB will begin playing from the point at which it was paused.
4) Eject
Press this button to open or close the CD tray.
5) CD tray
Place a CD in the tray with the label face up. Open the
tray by pressing the EJECT button (4). Press it again to
close the CD tray.
6) Source (selection of audio source)
Press to select the audio source (CD/FM/SIDE/USB/
AUX1/ AUX2 or AUX3). The source will be indicated
briefly in the display (11).
7) Volume
Use this knob to adjust the volume. It is ca. two full
turns from minimum to maximum volume. As the knob
is turned, the volume level is shown on the display.
VOL OO indicates minimum volume (quiet) and VOL 50
indicates maximum volume.
6
7
8) Operating mode indicator
Indicates whether the unit is turned on (blue) or in
standby mode (red). If it is not illuminated, the receiver has been turned off with the ON/OFF switch on
the rear panel.
9 & 10) Skip/Search/Tune
CD/USB mode: press (9) to select beginning of the
track on the CD/USB that is being played. Keep
pressed to search backwards in the current track
being played. Press PLAY to resume playback.
Press (10) to select next track on the CD/USB that is
being played. Keep pressed to search forward in the
current track being played. Press PLAY to resume
playback.
Tuner mode: press (9) to automatically search the
next radio station down the dial. Press (10) to automatically search the next radio station up the dial.
11) Display window
Operation indicators are displayed here.
CONTROLS AND INDICATORS
REMOTE CONTROL
5) Bass adjustment
Press to adjust Bass. Change setting using the + or
- knobs (13 or 14).
6) Treble adjustment
Press to adjust Treble. Change setting using the + or
- knobs (13 or 14).
1
6) Balance adjustment
2
3
11
4
12
Press to adjust Balance. Change setting using the +
or - knobs (13 or 14).
8) Select FM/AM
Press to select FM-stereo, FM-mono or AM.
9) Tune -
5
6
7
8
9
13
14
15
16
17
18
19
Press to search next station down the scale.
10) Numerical buttons
The numerical buttons 0-9 permit the user to select:
CD mode: track number.
Tuner mode: pre-set radio stations
11) Muting
Mute the audio with this button. Press it again to
return to the previous volume level. Muting will be
indicated on the display.
12) Volume (volume control)
Push up to increase volume or push down to decrease the volume.
10
20
13) + button
Press to increase setting of Bass, Treble or Balance
14) -button
Press to decrease setting of Bass, Treble or Balance
15) Speaker selector
Press to change speaker setting from Large to Small.
The setting is show in the display.
16) CD/USB player controls:
1) Remote function indicator
This LED is lit during any operation made on the remote control.
2) Power switch
Press this button to turn on the receiver, assuming
that it is in standby mode (the indicator LED on the
front panel is red). If it is not red, the receiver is off.
Turn on the receiver with the Main ON/OFF switch on
the rear panel. Press the button again to put the receiver in standby mode.
3) Dimmer
The display intensity can be changed in three steps.
Press to change from High-Low-Off
4) Input (selection of audio source)
Push this button up or down to select the audio source – CD/FM/SIDE/USB/AUX1/ AUX2 or AUX3 – changes. Selected source will be indicated in the display.
Press to start playback
Press to pause playback
Press to stop playback
+
Press to skip to next track
Press to skip to previous track
17) RDS selector
Press to change RDS display RDS PS, RDS RT or
RDS OFF
18) Tune +
Press to search next station up the scale.
19) Repeat
Press to select repeat function. One - All - Off
20) Memory (accessing the memory)
Press this button to access the memory. See separate
section page 13.
The battery cover is located on the back of the remote
control.
7
CONTROLS AND INDICATORS
Rear panel
1
2
3
5
1) Connecting the FM indoor antenna
Connect the enclosed FM indoor antenna. Locate
the wire where the reception will be optimal.
NOTE: It is also possible to connect a central or
outdoor antenna here; either one will provide better
reception than the indoor antenna.
2) Connecting the AM antenna
Connect the enclosed AM antenna. Place the ring
as far from the receiver, TV, and power cables as
possible. Adjust the direction of the antenna for the
best reception.
3) Audio inputs (AUX)
Input for three external audio sources, such as a
CD player, MiniDisc, TV or MP3 player.
4) MAINS [ON/OFF] switch
The mains [ON/OFF] switch must be in the ON position so the power switch on the front of the panel
can function. The unit should only be turned off
completely if it is not going to be used for longer
period of time, if repair work needs to be done, or
if cables need to be switched out.
5) Subwoofer output
Output for an active subwoofer (with built-in
amplifier). Connect an audio cable between the
subwoofer and this output. A subwoofer is an extra
accessory.
8
4
6
7
6) Speaker terminals
Connect speaker cables – the right channel to
RIGHT and the left channel to LEFT. Make sure to
also connect + to + and – to – on the speakers. See
separate section page 10.
7) Power outlet
Only connect the power cable after all other connections have been completed.
CONTROLS AND INDICATORS
Side panel
1
2
3
1) Line IN
Connect your iPod, Mp3 player or any other
audio source using a 3,5 mm audio cable.
Select SIDE as source
2) USB connector
Connect a USB memory/hard disc to playback
music files.
Note: This unit can handle/support USB memory or portable Hard Disc (2,5”). For bigger desk
top Hard Discs you need to connect external
power supply to run the hard disc.
Up to 999 tracks can be shown and controlled
by the skip buttons (also on the remote)
Stereo Zero can receive wireless audio signal
with the optional accessory Audio Pro RX-100.
RX-100 is a USB dongle that can receive audio
signal sent from Audio Pro TX-100 transmitter.
Connect the RX-100 USB dongle to the USB
connector (for power supply) and connect the
enclosed 3,5 mm audio cable to the SIDE input.
Select SIDE as source.
To learn more visit www.audiopro.com
3) Headphones
Connect a headphone set using a 3,5 mm connector.
Note: When headphones are plugged, the speaker output will be muted.
9
Connecting the speakers
Connect speaker cables according to the drawing below. Speaker cables are normally marked + and - (or with
different marks). Connect one end to the speakers terminals. Connect the other ends of the cables to the amplifier, following directions 1-4 below. Make sure to connect + to + and - to -. This also applies to the connections
to the speakers.
1)Remove the sheath from
the end of the wire
2) Open the speaker
terminal
3) Insert the wire into the
speaker terminal
Right speaker
4) Tighten
Left speaker
Amplifier’s rear panel
+ -
+ -
Connecting the subwoofer (extra accessory)
An active subwoofer will substantially improve the bass reproduction. Connect a line cable between the SUBWOOFER OUTPUT and LINE IN input on the subwoofer. Generally, a line cable is delivered with a subwoofer.
10
INSTALLATION
Using the remote control
Insert the AAA batteries included in the packaging
into the battery opening on the back of the remote
control. Make sure that the polarities (+ and -) are
aligned correctly.
Connecting the FM indoor antenna
Connect the FM indoor antenna plug to the output on
the rear panel.
The remote control operating range (approximate)
Operating range
up to 8 meter
Locate the other end where the reception is good.
It is also possible to connect communal antenna or
other external antenna.
Connecting the AM antenna
Connect the AM antenna wires according to the figure
below.
Note that the remote control’s power button only
works if the Main power switch on the rear of the
receiver is in the ON position and the LED on the
front of the panel is red. Weak batteries will affect
the performance range of the remote control.
Place the ring as far from the unit, TV, and power cables
as possible. Adjust the placement of the ring for the
best possible reception.
Connecting an external audio source
Connect up to three external audio sources with RCA
plugs to AUX1/2/3 on the rear panel or with a 3.5 mm
[1/8 inch] plug to LINE IN on the side panel. Select the
respective audio source with SOURCE on the front
panel or on the remote control.
AUX IN on the rear panel
LINE IN on the side
11
CD FUNCTIONS
Playback a CD
CD Repeat
Press EJECT to open the CD tray. Place a CD in the
tray with the label facing up. Press EJECT to close the
tray. Press PLAY to listen to the first track.
Track number
Shown on the display:
This option can only be used with the remote control. The following functions are available:
- Repeat a track
- Repeat an entire CD
Begin playing the CD. Press the REPEAT button
once in order to repeat the current track.
This symbol will appear on the display:
Playing time
Press the button twice to replay the entire CD.
Pause the CD
Press PLAY to pause the CD. Press PLAY again to
resume playback the CD.
or press
button on the remote control.
This symbol will appear on the display:
To stop CD Repeat function
Skip tracks
Press the SKIP knob to the right to skip to a highernumbered track. Press the SKIP knob to the left to
skip to a lower-numbered track
If using the remote control, press the SKIP buttons.
or
+
Search within a track
Keep the right SEARCH button pressed to fast forward
quickly within a track or the left SEARCH button to
search backward quickly.
If using the remote control, use the SKIP buttons.
or
+
To stop CD playback
Press the STOP button or, if using the remote control,
the
button.
or
12
Press the REPEAT button until none of the above
indicators is visible on the display.
TUNER FUNCTIONS
Automatic search of FM/AM radio stations
Select FM/AM as source using the SOURCE button.
Select FM-stereo, FM-mono or AM with the FM/AM
button. This is only possible from the remote control.
Display during radio listening
Example of display when FM is tuned to 103,20
MHz.
Press the TUNE button on the right to search up the
radio dial or on the left to search down the radio dial.
(This can also be made from the remote control).
or
TUNE - TUNE +
Example of display when FM is tuned to 103,20
MHz and stored to preset memory number 3.
Tuner presets
A total of 20 FM and AM stations can be stored in
memory.
Locate a desired radio station (FM or AM). Open
the memory with the MEMO button on the remote
control.
Example of display when AM is tuned to 1062 KHz.
Select the desired program number with the numeric
buttons on the remote control (0-9, +10).
The program number indicator will blink in the display.
Press the MEMO button on the remote control to
enter your choise. SAVE OK will be displayed.
Example of display when AM is tuned to 1062 KHz
and stored to preset number 11.
The radio station is now saved in the preset memory.
The program number will stop blinking.
Repeat the above procedure to preset other radio
stations.
Locating preset radio stations
Select FM/AM as source using the SOURCE button.
Select FM-stereo, FM-mono or AM with the FM/AM
button. This is only possible from the remote control.
Use the numeric buttons on the remote control to
select the desired program number.
Example: Preset number 8 press button 8
Preset number 18 press +10 and 8.
13
RDS [RADIO DATA SYSTEM] FUNCTIONS
RDS (Radio Data System)
RDS is a system that sends information (digital data) for FM broadcasts together with the broadcast signal.
Radio parts developed for RDS reception can convert these digital data for the display of program names,
program types, current time, etc.
Using RDS (Europe only)
The following RDS functions are available on this unit
(in the following order):
PS (Program Service Name)
Displays the station name
RT (Radio Text)
Displays any messages sent by the station
Note: The RDS button is on the remote control only.
Data on the display
Tune in a radio station with an RDS signal. Select the
desired RDS display on the remote control (RDS PS,
RDS RT or RDS OFF).
RDS OFF mode:
The display shows the station frequency, as well as a
preset program, if it is stored in the memory.
(PS) Press RDS PS to see the radio station name. If the
function is not available the display reverts to showing
the frequency.
(RT) Press RDS RT to see the radio text message,
if there is one. The text message will scroll from
right to left. If this function is not available the display will show RDS RT.
14
Note:
The described RDS functions can be selected
with the remote control’s RDS button.
The RDS functions and selections vary between different radio stations and countries.
ADJUSTING THE SOUND
Adjusting the volume
Turn the volume knob clockwise (to the right) to
raise the volume or counter-clockwise (to the left)
to lower the volume.
The scale shown on the display ranges from 0040, that is, from VOL OO (minimum) to VOL 50
(maximum).
Always check the volume setting before an audio
source is turned on. Turn the volume knob all the
way down before unplugging headphones.
Adjusting the balance between the left and right
channel
Press the BALANCE button on the remote control.
BAL L__R appears in the display. Press the + button to increase RIGHT channel or - button to increase
LEFT channel.
Example: balance set to center
Example: display showing the volume at 20.
Example: Right channel increased 2 steps
Note: Default volume setting when power on is
always 20.
Muting (Only possible with the remote control)
The volume can be turned off temporarily with the
muting function on the remote control. Press the
MUTE button on the remote control to turn the
audio off temporarily. During MUTING, the display
will blink. Press the MUTE button again to return
to the previous volume (Only possible from the remote control). The muting also stops if the volume
knob setting is changed.
Adjusting the bass
Press the BASS button on the remote control.
BASS appears in the display. Press the + button
to increase bass or - button to decrease bass.
Example: bass set at +3.
Adjusting the treble
Press the TREBLE button on the remote control. TREBLE appears in the display. Press the +
button to increase treble or - button to decrease
ttreble.
Example: treble set at +2.
15
OTHER IMPORTANT INFORMATION
Connecting the headphones.
Connect the headphones with a 3.5 mm [1/8 inch] stereo plug to the HEADPHONES output on the side panel.
When the headphones are connected, the speaker output turns off automatically. When the headphones are
connected, there is no audio output from the speakers.
Adjust the volume with the volume knob. Listening through the headphones at high volumes can be dangerous to one’s hearing.
NOTE!
Before disconnecting headphones, turn the volume
knob to minimum (VOL OO).
BASS, TREBLE and BALANCE settings will not affect
the headphones sound.
Connecting an audio source to LINE IN on the side
panel.
Connect an external audio source (such as an Mp3,
iPod player) to LINE IN on the side panel. Use a cable
with a 3.5 mm [1/8 inch] stereo plug. Select SIDE as
source using the SOURCE button on the front panel or
on the remote control.
Connecting an audio source to AUX on rear panel.
Connect an external audio source (such as a CD player,
TV, DVD, Mp3 player) to AUX on the rear panel. Use a
cable with PHONO plugs. Select AUX number as the
audio source using the SOURCE button on the front
panel or on the remote control.
Connecting a USB memory or Hard disc to USB.
Connect the USB memory stick or Hard Disc to the
USB side connector.
This unit can handle USB memory and portable Hard
Disc drives (2,5”). Bigger Desktop Hard Disc drives
need external power supply.
For easy access of the music files on the USB or Hard
Disc driver, place the music files on top in the root
menu.
Wireless ready
Stereo Zero can receive wireless audio signal with the
optional accessory Audio Pro RX-100. RX-100 is a USB
dongle that can receive audio signal sent from Audio
Pro TX-100 transmitter.
Connect the RX-100 USB dongle to the USB connector
(for power supply) and connect the enclosed 3,5 mm
audio cable to the SIDE input.
Select SIDE as source.
To learn more visit www.audiopro.com
16
TROUBLESHOOTING
If a unit does not function or perform as expected, the problem is not always a mechanical one. The
solution may be found in the table below. Check here before you contact your retailer or authorized service
center
Symptom:
Possible cause:
Possible correction:
Absence of sound
* Speaker cables not connected
* Connect according to the diagram on page 10
* Volume set at minimum
* Turn up the volume
* Muting activated
*Turn up the volume or press the muting button
on the remote control
* Headphones are connected
* Turn the volume to minimum and disconnect
the headphones
No sound from the left or right speaker
* The speaker cables are not connected
* Connect the cables according to the diagram
on page 10
Poor or absent FM reception
* The FM antenna is not connected
*Connect the FM antenna. See page 11
* No stations are set
* Find correct frequency. See page 13
* AM chosen as frequency
* Select FM Stereo. See page 13
No FM stereo reception
* FM Mono or AM chosen as frequency
* Select FM Stereo as frequency. See page 13
A pre-set station can not be accessed
* No broadcasting
* Wait for a broadcast from the station
* Station erased from memory
* Search for the station and pre-set it again
Poor or absent AM reception
* The AM antenna is not connected
*Connect the AM antenna. See page 11
A CD does not play
* The CD is upside down
* Put the CD in the tray with the label face up
* The CD is very dirty
* Carefully clean the CD
* The CD is very scratched
* Try a different CD
* Condensation on the optical lens
* If the unit has been subjected to extreme temperature fluctuations, do not use it for a while
* Another audio source selected
* Select CD as SOURCE button or press PLAY
* The batteries are burned out
* Install new AAA batteries
* The battery polarities are incorrect
* Insert the batteries according to the diagram
in the battery compartment
* Out-of-range usage
* Use the remote control within its range. See
page 11
* Remote control not aimed at the front panel
* Aim the remote control toward the front panel.
Remote control functions poorly or not at all
17
TECHNICAL DATA
Audio section:
Other:
Output power:
RMS:
20Hz-20kHz < 0,7% THD, 8 Ω............2 x 40 W
20Hz-20kHz < 0,7% THD, 4 Ω............2 x 65 W
CD player
Readable types
.....................................CD, CD-R: 8cm and 12 cm
Frequenzy response:
..................................................2Hz-22kHz (-3dB)
Signal-to-noice ratio:
.....................................................................85dBA
AM/FM tuner with RDS
Number of presets
...................................................20 presets (FM/AM together)
Line input on the side panel for connection of MP3 player
USB input for USB memory stick or USB hard drive
Input sensitivity/Impedance:
AUX in:....................................................2V/10kΩ
Line in:.............................................200mV/10kΩ
Tone controls:
BASS:............................±6dB 100Hz, 2dB/step
Treble:............................±6dB 10kHz, 2dB/step
Balance control:
...................................................0-10dB 2dB/step
FM tuner:
Frequency range:
........................................................87,5 - 108MHz
Subwoofer output
Dimensions:
Width: ....................................................................345 mm
Height:.....................................................................109 mm
Depth:.....................................................................330 mm
Weight:..........................................................................4,5 Kg
Power consumption:
Max:............................................................................150W
Standby:.....................................................................0,75W
Signal-to-noice ratio:
.......................................................................60dB
Usable sensitivity:
..........................................................................4µV
Stereo separation:
.......................................................................35dB
Image rejection:
.......................................................................70dB
AM tuner:
Frequency range:
........................................................531 - 1602kHz
Signal-to-noice ratio:
.......................................................................40dB
Usable sensitivity:
..........................................................................1mV
Image rejection:
.......................................................................30dB
18
Audio Pro follows the policy to constantly develop the
products. Therefore, specifications can be changed
without further notice.
19
YOUR OWN NOTES:
20
21
Audio Pro AB
Box 1015
S-251 10 Helsingborg
Sweden
www.audiopro.com