1
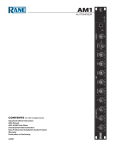
IMPORTANT SAFETY INSTRUCTIONS
The apparatus shall not be exposed to dripping or splashing and that no objects
with liquids, such as vases,
shall be placed on the apparatus. The MAINS plug is used as the disconnect device, the disconnect device shall
remain readily operable.
Warning: the user shall not place this apparatus in the
can be easily accessible.
area during the operation so that the mains switch
1. Read these instructions before operating this
apparatus.
CAUTION
2. Keep these instructions for future reference.
RISK OF ELECTRIC SHOCK
DO NOT OPEN
3. Heed all warnings to ensure safe operation.
4. Follow all instructions provided in this document.
5. Do not use this apparatus near water or in locations
where condensation may occur.
6. Clean only with dry cloth. Do not use aerosol or liquid
cleaners. Unplug this apparatus before cleaning.
7. Do not block any of the ventilation openings. Install
in accordance with the manufacturer’s instructions.
8. Do not install near any heat sources such as radiators,
heat registers, stoves, or other apparatus (including
.
9. Do not defeat the safety purpose of the polarized or
grounding-type plug. A polarized plug has two blades
with one wider than the other. A grounding type plug
has two blades and a third grounding prong. The wide
blade or the third prong is provided for your safety. If
the provided plug does not into your outlet, consult
an electrician for replacement of the obsolete outlet.
10. Protect the power cord from being walked on or
pinched particularly at plug, convenience receptacles,
and the point where they exit from the apparatus.
11. Only use attachments/accessories
manufacturer.
by the
12. Use only with a cart, stand, tripod, bracket, or
table
by the manufacturer, or sold with
the apparatus. When a cart is used, use caution
when moving the cart/apparatus
combination to avoid injury from tipover.
13. Unplug this apparatus during lighting
storms or when unused for long
periods of time.
14. Refer all servicing to
service personnel.
Servicing is required when the apparatus has been
damaged in any way, such as power-supply cord or
plug is damaged, liquid has been spilled or objects
have fallen into the apparatus, the apparatus has
been exposed to rain or moisture, does not operate
normally, or has been dropped.
CAUTION: TO REDUCE THE RISK OF ELECTRIC SHOCK,
DO NOT REMOVE COVER (OR BACK)
NO USER SERVICEABLE PARTS INSIDE
REFER SERVICING TO QUALIFIED PERSONNEL
The lightning flash with arrowhead symbol, within an
equilateral triangle, is intended to alert the user to the
presence of uninsulated “dangerous voltage” within the
product’
magnitude to constitute a risk of electric shock to persons.
The exclamation point within an equilateral triangle is intended to alert the user to the presence of important operating and maintenance (servicing) instructions in the literature
accompanying the appliance.
WARNING: To reduce the risk of
or electric shock, do
not expose this apparatus to rain or moisture.
CAUTION: Use of controls or adjustments or performance
of procedures other than those
may result in
hazardous radiation exposure.
ZX2 / ZX4
TABLE OF CONTENTS
page
INTRODUCTION .............................................................................................. 4
FEATURES ...................................................................................................... 4
INSTALLATION ............................................................................................... 5
FRONT PANEL DESCRIPTION ....................................................................... 6
REAR PANEL DESCRIPTION ......................................................................... 7
APPLICATIONS................................................................................................ 9
SPECIFICATIONS .......................................................................................... 10
REFERENCE BOOKS.................................................................................... 11
Phonic reserves the right to improve or alter any information supplied within this document without prior notice.
V1.0
04/20/2005
INTRODUCTION
FEATURES
ZX2
COMMON FEATURES
Thank you for purchasing the ZX2, a two-zone mixer
that is ideal for use in all manner of installations
including hotels, convention centers, theatres,
restaurants and retail outlets. They offer three stereo
line inputs, one paging microphone input with EQ
and ducking depth control, and an emergency input.
Each zone has selectable stereo or mono output and
features a subwoofer output. A mono "utility" output is
also included for areas such as restrooms and foyers.
Zone and utility outputs all have an individual source
selector and level control, while zone outputs have
an added high and low EQ. An emergency interface
connector allows for override control and insert of
emergency message paging. The added option of
remote volume control for each zone makes the ZX2 a
must have for your zone mixing requirements.
ZX4
Thank you for purchasing the ZX4, a four-zone mixer
that is ideal for use in all manner of installations
including hotels, convention centers, theatres,
restaurants and retail outlets. They offer three stereo
line inputs, one paging microphone input with EQ and
ducking depth control, and an emergency input. Four
zone outputs provide maximum zone separation and
a mono "utility" output is also included for areas such
as restrooms and foyers. Zone and utility outputs all
have individual source selectors and level controls,
while two zones are stereo/mono selectable. An
emergency interface connector allows for override
control and insert of emergency message paging.
The added option of remote volume control for each
zone makes the ZX4 a must have for your zone mixing
requirements.
page 4
Zx2 / Zx4 User's Manual
Three unbalanced stereo RCA line-level inputs with
individual trim controls
Balanced XLR paging microphone and 1/4" emergency
microphone inputs
Microphone ducking depth and EQ controls
Balanced 1/4" utility output provides audio to general
utility areas (foyers, restrooms, etc.)
Utility output source selectable
Stereo/Mono switch on zone 1 and 2
ZX2
Two balanced 1/4" stereo zone outputs with
independent source select switches and level
controls
Balanced 1/4" subwoofer output on each zone
High and low EQ controls on each zone
Remote level controls can be wired to the two zones
for applications requiring remote adjustment of audio
levels
ZX4
Four balanced 1/4" stereo zone outputs with
independent source select switches and level
controls
Remote level controls can be wired to the four zones
for applications requiring remote adjustment of audio
levels
PHONIC CORPORATION
INSTALLATION
Rack Mounting
The Phonic ZX2 and ZX4 zone mixers are standard 1 RU rack
mountable mixers. An additional 4" of depth are needed behind
the mixer to allow room for the back panel connectors. To avoid
overheating be sure that there is enough air space around the unit for
cooling and do not place the mixer in contact with, or directly on top of
high temperature devices such as power amplifiers.
Connectors
ZX2 and ZX4 zone mixers use balanced XLR jacks for paging
microphone input, unbalanced stereo RCA jacks for music inputs, and
balanced 1/4" phone jacks for emergency audio input, zone output
and utility output. RJ45 jacks provide input and output for paging
and remote level control, while an RS-232 D-type 9-pin connector is
provided for source link.
Impedance
The microphone input impedance is less than 2k ohms. The outputs
of the ZX2 and ZX4 are electronically balanced with output impedance
lower than 120 ohms. When driving transformer coupled loads, it may
be necessary to create 600 ohms source impedance. For this purpose
install two 247 ohms resistors in series with pin 2 and 3.
Mains Connection
The ZX2 and ZX4 use a standard IEC receptacle and a universal
mains cable to make the AC mains connection. Make sure all units
in the sound system are well grounded. For your own safety, do not
remove the ground connection within the units or at the supply cable,
or fail to make this connection at all. The audio ground is capacitor decoupled so please isolate it from the power ground. Do not attempt to
solve ground loop problems by disconnecting the power ground.
Safety Fuse Replacement
A safety fuse protects the unit from serious malfunction. The fuse
will blow in case of power problems or short circuits. If this happens
please replace it with an identical fuse only. If the new fuse also blows
right after replacement, there is likely to be a problem with the unit.
In that case, please call your nearest authorized Phonic dealer for
service or repair. Never use fuses that are not rated for the unit. This
may cause fire or electric shocks.
PHONIC CORPORATION
Zx2 / Zx4 User's Manual
page 5
FRONT PANEL DESCRIPTIONS
6) TREBLE (ZX2 only)
The zone TREBLE EQ is set at 10 KHz with +/-15
dB of boost or cut. Adjust this knob clockwise to add
crispness and clarity to the music. Adjust the knob
counterclockwise to reduce hissing.
7) VOLUME/LEVEL
zx2 / zx4
1) MID
Adjust this control to set the level of the music that is
sent to each zone. The gain range is -oo to +20 dB.
Adjust the knob clockwise to increase the volume
level. Adjust the knob counterclockwise to decrease
the volume level. This control does not affect the
actual level of the music input at the mixer. It only
adjusts the level sent to that zone.
The MID EQ is set at 800 Hz with +/-15 dB of boost
or cut. Adjust this knob clockwise to add fullness to
the microphone. Adjust the knob counterclockwise to
reduce excessively hard or "telephone-like" sounds.
2) TREBLE (High frequency)
The TREBLE EQ is set at 8 KHz with +/-15 dB of boost
or cut. Adjust this knob clockwise to add crispness
and clarity to the microphone. Adjust the knob
counterclockwise to reduce hissing or sibilance.
3) VOLUME
This knob controls the level of the balanced
microphone input that is fed to each zone (and utility
when MIC is selected). The output range is from +15
dB to +55 dB. Turn the knob clockwise to boost the
microphone volume.
zx4
8) SOURCE
This switch allows you to select one of three music
sources to be sent to the zone output. A signal source
first must be connected to the source input on the back
panel. (See "SOURCE INPUT" on page 8.)
9) MONO
4) DEPTH
Turning this knob clockwise will gradually decrease
the zone music source output and change the paging
depth to make the microphone output louder than the
music source.
When the MONO switch is pressed, the L & R zone
outputs are summed to mono.
10) LEVEL
Adjust this control to set the level of the music or
microphone that is sent to the utility zone. The
gain range is -10 dB to +20 dB. Turn the knob
clockwise to increase the volume level. Turn the knob
counterclockwise to decrease the volume level. This
control does not affect the actual level of the music
input at the mixer. It only adjusts the level sent to the
utility zone.
zx2
5) BASS (ZX2 only)
The zone BASS EQ is set at 100 Hz with +/-15 dB of
boost or cut. Adjust the knob clockwise to add warmth
and depth to music. Turn the knob counterclockwise
to reduce hum, stage rumble or to improve a mushy
sound.
page 6
Zx2 / Zx4 User's Manual
zx2 / zx4
PHONIC CORPORATION
11) SOURCE
16) AUDIO
This switch allows you to select from one of three line
inputs and a microphone input to be sent to the utility
output. A signal source first must be connected to an
input on the back panel. (See "SOURCE INPUT" and
"PAGING MICROPHONE" on page 8.)
This 1/4" input jack accepts input by balanced
or unbalanced phone plugs. This input works in
conjunction with the 24 DC CONTROL. When the
circuit is activated by a 24 VDC power supply all other
audio input sources will be terminated and whichever
audio source is connected to the emergency audio will
be routed to all zone and utility outputs.
12) EMERGENCY TRIM
The TRIM knob adjusts the level of emergency audio
input. When the 24 VDC control circuit is activated
by an external device the red LED light illuminates
and all zone and utility source outputs are replaced
by the emergency audio input. If the 24 VDC control
circuit is activated but there is no emergency audio
input, the emergency audio input source is the paging
microphone.
17) UTILITY OUTPUT
This is a standard line-level balanced 1/4" phone
output jack. It also provides unbalanced connection.
13) POWER
This switch turns the power for the mixer on and
off. The green LED illuminates when the mixer is
connected to an active AC mains power supply and
the power is switched on.
zx2
18) ZONE OUTPUTS
REAR PANEL DESCRIPTIONS
These are standard line-level balanced 1/4" phone
output jacks. The zone outputs include left (L) and
right (R) channel outputs. (Zone 4 on the ZX4 only has
a mono output channel.) A subwoofer (SUB) output is
included for better low frequency performance (ZX2
only). When operating in mono mode use the left
channel.
zx2 / zx4
14) POWER CABLE RECEPTACLE
This is a standard IEC power cable receptacle. Plug
the power cable in here and connect the other end of
the cable to an appropriate AC mains power supply.
15) 24VDC CONTROL
The terminal block input accepts an external 24 VDC
regardless of the position of the positive and negative
poles. It will activate the emergency function, which
will route the external emergency message to all zone
and utility outputs. It provides an override control for
emergency use.
PHONIC CORPORATION
zx4
19) REMOTE LEVEL CONTROL
This socket allows for the connection of external
volume control devices to remotely control music.
Each remote socket controls up to two zones. When
the REMOTE connection is not made, the output level
of each zone will be according to the level selected on
the mixer. Please use a 10k ohms potentiometer as
the remote level controller.
Zx2 / Zx4 User's Manual
page 7
zx2 / zx4
20) SOURCE INPUT
These are unbalanced line-level stereo RCA inputs.
There are three stereo music input sources. Each
includes a gain control with a range of –10 dB to +20
dB.
21) SOURCE LINK
The source link is an RS-232 D-type 9-pin connector
that distributes the three source inputs to the next
compatible zone mixer in the series. It also functions
to receive the source inputs from a ZX2 or ZX4 zone
mixer. This function allows the source inputs from one
Phonic zone mixer to be used for many other Phonic
zone mixers while simplifying wiring schemes.
22) PAGING CONTROL
This is an RJ45 jack that is used to connect the control
for a paging microphone to the mixer.
23) PAGING MICROPHONE
This is a balanced XLR jack that is used to connect the
audio for a paging microphone to the mixer. It includes
a gain control with a range of +15 dB to +55 dB.
The paging microphone connects to the mixer through
the XLR input and the paging control. The following is
a diagram detailing how to make the connection.
page 8
Zx2 / Zx4 User's Manual
PHONIC CORPORATION
APPLICATIONS
The following diagrams illustrate some of the most common applications and wiring for the ZX2 and ZX4 zone
mixers.
Office
Hotel / Convention Center
PHONIC CORPORATION
Zx2 / Zx4 User's Manual
page 9
SPECIFICATIONS
INPUT
Microphone
Input Impedance
2 kΩ
Gain
+15 ~ +55 dB
Frequency Response
40 Hz - 20 kHz, ±0.5 dB
EIN
-128 dBu
CMRR
100 dB @ max. gain
Phantom Power
+15V
Input Connectors
Balanced XLR
Stereo BGM Input
Input Impedance
40 kΩ
Gain
-10 ~ +20 dB
Frequency Response
40 Hz - 20 kHz, ±0.5 dB
Input Connectors
Unbalanced stereo RCA
Emergency Audio
Input Impedance
14 kΩ
Gain
-10 ~ +10 dB
Frequency Response
50 Hz - 20 kHz, ±0.5 dB
Input Connectors
Balanced TRS 1/4" phone jack
Panic Override
+24 VDC
Input Connectors
24 VDC terminal
OUTPUT
Stereo Zone Output
Impedance
120 Ω
Gain
-10 ~ +20 dB
Frequency Response
40 Hz - 20 kHz, ±0.5 dB
Paging Override Depth
-10 dB ~ Cut
Output Connectors
Balanced TRS 1/4" phone jack
Utility Output
Impedance
120 Ω
Frequency Response
40 Hz - 20 kHz, ±0.5 dB
Gain
-10 - +20 dB
Output Connectors
Balanced TRS 1/4" phone jack
SYSTEM
THD
Crosstalk
0.05%
-75 dB @ 1 kHz between any 2 outputs
Mains Power
100~120, 200~240 VAC, 50/60 Hz
Size (WxHxD)
482 x 44.5 x 168 mm (19" x 1.75" x 6.6")
Weight
page 10
2.5 kg (5.5 lbs.)
Zx2 / Zx4 User's Manual
PHONIC CORPORATION
REFERENCE BOOKS
Phonic recommends the following books for those interested in advanced audio engineering and sound system
operation:
Sound System Engineering by Don and Carolyn Davis, Focal Press, ISBN: 0-240-80305-1
Sound Reinforcement Handbook by Gary D. Davis, Hal Leonard Publishing Corporation, ISBN: 0-88188-900Audio System Design and Installation by Philip Giddings, Focal Press, ISBN: 0-240-80286-1
Practical Recording Techniques by Bruce and Jenny Bartlett, Focal Press, ISBN: 0-240-80306-X
Modern Recording Techniques by Huber & Runstein, Focal Press, ISBN: 0-240-80308-6
Sound Advice – The Musician’s Guide to the Recording Studio by Wayne Wadham, Schirmer Books, ISBN: 0-02872694-4
Professional Microphone Techniques by David Mills Huber, Philip Williams. Hal Leonard Publishing Corporation,
ISBN: 0-87288-685-9
Anatomy of a Home Studio: How Everything Really Works, from Microphones to Midi by Scott Wilkinson, Steve
Oppenheimer, Mark Isham. Mix Books, ISBN: 091837121X
Live Sound Reinforcement: A Comprehensive Guide to P.A. and Music Reinforcement Systems and Technology by
Scott Hunter Stark. Mix Books, ISBN: 0918371074
Audiopro Home Recording Course Vol 1: A Comprehensive Multimedia Audio Recording Text by Bill Gibson. Mix
Books, ISBN: 0918371104
Audiopro Home Recording Course Vol 2: A Comprehensive Multimedia Audio Recording Text by Bill Gibson. Mix
Books, ISBN: 0918371201
PHONIC CORPORATION
Zx2 / Zx4 User's Manual
page 11
6103 Johns Road #7