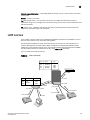
1
53-1002600-01
28 September 2012
Brocade ICX 6650
Administration Guide
Supporting FastIron Software Release 07.5.00
®
Copyright © 2006-2012 Brocade Communications Systems, Inc. All Rights Reserved.
Brocade, Brocade Assurance, the B-wing symbol, BigIron, DCX, Fabric OS, FastIron, MLX, NetIron, SAN Health, ServerIron,
TurboIron, VCS, and VDX are registered trademarks, and AnyIO, Brocade One, CloudPlex, Effortless Networking, ICX, NET Health,
OpenScript, and The Effortless Network are trademarks of Brocade Communications Systems, Inc., in the United States and/or in
other countries. Other brands, products, or service names mentioned may be trademarks of their respective owners.
Notice: This document is for informational purposes only and does not set forth any warranty, expressed or implied, concerning
any equipment, equipment feature, or service offered or to be offered by Brocade. Brocade reserves the right to make changes to
this document at any time, without notice, and assumes no responsibility for its use. This informational document describes
features that may not be currently available. Contact a Brocade sales office for information on feature and product availability.
Export of technical data contained in this document may require an export license from the United States government.
The authors and Brocade Communications Systems, Inc. shall have no liability or responsibility to any person or entity with
respect to any loss, cost, liability, or damages arising from the information contained in this book or the computer programs that
accompany it.
The product described by this document may contain “open source” software covered by the GNU General Public License or other
open source license agreements. To find out which open source software is included in Brocade products, view the licensing
terms applicable to the open source software, and obtain a copy of the programming source code, please visit
http://www.brocade.com/support/oscd.
Brocade Communications Systems, Incorporated
Corporate and Latin American Headquarters
Brocade Communications Systems, Inc.
130 Holger Way
San Jose, CA 95134
Tel: 1-408-333-8000
Fax: 1-408-333-8101
E-mail: [email protected]
Asia-Pacific Headquarters
Brocade Communications Systems China HK, Ltd.
No. 1 Guanghua Road
Chao Yang District
Units 2718 and 2818
Beijing 100020, China
Tel: +8610 6588 8888
Fax: +8610 6588 9999
E-mail: [email protected]
European Headquarters
Brocade Communications Switzerland Sàrl
Centre Swissair
Tour B - 4ème étage
29, Route de l'Aéroport
Case Postale 105
CH-1215 Genève 15
Switzerland
Tel: +41 22 799 5640
Fax: +41 22 799 5641
E-mail: [email protected]
Asia-Pacific Headquarters
Brocade Communications Systems Co., Ltd. (Shenzhen WFOE)
Citic Plaza
No. 233 Tian He Road North
Unit 1308 – 13th Floor
Guangzhou, China
Tel: +8620 3891 2000
Fax: +8620 3891 2111
E-mail: [email protected]
Document History
Title
Publication number
Summary of changes
Date
Brocade ICX 6650 Administration Guide
53-1002600-01
New document
September 2012
Contents
About This Document
Audience . . . . . . . . . . . . . . . . . . . . . . . . . . . . . . . . . . . . . . . . . . . . . . . xiii
Supported hardware and software . . . . . . . . . . . . . . . . . . . . . . . . . . xiii
Brocade ICX 6650 slot and port numbering . . . . . . . . . . . . . . . . . . . xiii
Document conventions . . . . . . . . . . . . . . . . . . . . . . . . . . . . . . . . . . . . xiv
Notice to the reader . . . . . . . . . . . . . . . . . . . . . . . . . . . . . . . . . . . . . . xv
Related publications . . . . . . . . . . . . . . . . . . . . . . . . . . . . . . . . . . . . . . xvi
Additional information. . . . . . . . . . . . . . . . . . . . . . . . . . . . . . . . . . . . . xvi
Getting technical help . . . . . . . . . . . . . . . . . . . . . . . . . . . . . . . . . . . . .xvii
Document feedback . . . . . . . . . . . . . . . . . . . . . . . . . . . . . . . . . . . . . .xvii
Chapter 1
Management Applications
Management port overview . . . . . . . . . . . . . . . . . . . . . . . . . . . . . . . . . 1
How the management port works. . . . . . . . . . . . . . . . . . . . . . . . . 1
CLI Commands for use with the management port. . . . . . . . . . . 2
Logging on through the CLI. . . . . . . . . . . . . . . . . . . . . . . . . . . . . . . . . . 3
Online help . . . . . . . . . . . . . . . . . . . . . . . . . . . . . . . . . . . . . . . . . . . 4
Command completion . . . . . . . . . . . . . . . . . . . . . . . . . . . . . . . . . . 4
Scroll control. . . . . . . . . . . . . . . . . . . . . . . . . . . . . . . . . . . . . . . . . . 4
Line editing commands . . . . . . . . . . . . . . . . . . . . . . . . . . . . . . . . . 5
Using slot number, and port number
with CLI commands. . . . . . . . . . . . . . . . . . . . . . . . . . . . . . . . . . . . . . . . 5
CLI nomenclature on Brocade ICX 6650 models . . . . . . . . . . . . 6
Searching and filtering output from CLI commands . . . . . . . . . . 6
Using special characters in regular expressions . . . . . . . . . . . . . 8
Creating an alias for a CLI command . . . . . . . . . . . . . . . . . . . . . 10
Chapter 2
Basic Software Features
Basic system parameter configuration . . . . . . . . . . . . . . . . . . . . . . . 14
Entering system administration information . . . . . . . . . . . . . . . 15
SNMP parameter configuration . . . . . . . . . . . . . . . . . . . . . . . . . 15
Displaying virtual routing interface statistics. . . . . . . . . . . . . . . 18
Disabling Syslog messages and traps for CLI access . . . . . . . . 18
Cancelling an outbound Telnet session . . . . . . . . . . . . . . . . . . . 20
Specifying an SNTP server . . . . . . . . . . . . . . . . . . . . . . . . . . . . . . . . . 20
Brocade ICX 6650 Administration Guide
53-1002600-01
iii
Configuring the device as an SNTP server . . . . . . . . . . . . . . . . . . . . 23
Displaying SNTP server information . . . . . . . . . . . . . . . . . . . . . . 25
Enabling broadcast mode for an SNTP client . . . . . . . . . . . . . . 25
Setting the system clock . . . . . . . . . . . . . . . . . . . . . . . . . . . . . . . 26
Limiting broadcast, multicast, and unknown unicast traffic. . . 28
CLI banner configuration . . . . . . . . . . . . . . . . . . . . . . . . . . . . . . . 28
Local MAC address for Layer 2 management traffic . . . . . . . . . 30
Basic port parameter configuration. . . . . . . . . . . . . . . . . . . . . . . . . . 31
Assigning a port name. . . . . . . . . . . . . . . . . . . . . . . . . . . . . . . . . 31
Port speed and duplex mode modification . . . . . . . . . . . . . . . . 32
Downgrading the Brocade ICX 6650 front panel ports
from 10 GbE to 1 GbE port speed . . . . . . . . . . . . . . . . . . . . . . . 33
Enabling auto-negotiation maximum port speed
advertisement and down-shift . . . . . . . . . . . . . . . . . . . . . . . . . . 33
Modifying port duplex mode . . . . . . . . . . . . . . . . . . . . . . . . . . . . 34
Disabling or re-enabling a port . . . . . . . . . . . . . . . . . . . . . . . . . . 35
Flow control configuration . . . . . . . . . . . . . . . . . . . . . . . . . . . . . . 35
Symmetric flow control on Brocade ICX 6650 devices . . . . . . . 37
Interpacket Gap (IPG) on a Brocade ICX 6650 switch. . . . . . . . 39
Changing the Gbps fiber negotiation mode . . . . . . . . . . . . . . . . 39
Port priority (QoS) modification. . . . . . . . . . . . . . . . . . . . . . . . . . 40
Port flap dampening configuration . . . . . . . . . . . . . . . . . . . . . . . 40
Port loop detection. . . . . . . . . . . . . . . . . . . . . . . . . . . . . . . . . . . . 43
Chapter 3
Operations, Administration, and Maintenance
OAM Overview . . . . . . . . . . . . . . . . . . . . . . . . . . . . . . . . . . . . . . . . . . . 50
Software versions installed and running on a device. . . . . . . . . . . . 50
Determining the flash image version running on the device . . 50
Displaying the boot image version running on the device . . . . 51
Displaying the image versions installed in flash memory . . . . . 51
Flash image verification . . . . . . . . . . . . . . . . . . . . . . . . . . . . . . . 52
Image file types . . . . . . . . . . . . . . . . . . . . . . . . . . . . . . . . . . . . . . . . . . 53
Software upgrades . . . . . . . . . . . . . . . . . . . . . . . . . . . . . . . . . . . . . . . 53
Viewing the contents of flash files . . . . . . . . . . . . . . . . . . . . . . . . . . . 53
Using SNMP to upgrade software . . . . . . . . . . . . . . . . . . . . . . . . . . . 54
Software reboot. . . . . . . . . . . . . . . . . . . . . . . . . . . . . . . . . . . . . . . . . . 56
Software boot configuration notes . . . . . . . . . . . . . . . . . . . . . . . 56
Displaying the boot preference . . . . . . . . . . . . . . . . . . . . . . . . . . . . . 56
Loading and saving configuration files . . . . . . . . . . . . . . . . . . . . . . . 57
Replacing the startup configuration with the
running configuration . . . . . . . . . . . . . . . . . . . . . . . . . . . . . . . . . 58
Replacing the running configuration with the
startup configuration . . . . . . . . . . . . . . . . . . . . . . . . . . . . . . . . . . 58
Logging changes to the startup-config file . . . . . . . . . . . . . . . . . 58
Copying a configuration file to or from a TFTP server . . . . . . . . 59
Dynamic configuration loading . . . . . . . . . . . . . . . . . . . . . . . . . . 59
Maximum file sizes for startup-config file and running-config . 61
iv
Brocade ICX 6650 Administration Guide
53-1002600-01
Loading and saving configuration files with IPv6 . . . . . . . . . . . . . . . 62
Using the IPv6 copy command . . . . . . . . . . . . . . . . . . . . . . . . . . 62
Copying a file from an IPv6 TFTP server. . . . . . . . . . . . . . . . . . . 63
IPv6 ncopy command . . . . . . . . . . . . . . . . . . . . . . . . . . . . . . . . . 64
IPv6 TFTP server file upload . . . . . . . . . . . . . . . . . . . . . . . . . . . . 65
Using SNMP to save and load configuration information . . . . . 66
Erasing image and configuration files . . . . . . . . . . . . . . . . . . . . 67
System reload scheduling . . . . . . . . . . . . . . . . . . . . . . . . . . . . . . . . . 67
Reloading at a specific time . . . . . . . . . . . . . . . . . . . . . . . . . . . . 67
Reloading after a specific amount of time. . . . . . . . . . . . . . . . . 68
Displaying the amount of time remaining before
a scheduled reload . . . . . . . . . . . . . . . . . . . . . . . . . . . . . . . . . . . 68
Canceling a scheduled reload. . . . . . . . . . . . . . . . . . . . . . . . . . . 68
Diagnostic error codes and remedies for TFTP transfers . . . . . . . . . 68
Network connectivity testing . . . . . . . . . . . . . . . . . . . . . . . . . . . . . . . 69
Pinging an IPv4 address . . . . . . . . . . . . . . . . . . . . . . . . . . . . . . . 69
Tracing an IPv4 route . . . . . . . . . . . . . . . . . . . . . . . . . . . . . . . . . . 71
Chapter 4
Ports on Demand Licensing
Ports on Demand Overview . . . . . . . . . . . . . . . . . . . . . . . . . . . . . . . . 73
Ports on Demand terminology . . . . . . . . . . . . . . . . . . . . . . . . . . . . . . 74
PoD licensing rules . . . . . . . . . . . . . . . . . . . . . . . . . . . . . . . . . . . . . . . 74
PoD licensing configuration tasks . . . . . . . . . . . . . . . . . . . . . . . . . . . 74
Obtaining a PoD license . . . . . . . . . . . . . . . . . . . . . . . . . . . . . . . 75
Viewing PoD licensing information from the
Brocade software portal . . . . . . . . . . . . . . . . . . . . . . . . . . . . . . . . . . . 80
Transferring a PoD license . . . . . . . . . . . . . . . . . . . . . . . . . . . . . . . . . 82
Syslog message information . . . . . . . . . . . . . . . . . . . . . . . . . . . . . . . 82
Ports on Demand Licensing . . . . . . . . . . . . . . . . . . . . . . . . . . . . . . . . 82
Front panel PoD . . . . . . . . . . . . . . . . . . . . . . . . . . . . . . . . . . . . . . 82
Rear panel Flexible Ports on Demand . . . . . . . . . . . . . . . . . . . . 83
PoD licenses. . . . . . . . . . . . . . . . . . . . . . . . . . . . . . . . . . . . . . . . . 83
Enabling ports on the front panel . . . . . . . . . . . . . . . . . . . . . . . . 84
Deleting a ICX6650-10G-LIC-POD license . . . . . . . . . . . . . . . . . 86
Enabling ports on the rear panel . . . . . . . . . . . . . . . . . . . . . . . . 87
Disabling the FPoD ports on the rear panel. . . . . . . . . . . . . . . . 89
Deleting a 10 GbE or 40 GbE license . . . . . . . . . . . . . . . . . . . . . 90
Viewing information about PoD licenses . . . . . . . . . . . . . . . . . . . . . . 91
Viewing the LID and the software packages
installed in the device . . . . . . . . . . . . . . . . . . . . . . . . . . . . . . . . . 91
Displaying general license information for PoD ports . . . . . . . . 92
Displaying the license configuration for PoD ports
for the Brocade ICX 6650 . . . . . . . . . . . . . . . . . . . . . . . . . . . . . . 94
Configuration considerations when configuring PoD
for Brocade ICX 6650 devices. . . . . . . . . . . . . . . . . . . . . . . . . . . 96
Brocade ICX 6650 Administration Guide
53-1002600-01
v
Chapter 5
IPv6 Configuration on Brocade ICX 6650 Switch
Full Layer 3 IPv6 feature support. . . . . . . . . . . . . . . . . . . . . . . . . . .101
IPv6 addressing overview . . . . . . . . . . . . . . . . . . . . . . . . . . . . . . . . .101
IPv6 address types. . . . . . . . . . . . . . . . . . . . . . . . . . . . . . . . . . .102
IPv6 stateless auto-configuration . . . . . . . . . . . . . . . . . . . . . . .104
IPv6 CLI command support . . . . . . . . . . . . . . . . . . . . . . . . . . . . . . .104
IPv6 host address on a Layer 2 switch . . . . . . . . . . . . . . . . . . . . . .106
Configuring a global or site-local IPv6 address
with a manually configured interface ID . . . . . . . . . . . . . . . . . 107
Configuring a link-local IPv6 address as a system-wide
address for a switch. . . . . . . . . . . . . . . . . . . . . . . . . . . . . . . . . . 107
Configuring the management port
for an IPv6 automatic address configuration . . . . . . . . . . . . . . . . .108
Configuring basic IPv6 connectivity on
a Layer 3 switch. . . . . . . . . . . . . . . . . . . . . . . . . . . . . . . . . . . . . . . . .108
Enabling IPv6 routing. . . . . . . . . . . . . . . . . . . . . . . . . . . . . . . . .108
IPv6 configuration on each router interface . . . . . . . . . . . . . .108
Configuring IPv4 and IPv6 protocol stacks. . . . . . . . . . . . . . . .111
IPv6 management on Brocade ICX 6650 devices
(IPv6 host support) . . . . . . . . . . . . . . . . . . . . . . . . . . . . . . . . . . . . . .112
Configuring IPv6 management ACLs . . . . . . . . . . . . . . . . . . . .112
Restricting SNMP access to an IPv6 node . . . . . . . . . . . . . . . .113
Specifying an IPv6 SNMP trap receiver . . . . . . . . . . . . . . . . . .113
Configuring SNMP V3 over IPv6 . . . . . . . . . . . . . . . . . . . . . . . .113
Configuring SNTP over IPv6. . . . . . . . . . . . . . . . . . . . . . . . . . . .113
Secure Shell, SCP, and IPv6 . . . . . . . . . . . . . . . . . . . . . . . . . . .113
IPv6 Telnet . . . . . . . . . . . . . . . . . . . . . . . . . . . . . . . . . . . . . . . . .114
IPv6 traceroute. . . . . . . . . . . . . . . . . . . . . . . . . . . . . . . . . . . . . .114
Configuring name-to-IPv6 address resolution using
IPv6 DNS resolver . . . . . . . . . . . . . . . . . . . . . . . . . . . . . . . . . . .115
Defining an IPv6 DNS entry. . . . . . . . . . . . . . . . . . . . . . . . . . . .115
Pinging an IPv6 address . . . . . . . . . . . . . . . . . . . . . . . . . . . . . .116
Configuring an IPv6 Syslog server . . . . . . . . . . . . . . . . . . . . . . 117
Viewing IPv6 SNMP server addresses . . . . . . . . . . . . . . . . . . . 117
Disabling router advertisement and solicitation messages . .118
Disabling IPv6 on a Layer 2 switch . . . . . . . . . . . . . . . . . . . . . .118
Static IPv6 route configuration. . . . . . . . . . . . . . . . . . . . . . . . . . . . .118
IPv6 over IPv4 tunnels . . . . . . . . . . . . . . . . . . . . . . . . . . . . . . . . . . .121
IPv6 over IPv4 tunnel configuration notes . . . . . . . . . . . . . . . .121
Configuring a manual IPv6 tunnel . . . . . . . . . . . . . . . . . . . . . .121
Clearing IPv6 tunnel statistics . . . . . . . . . . . . . . . . . . . . . . . . .122
Displaying IPv6 tunnel information. . . . . . . . . . . . . . . . . . . . . .123
ECMP load sharing for IPv6 . . . . . . . . . . . . . . . . . . . . . . . . . . . . . . .126
Disabling or re-enabling ECMP load sharing for IPv6 . . . . . . .127
Changing the maximum load sharing paths for IPv6 . . . . . . .127
Enabling support for network-based ECMP
load sharing for IPv6 . . . . . . . . . . . . . . . . . . . . . . . . . . . . . . . . .127
Displaying ECMP load-sharing information for IPv6 . . . . . . . .127
vi
Brocade ICX 6650 Administration Guide
53-1002600-01
IPv6 ICMP feature configuration . . . . . . . . . . . . . . . . . . . . . . . . . . .128
Configuring ICMP rate limiting . . . . . . . . . . . . . . . . . . . . . . . . .128
Enabling IPv6 ICMP redirect messages . . . . . . . . . . . . . . . . . .129
IPv6 neighbor discovery configuration . . . . . . . . . . . . . . . . . . . . . .129
IPv6 neighbor discovery configuration notes . . . . . . . . . . . . . .130
Neighbor solicitation and advertisement messages . . . . . . . .130
Router advertisement and solicitation messages . . . . . . . . . .131
Neighbor redirect messages . . . . . . . . . . . . . . . . . . . . . . . . . . .131
Setting neighbor solicitation parameters for
duplicate address detection . . . . . . . . . . . . . . . . . . . . . . . . . . .131
Setting IPv6 router advertisement parameters . . . . . . . . . . . .132
Prefixes advertised in IPv6 router
advertisement messages . . . . . . . . . . . . . . . . . . . . . . . . . . . . .134
Setting flags in IPv6 router advertisement messages. . . . . . .135
Enabling and disabling IPv6 router advertisements . . . . . . . .135
Configuring reachable time for remote IPv6 nodes. . . . . . . . .136
IPv6 MTU . . . . . . . . . . . . . . . . . . . . . . . . . . . . . . . . . . . . . . . . . . . . . .136
Configuration notes and feature limitations
for IPv6 MTU . . . . . . . . . . . . . . . . . . . . . . . . . . . . . . . . . . . . . . . .136
Changing the IPv6 MTU . . . . . . . . . . . . . . . . . . . . . . . . . . . . . . .137
Static neighbor entries configuration . . . . . . . . . . . . . . . . . . . . . . .137
Limiting the number of hops an IPv6 packet can traverse . . . . . .138
IPv6 source routing security enhancements. . . . . . . . . . . . . . . . . .138
Clearing global IPv6 information . . . . . . . . . . . . . . . . . . . . . . . . . . .138
Clearing the IPv6 cache. . . . . . . . . . . . . . . . . . . . . . . . . . . . . . .139
Clearing IPv6 neighbor information . . . . . . . . . . . . . . . . . . . . .139
Clearing IPv6 routes from the IPv6 route table . . . . . . . . . . . .140
Clearing IPv6 traffic statistics . . . . . . . . . . . . . . . . . . . . . . . . . .140
Displaying global IPv6 information. . . . . . . . . . . . . . . . . . . . . . . . . .140
Displaying IPv6 cache information . . . . . . . . . . . . . . . . . . . . . .140
Displaying IPv6 interface information. . . . . . . . . . . . . . . . . . . . 141
Displaying IPv6 neighbor information. . . . . . . . . . . . . . . . . . . .144
Displaying the IPv6 route table . . . . . . . . . . . . . . . . . . . . . . . . .145
Displaying local IPv6 routers . . . . . . . . . . . . . . . . . . . . . . . . . . .146
Displaying IPv6 TCP information . . . . . . . . . . . . . . . . . . . . . . . . 147
Displaying IPv6 traffic statistics . . . . . . . . . . . . . . . . . . . . . . . .151
Chapter 6
SNMP Access
SNMP overview . . . . . . . . . . . . . . . . . . . . . . . . . . . . . . . . . . . . . . . . .155
SNMP community strings . . . . . . . . . . . . . . . . . . . . . . . . . . . . . . . . .156
Encryption of SNMP community strings . . . . . . . . . . . . . . . . . .156
Adding an SNMP community string . . . . . . . . . . . . . . . . . . . . .156
Displaying the SNMP community strings . . . . . . . . . . . . . . . . .158
Brocade ICX 6650 Administration Guide
53-1002600-01
vii
User-based security model . . . . . . . . . . . . . . . . . . . . . . . . . . . . . . . .159
Configuring your NMS . . . . . . . . . . . . . . . . . . . . . . . . . . . . . . . .159
Configuring SNMP version 3 on Brocade ICX 6650 devices. .159
Defining the engine id . . . . . . . . . . . . . . . . . . . . . . . . . . . . . . . .159
Defining an SNMP group . . . . . . . . . . . . . . . . . . . . . . . . . . . . . .160
Defining an SNMP user account. . . . . . . . . . . . . . . . . . . . . . . .161
Defining SNMP views . . . . . . . . . . . . . . . . . . . . . . . . . . . . . . . . . . . .163
SNMP version 3 traps . . . . . . . . . . . . . . . . . . . . . . . . . . . . . . . . . . . .164
Defining an SNMP group and specifying which
view is notified of traps . . . . . . . . . . . . . . . . . . . . . . . . . . . . . . .164
Defining the UDP port for SNMP v3 traps . . . . . . . . . . . . . . . .165
Trap MIB changes . . . . . . . . . . . . . . . . . . . . . . . . . . . . . . . . . . .165
Specifying an IPv6 host as an SNMP trap receiver . . . . . . . . .166
SNMP v3 over IPv6 . . . . . . . . . . . . . . . . . . . . . . . . . . . . . . . . . .166
Specifying an IPv6 host as an SNMP trap receiver . . . . . . . . .166
Viewing IPv6 SNMP server addresses . . . . . . . . . . . . . . . . . . .167
Displaying SNMP Information. . . . . . . . . . . . . . . . . . . . . . . . . . . . . .167
Displaying the Engine ID . . . . . . . . . . . . . . . . . . . . . . . . . . . . . .167
Displaying SNMP groups . . . . . . . . . . . . . . . . . . . . . . . . . . . . . .168
Displaying user information. . . . . . . . . . . . . . . . . . . . . . . . . . . .168
Interpreting varbinds in report packets . . . . . . . . . . . . . . . . . .168
SNMP v3 configuration examples . . . . . . . . . . . . . . . . . . . . . . . . . .169
Simple SNMP v3 configuration . . . . . . . . . . . . . . . . . . . . . . . . .169
More detailed SNMP v3 configuration . . . . . . . . . . . . . . . . . . .169
Chapter 7
Foundry Discovery Protocol (FDP) and Cisco Discovery Protocol (CDP)
Packets
FDP Overview. . . . . . . . . . . . . . . . . . . . . . . . . . . . . . . . . . . . . . . . . . . 171
FDP configuration . . . . . . . . . . . . . . . . . . . . . . . . . . . . . . . . . . .172
Displaying FDP information . . . . . . . . . . . . . . . . . . . . . . . . . . . .173
Clearing FDP and CDP information. . . . . . . . . . . . . . . . . . . . . . 176
CDP packets . . . . . . . . . . . . . . . . . . . . . . . . . . . . . . . . . . . . . . . . . . . 177
Enabling interception of CDP packets globally . . . . . . . . . . . . 177
Enabling interception of CDP packets on an interface . . . . . . 177
Displaying CDP information. . . . . . . . . . . . . . . . . . . . . . . . . . . .178
Clearing CDP information . . . . . . . . . . . . . . . . . . . . . . . . . . . . .180
Chapter 8
LLDP and LLDP-MED
LLDP terms used in this chapter . . . . . . . . . . . . . . . . . . . . . . . . . . .182
LLDP overview . . . . . . . . . . . . . . . . . . . . . . . . . . . . . . . . . . . . . . . . . .183
Benefits of LLDP . . . . . . . . . . . . . . . . . . . . . . . . . . . . . . . . . . . .184
LLDP-MED overview . . . . . . . . . . . . . . . . . . . . . . . . . . . . . . . . . . . . .184
Benefits of LLDP-MED . . . . . . . . . . . . . . . . . . . . . . . . . . . . . . . .185
LLDP-MED class . . . . . . . . . . . . . . . . . . . . . . . . . . . . . . . . . . . . .186
viii
Brocade ICX 6650 Administration Guide
53-1002600-01
General LLDP operating principles . . . . . . . . . . . . . . . . . . . . . . . . .186
LLDP operating modes . . . . . . . . . . . . . . . . . . . . . . . . . . . . . . .186
LLDP packets . . . . . . . . . . . . . . . . . . . . . . . . . . . . . . . . . . . . . . .187
TLV support. . . . . . . . . . . . . . . . . . . . . . . . . . . . . . . . . . . . . . . . .188
MIB support . . . . . . . . . . . . . . . . . . . . . . . . . . . . . . . . . . . . . . . . . . . .191
Syslog messages. . . . . . . . . . . . . . . . . . . . . . . . . . . . . . . . . . . . . . . .191
LLDP configuration . . . . . . . . . . . . . . . . . . . . . . . . . . . . . . . . . . . . . .192
LLDP configuration notes and considerations . . . . . . . . . . . . .192
Enabling and disabling LLDP. . . . . . . . . . . . . . . . . . . . . . . . . . .193
Enabling support for tagged LLDP packets . . . . . . . . . . . . . . .193
Changing a port LLDP operating mode . . . . . . . . . . . . . . . . . .193
Maximum number of LLDP neighbors . . . . . . . . . . . . . . . . . . .195
Enabling LLDP SNMP notifications and Syslog messages . . .196
Changing the minimum time between LLDP transmissions . .197
Changing the interval between regular LLDP transmissions .198
Changing the holdtime multiplier for transmit TTL . . . . . . . . .198
Changing the minimum time between port reinitializations . .199
LLDP TLVs advertised by the Brocade device . . . . . . . . . . . . .199
LLDP-MED configuration. . . . . . . . . . . . . . . . . . . . . . . . . . . . . . . . . .206
Enabling LLDP-MED . . . . . . . . . . . . . . . . . . . . . . . . . . . . . . . . . .207
Enabling SNMP notifications and Syslog messages
for LLDP-MED topology changes. . . . . . . . . . . . . . . . . . . . . . . .207
Changing the fast start repeat count . . . . . . . . . . . . . . . . . . . .208
Defining a location id. . . . . . . . . . . . . . . . . . . . . . . . . . . . . . . . .209
Defining an LLDP-MED network policy . . . . . . . . . . . . . . . . . . .215
LLDP-MED attributes advertised by the Brocade device . . . . . . . . 217
Displaying LLDP statistics and configuration settings. . . . . . .218
LLDP configuration summary . . . . . . . . . . . . . . . . . . . . . . . . . .218
Displaying LLDP statistics . . . . . . . . . . . . . . . . . . . . . . . . . . . . .219
Displaying LLDP neighbors . . . . . . . . . . . . . . . . . . . . . . . . . . . .221
Displaying LLDP neighbors detail . . . . . . . . . . . . . . . . . . . . . . .222
Displaying LLDP configuration details . . . . . . . . . . . . . . . . . . .222
Resetting LLDP statistics . . . . . . . . . . . . . . . . . . . . . . . . . . . . . . . . .223
Clearing cached LLDP neighbor information. . . . . . . . . . . . . . . . . .224
Chapter 9
Hardware Component Monitoring
Digital optical monitoring . . . . . . . . . . . . . . . . . . . . . . . . . . . . . . . . .225
Digital optical monitoring configuration limitations. . . . . . . . .225
Enabling digital optical monitoring . . . . . . . . . . . . . . . . . . . . . .225
Setting the alarm interval . . . . . . . . . . . . . . . . . . . . . . . . . . . . .226
Displaying information about installed media . . . . . . . . . . . . .226
Viewing optical monitoring information . . . . . . . . . . . . . . . . . .228
Syslog messages for optical transceivers . . . . . . . . . . . . . . . .230
Chapter 10
Syslog
About Syslog messages . . . . . . . . . . . . . . . . . . . . . . . . . . . . . . . . . .232
Brocade ICX 6650 Administration Guide
53-1002600-01
ix
Displaying Syslog messages. . . . . . . . . . . . . . . . . . . . . . . . . . . . . . .232
Enabling real-time display of Syslog messages . . . . . . . . . . . .233
Enabling real-time display for a Telnet or SSH session . . . . . .233
Displaying real-time Syslog messages . . . . . . . . . . . . . . . . . . .234
Syslog service configuration. . . . . . . . . . . . . . . . . . . . . . . . . . . . . . .234
Displaying the Syslog configuration . . . . . . . . . . . . . . . . . . . . .234
Disabling or re-enabling Syslog. . . . . . . . . . . . . . . . . . . . . . . . .238
Specifying a Syslog server. . . . . . . . . . . . . . . . . . . . . . . . . . . . .238
Specifying an additional Syslog server . . . . . . . . . . . . . . . . . . .239
Disabling logging of a message level . . . . . . . . . . . . . . . . . . . .239
Changing the number of entries the local buffer can hold . . .239
Changing the log facility . . . . . . . . . . . . . . . . . . . . . . . . . . . . . .240
Displaying interface names in Syslog messages. . . . . . . . . . . 241
Displaying TCP or UDP port numbers in Syslog messages . . . 241
Retaining Syslog messages after a soft reboot . . . . . . . . . . . .242
Clearing the Syslog messages from the local buffer . . . . . . . .242
Chapter 11
Network Monitoring
Basic system management . . . . . . . . . . . . . . . . . . . . . . . . . . . . . . .243
Viewing system information . . . . . . . . . . . . . . . . . . . . . . . . . . .243
Viewing configuration information . . . . . . . . . . . . . . . . . . . . . .244
Viewing port statistics . . . . . . . . . . . . . . . . . . . . . . . . . . . . . . . .245
Viewing STP statistics . . . . . . . . . . . . . . . . . . . . . . . . . . . . . . . . 247
Clearing statistics. . . . . . . . . . . . . . . . . . . . . . . . . . . . . . . . . . . .248
Viewing egress queue counters . . . . . . . . . . . . . . . . . . . . . . . .249
RMON support. . . . . . . . . . . . . . . . . . . . . . . . . . . . . . . . . . . . . . . . . .250
Maximum number of entries allowed in the
RMON control table . . . . . . . . . . . . . . . . . . . . . . . . . . . . . . . . . .250
Statistics (RMON group 1). . . . . . . . . . . . . . . . . . . . . . . . . . . . .251
History (RMON group 2). . . . . . . . . . . . . . . . . . . . . . . . . . . . . . .253
Alarm (RMON group 3). . . . . . . . . . . . . . . . . . . . . . . . . . . . . . . .253
Event (RMON group 9). . . . . . . . . . . . . . . . . . . . . . . . . . . . . . . .253
sFlow . . . . . . . . . . . . . . . . . . . . . . . . . . . . . . . . . . . . . . . . . . . . . . . . .254
sFlow version 5 . . . . . . . . . . . . . . . . . . . . . . . . . . . . . . . . . . . . .254
sFlow support for IPv6 packets. . . . . . . . . . . . . . . . . . . . . . . . .255
sFlow configuration considerations . . . . . . . . . . . . . . . . . . . . .256
Configuring and enabling sFlow . . . . . . . . . . . . . . . . . . . . . . . .257
Enabling sFlow forwarding. . . . . . . . . . . . . . . . . . . . . . . . . . . . .263
sFlow version 5 feature configuration . . . . . . . . . . . . . . . . . . .264
Displaying sFlow information . . . . . . . . . . . . . . . . . . . . . . . . . .267
Utilization list for an uplink port . . . . . . . . . . . . . . . . . . . . . . . . . . . .270
Utilization list for an uplink port command syntax . . . . . . . . .270
Displaying utilization percentages for an uplink . . . . . . . . . . . 271
x
Brocade ICX 6650 Administration Guide
53-1002600-01
Appendix A
Syslog messages
Appendix B
NIAP-CCEVS Certification
NIAP-CCEVS certified Brocade equipment and
Ironware releases . . . . . . . . . . . . . . . . . . . . . . . . . . . . . . . . . . . . . . .299
Local user password changes . . . . . . . . . . . . . . . . . . . . . . . . . . . . .299
Index
Brocade ICX 6650 Administration Guide
53-1002600-01
xi
xii
Brocade ICX 6650 Administration Guide
53-1002600-01
About This Document
The Brocade ICX 6650 is a ToR (Top of Rack) Ethernet switch for campus LAN and classic Ethernet
data center environments.
Audience
This document is designed for system administrators with a working knowledge of Layer 2 and
Layer 3 switching and routing.
If you are using a Brocade Layer 3 Switch, you should be familiar with the following protocols if
applicable to your network: IP, RIP, OSPF, BGP, ISIS, PIM, and VRRP.
Supported hardware and software
This document is specific to the Brocade ICX 6650 running FastIron 7.5.00.
Brocade ICX 6650 slot and port numbering
Many CLI commands require users to enter port numbers as part of the command syntax, and
many show command outputs display port numbers. The port numbers are entered and displayed
in stack-unit/slot number/port number format. In all Brocade ICX 6650 inputs and outputs, the
stack-unit number is always 1.
The ICX 6650 contains the following slots and Ethernet ports:
• Slot 1 is located on the front of the ICX 6650 device and contains ports 1 through 56. Ports 1
through 32 are 10 GbE. Ports 33 through 56 are 1/10 GbE SFP+ ports. Refer to the following
figure.
Slot 1
Brocade ICX 6650 Administration Guide
53-1002600-01
xiii
Brocade ICX 6650 slot and port numbering
• Slot 2 is located on the back of the ICX 6650 device and contains ports 1 through 3 on the top
row and port 4 on the bottom row. These ports are 2x40 GbE QSFP+. Refer to the following
figure.
Slot 2
Slot 2 Slot 3
• Slot 3 is located on the back of the ICX 6650 device and contains ports 1 through 8. These
ports are 4 x 10 GbE breakout ports and require the use of a breakout cable. Refer to the
previous figure.
Document conventions
This section describes text formatting conventions and important notice formats used in this
document.
Text formatting
The narrative-text formatting conventions that are used are as follows:
bold text
Identifies command names
Identifies the names of user-manipulated GUI elements
Identifies keywords and operands
Identifies text to enter at the GUI or CLI
italic text
Provides emphasis
Identifies variables
Identifies paths and Internet addresses
Identifies document titles
code text
Identifies CLI output
Identifies command syntax examples
For readability, command names in the narrative portions of this guide are presented in mixed
lettercase: for example, switchShow. In actual examples, command lettercase is all lowercase.
Command syntax conventions
Command syntax in this manual follows these conventions:
command
Commands are printed in bold.
--option, option
Command options are printed in bold.
-argument, arg
Arguments.
Brocade ICX 6650 Administration Guide
53-1002600-01
Brocade ICX 6650 slot and port numbering
[]
Optional elements appear in brackets.
variable
Variables are printed in italics. In the help pages, values are underlined or
enclosed in angled brackets < >.
...
Repeat the previous element, for example “member[;member...]”
value
Fixed values following arguments are printed in plain font. For example,
--show WWN
|
Boolean. Elements are exclusive. Example: --show -mode egress | ingress
Notes, cautions, and warnings
The following notices and statements are used in this manual. They are listed below in order of
increasing severity of potential hazards.
NOTE
A note provides a tip, guidance, or advice, emphasizes important information, or provides a
reference to related information.
ATTENTION
An Attention statement indicates potential damage to hardware or data.
CAUTION
A Caution statement alerts you to situations that can be potentially hazardous to you or cause
damage to hardware, firmware, software, or data.
DANGER
A Danger statement indicates conditions or situations that can be potentially lethal or extremely
hazardous to you. Safety labels are also attached directly to products to warn of these conditions
or situations.
Notice to the reader
This document might contain references to the trademarks of the following corporations. These
trademarks are the properties of their respective companies and corporations.
These references are made for informational purposes only.
Corporation
Referenced Trademarks and Products
Microsoft Corporation
Windows, Windows NT, Internet Explorer
Oracle Corporation
Oracle, Java
Netscape Communications Corporation
Netscape
Mozilla Corporation
Mozilla Firefox
Brocade ICX 6650 Administration Guide
53-1002600-01
xv
Brocade ICX 6650 slot and port numbering
Corporation
Referenced Trademarks and Products
Sun Microsystems, Inc.
Sun, Solaris
Red Hat, Inc.
Red Hat, Red Hat Network, Maximum RPM, Linux Undercover
Related publications
The following Brocade documents supplement the information in this guide:
•
•
•
•
•
•
•
•
•
•
Brocade ICX 6650 Release Notes
Brocade ICX 6650 Hardware Installation Guide New
Brocade ICX 6650 Administration Guide
Brocade ICX 6650 Platform and Layer 2 Configuration Guide
Brocade ICX 6650 Layer 3 Routing Configuration Guide
Brocade ICX 6650 Security Configuration Guide
Brocade ICX 6650 IP Multicast Configuration Guide
Brocade ICX 6650 Diagnostic Reference
Unified IP MIB Reference
Ports-on-Demand Licensing for the Brocade ICX 6650
The latest versions of these guides are posted at http://www.brocade.com/ethernetproducts.
Additional information
This section lists additional Brocade and industry-specific documentation that you might find
helpful.
Brocade resources
To get up-to-the-minute information, go to http://my.brocade.com to register at no cost for a user
ID and password.
White papers, online demonstrations, and data sheets are available through the Brocade website
at:
http://www.brocade.com/products-solutions/products/index.page
For additional Brocade documentation, visit the Brocade website:
http://www.brocade.com
Release notes are available on the MyBrocade website.
Brocade ICX 6650 Administration Guide
53-1002600-01
Brocade ICX 6650 slot and port numbering
Other industry resources
For additional resource information, visit the Technical Committee T11 website. This website
provides interface standards for high-performance and mass storage applications for Fibre
Channel, storage management, and other applications:
http://www.t11.org
For information about the Fibre Channel industry, visit the Fibre Channel Industry Association
website:
http://www.fibrechannel.org
Getting technical help
To contact Technical Support, go to
http://www.brocade.com/services-support/index.page
for the latest e-mail and telephone contact information.
Document feedback
Quality is our first concern at Brocade and we have made every effort to ensure the accuracy and
completeness of this document. However, if you find an error or an omission, or you think that a
topic needs further development, we want to hear from you. Forward your feedback to:
[email protected]
Provide the title and version number of the document and as much detail as possible about your
comment, including the topic heading and page number and your suggestions for improvement.
Brocade ICX 6650 Administration Guide
53-1002600-01
xvii
Brocade ICX 6650 slot and port numbering
Brocade ICX 6650 Administration Guide
53-1002600-01
1
Management Applications
In this chapter
• Management port overview . . . . . . . . . . . . . . . . . . . . . . . . . . . . . . . . . . . . . . . 1
• Logging on through the CLI . . . . . . . . . . . . . . . . . . . . . . . . . . . . . . . . . . . . . . . . 3
• Using slot number, and port number with CLI commands . . . . . . . . . . . . . . . 5
Table 1 lists the Brocade ICX 6650 switch and the management application features the switch
supports. These features are supported in full Layer 3 software images.
TABLE 1
12
Supported management application features
Feature
Brocade ICX
6650
Management port
Yes
industry-standard Command Line
Interface (CLI), including support for:
• Serial and Telnet access
• Alias command
• On-line help
• Command completion
• Scroll control
• Line editing
• Searching and filtering output
• Special characters
Yes
Management port overview
The management port is an out-of-band port that customers can use to manage their devices
without interfering with the in-band ports. The management port is widely used to download
images and configurations and for Telnet sessions.
How the management port works
The following rules apply to management ports:
• Only packets that are specifically addressed to the management port MAC address or the
broadcast MAC address are processed by the Layer 2 Switch or Layer 3 Switch. All other
packets are filtered out.
• No packet received on a management port is sent to any in-band ports, and no packets
received on in-band ports are sent to a management port.
• A management port is not part of any VLAN
• Protocols are not supported on the management port.
Brocade ICX 6650 Administration Guide
53-1002600-01
1
1
Management port overview
• Creating a management VLAN disables the management port on the device.
For switches, any in-band port may be used for management purposes. A router sends Layer 3
packets using the MAC address of the port as the source MAC address.
CLI Commands for use with the management port
The following CLI commands can be used with a management port.
To display the current configuration, use the show running-config interface management
command.
Brocade(config-if-mgmt)#ip addr 10.44.9.64/24
Brocade(config)#show running-config interface management 1
interface management 1
ip address 10.44.9.64 255.255.255.0
Syntax: show running-config interface management <num>
To display the current configuration, use the show interfaces management command.
Brocade(config)#show interfaces management 1
GigEthernetmgmt1 is up, line protocol is up
Hardware is GigEthernet, address is 748e.f80c.5f40(bia 748e.f80c.5f40a)
Configured speed auto, actual 1Gbit, configured duplex fdx, actual fdx
Configured mdi mode AUTO, actual none
BPRU guard is disabled, ROOT protect is disabled
Link Error Dampening is Disabled
STP configured to OFF, priority is level0, mac-learning is enabled
Flow Control is config disabled, oper enabled
Mirror disabled, Monitor disabled
Not member of any active trunks
Not member of any configured trunks
No port name
IPG MII 0 bits-time, IPG GMII 0 bits-time
IP MTU 1500 bytes
300 second input rate: 83728 bits/sec, 130 packets/sec, 0.01% utilization
300 second output rate: 24 bits/sec, 0 packets/sec, 0.00% utilization
39926 packets input, 3210077 bytes, 0 no buffer
Received 4353 broadcasts, 32503 multicasts, 370 unicasts
0 input errors, 0 CRC, 0 frame, 0 ignored
0 runts, 0 giants
22 packets output, 1540 bytres, 0 underruns
Transmitted 0 broadcasts, 6 multicasts, 16 unicasts
0 output errors, 0 collisions
Syntax: show interfaces management <num>
To display the management interface information in brief form, enter the show interfaces brief
management command.
Brocade(config)#show interfaces brief management 1
Port
Link
State
Dupl Speed Trunk
Tag
Pri
mgmt1 Up
None
Full 1G
None
No
0
MAC
748e.f80c.5f40
Name
Syntax: show interfaces brief management <num>
2
Brocade ICX 6650 Administration Guide
53-1002600-01
1
Logging on through the CLI
To display management port statistics, enter the show statistics management command.
Brocade(config)#show statistics management 1
Port
Link
State
Dupl Speed Trunk
Tag
mgmt1 Up
None
Full 1G
None
No
Pri
0
MAC
748e.f80c.5f40
Name
Port mgmt1 Counters:
InOctets3210941OutOctets1540
InPkts39939OutPackets22
InBroadcastPkts4355OutbroadcastPkts0
InMultiastPkts35214OutMulticastPkts6
InUnicastPkts370OutUnicastPkts16
InBadPkts0
InFragments0
InDiscards0OutErrors0
CRC
0
Collisions0
InErrors0 LateCollisions0
InGiantPkts0
InShortPkts0
InJabber0
InFlowCtrlPkts0OutFlowCtrlPkts0
InBitsPerSec83728OutBitsPerSec24
InPktsPerSec130OutPktsPerSec0
InUtilization0.01%OutUtilization0.00%
Syntax: show statistics management <num>
To display the management interface statistics in brief form, enter the show statistics brief
management command.
Brocade(config)#show statistics brief management 1
PortIn PacketsOut PacketsTrunkIn ErrorsOut Errors
mgmt1399462200
Total399452200
Syntax: show statistics brief management <num>
Logging on through the CLI
Once an IP address is assigned to a Brocade device running Layer 2 software or to an interface on
the Brocade device running Layer 3 software, you can access the CLI either through the direct
serial connection to the device or through a local or remote Telnet session.
You can initiate a local Telnet or SNMP connection by attaching a cable to a port and specifying the
assigned management station IP address.
The commands in the CLI are organized into the following levels:
• User EXEC – Lets you display information and perform basic tasks such as pings and
traceroutes.
• Privileged EXEC – Lets you use the same commands as those at the User EXEC level plus
configuration commands that do not require saving the changes to the system-config file.
Brocade ICX 6650 Administration Guide
53-1002600-01
3
1
Logging on through the CLI
• CONFIG – Lets you make configuration changes to the device. To save the changes across
reboots, you need to save them to the system-config file. The CONFIG level contains sub-levels
for individual ports, for VLANs, for routing protocols, and other configuration areas.
NOTE
By default, any user who can open a serial or Telnet connection to the Brocade device can access
all these CLI levels. To secure access, you can configure Enable passwords or local user accounts,
or you can configure the device to use a RADIUS or TACACS/TACACS+ server for authentication. refer
to the Brocade ICX 6650 Switch Security Configuration Guide.
Online help
To display a list of available commands or command options, enter “?” or press Tab. If you have
not entered part of a command at the command prompt, all the commands supported at the
current CLI level are listed. If you enter part of a command, then enter “?” or press Tab, the CLI
lists the options you can enter at this point in the command string.
If you enter an invalid command followed by ?, a message appears indicating the command was
unrecognized. An example is given below.
Brocade(config)#rooter ip
Unrecognized command
Command completion
The CLI supports command completion, so you do not need to enter the entire name of a command
or option. As long as you enter enough characters of the command or option name to avoid
ambiguity with other commands or options, the CLI understands what you are typing.
Scroll control
By default, the CLI uses a page mode to paginate displays that are longer than the number of rows
in your terminal emulation window. For example, if you display a list of all the commands at the
global CONFIG level but your terminal emulation window does not have enough rows to display
them all at once, the page mode stops the display and lists your choices for continuing the display.
An example is given below.
aaa
all-client
appletalk
arp
boot
some lines omitted for brevity...
ipx
lock-address
logging
mac
--More--, next page: Space, next line:
Return key, quit: Control-c
The software provides the following scrolling options:
• Press the Space bar to display the next page (one screen at a time).
4
Brocade ICX 6650 Administration Guide
53-1002600-01
Using slot number, and port number with CLI commands
1
• Press the Return or Enter key to display the next line (one line at a time).
• Press Ctrl+C or Ctrl+Q to cancel the display.
Line editing commands
The CLI supports the following line editing commands. To enter a line-editing command, use the
CTRL+key combination for the command by pressing and holding the CTRL key, then pressing the
letter associated with the command.
TABLE 2
CLI line editing commands
Ctrl+Key combination
Description
Ctrl+A
Moves to the first character on the command line.
Ctrl+B
Moves the cursor back one character.
Ctrl+C
Escapes and terminates command prompts and ongoing tasks (such as
lengthy displays), and displays a fresh command prompt.
Ctrl+D
Deletes the character at the cursor.
Ctrl+E
Moves to the end of the current command line.
Ctrl+F
Moves the cursor forward one character.
Ctrl+K
Deletes all characters from the cursor to the end of the command line.
Ctrl+L; Ctrl+R
Repeats the current command line on a new line.
Ctrl+N
Enters the next command line in the history buffer.
Ctrl+P
Enters the previous command line in the history buffer.
Ctrl+U; Ctrl+X
Deletes all characters from the cursor to the beginning of the command line.
Ctrl+W
Deletes the last word you typed.
Ctrl+Z
Moves from any CONFIG level of the CLI to the Privileged EXEC level; at the
Privileged EXEC level, moves to the User EXEC level.
Using slot number, and port number
with CLI commands
Many CLI commands require users to enter port numbers as part of the command syntax, and
many show command outputs display port numbers. The port numbers are entered in the
following format: stack-unit/slot/port.
The ports are labelled on the front panels of the devices.
Brocade ICX 6650 Administration Guide
53-1002600-01
5
1
Using slot number, and port number with CLI commands
CLI nomenclature on Brocade ICX 6650 models
When you enter CLI commands that include the port number as part of the syntax, you must use
the stack unit/slot number/port number format. The unit number is 1. For example, the following
commands change the CLI from the global CONFIG level to the configuration level for the first port
on the device:
Brocade(config)#interface ethernet 1/1/1
Brocade(config-if-e1000-1/1/1)#
Syntax: ethernet <stack-unit>/<slot>/<port>
Searching and filtering output from CLI commands
You can filter CLI output from show commands and at the --More-- prompt. You can search for
individual characters, strings, or construct complex regular expressions to filter the output.
Searching and filtering output from Show commands
You can filter output from show commands to display lines containing a specified string, lines that
do not contain a specified string, or output starting with a line containing a specified string. The
search string is a regular expression consisting of a single character or string of characters. You
can use special characters to construct complex regular expressions. Refer to “Using special
characters in regular expressions” on page 8 for information on special characters used with
regular expressions.
Displaying lines containing a specified string
The following command filters the output of the show interface command for port 1/1/2 so it
displays only lines containing the word “Internet”. This command can be used to display the IP
address of the interface.
Brocade#show interface ethernet 1/1/2| include Internet
Internet address is 192.168.1.11/24, MTU 1518 bytes, encapsulation ethernet
Syntax: <show-command> | include <regular-expression>
NOTE
The vertical bar ( | ) is part of the command.
Note that the regular expression specified as the search string is case sensitive. In the example
above, a search string of “Internet” would match the line containing the IP address, but a search
string of “internet” would not.
Displaying lines that do not contain a specified string
The following command filters the output of the show who command so it displays only lines that
do not contain the word “closed”. This command can be used to display open connections to the
Brocade device.
6
Brocade ICX 6650 Administration Guide
53-1002600-01
Using slot number, and port number with CLI commands
1
Brocade#show who | exclude closed
Console connections:
established
you are connecting to this session
2 seconds in idle
Telnet connections (inbound):
1
established, client ip address 192.168.9.37
27 seconds in idle
Telnet connection (outbound):
SSH connections:
Syntax: <show-command> | exclude <regular-expression>
Displaying lines starting with a specified string
The following command filters the output of the show who command so it displays output starting
with the first line that contains the word “SSH”. This command can be used to display information
about SSH connections to the Brocade device.
Brocade#show who | begin SSH
SSH connections:
1
established, client ip address 192.168.9.210
7 seconds in idle
2
closed
3
closed
4
closed
5
closed
Syntax: <show-command> | begin <regular-expression>
Searching and filtering output at the --More-- prompt
The --More-- prompt displays when output extends beyond a single page. From this prompt, you can
press the Space bar to display the next page, the Return or Enter key to display the next line, or
Ctrl+C or Q to cancel the display. In addition, you can search and filter output from this prompt.
At the --More-- prompt, you can press the forward slash key ( / ) and then enter a search string. The
Brocade device displays output starting from the first line that contains the search string, similar to
the begin option for show commands. An example is given below.
--More--, next page: Space, next line: Return key, quit: Control-c
/telnet
The results of the search are displayed.
searching...
telnet
temperature
terminal
traceroute
undebug
undelete
whois
write
Brocade ICX 6650 Administration Guide
53-1002600-01
Telnet by name or IP address
temperature sensor commands
display syslog
TraceRoute to IP node
Disable debugging functions (see also 'debug')
Undelete flash card files
WHOIS lookup
Write running configuration to flash or terminal
7
1
Using slot number, and port number with CLI commands
To display lines containing only a specified search string (similar to the include option for show
commands) press the plus sign key ( + ) at the --More-- prompt and then enter the search string.
--More--, next page: Space, next line: Return key, quit: Control-c
+telnet
The filtered results are displayed.
filtering...
telnet
Telnet by name or IP address
To display lines that do not contain a specified search string (similar to the exclude option for show
commands) press the minus sign key ( - ) at the --More-- prompt and then enter the search string.
--More--, next page: Space, next line: Return key, quit: Control-c
-telnet
The filtered results are displayed.
filtering...
temperature
terminal
traceroute
undebug
undelete
whois
write
temperature sensor commands
display syslog
TraceRoute to IP node
Disable debugging functions (see also 'debug')
Undelete flash card files
WHOIS lookup
Write running configuration to flash or terminal
As with the commands for filtering output from show commands, the search string is a regular
expression consisting of a single character or string of characters. You can use special characters
to construct complex regular expressions. See the next section for information on special
characters used with regular expressions.
Using special characters in regular expressions
You use a regular expression to specify a single character or multiple characters as a search string.
In addition, you can include special characters that influence the way the software matches the
output against the search string. These special characters are listed in the following table.
TABLE 3
8
Special characters for regular expressions
Character
Operation
.
The period matches on any single character, including a blank space.
For example, the following regular expression matches “aaz”, “abz”, “acz”, and so on, but not just
“az”:
a.z
*
The asterisk matches on zero or more sequential instances of a pattern.
For example, the following regular expression matches output that contains the string “abc”,
followed by zero or more Xs:
abcX*
Brocade ICX 6650 Administration Guide
53-1002600-01
Using slot number, and port number with CLI commands
TABLE 3
1
Special characters for regular expressions (Continued)
Character
Operation
+
The plus sign matches on one or more sequential instances of a pattern.
For example, the following regular expression matches output that contains "de", followed by a
sequence of “g”s, such as “deg”, “degg”, “deggg”, and so on:
deg+
?
The question mark matches on zero occurrences or one occurrence of a pattern.
For example, the following regular expression matches output that contains "dg" or "deg":
de?g
NOTE: Normally when you type a question mark, the CLI lists the commands or options at that CLI
level that begin with the character or string you entered. However, if you enter Ctrl+V and
then type a question mark, the question mark is inserted into the command line, allowing
you to use it as part of a regular expression.
^
A caret (when not used within brackets) matches on the beginning of an input string.
For example, the following regular expression matches output that begins with “deg”:
^deg
$
A dollar sign matches on the end of an input string.
For example, the following regular expression matches output that ends with “deg”:
deg$
_
An underscore matches on one or more of the following:
, (comma)
{ (left curly brace)
} (right curly brace)
( (left parenthesis)
) (right parenthesis)
The beginning of the input string
The end of the input string
A blank space
For example, the following regular expression matches on “100” but not on “1002”, “2100”, and
so on.
_100_
[]
Square brackets enclose a range of single-character patterns.
For example, the following regular expression matches output that contains “1”, “2”, “3”, “4”, or
“5”:
[1-5]
You can use the following expression symbols within the brackets. These symbols are allowed
only inside the brackets.
• ^ – The caret matches on any characters except the ones in the brackets. For example, the
following regular expression matches output that does not contain “1”, “2”, “3”, “4”, or “5”:
•
•
•
•
•
•
•
•
•
[^1-5]
- The hyphen separates the beginning and ending of a range of characters. A match occurs if
any of the characters within the range is present. See the example above.
|
A vertical bar separates two alternative values or sets of values. The output can match one or the
other value.
For example, the following regular expression matches output that contains either “abc” or “defg”:
abc|defg
()
Parentheses allow you to create complex expressions.
For example, the following complex expression matches on “abc”, “abcabc”, or “defg”, but not on
“abcdefgdefg”:
((abc)+)|((defg)?)
Brocade ICX 6650 Administration Guide
53-1002600-01
9
1
Using slot number, and port number with CLI commands
If you want to filter for a special character instead of using the special character as described in the
table above, enter “\” (backslash) in front of the character. For example, to filter on output
containing an asterisk, enter the asterisk portion of the regular expression as “\*”.
Brocade#show ip route bgp | include \*
Creating an alias for a CLI command
You can create aliases for CLI commands. An alias serves as a shorthand version of a longer CLI
command. For example, you can create an alias called shoro for the CLI command show ip route.
Then when you enter shoro at the command prompt, the show ip route command is executed.
To create an alias called shoro for the CLI command show ip route, enter the alias shoro = show ip
route command.
Brocade(config)#alias shoro = show ip route
Syntax: [no] alias <alias-name> = <cli-command>
The <alias-name> must be a single word, without spaces.
After the alias is configured, entering shoro at either the Privileged EXEC or CONFIG levels of the
CLI, executes the show ip route command.
To create an alias called wrsbc for the CLI command copy running-config tftp 10.10.10.10 test.cfg,
enter the following command.
Brocade(config)#alias wrsbc = copy running-config tftp 10.10.10.10 test.cfg
To remove the wrsbc alias from the configuration, enter one of the following commands.
Brocade(config)#no alias wrsbc
or
Brocade(config)#unalias wrsbc
Syntax: unalias <alias-name>
The specified <alias-name> must be the name of an alias already configured on the Brocade
device.
To display the aliases currently configured on the Brocade device, enter the following command at
either the Privileged EXEC or CONFIG levels of the CLI.
Brocade#alias
wrsbc
shoro
copy running-config tftp 10.10.10.10 test.cfg
show ip route
Syntax: alias
Configuration notes for creating a command alias
The following configuration notes apply to this feature:
• You cannot include additional parameters with the alias at the command prompt. For
example, after you create the shoro alias, shoro bgp would not be a valid command.
10
Brocade ICX 6650 Administration Guide
53-1002600-01
Using slot number, and port number with CLI commands
1
• If configured on the Brocade device, authentication, authorization, and accounting is
performed on the actual command, not on the alias for the command.
• To save an alias definition to the startup-config file, use the write memory command.
Brocade ICX 6650 Administration Guide
53-1002600-01
11
1
12
Using slot number, and port number with CLI commands
Brocade ICX 6650 Administration Guide
53-1002600-01
Chapter
2
Basic Software Features
In this chapter
• Basic system parameter configuration . . . . . . . . . . . . . . . . . . . . . . . . . . . . .
• Specifying an SNTP server . . . . . . . . . . . . . . . . . . . . . . . . . . . . . . . . . . . . . . .
• Configuring the device as an SNTP server. . . . . . . . . . . . . . . . . . . . . . . . . . .
• Basic port parameter configuration . . . . . . . . . . . . . . . . . . . . . . . . . . . . . . . .
14
20
23
31
Table 4 lists the Brocade ICX 6650 switch and the basic software features the switch supports.
These features are supported in full Layer 3 software images, except where explicitly noted.
TABLE 4
Supported basic software features
Feature
Brocade ICX
6650
Basic System Parameters
System name, contact, and location
Yes
SNMP trap receiver and trap source
address
Yes
Virtual routing interface statistics via
SNMP
Yes
Disable Syslog messages and traps for CLI
access
Yes
Cancelling an outbound Telnet session
Yes
System time using a Simple Network Time
Protocol (SNTP) server or local system
counter
Yes
Enabling broadcast mode for SNTP client
Yes
System clock
Yes
Packet-based broadcast, multicast, and
unknown-unicast limits
Yes
CLI banners
Yes
Local MAC address for Layer 2
management traffic
Yes
Basic Port Parameters
Port name
Yes
10/100/1000 port speed
Yes
Auto-negotiation
Yes
Auto-negotiation maximum port speed
advertisement and down-shift
Yes
Brocade ICX 6650 Administration Guide
53-1002600-01
13
2
Basic system parameter configuration
TABLE 4
Supported basic software features
Feature
Brocade ICX
6650
Duplex mode
Yes
Port status (enable or disable)
Yes
Flow control:
• Responds to flow control packets,
but does not generate them
Yes
Symmetric flow control
• Can transmit and receive 802.3x
PAUSE frames
Yes
Auto-negotiation and advertisement of
flow control
Yes
Interpacket Gap (IPG) adjustment
Yes
Gbps fiber negotiate mode
Yes
QoS priority
Yes
Port flap dampening
Yes
Port loop detection
Yes
Basic system parameter configuration
Brocade devices are configured at the factory with default parameters that allow you to begin using
the basic features of the system immediately. However, many of the advanced features such as
VLANs or routing protocols for the device must first be enabled at the system (global) level before
they can be configured. If you use the Command Line Interface (CLI) to configure system
parameters, you can find these system level parameters at the Global CONFIG level of the CLI.
NOTE
Before assigning or modifying any router parameters, you must assign the IP subnet (interface)
addresses for each port.
NOTE
For information about configuring IP addresses, DNS resolver, DHCP assist, and other IP-related
parameters, refer to the Brocade ICX 6650 Switch Layer 3 Routing Configuration Guide.
NOTE
For information about the Syslog buffer and messages, refer to Appendix A, “Syslog messages”.
The procedures in this section describe how to configure the basic system parameters listed in
Table 4.
14
Brocade ICX 6650 Administration Guide
53-1002600-01
Basic system parameter configuration
2
Entering system administration information
You can configure a system name, contact, and location for a Brocade device and save the
information locally in the configuration file for future reference. This information is not required for
system operation but is suggested. When you configure a system name, the name replaces the
default system name in the CLI command prompt.
The name, contact, and location each can be up to 255 alphanumeric characters.
Here is an example of how to configure a system name, system contact, and location.
Brocade(config)# hostname zappa
zappa(config)# snmp-server contact Support Services
zappa(config)# snmp-server location Centerville
zappa(config)# end
zappa# write memory
Syntax: hostname <string>
Syntax: snmp-server contact <string>
Syntax: snmp-server location <string>
The text strings can contain blanks. The SNMP text strings do not require quotation marks when
they contain blanks but the host name does.
NOTE
The chassis name command does not change the CLI prompt. Instead, the command assigns an
administrative ID to the device.
SNMP parameter configuration
Use the procedures in this section to perform the following configuration tasks:
•
•
•
•
•
Specify a Simple Network Management Protocol (SNMP) trap receiver.
Specify a source address and community string for all traps sent by the device.
Change the holddown time for SNMP traps
Disable individual SNMP traps. (All traps are enabled by default.)
Disable traps for CLI access that is authenticated by a local user account, a RADIUS server, or
a TACACS/TACACS+ server.
NOTE
To add and modify “get” (read-only) and “set” (read-write) community strings, refer to the Brocade
ICX 6650 Switch Security Configuration Guide.
Specifying an SNMP trap receiver
You can specify a trap receiver to ensure that all SNMP traps sent by the Brocade device go to the
same SNMP trap receiver or set of receivers, typically one or more host devices on the network.
When you specify the host, you also specify a community string. The Brocade device sends all the
SNMP traps to the specified hosts and includes the specified community string. Administrators
can therefore filter for traps from a Brocade device based on IP address or community string.
Brocade ICX 6650 Administration Guide
53-1002600-01
15
2
Basic system parameter configuration
When you add a trap receiver, the software automatically encrypts the community string you
associate with the receiver when the string is displayed by the CLI. If you want the software to show
the community string in the clear, you must explicitly specify this when you add a trap receiver. In
either case, the software does not encrypt the string in the SNMP traps sent to the receiver.
To specify the host to which the device sends all SNMP traps, use one of the following methods.
To add a trap receiver and encrypt the display of the community string, enter commands such as
the following.
To specify an SNMP trap receiver and change the UDP port that will be used to receive traps, enter
a command such as the following.
Brocade(config)# snmp-server host 2.2.2.2 0 mypublic port 200
Brocade(config)# write memory
Syntax: snmp-server host <ip-addr> [0 | 1] <string> [port <value>]
The <ip-addr> parameter specifies the IP address of the trap receiver.
The 0 | 1 parameter specifies whether you want the software to encrypt the string (1) or show the
string in the clear (0). The default is 0.
The <string> parameter specifies an SNMP community string configured on the Brocade device.
The string can be a read-only string or a read-write string. The string is not used to authenticate
access to the trap host but is instead a useful method for filtering traps on the host. For example,
if you configure each of your Brocade devices that use the trap host to send a different community
string, you can easily distinguish among the traps from different Brocade devices based on the
community strings.
The command in the example above adds trap receiver 2.2.2.2 and configures the software to
encrypt display of the community string. When you save the new community string to the
startup-config file (using the write memory command), the software adds the following command
to the file.
snmp-server host 2.2.2.2 1 <encrypted-string>
To add a trap receiver and configure the software to encrypt display of the community string in the
CLI , enter commands such as the following.
Brocade(config)# snmp-server host 2.2.2.2 0 FastIron-12
Brocade(config)# write memory
The port <value> parameter allows you to specify which UDP port will be used by the trap receiver.
This parameter allows you to configure several trap receivers in a system. With this parameter, a
network management application can coexist in the same system. Brocade devices can be
configured to send copies of traps to more than one network management application.
Specifying a single trap source
You can specify a single trap source to ensure that all SNMP traps sent by the Layer 3 switch use
the same source IP address. For configuration details, refer to the Brocade ICX 6650 Switch Layer
3 Routing Configuration Guide.
16
Brocade ICX 6650 Administration Guide
53-1002600-01
Basic system parameter configuration
2
Setting the SNMP trap holddown time
When a Brocade device starts up, the software waits for Layer 2 convergence (STP) and Layer 3
convergence (OSPF) before beginning to send SNMP traps to external SNMP servers. Until
convergence occurs, the device might not be able to reach the servers, in which case the messages
are lost.
By default, a Brocade device uses a one-minute holddown time to wait for the convergence to occur
before starting to send SNMP traps. After the holddown time expires, the device sends the traps,
including traps such as “cold start” or “warm start” that occur before the holddown time expires.
You can change the holddown time to a value from one second to ten minutes.
To change the holddown time for SNMP traps, enter a command such as the following at the global
CONFIG level of the CLI.
Brocade(config)# snmp-server enable traps holddown-time 30
The command in this example changes the holddown time for SNMP traps to 30 seconds. The
device waits 30 seconds to allow convergence in STP and OSPF before sending traps to the SNMP
trap receiver.
Syntax: [no] snmp-server enable traps holddown-time <secs>
The <secs> parameter specifies the number of seconds and can be from 1 – 600 (ten minutes).
The default is 60 seconds.
Disabling SNMP traps
Brocade devices come with SNMP trap generation enabled by default for all traps. You can
selectively disable one or more of the following traps.
NOTE
By default, all SNMP traps are enabled at system startup.
SNMP Layer 2 traps
The following traps are generated on devices running Layer 2 software:
•
•
•
•
•
•
•
•
•
SNMP authentication keys
Power supply failure
Fan failure
Cold start
Link up
Link down
Bridge new root
Bridge topology change
Locked address violation
SNMP Layer 3 traps
The following traps are generated on devices running Layer 3 software:
• SNMP authentication key
Brocade ICX 6650 Administration Guide
53-1002600-01
17
2
Basic system parameter configuration
•
•
•
•
•
•
•
•
•
•
•
•
Power supply failure
Fan failure
Cold start
Link up
Link down
Bridge new root
Bridge topology change
Locked address violation
BGP4
OSPF
VRRP
VRRP-E
To stop link down occurrences from being reported, enter the following.
Brocade(config)# no snmp-server enable traps link-down
Syntax: [no] snmp-server enable traps <trap-type>
Displaying virtual routing interface statistics
You can enable SNMP to extract and display virtual routing interface statistics from the ifXTable
(64-bit counters).
The following describes the limitations of this feature:
• The Brocade device counts traffic from all virtual interfaces (VEs). For example, in a
configuration with two VLANs (VLAN 1 and VLAN 20) on port 1, when traffic is sent on VLAN 1,
the counters (VE statistics) increase for both VE 1 and VE 20.
• The counters include all traffic on each virtual interface, even if the virtual interface is
disabled.
• The counters include traffic that is denied by ACLs or MAC address filters.
To enable SNMP to display VE statistics, enter the enable snmp ve-statistics command.
Brocade(config)# enable snmp ve-statistics
Syntax: [no] enable snmp ve-statistics
Use the no form of the command to disable this feature once it is enabled.
Note that the above CLI command enables SNMP to display virtual interface statistics. It does not
enable the CLI to display the statistics.
Disabling Syslog messages and traps for CLI access
Brocade devices send Syslog messages and SNMP traps when a user logs into or out of the User
EXEC or Privileged EXEC level of the CLI. The feature applies to users whose access is
authenticated by an authentication-method list based on a local user account, RADIUS server, or
TACACS/TACACS+ server.
18
Brocade ICX 6650 Administration Guide
53-1002600-01
Basic system parameter configuration
2
NOTE
The Privileged EXEC level is sometimes called the “Enable” level, because the command for
accessing this level is enable.
The feature is enabled by default.
Examples of Syslog messages for CLI access
When a user whose access is authenticated by a local user account, a RADIUS server, or a TACACS
or TACACS+ server logs into or out of the CLI User EXEC or Privileged EXEC mode, the software
generates a Syslog message and trap containing the following information:
•
•
•
•
The time stamp
The user name
Whether the user logged in or out
The CLI level the user logged into or out of (User EXEC or Privileged EXEC level)
NOTE
Messages for accessing the User EXEC level apply only to access through Telnet. The device does
not authenticate initial access through serial connections but does authenticate serial access to the
Privileged EXEC level. Messages for accessing the Privileged EXEC level apply to access through the
serial connection or Telnet.
The following examples show login and logout messages for the User EXEC and Privileged EXEC
levels of the CLI.
Brocade# show logging
Syslog logging: enabled (0 messages dropped, 0 flushes, 0 overruns)
Buffer logging: level ACDMEINW, 12 messages logged
level code: A=alert C=critical D=debugging M=emergency E=error
I=informational N=notification W=warning
Static Log Buffer:
Dec 15 19:04:14:A:Fan 1, fan on right connector, failed
Dynamic Log Buffer (50 entries):
Oct 15 18:01:11:info:dg logout from USER EXEC mode
Oct 15 17:59:22:info:dg logout from PRIVILEGE EXEC mode
Oct 15 17:38:07:info:dg login to PRIVILEGE EXEC mode
Oct 15 17:38:03:info:dg login to USER EXEC mode
Syntax: show logging
The first message (the one on the bottom) indicates that user “dg” logged in to the CLI User EXEC
level on October 15 at 5:38 PM and 3 seconds (Oct 15 17:38:03). The same user logged into the
Privileged EXEC level four seconds later.
The user remained in the Privileged EXEC mode until 5:59 PM and 22 seconds. (The user could
have used the CONFIG modes as well. Once you access the Privileged EXEC level, no further
authentication is required to access the CONFIG levels.) At 6:01 PM and 11 seconds, the user
ended the CLI session.
Disabling the Syslog messages and traps
Logging of CLI access is enabled by default. If you want to disable the logging, enter the following
commands.
Brocade ICX 6650 Administration Guide
53-1002600-01
19
2
Specifying an SNTP server
Brocade(config)# no logging enable user-login
Brocade(config)# write memory
Brocade(config)# end
Brocade# reload
Syntax: [no] logging enable user-login
Cancelling an outbound Telnet session
If you want to cancel a Telnet session from the console to a remote Telnet server (for example, if the
connection is frozen), you can terminate the Telnet session by doing the following.
1. At the console, press Ctrl+^ (Ctrl+Shift-6).
2. Press the X key to terminate the Telnet session.
Pressing Ctrl+^ twice in a row causes a single Ctrl+^ character to be sent to the Telnet server. After
you press Ctrl+^, pressing any key other than X or Ctrl+^ returns you to the Telnet session.
Specifying an SNTP server
The Brocade device can be configured as a Simple Network Time Protocol (SNTP) client. You can
configure the Brocade device to consult up to three SNTP servers for the current system time and
date. The first server configured will be used unless it becomes unreachable, in which case the
Brocade device will attempt to synchronize with the other SNTP servers (if any) in the order in which
they were configured.
NOTE
Brocade devices do not retain time and date information across power cycles. Unless you want to
reconfigure the system time counter each time the system is reset, Brocade recommends that you
use the SNTP feature as described below.
To identify an SNTP server with IP address 10.99.8.95 to act as the clock reference for a Brocade
device, enter the following.
Brocade(config)# sntp server 10.99.8.95
Syntax: [no] sntp server { <ip-address> | <hostname> | ipv6 <ipv6-address> } [<sntp-version>] [
authentication-key <key-ID> <key-string>]
The <sntp-version> parameter specifies the SNTP version the server is running and can be from 1
– 4. The default is 4. The SNTP version is automatically set to 4, unless a different SNTP version is
specified in the device startup configuration. You can configure up to three SNTP servers by
entering three separate sntp server commands.
The order in which the SNTP servers are configured is the order in which they are consulted. The
server that was configured first is the first server consulted after the poll cycle; the next server will
be consulted only if a positive ACK is not received from the first one.
To specify an IPv6 address for the SNTP server, use the ipv6 option.
20
Brocade ICX 6650 Administration Guide
53-1002600-01
Specifying an SNTP server
2
The authentication-key option allows you to configure an authentication key for communication
with the SNTP server. When the authentication key is configured for an SNTP client, it is used only
for an SNTP unicast client. You must assign a unique server <key-ID> and pre-share <key-string>.
The <key-ID> and pre-share <key-string> are used together to create the MD5 checksum. The MD5
checksum is used for authentication for request and reply messages with the SNTP server. The
<key-ID> is the symmetric key shared with the upstream server, and accepts values from 1 to
4,294,967,295. The <key-string> is the authentication string itself, and can take up to 16
characters. If the <key-string> variable consists of only numerical characters, you must enclose the
numerical characters in double quotes.
Modification of the authentication key fields is not supported. To change the key ID or key string,
remove the time server using the no sntp server... command, then reconfigure the server with the
new key.
By default, the Brocade device polls its SNTP server every 30 minutes (1800 seconds). To
configure the Brocade device to poll for clock updates from a SNTP server every 15 minutes, enter
the following.
Brocade(config)# sntp poll-interval 900
Syntax: [no] sntp poll-interval <16-131072>
To display information about SNTP associations, enter the show sntp associations command.
Brocade# show sntp associations
address
ref clock
~10.95.6.102
0.0.0.0
~10.95.6.101
0.0.0.0
* synced, ~ configured
st
16
16
when
202
202
poll
4
0
delay
0.0
0.0
disp
5.45
0.0
Syntax: show sntp associations
The following table describes the information displayed by the show sntp associations command.
TABLE 5
Output from the show sntp associations command
Field
Description
(leading character)
One or both of the following:
*
Synchronized to this peer
~
Peer is statically configured
address
IP address of the peer
ref clock
IP address of the peer reference clock, or the reference ID of the
external clock source if the peer is stratum 1.
Examples of external clock source IDs: GPS, CDMA, WWV (Ft.Collins US
Radio 2.5, 5, 10, 15 MHz), CESM (calibrated Cesium clock), etc.
st
NTP stratum level of the peer
when
Amount of time since the last NTP packet was received from the peer. A
negative number indicates the system has never received any
synchronization message from the specified server.
poll
The poll interval of the peer relative to the server.
delay
The total delay time in milliseconds along the path to the root clock.
disp
The dispersion of the root path in milliseconds.
Brocade ICX 6650 Administration Guide
53-1002600-01
21
2
Specifying an SNTP server
To display detailed information about SNTP associations, enter the show sntp associations details
command.
Brocade# show sntp associations details
10.99.8.95 configured,insane, unsynched,invalid, stratum 16
ref ID 0.0.0.0,time 0.0 (Jan 1 00:00:00)
our mode client, peer mode unspec, our poll intvl 15, peer poll intvl 0
root delay 0.0 msec, root disp 0.0
delay 0 msec, offset 0 msec
precision 2**0, version 0
org time 0.0 (Jan 1 00:00:00)
rcv time 0.0 (Jan 1 00:00:00)
xmt time 0.0 (Jan 1 00:00:00)
Syntax: show sntp associations details
The following table describes the information displayed by the show sntp associations details
command.
TABLE 6
22
Output from the show sntp associations details command
Field
Description
IP address
The IP address of the SNTP server. The IP address is an IPv4 or an IPv6
address.
configured or dynamic
The SNTP server is either configured, or the last responsive broadcast
server that is found dynamically.
authenticated
If MD5 authentication is enabled for the peer.
sane or insane
If the SNTP server passes sanity checks.
synched or unsynched
If the system is synchronized or unsynchronized to the NTP peer.
valid or invalid
If the peer time is valid or invalid.
stratum
The NTP stratum level of the peer.
reference ID
The IP address of the peer (if any) to which the unit is synchronized. The
reference ID can also refer to the external clock source if the peer is
stratum 1.
Examples of external clock source IDs: GPS, CDMA, WWV (Ft.Collins US
Radio 2.5, 5, 10, 15 MHz), CESM (calibrated Cesium clock), etc.
time
The reference time stamp.
our mode
The mode relative to the peer. The mode can be a client or a broadcast
client.
peer mode
Peer mode relative to us.
our poll intvl
The system poll interval relative to the peer.
peer poll intv
The poll interval of the peer relative to the server.
root delay
The total delay time in milliseconds along the path to the root clock.
root disp
The dispersion of the root path in milliseconds.
delay
The round trip delay to the peer in milliseconds.
offset
The offset of the peer clock relative to the system clock.
Brocade ICX 6650 Administration Guide
53-1002600-01
Configuring the device as an SNTP server
2
Field
Description
precision
The precision of the system clock in Hz.
version
The NTP version of the peer. The version can be from 1 - 4.
org time
The original timestamp of the system clock. The original timestamp is
what the client has sent to the server.
rcv time
The receive timestamp of the system clock.
xmt time
The transmit timestamp of the system clock.
To display information about SNTP status, enter the show sntp status command.
Brocade# show sntp status
Clock is synchronized, stratum = 4, reference clock = 10.70.20.23
precision is 2**-20
reference time is 3489354594.3780510747
clock offset is 0.0000 msec, root delay is 0.41 msec
root dispersion is 0.11 msec, peer dispersion is 0.00 msec
sntp poll-interval is 10 secs
Syntax: show sntp status
The following table describes the information displayed by the show sntp status command.
TABLE 7
Output from the show sntp status command
Field
Description
unsynchronized
System is not synchronized to an NTP peer.
synchronized
System is synchronized to an NTP peer.
stratum
NTP stratum level of the upstream time server.
reference clock
IP address of the peer reference clock, or the reference ID of the
external clock source if the peer is stratum 1.
Examples of external clock source IDs: GPS, CDMA, WWV (Ft.Collins US
Radio 2.5, 5, 10, 15 MHz), CESM (calibrated Cesium clock), etc.
precision
Precision of this system's clock (in Hz)
reference time
Reference time stamp
clock offset
Offset of clock to synchronized peer
root delay
Total delay along the path to the root clock
root dispersion
Dispersion of the root path
peer dispersion
Dispersion of the synchronized peer
sntp poll-interval
Shows how often the Brocade device polls for clock updates from an
SNTP server.
Configuring the device as an SNTP server
You can configure the Brocade ICX 6650 device to function as an SNTP server to its downstream
clients. When using the device as an SNTP server, you can also set it to use its own internal clock
as the reference source if an upstream server becomes unavailable.
Brocade ICX 6650 Administration Guide
53-1002600-01
23
2
Configuring the device as an SNTP server
To use the device as a an SNTP server, enter a command such as the following at the Privileged
EXEC level.
Brocade(config)# sntp server-mode use-local-clock authentication-key abc123
Brocade(config)# write memory
The above example configures the device to operate as an SNTP server with the local clock as a
reference backup and an authentication key of “abc123” and writes the configuration changes to
memory.
Syntax: [no] sntp server-mode [ use-local-clock [ stratum <stratum-number> ] ] [
authentication-key <key-string> ]
• The use-local-clock option causes the Brocade device to use the local clock as a reference
source if an upstream reference source becomes unavailable. The SNTP stratum number is set
to 1 by default. You may specify a different stratum number using the stratum option;
<stratum-number> must be between 1 and 15. When the internal clock is serving as the SNTP
reference source, the Brocade device will use the specified stratum number (or the default
value of 1). When it is synchronized with the upstream server, the Brocade device will use the
upstream server’s stratum number plus 1.
If you do not include the use-local-clock option the Brocade device will function as specified by
RFC 4330: when the Brocade device loses upstream synchronization, it will respond to client
SNTP requests with a “kiss-of-death” response (stratum value=0).
NOTE
To enable the use-local-clock option, you must set the internal clock of the Brocade device
either by SNTP synchronization (see “Specifying an SNTP server” on page 20) or by using the
clock set command (see “Setting the system clock” on page 26). Until the internal clock is set,
the Brocade device will continue to rely exclusively on an upstream SNTP server if one is
reachable. If none, the SNTP server of the Brocade device is disabled (down).
• To require a code string for authentication of SNTP communication from clients, use the
authentication-key option and enter a key string of up to 16 characters. When this option is
used, authentication parameters are required in clients’ SNTP request messages. If
authentication fails, the Brocade device will reply with stratum 0 and a reference ID code of
“CRYP” (cryptographic authentication or identification failed), and messages received without
the required parameters will be dropped.
NOTE
Once entered, the authentication key cannot be viewed. Using the show running-config
command will show output similar to the following when an authentication key has been set:
sntp server-mode authentication-key 2 $QHMiR3NzQA=
The 2 indicates that the key is encrypted using base-64 encryption; the characters following
the 2 are the encrypted authentication string.
NOTE
You cannot enable or disable the use-local-clock option (or its stratum number) or change the
authentication string when the SNTP server is up. To change these settings after enabling SNTP
server mode, you must disable server mode using the command no sntp server-mode, then
re-enable it with the new parameters.
24
Brocade ICX 6650 Administration Guide
53-1002600-01
Configuring the device as an SNTP server
2
Displaying SNTP server information
Use the show sntp server-mode command to display the status of the SNTP server and its
configuration.
Brocade# show sntp server-mode
Status
: up
Stratum
: 1
Authentication
: md5
Clock source
: local-clock
Last 5 unique downstream client responses generated :
Client Address
Reference Time
10.20.79.91
15:57:48 Pacific Tue Aug 07 2012
10.20.79.63
15:56:26 Pacific Tue Aug 07 2012
10.20.79.110
15:52:08 Pacific Tue Aug 07 2012
Syntax: show sntp server-mode
TABLE 8
Output from the show sntp server-mode command
Field
Description
status
The operational state of the SNTP server. “Up” means that the SNTP port is
open; “down” means that the SNTP port is closed. (If sntp server-mode is
disabled, the show sntp server-mode command will display the message
“SNTP server is not operational.)
stratum
Stratum number of this server. The range is from 1 through 15. If the device is
synchronized to an upstream SNTP server, this will show that server’s stratum
number +1. If the device is unsynchronized and using the use-local-clock
option, this will show the user-specified stratum number (or the default value
of “1” if no stratum has been configured).
authentication
Authentication key used. If authentication has been configured successfully,
this displays “md5.” If not, it displays “none.”
clock source
The source of the reference time. When the reference source is an upstream
SNTP server, this will show the IP address of the upstream server. When the
internal clock of the device is being used as the reference, this will show
“local-clock.”
last upstream sync
The last upstream time-server synchronization, displayed in timestamp format.
This field is not displayed if the time source is the local clock.
last responses sent to clients
The last responses sent to downstream clients (maximum of five unique
clients), displayed in reverse chronological order. Each entry shows the IP
address of the client and the timestamp sent.
Enabling broadcast mode for an SNTP client
The Brocade device can be configured as an SNTP client. You can enable an SNTP client to function
in a broadcast mode when the NTP server is within the same LAN, and the expected delay in
response to calibrate the system clock is minimal. In a broadcast mode, the SNTP client will not
send queries to the NTP server. The SNTP client will listen to any number of NTP servers on the
Brocade ICX 6650 Administration Guide
53-1002600-01
25
2
Configuring the device as an SNTP server
network until the last message is received from the system clock. To update the system clock with
the last message received, you can enable the SNTP client to either listen to all NTP broadcast
servers on any interface, or enable the SNTP client to listen to only one specific NTP broadcast
server.
To enable an SNTP client in a broadcast mode to listen to all NTP servers on any interface, enter
the sntp broadcast client command.
Brocade(config)#sntp broadcast client
Syntax: sntp broadcast client
The sntp broadcast client command enables an SNTP client to listen to all NTP servers, and update
the client’s clock with the last message received from any NTP server.
To enable an SNTP client to listen to only one specific IPv4 NTP broadcast server, enter the
following commands.
Brocade(config)#sntp broadcast client
Brocade(config)#sntp broadcast server 1.1.1.1
To enable an SNTP client to listen to only one specific IPv6 NTP broadcast server, enter the
following commands.
Brocade(config)#sntp broadcast client
Brocade(config)#sntp broadcast server ipv6 2001:DB8:2:1::1
Syntax: sntp broadcast server [<ip-address> | ipv6 <ipv6-address>]
The sntp broadcast client command must be configured with the sntp broadcast server command
to allow for an SNTP client to listen to only one specific NTP server.
When both unicast and broadcast modes are enabled for an SNTP client, the priority by which the
NTP server is used to update the client’s clock is as follows.
1. The last responsive unicast server.
2. The broadcast server on any interface.
Setting the system clock
In addition to SNTP support, Brocade switches and routers also allow you to set the system time
counter. Using the clock set command starts the system clock with the time and date you specify.
NOTE
The time counter setting is not retained across power cycles. For more details about SNTP, refer to
“Specifying an SNTP server” on page 20.
To set the system time and date to 10:15:05 on October 15, 2012, enter the following command.
Brocade# clock set 10:15:05 10-15-2012
Syntax: [no] clock set <hh:mm:ss> <mm-dd-yy> | <mm-dd-yyyy>
To synchronize the time counter with your SNTP server time, enter the following command.
Brocade# sntp sync
26
Brocade ICX 6650 Administration Guide
53-1002600-01
Configuring the device as an SNTP server
2
Syntax: sntp sync
By default, Brocade switches and routers do not change the system time for daylight saving time.
To enable daylight saving time, enter the clock summer-time command.
Brocade(config)# clock summer-time
Syntax: [no] clock summer-time
Although SNTP servers typically deliver the time and date in Greenwich Mean Time (GMT), you can
configure the Brocade device to adjust the time for any one-hour offset from GMT or for one of the
following U.S. time zones:
•
•
•
•
•
•
•
•
•
•
•
•
US Pacific (default)
Alaska
Aleutian
Arizona
Central
East-Indiana
Eastern
Hawaii
Michigan
Mountain
Pacific
Samoa
The default is US Pacific.
To change the time zone to Australian East Coast time (which is normally 10 hours ahead of GMT),
enter the clock timezone gmt command.
Brocade(config)# clock timezone gmt gmt+10
Syntax: [no] clock timezone gmt | us <time-zone>
You can enter one of the following values for <time-zone>:
• US time zones (us): alaska, aleutian, arizona, central, east-indiana, eastern, hawaii, michigan,
mountain, pacific, samoa.
• GMT time zones (gmt): gmt+0:00 to gmt+12:00 in increments of 1, and gmt-0:00 to gmt-12:00
in decrements of 1 are supported.
New start and end dates for US daylight saving time
NOTE
This feature applies to US time zones only.
The system will automatically change the system clock to Daylight Saving Time (DST), in compliance
with the new federally mandated start of daylight saving time, which is extended one month
beginning in 2007. The DST will start at 2:00am on the second Sunday in March and will end at
2:00am on the first Sunday in November.
Brocade ICX 6650 Administration Guide
53-1002600-01
27
2
Configuring the device as an SNTP server
The DST feature is automatic, but to trigger the device to the correct time, the device must be
configured to the US time zone, not the GMT offset. To configure your device to use the US time
zone, enter the clock timezone us pacific command.
Brocade(config)# clock timezone us pacific
Syntax: [no] clock timezone us <timezone-type>
Enter pacific, eastern, central, or mountain for <timezone-type>.
This command must be configured on every device that follows the US DST.
To verify the change, run a show clock command.
Brocade# show clock
Limiting broadcast, multicast, and unknown unicast traffic
Brocade devices can forward all flooded traffic at wire speed within a VLAN. However, some
third-party networking devices cannot handle high rates of broadcast, multicast, or
unknown-unicast traffic. If high rates of traffic are being received by the Brocade device on a given
port of that VLAN, you can limit the number of broadcast, multicast, or unknown-unicast packets
received each second on that port. For more information about limiting broadcast, multicast, and
unknown unicast traffic, refer to the Brocade ICX 6650 Switch Security Configuration Guide.
CLI banner configuration
Brocade ICX 6650 devices can be configured to display a greeting message on users’ terminals
when they enter the Privileged EXEC CLI level or access the device through Telnet. In addition, a
Brocade device can display a message on the Console when an incoming Telnet CLI session is
detected.
Setting a message of the day banner
You can configure the Brocade device to display a message on a user terminal when he or she
establishes a Telnet CLI session. For example, to display the message “Welcome to Brocade ICX
6650!” when a Telnet CLI session is established.
Brocade(config)# banner motd $ (Press Return)
Enter TEXT message, End with the character '$'.
Welcome to Brocade ICX 6650! $
A delimiting character is established on the first line of the banner motd command. You begin and
end the message with this delimiting character. The delimiting character can be any character
except “ (double-quotation mark) and cannot appear in the banner text. In this example, the
delimiting character is $ (dollar sign). The text in between the dollar signs is the contents of the
banner. The banner text can be up to 4000 characters long, which can consist of multiple lines.
Syntax: [no] banner motd <delimiting-character>
To remove the banner, enter the no banner motd command.
28
Brocade ICX 6650 Administration Guide
53-1002600-01
Configuring the device as an SNTP server
2
NOTE
The banner <delimiting-character> command is equivalent to the banner motd
<delimiting-character> command.
NOTE
If you are using a Web client to view the message of the day, and your banners are very wide, with
large borders, you may need to set your PC display resolution to a number greater than the width of
your banner. For example, if your banner is 100 characters wide and the display is set to 80
characters, the banner may distort, or wrap, and be difficult to read. If you set your display resolution
to 120 characters, the banner will display correctly.
Requiring users to press the Enter key after the message of the day banner
In earlier IronWare software releases, users were required to press the Enter key after the Message
of the Day (MOTD) was displayed, prior to logging in to the Brocade device on a console or from a
Telnet session. Now, this requirement is disabled by default. Unless configured, users do not have
to press Enter after the MOTD banner is displayed.
For example, if the MOTD "Authorized Access Only" is configured, by default, the following
messages are displayed when a user tries to access the Brocade device from a Telnet session.
Authorized Access Only ...
Username:
The user can then login to the device.
However, if the requirement to press the Enter key is enabled, the following messages are displayed
when accessing the switch from Telnet.
Authorized Access Only ...
Press <Enter> to accept and continue the login process....
The user must press the Enter key before the login prompt is displayed.
Also, on the console, the following messages are displayed if the requirement to press the Enter
key is disabled.
Press Enter key to login
Authorized Access Only ...
User Access Verification
Please Enter Login Name:
However, if the requirement to press the Enter key after a MOTD is enabled, the following messages
are displayed when accessing the switch on the console.
Press Enter key to login
Authorized Access Only ...
Press <Enter> to accept and continue the login process....
The user must press the Enter key to continue to the login prompt.
To enable the requirement to press the Enter key after the MOTD is displayed, enter a command
such as the following.
Brocade(config)# banner motd require-enter-key
Syntax: [no] banner motd require-enter-key
Use the no form of the command to disable the requirement.
Brocade ICX 6650 Administration Guide
53-1002600-01
29
2
Configuring the device as an SNTP server
Setting a privileged EXEC CLI level banner
You can configure the Brocade device to display a message when a user enters the Privileged EXEC
CLI level.
Example
Brocade(config)# banner exec_mode # (Press Return)
Enter TEXT message, End with the character '#'.
You are entering Privileged EXEC level
Do not foul anything up! #
As with the banner motd command, you begin and end the message with a delimiting character; in
this example, the delimiting character is #(pound sign). The delimiting character can be any
character except “ (double-quotation mark) and cannot appear in the banner text. The text in
between the pound signs is the contents of the banner. Banner text can be up to 4000 characters,
which can consist of multiple lines.
Syntax: [no] banner exec_mode <delimiting-character>
To remove the banner, enter the no banner exec_mode command.
Displaying a console message when an incoming Telnet session is detected
You can configure the Brocade device to display a message on the Console when a user
establishes a Telnet session. This message indicates where the user is connecting from and
displays a configurable text message.
Example
Brocade(config)# banner incoming $ (Press Return)
Enter TEXT message, End with the character '$'.
Incoming Telnet Session!! $
When a user connects to the CLI using Telnet, the following message appears on the Console.
Telnet from 10.157.22.63
Incoming Telnet Session!!
As with the banner motd command, you begin and end the message with a delimiting character; in
this example, the delimiting character is $(dollar sign). The delimiting character can be any
character except “ (double-quotation mark) and cannot appear in the banner text. The text in
between the dollar signs is the contents of the banner. Banner text can be up to 4000 characters,
which can consist of multiple lines.
Syntax: [no] banner incoming <delimiting-character>
To remove the banner, enter the no banner incoming command.
Local MAC address for Layer 2 management traffic
By default, Brocade Layer 2 devices use the MAC address of the first port as the MAC address for
Layer 2 management traffic. For example, when the Brocade device receives an ARP request for its
management IP address, it responds with the first port MAC address. This may cause problems in
some configurations where the Brocade device uses the same MAC address for management
traffic as for switched traffic.
30
Brocade ICX 6650 Administration Guide
53-1002600-01
Basic port parameter configuration
2
You can configure the Brocade device to use a different MAC address for Layer 2 management
traffic than for switched traffic. When you issue the use-local-management-mac, the Brocade
device changes a local bit in the first port MAC address and uses this MAC address for
management traffic. The second bit of the first port MAC address is changed to 2. For example, if
the MAC address is 748e.f80c.5f40 after the feature is enabled, the switch uses 728e.f80c.5f40
for management functions. Switched traffic will continue to use the first port MAC address without
the local bit setting.
Example
Brocade(config)# use-local-management-mac
Brocade(config)# write memory
Brocade(config)# end
Brocade# reload
Syntax: [no] use-local-management-mac
NOTE
You must save the configuration and reload the software to place the change into effect.
NOTE
This feature is only available for the switch code. It is not available for router code.
Basic port parameter configuration
The procedures in this section describe how to configure the port parameters shown in Table 4.
All Brocade ports are pre-configured with default values that allow the device to be fully operational
at initial startup without any additional configuration. However, in some cases, changes to the port
parameters may be necessary to adjust to attached devices or other network requirements.
Assigning a port name
A port name can be assigned to help identify interfaces on the network. You can assign a port
name to physical ports, virtual interfaces, and loopback interfaces.
To assign a name to a port.
Brocade(config)# interface ethernet 1/1/1
Brocade(config-if-e10000-1/1/1)# port-name Marsha
Syntax: port-name <text>
The <text> parameter is an alphanumeric string. The name can be up to 64 characters long. The
name can contain blanks. You do not need to use quotation marks around the string, even when it
contains blanks.
Brocade ICX 6650 Administration Guide
53-1002600-01
31
2
Basic port parameter configuration
Port speed and duplex mode modification
The Gigabit Ethernet copper ports are designed to auto-sense and auto-negotiate the speed and
duplex mode of the connected device. If the attached device does not support this operation, you
can manually enter the port speed to operate at either 10, 100, or 1000 Mbps. The default and
recommended setting is 10/100/1000 auto-sense.
NOTE
You can modify the port speed of copper ports only; this feature does not apply to fiber ports.
NOTE
For optimal link operation, copper ports on devices that do not support 803.3u must be configured
with like parameters, such as speed (10,100,1000), duplex (half, full), MDI/MDIX, and Flow Control.
Port speed and duplex mode configuration syntax
The following commands change the port speed of copper interface 1/1/1 on a Brocade ICX 6650
device from the default of 10/100/1000 auto-sense, to 100 Mbps operating in full-duplex mode.
Brocade(config)# interface ethernet 1/1/1
Brocade(config-if-e10000-1/1/1)# speed-duplex 100-full
Syntax: speed-duplex <value>
where <value> can be one of the following:
•
•
•
•
•
•
•
10-full – 10 Mbps, full duplex
10-half – 10 Mbps, half duplex
100-full – 100 Mbps, full duplex
100-half – 100 Mbps, half duplex
1000-full-master – 1 Gbps, full duplex master
1000-full-slave – 1 Gbps, full duplex slave
auto – auto-negotiation
The default is auto (auto-negotiation).
Use the no form of the command to restore the default.
NOTE
On Brocade ICX 6650 devices, when setting the speed and duplex-mode of an interface to 1000-full,
configure one side of the link as master (1000-full-master) and the other side as slave
(1000-full-slave).
NOTE
On Brocade ICX 6650 devices, after you remove 10 Gbps speed from the running configuration,
plugging in a 1G optic SFP transceiver into a 10 Gbps port causes the software to fail to revert the
ports back from the default 10G LRM mode to 1 Gbps speed. Remove the 1G SFP transceiver and
plug in the 10G optic SFP+transceiver so that the devices go into default 10 Gbps LRM mode.
32
Brocade ICX 6650 Administration Guide
53-1002600-01
Basic port parameter configuration
2
Downgrading the Brocade ICX 6650 front panel ports
from 10 GbE to 1 GbE port speed
Ports 1/1/1 through 1/1/56 port speed can be downgraded from 10 GbE to 1 GbE port speed.
NOTE
Ports 1/1/33 through 1/1/56 can only be downgraded to 1 GbE port speed if you have downloaded
the ICX6650-10G-LIC-POD license onto the device. If the license is not downloaded onto the device,
the port is in an error-disabled state at 10 GbE port speed when attempting to downgrading the port
to 1 GbE port speed.
1. Enter the speed-duplex command on a single, multiple, or interface range as shown in the
following example.
Brocade(config)# interface ethernet 1/3/1
Brocade(config-if-e10000-1/3/1)# speed-duplex 1000-full-master
Syntax: [no] speed-duplex [10g-full | 1000-full-master]
The 10g-full option enables the port speed to 10 Gbps.
The 1000-full-master option enables the port speed to 1 Gbps.
2. Enter the write memory command to save the configuration.
Ports 1/1/1 through 1/1/56 are downgraded to 1 Gbps speed. A system reload is not required.
Use the no speed-duplex command to disable the port speed.
Enabling auto-negotiation maximum port speed
advertisement and down-shift
NOTE
For optimal link operation, link ports on devices that do not support 803.3u must be configured with
like parameters, such as speed (10,100,1000), duplex (half, full), MDI/MDIX, and Flow Control.
Maximum Port speed advertisement and Port speed down-shift are enhancements to the
auto-negotiation feature, a mechanism for accommodating multi-speed network devices by
automatically configuring the highest performance mode of inter-operation between two connected
devices.
Port speed down-shift enables Gbps copper ports on the Brocade device to establish a link at 1000
Mbps over a 4-pair wire when possible, or to down-shift to 100 Mbps if the medium is a 2-pair wire.
Maximum port speed advertisement enables you to configure an auto-negotiation maximum speed
that Gbps copper ports on the Brocade device will advertise to the connected device. You can
configure a port to advertise a maximum speed of either 100 Mbps or 10 Mbps. When the
maximum port speed advertisement feature is configured on a port that is operating at 100 Mbps
maximum speed, the port will advertise 10/100 Mbps capability to the connected device.
Similarly, if a port is configured at 10 Mbps maximum speed, the port will advertise 10 Mbps
capability to the connected device.
The port speed down-shift and maximum port speed advertisement features operate dynamically
at the physical link layer between two connected network devices. They examine the cabling
conditions and the physical capabilities of the remote link, then configure the speed of the link
segment according to the highest physical-layer technology that both devices can accommodate.
Brocade ICX 6650 Administration Guide
53-1002600-01
33
2
Basic port parameter configuration
The port speed down-shift and maximum port speed advertisement features operate dynamically
at the physical link layer, independent of logical trunk group configurations. Although Brocade
recommends that you use the same cable types and auto-negotiation configuration on all
members of a trunk group, you could utilize the auto-negotiation features conducive to your cabling
environment. For example, in certain circumstances, you could configure each port in a trunk
group to have its own auto-negotiation maximum port speed advertisement or port speed
down-shift configuration.
Maximum port speed application notes
• Port speed down-shift and maximum port speed advertisement work only when
auto-negotiation is enabled (CLI command speed-duplex auto). If auto-negotiation is OFF, the
device will reject the port speed down-shift and maximum port speed advertisement
configuration.
• When port speed down-shift or maximum port speed advertisement is enabled on a port, the
device will reject any configuration attempts to set the port to a forced speed mode (100 Mbps
or 1000 Mbps).
• When the port speed down-shift feature is enabled on a combo port, the port will not support
true media automatic detection, meaning the device will not be able to detect and select the
fiber or copper connector based on link availability.
Modifying port duplex mode
You can manually configure a 10/100 Mbps port to accept either full-duplex (bi-directional) or
half-duplex (uni-directional) traffic.
NOTE
You can modify the port duplex mode of copper ports only. This feature does not apply to fiber ports.
Port duplex mode and port speed are modified by the same command.
Port duplex mode configuration syntax
To change the port speed of interface 1/1/1 from the default of 10/100/1000 auto-sense to 10
Mbps operating at full-duplex, enter the following.
Brocade(config)# interface ethernet 1/1/1
Brocade(config-if-e10000-1/1/1)# speed-duplex 10-full
Syntax: speed-duplex <value>
The <value> can be one of the following:
•
•
•
•
•
34
10-full
10-half
100-full
100-half
auto (default)
Brocade ICX 6650 Administration Guide
53-1002600-01
Basic port parameter configuration
2
Disabling or re-enabling a port
A port can be made inactive (disable) or active (enable) by selecting the appropriate status option.
The default value for a port is enabled.
To disable port 1/1/1 of a Brocade device, enter the following.
Brocade(config)# interface ethernet 1/1/1
Brocade(config-if-e10000-1/1/1)# disable
You also can disable or re-enable a virtual interface. To do so, enter commands such as the
following.
Brocade(config)# interface ve 1
Brocade(config-vif-1)# disable
Syntax: disable
To re-enable a virtual interface, enter the enable command at the Interface configuration level. For
example, to re-enable virtual interface v1, enter the enable command.
Brocade(config-vif-1)# enable
Syntax: enable
Flow control configuration
Flow control (802.3x) is a QoS mechanism created to manage the flow of data between two
full-duplex Ethernet devices. Specifically, a device that is oversubscribed (is receiving more traffic
than it can handle) sends an 802.3x PAUSE frame to its link partner to temporarily reduce the
amount of data the link partner is transmitting. Without flow control, buffers would overflow,
packets would be dropped, and data retransmission would be required.
All Brocade ICX 6650 devices support asymmetric flow control, meaning they can receive PAUSE
frames but cannot transmit them.
Flow control configuration notes
• Auto-negotiation of flow control is not supported on 10 Gbps and 40 Gbps ports, fiber ports,
and copper or fiber combination ports.
• When any of the flow control commands are applied to a port that is up, the port will be
disabled and re-enabled.
• For 10 Gbps and 40 Gbps ports, the show interface <stack-unit>/<slot>/<port> display shows
Flow Control is enabled or Flow Control is disabled, depending on the configuration.
• When flow-control is enabled, the hardware can only advertise PAUSE frames. It does not
advertise Asym.
Disabling or re-enabling flow control
You can configure the Brocade ICX 6650 device to operate with or without flow control. Flow control
is enabled by default globally and on all full-duplex ports. You can disable and re-enable flow
control at the Global CONFIG level for all ports. When enabled globally, you can disable and
re-enable flow control on individual ports.
Brocade ICX 6650 Administration Guide
53-1002600-01
35
2
Basic port parameter configuration
To disable flow control, enter the no flow-control command.
Brocade(config)# no flow-control
To turn the feature back on, enter the flow-control command.
Brocade(config)# flow-control
Syntax: [no] flow-control
NOTE
For optimal link operation, link ports on devices that do not support 803.3u must be configured with
like parameters, such as speed (10,100,1000), duplex (half, full), MDI/MDIX, and Flow Control.
Negotiation and advertisement of flow control
By default, when flow control is enabled globally and auto-negotiation is ON, flow control is enabled
and advertised on 10/100/1000M ports. If auto-negotiation is OFF or if the port speed was
configured manually, then flow control is not negotiated with or advertised to the peer. For details
about auto-negotiation, refer to “Port speed and duplex mode modification” on page 32.
To disable flow control capability on a port, enter the following commands.
Brocade(config)# interface ethernet 1/1/1
Brocade(config-if-e10000-1/1/1)# no flow-control
To enable flow control negotiation, enter the following commands.
Brocade(config)# interface ethernet 1/1/1
Brocade(config-if-e10000-1/1/1)# flow-control neg-on
Error - This command is not supported for fiber ports and gbic copper optics
The error message is displayed because auto-negotiation of flow control is not supported on 10
Gbps and 40 Gbps ports.
Syntax: [no] flow-control [neg-on]
• flow-control [default] - Enable flow control, flow control negotiation, and advertise flow control
• no flow-control neg-on - Disable flow control negotiation
• no flow-control - Disable flow control, flow control negotiation, and advertising of flow control
After flow control negotiation is enabled using the flow-control neg-on command option, flow
control is enabled or disabled depending on the peer advertisement.
Commands may be entered in IF (single port) or MIF (multiple ports at once) mode.
Example
Brocade(config)# interface ethernet 1/1/1
Brocade(config-if-e10000-1/1/1)# no flow-control
This command disables flow control on port 1/1/1.
Brocade(config)# interface ethernet 1/1/1 to 1/1/2
Brocade(config-mif-1/1/1-1/1/2)# no flow-control
This command disables flow control on ports 1/1/1 to 1/1/2.
36
Brocade ICX 6650 Administration Guide
53-1002600-01
Basic port parameter configuration
2
Displaying flow-control status
The show interface <stack-unit>/<slot>/<port> command displays configuration, operation, and
negotiation status where applicable.
For example, issuing the command for 10/100/1000M port 1/1/36 displays the following output.
Brocade# show interfaces ethernet 1/1/36
10GigabitEthernet1/1/36 is up, line protocol is up
Hardware is 10GigabitEthernet, address is 748e.f80c.5f40 (bia 748e.f80c.5f40)
Interface type is 10Gig SFP+
Configured speed 10Gbit, actual 10Gbit, configured duplex fdx, actual fdx
Member of L2 VLAN ID 1, port is untagged, port state is FORWARDING
BPDU guard is Disabled, ROOT protect is Disabled
Link Error Dampening is Disabled
STP configured to ON, priority is level0, mac-learning is enabled
Flow Control is enabled
Mirror disabled, Monitor disabled
Not member of any active trunks
Not member of any configured trunks
No port name
MTU 10200 bytes, encapsulation ethernet
300 second input rate: 0 bits/sec, 0 packets/sec, 0.00% utilization
300 second output rate: 96 bits/sec, 0 packets/sec, 0.00% utilization
0 packets input, 0 bytes, 0 no buffer
Received 0 broadcasts, 0 multicasts, 0 unicasts
0 input errors, 0 CRC, 0 frame, 0 ignored
0 runts, 0 giants
1 packets output, 64 bytes, 0 underruns
Transmitted 0 broadcasts, 1 multicasts, 0 unicasts
0 output errors, 0 collisions
Relay Agent Information option: Disabled
Egress queues:
Queue counters
0
1
2
3
4
5
6
7
Queued packets
0
0
0
0
0
0
0
0
Dropped Packets
0
0
0
0
0
0
0
0
Symmetric flow control on Brocade ICX 6650 devices
In addition to asymmetric flow control, Brocade ICX 6650 devices support symmetric flow control,
meaning they can both receive and transmit 802.3x PAUSE frames.
By default on Brocade ICX 6650 devices, packets are dropped from the end of the queue at the
egress port (tail drop mode), when the maximum queue limit is reached. Conversely, when
symmetric flow control is enabled, packets are guaranteed delivery since they are managed at the
ingress port and no packets are dropped.
Symmetric flow control addresses the requirements of a lossless service class in an Internet Small
Computer System Interface (iSCSI) environment.
Brocade ICX 6650 Administration Guide
53-1002600-01
37
2
Basic port parameter configuration
About XON and XOFF thresholds
An 802.3x PAUSE frame is generated when the buffer limit at the ingress port reaches or exceeds
the port’s upper watermark threshold (XOFF limit). The PAUSE frame requests that the sender stop
transmitting traffic for a period of time. The time allotted enables the egress and ingress queues to
be cleared. When the ingress queue falls below the port’s lower watermark threshold (XON limit),
an 802.3x PAUSE frame with a quanta of 0 (zero) is generated. The PAUSE frame requests that the
sender resume sending traffic normally.
NOTE
In Brocade ICX 6650, you cannot change the default XON and XOFF values.
Each 1G , 10G, and 40G port is configured with a default total number of buffers as well as a
default XOFF and XON threshold.
TABLE 9
XON and XOFF default thresholds ( Apply to both Jumbo or non-Jumbo mode)
Limit when Jumbo disabled /
% of buffer limit
Limit when Jumbo enabled /
% of buffer limit
Total buffers
256
256
XOFF
192 (78%)
192 (78%)
XON
136 (56%)
136 (56%)
Total buffers
960
960
XOFF
832 (87%)
832 (87%)
XON
720 (75%)
720 (75%)
1G or 10G ports
40G ports
Configuration notes and feature limitations for
symmetric flow control
Note the following configuration notes and feature limitations before enabling symmetric flow
control.
• Symmetric flow control is supported on Brocade ICX 6650 devices.
• Symmetric flow control is supported on all 1 Gbps, 10 Gbps, and 40 Gbps data ports.
• To use this feature, 802.3x flow control must be enabled globally and per interface on the
Brocade ICX 6650 device. By default, 802.3x flow control is enabled, but can be disabled with
the no flow-control command.
• The following QoS features are not supported together with symmetric flow control:
- dynamic buffer allocation (CLI command qd-descriptor and qd-buffer)
- Buffer profiles (CLI command buffer-profile port-region) is not supported for scheduler
profiles.
-
DSCP-based QoS (CLI command trust dscp)
• Head of Line (HOL) blocking may occur when symmetric flow control is enabled. This means
that a peer can stop transmitting traffic streams unrelated to the congestion stream.
38
Brocade ICX 6650 Administration Guide
53-1002600-01
Basic port parameter configuration
2
Enabling and disabling symmetric flow control
By default, symmetric flow control is disabled and tail drop mode is enabled. However, because
flow control is enabled by default on all full-duplex ports, these ports will always honor received
802.3x Pause frames, whether or not symmetric flow control is enabled.
To enable symmetric flow control globally on all full-duplex data ports of a standalone unit, enter
the symmetric-flow-control enable command.
Brocade(config)# symmetric-flow-control enable
Syntax: [no] symmetric-flow-control enable
To disable symmetric flow control once it has been enabled, use the no form of the command.
Interpacket Gap (IPG) on a Brocade ICX 6650 switch
You can configure an IPG for each port. An IPG is a configurable time delay between successive
data packets. You can configure an IPG with a range from 48-120 bit times in multiples of 8, with a
default of 96. The IPG may be set from either the interface configuration level or the multiple
interface level. You configure IPG at the interface level on 1 Gbps ports only. The command you use
depends on the interface type on which IPG is being configured.
The default interpacket gap is 96 bits-time, which is 9.6 microseconds for 10 Mbps Ethernet, 960
nanoseconds for 100 Mbps Ethernet, 96 nanoseconds for 1 Gbps Ethernet, and 9.6 nanoseconds
for 10 Gbps Ethernet.
IPG configuration notes
• IPG configuration commands are based on "port regions". All ports within the same port region
should have the same IPG configuration. If a port region contains two or more ports, changes
to the IPG configuration for one port are applied to all ports in the same port region. When you
enter a value for IPG, the CLI displays the ports to which the IPG configuration is applied.
Example
Brocade(config-if-e10000-1/2/1)# ipg 48
Syntax: ipg <decimal>
The <decimal> variable specifies a range between 48 to 120, in multiples of 8.
• When you enter a value for IPG, the device applies the closest valid IPG value for the port mode
to the interface. For example, if you specify 120 for a 1 Gbps Ethernet port in 1 Gbps mode, the
device assigns 112 as the closest valid IPG value to program into hardware.
• When an IPG is applied to a trunk group, it applies to all ports in the trunk group. When you are
creating a new trunk group, the IPG setting on the primary port is automatically applied to the
secondary ports.
• This feature is supported on 10/100/1000M ports.
Changing the Gbps fiber negotiation mode
The globally configured Gbps negotiation mode is the default mode for all Gbps fiber ports. You
can override the globally configured default and set individual ports to the following:
Brocade ICX 6650 Administration Guide
53-1002600-01
39
2
Basic port parameter configuration
• Negotiate-full-auto – The port first tries to perform a handshake with the other port to
exchange capability information. If the other port does not respond to the handshake attempt,
the port uses the manually configured configuration information (or the defaults if an
administrator has not set the information). This is the default.
• Auto-Gbps – The port tries to perform a handshake with the other port to exchange capability
information.
• Negotiation-off – The port does not try to perform a handshake. Instead, the port uses
configuration information manually configured by an administrator.
To change the mode for individual ports, enter commands such as the following.
Brocade(config)# interface ethernet 1/1/1 to 1/1/2
Brocade(config-mif-1/1/1-1/1/2)# gig-default auto-gig
This command overrides the global setting and sets the negotiation mode to auto-Gbps for ethernet
ports 1/1/1– 1/1/2.
Syntax: gig-default neg-full-auto | auto-gig | neg-off
NOTE
When Gbps negotiation mode is turned off (CLI command gig-default neg-off), the Brocade device
may inadvertently take down both ends of a link. This is a hardware limitation for which there is
currently no workaround.
Port priority (QoS) modification
You can give preference to the inbound traffic on specific ports by changing the Quality of Service
(QoS) level on those ports. For information and procedures, refer to the Brocade ICX 6650 Switch
Platform and Layer 2 Configuration Guide.
Port flap dampening configuration
Port Flap Dampening increases the resilience and availability of the network by limiting the number
of port state transitions on an interface.
If the port link state toggles from up to down for a specified number of times within a specified
period, the interface is physically disabled for the specified wait period. Once the wait period
expires, the port link state is re-enabled. However, if the wait period is set to zero (0) seconds, the
port link state will remain disabled until it is manually re-enabled.
Port flap dampening configuration notes
• When a flap dampening port becomes a member of a trunk group, that port, as well as all
other member ports of that trunk group, will inherit the primary port configuration. This means
that the member ports will inherit the primary port flap dampening configuration, regardless of
any previous configuration.
• The Brocade device counts the number of times a port link state toggles from "up to down",
and not from "down to up".
• The sampling time or window (the time during which the specified toggle threshold can occur
before the wait period is activated) is triggered when the first "up to down" transition occurs.
• "Up to down" transitions include UDLD-based toggles, as well as the physical link state.
40
Brocade ICX 6650 Administration Guide
53-1002600-01
Basic port parameter configuration
2
Configuring port flap dampening on an interface
This feature is configured at the interface level.
Brocade(config)# interface ethernet 1/1/1
Brocade(config-if-e10000-1/1/1)# link-error-disable 10 3 10
Syntax: [no] link-error-disable <toggle-threshold> <sampling-time-in-sec> <wait-time-in-sec>
The <toggle-threshold> is the number of times a port link state goes from up to down and down to
up before the wait period is activated. Enter a value from 1 - 50.
The <sampling-time-in-sec> is the amount of time during which the specified toggle threshold can
occur before the wait period is activated. The default is 0 seconds. Enter 1 – 65535 seconds.
The <wait-time-in-sec> is the amount of time the port remains disabled (down) before it becomes
enabled. Enter a value from 0 – 65535 seconds; 0 indicates that the port will stay down until an
administrative override occurs.
Configuring port flap dampening on a trunk
You can configure the port flap dampening feature on the primary port of a trunk using the
link-error-disable command. Once configured on the primary port, the feature is enabled on all
ports that are members of the trunk. You cannot configure port flap dampening on port members
of the trunk.
Enter commands such as the following on the primary port of a trunk.
Brocade(config)# interface ethernet 1/1/3
Brocade(config-if-e10000-1/1/3)# link-error-disable 10 3 10
Re-enabling a port disabled by port flap dampening
A port disabled by port flap dampening is automatically re-enabled once the wait period expires;
however, if the wait period is set to zero (0) seconds, you must re-enable the port by entering the
following command on the disabled port.
Brocade(config)# interface ethernet 1/1/3
Brocade(config-if-e10000-1/1/3)# no link-error-disable 10 3 10
Displaying ports configured with port flap dampening
Ports that have been disabled due to the port flap dampening feature are identified in the output of
the show link-error-disable command. The following shows an example output.
Brocade# show link-error-disable
Port 1/1/3 is forced down by link-error-disable.
Use the show link-error-disable all command to display the ports with the port flap dampening
feature enabled.
Brocade ICX 6650 Administration Guide
53-1002600-01
41
2
Basic port parameter configuration
Brocade# show link-error-disable all
Port
-----------------Config--------------#
Threshold Sampling-Time Shutoff-Time
--------------- ------------- -----------1/1/3
1
14
3
1/1/32
2
20
Indefinite
1/1/56
1
10
Indefinite
1/2/1
10
3
10
1/3/4
4
10
2
1/3/8
1
10
Indefinite
------Oper---State Counter
----- ------Idle
N/A
Idle
N/A
Down
N/A
Idle
N/A
Idle
N/A
Idle
N/A
Table 10 defines the port flap dampening statistics displayed by the show link-error-disable all
command.
TABLE 10
Output of show link-error-disable
Column
Description
Port #
The port number.
Threshold
The number of times the port link state will go from up to down and
down to up before the wait period is activated.
Sampling-Time
The number of seconds during which the specified toggle threshold can
occur before the wait period is activated.
Shutoff-Time
The number of seconds the port will remain disabled (down) before it
becomes enabled. A zero (0) indicates that the port will stay down until
an administrative override occurs.
State
Counter
The port state can be one of the following:
Idle – The link is normal and no link state toggles have been
detected or sampled.
• Down – The port is disabled because the number of sampled errors
exceeded the configured threshold.
• Err – The port sampled one or more errors.
•
•
•
•
If the port state is Idle, this field displays N/A.
If the port state is Down, this field shows the remaining value of the
shutoff timer.
If the port state is Err, this field shows the number of errors
sampled.
Syntax: show link-error-disable [all]
Syslog messages for port flap dampening
The following Syslog messages are generated for port flap dampening.
• If the threshold for the number of times that a port link toggles from “up” to “down” then
“down” to “up” has been exceeded, the following Syslog message is displayed.
0d00h02m10s:I:ERR_DISABLE: Link flaps on port ethernet 16 exceeded threshold;
port in err-disable state
• If the wait time (port is down) expires and the port is brought up the following Syslog message
is displayed.
0d00h02m41s:I:ERR_DISABLE: Interface ethernet 16, err-disable recovery timeout
42
Brocade ICX 6650 Administration Guide
53-1002600-01
Basic port parameter configuration
2
Port loop detection
This feature allows the Brocade device to disable a port that is on the receiving end of a loop by
sending test packets. You can configure the time period during which test packets are sent.
Types of loop detection
There are two types of loop detection; Strict Mode and Loose Mode. In Strict Mode, a port is
disabled only if a packet is looped back to that same port. Strict Mode overcomes specific
hardware issues where packets are echoed back to the input port. In Strict Mode, loop detection
must be configured on the physical port.
In Loose Mode, loop detection is configured on the VLAN of the receiving port. Loose Mode
disables the receiving port if packets originate from any port or VLAN on the same device. The VLAN
of the receiving port must be configured for loop detection in order to disable the port.
Recovering disabled ports
Once a loop is detected on a port, it is placed in Err-Disable state. The port will remain disabled
until one of the following occurs:
• You manually disable and enable the port at the Interface Level of the CLI.
• You enter the command clear loop-detection. This command clears loop detection statistics
and enables all Err-Disabled ports.
• The device automatically re-enables the port. To set your device to automatically re-enable
Err-Disabled ports, refer to “Configuring the device to automatically re-enable ports” on
page 44.
Port loopback detection configuration notes
• Loopback detection packets are sent and received on both tagged and untagged ports.
Therefore, this feature cannot be used to detect a loop across separate devices.
The following information applies to Loose Mode loop detection:
• With Loose Mode, two ports of a loop are disabled.
• Different VLANs may disable different ports. A disabled port affects every VLAN using it.
• Loose Mode floods test packets to the entire VLAN. This can impact system performance if too
many VLANs are configured for Loose Mode loop detection.
NOTE
Brocade recommends that you limit the use of Loose Mode. If you have a large number of VLANS,
configuring loop detection on all of them can significantly affect system performance because of the
flooding of test packets to all configured VLANs. An alternative to configuring loop detection in a
VLAN-group of many VLANs is to configure a separate VLAN with the same tagged port and
configuration, and enable loop detection on this VLAN only.
NOTE
When loop detection is used with L2 loop prevention protocols, such as spanning tree (STP), the L2
protocol takes higher priority. Loop detection cannot send or receive probe packets if ports are
blocked by L2 protocols, so it does not detect L2 loops when STP is running because loops within a
VLAN have been prevented by STP. Loop detection running in Loose Mode can detect and break L3
Brocade ICX 6650 Administration Guide
53-1002600-01
43
2
Basic port parameter configuration
loops because STP cannot prevent loops across different VLANs. In these instances, the ports are
not blocked and loop detection is able to send out probe packets in one VLAN and receive packets
in another VLAN. In this way, loop detection running in Loose Mode disables both ingress and egress
ports.
Enabling loop detection
Use the loop-detection command to enable loop detection on a physical port (Strict Mode) or a
VLAN (Loose Mode). Loop detection is disabled by default. The following example shows a Strict
Mode configuration.
Brocade(config)# interface ethernet 1/1/1
Brocade(config-if-e10000-1/1/1)# loop-detection
The following example shows a Loose Mode configuration.
Brocade(config)# vlan20
Brocade(config-vlan-20)# loop-detection
By default, the port will send test packets every one second, or the number of seconds specified by
the loop-detection-interval command. Refer to “Configuring a global loop detection interval” on
page 44.
Syntax: [no] loop-detection
Use the [no] form of the command to disable loop detection.
Configuring a global loop detection interval
The loop detection interval specifies how often a test packet is sent on a port. When loop detection
is enabled, the loop detection time unit is 0.1 second, with a default of 10 (one second). The range
is from 1 (one tenth of a second) to 100 (10 seconds). You can use the show loop-detection status
command to view the loop detection interval.
To configure the global loop detection interval, enter a command similar to the following.
Brocade(config)# loop-detection-interval 50
This command sets the loop-detection interval to 5 seconds (50 x 0.1).
To revert to the default global loop detection interval of 10, enter one of the following.
Brocade(config)# loop-detection-interval 10
OR
Brocade(config)# no loop-detection-interval 50
Syntax: [no] loop-detection-interval <number>
where <number> is a value from 1 to 100. The system multiplies your entry by 0.1 to calculate the
interval at which test packets will be sent.
Configuring the device to automatically re-enable ports
To configure the Brocade ICX 6650 device to automatically re-enable ports that were disabled
because of a loop detection, enter the errdisable recovery cause loop-detection command.
44
Brocade ICX 6650 Administration Guide
53-1002600-01
Basic port parameter configuration
2
Brocade(config)# errdisable recovery cause loop-detection
The above command will cause the Brocade ICX 6650 device to automatically re-enable ports that
were disabled because of a loop detection. By default, the device will wait 300 seconds before
re-enabling the ports. You can optionally change this interval to a value from 10 to 65535
seconds. Refer to “Specifying the recovery time interval” on page 45.
Syntax: [no] errdisable recovery cause loop-detection
Use the [no] form of the command to disable this feature.
Specifying the recovery time interval
The recovery time interval specifies the number of seconds the Brocade ICX 6650 device will wait
before automatically re-enabling ports that were disabled because of a loop detection. (Refer to
“Configuring the device to automatically re-enable ports” on page 44.) By default, the device will
wait 300 seconds. To change the recovery time interval, enter a command such as the following.
Brocade(config)# errdisable recovery interval 120
The above command configures the device to wait 120 seconds (2 minutes) before re-enabling the
ports.
To revert back to the default recovery time interval of 300 seconds (5 minutes), enter one of the
following commands.
Brocade(config)# errdisable recovery interval 300
OR
Brocade(config)# no errdisable recovery interval 120
Syntax: [no] errdisable recovery interval <seconds>
where <seconds> is a number from 10 to 65535.
Clearing loop-detection
To clear loop detection statistics and re-enable all ports that are in Err-Disable state because of a
loop detection, enter the clear loop-detection command.
Brocade# clear loop-detection
Displaying loop-detection information
Use the show loop-detection status command to display loop detection status, as shown.
Brocade# show loop-detection status
loop detection packets interval: 10 (unit 0.1 sec)
index port/vlan status
# errdis
1
vlan1
0 errdis port
0
2
vlan2
0 errdis port
0
3
vlan3
0 errdis port
0
4
vlan4
0 errdis port
0
5
vlan5
0 errdis port
0
sent-pkts
452
34
32
30
29
recv-pkts
0
0
0
0
0
If a port is errdisabled in Strict mode, it shows “ERR-DISABLE by itself”. If it is errdisabled due to its
associated vlan, it shows “ERR-DISABLE by vlan ?”
Brocade ICX 6650 Administration Guide
53-1002600-01
45
2
Basic port parameter configuration
The following command displays the current disabled ports, including the cause and the time.
Brocade# show loop-detection disable
Number of err-disabled ports: 2
You can re-enable err-disable ports one by one by "disable" then "enable"
under interface config, re-enable all by "clear loop-detect", or
configure "errdisable recovery cause loop-detection" for automatic recovery
index
1
2
port
1/1/1
1/1/9
caused-by
vlan 1
vlan 1
disabled-time
00:00:10
00:00:10
This example shows the disabled ports, the cause, and the time the port was disabled. If
loop-detection is configured on a physical port, the disable cause will show “itself”. For VLANs
configured for loop-detection, the cause will be a VLAN.
The following command shows the hardware and software resources being used by the
loop-detection feature.
Vlans configured loop-detection use 1 HW MAC
Vlans not configured but use HW MAC: 1 10
configuration pool
linklist pool
alloc in-use
16
6
16
10
avail get-fail
10
0
6
0
limit
3712
3712
get-mem
6
10
size init
15
16
16
16
Displaying loop detection resource information
Use the show loop-detection resource command to display the hardware and software resource
information on loop detection.
Brocade# show loop-detection resource
Vlans configured loop-detection use 1 HW MAC
Vlans not configured but use HW MAC: 1 10
configuration pool
linklist pool
alloc in-use
16
6
16
10
avail get-fail
10
0
6
0
limit
3712
3712
get-mem
6
10
size init
15
16
16
16
Syntax: show loop-detection resource
Table 11 describes the output fields for this command.
TABLE 11
Field
Field definitions for the show loop-detection resource command
Description
This command displays the following information for the configuration pool and the linklist pool.
46
alloc
Memory allocated
in-use
Memory in use
avail
Available memory
get-fail
The number of get requests that have failed
limit
The maximum memory allocation
get-mem
The number of get-memory requests
Brocade ICX 6650 Administration Guide
53-1002600-01
Basic port parameter configuration
TABLE 11
2
Field definitions for the show loop-detection resource command (Continued)
Field
Description
size
The size
init
The number of requests initiated
Displaying loop detection configuration status on an interface
Use the show interface command to display the status of loop detection configuration on a
particular interface.
Brocade# show interface ethernet 1/1/1
10GigabitEthernet1/1/1 is disabled, line protocol is down
Hardware is 10GigabitEthernet, address is 748e.f80c.5f40(bia 748e.f80c.5f40a)
Interface type is 1Gig Copper SFP (miniGBIC)
Configured speed 1Gbit, actual unknown, configured duplex fdx, actual unknown
Member of 1 L2 VLANs, port is tagged, port state is DISABLED
BPDU guard is Disabled, ROOT protect is Disabled
Link Error Dampening is Enabled
STP configured to ON, priority is level0, mac-learning is enabled
Loop Detection is ENABLED
Flow Control is disabled
Mirror disabled, Monitor disabled
Not member of any active trunks
Not member of any configured trunks
No port name
MTU 10200 bytes, encapsulation ethernet
300 second input rate: 0 bits/sec, 0 packets/sec, 0.00% utilization
300 second output rate: 0 bits/sec, 0 packets/sec, 0.00% utilization
0 packets input, 0 bytes, 0 no buffer
Received 0 broadcasts, 0 multicasts, 0 unicasts
0 input errors, 0 CRC, 0 frame, 0 ignored
0 runts, 0 giants
0 packets output, 0 bytes, 0 underruns
Transmitted 0 broadcasts, 0 multicasts, 0 unicasts
0 output errors, 0 collisions
Relay Agent Information option: Disabled
Egress queues:
Queue counters
0
1
2
3
4
5
6
7
Queued packets
0
0
0
0
0
0
0
0
Dropped Packets
0
0
0
0
0
0
0
0
Syslog message due to disabled port in loop detection
The following message is logged when a port is disabled due to loop detection. This message also
appears on the console.
Loop-detection: port 1/1/35 (vlan=1), put into errdisable state
The Errdisable function logs a message whenever it re-enables a port.
Brocade ICX 6650 Administration Guide
53-1002600-01
47
2
48
Basic port parameter configuration
Brocade ICX 6650 Administration Guide
53-1002600-01
Chapter
3
Operations, Administration, and Maintenance
In this chapter
• OAM Overview . . . . . . . . . . . . . . . . . . . . . . . . . . . . . . . . . . . . . . . . . . . . . . . . .
• Software versions installed and running on a device . . . . . . . . . . . . . . . . . .
• Image file types . . . . . . . . . . . . . . . . . . . . . . . . . . . . . . . . . . . . . . . . . . . . . . . .
• Software upgrades . . . . . . . . . . . . . . . . . . . . . . . . . . . . . . . . . . . . . . . . . . . . .
• Viewing the contents of flash files . . . . . . . . . . . . . . . . . . . . . . . . . . . . . . . . .
• Using SNMP to upgrade software. . . . . . . . . . . . . . . . . . . . . . . . . . . . . . . . . .
• Software reboot . . . . . . . . . . . . . . . . . . . . . . . . . . . . . . . . . . . . . . . . . . . . . . . .
• Displaying the boot preference. . . . . . . . . . . . . . . . . . . . . . . . . . . . . . . . . . . .
• Loading and saving configuration files . . . . . . . . . . . . . . . . . . . . . . . . . . . . .
• System reload scheduling. . . . . . . . . . . . . . . . . . . . . . . . . . . . . . . . . . . . . . . .
• Diagnostic error codes and remedies for TFTP transfers . . . . . . . . . . . . . . .
• Network connectivity testing. . . . . . . . . . . . . . . . . . . . . . . . . . . . . . . . . . . . . .
50
50
53
53
53
54
56
56
57
67
68
69
Table 12 lists the Brocade ICX 6650 switch and the operations, administration, and maintenance
(OAM) features the switch supports. These features are supported only in full Layer 3 software
images, except where explicitly noted.
TABLE 12
Supported operations, administration, and maintenance features
Feature
Brocade ICX
6650
Flash and boot code verification
Yes
Flash image verification
Yes
Software upgrade via CLI
Yes
Software upgrade via SNMP
Yes
Hitless support:
• PBR
• GRE Tunnels
• IPv6 to IPv4 Tunnels
Yes (PBR only)
Software reboot
Yes
Show boot preference
Yes
Load and save configuration files
Yes
System reload scheduling
Yes
Diagnostic error codes and remedies for TFTP transfers
Yes
IPv4 ping
Yes
IPv4 traceroute
Yes
Brocade ICX 6650 Administration Guide
53-1002600-01
49
3
OAM Overview
OAM Overview
For easy software image management, all Brocade ICX 6650 devices support the download and
upload of software images between the flash modules on the devices and a Trivial File Transfer
Protocol (TFTP) server on the network.
Brocade devices have two flash memory modules:
• Primary flash – The default local storage device for image files and configuration files.
• Secondary flash – A second flash storage device. You can use the secondary flash to store
redundant images for additional booting reliability or to preserve one software image while
testing another one.
Only one flash device is active at a time. By default, the primary image will become active upon
reload.
You can update the software contained on a flash module using TFTP to copy the update image
from a TFTP server onto the flash module. In addition, you can copy software images and
configuration files from a flash module to a TFTP server.
NOTE
Brocade devices are TFTP clients but not TFTP servers. You must perform the TFTP transaction from
the Brocade device. You cannot “put” a file onto the Brocade device using the interface of your TFTP
server.
NOTE
If you are attempting to transfer a file using TFTP but have received an error message, refer to
“Diagnostic error codes and remedies for TFTP transfers” on page 68.
Software versions installed and running on a device
Use the following methods to display the software versions running on the device and the versions
installed in flash memory.
Determining the flash image version running on the device
To determine the flash image version running on a device, enter the show version command at any
level of the CLI. Some examples are shown below.
Brocade ICX 6650 devices
To determine the flash image version running on a Brocade ICX 6650 device, enter the show
version command at any level of the CLI. The following shows an example output.
Brocade#show version
Copyright (c) 1996-2012 Brocade Communications Systems, Inc. All rights reserved.
UNIT 1: compiled on Jul 31 2012 at 21:55:03 labeled as ICXLS07500
(11358772 bytes) from Secondary ICXLS07500.bin
SW: Version 07.5.00T321
Boot-Monitor Image size = 524288, Version:07.5.00T320 (fxz07500B1)
HW: Stackable ICX6650-64
==========================================================================
50
Brocade ICX 6650 Administration Guide
53-1002600-01
Software versions installed and running on a device
3
UNIT 1: SL 1: ICX6650-64 56-port Management Module
Serial #: CEN2525H006
License: BASE_SOFT_PACKAGE
(LID: egpHKHKjFFL)
P-ENGINE 0: type EC02, rev 01
==========================================================================
UNIT 1: SL 2: ICX6650-64 4-port 160G Module
==========================================================================
UNIT 1: SL 3: ICX6650-64 8-port 80G Module
==========================================================================
800 MHz Power PC processor 8544E (version 0021/0022) 400 MHz bus
65536 KB flash memory
1024 MB DRAM
STACKID 1 system uptime is 23 hours 12 minutes 8 seconds
==========================================================================
HARDWARE INFORMATION
UNIT NAME
: ICX6650-64
HW REVISION
: 2 (BETA)
Board ID : 4(ICX6650)
CPLD INFORMATION
CPLD code is RD revision
CPLD CODE REVISION = 6
==========================================================================
The system : started=warm start reloaded=by "reload"
*** NOT FOR PRODUCTION ***
The version information is shown in bold type in this example:
• “07.5.00T321” indicates the flash code version number. The “T321” is used by Brocade for
record keeping.
• “labeled as ICXLS07500” indicates the flash code image label. The label indicates the image
type and version and is especially useful if you change the image file name.
• “Secondary ICXLS07500.bin” indicates the flash code image file name that was loaded.
Displaying the boot image version running on the device
To determine the boot image running on a device, enter the show flash command at any level of the
CLI. The following shows an example output.
Brocade#show flash
Stack unit 1:
Compressed Pri Code size = 12849087, Version:07.5.00áT323 (ICXLR07500B1.bin)
Compressed Sec Code size = 12848889, Version:07.5.00T323 (ICXLR07500b1.bin)
Compressed Boot-Monitor Image size = 524288, Version:07.5.00T7f5
Code Flash Free Space = 21843968
The boot code version is shown in bold type.
Displaying the image versions installed in flash memory
Enter the show flash command to display the boot and flash images installed on the device. An
example of the command output is shown in “Displaying the boot image version running on the
device” on page 51:
• The “Compressed Pri Code size” line lists the flash code version installed in the primary flash
area.
Brocade ICX 6650 Administration Guide
53-1002600-01
51
3
Software versions installed and running on a device
• The “Compressed Sec Code size” line lists the flash code version installed in the secondary
flash area.
• The “Boot Monitor Image size” line lists the boot code version installed in flash memory. The
device does not have separate primary and secondary flash areas for the boot image. The
flash memory module contains only one boot image.
Flash image verification
The Flash Image Verification feature allows you to verify boot images based on hash codes, and to
generate hash codes where needed. This feature lets you select from three data integrity
verification algorithms:
• MD5 - Message Digest algorithm (RFC 1321)
• SHA1 - US Secure Hash Algorithm (RFC 3174)
• CRC - Cyclic Redundancy Checksum algorithm
Flash image CLI commands
Use the following command syntax to verify the flash image:
Syntax: verify md5 | sha1 | crc32 <ASCII string> | primary | secondary [<hash code>]
•
•
•
•
•
•
•
md5 – Generates a 16-byte hash code
sha1 – Generates a 20-byte hash code
crc32 – Generates a 4 byte checksum
ascii string – A valid image filename
primary – The primary boot image (primary.img)
secondary – The secondary boot image (secondary.img)
hash code – The hash code to verify
The following examples show how the verify command can be used in a variety of circumstances.
To generate an MD5 hash value for the secondary image, enter the following command.
Brocade#verify md5 secondary
Brocade#.........................Done
Size = 2044830, MD5 01c410d6d153189a4a5d36c955653862
To generate a SHA-1 hash value for the secondary image, enter the following command.
Brocade#verify sha secondary
Brocade#.........................Done
Size = 2044830, SHA1 49d12d26552072337f7f5fcaef4cf4b742a9f525
To generate a CRC32 hash value for the secondary image, enter the following command.
Brocade#verify crc32 secondary
Brocade#.........................Done
Size = 2044830, CRC32 b31fcbc0
To verify the hash value of a secondary image with a known value, enter the following commands.
Brocade#verify md5 secondary 01c410d6d153189a4a5d36c955653861
Brocade#.........................Done
Size = 2044830, MD5 01c410d6d153189a4a5d36c955653862
Verification FAILED.
52
Brocade ICX 6650 Administration Guide
53-1002600-01
Image file types
3
In the previous example, the codes did not match, and verification failed. If verification succeeds,
the output will look like this.
Brocade#verify md5 secondary 01c410d6d153189a4a5d36c955653861
Brocade#.........................Done
Size = 2044830, MD5 01c410d6d153189a4a5d36c955653861
Verification SUCEEDED.
The following examples show this process for SHA-1 and CRC32 algorithms.
Brocade#verify sha secondary 49d12d26552072337f7f5fcaef4cf4b742a9f525
Brocade#.........................Done
Size = 2044830, sha 49d12d26552072337f7f5fcaef4cf4b742a9f525
Verification SUCCEEDED.
and
Brocade#verify crc32 secondary b31fcbc0
Brocade#.........................Done
Size = 2044830, CRC32 b31fcbc0
Verification SUCCEEDED.
Image file types
This section lists the uboot, router, and switch image file types supported and how to install them
on the Brocade ICX 6650 switches. For information about a specific version of code, refer to the
release notes.
TABLE 13
Software image files
Product
uboot image
Router image
Switch image
Brocade ICX 6650
fxz07500.bin
fxz07500.bin
ICXLR07500.bin
Software upgrades
Refer to the release notes for instructions about upgrading the software.
Viewing the contents of flash files
The copy flash console command can be used to display the contents of a configuration file,
backup file, or renamed file stored in flash memory. The file contents are displayed on the console
when the command is entered at the CLI.
To display a list of files stored in flash memory, enter the show files command at the device
configuration prompt.
The following shows an example command output.
Brocade ICX 6650 Administration Guide
53-1002600-01
53
3
Using SNMP to upgrade software
Brocade#show dir
12703628 [4e58] primary
12706082 [4e58] secondary
668 [0000] $$$license
463 [0000] startup-config.backup
512 [0000] meta_data.bin
432 [0000] startup-config
25411785 bytes 6 File(s)
21843968 bytes free
Syntax: show dir
To display the contents of a flash configuration file, enter a command such as the following from
the User EXEC or Privileged EXEC mode of the CLI:
Brocade#copy flash console startup-config.backup
ver 07.5.00RC1T323
!
stack unit 1
module 1 icx6650-64-56-port-management-module
module 2 icx6650-64-4-port-160g-module
module 3 icx6650-64-8-port-80g-module
!
!
!
!
!
!
!
!
!
!
ip default-network 10.20.68.129/8
!
!
interface management 1
ip address 10.20.68.144 255.255.255.0
!
!
!
!
!
Syntax: copy flash console <filename>
For <filename>, enter the name of a file stored in flash memory.
Using SNMP to upgrade software
You can use a third-party SNMP management application such as HP OpenView to upgrade
software on a Brocade device.
54
Brocade ICX 6650 Administration Guide
53-1002600-01
Using SNMP to upgrade software
3
NOTE
The syntax shown in this section assumes that you have installed HP OpenView in the “/usr”
directory.
NOTE
Brocade recommends that you make a backup copy of the startup-config file before you upgrade the
software. If you need to run an older release, you will need to use the backup copy of the
startup-config file.
1. Configure a read-write community string on the Brocade device, if one is not already
configured. To configure a read-write community string, enter the following command from the
global CONFIG level of the CLI.
snmp-server community <string> ro | rw
where <string> is the community string and can be up to 32 characters long.
2. On the Brocade device, enter the following command from the global CONFIG level of the CLI.
no snmp-server pw-check
This command disables password checking for SNMP set requests. If a third-party SNMP
management application does not add a password to the password field when it sends SNMP
set requests to a Brocade device, by default the Brocade device rejects the request.
3. From the command prompt in the UNIX shell, enter the following command.
/usr/OV/bin/snmpset -c <rw-community-string> <brcd-ip-addr> 1.3.6.1.4.1.1991.1.1.2.1.5.0
ipaddress <tftp-ip-addr> 1.3.6.1.4.1.1991.1.1.2.1.6.0 octetstringascii <file-name>
1.3.6.1.4.1.1991.1.1.2.1.7.0 integer <command-integer>
where
<rw-community-string> is a read-write community string configured on the Brocade device.
<brcd-ip-addr> is the IP address of the Brocade device.
<tftp-ip-addr> is the TFTP server IP address.
<file-name> is the image file name.
<command-integer> is one of the following.
20 – Download the flash code into the primary flash area.
22 – Download the flash code into the secondary flash area.
Brocade ICX 6650 Administration Guide
53-1002600-01
55
3
Software reboot
Software reboot
You can use boot commands to immediately initiate software boots from a software image stored
in primary or secondary flash on a Brocade device or from a BootP or TFTP server. You can test new
versions of code on a Brocade device or choose the preferred boot source from the console boot
prompt without requiring a system reset.
NOTE
It is very important that you verify a successful TFTP transfer of the boot code before you reset the
system. If the boot code is not transferred successfully but you try to reset the system, the system
will not have the boot code with which to successfully boot.
By default, the Brocade device first attempts to boot from the image stored in its primary flash,
then its secondary flash, and then from a TFTP server. You can modify this booting sequence at the
global CONFIG level of the CLI using the boot system… command.
To initiate an immediate boot from the CLI, enter one of the boot system… commands.
NOTE
When using the boot system tftp command, the IP address of the device and the TFTP server should
be in the same subnet.
Software boot configuration notes
• If you are booting the device from a TFTP server through a fiber connection, use the following
command: boot system tftp <ip-address> <filename> fiber-port.
Displaying the boot preference
Use the show boot-preference command to display the boot sequence in the startup config and
running config files. The boot sequence displayed is also identified as either user-configured or the
default.
The following example shows the default boot sequence preference.
Brocade#show boot-preference
Boot system preference (Configured):
Use Default
Boot system preference(Default):
Boot system flash primary
Boot system flash secondary
The following example shows a user-configured boot sequence preference.
Brocade#show boot-preference
Boot system preference(Configured):
Boot system tftp 10.20.67.106 icxlr07500.bin
Boot system preference(Default):
Boot system flash primary
Boot system flash secondary
56
Brocade ICX 6650 Administration Guide
53-1002600-01
Loading and saving configuration files
3
Syntax: show boot-preference
The results of the show run command for the configured example above appear as follows.
Brocade#show run
Current configuration:
!
ver 07.5.00B1T323
!
stack unit 1
module 1 icx6650-64-56-port-management-module
module 2 icx6650-64-4-port-160g-module
module 3 icx6650-64-8-port-80g-module
!
!
trunk ethe 1/2/1 to 1/2/2
trunk ethe 1/2/3 to 1/2/4
!
vlan 1 name DEFAULT-VLAN by port
!
vlan 10 by port
!
vlan 20 by port
!
!
!
!
traffic-policy TPD1 rate-limit fixed 125 exceed-action Drop
!
!
!
!
fpod-40g-enable group 2
optical-monitor
chassis poll-time 200
ip show-portname
ip route 0.0.0.0 0.0.0.0 10.21.112.1
!
logging console
fdp run
!
!
router pim
!
end
Loading and saving configuration files
For easy configuration management, all Brocade devices support both the download and upload of
configuration files between the devices and a TFTP server on the network.
You can upload either the startup configuration file or the running configuration file to the TFTP
server for backup and use in booting the system:
• Startup configuration file – This file contains the configuration information that is currently
saved in flash. To display this file, enter the show configuration command at any CLI prompt.
Brocade ICX 6650 Administration Guide
53-1002600-01
57
3
Loading and saving configuration files
• Running configuration file – This file contains the configuration active in the system RAM but
not yet saved to flash. These changes could represent a short-term requirement or general
configuration change. To display this file, enter the show running-config or write terminal
command at any CLI prompt.
Each device can have one startup configuration file and one running configuration file. The startup
configuration file is shared by both flash modules. The running configuration file resides in DRAM.
When you load the startup-config file, the CLI parses the file three times.
1. During the first pass, the parser searches for system-max commands. A system-max
command changes the size of statically configured memory.
2. During the second pass, the parser implements the system-max commands if present and also
implements trunk configuration commands (trunk command) if present.
3. During the third pass, the parser implements the remaining commands.
Replacing the startup configuration with the
running configuration
After you make configuration changes to the active system, you can save those changes by writing
them to flash memory. When you write configuration changes to flash memory, you replace the
startup configuration with the running configuration.
To replace the startup configuration with the running configuration, enter the following command
at any Enable or CONFIG command prompt.
Brocade#write memory
Replacing the running configuration with the
startup configuration
If you want to back out of the changes you have made to the running configuration and return to
the startup configuration, enter the following command at the Privileged EXEC level of the CLI.
Brocade#reload
Logging changes to the startup-config file
You can configure a Brocade device to generate a Syslog message when the startup-config file is
changed. The trap is enabled by default.
The following Syslog message is generated when the startup-config file is changed.
startup-config was changed
If the startup-config file was modified by a valid user, the following Syslog message is generated.
startup-config was changed by <username>
To disable or re-enable Syslog messages when the startup-config file is changed, use the following
command.
Syntax: [no] logging enable config-changed
58
Brocade ICX 6650 Administration Guide
53-1002600-01
Loading and saving configuration files
3
Copying a configuration file to or from a TFTP server
To copy the startup-config or running-config file to or from a TFTP server, use one of the following
methods.
NOTE
For details about the copy and ncopy commands used with IPv6, refer to “Using the IPv6 copy
command” on page 62 and “IPv6 ncopy command” on page 64.
NOTE
You can name the configuration file when you copy it to a TFTP server. However, when you copy a
configuration file from the server to a Brocade device, the file is always copied as “startup-config”
or “running-config”, depending on which type of file you saved to the server.
To initiate transfers of configuration files to or from a TFTP server using the CLI, enter one of the
following commands:
• copy startup-config tftp <tftp-ip-addr> <filename> – Use this command to upload a copy of the
startup configuration file from the Layer 2 Switch or Layer 3 Switch to a TFTP server.
• copy running-config tftp <tftp-ip-addr> <filename> – Use this command to upload a copy of
the running configuration file from the Layer 2 Switch or Layer 3 Switch to a TFTP server.
• copy tftp startup-config <tftp-ip-addr> <filename> – Use this command to download a copy of
the startup configuration file from a TFTP server to a Layer 2 Switch or Layer 3 Switch.
Dynamic configuration loading
You can load dynamic configuration commands (commands that do not require a reload to take
effect) from a file on a TFTP server into the running-config on the Brocade device. You can make
configuration changes off-line, then load the changes directly into the device running-config,
without reloading the software.
Dynamic configuration usage considerations
• Use this feature only to load configuration information that does not require a software reload
to take effect. For example, you cannot use this feature to change statically configured
memory (system-max command).
• Do not use this feature if you have deleted a trunk group but have not yet placed the changes
into effect by saving the configuration and then reloading. When you delete a trunk group, the
command to configure the trunk group is removed from the device running-config, but the
trunk group remains active. To finish deleting a trunk group, save the configuration (to the
startup-config file), then reload the software. After you reload the software, then you can load
the configuration from the file.
• Do not load port configuration information for secondary ports in a trunk group. Since all ports
in a trunk group use the port configuration settings of the primary port in the group, the
software cannot implement the changes to the secondary port.
Preparing the configuration file
A configuration file that you create must follow the same syntax rules as the startup-config file the
device creates.
Brocade ICX 6650 Administration Guide
53-1002600-01
59
3
Loading and saving configuration files
• The configuration file is a script containing CLI configuration commands. The CLI reacts to
each command entered from the file in the same way the CLI reacts to the command if you
enter it. For example, if the command results in an error message or a change to the CLI
configuration level, the software responds by displaying the message or changing the CLI level.
• The software retains the running-config that is currently on the device, and changes the
running-config only by adding new commands from the configuration file. If the running config
already contains a command that is also in the configuration file you are loading, the CLI
rejects the new command as a duplicate and displays an error message. For example, if the
running-config already contains a a command that configures ACL 1, the software rejects ACL
1 in the configuration file, and displays a message that ACL 1 is already configured.
• The file can contain global CONFIG commands or configuration commands for interfaces,
routing protocols, and so on. You cannot enter User EXEC or Privileged EXEC commands.
• The default CLI configuration level in a configuration file is the global CONFIG level. Thus, the
first command in the file must be a global CONFIG command or “ ! ”. The ! (exclamation point)
character means “return to the global CONFIG level”.
NOTE
You can enter text following “ ! “ as a comment. However, the “ !” is not a comment marker. It
returns the CLI to the global configuration level.
NOTE
If you copy-and-paste a configuration into a management session, the CLI ignores the “ ! “
instead of changing the CLI to the global CONFIG level. As a result, you might get different
results if you copy-and-paste a configuration instead of loading the configuration using TFTP.
• Make sure you enter each command at the correct CLI level. Since some commands have
identical forms at both the global CONFIG level and individual configuration levels, if the CLI
response to the configuration file results in the CLI entering a configuration level you did not
intend, then you can get unexpected results.
For example, if a trunk group is active on the device, and the configuration file contains a
command to disable STP on one of the secondary ports in the trunk group, the CLI rejects the
commands to enter the interface configuration level for the port and moves on to the next
command in the file you are loading. If the next command is a spanning-tree command whose
syntax is valid at the global CONFIG level as well as the interface configuration level, then the
software applies the command globally. Here is an example.
The configuration file contains these commands.
interface ethernet 1/1/7
no spanning-tree
The CLI responds like this.
Brocade(config)#interface ethernet 1/1/7
Error - cannot configure secondary ports of a trunk
Brocade(config)#no spanning-tree
Brocade(config)#
• If the file contains commands that must be entered in a specific order, the commands must
appear in the file in the required order. For example, if you want to use the file to replace an IP
address on an interface, you must first remove the old address using “no” in front of the ip
address command, then add the new address. Otherwise, the CLI displays an error message
and does not implement the command. Here is an example.
60
Brocade ICX 6650 Administration Guide
53-1002600-01
Loading and saving configuration files
3
The configuration file contains these commands.
interface ethernet 1/1/7
ip address 10.10.10.69/24
The running-config already has a command to add an address to port 11, so the CLI responds
like this.
Brocade(config)#interface ethernet 1/1/7
Brocade(config-if-e10000-1/1/7)#ip add 10.10.10.69/24
Error: can only assign one primary ip address per subnet
Brocade(config-if-e10000-1/1/7)#
To successfully replace the address, enter commands into the file as follows.
interface ethernet 1/1/7
no ip address 10.20.20.69/24
ip address 10.10.10.69/24
This time, the CLI accepts the command, and no error message is displayed.
Brocade(config)#interface ethernet 1/1/7
Brocade(config-if-e10000-1/1/7)#no ip add 10.20.20.69/24
Brocade(config-if-e10000-1/1/7)#ip add 10.10.10.69/24
Brocade(config-if-e10000-1/1/7)
• Always use the end command at the end of the file. The end command must appear on the
last line of the file, by itself.
Loading the configuration information into the running-config
To load the file from a TFTP server, use either of the following commands:
• copy tftp running-config <ip-addr> <filename>
• ncopy tftp <ip-addr> <filename> running-config
NOTE
If you are loading a configuration file that uses a truncated form of the CLI command access-list, the
software will not go into batch mode.
For example, the following command line will initiate batch mode.
access-list 131 permit host pc1 host pc2
The following command line will not initiate batch mode.
acc 131 permit host pc1 host pc2
Maximum file sizes for startup-config file and running-config
Each Brocade device has a maximum allowable size for the running-config and the startup-config
file. If you use TFTP to load additional information into a device running-config or startup-config file,
it is possible to exceed the maximum allowable size. If this occurs, you will not be able to save the
configuration changes.
The maximum size for the running-config and the startup-config file is 640K each.
To determine the size of a running-config or startup-config file, copy it to a TFTP server, then use
the directory services on the server to list the size of the copied file. To copy the running-config or
startup-config file to a TFTP server, use one of the following commands:
Brocade ICX 6650 Administration Guide
53-1002600-01
61
3
Loading and saving configuration files with IPv6
• Commands to copy the running-config to a TFTP server:
• copy running-config tftp <ip-addr> <filename>
• ncopy running-config tftp <ip-addr> <from-name>
• Commands to copy the startup-config file to a TFTP server:
• copy startup-config tftp <ip-addr> <filename>
• ncopy startup-config tftp <ip-addr> <from-name>
Loading and saving configuration files with IPv6
This section describes the IPv6 copy and ncopy commands.
Using the IPv6 copy command
The copy command for IPv6 allows you to do the following:
• Copy a file from a specified source to an IPv6 TFTP server
• Copy a file from an IPv6 TFTP server to a specified destination
Copying a file to an IPv6 TFTP server
You can copy a file from the following sources to an IPv6 TFTP server:
• Flash memory
• Running configuration
• Startup configuration
Copying a file from flash memory
For example, to copy the primary or secondary boot image from the device flash memory to an IPv6
TFTP server, enter a command such as the following.
Brocade#copy flash tftp 2001:DB8:e0ff:7837::3 test.img secondary
This command copies the secondary boot image named test.img from flash memory to a TFTP
server with the IPv6 address of 2001:DB8:e0ff:7837::3.
Syntax: copy flash tftp <ipv6-address> <source-file-name> primary | secondary
The <ipv6-address> parameter specifies the address of the TFTP server. You must specify this
address in hexadecimal using 16-bit values between colons as documented in RFC 2373.
The <source-file-name> parameter specifies the name of the file you want to copy to the IPv6 TFTP
server.
The primary keyword specifies the primary boot image, while the secondary keyword specifies the
secondary boot image.
Copying a file from the running or startup configuration
For example, to copy the running configuration to an IPv6 TFTP server, enter a command such as
the following.
62
Brocade ICX 6650 Administration Guide
53-1002600-01
Loading and saving configuration files with IPv6
3
Brocade#copy running-config tftp 2001:DB8:e0ff:7837::3 newrun.cfg
This command copies the running configuration to a TFTP server with the IPv6 address of
2001:DB8:e0ff:7837::3 and names the file on the TFTP server newrun.cfg.
Syntax: copy running-config | startup-config tftp <ipv6-address> <destination-file-name>
Specify the running-config keyword to copy the running configuration file to the specified IPv6 TFTP
server.
Specify the startup-config keyword to copy the startup configuration file to the specified IPv6 TFTP
server.
The tftp <ipv6-address> parameter specifies the address of the TFTP server. You must specify this
address in hexadecimal using 16-bit values between colons as documented in RFC 2373.
The <destination-file-name> parameter specifies the name of the file that is copied to the IPv6
TFTP server.
Copying a file from an IPv6 TFTP server
You can copy a file from an IPv6 TFTP server to the following destinations:
• Flash memory
• Running configuration
• Startup configuration
Copying a file to flash memory
For example, to copy a boot image from an IPv6 TFTP server to the primary or secondary storage
location in the device flash memory, enter a command such as the following.
Brocade#copy tftp flash 2001:DB8:e0ff:7837::3 test.img secondary
This command copies a boot image named test.img from an IPv6 TFTP server with the IPv6
address of 2001:DB8:e0ff:7837::3 to the secondary storage location in the device flash memory.
Syntax: copy tftp flash <ipv6-address> <source-file-name> primary | secondary
The <ipv6-address> parameter specifies the address of the TFTP server. You must specify this
address in hexadecimal using 16-bit values between colons as documented in RFC 2373.
The <source-file-name> parameter specifies the name of the file you want to copy from the IPv6
TFTP server.
The primary keyword specifies the primary storage location in the device flash memory, while the
secondary keyword specifies the secondary storage location in the device flash memory.
Copying a file to the running or startup configuration
For example, to copy a configuration file from an IPv6 TFTP server to the running or startup
configuration, enter a command such as the following.
Brocade#copy tftp running-config 2001:DB8:e0ff:7837::3 newrun.cfg overwrite
This command copies the newrun.cfg file from the IPv6 TFTP server and overwrites the running
configuration file with the contents of newrun.cfg.
Brocade ICX 6650 Administration Guide
53-1002600-01
63
3
Loading and saving configuration files with IPv6
NOTE
To activate this configuration, you must reload (reset) the device.
Syntax: copy tftp running-config | startup-config <ipv6-address> <source-file-name> [overwrite]
Specify the running-config keyword to copy the running configuration from the specified IPv6 TFTP
server.
The <ipv6-address> parameter specifies the address of the TFTP server. You must specify this
address in hexadecimal using 16-bit values between colons as documented in RFC 2373.
The <source-file-name> parameter specifies the name of the file that is copied from the IPv6 TFTP
server.
The overwrite keyword specifies that the device should overwrite the current configuration file with
the copied file. If you do not specify this parameter, the device copies the file into the current
running or startup configuration but does not overwrite the current configuration.
IPv6 ncopy command
The ncopy command for IPv6 allows you to do the following:
•
•
•
•
Copy a primary or secondary boot image from flash memory to an IPv6 TFTP server.
Copy the running configuration to an IPv6 TFTP server.
Copy the startup configuration to an IPv6 TFTP server
Upload various files from an IPv6 TFTP server.
Copying a primary or secondary boot Image from flash memory to an IPv6 TFTP
server
For example, to copy the primary or secondary boot image from the device flash memory to an IPv6
TFTP server, enter a command such as the following.
Brocade#ncopy flash primary tftp 2001:DB8:e0ff:7837::3 primary.img
This command copies the primary boot image named primary.img from flash memory to a TFTP
server with the IPv6 address of 2001:DB8:e0ff:7837::3.
Syntax: ncopy flash primary | secondary tftp <ipv6-address> <source-file-name>
The primary keyword specifies the primary boot image, while the secondary keyword specifies the
secondary boot image.
The tftp <ipv6-address> parameter specifies the address of the TFTP server. You must specify this
address in hexadecimal using 16-bit values between colons as documented in RFC 2373.
The <source-file-name> parameter specifies the name of the file you want to copy from flash
memory.
Copying the running or startup configuration to an IPv6 TFTP server
For example, to copy a device running or startup configuration to an IPv6 TFTP server, enter a
command such as the following.
Brocade#ncopy running-config tftp 2001:DB8:e0ff:7837::3 bakrun.cfg
64
Brocade ICX 6650 Administration Guide
53-1002600-01
Loading and saving configuration files with IPv6
3
This command copies a device running configuration to a TFTP server with the IPv6 address of
2001:DB8:e0ff:7837::3 and names the destination file bakrun.cfg.
Syntax: ncopy running-config | startup-config tftp <ipv6-address> <destination-file-name>
Specify the running-config keyword to copy the device running configuration or the startup-config
keyword to copy the device startup configuration.
The tftp <ipv6-address> parameter specifies the address of the TFTP server. You must specify this
address in hexadecimal using 16-bit values between colons as documented in RFC 2373.
The <destination-file-name> parameter specifies the name of the running configuration that is
copied to the IPv6 TFTP server.
IPv6 TFTP server file upload
You can upload the following files from an IPv6 TFTP server:
•
•
•
•
Primary boot image.
Secondary boot image.
Running configuration.
Startup configuration.
Uploading a primary or secondary boot image from an IPv6 TFTP server
For example, to upload a primary or secondary boot image from an IPv6 TFTP server to a device
flash memory, enter a command such as the following.
Brocade#ncopy tftp 2001:DB8:e0ff:7837::3 primary.img flash primary
This command uploads the primary boot image named primary.img from a TFTP server with the
IPv6 address of 2001:DB8:e0ff:7837::3 to the device primary storage location in flash memory.
Syntax: ncopy tftp <ipv6-address> <source-file-name> flash primary | secondary
The tftp <ipv6-address> parameter specifies the address of the TFTP server. You must specify this
address in hexadecimal using 16-bit values between colons as documented in RFC 2373.
The <source-file-name> parameter specifies the name of the file you want to copy from the TFTP
server.
The primary keyword specifies the primary location in flash memory, while the secondary keyword
specifies the secondary location in flash memory.
Uploading a running or startup configuration from an IPv6 TFTP server
For example to upload a running or startup configuration from an IPv6 TFTP server to a device,
enter a command such as the following.
Brocade#ncopy tftp 2001:DB8:e0ff:7837::3 newrun.cfg running-config
This command uploads a file named newrun.cfg from a TFTP server with the IPv6 address of
2001:DB8:e0ff:7837::3 to the device.
Syntax: ncopy tftp <ipv6-address> <source-file-name> running-config | startup-config
Brocade ICX 6650 Administration Guide
53-1002600-01
65
3
Loading and saving configuration files with IPv6
The tftp <ipv6-address> parameter specifies the address of the TFTP server. You must specify this
address in hexadecimal using 16-bit values between colons as documented in RFC 2373.
The <source-file-name> parameter specifies the name of the file you want to copy from the TFTP
server.
Specify the running-config keyword to upload the specified file from the IPv6 TFTP server to the
device. The device copies the specified file into the current running configuration but does not
overwrite the current configuration.
Specify the startup-config keyword to upload the specified file from the IPv6 TFTP server to the
device. The the device copies the specified file into the current startup configuration but does not
overwrite the current configuration.
Using SNMP to save and load configuration information
You can use a third-party SNMP management application such as HP OpenView to save and load a
configuration on a Brocade device. To save and load configuration information using HP OpenView,
use the following procedure.
NOTE
The syntax shown in this section assumes that you have installed HP OpenView in the “/usr”
directory.
1. Configure a read-write community string on the Brocade device, if one is not already
configured. To configure a read-write community string, enter the following command from the
global CONFIG level of the CLI.
snmp-server community <string> ro | rw
where <string> is the community string and can be up to 32 characters long.
2. On the Brocade device, enter the following command from the global CONFIG level of the CLI.
no snmp-server pw-check
This command disables password checking for SNMP set requests. If a third-party SNMP
management application does not add a password to the password field when it sends SNMP
set requests to a Brocade device, by default the Brocade device rejects the request.
3. From the command prompt in the UNIX shell, enter the following command.
/usr/OV/bin/snmpset -c <rw-community-string> <fdry-ip-addr> 1.3.6.1.4.1.1991.1.1.2.1.5.0
ipaddress <tftp-ip-addr> 1.3.6.1.4.1.1991.1.1.2.1.8.0 octetstringascii <config-file-name>
1.3.6.1.4.1.1991.1.1.2.1.9.0 integer <command-integer>
where
<rw-community-string> is a read-write community string configured on the Brocade device.
<fdry-ip-addr> is the IP address of the Brocade device.
<tftp-ip-addr> is the TFTP server IP address.
<config-file-name> is the configuration file name.
<command-integer> is one of the following:
66
Brocade ICX 6650 Administration Guide
53-1002600-01
System reload scheduling
3
20 – Upload the startup-config file from the flash memory of the Brocade device to the TFTP
server.
21 – Download a startup-config file from a TFTP server to the flash memory of the Brocade
device.
22 – Upload the running-config from the flash memory of the Brocade device to the TFTP
server.
23 – Download a configuration file from a TFTP server into the running-config of the Brocade
device.
NOTE
Option 23 adds configuration information to the running-config on the device, and does not
replace commands. If you want to replace configuration information in the device, use “no”
forms of the configuration commands to remove the configuration information, then use
configuration commands to create the configuration information you want. Follow the
guidelines in “Dynamic configuration loading” on page 59.
Erasing image and configuration files
To erase software images or configuration files, use the commands described below. These
commands are valid at the Privileged EXEC level of the CLI:
• erase flash primary erases the image stored in primary flash of the system.
• erase flash secondary erases the image stored in secondary flash of the system.
• erase startup-config erases the configuration stored in the startup configuration file; however,
the running configuration remains intact until system reboot.
System reload scheduling
In addition to reloading the system manually, you can configure the Brocade device to reload itself
at a specific time or after a specific amount of time has passed.
NOTE
The scheduled reload feature requires the system clock. You can use a Simple Network Time
Protocol (SNTP) server to set the clock or you can set the device clock manually. Refer to “Specifying
an SNTP server” on page 20 or “Setting the system clock” on page 26.
Reloading at a specific time
To schedule a system reload for a specific time, use the reload at command. For example, to
schedule a system reload from the primary flash module for 6:00:00 AM, April 1, 2003, enter the
following command at the global CONFIG level of the CLI.
Brocade#reload at 06:00:00 04-01-03
Syntax: reload at <hh:mm:ss> <mm-dd-yy> [primary | secondary]
<hh:mm:ss> is the hours, minutes, and seconds.
Brocade ICX 6650 Administration Guide
53-1002600-01
67
3
Diagnostic error codes and remedies for TFTP transfers
<mm-dd-yy> is the month, day, and year.
primary | secondary specifies whether the reload is to occur from the primary code flash module or
the secondary code flash module. The default is primary.
Reloading after a specific amount of time
To schedule a system reload to occur after a specific amount of time has passed on the system
clock, use reload after command. For example, to schedule a system reload from the secondary
flash one day and 12 hours later, enter the following command at the global CONFIG level of the
CLI.
Brocade#reload after 01:12:00 secondary
Syntax: reload after <dd:hh:mm> [primary | secondary]
<dd:hh:mm> is the number of days, hours, and minutes.
primary | secondary specifies whether the reload is to occur from the primary code flash module or
the secondary code flash module.
Displaying the amount of time remaining before
a scheduled reload
To display how much time is remaining before a scheduled system reload, enter the following
command from any level of the CLI.
Brocade#show reload
Canceling a scheduled reload
To cancel a scheduled system reload using the CLI, enter the following command at the global
CONFIG level of the CLI.
Brocade#reload cancel
Diagnostic error codes and remedies for TFTP transfers
This section describes the error messages associated with TFTP transfer of configuration files,
software images or flash images to or from a Brocade device.
68
Error
code
Message
Explanation and action
1
Flash read preparation failed.
2
Flash read failed.
A flash error occurred during the download.
Retry the download. If it fails again, contact customer support.
3
Flash write preparation failed.
4
Flash write failed.
5
TFTP session timeout.
TFTP failed because of a time out.
Check IP connectivity and make sure the TFTP server is running.
Brocade ICX 6650 Administration Guide
53-1002600-01
Network connectivity testing
3
Error
code
Message
Explanation and action
6
TFTP out of buffer space.
The file is larger than the amount of room on the device or TFTP server.
If you are copying an image file to flash, first copy the other image to
your TFTP server, then delete it from flash. (Use the erase flash... CLI
command at the Privileged EXEC level to erase the image in the flash.)
If you are copying a configuration file to flash, edit the file to remove
unnecessary information, then try again.
7
TFTP busy, only one TFTP
session can be active.
Another TFTP transfer is active on another CLI session, or network
management system.
Wait, then retry the transfer.
8
File type check failed.
You accidentally attempted to copy the incorrect image code into the
system. For example, you might have tried to copy a Chassis image into
a Compact device.
Retry the transfer using the correct image.
16
TFTP remote - general error.
17
TFTP remote - no such file.
The TFTP configuration has an error. The specific error message
describes the error.
Correct the error, then retry the transfer.
18
TFTP remote - access violation.
19
TFTP remote - disk full.
20
TFTP remote - illegal operation.
21
TFTP remote - unknown
transfer ID.
22
TFTP remote - file already
exists.
23
TFTP remote - no such user.
Network connectivity testing
After you install the network cables, you can test network connectivity to other devices by pinging
those devices. You also can observe the LEDs related to network connection and perform trace
routes.
For more information about observing LEDs, refer to the Brocade ICX 6650 Hardware Installation
Guide.
Pinging an IPv4 address
NOTE
This section describes the IPv4 ping command. For details about IPv6 ping, refer to “Pinging an IPv6
address” on page 116.
To verify that a Brocade device can reach another device through the network, enter a command
such as the following at any level of the CLI on the Brocade device:
Brocade> ping 192.33.4.7
Brocade ICX 6650 Administration Guide
53-1002600-01
69
3
Network connectivity testing
Syntax: ping <ip addr> | <hostname> [source <ip addr>] [count <num>] [timeout <msec>] [ttl
<num>] [size <byte>] [quiet] [numeric] [no-fragment] [verify] [data <1-to-4 byte hex>]
[brief [max-print-per-sec <number>] ]
NOTE
If the device is a Brocade Layer 2 Switch or Layer 3 Switch, you can use the host name only if you
have already enabled the Domain Name Server (DNS) resolver feature on the device from which you
are sending the ping. Refer to Brocade ICX 6650 Switch Layer 3 Routing Configuration Guide.
The required parameter is the IP address or host name of the device.
The source <ip addr> specifies an IP address to be used as the origin of the ping packets.
The count <num> parameter specifies how many ping packets the device sends. You can specify
from 1 – 4294967296. The default is 1.
The timeout <msec> parameter specifies how many milliseconds the Brocade device waits for a
reply from the pinged device. You can specify a timeout from 1 – 4294967296 milliseconds. The
default is 5000 (5 seconds).
The ttl <num> parameter specifies the maximum number of hops. You can specify a TTL from 1 –
255. The default is 64.
The size <byte> parameter specifies the size of the ICMP data portion of the packet. This is the
payload and does not include the header. You can specify from 0 – 4000. The default is 16.
The no-fragment parameter turns on the “don’t fragment” bit in the IP header of the ping packet.
This option is disabled by default.
The quiet parameter hides informational messages such as a summary of the ping parameters
sent to the device and instead only displays messages indicating the success or failure of the ping.
This option is disabled by default.
The verify parameter verifies that the data in the echo packet (the reply packet) is the same as the
data in the echo request (the ping). By default the device does not verify the data.
The data <1 – 4 byte hex> parameter lets you specify a specific data pattern for the payload
instead of the default data pattern, “abcd”, in the packet data payload. The pattern repeats itself
throughout the ICMP message (payload) portion of the packet.
NOTE
For numeric parameter values, the CLI does not check that the value you enter is within the allowed
range. Instead, if you do exceed the range for a numeric value, the software rounds the value to the
nearest valid value.
The brief parameter causes ping test characters to be displayed. The following ping test characters
are supported:
70
!
Indicates that a reply was received.
.
Indicates that the network server timed out while waiting for a reply.
U
Indicates that a destination unreachable error PDU was received.
I
Indicates that the user interrupted ping.
Brocade ICX 6650 Administration Guide
53-1002600-01
Network connectivity testing
3
NOTE
The number of ! characters displayed may not correspond to the number of successful replies
by the ping command. Similarly, the number of . characters displayed may not correspond to
the number of server timeouts that occurred while waiting for a reply. The "success" or
"timeout" results are shown in the display as “Success rate is XX percent (X/Y)".
The optional max-print-per-sec <number> parameter specifies the maximum number of target
responses the Brocade device can display per second while in brief mode. You can specify from 0 –
2047. The default is 511.
NOTE
If you address the ping to the IP broadcast address, the device lists the first four responses to the
ping.
Tracing an IPv4 route
NOTE
This section describes the IPv4 traceroute command. For details about IPv6 traceroute, refer to
“IPv6 traceroute” on page 114.
Use the traceroute command to determine the path through which a Brocade device can reach
another device. Enter the command at any level of the CLI.
The CLI displays trace route information for each hop as soon as the information is received.
Traceroute requests display all responses to a given TTL. In addition, if there are multiple
equal-cost routes to the destination, the Brocade device displays up to three responses by default.
Brocade> traceroute 192.33.4.7
Syntax: traceroute <host-ip-addr> [maxttl <value>] [minttl <value>] [numeric] [timeout <value>]
[source-ip <ip-addr>]
Possible and default values are as follows.
minttl – minimum TTL (hops) value: Possible values are 1 – 255. Default value is 1 second.
maxttl – maximum TTL (hops) value: Possible values are 1 – 255. Default value is 30 seconds.
timeout – Possible values are 1 – 120. Default value is 2 seconds.
numeric – Lets you change the display to list the devices by their IP addresses instead of their
names.
source-ip <ip-addr> – Specifies an IP address to be used as the origin for the traceroute.
Brocade ICX 6650 Administration Guide
53-1002600-01
71
3
72
Network connectivity testing
Brocade ICX 6650 Administration Guide
53-1002600-01
Chapter
4
Ports on Demand Licensing
In this chapter
• Ports on Demand terminology . . . . . . . . . . . . . . . . . . . . . . . . . . . . . . . . . . . .
• PoD licensing rules . . . . . . . . . . . . . . . . . . . . . . . . . . . . . . . . . . . . . . . . . . . . .
• PoD licensing configuration tasks . . . . . . . . . . . . . . . . . . . . . . . . . . . . . . . . .
• Viewing PoD licensing information from the Brocade software portal . . . .
• Transferring a PoD license . . . . . . . . . . . . . . . . . . . . . . . . . . . . . . . . . . . . . . .
• Syslog message information. . . . . . . . . . . . . . . . . . . . . . . . . . . . . . . . . . . . . .
• Ports on Demand Licensing . . . . . . . . . . . . . . . . . . . . . . . . . . . . . . . . . . . . . .
• Viewing information about PoD licenses . . . . . . . . . . . . . . . . . . . . . . . . . . . .
74
74
74
80
82
82
82
91
Ports on Demand Overview
The Brocade ICX 6650 device features Ports on Demand licensing. With Ports on Demand
licensing, software features do not require licenses and you can add port licenses as needed.
The Brocade ICX 6650 device supports:
• 56 front-panel, dual-speed 1/10 GbE SFP+ ports
• 4 rear-panel 40 GbE QSFP+ ports
• 2 rear-panel 4x10 GbE QSFP+ breakout ports.
When a license is ordered, an entitlement certificate or e-mail message, along with a transaction
key, are issued to the customer by Brocade as proof of purchase. The transaction key and License
ID (LID) of the Brocade device are used to generate a license key from the Brocade software
licensing portal. The license key is contained within a license file, which is downloaded to the
customer’s PC, where the file can then be transferred to a TFTP or SCP server, and then uploaded
to the Brocade device.
Table 14 lists the Brocade ICX 6650 and the Ports on Demand (PoD) licensing features the switch
supports.
TABLE 14
Supported Ports on Demand features
Feature
Brocade ICX 6650
License generation
Yes
License query
Yes
Deleting a license
Yes
Brocade ICX 6650 Administration Guide
53-1002600-01
73
4
Ports on Demand terminology
Ports on Demand terminology
Ports on Demand licensing uses the following terms:
• Entitlement certificate – The proof-of-purchase certificate (paper-pack) issued by Brocade
when a license is purchased. The certificate contains a unique transaction key that is used in
conjunction with the License ID of the Brocade device to generate and download a PoD license
from the Brocade software portal.
• Transaction key – A unique key, along with the LID, used to generate a PoD license from the
Brocade software portal. The transaction key is issued by Brocade when a license is
purchased. The transaction key is delivered according to the method specified when the order
is placed:
-
Paper-pack – The transaction key is recorded on an entitlement certificate, which is
mailed to the customer.
-
Electronic – The transaction key is contained in an e-mail message, which is sent instantly
to the customer after the order is placed. The customer receives the e-mail message
within a few minutes after the order is placed, though the timing will vary depending on the
network, Internet connection, and so on.
If a delivery method is not specified at the time of the order, the key will be delivered by the way
of paper-pack.
• License ID (LID) – This is a character string (not necessarily numbers) that uniquely identifies
the Brocade device. The LID is used in conjunction with a transaction key to generate and
download a PoD license from the Brocade software portal. The PoD license is tied to the LID of
the Brocade device for which the license was ordered and generated.
• License file – The file containing the license key produced by the Brocade software portal
when the license is generated. The license file will enable additional ports on the specific
device once installed.
PoD licensing rules
The following licensing rules apply to Brocade ICX 6650 devices:
• A license is tied to the unique LID of the switch for which the license was ordered. Therefore, a
license can only be used on the device which LID is used to generate the license. It cannot be
used on any other device.
• More than one license can be installed per device.
PoD licensing configuration tasks
To obtain and install a PoD license, follow the configuration tasks listed in Table 15.
74
Brocade ICX 6650 Administration Guide
53-1002600-01
PoD licensing configuration tasks
TABLE 15
4
Configuration tasks for Ports on Demand licensing
Configuration task
Reference
1
Order the desired license.
For a list of available licenses and associated license
SKU numbers, refer to Table 17 on page 84.
2
When you receive the transaction key, retrieve
the LID of the Brocade device.
If you received the transaction key by way of
paper-pack, record the LID on the entitlement
certificate in the space provided.
“Viewing the LID and the software packages installed
in the device” on page 91
3
Log in to the Brocade software portal to
generate and obtain the license file.
“Obtaining a PoD license” on page 75
4
Upload the license file to the Brocade device.
“Enabling ports on the front panel” on page 84
“Enabling ports on the rear panel” on page 87
5
Verify that the license is installed.
“Displaying general license information for PoD ports”
on page 92
Obtaining a PoD license
To generate and obtain a PoD license, complete the following steps.
1. Order a PoD license. Refer to Table 17 on page 84 for a list of available licenses and
associated license SKU numbers.
2. When you receive the paper-pack or electronic transaction key, retrieve the LID of your Brocade
device by entering the show version command on the device. Refer to “Viewing the LID and the
software packages installed in the device” on page 91.” for an example command output.
If you received a paper-pack transaction key, write the LID in the space provided on the
entitlement certificate.
NOTE
Do not discard the entitlement certificate or the e-mail message with the electronic key. Keep it
in a safe place in case it is needed for technical support or product replacement (RMAs).
3. Log in to the Brocade software portal at http://swportal.brocade.com and complete the PoD
license request. If you do not have a login ID and password, request access by following the
instructions on the screen. Refer to Figure 1 on page 76.
Brocade ICX 6650 Administration Guide
53-1002600-01
75
4
PoD licensing configuration tasks
Figure 1 shows the Software Portal Login window.
FIGURE 1
76
Brocade Software Portal Login window
Brocade ICX 6650 Administration Guide
53-1002600-01
PoD licensing configuration tasks
4
From the License Management menu, select Brocade IP/ADP > License Generation with
Transaction key. The IP/ADP License Generation window displays.
FIGURE 2
Brocade ICX 6650 Administration Guide
53-1002600-01
License Management Welcome window
77
4
PoD licensing configuration tasks
Figure 3 shows the IP/ADP License Generation window for generating a license using a
transaction key and LID.
FIGURE 3
IP/ADP License Generation window
Enter the required information.
• For a description of the field, move the pointer over the field.
• An asterisk next to a field indicates that the information is required.
78
Brocade ICX 6650 Administration Guide
53-1002600-01
PoD licensing configuration tasks
4
NOTE
You can generate more than one license at a time. For each license request, enter the Unit's
Unique License ID and Transaction Key, and click Add.
When you have finished entering the required information, read the Brocade End User License
Agreement, and select the I have read and accept the Brocade End User License Agreement
check box.
Click the Generate button to generate the license. Figure 4 shows the IP/ADP License
Generation Result window, which displays an order summary and the results of the license
request.
• If the license request is successful, the Status field shows “Success” and the License File
field contains a hyperlink to the generated license file. The license file is automatically
sent by e-mail to the specified customer e-mail address.
• If the license request fails, the Status field indicates the reason it failed and the action to
be taken.
FIGURE 4
IP/ADP License Generation Result window
4. Download the license file to your PC by either clicking the hyperlink in the License File field or
saving the license file from the e-mail attachment.
Brocade ICX 6650 Administration Guide
53-1002600-01
79
4
Viewing PoD licensing information from the Brocade software portal
5. Upload the license file to the Brocade device.
6. Use the show license command to verify that the license is correctly installed on the device.
Viewing PoD licensing information from the
Brocade software portal
This section describes other PoD licensing tasks supported from the Brocade software portal. You
can use the License Query option to view PoD license information for a particular unit, transaction
key, or both. You can export the report to Excel for sharing or archiving purposes.
Depending on the status of the license (for example, whether the license was generated), the
report will include the following Information:
•
•
•
•
•
•
•
Hardware part number, serial number, and description
Software part number, serial number, and description
Date the license was installed
Transaction key
LID
Feature name
Product line
To display information about the license, select Brocade IP/ADP > License Query.
The License Query window displays. (Refer to Figure 5).
FIGURE 5
License Query window
• To view software license information for a particular unit, enter the LID in the Unit ID field and
click Search.
• To view software license information for a particular transaction key, enter the unique number
in the Transaction key field and click Search.
80
Brocade ICX 6650 Administration Guide
53-1002600-01
Viewing PoD licensing information from the Brocade software portal
4
NOTE
The transaction search will not return any results if the transaction key has not been activated.
Figure 6 shows an example of the license query results.
FIGURE 6
License Query Results window
In this example, the line items for Level 1 display hardware-related information and the line items
for Level 2 display software-related information. If the query was performed before the transaction
key was generated, the first row (Level 1) would not appear as part of the search results. Similarly,
if the query was performed before the license was generated, some of the information in the
second row would not be displayed.
Brocade ICX 6650 Administration Guide
53-1002600-01
81
4
Transferring a PoD license
Transferring a PoD license
A license can be transferred between Brocade devices if both the following conditions are true:
• The device is under an active support contract.
• The license is being transferred between two similar models (for example, from a 24-port
model to another 24-port model or from a 48-port model to another 48-port model).
NOTE
Transferring a license is only available internally for TAC, and externally for designated partners with
specific accounts in the Brocade software portal. Contact your Brocade representative for more
information.
Syslog message information
Table 16 lists the syslog messages that are supported for software-based licensing.
TABLE 16
Syslog messages
Message level
Message
Explanation
Informational
Router License: Normal license package
<license_name> with LID <LID_number> is
added on <unit_id>
The license package has been added.
Informational
Router License: Normal license package
<license_name> with LID <LID_number> is
removed on <unit_id>
The license package has been deleted.
Ports on Demand Licensing
The Brocade ICX 6650 has the following ports:
Front panel PoD
The front panel has the following fixed PoD ports:
• Ports 1/1/1 to 1/1/32 are enabled by default.
• Ports 1/1/33 to 1/1/56 are disabled by default and are in an error-disabled state. For a
detailed description of the port states (up, down, or error-disabled), refer to “Configuration
considerations when configuring PoD for Brocade ICX 6650 devices” on page 96.
Refer to Figure 7 below for an illustration of the front panel ports.
82
Brocade ICX 6650 Administration Guide
53-1002600-01
Ports on Demand Licensing
FIGURE 7
4
Brocade ICX 6650 front panel
Base (32x10 GbE)
8x10 GbE
8x10 GbE
8x10 GbE
Blocks of 8 1/10 GbE SFP+ ports
Sequential only
33-40, 41-48, 49-56
Rear panel Flexible Ports on Demand
The rear panel has 6 QSFP+ ports:
• 2 pairs of 40 ports that are error-disabled by default. For a detailed description of the port
states (up, down, or error-disabled), refer to “Configuration considerations when configuring
PoD for Brocade ICX 6650 devices” on page 96.
• 2 ports that can be converted to eight ports using a breakout cable. The ports are errordisabled by default. For a detailed description of the port states (up, down, or error-disabled),
refer to “Configuration considerations when configuring PoD for Brocade ICX 6650 devices” on
page 96.
The ports are on the rear panel are categorized into groups. Each group requires a Flexible PoD
(FPoD) license to enable the ports. For more information about using the FPoD license with a group
of ports, refer to “Disabling the FPoD ports on the rear panel” on page 89.
• Group 1 = Ports 1/2/1 - 1/2/2. When enabled, these ports operate at 40 GbE.
• Group 2 = Ports 1/2/3 - 1/2/4. When enabled, these ports operate at 40 GbE.
• Group 3 = Ports 1/3/1-4, 1/3/5-8. When enabled, these breakout ports operate at 10 GbE.
Refer to Figure 8 for an illustration of the rear panel ports.
FIGURE 8
Brocade ICX 6650 rear panel
Specific pairs of QSFP+ ports
2x40 GbE (2/1-2 or 2/3-4)
2/1-2
2/4
2/3
3/1-8
4x10 GbE breakout ports
(3/1-4, 3/5-8)
PoD licenses
Table 17 lists the PoD license SKUs for the Brocade ICX 6650, the license names, and the function
of each license.
Brocade ICX 6650 Administration Guide
53-1002600-01
83
4
Ports on Demand Licensing
TABLE 17
PoD licenses
License SKU
License Name
Function
ICX6650-8P10G-POD
ICX6650-10G-LIC-POD
Enables ports 1/1/33- 1/1/56 in
blocks of eight in sequential order.
You need three
ICX6650-8P10G-POD licenses to
enable all front panel ports. When
you purchase a license, a new
transaction key is generated as you
upgrade to a higher port capacity.
Purchase the following:
• 8 port capacity = 1
ICX6650-8P10G-POD license.
Enables ports 1/1/33 1/1/40.
• 16 port capacity = 2
ICX6650-8P10G-POD licenses.
Enables ports 1/1/33 /1/1/48.
• 24 port capacity = 3
ICX6650-8P10G-POD licenses.
Enables ports 1/1/331/1/56.
ICX6650-2P40G-POD
ICX6650-40G-LIC-POD
Enables the rear panel ports by port
groups. You need three
ICX6650-2P40G-POD licenses to
enable all rear panel ports.
Purchase the following:
• 2 port capacity = 1
ICX6650-2P40G-POD license.
Enables one group out of the 3
groups (group 1, group 2, or
group 3).
• 4 port capacity = 2
ICX6650-2P40G-POD licenses.
Enables two groups out of the
three groups.
• 6 port capacity = 3
ICX6650-2P40G-POD licenses.
Enables all three groups.
NOTE
Trial licenses are not available for PoD licensing.
Enabling ports on the front panel
By default, ports 1/1/33 to 1/1/56 are in an error-disabled state. Use the ICX6650-10G-LIC-POD
license to enable these ports. Once enabled, the ports are up at 10 GbE port speed.
One ICX6650-10G-LIC-POD license enables eight ports at a time in sequential order. Refer to
Table 17 for a list PoD licenses.
84
Brocade ICX 6650 Administration Guide
53-1002600-01
Ports on Demand Licensing
4
1. Download the ICX6650-10G-LIC-POD license from the Brocade software portal onto the
Brocade device.
2. Place the license file on a TFTP or SCP server to which the Brocade device has access to.
3. Use TFTP or SCP to copy the file to the license database of the Brocade device.
To use TFTP to copy the file to the license database of the Brocade device, enter the following
command.
Brocade# copy tftp license 10.120.54.185 lic.xml unit 1
Brocade#Flash Memory Write (8192 bytes per dot)
Copy Software License from TFTP to Flash Done.
Syntax: copy tftp license [IP_address| ipv6_address] license_filename_on_host unit unit_id
The IP_address variable is the address of the IPv4 TFTP server.
The ipv6_address variable is the address of the IPv6 TFTP server.
The license_filename_on_host variable is the file name of the license file.
The unit unit_id variable specifies a unit for which you want to add a software license file. The
unit_id variable is 1.
If you attempt to download the same license twice on the device, the following error message is
displayed on the console.
Can't add the license string - 93 (DUPLICATE_LICENSE)
NOTE
SSH and Secure Copy (SCP) must be enabled on the Brocade device before the procedures in
this section can be performed. For details, refer to the Brocade ICX 6650 Switch Security
Configuration Guide.
To copy the file from an SCP-enabled client to the license database of a specific unit, enter the
following command.
scp license.xml [email protected]:license:1
In the example, the license is copied to unit 1.
Syntax: scp license_file_on_host user@IP_address:license:unit id
The unit_id variable specifies a unit for which you want to add a software license file. The
unit_id variable is 1.
4. Insert an SFP+ optical transceiver to enable ports to 10 GbE speed.
5. Insert an SFP+ or SFP optical transceiver to enable the ports to 1 GbE speed.
6. Repeat step 1 through step 3 above to enable ports 1/1/33 to 1/1/48.
7.
Repeat step 1 through step 3 above to enable ports 1/1/33 to 1/1/56.
By default, once the license is installed, the ports are up in 10 GbE port speed. You do not need to
use the speed-duplex command, or reload the system to enable the ports to 10 GbE port speed. As
you upgrade from a lower port to a higher port capacity license, the new license replaces the
previous license.
Brocade ICX 6650 Administration Guide
53-1002600-01
85
4
Ports on Demand Licensing
Deleting a ICX6650-10G-LIC-POD license
When downgrading to a lower port capacity license using the ICX6650-10G-LIC-POD license, you
must first delete the higher port capacity license and then re-install the lower port capacity license
in your system. A reload is required for the license to take effect.
1. Delete the 16-port ICX6650-10G-LIC-POD license file from the device.
Brocade#license delete unit 1 index 1
2. Use TFTP or SCP to copy the 8-port ICX6650-10G-LIC-POD license file to the license database
of the device.
To use TFTP to copy the file to the license database of the Brocade device, enter the following
command.
Brocade# copy tftp license 10.120.54.185 lic.xml unit 1
Brocade#Flash Memory Write (8192 bytes per dot)
Copy Software License from TFTP to Flash Done.
Syntax: copy tftp license [IP_address| ipv6_address] license_filename_on_host unit unit_id
The IP_address variable is the address of the IPv4 TFTP server.
The ipv6_address variable is the address of the IPv6 TFTP server.
The license_filename_on_host variable is the filename of the license file.
The unit unit_id variable specifies a unit for which you want to add a software license file. The
unit_id variable is 1.
If you attempt to download the same license twice on the device, the following error message is
displayed on the console.
Can't add the license string - 93 (DUPLICATE_LICENSE)
NOTE
SSH and Secure Copy (SCP) must be enabled on the Brocade device before the procedures in
this section can be performed. For details, refer to the Brocade ICX 6650 Switch Security
Configuration Guide.
To copy the file from an SCP-enabled client to the license database of a specific unit, enter the
following command.
scp license.xml [email protected]:license:1
In the example above, the license is copied to unit 1.
Syntax: scp license_file_on_host user@IP_address:license:unit id
The unit_id variable specifies a unit for which you want to add a software license file. The
unit_id variable is 1.
3. Reload the device for the 8-port ICX6650-10G-LIC-POD license file to take effect.
Brocade#reload
4. Use the show pod command to display configuration information for the 8-port
ICX6650-10G-LIC-POD license.
86
Brocade ICX 6650 Administration Guide
53-1002600-01
Ports on Demand Licensing
Brocade#show pod
Unit-Id: 1
PoD 10G license capacity: 8
PoD 10G license capacity used:
PoD 40G license capacity: 6
PoD 40G license capacity used:
PoD-ports
1/1/33
1/1/34
1/1/35
1/1/36
1/1/37
1/1/38
1/1/39
1/1/40
1/1/41
1/1/42
1/1/43
1/1/44
1/1/45
1/1/46
1/1/47
1/1/48
1/1/49
1/1/50
1/1/51
1/1/52
1/1/53
1/1/54
1/1/55
1/1/56
Lic-Available
Yes
Yes
Yes
Yes
Yes
Yes
Yes
Yes
No
No
No
No
No
No
No
No
No
No
No
No
No
No
No
No
4
8
6
Lic-Used
Yes
Yes
Yes
Yes
Yes
Yes
Yes
Yes
No
No
No
No
No
No
No
No
No
No
No
No
No
No
No
No
Syntax: show pod
For more information about the license delete command, refer to “Deleting a 10 GbE or 40 GbE
license” on page 90.
Enabling ports on the rear panel
By default, ports on the rear panel are in an error-disabled state. Use the ICX6650-40G-LIC-POD
license to enable these ports. Once enabled, ports 1/2/1 through 1/2/4 are at 40 GbE port speed,
and ports 1/3/1 through 1/3/8 are at 10 GbE port speed.
1. Download the ICX6650-40G-LIC-POD license from the Brocade software portal.
2. Place the license file on a TFTP or SCP server to which the Brocade device has access.
3. Use TFTP or SCP to copy the file to the license database of the Brocade device.
To use TFTP to copy the file to the license database of the Brocade device, enter the following
command.
Brocade# copy tftp license 10.120.54.185 lic.xml unit 1
Syntax: copy tftp license [IP_address| ipv6_address] license_filename_on_host unit unit_id
The IP_address variable is the address of the IPv4 TFTP server.
Brocade ICX 6650 Administration Guide
53-1002600-01
87
4
Ports on Demand Licensing
The ipv6_address variable is the address of the IPv6 TFTP server.
The license_filename_on_host variable is the file name of the license file.
The unit unit_id variable specifies a unit for which you want to add a software license file. The
unit_id variable is 1.
If you attempt to download the same license twice on the device, the following error message is
displayed on the console.
Can't add the license string - 93 (DUPLICATE_LICENSE)
NOTE
SSH and Secure Copy (SCP) must be enabled on the Brocade device before the procedures in
this section can be performed. For details, refer to the Brocade ICX 6650 Switch Security
Configuration Guide.
To copy the file from an SCP-enabled client to the license database of a specific unit, enter the
following command.
scp license.xml [email protected]:license:1
In the example, the license is copied to unit 1.
Syntax: scp license_file_on_host user@IP_address:license:unit id
The unit_id variable specifies a unit for which you want to add a software license file. The
unit_id variable is 1.
4. Insert the 40 GbE QSFP optical transceiver for ports 1/2/1 through 1/2/4.
5. Insert the QSFP+ to 4 SFP+ copper breakout cable or the breakout capable QSFP+ optical
transceiver for ports 1/3/1 through 1/3/8.
6. Enter the following command.
Brocade(config)# fpod-40g-enable group 1
Brocade(config)# fpod-40g-enable group 2
Syntax: [no] fpod-40g-enable group groupID
Enter one of the following values for groupID:
1 = Ports 1/2/1 - 1/2/2
2 = Ports 1/2/3 - 1/2/4
3 = Ports 1/3/1 - 1/3/8
The ports in the group are enabled without a system reload. The port status is up in 30
seconds.
You can use the no fpod-40g-enable group groupID command to disable the port speed for the
groups specified. The ports become non-operational and revert back to the default state,
error-disabled. A system reload is not required. For more information about disabling the port
speed for groups using the no fpod-40g-enable group groupID command, refer to “Disabling
the FPoD ports on the rear panel” on page 89.
7.
88
Use the show pod and show license commands to display information on port licensing. Refer
to “Displaying general license information for PoD ports” on page 92, and “Displaying the
license configuration for PoD ports for the Brocade ICX 6650” on page 94.
Brocade ICX 6650 Administration Guide
53-1002600-01
Ports on Demand Licensing
4
Disabling the FPoD ports on the rear panel
Enter the following command to disable the ports in group 1.
Brocade(config)# no fpod-40g-enable group 1
Ports 1/2/1 and 1/2/2 in group 1 are disabled. With a 2-port capacity license, you can choose to
enable any one group out of the three groups (group 1, group 2, or group 3). For example, if you
want to disable the ports in group 1 and enable the ports in group 2, perform the following steps.
1. Disable ports for group 1.
Brocade(config)# no fpod-40g-enable group 1
2. Enable ports for group 2.
Brocade(config)# fpod-40g-enable group 2
Ports 1/2/3 and 1/2/4 are enabled. A system reload is not required.
With a 4-port capacity license, you can choose to enable any two groups out of the three groups.
For example, if you want to enable the ports in group 3, but you have already enabled the ports in
group 1 and group 2, you must first disable the ports in group 1 or group 2. If you do not disable the
ports in group 1 or group 2, the following error message displays on the CLI.
Brocade(config)#fpod-40g-enable group 3
Error: 40G PoD license capacity has been exceeded
The error message implies that you have exceeded the license capacity for this unit. To enable
ports in group 3, perform the following steps.
1. Disable ports in group 1 or 2.
Brocade(config)# no fpod-40g-enable group 2
2. Enable ports in group 3.
Brocade(config)# fpod-40g-enable group 3
3. Use the show pod command to display configuration information for the groups enabled as
shown in the example output below.
Brocade ICX 6650 Administration Guide
53-1002600-01
89
4
Ports on Demand Licensing
Brocade(config)#show pod
Unit-Id: 1
PoD 10G license capacity: 24
PoD 10G license capacity used:
PoD 40G license capacity: 4
PoD 40G license capacity used:
PoD-ports
1/1/33
1/1/34
1/1/35
1/1/36
1/1/37
1/1/38
1/1/39
1/1/40
1/1/41
1/1/42
1/1/43
1/1/44
1/1/45
1/1/46
1/1/47
1/1/48
1/1/49
1/1/50
1/1/51
1/1/52
1/1/53
1/1/54
1/1/55
1/1/56
1/2/1
1/2/2
1/2/3
1/2/4
1/3/1
1/3/2
1/3/3
1/3/4
1/3/5
1/3/6
1/3/7
1/3/8
Lic-Available
Yes
Yes
Yes
Yes
Yes
Yes
Yes
Yes
Yes
Yes
Yes
Yes
Yes
Yes
Yes
Yes
Yes
Yes
Yes
Yes
Yes
Yes
Yes
Yes
Yes
Yes
No
No
Yes
Yes
Yes
Yes
Yes
Yes
Yes
Yes
24
4
Lic-Used
Yes
Yes
Yes
Yes
Yes
Yes
Yes
Yes
Yes
Yes
Yes
Yes
Yes
Yes
Yes
Yes
Yes
Yes
Yes
Yes
Yes
Yes
Yes
Yes
Yes
Yes
No
No
Yes
Yes
Yes
Yes
Yes
Yes
Yes
Yes
Syntax: show pod
Deleting a 10 GbE or 40 GbE license
A PoD license remains in the license database until it is deleted.
To delete all PoD (10 GbE or 40 GbE) license files from a unit, enter the following command at the
privileged EXEC level of the CLI.
Brocade# license delete unit 1 all
90
Brocade ICX 6650 Administration Guide
53-1002600-01
Viewing information about PoD licenses
4
To delete a specific license file from a unit, enter the following command at the privileged EXEC
level of the CLI.
Brocade# license delete unit 1 index 1
Syntax: license delete unit unit_id [all | index license_index]
The unit_id variable specifies the unit ID number. The unit ID number is 1.
The all option allows you to delete all license files for a specific unit.
The index license_index option specifies the software license file, and is generated by the member
unit. The license index number is the license file you want to delete from a unit.
Deleting a 10 GbE or 40 GbE license requires a system reload for the command to take effect.
Viewing information about PoD licenses
This section describes the show commands associated with PoD licensing. These commands are
issued on the Brocade device, at any level of the CLI.
NOTE
You can also view information about PoD licenses from the Brocade software portal. Refer to
“Viewing PoD licensing information from the Brocade software portal” on page 80.
Viewing the LID and the software packages
installed in the device
Brocade devices that ship during and after the release of PoD licensing have the License ID (LID)
imprinted on the label affixed to the device. You also can use the show version CLI command to
view the LID on these devices, and on devices that shipped before the release of PoD licensing.
Use the show version command to display the serial number, software and hardware license
package name, and LID of all units in the device. The following example is sample output from a
Brocade ICX 6650 device with the package, ICX6650_L3_SOFT_PACKAGE, installed on unit 1.
NOTE
The software package name is not the same as the license name.
Brocade ICX 6650 Administration Guide
53-1002600-01
91
4
Viewing information about PoD licenses
Brocade#show version
Copyright (c) 1996-2012 Brocade Communications Systems, Inc. All rights
reserved.
UNIT 1: compiled on Jul 16 2012 at 20:00:20 labeled as ICXLR07500B1
(12849087 bytes) from Primary ICXLR07500B1.bin
SW: Version 07.5.00B1T323
Boot-Monitor Image size = 524288, Version:07.5.00T320 (fxz07500b006)
HW: Stackable ICX6650-64
==========================================================================
UNIT 1: SL 1: ICX6650-64 56-port Management Module
Serial #: CEN0316H00W
License: ICX6650_L3_SOFT_PACKAGE
(LID: egpFIGLjFFy)
P-ENGINE 0: type EC02, rev 01
==========================================================================
UNIT 1: SL 2: ICX6650-64 4-port 160G Module
==========================================================================
UNIT 1: SL 3: ICX6650-64 8-port 80G Module
==========================================================================
800 MHz Power PC processor 8544E (version 0021/0022) 400 MHz bus
65536 KB flash memory
1024 MB DRAM
STACKID 1 system uptime is 4 days 20 hours 39 minutes 48 seconds
==========================================================================
HARDWARE INFORMATION
UNIT NAME
: ICX6650-64
HW REVISION
: 1 (ALPHA)
Board ID : 4(ICX6650)
CPLD INFORMATION
CPLD code is RD revision
CPLD CODE REVISION = 5
==========================================================================
The system : started=warm start reloaded=by "reload"
*** NOT FOR PRODUCTION ***
Displaying general license information for PoD ports
To display general license information about the PoD license in the device, use the show license
command. The show license command only displays software license information for a unit, not
hardware license information, as shown in the following example.
Brocade#show license
Index
License Name
Stack unit 1:
1
ICX6650-10G-LIC-POD
2
ICX6650-40G-LIC-POD
Lid
License Type
Status
License Period
egpHKHKjFFL
egpHKHKjFFL
Normal
Normal
Active
Active
Unlimited
Unlimited
License Capacity
24
6
Syntax: show license
92
Brocade ICX 6650 Administration Guide
53-1002600-01
Viewing information about PoD licenses
4
To display PoD license information for unit 1 on a Brocade ICX 6650 device, enter the show license
unit unit_id command. In the following example, the 10 GbE and 40 GbE Brocade ICX 6650 PoD
licenses are installed on unit 1.
Brocade#show license unit 1
Index
License Name
Stack unit 1:
1
ICX6650-10G-LIC-POD
2
ICX6650-40G-LIC-POD
Lid
License Type
Status
License Period
egpHKHKjFFL
egpHKHKjFFL
Normal
Normal
Active
Active
Unlimited
Unlimited
License Capacity
24
6
Syntax: show license [unit unit_id]
The unit unit_id parameter specifies the unit ID number.
Table 18 describes the information displayed by the show license unit unit_id command
TABLE 18
Output from the show license unit command
Field
Description
Index
The index number specifies the PoD license file for a specific unit. The
index number is generated by the member unit.
License Name
The name of license installed for the license index number on the unit.
Lid
The license ID. This number is embedded in the Brocade device.
License Type
Indicates the license is normal (permanent).
Status
Indicates the status of the license:
Valid – A license is valid if the LID matches the serial number of the
device for which the license was purchased, and the package name
is recognized by the system.
• Invalid – The LID does not match the serial number of the device
for which the license was purchased.
• Active – The license is valid and in effect on the device.
• Not used – The license is not in effect on the device.
•
License Period
The license type is normal (permanent). The field displays Unlimited.
License Capacity
The port capacity of the PoD license. The 10 GbE PoD license consists of
an 8-, 16-, or 24-port capacity license. The 40 GbE PoD license consists
of 2-, 4-, or 6-port capacity license.
To display detailed information about a specific license on unit 1, use the show license unit unit_id
[index index_number] command. The following example shows sample output.
Brocade#show license unit 1 index 1
License information for unit 1 license <1>:
+license name:
ICX6650-10G-LIC-POD
+lid:
egpHKHKjFFL
+license type:
normal
+status:
active
+license period:
unlimited
Syntax: show license unit unit_id [index index_number]
The unit unit_id variable specifies the unit ID number. The unit ID number is 1.
The index license_index option specifies the software license file, and is generated by the member
unit.
Brocade ICX 6650 Administration Guide
53-1002600-01
93
4
Viewing information about PoD licenses
Table 19 describes the information displayed by the show license unit unit_id [index
index_number] command.
TABLE 19
Output from the show license unit_id [index index_number] command
Field
Description
+license name
The name of the license installed on the unit.
+lid
The license ID. This number is embedded in the Brocade device.
+license type
Indicates the license is normal (permanent).
+status
+license period
Indicates the status of the license:
Valid – A license is valid if the LID matches the serial number of the
device for which the license was purchased, and the package name
is recognized by the system.
• Invalid – The LID does not match the serial number of the device
for which the license was purchased.
• Active – The license is valid and in effect on the device.
• Not used – The license is not in effect on the device.
•
The license type is normal (permanent), This field displays Unlimited.
Displaying the license configuration for PoD ports
for the Brocade ICX 6650
To display the license configuration for PoD ports in the system, enter the show pod command at
the CLI level. In the following output, the 16-port capacity license is used for the 10 GbE PoD
license, and the 6-port capacity license is used for the 40 GbE PoD license.
94
Brocade ICX 6650 Administration Guide
53-1002600-01
Viewing information about PoD licenses
Brocade(config)#show pod
Unit-Id: 1
PoD 10G license capacity: 16
PoD 10G license capacity used:
PoD 40G license capacity: 6
PoD 40G license capacity used:
PoD-ports
1/1/33
1/1/34
1/1/35
1/1/36
1/1/37
1/1/38
1/1/39
1/1/40
1/1/41
1/1/42
1/1/43
1/1/44
1/1/45
1/1/46
1/1/47
1/1/48
1/1/49
1/1/50
1/1/51
1/1/52
1/1/53
1/1/54
1/1/55
1/1/56
1/2/1
1/2/2
1/2/3
1/2/4
1/3/1
1/3/2
1/3/3
1/3/4
1/3/5
1/3/6
1/3/7
1/3/8
Lic-Available
Yes
Yes
Yes
Yes
Yes
Yes
Yes
Yes
Yes
Yes
Yes
Yes
Yes
Yes
Yes
Yes
No
No
No
No
No
No
No
No
Yes
Yes
Yes
Yes
Yes
Yes
Yes
Yes
Yes
Yes
Yes
Yes
4
16
6
Lic-Used
Yes
Yes
Yes
Yes
Yes
Yes
Yes
Yes
Yes
Yes
Yes
Yes
Yes
Yes
Yes
Yes
No
No
No
No
No
No
No
No
Yes
Yes
Yes
Yes
Yes
Yes
Yes
Yes
Yes
Yes
Yes
Yes
Syntax: show pod
Table 20 describes the information displayed in the output of the show pod command.
Brocade ICX 6650 Administration Guide
53-1002600-01
95
4
Viewing information about PoD licenses
TABLE 20
Output from the show pod command
Field
Description
Unit-Id
The unit ID number of the PoD.
PoD license capacity
The port capacity of the PoD license (10 GbE or 40 GbE license) that is
purchased. The PoD 10 GbE license consists of an 8-, 16-, or 24-port
capacity license. The PoD 40 GbE license consists of a 2-, 4-, or 6-port
capacity license.
PoD license capacity used
The port capacity of the PoD license (10 GbE or 40 GbE license) that is in use
by the port. The PoD 10 GbE license consists of an 8-, 16-, or 24-port capacity
license. The PoD 40 GbE license consists of a 2-, 4-, or 6-port capacity license.
PoD-ports
The list of PoD ports in the PoD unit.
Lic-Available
Whether the license is available for the port.
Lic-Used
Whether the license is used by the port.
Configuration considerations when configuring PoD
for Brocade ICX 6650 devices
Consider the following when configuring PoD for Brocade ICX 6650 devices:
• You can add a ICX6650-2P40G-POD license to any configuration. For example, you can add a
ICX6650-2P40G-POD license to a base 32-port configuration.
• In a trunk formation, if there is no license upon bootup or hot swap of a unit, a port is disabled.
This does not affect the trunk formation.
• A 10 GbE or 40 GbE port can be in one of the following port states:
- Error-disabled (invalid license)
- Down
- Up
A port is in an error-disabled (invalid license) state when there is no license installed in the
device. An invalid license implies that you have incorrectly installed a license that is not tied to
the device. When a physical link is established between two devices, but a license is not
installed in the device, the port remains in an error-disabled state. A port is operational only
when you install the correct license in the device.The show interface ethernet command
displays the port in the ERROR_DISABLED state because there is no license installed, and
there is no physical link between two devices. The following example output is from a Brocade
ICX 6650 device.
96
Brocade ICX 6650 Administration Guide
53-1002600-01
Viewing information about PoD licenses
4
Brocade# show interface ethernet 1/1/33
10GigabitEthernet1/1/33 is ERR-DISABLED (invalid license), line protocol is
down
Hardware is 10GigabitEthernet, address is 748e.f80c.5f40(bia 748e.f80c.5f40)
Interface type is unknown
Configured speed 10Gbit, actual unknown, configured duplex fdx, actual
unknown
Member of L2 VLAN ID 1, port is untagged, port state is DISABLED
BPDU guard is Disabled, ROOT protect is Disabled
Link Error Dampening is Disabled
STP configured to ON, priority is level0, mac-learning is enabled
Flow Control is enabled
Mirror disabled, Monitor disabled
Not member of any active trunks
Not member of any configured trunks
No port name
A port is in a down state when there is no physical link between two devices, and a license is
installed in the device. The show interface ethernet command displays the port in the down
state. The following example output is from a Brocade ICX 6650 device.
Brocade# show interface ethernet 1/1/33
10GigabitEthernet1/1/33 is down, line protocol is down
Hardware is 10GigabitEthernet, address is 748e.f80c.5f40(bia 748e.f80c.5f40)
Interface type is unknown
Configured speed 10Gbit, actual unknown, configured duplex fdx, actual
unknown
Member of L2 VLAN ID 1, port is untagged, port state is BLOCKING
BPDU guard is Disabled, ROOT protect is Disabled
Link Error Dampening is Disabled
STP configured to ON, priority is level0, mac-learning is enabled
Flow Control is enabled
Mirror disabled, Monitor disabled
Not member of any active trunks
Not member of any configured trunks
No port name
A port is in an up state when a physical link is established between two devices, and a license
is installed in the device. The show interface ethernet command displays the port in the up
state. The following example output is from a Brocade ICX 6650 device.
Brocade# show interface ethernet 1/2/1
40GigabitEthernet1/2/1 is up, line protocol is up
Hardware is 40GigabitEthernet, address is 748e.f80c.5f40(bia 748e.f80c.5f40)
Interface type is 40Gig Copper
Configured speed 40Gbit, actual 40Gbit, configured duplex fdx, actual fdx
Configured mdi mode AUTO, actual none
Member of 1 L2 VLANs, port is tagged, port state is FORWARDING
BPDU guard is Disabled, ROOT protect is Disabled
Link Error Dampening is Disabled
STP configured to ON, priority is level0, mac-learning is enabled
Flow Control is enabled
Mirror disabled, Monitor disabled
Member of active trunk ports 1/2/1,1/2/2,1/2/3,1/2/4, primary port
Member of configured trunk ports 1/2/1,1/2/2,1/2/3,1/2/4, primary port
No port name
Brocade ICX 6650 Administration Guide
53-1002600-01
97
4
98
Viewing information about PoD licenses
Brocade ICX 6650 Administration Guide
53-1002600-01
Chapter
5
IPv6 Configuration on Brocade ICX 6650 Switch
In this chapter
• Full Layer 3 IPv6 feature support . . . . . . . . . . . . . . . . . . . . . . . . . . . . . . . . .
• IPv6 addressing overview . . . . . . . . . . . . . . . . . . . . . . . . . . . . . . . . . . . . . . .
• IPv6 CLI command support . . . . . . . . . . . . . . . . . . . . . . . . . . . . . . . . . . . . .
• IPv6 host address on a Layer 2 switch . . . . . . . . . . . . . . . . . . . . . . . . . . . .
• Configuring basic IPv6 connectivity on a Layer 3 switch . . . . . . . . . . . . . .
• IPv6 management on Brocade ICX 6650 devices (IPv6 host support) . . .
• Static IPv6 route configuration . . . . . . . . . . . . . . . . . . . . . . . . . . . . . . . . . . .
• IPv6 over IPv4 tunnels. . . . . . . . . . . . . . . . . . . . . . . . . . . . . . . . . . . . . . . . . .
• ECMP load sharing for IPv6 . . . . . . . . . . . . . . . . . . . . . . . . . . . . . . . . . . . . .
• IPv6 ICMP feature configuration. . . . . . . . . . . . . . . . . . . . . . . . . . . . . . . . . .
• IPv6 neighbor discovery configuration . . . . . . . . . . . . . . . . . . . . . . . . . . . . .
• IPv6 MTU . . . . . . . . . . . . . . . . . . . . . . . . . . . . . . . . . . . . . . . . . . . . . . . . . . . .
• Static neighbor entries configuration. . . . . . . . . . . . . . . . . . . . . . . . . . . . . .
• Limiting the number of hops an IPv6 packet can traverse. . . . . . . . . . . . .
• IPv6 source routing security enhancements . . . . . . . . . . . . . . . . . . . . . . . .
• Clearing global IPv6 information . . . . . . . . . . . . . . . . . . . . . . . . . . . . . . . . .
• Displaying global IPv6 information . . . . . . . . . . . . . . . . . . . . . . . . . . . . . . . .
101
101
104
106
108
112
118
121
126
128
129
136
137
138
138
138
140
Table 21 lists the Brocade ICX 6650 switch and the IPv6 features the switch supports. These
features are supported full Layer 3 software images, except where explicitly noted.
TABLE 21
Supported IPv6 features on Brocade ICX 6650 devices
Feature
Brocade
ICX 6650
Global IPv6 address
1
Yes
IPv6 access list
Yes
IPv6 access-list (management ACLs)
Yes
Site-local IPv6 address
Yes
Link-local IPv6 address
Yes
IPv4 and IPv6 host stacks
Yes
IPv6 copy
1
Yes
1
IPv6 ncopy
Yes
IPv6 debug
Yes
Brocade ICX 6650 Administration Guide
53-1002600-01
99
5
IPv6 Configuration on Brocade ICX 6650 Switch
TABLE 21
Supported IPv6 features on Brocade ICX 6650 devices
Feature
Brocade
ICX 6650
IPv6 ping
Yes
IPv6 traceroute
Yes
DNS server name resolution
Yes
Logging (Syslog)
Yes
RADIUS
Yes
1
SCP
Yes
SSH
Yes
SNMP
Yes
SNMP traps
Yes
SNTP
Yes
Telnet
Yes
TFTP
Yes
1
Router advertisement and
solicitation
Yes
IPv6 static routes
Yes
IPv6 over IPv4 tunnels
Yes
ECMP load sharing
Yes
IPv6 ICMP
Yes
IPv6 routing protocols1
Yes
ICMP redirect messages
Yes
IPv6 neighbor discovery
Yes
IPv6 Layer 3 forwarding
Yes
IPv6 redistribution
Yes
IPv6 MTU
Yes
Static neighbor entries
Yes
Hop limit for IPv6 packets
Yes
Clear IPv6 global information
Yes
IPv6 source routing security
enhancements
Yes
The following IPv6 features, listed in Table 21, are documented in other chapters or sections of
this guide:
1
•
•
•
•
•
100
IPv6 access list – Brocade ICX 6650 Switch Security Configuration Guide
IPv6 copy – “Using the IPv6 copy command” on page 62
IPv6 ncopy – “IPv6 ncopy command” on page 64
RADIUS – Brocade ICX 6650 Switch Security Configuration Guide
TFTP – “Loading and saving configuration files with IPv6” on page 62
Brocade ICX 6650 Administration Guide
53-1002600-01
Full Layer 3 IPv6 feature support
5
• IPV6 routing protocols – Various chapters
Full Layer 3 IPv6 feature support
The following IPv6 Layer 3 features are supported:
•
•
•
•
•
•
•
•
IPv6 unicast routing (multicast routing is not supported)
OSPF V3
RIPng
IPv6 ICMP redirect messages
IPv6 route redistribution
IPv6 static routes
IPv6 over IPv4 tunnels in hardware
IPv6 Layer 3 forwarding
IPv6 addressing overview
IPv6 was designed to replace IPv4, the Internet protocol that is most commonly used currently
throughout the world. IPv6 increases the number of network address bits from 32 (IPv4) to 128
bits, which provides more than enough unique IP addresses to support all of the network devices
on the planet into the future. IPv6 is expected to quickly become the network standard.
An IPv6 address is composed of 8 fields of 16-bit hexadecimal values separated by colons (:).
Figure 9 shows the IPv6 address format.
FIGURE 9
IPv6 address format
Network Prefix
HHHH
HHHH
HHHH
Interface ID
HHHH
HHHH
HHHH
HHHH
HHHH
128 Bits
HHHH = Hex Value 0000 – FFFF
As shown in Figure 9, HHHH is a 16-bit hexadecimal value, while H is a 4-bit hexadecimal value.
The following is an example of an IPv6 address.
2001:DB8:0000:0200:002D:D0FF:FE48:4672
Note that this IPv6 address includes hexadecimal fields of zeros. To make the address less
cumbersome, you can do the following:
• Omit the leading zeros; for example, 2001:0:0:200:2D:D0FF:FE48:4672.
• Compress the successive groups of zeros at the beginning, middle, or end of an IPv6 address
to two colons (::) once per address; for example, 2001:DB8::200:2D:D0FF:FE48:4672.
When specifying an IPv6 address in a command syntax, keep the following in mind:
• You can use the two colons (::) only once in the address to represent the longest successive
hexadecimal fields of zeros
Brocade ICX 6650 Administration Guide
53-1002600-01
101
5
IPv6 addressing overview
• The hexadecimal letters in IPv6 addresses are not case-sensitive
As shown in Figure 9, the IPv6 network prefix is composed of the left-most bits of the address. As
with an IPv4 address, you can specify the IPv6 prefix using the <prefix>/<prefix-length> format,
where the following applies.
The <prefix> parameter is specified as 16-bit hexadecimal values separated by a colon.
The <prefix-length> parameter is specified as a decimal value that indicates the left-most bits of
the IPv6 address.
The following is an example of an IPv6 prefix.
2001:DB8:49EA:D088::/64
IPv6 address types
As with IPv4 addresses, you can assign multiple IPv6 addresses to a switch interface. Table 22
presents the three major types of IPv6 addresses that you can assign to a switch interface.
A major difference between IPv4 and IPv6 addresses is that IPv6 addresses support scope, which
describes the topology in which the address may be used as a unique identifier for an interface or
set of interfaces.
Unicast and multicast addresses support scoping as follows:
• Unicast addresses support two types of scope: global scope and local scope. In turn, local
scope supports site-local addresses and link-local addresses. Table 22 describes global,
site-local, and link-local addresses and the topologies in which they are used.
• Multicast addresses support a scope field, which Table 22 describes.
102
Brocade ICX 6650 Administration Guide
53-1002600-01
IPv6 addressing overview
TABLE 22
5
IPv6 address types
.
Address
type
Description
Address structure
Unicast
An address for a single
interface. A packet sent to a
unicast address is delivered to
the interface identified by the
address.
Depends on the type of the unicast address:
• Aggregatable global address—An address equivalent to a global
or public IPv4 address. The address structure is as follows: a
fixed prefix of 2000::/3 (001), a 45-bit global routing prefix, a
16-bit subnet ID, and a 64-bit interface ID.
• Site-local address—An address used within a site or intranet.
(This address is similar to a private IPv4 address.) A site
consists of multiple network links. The address structure is as
follows: a fixed prefix of FEC0::/10 (1111 1110 11), a 16-bit
subnet ID, and a 64-bit interface ID.
• Link-local address—An address used between directly
connected nodes on a single network link. The address
structure is as follows: a fixed prefix of FE80::/10 (1111 1110
10) and a 64-bit interface ID.
• IPv4-compatible address—An address used in IPv6 transition
mechanisms that tunnel IPv6 packets dynamically over IPv4
infrastructures. The address embeds an IPv4 address in the
low-order 32 bits and the high-order 96 bits are zeros. The
address structure is as follows: 0:0:0:0:0:0:A.B.C.D.
• Loopback address—An address (0:0:0:0:0:0:0:1 or ::1) that a
switch can use to send an IPv6 packet to itself. You cannot
assign a loopback address to a physical interface.
• Unspecified address—An address (0:0:0:0:0:0:0:0 or ::) that a
node can use until you configure an IPv6 address for it.
Multicast
An address for a set of
interfaces belonging to
different nodes. Sending a
packet to a multicast address
results in the delivery of the
packet to all interfaces in the
set.
A multicast address has a fixed prefix of FF00::/8 (1111 1111). The
next 4 bits define the address as a permanent or temporary
address. The next 4 bits define the scope of the address (node, link,
site, organization, global).
Anycast
An address for a set of
interfaces belonging to
different nodes. Sending a
packet to an anycast address
results in the delivery of the
packet to the closest interface
identified by the address.
An anycast address looks similar to a unicast address, because it is
allocated from the unicast address space. If you assign a unicast
address to multiple interfaces, it is an anycast address. An interface
assigned an anycast address must be configured to recognize the
address as an anycast address.
An anycast address can be assigned to a switch only.
An anycast address must not be used as the source address of an
IPv6 packet.
A switch automatically configures a link-local unicast address for an interface by using the prefix of
FE80::/10 (1111 1110 10) and a 64-bit interface ID. The 128-bit IPv6 address is then subjected to
duplicate address detection to ensure that the address is unique on the link. If desired, you can
override this automatically configured address by explicitly configuring an address.
NOTE
Brocade ICX 6650 devices support RFC 2526, which requires that within each subnet, the highest
128 interface identifier values reserved for assignment as subnet anycast addresses. Thus, if you
assign individual IPv6 addresses within a subnet, the second highest IPv6 address in the subnet
does not work.
Brocade ICX 6650 Administration Guide
53-1002600-01
103
5
IPv6 CLI command support
IPv6 stateless auto-configuration
Brocade routers use the IPv6 stateless autoconfiguration feature to enable a host on a local link to
automatically configure its interfaces with new and globally unique IPv6 addresses associated with
its location. The automatic configuration of a host interface is performed without the use of a
server, such as a Dynamic Host Configuration Protocol (DHCP) server, or manual configuration.
The automatic configuration of a host interface works in the following way: a switch on a local link
periodically sends switch advertisement messages containing network-type information, such as
the 64-bit prefix of the local link and the default route, to all nodes on the link. When a host on the
link receives the message, it takes the local link prefix from the message and appends a 64-bit
interface ID, thereby automatically configuring its interface. (The 64-bit interface ID is derived from
the MAC address of the host’s NIC.) The 128-bit IPv6 address is then subjected to duplicate
address detection to ensure that the address is unique on the link.
The duplicate address detection feature verifies that a unicast IPv6 address is unique before it is
assigned to a host interface by the stateless auto configuration feature. Duplicate address
detection uses neighbor solicitation messages to verify that a unicast IPv6 address is unique.
NOTE
For the stateless auto configuration feature to work properly, the advertised prefix length in switch
advertisement messages must always be 64 bits.
The IPv6 stateless autoconfiguration feature can also automatically reconfigure a host’s interfaces
if you change the ISP for the host’s network. (The host’s interfaces must be renumbered with the
IPv6 prefix of the new ISP.)
The renumbering occurs in the following way: a switch on a local link periodically sends
advertisements updated with the prefix of the new ISP to all nodes on the link. (The advertisements
still contain the prefix of the old ISP.) A host can use the addresses created from the new prefix and
the existing addresses created from the old prefix on the link. When you are ready for the host to
use the new addresses only, you can configure the lifetime parameters appropriately using the ipv6
nd prefix-advertisement command. During this transition, the old prefix is removed from the switch
advertisements. At this point, only addresses that contain the new prefix are used on the link.
IPv6 CLI command support
Table 23 lists the IPv6 CLI commands supported.
TABLE 23
104
IPv6 CLI command support
IPv6 command
Description
Switch code
Router code
clear ipv6 cache
Deletes all entries in the dynamic host cache.
clear ipv6 mld-snooping
Deletes MLD-snooping-related counters or cache
entries.
X
X
clear ipv6 neighbor
Deletes all dynamic entries in the IPv6 neighbor
table.
X
X
clear ipv6 ospf
Clears OSPF-related entries.
X
clear ipv6 rip
Clears RIP-related entries.
X
clear ipv6 route
Deletes all dynamic entries in the IPv6 route table.
X
clear ipv6 traffic
Resets all IPv6 packet counters.
X
X
X
Brocade ICX 6650 Administration Guide
53-1002600-01
5
IPv6 CLI command support
TABLE 23
IPv6 CLI command support (Continued)
IPv6 command
Description
clear ipv6 tunnel
Clears statistics for IPv6 tunnels
copy tftp
Downloads a copy of a Brocade software image
from a TFTP server into the system flash using
IPv6.
X
X
debug ipv6
Displays IPv6 debug information.
X
X
ipv6 access-class
Configures access control for IPv6 management
traffic.
X
X
ipv6 access-list
Configures an IPv6 access control list for IPv6
access control.
X
X
ipv6 address
Configures an IPv6 address on an interface
(router) or globally (switch)
X
X
ipv6 debug
Enables IPv6 debugging.
X
X
ipv6 dns domain-name
Configures an IPv6 domain name.
X
X
ipv6 dns server-address
Configures an IPv6 DNS server address.
X
X
ipv6 enable
Enables IPv6 on an interface.
X
X
ipv6 hop-limit
Sets the IPv6 hop limit.
X
ipv6 icmp
Configures IPv6 ICMP parameters
X
Ipv6 load-sharing
Enables IPv6 load sharing
X
Ipv6 mld-snooping
Configures MLD snooping
ipv6 mtu
Configures the maximum length of an IPv6 packet
that can be transmitted on a particular interface.
X
ipv6 nd
Configures neighbor discovery.
X
ipv6 neighbor
Maps a static IPv6 address to a MAC address in
the IPv6 neighbor table.
X
ipv6 ospf
Configures OSPF V3 parameters on an interface.
X
ipv6 prefix-list
Builds an IPv6 prefix list.
X
ipv6 redirects
Enables the sending of ICMP redirect messages
on an interface.
X
ipv6 rip
Configures RIPng parameters on an interface
X
ipv6 route
Configures an IPv6 static route.
X
ipv6 router
Enables an IPv6 routing protocol.
X
ipv6 traffic-filter
Applies an IPv6 ACL to an interface.
ipv6 unicast-routing
Enables IPv6 unicast routing.
log host ipv6
Configures the IPv6 Syslog server.
X
X
ping ipv6
Performs an ICMP for IPv6 echo test.
X
X
show ipv6
Displays some global IPv6 parameters, such IPv6
DNS server address.
X
X
show ipv6 access-list
Displays configured IPv6 access control lists.
X
X
show ipv6 cache
Displays the IPv6 host cache.
Brocade ICX 6650 Administration Guide
53-1002600-01
Switch code
Router code
X
X
X
X
X
X
X
105
5
IPv6 host address on a Layer 2 switch
TABLE 23
IPv6 CLI command support (Continued)
IPv6 command
Description
Switch code
Router code
show ipv6 interface
Displays IPv6 information for an interface.
show ipv6 mld-snooping
Displays information about MLD snooping.
X
X
show ipv6 neighbor
Displays the IPv6 neighbor table.
X
X
show ipv6 ospf
Displays information about OSPF V3.
X
show ipv6 prefix-lists
Displays the configured IPv6 prefix lists.
X
show ipv6 rip
Displays information about RIPng.
X
show ipv6 route
Displays IPv6 routes.
X
show ipv6 router
Displays IPv6 local routers.
X
show ipv6 tcp
Displays information about IPv6 TCP sessions.
X
X
show ipv6 traffic
Displays IPv6 packet counters.
X
X
show ipv6 tunnel
Displays information about IPv6 tunnels
X
X
snmp-client ipv6
Restricts SNMP access to a certain IPv6 node.
X
X
snmp-server host ipv6
Specifies the recipient of SNMP notifications.
X
X
sntp server ipv6
Enables the Brocade device to send SNTP packets
over IPv6.
X
X
telnet
Enables a Telnet connection from the Brocade
device to a remote IPv6 host using the console.
X
X
traceroute ipv6
Traces a path from the Brocade device to an IPv6
host.
X
X
X
IPv6 host address on a Layer 2 switch
In a Layer 3 (router) configuration, each port can be configured separately with an IPv6 address.
This is accomplished using the interface configuration process that is described in “IPv6
configuration on each router interface” on page 108.
In a Layer 2 (switch) configuration, individual ports cannot be configured with an IP address (IPv4
or IPv6). In this situation, the switch has one IP address for the management port and one IP
address for the system. This has previously been supported for IPv4 but not for IPv6.
There is support for configuring an IPv6 address on the management port as described in
“Configuring the management port for an IPv6 automatic address configuration” on page 108, and
for configuring a system-wide IPv6 address on a Layer 2 switch. Configuration of the system-wide
IPv6 address is exactly like configuration of an IPv6 address in router mode, except that the IPv6
configuration is at the Global CONFIG level instead of at the Interface level.
The process for defining the system-wide interface for IPv6 is described in the following sections:
• “Configuring a global or site-local IPv6 address with a manually configured interface ID” on
page 107
• “Configuring a link-local IPv6 address as a system-wide address for a switch” on page 107
106
Brocade ICX 6650 Administration Guide
53-1002600-01
IPv6 host address on a Layer 2 switch
5
NOTE
When configuring an Ipv6 host address on a Layer 2 switch that has multiple VLANs, make sure the
configuration includes a designated management VLAN that identifies the VLAN to which the global
IP address belongs. Refer to the Brocade ICX 6650 Switch Security Configuration Guide.
Configuring a global or site-local IPv6 address
with a manually configured interface ID
To configure a global or site-local IPv6 address with a manually-configured interface ID, such as a
system-wide address for a switch, enter a command similar to the following at the Global CONFIG
level.
Brocade(config)#ipv6 address 2001:DB8:12D:1300:240:D0FF:FE48:4000:1/64
Syntax: ipv6 address <ipv6-prefix>/<prefix-length>
You must specify the <ipv6-prefix> parameter in hexadecimal using 16-bit values between colons
as documented in RFC 2373.
You must specify the <prefix-length> parameter in decimal value. A slash mark (/) must follow the
<ipv6-prefix> parameter and precede the <prefix-length> parameter.
Configuring a link-local IPv6 address as a system-wide
address for a switch
To enable IPv6 and automatically configure a global interface enter commands such as the
following.
Brocade(config)#ipv6 enable
This command enables IPv6 on the switch and specifies that the interface is assigned an
automatically computed link-local address.
Syntax: [no] ipv6 enable
To override a link-local address that is automatically computed for the global interface with a
manually configured address, enter a command such as the following.
Brocade(config)#ipv6 address 2001:DB8::240:D0FF:FE48:4672 link-local
This command explicitly configures the link-local address 2001:DB8::240:D0FF:FE48:4672 for the
global interface.
Syntax: ipv6 address <ipv6-address> link-local
You must specify the <ipv6-address> parameter in hexadecimal using 16-bit values between
colons as documented in RFC 2373.
The link-local keyword indicates that the router interface should use the manually configured
link-local address instead of the automatically computed link-local address.
Brocade ICX 6650 Administration Guide
53-1002600-01
107
5
Configuring the management port for an IPv6 automatic address configuration
Configuring the management port
for an IPv6 automatic address configuration
You can have the management port configured to automatically obtain an IPv6 address. This
process is the same for any other port and is described in detail in the section “Configuring a global
IPv6 address with an automatically computed EUI-64 interface ID” on page 110
Configuring basic IPv6 connectivity on
a Layer 3 switch
To configure basic IPv6 connectivity on a Brocade Layer 3 Switch, you must do the following:
• Enable IPv6 routing globally on the switch
• Configure an IPv6 address or explicitly enable IPv6 on each router interface over which you
plan to forward IPv6 traffic
• Configure IPv4 and IPv6 protocol stacks. (This step is mandatory only if you want a router
interface to send and receive both IPv4 and IPv6 traffic.)
All other configuration tasks in this chapter are optional.
Enabling IPv6 routing
By default, IPv6 routing is disabled. To enable the forwarding of IPv6 traffic globally on the Layer 3
switch, enter the following command.
Brocade(config)#ipv6 unicast-routing
Syntax: [no] ipv6 unicast-routing
To disable the forwarding of IPv6 traffic globally on the Brocade device, enter the no form of this
command.
IPv6 configuration on each router interface
To forward IPv6 traffic on a router interface, the interface must have an IPv6 address, or IPv6 must
be explicitly enabled. By default, an IPv6 address is not configured on a router interface.
If you choose to configure a global or site-local IPv6 address for an interface, IPv6 is also enabled
on the interface. Further, when you configure a global or site-local IPv6 address, you must decide
on one of the following in the low-order 64 bits:
• A manually configured interface ID.
• An automatically computed EUI-64 interface ID.
If you prefer to assign a link-local IPv6 address to the interface, you must explicitly enable IPv6 on
the interface, which causes a link-local address to be automatically computed for the interface. If
preferred, you can override the automatically configured link-local address with an address that you
manually configure.
This section provides the following information:
108
Brocade ICX 6650 Administration Guide
53-1002600-01
Configuring basic IPv6 connectivity on a Layer 3 switch
5
• Configuring a global or site-local address with a manually configured or automatically
computed interface ID for an interface.
• Automatically or manually configuring a link-local address for an interface.
• Configuring IPv6 anycast addresses
Configuring a global or site-local IPv6 address on an interface
Configuring a global or site-local IPv6 address on an interface does the following:
• Automatically configures an interface ID (a link-local address), if specified.
• Enables IPv6 on that interface.
Additionally, the configured interface automatically joins the following required multicast groups for
that link:
• Solicited-node multicast group 2001:DB8:0:0:0:1:FF00::/104 for each unicast address
assigned to the interface.
•
•
•
•
Solicited-node for subnet anycast address for each unicast assigned address
Solicited-node for anycast address 2001:DB8:0:0:0:1:FF00::0000
All-nodes link-local multicast group 2001:DB8::1
All-routers link-local multicast group 2001:DB8::2
The neighbor discovery feature sends messages to these multicast groups. For more information,
refer to “IPv6 neighbor discovery configuration” on page 129.
Configuring a global or site-local IPv6 address with a manually configured interface ID
To configure a global or site-local IPv6 address, including a manually configured interface ID, for an
interface, enter commands such as the following.
Brocade(config)#interface ethernet 1/2/1
Brocade(config-if-e1000-3/1)#ipv6 address 2001:DB8:12D:1300:240:D0FF:
FE48:4672:/64
These commands configure the global prefix 2001:DB8:12d:1300::/64 and the interface ID
::240:D0FF:FE48:4672, and enable IPv6 on Ethernet interface 1/2/1.
Syntax: ipv6 address <ipv6-prefix>/<prefix-length>
You must specify the <ipv6-prefix> parameter in hexadecimal using 16-bit values between colons
as documented in RFC 2373.
You must specify the <prefix-length> parameter as a decimal value. A slash mark (/) must follow
the <ipv6-prefix> parameter and precede the <prefix-length> parameter.
To configure a /122 address on a VE enter commands similar to the following.
Brocade(config-vlan-11)#interface ve11
Brocade(config-vif-11)#ipv6 add 2001:DB8::1/122
Brocade(config-vif-11)#show ipv6 interface
Routing Protocols : R - RIP O - OSPF
Interface
Status
Routing Global Unicast Address
VE 11
up/up
2001:DB8:1/122
Brocade(config-vif-11)#sh ipv6 route
IPv6 Routing Table - 1 entries:
Type Codes: C - Connected, S - Static, R - RIP, O - OSPF, B - BGP
OSPF Sub Type Codes: O - Intra, Oi - Inter, O1 - Type1 external, O2 - Type2
external
Brocade ICX 6650 Administration Guide
53-1002600-01
109
5
Configuring basic IPv6 connectivity on a Layer 3 switch
Type IPv6 Prefix
C 2001:DB8/122
Next Hop Router
::
Interface
ve 11
Dis/Metric
0/0
Configuring a global IPv6 address with an automatically computed EUI-64 interface ID
To configure a global IPv6 address with an automatically computed EUI-64 interface ID in the
low-order 64-bits, enter commands such as the following.
Brocade(config)#interface ethernet 1/1/1
Brocade(config-if-e10000-1/1/1)#ipv6 address 2001:DB8:12D:1300::/64 eui-64
These commands configure the global prefix 2001:DB8:12d:1300::/64 and an interface ID, and
enable IPv6 on ethernet interface 1/1/1.
Syntax: ipv6 address <ipv6-prefix>/<prefix-length> eui-64
You must specify the <ipv6-prefix> parameter in hexadecimal using 16-bit values between colons
as documented in RFC 2373.
You must specify the <prefix-length> parameter as a decimal value. A slash mark (/) must follow
the <ipv6-prefix> parameter and precede the <prefix-length> parameter.
The eui-64 keyword configures the global address with an EUI-64 interface ID in the low-order 64
bits. The interface ID is automatically constructed in IEEE EUI-64 format using the interface’s MAC
address.
Configuring a link-local IPv6 address on an interface
To explicitly enable IPv6 on a router interface without configuring a global or site-local address for
the interface, enter commands such as the following.
Brocade(config)#interface ethernet 1/1/1
Brocade(config-if-e10000-1/1/1)#ipv6 enable
These commands enable IPv6 on Ethernet interface 1/1/1 and specify that the interface is
assigned an automatically computed link-local address.
Syntax: [no] ipv6 enable
NOTE
When configuring VLANs that share a common tagged interface with a physical or Virtual Ethernet
(VE) interface, Brocade recommends that you override the automatically computed link-local
address with a manually configured unique address for the interface. If the interface uses the
automatically computed address, which in the case of physical and VE interfaces is derived from a
global MAC address, all physical and VE interfaces will have the same MAC address.
To override a link-local address that is automatically computed for an interface with a manually
configured address, enter commands such as the following.
Brocade(config)#interface ethernet 1/1/1
Brocade(config-if-e10000-1/1/1)#ipv6 address 2001:DB8::240:D0FF:FE48:4672
link-local
These commands explicitly configure the link-local address 2001:DB8::240:D0FF:FE48:4672 for
ethernet interface 1/1/1.
Syntax: ipv6 address <ipv6-address> link-local
110
Brocade ICX 6650 Administration Guide
53-1002600-01
Configuring basic IPv6 connectivity on a Layer 3 switch
5
You must specify the <ipv6-address> parameter in hexadecimal using 16-bit values between
colons as documented in RFC 2373.
The link-local keyword indicates that the router interface should use the manually configured
link-local address instead of the automatically computed link-local address.
Configuring an IPv6 anycast address on an interface
In IPv6, an anycast address is an address for a set of interfaces belonging to different nodes.
Sending a packet to an anycast address results in the delivery of the packet to the closest interface
configured with the anycast address.
An anycast address looks similar to a unicast address, because it is allocated from the unicast
address space. If you assign an IPv6 unicast address to multiple interfaces, it is an anycast
address. On the Brocade device, you configure an interface assigned an anycast address to
recognize the address as an anycast address.
For example, the following commands configure an anycast address on interface 1/1/1.
Brocade(config)#interface ethernet 1/1/1
Brocade(config-if-e10000-1/1/1)#ipv6 address 2001:DB8::/64 anycast
Syntax: ipv6 address <ipv6-prefix>/<prefix-length> [anycast]
IPv6 anycast addresses are described in detail in RFC 1884. See RFC 2461 for a description of
how the IPv6 Neighbor Discovery mechanism handles anycast addresses.
Configuring IPv4 and IPv6 protocol stacks
One situation in which you must configure a router to run both IPv4 and IPv6 protocol stacks is if it
is deployed as an endpoint for an IPv6 over IPv4 tunnel.
Each router interface that will send and receive both IPv4 and IPv6 traffic must be configured with
an IPv4 address and an IPv6 address. (An alternative to configuring a router interface with an IPv6
address is to explicitly enable IPv6 using the ipv6 enable command. For more information about
using this command, refer to “Configuring a link-local IPv6 address on an interface” on page 110.)
To configure a router interface to support both the IPv4 and IPv6 protocol stacks, use commands
such as the following.
Brocade(config)#ipv6 unicast-routing
Brocade(config)#interface ethernet 1/1/1
Brocade(config-if-e10000-1/1/1)#ip address 192.168.1.1 255.255.255.0
Brocade(config-if-e10000-1/1/1)#ipv6 address 2001:DB8:12d:1300::/64 eui-64
These commands globally enable IPv6 routing and configure an IPv4 address and an IPv6 address
for Ethernet interface 1/1/1.
Syntax: [no] ipv6 unicast-routing
To disable IPv6 traffic globally on the router, enter the no form of this command.
Syntax: ip address <ip-address> <sub-net-mask> [secondary]
You must specify the <ip-address> parameter using 8-bit values in dotted decimal notation.
You can specify the <sub-net-mask> parameter in either dotted decimal notation or as a decimal
value preceded by a slash mark (/).
Brocade ICX 6650 Administration Guide
53-1002600-01
111
5
IPv6 management on Brocade ICX 6650 devices (IPv6 host support)
The secondary keyword specifies that the configured address is a secondary IPv4 address.
To remove the IPv4 address from the interface, enter the no form of this command.
Syntax: ipv6 address <ipv6-prefix>/<prefix-length> [eui-64]
This syntax specifies a global or site-local IPv6 address. For information about configuring a
link-local IPv6 address, refer to “Configuring a link-local IPv6 address on an interface” on
page 110.
You must specify the <ipv6-prefix> parameter in hexadecimal using 16-bit values between colons
as documented in RFC 2373.
You must specify the <prefix-length> parameter as a decimal value. A slash mark (/) must follow
the <ipv6-prefix> parameter and precede the <prefix-length> parameter.
The eui-64 keyword configures the global address with an EUI-64 interface ID in the low-order 64
bits. The interface ID is automatically constructed in IEEE EUI-64 format using the interface’s MAC
address. If you do not specify the eui-64 keyword, you must manually configure the 64-bit interface
ID as well as the 64-bit network prefix. For more information about manually configuring an
interface ID, refer to “Configuring a global or site-local IPv6 address on an interface” on page 109.
IPv6 management on Brocade ICX 6650 devices
(IPv6 host support)
You can configure a Brocade ICX 6650 switch to serve as an IPv6 host in an IPv6 network. An IPv6
host has IPv6 addresses on its interfaces, but does not have full IPv6 routing enabled on it.
This section describes the IPv6 host features supported on Brocade ICX 6650 devices.
Configuring IPv6 management ACLs
When you enter the ipv6 access-list command, the Brocade device enters the IPv6 Access List
configuration level, where you can access several commands for configuring IPv6 ACL entries. After
configuring the ACL entries, you can apply them to network management access features such as
Telnet, SSH, Web, and SNMP.
NOTE
Unlike IPv4, there is no distinction between standard and extended ACLs in IPv6.
Example
FastIron(config)#ipv6 access-list netw
FastIron(config-ipv6-access-list-netw)#
Syntax: [no] ipv6 access-list <ACL name>
The <ACL name> variable specifies a name for the IPv6 ACL. An IPv6 ACL name cannot start with a
numeral, for example, 1access. Also, an IPv4 ACL and an IPv6 ACL cannot share the same name.
112
Brocade ICX 6650 Administration Guide
53-1002600-01
IPv6 management on Brocade ICX 6650 devices (IPv6 host support)
5
Restricting SNMP access to an IPv6 node
You can restrict SNMP access to the device to the IPv6 host whose IP address you specify. To do
so, enter a command such as the following.
Brocade(config)#snmp-client ipv6 2001:DB8:89::23
Syntax: snmp-client ipv6 <ipv6-address>
The <ipv6-address> you specify must be in hexadecimal format using 16-bit values between colons
as documented in RFC 2373.
Specifying an IPv6 SNMP trap receiver
You can specify an IPv6 host as a trap receiver to ensure that all SNMP traps sent by the device will
go to the same SNMP trap receiver or set of receivers, typically one or more host devices on the
network. To do so, enter a command such as the following.
Brocade(config)#snmp-server host ipv6 2001:DB8:89::13
Syntax: snmp-server host ipv6 <ipv6-address>
The <ipv6-address> you specify must be in hexadecimal format using 16-bit values between colons
as documented in RFC 2373.
Configuring SNMP V3 over IPv6
Brocade ICX 6650 devices support IPv6 for SNMP version 3. For more information about how to
configure SNMP, refer to Chapter 6, “SNMP Access”.
Configuring SNTP over IPv6
To enable the Brocade device to send SNTP packets over IPv6, enter a command such as the
following at the Global CONFIG level of the CLI.
Brocade(config)#sntp server ipv6 2001:DB8::400
Syntax: sntp server ipv6 <ipv6-address>
The <ipv6-address> is the IPv6 address of the SNTP server. When you enter the IPv6 address, you
do not need to specify the prefix length. A prefix length of 128 is implied.
Secure Shell, SCP, and IPv6
Secure Shell (SSH) is a mechanism that allows secure remote access to management functions on
the Brocade device. SSH provides a function similar to Telnet. You can log in to and configure the
Brocade device using a publicly or commercially available SSH client program, just as you can with
Telnet. However, unlike Telnet, which provides no security, SSH provides a secure, encrypted
connection to the Brocade device.
Brocade ICX 6650 Administration Guide
53-1002600-01
113
5
IPv6 management on Brocade ICX 6650 devices (IPv6 host support)
To open an SSH session between an IPv6 host running an SSH client program and the Brocade
device, open the SSH client program and specify the IPv6 address of the device. For more
information about configuring SSH on the Brocade device, refer to the Brocade ICX 6650 Switch
Security Configuration Guide.
IPv6 Telnet
Telnet sessions can be established between a Brocade device to a remote IPv6 host, and from a
remote IPv6 host to the Brocade device using IPv6 addresses.
The telnet command establishes a Telnet connection from a Brocade device to a remote IPv6 host
using the console. Up to five read-access Telnet sessions are supported on the router at one time.
Write-access through Telnet is limited to one session, and only one outgoing Telnet session is
supported on the router at one time. To see the number of open Telnet sessions at any time, enter
the show telnet command.
Example
To establish a Telnet connection to a remote host with the IPv6 address of 2001:DB8::1, enter the
following command.
Brocade#telnet ipv6 2001:DB8::1
Syntax: telnet <ipv6-address> [<port-number> | outgoing-interface ethernet
<stack-unit>/<slot>/<port> | ve <number>]
The <ipv6-address> parameter specifies the address of a remote host. You must specify this
address in hexadecimal using 16-bit values between colons as documented in RFC 2373.
The <port-number> parameter specifies the port number on which the Brocade device establishes
the Telnet connection. You can specify a value between 1 - 65535. If you do not specify a port
number, the Brocade device establishes the Telnet connection on port 23.
If the IPv6 address you specify is a link-local address, you must specify the outgoing-interface
ethernet <stack-unit>/<slot>/<port>| ve <number> parameter. This parameter identifies the
interface that must be used to reach the remote host. Specify the ethernet port in the
<stack-unit>/<slot>/<port> format. Stack-unit is 1. If you specify a VE interface, also specify the VE
number.
Establishing a Telnet session from an IPv6 host
To establish a Telnet session from an IPv6 host to the Brocade device, open your Telnet application
and specify the IPv6 address of the Layer 3 Switch.
IPv6 traceroute
NOTE
This section describes the IPv6 traceroute command. For details about IPv4 traceroute, refer to
“Tracing an IPv4 route” on page 71.
The traceroute command allows you to trace a path from the Brocade device to an IPv6 host.
114
Brocade ICX 6650 Administration Guide
53-1002600-01
IPv6 management on Brocade ICX 6650 devices (IPv6 host support)
5
The CLI displays trace route information for each hop as soon as the information is received.
Traceroute requests display all responses to a minimum TTL of 1 second and a maximum TTL of 30
seconds. In addition, if there are multiple equal-cost routes to the destination, the Brocade device
displays up to three responses.
For example, to trace the path from the Brocade device to a host with an IPv6 address of
2001:DB8:349e:a384::34, enter the following command:
Brocade#traceroute ipv6 2001:DB8:349e:a384::34
Syntax: traceroute ipv6 <ipv6-address>
The <ipv6-address> parameter specifies the address of a host. You must specify this address in
hexadecimal using 16-bit values between colons as documented in RFC 2373.
Configuring name-to-IPv6 address resolution using
IPv6 DNS resolver
The Domain Name Server (DNS) resolver feature lets you use a host name to perform Telnet and
ping commands. You can also define a DNS domain on a Brocade device and thereby recognize all
hosts within that domain. After you define a domain name, the Brocade device automatically
appends the appropriate domain to the host and forwards it to the domain name server.
For example, if the domain “example.com” is defined on a Brocade device, and you want to initiate
a ping to host “EXA01” on that domain, you need to reference only the host name in the command
instead of the host name and its domain name. For example, you could enter either of the following
commands to initiate the ping.
Brocade#ping ipv6 exa01
Brocade#ping ipv6 exa01.example.com
Defining an IPv6 DNS entry
IPv6 defines new DNS record types to resolve queries for domain names to IPv6 addresses, as well
as IPv6 addresses to domain names. Brocade devices running IPv6 software support AAAA DNS
records, which are defined in RFC 1886.
AAAA DNS records are analogous to the A DNS records used with IPv4. They store a complete IPv6
address in each record. AAAA records have a type value of 28.
To establish an IPv6 DNS entry for the device, enter the following command.
Brocade(config)#ipv6 dns domain-name companyA.com
Syntax: [no] ipv6 dns domain-name <domain name>
To define an IPv6 DNS server address, enter the following command.
Brocade(config)#ipv6 dns server-address 2001:DB8::1
Syntax: [no] ipv6 dns server-address <ipv6-addr> [<ipv6-addr>] [<ipv6-addr>] [<ipv6-addr>]
Brocade ICX 6650 Administration Guide
53-1002600-01
115
5
IPv6 management on Brocade ICX 6650 devices (IPv6 host support)
As an example, in a configuration where ftp6.companyA.com is a server with an IPv6 protocol
stack, when a user pings ftp6.companyA.com, the Brocade device attempts to resolve the AAAA
DNS record. In addition, if the DNS server does not have an IPv6 address, as long as it is able to
resolve AAAA records, it can still respond to DNS queries.
Pinging an IPv6 address
NOTE
This section describes the IPv6 ping command. For details about IPv4 ping, refer to “Pinging an IPv4
address” on page 69.
The ping command allows you to verify the connectivity from a Brocade device to an IPv6 device by
performing an ICMP for IPv6 echo test.
For example, to ping a device with the IPv6 address of 2001:DB8:847f:a385:34dd::45 from the
Brocade device, enter the following command.
Brocade#ping ipv6 2001:DB8:847f:a385:34dd::45
Syntax: ping ipv6 <ipv6-address> [outgoing-interface [<port> | ve <number>]] [source
<ipv6-address>] [count <number>] [timeout <milliseconds>] [ttl <number>] [size
<bytes>] [quiet] [numeric] [no-fragment] [verify]
[data <1-to-4 byte hex>] [brief]
• The <ipv6-address> parameter specifies the address of the router. You must specify this
address in hexadecimal using 16-bit values between colons as documented in RFC 2373.
• The outgoing-interface keyword specifies a physical interface over which you can verify
connectivity. If you specify a physical interface, such as an Ethernet interface, you must also
specify the port number of the interface. If you specify a virtual interface, such as a VE, you
must specify the number associated with the VE.
• The source <ipv6-address> parameter specifies an IPv6 address to be used as the origin of
the ping packets.
• The count <number> parameter specifies how many ping packets the router sends. You can
specify from 1 - 4294967296. The default is 1.
• The timeout <milliseconds> parameter specifies how many milliseconds the router waits for a
reply from the pinged device. You can specify a timeout from 1 - 4294967296 milliseconds.
The default is 5000 (5 seconds).
• The ttl <number> parameter specifies the maximum number of hops. You can specify a TTL
from 1 - 255. The default is 64.
• The size <bytes> parameter specifies the size of the ICMP data portion of the packet. This is
the payload and does not include the header. You can specify from 0 - 4000. The default is 16.
• The no-fragment keyword turns on the "do not fragment" bit in the IPv6 header of the ping
packet. This option is disabled by default.
• The quiet keyword hides informational messages such as a summary of the ping parameters
sent to the device, and instead only displays messages indicating the success or failure of the
ping. This option is disabled by default.
• The verify keyword verifies that the data in the echo packet (the reply packet) is the same as
the data in the echo request (the ping). By default the device does not verify the data.
116
Brocade ICX 6650 Administration Guide
53-1002600-01
IPv6 management on Brocade ICX 6650 devices (IPv6 host support)
5
• The data <1 - 4 byte hex> parameter lets you specify a specific data pattern for the payload
instead of the default data pattern, "abcd", in the packet's data payload. The pattern repeats
itself throughout the ICMP message (payload) portion of the packet.
NOTE
For parameters that require a numeric value, the CLI does not check that the value you enter is
within the allowed range. Instead, if you do exceed the range for a numeric value, the software
rounds the value to the nearest valid value.
• The brief keyword causes ping test characters to be displayed. The following ping test
characters are supported.
! Indicates that a reply was received.
. Indicates that the network server timed out while waiting for a reply.
U Indicates that a destination unreachable error PDU was received.
I Indicates that the user interrupted ping.
Configuring an IPv6 Syslog server
To enable IPv6 logging, specify an IPv6 Syslog server. Enter a command such as the following.
Brocade(config)#log host ipv6 2001:DB8:e0bb::4/128
Syntax: log host ipv6 <ipv6-address> [<udp-port-num>]
The <ipv6-address> must be in hexadecimal using 16-bit values between colons as documented in
RFC 2373.
The <udp-port-num> optional parameter specifies the UDP application port used for the Syslog
facility.
Viewing IPv6 SNMP server addresses
Some of the show commands display IPv6 addresses for IPv6 SNMP servers. The following shows
an example output for the show snmp server command.
Brocade#show snmp server
Contact:
Location:
Community(ro): .....
Traps
Warm/Cold start:
Link up:
Link down:
Authentication:
Locked address violation:
Power supply failure:
Fan failure:
Temperature warning:
STP new root:
STP topology change:
Brocade ICX 6650 Administration Guide
53-1002600-01
Enable
Enable
Enable
Enable
Enable
Enable
Enable
Enable
Enable
Enable
117
5
Static IPv6 route configuration
vsrp: Enable
Total Trap-Receiver Entries: 4
Trap-Receiver IP-Address
Port-Number Community
1
192.147.201.100
162
.....
2
2001:DB8::200
162
.....
3
192.147.202.100
162
.....
4
2001:DB8::200
162
.....
Disabling router advertisement and solicitation messages
Router advertisement and solicitation messages enable a node on a link to discover the routers on
the same link. By default, router advertisement and solicitation messages are permitted on the
device. To disable these messages, configure an IPv6 access control list that denies them. The
following shows an example configuration.
Example
Brocade(config)#ipv6 access-list rtradvert
Brocade(config)#deny icmp any any router-advertisement
Brocade(config)#deny icmp any any router-solicitation
Brocade(config)#permit ipv6 any any
Disabling IPv6 on a Layer 2 switch
IPv6 is enabled by default in the Layer 2 switch code. If desired, you can disable IPv6 on a global
basis on a device running the switch code. To do so, enter the following command at the Global
CONFIG level of the CLI.
Brocade(config)#no ipv6 enable
Syntax: no ipv6 enable
To re-enable IPv6 after it has been disabled, enter ipv6 enable.
NOTE
IPv6 is disabled by default in the router code and must be configured on each interface that will
support IPv6.
Static IPv6 route configuration
NOTE
Static IPv6 route configuration is supported only with the IPv6 Layer 3 PROM and the full Layer 3
image.
You can configure a static IPv6 route to be redistributed into a routing protocol, but you cannot
redistribute routes learned by a routing protocol into the static IPv6 routing table.
118
Brocade ICX 6650 Administration Guide
53-1002600-01
Static IPv6 route configuration
5
Before configuring a static IPv6 route, you must enable the forwarding of IPv6 traffic on the Layer 3
switch using the ipv6 unicast-routing command and enable IPv6 on at least one interface by
configuring an IPv6 address or explicitly enabling IPv6 on that interface. For more information on
performing these configuration tasks, refer to “Configuring IPv4 and IPv6 protocol stacks” on
page 111.
Configuring a static IPv6 route
To configure a static IPv6 route for a destination network with the prefix 2001:DB8::0/32, a
next-hop gateway with the global address 2001:DB8:0:ee44::1, and an administrative distance of
110, enter the following command.
Brocade(config)#ipv6 route 2001:DB8::0/32 2001:DB8:0:ee44::1 distance 110
Syntax: ipv6 route <dest-ipv6-prefix>/<prefix-length> <next-hop-ipv6-address> [<metric>]
[distance <number>]
To configure a static IPv6 route for a destination network with the prefix 2001:DB8::0/32 and a
next-hop gateway with the link-local address 2001:DB8:1 that the Layer 3 switch can access
through Ethernet interface 1/2/1, enter the following command.
Brocade(config)#ipv6 route 2001:DB8::0/32 ethernet 1/2/1 2001:DB8:1
Syntax: ipv6 route <dest-ipv6-prefix>/<prefix-length> [ ethernet <stack-unit>/<slot>/<port> | ve
<num> ] <next-hop-ipv6-address> [<metric>] [distance <number>]
Specify Ethernet port in the <stack-unit>/<slot>/<port> format. Stack-unit is 1.
To configure a static IPv6 route for a destination network with the prefix 2001:DB8::0/32 and a
next-hop gateway that the Layer 3 switch can access through tunnel 1, enter the following
command.
Brocade(config)#ipv6 route 2001:DB8::0/32 tunnel 1
Syntax: ipv6 route <dest-ipv6-prefix>/<prefix-length> <interface> <port> [<metric>] [distance
<number>]
Table 24 describes the parameters associated with this command and indicates the status of each
parameter.
Brocade ICX 6650 Administration Guide
53-1002600-01
119
5
Static IPv6 route configuration
TABLE 24
Static IPv6 route parameters
Parameter
Configuration details
Status
The IPv6 prefix and prefix length
of the route’s destination
network.
You must specify the
<dest-ipv6-prefix> parameter in
hexadecimal using 16-bit values
between colons as documented in
RFC 2373.
You must specify the <prefix-length>
parameter as a decimal value. A
slash mark (/) must follow the
<ipv6-prefix> parameter and precede
the <prefix-length> parameter.
Mandatory for all static IPv6 routes.
The route’s next-hop gateway,
You can specify the next-hop gateway
which can be one of the following: as one of the following types of IPv6
addresses:
• The IPv6 address of a
next-hop gateway.
• A global address.
• A tunnel interface.
• A link-local address.
If you specify a global address, you do
not need to specify any additional
parameters for the next-hop gateway.
If you specify a link-local address, you
must also specify the interface
through which to access the address.
You can specify one of the following
interfaces:
• An Ethernet interface.
• A tunnel interface.
• A virtual interface (VE).
If you specify an Ethernet interface,
also specify the port number
associated with the interface. If you
specify a VE or tunnel interface, also
specify the VE or tunnel number.
You can also specify the next-hop
gateway as a tunnel interface. If you
specify a tunnel interface, also
specify the tunnel number.
Mandatory for all static IPv6 routes.
The route’s metric.
You can specify a value from 1 – 16.
Optional for all static IPv6 routes. (The
default metric is 1.)
The route’s administrative
distance.
You must specify the distance
keyword and any numerical value.
Optional for all static IPv6 routes. (The
default administrative distance is 1.)
A metric is a value that the Layer 3 switch uses when comparing this route to other static routes in
the IPv6 static route table that have the same destination. The metric applies only to routes that
the Layer 3 switch has already placed in the IPv6 static route table.
The administrative distance is a value that the Layer 3 switch uses to compare this route with
routes from other route sources that have the same destination. (The Layer 3 switch performs this
comparison before placing a route in the IPv6 route table.) This parameter does not apply to routes
that are already in the IPv6 route table. In general, a low administrative distance indicates a
preferred route. By default, static routes take precedence over routes learned by routing protocols.
If you want a dynamic route to be chosen over a static route, you can configure the static route with
a higher administrative distance than the dynamic route.
120
Brocade ICX 6650 Administration Guide
53-1002600-01
IPv6 over IPv4 tunnels
5
IPv6 over IPv4 tunnels
NOTE
This feature is supported only with the IPv6 Layer 3 PROM and the full Layer 3 image.
To enable communication between isolated IPv6 domains using the IPv4 infrastructure, you can
manually configure IPv6 over IPv4 tunnels that provide static point-point connectivity.
As shown in Figure 10, these tunnels encapsulate an IPv6 packet within an IPv4 packet.
FIGURE 10
IPv6 over an IPv4 tunnel
IPv6 Traffic Over IPv4 Tunnel
IPv6 Host
IPv6 Header
IPv6
Network
IPv4
Network
IPv6
Network
Dual-Stack L3 Switch
IPv6 Data
IPv4 Header
Dual-Stack L3 Switch
IPv6 Header
IPv6 Data
IPv6 Header
IPv6 Host
IPv6 Data
In general, a manually configured tunnel establishes a permanent link between switches in IPv6
domains. A manually configured tunnel has explicitly configured IPv4 addresses for the tunnel
source and destination.
This tunneling mechanism requires that the Layer 3 switch at each end of the tunnel run both IPv4
and IPv6 protocol stacks. The Layer 3 switches running both protocol stacks, or dual-stack routers,
can interoperate directly with both IPv4 and IPv6 end systems and routers. Refer to “Configuring
IPv4 and IPv6 protocol stacks” on page 111.
IPv6 over IPv4 tunnel configuration notes
• The local tunnel configuration must include both source and destination addresses.
• The remote side of the tunnel must have the opposite source/destination pair.
• A tunnel interface supports static and dynamic IPv6 configuration settings and routing
protocols.
• Duplicate Address Detection (DAD) is not currently supported with IPv6 tunnels. Make sure
tunnel endpoints do not have duplicate IP addresses.
• Neighbor Discovery (ND) is not supported with IPv6 tunnels.
• If a tunnel source port is a multi-homed IPv4 source, the tunnel will use the first IPv4 address
only. For proper tunnel operation, use the ip address option.
Configuring a manual IPv6 tunnel
You can use a manually configured tunnel to connect two isolated IPv6 domains. You should deploy
this point-to-point tunnelling mechanism if you need a permanent and stable connection.
To configure a manual IPv6 tunnel, enter commands such as the following on a Layer 3 Switch
running both IPv4 and IPv6 protocol stacks on each end of the tunnel.
Brocade ICX 6650 Administration Guide
53-1002600-01
121
5
IPv6 over IPv4 tunnels
Brocade(config)#interface tunnel 1
Brocade(config-tnif-1)#tunnel source ethernet 1/1/1
Brocade(config-tnif-1)#tunnel destination 192.162.100.1
Brocade(config-tnif-1)#tunnel mode ipv6ip
Brocade(config-tnif-1)#ipv6 enable
This example creates tunnel interface 1 and assigns a link local IPv6 address with an automatically
computed EUI-64 interface ID to it. The IPv4 address assigned to Ethernet interface 1/1/1 is used
as the tunnel source, while the IPv4 address 192.168.100.1 is configured as the tunnel
destination. The tunnel mode is specified as a manual IPv6 tunnel. Finally, the tunnel is enabled.
Note that instead of entering ipv6 enable, you could specify an IPv6 address, for example, ipv6
address 2001:DB8:384d:34::/64 eui-64, which would also enable the tunnel.
Syntax: [no] interface tunnel <number>
For the <number> parameter, specify a value between 1 – 8.
Syntax: [no] tunnel source <ipv4-address> | ethernet <stack-unit>/<slot>/<port> | loopback
<number> | ve <number>
The tunnel source can be an IP address or an interface.
For <ipv4-address>, use 8-bit values in dotted decimal notation.
The ethernet | loopback | ve parameter specifies an interface as the tunnel source.Specify the
ethernet port in the <stack-unit>/<slot>/<port> format. Stack-unit is 1.
If you specify a loopback, VE, or interface, also specify the loopback, VE, or number, respectively.
Syntax: [no] tunnel destination <ipv4-address>
Specify the <ipv4-address> parameter using 8-bit values in dotted decimal notation.
Syntax: [no] tunnel mode ipv6ip
ipv6ip indicates that this is an IPv6 manual tunnel.
Syntax: ipv6 enable
The ipv6 enable command enables the tunnel. Alternatively, you could specify an IPv6 address,
which would also enable the tunnel.
Syntax: ipv6 address <ipv6-prefix>/<prefix-length> [eui-64]
The ipv6 address command enables the tunnel. Alternatively, you could enter ipv6 enable, which
would also enable the tunnel.
Specify the <ipv6-prefix> parameter in hexadecimal format using 16-bit values between colons as
documented in RFC 2373.
Specify the <prefix-length> parameter as a decimal value. A slash mark (/) must follow the
<ipv6-prefix> parameter and precede the <prefix-length> parameter. The eui-64 keyword
configures the global address with an EUI-64 interface ID in the low-order 64 bits. The interface ID
is automatically constructed in IEEE EUI-64 format using the interface’s MAC address.
Clearing IPv6 tunnel statistics
You can clear statistics (reset all fields to zero) for all IPv6 tunnels or for a specific tunnel interface.
122
Brocade ICX 6650 Administration Guide
53-1002600-01
IPv6 over IPv4 tunnels
5
For example, to clear statistics for tunnel 1, enter the following command at the Privileged EXEC
level or any of the Config levels of the CLI.
Brocade#clear ipv6 tunnel 1
To clear statistics for all IPv6 tunnels, enter the following command.
Brocade#clear ipv6 tunnel
Syntax: clear ipv6 tunnel [<number>]
The <number> parameter specifies the tunnel number.
Displaying IPv6 tunnel information
Use the commands in this section to display the configuration, status, and counters associated
with IPv6 tunnels.
Displaying a summary of tunnel information
To display a summary of tunnel information, enter the following command at any level of the CLI.
Brocade#show ipv6 tunnel
IP6 Tunnels
Tunnel Mode
Packet Received
1
configured
0
2
configured
0
Packet Sent
0
22419
Syntax: show ipv6 tunnel
This display shows the following information.
TABLE 25
IPv6 tunnel summary information
Field
Description
Tunnel
The tunnel interface number.
Mode
The tunnel mode. Possible modes include the following:
configured – Indicates a manually configured tunnel.
•
Packet Received
The number of packets received by a tunnel interface. Note that this is
the number of packets received by the CPU. It does not include the
number of packets processed in hardware.
Packet Sent
The number of packets sent by a tunnel interface. Note that this is the
number of packets sent by the CPU. It does not include the number of
packets processed in hardware.
Displaying tunnel interface information
To display status and configuration information for tunnel interface 1, enter the following command
at any level of the CLI.
Brocade ICX 6650 Administration Guide
53-1002600-01
123
5
IPv6 over IPv4 tunnels
Brocade#show interfaces tunnel 1
Tunnel1 is up, line protocol is up
Hardware is Tunnel
Tunnel source ve 30
Tunnel destination is 2.2.2.10
Tunnel mode ipv6ip
No port name
MTU 1480 bytes, encapsulation IPV4
Syntax: show interfaces tunnel <number>
The <number> parameter indicates the tunnel interface number for which you want to display
information.
This display shows the following information.
TABLE 26
IPv6 tunnel interface information
Field
Tunnel interface status
Line protocol status
Hardware is tunnel
Tunnel source
Description
The status of the tunnel interface can be one of the following:
up – The tunnel mode is set and the tunnel interface is enabled.
down – The tunnel mode is not set.
administratively down – The tunnel interface was disabled with the
disable command.
•
•
•
The status of the line protocol can be one of the following:
up – IPv4 connectivity is established.
down – The line protocol is not functioning and is down.
•
•
The interface is a tunnel interface.
The tunnel source can be one of the following:
An IPv4 address
The IPv4 address associated with an interface/port.
•
•
Tunnel destination
The tunnel destination can be an IPv4 address.
Tunnel mode
The tunnel mode can be the following:
• ipv6ip – indicates a manually configured tunnel
Port name
The port name configured for the tunnel interface.
MTU
The setting of the IPv6 maximum transmission unit (MTU).
Displaying interface level IPv6 settings
To display Interface level IPv6 settings for tunnel interface 1, enter the following command at any
level of the CLI.
124
Brocade ICX 6650 Administration Guide
53-1002600-01
IPv6 over IPv4 tunnels
5
Brocade#show ipv6 interface tunnel 1
Interface Tunnel 1 is up, line protocol is up
IPv6 is enabled, link-local address is 2001:DB8::3:4:2 [Preferred]
Global unicast address(es):
2001:DB8::1 [Preferred], subnet is 2001:DB8::/64
2001:DB8::1[Preferred], subnet is 2001:DB8::/64
Joined group address(es):
2001:DB8::1:ff04:2
2001:DB8::5
2001:DB8::1:ff00:1
2001:DB8::2
2001:DB8::1
MTU is 1480 bytes
ICMP redirects are enabled
No Inbound Access List Set
No Outbound Access List Set
OSPF enabled
The display command above reflects the following configuration.
Brocade#show running-config interface tunnel 1
!
interface tunnel 1
port-name ManualTunnel1
tunnel mode ipv6ip
tunnel source loopback 1
tunnel destination 2.1.1.1
ipv6 address 2001:DB8::1/64
ipv6 address 2001:DB8::1/64
ipv6 ospf area 0
This display shows the following information.
TABLE 27
Interface level IPv6 tunnel information
Field
Interface Tunnel status
Line protocol status
Brocade ICX 6650 Administration Guide
53-1002600-01
Description
The status of the tunnel interface can be one of the following:
up – IPv4 connectivity is established.
down – The tunnel mode is not set.
administratively down – The tunnel interface was disabled with the
disable command.
•
•
•
The status of the line protocol can be one of the following:
up – IPv6 is enabled through the ipv6 enable or ipv6 address
command.
• down – The line protocol is not functioning and is down.
•
125
5
ECMP load sharing for IPv6
ECMP load sharing for IPv6
The IPv6 route table selects the best route to a given destination from among the routes in the
tables maintained by the configured routing protocols (BGP4, OSPF, static, and so on). The IPv6
route table can contain more than one path to a given destination. When this occurs, the Brocade
device selects the path with the lowest cost for insertion into the routing table. If more than one
path with the lowest cost exists, all of these paths are inserted into the routing table, subject to the
configured maximum number of load sharing paths (by default 4). The device uses Equal-Cost
Multi-Path (ECMP) load sharing to select a path to a destination.
When a route is installed by routing protocols or configured static route for the first time, and the
IPv6 route table contains multiple, equal-cost paths to that route, the device checks the IPv6
neighbor for each next hop. Every next hop where the link layer address has been resolved will be
stored in hardware. The device will initiate neighbor discovery for the next hops whose link layer
addresses are not resolved. The hardware will hash the packet and choose one of the paths. The
number of paths would be updated in hardware as the link layer gets resolved for a next hop.
If the path selected by the device becomes unavailable, the IPv6 neighbor should change state and
trigger the update of the destination in the hardware.
Brocade devices support network-based ECMP load-sharing methods for IPv6 traffic. The Brocade
device distributes traffic across equal-cost paths based on a XOR of some bits from the MAC source
address, MAC destination address, IPv6 source address, IPv6 destination address, IPv6 flow label,
IPv6 next header. The software selects a path based on a calculation involving the maximum
number of load-sharing paths allowed and the actual number of paths to the destination network.
This is the default ECMP load-sharing method for IPv6.
You can manually disable or enable ECMP load sharing for IPv6 and specify the number of
equal-cost paths the device can distribute traffic across. In addition, you can display information
about the status of ECMP load-sharing on the device.
126
Brocade ICX 6650 Administration Guide
53-1002600-01
ECMP load sharing for IPv6
5
Disabling or re-enabling ECMP load sharing for IPv6
ECMP load sharing for IPv6 is enabled by default. To disable the feature, enter the following
command.
Brocade(config)#no ipv6 load-sharing
If you want to re-enable the feature after disabling it, you must specify the number of load-sharing
paths. The maximum number of paths the device supports is a value from 2 – 8. By entering a
command such as the following, IPv6 load-sharing will be re-enabled.
Brocade(config)#ipv6 load-sharing 4
Syntax: [no] ipv6 load-sharing<num>
The <num> parameter specifies the number of paths and can be from 2 – 8. The default is 4.
Changing the maximum load sharing paths for IPv6
By default, IPv6 ECMP load sharing allows traffic to be balanced across up to four equal paths. You
can change the maximum number of paths the device supports to a value from 2 – 8.
To change the number of ECMP load sharing paths for IPv6, enter a command such as the
following.
Brocade(config)#ipv6 load-sharing 6
Syntax: [no] ipv6 load-sharing [<num>]
The <num> parameter specifies the number of paths and can be from 2 – 8. The default is 4.
Enabling support for network-based ECMP
load sharing for IPv6
Network-based ECMP load sharing is supported. In this configuration, traffic is distributed across
equal-cost paths based on the destination network address. Routes to each network are stored in
CAM and accessed when a path to a network is required. Because multiple hosts are likely to
reside on a network, this method uses fewer CAM entries.
Displaying ECMP load-sharing information for IPv6
To display the status of ECMP load sharing for IPv6, enter the following command.
Brocade#show ipv6
Global Settings
unicast-routing enabled, hop-limit 64
No Inbound Access List Set
No Outbound Access List Set
Prefix-based IPv6 Load-sharing is Enabled, Number of load share paths: 4
Syntax: show ipv6
Brocade ICX 6650 Administration Guide
53-1002600-01
127
5
IPv6 ICMP feature configuration
IPv6 ICMP feature configuration
As with the Internet Control Message Protocol (ICMP) for IPv4, ICMP for IPv6 provides error and
informational messages. Implementation of the stateless auto configuration, neighbor discovery,
and path MTU discovery features use ICMP messages.
This section explains how to configure following IPv6 ICMP features:
• ICMP rate limiting
• ICMP redirects
Configuring ICMP rate limiting
You can limit the rate at which IPv6 ICMP error messages are sent out on a network. IPv6 ICMP
implements a token bucket algorithm.
To illustrate how this algorithm works, imagine a virtual bucket that contains a number of tokens.
Each token represents the ability to send one ICMP error message. Tokens are placed in the bucket
at a specified interval until the maximum number of tokens allowed in the bucket is reached. For
each error message that ICMP sends, a token is removed from the bucket. If ICMP generates a
series of error messages, messages can be sent until the bucket is empty. If the bucket is empty of
tokens, error messages cannot be sent until a new token is placed in the bucket.
You can adjust the following elements related to the token bucket algorithm:
• The interval at which tokens are added to the bucket. The default is 100 milliseconds.
• The maximum number of tokens in the bucket. The default is 10 tokens.
For example, to adjust the interval to 1000 milliseconds and the number of tokens to 100 tokens,
enter the following command.
Brocade(config)# ipv6 icmp error-interval 1000 100
Syntax: ipv6 icmp error-interval <interval> [<number-of-tokens>]
The interval in milliseconds at which tokens are placed in the bucket can range from 0 –
2147483647. The maximum number of tokens stored in the bucket can range from 1 – 200.
NOTE
If you retain the default interval value or explicitly set the value to 100 milliseconds, output from the
show run command does not include the setting of the ipv6 icmp error-interval command because
the setting is the default.
Also, if you configure the interval value to a number that does not evenly divide into 100000 (100
milliseconds), the system rounds up the value to a next higher value that does divide evenly into
100000. For example, if you specify an interval value of 150, the system rounds up the value to 200.
ICMP rate limiting is enabled by default. To disable ICMP rate limiting, set the interval to zero.
128
Brocade ICX 6650 Administration Guide
53-1002600-01
IPv6 neighbor discovery configuration
5
Enabling IPv6 ICMP redirect messages
NOTE
This feature is supported only with the IPv6 Layer 3 PROM and the full Layer 3 image.
You can enable a Layer 3 switch to send an IPv6 ICMP redirect message to a neighboring host to
inform it of a better first-hop router on a path to a destination. By default, the sending of IPv6 ICMP
redirect messages by a Layer 3 switch is disabled. (For more information about how ICMP redirect
messages are implemented for IPv6, refer to “IPv6 neighbor discovery configuration” on
page 129.)
NOTE
This feature is supported on Virtual Ethernet (VE) interfaces only.
For example, to enable the sending of IPv6 ICMP redirect messages on VE 2, enter the following
commands.
Brocade(config)#interface ve2
Brocade(config-vif-2)#ipv6 redirects
To disable the sending of IPv6 ICMP redirect messages after it has been enabled on VE 2, enter the
following commands.
Brocade(config)#interface ve2
Brocade(config-vif-2)#no ipv6 redirects
Syntax: [no] ipv6 redirects
Use the show ipv6 interface command to verify that the sending of IPv6 ICMP redirect messages is
enabled on a particular interface.
IPv6 neighbor discovery configuration
The neighbor discovery feature for IPv6 uses IPv6 ICMP messages to do the following tasks:
• Determine the link-layer address of a neighbor on the same link.
• Verify that a neighbor is reachable.
• Track neighbor routers.
An IPv6 host is required to listen for and recognize the following addresses that identify itself:
•
•
•
•
•
•
Link-local address.
Assigned unicast address.
Loopback address.
All-nodes multicast address.
Solicited-node multicast address.
Multicast address to all other groups to which it belongs.
You can adjust the following IPv6 neighbor discovery features:
• Neighbor solicitation messages for duplicate address detection.
• Router advertisement messages:
Brocade ICX 6650 Administration Guide
53-1002600-01
129
5
IPv6 neighbor discovery configuration
• Interval between router advertisement messages.
• Value that indicates a router is advertised as a default router (for use by all nodes on a
given link).
• Prefixes advertised in router advertisement messages.
• Flags for host stateful autoconfiguration.
• Amount of time during which an IPv6 node considers a remote node reachable (for use by all
nodes on a given link).
IPv6 neighbor discovery configuration notes
NOTE
For all solicitation and advertisement messages, Brocade uses seconds as the unit of measure
instead of milliseconds.
• If you add a port to a port-based VLAN, and the port has IPv6 neighbor discovery configuration,
the system will clean up the neighbor discovery configuration from the port and display the
following message on the console.
ND6 port config on the new member ports removed
• Neighbor discovery is not supported on tunnel interfaces.
Neighbor solicitation and advertisement messages
Neighbor solicitation and advertisement messages enable a node to determine the link-layer
address of another node (neighbor) on the same link. (This function is similar to the function
provided by the Address Resolution Protocol [ARP] in IPv4.) For example, node 1 on a link wants to
determine the link-layer address of node 2 on the same link. To do so, node 1, the source node,
multicasts a neighbor solicitation message. The neighbor solicitation message, which has a value
of 135 in the Type field of the ICMP packet header, contains the following information:
• Source address: IPv6 address of node 1 interface that sends the message.
• Destination address: solicited-node multicast address (2001:DB8:0:0:0:1:FF00::/104) that
corresponds the IPv6 address of node 2.
• Link-layer address of node 1.
• A query for the link-layer address of node 2.
After receiving the neighbor solicitation message from node 1, node 2 replies by sending a
neighbor advertisement message, which has a value of 136 in the Type field of the ICMP packet
header. The neighbor solicitation message contains the following information:
• Source address: IPv6 address of the node 2 interface that sends the message.
• Destination address: IPv6 address of node 1.
• Link-layer address of node 2.
After node 1 receives the neighbor advertisement message from node 2, nodes 1 and 2 can now
exchange packets on the link.
After the link-layer address of node 2 is determined, node 1 can send neighbor solicitation
messages to node 2 to verify that it is reachable. Also, nodes 1, 2, or any other node on the same
link can send a neighbor advertisement message to the all-nodes multicast address (2001:DB8:1)
if there is a change in their link-layer address.
130
Brocade ICX 6650 Administration Guide
53-1002600-01
IPv6 neighbor discovery configuration
5
Router advertisement and solicitation messages
Router advertisement and solicitation messages enable a node on a link to discover the routers on
the same link.
Each configured router interface on a link sends out a router advertisement message, which has a
value of 134 in the Type field of the ICMP packet header, periodically to the all-nodes link-local
multicast address (2001:DB8::1).
A configured router interface can also send a router advertisement message in response to a
router solicitation message from a node on the same link. This message is sent to the unicast IPv6
address of the node that sent the router solicitation message.
At system startup, a host on a link sends a router solicitation message to the all-routers multicast
address (FF01). Sending a router solicitation message, which has a value of 133 in the Type field of
the ICMP packet header, enables the host to automatically configure its IPv6 address immediately
instead of awaiting the next periodic router advertisement message.
Because a host at system startup typically does not have a unicast IPv6 address, the source
address in the router solicitation message is usually the unspecified IPv6 address
(0:0:0:0:0:0:0:0). If the host has a unicast IPv6 address, the source address is the unicast IPv6
address of the host interface sending the router solicitation message.
Entering the ipv6 unicast-routing command automatically enables the sending of router
advertisement messages on all configured router Ethernet interfaces. You can configure several
router advertisement message parameters. For information about disabling the sending of router
advertisement messages and the router advertisement parameters that you can configure, refer to
“Enabling and disabling IPv6 router advertisements” on page 135 and “Setting IPv6 router
advertisement parameters” on page 132.
Neighbor redirect messages
After forwarding a packet, by default, a router can send a neighbor redirect message to a host to
inform it of a better first-hop router. The host receiving the neighbor redirect message will then
readdress the packet to the better router.
A router sends a neighbor redirect message only for unicast packets, only to the originating node,
and to be processed by the node.
A neighbor redirect message has a value of 137 in the Type field of the ICMP packet header.
Setting neighbor solicitation parameters for
duplicate address detection
Although the stateless auto configuration feature assigns the 64-bit interface ID portion of an IPv6
address using the MAC address of the host’s NIC, duplicate MAC addresses can occur. Therefore,
the duplicate address detection feature verifies that a unicast IPv6 address is unique before it is
assigned to a host interface by the stateless auto configuration feature. Duplicate address
detection verifies that a unicast IPv6 address is unique.
If duplicate address detection identifies a duplicate unicast IPv6 address, the address is not used.
If the duplicate address is the link-local address of the host interface, the interface stops
processing IPv6 packets.
Brocade ICX 6650 Administration Guide
53-1002600-01
131
5
IPv6 neighbor discovery configuration
NOTE
Duplicate Address Detection (DAD) is not currently supported with IPv6 tunnels. Make sure tunnel
endpoints do not have duplicate IP addresses.
You can configure the following neighbor solicitation message parameters that affect duplicate
address detection while it verifies that a tentative unicast IPv6 address is unique:
• The number of consecutive neighbor solicitation messages that duplicate address detection
sends on an interface. By default, duplicate address detection sends three neighbor
solicitation messages without any follow-up messages.
• The interval in seconds at which duplicate address detection sends a neighbor solicitation
message on an interface. By default, duplicate address detection sends a neighbor solicitation
message every 1000 milliseconds.
For example, to change the number of neighbor solicitation messages sent on Ethernet interface
1/2/1 to two and the interval between the transmission of the two messages to 9 seconds, enter
the following commands.
Brocade(config)#interface ethernet 1/1/1
Brocade(config-if-e10000-1/1/1)#ipv6 nd dad attempt 2
Brocade(config-if-e10000-1/1/1)#ipv6 nd ns-interval 9000
Syntax: [no] ipv6 nd dad attempt <number>
Syntax: [no] ipv6 nd ns-interval <number>
For the number of neighbor solicitation messages, specify a number from 0 – 255. The default is
3. Configuring a value of 0 disables duplicate address detection processing on the specified
interface. To restore the number of messages to the default value, use the no form of this
command.
For the interval between neighbor solicitation messages and the value for the retrans timer in
router advertisements, specify a number from 0 – 4294967295 milliseconds. The default value
for the interval between neighbor solicitation messages is 1000 milliseconds. The default value
for the retrans timer is 0. Brocade does not recommend very short intervals in normal IPv6
operation. When a non-default value is configured, the configured time is both advertised and used
by the router itself. To restore the default interval, use the no form of this command.
Setting IPv6 router advertisement parameters
You can adjust the following parameters for router advertisement messages:
• The interval (in seconds) at which an interface sends router advertisement messages. By
default, an interface sends a router advertisement message every 200 seconds.
• The "router lifetime" value, which is included in router advertisements sent from a particular
interface. The value (in seconds) indicates if the router is advertised as a default router on this
interface. If you set the value of this parameter to 0, the router is not advertised as a default
router on an interface. If you set this parameter to a value that is not 0, the router is advertised
as a default router on this interface. By default, the router lifetime value included in router
advertisement messages sent from an interface is 1800 seconds.
• The hop limit to be advertised in the router advertisement.
132
Brocade ICX 6650 Administration Guide
53-1002600-01
IPv6 neighbor discovery configuration
5
When adjusting these parameter settings, Brocade recommends that the interval between router
advertisement transmission be less than or equal to the router lifetime value if the router is
advertised as a default router. For example, to adjust the interval of router advertisements to 300
seconds and the router lifetime value to 1900 seconds on Ethernet interface 1/1/1, enter the
following commands.
Brocade(config)#interface ethernet 1/1/1
Brocade(config-if-e10000-1/1/1)#ipv6 nd ra-interval 300
Brocade(config-if-e10000-1/1/1)#ipv6 nd ra-lifetime 1900
Brocade(config-if-e10000-1/1/1)#ipv6 nd ra-hop-limit 1
Here is another example with a specified range.
Brocade(config)#interface ethernet 1/1/2
Brocade(config-if-e10000-1/1/2)#ipv6 nd ra-interval range 33 55
Brocade(config-if-e10000-1/1/2)#ipv6 nd ra-lifetime 1900
Brocade(config-if-e10000-1/1/2)#ipv6 nd ra-hop-limit 1
Syntax: [no] ipv6 nd ra-interval <number> | <min range value> <max range value>
Syntax: [no] ipv6 nd ra-lifetime <number>
Syntax: ipv6 nd ra-hop-limit <number>
<number> is a value from 0 – 255. The default is 64.
The ipv6 nd ra-interval <number> can be a value between 3 – 1800 seconds. The default is 200
seconds. The actual RA interval will be from .5 to 1.5 times the configured or default value. For
example, in the above configuration, for ipv6 nd ra-interval 300, the range would be 150 – 450. To
restore the default interval of 200 seconds, use the no form of the command.
The ipv6 nd ra-interval range <min range value> <max range value> command lets you specify a
range of values instead of a single value.
The <min range value> specifies the minimum number of seconds allowed between sending
unsolicited multicast router advertisements from the interface. The default is 0.33 times the
<max range value> if the <max range value> is greater than or equal to 9 seconds. Otherwise,
the default is the value specified by the <max range value>. The <min range value> can be a
number between -3 – (.75 x <max range value>).
The <max range value> parameter specifies the maximum number of seconds allowed
between sending unsolicited multicast router advertisements from the interface. This number
can be between 4 – 1800 seconds and must be greater than the <min range value> x 1.33.
The default is 600 seconds.
The ipv6 nd ra-lifetime <number> is a value between 0 – 9000 seconds. To restore the router
lifetime value of 1800 seconds, use the no form of the command.
The ipv6 nd ra-hop-limit <number> is a value from 0 – 255. The default is 64.
NOTE
By default, router advertisements will always have the MTU option. To suppress the MTU option, use
the following command at the Interface level of the CLI: ipv6 nd suppress-mtu-option.
Brocade ICX 6650 Administration Guide
53-1002600-01
133
5
IPv6 neighbor discovery configuration
Prefixes advertised in IPv6 router
advertisement messages
By default, router advertisement messages include prefixes configured as addresses on router
interfaces using the ipv6 address command. You can use the ipv6 nd prefix-advertisement
command to control exactly which prefixes are included in router advertisement messages. Along
with which prefixes the router advertisement messages contain, you can also specify the following
parameters:
• Valid lifetime—(Mandatory) The time interval (in seconds) in which the specified prefix is
advertised as valid. The default is 2592000 seconds (30 days). When the timer expires, the
prefix is no longer considered to be valid.
• Preferred lifetime—(Mandatory) The time interval (in seconds) in which the specified prefix is
advertised as preferred. The default is 604800 seconds (7 days). When the timer expires, the
prefix is no longer considered to be preferred.
• Onlink flag—(Optional) If this flag is set, the specified prefix is assigned to the link upon which it
is advertised. Nodes sending traffic to addresses that contain the specified prefix consider the
destination to be reachable on the local link.
• Autoconfiguration flag—(Optional) If this flag is set, the stateless auto configuration feature can
use the specified prefix in the automatic configuration of 128-bit IPv6 addresses for hosts on
the local link, provided the specified prefix is aggregatable, as specified in RFC 2374.
For example, to advertise the prefix 2001:DB8:a487:7365::/64 in router advertisement messages
sent out on Ethernet interface 1/1/1 with a valid lifetime of 1000 seconds, a preferred lifetime of
800 seconds, and the Onlink and Autoconfig flags set, enter the following commands.
Brocade(config)#interface ethernet 1/1/1
Brocade(config-if-e10000-1/1/1)#ipv6 nd prefix-advertisement
2001:DB8:a487:7365::/64 1000 800 onlink autoconfig
Syntax: [no] ipv6 nd prefix-advertisement <ipv6-prefix>/<prefix-length> <valid-lifetime>
<preferred-lifetime> [autoconfig] [onlink]
You must specify the <ipv6-prefix> parameter in hexadecimal using 16-bit values between colons
as documented in RFC 2373.
You must specify the <prefix-length> parameter as a decimal value. A slash mark (/) must follow
the <ipv6-prefix> parameter and precede the <prefix-length> parameter.
The valid lifetime and preferred lifetime is a numerical value between 0 – 4294967295 seconds.
The default valid lifetime is 2592000 seconds (30 days), while the default preferred lifetime is
604800 seconds (7 days).
To remove a prefix from the router advertisement messages sent from a particular interface, use
the no form of this command.
134
Brocade ICX 6650 Administration Guide
53-1002600-01
IPv6 neighbor discovery configuration
5
Setting flags in IPv6 router advertisement messages
An IPv6 router advertisement message can include the following flags:
• Managed Address Configuration—This flag indicates to hosts on a local link if they should use
the stateful autoconfiguration feature to get IPv6 addresses for their interfaces. If the flag is
set, the hosts use stateful autoconfiguration to get addresses as well as non-IPv6-address
information. If the flag is not set, the hosts do not use stateful autoconfiguration to get
addresses and if the hosts can get non-IPv6-address information from stateful
autoconfiguration is determined by the setting of the Other Stateful Configuration flag.
• Other Stateful Configuration—This flag indicates to hosts on a local link if they can get non-IPv6
address autoconfiguration information. If the flag is set, the hosts can use stateful
autoconfiguration to get non-IPv6-address information.
NOTE
When determining if hosts can use stateful autoconfiguration to get non-IPv6-address information,
a set Managed Address Configuration flag overrides an unset Other Stateful Configuration flag. In
this situation, the hosts can obtain nonaddress information. However, if the Managed Address
Configuration flag is not set and the Other Stateful Configuration flag is set, then the setting of the
Other Stateful Configuration flag is used.
By default, the Managed Address Configuration and Other Stateful Configuration flags are not set
in router advertisement messages. For example, to set these flags in router advertisement
messages sent from Ethernet interface 1/1/1, enter the following commands.
Brocade(config)#interface ethernet 1/1/1
Brocade(config-if-e10000-1/1/1)#ipv6 nd managed-config-flag
Brocade(config-if-e10000-1/1/1)#ipv6 nd other-config-flag
Syntax: [no] ipv6 nd managed-config-flag
Syntax: [no] ipv6 nd other-config-flag
To remove either flag from router advertisement messages sent on an interface, use the no form of
the respective command.
Enabling and disabling IPv6 router advertisements
If IPv6 unicast routing is enabled on an Ethernet interface, by default, this interface sends IPv6
router advertisement messages. However, by default, non-LAN interface types, for example, tunnel
interfaces, do not send router advertisement messages.
To disable the sending of router advertisement messages on an Ethernet interface, enter
commands such as the following.
Brocade(config)#interface ethernet 1/1/1
Brocade(config-if-e10000-1/1/1)#ipv6 nd suppress-ra
To enable the sending of router advertisement messages on a tunnel interface, enter commands
such as the following.
Brocade(config)#interface tunnel 1
Brocade(config-tnif-1)#no ipv6 nd suppress-ra
Syntax: [no] ipv6 nd suppress-ra
Brocade ICX 6650 Administration Guide
53-1002600-01
135
5
IPv6 MTU
Configuring reachable time for remote IPv6 nodes
You can configure the duration (in seconds) that a router considers a remote IPv6 node reachable.
By default, a router interface uses the value of 30 seconds.
The router advertisement messages sent by a router interface include the amount of time specified
by the ipv6 nd reachable-time command so that nodes on a link use the same reachable time
duration. By default, the messages include a default value of 0.
Brocade does not recommend configuring a short reachable time duration, because a short
duration causes the IPv6 network devices to process the information at a greater frequency.
For example, to configure the reachable time of 40 seconds for Ethernet interface 1/1/1, enter the
following commands.
Brocade(config)#interface ethernet 1/1/1
Brocade(config-if-e10000-1/1/1)#ipv6 nd reachable-time 40
Syntax: [no] ipv6 nd reachable-time <seconds>
For the <seconds> parameter, specify a number from 0 – 3600 seconds. To restore the default
time, use the no form of this command.
NOTE
The actual reachable time will be from .5 to 1.5 times the configured or default value.
IPv6 MTU
The IPv6 maximum transmission unit (MTU) is the maximum length of an IPv6 packet that can be
transmitted on a particular interface. If an IPv6 packet is longer than an MTU, the host that
originated the packet fragments the packet and transmits its contents in multiple packets that are
shorter than the configured MTU.
By default, in non-jumbo mode, the maximum Ethernet MTU size is 1500 bytes. When jumbo is
enabled, the default maximum Ethernet MTU size is 10200.
Configuration notes and feature limitations
for IPv6 MTU
• The IPv6 MTU command is applicable to VEs and physical IP interfaces. It applies to traffic
routed between networks.
• You cannot use this command to set Layer 2 maximum frame sizes per interface. The global
jumbo command causes all interfaces to accept Layer 2 frames.
• For non-jumbo mode, you can configure an IPv6 MTU greater than 1500 bytes, although the
default remains at 1500 bytes. The value of the MTU you can define depends on the following:
• For a physical port, the maximum value of the MTU is the equal to the maximum frame
size of the port minus 18 (Layer 2 MAC header + CRC).
• If a the size of a jumbo packet received on a port is equal to the maximum frame size – 18
(Layer 2 MAC header + CRC) and if this value is greater than the outgoing port’s IPv4/IPv6
MTU, then it will be forwarded in the CPU.
136
Brocade ICX 6650 Administration Guide
53-1002600-01
Static neighbor entries configuration
5
• For a virtual routing interface, the maximum value of the MTU is the maximum frame size
configured for the VLAN to which it is associated, minus 18 (Layer 2 MAC header + CRC). If
a maximum frame size for a VLAN is not configured, then configure the MTU based on the
smallest maximum frame size of all the ports of the VLAN that corresponds to the virtual
routing interface, minus 18 (Layer 2 MAC header + CRC).
Changing the IPv6 MTU
To define IPv6 maximum transmission unit (MTU) globally, enter the ipv6 mtu command at the
Global CONFIG level of the CLI:
Brocade(config)#ipv6 mtu 1300
You can configure the IPv6 MTU on individual interfaces. For example, to configure the MTU on
Ethernet interface 1/2/1 as 1280 bytes, enter the following commands.
Brocade(config)#interface ethernet 1/1/1
Brocade(config-if-e10000-1/1/1)#ipv6 mtu 1280
Syntax: [no] ipv6 mtu <bytes>
For <bytes>, specify a value between 1280 – 1500, or 1280 – 10200 if jumbo mode is enabled. If
a nondefault value is configured for an interface, router advertisements include an MTU option.
Static neighbor entries configuration
In some special cases, a neighbor cannot be reached using the neighbor discovery feature. In this
situation, you can add a static entry to the IPv6 neighbor discovery cache, which causes a neighbor
to be reachable at all times without using neighbor discovery. (A static entry in the IPv6 neighbor
discovery cache functions like a static ARP entry in IPv4.)
NOTE
A port that has a statically assigned IPv6 entry cannot be added to a VLAN.
NOTE
Static neighbor configurations will be cleared on secondary ports when a trunk is formed.
For example, to add a static entry for a neighbor with the IPv6 address 2001:DB8:2678:47b and
link-layer address 2001.DB8.8641 that is reachable through Ethernet interface 1/1/1, enter the
ipv6 neighbor command.
Brocade(config)#ipv6 neighbor 2001:DB8:2678:47b ethernet 1/1/1 2001.DB8.8641
Syntax: [no] ipv6 neighbor <ipv6-address> ethernet <stack-unit>/<slot>/<port>| ve
<ve-number> [ethernet <stack-unit>/<slot>/<port>] <link-layer-address>
The <ipv6-address> parameter specifies the address of the neighbor.
The ethernet | ve parameter specifies the interface through which to reach a neighbor. Specify the
Ethernet port in the <stack-unit>/<slot>/<port> format. Stack-unit is 1. If you specify a VE, specify
the VE number and then the Ethernet port numbers associated with the VE. The link-layer address
is a 48-bit hardware address of the neighbor.
Brocade ICX 6650 Administration Guide
53-1002600-01
137
5
Limiting the number of hops an IPv6 packet can traverse
If you attempt to add an entry that already exists in the neighbor discovery cache, the software
changes the already existing entry to a static entry.
To remove a static IPv6 entry from the IPv6 neighbor discovery cache, use the no form of this
command.
Limiting the number of hops an IPv6 packet can traverse
By default, the maximum number of hops an IPv6 packet can traverse is 64. You can change this
value to between 0 – 255 hops. For example, to change the maximum number of hops to 70, enter
the following command.
Brocade(config)#ipv6 hop-limit 70
Syntax: [no] ipv6 hop-limit <number>
Use the no form of the command to restore the default value.
hop-limit 0 will transmit packets with default (64) hop limit.
<number> can be from 0 – 255.
IPv6 source routing security enhancements
The IPv6 specification (RFC 2460) specifies support for IPv6 source-routed packets using a type 0
Routing extension header, requiring device and host to process the type 0 routing extension
header. However, this requirement may leave a network open to a DoS attack.
A security enhancement disables sending IPv6 source-routed packets to IPv6 devices. (This
enhancement conforms to RFC 5095.)
By default, when the router drops a source-routed packet, it sends an ICMP Parameter Problem
(type 4), Header Error (code 0) message to the packet's source address, pointing to the
unrecognized routing type. To disable these ICMP error messages, enter the following command:
Brocade(config)# no ipv6 icmp source-route
Syntax: [no] ipv6 icmp source-route
Use the ipv6 icmp source-route form of the command to enable the ICMP error messages.
Clearing global IPv6 information
You can clear the following global IPv6 information:
•
•
•
•
138
Entries from the IPv6 cache.
Entries from the IPv6 neighbor table.
IPv6 routes from the IPv6 route table.
IPv6 traffic statistics.
Brocade ICX 6650 Administration Guide
53-1002600-01
Clearing global IPv6 information
5
Clearing the IPv6 cache
You can remove all entries from the IPv6 cache or specify an entry based on the following:
• IPv6 prefix.
• IPv6 address.
• Interface type.
For example, to remove entries for IPv6 address 2001:DB8::1, enter the following command at the
Privileged EXEC level or any of the Config levels of the CLI.
Brocade#clear ipv6 cache 2001:DB8::1
Syntax: clear ipv6 cache [<ipv6-prefix>/<prefix-length> | <ipv6-address> | ethernet
<stack-unit>/<slot>/<port>| tunnel <number> | ve <number>]
You must specify the <ipv6-prefix> parameter in hexadecimal using 16-bit values between colons
as documented in RFC 2373. You must specify the <prefix-length> parameter as a decimal value. A
slash mark (/) must follow the <ipv6-prefix> parameter and precede the <prefix-length>
parameter.
You must specify the <ipv6-address> parameter in hexadecimal using 16-bit values between
colons as documented in RFC 2373.
The ethernet | tunnel | ve parameter specifies the interfaces for which you can remove cache
entries. Specify the Ethernet port in the <stack-unit>/<slot>/<port> format. Stack-unit is 1. If you
specify a VE or tunnel interface, also specify the VE or tunnel number, respectively.
Clearing IPv6 neighbor information
You can remove all entries from the IPv6 neighbor table or specify an entry based on the following:
• IPv6 prefix
• IPv6 address
• Interface type
For example, to remove entries for Ethernet interface 1/2/1, enter the following command at the
Privileged EXEC level or any of the CONFIG levels of the CLI.
Brocade#clear ipv6 neighbor ethernet 1/2/1
Syntax: clear ipv6 neighbor [<ipv6-prefix>/<prefix-length> | <ipv6-address> | ethernet
<stack-unit>/<slot>/<port>| ve <number>]
You must specify the <ipv6-prefix> parameter in hexadecimal using 16-bit values between colons
as documented in RFC 2373. You must specify the <prefix-length> parameter as a decimal value. A
slash mark (/) must follow the <ipv6-prefix> parameter and precede the <prefix-length>
parameter.
You must specify the <ipv6-address> parameter in hexadecimal using 16-bit values between
colons as documented in RFC 2373.
The ethernet | ve parameter specifies the interfaces for which you can remove cache entries.
Specify the <stack-unit>/<slot>/<port> format. Stack-unit is 1. If you specify a VE, also specify the
VE number.
Brocade ICX 6650 Administration Guide
53-1002600-01
139
5
Displaying global IPv6 information
Clearing IPv6 routes from the IPv6 route table
You can clear all IPv6 routes or only those routes associated with a particular IPv6 prefix from the
IPv6 route table and reset the routes.
For example, to clear IPv6 routes associated with the prefix 2001:DB8::/32, enter the following
command at the Privileged EXEC level or any of the Config levels of the CLI.
Brocade#clear ipv6 route 2001:DB8::/32
Syntax: clear ipv6 route [<ipv6-prefix>/<prefix-length>]
The <ipv6-prefix>/<prefix-length> parameter clears routes associated with a particular IPv6 prefix.
You must specify the <ipv6-prefix> parameter in hexadecimal using 16-bit values between colons
as documented in RFC 2373. You must specify the <prefix-length> parameter as a decimal value. A
slash mark (/) must follow the <ipv6-prefix> parameter and precede the <prefix-length>
parameter.
Clearing IPv6 traffic statistics
To clear all IPv6 traffic statistics (reset all fields to zero), enter the following command at the
Privileged EXEC level or any of the Config levels of the CLI.
Brocade(config)#clear ipv6 traffic
Syntax: clear ipv6 traffic
Displaying global IPv6 information
You can display output for the following global IPv6 parameters:
•
•
•
•
•
•
•
IPv6 cache
IPv6 interfaces
IPv6 neighbors
IPv6 route table
Local IPv6 routers
IPv6 TCP connections and the status of individual connections
IPv6 traffic statistics
Displaying IPv6 cache information
The IPv6 cache contains an IPv6 host table that has indices to the next hop gateway and the router
interface on which the route was learned.
To display IPv6 cache information, enter the following command at any CLI level.
140
Brocade ICX 6650 Administration Guide
53-1002600-01
Displaying global IPv6 information
Brocade#show ipv6 cache
Total number of cache entries: 10
Total number of cache entries: 10
IPv6 Address
1
2001:DB8::2
2
2001:DB8::106
3
2001:DB8::110
4
2001:DB8:46a::1
5
2001:DB8::2e0:52ff:fe99:9737
6
2001:DB8::fff:ffff:feff:ffff
7
2001:DB8::c0a8:46a
8
2001:DB8::c0a8:46a
9
2001:DB8::1
10 2001:DB8::2e0:52ff:fe99:9700
Next Hop
LOCAL
LOCAL
DIRECT
LOCAL
LOCAL
LOCAL
LOCAL
LOCAL
LOCAL
LOCAL
5
Port
tunnel 2
ethe 1/1/1
ethe 1/1/2
ethe 1/1/3
ethe 1/1/4
loopback 2
tunnel 2
tunnel 6
loopback 2
ethe 1/1/5
Syntax: show ipv6 cache [<index-number> | <ipv6-prefix>/<prefix-length> | <ipv6-address> |
ethernet <stack-unit>/<slot>/<port> | ve <number> | tunnel <number>]
The <index-number> parameter restricts the display to the entry for the specified index number
and subsequent entries.
The <ipv6-prefix>/<prefix-length> parameter restricts the display to the entries for the specified
IPv6 prefix. You must specify the <ipv6-prefix> parameter in hexadecimal using 16-bit values
between colons as documented in RFC 2373. You must specify the <prefix-length> parameter as a
decimal value. A slash mark (/) must follow the <ipv6-prefix> parameter and precede the
<prefix-length> parameter.
The ethernet | ve | tunnel parameter restricts the display to the entries for the specified interface.
The <ipv6-address> parameter restricts the display to the entries for the specified IPv6 address.
You must specify this parameter in hexadecimal using 16-bit values between colons as
documented in RFC 2373.
Specify the ethernet port in the <stack-unit>/<slot>/<port> format. Stack-unit is 1. If you specify a
VE interface, also specify the VE number. If you specify a tunnel interface, also specify the tunnel
number.
This display shows the following information.
TABLE 28
IPv6 cache information fields
Field
Description
Total number of cache entries
The number of entries in the cache table.
IPv6 Address
The host IPv6 address.
Next Hop
The next hop, which can be one of the following:
• Direct – The next hop is directly connected to the router.
• Local – The next hop is originated on this router.
• <ipv6 address> – The IPv6 address of the next hop.
Port
The port on which the entry was learned.
Displaying IPv6 interface information
To display IPv6 interface information, enter the following command at any CLI level.
Brocade ICX 6650 Administration Guide
53-1002600-01
141
5
Displaying global IPv6 information
Brocade#show ipv6 interface
Routing Protocols : R - RIP O - OSPF
Interface
Status
Routing Global Unicast Address
Ethernet 1/1/1 down/down R
Ethernet 1/1/2 down/down
Ethernet 1/1/3 up/up
2001:DB8::c017:101/64
Ethernet 1/1/4 up/up
2001:DB8::c019:101/64
VE 4
down/down
VE 14
up/up
2001:DB8::c060:101/64
Loopback 1
up/up
2001:DB8::1/128
Loopback 2
up/up
2001:DB8::303:303/128
Loopback 3
up/up
Syntax: show ipv6 interface [<interface> [<stack-unit>/<slot>/<port> |<number>]]
The <interface> parameter displays detailed information for a specified interface. For the interface,
you can specify the Ethernet, loopback, tunnel, or VE keywords. Specify the Ethernet port in the
<stack-unit>/<slot>/<port> format. Stack-unit is 1. If you specify a loopback, tunnel, or VE
interface, also specify the number associated with the interface.
This display shows the following information.
TABLE 29
General IPv6 interface information fields
Field
Description
Routing protocols
A one-letter code that represents a routing protocol that can be enabled
on an interface.
Interface
The interface type, and the port number or number of the interface.
Status
The status of the interface. The entry in the Status field will be either
“up/up” or “down/down”.
Routing
The routing protocols enabled on the interface.
Global Unicast Address
The global unicast address of the interface.
To display detailed information for a specific interface, enter a command such as the following at
any CLI level.
142
Brocade ICX 6650 Administration Guide
53-1002600-01
Displaying global IPv6 information
5
Brocade#show ipv6 interface ethernet 1/1/1
Interface Ethernet 1/1/1 is up, line protocol is up
IPv6 is enabled, link-local address is 2001:DB8::2e0:52ff:fe99:97
Global unicast address(es):
Joined group address(es):
2001:DB8::9
2001:DB8::1:ff99:9700
2001:DB8::2
2001:DB8::1
MTU is 1500 bytes
ICMP redirects are enabled
ND DAD is enabled, number of DAD attempts: 3
ND reachable time is 30 seconds
ND advertised reachable time is 0 seconds
ND retransmit interval is 1 seconds
ND advertised retransmit interval is 0 seconds
ND router advertisements are sent every 200 seconds
ND router advertisements live for 1800 seconds
No Inbound Access List Set
No Outbound Access List Set
RIP enabled
This display shows the following information.
TABLE 30
Detailed IPv6 interface information fields
Field
Description
Interface/line protocol status
The status of interface and line protocol. If you have disabled the
interface with the disable command, the status will be “administratively
down”. Otherwise, the status is either “up” or “down”.
IPv6 status/link-local address
The status of IPv6. The status is either “enabled” or “disabled”.
Displays the link-local address, if one is configured for the interface.
Global unicast address(es)
Displays the global unicast address(es), if one or more are configured for
the interface.
Joined group address(es)
The multicast address(es) that a router interface listens for and
recognizes.
MTU
The setting of the maximum transmission unit (MTU) configured for the
IPv6 interface. The MTU is the maximum length an IPv6 packet can have
to be transmitted on the interface. If an IPv6 packet is longer than an
MTU, the host that originated the packet fragments the packet and
transmits its contents in multiple packets that are shorter than the
configured MTU.
ICMP
The setting of the ICMP redirect parameter for the interface.
ND
The setting of the various neighbor discovery parameters for the
interface.
Access List
The inbound and outbound access control lists applied to the interface.
Routing protocols
The routing protocols enabled on the interface.
Brocade ICX 6650 Administration Guide
53-1002600-01
143
5
Displaying global IPv6 information
Displaying IPv6 neighbor information
You can display the IPv6 neighbor table, which contains an entry for each IPv6 neighbor with which
the router exchanges IPv6 packets.
To display the IPv6 neighbor table, enter the following command at any CLI level.
Brocade(config)#show ipv6 neighbor
Total number of Neighbor entries: 42
IPv6 Address
LinkLayer-Addr State Age Port
vlan IsR
2001:DB8:8::25
6400.0dbb.b541 STALE
163 e 1/1/41 5
0
2001:DB8::b200:dff:fe99:4ff5
b000.0d99.4ff5 STALE
162 e 1/1/41 5 0
2001:DB8:8::28
0000.0d9b.4257 STALE
163 e 1/1/41 5
0
2001:DB8:8::2b
c000.0d35.a8e1 STALE
163 e 1/1/41 5
0
2001:DB8::6600:dff:febb:b541
6400.0dbb.b541 STALE
162 e 1/1/41 5
Syntax: show ipv6 neighbor [<ipv6-prefix>/<prefix-length> | <ipv6-address> | <interface>
[<stack-unit>/<slot>/<port> ] |<number>]]
The <ipv6-prefix>/<prefix-length> parameters restrict the display to the entries for the specified
IPv6 prefix. You must specify the <ipv6-prefix> parameter in hexadecimal using 16-bit values
between colons as documented in RFC 2373. You must specify the <prefix-length> parameter as a
decimal value. A slash mark (/) must follow the <ipv6-prefix> parameter and precede the
<prefix-length> parameter.
The <ipv6-address> parameter restricts the display to the entries for the specified IPv6 address.
You must specify this parameter in hexadecimal using 16-bit values between colons as
documented in RFC 2373.
The <interface> parameter restricts the display to the entries for the specified router interface. For
this parameter, you can specify the Ethernet or VE keywords. Specify the Ethernet port in the
<stack-unit>/<slot>/<port> format. Stack-unit is 1. If you specify a VE interface, also specify the VE
number.
This display shows the following information.
TABLE 31
I
Description
Total number of neighbor entries
The total number of entries in the IPv6 neighbor table.
IPv6 Address
The 128-bit IPv6 address of the neighbor.
Link-Layer Address
The 48-bit interface ID of the neighbor.
State
144
IPv6 neighbor information fields
Field
The current state of the neighbor. Possible states are as follows:
INCOMPLETE – Address resolution of the entry is being performed.
*REACH – The static forward path to the neighbor is functioning
properly.
• REACH – The forward path to the neighbor is functioning properly.
• STALE – This entry has remained unused for the maximum interval.
While stale, no action takes place until a packet is sent.
• DELAY – This entry has remained unused for the maximum interval,
and a packet was sent before another interval elapsed.
• PROBE – Neighbor solicitation are transmitted until a reachability
confirmation is received.
•
•
Brocade ICX 6650 Administration Guide
53-1002600-01
Displaying global IPv6 information
TABLE 31
5
IPv6 neighbor information fields (Continued)
Field
Description
Age
The number of seconds the entry has remained unused. If this value
remains unused for the number of seconds specified by the ipv6 nd
reachable-time command (the default is 30 seconds), the entry is
removed from the table.
Port
The physical port on which the entry was learned.
vlan
The VLAN on which the entry was learned.
IsR
Determines if the neighbor is a router or host:
0 – Indicates that the neighbor is a host.
1 – Indicates that the neighbor is a router.
Displaying the IPv6 route table
To display the IPv6 route table, enter the following command at any CLI level.
Brocade#show ipv6 route
IPv6 Routing Table - 58 entries:
Type Codes: C - Connected, S - Static, R - RIP, O - OSPF, B - BGP
OSPF Sub Type Codes: O - Intra, Oi - Inter, O1 - Type1 external, O2 - Type2 ext
ernal
Type IPv6 Prefix
Next Hop Router
Interface Dis/Metric
C 2001:DB8:9::/64
::
ve 1009
0/0
C 2001:DB8:a::/64
::
ve 1010
0/0
C 2001:DB8:b::/64
::
ve 1011
0/0
C 2001:DB8:c::/64
::
ve 1012
0/0
C 2001:DB8:d::/64
::
ve 1013
0/0
C 2001:DB8:e::/64
::
ve 1014
0/0
C 2001:DB8:f::/64
::
ve 1015
0/0
C 2001:DB8:10::/64
::
ve 1016
0/0
C 2001:DB8:11::/64
::
ve 1017
0/0
C 2001:DB8:12::/64
::
ve 1018
0/0
C 2001:DB8:13::/64
::
ve 1019
0/0
Syntax: show ipv6 route [<ipv6-address> | <ipv6-prefix>/<prefix-length> | bgp | connect | ospf |
rip | static | summary]
The <ipv6-address> parameter restricts the display to the entries for the specified IPv6 address.
You must specify the <ipv6-address> parameter in hexadecimal using 16-bit values between
colons as documented in RFC 2373.
The <ipv6-prefix>/<prefix-length> parameters restrict the display to the entries for the specified
IPv6 prefix. You must specify the <ipv6-prefix> parameter in hexadecimal using 16-bit values
between colons as documented in RFC 2373. You must specify the <prefix-length> parameter as a
decimal value. A slash mark (/) must follow the <ipv6-prefix> parameter and precede the
<prefix-length> parameter.
The bgp keyword restricts the display to entries for BGP4 routes.
The connect keyword restricts the display to entries for directly connected interface IPv6 routes.
The ospf keyword restricts the display to entries for OSPFv3 routes.
The rip keyword restricts the display to entries for RIPng routes.
Brocade ICX 6650 Administration Guide
53-1002600-01
145
5
Displaying global IPv6 information
The static keyword restricts the display to entries for static IPv6 routes.
The summary keyword displays a summary of the prefixes and different route types.
The following table lists the information displayed by the show ipv6 route command.
TABLE 32
IPv6 route table fields
Field
Description
Number of entries
The number of entries in the IPv6 route table.
Type
The route type, which can be one of the following:
• C – The destination is directly connected to the router.
• S – The route is a static route.
• R – The route is learned from RIPng.
• O – The route is learned from OSPFv3.
• B – The route is learned from BGP4.
IPv6 Prefix
The destination network of the route.
Next-Hop Router
The next-hop router.
Interface
The interface through which this router sends packets to reach the
route's destination.
Dis/Metric
The route’s administrative distance and metric value.
To display a summary of the IPv6 route table, enter the following command at any CLI level.
Brocade#show ipv6 route summary
IPv6 Routing Table - 7 entries:
4 connected, 2 static, 0 RIP, 1 OSPF, 0 BGP
Number of prefixes:
/16: 1 /32: 1 /64: 3 /128: 2
The following table lists the information displayed by the show ipv6 route summary command.
TABLE 33
IPv6 route table summary fields
Field
Description
Number of entries
The number of entries in the IPv6 route table.
Number of route types
The number of entries for each route type.
Number of prefixes
A summary of prefixes in the IPv6 route table, sorted by prefix length.
Displaying local IPv6 routers
The Brocade device can function as an IPv6 host, instead of an IPv6 router, if you configure IPv6
addresses on its interfaces but do not enable IPv6 routing using the ipv6 unicast-routing
command.
From the IPv6 host, you can display information about IPv6 routers to which the host is connected.
The host learns about the routers through their router advertisement messages. To display
information about the IPv6 routers connected to an IPv6 host, enter the following command at any
CLI level.
146
Brocade ICX 6650 Administration Guide
53-1002600-01
Displaying global IPv6 information
5
Brocade#show ipv6 router
Router 2001:DB8::2e0:80ff:fe46:3431 on Ethernet 50, last update 0 min
Hops 64, Lifetime 1800 sec
Reachable time 0 msec, Retransmit time 0 msec
Syntax: show ipv6 router
If you configure your Brocade device to function as an IPv6 router (you configure IPv6 addresses on
its interfaces and enable IPv6 routing using the ipv6 unicast-routing command) and you enter the
show ipv6 router command, you will receive the following output.
No IPv6 router in table
Meaningful output for this command is generated for Brocade devices configured to function as
IPv6 hosts only.
This display shows the following information.
TABLE 34
IPv6 local router information fields
Field
Description
Router <ipv6 address> on <interface>
<port>
The IPv6 address for a particular router interface.
Last update
The amount of elapsed time (in minutes) between the current and
previous updates received from a router.
Hops
The default value that should be included in the Hop Count field of the
IPv6 header for outgoing IPv6 packets. The hops value applies to the
router for which you are displaying information and should be followed
by IPv6 hosts attached to the router. A value of 0 indicates that the
router leaves this field unspecified.
Lifetime
The amount of time (in seconds) that the router is useful as the default
router.
Reachable time
The amount of time (in milliseconds) that a router assumes a neighbor is
reachable after receiving a reachability confirmation. The reachable
time value applies to the router for which you are displaying information
and should be followed by IPv6 hosts attached to the router. A value of 0
indicates that the router leaves this field unspecified.
Retransmit time
The amount of time (in milliseconds) between retransmissions of
neighbor solicitation messages. The retransmit time value applies to the
router for which you are displaying information and should be followed
by IPv6 hosts attached to the router. A value of 0 indicates that the
router leaves this field unspecified.
Displaying IPv6 TCP information
You can display the following IPv6 TCP information:
• General information about each TCP connection on the router, including the percentage of free
memory for each of the internal TCP buffers.
• Detailed information about a specified TCP connection.
To display general information about each TCP connection on the router, enter the following
command at any CLI level.
Brocade ICX 6650 Administration Guide
53-1002600-01
147
5
Displaying global IPv6 information
Brocade#show ipv6 tcp connections
Local IP address:port <-> Remote IP address:port
192.168.182.110:23 <->
192.168.8.186:4933
192.168.182.110:8218 <-> 192.168.182.106:179
192.168.182.110:8039 <-> 192.168.2.119:179
192.168.182.110:8159 <-> 192.168.2.102:179
2001:DB8::110:179 <->
2001:DB8::106:8222
Total 5 TCP connections
TCP state
ESTABLISHED
ESTABLISHED
SYN-SENT
SYN-SENT
ESTABLISHED (1440)
TCP MEMORY USAGE PERCENTAGE
FREE TCP = 98 percent
FREE TCP QUEUE BUFFER = 99 percent
FREE TCP SEND BUFFER = 97 percent
FREE TCP RECEIVE BUFFER = 100 percent
FREE TCP OUT OF SEQUENCE BUFFER = 100 percent
Syntax: show ipv6 tcp connections
This display shows the following information.
TABLE 35
General IPv6 TCP connection fields
Field
Description
Local IP address:port
The IPv4 or IPv6 address and port number of the local router interface
over which the TCP connection occurs.
Remote IP address:port
The IPv4 or IPv6 address and port number of the remote router interface
over which the TCP connection occurs.
TCP state
FREE TCP = <percentage>
148
The state of the TCP connection. Possible states include the following:
LISTEN – Waiting for a connection request.
SYN-SENT – Waiting for a matching connection request after having
sent a connection request.
• SYN-RECEIVED – Waiting for a confirming connection request
acknowledgment after having both received and sent a connection
request.
• ESTABLISHED – Data can be sent and received over the
connection. This is the normal operational state of the connection.
• FIN-WAIT-1 – Waiting for a connection termination request from the
remote TCP, or an acknowledgment of the connection termination
request previously sent.
• FIN-WAIT-2 – Waiting for a connection termination request from the
remote TCP.
• CLOSE-WAIT – Waiting for a connection termination request from
the local user.
• CLOSING – Waiting for a connection termination request
acknowledgment from the remote TCP.
• LAST-ACK – Waiting for an acknowledgment of the connection
termination request previously sent to the remote TCP (which
includes an acknowledgment of its connection termination
request).
• TIME-WAIT – Waiting for enough time to pass to be sure the remote
TCP received the acknowledgment of its connection termination
request.
• CLOSED – There is no connection state.
•
•
The percentage of free TCP control block (TCP) space.
Brocade ICX 6650 Administration Guide
53-1002600-01
Displaying global IPv6 information
TABLE 35
5
General IPv6 TCP connection fields (Continued)
Field
Description
FREE TCP QUEUE BUFFER =
<percentage>
The percentage of free TCP queue buffer space.
FREE TCP SEND BUFFER =
<percentage>
The percentage of free TCP send buffer space.
FREE TCP RECEIVE BUFFER =
<percentage>
The percentage of free TCP receive buffer space.
FREE TCP OUT OF SEQUENCE BUFFER
= <percentage>
The percentage of free TCP out of sequence buffer space.
To display detailed information about a specified TCP connection, enter a command such as the
following at any CLI level.
Brocade#show ipv6 tcp status 2001:DB8::110 179 2000:4::106 8222
TCP: TCP = 0x217fc300
TCP: 2000:4::110:179 <-> 2000:4::106:8222: state: ESTABLISHED Port: 1
Send: initial sequence number = 242365900
Send: first unacknowledged sequence number = 242434080
Send: current send pointer = 242434080
Send: next sequence number to send = 242434080
Send: remote received window = 16384
Send: total unacknowledged sequence number = 0
Send: total used buffers 0
Receive: initial incoming sequence number = 740437769
Receive: expected incoming sequence number = 740507227
Receive: received window = 16384
Receive: bytes in receive queue = 0
Receive: congestion window = 1459
Syntax: show ipv6 tcp status <local-ip-address> <local-port-number> <remote-ip-address>
<remote-port-number>
The <local-ip-address> parameter can be the IPv4 or IPv6 address of the local interface over which
the TCP connection is taking place.
The <local-port-number> parameter is the local port number over which a TCP connection is taking
place.
The <remote-ip-address> parameter can be the IPv4 or IPv6 address of the remote interface over
which the TCP connection is taking place.
The <remote-port-number> parameter is the local port number over which a TCP connection is
taking place.
Brocade ICX 6650 Administration Guide
53-1002600-01
149
5
Displaying global IPv6 information
This display shows the following information.
TABLE 36
150
Specific IPv6 TCP connection fields
Field
Description
TCP = <location>
The location of the TCP.
<local-ip-address> <local-port-number>
<remote-ip-address> <remote-port-number> <state> <port>
This field provides a general summary of the
following:
• The local IPv4 or IPv6 address and port
number.
• The remote IPv4 or IPv6 address and port
number.
• The state of the TCP connection. For
information on possible states, refer to
Table 35 on page 148.
• The port numbers of the local interface.
Send: initial sequence number = <number>
The initial sequence number sent by the local
router.
Send: first unacknowledged sequence number = <number>
The first unacknowledged sequence number sent
by the local router.
Send: current send pointer = <number>
The current send pointer.
Send: next sequence number to send = <number>
The next sequence number sent by the local
router.
Send: remote received window = <number>
The size of the remote received window.
Send: total unacknowledged sequence number = <number>
The total number of unacknowledged sequence
numbers sent by the local router.
Send: total used buffers <number>
The total number of buffers used by the local
router in setting up the TCP connection.
Receive: initial incoming sequence number = <number>
The initial incoming sequence number received by
the local router.
Receive: expected incoming sequence number = <number>
The incoming sequence number expected by the
local router.
Receive: received window = <number>
The size of the local router’s receive window.
Receive: bytes in receive queue = <number>
The number of bytes in the local router’s receive
queue.
Receive: congestion window = <number>
The size of the local router’s receive congestion
window.
Brocade ICX 6650 Administration Guide
53-1002600-01
Displaying global IPv6 information
5
Displaying IPv6 traffic statistics
To display IPv6 traffic statistics, enter the following command at any CLI level.
Brocade#show ipv6 traffic
IP6 Statistics
36947 received, 66818 sent, 0 forwarded, 36867 delivered, 0 rawout
0 bad vers, 23 bad scope, 0 bad options, 0 too many hdr
0 no route, 0 can not forward, 0 redirect sent
0 frag recv, 0 frag dropped, 0 frag timeout, 0 frag overflow
0 reassembled, 0 fragmented, 0 ofragments, 0 can not frag
0 too short, 0 too small, 11 not member
0 no buffer, 66819 allocated, 21769 freed
0 forward cache hit, 46 forward cache miss
ICMP6 Statistics
Received:
0 dest unreach, 0 pkt too big, 0 time exceeded, 0 param prob
2 echo req, 1 echo reply, 0 mem query, 0 mem report, 0 mem red
0 router soli, 2393 router adv, 106 nei soli, 3700 nei adv, 0 redirect
0 bad code, 0 too short, 0 bad checksum, 0 bad len
0 reflect, 0 nd toomany opt, 0 badhopcount
Sent:
0 dest unreach, 0 pkt too big, 0 time exceeded, 0 param prob
1 echo req, 2 echo reply, 0 mem query, 0 mem report, 0 mem red
0 router soli, 2423 router adv, 3754 nei soli, 102 nei adv, 0 redirect
0 error, 0 can not send error, 0 too freq
Sent Errors:
0 unreach no route, 0 admin, 0 beyond scope, 0 address, 0 no port
0 pkt too big, 0 time exceed transit, 0 time exceed reassembly
0 param problem header, 0 nextheader, 0 option, 0 redirect, 0 unknown
UDP Statistics
470 received, 7851 sent, 6 no port, 0 input errors
TCP Statistics
57913 active opens, 0 passive opens, 57882 failed attempts
159 active resets, 0 passive resets, 0 input errors
565189 in segments, 618152 out segments, 171337 retransmission
Syntax: show ipv6 traffic
This show ipv6 traffic command displays the following information.
Field
Description
IPv6 statistics
received
The total number of IPv6 packets received by the router.
sent
The total number of IPv6 packets originated and sent by the router.
forwarded
The total number of IPv6 packets received by the router and forwarded to other
routers.
delivered
The total number of IPv6 packets delivered to the upper layer protocol.
rawout
This information is used by Brocade Technical Support.
Brocade ICX 6650 Administration Guide
53-1002600-01
151
5
Displaying global IPv6 information
Field
Description (Continued)
bad vers
The number of IPv6 packets dropped by the router because the version number
is not 6.
bad scope
The number of IPv6 packets dropped by the router because of a bad address
scope.
bad options
The number of IPv6 packets dropped by the router because of bad options.
too many hdr
The number of IPv6 packets dropped by the router because the packets had too
many headers.
no route
The number of IPv6 packets dropped by the router because there was no route.
can not forward
The number of IPv6 packets the router could not forward to another router.
redirect sent
This information is used by Brocade Technical Support.
frag recv
The number of fragments received by the router.
frag dropped
The number of fragments dropped by the router.
frag timeout
The number of fragment timeouts that occurred.
frag overflow
The number of fragment overflows that occurred.
reassembled
The number of fragmented IPv6 packets that the router reassembled.
fragmented
The number of IPv6 packets fragmented by the router to accommodate the MTU
of this router or of another device.
ofragments
The number of output fragments generated by the router.
can not frag
The number of IPv6 packets the router could not fragment.
too short
The number of IPv6 packets dropped because they are too short.
too small
The number of IPv6 packets dropped because they do not have enough data.
not member
The number of IPv6 packets dropped because the recipient is not a member of
a multicast group.
no buffer
The number of IPv6 packets dropped because there is no buffer available.
forward cache miss
The number of IPv6 packets received for which there is no corresponding cache
entry.
ICMP6 statistics
Some ICMP statistics apply to both Received and Sent, some apply to Received only, some apply to Sent only, and
some apply to Sent Errors only.
Applies to received and sent
152
dest unreach
The number of Destination Unreachable messages sent or received by the
router.
pkt too big
The number of Packet Too Big messages sent or received by the router.
time exceeded
The number of Time Exceeded messages sent or received by the router.
param prob
The number of Parameter Problem messages sent or received by the router.
echo req
The number of Echo Request messages sent or received by the router.
echo reply
The number of Echo Reply messages sent or received by the router.
mem query
The number of Group Membership Query messages sent or received by the
router.
mem report
The number of Membership Report messages sent or received by the router.
Brocade ICX 6650 Administration Guide
53-1002600-01
Displaying global IPv6 information
5
Field
Description (Continued)
mem red
The number of Membership Reduction messages sent or received by the router.
router soli
The number of Router Solicitation messages sent or received by the router.
router adv
The number of Router Advertisement messages sent or received by the router.
nei soli
The number of Neighbor Solicitation messages sent or received by the router.
nei adv
The number of Router Advertisement messages sent or received by the router.
redirect
The number of redirect messages sent or received by the router.
Applies to received only
bad code
The number of Bad Code messages received by the router.
too short
The number of Too Short messages received by the router.
bad checksum
The number of Bad Checksum messages received by the router.
bad len
The number of Bad Length messages received by the router.
nd toomany opt
The number of Neighbor Discovery Too Many Options messages received by the
router.
badhopcount
The number of Bad Hop Count messages received by the router.
Applies to sent only
error
The number of Error messages sent by the router.
can not send error
The number of times the node encountered errors in ICMP error messages.
too freq
The number of times the node has exceeded the frequency of sending error
messages.
Applies to sent errors only
unreach no route
The number of Unreachable No Route errors sent by the router.
admin
The number of Admin errors sent by the router.
beyond scope
The number of Beyond Scope errors sent by the router.
address
The number of Address errors sent by the router.
no port
The number of No Port errors sent by the router.
pkt too big
The number of Packet Too Big errors sent by the router.
time exceed transit
The number of Time Exceed Transit errors sent by the router.
time exceed reassembly
The number of Time Exceed Reassembly errors sent by the router.
param problem header
The number of Parameter Problem Header errors sent by the router.
nextheader
The number of Next Header errors sent by the router.
option
The number of Option errors sent by the router.
redirect
The number of Redirect errors sent by the router.
unknown
The number of Unknown errors sent by the router.
UDP statistics
received
The number of UDP packets received by the router.
sent
The number of UDP packets sent by the router.
no port
The number of UDP packets dropped because the packet did not contain a valid
UDP port number.
Brocade ICX 6650 Administration Guide
53-1002600-01
153
5
Displaying global IPv6 information
Field
Description (Continued)
input errors
This information is used by Brocade Technical Support.
TCP statistics
154
active opens
The number of TCP connections opened by the router by sending a TCP SYN to
another device.
passive opens
The number of TCP connections opened by the router in response to connection
requests (TCP SYNs) received from other devices.
failed attempts
This information is used by Brocade Technical Support.
active resets
The number of TCP connections the router reset by sending a TCP RESET
message to the device at the other end of the connection.
passive resets
The number of TCP connections the router reset because the device at the
other end of the connection sent a TCP RESET message.
input errors
This information is used by Brocade Technical Support.
in segments
The number of TCP segments received by the router.
out segments
The number of TCP segments sent by the router.
retransmission
The number of segments that the router retransmitted because the
retransmission timer for the segment had expired before the device at the other
end of the connection had acknowledged receipt of the segment.
Brocade ICX 6650 Administration Guide
53-1002600-01
Chapter
6
SNMP Access
In this chapter
• SNMP overview . . . . . . . . . . . . . . . . . . . . . . . . . . . . . . . . . . . . . . . . . . . . . . .
• SNMP community strings . . . . . . . . . . . . . . . . . . . . . . . . . . . . . . . . . . . . . . .
• User-based security model . . . . . . . . . . . . . . . . . . . . . . . . . . . . . . . . . . . . . .
• Defining SNMP views . . . . . . . . . . . . . . . . . . . . . . . . . . . . . . . . . . . . . . . . . .
• SNMP version 3 traps . . . . . . . . . . . . . . . . . . . . . . . . . . . . . . . . . . . . . . . . . .
• Displaying SNMP Information . . . . . . . . . . . . . . . . . . . . . . . . . . . . . . . . . . . .
• SNMP v3 configuration examples . . . . . . . . . . . . . . . . . . . . . . . . . . . . . . . .
155
156
159
163
164
167
169
Table 37 lists individual Brocade ICX 6650 switches and the SNMP access methods they support.
These features are supported in full Layer 3 software images, except where explicitly noted.
TABLE 37
Supported SNMP access features
Feature
Brocade ICX
6650
SNMP v1, v2, v3
Yes
Community strings
Yes
User-based security model for SNMP v3
Yes
SNMP v3 traps
Yes
Defining the UDP port for SNMP v3 traps
Yes
SNMP v3 over IPv6
Yes
AES encryption for SNMP v3
Yes
SNMP overview
SNMP is a set of protocols for managing complex networks. SNMP sends messages, called protocol
data units (PDUs), to different parts of a network. SNMP-compliant devices, called agents, store
data about themselves in Management Information Bases (MIBs) and return this data to the SNMP
requesters.
The Brocade ICX 6650 Switch Security Configuration Guide introduces a few methods used to
secure SNMP access. This chapter presents additional methods for securing SNMP access to
Brocade devices. It contains the following sections:
• “SNMP community strings”
• “User-based security model”
• “SNMP v3 configuration examples”
Brocade ICX 6650 Administration Guide
53-1002600-01
155
6
SNMP community strings
• “SNMP version 3 traps”
• “Displaying SNMP Information”
• “SNMP v3 configuration examples”
Restricting SNMP access using ACL, VLAN, or a specific IP address constitute the first level of
defense when the packet arrives at a Brocade device. The next level uses one of the following
methods:
• Community string match In SNMP versions 1 and 2
• User-based model in SNMP version 3
SNMP views are incorporated in community strings and the user-based model.
SNMP community strings
SNMP versions 1 and 2 use community strings to restrict SNMP access. You can configure as many
additional read-only and read-write community strings as you need. The number of strings you can
configure depends on the memory on the device. There is no practical limit.
NOTE
If you delete the startup-config file, the device automatically re-adds the default “public” read-only
community string the next time you load the software.
Encryption of SNMP community strings
The software automatically encrypts SNMP community strings. Users with read-only access or who
do not have access to management functions in the CLI cannot display the strings.
Encryption is enabled by default. You can disable encryption for individual strings or trap receivers
if desired. Refer to the next section for information about encryption.
Adding an SNMP community string
The default SNMP community name (string) on a device is “public” with read only privilege.
You can assign other SNMP community strings, and indicate if the string is encrypted or clear. By
default, the string is encrypted.
To add an encrypted community string, enter commands such as the following.
Brocade(config)#snmp-server community private rw
Brocade(config)#write memory
Syntax: snmp-server community [0 | 1] <string>
ro | rw [view <viewname>] [<standard-ACL-name> | <standard-ACL-id>]
The <string> parameter specifies the community string name. The string can be up to 32
characters long.
The ro | rw parameter specifies whether the string is read-only (ro) or read-write (rw).
156
Brocade ICX 6650 Administration Guide
53-1002600-01
SNMP community strings
6
NOTE
If you issue a no snmp-server community public ro command and then enter a write memory
command to save that configuration, the “public” community name is removed and will have no
SNMP access. If for some reason the device is brought down and then brought up, the “no
snmp-server community public ro” command is restored in the system and the “public” community
string has no SNMP access.
The 0 | 1 parameter affects encryption for display of the string in the running-config and the
startup-config file. Encryption is enabled by default. When encryption is enabled, the community
string is encrypted in the CLI regardless of the access level you are using.
The encryption option can be omitted (the default) or can be one of the following:
• 0 – Disables encryption for the community string you specify with the command. The
community string is shown as clear text in the running-config and the startup-config file. Use
this option if you do not want the display of the community string to be encrypted.
• 1 – Assumes that the community string you enter is encrypted, and decrypts the value before
using it.
NOTE
If you want the software to assume that the value you enter is the clear-text form, and to encrypt
display of that form, do not enter 0 or 1. Instead, omit the encryption option and allow the software
to use the default behavior.
NOTE
If you specify encryption option 1, the software assumes that you are entering the encrypted form
of the community string. In this case, the software decrypts the community string you enter before
using the value for authentication. If you accidentally enter option 1 followed by the clear-text
version of the community string, authentication will fail because the value used by the software will
not match the value you intended to use.
Configuring snmp-server community private rw adds the read-write SNMP community
string “private”. When you save the new community string to the startup-config file (using the write
memory command), the software adds the following command to the file.
snmp-server community 1 <encrypted-string> rw
To add a non-encrypted community string, you must explicitly specify that you do not want the
software to encrypt the string. Here is an example.
Brocade(config)#snmp-server community 0 private rw
Brocade(config)#write memory
The command in this example adds the string “private” in the clear, which means the string is
displayed in the clear. When you save the new community string to the startup-config file, the
software adds the following command to the file.
snmp-server community 0 private rw
The view <viewname> parameter is optional. It allows you to associate a view to the members of
this community string. Enter up to 32 alphanumeric characters. If no view is specified, access to
the full MIB is granted. The view that you want must exist before you can associate it to a
community string. Here is an example of how to use the view parameter in the community string
command.
Brocade(config)#snmp-s community myread ro view sysview
Brocade ICX 6650 Administration Guide
53-1002600-01
157
6
SNMP community strings
The command in this example associates the view “sysview” to the community string named
“myread”. The community string has read-only access to “sysview”. For information on how to
create views, refer to “SNMP v3 configuration examples” on page 169.
The <standard-ACL-name> | <standard-ACL-id> parameter is optional. It allows you to specify
which ACL group will be used to filter incoming SNMP packets. You can enter either the ACL name
or its ID. Here are some examples.
Brocade(config)#snmp-s community myread ro view sysview 2
Brocade(config)#snmp-s community myread ro view sysview myACL
The command in the first example indicates that ACL group 2 will filter incoming SNMP packets;
whereas, the command in the second example uses the ACL group called “myACL” to filter incoming
packets.Refer to the Brocade ICX 6650 Switch Security Configuration Guide for more information.
NOTE
To make configuration changes, including changes involving SNMP community strings, you must
first configure a read-write community string using the CLI. Alternatively, you must configure another
authentication method and log on to the CLI using a valid password for that method.
Displaying the SNMP community strings
To display the configured community strings, enter the following command at any CLI level.
Brocade#show snmp server
Contact: Marshall
Location: Copy Center
Community(ro): public
Community(rw): private
Traps
Cold start:
Link up:
Link down:
Authentication:
Locked address violation:
Power supply failure:
Fan failure:
Temperature warning:
STP new root:
STP topology change:
ospf:
Enable
Enable
Enable
Enable
Enable
Enable
Enable
Enable
Enable
Enable
Enable
Total Trap-Receiver Entries: 4
Trap-Receiver IP Address
Community
1
192.95.6.211
2
192.95.5.21
Syntax: show snmp server
NOTE
If display of the strings is encrypted, the strings are not displayed. Encryption is enabled by default.
158
Brocade ICX 6650 Administration Guide
53-1002600-01
User-based security model
6
User-based security model
SNMP version 3 (RFC 2570 through 2575) introduces a User-Based Security model (RFC 2574) for
authentication and privacy services.
SNMP version 1 and version 2 use community strings to authenticate SNMP access to
management modules. This method can still be used for authentication. In SNMP version 3, the
User-Based Security model of SNMP can be used to secure against the following threats:
•
•
•
•
Modification of information
Masquerading the identity of an authorized entity
Message stream modification
Disclosure of information
SNMP version 3 also supports View-Based Access Control Mechanism (RFC 2575) to control
access at the PDU level. It defines mechanisms for determining whether or not access to a
managed object in a local MIB by a remote principal should be allowed. (refer to “SNMP v3
configuration examples” on page 169.)
Configuring your NMS
In order to use the SNMP version 3 features.
1. Make sure that your Network Manager System (NMS) supports SNMP version 3.
2. Configure your NMS agent with the necessary users.
3. Configure the SNMP version 3 features in Brocade ICX 6650 devices.
Configuring SNMP version 3 on Brocade ICX 6650 devices
Follow the steps given below to configure SNMP version 3 on Brocade devices.
1. Enter an engine ID for the management module using the snmp-server engineid command if
you will not use the default engine ID.Refer to “Defining the engine id” on page 159.
2. Create views that will be assigned to SNMP user groups using the snmp-server view command.
refer to “SNMP v3 configuration examples” on page 169 for details.
3. Create ACL groups that will be assigned to SNMP user groups using the access-list command.
4. Create user groups using the snmp-server group command.Refer to “Defining an SNMP group”
on page 160.
5. Create user accounts and associate these accounts to user groups using the snmp-server user
command.Refer to “Defining an SNMP user account” on page 161.
If SNMP version 3 is not configured, then community strings by default are used to authenticate
access.
Defining the engine id
A default engine ID is generated during system start up. To determine what the default engine ID of
the device is, enter the show snmp engineid command and find the following line:
Local SNMP Engine ID: 800007c70300e05290ab60
Brocade ICX 6650 Administration Guide
53-1002600-01
159
6
User-based security model
See the section “Displaying the Engine ID” on page 167 for details.
The default engine ID guarantees the uniqueness of the engine ID for SNMP version 3. If you want
to change the default engine ID, enter the snmp-server engineid local command.
Brocade(config)#snmp-server engineid local 800007c70300e05290ab60
Syntax: [no] snmp-server engineid local <hex-string>
The local parameter indicates that engine ID to be entered is the ID of this device, representing an
SNMP management entity.
NOTE
Each user localized key depends on the SNMP server engine ID, so all users need to be reconfigured
whenever the SNMP server engine ID changes.
NOTE
Since the current implementation of SNMP version 3 does not support Notification, remote engine
IDs cannot be configured at this time.
The <hex-string> variable consists of 11 octets, entered as hexadecimal values. There are two
hexadecimal characters in each octet. There should be an even number of hexadecimal characters
in an engine ID.
The default engine ID has a maximum of 11 octets:
• Octets 1 through 4 represent the agent's SNMP management private enterprise number as
assigned by the Internet Assigned Numbers Authority (IANA). The most significant bit of Octet 1
is "1". For example, “000007c7” is the ID for Brocade Communications, Inc. in hexadecimal.
With Octet 1 always equal to "1", the first four octets in the default engine ID is always
“800007c7” (which is 1991 in decimal).
• Octet 5 is always 03 in hexadecimal and indicates that the next set of values represent a MAC
address.
• Octets 6 through 11 form the MAC address of the lowest port in the management module.
NOTE
Engine ID must be a unique number among the various SNMP engines in the management domain.
Using the default engine ID ensures the uniqueness of the numbers.
Defining an SNMP group
SNMP groups map SNMP users to SNMP views. For each SNMP group, you can configure a read
view, a write view, or both. Users who are mapped to a group will use its views for access control.
To configure an SNMP user group, enter a command such as the following.
Brocade(config)#snmp-server group admin v3 auth read all write all
Syntax: [no] snmp-server group <groupname> v1 | v2 | v3 auth | noauth | priv [access
<standard-ACL-id>] [read <viewstring> | write <viewstring>]
160
Brocade ICX 6650 Administration Guide
53-1002600-01
User-based security model
6
NOTE
This command is not used for SNMP version 1 and SNMP version 2. In these versions, groups and
group views are created internally using community strings. (refer to “SNMP community strings” on
page 156.) When a community string is created, two groups are created, based on the community
string name. One group is for SNMP version 1 packets, while the other is for SNMP version 2
packets.
The group <groupname> parameter defines the name of the SNMP group to be created.
The v1, v2, or v3 parameter indicates which version of SNMP is used. In most cases, you will be
using v3, since groups are automatically created in SNMP versions 1 and 2 from community
strings.
The auth | noauth parameter determines whether or not authentication will be required to access
the supported views. If auth is selected, then only authenticated packets are allowed to access the
view specified for the user group. Selecting noauth means that no authentication is required to
access the specified view. Selecting priv means that an authentication password will be required
from the users.
The access <standard-ACL-id> parameter is optional. It allows incoming SNMP packets to be
filtered based on the standard ACL attached to the group.
The read <viewstring> | write <viewstring> parameter is optional. It indicates that users who
belong to this group have either read or write access to the MIB.
The <viewstring> variable is the name of the view to which the SNMP group members have access.
If no view is specified, then the group has no access to the MIB.
The value of <viewstring> is defined using the snmp-server view command. The SNMP agent
comes with the "all" default view, which provides access to the entire MIB; however, it must be
specified when creating the group. The "all" view also allows SNMP version 3 to be backwards
compatibility with SNMP version 1 and version 2.
NOTE
If you will be using a view other than the "all" view, that view must be configured before creating the
user group.Refer to the section “SNMP v3 configuration examples” on page 169, especially for
details on the include | exclude parameters.
Defining an SNMP user account
The snmp-server user command does the following:
•
•
•
•
Creates an SNMP user.
Defines the group to which the user will be associated.
Defines the type of authentication to be used for SNMP access by this user.
Specifies one of the following encryption types used to encrypt the privacy password:
• Data Encryption Standard (DES) – A symmetric-key algorithm that uses a 56-bit key.
• Advanced Encryption Standard (AES) – The 128-bit encryption standard adopted by the
U.S. government. This standard is a symmetric cipher algorithm chosen by the National
Institute of Standards and Technology (NIST) as the replacement for DES.
Here is an example of how to create an SNMP User account.
Brocade(config)#snmp-s user bob admin v3 access 2 auth md5 bobmd5 priv des bobdes
Brocade ICX 6650 Administration Guide
53-1002600-01
161
6
User-based security model
The CLI for creating SNMP version 3 users has been updated as follows.
Syntax: [no] snmp-server user <name> <groupname> v3
[[access <standard-ACL-id>]
[[encrypted] [auth md5 <md5-password> | sha <sha-password>]
[priv [encrypted] des <des-password-key> | aes <aes-password-key>]]]
The <name> parameter defines the SNMP user name or security name used to access the
management module.
The <groupname> parameter identifies the SNMP group to which this user is associated or
mapped. All users must be mapped to an SNMP group. Groups are defined using the snmp-server
group command.
NOTE
The SNMP group to which the user account will be mapped should be configured before creating the
user accounts; otherwise, the group will be created without any views. Also, ACL groups must be
configured before configuring user accounts.
The v3 parameter is required.
The access <standard-ACL-id> parameter is optional. It indicates that incoming SNMP packets are
filtered based on the ACL attached to the user account.
NOTE
The ACL specified in a user account overrides the ACL assigned to the group to which the user is
mapped. If no ACL is entered for the user account, then the ACL configured for the group will be used
to filter packets.
The encrypted parameter means that the MD5 or SHA password will be a digest value. MD5 has
16 octets in the digest. SHA has 20. The digest string has to be entered as a hexadecimal string.
In this case, the agent need not generate any explicit digest. If the encrypted parameter is not
used, the user is expected to enter the authentication password string for MD5 or SHA. The agent
will convert the password string to a digest, as described in RFC 2574.
The auth md5 | sha parameter is optional. It defines the type of encryption that the user must
have to be authenticated. Choose between MD5 or SHA encryption. MD5 and SHA are two
authentication protocols used in SNMP version 3.
The <md5-password> and <sha-password> define the password the user must use to be
authenticated. These password must have a minimum of 8 characters. If the encrypted parameter
is used, then the digest has 16 octets for MD5 or 20 octets for SHA.
NOTE
Once a password string is entered, the generated configuration displays the digest (for security
reasons), not the actual password.
The priv [encrypted] parameter is optional after you enter the md5 or sha password. The priv
parameter specifies the encryption type (DES or AES) used to encrypt the privacy password. If the
encrypted keyword is used, do the following:
• If DES is the privacy protocol to be used, enter des followed by a 16-octet DES key in
hexadecimal format for the <des-password-key>. If you include the encrypted keyword, enter a
password string of at least 8 characters.
162
Brocade ICX 6650 Administration Guide
53-1002600-01
Defining SNMP views
6
• If AES is the privacy protocol to be used, enter aes followed by the AES password key. For a
small password key, enter 12 characters. For a big password key, enter 16 characters. If you
include the encrypted keyword, enter a password string containing 32 hexadecimal characters.
Defining SNMP views
SNMP views are named groups of MIB objects that can be associated with user accounts to allow
limited access for viewing and modification of SNMP statistics and system configuration. SNMP
views can also be used with other commands that take SNMP views as an argument. SNMP views
reference MIB objects using object names, numbers, wildcards, or a combination of the three. The
numbers represent the hierarchical location of the object in the MIB tree. You can reference
individual objects in the MIB tree or a subset of objects from the MIB tree.
To configure the number of SNMP views available on the Brocade device, enter the following
command.
Brocade(config)#system-max view 15
Syntax: system-max view <number-of-views>
This command specifies the maximum number of SNMPv2 and v3 views that can be configured on
a device. The number of views can be from 10 – 65536. The default is 10 views.
To add an SNMP view, enter one of the following commands.
Brocade(config)#snmp-server view Maynes system included
Brocade(config)#snmp-server view Maynes system.2 excluded
Brocade(config)#snmp-server view Maynes 2.3.*.6 included
Brocade(config)#write mem
NOTE
The snmp-server view command supports the MIB objects as defined in RFC 1445.
Syntax: [no] snmp-server view <name> <mib_tree> included | excluded
The <name> parameter can be any alphanumeric name you choose to identify the view. The
names cannot contain spaces.
The <mib_tree> parameter is the name of the MIB object or family. MIB objects and MIB sub-trees
can be identified by a name or by the numbers called Object Identifiers (OIDs) that represent the
position of the object or sub-tree in the MIB hierarchy. You can use a wildcard (*) in the numbers to
specify a sub-tree family.
The included | excluded parameter specifies whether the MIB objects identified by the
<mib_family> parameter are included in the view or excluded from the view.
NOTE
All MIB objects are automatically excluded from any view unless they are explicitly included;
therefore, when creating views using the snmp-server view command, indicate which portion of the
MIB you want users to access.
For example, you may want to assign the view called “admin” a community string or user group. The
“admin” view will allow access to the Brocade MIBs objects that begin with the 1.3.6.1.4.1.1991
object identifier. Enter the following command.
Brocade ICX 6650 Administration Guide
53-1002600-01
163
6
SNMP version 3 traps
Brocade(config)#snmp-server view admin 1.3.6.1.4.1.1991 included
You can exclude portions of the MIB within an inclusion scope. For example, if you want to exclude
the snAgentSys objects, which begin with 1.3.6.1.4.1.1991.1.1.2 object identifier from the admin
view, enter a second command such as the following.
Brocade(config)#snmp-server view admin 1.3.6.1.4.1.1991.1.1.2 excluded
NOTE
Note that the exclusion is within the scope of the inclusion.
To delete a view, use the no parameter before the command.
SNMP version 3 traps
Brocade devices support SNMP notifications in SMIv2 format. This allows notifications to be
encrypted and sent to the target hosts in a secure manner.
Defining an SNMP group and specifying which
view is notified of traps
The SNMP group command allows configuration of a viewname for notification purpose, similar to
the read and write view. The default viewname is "all", which allows access to the entire MIB.
To configure an SNMP user group, first configure SNMP v3 views using the snmp-server view
command.Refer to “SNMP v3 configuration examples” on page 169. Then enter a command such
as the following.
Brocade(config)#snmp-server group admin v3 auth read all write all
notify all
Syntax: [no] snmp-server group <groupname>
v1 | v2 | v3
auth | noauth | priv
[access <standard-ACL-id>] [read <viewstring> | write <viewstring> | notify <viewstring>]
The group <groupname> parameter defines the name of the SNMP group to be created.
The v1, v2, or v3 parameter indicates which version of SNMP to use. In most cases, you will use v3,
since groups are automatically created in SNMP versions 1 and 2 from community strings.
The auth | noauth parameter determines whether or not authentication will be required to access
the supported views. If auth is selected, then only authenticated packets are allowed to access the
view specified for the user group. Selecting noauth means that no authentication is required to
access the specified view. Selecting priv means that an authentication password will be required
from the users.
The access <standard-ACL-id> parameter is optional. It allows incoming SNMP packets to be
filtered based on the standard ACL attached to the group.
The read <viewstring> | write <viewstring> parameter is optional. It indicates that users who
belong to this group have either read or write access to the MIB.
The notify view allows administrators to restrict the scope of varbind objects that will be part of the
notification. All of the varbinds need to be in the included view for the notification to be created.
164
Brocade ICX 6650 Administration Guide
53-1002600-01
SNMP version 3 traps
6
The <viewstring> variable is the name of the view to which the SNMP group members have access.
If no view is specified, then the group has no access to the MIB.
Defining the UDP port for SNMP v3 traps
The SNMP host command enhancements allow configuration of notifications in SMIv2 format, with
or without encryption, in addition to the previously supported SMIv1 trap format.
You can define a port that receives the SNMP v3 traps by entering a command such as the
following.
Brocade(config)#snmp-server host 192.168.4.11 version v3 auth security-name port
4/1
Syntax: [no] snmp-server host <ip-addr> | <ipv6-addr> version [ v1 | v2c <community-string> |
v3 auth | noauth | priv <security-name>] [port <trap-UDP-port-number>]
The <ip-addr> parameter specifies the IP address of the host that will receive the trap.
For version, indicate one of the following
For SNMP version 1, enter v1 and the name of the community string (<community-string>). This
string is encrypted within the system.
NOTE
If the configured version is v2c, then the notification is sent out in SMIv2 format, using the
community string, but in cleartext mode. To send the SMIv2 notification in SNMPv3 packet format,
configure v3 with auth or privacy parameters, or both, by specifying a security name. The actual
authorization and privacy values are obtained from the security name.
For SNMP version 2c, enter v2 and the name of the community string. This string is encrypted
within the system.
For SNMP version 3, enter one of the following depending on the authorization required for the
host:
• v3 auth <security-name>: Allow only authenticated packets.
• v3 no auth <security-name>: Allow all packets.
• v3 priv <security-name>: A password is required
For port <trap-UDP-port-number>, specify the UDP port number on the host that will receive the
trap.
Trap MIB changes
To support the SNMP V3 trap feature, the Brocade Enterprise Trap MIB was rewritten in SMIv2
format, as follows:
• The MIB name was changed from FOUNDRY-SN-TRAP-MIB to FOUNDRY-SN-NOTIFICATION-MIB
• Individual notifications were changed to NOTIFICATION-TYPE instead of TRAP-TYPE.
• As per the SMIv2 format, each notification has an OID associated with it. The root node of the
notification is snTraps (OID enterprise.foundry.0). For example, OID for
snTrapRunningConfigChanged is {snTraps.73}. Earlier, each trap had a trap ID associated with
it, as per the SMIv1 format.
Brocade ICX 6650 Administration Guide
53-1002600-01
165
6
SNMP version 3 traps
Backward compatibility with SMIv1 trap format
The Brocade device will continue to support creation of traps in SMIv1 format, as before. To allow
the device to send notifications in SMIv2 format, configure the device as described above. The
default mode is still the original SMIv1 format.
Specifying an IPv6 host as an SNMP trap receiver
You can specify an IPv6 host as a trap receiver to ensure that all SNMP traps sent by the device
will go to the same SNMP trap receiver or set of receivers, typically one or more host devices on the
network. To do so, enter a command such as the following.
Brocade(config)#snmp-server host ipv6 2001:DB8:89::13
Syntax: snmp-server host ipv6 <ipv6-address>
The <ipv6-address> must be in hexadecimal format using 16-bit values between colons as
documented in RFC 2373.
SNMP v3 over IPv6
Some Brocade ICX 6650 devices support IPv6 for SNMP version 3.
Restricting SNMP Access to an IPv6 Node
You can restrict SNMP access so that the Brocade device can only be accessed by the IPv6 host
address that you specify. To do so, enter a command such as the following .
Brocade(config)#snmp-client ipv6 2001:DB8:89::23
Syntax: snmp-client ipv6 <ipv6-address>
The <ipv6-address> must be in hexadecimal format using 16-bit values between colons as
documented in RFC 2373.
Specifying an IPv6 host as an SNMP trap receiver
You can specify an IPv6 host as a trap receiver to ensure that all SNMP traps sent by the Brocade
device will go to the same SNMP trap receiver or set of receivers, typically one or more host devices
on the network. To do so, enter the snmp-server host ipv6 command .
Brocade(config)#snmp-server host ipv6 2001:DB8:89::13
Syntax: snmp-server host ipv6 <ipv6-address>
The <ipv6-address> must be in hexadecimal format using 16-bit values between colons as
documented in RFC 2373.
166
Brocade ICX 6650 Administration Guide
53-1002600-01
Displaying SNMP Information
6
Viewing IPv6 SNMP server addresses
Many of the existing show commands display IPv6 addresses for IPv6 SNMP servers. The following
example shows output for the show snmp server command.
Brocade#show snmp server
Contact:
Location:
Community(ro): .....
Traps
Warm/Cold start:
Link up:
Link down:
Authentication:
Locked address violation:
Power supply failure:
Fan failure:
Temperature warning:
STP new root:
STP topology change:
vsrp:
Total Trap-Receiver Entries: 4
Trap-Receiver IP-Address
1
192.147.201.100
2
2001:DB8::200
3
192.147.202.100
4
2001:DB8::200
Enable
Enable
Enable
Enable
Enable
Enable
Enable
Enable
Enable
Enable
Enable
Port-Number Community
162
.....
162
.....
162
.....
162
.....
Displaying SNMP Information
This section lists the commands for viewing SNMP-related information.
Displaying the Engine ID
To display the engine ID of a management module, enter a command such as the following.
Brocade#show snmp engineid
Local SNMP Engine ID: 800007c70300e05290ab60
Engine Boots: 3
Engine time: 5
Syntax: show snmp engineid
The engine ID identifies the source or destination of the packet.
The engine boots represents the number of times that the SNMP engine reinitialized itself with the
same engine ID. If the engineID is modified, the boot count is reset to 0.
The engine time represents the current time with the SNMP agent.
Brocade ICX 6650 Administration Guide
53-1002600-01
167
6
Displaying SNMP Information
Displaying SNMP groups
To display the definition of an SNMP group, enter a command such as the following.
Brocade#show snmp group
groupname = exceptifgrp
security model = v3
security level = authNoPriv
ACL id = 2
readview = exceptif
writeview = <none>
Syntax: show snmp group
The value for security level can be one of the following.
Security level
Authentication
<none>
If the security model shows v1 or v2, then security level is blank. User names are not
used to authenticate users; community strings are used instead.
noauthNoPriv
Displays if the security model shows v3 and user authentication is by user name only.
authNoPriv
Displays if the security model shows v3 and user authentication is by user name and the
MD5 or SHA algorithm.
Displaying user information
To display the definition of an SNMP user account, enter a command such as the following.
Brocade#show snmp user
username = bob
ACL id = 2
group = admin
security model = v3
group ACL id = 0
authtype = md5
authkey = 3aca18d90b8d172760e2dd2e8f59b7fe
privtype = des, privkey = 1088359afb3701730173a6332d406eec
engine ID= 800007c70300e052ab0000
Syntax: show snmp user
Interpreting varbinds in report packets
If an SNMP version 3 request packet is to be rejected by an SNMP agent, the agent sends a report
packet that contains one or more varbinds. The varbinds contain additional information, showing
the cause of failures. An SNMP manager application decodes the description from the varbind. The
following table presents a list of varbinds supported by the SNMP agent.
168
Brocade ICX 6650 Administration Guide
53-1002600-01
SNMP v3 configuration examples
6
Varbind object Identifier
Description
1. 3. 6. 1. 6. 3. 11. 2. 1. 3. 0
Unknown packet data unit.
1. 3. 6. 1. 6. 3. 12. 1. 5. 0
The value of the varbind shows the engine ID that needs to be used in
the snmp-server engineid command
1. 3. 6. 1. 6. 3. 15. 1. 1. 1. 0
Unsupported security level.
1. 3. 6. 1. 6. 3. 15. 1. 1. 2. 0
Not in time packet.
1. 3. 6. 1. 6. 3. 15. 1. 1. 3. 0
Unknown user name. This varbind may also be generated:
If the configured ACL for this user filters out this packet.
If the group associated with the user is unknown.
•
•
1. 3. 6. 1. 6. 3. 15. 1. 1. 4. 0
Unknown engine ID. The value of this varbind would be the correct
authoritative engineID that should be used.
1. 3. 6. 1. 6. 3. 15. 1. 1. 5. 0
Wrong digest.
1. 3. 6. 1. 6. 3. 15. 1. 1. 6. 0
Decryption error.
SNMP v3 configuration examples
The following sections present examples of how to configure SNMP v3.
Simple SNMP v3 configuration
Brocade(config)#snmp-s group admingrp v3 priv read all write all notify all
Brocade(config)#snmp-s user adminuser admingrp v3 auth md5 <auth password> priv
<privacy password>
Brocade(config)#snmp-s host <dest-ip> version v3 privacy adminuser
More detailed SNMP v3 configuration
Brocade(config)#snmp-server view internet internet included
Brocade(config)#snmp-server view system system included
Brocade(config)#snmp-server community ..... ro
Brocade(config)#snmp-server community ..... rw
Brocade(config)#snmp-server contact isc-operations
Brocade(config)#snmp-server location sdh-pillbox
Brocade(config)#snmp-server host 192.91.255.32 .....
Brocade(config)#snmp-server group ops v3 priv read internet write system
Brocade(config)#snmp-server group admin v3 priv read internet write internet
Brocade(config)#snmp-server group restricted v3 priv read internet
Brocade(config)#snmp-server user ops ops v3 encrypted auth md5
ab8e9cd6d46e7a270b8c9549d92a069 priv encrypted des
0e1b153303b6188089411447dbc32de
Brocade(config)#snmp-server user admin admin v3 encrypted auth md5
0d8a2123f91bfbd8695fef16a6f4207b priv encrypted des
18e0cf359fce4fcd60df19c2b6515448
Brocade(config)#snmp-server user restricted restricted v3 encrypted auth md5
261fd8f56a3ad51c8bcec1e4609f54dc priv encrypted des
d32e66152f89de9b2e0cb17a65595f43
Brocade ICX 6650 Administration Guide
53-1002600-01
169
6
170
SNMP v3 configuration examples
Brocade ICX 6650 Administration Guide
53-1002600-01
Chapter
Foundry Discovery Protocol (FDP) and Cisco Discovery
Protocol (CDP) Packets
7
In this chapter
• FDP Overview . . . . . . . . . . . . . . . . . . . . . . . . . . . . . . . . . . . . . . . . . . . . . . . . . 171
• CDP packets. . . . . . . . . . . . . . . . . . . . . . . . . . . . . . . . . . . . . . . . . . . . . . . . . . 177
Table 38 lists the Brocade ICX 6650 switch and the discovery protocols the switch supports. These
features are supported in full Layer 3 software images, except where explicitly noted.
TABLE 38
Supported discovery protocol features
Feature
Brocade ICX
6650
Foundry Discovery Protocol (FDP) for IPv4
and IPv6 traffic
Yes
Cisco Discovery Protocol (CDP) for IPv4
and IPV6 traffic
Yes
FDP Overview
The Foundry Discovery Protocol (FDP) enables Brocade ICX 6650 devices to advertise themselves
to other Brocade devices on the network. When you enable FDP on a Brocade ICX 6650 device, the
device periodically advertises information including the following:
•
•
•
•
Hostname (device ID)
Product platform and capability
Software version
VLAN and Layer 3 protocol address information for the port sending the update. IP, IPX, and
AppleTalk Layer 3 information is supported.
A Brocade ICX 6650 device running FDP sends FDP updates on Layer 2 to MAC address
01-E0-52-CC-CC-CC. Other Brocade devices listening on that address receive the updates and can
display the information in the updates. Brocade devices can send and receive FDP updates on
Ethernet interfaces.
FDP is disabled by default.
NOTE
If FDP is not enabled on a Brocade device that receives an FDP update or the device is running a
software release that does not support FDP, the update passes through the device at Layer 2.
Brocade ICX 6650 Administration Guide
53-1002600-01
171
7
FDP Overview
FDP configuration
The following sections describe how to enable Foundry Discovery Protocol (FDP) and how to change
the FDP update and hold timers.
Enabling FDP globally
To enable a Brocade ICX 6650 device to globally send FDP packets, enter the following command
at the global CONFIG level of the CLI.
Brocade(config)# fdp run
Syntax: [no] fdp run
The feature is disabled by default.
Enabling FDP at the interface level
By default, FDP is enabled at the interface level after FDP is enabled on the device.
When FDP is enabled globally, you can disable and re-enable FDP on individual ports.
Disable FDP by entering commands such as the following:
Brocade(config)# interface ethernet 1/1/1
Brocade(config-if-e10000-1/1/1)# no fdp enable
Enable or repenable FDP by entering commands such as the following:
Brocade(config-if-e10000-1/1/1)# fdp enable
Syntax: [no] fdp enable
Specifying the IP management address to advertise
When FDP is enabled, by default, the Brocade ICX 6650 device advertises one IPv4 address and
one IPv6 address to its FDP neighbors. If desired, you can configure the device to advertise only the
IPv4 management address or only the IPv6 management address. You can set the configuration
globally on a Layer 2 switch, or on an interface on a Layer 3 switch.
For example, to configure a Layer 2 switch to advertise the IPv4 address, enter the following
command at the Global CONFIG level of the CLI:
Brocade(config)# fdp advertise ipv4
To configure a Layer 3 switch to advertise the IPv6 address, enter the following command at the
Interface level of the CLI:
Brocade(config-if-e10000-1/1/1)# fdp advertise ipv6
Syntax: fdp advertise ipv4 | ipv6
Changing the FDP update timer
By default, a Brocade ICX 6650 device enabled for FDP sends an FDP update every 60 seconds.
You can change the update timer to a value from 5 – 900 seconds.
172
Brocade ICX 6650 Administration Guide
53-1002600-01
FDP Overview
7
To change the FDP update timer, enter a command such as the following at the global CONFIG level
of the CLI.
Brocade(config)# fdp timer 120
Syntax: [no] fdp timer <secs>
The <secs> parameter specifies the number of seconds between updates and can be from 5 –
900 seconds. The default is 60 seconds.
Changing the FDP hold time
By default, a Brocade ICX 6650 device that receives an FDP update holds the information until one
of the following events occurs:
• The device receives a new update.
• 180 seconds have passed since receipt of the last update. This is the hold time.
Once either of these events occurs, the device discards the update.
To change the FDP hold time, enter the fdp holdtime command at the global CONFIG level of the
CLI.
Brocade(config)# fdp holdtime 360
Syntax: [no] fdp holdtime <secs>
The <secs> parameter specifies the number of seconds a Brocade device that receives an FDP
update can hold the update before discarding it. You can specify from 10 – 255 seconds. The
default is 180 seconds.
Displaying FDP information
You can display the following Foundry Discovery Protocol (FDP) information:
•
•
•
•
FDP entries for Brocade neighbors
Individual FDP entries
FDP information for an interface on the device you are managing
FDP packet statistics
NOTE
If the Brocade device has intercepted CDP updates, then the CDP information is also displayed.
Displaying neighbor information
To display a summary list of all the Brocade neighbors that have sent FDP updates to this Brocade
device, enter the show fdp neighbor command.
Brocade ICX 6650 Administration Guide
53-1002600-01
173
7
FDP Overview
Brocade#show fdp neighbors
Capability Codes: R - Router, T - Trans Bridge, B - Source Route Bridge
S - Switch, H - Host, I - IGMP, r - Repeater
(*) indicates a CDP device
Device ID
Local Interface
-------------- ---------------ICX6650-64 Rou ethernet1/1/1
ICX6650-64 Rou ethernet1/1/2
ICX6650-64 Rou ethernet1/1/3
ICX6650-64 Rou ethernet1/1/4
(*)CISCO3750
ethernet1/1/5
GigabitEthernet1/0/5
ICX6650-64 Rou ethernet1/1/9
ICX6650-64 Rou ethernet1/1/10
ICX6650-64 Rou ethernet1/1/25
ICX6650-64 Rou ethernet1/1/26
Holdtm
-----133
133
133
133
169
Capability
---------Router
Router
Router
Router
S I
Platform
----------ICX6650-64
ICX6650-64
ICX6650-64
ICX6650-64
cisco WS-C3
Port ID
------------ethernet1/3/1
ethernet1/3/2
ethernet1/3/3
ethernet1/3/4
163
163
122
122
Router
Router
Router
Router
ICX6650-64
ICX6650-64
ICX6650-64
ICX6650-64
ethernet1/1/9
ethernet1/1/10
ethernet1/1/25
ethernet1/1/26
Syntax: show fdp neighbor [ethernet <stack-unit>/<slot>/<port>] [detail]
The ethernet <stack-unit>/<slot>/<port> parameter lists the information for updates received on
the specified ethernet interface. Stack-unit is 1.
The detail parameter lists detailed information for each device.
The show fdp neighbor command, without optional parameters, displays the following information.
TABLE 39
Summary FDP and CDP neighbor information
This line...
Displays...
Device ID
The hostname of the neighbor.
Local Int
The interface on which this Brocade device received an FDP or CDP
update for the neighbor.
Holdtm
The maximum number of seconds this device can keep the information
received in the update before discarding it.
Capability
The role the neighbor is capable of playing in the network.
Platform
The product platform of the neighbor.
Port ID
The interface through which the neighbor sent the update.
To display detailed information, enter the show fdp neighbor detail command.
Brocade# show fdp neighbor detail
Device ID: ICX6650-64 Router
configured as tag-type8100
Entry address(es):
IP address: 10.20.79.91
Platform: ICX6650-64 Router, Capabilities: Router
Interface: ethernet1/1/1
Port ID (outgoing port): ethernet1/3/1 is UNTAGGED in VLAN 1
Holdtime : 133 seconds
Brocade Communications Systems, Inc. ICX6650-64, IronWare Version 07.5.00B1T323
Compiled on Jul 16 2012 at 20:00:20 labeled as ICXLR07500B1
Device ID: ICX6650-64 Router
configured as tag-type8100
Entry address(es):
174
Brocade ICX 6650 Administration Guide
53-1002600-01
FDP Overview
7
The show fdp neighbor detail command displays the following information.
TABLE 40
Detailed FDP and CDP neighbor information
Parameter
Definition
Device ID
The hostname of the neighbor. In addition, this line lists the VLAN
memberships and other VLAN information for the neighbor port that
sent the update to this device.
Entry address(es)
The Layer 3 protocol addresses configured on the neighbor port that
sent the update to this device. If the neighbor is a Layer 2 Switch, this
field lists the management IP address.
Platform
The product platform of the neighbor.
Capabilities
The role the neighbor is capable of playing in the network.
Interface
The interface on which this device received an FDP or CDP update for
the neighbor.
Port ID
The interface through which the neighbor sent the update.
Holdtime
The maximum number of seconds this device can keep the information
received in the update before discarding it.
Version
The software version running on the neighbor.
Displaying FDP entries
To display the detailed neighbor information for a specific device, enter the show fdp entry
<device-id> command.
Brocade#show fdp entry rpru43
Device ID: rpru43
configured as tag-type8100
Entry address(es):
IP address: 10.20.67.98
IPv6 address (Global): 2001:DB8:2
Platform: ICX6650-64 Router, Capabilities: Router
Interface: ethernet1/1/6
Port ID (outgoing port): ethernet1/1/6 is TAGGED in following VLAN(s):
1000
Holdtime : 157 seconds
Brocade Communications Systems, Inc. ICX6650-64, IronWare Version 07.5.00B1T323
23 Compiled on Jun 28 2012 at 18:54:50 labeled as ICXLR07500B1
Device ID: rpru43
configured as tag-type8100
Entry address(es):
IP address: 10.20.67.98
IPv6 address (Global): 2001:DB8:2
Platform:ICX6650-64 Router , Capabilities: Router
Interface: ethernet1/1/7
Syntax: show fdp entry * | <device-id>
The * | <device-id> parameter specifies the device ID. If you enter *, the detailed updates for all
neighbor devices are displayed. If you enter a specific device ID, the update for that device is
displayed. For information about the display, refer to Table 40.
Brocade ICX 6650 Administration Guide
53-1002600-01
175
7
FDP Overview
Displaying FDP information for an interface
To display FDP information for an interface, enter a command such as the following.
BrocadeA# show fdp interface ethernet 1/1/1
FastEthernet2/3 is up, line protocol is up
Encapsulation ethernet
Sending FDP packets every 5 seconds
Holdtime is 180 seconds
This example shows information for Ethernet port 1/1/1. The port sends FDP updates every 5
seconds. Neighbors that receive the updates can hold them for up to 180 seconds before
discarding them.
Syntax: show fdp interface [ethernet <stack-unit>/<slot>/<port>]
The ethernet <stack-unit>/<slot>/<port> parameter lists the information only for the specified
ethernet interface. Stack-unit is 1.
Displaying FDP and CDP statistics
To display FDP and CDP packet statistics, enter the following command.
BrocadeA# show fdp traffic
CDP/FDP counters:
Total packets output: 6, Input: 5
Hdr syntax: 0, Chksum error: 0, Encaps failed: 0
No memory: 0, Invalid packet: 0, Fragmented: 0
Internal errors: 0
Syntax: show fdp traffic
Clearing FDP and CDP information
You can clear the following FDP and CDP information:
• Information received in FDP and CDP updates
• FDP and CDP statistics
The same commands clear information for both FDP and CDP.
Clearing FDP and CDP neighbor information
To clear the information received in FDP and CDP updates from neighboring devices, enter the
following command.
Brocade# clear fdp table
Syntax: clear fdp table
NOTE
This command clears all the updates for FDP and CDP.
176
Brocade ICX 6650 Administration Guide
53-1002600-01
CDP packets
7
Clearing FDP and CDP statistics
To clear FDP and CDP statistics, enter the following command.
Brocade# clear fdp counters
Syntax: clear fdp counters
CDP packets
Cisco Discovery Protocol (CDP) packets are used by Cisco devices to advertise themselves to other
Cisco devices. By default, Brocade devices forward these packets without examining their
contents. You can configure a Brocade device to intercept and display the contents of CDP
packets. This feature is useful for learning device and interface information for Cisco devices in the
network.
Brocade devices support intercepting and interpreting CDP version 1 and version 2 packets.
NOTE
The Brocade device can interpret only the information fields that are common to both CDP version
1 and CDP version 2.
NOTE
When you enable interception of CDP packets, the Brocade device drops the packets. As a result,
Cisco devices will no longer receive the packets.
Enabling interception of CDP packets globally
To enable the device to intercept and display CDP packets, enter the following command at the
global CONFIG level of the CLI.
Brocade(config)# cdp run
Syntax: [no] cdp run
The feature is disabled by default.
Enabling interception of CDP packets on an interface
You can disable and enable CDP at the interface level.
You can enter commands such as the following.
Brocade(config)# interface ethernet 1/1/1
Brocade(config-if-e10000-1/1/1)# cdp enable
Syntax: [no] cdp enable
By default, the feature is enabled on an interface once CDP is enabled on the device.
Brocade ICX 6650 Administration Guide
53-1002600-01
177
7
CDP packets
Displaying CDP information
You can display the following CDP information:
• Cisco neighbors
• CDP entries for all Cisco neighbors or a specific neighbor
• CDP packet statistics
Displaying neighbors
To display the Cisco neighbors the Brocade device has learned from CDP packets, enter the show
fdp neighbors command.
Brocade# show fdp neighbors
Capability Codes: R - Router, T - Trans Bridge, B - Source Route Bridge
S - Switch, H - Host, I - IGMP, r - Repeater
(*) indicates a CDP device
Device ID
Local Interface
-------------- ---------------ICX6650-64 Rou ethernet1/1/1
ICX6650-64 Rou ethernet1/1/2
ICX6650-64 Rou ethernet1/1/3
ICX6650-64 Rou ethernet1/1/4
(*)CISCO3750
ethernet1/1/5
GigabitEthernet1/0/5
Holdtm
-----133
133
133
133
169
Capability
---------Router
Router
Router
Router
S I
Platform
----------ICX6650-64
ICX6650-64
ICX6650-64
ICX6650-64
cisco WS-C3
Port ID
------------ethernet1/3/1
ethernet1/3/2
ethernet1/3/3
ethernet1/3/4
To display detailed information for the neighbors, enter the show fdp neighbors detail command.
Brocade# show fdp neighbors detail
Device ID: ICX6650-64 Router
configured as tag-type8100
Entry address(es):
IP address: 10.20.79.91
Platform: ICX6650-64 Router, Capabilities: Router
Interface: ethernet1/1/1
Port ID (outgoing port): ethernet1/3/1 is UNTAGGED in VLAN 1
Holdtime : 133 seconds
Brocade Communications Systems, Inc. ICX6650-64, IronWare Version 07.5.00B1T323
Compiled on Jul 16 2012 at 20:00:20 labeled as ICXLR07500B1
Device ID: ICX6650-64 Router
configured as tag-type8100
To display information about a neighbor attached to a specific port, enter a command such as the
following.
178
Brocade ICX 6650 Administration Guide
53-1002600-01
CDP packets
7
Brocade# show fdp neighbors ethernet 1/1/1
Device ID: Router
Entry address(es):
IP address: 192.95.6.143
Platform: cisco RSP4, Capabilities: Router
Interface: Eth 1/1/1, Port ID (outgoing port): FastEthernet5/0/0
Holdtime : 127 seconds
Version :
Cisco Internetwork Operating System Software
IOS (tm) RSP Software (RSP-JSV-M), Version 12.0(5)T1, RELEASE SOFTWARE
(fc1)
Copyright (c) 1986-1999 by cisco Systems, Inc.
Compiled Thu 19-Aug-99 04:12 by cmong
Syntax: show fdp neighbors [detail | ethernet <stack-unit>/<slot>/<port>]
Specify the Ethernet port in the <stack-unit>/<slot>/<port> format. Stack-unit is 1.
Displaying CDP entries
To display CDP entries for all neighbors, enter the show fdp entry command.
Brocade# show fdp entry *
Device ID: Router
configured as tag-type8100
Entry address(es):
IP address: 10.20.67.98
IPv6 address (Global): 2001:DB8:2
Platform: ICX6650-64 Router, Capabilities: Router
Interface: ethernet1/1/6
Port ID (outgoing port): ethernet1/1/6 is TAGGED in following VLAN(s):
1000
Holdtime : 128 seconds
Brocade Communications Systems, Inc. ICX6650-64 Router, IronWare Version
07.5.00B1T323 23 Compiled on Jun 28 2012 at 18:54:50 labeled as ICXLR07500B1
To display CDP entries for a specific device, specify the device ID, as shown in the following
example.
Brocade# show fdp entry CISCO3750
Device ID: CISCO3750
Entry address(es):
Platform: cisco WS-C3750G-24TS, Capabilities: Switch, IGMP
Interface: ethernet1/1/5, Port ID (outgoing port): GigabitEthernet1/0/5
Holdtime : 130 seconds
Cisco Internetwork Operating System Software
IOS (tm) C3750 Software (C3750-I5-M), Version 12.2(18)SE, RELEASE SOFTWARE (fc1)
Copyright (c) 1986-2004 by cisco Systems, Inc.
Compiled Wed 04-Feb-04 20:29 by antonino
Syntax: show fdp entry * | <device-id>
Brocade ICX 6650 Administration Guide
53-1002600-01
179
7
CDP packets
Displaying CDP statistics
To display CDP packet statistics, enter the show fdp traffic command.
Brocade# show fdp traffic
CDP counters:
Total packets output: 0, Input: 3
Hdr syntax: 0, Chksum error: 0, Encaps failed: 0
No memory: 0, Invalid packet: 0, Fragmented: 0
Syntax: show fdp traffic
Clearing CDP information
You can clear the following CDP information:
• Cisco Neighbor information
• CDP statistics
To clear the Cisco neighbor information, enter the clear fdp table command.
Brocade# clear fdp table
Syntax: clear fdp table
To clear CDP statistics, enter the following command.
Brocade# clear fdp counters
Syntax: clear fdp counters
180
Brocade ICX 6650 Administration Guide
53-1002600-01
Chapter
8
LLDP and LLDP-MED
In this chapter
• LLDP terms used in this chapter . . . . . . . . . . . . . . . . . . . . . . . . . . . . . . . . .
• LLDP overview . . . . . . . . . . . . . . . . . . . . . . . . . . . . . . . . . . . . . . . . . . . . . . . .
• LLDP-MED overview. . . . . . . . . . . . . . . . . . . . . . . . . . . . . . . . . . . . . . . . . . . .
• General LLDP operating principles. . . . . . . . . . . . . . . . . . . . . . . . . . . . . . . .
• MIB support . . . . . . . . . . . . . . . . . . . . . . . . . . . . . . . . . . . . . . . . . . . . . . . . . .
• Syslog messages . . . . . . . . . . . . . . . . . . . . . . . . . . . . . . . . . . . . . . . . . . . . . .
• LLDP configuration . . . . . . . . . . . . . . . . . . . . . . . . . . . . . . . . . . . . . . . . . . . .
• LLDP-MED configuration . . . . . . . . . . . . . . . . . . . . . . . . . . . . . . . . . . . . . . . .
• LLDP-MED attributes advertised by the Brocade device . . . . . . . . . . . . . .
• Resetting LLDP statistics . . . . . . . . . . . . . . . . . . . . . . . . . . . . . . . . . . . . . . .
• Clearing cached LLDP neighbor information . . . . . . . . . . . . . . . . . . . . . . . .
182
183
184
186
191
191
192
206
217
223
224
Table 41 lists the Brocade ICX 6650 switch and the Link Layer Discovery Protocol (LLDP) features
the switch supports. These features are supported in full Layer 3 software images, except where
explicitly noted.
TABLE 41
Supported LLDP features
Feature
Brocade ICX
6650
LLDP
Yes
LLDP-MED
Yes
Support for tagged LLDP packets
Yes
IPv4 management address advertisement Yes
IPv6 management address advertisement Yes
LLDP operating mode setting per port
Yes
Setting the maximum number of LLDP
neighbors
Yes
SNMP and Syslog messages
Yes
LLDP transmission intervals
Yes
Holdtime multiplier for transmit TTL
Yes
Configuring the minimum time between
port reinitializations
Yes
Fast start repeat count for LLDP-MED
Yes
Location ID for LLDP-MED
Yes
Brocade ICX 6650 Administration Guide
53-1002600-01
181
8
LLDP terms used in this chapter
TABLE 41
Supported LLDP features
Feature
Brocade ICX
6650
LLDP-MED network policy
Yes
LLDP statistics and configuration details
Yes
This chapter describes how to configure the following protocols:
Link layer discovery protocol (LLDP) – The Layer 2 network discovery protocol described in the IEEE
802.1AB standard, Station and Media Access Control Connectivity Discovery. This protocol
enables a station to advertise its capabilities to, and to discover, other LLDP-enabled stations in the
same 802 LAN segments.
LLDP media endpoint devices (LLDP-MED) – The Layer 2 network discovery protocol extension
described in the ANSI/TIA-1057 standard, LLDP for Media Endpoint Devices. This protocol enables
a switch to configure and manage connected Media Endpoint devices that need to send media
streams across the network (e.g., IP telephones and security cameras).
LLDP enables network discovery between Network Connectivity devices (such as switches),
whereas LLDP-MED enables network discovery at the edge of the network, between Network
Connectivity devices and media Endpoint devices (such as IP phones).
The information generated by LLDP and LLDP-MED can be used to diagnose and troubleshoot
misconfigurations on both sides of a link. For example, the information generated can be used to
discover devices with misconfigured or unreachable IP addresses, and to detect port speed and
duplex mismatches.
LLDP and LLDP-MED facilitate interoperability across multiple vendor devices. Brocade devices
running LLDP can interoperate with third-party devices running LLDP.
The Brocade LLDP and LLDP-MED implementation adheres to the IEEE 802.1AB and TIA-1057
standards.
LLDP terms used in this chapter
Endpoint device – An LLDP-MED device located at the network edge, that provides some aspect of
IP communications service based on IEEE 802 LAN technology. An Endpoint device is classified in
one of three class types (I, II, or III) and can be an IP telephone, softphone, or conference bridge,
among others.
LLDP agent – The protocol entity that implements LLDP for a particular IEEE 802 device.
Depending on the configured LLDP operating mode, an LLDP agent can send and receive LLDP
advertisements (frames), or send LLDP advertisements only, or receive LLDP advertisements only.
LLDPDU (LLDP Data Unit) – A unit of information in an LLDP packet that consists of a sequence of
short variable length information elements, known as TLVs. LLDP pass-through is not supported in
conformance to IEEE standard.
MIB (Management Information Base) – A virtual database that identifies each manageable object
by its name, syntax, accessibility, and status, along with a text description and unique object
identifier (OID). The database is accessible by a Network Management Station (NMS) using a
management protocol such as the Simple Network Management Protocol (SNMP).
182
Brocade ICX 6650 Administration Guide
53-1002600-01
LLDP overview
8
Network connectivity device – A forwarding 802 LAN device, such as a router, switch, or wireless
access point.
Station – A node in a network.
TLV (Type-Length-Value) – An information element in an LLDPDU that describes the type of
information being sent, the length of the information string, and the value (actual information) that
will be transmitted.
TTL (Time-to-Live) – Specifies the length of time that the receiving device should maintain the
information acquired through LLDP in its MIB.
LLDP overview
LLDP enables a station attached to an IEEE 802 LAN/MAN to advertise its capabilities to, and to
discover, other stations in the same 802 LAN segments.
The information distributed by LLDP (the advertisement) is stored by the receiving device in a
standard Management Information Base (MIB), accessible by a Network Management System
(NMS) using a management protocol such as the Simple Network Management Protocol (SNMP).
The information also can be viewed from the CLI, using show LLDP commands.
Figure 11 illustrates LLDP connectivity
.
FIGURE 11
LLDP connectivity
port
A19
C2
D2
F3
device
info
Switch
IP-Phone
IP-Phone
OP-PBX
xxxx
xxxx
xxxx
xxxx
I’m a PBX
port
A4
B6
B21
device
IP-Phone
PC
Switch
info
xxxx
xxxx
xxxx
I’m a switch
I’m a switch
I’m a switch
I’m a switch
I’m a switch
I’m a switch
I’m a switch
I’m an IP Phone
I’m an IP Phone
I’m an IP Phone
I’m a PC
Brocade ICX 6650 Administration Guide
53-1002600-01
183
8
LLDP-MED overview
Benefits of LLDP
LLDP provides the following benefits:
• Network Management:
• Simplifies the use of and enhances the ability of network management tools in
multi-vendor environments
• Enables discovery of accurate physical network topologies such as which devices are
neighbors and through which ports they connect
• Enables discovery of stations in multi-vendor environments
• Network Inventory Data:
• Supports optional system name, system description, system capabilities and management
address
• System description can contain the device product name or model number, version of
hardware type, and operating system
• Provides device capability, such as switch, router, or WLAN access point
• Network troubleshooting:
• Information generated by LLDP can be used to detect speed and duplex mismatches
• Accurate topologies simplify troubleshooting within enterprise networks
• Can discover devices with misconfigured or unreachable IP addresses
LLDP-MED overview
LLDP-MED is an extension to LLDP. This protocol enables advanced LLDP features in a Voice over
IP (VoIP) network. Whereas LLDP enables network discovery between Network Connectivity
devices, LLDP-MED enables network discovery between Network Connectivity devices and media
Endpoints such as, IP telephones, softphones, VoIP gateways and conference bridges
.Figure 12 demonstrates LLDP-MED connectivity.
184
Brocade ICX 6650 Administration Guide
53-1002600-01
LLDP-MED overview
FIGURE 12
8
LLDP-MED connectivity
LLDP-MED Network Connectivity Devices
(e.g., L2/L3 switch, bridge, etc.) provide IEEE
802 network access to LLDP-MED endpoints
LLDP-MED Generic Endpoints (Class I)
act as basic participants in LLDP-MED.
Example Class I device: Communications
controller
IP Network
Infrastructure
(IEEE 802 LAN)
LLDP-MED Media Endpoints
(Class II) support IP media
streams.
Example Class II devices:
media gateway, conference
bridge
LLDP-MED Comunication Device Endpoints
(Class III) support end user IP communication.
Example Class III devices: IP telephone,
softphone
Benefits of LLDP-MED
LLDP-MED provides the following benefits:
• Vendor-independent management capabilities, enabling different IP telephony systems to
interoperate in one network.
• Automatically deploys network policies, such as Layer 2 and Layer 3 QoS policies and Voice
VLANs.
• Supports E-911 Emergency Call Services (ECS) for IP telephony
• Collects Endpoint inventory information
• Network troubleshooting
• Helps to detect improper network policy configuration
Brocade ICX 6650 Administration Guide
53-1002600-01
185
8
General LLDP operating principles
LLDP-MED class
An LLDP-MED class specifies an Endpoint type and its capabilities. An Endpoint can belong to one
of three LLDP-MED class types:
• Class 1 (Generic endpoint) – A Class 1 Endpoint requires basic LLDP discovery services, but
does not support IP media nor does it act as an end-user communication appliance. A Class 1
Endpoint can be an IP communications controller, other communication-related server, or
other device requiring basic LLDP discovery services.
• Class 2 (Media endpoint) – A Class 2 Endpoint supports media streams and may or may not be
associated with a particular end user. Device capabilities include media streaming, as well as
all of the capabilities defined for Class 1 Endpoints. A Class 2 Endpoint can be a voice/media
gateway, conference, bridge, media server, etc..
• Class 3 (Communication endpoint) – A Class 3 Endpoint supports end user IP communication.
Capabilities include aspects related to end user devices, as well as all of the capabilities
defined for Class 1 and Class 2 Endpoints. A Class 3 Endpoint can be an IP telephone,
softphone (PC-based phone), or other communication device that directly supports the end
user.
Discovery services defined in Class 3 include location identifier (ECS/E911) information and
inventory management.
The LLDP-MED device class is advertised when LLDP-MED is enabled on a port.
Figure 12 illustrates LLDP-MED connectivity and supported LLDP-MED classes.
General LLDP operating principles
LLDP and LLDP-MED use the services of the Data Link sublayers, Logical Link Control and Media
Access Control, to transmit and receive information to and from other LLDP Agents (protocol
entities that implement LLDP).
LLDP is a one-way protocol. An LLDP agent can transmit and receive information to and from
another LLDP agent located on an adjacent device, but it cannot solicit information from another
LLDP agent, nor can it acknowledge information received from another LLDP agent.
LLDP operating modes
When LLDP is enabled on a global basis, by default, each port on the Brocade device will be
capable of transmitting and receiving LLDP packets. You can disable a port’s ability to transmit and
receive LLDP packets, or change the operating mode to one of the following:
• Transmit LLDP information only
• Receive LLDP information only
LLDP transmit mode
An LLDP agent sends LLDP packets to adjacent LLDP-enabled devices. The LLDP packets contain
information about the transmitting device and port.
186
Brocade ICX 6650 Administration Guide
53-1002600-01
General LLDP operating principles
8
An LLDP agent initiates the transmission of LLDP packets whenever the transmit countdown timing
counter expires, or whenever LLDP information has changed. When a transmit cycle is initiated,
the LLDP manager extracts the MIB objects and formats this information into TLVs. The TLVs are
inserted into an LLDPDU, addressing parameters are prepended to the LLDPDU, and the
information is sent out LLDP-enabled ports to adjacent LLDP-enabled devices.
LLDP receive mode
An LLDP agent receives LLDP packets from adjacent LLDP-enabled devices. The LLDP packets
contain information about the transmitting device and port.
When an LLDP agent receives LLDP packets, it checks to ensure that the LLDPDUs contain the
correct sequence of mandatory TLVs, then validates optional TLVs. If the LLDP agent detects any
errors in the LLDPDUs and TLVs, it drops them in software. TLVs that are not recognized but do not
contain basic formatting errors, are assumed to be valid and are assigned a temporary
identification index and stored for future possible alter retrieval by network management. All
validated TLVs are stored in the neighbor database.
LLDP packets
LLDP agents transmit information about a sending device/port in packets called LLDP Data Units
(LLDPDUs). All the LLDP information to be communicated by a device is contained within a single
1500 byte packet. A device receiving LLDP packets is not permitted to combine information from
multiple packets.
As shown in Figure 13, each LLDPDU has three mandatory TLVs, an End of LLDPDU TLV, plus
optional TLVs as selected by network management.
FIGURE 13
LLDPDU packet format
Chassis ID
TLV
M
Port ID
TLV
M
Time to
Live TLV
Optional
TLV
M
...
Optional
TLV
End of
LLDPDU TLV
M
M = mandatory TLV (required for all LLDPDUs)
Each LLDPDU consists of an untagged Ethernet header and a sequence of short, variable length
information elements known as type, length, value (TLV).
TLVs have Type, Length, and Value fields, where:
• Type identifies the kind of information being sent
• Length indicates the length (in octets) of the information string
• Value is the actual information being sent (for example, a binary bit map or an alpha-numeric
string containing one or more fields).
Brocade ICX 6650 Administration Guide
53-1002600-01
187
8
General LLDP operating principles
TLV support
This section lists the LLDP and LLDP-MED TLV support.
LLDP TLVs
There are two types of LLDP TLVs, as specified in the IEEE 802.3AB standard:
• Basic management TLVs consist of both optional general system information TLVs as well as
mandatory TLVs.
Mandatory TLVs cannot be manually configured. They are always the first three TLVs in the
LLDPDU, and are part of the packet header.
General system information TLVs are optional in LLDP implementations and are defined by the
Network Administrator.
Brocade devices support the following Basic Management TLVs:
•
•
•
•
•
•
•
•
•
Chassis ID (mandatory)
Port ID (mandatory)
Time to Live (mandatory)
Port description
System name
System description
System capabilities
Management address
End of LLDPDU
• Organizationally-specific TLVs are optional in LLDP implementations and are defined and
encoded by individual organizations or vendors. These TLVs include support for, but are not
limited to, the IEEE 802.1 and 802.3 standards and the TIA-1057 standard.
Brocade devices support the following Organizationally-specific TLVs:
• 802.1 organizationally-specific TLVs
Port VLAN ID
VLAN name TLV
• 802.3 organizationally-specific TLVs
MAC/PHY configuration/status
Power through MDI
Link aggregation
Maximum frame size
188
Brocade ICX 6650 Administration Guide
53-1002600-01
General LLDP operating principles
8
LLDP-MED TLVs
Brocade devices honor and send the following LLDP-MED TLVs, as defined in the TIA-1057
standard:
•
•
•
•
LLDP-MED capabilities
Network policy
Location identification
Extended power-via-MDI
Mandatory TLVs
When an LLDP agent transmits LLDP packets to other agents in the same 802 LAN segments, the
following mandatory TLVs are always included:
• Chassis ID
• Port ID
• Time to Live (TTL)
This section describes the above TLVs in detail.
Chassis ID
The Chassis ID identifies the device that sent the LLDP packets.
There are several ways in which a device may be identified. A chassis ID subtype, included in the
TLV and shown in Table 42, indicates how the device is being referenced in the Chassis ID field.
TABLE 42
Chassis ID subtypes
ID subtype
Description
0
Reserved
1
Chassis component
2
Interface alias
3
Port component
4
MAC address
5
Network address
6
Interface name
7
Locally assigned
8 – 255
Reserved
Brocade ICX 6650 devices use chassis ID subtype 4, the base MAC address of the device. Other
third party devices may use a chassis ID subtype other than 4. The chassis ID will appear similar to
the following on the remote device, and in the CLI display output on the Brocade device (show lldp
local-info).
Chassis ID (MAC address): 748e.f80c.5f40
The chassis ID TLV is always the first TLV in the LLDPDU.
Port ID
The Port ID identifies the port from which LLDP packets were sent.
Brocade ICX 6650 Administration Guide
53-1002600-01
189
8
General LLDP operating principles
There are several ways in which a port may be identified, as shown in Figure 43. A port ID subtype,
included in the TLV, indicates how the port is being referenced in the Port ID field.
TABLE 43
Port ID subtypes
ID subtype
Description
0
Reserved
1
Interface alias
2
Port component
3
MAC address
4
Network address
5
Interface name
6
Agent circuit ID
7
Locally assigned
8 – 255
Reserved
Brocade ICX 6650 devices use port ID subtype 3, the permanent MAC address associated with the
port. Other third party devices may use a port ID subtype other than 3. The port ID appears similar
to the following on the remote device, and in the CLI display output on the Brocade device (show
lldp local-info).
Port ID (MAC address): 748e.f80c.5f40
The LLDPDU format is shown in “LLDPDU packet format” on page 187.
The Port ID TLV format is shown below.
FIGURE 14
Port ID TLV packet format
TLV Type = 3
7 bits
TLV Information
String Length = 2
9 bits
Time to Live (TTL)
2 octets
TTL value
The Time to Live (TTL) Value is the length of time the receiving device should maintain the
information acquired by LLDP in its MIB.
The TTL value is automatically computed based on the LLDP configuration settings. The TTL value
will appear similar to the following on the remote device, and in the CLI display output on the
Brocade device (show lldp local-info).
Time to live: 40 seconds
If the TTL field has a value other than zero, the receiving LLDP agent is notified to completely
replace all information associated with the LLDP agent/port with the information in the received
LLDPDU.
If the TTL field value is zero, the receiving LLDP agent is notified that all system information
associated with the LLDP agent/port is to be deleted. This TLV may be used, for example, to signal
that the sending port has initiated a port shutdown procedure.
The LLDPDU format is shown in “LLDPDU packet format” on page 187.
190
Brocade ICX 6650 Administration Guide
53-1002600-01
MIB support
8
The TTL TLV format is shown below.
FIGURE 15
TTL TLV packet format
TLV Type = 3
7 bits
TLV Information
String Length = 2
9 bits
Time to Live (TTL)
2 octets
MIB support
Brocade ICX 6650 devices support the following standard management information base (MIB)
modules:
•
•
•
•
LLDP-MIB
LLDP-EXT-DOT1-MIB
LLDP-EXT-DOT3-MIB
LLDP-EXT-MED-MIB
Syslog messages
Syslog messages for LLDP provide management applications with information related to MIB data
consistency and general status. These Syslog messages correspond to the lldpRemTablesChange
SNMP notifications. Refer to “Enabling LLDP SNMP notifications and Syslog messages” on
page 196.
Syslog messages for LLDP-MED provide management applications with information related to
topology changes. These Syslog messages correspond to the lldpXMedTopologyChangeDetected
SNMP notifications. Refer to “Enabling SNMP notifications and Syslog messages for LLDP-MED
topology changes” on page 207.
Brocade ICX 6650 Administration Guide
53-1002600-01
191
8
LLDP configuration
LLDP configuration
This section describes how to enable and configure LLDP.
Table 44 lists the LLDP global-level tasks and the default behavior/value for each task.
TABLE 44
LLDP global configuration tasks and default behavior /value
Global task
Default behavior / value when LLDP is enabled
Enabling LLDP on a global basis
Disabled
Specifying the maximum number of LLDP
neighbors per device
Automatically set to 392 neighbors per device
Specifying the maximum number of LLDP
neighbors per port
Automatically set to 4 neighbors per port
Enabling SNMP notifications and Syslog messages
Disabled
Changing the minimum time between SNMP traps
and Syslog messages
Automatically set to 2 seconds when SNMP notifications and
Syslog messages for LLDP are enabled
Enabling and disabling TLV advertisements
When LLDP transmit is enabled, by default, the Brocade
device will automatically advertise LLDP capabilities, except
for the system description, VLAN name, and power-via-MDI
information, which may be configured by the system
administrator.
Also, if desired, you can disable the advertisement of
individual TLVs.
Changing the minimum time between LLDP
transmissions
Automatically set to 2 seconds
Changing the interval between regular LLDP
transmissions
Automatically set to 30 seconds
Changing the holdtime multiplier for transmit TTL
Automatically set to 4
Changing the minimum time between port
reinitializations
Automatically set to 2 seconds
LLDP configuration notes and considerations
• LLDP is supported on Ethernet interfaces only.
• If a port is 802.1X-enabled, the transmission and reception of LLDP packets will only take
place while the port is authorized.
• Cisco Discovery Protocol (CDP) and Brocade Discovery Protocol (FDP) run independently of
LLDP. Therefore, these discovery protocols can run simultaneously on the same device.
• By default, the Brocade device limits the number of neighbors per port to four, and staggers
the transmission of LLDP packets on different ports, in order to minimize any high-usage
spikes to the CPU.
• By default, the Brocade device forwards
• Ports that are in blocking mode (spanning tree) can still receive LLDP packets from a
forwarding port.
• Auto-negotiation status indicates what is being advertised by the port for 802.3
auto-negotiation.
192
Brocade ICX 6650 Administration Guide
53-1002600-01
LLDP configuration
8
Enabling and disabling LLDP
LLDP is enabled by default on individual ports. However, to run LLDP, you must first enable it on a
global basis (on the entire device).
To enable LLDP globally, enter the following command at the global CONFIG level of the CLI.
Brocade(config)#lldp run
Syntax: [no] lldp run
Enabling support for tagged LLDP packets
By default, Brocade devices do not accept tagged LLDP packets from other vendors’ devices. To
enable support, apply the command lldp tagged-packets process at the Global CONFIG level of the
CLI. When enabled, the device will accept incoming LLDP tagged packets if the VLAN tag matches
any of the following:
• a configured VLAN on the port
• the default VLAN for a tagged port
• the configured untagged VLAN for a dual-mode port
To enable support for tagged LLDP packets, enter the following command.
Brocade(config)#lldp tagged-packets process
Syntax: [no] lldp tagged-packets process
Changing a port LLDP operating mode
LLDP packets are not exchanged until LLDP is enabled on a global basis. When LLDP is enabled on
a global basis, by default, each port on the Brocade device will be capable of transmitting and
receiving LLDP packets. You can disable a port’s ability to transmit and receive LLDP packets, or
change the operating mode to one of the following:
• Transmit LLDP information only
• Receive LLDP information only
You can configure a different operating mode for each port on the Brocade device. For example,
you could disable the receipt and transmission of LLDP packets on port e 1/1/1, configure port e
1/1/3 to only receive LLDP packets, and configure port e 1/1/5 to only transmit LLDP packets.
The following sections show how to change the operating mode.
Enabling and disabling receive and transmit mode
To disable the receipt and transmission of LLDP packets on individual ports, enter a command
such as the following at the Global CONFIG level of the CLI.
Brocade(config)#no lldp enable ports e 1/1/1 e 1/1/2
The above command disables LLDP on ports 1/1/1 and 1/1/2. These ports will not transmit nor
receive LLDP packets.
To enable LLDP on a port after it has been disabled, enter the following command.
Brocade ICX 6650 Administration Guide
53-1002600-01
193
8
LLDP configuration
Brocade(config)#lldp enable ports e 1/2/1
Syntax: [no] lldp enable ports ethernet <stack-unit>/<slot>/<port>| all
Use the [no] form of the command to disable the receipt and transmission of LLDP packets on a
port. Specify the ethernet port in the <stack-unit>/<slot>/<port> format. Stack-unit is 1.
You can list all of the ports individually, use the keyword to to specify ranges of ports, or a
combination of both. To apply the configuration to all ports on the device, use the keyword all
instead of listing the ports individually.
NOTE
When a port is configured to both receive and transmit LLDP packets and the MED capabilities TLV
is enabled, LLDP-MED is enabled as well. LLDP-MED is not enabled if the operating mode is set to
receive only or transmit only.
Enabling and disabling receive only mode
When LLDP is enabled on a global basis, by default, each port on the Brocade ICX 6650 device will
be capable of transmitting and receiving LLDP packets. To change the LLDP operating mode from
receive and transmit mode to receive only mode, simply disable the transmit mode. Enter a
command such as the following at the Global CONFIG level of the CLI.
Brocade(config)#no lldp enable transmit ports e 1/1/1 e 1/1/2 e 1/1/3
The above command changes the LLDP operating mode on ports 1/1/1, 1/1/2, and 1/1/3 from
transmit and receive mode to receive only mode.
To change a port LLDP operating mode from transmit only to receive only, first disable the transmit
only mode, then enable the receive only mode. Enter commands such as the following.
Brocade(config)#no lldp enable transmit ports e 1/1/4 e 1/1/5 e 1/1/6
Brocade(config)#lldp enable receive ports e 1/1/4 e 1/1/5 e 1/1/6
The above commands change the LLDP operating mode on ports 1/1/4, 1/1/5, and 1/1/6, from
transmit only to receive only. Note that if you do not disable the transmit only mode, you will
configure the port to both transmit and receive LLDP packets.
NOTE
LLDP-MED is not enabled when you enable the receive only operating mode. To enable LLDP-MED,
you must configure the port to both receive and transmit LLDP packets. Refer to “Enabling and
disabling receive and transmit mode” on page 193.
Syntax: [no] lldp enable receive ports ethernet <stack-unit>/<slot>/<port>| all
Use the no form of the command to disable the receive only mode. Specify the ethernet port in the
<stack-unit>/<slot>/<port> format. Stack-unit is 1.
You can list all of the ports individually, use the keyword to to specify ranges of ports, or a
combination of both. To apply the configuration to all ports on the device, use the keyword all
instead of listing the ports individually.
Enabling and Disabling Transmit Only Mode
When LLDP is enabled on a global basis, by default, each port on the Brocade device will be
capable of transmitting and receiving LLDP packets. To change the LLDP operating mode to
transmit only mode, simply disable the receive mode. Enter a command such as the following at
the Global CONFIG level of the CLI.
194
Brocade ICX 6650 Administration Guide
53-1002600-01
LLDP configuration
8
Brocade(config)#no lldp enable receive ports e 1/1/1 e 1/1/2 e 1/1/3
The above command changes the LLDP operating mode on ports 1/1/1 , 1/1/2, and 1/1/3 from
transmit and receive mode to transmit only mode. Any incoming LLDP packets will be dropped in
software.
To change a port LLDP operating mode from receive only to transmit only, first disable the receive
only mode, then enable the transmit only mode. For example, enter commands such as the
following at the Global CONFIG level of the CLI.
Brocade(config)#no lldp enable receive ports e 1/1/4 e 1/1/5
Brocade(config)#lldp enable transmit ports e 1/1/4 e 1/1/5
The above commands change the LLDP operating mode on ports 1/1/4 and 1/1/5 from receive
only mode to transmit only mode. Any incoming LLDP packets will be dropped in software. Note
that if you do not disable receive only mode, you will configure the port to both receive and transmit
LLDP packets.
NOTE
LLDP-MED is not enabled when you enable the transmit only operating mode. To enable LLDP-MED,
you must configure the port to both receive and transmit LLDP packets. Refer to “Enabling and
disabling receive and transmit mode” on page 193.
Syntax: [no] lldp enable transmit ports ethernet <stack-unit>/<slot>/<port>| all
Use the no form of the command to disable the transmit only mode. Specify the ethernet port in the
<stack-unit>/<slot>/<port> format. Stack-unit is 1.
You can list all of the ports individually, use the keyword to to specify ranges of ports, or a
combination of both. To apply the configuration to all ports on the device, use the keyword all
instead of listing the ports individually.
Maximum number of LLDP neighbors
You can change the limit of the number of LLDP neighbors for which LLDP data will be retained, per
device as well as per port.
Specifying the maximum number of
LLDP neighbors per device
You can change the maximum number of neighbors for which LLDP data will be retained for the
entire system.
For example, to change the maximum number of LLDP neighbors for the entire device to 26, enter
the following command.
Brocade(config)#lldp max-total-neighbors 26
Syntax: [no] lldp max-total-neighbors <value>
Use the [no] form of the command to remove the static configuration and revert to the default
value of 392.
The <value> variable is a number between 16 and 8192. The default number of LLDP neighbors
per device is 392.
Brocade ICX 6650 Administration Guide
53-1002600-01
195
8
LLDP configuration
Use the show lldp command to view the configuration.
Specifying the maximum number of
LLDP neighbors per port
You can change the maximum number of LLDP neighbors for which LLDP data will be retained for
each port. By default, the maximum number is four and you can change this to a value between
one and 64.
For example, to change the maximum number of LLDP neighbors to six, enter the following
command.
Brocade(config)#lldp max-neighbors-per-port 6
Syntax: [no] lldp max-neighbors-per-port <value>
Use the no form of the command to remove the static configuration and revert to the default value
of four.
The <value> variable is a number from 1 to 64. The default is number of LLDP neighbors per port
is four.
Use the show lldp command to view the configuration.
Enabling LLDP SNMP notifications and Syslog messages
SNMP notifications and Syslog messages for LLDP provide management applications with
information related to MIB data updates and general status.
When you enable LLDP SNMP notifications, corresponding Syslog messages are enabled as well.
When you enable LLDP SNMP notifications, the device will send traps and corresponding Syslog
messages whenever there are changes to the LLDP data received from neighboring devices.
LLDP SNMP notifications and corresponding Syslog messages are disabled by default. To enable
them, enter a command such as the following at the Global CONFIG level of the CLI.
Brocade(config)#lldp enable snmp notifications ports e 1/1/1 to 1/1/2
The above command enables SNMP notifications and corresponding Syslog messages on ports
1/1/1 and 1/1/2. By default, the device will send no more than one SNMP notification and Syslog
message within a five second period. If desired, you can change this interval. Refer to “Specifying
the minimum time between SNMP traps and Syslog messages” on page 197.
Syntax: [no] lldp enable snmp notifications ports ethernet <stack-unit>/<slot>/<port>| all
Specify the ethernet port in the <stack-unit>/<slot>/<port> format. Stack-unit is 1.
You can list all of the ports individually, use the keyword to to specify ranges of ports, or a
combination of both. To apply the configuration to all ports on the device, use the keyword all
instead of listing the ports individually.
196
Brocade ICX 6650 Administration Guide
53-1002600-01
LLDP configuration
8
Specifying the minimum time between
SNMP traps and Syslog messages
When SNMP notifications and Syslog messages for LLDP are enabled, the device will send no more
than one SNMP notification and corresponding Syslog message within a five second period. If
desired, you can throttle the amount of time between transmission of SNMP traps
(lldpRemTablesChange) and Syslog messages from five seconds up to a value equal to one hour
(3600 seconds).
NOTE
Because LLDP Syslog messages are rate limited, some LLDP information given by the system will
not match the current LLDP statistics (as shown in the show lldp statistics command output).
To change the minimum time interval between traps and Syslog messages, enter a command such
as the following.
Brocade(config)#lldp snmp-notification-interval 60
When the above command is applied, the LLDP agent will send no more than one SNMP
notification and Syslog message every 60 seconds.
Syntax: [no] lldp snmp-notification-interval <seconds>
The <seconds> variable is a value between 5 and 3600. The default is 5 seconds.
Changing the minimum time between LLDP transmissions
The LLDP transmit delay timer limits the number of LLDP frames an LLDP agent can send within a
specified time frame. When you enable LLDP, the system automatically sets the LLDP transmit
delay timer to two seconds. If desired, you can change the default behavior from two seconds to a
value between 1 and 8192 seconds.
NOTE
The LLDP transmit delay timer must not be greater than one quarter of the LLDP transmission
interval (CLI command lldp transmit-interval).
The LLDP transmit delay timer prevents an LLDP agent from transmitting a series of successive
LLDP frames during a short time period, when rapid changes occur in LLDP. It also increases the
probability that multiple changes, rather than single changes, will be reported in each LLDP frame.
To change the LLDP transmit delay timer, enter a command such as the following at the Global
CONFIG level of the CLI.
Brocade(config)#lldp transmit-delay 7
The above command causes the LLDP agent to wait a minimum of seven seconds after
transmitting an LLDP frame and before sending another LLDP frame.
Syntax: [no] lldp transmit-delay <seconds>
The <seconds> variable is a value between 1 and 8192. The default is two seconds. Note that this
value must not be greater than one quarter of the LLDP transmission interval (CLI command lldp
transmit-interval).
Brocade ICX 6650 Administration Guide
53-1002600-01
197
8
LLDP configuration
Changing the interval between regular LLDP transmissions
The LLDP transmit interval specifies the number of seconds between regular LLDP packet
transmissions. When you enable LLDP, by default, the device will wait 30 seconds between regular
LLDP packet transmissions. If desired, you can change the default behavior from 30 seconds to a
value between 5 and 32768 seconds.
To change the LLDP transmission interval, enter a command such as the following at the Global
CONFIG level of the CLI.
Brocade(config)#lldp transmit-interval 40
The above command causes the LLDP agent to transmit LLDP frames every 40 seconds.
Syntax: [no] lldp transmit-interval <seconds>
The <seconds> variable is a value from 5 to 32768. The default is 30 seconds.
NOTE
Setting the transmit interval or transmit holdtime multiplier, or both, to inappropriate values can
cause the LLDP agent to transmit LLDPDUs with TTL values that are excessively high. This in turn
can affect how long a receiving device will retain the information if it is not refreshed.
Changing the holdtime multiplier for transmit TTL
The holdtime multiplier for transmit TTL is used to compute the actual time-to-live (TTL) value used
in an LLDP frame. The TTL value is the length of time the receiving device should maintain the
information in its MIB. When you enable LLDP, the device automatically sets the holdtime
multiplier for TTL to four. If desired, you can change the default behavior from four to a value
between two and ten.
To compute the TTL value, the system multiplies the LLDP transmit interval by the holdtime
multiplier. For example, if the LLDP transmit interval is 30 and the holdtime multiplier for TTL is 4,
then the value 120 is encoded in the TTL field in the LLDP header.
To change the holdtime multiplier, enter a command such as the following at the Global CONFIG
level of the CLI.
Brocade(config)#lldp transmit-hold 6
Syntax: [no] lldp transmit-hold <value>
The <value> variable is a number from 2 to 10. The default value is 4.
NOTE
Setting the transmit interval or transmit holdtime multiplier, or both, to inappropriate values can
cause the LLDP agent to transmit LLDPDUs with TTL values that are excessively high. This in turn
can affect how long a receiving device will retain the information if it is not refreshed.
198
Brocade ICX 6650 Administration Guide
53-1002600-01
LLDP configuration
8
Changing the minimum time between port reinitializations
The LLDP re-initialization delay timer specifies the minimum number of seconds the device will wait
from when LLDP is disabled on a port, until it will honor a request to re-enable LLDP on that port.
When you enable LLDP, the system sets the re-initialization delay timer to two seconds. If desired,
you can change the default behavior from two seconds to a value between one and ten seconds.
To set the re-initialization delay timer, enter a command such as the following at the Global CONFIG
level of the CLI.
Brocade(config)#lldp reinit-delay 5
The above command causes the device to wait five seconds after LLDP is disabled, before
attempting to honor a request to re-enable it.
Syntax: [no] lldp reinit-delay <seconds>
The <seconds> variable is a value from 1 – 10. The default is two seconds.
LLDP TLVs advertised by the Brocade device
When LLDP is enabled on a global basis, the Brocade device will automatically advertise the
following information, except for the features noted:
General system information:
•
•
•
•
•
Management address
Port description
System capabilities
System description (not automatically advertised)
System name
802.1 capabilities:
• VLAN name (not automatically advertised)
• Untagged VLAN ID
802.3 capabilities:
•
•
•
•
Link aggregation information
MAC/PHY configuration and status
Maximum frame size
Power-via-MDI information (not automatically advertised)
The above TLVs are described in detail in the following sections.
NOTE
The system description, VLAN name, and power-via-MDI information TLVs are not automatically
enabled. The following sections show how to enable these advertisements.
General system information for LLDP
Except for the system description, the Brocade device will advertise the following system
information when LLDP is enabled on a global basis:
Brocade ICX 6650 Administration Guide
53-1002600-01
199
8
LLDP configuration
•
•
•
•
•
Management address
Port description
System capabilities
System description (not automatically advertised)
System name
Management Address
A management address is normally an IPv4 or IPv6 address that can be used to manage the
device. Management address advertising has two modes: default, or explicitly configured. The
default mode is used when no addresses are configured to be advertised for a given port. If any
addresses are configured to be advertised for a given port, then only those addresses are
advertised. This applies across address types, so for example, if just one IPv4 address is explicitly
configured to be advertised for a port, then no IPv6 addresses will be advertised for that port (since
none were configured to be advertised), even if IPv6 addresses are configured within the system.
If no management address is explicitly configured to be advertised, the Brocade ICX 6650 device
will use the first available IPv4 address and the first available IPv6 address (so it may advertise
IPv4, IPv6 or both). A Layer 3 switch will select the first available address of each type from those
configured on the following types of interfaces, in the following order of preference:
•
•
•
•
•
•
•
Physical port on which LLDP will be transmitting the packet
Virtual router interface (VE) on a VLAN that the port is a member of
Dedicated management port
Loopback interface
Virtual router interface (VE) on any other VLAN
Other physical port
Other interface
For IPv6 addresses, link-local and anycast addresses will be excluded from these searches.
If no IP address is configured on any of the above, the port's current MAC address will be
advertised.
To advertise a IPv4 management address, enter a command such as the following:
Brocade(config)#lldp advertise management-address ipv4 10.157.2.1 ports e 1/1/1
The management address will appear similar to the following on the remote device, and in the CLI
display output on the Brocade device (show lldp local-info):
Management address (IPv4): 10.157.2.1
Syntax: [no] lldp advertise management-address ipv4 <ipv4 address> ports ethernet
<stack-unit>/<slot>/<port>| all
To support an IPv6 management address, there is a similar command that has equivalent behavior
as the IPv4 command.
To advertise an IPv6 management address, enter a command such as the following:
Brocade(config)#lldp advertise management-address ipv6 2001:DB8:90 ports e 1/1/3
Syntax: [no] lldp advertise management-address ipv6 <ipv6 address> ports ethernet
<stack-unit>/<slot>/<port>| all
200
Brocade ICX 6650 Administration Guide
53-1002600-01
LLDP configuration
8
The <ipv4 address> or <ipv6 address> or both variables are the addresses that may be used to
reach higher layer entities to assist discovery by network management. In addition to management
addresses, the advertisement will include the system interface number associated with the
management address.
Specify the ethernet port in the <stack-unit>/<slot>/<port> format. Stack-unit is 1.
You can list all of the ports individually; use the keyword to specify a range of ports, or a
combination of both. To apply the configuration to all ports on the device, use the keyword all
instead of listing the ports individually.
Port description
The port description TLV identifies the port from which the LLDP agent transmitted the
advertisement. The port description is taken from the ifDescr MIB object from MIB-II.
By default, the port description is automatically advertised when LLDP is enabled on a global basis.
To disable advertisement of the port description, enter a command such as the following.
Brocade(config)#no lldp advertise port-description ports e 1/1/1 to 1/1/5
The port description will appear similar to the following on the remote device, and in the CLI display
output on the Brocade device (show lldp local-info).
Port description: “GigabitEthernet20”
Syntax: [no] lldp advertise port-description ports ethernet <stack-unit>/<slot>/<port>| all
Specify the ethernet port in the <stack-unit>/<slot>/<port> format. Stack-unit is 1.
You can list all of the ports individually, use the keyword to to specify ranges of ports, or a
combination of both. To apply the configuration to all ports on the device, use the keyword all
instead of listing the ports individually. Note that using the keyword all may cause undesirable
effects on some ports. For example, if you configure all ports to advertise their VLAN name, and the
configuration includes ports that are not members of any VLAN, the system will warn of the
misconfigurations on non-member VLAN ports. The configuration will be applied to all ports,
however, the ports that are not members of any VLAN will not send VLAN name advertisements.
System capabilities
The system capabilities TLV identifies the primary functions of the device and indicates whether
these primary functions are enabled. The primary functions can be one or more of the following
(more than one for example, if the device is both a bridge and a router):
•
•
•
•
•
•
•
•
Repeater
Bridge
WLAN access point
Router
Telephone
DOCSIS cable device
Station only (devices that implement end station capability)
Other
Brocade ICX 6650 Administration Guide
53-1002600-01
201
8
LLDP configuration
System capabilities for Brocade devices are based on the type of software image in use (e.g., Layer
2 switch or Layer 3 router). The enabled capabilities will be the same as the available capabilities,
except that when using a router image (base or full Layer 3), if the global route-only feature is
turned on, the bridge capability will not be included, since no bridging takes place.
By default, the system capabilities are automatically advertised when LLDP is enabled on a global
basis. To disable this advertisement, enter a command such as the following.
Brocade(config)#no lldp advertise system-capabilities ports e 1/1/1 to 1/1/5
The system capabilities will appear similar to the following on the remote device, and in the CLI
display output on the Brocade device (show lldp local-info).
System capabilities :
Enabled capabilities:
bridge
bridge
Syntax: [no] lldp advertise system-capabilities ports ethernet <stack-unit>/<slot>/<port>| all
Specify the ethernet port in the <stack-unit>/<slot>/<port> format. Stack-unit is 1.
You can list all of the ports individually, use the keyword to to specify ranges of ports, or a
combination of both. To apply the configuration to all ports on the device, use the keyword all
instead of listing the ports individually. Note that using the keyword all may cause undesirable
effects on some ports. For example, if you configure all ports to advertise their VLAN name, and the
configuration includes ports that are not members of any VLAN, the system will warn of the
misconfigurations on non-member VLAN ports. The configuration will be applied to all ports,
however, the ports that are not members of any VLAN will not send VLAN name advertisements.
System description
The system description is the network entity, which can include information such as the product
name or model number, the version of the system hardware type, the software operating system
level, and the networking software version. The information corresponds to the sysDescr MIB
object in MIB-II.
To advertise the system description, enter a command such as the following.
Brocade(config)#lldp advertise system-description ports e 1/1/1 to 1/1/5
The system description will appear similar to the following on the remote device, and in the CLI
display output on the Brocade device (show lldp local-info).
+ System description : "Brocade Communications, Inc.
IronWare Version 04.0.00b256T3e1 Compiled on Sep 04 2007 at 0\
3:54:29 labeled as SXS04000b256"
NOTE
The contents of the show command output will vary depending on which TLVs are configured to be
advertised.
Syntax: [no] lldp advertise system-description ports ethernet <stack-unit>/<slot>/<port>| all
Specify the ethernet port in the <stack-unit>/<slot>/<port> format. Stack-unit is 1.
202
Brocade ICX 6650 Administration Guide
53-1002600-01
LLDP configuration
8
You can list all of the ports individually, use the keyword to to specify ranges of ports, or a
combination of both. To apply the configuration to all ports on the device, use the keyword all
instead of listing the ports individually. Note that using the keyword all may cause undesirable
effects on some ports. For example, if you configure all ports to advertise their VLAN name, and the
configuration includes ports that are not members of any VLAN, the system will warn of the
misconfigurations on non-member VLAN ports. The configuration will be applied to all ports,
however, the ports that are not members of any VLAN will not send VLAN name advertisements.
System name
The system name is the system administratively assigned name, taken from the sysName MIB
object in MIB-II. The sysName MIB object corresponds to the name defined with the CLI command
hostname.
By default, the system name is automatically advertised when LLDP is enabled on a global basis.
To disable this advertisement, enter a command such as the following.
Brocade(config)#no lldp advertise system-name ports e 1/1/1 to 1/1/5
The system name will appear similar to the following on the remote device, and in the CLI display
output on the Brocade device (show lldp local-info).
System name:
“ICX6650-64 ”
Syntax: [no] lldp advertise system-name ports ethernet <stack-unit>/<slot>/<port>| all
Specify the ethernet port in the <stack-unit>/<slot>/<port> format. Stack-unit is 1.
You can list all of the ports individually, use the keyword to to specify ranges of ports, or a
combination of both. To apply the configuration to all ports on the device, use the keyword all
instead of listing the ports individually. Note that using the keyword all may cause undesirable
effects on some ports. For example, if you configure all ports to advertise their VLAN name, and the
configuration includes ports that are not members of any VLAN, the system will warn of the
misconfigurations on non-member VLAN ports. The configuration will be applied to all ports,
however, the ports that are not members of any VLAN will not send VLAN name advertisements.
802.1 capabilities
Except for the VLAN name, the Brocade ICX 6650 device will advertise the following 802.1
attributes when LLDP is enabled on a global basis:
• VLAN name (not automatically advertised)
• Untagged VLAN ID
VLAN name
The VLAN name TLV contains the name and VLAN ID of a VLAN configured on a port. An LLDPDU
may include multiple instances of this TLV, each for a different VLAN.
To advertise the VLAN name, enter a command such as the following.
Brocade(config)#lldp advertise vlan-name vlan 99 ports e 1/1/1 to 1/1/5
The VLAN name will appear similar to the following on the remote device, and in the CLI display
output on the Brocade device (show lldp local-info).
VLAN name (VLAN 99): “Voice-VLAN-99”
Brocade ICX 6650 Administration Guide
53-1002600-01
203
8
LLDP configuration
Syntax: [no] lldp advertise vlan-name vlan <vlan ID> ports ethernet <stack-unit>/<slot>/<port>|
all
For <vlan ID>, enter the VLAN ID to advertise.
Specify the ethernet port in the <stack-unit>/<slot>/<port> format. Stack-unit is 1.
You can list all of the ports individually, use the keyword to to specify ranges of ports, or a
combination of both. To apply the configuration to all ports on the device, use the keyword all
instead of listing the ports individually. Note that using the keyword all may cause undesirable
effects on some ports. For example, if you configure all ports to advertise their VLAN name, and the
configuration includes ports that are not members of any VLAN, the system will warn of the
misconfigurations on non-member VLAN ports. The configuration will be applied to all ports,
however, the ports that are not members of any VLAN will not send VLAN name advertisements.
Untagged VLAN ID
The port VLAN ID TLV advertises the Port VLAN Identifier (PVID) that will be associated with
untagged or priority-tagged frames. If the port is not an untagged member of any VLAN (i.e., the
port is strictly a tagged port), the value zero will indicate that.
By default, the port VLAN ID is automatically advertised when LLDP is enabled on a global basis.
To disable this advertisement, enter a command such as the following.
Brocade(config)#no lldp advertise port-vlan-id ports e 1/1/1 to 1/1/5
The untagged VLAN ID will appear similar to the following on the remote device, and in the CLI
display output on the Brocade device (show lldp local-info).
Port VLAN ID: 99
Syntax: [no] lldp advertise port-vlan-id ports ethernet <stack-unit>/<slot>/<port>| all
Specify the ethernet port in the <stack-unit>/<slot>/<port> format. Stack-unit is 1.
You can list all of the ports individually, use the keyword to to specify ranges of ports, or a
combination of both. To apply the configuration to all ports on the device, use the keyword all
instead of listing the ports individually. Note that using the keyword all may cause undesirable
effects on some ports. For example, if you configure all ports to advertise their VLAN name, and the
configuration includes ports that are not members of any VLAN, the system will warn of the
misconfigurations on non-member VLAN ports. The configuration will be applied to all ports,
however, the ports that are not members of any VLAN will not send VLAN name advertisements.
802.3 capabilities
Except for Power-via-MDI information, the Brocade ICX 6650 device will advertise the following
802.3 attributes when LLDP is enabled on a global basis:
•
•
•
•
Link aggregation information
MAC/PHY configuration and status
Maximum frame size
Power-via-MDI information (not automatically advertised)
Link aggregation TLV
The link-aggregation time, length, value (TLV) indicates the following:
• Whether the link is capable of being aggregated
204
Brocade ICX 6650 Administration Guide
53-1002600-01
LLDP configuration
8
• Whether the link is currently aggregated
• The primary trunk port
Brocade devices advertise link aggregation information about standard link aggregation (LACP) as
well as static trunk configuration.
By default, link-aggregation information is automatically advertised when LLDP is enabled on a
global basis. To disable this advertisement, enter a command such as the following.
Brocade(config)#no lldp advertise link-aggregation ports e 1/1/5
Syntax: [no] lldp advertise link-aggregation ports ethernet <stack-unit>/<slot>/<port>| all
The link aggregation advertisement will appear similar to the following on the remote device, and in
the CLI display output on the Brocade device (show lldp local-info).
Link aggregation: not capable
Specify the ethernet port in the <stack-unit>/<slot>/<port> format. Stack-unit is 1.
You can list all of the ports individually, use the keyword to to specify ranges of ports, or a
combination of both. To apply the configuration to all ports on the device, use the keyword all
instead of listing the ports individually. Note that using the keyword all may cause undesirable
effects on some ports. For example, if you configure all ports to advertise their VLAN name, and the
configuration includes ports that are not members of any VLAN, the system will warn of the
misconfigurations on non-member VLAN ports. The configuration will be applied to all ports,
however, the ports that are not members of any VLAN will not send VLAN name advertisements.
MAC and PHY configuration status
The MAC and PHY configuration and status TLV includes the following information:
•
•
•
•
•
Auto-negotiation capability and status
Speed and duplex mode
Flow control capabilities for auto-negotiation
Port speed down-shift and maximum port speed advertisement
If applicable, indicates if the above settings are the result of auto-negotiation during link
initiation or of a manual set override action
The advertisement reflects the effects of the following CLI commands:
•
•
•
•
speed-duplex
flow-control
gig-default
link-config
By default, the MAC/PHY configuration and status information are automatically advertised when
LLDP is enabled on a global basis. To disable this advertisement, enter a command such as the
following.
Brocade(config)#no lldp advertise mac-phy-config-status ports e 1/1/1 to 1/1/5
The MAC/PHY configuration advertisement will appear similar to the following on the remote
device, and in the CLI display output on the Brocade device (show lldp local-info).
Brocade ICX 6650 Administration Guide
53-1002600-01
205
8
LLDP-MED configuration
+ 802.3 MAC/PHY
: auto-negotiation enabled
Advertised capabilities: 10baseT-HD, 10baseT-FD, 100baseTX-HD,
100baseTX-FD,
fdxSPause, fdxBPause, 1000baseT-HD, 1000baseT-FD
Operational MAU type: 100BaseTX-FD
Syntax: [no] lldp advertise mac-phy-config-status ports ethernet <stack-unit>/<slot>/<port>| all
Specify the ethernet port in the <stack-unit>/<slot>/<port> format. Stack-unit is 1.
You can list all of the ports individually, use the keyword to to specify ranges of ports, or a
combination of both. To apply the configuration to all ports on the device, use the keyword all
instead of listing the ports individually. Note that using the keyword all may cause undesirable
effects on some ports. For example, if you configure all ports to advertise their VLAN name, and the
configuration includes ports that are not members of any VLAN, the system will warn of the
misconfigurations on non-member VLAN ports. The configuration will be applied to all ports,
however, the ports that are not members of any VLAN will not send VLAN name advertisements.
Maximum frame size
The maximum frame size TLV provides the maximum 802.3 frame size capability of the port. This
value is expressed in octets and includes the four-octet Frame Check Sequence (FCS). The default
maximum frame size is 1522. The advertised value may change depending on whether the
aggregated-vlan or jumbo CLI commands are in effect.
NOTE
On 48GC modules in non-jumbo mode, the maximum size of ping packets is 1486 bytes and the
maximum frame size of tagged traffic is no larger than 1581 bytes.
By default, the maximum frame size is automatically advertised when LLDP is enabled on a global
basis. To disable this advertisement, enter a command such as the following.
Brocade(config)#no lldp advertise max-frame-size ports e 1/1/1 to 1/1/5
The maximum frame size advertisement will appear similar to the following on the remote device,
and in the CLI display output on the Brocade device (show lldp local-info).
Maximum frame size: 1522 octets
Syntax: [no] lldp advertise max-frame-size ports ethernet <stack-unit>/<slot>/<port>| all
Specify the ethernet port in the <stack-unit>/<slot>/<port> format. Stack-unit is 1.
You can list all of the ports individually, use the keyword to to specify ranges of ports, or a
combination of both. To apply the configuration to all ports on the device, use the keyword all
instead of listing the ports individually. Note that using the keyword all may cause undesirable
effects on some ports. For example, if you configure all ports to advertise their VLAN name, and the
configuration includes ports that are not members of any VLAN, the system will warn of the
misconfigurations on non-member VLAN ports. The configuration will be applied to all ports,
however, the ports that are not members of any VLAN will not send VLAN name advertisements.
LLDP-MED configuration
This section provides the details for configuring LLDP-MED.
206
Brocade ICX 6650 Administration Guide
53-1002600-01
LLDP-MED configuration
8
Table 45 lists the global and interface-level tasks and the default behavior/value for each task.
TABLE 45
LLDP-MED configuration tasks and default behavior / value
Task
Default behavior / value
Global CONFIG-level tasks
Enabling LLDP-MED on a global basis
Disabled
Enabling SNMP notifications and Syslog messages
for LLDP-MED topology change
Disabled
Changing the Fast Start Repeat Count
The system automatically sets the fast start repeat count to
3 when a Network Connectivity Device receives an LLDP
packet from an Endpoint that is newly connected to the
network.
NOTE: The LLDP-MED fast start mechanism is only intended
to run on links between Network Connectivity devices
and Endpoint devices. It does not apply to links
between LAN infrastructure elements, including
between Network Connectivity devices, or to other
types of links.
Interface-level tasks
Defining a location ID
Not configured
Defining a network policy
Not configured
Enabling LLDP-MED
When LLDP is enabled globally, LLDP-MED is enabled if the LLDP-MED capabilities TLV is also
enabled. By default, the LLDP-MED capabilities TLV is automatically enabled. To enable LLDP,
refer to “Enabling and disabling LLDP” on page 193.
NOTE
LLDP-MED is not enabled on ports where the LLDP operating mode is receive only or transmit only.
LLDP-MED is enabled on ports that are configured to both receive and transmit LLDP packets and
have the LLDP-MED capabilities TLV enabled.
Enabling SNMP notifications and Syslog messages
for LLDP-MED topology changes
SNMP notifications and Syslog messages for LLDP-MED provide management applications with
information related to topology changes. For example, SNMP notifications can alert the system
whenever a remote Endpoint device is connected to or removed from a local port. SNMP
notifications identify the local port where the topology change occurred, as well as the device
capability of the remote Endpoint device that was connected to or removed from the port.
When you enable LLDP-MED SNMP notifications, corresponding Syslog messages are enabled as
well. When you enable LLDP-MED SNMP notifications, the device will send traps and Syslog
messages when an LLDP-MED Endpoint neighbor entry is added or removed.
SNMP notifications and corresponding Syslog messages are disabled by default. To enable them,
enter a command such as the following at the Global CONFIG level of the CLI.
Brocade ICX 6650 Administration Guide
53-1002600-01
207
8
LLDP-MED configuration
Brocade(config)#lldp enable snmp med-topo-change-notifications ports e 1/1/1 to
1/1/5
Syntax: no lldp enable snmp med-topo-change-notifications ports ethernet
<stack-unit>/<slot>/<port>| all
Specify the ethernet port in the <stack-unit>/<slot>/<port> format. Stack-unit is 1.
You can list all of the ports individually, use the keyword to to specify ranges of ports, or a
combination of both. To apply the configuration to all ports on the device, use the keyword all
instead of listing the ports individually. Note that using the keyword all may cause undesirable
effects on some ports. For example, if you configure all ports to advertise their VLAN name, and the
configuration includes ports that are not members of any VLAN, the system will warn of the
misconfigurations on non-member VLAN ports. The configuration will be applied to all ports,
however, the ports that are not members of any VLAN will not send VLAN name advertisements.
Changing the fast start repeat count
The fast start feature enables a Network Connectivity Device to initially advertise itself at a faster
rate for a limited time when an LLDP-MED Endpoint has been newly detected or connected to the
network. This feature is important where rapid availability is crucial for applications such as
emergency call service location (E911).
The fast start timer starts when a Network Connectivity Device receives the first LLDP frame from a
newly detected Endpoint.
The LLDP-MED fast start repeat count specifies the number of LLDP packets that will be sent
during the LLDP-MED fast start period. By default, the device will send three packets at
one-second intervals. If desired, you can change the number of packets the device will send per
second, up to a maximum of 10.
NOTE
The LLDP-MED fast start mechanism is only intended to run on links between Network Connectivity
devices and Endpoint devices. It does not apply to links between LAN infrastructure elements,
including between Network Connectivity devices, or to other types of links.
To change the LLDP-MED fast start repeat count, enter commands such as the following.
Brocade(config)#lldp med fast-start-repeat-count 5
The above command causes the device to send five LLDP packets during the LLDP-MED fast start
period.
Syntax: [no] lldp med fast-start-repeat-count <value>
where value is a number from 1 to 10, which specifies the number of packets that will be sent
during the LLDP-MED fast start period. The default is 3.
208
Brocade ICX 6650 Administration Guide
53-1002600-01
LLDP-MED configuration
8
Defining a location id
The LLDP-MED Location Identification extension enables the Brocade ICX 6650 device to set the
physical location that an attached Class III Endpoint will use for location-based applications. This
feature is important for applications such as IP telephony, for example, where emergency
responders need to quickly determine the physical location of a user in North America that has just
dialed 911.
For each port, you can define one or more of the following location ID formats:
• Geographic location (coordinate-based)
• Civic address
• Emergency Call Services (ECS) Emergency Location Identification Number (ELIN)
The above location ID formats are defined in the following sections.
Coordinate-based location
Coordinate-based location is based on the IETF RFC 3825 [6] standard, which specifies a Dynamic
Host Configuration Protocol (DHCP) option for the coordinate-based geographic location of a client.
When you configure an Endpoint location information using the coordinate-based location, you
specify the latitude, longitude, and altitude, along with resolution indicators (a measure of the
accuracy of the coordinates), and the reference datum (the map used for the given coordinates).
To configure a coordinate-based location for an Endpoint device, enter a command such as the
following at the Global CONFIG level of the CLI.
Brocade(config)#lldp med location-id coordinate-based latitude
-78.303 resolution 20 longitude 34.27 resolution 18 altitude meters 50 resolution
16 wgs84
Syntax: [no] lldp med location-id coordinate-based
latitude <degrees> resolution <bits>
longitude <degrees> resolution <bits>
altitude floors <number> resolution <bits> | meters <number> resolution <bits>
<datum>
latitude <degrees> is the angular distance north or south from the earth equator measured
through 90 degrees. Positive numbers indicate a location north of the equator and negative
numbers indicate a location south of the equator.
resolution <bits> specifies the precision of the value given for latitude. A smaller value increases
the area within which the device is located. For latitude, enter a number between 1 and 34.
longitude <degrees> is the angular distance from the intersection of the zero meridian. Positive
values indicate a location east of the prime meridian and negative numbers indicate a location
west of the prime meridian.
resolution <bits> specifies the precision of the value given for longitude. A smaller value increases
the area within which the device is located. For longitude resolution, enter a number between 1
and 34.
Brocade ICX 6650 Administration Guide
53-1002600-01
209
8
LLDP-MED configuration
altitude floors <number> is the vertical elevation of a building above the ground, where 0
represents the floor level associated with the ground level at the main entrance and larger values
represent floors that are above (higher in altitude) floors with lower values. For example, 2 for the
2nd floor. Sub-floors can be represented by non-integer values. For example, a mezzanine
between floor 1 and floor 2 could be represented as 1.1. Similarly, the mezzanines between floor 4
and floor 5 could be represented as 4.1 and 4.2 respectively. Floors located below ground level
could be represented by negative values.
resolution <bits> specifies the precision of the value given for altitude. A smaller value increases
the area within which the device is located. For floors resolution, enter the value 0 if the floor is
unknown, or 30 if a valid floor is being specified.
altitude meters <number> is the vertical elevation in number of meters, as opposed to floors.
resolution <bits> specifies the precision of the value given for altitude. A smaller value increases
the area within which the device is located. For meters resolution, enter a value from 0 to 30.
<Datum> is the map used as the basis for calculating the location. Specify one of the following:
• wgs84 – (geographical 3D) – World Geodesic System 1984, CRS Code 4327, Prime Meridian
Name: Greenwich
• nad83-navd88 – North American Datum 1983, CRS Code 4269, Prime Meridian Name:
Greenwich; The associated vertical datum is the North American Vertical Datum of 1988
(NAVD88). Use this datum when referencing locations on land. If land is near tidal water, use
nad83-mllw (below).
• nad83-mllw – North American Datum 1983, CRS Code 4269, Prime Meridian Name:
Greenwich; The associated vertical datum is mean lower low water (MLLW). Use this datum
when referencing locations on water, sea, or ocean.
Example coordinate-based location configuration
The following shows an example coordinate-based location configuration for the Sears Tower, at
the following location.
103rd Floor
233 South Wacker Drive
Chicago, IL 60606
Brocade(config)#lldp med location-id coordinate-based latitude 41.87884
resolution 18 longitude 87.63602 resolution 18 altitude floors 103 resolution 30
wgs84
The above configuration shows the following:
• Latitude is 41.87884 degrees north (or 41.87884 degrees).
• Longitude is 87.63602 degrees west (or 87.63602 degrees).
• The latitude and longitude resolution of 18 describes a geo-location area that is latitude
41.8769531 to latitude 41.8789062 and extends from -87.6367188 to -87.6347657 degrees
longitude. This is an area of approximately 373412 square feet (713.3 ft. x 523.5 ft.).
• The location is inside a structure, on the 103rd floor.
• The WGS 84 map was used as the basis for calculating the location.
Example coordinate-based location advertisement
The coordinate-based location advertisement will appear similar to the following on the remote
device, and in the CLI display output on the Brocade device (show lldp local-info).
210
Brocade ICX 6650 Administration Guide
53-1002600-01
LLDP-MED configuration
8
+ MED Location ID
Data Format: Coordinate-based
Latitude Resolution : 20 bits
Latitude Value
: -78.303 degrees
Longitude Resolution : 18 bits
Longitude Value
: 34.27 degrees
Altitude Resolution : 16 bits
Altitude Value
: 50. meters
Datum
: WGS 84
Configuring civic address location
When you configure a media Endpoint location using the address-based location, you specify the
location the entry refers to, the country code, and the elements that describe the civic or postal
address.
To configure a civic address-based location for LLDP-MED, enter commands such as the following
at the Global CONFIG level of the CLI.
Brocade(config)#lldp med location-id civic-address refers-to client country US
elem 1 CA elem 3 “Santa Clara” elem 6 “4980 Great America Pkwy” elem 24 95054 elem
27 5 elem 28 551 elem 29 office elem 23 “John Doe”
Syntax: [no] lldp med location-id civic-address refers-to <elem> country <country code> elem <CA
type> <value> [elem <CA type> <value>] [elem <CA type> <value>]....
refers-to <elem> describes the location that the entry refers to. Specify one of the following:
• client
• dhcp-server
• network-element
where dhcp-server or network-element should only be used if it is known that the Endpoint is in
close physical proximity to the DHCP server or network element.
<country code> is the two-letter ISO 3166 country code in capital ASCII letters.
Example
•
•
•
•
•
CA – Canada
DE – Germany
JP – Japan
KR – Korea
US – United States
<CA type> is a value from 0 – 255, that describes the civic address element. For example, a CA
type of 24 specifies a postal or zip code. Valid elements and their types are listed in Table 46.
<value> is the actual value of the elem <CA type>, above. For example, 95123 for the postal or zip
code. Acceptable values are listed in Table 46, below.
NOTE
If the value of an element contains one or more spaces, use double quotation marks (“) at the
beginning and end of the string. For example, elem 3 “Santa Clara”.
Brocade ICX 6650 Administration Guide
53-1002600-01
211
8
LLDP-MED configuration
TABLE 46
212
Elements used with civic address
Civic Address (CA)
type
Description
Acceptable values / examples
0
Language
The ISO 639 language code used for presenting the address
information.
1
National subdivisions (state,
canton, region, province, or
prefecture)
Examples:
Canada – Province
Germany – State
Japan – Metropolis
Korea – Province
United States – State
2
County, parish, gun (JP), or
district (IN)
Examples:
Canada – County
Germany – County
Japan – City or rural area
Korea – County
United States – County
3
City, township, or shi (JP)
Examples:
Canada – City or town
Germany – City
Japan – Ward or village
Korea – City or village
United States – City or town
4
City division, borough, city
district, ward, or chou (JP)
Examples:
Canada – N/A
Germany – District
Japan – Town
Korea – Urban district
United States – N/A
5
Neighborhood or block
Examples:
Canada – N/A
Germany – N/A
Japan – City district
Korea – Neighborhood
United States – N/A
6
Street
Examples:
Canada – Street
Germany – Street
Japan – Block
Korea – Street
United States – Street
16
Leading street direction
N (north), E (east), S (south), W (west), NE, NW, SE, SW
17
Trailing street suffix
N (north), E (east), S (south), W (west), NE, NW, SE, SW
18
Street suffix
Acceptable values for the United States are listed in the United
States Postal Service Publication 28 [18], Appendix C.
Example: Ave, Place
19
House number
The house number (street address)
Example: 1234
Brocade ICX 6650 Administration Guide
53-1002600-01
LLDP-MED configuration
TABLE 46
8
Elements used with civic address (Continued)
Civic Address (CA)
type
Description
Acceptable values / examples
20
House number suffix
A modifier to the house number. It does not include parts of
the house number.
Example: A, 1/2
21
Landmark or vanity address
A string name for a location. It conveys a common local
designation of a structure, a group of buildings, or a place that
helps to locate the place.
Example: UC Berkeley
22
Additional location
information
An unstructured string name that conveys additional
information about the location.
Example: west wing
23
Name (residence and office
occupant)
Identifies the person or organization associated with the
address.
Example: Textures Beauty Salon
24
Postal / zip code
The valid postal / zip code for the address.
Example: 95054-1234
25
Building (structure)
The name of a single building if the street address includes
more than one building or if the building name is helpful in
identifying the location.
Example: Law Library
26
Unit (apartment, suite)
The name or number of a part of a structure where there are
separate administrative units, owners, or tenants, such as
separate companies or families who occupy that structure.
Common examples include suite or apartment designations.
Example: Apt 27
27
Floor
Example: 4
28
Room number
The smallest identifiable subdivision of a structure.
Example: 7A
29
Placetype
The type of place described by the civic coordinates. For
example, a home, office, street, or other public space.
Example: Office
30
Postal community name
When the postal community name is defined, the civic
community name (typically CA type 3) is replaced by this value.
Example: Alviso
31
Post office box (P.O. box)
When a P.O. box is defined, the street address components (CA
types 6, 16, 17, 18, 19, and 20) are replaced with this value.
Example: P.O. Box 1234
32
Additional code
An additional country-specific code that identifies the location.
For example, for Japan, this is the Japan Industry Standard (JIS)
address code. The JIS address code provides a unique
address inside of Japan, down to the level of indicating the
floor of the building.
Brocade ICX 6650 Administration Guide
53-1002600-01
213
8
LLDP-MED configuration
TABLE 46
Elements used with civic address (Continued)
Civic Address (CA)
type
Description
Acceptable values / examples
128
Script
The script (from ISO 15924 [14]) used to present the address
information.
Example: Latn
NOTE: If not manually configured, the system assigns the
default value Latn
255
Reserved
Example civic address location advertisement
The Civic address location advertisement will appear similar to the following on the remote device,
and in the CLI display output on the Brocade device (show lldp local-info).
+ MED Location
Data Format:
Location of:
Country
:
CA Type
:
CA Value
:
CA Type
:
CA Value
:
CA Type
:
CA Value
:
CA Type
:
CA Value
:
CA Type
:
CA Value
:
CA Type
:
CA Value
:
CA Type
:
CA Value
:
CA Type
:
CA Value
:
ID
Civic Address
Client
"US"
1
"CA"
3
"Santa Clara"
6
"4980 Great America Pkwy."
24
"95054"
27
"5"
28
"551"
29
"office"
23
"John Doe"
Configuring emergency call service
The Emergency Call Service (ECS) location is used specifically for Emergency Call Services
applications.
When you configure a media Endpoint location using the emergency call services location, you
specify the Emergency Location Identification Number (ELIN) from the North America Numbering
Plan format, supplied to the Public Safety Answering Point (PSAP) for ECS purposes.
To configure an ECS-based location for LLDP-MED, enter a command such as the following at the
Global CONFIG level of the CLI.
Brocade(config)#lldp med location-id ecs-elin 4082071700
Syntax: [no] lldp med location-id ecs-elin <number> ports ethernet <stack-unit>/<slot>/<port>|
all
The <number> variable is a number from 10 to 25 digits in length.
214
Brocade ICX 6650 Administration Guide
53-1002600-01
LLDP-MED configuration
8
Specify the ethernet port in the <stack-unit>/<slot>/<port> format. Stack-unit is 1.
You can list all of the ports individually, use the keyword to to specify ranges of ports, or a
combination of both. To apply the configuration to all ports on the device, use the keyword all
instead of listing the ports individually.
Example ECS ELIN location advertisements
The ECS ELIN location advertisement will appear similar to the following on the remote device, and
in the CLI display output on the Brocade device (show lldp local-info).
+ MED Location ID
Data Format: ECS ELIN
Value
: 4082071700
Defining an LLDP-MED network policy
An LLDP-MED network policy defines an Endpoint VLAN configuration (VLAN type and VLAN ID) and
associated Layer 2 and Layer 3 priorities that apply to a specific set of applications on a port.
NOTE
This feature applies to applications that have specific real-time network policy requirements, such
as interactive voice or video services. It is not intended to run on links other than between Network
Connectivity devices and Endpoints, and therefore does not advertise the multitude of network
policies that frequently run on an aggregated link.
To define an LLDP-MED network policy for an Endpoint, enter a command such as the following.
Brocade(config)#lldp med network-policy application voice tagged vlan 99 priority
3 dscp 22 port e 1/1/3
The network policy advertisement will appear similar to the following on the remote device, and in
the CLI display output on the Brocade device (show lldp local-info).
+ MED Network Policy
Application Type :
Policy Flags
:
VLAN ID
:
L2 Priority
:
DSCP Value
:
Voice
Known Policy, Tagged
99
3
22
NOTE
Endpoints will advertise a policy as “unknown” in the show lldp neighbor detail command output, if
it is a policy that is required by the Endpoint and the Endpoint has not yet received it.
LLDP-MED network policy configuration syntax
The CLI syntax for defining an LLDP-MED network policy differs for tagged, untagged, and priority
tagged traffic. Refer to the appropriate syntax, below.
Brocade ICX 6650 Administration Guide
53-1002600-01
215
8
LLDP-MED configuration
For tagged traffic
Syntax: [no] lldp med network-policy application <application type> tagged vlan <vlan ID> priority
<0 – 7> dscp <0 – 63> ports ethernet <stack-unit>/<slot>/<port>| all
For untagged traffic
Syntax: [no] lldp med network-policy application <application type> untagged dscp <0 – 63> ports
ethernet <stack-unit>/<slot>/<port>| all
For priority-tagged traffic
Syntax: [no] lldp med network-policy application <application type> priority-tagged priority <0 – 7>
dscp <0 – 63> ports ethernet <stack-unit>/<slot>/<port>| all
Specify the ethernet port in the <stack-unit>/<slot>/<port> format. Stack-unit is 1.
You can list all of the ports individually, use the keyword to to specify ranges of ports, or a
combination of both. To apply the configuration to all ports on the device, use the keyword all
instead of listing the ports individually.
The <application type> variable indicates the primary function of the applications defined by this
network policy. Application type can be one of the following:
• guest-voice – Limited voice service for guest users and visitors with their own IP telephony
handsets or similar devices that support interactive voice services.
• guest-voice-signaling – Limited voice service for use in network topologies that require a
different policy for guest voice signaling than for guest voice media.
• softphone-voice – Softphone voice service for use with multi-media applications that work in
association with VoIP technology, enabling phone calls direct from a PC or laptop. Softphones
do not usually support multiple VLANs, and are typically configured to use an untagged VLAN
or a single tagged data-specific VLAN. Note that when a network policy is defined for use with
an untagged VLAN, the Layer 2 priority field is ignored and only the DSCP value is relevant.
• streaming-video – Applies to broadcast- or multicast-based video content distribution and
similar applications that support streaming video services requiring specific network policy
treatment. Video applications that rely on TCP without buffering would not be an intended use
of this application type.
• video-conferencing – Applies to dedicated video conferencing equipment and similar devices
that support real-time interactive video/audio services.
• video-signaling – For use in network topologies that require a separate policy for video
signaling than for video media. Note that this application type should not be advertised if all
the same network policies apply as those advertised in the video conferencing policy TLV.
• voice – For use by dedicated IP telephony handsets and similar devices that support
interactive voice services.
• voice-signaling – For use in network topologies that require a different policy for voice signaling
than for voice media. Note that this application type should not be advertised if all the same
network policies apply as those advertised in the voice policy TLV.
• tagged vlan <vlan id> specifies the tagged VLAN that the specified application type will use.
• untagged indicates that the device is using an untagged frame format.
• priority-tagged indicates that the device uses priority-tagged frames. In this case, the device
uses the default VLAN (PVID) of the ingress port.
216
Brocade ICX 6650 Administration Guide
53-1002600-01
LLDP-MED attributes advertised by the Brocade device
8
• priority <0 –7> indicates the Layer 2 priority value to be used for the specified application type.
Enter 0 to use the default priority.
• dscp <0 – 63> specifies the Layer 3 Differentiated Service codepoint priority value to be used
for the specified application type. Enter 0 to use the default priority.
Specify the ethernet port in the <stack-unit>/<slot>/<port> format. Stack-unit is 1.
You can list all of the ports individually, use the keyword to to specify ranges of ports, or a
combination of both. To apply the configuration to all ports on the device, use the keyword all
instead of listing the ports individually. Note that using the keyword all may cause undesirable
effects on some ports. For example, if you configure all ports to advertise their VLAN name, and the
configuration includes ports that are not members of any VLAN, the system will warn of the
misconfigurations on non-member VLAN ports. The configuration will be applied to all ports,
however, the ports that are not members of any VLAN will not send VLAN name advertisements.
LLDP-MED attributes advertised by the Brocade device
LLDP-MED attributes are only advertised on a port if LLDP-MED is enabled (which is done by
enabling the LLDP-MED capabilities TLV), the port operating mode is receive and transmit (the
default), and the port has received an LLDP-MED advertisement from an Endpoint. By default, the
Brocade device will automatically advertise the following LLDP-MED attributes when the above
criteria are met:
•
•
•
•
LLDP-MED capabilities
Location ID
Network policy
Power-via-MDI information
NOTE
Although the Location ID and Network policy attributes are automatically advertised, they will have
no effect until they are actually defined.
LLDP-MED capabilities
When enabled, LLDP-MED is enabled, and the LLDP-MED capabilities TLV is sent whenever any
other LLDP-MED TLV is sent. When disabled, LLDP-MED is disabled and no LLDP-MED TLVs are
sent.
The LLDP-MED capabilities advertisement includes the following information:
• The supported LLDP-MED TLVs
• The device type (Network Connectivity device or Endpoint (Class 1, 2, or 3))
By default, LLDP-MED information is automatically advertised when LLDP-MED is enabled. To
disable this advertisement, enter a command such as the following.
Brocade(config)#no lldp advertise med-capabilities ports e 1/1/1 to 1/1/5
NOTE
Disabling the LLDP-MED capabilities TLV disables LLDP-MED.
To re-enable the LLDP-MED Capabilities TLV (and LLDP-MED) after it has been disabled, enter a
command such as the following.
Brocade ICX 6650 Administration Guide
53-1002600-01
217
8
LLDP-MED attributes advertised by the Brocade device
Brocade(config)#lldp advertise med-capabilities ports e 1/1/1 to 1/1/5
The LLDP-MED capabilities advertisement will appear similar to the following on the remote device,
and in the CLI display output on the Brocade device (show lldp local-info).
+ MED capabilities: capabilities, networkPolicy, location, extendedPSE
MED device type : Network Connectivity
Syntax: [no] lldp advertise med-capabilities ports ethernet <stack-unit>/<slot>/<port> | all
Specify the ethernet port in the <stack-unit>/<slot>/<port> format. Stack-unit is 1.
You can list all of the ports individually, use the keyword to to specify ranges of ports, or a
combination of both. To apply the configuration to all ports on the device, use the keyword all
instead of listing the ports individually. Note that using the keyword all may cause undesirable
effects on some ports. For example, if you configure all ports to advertise their VLAN name, and the
configuration includes ports that are not members of any VLAN, the system will warn of the
misconfigurations on non-member VLAN ports. The configuration will be applied to all ports,
however, the ports that are not members of any VLAN will not send VLAN name advertisements.
Displaying LLDP statistics and configuration settings
You can use the following CLI show commands to display information about LLDP settings and
statistics:
•
•
•
•
show lldp – Displays a summary of the LLDP configuration settings.
show lldp statistics – Displays LLDP global and per-port statistics.
show lldp neighbors – Displays a list of the current LLDP neighbors.
show lldp neighbors detail – Displays the details of the latest advertisements received from
LLDP neighbors.
• show lldp local-info – Displays the details of the LLDP advertisements that will be transmitted
on each port.
This above show commands are described in this section.
LLDP configuration summary
To display a summary of the LLDP configuration settings on the device, enter the show lldp
command at any level of the CLI.
The following shows an example report.
218
Brocade#show lldp
LLDP transmit interval
LLDP transmit hold multiplier
LLDP transmit delay
LLDP SNMP notification interval
LLDP reinitialize delay
LLDP-MED fast start repeat count
:
:
:
:
:
:
LLDP maximum neighbors
LLDP maximum neighbors per port
: 392
: 4
10 seconds
4 (transmit TTL: 40 seconds)
1 seconds
5 seconds
1 seconds
3
Brocade ICX 6650 Administration Guide
53-1002600-01
LLDP-MED attributes advertised by the Brocade device
8
Syntax: show lldp
The following table describes the information displayed by the show lldp statistics command.
Field
Description
LLDP transmit interval
The number of seconds between regular LLDP packet transmissions.
LLDP transmit hold
multiplier
The multiplier used to compute the actual time-to-live (TTL) value of an LLDP
advertisement. The TTL value is the transmit interval multiplied by the transmit hold
multiplier.
LLDP transmit delay
The number of seconds the LLDP agent will wait after transmitting an LLDP frame and
before transmitting another LLDP frame.
LLDP SNMP notification
interval
The number of seconds between transmission of SNMP LLDP traps
(lldpRemTablesChange) and SNMP LLDP-MED traps
(lldpXMedTopologyChangeDetected).
LLDP reinitialize delay
The minimum number of seconds the device will wait from when LLDP is disabled on a
port, until a request to re-enable LLDP on that port will be honored.
LLDP-MED fast start
repeat count
The number of seconds between LLDP frame transmissions when an LLDP-MED
Endpoint is newly detected.
LLDP maximum
neighbors
The maximum number of LLDP neighbors for which LLDP data will be retained, per
device.
LLDP maximum
neighbors per port
The maximum number of LLDP neighbors for which LLDP data will be retained, per port.
Displaying LLDP statistics
The show lldp statistics command displays an overview of LLDP neighbor detection on the device,
as well as packet counters and protocol statistics. The statistics are displayed on a global basis.
The following shows an example report.
Brocade ICX 6650 Administration Guide
53-1002600-01
219
8
LLDP-MED attributes advertised by the Brocade device
Brocade#show lldp statistics
Last neighbor change time: 23 hours 50 minutes 40 seconds ago
Neighbor
Neighbor
Neighbor
Neighbor
entries added
entries deleted
entries aged out
advertisements dropped
Port
1
2
3
4
5
6
7
8
9
10
11
12
13
14
Tx Pkts
Total
60963
0
60963
60963
0
0
0
0
0
60974
0
0
0
0
Rx Pkts
Total
75179
0
60963
121925
0
0
0
0
0
0
0
0
0
0
:
:
:
:
14
5
4
0
Rx Pkts
Rx Pkts
Rx TLVs
Rx TLVs Neighbors
w/Errors Discarded Unrecognz Discarded Aged Out
0
0
0
0
4
0
0
0
0
0
0
0
0
0
0
0
0
0
0
0
0
0
0
0
0
0
0
0
0
0
0
0
0
0
0
0
0
0
0
0
0
0
0
0
0
0
0
0
0
0
0
0
0
0
0
0
0
0
0
0
0
0
0
0
0
0
0
0
0
0
Syntax: show lldp statistics
NOTE
You can reset LLDP statistics using the CLI command clear LLDP statistics. Refer to “Resetting LLDP
statistics” on page 223.
The following table describes the information displayed by the show lldp statistics command.
220
Field
Description
Last neighbor change
time
The elapsed time (in hours, minutes, and seconds) since a neighbor last advertised
information. For example, the elapsed time since a neighbor was last added, deleted, or
its advertised information changed.
Neighbor entries added
The number of new LLDP neighbors detected since the last reboot or since the last time
the clear lldp statistics all command was issued.
Neighbor entries
deleted
The number of LLDP neighbors deleted since the last reboot or since the last time the
clear lldp statistics all command was issued.
Neighbor entries aged
out
The number of LLDP neighbors dropped on all ports after the time-to-live expired.
Note that LLDP entries age out naturally when a port cable or module is disconnected or
when a port becomes disabled. However, if a disabled port is re-enabled, the system
will delete the old LLDP entries.
Neighbor
advertisements
dropped
The number of valid LLDP neighbors the device detected, but could not add. This can
occur, for example, when a new neighbor is detected and the device is already
supporting the maximum number of neighbors possible. This can also occur when an
LLDPDU is missing a mandatory TLV or is not formatted correctly.
Port
The local port number.
Tx Pkts Total
The number of LLDP packets the port transmitted.
Brocade ICX 6650 Administration Guide
53-1002600-01
LLDP-MED attributes advertised by the Brocade device
8
Field
Description
Rx Pkts Total
The number of LLDP packets the port received.
Rx Pkts w/Errors
The number of LLDP packets the port received that have one or more detectable errors.
Rx Pkts Discarded
The number of LLDP packets the port received then discarded.
Rx TLVs Unrecognz
The number of TLVs the port received that were not recognized by the LLDP local agent.
Unrecognized TLVs are retained by the system and can be viewed in the output of the
show LLDP neighbors detail command or retrieved through SNMP.
Rx TLVs Discarded
The number of TLVs the port received then discarded.
Neighbors Aged Out
The number of times a neighbor information was deleted because its TTL timer expired.
Displaying LLDP neighbors
The show lldp neighbors command displays a list of the current LLDP neighbors per port.
The following shows an example report.
Brocade#show lldp neighbors
Lcl Port Chassis ID
Port ID
1/1/1
748e.f80c.5f40 748e.f80c.5f40
1/1/2
748e.f80c.5f40 748e.f80c.5f40
1/1/3
748e.f80c.5f40 748e.f80c.5f40
1/1/4
748e.f80c.5f40 748e.f80c.5f40
1/1/53
748e.f80c.5f40 748e.f80c.5f40
1/1/54
748e.f80c.5f40 748e.f80c.5f40
1/1/55
748e.f80c.5f40 748e.f80c.5f40
1/1/56
748e.f80c.5f40 748e.f80c.5f40
Port Description
10GigabitEthernet1/3/1
10GigabitEthernet1/3/2
10GigabitEthernet1/3/3
10GigabitEthernet1/3/4
10GigabitEthernet1/3/5
10GigabitEthernet1/3/6
10GigabitEthernet1/3/7
10GigabitEthernet1/3/8
System Name
ICX6650-64 Ro~
ICX6650-64 Ro~
ICX6650-64 Ro~
ICX6650-64 Ro~
ICX6650-64 Ro~
ICX6650-64 Ro~
ICX6650-64 Ro~
ICX6650-64 Ro~
Syntax: show lldp neighbors
The following table describes the information displayed by the show lldp neighbors command.
Field
Description
Lcl Port
The local LLDP port number.
Chassis ID
The identifier for the chassis.
Brocade devices use the base MAC address of the device as the Chassis ID.
Port ID
The identifier for the port.
Brocade devices use the permanent MAC address associated with the port as the port ID.
Port
Description
The description for the port.
Brocade devices use the ifDescr MIB object from MIB-II as the port description.
System Name
The administratively-assigned name for the system.
Brocade devices use the sysName MIB object from MIB-II, which corresponds to the CLI
hostname command setting.
NOTE: A tilde (~) at the end of a line indicates that the value in the field is too long to display in
full and is truncated.
Brocade ICX 6650 Administration Guide
53-1002600-01
221
8
LLDP-MED attributes advertised by the Brocade device
Displaying LLDP neighbors detail
The show lldp neighbors detail command displays the LLDP advertisements received from LLDP
neighbors.
The following shows an example show lldp neighbors detail ports ethernet 1/1/1 report.
NOTE
The show lldp neighbors detail output will vary depending on the data received. Also, values that
are not recognized or do not have a recognizable format, may be displayed in hexadecimal binary
form.
Brocade#show lldp neighbors detail ports ethernet 1/1/1
Local port: 1/1/1
Neighbor: 748e.f80c.5f40, TTL 110 seconds
+ Chassis ID (MAC address): 748e.f80c.5f40
+ Port ID (MAC address): 748e.f80c.5f40
+ Time to live: 120 seconds
+ System name
: "ICX6650-64 Router"
+ Port description
: "10GigabitEthernet1/3/1"
+ System capabilities : bridge, router
Enabled capabilities: bridge, router
+ 802.3 MAC/PHY
: auto-negotiation supported, but disabled
Operational MAU type
: b40GbaseCR4
+ Link aggregation: not capable
+ Maximum frame size: 1522 octets
+ Port VLAN ID: 1
+ Management address (IPv4): 10.20.79.110
A backslash (\) at the end of a line indicates that the text continues on the next line.
Except for the following field, the fields in the above output are described in the individual TLV
advertisement sections in this chapter.
Field
Description
Neighbor
The source MAC address from which the packet was received, and the remaining TTL for the
neighbor entry.
Syntax: show lldp neighbors detail [ports ethernet <stack-unit>/<slot>/<port>| all]
If you do not specify any ports or use the keyword all, by default, the report will show the LLDP
neighbor details for all ports.
Specify the ethernet port in the <stack-unit>/<slot>/<port> format. Stack-unit is 1.
You can list all of the ports individually, use the keyword to to specify ranges of ports, or a
combination of both. To apply the configuration to all ports on the device, use the keyword all
instead of listing the ports individually.
Displaying LLDP configuration details
The show lldp local-info command displays the local information advertisements (TLVs) that will be
transmitted by the LLDP agent.
222
Brocade ICX 6650 Administration Guide
53-1002600-01
Resetting LLDP statistics
8
NOTE
The show lldp local-info output will vary based on LLDP configuration settings.
The following shows an example report.
Brocade#show lldp local-info ports ethernet 1/1/1
Local port: 1/1/1
+ Chassis ID (MAC address): 748e.f80c.5f40
+ Port ID (MAC address): 748e.f80c.5f40
+ Time to live: 120 seconds
+ System name
: "ICX6650-64 Router"
+ Port description
: "10GigabitEthernet1/1/1"
+ System capabilities : bridge, router
Enabled capabilities: bridge, router
+ 802.3 MAC/PHY
: auto-negotiation supported, but disabled
Operational MAU type
: b10GbaseCX4
+ Link aggregation: not capable
+ Maximum frame size: 1522 octets
+ Port VLAN ID: 1
+ Management address (IPv4): 10.20.79.91
NOTE
The contents of the show output will vary depending on which TLVs are configured to be advertised.
A backslash (\) at the end of a line indicates that the text continues on the next line.
The fields in the above output are described in the individual TLV advertisement sections in this
chapter.
Syntax: show lldp local-info [ports ethernet <stack-unit>/<slot>/<port>| all]
If you do not specify any ports or use the keyword all, by default, the report will show the local
information advertisements for all ports.
Specify the ethernet port in the <stack-unit>/<slot>/<port> format. Stack-unit is 1.
You can list all of the ports individually, use the keyword to to specify ranges of ports, or a
combination of both. To apply the configuration to all ports on the device, use the keyword all
instead of listing the ports individually.
Resetting LLDP statistics
To reset LLDP statistics, enter the clear lldp statistics command at the Global CONFIG level of the
CLI. The Brocade device will clear the global and per-port LLDP neighbor statistics on the device
(refer to “Displaying LLDP statistics” on page 219).
Brocade#clear lldp statistics
Syntax: clear lldp statistics [ports ethernet <stack-unit>/<slot>/<port>| all]
If you do not specify any ports or use the keyword all, by default, the system will clear lldp statistics
on all ports.
Specify the ethernet port in the <stack-unit>/<slot>/<port> format. Stack-unit is 1.
Brocade ICX 6650 Administration Guide
53-1002600-01
223
8
Clearing cached LLDP neighbor information
You can list all of the ports individually, use the keyword to to specify ranges of ports, or a
combination of both. To apply the configuration to all ports on the device, use the keyword all
instead of listing the ports individually.
Clearing cached LLDP neighbor information
The Brocade device clears cached LLDP neighbor information after a port becomes disabled and
the LLDP neighbor information ages out. However, if a port is disabled then re-enabled before the
neighbor information ages out, the device will clear the cached LLDP neighbor information when
the port is re-enabled.
If desired, you can manually clear the cache. For example, to clear the cached LLDP neighbor
information for port e 1/1/1, enter the following command at the Global CONFIG level of the CLI.
Brocade#clear lldp neighbors ports e 1/1/1
Syntax: clear lldp neighbors [ports ethernet <stack-unit>/<slot>/<port>| all]
If you do not specify any ports or use the keyword all, by default, the system will clear the cached
LLDP neighbor information for all ports.
Specify the ethernet port in the <stack-unit>/<slot>/<port> format. Stack-unit is 1.
You can list all of the ports individually, use the keyword to to specify ranges of ports, or a
combination of both. To apply the configuration to all ports on the device, use the keyword all
instead of listing the ports individually.
224
Brocade ICX 6650 Administration Guide
53-1002600-01
Chapter
Hardware Component Monitoring
9
In this chapter
• Digital optical monitoring . . . . . . . . . . . . . . . . . . . . . . . . . . . . . . . . . . . . . . . 225
Table 47 lists the Brocade ICX 6650 switch and the hardware monitoring features the switch
supports. These features are supported in full Layer 3 software images.
TABLE 47
Supported hardware monitoring features
Feature
Brocade ICX
6650
Digital optical monitoring
Yes
Digital optical monitoring
You can configure your Brocade ICX 6650 device to monitor optical transceivers in the system,
either globally or by specified ports. When this feature is enabled, the system will monitor the
temperature and signal power levels for the optical transceivers in the specified ports. Console
messages and Syslog messages are sent when optical operating conditions fall below or rise above
the XFP, SFP, and SFP+ manufacturer recommended thresholds.
Digital optical monitoring configuration limitations
A Brocade ICX 6650 switch can monitor a maximum of 24 SFPs and 12 XFPs.
Enabling digital optical monitoring
To enable optical monitoring on all Brocade ICX 6650-qualified optics installed in the device, use
the following command.
Brocade(config)#optical-monitor
To enable optical monitoring on a specific port, use the following command.
Brocade(config)#interface ethernet 1/1/1
Brocade(config-if-e10000-1/1/1)#optical-monitor
To enable optical monitoring on a range of ports, use the following command.
Brocade(config)#interface ethernet 1/1/1 to 1/1/2
Brocade(config-mif-1/1/1-1/1/2)#optical-monitor
Syntax: [no] optical-monitor
Use the no form of the command to disable digital optical monitoring.
Brocade ICX 6650 Administration Guide
53-1002600-01
225
9
Digital optical monitoring
Setting the alarm interval
You can optionally change the interval between which alarms and warning messages are sent. The
default interval is three minutes. To change the interval, use the following command.
Brocade(config)#interface ethernet 1/1/1 to 1/1/2
Brocade(config-mif-1/1/1-1/1/2)#optical-monitor 10
Syntax: [no] optical-monitor [<alarm-interval>]
For <alarm-interval>, enter a value between 1 and 65535. Enter 0 to disable alarms and warning
messages.
NOTE
The commands no optical-monitor and optical-monitor 0 perform the same function. That is, they
both disable digital optical monitoring.
Displaying information about installed media
Use the show media, show media slot, and show media ethernet commands to obtain information
about the media devices installed per device, per slot, and per port. The results displayed from
these commands provide the Type, Vendor, Part number, Version and Serial number of the SFP,
SFP+, or XFP optical device installed in the port. If there is no SFP, SFP+, or XFP optical device
installed in a port, the “Type” field will display “EMPTY”.
Use the show media command to obtain information about the media devices installed in a device.
Brocade#show
Port 1/1/1:
Port 1/1/2:
Port 1/1/3:
Port 1/1/4:
Port 1/1/5:
Port 1/1/6:
Port 1/1/7:
Port 1/1/8:
Port 1/1/9:
Port 1/1/10:
Port 1/1/11:
Port 1/1/12:
Port 1/1/13:
Port 1/1/14:
Port 1/1/15:
Port 1/1/16:
Port 1/1/17:
Port 1/1/18:
Port 1/1/19:
Port 1/1/20:
Port 1/1/21:
Port 1/1/22:
Port 1/1/23:
Port 1/1/24:
Port 1/1/25:
Port 1/1/26:
Port 1/1/27:
Port 1/1/28:
Port 1/1/29:
226
media
Type : 10GE Twinax
Type : 10GE Twinax
Type : 10GE Twinax
Type : 10GE Twinax
Type : 1G M-TX(SFP)
Type : 1G M-TX(SFP)
Type : EMPTY
Type : EMPTY
Type : 10GE Twinax
Type : 10GE Twinax
Type : EMPTY
Type : EMPTY
Type : EMPTY
Type : EMPTY
Type : 10GE SR 300m
Type : EMPTY
Type : EMPTY
Type : EMPTY
Type : EMPTY
Type : EMPTY
Type : EMPTY
Type : EMPTY
Type : EMPTY
Type : EMPTY
Type : 10GE Twinax
Type : 10GE Twinax
Type : EMPTY
Type : EMPTY
Type : EMPTY
1M
1M
1M
1M
(SFP
(SFP
(SFP
(SFP
+)
+)
+)
+)
3M (SFP +)
3M (SFP +)
(SFP +)
3M (SFP +)
3M (SFP +)
Brocade ICX 6650 Administration Guide
53-1002600-01
Digital optical monitoring
Port
Port
Port
Port
Port
Port
Port
Port
Port
Port
Port
Port
Port
Port
Port
Port
Port
Port
Port
Port
Port
Port
Port
Port
Port
Port
Port
Port
Port
Port
Port
Port
Port
Port
Port
Port
Port
Port
Port
1/1/30:
1/1/31:
1/1/32:
1/1/33:
1/1/34:
1/1/35:
1/1/36:
1/1/37:
1/1/38:
1/1/39:
1/1/40:
1/1/41:
1/1/42:
1/1/43:
1/1/44:
1/1/45:
1/1/46:
1/1/47:
1/1/48:
1/1/49:
1/1/50:
1/1/51:
1/1/52:
1/1/53:
1/1/54:
1/1/55:
1/1/56:
1/2/1:
1/2/2:
1/2/3:
1/2/4:
1/3/1:
1/3/2:
1/3/3:
1/3/4:
1/3/5:
1/3/6:
1/3/7:
1/3/8:
Type : EMPTY
Type : EMPTY
Type : EMPTY
Type : EMPTY
Type : EMPTY
Type : EMPTY
Type : EMPTY
Type : EMPTY
Type : EMPTY
Type : 10GE Twinax
3M (SFP
Type : 10GE Twinax
3M (SFP
Type : EMPTY
Type : EMPTY
Type : EMPTY
Type : EMPTY
Type : EMPTY
Type : EMPTY
Type : EMPTY
Type : EMPTY
Type : EMPTY
Type : EMPTY
Type : EMPTY
Type : EMPTY
Type : 10GE Twinax
1M (SFP
Type : 10GE Twinax
1M (SFP
Type : 10GE Twinax
1M (SFP
Type : 10GE Twinax
1M (SFP
Type : 40GE-SR4 100m (QSFP+)
Type : EMPTY
Type : 40GE-SR4 100m (QSFP+)
Type : 40GE-SR4 100m (QSFP+)
Type : EMPTY
Type : EMPTY
Type : EMPTY
Type : EMPTY
Type : EMPTY
Type : EMPTY
Type : EMPTY
Type : EMPTY
9
+)
+)
+)
+)
+)
+)
Use the show media slot command to obtain information about the media device installed in a slot.
Brocade#show media slot 1
Port 1/1/1: Type : 10GE Cable 1m (SFP +)
Vendor: BROCADE
Version:
Part# : 58-0000051-01
Serial#:
Port 1/1/2: Type : 10GE Cable 1m (SFP +)
Vendor: BROCADE
Version:
Part# : 58-0000051-01
Serial#:
Port 1/1/3: Type : 10GE Cable 1m (SFP +)
Vendor: BROCADE
Version:
Part# : 58-0000051-01
Serial#:
Port 1/1/4: Type : 10GE Cable 1m (SFP +)
Vendor: BROCADE
Version:
Part# : 58-0000051-01
Serial#:
Port 1/1/5: Type : EMPTY
Port 1/1/6: Type : EMPTY
Port 1/1/7: Type : EMPTY
Port 1/1/8: Type : EMPTY
Port 1/1/9: Type : 10GE SR 300m (SFP +)
Brocade ICX 6650 Administration Guide
53-1002600-01
A
MAM112210012JNF1
A
MAM112210012JNF2
A
MAM112210012JNF3
A
MAM112210012JNF4
227
9
Digital optical monitoring
Vendor: BROCADE
Version:
Part# : 57-0000075-01
Serial#:
Port 1/1/10: Type : 10GE LR 10km (SFP +)
Vendor: BROCADE
Version:
Part# : 57-0000076-01
Serial#:
Port 1/1/11: Type : 1G M-SX(SFP)
Vendor : Brocade
Version:
Part# : AFBR-5715PZ-FD
Serial#:
Port 1/1/12: Type : 1G M-SX(SFP)
Vendor : Brocade
Version:
Part# : AFBR-5710PZ-FD
Serial#:
A
AAF209450000A9K
A
ADF209100000D4P
AA0910S4YAF
AM0850SCTHH
Use the show media ethernet command to obtain information about the media device installed in a
port.
Brocade#show media ethernet 1/2/1
Port 1/2/1: Type : 40GE-SR4 100m (QSFP+)
Vendor: BROCADE
Version: A
Part# : 57-1000129-01
Serial#: ATA111491001893
Syntax: show media [slot <slot> | ethernet <stack-unit>/<slot>/<port>]
Specify the ethernet port in the <stack-unit>/<slot>/<port> format. Stack-unit is 1.
Viewing optical monitoring information
You can view temperature and power information for qualified SFP, SFP+, and QSFP+ transceivers
installed in a Brocade ICX 6650 device.
Use the show optic command to view information about an SFP, SFP+, and QSFP+ transceivers
installed in a particular port. The following shows example output from a 40GBASE-SR4 fiber optic.
The fiber optic has 4 channels for TX, RX.
Optical monitoring feature will not work in the following scenarios:
• The port is DOWN.
• The the optic module does not support optical monitoring.
Brocade(config)#show optic 1/2/1
40GBASE_SR4
===============
Port Temperature
Voltage
Rx Power
Tx Bias Current
+----+-----------+--------------+--------------+---------------+
1/2/1
42.6640 C
005.1911 dBm -001.1560 dBm
7.332 mA
Normal
Normal
Normal
Normal
Chan Rx Power #1 Rx Power #2
Rx Power #3
Rx Power #4
+----+-----------+--------------+--------------+---------------+
-001.1560 dBm -001.0846 dBm -001.3507 dBm -001.1221 dBm
Normal
Normal
Normal
Normal
Chan Tx Bias #1
Tx Bias #2
Tx Bias #3
Tx Bias #4
+----+-----------+--------------+--------------+---------------+
7.332 mA
7.412 mA
7.208 mA
7.222 mA
Normal
Normal
Normal
Normal
Syntax: show optic <stack-unit>/<slot>/<port>
Specify the ethernet port in the <stack-unit>/<slot>/<port> format. Stack-unit is 1.
228
Brocade ICX 6650 Administration Guide
53-1002600-01
Digital optical monitoring
9
NOTE
The show optic function takes advantage of information stored and supplied by the manufacturer of
the SFP, SFP+, and QSFP+ transceiver. This information is an optional feature of the Multi-Source
Agreement standard defining the optical interface. Not all component suppliers have implemented
this feature set. In such cases where the SFP, SFP+, and QSFP+ transceiver does not supply the
information, a “Not Available” message will be displayed for the specific port on which the module
is installed.
The following table describes the information displayed by the show optic command.
TABLE 48
Output from the show optic command
Field
Description
Port
The Brocade port number.
Temperature
•
Tx Power
•
•
Rx Power
•
•
•
•
•
Tx Bias Current
The operating temperature, in degrees Celsius, of the optical
transceiver.
The alarm status, as described in Table 49.
The transmit power signal, in decibels (dB), of the measured power
referenced to one milliwatt (mW).
The alarm status, as described in Table 49.
The receive power signal, in decibels (dB), of the measured power
referenced to one milliwatt (mW).
The alarm status, as described in Table 49
The transmit bias power signal, in milliamperes (mA).
The alarm status, as described in Table 49.
For Temperature, Tx Power, Rx Power, and Tx Bias Current in the show optic command output,
values are displayed along with one of the following alarm status values: Low-Alarm, Low-Warn,
Normal, High-Warn or High-Alarm. The thresholds that determine these status values are set by the
manufacturer of the optical transceivers. Table 49 describes each of these status values.
TABLE 49
Alarm status value description
Status value
Description
Low-Alarm
Monitored level has dropped below the "low-alarm" threshold set by the manufacturer of the
optical transceiver.
Low-Warn
Monitored level has dropped below the "low-warn" threshold set by the manufacturer of the
optical transceiver.
Normal
Monitored level is within the "normal" range set by the manufacturer of the optical transceiver.
High-Warn
Monitored level has climbed above the "high-warn" threshold set by the manufacturer of the
optical transceiver.
High-Alarm
Monitored level has climbed above the "high-alarm" threshold set by the manufacturer of the
optical transceiver.
Viewing optical transceiver thresholds
The thresholds that determine the alarm status values for an optical transceiver are set by the
manufacturer of the SFP, SFP+, and QSFP+. To view the thresholds for a qualified optical
transceiver in a particular port, use the show optic threshold command as shown below.
Brocade ICX 6650 Administration Guide
53-1002600-01
229
9
Digital optical monitoring
Brocade#show optic thresholds 1/1/4
Port 1/1/4 optical monitor thresholds:
Temperature High alarm
5a00
Temperature Low alarm
fb00
Temperature High warning
5500
Temperature Low warning
0000
TX Bias High alarm
1482
TX Bias Low alarm
04e2
TX Bias High warning
1482
TX Bias Low warning
04e2
TX Power High alarm
4e20
TX Power Low alarm
04ec
TX Power High warning
1edc
TX Power Low warning
0c62
RX Power High alarm
4e20
RX Power Low alarm
013b
RX Power High warning
1edc
RX Power Low warning
013b
90.0000
-5.0000
85.0000
0.0000
10.500
2.500
10.500
2.500
003.0102
-008.9962
-001.0237
-004.9894
003.0102
-015.0168
-001.0237
-015.0168
C
C
C
C
mA
mA
mA
mA
dBm
dBm
dBm
dBm
dBm
dBm
dBm
dBm
Syntax: show optic threshold <stack-unit>/<slot>/<port>
Specify the ethernet port in the <stack-unit>/<slot>/<port> format. Stack-unit is 1.
For Temperature, Supply Voltage, TX Bias, TX Power, and RX Power, values are displayed for each of
the following four alarm and warning settings: High alarm, Low alarm, High warning, and Low
warning. The hexadecimal values are the manufacturer internal calibrations, as defined in the
SFF-8472 standard. The other values indicate at what level (above the high setting or below the
low setting) the system should send a warning message or an alarm. Note that these values are
set by the manufacturer of the optical transceiver, and cannot be configured.
Syslog messages for optical transceivers
The system generates Syslog messages for optical transceivers in the following circumstances:
• The temperature, supply voltage, TX Bias, TX power, or TX power value goes above or below the
high or low warning or alarm threshold set by the manufacturer.
• The optical transceiver does not support digital optical monitoring.
• The optical transceiver is not qualified, and therefore not supported by Brocade.
For details about the above Syslog messages, refer to Appendix A, “Syslog messages”.
230
Brocade ICX 6650 Administration Guide
53-1002600-01
Chapter
10
Syslog
In this chapter
• About Syslog messages . . . . . . . . . . . . . . . . . . . . . . . . . . . . . . . . . . . . . . . . 232
• Displaying Syslog messages . . . . . . . . . . . . . . . . . . . . . . . . . . . . . . . . . . . . . 232
• Syslog service configuration . . . . . . . . . . . . . . . . . . . . . . . . . . . . . . . . . . . . . 234
Table 50 lists the Brocade ICX 6650 switch and the Syslog features the switch supports. These
features are supported in full Layer 3 software images, except where explicitly noted.
TABLE 50
Supported Syslog features
Feature
Brocade ICX
6650
Syslog messages
Yes
Real-time display of Syslog messages
Yes
Real-time display for Telnet or SSH
sessions
Yes
Show log on all terminals
Yes
Time stamps
Yes
Multiple Syslog server logging (up to 6
Syslog servers)
Yes
Disabling logging of a message level
Yes
Changing the number of entries the local
buffer can hold
Yes
Changing the log facility
Yes
Displaying Interface names in Syslog
messages
Yes
Displaying TCP and UDP port numbers in
Syslog messages
Yes
Retaining Syslog messages after a soft
reboot
Yes
Clearing Syslog messages from the local
buffer
Yes
This chapter describes how to display Syslog messages and how to configure the Syslog facility,
and lists the Syslog messages that Brocade ICX 6650 devices can display during standard
operation. Refer to “Syslog” on page 231 for a list of Syslog messages.
Brocade ICX 6650 Administration Guide
53-1002600-01
231
10
About Syslog messages
About Syslog messages
Brocade software can write syslog messages to provide information at the following severity levels:
•
•
•
•
•
•
•
•
Emergencies
Alerts
Critical
Errors
Warnings
Notifications
Informational
Debugging
The device writes the messages to a local buffer.
You also can specify the IP address or host name of up to six Syslog servers. When you specify a
Syslog server, the Brocade ICX 6650 device writes the messages both to the system log and to the
Syslog server.
Using a Syslog server ensures that the messages remain available even after a system reload. The
Brocade local Syslog buffer is cleared during a system reload or reboot, but the Syslog messages
sent to the Syslog server remain on the server.
NOTE
To enable the Brocade ICX 6650 device to retain Syslog messages after a soft reboot (reload
command). Refer to “Retaining Syslog messages after a soft reboot” on page 242.
The Syslog service on a Syslog server receives logging messages from applications on the local
host or from devices such as a Layer 2 Switch or Layer 3 Switch. Syslog adds a time stamp to each
received message and directs messages to a log file. Most Unix workstations come with Syslog
configured. Some third party vendor products also provide Syslog running on NT.
Syslog uses UDP port 514 and each Syslog message thus is sent with destination port 514. Each
Syslog message is one line with Syslog message format. The message is embedded in the text
portion of the Syslog format. There are several subfields in the format. Keywords are used to
identify each subfield, and commas are delimiters. The subfield order is insensitive except that the
text subfield should be the last field in the message. All the subfields are optional.
Displaying Syslog messages
To display the Syslog messages in the device local buffer, enter the show logging command at any
level of the CLI. The following shows an example display output.
Brocade>#show logging
Syslog logging: enabled (0 messages dropped, 0 flushes, 0 overruns)
Buffer logging: level ACDMEINW, 3 messages logged
level code: A=alert C=critical D=debugging M=emergency E=error
I=informational N=notification W=warning
Static Log Buffer:
Dec 15 19:04:14:A:Fan 1, fan on right connector, failed
232
Brocade ICX 6650 Administration Guide
53-1002600-01
Displaying Syslog messages
10
Dynamic Log Buffer (50 entries):
Dec 15 18:46:17:I:Interface ethernet 4, state up
Dec 15 18:45:21:I:Bridge topology change, vlan 4095, interface 4, changed
state to forwarding
Dec 15 18:45:15:I:Warm start
For information about the Syslog configuration information, time stamps, and dynamic and static
buffers, refer to “Displaying the Syslog configuration” on page 234.
Enabling real-time display of Syslog messages
By default, to view Syslog messages generated by a Brocade ICX 6650 device, you need to display
the Syslog buffer or the log on a Syslog server used by the Brocade ICX 6650 device.
You can enable real-time display of Syslog messages on the management console. When you
enable this feature, the software displays a Syslog message on the management console when the
message is generated. However, to enable display of real-time Syslog messages in Telnet or SSH
sessions, you also must enable display within the individual sessions.
To enable real-time display of Syslog messages, enter the following command at the global CONFIG
level of the CLI.
Brocade(config)#logging console
Syntax: [no] logging console
This command enables the real-time display of Syslog messages on the serial console. You can
enter this command from the serial console or a Telnet or SSH session.
Enabling real-time display for a Telnet or SSH session
To also enable the real-time display for a Telnet or SSH session, enter the following command from
the Privileged EXEC level of the session.
telnet@Brocade#terminal monitor
Syslog trace was turned ON
Syntax: terminal monitor
Notice that the CLI displays a message to indicate the status change for the feature. To disable the
feature in the management session, enter the terminal monitor command again. The command
toggles the feature on and off.
telnet@Brocade#terminal monitor
Syslog trace was turned OFF
Here is an example of how the Syslog messages are displayed.
telnet@Brocade#terminal monitor
Syslog trace was turned ON
SYSLOG: <9>Brocade, Power supply 2, power supply on left connector, failed
SYSLOG: <14>Brocade, Interface ethernet 6, state down
SYSLOG: <14>Brocade, Interface ethernet 2, state up
Brocade ICX 6650 Administration Guide
53-1002600-01
233
10
Syslog service configuration
Displaying real-time Syslog messages
Any terminal logged on to a Brocade switch can receive real-time Syslog messages when the
terminal monitor command is issued.
Syslog service configuration
The procedures in this section describe how to perform the following Syslog configuration tasks:
• Specify a Syslog server. You can configure the Brocade device to use up to six Syslog servers.
(Use of a Syslog server is optional. The system can hold up to 1000 Syslog messages in an
internal buffer.)
•
•
•
•
Change the level of messages the system logs.
Change the number of messages the local Syslog buffer can hold.
Display the Syslog configuration.
Clear the local Syslog buffer.
Logging is enabled by default, with the following settings:
• Messages of all severity levels (Emergencies – Debugging) are logged.
• By default, up to 50 messages are retained in the local Syslog buffer. This can be changed.
• No Syslog server is specified.
Displaying the Syslog configuration
To display the Syslog parameters currently in effect on a Brocade device, enter the following
command from any level of the CLI.
Brocade>#show logging
Syslog logging: enabled (0 messages dropped, 0
Buffer logging: level ACDMEINW, 3 messages
level code: A=alert C=critical D=debugging
I=informational N=notification
flushes, 0 overruns)
logged
M=emergency E=error
W=warning
Static Log Buffer:
Dec 15 19:04:14:A:Fan 1, fan on right connector, failed
Dynamic Log Buffer (50 entries):
Dec 15 18:46:17:I:Interface ethernet 1/4, state up
Dec 15 18:45:21:I:Bridge topology change, vlan 4095, interface 4, changed
state to forwarding
Dec 15 18:45:15:I:Warm start
Syntax: show logging
The Syslog display shows the following configuration information, in the rows above the log entries
themselves.
234
Brocade ICX 6650 Administration Guide
53-1002600-01
Syslog service configuration
TABLE 51
10
CLI display of Syslog buffer configuration
Field
Definition
Syslog logging
The state (enabled or disabled) of the Syslog buffer.
messages dropped
The number of Syslog messages dropped due to user-configured filters. By
default, the software logs messages for all Syslog levels. You can disable
individual Syslog levels, in which case the software filters out messages at those
levels. Refer to “Disabling logging of a message level” on page 239. Each time
the software filters out a Syslog message, this counter is incremented.
flushes
The number of times the Syslog buffer has been cleared by the clear logging
command. Refer to “Clearing the Syslog messages from the local buffer” on
page 242.
overruns
The number of times the dynamic log buffer has filled up and been cleared to
hold new entries. For example, if the buffer is set for 100 entries, the 101st entry
causes an overrun. After that, the 201st entry causes a second overrun.
level
The message levels that are enabled. Each letter represents a message type and
is identified by the key (level code) below the value. If you disable logging of a
message level, the code for that level is not listed.
messages logged
The total number of messages that have been logged since the software was
loaded.
level code
The message levels represented by the one-letter codes.
Static and dynamic buffers
The software provides two buffers:
• Static – logs power supply failures, fan failures, and temperature warning or shutdown
messages
• Dynamic – logs all other message types
In the static log, new messages replace older ones, so only the most recent message is displayed.
For example, only the most recent temperature warning message will be present in the log. If
multiple temperature warning messages are sent to the log, the latest one replaces the previous
one. The static buffer is not configurable.
The message types that appear in the static buffer do not appear in the dynamic buffer. The
dynamic buffer contains up to the maximum number of messages configured for the buffer (50 by
default), then begins removing the oldest messages (at the bottom of the log) to make room for
new ones.
The static and dynamic buffers are both displayed when you display the log.
Brocade ICX 6650 Administration Guide
53-1002600-01
235
10
Syslog service configuration
Brocade#show logging
Syslog logging: enabled (0 messages dropped, 0 flushes, 0 overruns)
Buffer logging: level ACDMEINW, 3 messages logged
level code: A=alert C=critical D=debugging M=emergency E=error
I=informational N=notification W=warning
Static Log Buffer:
Dec 15 19:04:14:A:Fan 1, fan on right connector, failed
Dec 15 19:00:14:A:Fan 2, fan on left connector, failed
Dynamic Log Buffer (50 entries):
Dec 15 18:46:17:I:Interface ethernet 4, state up
Dec 15 18:45:21:I:Bridge topology change, vlan 4095, interface 4, changed
state to forwarding
Dec 15 18:45:15:I:Warm start
Notice that the static buffer contains two separate messages for fan failures. Each message of
each type has its own buffer. Thus, if you replace fan 1 but for some reason that fan also fails, the
software replaces the first message about the failure of fan 1 with the newer message. The
software does not overwrite the message for fan 2, unless the software sends a newer message for
fan 2.
Clearing log entries
When you clear log entries, you can selectively clear the static or dynamic buffer, or you can clear
both. For example, to clear only the dynamic buffer, enter the following command at the Privileged
EXEC level.
Brocade#clear logging dynamic-buffer
Syntax: clear logging [dynamic-buffer | static-buffer]
You can specify dynamic-buffer to clear the dynamic buffer or static-buffer to clear the static buffer.
If you do not specify a buffer, both buffers are cleared.
Time stamps
The contents of the time stamp differ depending on whether you have set the time and date on the
onboard system clock:
• If you have set the time and date on the onboard system clock, the date and time are shown in
the following format.
mm dd hh:mm:ss
where
•
•
•
•
•
mm – abbreviation for the name of the month
dd – day
hh – hours
mm – minutes
ss – seconds
For example, “Oct 15 17:38:03” means October 15 at 5:38 PM and 3 seconds.
236
Brocade ICX 6650 Administration Guide
53-1002600-01
Syslog service configuration
10
• If you have not set the time and date on the onboard system clock, the time stamp shows the
amount of time that has passed since the device was booted, in the following format.
<num>d<num>h<num>m<num>s
where
•
•
•
•
<num>d – day
<num>h – hours
<num>m – minutes
<num>s – seconds
For example, “188d1h01m00s” means the device had been running for 188 days, 11 hours,
one minute, and zero seconds when the Syslog entry with this time stamp was generated.
Example of Syslog messages on a device with the onboard clock set
The example shows the format of messages on a device where the onboard system clock has been
set. Each time stamp shows the month, the day, and the time of the system clock when the
message was generated. For example, the system time when the most recent message (the one at
the top) was generated was October 15 at 5:38 PM and 3 seconds.
Brocade#show logging
Syslog logging: enabled (0 messages dropped, 0 flushes, 0 overruns)
Buffer logging: level ACDMEINW, 38 messages logged
level code: A=alert C=critical D=debugging M=emergency E=error
I=informational N=notification W=warning
Static Log Buffer:
Dec 15 19:04:14:A:Fan 1, fan on right connector, failed
Dec 15 19:00:14:A:Fan 2, fan on left connector, failed
Dynamic Log Buffer (50 entries):
Oct 15 17:38:03:warning:list 101 denied tcp 10.157.22.191(0)(Ethernet 18
0010.5a1f.77ed) -> 10.99.4.69(http), 1 event(s)
Oct 15 07:03:30:warning:list 101 denied tcp 10.157.22.26(0)(Ethernet 18
0010.5a1f.77ed) -> 10.99.4.69(http), 1 event(s)
Oct 15 06:58:30:warning:list 101 denied tcp 10.157.22.198(0)(Ethernet 18
0010.5a1f.77ed) -> 10.99.4.69(http), 1 event(s)
Example of Syslog messages on a device wih the onboard clock not set
The example shows the format of messages on a device where the onboard system clock is not set.
Each time stamp shows the amount of time the device had been running when the message was
generated. For example, the most recent message, at the top of the list of messages, was
generated when the device had been running for 21 days, seven hours, two minutes, and 40
seconds.
Brocade ICX 6650 Administration Guide
53-1002600-01
237
10
Syslog service configuration
Brocade#show logging
Syslog logging: enabled (0 messages dropped, 0 flushes, 0 overruns)
Buffer logging: level ACDMEINW, 16 messages logged
level code: A=alert C=critical D=debugging M=emergency E=error
I=informational N=notification W=warning
Static Log Buffer:
0d00h00m17s:I:System: Stack unit 1
Power supply 2
is up
0d00h00m14s:A:System: Stack unit 1 Temperature 53.0 C degrees, warning level 0.0
C degrees, shutdown level 85.0 C degrees
0d00h00m14s:W:System: Temperature is over warning level on unit 1
Dynamic Log Buffer (50 lines):
3d00h21m29s:I:running-config was changed by from console
2d21h52m07s:I:running-config was changed by from console
1d11h35m29s:I:VLAN: Id 20 deleted by user from console session
1d02h42m03s:I:running-config was changed by from console
0d00h01m38s:D:DHCPC: Stopped DHCP Client service
0d00h00m14s:I:System: Interface ethernet 1/2/4, state up
0d00h00m14s:I:System: Interface ethernet 1/2/3, state up
0d00h00m14s:I:System: Interface ethernet 1/2/2, state up
0d00h00m14s:I:System: Interface ethernet 1/2/1, state up
0d00h00m14s:I:System: Interface ethernet mgmt1, state up
0d00h00m08s:D:DHCPC: starting dhcp client service on 69 port(s)
Disabling or re-enabling Syslog
Syslog is enabled by default. To disable it, enter the logging on command at the global CONFIG
level.
Brocade(config)#no logging on
Syntax: [no] logging on [<udp-port>]
The <udp-port> parameter specifies the application port used for the Syslog facility. The default is
514.
To re-enable logging, re-enter the logging on command.
Brocade(config)#logging on
This command enables local Syslog logging with the following defaults:
• Messages of all severity levels (Emergencies – Debugging) are logged.
• Up to 50 messages are retained in the local Syslog buffer.
• No Syslog server is specified.
Specifying a Syslog server
To specify a Syslog server, enter the logging host command.
Brocade(config)#logging host 10.0.0.99
Syntax: logging host <ip-addr> | <server-name>
238
Brocade ICX 6650 Administration Guide
53-1002600-01
Syslog service configuration
10
Specifying an additional Syslog server
To specify an additional Syslog server, enter the logging host <ip-addr> command again. You can
specify up to six Syslog servers.
Brocade(config)#logging host 10.0.0.99
Syntax: logging host <ip-addr> | <server-name>
Disabling logging of a message level
To change the message level, disable logging of specific message levels. You must disable the
message levels on an individual basis.
For example, to disable logging of debugging and informational messages, enter the following
commands.
Brocade(config)#no logging buffered debugging
Brocade(config)#no logging buffered informational
Syntax: [no] logging buffered <level> | <num-entries>
The <level> parameter can have one of the following values:
•
•
•
•
•
•
•
•
alerts
critical
debugging
emergencies
errors
informational
notifications
warnings
The commands in the example above change the log level to notification messages or higher. The
software will not log informational or debugging messages. The changed message level also
applies to the Syslog servers.
Changing the number of entries the local buffer can hold
You also can use the logging buffered command to change the number of entries the local Syslog
buffer can store. For example.
Brocade(config)#logging buffered 100
Brocade(config)#write mem
Brocade(config)#exit
Brocade#reload
Syntax: logging buffered <num>
The default number of messages is 50.
Brocade ICX 6650 Administration Guide
53-1002600-01
239
10
Syslog service configuration
For Layer 2 switches, you can set the Syslog buffer limit from 1 – 100 entries. For Layer 3 switches,
you can set the Syslog buffer limit from 1 – 1000 entries.
Local buffer configuration notes
• You must save the configuration and reload the software to place the change into effect.
• If you decrease the size of the buffer, the software clears the buffer before placing the change
into effect.
• If you increase the size of the Syslog buffer, the software will clear some of the older locally
buffered Syslog messages.
Changing the log facility
The Syslog daemon on the Syslog server uses a facility to determine where to log the messages
from the Brocade device. The default facility for messages the Brocade device sends to the Syslog
server is “user”. You can change the facility using the following command.
NOTE
You can specify only one facility. If you configure the Brocade device to use two Syslog servers, the
device uses the same facility on both servers.
Brocade(config)#logging facility local0
Syntax: logging facility <facility-name>
The <facility-name> can be one of the following:
•
•
•
•
•
•
•
•
•
•
•
•
•
•
•
•
•
•
•
240
kern – kernel messages
user – random user-level messages
mail – mail system
daemon – system daemons
auth – security or authorization messages
syslog – messages generated internally by Syslog
lpr – line printer subsystem
news – netnews subsystem
uucp – uucp subsystem
sys9 – cron/at subsystem
sys10 – reserved for system use
sys11 – reserved for system use
sys12 – reserved for system use
sys13 – reserved for system use
sys14 – reserved for system use
cron – cron/at subsystem
local0 – reserved for local use
local1 – reserved for local use
local2 – reserved for local use
Brocade ICX 6650 Administration Guide
53-1002600-01
Syslog service configuration
•
•
•
•
•
10
local3 – reserved for local use
local4 – reserved for local use
local5 – reserved for local use
local6 – reserved for local use
local7 – reserved for local use
Displaying interface names in Syslog messages
By default, an interface slot number (if applicable) and port number are displayed when you display
Syslog messages. If you want to display the name of the interface instead of its number, enter the
following command:
Brocade(config)# ip show-portname
This command is applied globally to all interfaces on Layer 2 Switches and Layer 3 Switches.
Syntax: [no] Ip show-portname
By default, Syslog messages show the interface type, such as “ethernet”, “pos”, and so on. For
example, you see the following
SYSLOG: <14>Jun 27 16:17:02 10.20.68.32 System: Interface ethernet 1/1/4, state up
However, if ip show-portname is configured and a name has been assigned to the port, the port
name replaces the interface type as shown in the example below.
SYSLOG: <14>Jun 27 16:18:33 10.20.68.32 System: Interface port4 1/1/4, state up
Also, when you display the messages in the Syslog, you see the interface name under the Dynamic
Log Buffer section. The actual interface number is appended to the interface name. For example, if
the interface name is "lab" and its port number is "2", you see "lab2" displayed as in the example
below:
Brocade# show logging
Syslog logging: enabled (0 messages dropped, 0 flushes, 0 overruns)
Buffer logging: level ACDMEINW, 3 messages logged
level code: A=alert C=critical D=debugging M=emergency E=error
I=informational N=notification W=warning
Static Log Buffer:
Dec 15 19:04:14:A:Fan 1, fan on right connector, failed
Dynamic Log Buffer (50 entries):
Dec 15 18:46:17:I:Interface ethernet Lab2, state up
Dec 15 18:45:15:I:Warm start
Displaying TCP or UDP port numbers in Syslog messages
The command ip show-service-number-in-log allows you to change the display of TCP or UDP
application information from the TCP or UDP well-known port name to the TCP or UDP port number.
For example, when this command is in effect, the Brocade device will display http (the well-known
port name) instead of 80 (the port number) in the output of show commands, and other
commands that contain application port information. By default, Brocade devices display TCP or
UDP application information in named notation.
To display TCP or UDP port numbers instead of their names, enter the following command.
Brocade ICX 6650 Administration Guide
53-1002600-01
241
10
Syslog service configuration
Brocade(config)#ip show-service-number-in-log
Syntax: [no] ip show-service-number-in-log
Retaining Syslog messages after a soft reboot
You can configure the device to save the System log (Syslog) after a soft reboot (reload command).
Syslog reboot configuration considerations
• If the Syslog buffer size was set to a different value using the CLI command logging buffered,
the System log will be cleared after a soft reboot, even when this feature (logging persistence)
is in effect. This will occur only with a soft reboot immediately following a Syslog buffer size
change. A soft reboot by itself will not clear the System log. To prevent the system from clearing
the System log, leave the number of entries allowed in the Syslog buffer unchanged.
• This feature does not save Syslog messages after a hard reboot. When the Brocade device is
power-cycled, the Syslog messages are cleared.
• If logging persistence is enabled and you load a new software image on the device, you must
first clear the log if you want to reload the device. (Refer to “Clearing the Syslog messages from
the local buffer” on page 242.)
To configure the device to save the System log messages after a soft reboot, enter the following
command.
Brocade(config)#logging persistence
Syntax: [no] logging persistence
Enter no logging persistence to disable this feature after it has been enabled.
Clearing the Syslog messages from the local buffer
To clear the Syslog messages stored in the local buffer of the Brocade device, enter the clear
logging command.
Brocade#clear logging
Syntax: clear logging
.
242
Brocade ICX 6650 Administration Guide
53-1002600-01
Chapter
11
Network Monitoring
In this chapter
• Basic system management. . . . . . . . . . . . . . . . . . . . . . . . . . . . . . . . . . . . . .
• RMON support . . . . . . . . . . . . . . . . . . . . . . . . . . . . . . . . . . . . . . . . . . . . . . . .
• sFlow. . . . . . . . . . . . . . . . . . . . . . . . . . . . . . . . . . . . . . . . . . . . . . . . . . . . . . . .
• Utilization list for an uplink port . . . . . . . . . . . . . . . . . . . . . . . . . . . . . . . . . .
243
250
254
270
Table 52 lists the Brocade ICX 6650 switch and the network monitoring features the switch
supports. These features are supported in full Layer 3 software images, except where explicitly
noted.
TABLE 52
Supported network monitoring features
Feature
Brocade ICX
6650
Egress queue counters
Yes
Remote monitoring (RMON)
Yes
Specifying the maximum number of
Yes
entries allowed in the RMON Control Table
sFlow version 2
Yes
sFlow version 5 (default)
Yes
sFlow support for IPv6 packets
Yes
Uplink utilization lists
Yes
Basic system management
The following sections contain procedures for basic system management tasks.
Viewing system information
You can access software and hardware specifics for a Brocade Layer 2 Switch or Layer 3 Switch.
For software specifics, refer to “Software versions installed and running on a device” on page 50.
To view the software and hardware details for the system, enter the show version command. The
following shows an example output.
Brocade ICX 6650 Administration Guide
53-1002600-01
243
11
Basic system management
Brocade#show version
Copyright (c) 1996-2012 Brocade Communications Systems, Inc. All rights reserved.
UNIT 1: compiled on Jul 31 2012 at 21:55:03 labeled as ICXLS07500
(11358772 bytes) from Secondary ICXLS07500.bin
SW: Version 07.5.00T321
Boot-Monitor Image size = 524288, Version:07.5.00T320 (fxz07500B1)
HW: Stackable ICX6650-64
==========================================================================
UNIT 1: SL 1: ICX6650-64 56-port Management Module
Serial #: CEN2525H006
License: BASE_SOFT_PACKAGE
(LID: egpHKHKjFFL)
P-ENGINE 0: type EC02, rev 01
==========================================================================
UNIT 1: SL 2: ICX6650-64 4-port 160G Module
==========================================================================
UNIT 1: SL 3: ICX6650-64 8-port 80G Module
==========================================================================
800 MHz Power PC processor 8544E (version 0021/0022) 400 MHz bus
65536 KB flash memory
1024 MB DRAM
STACKID 1 system uptime is 23 hours 12 minutes 8 seconds
==========================================================================
HARDWARE INFORMATION
UNIT NAME
: ICX6650-64
HW REVISION
: 2 (BETA)
Board ID : 4(ICX6650)
CPLD INFORMATION
CPLD code is RD revision
CPLD CODE REVISION = 6
==========================================================================
The system : started=warm start reloaded=by "reload"
*** NOT FOR PRODUCTION ***
The following hardware details are listed in the output of the show version command:
•
•
•
•
Chassis type
PROM type (if applicable)
Chassis serial number
Management and interface module serial numbers and ASIC types
For a description of the software details in the output of the show version command, refer to
“Software versions installed and running on a device” on page 50.
Syntax: show version
Viewing configuration information
You can view a variety of configuration details and statistics with the show option. The show option
provides a convenient way to check configuration changes before saving them to flash.
The show options available will vary for Layer 2 Switches and Layer 3 Switches and by configuration
level.
To determine the available show commands for the system or a specific level of the CLI, enter the
following command.
244
Brocade ICX 6650 Administration Guide
53-1002600-01
Basic system management
11
Brocade#show ?
Syntax: show <option>
You also can enter “show” at the command prompt, then press the TAB key.
Viewing port statistics
Port statistics are polled by default every 10 seconds.
You can view statistics for ports by entering the following show commands:
• show interfaces
• show configuration
• show statistics
To display the statistics, enter a command such as the following.
Brocade#show statistics ethernet 1/1/1
Port Link State
Dupl Speed Trunk Tag Priori MAC
Name
1/1/1 Up
Forward
Half 100M None No level0 748e.f80c.5f40
Port 1/1/1 Counters:
InOctets
InPkts
InBroadcastPkts
InMulticastPkts
InUnicastPkts
InBadPkts
InFragments
InDiscards
CRC
InErrors
InGiantPkts
InShortPkts
InJabber
InFlowCtrlPkts
InBitsPerSec
InPktsPerSec
InUtilization
3200
50
0
48
2
0
0
0
0
0
0
0
0
0
264
0
0.00%
OutOctets
OutPkts
OutBroadcastPkts
OutMulticastPkts
OutUnicastPkts
256
4
3
0
1
OutErrors
Collisions
LateCollisions
0
0
0
OutFlowCtrlPkts
OutBitsPerSec
OutPktsPerSec
OutUtilization
0
16
0
0.00%
Syntax: show statistics [ethernet <stack-unit>/<slot>/<port>
Specify the Ethernet port in the <stack-unit>/<slot>/<port> format. Stack-unit is 1.
Table 53 lists the statistics displayed in the output of the show statistics command.
TABLE 53
Port statistics
Parameter
Description
Port configuration
Port
The port number.
Link
The link state.
Brocade ICX 6650 Administration Guide
53-1002600-01
245
11
Basic system management
TABLE 53
Port statistics (Continued)
Parameter
Description
State
The STP state.
Dupl
The mode (full-duplex or half-duplex).
Speed
The port speed (10M, 100M, or 1000M).
Trunk
The trunk group number, if the port is a member of a trunk group.
Tag
Whether the port is a tagged member of a VLAN.
Priori
The QoS forwarding priority of the port (level0 – level7).
MAC
The MAC address of the port.
Name
The name of the port, if you assigned a name.
Statistics
InOctets
The total number of good octets and bad octets received.
OutOctets
The total number of good octets and bad octets sent.
InPkts
The total number of packets received. The count includes rejected and local
packets that are not sent to the switching core for transmission.
OutPkts
The total number of good packets sent. The count includes unicast, multicast,
and broadcast packets.
InBroadcastPkts
The total number of good broadcast packets received.
OutBroadcastPkts
The total number of good broadcast packets sent.
InMulticastPkts
The total number of good multicast packets received.
OutMulticastPkts
The total number of good multicast packets sent.
InUnicastPkts
The total number of good unicast packets received.
OutUnicastPkts
The total number of good unicast packets sent.
InBadPkts
InFragments
The total number of packets received for which both of the following was true:
The length was less than 64 bytes.
The CRC was invalid.
•
•
InDiscards
The total number of packets that were received and then dropped due to a lack
of receive buffers.
OutErrors
The total number of packets with internal transmit errors such as TX underruns.
CRC
246
The total number of packets received for which one of the following is true:
The CRC was invalid.
The packet was oversized.
Jabbers: The packets were longer than 1518 octets and had a bad FCS.
Fragments: The packets were less than 64 octets long and had a bad FCS.
The packet was undersized (short).
•
•
•
•
•
The total number of packets received for which all of the following was true:
The data length was between 64 bytes and the maximum allowable frame
size.
• No Collision or Late Collision was detected.
• The CRC was invalid.
•
Collisions
The total number of packets received in which a Collision event was detected.
InErrors
The total number of packets received that had Alignment errors or phy errors.
Brocade ICX 6650 Administration Guide
53-1002600-01
Basic system management
11
TABLE 53
Port statistics (Continued)
Parameter
Description
LateCollisions
The total number of packets received in which a Collision event was detected,
but for which a receive error (Rx Error) event was not detected.
InGiantPkts
The total number of packets for which all of the following was true:
• The data length was longer than the maximum allowable frame size.
• No Rx Error was detected.
NOTE: Packets are counted for this statistic regardless of whether the CRC is
valid or invalid.
InShortPkts
The total number of packets received for which all of the following was true:
The data length was less than 64 bytes.
No Rx Error was detected.
No Collision or Late Collision was detected.
•
•
•
NOTE: Packets are counted for this statistic regardless of whether the CRC is
valid or invalid.
InJabber
The total number of packets received for which all of the following was true:
The data length was longer than the maximum allowable frame size.
No Rx Error was detected.
The CRC was invalid.
•
•
•
InFlowCtrlPkts
The total number of flow control packets received.
OutFlowCtrlPkts
The total number of flow control packets transmitted.
InBitsPerSec
The number of bits received per second.
OutBitsPerSec
The number of bits sent per second.
InPktsPerSec
The number of packets received per second.
OutPktsPerSec
The number of packets sent per second.
InUtilization
The percentage of the port bandwidth used by received traffic.
OutUtilization
The percentage of the port bandwidth used by sent traffic.
Viewing STP statistics
You can view a summary of STP statistics for Layer 2 Switches and Layer 3 Switches. STP statistics
are by default polled every 10 seconds.
To view spanning tree statistics, enter the show span command. To view STP statistics for a VLAN,
enter the span vlan command.
Brocade ICX 6650 Administration Guide
53-1002600-01
247
11
Basic system management
Clearing statistics
You can clear statistics for many parameters using the clear command.
To determine the available clear commands for the system, enter the clear command at the
Privileged EXEC level of the CLI.
Brocade#clear ?
Syntax: clear <option>
You also can enter “clear” at the command prompt, then press the TAB key.
248
Brocade ICX 6650 Administration Guide
53-1002600-01
Basic system management
11
Viewing egress queue counters
The show interface command displays the number of packets on a port that were queued for each
QoS priority (traffic class) and dropped because of congestion.
NOTE
These counters do not include traffic on management ports or for a stack member unit that is down.
The egress queue counters display at the end of the show interface command output as shown in
the following example.
Brocade#show interface e 1/1/1
GigabitEthernet1/1/1 is up, line protocol is up
Hardware is GigabitEthernet, address is 748e.f80c.5f40(bia 748e.f80c.5f40)
Configured speed auto, actual 1Gbit, configured duplex fdx, actual fdx
Configured mdi mode AUTO, actual none
Member of L2 VLAN ID 52, port is untagged, port state is FORWARDING
BPDU guard is Disabled, ROOT protect is Disabled
Link Error Dampening is Disabled
STP configured to ON, priority is level0, mac-learning is enabled
Flow Control is config enabled, oper enabled, negotiation disabled
mirror disabled, monitor disabled
Not member of any active trunks
Not member of any configured trunks
No port name
Inter-Packet Gap (IPG) is 96 bit times
IP MTU 1500 bytes
300 second input rate: 0 bits/sec, 0 packets/sec, 0.00% utilization
300 second output rate: 256 bits/sec, 0 packets/sec, 0.00% utilization
0 packets input, 0 bytes, 0 no buffer
Received 0 broadcasts, 0 multicasts, 0 unicasts
0 input errors, 0 CRC, 0 frame, 0 ignored
0 runts, 0 giants
215704 packets output, 13805066 bytes, 0 underruns
Transmitted 0 broadcasts, 215704 multicasts, 0 unicasts
0 output errors, 0 collisions
Relay Agent Information option: Disabled
Egress queues:
Queue counters
0
1
2
3
4
5
6
7
Queued packets
0
0
1
0
0
0
0
215703
Dropped Packets
0
0
0
0
0
0
0
0
Syntax: show interface [ethernet <stack-unit>/<slot>/<port>]
Specify the Ethernet port in the <stack-unit>/<slot>/<port> format. Stack-unit is 1.
Table 54 defines the egress queue statistics displayed in the output.
Brocade ICX 6650 Administration Guide
53-1002600-01
249
11
RMON support
TABLE 54
Egress queue statistics
Parameter
Description
Queue counters
The QoS traffic class.
Queued packets
The number of packets queued on the port for the given traffic class.
Dropped packets
The number of packets for the given traffic class that were dropped because
of congestion.
Clearing the egress queue counters
You can clear egress queue statistics (reset them to zero), using the clear statistics and clear
statistics ethernet <port> command.
Syntax: clear statistics [ethernet <stack-unit>/<slot>/<port>]
Specify the Ethernet port in the <stack-unit>/<slot>/<port> format. Stack-unit is 1.
RMON support
The Brocade RMON agent supports the following groups. The group numbers come from the RMON
specification (RFC 1757):
•
•
•
•
Statistics (RMON Group 1)
History (RMON Group 2)
Alarms (RMON Group 3)
Events (RMON Group 9)
The CLI allows you to make configuration changes to the control data for these groups, but you
need a separate RMON application to view and display the data graphically.
Maximum number of entries allowed in the
RMON control table
You can specify the maximum number of entries allowed in the RMON control table, including
alarms, history, and events. The maximum number of RMON entries supported is 32768.
To set the maximum number of allowable entries to 3000 in the RMON history table, enter
commands such as the following.
Brocade(config)#system-max rmon-entries 3000
Brocade(config)#write mem
Brocade(config)#exit
Brocade#reload
NOTE
You must save the change to the startup-config file and reload or reboot. The change does not take
effect until you reload or reboot.
Syntax: system-max rmon-entries <value>
where <value> is 32768.
250
Brocade ICX 6650 Administration Guide
53-1002600-01
11
RMON support
Statistics (RMON group 1)
Count information on multicast and broadcast packets, total packets sent, undersized and
oversized packets, CRC alignment errors, jabbers, collision, fragments and dropped events is
collected for each port on a Brocade Layer 2 Switch or Layer 3 Switch.
The statistics group collects statistics on promiscuous traffic across an interface. The interface
group collects statistics on total traffic into and out of the agent interface.
No configuration is required to activate collection of statistics for the Layer 2 Switch or Layer 3
Switch. This activity is by default automatically activated at system start-up.
You can view a textual summary of the statistics for all ports by entering the following CLI
command.
Brocade#show rmon statistics
Ethernet statistics 1 is active, owned by monitor
Interface 1/1 (ifIndex 1) counters
Octets
0
Drop events
0
Packets
Broadcast pkts
0
Multicast pkts
CRC alignment errors
0
Undersize pkts
Oversize pkts
0
Fragments
Jabbers
0
Collisions
64 octets pkts
0
65 to 127 octets pkts
128 to 255 octets pkts
0
256 to 511 octets pkts
512 to 1023 octets pkts
0 1024 to 1518 octets pkts
0
0
0
0
0
0
0
0
Syntax: show rmon statistics [ethernet <stack-unit>/<slot>/<port>]
Specify the Ethernet port in the <stack-unit>/<slot>/<port> format. Stack-unit is 1.
You can use the physical port number or the SNMP port number. The physical port number is
based on the product. The SNMP numbers of the ports start at 1 and increase sequentially.
This command shows the following information.
TABLE 55
Export configuration and statistics
Parameter
Definition
Octets
The total number of octets of data received on the network.
This number includes octets in bad packets. This number does not include framing bits
but does include Frame Check Sequence (FCS) octets.
Drop events
Indicates an overrun at the port. The port logic could not receive the traffic at full line
rate and had to drop some packets as a result.
The counter indicates the total number of events in which packets were dropped by the
RMON probe due to lack of resources. This number is not necessarily the number of
packets dropped, but is the number of times an overrun condition has been detected.
Packets
The total number of packets received.
This number includes bad packets, broadcast packets, and multicast packets.
Broadcast pkts
The total number of good packets received that were directed to the broadcast
address.
This number does not include multicast packets.
Multicast pkts
The total number of good packets received that were directed to a multicast address.
This number does not include packets directed to the broadcast address.
Brocade ICX 6650 Administration Guide
53-1002600-01
251
11
RMON support
TABLE 55
Export configuration and statistics (Continued)
Parameter
Definition
CRC alignment errors
The total number of packets received that were from 64 – 1518 octets long, but had
either a bad FCS with an integral number of octets (FCS Error) or a bad FCS with a
non-integral number of octets (Alignment Error).
The packet length does not include framing bits but does include FCS octets.
Undersize pkts
The total number of packets received that were less than 64 octets long and were
otherwise well formed.
This number does not include framing bits but does include FCS octets.
Fragments
The total number of packets received that were less than 64 octets long and had either
a bad FCS with an integral number of octets (FCS Error) or a bad FCS with a
non-integral number of octets (Alignment Error).
It is normal for this counter to increment, since it counts both runts (which are normal
occurrences due to collisions) and noise hits.
This number does not include framing bits but does include FCS octets.
Oversize packets
The total number of packets received that were longer than 1518 octets and were
otherwise well formed.
This number does not include framing bits but does include FCS octets.
NOTE: 48GC modules do not support count information on oversized packets and
report 0.
Jabbers
The total number of packets received that were longer than 1518 octets and had either
a bad FCS with an integral number of octets (FCS Error) or a bad FCS with a
non-integral number of octets (Alignment Error).
NOTE: This definition of jabber is different from the definition in IEEE-802.3 section
8.2.1.5 (10BASE5) and section 10.3.1.4 (10BASE2). These documents define
jabber as the condition where any packet exceeds 20 ms. The allowed range to
detect jabber is between 20 ms and 150 ms.
This number does not include framing bits but does include FCS octets.
NOTE: 48GC modules do not support count information on jabbers and report 0.
252
Collisions
The best estimate of the total number of collisions on this Ethernet segment.
64 octets pkts
The total number of packets received that were 64 octets long.
This number includes bad packets.
This number does not include framing bits but does include FCS octets.
65 to 127 octets pkts
The total number of packets received that were 65 – 127 octets long.
This number includes bad packets.
This number does not include framing bits but does include FCS octets.
128 to 255 octets pkts
The total number of packets received that were 128 – 255 octets long.
This number includes bad packets.
This number does not include framing bits but does include FCS octets.
256 to 511 octets pkts
The total number of packets received that were 256 – 511 octets long.
This number includes bad packets.
This number does not include framing bits but does include FCS octets.
512 to 1023 octets pkts
The total number of packets received that were 512 – 1023 octets long.
This number includes bad packets.
This number does not include framing bits but does include FCS octets.
1024 to 1518 octets
pkts
The total number of packets received that were 1024 – 1518 octets long.
This number includes bad packets.
This number does not include framing bits but does include FCS octets.
Brocade ICX 6650 Administration Guide
53-1002600-01
RMON support
11
History (RMON group 2)
All active ports by default will generate two history control data entries per active Brocade Layer 2
Switch port or Layer 3 Switch interface. An active port is defined as one with a link up. If the link
goes down the two entries are automatically deleted.
Two history entries are generated for each device:
• A sampling of statistics every 30 seconds
• A sampling of statistics every 30 minutes
The history data can be accessed and displayed using any of the popular RMON applications
A sample RMON history command and its syntax is shown below.
Brocade(config)#rmon history 1 interface ethernet 1/1/1 buckets 10 interval 10
owner nyc02
Syntax: rmon history <entry-number> interface [ ethernet <stack-unit>/<slot>/<port>] buckets
<number> interval <sampling-interval> owner <text-string>
Specify the Ethernet port in the <stack-unit>/<slot>/<port> format. Stack-unit is 1.
You can modify the sampling interval and the bucket (number of entries saved before overwrite)
using the CLI. In the above example, owner refers to the RMON station that will request the
information.
NOTE
To review the control data entry for each port or interface, enter the show rmon history command.
Alarm (RMON group 3)
Alarm is designed to monitor configured thresholds for any SNMP integer, time tick, gauge or
counter MIB object. Using the CLI, you can define what MIB objects are monitored, the type of
thresholds that are monitored (falling, rising or both), the value of those thresholds, and the
sample type (absolute or delta).
An alarm event is reported each time that a threshold is exceeded. The alarm entry also indicates
the action (event) to be taken if the threshold be exceeded.
A sample CLI alarm entry and its syntax is shown below.
Brocade(config)#rmon alarm 1 ifInOctets.6 10 delta rising-threshold 100 1 falling
threshold 50 1 owner nyc02
Syntax: rmon alarm <entry-number> <MIB-object.interface-num> <sampling-time>
<sample-type>
<threshold-type> <threshold-value> <event-number> <threshold-type> <threshold-value>
<event-number>
owner <text-string>
Event (RMON group 9)
There are two elements to the Event Group—the event control table and the event log table.
Brocade ICX 6650 Administration Guide
53-1002600-01
253
11
sFlow
The event control table defines the action to be taken when an alarm is reported. Defined events
can be found by entering the CLI command, show event. The Event Log Table collects and stores
reported events for retrieval by an RMON application.
A sample entry and syntax of the event control table is shown below.
Brocade(config)#rmon event 1 description ‘testing a longer string’ log-and-trap
public owner nyc02
Syntax: rmon event <event-entry> description <text-string> log | trap | log-and-trap owner
<rmon-station>
sFlow
NOTE
Brocade ICX 6650 devices support sFlow version 5 by default.
sFlow is a standards-based protocol that allows network traffic to be sampled at a user-defined rate
for the purpose of monitoring traffic flow patterns and identifying packet transfer rates on
user-specified interfaces.
When sFlow is enabled on a Layer 2 or Layer 3 switch, the system performs the following
sFlow-related tasks:
• Samples traffic flows by copying packet header information
• Identifies ingress and egress interfaces for the sampled flows
• Combines sFlow samples into UDP packets and forwards them to the sFlow collectors for
analysis
• Forwards byte and packet count data, or counter samples, to sFlow collectors
sFlow is described in RFC 3176, “InMon Corporation's sFlow: A Method for Monitoring Traffic in
Switched and Routed Networks”.
NOTE
You can use QoS queue 1 for priority traffic, even when sFlow is enabled on the port. QoS queue 1
is reserved for sFlow and is not used by other packets. Any non-sFlow packets assigned to QoS
queue 1 will be directed to QoS queue 0.
sFlow version 5
sFlow version 5 enhances and modifies the format of the data sent to the sFlow collector. sFlow
version 5 introduces several new sFlow features and also defines a new datagram syntax used by
the sFlow agent to report flow samples and interface counters to the sFlow collector.
sFlow version 5 adds support for the following:
•
•
•
•
•
254
sFlow version 5 datagrams
Sub-agent support
Configurable sFlow export packet size
Support for the new data field and sample type length in flow samples
Configurable interval for exporting Brocade-specific data structure
Brocade ICX 6650 Administration Guide
53-1002600-01
sFlow
11
sFlow version 5 is backward-compatible with sFlow version 2. By default, the sFlow agent exports
sFlow version 5 flow samples by default, but you can configure the device to export the data in
sFlow version 2 format. You can switch between sFlow version 2 and sFlow version 5 formats. The
sFlow collector automatically parses each incoming sample and decodes it based on the version
number.
The configuration procedures for sFlow version 5 are the same as for sFlow version 2, except where
explicitly noted. Configuration procedures for sFlow are in the section “Configuring and enabling
sFlow” on page 257. The features and CLI commands that are specific to sFlow version 5 are
described in the section “sFlow version 5 feature configuration” on page 264.
sFlow support for IPv6 packets
The Brocade implementation of sFlow features support IPv6 packets. This support includes
extended router information and extended gateway information in the sampled packet. Note that
sFlow support for IPv6 packets exists only on devices running software that supports IPv6.
The configuration procedures for this feature are the same as for IPv4, except where the collector is
a link-local address on a Layer 3 switch. For details refer to “Specifying the collector” on page 258.
Extended router information
IPv6 sFlow sampled packets include the following extended router information:
•
•
•
•
IP address of the next hop router
Outgoing VLAN ID
Source IP address prefix length
Destination IP address prefix length
Note that in IPv6 devices, the prefix lengths of the source and destination IP addresses are
collected if BGP is configured and the route lookup is completed. In IPv4 devices, this information is
collected only if BGP is configured on the devices.
Extended gateway information
If BGP is enabled, extended gateway information is included in IPv6 sFlow sampled packets,
including the following BGP information about a packet destination route:
•
•
•
•
The autonomous system (AS) number for the router
The source IP AS of the route
The source peer AS for the route
The AS patch to the destination
NOTE
AS communities and local preferences are not included in the sampled packets.
To obtain extended gateway information, use “struct extended_gateway” as described in RFC 3176.
Brocade ICX 6650 Administration Guide
53-1002600-01
255
11
sFlow
IPv6 packet sampling
IPv6 sampling is performed by the packet processor. The system uses the sampling rate setting to
selectively mark the monitoring bit in the header of an incoming packet. Marked packets tell the
CPU that the packets are subject to sFlow sampling.
sFlow configuration considerations
This section lists the sFlow configuration considerations on Brocade ICX 6650 devices.
You can use QoS queue 1 for priority traffic, even when sFlow is enabled on the port. QoS queue 1
is reserved for sFlow and is not used by other packets. Any non-sFlow packets assigned to QoS
queue 1 will be directed to QoS queue 0.
sFlow and hardware support
• Brocade ICX 6650 devices support sFlow packet sampling of inbound traffic only. These
devices do not sample outbound packets. However, Brocade ICX 6650 devices support byte
and packet count statistics for both traffic directions.
• sFlow is supported on all Ethernet ports (10/100, Gbps, and 10 Gbps)
sFlow and CPU utilization
Enabling sFlow may cause a slight and noticeable increase of up to 20% in CPU utilization. In
typical scenarios, this is normal behavior for sFlow, and does not affect the functionality of other
features on the switch.
sFlow and source address
The sampled sFlow data sent to the collectors includes an agent_address field. This field identifies
the IP address of the device that sent the data:
• On a Layer 2 Switch, agent_address is the Layer 2 Switch management IP address. You must
configure the management IP address in order to export sFlow data from the device. If the
switch has both an IPv4 and IPv6 address, the agent_address is the IPv4 address. If the switch
has an IPv6 address only, the agent_address is the global IPv6 address.
• On a Layer 3 Switch with IPv6 interfaces only, sFlow looks for an IPv6 address in the following
order, and uses the first address found:
• The first IPv6 address on the lowest-numbered loopback interface
• The first IPv6 address on the lowest-numbered VE interface
• The first IPv6 address on any interface
• On a Layer 3 Switch with both IPv4 and IPv6 interfaces, or with IPv4 interfaces only, sFlow
looks for an IP address in the following order, and uses the first address found:
•
•
•
•
256
The IPv4 router ID configured by the ip router-id command
The first IPv4 address on the lowest-numbered loopback interface
The first IPv4 address on the lowest-numbered virtual interface
The first IPv4 address on any interface
Brocade ICX 6650 Administration Guide
53-1002600-01
sFlow
11
NOTE
The device uses the router ID only if the device also has an IP interface with the same address.
Router ID is not supported on IPv6 devices.
NOTE
If an IP address is not already configured when you enable sFlow, the feature uses the source
address 0.0.0.0. To display the agent_address, enable sFlow, then enter the show sflow command.
Refer to “Enabling sFlow forwarding” on page 263 and “Displaying sFlow information” on page 267.
NOTE
In sFlow version 5, you can set an arbitrary IPv4 or IPv6 address as the sFlow agent IP address. Refer
to “Specifying the sFlow agent IP address” on page 265.
sFlow and source port
By default, sFlow sends data to the collector out of UDP source port 8888, but you can specify a
different source port. For more information, refer to “Changing the sFlow source port” on page 263.
sFlow and sampling rate
The sampling rate is the average ratio of the number of packets incoming on an sFlow enabled
port, to the number of flow samples taken from those packets. sFlow sampling can affect
performance in some configurations.
Note that on the Brocade ICX 6650 devices, the configured sampling rate and the actual rate are
the same. The software does not adjust the configured sampling rate as on other Brocade devices.
Configuring and enabling sFlow
NOTE
The commands in this section apply to sFlow version 2 and sFlow version 5. CLI commands that are
specific to sFlow version 5 are documented in “sFlow version 5 feature configuration” on page 264.
To configure sFlow, perform the following tasks:
• Optional – If your device supports sFlow version 5, change the version used for exporting sFlow
data
• Specify collector information. The collector is the external device to which you are exporting the
sFlow data. You can specify up to four collectors.
•
•
•
•
•
•
•
Optional – Change the polling interval
Optional – Change the sampling rate
Optional – Change the sFlow source port
Enable sFlow globally
Enable sFlow forwarding on individual interfaces
Enable sFlow forwarding on individual trunk ports
If your device supports sFlow version 5, configure sFlow version 5 features
Brocade ICX 6650 Administration Guide
53-1002600-01
257
11
sFlow
NOTE
If you change the router ID or other IP address value that sFlow uses for its agent_address, you need
to disable and then re-enable sFlow to cause the feature to use the new source address.
Specifying the collector
sFlow exports traffic statistics to an external collector. You can specify up to four collectors. You can
specify more than one collector with the same IP address if the UDP port numbers are unique. You
can have up to four unique combinations of IP addresses and UDP port numbers.
Specifying an sFlow collector on IPv4 devices
To specify an sFlow collector on an IPv4 device, enter a command such as the following.
Brocade(config)#sflow destination 10.10.10.1
This command specifies a collector with IPv4 address 10.10.10.1, listening for sFlow data on UDP
port 6343.
Syntax: [no] sflow destination <ip-addr> [<dest-udp-port>]
The <ip-addr> parameter specifies the IP address of the collector.
The <dest-udp-port> parameter specifies the UDP port on which the sFlow collector will be listening
for exported sFlow data. The default port number is 6343.
The sampled sFlow data sent to the collectors includes an agent_address field. This field identifies
the device that sent the data. Refer to “sFlow and source address” on page 256.
258
Brocade ICX 6650 Administration Guide
53-1002600-01
sFlow
11
Specifying an sFlow collector on IPv6 devices
To specify an sFlow collector on an IPv6 device, enter a command such as the following.
Brocade(config)#sflow destination ipv6 2001:DB8:0::0b:02a
This command specifies a collector with IPv6 address 2001:DB8:0::0b:02a, listening for sFlow
data on UDP port 6343.
Syntax: [no] sflow destination ipv6 <ip-addr> [<dest-udp-port>]
The <ip-addr> parameter specifies the IP address of the collector.
The <dest-udp-port> parameter specifies the UDP port on which the sFlow collector will be listening
for exported sFlow data. The default port number is 6343.
If the IPv6 address you specify is a link-local address on a Layer 3 switch, you must also specify the
outgoing-interface ethernet <stack-unit>/<slot>/<port> or the ve <port-num>. This identifies the
outgoing interface through which the sampled packets will be sent.
The sampled sFlow data sent to the collectors includes an agent_address field. This field identifies
the device that sent the data. Refer to “sFlow and source address” on page 256.
Changing the polling interval
The polling interval defines how often sFlow byte and packet counter data for a port are sent to the
sFlow collectors. If multiple ports are enabled for sFlow, the Brocade ICX 6650 device staggers
transmission of the counter data to smooth performance. For example, if sFlow is enabled on two
ports and the polling interval is 20 seconds, the Brocade ICX 6650 device sends counter data
every ten seconds. The counter data for one of the ports are sent after ten seconds, and counter
data for the other port are sent after an additional ten seconds. Ten seconds later, new counter
data for the first port are sent. Similarly, if sFlow is enabled on five ports and the polling interval is
20 seconds, the Brocade device sends counter data every four seconds.
The default polling interval is 20 seconds. You can change the interval to a value from 1 to any
higher value. The interval value applies to all interfaces on which sFlow is enabled. If you set the
polling interval to 0, counter data sampling is disabled.
To change the polling interval, enter a command such as the following at the global CONFIG level of
the CLI.
Brocade(config)#sflow polling-interval 30
Syntax: [no] sflow polling-interval <secs>
The <secs> parameter specifies the interval and can be from 1 to any higher value. The default is
20 seconds. If you specify 0, counter data sampling is disabled.
Changing the sampling rate
The sampling rate is the average ratio of the number of packets incoming on an sFlow-enabled
port, to the number of flow samples taken from those packets.
You can change the default (global) sampling rate. You also can change the rate on an individual
port, overriding the default sampling rate of 512. With a sampling rate of 512, on average, one in
every 512 packets forwarded on an interface is sampled.
Brocade ICX 6650 Administration Guide
53-1002600-01
259
11
sFlow
Configuration considerations
The sampling rate is a fraction in the form 1/N, meaning that, on average, one out of every N
packets will be sampled. The sflow sample command at the global level or port level specifies N,
the denominator of the fraction. Thus a higher number for the denominator means a lower
sampling rate since fewer packets are sampled. Likewise, a lower number for the denominator
means a higher sampling rate because more packets are sampled. For example, if you change the
denominator from 512 to 128, the sampling rate increases because four times as many packets
will be sampled.
NOTE
Brocade recommends that you do not change the denominator to a value lower than the default.
Sampling requires CPU resources. Using a low denominator for the sampling rate can cause high
CPU utilization.
Configured rate and actual rate
When you enter a sampling rate value, this value is the configured rate as well as the actual
sampling rate.
Change to global rate
If you change the global sampling rate, the change is applied to all sFlow-enabled ports except
those ports on which you have already explicitly set the sampling rate. For example, suppose that
sFlow is enabled on ports 1/1/1, 1/1/2, and 1/1/3. If you configure the sampling rate on port
1/1/1 but leave the other two ports using the default rate, then a change to the global sampling
rate applies to ports 1/1/2 and 1/1/3 but not port 1/1/1. sFlow assumes that you want to
continue using the sampling rate you explicitly configured on an individual port even if you globally
change the sampling rate for the other ports.
Module rate
While different ports on a module may be configured to have different sampling rates, the
hardware for the module will be programmed to take samples at a single rate (the module sampling
rate). The module sampling rate will be the highest sampling rate (i.e. lowest number) configured
for any of the ports on the module.
When ports on a given module are configured with different sampling rates, the CPU discards some
of the samples supplied by the hardware for ports with configured sampling rates which are lower
than the module sampling rate. This is referred to as subsampling, and the ratio between the port
sampling rate and the module sampling rate is known as the subsampling factor. For example, if
the module in slot 1has sFlow enabled on ports 1/1/1 and 1/1/3, and port 1/1/1 is using the
default sampling rate of 512, and port 1/1/3 is configured explicitly for a rate of 2048, then the
module sampling rate will be 512 because this is this highest port sampling rate (lowest number).
The subsampling factor for port 1/1/1 will be 1, meaning that every sample taken by the hardware
will be exported, while the subsampling factor for port 1/1/3 will be 4, meaning that one out of
every four samples taken by the hardware will be exported. Whether a port's sampling rate is
configured explicitly, or whether it uses the global default setting, has no effect on the calculations.
You do not need to perform any of these calculations to change a sampling rate. For simplicity, the
syntax information in this section lists the valid sampling rates. You can display the rates you
entered for the default sampling rate, module rates, and all sFlow-enabled ports by entering the
show sflow command. Refer to “Displaying sFlow information” on page 267.
Sampling rate for new ports
260
Brocade ICX 6650 Administration Guide
53-1002600-01
sFlow
11
When you enable sFlow on a port, the port's sampling rate is set to the global default sampling rate.
This also applies to ports on which you disable and then re-enable sFlow. The port does not retain
the sampling rate it had when you disabled sFlow on the port, even if you had explicitly set the
sampling rate on the port.
Changing the default sampling rate
To change the default (global) sampling rate, enter a command such as the following at the global
CONFIG level of the CLI.
Brocade(config)#sflow sample 2048
Syntax: [no] sflow sample <num>
The <num> parameter specifies the average number of packets from which each sample will be
taken. The software rounds the value you enter to the next higher odd power of 2. This value
becomes the actual default sampling rate and is one of the following:
•
•
•
•
•
•
•
•
•
•
•
•
•
•
•
•
•
2
8
32
128
512
2048
4096
8192
32768
131072
524288
2097152
8388608
33554432
134217728
536870912
2147483648
For example, if the configured sampling rate is 1000, then the actual rate is 2048 and 1 in 2048
packets are sampled by the hardware.
Changing the sampling rate of a module
You cannot change a module sampling rate directly. You can change a module sampling rate only
by changing the sampling rate of a port on that module.
Changing the sampling rate on a port
You can configure an individual port to use a different sampling rate than the global default
sampling rate. This is useful in cases where ports have different bandwidths. For example, if you
are using sFlow on 10/100 ports and Gbps Ethernet ports, you might want to configure the Gbps
ports to use a higher sampling rate (and thus gather fewer samples per number of packets) than
the 10/100 ports.
Brocade ICX 6650 Administration Guide
53-1002600-01
261
11
sFlow
To change the sampling rate on an individual port, enter a command such as the following at the
configuration level for the port.
Brocade(config-if-1/1)#sflow sample 8192
Syntax: [no] sflow sample <num>
The <num> parameter specifies the average number of packets from which each sample will be
taken. The software rounds the value you enter up to the next odd power of 2. The actual sampling
rate becomes one of the values listed in “Changing the default sampling rate”.
NOTE
Configuring a sampling rate on a port that is the primary port of a trunk applies that same sampling
rate to all ports in the trunk.
Changing the sampling rate for a trunk port
You can configure an individual static trunk port to use a different sampling rate than the global
default sampling rate. This feature is also supported on LACP trunk ports. This feature is useful in
cases where ports have different bandwidths. For example, if you are using sFlow on 10/100 ports
and Gbps Ethernet ports, you might want to configure the Gbps ports to use a higher sampling rate
(and thus gather fewer samples per number of packets) than the 10/100 ports.
To configure a static trunk port to use a different sampling rate than the global default sampling
rate, enter commands such as the following:
Brocade(config)#trunk e 1/1/1 to 1/1/2
Brocade(config-trunk-1/1/1-1/1/2)sflow sample 8192
Syntax: [no] sflow sample <num>
The <num> parameter specifies the average number of packets from which each sample will be
taken. The software rounds the value you enter up to the next odd power of 2. The actual sampling
rate becomes one of the values listed in “Changing the default sampling rate”.
NOTE
Configuring a sampling rate on only the port that is the primary port of a trunk automatically applies
that same sampling rate to all ports in the trunk.
262
Brocade ICX 6650 Administration Guide
53-1002600-01
sFlow
11
Changing the sFlow source port
By default, sFlow sends data to the collector using UDP source port 8888, but you can change the
source UDP port to any port number in the range 1025-65535.
To change the source UDP port, enter a command such as the following:
Brocade(config)#sflow source-port 8000
Syntax: [no] sflow source-port <num>
The <num> parameter specifies the sFlow source port.
Enabling sFlow forwarding
sFlow exports data only for the interfaces on which you enable sFlow forwarding. You can enable
sFlow forwarding on Ethernet interfaces.
To enable sFlow forwarding, perform the following:
• Globally enable the sFlow feature
• Enable sFlow forwarding on individual interfaces
• Enable sFlow forwarding on individual trunk ports
NOTE
Before you enable sFlow, make sure the device has an IP address that sFlow can use as its source
address. Refer to “sFlow and source address” on page 256 for the source address requirements.
NOTE
When you enable sFlow forwarding on an 802.1X-enabled interface, the samples taken from the
interface include the username used to obtain access to either or both the inbound and outbound
ports, if that information is available. For information about 802.1X, refer to the Brocade ICX 6650
Switch Security Configuration Guide.
Command syntax for enabling sFlow forwarding
This section shows how to enable sFlow forwarding.
Globally enabling sFlow forwarding
To enable sFlow forwarding, you must first enable it on a global basis, then on individual interfaces
or trunk ports, or both.
To globally enable sFlow forwarding, enter the following command.
Brocade(config)#sflow enable
You can now enable sFlow forwarding on individual ports as described in the next two sections.
Syntax: [no] sflow enable
Enabling sFlow forwarding on individual interfaces
To enable sFlow forwarding enter commands such as the following.
Brocade ICX 6650 Administration Guide
53-1002600-01
263
11
sFlow
Brocade(config)#sflow enable
Brocade(config)#interface ethernet 1/1/1 to 1/1/4
Brocade(config-mif-1/1/1-1/1/4)#sflow forwarding
These commands globally enable sFlow, then enable sFlow forwarding on Ethernet ports 1/1/1 –
1/1/4. You must use both the sflow enable and sflow forwarding commands to enable the feature.
Syntax: [no] sflow enable
Syntax: [no] sflow forwarding
Enabling sFlow forwarding on individual trunk ports
This feature is supported on individual ports of a static trunk group. It is also supported on LACP
trunk ports.
NOTE
When you enable sFlow forwarding on a trunk port, only the primary port of the trunk group forwards
sFlow samples.
To enable sFlow forwarding on a trunk port, enter commands such as the following.
Brocade(config)#sflow enable
Brocade(config)#trunk e 1/1/1 to 1/1/4
Brocade(config-trunk-1/1/1-1/1/4)#config-trunk-ind
Brocade(config-trunk-1/1/1-1/1/4)#sflow forwarding e 1/1/2
These commands globally enable sFlow, then enable sFlow forwarding on trunk port ethernet
1/1/2. You must use both the sflow enable and sflow forwarding commands to enable the feature.
Syntax: [no] sflow enable
Syntax: [no] sflow forwarding
sFlow version 5 feature configuration
NOTE
The commands in this section are supported when sFlow version 5 is enabled on the device. These
commands are not supported with sFlow version 2. sFlow version 5 also supports all of the sFlow
configuration commands in “Configuring and enabling sFlow” on page 257.
When sFlow version 5 is enabled on the device, you can do the following:
•
•
•
•
•
Specify the sFlow version (version 2 or version 5)
Specify the sFlow agent IP address
Specify the maximum flow sample size
Export CPU and memory usage Information to the sFlow collector
Specify the polling interval for exporting CPU and memory usage information to the sFlow
collector
• Export CPU-directed data (management traffic) to the sFlow collector
264
Brocade ICX 6650 Administration Guide
53-1002600-01
sFlow
11
Egress interface ID for sampled broadcast and multicast packets
For broadcast and multicast traffic, the egress interface ID for sampled traffic is always
0x80000000. When broadcast and multicast packets are sampled, they are usually forwarded to
more than one port. However, the output port field in an sFlow datagram supports the display of
one egress interface ID only. Therefore, the sFlow version 5 agent always sets the output port ID to
0x80000000 for broadcast and multicast packets that are sampled.
Specifying the sFlow version format
If your device supports sFlow version 5, you can optionally specify the version used for exporting
sFlow data. Refer “Specifying the sFlow agent IP address”.
Specifying the sFlow agent IP address
The sampled sFlow data sent to the collectors includes an agent_address field. This field identifies
the device (the sFlow agent) that sent the data. By default, the device automatically selects the
sFlow agent IP address based on the configuration, as described in the section “sFlow and source
address” on page 256. Alternatively, you can configure the device to instead use an arbitrary IPv4
or IPv6 address as the sFlow agent IP address.
To specify an IPv4 address as the sFlow agent IP address, enter a command such as the following
Brocade(config)#sflow agent-ip 10.10.10.1
Syntax: [no] sflow agent-ip <ipv4-addr>
The <ipv4-addr> specifies the address of the device that sent the data.
To specify an IPv6 address as the sFlow agent IP address, enter a command such as the following.
Brocade(config)#sflow agent-ip 2001:DB8:D0FF:FE48:4672
Syntax: [no] sflow agent-ip <ipv6-addr>
The <ipv6-addr> specifies the address of the device that sent the data.
Specifying the version used for exporting sFlow data
By default, when sFlow is enabled globally on the Brocade ICX 6650 device, the sFlow agent
exports sFlow data in version 5 format. You can change this setting so that the sFlow agent exports
data in version 2 format. You can switch between versions without rebooting the device or
disabling sFlow.
NOTE
When the sFlow version number is changed, the system will reset sFlow counters and flow sample
sequence numbers.
To specify the sFlow version used for exporting sFlow data, enter the following command.
Brocade(config)#sflow version 2
Brocade ICX 6650 Administration Guide
53-1002600-01
265
11
sFlow
Syntax: [no] sflow version 2 | 5
The default is 5.
Specifying the maximum flow sample size
With sFlow version 5, you can specify the maximum size of the flow sample sent to the sFlow
collector. If a packet is larger than the specified maximum size, then only the contents of the
packet up to the specified maximum number of bytes is exported. If the size of the packet is
smaller than the specified maximum, then the entire packet is exported.
For example, to specify 1024 bytes as the maximum flow sample size, enter the following
command.
Brocade(config)# sflow max-packet-size 1024
Syntax: [no] sflow max-packet-size <size>
For both sFlow version 2 and version 5, the default maximum flow sample size is 256 bytes.
For sFlow version 5, the maximum flow sample size is 1300 bytes.
Exporting CPU and memory usage information to the sFlow collector
With sFlow version 5, you can optionally configure the sFlow agent on the Brocade device to export
information about CPU and memory usage to the sFlow collector.
To export CPU usage and memory usage information, enter the following command.
Brocade(config)# sflow export system-info
Syntax: [no] sflow export system-info
By default, CPU usage information and memory usage information are not exported.
Specifying the polling interval for exporting CPU and memory usage information to
the sFlow collector
The polling interval defines how often sFlow data for a port is sent to the sFlow collector. With sFlow
version 5, you can optionally set the polling interval used for exporting CPU and memory usage
information.
For example, to set the polling interval for exporting CPU and memory usage information to 30
seconds, enter the following command.
Brocade(config)# sflow export system-info 30
Syntax: [no] sflow export system-info <seconds>
You can specify a polling interval from 5 seconds to 1,800 seconds (30 minutes). The default
polling interval for exporting CPU and memory usage information is 300 seconds (5 minutes).
266
Brocade ICX 6650 Administration Guide
53-1002600-01
sFlow
11
Exporting CPU-directed data (management traffic) to the sFlow collector
You can select which and how often data destined to the CPU (for example, Telnet sessions) is sent
to the sFlow collector.
CLI commands allow you to do the following:
• Enable the sFlow agent to export CPU-directed data
• Specify the sampling rate for exported CPU-directed data
Enabling the sFlow agent to export CPU-directed data
To enable the sFlow agent on a Brocade ICX 6650 device to export data destined to the CPU to the
sFlow collector, enter the following command.
Brocade(config)# sflow export cpu-traffic
Syntax: [no] sflow export cpu-traffic
By default, this feature is disabled. The sFlow agent does not send data destined to the CPU to the
sFlow collector.
Specifying the sampling rate for exported CPU-directed data
The sampling rate is the average ratio of the number of packets incoming on an sFlow-enabled
port, to the number of flow samples taken from those packets. You can optionally set the sampling
rate for CPU-directed data exported to the sFlow collector. For example, to set this sampling rate to
2048, enter the following command.
Brocade(config)# sflow export cpu-traffic 2048
Syntax: [no] sflow export cpu-traffic <rate>
The default sampling rate depends on the Brocade device being configured. Refer to “Changing the
sampling rate” on page 259 for the default sampling rate for each kind of Brocade device.
Displaying sFlow information
To display sFlow configuration information and statistics, enter the following command at any level
of the CLI.
Brocade ICX 6650 Administration Guide
53-1002600-01
267
11
sFlow
Brocade#show sflow
Flow version: 5
sFlow services are enabled.
sFlow agent IPv6 address: 2001:DB8:2
2 collector destinations configured:
Collector IPv6 2001:DB8:1, UDP 6343
Collector IP 10.37.224.233, UDP 6343
Configured UDP source port: 2000
Polling interval is 20 seconds.
Configured default sampling rate: 1 per 100 packets.
Actual default sampling rate: 1 per 100 packets.
The maximum sFlow sample size: 1300.
exporting cpu-traffic is enabled.
exporting cpu-traffic sample rate: 10.
83715 UDP packets exported
8931 sFlow flow samples collected.
sFlow ports: ethe 1/1/11 ethe 1/1/32 ethe 1/2/1
Module Sampling Rates
--------------------Port Sampling Rates
------------------Port=1/1/11, configured rate=25, actual rate=25
Port=1/1/32, configured rate=10, actual rate=10
Port=1/2/1, configured rate=10, actual rate=10
Syntax: show sflow
The show sflow command displays the following information.
TABLE 56
sFlow information
Parameter
Definition
sFlow version
The version of sFlow enabled on the device, which can be one of the
following:
• 2
• 5
sFlow services
268
The feature state, which can be one of the following:
disabled
enabled
•
•
sFlow agent IP address
The IP address that sFlow is using in the agent_address field of packets
sent to the collectors. Refer to “sFlow and source address” on page 256.
Collector
The collector information. The following information is displayed for each
collector:
• IP address
• UDP port
If more than one collector is configured, the line above the collectors
indicates how many have been configured.
Configured UDP source port
The UDP source port used to send data to the collector.
Polling interval
The port counter polling interval.
Configured default sampling rate
The configured global sampling rate. If you changed the global sampling
rate, the value you entered is shown here. The actual rate calculated by
the software based on the value you entered is listed on the next line,
”Actual default sampling rate”.
Actual default sampling rate
The actual default sampling rate.
Brocade ICX 6650 Administration Guide
53-1002600-01
sFlow
11
TABLE 56
sFlow information (Continued)
Parameter
Definition
The maximum sFlow sample size
The maximum size of a flow sample sent to the sFlow collector.
exporting cpu-traffic
Indicates whether or not the sFlow agent is configured to export data
destined to the CPU (e.g., Telnet sessions) to the sFlow collector:
• enabled
• disabled
exporting cpu-traffic sample rate
The sampling rate for CPU-directed data, which is the average ratio of
the number of incoming packets on an sFlow-enabled port, to the
number of flow samples taken from those packets.
exporting system-info
Indicates whether or not the sFlow agent is configured to export
information about CPU and memory usage to the sFlow collector:
• enabled
• disabled
exporting system-info polling interval
Specifies the interval, in seconds, that sFlow data is sent to the sFlow
collector.
UDP packets exported
The number of sFlow export packets the Brocade ICX 6650 device has
sent.
NOTE: Each UDP packet can contain multiple samples.
sFlow samples collected
The number of sampled packets that have been sent to the collectors.
sFlow ports
The ports on which you enabled sFlow.
Module Sampling Rates
The configured and actual sampling rates for each module. If a module
does not have any sFlow-enabled ports, the rates are listed as 0.
Port Sampling Rates
The configured and actual sampling rates for each sFlow-enabled port.
The Subsampling factor indicates how many times the sampling rate of
the port's module is multiplied to achieve the port's sampling rate.
Because of the way the actual sampling rates are computed, the
Subsampling factors are always whole numbers.
Clearing sFlow statistics
To clear the UDP packet and sFlow sample counters in the show sflow display, enter the following
command.
Brocade#clear statistics
Syntax: clear statistics
This command clears the values in the following fields of the show sflow display:
• UDP packets exported
• sFlow samples collected
NOTE
This command also clears the statistics counters used by other features.
Brocade ICX 6650 Administration Guide
53-1002600-01
269
11
Utilization list for an uplink port
Utilization list for an uplink port
You can configure uplink utilization lists that display the percentage of a given uplink port
bandwidth that is used by a specific list of downlink ports. The percentages are based on
30-second intervals of RMON packet statistics for the ports. Both transmit and receive traffic is
counted in each percentage.
NOTE
This feature is intended for ISP or collocation environments in which downlink ports are dedicated
to various customers’ traffic and are isolated from one another. If traffic regularly passes between
the downlink ports, the information displayed by the utilization lists does not provide a clear
depiction of traffic exchanged by the downlink ports and the uplink port.
Each uplink utilization list consists of the following:
• Utilization list number (1, 2, 3, or 4)
• One or more uplink ports
• One or more downlink ports
Each list displays the uplink port and the percentage of that port bandwidth that was utilized by the
downlink ports over the most recent 30-second interval.
You can configure up to four bandwidth utilization lists.
Utilization list for an uplink port command syntax
To configure an uplink utilization list, enter commands such as the following. The commands in this
example configure a link utilization list with port 1/1/1 as the uplink port and ports 1/1/2 and
1/1/3 as the downlink ports.
Brocade(config)#relative-utilization 1 uplink eth 1/1/1 downlink eth 1/1/2 to
1/1/3
Brocade(config)#write memory
Syntax: [no] relative-utilization <num> uplink ethernet <stack-unit>/<slot>/<port> [to
<stack-unit>/<slot>/<port>] downlink ethernet <stack-unit>/<slot>/<port> [to
<stack-unit>/<slot>/<port>]
The <num> parameter specifies the list number. You can configure up to four lists. Specify a
number from 1 – 4.
The uplink ethernet parameters and the port numbers you specify after the parameters indicate
the uplink ports.
The downlink ethernet parameters and the port numbers you specify after the parameters indicate
the downlink ports.
Specify the Ethernet port in the <stack-unit>/<slot>/<port> format. Stack-unit is 1.
270
Brocade ICX 6650 Administration Guide
53-1002600-01
Utilization list for an uplink port
11
Displaying utilization percentages for an uplink
After you configure an uplink utilization list, you can display the list to observe the percentage of
the uplink bandwidth that each of the downlink ports used during the most recent 30-second port
statistics interval. The number of packets sent and received between the two ports is listed, as well
as the ratio of each individual downlink port packets relative to the total number of packets on the
uplink.
To display an uplink utilization list, enter a command such as the following at any level of the CLI.
Brocade#show relative-utilization 1
uplink: ethe 1
30-sec total uplink packet count = 3011
packet count ratio (%)
1/ 2:60
1/ 3:40
In this example, ports 1/1/2 and 1/1/3 are sending traffic to port 1/1/1. Port 1/1/2 and port
1/1/3 are isolated (not shared by multiple clients) and typically do not exchange traffic with other
ports except for the uplink port, 1/1/1.
Syntax: show relative-utilization <num>
The <num> parameter specifies the list number.
NOTE
The example above represents a pure configuration in which traffic is exchanged only by ports 1/1/2
and 1/1/1, and by ports 1/1/3 and 1/1/1. For this reason, the percentages for the two downlink
ports equal 100%. In some cases, the percentages do not always equal 100%. This is true in cases
where the ports exchange some traffic with other ports in the system or when the downlink ports
are configured together in a port-based VLAN.
In the following example, ports 1/1/2 and 1/1/3 are in the same port-based VLAN.
Brocade#show
uplink: ethe
30-sec total
packet count
1/ 2:100
relative-utilization 1
1
uplink packet count = 3011
ratio (%)
1/ 3:100
Here is another example showing different data for the same link utilization list. In this example,
port 1/1/2 is connected to a hub and is sending traffic to port 1/1/1. Port 1/1/3 is unconnected.
Brocade#show
uplink: ethe
30-sec total
packet count
1 /2:100
Brocade ICX 6650 Administration Guide
53-1002600-01
relative-utilization 1
1
uplink packet count = 2996
ratio (%)
1/ 3:---
271
11
272
Utilization list for an uplink port
Brocade ICX 6650 Administration Guide
53-1002600-01
Appendix
A
Syslog messages
Table 57 lists all of the Syslog messages. Note that some of the messages apply only to Layer 3
Switches.
NOTE
This chapter does not list Syslog messages that can be displayed when a debug option is enabled.
The messages are listed by message level, in the following order, then by message type:
•
•
•
•
•
•
•
•
Emergencies (none)
Alerts
Critical
Errors
Warnings
Notifications
Informational
Debugging
TABLE 57
Brocade Syslog messages
Message level
Message
Explanation
Alert
<num-modules> modules and 1 power
supply, need more power supply!!
Indicates that the chassis needs more
power supplies to run the modules in the
chassis.
The <num-modules> parameter indicates
the number of modules in the chassis.
Alert
Fan <num>, <location>, failed
A fan has failed.
The <num> is the fan number.
The <location> describes where the failed
fan is in the chassis.
Alert
MAC Authentication failed for
<mac-address> on <portnum>
RADIUS authentication was successful for
the specified <mac-address> on the
specified <portnum>; however, the VLAN
returned in the RADIUS Access-Accept
message did not refer to a valid VLAN or
VLAN ID on the Brocade device. This is
treated as an authentication failure.
Alert
MAC Authentication failed for
<mac-address> on <portnum> (Invalid User)
RADIUS authentication failed for the
specified <mac-address> on the specified
<portnum> because the MAC address sent
to the RADIUS server was not found in the
RADIUS server users database.
Brocade ICX 6650 Administration Guide
53-1002600-01
273
A
Syslog messages
TABLE 57
274
Brocade Syslog messages (Continued)
Message level
Message
Explanation
Alert
MAC Authentication failed for
<mac-address> on <portnum> (No VLAN
Info received from RADIUS server)
RADIUS authentication was successful for
the specified <mac-address> on the
specified <portnum>; however, dynamic
VLAN assignment was enabled for the port,
but the RADIUS Access-Accept message did
not include VLAN information. This is
treated as an authentication failure.
Alert
MAC Authentication failed for
<mac-address> on <portnum> (Port is
already in another radius given vlan)
RADIUS authentication was successful for
the specified <mac-address> on the
specified <portnum>; however, the RADIUS
Access-Accept message specified a VLAN
ID, although the port had previously been
moved to a different RADIUS-assigned
VLAN. This is treated as an authentication
failure.
Alert
MAC Authentication failed for
<mac-address> on <portnum> (RADIUS
given vlan does not exist)
RADIUS authentication was successful for
the specified <mac-address> on the
specified <portnum>; however, the RADIUS
Access-Accept message specified a VLAN
that does not exist in the Brocade
configuration. This is treated as an
authentication failure.
Alert
MAC Authentication failed for
<mac-address> on <portnum> (RADIUS
given VLAN does not match with TAGGED
vlan)
Multi-device port authentication failed for
the <mac-address> on a tagged port
because the packet with this MAC address
as the source was tagged with a VLAN ID
different from the RADIUS-supplied VLAN
ID.
Alert
Management module at slot <slot-num>
state changed from <module-state> to
<module-state>.
Indicates a state change in a management
module.
The <slot-num> indicates the chassis slot
containing the module.
The <module-state> can be one of the
following:
• active
• standby
• crashed
• coming-up
• unknown
Alert
OSPF LSA Overflow, LSA Type =
<lsa-type>
Indicates an LSA database overflow.
The <lsa-type> parameter indicates the
type of LSA that experienced the overflow
condition. The LSA type is one of the
following:
• 1 – Router
• 2 – Network
• 3 – Summary
• 4 – Summary
• 5 – External
Alert
OSPF Memory Overflow
OSPF has run out of memory.
Brocade ICX 6650 Administration Guide
53-1002600-01
Syslog messages
TABLE 57
A
Brocade Syslog messages (Continued)
Message level
Message
Explanation
Alert
Power supply <num>, <location>, failed
A power supply has failed.
The <num> is the power supply number.
The <location> describes where the failed
power supply is in the chassis.
Alert
System: Module in slot <slot-num>
encountered PCI config read error: Bus
<PCI-bus-number>, Dev
<PCI-device-number>, Reg Offset
<PCI-config-register-offset>.
The module encountered a hardware
configuration read error.
Alert
System: Module in slot <slot-num>
encountered PCI config write error: Bus
<PCI-bus-number>, Dev
<PCI-device-number>, Reg Offset
<PCI-config-register-offset>.
The module encountered a hardware
configuration write error.
Alert
System: Module in slot <slot-num>
encountered PCI memory read error: Mem
Addr <memory-address>
The module encountered a hardware
memory read error.
The <memory-address> is in hexadecimal
format.
Alert
System: Module in slot <slot-num>
encountered PCI memory write error: Mem
Addr <memory-address>.
The module encountered a hardware
memory write error.
The <memory-address> is in hexadecimal
format.
Alert
System: Module in slot <slot-num>
encountered unrecoverable PCI bridge
validation failure. Module will be deleted.
The module encountered an unrecoverable
(hardware) bridge validation failure. The
module will be disabled or powered down.
Alert
System: Module in slot <slot-num>
encountered unrecoverable PCI config read
failure. Module will be deleted.
The module encountered an unrecoverable
hardware configuration read failure. The
module will be disabled or powered down.
Alert
System: Module in slot <slot-num>
encountered unrecoverable PCI config write
failure. Module will be deleted.
The module encountered an unrecoverable
hardware configuration write failure. The
module will be disabled or powered down.
Alert
System: Module in slot <slot-num>
encountered unrecoverable PCI device
validation failure. Module will be deleted.
The module encountered an unrecoverable
(hardware) device validation failure. The
module will be disabled or powered down.
Alert
System: Module in slot <slot-num>
encountered unrecoverable PCI memory
read failure. Module will be deleted.
The module encountered an unrecoverable
hardware memory read failure. The module
will be disabled or powered down.
Alert
System: Module in slot <slot-num>
encountered unrecoverable PCI memory
write failure. Module will be deleted.
The module encountered an unrecoverable
hardware memory write failure. The module
will be disabled or powered down.
Alert
System: No Free Tcam Entry available.
System will be unstable
In FWS devices, the limit for the TCAM
routing entries has been reached. You must
reboot the device.
Alert
System: Temperature is over shutdown level,
system is going to be reset in <num>
seconds
The chassis temperature has risen above
shutdown level. The system will be shut
down in the amount of time indicated.
Brocade ICX 6650 Administration Guide
53-1002600-01
275
A
Syslog messages
TABLE 57
276
Brocade Syslog messages (Continued)
Message level
Message
Explanation
Alert
Temperature <degrees> C degrees, warning
level <warn-degrees> C degrees, shutdown
level <shutdown-degrees> C degrees
Indicates an over temperature condition on
the active module.
The <degrees> value indicates the
temperature of the module.
The <warn-degrees> value is the warning
threshold temperature configured for the
module.
The <shutdown-degrees> value is the
shutdown temperature configured for the
module.
Critical
Authentication shut down <portnum> due to
DOS attack
Denial of Service (DoS) attack protection
was enabled for multi-device port
authentication on the specified <portnum>,
and the per-second rate of RADIUS
authentication attempts for the port
exceeded the configured limit. The Brocade
device considers this to be a DoS attack
and disables the port.
Debug
BGP4: Not enough memory available to run
BGP4
The device could not start the BGP4 routing
protocol because there is not enough
memory available.
Debug
DOT1X: Not enough memory
There is not enough system memory for
802.1X authentication to take place.
Contact Brocade Technical Support.
Error
No of prefixes received from BGP peer
<ip-addr> exceeds maximum
prefix-limit...shutdown
The Layer 3 Switch has received more than
the specified maximum number of prefixes
from the neighbor, and the Layer 3 Switch is
therefore shutting down its BGP4 session
with the neighbor.
Informational
IPv6: IPv6 protocol disabled on the device
from <session-id>
IPv6 protocol was disabled on the device
during the specified session.
Informational
IPv6: IPv6 protocol enabled on the device
from <session-id>
IPv6 protocol was enabled on the device
during the specified session.
Informational
MAC Filter applied to port <port-id> by
<username> from <session-id> (filter
id=<filter-ids> )
Indicates a MAC address filter was applied
to the specified port by the specified user
during the specified session.
<session-id> can be console, telnet, ssh,
web, or snmp.
<filter-ids> is a list of the MAC address
filters that were applied.
Informational
MAC Filter removed from port <port-id> by
<username> from <session-id> (filter
id=<filter-ids> )
Indicates a MAC address filter was removed
from the specified port by the specified user
during the specified session.
<session-id> can be console, telnet, ssh,
web, or snmp.
<filter-ids> is a list of the MAC address
filters that were removed.
Brocade ICX 6650 Administration Guide
53-1002600-01
Syslog messages
TABLE 57
A
Brocade Syslog messages (Continued)
Message level
Message
Explanation
Informational
Security: Password has been changed for
user <username> from <session-id>
Password of the specified user has been
changed during the specified session ID or
type. <session-id> can be console, telnet,
ssh, web, or snmp.
Informational
<device-name> : Logical link on interface
ethernet <slot#/port#> is down.
The specified ports were logically brought
down while singleton was configured on the
port.
Informational
<device-name>: Logical link on interface
ethernet <slot#/port#> is up.
The specified ports were logically brought
up while singleton was configured on the
port.
Informational
<user-name> login to PRIVILEGED mode
A user has logged into the Privileged EXEC
mode of the CLI.
The <user-name> is the user name.
Informational
<user-name> login to USER EXEC mode
A user has logged into the USER EXEC mode
of the CLI.
The <user-name> is the user name.
Informational
<user-name> logout from PRIVILEGED mode
A user has logged out of Privileged EXEC
mode of the CLI.
The <user-name> is the user name.
Informational
<user-name> logout from USER EXEC mode
A user has logged out of the USER EXEC
mode of the CLI.
The <user-name> is the user name.
Informational
ACL <ACL id> added | deleted | modified
from console | telnet | ssh | web | snmp
session
A user created, modified, deleted, or
applied an ACL through a Web, SNMP,
console, SSH, or Telnet session.
Informational
Bridge is new root, vlan <vlan-id>,
root ID <root-id>
A Spanning Tree Protocol (STP) topology
change has occurred, resulting in the
Brocade device becoming the root bridge.
The <vlan-id> is the ID of the VLAN in which
the STP topology change occurred.
The <root-id> is the STP bridge root ID.
Informational
Bridge root changed, vlan <vlan-id>, new
root ID <string>, root interface <portnum>
A Spanning Tree Protocol (STP) topology
change has occurred.
The <vlan-id> is the ID of the VLAN in which
the STP topology change occurred.
The <root-id> is the STP bridge root ID.
The <portnum> is the number of the port
connected to the new root bridge.
Brocade ICX 6650 Administration Guide
53-1002600-01
277
A
Syslog messages
TABLE 57
278
Brocade Syslog messages (Continued)
Message level
Message
Explanation
Informational
Bridge topology change, vlan <vlan-id>,
interface <portnum>, changed state to
<stp-state>
A Spanning Tree Protocol (STP) topology
change has occurred on a port.
The <vlan-id> is the ID of the VLAN in which
the STP topology change occurred.
The <portnum> is the port number.
The <stp-state> is the new STP state and
can be one of the following:
• disabled
• blocking
• listening
• learning
• forwarding
• unknown
Informational
Cold start
The device has been powered on.
Informational
DHCP : snooping on untrusted port
<portnum>, type <number>, drop
The device has indicated that the DHCP
client receives DHCP server reply packets
on untrusted ports, and packets are
dropped.
Informational
DOT1X : port <portnum> - mac <mac
address> Cannot apply an ACL or MAC filter
on a port member of a VE (virtual interface)
The RADIUS server returned an IP ACL or
MAC address filter, but the port is a
member of a virtual interface (VE).
Informational
DOT1X : port <portnum> - mac <mac
address> cannot remove inbound ACL
An error occurred while removing the
inbound ACL.
Informational
DOT1X : port <portnum> - mac <mac
address> Downloading a MAC filter, but MAC
filter have no effect on router port
The RADIUS server returned an MAC
address filter, but the <portnum> is a router
port (it has one or more IP addresses).
Informational
DOT1X : port <portnum> - mac <mac
address> Downloading an IP ACL, but IP ACL
have no effect on a switch port
The RADIUS server returned an IP ACL, but
the <portnum> is a switch port (no IP
address).
Informational
DOT1X : port <portnum> - mac <mac
The Brocade device was unable to
address> Error - could not add all MAC filters implement the MAC address filters returned
by the RADIUS server.
Informational
DOT1X : port <portnum> - mac <mac
address> Invalid MAC filter ID - this ID
doesn't exist
The MAC address filter ID returned by the
RADIUS server does not exist in the Brocade
configuration.
Informational
DOT1X : port <portnum> - mac <mac
address> Invalid MAC filter ID - this ID is user
defined and cannot be used
The port was assigned a MAC address filter
ID that had been dynamically created by
another user.
Informational
DOT1X : port <portnum> - mac <mac
address> is unauthorized because system
resource is not enough or the invalid
information to set the dynamic assigned IP
ACLs or MAC address filters
802.1X authentication failed for the Client
with the specified <mac address> on the
specified <portnum> either due to
insufficient system resources on the device,
or due to invalid IP ACL or MAC address
filter information returned by the RADIUS
server.
Informational
DOT1X : port <portnum> - mac <mac
address> Port is already bound with MAC
filter
The RADIUS server returned a MAC address
filter, but a MAC address filter had already
been applied to the port.
Brocade ICX 6650 Administration Guide
53-1002600-01
Syslog messages
TABLE 57
A
Brocade Syslog messages (Continued)
Message level
Message
Explanation
Informational
DOT1X : port <portnum> - mac <mac
address> This device doesn't support ACL
with MAC Filtering on the same port
The RADIUS server returned a MAC address
filter while an IP ACL was applied to the
port, or returned an IP ACL while a MAC
address filter was applied to the port.
Informational
DOT1X Port <portnum> is unauthorized
because system resource is not enough or
the invalid information to set the dynamic
assigned IP ACLs or MAC address filters
802.1X authentication could not take place
on the port. This happened because strict
security mode was enabled and one of the
following occurred:
• Insufficient system resources were
available on the device to apply an IP
ACL or MAC address filter to the port
• Invalid information was received from
the RADIUS server (for example, the
Filter-ID attribute did not refer to an
existing IP ACL or MAC address filter)
Informational
DOT1X: Port <portnum> currently used
vlan-id changes to <vlan-id> due to
dot1x-RADIUS vlan assignment
A user has completed 802.1X
authentication. The profile received from
the RADIUS server specifies a VLAN ID for
the user. The port to which the user is
connected has been moved to the VLAN
indicated by <vlan-id>.
Informational
DOT1X: Port <portnum> currently used
vlan-id is set back to port default vlan-id
<vlan-id>
The user connected to <portnum> has
disconnected, causing the port to be moved
back into its default VLAN, <vlan-id>.
Informational
DOT1X: Port <portnum>,
AuthControlledPortStatus change:
authorized
The status of the interface controlled port
has changed from unauthorized to
authorized.
Informational
DOT1X: Port <portnum>,
AuthControlledPortStatus change:
unauthorized
The status of the interface controlled port
has changed from authorized to
unauthorized.
Informational
Enable super | port-config | read-only
password deleted | added | modified from
console | telnet | ssh | web | snmp
OR
Line password deleted | added | modified
from console | telnet | ssh | web | snmp
A user created, re-configured, or deleted an
Enable or Line password through the Web,
SNMP, console, SSH, or Telnet session.
Informational
ERR_DISABLE: Interface ethernet
<port-number>, err-disable recovery timeout
Errdisable recovery timer expired and the
port has been reenabled.
Informational
ERR_DISABLE: Interface ethernet 16,
err-disable recovery timeout
If the wait time (port is down and is waiting
to come up) expires and the port is brought
up the following message is displayed.
Informational
ERR_DISABLE: Link flaps on port ethernet 16
exceeded threshold; port in err-disable state
The threshold for the number of times that
a port link toggles from “up” to “down” and
“down” to “up” has been exceeded.
Informational
Interface <portnum>, line protocol down
The line protocol on a port has gone down.
The <portnum> is the port number.
Informational
Interface <portnum>, line protocol up
The line protocol on a port has come up.
The <portnum> is the port number.
Brocade ICX 6650 Administration Guide
53-1002600-01
279
A
Syslog messages
TABLE 57
280
Brocade Syslog messages (Continued)
Message level
Message
Explanation
Informational
Interface <portnum>, state down
A port has gone down.
The <portnum> is the port number.
Informational
Interface <portnum>, state up
A port has come up.
The <portnum> is the port number.
Informational
MAC Based Vlan Disabled on port <port id>
A MAC Based VLAN has been disabled on a
port
Informational
MAC Based Vlan Enabled on port <port id>
A MAC Based VLAN has been enabled on a
port.
Informational
MAC Filter added | deleted | modified from
console | telnet | ssh | web | snmp session
filter id = <MAC filter ID>, src mac = <Source
MAC address> | any, dst mac = <Destination
MAC address> | any
A user created, modified, deleted, or
applied this MAC address filter through the
Web, SNMP, console, SSH, or Telnet
session.
Informational
MSTP: BPDU-guard interface ethernet
<port-number> detect (Received BPDU),
putting into err-disable state.
BPDU guard violation occurred in MSTP.
Informational
OPTICAL MONITORING: port <port-number>
is not capable.
The optical transceiver is qualified by
Brocade, but the transceiver does not
support digital optical performance
monitoring.
Informational
Port <p> priority changed to <n>
A port priority has changed.
Informational
Port <portnum>, srcip-security
max-ipaddr-per-int reached.Last
IP=<ipaddr>
The address limit specified by the
srcip-security max-ipaddr-per-interface
command has been reached for the port.
Informational
Port <portnum>, srcip-security
max-ipaddr-per-int reached.Last
IP=<ipaddr>
The address limit specified by the
srcip-security max-ipaddr-per-interface
command has been reached for the port.
Informational
Security: console login by <username> to
USER | PRIVILEGE EXEC mode
The specified user logged into the device
console into the specified EXEC mode.
Informational
Security: console logout by <username>
The specified user logged out of the device
console.
Informational
Security: telnet | SSH login by <username>
from src IP <ip-address>, src MAC
<mac-address> to USER | PRIVILEGE EXEC
mode
The specified user logged into the device
using Telnet or SSH from either or both the
specified IP address and MAC address. The
user logged into the specified EXEC mode.
Informational
Security: telnet | SSH logout by <username>
from src IP <ip-address>, src MAC
<mac-address> to USER | PRIVILEGE EXEC
mode
The specified user logged out of the device.
The user was using Telnet or SSH to access
the device from either or both the specified
IP address and MAC address. The user
logged out of the specified EXEC mode.
Informational
SNMP read-only community | read-write
community | contact | location | user |
group | view | engineld | trap [host] [<value
-str>] deleted | added | modified from
console | telnet | ssh | web | snmp session
A user made SNMP configuration changes
through the Web, SNMP, console, SSH, or
Telnet session.
[<value-str>] does not appear in the
message if SNMP community or engineld is
specified.
Brocade ICX 6650 Administration Guide
53-1002600-01
Syslog messages
TABLE 57
A
Brocade Syslog messages (Continued)
Message level
Message
Explanation
Informational
SNMP Auth. failure, intruder IP: <ip-addr>
A user has tried to open a management
session with the device using an invalid
SNMP community string.
The <ip-addr> is the IP address of the host
that sent the invalid community string.
Informational
SSH | telnet server enabled | disabled from
console | telnet | ssh | web | snmp session
[by user <username>]
A user enabled or disabled an SSH or Telnet
session, or changed the SSH
enable/disable configuration through the
Web, SNMP, console, SSH, or Telnet
session.
Informational
startup-config was changed
or
startup-config was changed by <user-name>
A configuration change was saved to the
startup-config file.
The <user-name> is the user ID, if they
entered a user ID to log in.
Informational
STP: Root Guard Port <port-number>, VLAN
<vlan-ID> consistent (Timeout).
Root guard unblocks a port.
Informational
STP: Root Guard Port <port-number>, VLAN
<vlan-ID> inconsistent (Received superior
BPDU).
Root guard blocked a port.
Informational
STP: VLAN <vlan id> BPDU-Guard on Port
<port id> triggered (Received BPDU), putting
into err-disable state
The BPDU guard feature has detected an
incoming BPDU on {vlan-id, port-id}
Informational
STP: VLAN <vlan id> Root-Protect Port <port
id>, Consistent (Timeout)
The root protect feature goes back to the
consistent state.
Informational
STP: VLAN <vlan id> Root-Protect Port <port
id>, Inconsistent (Received superior BPDU)
The root protect feature has detected a
superior BPDU and goes into the
inconsistent state on {vlan-id, port-id}.
Informational
STP: VLAN <vlan-id> BPDU-guard port
<port-number> detect (Received BPDU),
putting into err-disable state
STP placed a port into an errdisable state
for BPDU guard.
Informational
STP: VLAN 1 BPDU-guard port
<port-number> detect (Received BPDU),
putting into err-disable state.
BPDU guard violation in occurred in STP or
RSTP.
Informational
Syslog server <IP-address> deleted | added
| modified from console | telnet | ssh | web
| snmp
OR
Syslog operation enabled | disabled from
console | telnet | ssh | web | snmp
A user made Syslog configuration changes
to the specified Syslog server address, or
enabled or disabled a Syslog operation
through the Web, SNMP, console, SSH, or
Telnet session.
Informational
SYSTEM: Optic is not Brocade-qualified
(<port-number>)
Brocade does not support the optical
transceiver.
Informational
System: Fan <fan id> (from left when facing
right side), ok
The fan status has changed from fail to
normal.
Informational
System: Fan speed changed automatically to
<fan speed>
The system automatically changed the fan
speed to the speed specified in this
message.
Informational
System: No free TCAM entry. System will be
unstable
There are no TCAM entries available.
Brocade ICX 6650 Administration Guide
53-1002600-01
281
A
Syslog messages
TABLE 57
282
Brocade Syslog messages (Continued)
Message level
Message
Explanation
Informational
System: Static Mac entry with Mac Address
<mac-address> is added from the
<unit>/<slot>/<port> to
<unit>/<slot>/<port> on VLANs <vlan-id> to
<vlan-id>
A MAC address is added to a range of
interfaces, which are members of the
specified VLAN range.
Informational
System: Static Mac entry with Mac Address
<mac-address> is added to ethe
<unit>/<slot>/<port> to
<unit>/<slot>/<port> on <vlan-id>
A MAC address is added to a range of
interfaces, which are members of the
specified VLAN.
Informational
System: Static Mac entry with Mac Address
<mac-address> is added to portnumber
<unit>/<slot>/<port> on VLAN <vlan-id>
A MAC address is added to an interface and
the interface is a member of the specified
VLAN.
Informational
System: Static Mac entry with Mac Address
<mac-address> is deleted from ethe
<unit>/<slot>/<port> to
<unit>/<slot>/<port> on <vlan-id>
A MAC address is deleted from a range of
interfaces, which are members of the
specified VLAN.
Informational
System: Static Mac entry with Mac Address
<mac-address> is deleted from ethe
<unit>/<slot>/<port> to
<unit>/<slot>/<port> on VLANs <vlan-id> to
<vlan-id>
A MAC address is deleted from a range of
interfaces, which are members of the
specified VLAN range.
Informational
System: Static Mac entry with Mac Address
<mac-address> is deleted from portnumber
<unit>/<slot>/<port> on <vlan-id>
A MAC address is deleted from an interface
and the interface is a member of the
specified VLAN.
Informational
System: Static Mac entry with Mac Address
<mac-address> is deleted from portnumber
<unit>/<slot>/<port> on VLANs <vlan-id> to
<vlan-id>
A MAC address is deleted from an interface
and the interface is a member of the
specified VLAN range.
Informational
telnet | SSH | web access [by <username>]
from src IP <source ip address>, src MAC
<source MAC address> rejected, <n>
attempts
There were failed web, SSH, or Telnet login
access attempts from the specified source
IP and MAC address.
• [by <user> <username>] does not
appear if telnet or SSH clients are
specified.
• <n> is the number of times this SNMP
trap occurred in the last five minutes,
or other configured number of
minutes.
Informational
Trunk group (<ports>) created by 802.3ad
link-aggregation module.
802.3ad link aggregation is configured on
the device, and the feature has dynamically
created a trunk group (aggregate link).
The <ports> is a list of the ports that were
aggregated to make the trunk group.
Informational
user <username> added | deleted |
modified from console | telnet | ssh | web |
snmp
A user created, modified, or deleted a local
user account through the Web, SNMP,
console, SSH, or Telnet session.
Informational
vlan <vlan id> added | deleted | modified
from console | telnet | ssh | web | snmp
session
A user created, modified, or deleted a VLAN
through the Web, SNMP, console, SSH, or
Telnet session.
Brocade ICX 6650 Administration Guide
53-1002600-01
Syslog messages
TABLE 57
A
Brocade Syslog messages (Continued)
Message level
Message
Explanation
Informational
Warm start
The system software (flash code) has been
reloaded.
Informational
vlan <vlan-id> Bridge is RootBridge
<mac-address> (MgmtPriChg)
802.1W changed the current bridge to be
the root bridge of the given topology due to
administrative change in bridge priority.
Informational
vlan <vlan-id> Bridge is RootBridge
<mac-address> (MsgAgeExpiry)
The message age expired on the Root port
so 802.1W changed the current bridge to
be the root bridge of the topology.
Informational
vlan <vlan-id> interface <portnum> Bridge
TC Event (DOT1wTransition)
802.1W recognized a topology change
event in the bridge. The topology change
event is the forwarding action that started
on a non-edge Designated port or Root port.
Informational
vlan <vlan-id> interface <portnum> STP
state -> <state> (DOT1wTransition)
802.1W changed the state of a port to a
new state: forwarding, learning, blocking. If
the port changes to blocking, the bridge
port is in discarding state.
Informational
vlan <vlan-id> New RootBridge
<mac-address> RootPort <portnum>
(BpduRcvd)
802.1W selected a new root bridge as a
result of the BPDUs received on a bridge
port.
Informational
vlan <vlan-id> New RootPort <portnum>
(RootSelection)
802.1W changed the port role to Root port,
using the root selection computation.
Notification
ACL exceed max DMA L4 cam resource,
using flow based ACL instead
The port does not have enough Layer 4 CAM
entries for the ACL.
To correct this condition, allocate more
Layer 4 CAM entries. To allocate more Layer
4 CAM entries, enter the following
command at the CLI configuration level for
the interface:
ip access-group max-l4-cam <num>
Notification
ACL insufficient L4 cam resource, using flow
based ACL instead
The port does not have a large enough CAM
partition for the ACLs
Notification
ACL insufficient L4 session resource, using
flow based ACL instead
The device does not have enough Layer 4
session entries.
To correct this condition, allocate more
memory for sessions. To allocate more
memory, enter the following command at
the global CONFIG level of the CLI interface:
system-max session-limit <num>
Notification
ACL port fragment packet inspect rate
<rate> exceeded on port <portnum>
The fragment rate allowed on an individual
interface has been exceeded.
The <rate> indicates the maximum rate
allowed.
The <portnum> indicates the port.
This message can occur if fragment
thottling is enabled.
Brocade ICX 6650 Administration Guide
53-1002600-01
283
A
Syslog messages
TABLE 57
284
Brocade Syslog messages (Continued)
Message level
Message
Explanation
Notification
ACL system fragment packet inspect rate
<rate> exceeded
The fragment rate allowed on the device
has been exceeded.
The <rate> indicates the maximum rate
allowed.
This message can occur if fragment
thottling is enabled.
Notification
Authentication Disabled on <portnum>
The multi-device port authentication feature
was disabled on the on the specified
<portnum>.
Notification
Authentication Enabled on <portnum>
The multi-device port authentication feature
was enabled on the on the specified
<portnum>.
Notification
BGP Peer <ip-addr> DOWN (IDLE)
Indicates that a BGP4 neighbor has gone
down.
The <ip-addr> is the IP address of the
neighbor BGP4 interface with the Brocade
device.
Notification
BGP Peer <ip-addr> UP (ESTABLISHED)
Indicates that a BGP4 neighbor has come
up.
The <ip-addr> is the IP address of the
neighbor BGP4 interface with the Brocade
device.
Notification
DHCP : snooping on untrusted port
<portnum>, type <number>, drop
Indicates that the DHCP client receives
DHCP server reply packets on untrusted
ports, and packets are dropped.
Notification
DOT1X issues software but not physical port
down indication of Port <portnum> to other
software applications
The device has indicated that the specified
is no longer authorized, but the actual port
may still be active.
Notification
DOT1X issues software but not physical port
up indication of Port <portnum> to other
software applications
The device has indicated that the specified
port has been authenticated, but the actual
port may not be active.
Notification
DOT1X: Port <port_id> Mac <mac_address>
-user <user_id> - RADIUS timeout for
authentication
The RADIUS session has timed out for this
802.1x port.
Notification
Local ICMP exceeds <burst-max> burst
packets, stopping for <lockup> seconds!!
The number of ICMP packets exceeds the
<burst-max> threshold set by the ip icmp
burst command. The Product Name device
may be the victim of a Denial of Service
(DoS) attack.
All ICMP packets will be dropped for the
number of seconds specified by the
<lockup> value. When the lockup period
expires, the packet counter is reset and
measurement is restarted.
Brocade ICX 6650 Administration Guide
53-1002600-01
Syslog messages
TABLE 57
A
Brocade Syslog messages (Continued)
Message level
Message
Explanation
Notification
Local TCP exceeds <burst-max> burst
packets, stopping for <lockup> seconds!!
The number of TCP SYN packets exceeds
the <burst-max> threshold set by the ip tcp
burst command. The Product Name device
may be the victim of a TCP SYN DoS attack.
All TCP SYN packets will be dropped for the
number of seconds specified by the
<lockup> value. When the lockup period
expires, the packet counter is reset and
measurement is restarted.
Notification
Local TCP exceeds <num> burst packets,
stopping for <num> seconds!!
Threshold parameters for local TCP traffic
on the device have been configured, and
the maximum burst size for TCP packets
has been exceeded.
The first <num> is the maximum burst size
(maximum number of packets allowed).
The second <num> is the number of
seconds during which additional TCP
packets will be blocked on the device.
NOTE: This message can occur in response
to an attempted TCP SYN attack.
Notification
MAC Authentication RADIUS timeout for
<mac_address> on port <port_id>
The RADIUS session has timed out for the
MAC address for this port.
Notification
MAC Authentication succeeded for
<mac-address> on <portnum>
RADIUS authentication was successful for
the specified <mac-address> on the
specified <portnum>.
Notification
Module was inserted to slot <slot-num>
Indicates that a module was inserted into a
chassis slot.
The <slot-num> is the number of the
chassis slot into which the module was
inserted.
Notification
Module was removed from slot <slot-num>
Indicates that a module was removed from
a chassis slot.
The <slot-num> is the number of the
chassis slot from which the module was
removed.
Notification
OSPF interface state changed,
rid <router-id>, intf addr <ip-addr>,
state <ospf-state>
Indicates that the state of an OSPF
interface has changed.
The <router-id> is the router ID of the
Brocade device.
The <ip-addr> is the interface IP address.
The <ospf-state> indicates the state to
which the interface has changed and can
be one of the following:
• down
• loopback
• waiting
• point-to-point
• designated router
• backup designated router
• other designated router
• unknown
Brocade ICX 6650 Administration Guide
53-1002600-01
285
A
Syslog messages
TABLE 57
286
Brocade Syslog messages (Continued)
Message level
Message
Explanation
Notification
OSPF intf authen failure, rid <router-id>,
intf addr <ip-addr>,
pkt src addr <src-ip-addr>,
error type <error-type>, pkt type <pkt-type>
Indicates that an OSPF interface
authentication failure has occurred.
The <router-id> is the router ID of the
Product Name device.
The <ip-addr> is the IP address of the
interface on the Product Name device.
The <src-ip-addr> is the IP address of the
interface from which the Product Name
device received the authentication failure.
The <error-type> can be one of the
following:
• bad version
• area mismatch
• unknown NBMA neighbor
• unknown virtual neighbor
• authentication type mismatch
• authentication failure
• network mask mismatch
• hello interval mismatch
• dead interval mismatch
• option mismatch
• unknown
The <packet-type> can be one of the
following:
• hello
• database description
• link state request
• link state update
• link state ack
• unknown
Brocade ICX 6650 Administration Guide
53-1002600-01
Syslog messages
TABLE 57
A
Brocade Syslog messages (Continued)
Message level
Message
Explanation
Notification
OSPF intf config error, rid <router-id>,
intf addr <ip-addr>,
pkt src addr <src-ip-addr>,
error type <error-type>, pkt type <pkt-type>
Indicates that an OSPF interface
configuration error has occurred.
The <router-id> is the router ID of the
Product Name device.
The <ip-addr> is the IP address of the
interface on the Product Name device.
The <src-ip-addr> is the IP address of the
interface from which the Product Name
device received the error packet.
The <error-type> can be one of the
following:
• bad version
• area mismatch
• unknown NBMA neighbor
• unknown virtual neighbor
• authentication type mismatch
• authentication failure
• network mask mismatch
• hello interval mismatch
• dead interval mismatch
• option mismatch
• unknown
The <packet-type> can be one of the
following:
• hello
• database description
• link state request
• link state update
• link state ack
• unknown
Notification
OSPF intf rcvd bad pkt, rid <router-id>,
intf addr <ip-addr>,
pkt src addr <src-ip-addr>,
pkt type <pkt-type>
Indicates that an OSPF interface received a
bad packet.
The <router-id> is the router ID of the
Product Name device.
The <ip-addr> is the IP address of the
interface on the Product Name device.
The <src-ip-addr> is the IP address of the
interface from which the Product Name
device received the authentication failure.
The <packet-type> can be one of the
following:
• hello
• database description
• link state request
• link state update
• link state ack
• unknown
Brocade ICX 6650 Administration Guide
53-1002600-01
287
A
Syslog messages
TABLE 57
288
Brocade Syslog messages (Continued)
Message level
Message
Explanation
Notification
OSPF intf rcvd bad pkt: Bad Checksum, rid
<ip-addr>, intf addr <ip-addr>, pkt size
<num>, checksum <num>, pkt src addr
<ip-addr>, pkt type <type>
The device received an OSPF packet that
had an invalid checksum.
The rid <ip-addr> is the Brocade router ID.
The intf addr <ip-addr> is the IP address of
the Brocade interface that received the
packet.
The pkt size <num> is the number of bytes
in the packet.
The checksum <num> is the checksum
value for the packet.
The pkt src addr <ip-addr> is the IP address
of the neighbor that sent the packet.
The pkt type <type> is the OSPF packet type
and can be one of the following:
• hello
• database description
• link state request
• link state update
• link state acknowledgement
• unknown (indicates an invalid packet
type)
Notification
OSPF intf rcvd bad pkt: Bad Packet type, rid
<ip-addr>, intf addr <ip-addr>, pkt size
<num>, checksum <num>, pkt src addr
<ip-addr>, pkt type <type>
The device received an OSPF packet with an
invalid type.
The parameters are the same as for the
Bad Checksum message. The pkt type
<type> value is “unknown”, indicating that
the packet type is invalid.
Notification
OSPF intf rcvd bad pkt: Invalid packet size,
rid <ip-addr>, intf addr <ip-addr>, pkt size
<num>, checksum <num>, pkt src addr
<ip-addr>, pkt type <type>
The device received an OSPF packet with an
invalid packet size.
The parameters are the same as for the
Bad Checksum message.
Notification
OSPF intf rcvd bad pkt: Unable to find
associated neighbor, rid <ip-addr>, intf addr
<ip-addr>, pkt size <num>, checksum
<num>, pkt src addr <ip-addr>, pkt type
<type>
The neighbor IP address in the packet is not
in the list of OSPF neighbors in the Brocade
device.
The parameters are the same as for the
Bad Checksum message.
Brocade ICX 6650 Administration Guide
53-1002600-01
Syslog messages
TABLE 57
A
Brocade Syslog messages (Continued)
Message level
Message
Explanation
Notification
OSPF intf retransmit, rid <router-id>,
intf addr <ip-addr>, nbr rid <nbr-router-id>,
pkt type is <pkt-type>, LSA type <lsa-type>,
LSA id <lsa-id>, LSA rid <lsa-router-id>
An OSPF interface on the Product Name
device has retransmitted a Link State
Advertisement (LSA).
The <router-id> is the router ID of the
Product Name device.
The <ip-addr> is the IP address of the
interface on the Product Name device.
The <nbr-router-id> is the router ID of the
neighbor router.
The <packet-type> can be one of the
following:
• hello
• database description
• link state request
• link state update
• link state ack
• unknown
The <lsa-type> is the type of LSA.
The <lsa-id> is the LSA ID.
The <lsa-router-id> is the LSA router ID.
Notification
OSPF LSDB approaching overflow,
rid <router-id>, limit <num>
The software is close to an LSDB condition.
The <router-id> is the router ID of the
Product Name device.
The <num> is the number of LSAs.
Notification
OSPF LSDB overflow, rid <router-id>,
limit <num>
A Link State Database Overflow (LSDB)
condition has occurred.
The <router-id> is the router ID of the
Product Name device.
The <num> is the number of LSAs.
Notification
OSPF max age LSA, rid <router-id>,
area <area-id>, LSA type <lsa-type>,
LSA id <lsa-id>, LSA rid <lsa-router-id>
An LSA has reached its maximum age.
The <router-id> is the router ID of the
Product Name device.
The <area-id> is the OSPF area.
The <lsa-type> is the type of LSA.
The <lsa-id> is the LSA ID.
The <lsa-router-id> is the LSA router ID.
Brocade ICX 6650 Administration Guide
53-1002600-01
289
A
Syslog messages
TABLE 57
290
Brocade Syslog messages (Continued)
Message level
Message
Explanation
Notification
OSPF nbr state changed, rid <router-id>, nbr
addr <ip-addr>, nbr rid <nbr-router-Id>, state
<ospf-state>
Indicates that the state of an OSPF
neighbor has changed.
The <router-id> is the router ID of the
Product Name device.
The <ip-addr> is the IP address of the
neighbor.
The <nbr-router-id> is the router ID of the
neighbor.
The <ospf-state> indicates the state to
which the interface has changed and can
be one of the following:
• down
• attempt
• initializing
• 2-way
• exchange start
• exchange
• loading
• full
• unknown
Notification
OSPF originate LSA, rid <router-id>,
area <area-id>, LSA type <lsa-type>,
LSA id <lsa-id>,
LSA router id <lsa-router-id>
An OSPF interface has originated an LSA.
The <router-id> is the router ID of the
Product Name device.
The <area-id> is the OSPF area.
The <lsa-type> is the type of LSA.
The <lsa-id> is the LSA ID.
The <lsa-router-id> is the LSA router ID.
Brocade ICX 6650 Administration Guide
53-1002600-01
Syslog messages
TABLE 57
A
Brocade Syslog messages (Continued)
Message level
Message
Explanation
Notification
OSPF virtual intf authen failure,
rid <router-id>, intf addr <ip-addr>,
pkt src addr <src-ip-addr>,
error type <error-type>, pkt type <pkt-type>
Indicates that an OSPF virtual routing
interface authentication failure has
occurred.
The <router-id> is the router ID of the
Product Name device.
The <ip-addr> is the IP address of the
interface on the Product Name device.
The <src-ip-addr> is the IP address of the
interface from which the Product Name
device received the authentication failure.
The <error-type> can be one of the
following:
• bad version
• area mismatch
• unknown NBMA neighbor
• unknown virtual neighbor
• authentication type mismatch
• authentication failure
• network mask mismatch
• hello interval mismatch
• dead interval mismatch
• option mismatch
• unknown
The <packet-type> can be one of the
following:
• hello
• database description
• link state request
• link state update
• link state ack
• unknown
Brocade ICX 6650 Administration Guide
53-1002600-01
291
A
Syslog messages
TABLE 57
292
Brocade Syslog messages (Continued)
Message level
Message
Explanation
Notification
OSPF virtual intf config error,
rid <router-id>, intf addr <ip-addr>,
pkt src addr <src-ip-addr>,
error type <error-type>, pkt type <pkt-type>
Indicates that an OSPF virtual routing
interface configuration error has occurred.
The <router-id> is the router ID of the
Product Name device.
The <ip-addr> is the IP address of the
interface on the Product Name device.
The <src-ip-addr> is the IP address of the
interface from which the Product Name
device received the error packet.
The <error-type> can be one of the
following:
• bad version
• area mismatch
• unknown NBMA neighbor
• unknown virtual neighbor
• authentication type mismatch
• authentication failure
• network mask mismatch
• hello interval mismatch
• dead interval mismatch
• option mismatch
• unknown
The <packet-type> can be one of the
following:
• hello
• database description
• link state request
• link state update
• link state ack
• unknown
Notification
OSPF virtual intf rcvd bad pkt,
rid <router-id>, intf addr <ip-addr>,
pkt src addr <src-ip-addr>,
pkt type <pkt-type>
Indicates that an OSPF interface received a
bad packet.
The <router-id> is the router ID of the
Product Name device.
The <ip-addr> is the IP address of the
interface on the Product Name device.
The <src-ip-addr> is the IP address of the
interface from which the Product Name
device received the authentication failure.
The <packet-type> can be one of the
following:
• hello
• database description
• link state request
• link state update
• link state ack
• unknown
Brocade ICX 6650 Administration Guide
53-1002600-01
Syslog messages
TABLE 57
A
Brocade Syslog messages (Continued)
Message level
Message
Explanation
Notification
OSPF virtual intf retransmit, rid <router-id>,
intf addr <ip-addr>, nbr rid <nbr-router-id>,
pkt type is <pkt-type>, LSA type <lsa-type>,
LSA id <lsa-id>, LSA rid <lsa-router-id>
An OSPF interface on the Product Name
device has retransmitted a Link State
Advertisement (LSA).
The <router-id> is the router ID of the
Product Name device.
The <ip-addr> is the IP address of the
interface on the Product Name device.
The <nbr-router-id> is the router ID of the
neighbor router.
The <packet-type> can be one of the
following:
• hello
• database description
• link state request
• link state update
• link state ack
• unknown
The <lsa-type> is the type of LSA.
The <lsa-id> is the LSA ID.
The <lsa-router-id> is the LSA router ID.
Notification
OSPF virtual intf state changed,
rid <router-id>, area <area-id>,
nbr <ip-addr>, state <ospf-state>
Indicates that the state of an OSPF virtual
routing interface has changed.
The <router-id> is the router ID of the router
the interface is on.
The <area-id> is the area the interface is in.
The <ip-addr> is the IP address of the OSPF
neighbor.
The <ospf-state> indicates the state to
which the interface has changed and can
be one of the following:
• down
• loopback
• waiting
• point-to-point
• designated router
• backup designated router
• other designated router
• unknown
Brocade ICX 6650 Administration Guide
53-1002600-01
293
A
Syslog messages
TABLE 57
Brocade Syslog messages (Continued)
Message level
Message
Explanation
Notification
OSPF virtual nbr state changed,
rid <router-id>, nbr addr <ip-addr>,
nbr rid <nbr-router-id>, state <ospf-state>
Indicates that the state of an OSPF virtual
neighbor has changed.
The <router-id> is the router ID of the
Product Name device.
The <ip-addr> is the IP address of the
neighbor.
The <nbr-router-id> is the router ID of the
neighbor.
The <ospf-state> indicates the state to
which the interface has changed and can
be one of the following:
• down
• attempt
• initializing
• 2-way
• exchange start
• exchange
• loading
• full
• unknown
Notification
Transit ICMP in interface <portnum>
exceeds <num> burst packets, stopping for
<num> seconds!!
Threshold parameters for ICMP transit
(through) traffic have been configured on
an interface, and the maximum burst size
for ICMP packets on the interface has been
exceeded.
The <portnum> is the port number.
The first <num> is the maximum burst size
(maximum number of packets allowed).
The second <num> is the number of
seconds during which additional ICMP
packets will be blocked on the interface.
NOTE: This message can occur in response
to an attempted Smurf attack.
Notification
Transit TCP in interface <portnum> exceeds
<num> burst packets, stopping for <num>
seconds!
Threshold parameters for TCP transit
(through) traffic have been configured on
an interface, and the maximum burst size
for TCP packets on the interface has been
exceeded.
The <portnum> is the port number.
The first <num> is the maximum burst size
(maximum number of packets allowed).
The second <num> is the number of
seconds during which additional TCP
packets will be blocked on the interface.
NOTE: This message can occur in response
to an attempted TCP SYN attack.
294
Brocade ICX 6650 Administration Guide
53-1002600-01
Syslog messages
TABLE 57
A
Brocade Syslog messages (Continued)
Message level
Message
Explanation
Notification
VRRP intf state changed,
intf <portnum>, vrid <virtual-router-id>,
state <vrrp-state>
A state change has occurred in a Virtual
Router Redundancy Protocol (VRRP) or
VRRP-E IPv4 or IPv6 interface.
The <portnum> is the port or interface
where VRRP or VRRP-E is configured.
The <virtual-router-id> is the virtual router
ID (VRID) configured on the interface.
The <vrrp-state> can be one of the
following:
• init
• master
• backup
• unknown
VRRP (IPv6) intf state changed,
intf <portnum>, vrid <virtual-router-id>,
state <vrrp-state>
Warning
DOT1X security violation at port <portnum>,
malicious mac address detected:
<mac-address>
A security violation was encountered at the
specified port number.
Warning
Dup IP <ip-addr> detected, sent from MAC
<mac-addr> interface <portnum>
Indicates that the Product Name device
received a packet from another device on
the network with an IP address that is also
configured on the Brocade device.
The <ip-addr> is the duplicate IP address.
The <mac-addr> is the MAC address of the
device with the duplicate IP address.
The <portnum> is the Brocade port that
received the packet with the duplicate IP
address. The address is the packet source
IP address.
Warning
IGMP/MLD no hardware vidx, broadcast to
the entire vlan. rated limited number
IGMP or MLD snooping has run out of
hardware application VLANs. There are
4096 application VLANs per device. Traffic
streams for snooping entries without an
application VLAN are switched to the entire
VLAN and to the CPU to be dropped. This
message is rate-limited to appear a
maximum of once every 10 minutes. The
rate-limited number shows the number on
non-printed warnings.
Warning
IGMP/MLD: <vlanId>(<portId>) is V1 but
rcvd V2 from nbr <ipAddr>
Port has received a query with a MLD
version that does not match the port MLD
version. This message is rated-limited to
appear a maximum of once every 10 hours.
Warning
Latched low RX Power | TX Power | TX Bias
Current | Supply Voltage | Temperature
warning
alarm | warning, port <port-number>
The optical transceiver on the given port
has risen above or fallen below the alarm or
warning threshold.
Brocade ICX 6650 Administration Guide
53-1002600-01
295
A
Syslog messages
TABLE 57
296
Brocade Syslog messages (Continued)
Message level
Message
Explanation
Warning
list <ACL-num> denied <ip-proto>
<src-ip-addr> (<src-tcp/udp-port>)
(Ethernet <portnum> <mac-addr>) ->
<dst-ip-addr> (<dst-tcp/udp-port>),
1 event(s)
Indicates that an Access Control List (ACL)
denied (dropped) packets.
The <ACL-num> indicates the ACL number.
Numbers 1 – 99 indicate standard ACLs.
Numbers 100 – 199 indicate extended
ACLs.
The <ip-proto> indicates the IP protocol of
the denied packets.
The <src-ip-addr> is the source IP address
of the denied packets.
The <src-tcp/udp-port> is the source TCP or
UDP port, if applicable, of the denied
packets.
The <portnum> indicates the port number
on which the packet was denied.
The <mac-addr> indicates the source MAC
address of the denied packets.
The <dst-ip-addr> indicates the destination
IP address of the denied packets.
The <dst-tcp/udp-port> indicates the
destination TCP or UDP port number, if
applicable, of the denied packets.
Warning
Locked address violation at interface
e<portnum>, address <mac-address>
Indicates that a port on which you have
configured a lock-address filter received a
packet that was dropped because the
packet source MAC address did not match
an address learned by the port before the
lock took effect.
The e<portnum> is the port number.
The <mac-address> is the MAC address
that was denied by the address lock.
Assuming that you configured the port to
learn only the addresses that have valid
access to the port, this message indicates a
security violation.
Warning
mac filter group denied packets on port
<portnum> src macaddr <mac-addr>,
<num> packets
Indicates that a MAC address filtergroup
configured on a port has denied packets.
The <portnum> is the port on which the
packets were denied.
The <mac-addr> is the source MAC address
of the denied packets.
The <num> indicates how many packets
matching the values above were dropped
during the five-minute interval represented
by the log entry.
Warning
multicast no software resource:
resource-name, rate limited number
IGMP or MLD snooping has run out of
software resources. This message is
rate-limited to appear a maximum of once
every 10 minutes. The rate-limited number
shows the number of non-printed warnings.
Brocade ICX 6650 Administration Guide
53-1002600-01
Syslog messages
TABLE 57
A
Brocade Syslog messages (Continued)
Message level
Message
Explanation
Warning
No global IP! cannot send IGMP msg.
The device is configured for ip multicast
active but there is no configured IP address
and the device cannot send out IGMP
queries.
Warning
No of prefixes received from BGP peer
<ip-addr> exceeds warning limit <num>
The Layer 3 Switch has received more than
the allowed percentage of prefixes from the
neighbor.
The <ip-addr> is the IP address of the
neighbor.
The <num> is the number of prefixes that
matches the percentage you specified. For
example, if you specified a threshold of 100
prefixes and 75 percent as the warning
threshold, this message is generated if the
Layer 3 Switch receives a 76th prefix from
the neighbor.
Warning
NTP server <ip-addr> failed to respond
Indicates that a Simple Network Time
Protocol (SNTP) server did not respond to
the device query for the current time.
The <ip-addr> indicates the IP address of
the SNTP server.
Warning
rip filter list <list-num> <direction> V1 | V2
denied <ip-addr>, <num> packets
Indicates that a RIP route filter denied
(dropped) packets.
The <list-num> is the ID of the filter list.
The <direction> indicates whether the filter
was applied to incoming packets or
outgoing packets. The value can be one of
the following:
• in
• out
The V1 or V2 value specifies the RIP version
(RIPv1 or RIPv2).
The <ip-addr> indicates the network
number in the denied updates.
The <num> indicates how many packets
matching the values above were dropped
during the five-minute interval represented
by the log entry.
Warning
Temperature is over warning level.
The chassis temperature has risen above
the warning level.
Brocade ICX 6650 Administration Guide
53-1002600-01
297
A
298
Syslog messages
Brocade ICX 6650 Administration Guide
53-1002600-01
Appendix
B
NIAP-CCEVS Certification
Some Brocade devices have passed the Common Criteria (CC) certification testing. This testing is
sponsored by the National Information Assurance Partnership (NIAP) - Common Criteria Evaluation
and Validation Scheme (CCEVS). For more information regarding the NIAP-CCEVS certification
process refer to the following link: http://www.niap-ccevs.org/.
In an effort to maintain a proper level of security as it relates to access to network infrastructure
resources, Brocade recommends that all Brocade hardware be installed within a secure location
that is accessible by approved personnel only.
NIAP-CCEVS certified Brocade equipment and
Ironware releases
The Business Continuity Manager is NIAP-CCEVS certified. The following IronWare software release
must be used to remain compliant with this certification:
TABLE 58
NIAP-CCEVS certified Brocade equipment and IronWare software releases
Brocade product
Brocade IronWare
software version
Discussed in
Brocade ICX 6650 Family
7.5.00
Brocade ICX 6650 Administration Guide
Local user password changes
Please note that if existing usernames and passwords have been configured on a Brocade Device
with specific privilege levels (super-user, read-only, port-config), and if you attempt to change a
user's password by executing the following syntax:
Brocade-Device(config)# user brcdreadonly password value
The privilege level of this particular user will be changed from its current value to "super-user". The
“super-user” level username and password combination provides full access to the Brocade
command line interface (CLI). To prevent this from occurring, use the following syntax:
Brocade-Device(config)# user fdryreadonly privilege value password
value
Brocade ICX 6650 Administration Guide
53-1002600-01
299
B
300
Local user password changes
Brocade ICX 6650 Administration Guide
53-1002600-01
Index
A
alarm interval, setting, 226
alarm status values, 229
B
banner configuration, 28
banner, setting a privileged EXEC CLI level, 30
boot preference, displaying, 56
broadcast, multicast, and unknown traffic
limiting, 28
C
CDP
clearing information, 176, 180
clearing statistics, 177
displaying entries, 179
displaying information, 178
displaying neighbors, 178
displaying packet statistics, 176
displaying statistics, 180
enabling interception of packets globally,
177
enabling interception of packets on an
interface, 177
Cisco Discovery Protocol (CDP) overview, 177
Brocade ICX 6650 Administration Guide
53-1002600-01
301
command
alias, 10
banner exec_mode, 30
banner incoming, 30
banner motd, 28
clear, 248
clear fdp counters, 177, 180
clear fdp table, 176, 180
clear ipv6 cache, 139
clear ipv6 neighbor, 139
clear ipv6 route, 140
clear ipv6 traffic, 140
clear ipv6 tunnel, 122
clear lldp neighbors, 224
clear LLDP statistics, 220
clear lldp statistics, 223
clear logging, 236, 242
clear statistics, 250, 269
clock set, 26
clock summer-time, 27
clock timezone gmt, 27
clock timezone us, 28
copy flash console, 53, 54
copy flash tftp, 62
copy running-config, 63
copy running-config tftp, 59
copy startup-config tftp, 59
copy tftp flash, 63
copy tftp running-config, 61
copy tftp startup-config, 59
disable, 35
enable, 35
enable snmp ve-statistics, 18
end, 59, 61
erase flash primary, 67
erase flash secondary, 67
erase startup-config, 67
errdisable recovery interval, 45
fdp advertise ipv4 | ipv6, 172
fdp holdtime, 173
fdp timer, 173
flow-control, 36
hostname, 15
interface tunnel, 122
ip address, 111
Ip show-portname, 241
ip show-service-number-in-log, 241
ipv6 access-list, 112
ipv6 address, 107, 109, 112, 122
ipv6 dns domain-name, 115
ipv6 dns server-address, 115
ipv6 enable, 107, 110, 122
302
ipv6 hop-limit, 138
ipv6 icmp error-interval, 128
ipv6 icmp source-route, 138
ipv6 nd dad attempt, 132
ipv6 nd managed-config-flag, 135
ipv6 nd ns-interval, 132
ipv6 nd other-config-flag, 135
ipv6 nd prefix-advertisement, 134
ipv6 nd ra-hop-limit, 133
ipv6 nd ra-interval, 133
ipv6 nd ra-lifetime, 133
ipv6 nd reachable-time, 136
ipv6 nd suppress-ra, 135
ipv6 neighbor, 137
ipv6 unicast-routing, 111, 131
lldp advertise mac-phy-config-status ports,
205
lldp advertise management-address ipv4,
200
lldp advertise max-frame-size ports, 206
lldp advertise max-frame-size ports
ethernet, 206
lldp advertise port-description ports
ethernet, 201
lldp advertise port-vlan-id ports ethernet,
204
lldp advertise system-capabilities ports
ethernet, 202
lldp advertise system-description ports
ethernet, 202
lldp advertise vlan-name vlan, 204
lldp enable ports, 193
lldp enable ports ethernet, 194
lldp enable receive ports, 195
lldp enable snmp notifications ports
Brocade ICX 6650 Administration Guide
53-1002600-01
ethernet, 196
lldp enable transmit ports, 194
lldp enable transmit ports ethernet, 195
lldp max-neighbors-per-port, 196
lldp max-total-neighbors, 195
lldp med location-id civic-address, 211
lldp med location-id coordinate-based, 209
lldp med location-id ecs-elin, 214
lldp med network-policy application, 216
lldp snmp-notification-interval, 197
lldp transmit-delay, 197
lldp transmit-hold, 198
lldp transmit-interval, 197, 198
logging buffered, 239
logging console, 233
logging enable config-changed, 58
logging enable user-login, 20
logging facility, 240
logging host, 239
logging on, 238
logging persistence, 242
loop-detection, 44
loop-detection-interval, 44
ncopy, 64
ncopy running-config tftp, 62
optical-monitor, 225, 226
ping, 70, 116
port-name, 31
relative-utilization, 270
reload after, 68
reload at, 67
reload cancel, 68
rmon alarm, 253
rmon history, 253
sflow agent-ip, 265
sflow enable, 263, 264
sflow export cpu-traffic, 267
sflow export system-info, 266
sflow forwardin, 264
sflow forwarding, 264
sflow max-packet-size, 266
sflow polling-interval, 259
sflow sample, 261, 262
sflow source-port, 263
sflow version 2 | 5, 266
show clock, 28
show interfaces management, 2
show logging, 19
show media, 226
show running-config interface
Brocade ICX 6650 Administration Guide
53-1002600-01
management, 2
show sntp associations, 21
show sntp server-mode, 25
show sntp status, 23
show statistics management, 3
show who, 6
snmp-client ipv6, 113
snmp-server community, 55, 66, 157
snmp-server contact, 15
snmp-server enable traps holddown-time,
17
snmp-server engineid local, 160
snmp-server group, 160, 164
snmp-server host, 16
snmp-server host ipv6, 113
snmp-server location, 15
snmp-server pw-check, 55, 66
snmp-server user, 161
snmp-server view, 163
sntp broadcast client, 26
sntp broadcast server, 26
sntp poll-interval, 21
sntp server, 20
sntp server ipv6, 113
sntp server-mode, 24
sntp sync, 27
speed-duplex, 32, 34
symmetric-flow-control, 39
system-max rmon-entries, 250
system-max view, 163
telnet, 114
terminal monitor, 233
traceroute, 71, 114
traceroute ipv6, 114
tunnel destination, 122
tunnel mode ipv6ip, 122
tunnel source, 122
use-local-management-mac, 31
write memory, 16
command line interface
banner configuration, 28
creating an alias for a command, 10
logging in, 3
nomenclature on Chassis-based models, 6
security levels, 3
303
command output
egress queue statistics, 250
IPv6 tunnel interface information, 124
sFlow information, 268
show fdp neighbor, 174
show ipv6 cache, 141
show ipv6 interface, 142
show ipv6 neighbor, 144
show ipv6 route command, 146
show ipv6 router, 147
show ipv6 tcp connections, 148
show ipv6 tcp status, 150
show ipv6 traffic, 151
show link-error-disable, 42
show lldp neighbors, 221
show lldp statistics, 219, 220
show loop-detection resource, 46
show optic, 229
show sflow, 268
show sntp associations, 21
show sntp associations details, 22
show sntp server-mode, 25
show sntp status, 23
commands
line editing, 5
searching and filtering output, 6
configuration
basic port parameter, 31
basis system parameters, 14
dynamic loading, 59
entering system information, 15
flow control, 35
Interpacket Gap (IPG), 39
IPv4 and IPv6 protocol stack, 111
IPv6 connectivity on a Layer 3 switch, 108
IPv6 management ACLs, 112
IPv6 management port, 108
IPv6 neighbor discovery, 129
IPv6 static neighbor entries, 137
IPv6 Syslog server, 117
loading and saving files, 57
manual IPv6 tunnel, 121
port flap dampening, 40
SNMP parameters, 15
SNMP V3 and SNTP over IPv6, 113
static IPv6 route, 118
viewing information, 244
configuration file
copying to or from TFTP server, 59
running, 57
startup, 57
304
configuration files
loading and saving with IPv6, 62
D
diagnostic error codes, 68
digital optical monitoring, 225
disabling Syslog messages and traps, 19
dynamic configuration loading, 59
E
egress queue counters
viewing on FCX devices, 249
egress queue counters, clearing, 250
EMCP load sharing for IPv6, 126
error codes used for diagnostics, 68
F
FCX devices
viewing egress queue counters, 249
FDP
changing the hold time, 173
changing the update timer, 172
clearing information, 176
clearing statistics, 177
configuration, 172
displaying entries, 175
displaying information, 173
displaying packet statistics, 176
enabling at the interface level, 172
enabling globally, 172
specifying the IP management address, 172
feature support
basic software, 13
Foundry Discovery Protocol (FDP) and Cisco
Discovery Protocol (CDP) packets, 171
hardware component monitoring, 225
IPv6 configuration on FastIron X series, FCX
series, and ICX series switches, 99
Link Layer Discovery Protocol (LLDP), 181
management applications, 1
network monitoring, 243
Operations, Administration, and
Brocade ICX 6650 Administration Guide
53-1002600-01
Maintenance (OAM), 49
SNMP access, 155
software-based licensing, 73
Syslog, 231
flash image
CLI commands, 52
determining version running on device, 50
file types, 53
verification, 51, 52
flash memory
copying a file to, 63
flow control
configuration, 35
configuration notes, 35, 38
disabling or re-enabling, 35
displaying status, 37
enabling and disabling, 39
negotiation and advertisement, 36
symmetric and asymmetric, 37
Foundry Discovery Protocol (FDP) overview,
171
I
ICMP
configuring rate limiting, 128
enabling redirect messages, 129
ICMP feature configuration for IPv6, 128
Brocade ICX 6650 Administration Guide
53-1002600-01
Interface
enable, 35
flow-control, 36
gig-default, 40
ip address, 111
ipv6 address, 109, 110, 111, 112
ipv6 address eui, 110
ipv6 address link-local, 110
ipv6 enable, 110
ipv6 mtu, 137
ipv6 nd dad attempt, 132
ipv6 nd managed-config-flag, 135
ipv6 nd ns-interval, 132
ipv6 nd other-config-flag, 135
ipv6 nd prefix-advertisement, 134
ipv6 nd ra-interval, 133
ipv6 nd ra-lifetime, 133
ipv6 nd reachable-time, 136
ipv6 nd suppress-ra, 135
ipv6 redirects, 129
link-error-disable, 41
optical-monitor, 225
port-name, 31
speed-duplex, 32, 34
Interpacket Gap (IPG) configuration, 39
IPv4 and IPv6
protocol stack configuration, 111
IPv4 route, tracing, 71
IPv6
address types, 102
addressing overview, 101
changing the MTU, 137
clearing global information, 138
clearing neighbor information, 139
clearing routes from IPv6 route table, 140
clearing the cache, 139
clearing traffic statistics, 140
clearing tunnel statistics, 122
configuring a global or site-local address,
107
configuring a link-local address as a
system-wide address for a switch, 107
configuring a manual tunnel, 121
configuring a Syslog server, 117
configuring address resolution using DNS
resolver, 115
configuring anycast address, 111
configuring basic connectivity on a Layer 3
305
switch, 108
configuring ICMP rate limiting, 128
configuring IPv6 management ACLs, 112
configuring on each router interface, 108
configuring reachable time for remote
nodes, 136
configuring SNMP V3, 113
configuring SNTP, 113
configuring the management port, 108
defining a DNS entry, 115
disabling on a Layer 2 switch, 118
disabling router advertisement and
solication messages, 118
disabling router advertisement and
solicitation messages, 118
displaying cache information, 140
displaying ECMP load-sharing information,
127
displaying global information, 140
displaying interface information, 141
displaying interface-level settings, 124
displaying local routers, 146
displaying neighbor information, 144
displaying route table, 145
displaying TCP information, 147
displaying traffic statistics, 151
displaying tunnel information, 123
ECMP load sharing, 126
enabling and disabling router
advertisements, 135
enabling ICMP redirect messages, 129
enabling routing, 108
full layer supported features, 101
host address on a Layer 2 switch, 106
ICMP feature configuration, 128
limiting the number of hops a packet can
traverse, 138
management on FastIron X series devices,
112
maximum transmission unit (MTU), 136
neighbor discovery configuration, 129
neighbor redirect messages, 131
neighbor solicitation and advertisement
messages, 130
pinging and address, 116
prefixes advertised in router messages, 134
router advertisement and solicitation
messages, 131
secure shell and SCP, 113
setting flags in router advertisement
messages, 135
setting neighbor solicitation parameters,
306
131
setting router advertisement parameters,
132
source routing security enhancements, 138
specifying an SNMP trap receiver, 113
stateless auto-configuration, 104
static neighbor entries configuration, 137
static route configuration, 118
static route parameters, 120
supported CLI commands, 104
telnet, 114
traceroute, 114
viewing SNMP server address, 117
IPv6 host support, 112
IPv6 over IPv4 tunnels, 121
IPv6 TFTP server file upload, 65
L
Layer 2 switch
IPv6 host address, 106
license file
deleting, 90
Licensing
Ports on Demand, 82
show license, 91
Licensing for Ports on Demand, 92
Link layer discovery protocol (LLDP), description
of, 182
LLDP
802.1 capabilities when enabled, 203
802.3 capabilities when enabled on a global
basis, 204
basic management TLV, 188
benefits, 184
changing a port operating mode, 193
changing the holdtime multipler, 198
changing the interval between regular
transmissions, 198
changing the minimum time between port
reinitializations, 199
changing the minimum time between
transmissions, 197
clearing cached LLDP neighbor information,
224
configuration summary, 218
displaying neighbors detail, 222
enabling and disabling, 193
enabling SNMP notifications and Syslog
Brocade ICX 6650 Administration Guide
53-1002600-01
messages, 196
enabling support for tagged packets, 193
general operating prinicples, 186
general system information, 199
global configuration tasks, 192
MIB support, 191
organizationally-specific TLVs, 188
overview, 183
packets, 187
receive mode, 187
resetting statistics, 223
specifying the maximum number of LLDP
neighbors per port, 196
specifying the maximum number of
neighbors per device, 195
specifying the minimum time between
SNMP traps and Syslog messages, 197
Syslog messages, 191
terms used in chapter, 182
TLVs advertised by Brocade device, 199
transmit mode, 186
LLDP media endpoint devices (LLDP-MED),
description of, 182
LLDP_MED
benefits, 185
general operating principles, 186
overview, 184
LLDP-MED
attributes advertised by the Brocade device,
217
capabilities, 217
class, 186
configuration tasks, 206
configuring civic address location, 211
configuring emergency call service, 214
coordinate-based location, 209
defining a location ID, 209
defining a network policy, 215
displaying statistics and configuration
settings, 218
elements used with civic address, 212
enabling, 207
enabling SNMP notifications and Syslog
messages, 207
example civic address location
advertisement, 214
fast start repeat count, 208
TLVs, 189
logging, 239
logging changes to, 58
Brocade ICX 6650 Administration Guide
53-1002600-01
loop detection
clearing, 45
configuring a global interval, 44
displaying resource information, 46
enabling, 44
specifying the recovery time interval, 45
M
MAC address
using for Layer 2 traffic, 31
management application feature support, 1
management port
commands, 2
overview, 1
rules, 1
media, displaying information, 226
MTU for IPv6, 136
N
negotiation mode, changing the speed, 39
network connectivity testing, 69
NIAP-CCEVS certification, 299
O
Operations, Administration, and Maintenance
(OAM)
overview, 50
optical monitoring, viewing, 228
optical transceiver thresholds, viewing, 229
optical transceivers
Syslog messages, 230
P
ping
IPv6 address, 116
port configuration
assigning a port name, 31
disabling or re-enabling a port, 35
enabling port speed, 33
modifying port duplex mode, 34
modifying port speed and duplex mode, 31
port flap dampening configuration, 40
307
port loop detection, 43
port statistics
parameters, 245
viewing, 245
R
RMON
alarm (group 3), 253
event (group 9), 253
export configuration and statistics, 251
history (group 2), 253
maximum number of entries allowed in
control table, 250
statistics, 251
RMON support, 250
266
specifying the polling interval, 266
specifying the version used for exporting
sFlow data, 266
support for IPv6 packets, 255
uplink utilization list configuration, 270
utilization list for an uplink port command
syntax, 270
version 5, 254
S
search string, using special characters, 8
secure copy (SCP)
using to install a software license, 85, 86,
88
secure shell (SSH)
and IPv6, 113
sFlow
and CPU utilization, 256
and hardware support, 256
and sampling rate, 257
and source address, 256
and source port, 257
changing the polling interval, 259
changing the sampling rate, 259
changing the source port, 263
clearing statistics, 269
command syntax for sFlow forwarding, 263
configuration considerations, 256
configuring and enabling, 257
configuring version 5 features, 264
displaying information, 267
enabling forwarding, 263
exporting CPU and memory usage
information, 266
extended gateway information, 255
extended router information, 255
IPv6 packet sampling, 256
overview, 254
specifying the collector, 258
specifying the maximum flow sample size,
308
Brocade ICX 6650 Administration Guide
53-1002600-01
show command
ipv6 inter tunnel, 124
show boot-preference, 56
show clock, 28
show dir, 53
show fdp entry, 175, 179
show fdp neighbor, 173
show fdp neighbors, 178
show fdp traffic, 180
show flash, 51
show interface, 37, 249
show interfaces tunnel, 124
show ipv6, 127
show ipv6 cache, 140
show ipv6 interface, 141
show ipv6 neighbor, 144
show ipv6 route, 145
show ipv6 router, 146
show ipv6 tcp connections, 147
show ipv6 tcp status, 149
show ipv6 traffic, 151
show ipv6 tunnel, 123
show link-error-disable, 41
show lldp, 218
show lldp local-info, 205, 215, 218, 222
show lldp neighbors, 221
show lldp neighbors detail, 222
show lldp statistics, 197, 220
show lldp statisticsLLDP
displaying statistics, 219
show logging, 232, 234, 235
show loop-detection resource, 46
show loop-detection status, 45
show media slot, 227
show optic, 228
show optic threshold, 229
show relative-utilization, 271
show rmon statistics, 251
show sflow, 260, 268
show snmp engineid, 159, 167
show snmp group, 168
show snmp server, 117, 158, 167
show snmp user, 168
show sntp associations, 21
show sntp status, 23
show span, 247
show statistics ethernet, 245
show version, 50, 244
sntp server-mode, 25
span vlan, 247
Simple Network Time Protocol (SNTP), 20
Brocade ICX 6650 Administration Guide
53-1002600-01
SNMP
community strings, 156
configuring V3 over IPv6, 113
configuring version 3 on Brocade devices,
159
defining a group, 160
defining a user account, 161
defining the engine ID, 159
defining the UDP port for traps, 165
defining views, 163
disabling traps, 17, 18, 19
displaying groups, 168
displaying the community strings, 158
displaying the engine ID, 167
displaying user information, 168
encryption of community strings, 156
interpreting varbinds in report packets, 168
IPv6 support, 166
Layer 2 generated traps, 17
Layer 3 generated traps, 17
overview, 155
restricting access to an IPv6 node, 113
setting the trap holddown time, 17
specifying a single trap source, 16
specifying a trap receiver, 15
specifying an IPv6 host as trap receiver, 166
specifying an IPv6 trap receiver, 113
trap MIB changes, 165
user-based security model, 159
using to save and load configuration
information, 66
using to upgrade software, 54
v3 configuration examples, 169
version 3 traps, 164
viewing IPv6 server addresses, 117, 167
SNMP parameter configuration, 15
SNTP
configuring Brocade device to function as
server, 23
configuring over IPv6, 113
displaying server information, 25
enabling broadcast mode for client, 25
specifying a server, 20
software image files, 53
software license
terminology, 74
transferring, 82
viewing from the Brocade software portal,
80
viewing information about, 91
309
software licensing
configuration tasks, 74
obtaining a license, 75
software reboot, 56
software upgrade, 54
special characters used in search string, 8
SSH
using to install a software license, 85, 86,
88
startup configuration, 58
static IPv6 route configuration, 118
static IPv6 route parameters, 120
statistics
clearing, 248
displaying virtual routing interface, 18
enabling SNMP VE, 18
STP statistics, viewing, 247
Syslog
changing the log facility, 240
changing the number of entries the local
buffer can hold, 239
clearing log entries, 236
clearing messages from the local buffer,
242
CLI display of buffer configuration, 235
disabling, 19
disabling logging of a message level, 239
disabling or re-enabling, 238
displaying interface names in messages,
241
displaying messages, 232
displaying real-time messages, 234
displaying TCP or UDP port numbers in
messages, 241
displaying the configuration, 234
enabling real-time display for a Telnet or
SSH session, 233
enabling real-time display of messages, 233
message due to disabled port in loop
detection, 47
message types, 273
messages for CLI access, 19
messages for port flap dampening, 42
messages on a device with the onboard
clock set, 237
messages supported for software-based
310
licensing, 82
overview, 232
retaining messages after a soft reboot, 242
service configuration, 234
specifying a server, 238
specifying an additional server, 239
static and dynamic buffers, 235
time stamps, 236
Syslog messages
disabling, 18
system clock
setting, 26
system management
basic, 243
viewing information, 243
system reload scheduling, 67
T
Telnet
cancelling an outbound session, 20
testing network connectivity, 69
TFTP
server file upload, 65
transfer remedies, 68
thresholds
XON and XOFF, 38
tracing an IPv4 route, 71
Trunk
sflow-subsampling ethernet, 262
trunk port
changing the sampling rate, 262
Tunnel
ipv6 address, 122
ipv6 enable, 122
tunnel destination, 122
tunnel mode ipv6ip, 122
tunnel source, 122
V
viewing system information, 243
virtual routing interface statistics, 18
VLAN
loop-detection, 44
Brocade ICX 6650 Administration Guide
53-1002600-01
X
XON and XOFF
thresholds, 38
Brocade ICX 6650 Administration Guide
53-1002600-01
311
312
Brocade ICX 6650 Administration Guide
53-1002600-01