1
Color
Spot
575
AT
USER MANUAL
Version: 1.4
ROBE® Lighting s.r.o.
Czech Republic
www.robe.cz
Color
Spot
575
AT
Table of contents
1. Safety instructions
2. Operating determinations
3. Description of the device
4. Installation
4
4
5
6
4.1 Fitting the lamp
4.2 Lamp adjustment
4.3 Inserting / Exchanging colours and gobos
4.4 Replacing the 3-facet prism
4.5 Connection to the mains
4.6 Changing the power supply settings-magetic ballast
4KIIKPIVJGſZVWTG &/:EQPPGEVKQPEQPPGEVKQPDGVYGGPſZVWTGU
5. DMX protocol
6. Controller mode
6
7
7
8
8
9
0
1
12
17
6.1 DMX addressing
6.2 Remotely controllable functions
17
17
7. Stand - alone mode
8. Control menu map
9. Control menu
18
19
21
9.1 Fixture Address
9.2 Slave control
9.3 Fixture informations
9.4 Personality
9.5 Lamp On/Off
9.6 Manual mode
9.7 Test sequences
9.8 Stand-alone setting
9.9 Reset functions
9.10 Special functions
21
21
21
22
23
23
23
24
24
25
10. Power down mode
11.RDM
12. Error and information messages
6GEJPKECNURGEKſECVKQPU
14. Maintenance and cleaning
25
25
27
8
30
3
CAUTION!
Keep this device away from rain and moisture!
Unplug mains lead before opening the housing!
FOR YOUR OWN SAFETY, PLEASE READ THIS USER MANUAL CAREFULLY
BEFORE YOU INITIAL START - UP!
1. Safety instructions
Every person involved with installation and maintenance of this device have to:
DGSWCNKNſGF
- follow the instructions of this manual
CAUTION!
Be careful with your operations. With a high voltage you can suffer
a dangerous electric shock when touching the wires!
This device has left our premises in absolutely perfect condition. In order to maintain this condition and to ensure a safe operation, it is absolutely necessary for the user to follow the safety instructions and warning notes written in this manual.
Important:
The manufacturer will not accept liability for any resulting damages caused by the non-observance of this manual or any
WPCWVJQTK\GFOQFKſECVKQPVQVJGFGXKEG
2NGCUGEQPUKFGTVJCVFCOCIGUECWUGFD[OCPWCNOQFKſECVKQPUVQVJGFGXKEGCTGPQVUWDLGEVVQYCTTCPV[
Never let the power-cord come into contact with other cables! Handle the power-cord and all connections with the mains
with particular caution!
Make sure that the available voltage is not higher than stated on the rear panel.
Always plug in the power plug least. Make sure that the power-switch is set to off -position before you connect the device
to the mains. The power-plug has to be accessable after installing the device.
Make sure that the power-cord is never crimped or damaged by sharp edges. Check the device and the power-cord from
time to time.
Always disconnect from the mains, when the device is not in use or before cleaning it. Only handle the power-cord by the
plug. Never pull out the plug by tugging the power-cord.
This device falls under protection class I. Therefore it is essential to connect the yellow/green conductor to earth.
6JGGNGEVTKEEQPPGEVKQPTGRCKTUCPFUGTXKEKPIOWUVDGECTTKGFQWVD[CSWCNKſGFGORNQ[GG
Do not connect this device to a dimmer pack.
&QPQVUYKVEJVJGſZVWTGQPCPFQHHKPUJQTVKPVGTXCNUCUVJKUYQWNFTGFWEGVJGNCORŏUNKHG
During the initial start-up some smoke or smell may arise. This is a normal process and does not necessarily mean that
the device is defective.
&QPQVVQWEJVJGFGXKEGŏUJQWUKPIDCTGJCPFUFWTKPIKVUQRGTCVKQP
JQWUKPIDGEQOGUJQV
For replacement use lamps and fuses of same type and rating only.
CAUTION ! EYEDAMAGES !
Avoid looking directly into the light source (meant especially for epileptics) !
2. Operating determinations
This device is a moving-head spot for creating decorative effects and was designed for indoor use only.
+HVJGFGXKEGJCUDGGPGZRQUGFVQFTCUVKEVGORGTCVWTGƀWEVWCVKQP
GICHVGTVTCPURQTVCVKQPFQPQVUYKVEJKVQPKOOGFKCtely. The arising condensation water might damage your device. Leave the device switched off until it has reached room
temperature.
4
Never run the device without lamp!
Do not shake the device. Avoid brute force when installing or operating the device.
0GXGTNKHVVJGſZVWTGD[JQNFKPIKVCVVJGRTQLGEVQTJGCFCUVJGOGEJCPKEUOC[DGFCOCIGF#NYC[UJQNFVJGſZVWTGCVVJG
transport handles.
9JGPEJQQUKPIVJGKPUVCNNCVKQPURQVRNGCUGOCMGUWTGVJCVVJGFGXKEGKUPQVGZRQUGFVQGZVTGOGJGCVOQKUVWTGQTFWUV
There should not be any cables lying around. You endanger your own and the safety of others!
The minimum distance between light-output and the illuminated surface must be more than 2 meters.
/CMGUWTGVJCVVJGCTGCDGNQYVJGKPUVCNNCVKQPRNCEGKUDNQEMGFYJGPTKIIKPIFGTKIIKPIQTUGTXKEKPIVJGſZVWTG
#NYC[UſZVJGſZVWTGYKVJCPCRRTQRTKCVGUCHGV[TQRG(KZVJGUCHGV[TQRGCVVJGEQTTGEVJQNGUQPN[
1PN[QRGTCVGVJGſZVWTGCHVGTJCXKPIEJGEMGFVJCVVJGJQWUKPIKUſTON[ENQUGFCPFCNNUETGYUCTGVKIJVN[HCUVGPGF
6JGNCOROWUVPGXGTDGKIPKVGFKHVJGQDLGEVKXGNGPUQTCP[JQWUKPIEQXGTKUQRGPCUFKUEJCTIGNCORUOC[GZRNQUGCPF
emit a high ultraviolet radiation, which may cause burns.
6JGOCZKOWOCODKGPVVGORGTCVWTGu%OWUVPGXGTDGGZEGGFGF1VJGTYKUGVJGNCORKUUYKVEJGFQHHCPFVJGſZVWTG
is out of operation for 5 minutes.
CAUTION!
The lens has to be replaced when it is obviously damaged,
so that its function is impaired, e. g. due to cracks or deep scratches!
1RGTCVGVJGFGXKEGQPN[CHVGTJCXKPIHCOKNKCTK\GFYKVJKVUHWPEVKQPU&QPQVRGTOKVQRGTCVKQPD[RGTUQPUPQVSWCNKſGFHQT
operating the device. Most damages are the result of unprofessional operation!
CAUTION!
The lamp has to be replaced when it is damaged
or deformed due to the heat!
Please use the original packaging if the device is to be transported.
2NGCUGEQPUKFGTVJCVWPCWVJQTK\GFOQFKſECVKQPUQPVJGFGXKEGCTGHQTDKFFGPFWGVQUCHGV[TGCUQPU
If this device will be operated in any way different to the one described in this manual, the product may suffer damages
and the guarantee becomes void. Furthermore, any other operation may lead to dangers like short-circuit, burns, electric
UJQEMDWTPUFWGVQWNVTCXKQNGVTCFKCVKQPNCORGZRNQUKQPETCUJGVE
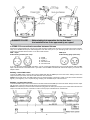
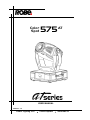
3. Description of the device
1 - Moving head
2 - Yoke
3 - Base
4 - Handle
5
Front panel of the base
1 - Display
2 - Mode-button
3 - Enter-button
4 - Up-button
5 - Down-button
Rear panel of the base
1 - 5-pin DMX output
2 - 5-pin DMX input
3 - Power switch
4 - 3-pin DMX output
5 - 3-pin DMX input
6 - Power cord
7 - Fuse holder
4. Installation
4.1 Fitting the lamp
DANGER !
Install the lamps with the device switched off only.
Unplug from mains before !
6QKPUGTVVJGNCOR/549NQQUGPVJGNCOREQXGTCVVJGTGCTQHJGCF
UGGVJGFTCYKPIUD[TGOQYKPIVJGHCUVGning screws which are marked „X,Y,Z”. Carefully pull out the cover with the lamp socket assembly.If changing the lamp,
remove the old lamp from the socket. Insert the lamp to the socket.
Do not install a lamp with a higher wattage! A lamp like this generates temperatures the device is not designed for. Damages
ECWUGFD[PQPQDUGTXCPEGCTGPQVUWDLGEVVQYCTTCPV[2NGCUGHQNNQYVJGNCOROCPWHCEVWTGTŎUPQVGU&QPQVVQWEJVJGINCUU-bulb with bare hands during the installation! Make sure that the lamp is installed tightly into the lampholder system.
Reclose the lamp cover and tighten the 3 screws.
Before striking the lamp, reset the “LAti”and “LASt” counter s in the menu of the Control Board, by pressing the “Up”
and “Down” DWVVQPUKPQPGVKOGCPFVJGPEQPſTOKPIYKVJVJGEnter-button.
6
&QPQVQRGTCVGVJKUſZVWTGYKVJQRGPGFJQWUKPIEQXGT
4.2 Lamp adjustment
6JG%QNQT5RQV#6NCORJQNFGTKUCNKIPGFCVVJGHCEVQT[&WGVQFKHHGTGPEGUDGVYGGPNCORUſPGCFLWUVOGPVOC[
improve light performance.
5VTKMGVJGNCORQRGPVJGUJWVVGTCPFVJGKTKUUGVVJGFKOOGTKPVGPUKV[QPVQCPFHQEWUVJGNKIJVQPCƀCVUWTHCEG
YCNN
%GPVGTCJQVURQV
VJGDTKIJVGUVRCTVQHVJGKOCIGD[WUKPIVJGCFLWUVOGPVUETGYU„A, B, C”. Turn one screw after another
CSWCTVGTVWTPENQMYKUG
EQWPVGTENQMYKUGVQUGVVJGJQVURQVKPVJGEGPVGTQHVJGKOCIG+H[QWECPPQVFGVGEVVJGJQVURQV
CFLWUVVJGNCORWPVKNVJGNKIJVKUGXGPN[FKUVTKDWVGF
4.3 Inserting / Exchanging colours and gobos
DANGER!
Install the colours and gobos with the device switched off only.
Unplug from mains before!
+H[QWYKUJVQWUGQVJGTHQTOUCPFRCVVGTPUCUVJGUVCPFCTFIQDQUQTKHEQNQWTUCTGVQDGGZEJCPIGFQRGPVJGVQREQXGT
of the head by loosening 4 quarter-turn fasteners on the top cover.
Colour wheel:
Gently bend out the colour module
to release it from the 3 distance
UNQVUCPFGLGEVKVHTQOVJGRTGUUKPI
snap.
Put the new colour module back
under the pressing snap and push
it to the distance slots.
Stat. gobo wheel:
Gently bend out the gobo module to release
KV HTQO VJG FKUVCEG UNQVU CPF GLGEV KV HTQO VJG
pressing snap.
Put the new gobo module back under the pressing
snap and push it to the distace slots.
7
Rotating gobo wheel:
)GPVN[DGPFQWVVJGIQDQOQFWNGVQTGNGCUGKVHTQOVJGFKUVCPEGUNQVUCPFGLGEVKVHTQOVJGRTGUUKPIUPCR
2TGUUVJGGPFUQHVJGſZCVKQPTKPIVQIGVJGTYKVJCPCRRTQRTKCVGVQQNCPFTGOQXGKVHTQOVJGIQDQJQNFGT4GOQXGVJGIQDQ
CPFKPUGTVVJGPGYIQDQ2TGUUVJGGPFUQHVJGſZCVKQPTKPIVQIGVJGTCPFKPUGTVKVKPVJGHTQPVQHVJGIQDQ
Put the gobo module back under the pressing snap and push it to the distance slots.
CAUTION!
The gobo holder with the magnet must be placed
in the same position as it was placed before gobo replacement!
4.4 Replacing the 3-facet prism
Gently bend out the prism
holder to release it from
VJG ſZCVKXG JQNGU QH RTKUO
OQFWNG CPF GLGEV KV HTQO
the pressing snap.
Put the new prism holder
back under the pressing
snap and push it to the 3
ſZCVKXGJQNGU
4.5 Connection to the mains
Verify the power supply settings before applying power!
If you wish to change the power supply settings, see the chapter below.
%QPPGEVVJGſZVWTGVQVJGOCKPUYKVJVJGGPENQUGFRQYGTRNWI+H[QWPGGFVQKPUVCNNQVJGTRQYGTRNWIQPVJGRQYGTECDNG
HQNNQYVJGKFGPVKſECVKQPVCDNGDGNQY
The earth has to be connected!
&QPQVEQPPGEVVJGſZVWTGVQCFKOOGTU[UVGO
The occupation of the connection-cables is as follows:
Cable (EU) Cable (US)
Pin
Brown
Black
Live
L
Liht blue
White
Neutral
N
Yellow/
Green
Green
Earth
8
International
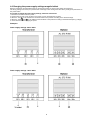
4.6 Changing the power supply settings-magetic ballast
Both the transformer and the ballast must be connected correctly for the local AC voltage and frequency.
6JGYTQPIUGVVKPIUECPECWUGRQQTRGTHQTOCPEGQTFGOCIGQHVJGOQXKPIJGCF6JGHCEVQT[UGVVKPIUCTGRTKPVGFPGZVVQ
the power switch.
If you want to change the power supply settings, follow the instructions:
&KUEQPPGEVVJGſZVWTGHTQO#%RQYGT
4GOQXGVJGVQRDCUGEQXGT
ENQUGUVVQVJGRQYGTEQTFD[NQQUGPKPIVJGUETGYU
3. Move the wire 1 on the transformer connection block to the position according to the desired voltage.
/QXGVJGYKTGUCPFQPVJGDCNNCUVEQPPGEVKQPDNQEMVQVJGRQUKVKQPCEEQTFKPIVQVJGFGUKTGFHTGSWGPE[
XQNVCIG
5. Close the base before applying AC power.
Examples:
Power supply settings: 230V / 50Hz
Power supply settings: 120V / 60Hz
9
4KIIKPIVJGſZVWTG
DANGER TO LIFE!
Please consider the respective national norms during the installation!
The installation must only be carried out by an authorized dealer!
6JGKPUVCNNCVKQPQHVJGRTQLGEVQTJCUVQDGDWKNVCPFEQPUVTWEVGFKPCYC[VJCVKVECPJQNFVKOGUVJGYGKIJVHQTJQWT
without any harming deformation.
The installation must always be secured with a secondary safety attachment, e.g. an appropriate catch net. This secondary
safety attachment must be constructed in a way that no part of the installation can fall down if the main attachment fails.
9JGPTKIIKPIFGTKIIKPIQTUGTXKEKPIVJGſZVWTGUVC[KPIKPVJGCTGCDGNQYVJGKPUVCNNCVKQPRNCEGQPDTKFIGUWPFGTJKIJ
working places and other endangered areas is forbidden.
6JGQRGTCVQTJCUVQOCMGUWTGVJCVUCHGV[TGNCVKPICPFOCEJKPGVGEJPKECNKPUVCNNCVKQPUCTGCRRTQXGFD[CPGZRGTVDGHQTG
VCMKPIKPVQQRGTCVKQPHQTVJGſTUVVKOGCPFCHVGTEJCPIGUDGHQTGVCMKPIKPVQQRGTCVKQPCPQVJGTVKOG
6JGQRGTCVQTJCUVQOCMGUWTGVJCVUCHGV[TGNCVKPICPFOCEJKPGVGEJPKECNKPUVCNNCVKQPUCTGCRRTQXGFD[CPGZRGTVCHVGT
every four year in the course of an acceptance test.
The operator has to make sure that safety-relating and machine-technical installations are approved by a skilled person
once a year.
6JGRTQLGEVQTUJQWNFDGKPUVCNNGFQWVUKFGCTGCUYJGTGRGTUQPUOC[YCNMD[QTDGUGCVGF
+/2146#0618'4*'#&4+))+0)4'37+4'5':6'05+8'':2'4+'0%'KPENWFKPI
DWVPQVNKOKVGFVQECNEWNCVKPI
working load limits, installation material being used, and periodic safety inspection of all installation material and the
RTQLGEVQT+H[QWNCEMVJGUGSWCNKſECVKQPUFQPQVCVVGORVVJGKPUVCNNCVKQP[QWTUGNHDWVKPUVGCFWUGCRTQHGUUKQPCNUVTWEVWTCN
TKIIGT+ORTQRGTKPUVCNNCVKQPECPTGUWNVKPDQFKN[KPLWT[CPFQTFCOCIGVQRTQRGTV[
6JGRTQLGEVQTJCUVQDGKPUVCNNGFQWVQHVJGTGCEJQHRGQRNG
+HVJGRTQLGEVQTUJCNNDGNQYGTGFHTQOVJGEGKNKPIQTJKIJLQKUVURTQHGUUKQPCNVTWUUKPIU[UVGOUJCXGVQDGWUGF6JGRTQLGEVQT
OWUVPGXGTDGſZGFUYKPIKPIHTGGN[KPVJGTQQO
Caution: 2TQLGEVQTUOC[ECWUGUGXGTGKPLWTKGUYJGPETCUJKPIFQYP+H[QWJCXGFQWDVUEQPEGTPKPIVJGUCHGV[QHCRQUUKDNG
KPUVCNNCVKQPFQ016KPUVCNNVJGRTQLGEVQT
$GHQTGTKIIKPIOCMGUWTGVJCVVJGKPUVCNNCVKQPCTGCECPJQNFCOKPKOWORQKPVNQCFQHVKOGUVJGRTQLGEVQTŏUYGKIJV
&CPIGTQHſTG 9JGPKPUVCNNKPIVJGFGXKEGOCMGUWTGVJGTGKUPQJKIJN[
KPƀCOOCDNGOCVGTKCN
FGEQTCVKQPCTVKENGUGVE
in between a distance of min. 0,5 m.
9CTPKPI 7UGENCORUVQTKIVJGſZVWTGQPVJGVTWUU
Follow the instructions mentioned at the bottom of the base.
/CMGUWTGVJCVVJGFGXKEGKUſZGFRTQRGTN[
Ensure that the structure (truss) to which you are attaching
VJGſZVWTGUKUUGEWTG
6JGRTQLGEVQTECPDGRNCEGFFKTGEVN[QPVJGUVCIGƀQQTQTTKIIGFKPCP[QTKGPVCVKQPQPCVTWUUYKVJQWVCNVGTKPIKVUQRGTCVKQP
characteristics.
(QTQXGTJGCFWUGCNYC[UKPUVCNNCUCHGV[TQRGVJCVECPJQNFCVNGCUVVKOGUVJGYGKIJVQHVJGſZVWTG;QWOWUVQPN[WUG
safety-ropes with screw-on carabines. Pull the safety-rope through the two apertures on the bottom of the base and over
VJGVTWUUKPIU[UVGOGVE+PUGTVVJGGPFKPVJGECTCDKPGCPFVKIJVGPVJGſZCVKQPUETGY
Fixation via the omega holders
$QNVGCEJENCOR
VQVJGQOGICJQNFGT
YKVJ/DQNVCPFNQEMPWVVJTQWIJVJGJQNGKPVJGJQNFGT
(CUVGPVJGQOGICJQNFGTUQPVJGDQVVQOQHVJGDCUGD[KPUGTVKPIDQVJSWKEMNQEMHCUVGPGTU
KPVQVJGJQNGUQHVJG
base and tighten fully clockwise.
(CUVGPVJGUCHGV[TQRG
VJTQWIJVJGVYQCRGTVWTGUQPVJGDQVVQOQHVJGDCUGCPFQXGTVJGVTWUUKPIU[UVGO
9JGPKPUVCNNKPIſZVWTGUUKFGD[UKFGCXQKFKNNWOKPCVKPIQPGſZVWTGYKVJCPQVJGT
�)'461.+('
$GHQTGVCMKPIKPVQQRGTCVKQPHQTVJGſTUVVKOG
the installation has to be approved by an expert!
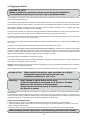
&/:EQPPGEVKQPEQPPGEVKQPDGVYGGPſZVWTGU
6JGſZVWTGKUGSWKRRGFYKVJDQVJRKPCPFRKP:.4UQEMGVUHQT&/:KPRWVCPFQWVRWV6JGUQEMGVUCTGYKTGFKPRCTCNNGN
Only use a shielded twisted-pair cable designed for RS-485 and 3-pin or 5-pin XLR-plugs and connectors in order to
EQPPGEVVJGEQPVTQNNGTYKVJVJGſZVWTGQTQPGſZVWTGYKVJCPQVJGT
DMX - output
DMX-input
XLR mounting-sockets (rear view):
XLR mounting-plugs (rear view):
1 - Shield
2 5KIPCN
35KIPCN
4 - Not connected
5 - Not connected
If you are using the standard DMX controllers, you can connect the DMX output of the controller directly with the DMX
KPRWVQHVJGſTUVſZVWTGKPVJG&/:EJCKP+H[QWYKUJVQEQPPGEV&/:EQPVTQNNGTUYKVJQVJGT:.4QWVRWVU[QWPGGFVQWUG
adapter-cables.
Building a serial DMX-chain:
%QPPGEVVJG&/:QWVRWVQHVJGſTUVſZVWTGKPVJG&/:EJCKPYKVJVJG&/:KPRWVQHVJGPGZVſZVWTG#NYC[UEQPPGEVQPG
QWVRWVYKVJVJGKPRWVQHVJGPGZVſZVWTGWPVKNCNNſZVWTGUCTGEQPPGEVGF
Caution: #VVJGNCUVſZVWTGVJG&/:ECDNGJCUVQDGVGTOKPCVGFYKVJCVGTOKPCVQT5QNFGTC1JOTGUKUVQTDGVYGGP
5KIPCN
ŌCPF5KIPCN
KPVQCRKP:.4RNWICPFRNWIKVKPVJG&/:QWVRWVQHVJGNCUVſZVWTG
Building a master/slave-chain:
%QPPGEVVJG&/:QWVRWVQHVJGOCUVGTſZVWTGKPVJGFCVCEJCKPYKVJVJG&/:KPRWVQHVJGſTUVUNCXG#NYC[UEQPPGEVQWVRWV
YKVJVJGKPRWVQHVJGPGZVUNCXGWPVKNCNNUNCXGUCTGEQPPGEVGF
WRVQſZVWTGU
Caution: +VŏUPGEGUUCT[VQKPUGTVVJG:.4VGTOKPCVKQPRNWI
YKVJ1JOKPVQVJGKPRWVQHVJGOCUVGTſZVWTGCPFKPVQVJG
QWVRWVQHVJGNCUVUNCXGſZVWTGKPVJGNKPMKPQTFGTVQGPUWTGRTQRGTVTCPUOKUUKQPQPVJGFCVCNKPM
11
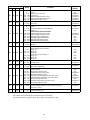
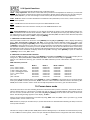
5. DMX protocol - version 1.0
Mode/Channel
1
2
3
4
Value
1
1
1
1
Pan
2CPOQXGOGPVD[u
proportional
2
2
2
2
Pan Fine
Fine control of pan movement
proportional
3
3
3
3
Tilt
6KNVOQXGOGPVD[u
proportional
4
4
4
4
6KNVſPG
Fine control of tilt movement
proportional
5
5
5
5
1 - 255
1 - 255
6
6
7
6
7
Pan/Tilt speed, Pan/Tilt time
/CZURGGF
VTCEMKPIOQFG
P./T. speed-set Speed Mode in menu: P.t. Mo.
5RGGFHTQOOCZVQOKP
XGEVQTOQFG
P./T. time - set Time Mode in menu: P.t. Mo.
6KOGHTQOUVQU*
step
proportional
proportional
Power/Special functions
Reserved
To activate following functions, stop in DMX value for at least 3 s
CPFUJWVVGTOWUVDGENQUGFCVNGCUVU
œ5JWVVGT5VTQDGŒEJCPPGN
OWUVDGCVTCPIG&/:
Pan/Tilt speed mode
Pan/Tilt time mode
Blackout while pan/tilt moving
Disabled blackout while pan/tilt moving
Blackout while colour wheel moving
Disabled blackout while colour wheel moving
Blackout while gobo wheel moving
Disabled blackout while gobo wheel moving
To activate following functions, stop in DMX value for at least 3 s.
.COR1PTGUGV
VQVCNTGUGVGZEGRVRCPVKNVTGUGV
Pan/Tilt reset
Colour wheels reset
Gobo wheels reset
Dimmer/ Strobe reset
Focus/Zoom/Frost reset
Iris/Prism reset
Total reset
Reserved
Lamp Off
Reserved
32 - 63
64 - 95
96 - 127
128 - 159
192 - 223
224 - 255
Pan/Tilt macro selection
Disabled pan/tilt macro
Reserved
(KIWTGQHEKTENG
HTQOUOCNNVQNCTIG
(KIWTGQHJQTK\QPVCNGKIJV
HTQOUOCNNVQNCTIG
(KIWTGQHXGTVKECNGKIJV
HTQOUOCNNVQNCTIG
(KIWTGQHTGEVCPING
HTQOUOCNNVQNCTIG
(KIWTGQHVTKCPING
HTQOUOCNNVQNCTIG
(KIWTGQHſXGRQKPVGFUVCT
HTQOUOCNNVQNCTIG
(KIWTGQHETQUU
HTQOUOCNNVQNCTIG
6
Type
of control
Function
step
step
step
step
step
step
step
step
step
step
step
step
step
step
step
step
step
step
step
step
step
step
proportional
proportional
proportional
proportional
proportional
proportional
proportional
Notes: *5JQTVVKOGUCTGPQVWUGFHQTNQPIVTCEMU
GIUHQTVTCEM&/:6KOGUCTGTGUVTKEVGFD[OGEJCPKECN parameters of
VJGſZVWTG
**6JGUYKVEJHWPEVKQPUJCXGRTKQTKV[VQVJGGSWKXCNGPVHWPEVKQPUKPOGPWœ2GTUQPCNKV[ŒDWVVJGUGVVKPID[&/:is not saved
VQVJGOGOQT[
CHVGTUYKVEJKPIVJGſZVWTGQPVJGUGVVKPIHTQOOGPWœ2GTUQPCNKV[ŒKUNQCFGFCPF after that can be chanIGFD[&/:XCNWGQPVJGEJCPPGN
DMX protocol
menu „PerS”
2CP6KNVURGGFOQFG
2V/Q 52/Q
2CP6KNVVKOGOQFG
2V/Q 6K/Q
$NCEMQWVYJKNGRCPVKNVOQXKPI
#DNE 2V/ 1P
&KUCDNGFDNCEMQWVYJKNGRCPVKNVOQXKPI
#DNE 2V/ 1HH
$NCEMQWVYJKNGEQNQWTYJGGNOQXKPI
#DNE %QN/ 1P
&KUCDNGFDNCEMQWVYJKNGEQNQWTYJGGNOQXKPI #DNE %QN/ 1HH
$NCEMQWVYJKNGIQDQYJGGNOQXKPI #DNE %QN/ 1P
&KUCDNGFDNCEMQWVYJKNGIQDQYJGGNOQXKPI #DNE %QN/ 1HH
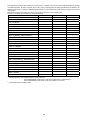
12
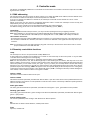
1
Mode/Channel
2
3
4
8
8
Value
1 - 127
128 - 129
13
26
39
52
65
78
91
117
128 - 129
7
7
9
9
137 - 143
144 - 149
157 - 163
164 - 169
177 - 183
184 - 189
216 - 217
218 - 243
244 - 249
8
10
14
28
42
56
84
98
112
128 - 129
9
8
11
10
137 - 144
145 - 151
152 - 159
167 - 174
175 - 181
182 - 189
216 - 217
218 - 243
244 - 249
Type of
control
Function
Pan/Tilt macro speed
Set pan/tilt speed (channel 5) to 0
No macro generation
Macro generation from fast to slow-forwards
No macro generation
Macro generation from slow to fast-backwards
step
proportional
step
proportional
Colour wheel 1
Continual Positioning
+PTCPIG&/:KURQUUKDNGſPGEQNQWT
positioning- set value on channel 8 (10)
Open/white
Light blue
Red
Blue
Light green
Yellow
Magenta
Cyan
Green
Orange
White
Positioning
Light blue
Red
Blue
Light green
Yellow
Magenta
Cyan
Green
Orange
Forwards rainbow effect from fast to slow
No rotation
Backwards rainbow effect from slow to fast
Random colour selection by audio control
5GVOKETQRJQPGUGPUKVKXKV[KPOGPWœ2GTUQPCNKV[Œ
Auto random colour selection from fast to slow
proportional
proportional
proportional
proportional
proportional
proportional
proportional
proportional
proportional
proportional
proportional
step
step
step
step
step
step
step
step
step
proportional
step
proportional
step
proportional
%QNQWTYJGGNſPGRQUKVKQPKPI
Fine positioning
Colour wheel 2
Continual Positioning
+PTCPIG&/:KURQUUKDNGſPGEQNQWT positioning- set value on channel 10 (12)
Open/white
Deep red
Deep blue
Pink
Cyan
Magenta
Yellow
-EQTTGEVKQPſNVGT
UV Filter
White
Positioning
Deep red
Deep blue
Pink
Cyan
Magenta
Yellow
-EQTTGEVKQPſNVGT
UV Filter
Forwards rainbow effect from fast to slow
No rotation
Backwards rainbow effect from slow to fast
Random colour selection by audio control
5GVOKETQRJQPGUGPUKVKXKV[KPOGPWœ2GTUQPCNKV[Œ
Auto random colour selection from fast to slow
13
proportional
proportional
proportional
proportional
proportional
proportional
proportional
proportional
proportional
proportional
proportional
step
step
step
step
step
step
step
step
proportional
step
proportional
step
proportional
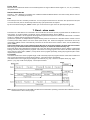
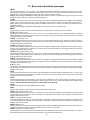
1
Mode/Channel
2
3
4
10
12
Value
7
13
19
26
32
39
45
51
58
64
11
9
13
11
65 - 69
75 - 79
85 - 89
95 - 99
222 - 223
224 - 243
244 - 249
12
13
14
10
15
12
4-7
8 - 11
12 - 15
16 - 19
24 - 27
28 - 31
32 - 35
36 - 39
44 - 47
48 - 51
52 - 55
56 - 59
Function
%QNQWTYJGGNſPGRQUKVKQPKPI
Fine positioning
Static gobo wheel
Continual Positioning
+PTCPIG&/:KURQUUKDNGſPGIQDQ
positioning - set value on channel 12 (14)
Open/hole
)QDQ
)QDQ
)QDQ
)QDQ
)QDQ
)QDQ
)QDQ
)QDQ
)QDQ
Open/hole
Positioning
Gobo 1
Gobo 2
Gobo 3
Gobo 4
Gobo 5
Gobo 6
Gobo 7
Gobo 8
Gobo 9
Shaking gobos from slow to fast
Gobo 1
Gobo 2
Gobo 3
Gobo 4
Gobo 5
Gobo 6
Gobo 7
Gobo 8
Gobo 9
Open/hole
Forwards gobo wheel rotation from fast to slow
No rotation
Backwards gobo wheel rotation from slow to fast
Random gobo selection by audio control
5GVOKETQRJQPGUGPUKVKXKV[KPOGPWœ2GTUQPCNKV[Œ
Auto random gobo selection from fast to slow
Fine static gobo wheel
Fine positioning
Rotating gobo wheel
Index - set indexing on channel 14 (11/16/13)
Open/hole
)QDQ
)QDQ
)QDQ
)QDQ
)QDQ
)QDQ
)QDQ
Rotation - set rotation on channel 14 (11/16/13)
Gobo 1
Gobo 2
Gobo 3
Gobo 4
Gobo 5
Gobo 6
Gobo 7
14
Type of
control
proportional
proportional
proportional
proportional
proportional
proportional
proportional
proportional
proportional
proportional
proportional
proportional
step
step
step
step
step
step
step
step
step
proportional
proportional
proportional
proportional
proportional
proportional
proportional
proportional
proportional
proportional
proportional
step
proportional
proportional
step
step
step
step
step
step
step
step
step
step
step
step
step
step
step
1
Mode/Channel
2
3
4
Value
13
10
15
12
222 - 223
224 - 243
244 - 249
14
11
15
16
17
16
13
17
12
13
18
19
14
15
1 - 127
128 - 129
Function
Shaking gobos from slow to fast
Index - set indexing on channel 14 (11/16/13)
Gobo 1
Gobo 2
Gobo 3
Gobo 4
Gobo 5
Gobo 6
Gobo 7
Shaking gobos from slow to fast
Rotation - set rotation on channel 14 (11/16/13)
Gobo 1
Gobo 2
Gobo 3
Gobo 4
Gobo 5
Gobo 6
Gobo 7
Open/hole
Forwards gobo wheel rotation from fast to slow
No rotation
Backwards gobo wheel rotation from slow to fast
Random gobo selection by audio control
5GVOKETQRJQPGUGPUKVKXKV[KPOGPWœ2GTUQPCNKV[Œ
Auto random gobo selection from fast to slow
Gobo indexing and rotation
Gobo indexing - set position on channel
)QDQKPFGZKPI
Gobo rotation - set position on channel
No rotation
Forwards gobo rotation from fast to slow
No rotation
Backwards gobo rotation from slow to fast
)QDQſPGKPFGZKPI
(KPGKPFGZKPI
128 - 255
128 - 135
136 - 143
144 - 151
152 - 159
168 - 175
176 - 183
184 - 191
192 - 199
216 - 223
224 - 231
232 - 239
248 - 255
Prism
1RGPRQUKVKQP
JQNG
3-facet rotating prism
Prism/gobo macros
Macro 1
Macro 2
Macro 3
Macro 4
Macro 5
Macro 6
Macro 7
Macro 8
Macro 9
/CETQ
Macro 11
Macro 12
Macro 13
Macro 14
Macro 15
Macro 16
1 - 127
128 - 129
Prism rotation
No rotation
Forwards rotation from fast to slow proportional
No rotation
Backwards rotation from slow to fast
15
Type of
control
proportional
proportional
proportional
proportional
proportional
proportional
proportional
proportional
proportional
proportional
proportional
proportional
proportional
proportional
step
proportional
proportional
step
proportional
proportional
step
proportional
step
proportional
proportional
step
step
step
step
step
step
step
step
step
step
step
step
step
step
step
step
step
step
step
proportional
step
proportional
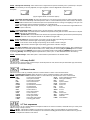
1
18
Mode/Channel
2
3
4
14
19
20
16
21
Value
1 - 179
212 - 233
234 - 255
1 - 179
20
15
21
22
22
17
23
16
24
192 -219
248 - 249
252 - 253
254 - 255
18
128 - 169
23
17
24
25
19
26
25
18
27
20
26
19
28
21
27
29
Frost
Open
(TQUVHTQOVQ HTQUV
Pulse closing from slow to fast
Pulse opening from fast to slow
Ramping from fast to slow
Iris
Open
(TQOOCZFKCOGVGTVQOKPFKCOGVGT
Closed
Pulse effects with Iris blackout
Pulse opening from slow to fast
Pulse closing from fast to slow
4CPFQORWNUGQRGPKPI
HCUV
4CPFQORWNUGQRGPKPI
UNQY
4CPFQORWNUGENQUKPI
HCUV
4CPFQORWNUGENQUKPI
UNQY
step
proportional
proportional
proportional
proportional
proportional
step
proportional
step
proportional
proportional
step
step
step
step
+TKUſPG
+TKUſPG
proportional
Zoom
Zoom without focus corection
<QQOu
<QQOu
<QQOu
Zoom with focus corection ***
<QQOu
<QQOu
<QQOu
(QEWUſPG
(KPGHQEWUCFLWUVOGPV
proportional
Focus
Coarse focus
(TQUVſPG
Fine frost
32 - 63
64 - 95
96 - 127
128 - 143
144 - 159
192 - 223
224 - 255
Type of
control
Function
step
step
step
step
step
step
proportional
Shutter, Strobe
Shutter closed
0QHWPEVKQP
5JWVVGTQRGP
Strobe-effect from slow to fast
0QHWPEVKQP
5JWVVGTQRGP
Opening pulse in sequences from slow to fast
Closing pulse in sequences from fast to slow
0QHWPEVKQP
5JWVVGTQRGP
Random strobe-effect from slow to fast
0QHWPEVKQP
5JWVVGTQRGP
Dimmer
%QCTUGITCFWCNCFLWUVOGPVQHVJGFKOOGTKPVGPUKV[
HTQOVQ
&KOOGTſPG
&KOOGTKPVGPUKV[ſPG
6JGHWPEVKQPKORTQXGUVJGKOCIGQPVJGYCNNKHVJG\QQOEJCPIGU
KVUGHHGEVKUVJGDGUVHQTIQDQUHTQOTQVIQDQYJGGNCPFHQTFKUVCPEGO
16
proportional
step
step
proportional
step
proportional
proportional
step
proportional
step
proportional
proportional
6. Controller mode
6JGſZVWTGUCTGKPFKXKFWCNN[CFFTGUUGFQPCFCVCNKPMCPFEQPPGEVGFVQVJGEQPVTQNNGT6JGſZVWTGUTGURQPFVQVJG&/:
signal from the controller.
6.1 DMX addressing
6JGEQPVTQNRCPGNQPVJGHTQPVRCPGNQHVJGſZVWTGCNNQYU[QWVQCUUKIPVJG&/:ſZVWTGCFFTGUUYJKEJKUFGſPGFCUVJG
ſTUVEJCPPGNHTQOYJKEJVJG%QNQT5RQV#6YKNNTGURQPFVQVJGEQPVTQNNGT
+H[QWUGVHQTGZCORNGVJGCFFTGUUVQEJCPPGNVJG%QNQT5RQV#6YKNNWUGVJGEJCPPGNVQHQTEQPVTQN
KHOQFGKUUGNGEVGF
2NGCUGDGUWTGVJCV[QWFQPŏVJCXGCP[QXGTNCRRKPIEJCPPGNUKPQTFGTVQEQPVTQNGCEJ%QNQT5RQV#6EQTTGEVN[CPF
KPFGRGPFGPVN[HTQOCP[QVJGTſZVWTGQPVJG&/:FCVCNKPM
If two, three or more ColorSpot 575 AT are addressed similarly, they will work similarly.
(QTCFFTGUUUGVVKPIRNGCUGTGHGTVQVJGKPUVTWEVKQPUWPFGTœ#FFTGUUKPIŒ
OGPW„A001”
Controlling:
After having addressed all ColorSpot 575 AT, you may now start operating these via your lighting controller.
Note: After switching on, the ColorSpot 575 AT will automatically detect whether DMX 512 data is received or not.
+HVJGTGKUPQFCVCTGEGKXGFCVVJG&/:KPRWVVJGFKURNC[YKNNUVCTVVQƀCUJ„A001” with actually set address.
This situation can occur if:
-VJG2+0
RKP:.4RNWI
ECDNGYKVJ&/:UKIPCNHTQOEQPVTQNNGTKUPQVEQPPGEVGFYKVJVJGKPRWVQHVJG%QNQT5RQV#6
- the controller is switched off or defective, the cable or connector is defective or the signal wires are swap in the input
connector.
Note: +VŏUPGEGUUCT[VQKPUGTVVJG:.4VGTOKPCVKQPRNWI
YKVJ1JOVQVJGNCUVſZVWTGKPVJGNKPMKPQTFGTVQGPUWTG
proper transmission on the DMX data link.
6.2 Remotely controllable functions
Lamp
The ColorSpot 575 AT is to be operated with a Philips MSR 575/2.
A relay inside of the ColorSpot 575 AT allows you to switch on and off the lamp via the control panel or via your DMX-controller without affecting the rest of the lighting.
6QUYKVEJ1P1HHVJGNCORRNGCUGTGHGTVQœ5YKVEJKPI1P1HHVJGNCORő
OGPW„LAMP”
Note: It is also important to note, that the discharge lamp is cold restrike types, that means, that they have to be cold
DGHQTGTGUVTKMKPI(QTVJKUTGCUQP[QWJCXGVQYCKVOKPWVGU
OCZURGGFQHHCPOWUVDGCFLWUVGFCHVGTJCXKPIUYKVEJGF
1HHVJGNCORDGHQTG[QWECPUYKVEJKVDCEMœ1PŒCICKP+H[QWVT[VQUYKVEJœ1PŒVJGNCORYKVJKPOKPWVGUCHVGTJCXKPI
UYKVEJGFKVœ1HHŒVJG%QNQT5RQV#6YKNNUVQTGVJKUKPHQTOCVKQPCPFCWVQOCVKECNN[KIPKVGVJGNCORYJGPVJGOKPWVGU
RGTKQFJCUGZRKTGF6JGOGUUCIG„HEAt” will appear on the control panel display of the ColorSpot 575 AT. If the ignition
of the lamp is seven times unsuccessful, on the display will appear „LA.Er”, meaning that the lamp could be damaged or
even missed, or there could be a failure on the ignitor or ballast.
Colour 1-wheel
6JKUYJGGNEQPVCKPUFKEJTQKEſNVGTUCPFCPQRGP
Colour 2-wheel
6JKUYJGGNEQPVCKPUTGRNCEGCDNGœ5.16.1%-ŒFKEJTQKEſNVGTUQRGP6JGEQNQWTYJGGNECPDGRQUKVKQPGFDGVYGGPVYQ
CFLCEGPVEQNQWTUKPCP[RQUKVKQP+VKUCNUQRQUUKDNGVQTQVCVGVJGEQNQWTYJGGNEQPVKPWQWUN[CVFKHHGTGPVURGGFU
œ4CKPDQY
GHHGEVŒKPDQVJFKTGEVKQPU
Static gobo-wheel
6JGUVCVKEIQDQYJGGNKPENWFGUTGRNCEGCDNGœ5.16.1%-ŒOGVCNIQDQUQRGPIQDQUJCMGHWPEVKQPRQUUKDNG
Rotating gobo-wheel
6JGTQVCVKPIIQDQYJGGNKPENWFGUIQDQUTQVCVKPIKPDQVJFKTGEVKQPUKPFGZCDNGTGRNCEGCDNGœ5.16.1%-ŒFKEJTQKEINCUU
IQDQUQRGPRQUKVKQP
3-facet rotating prism
The 3-facet replaceable prism rotating in both directions at different speeds.
Iris
Motorized iris for different beam diameter, variable pulse effects.
Frost
Separate, variable frost.
17
Focus, Zoom
/QVQTK\GFHQEWUGPCDNGUVJGDGCOVQDGHQEWUGFCP[YJGTGQPUVCIGCVFKHHGTGPVDGCOCPINGUuuuRTQXKFGFD[
the special zoom.
Dimmer/Shutter/Strobe
5OQQVJFKOOKPIKURTQXKFGFD[VJGEQODKPGFOGEJCPKECNFKOOGTUJWVVGTWPKV6JKUWPKVOC[CNUQDGWUGFHQT
UVTQDGGHHGEV
ƀCUJGURGTUGEQPF
Fans
6JG%QNQT5RQV#6KUEQQNGFD[CZKCNHCPUKPVJGRTQLGEVQTJGCFCPFQPGKPVJGDCUG6JGURGGFQHVJGHCP
CPF
QHEQWTUGVJGPQKUGECPDGEQPVKPWQWUN[TGFWEGFKHXGT[SWKGVRGTHQTOCPEGKUTGSWKTGF
By the Control Board using the „FAnS” function you can choose the 2 types of the fan speed operating modes.
7. Stand - alone mode
6JGſZVWTGUQPCFCVCNKPMCTGPQVEQPPGEVGFVQVJGEQPVTQNNGTDWVECPGZGEWVGRTGUGVRTQITCOUYJKEJECPDGFKHHGTGPVHQT
GXGT[ſZVWTG6QUGVVJGRTQITCOVQDGRNC[GFUGGVJG„5VCPFCNQPGUGVVKPIŒ OGPW„St.AL.”
„5VCPFCNQPGQRGTCVKQPŒECPDGCRRNKGFVQVJGUKPINGſZVWTG
VJGſZVWTGOC[DGUGVVQVJGOCUVGTUNCXGOQFGQTEQPVTQNNGT
OQFGQTVQOWNVKRNGſZVWTGUQRGTCVKPIU[PEJTQPQWUN[
5[PEJTQPQWUQRGTCVKQPQHOWNVKRNGſZVWTGUTGSWKTGUVJCVVJG[OWUVDGEQPPGEVGFQPCFCVCNKPMCPFQPGQHVJGOKUUGVCU
COCUVGT
OCUVGTOQFGCPFVJGTGUVCUVJGUNCXGU
UNCXGOQFG6JGUNCXGUCTGCUUKIPGFVQ5.#5.#CPFQPVJG
EGTVCKPUNCXGCFFTGUUECPDGEQPPGEVGFQPN[QPGſZVWTG6QUGVVJGſZVWTGCUVJGOCUVGTQTUNCXGUGGVJGœ#FFTGUUKPIŒ
OGPW„A001”
+HVJGOCUVGTſZVWTGTWPUCTGUGVUYKVEJGU1P1HHVJGNCORQTRNC[UVGUV
RTQITCOCNNUNCXGUYKNNGZGEWVGVJGUG
CEVUVQQ
GIKHVJGOCUVGTſZVWTGJCUUYKVEJGFVJGNCORQHHPQUNCXGUECPUYKVEJVJGNCORQP
6JGOCUVGTſZVWTGUVCTVUUKOWNVCPGQWURTQITCOUVCTVKPVJGQVJGTUNCXGſZVWTGU#NNſZVWTGUJCXGCFGſPKVGU[PEJTQPK\GF
starting point when playing back their programs. The number of running program is the same in all slaves and depends
QPVJGOCUVGTŏUEJQKEG
OGPW„St.AL.”'XGT[ſZVWTGTWPUKVURTQITCOTGRGCVGFN[UVCTVKPIVJGRTQITCOUVGR0QYJGP
requested by the master.
For example:
+HVJGUNCXGſZVWTGJCUCUJQTVGTRTQITCONGPIVJKVYKNNEQPVKPQWUN[TGRGCVKVURTQITCOWPVKNVJGOCUVGTſZVWTGſPKUJGUKVU
QYPRTQITCOCPFTGUVCTVUKVURTQITCOTWPPKPI
UNCXGRTQIUVGRYKNNPQVDGſPKUJGF
+HVJGUNCXGſZVWTGJCUCNQPIGTRTQITCONGPIVJKVYKNNTGUVCTVCVRTQIUVGRDGHQTGKVEQORNGVGUCNNKVU prog. steps
UNCXGRTQIUVGRYKNNPQVDGRNC[GFUGGVJGRKEVWTGDGNNQY
Note:&KUEQPGEVVJGſZVWTGUHTQOVJG&/:EQPVTQNNGTDGHQTGOCUVGTUNCXGQRGTCVKPIQVJGTYKUGFCVCEQNNKUKQPUECPQEEWT
CPFVJGſZVWTGUYKNNPQVYQTMRTQRGTN[
18
8. Control menu map
Default settings = Bold print
#
dM.Ad.
:
512
MA.SL.
d.Abl
MASt.
SLA.1
:
SLA.9
SL.Ct.
InFo
Po.ti.
totl
rSEt
La.ti.
totl
rSEt
LA.St.
totl
rSEt
tEMP.
Cur.t.
boAr.
HEAd
Hi.tE.
boAr.
HEAd
rSEt
boAr.
HEAd
DM.ln.
Pan (0-255)
:
F.dim (0-255)
VErS.
PErS.
IC1.b.
IC2.b.
IC3.b.
IC4.b.
IC1.L.
IC2.L.
IC1.r.
IC2.r.
r.PAn (On, Off)
r.tilt
(On, Off)
dM.Pr. (Mod.1, Mod.2)
La.Pr.
LA.Au. (On, Off)
d.L.O.F. (On, Off)
dM.On (On, Off)
dM.OF (On, Off)
LA.dE. (0..1..90 s)
En.Sn. (On, Off)
dISP.
turn
(On, Off)
d.On (On, Off)
d.lnt. (20...100)
19
bL.Co.
FEEd.
MI.SE.
FAn.S.
P.t.Mo.
A.b.Lc.
(On, Off)
(On, Off)
(1...10...20)
(Auto, High)
(SP.Mo., ti.Mo.)
P.t.M. (On, Off)
Col.M. (On, Off)
Gob.M. (On, Off)
In.Po.
PAn (0-255)
:
F.dim (0-255)
Stor.
dF.SE.
(On, Off)
LAMP
MAn.M.
PrE.C.
PAn (Pan.1...Pan.3)
:
dimr (dim.0...dim.C.)
MAn.C.
PAn (0-255)
:
F.dim (0-255)
tESt
Mod 1
PAn (0-255)
tilt (0-255)
Foc. (0-255)
Go...
Mod 2
St.AL.
Audi.
Off
tESt
PrG.1
PrG.2
PrG.3
PLAY
tESt
PrG.1
PrG.2
PrG.3
Edit
PrG.1
PrG.2
2T)
5V
:
St.99
rESE
SPEC
LA.Ad.
PAn (0-255)
tilt (0-255)
Foc. (0-255)
CodE
AdJ.
PAn
:
F.CAL
Col.1 (0-255)
:
dimr (0-255)
A.rES.
PAn (0-255)
:
S.tim. (0.1-25.5) (s)
COPY
9. Control menu
The control panel situated on the front panel of the base offers several features. You can simply set the DMX address,
read the number of the lamp or unit hours, switch On and Off the lamp, run test, make a reset and also use many functions
HQTUGVVKPIſZVWTGDGJCXKQWT
Control elements on the control board:
[MODE] button-leaves menu without saving changes.
[ENTER]DWVVQPGPVGTUOGPWEQPſTOUCFLWUVGFXCNWGUCPFNGCXGUOGPW
[UP] button and [DOWN] button- moves between menu items on the the same level, sets values.
#HVGTUYKVEJKPIVJGſZVWTGQPVJGFKURNC[UJQYUVJGKPKVKCNUETGGP
Use [UP], [DOWN] to browse through the menu. To select a function or submenu, press [ENTER].
9.1 Fixture Address
7UGVJKUOGPWVQUGVVJG&/:CFFTGUUQHVJGſZVWTGQTUGVVJGſZVWTGCUC/CUVGT
5NCXG
dM.Ad. - DMX addressing. Select this submenu to set DMX start address.
MA.SL. - Master/slave addressing5GNGEVVJKUUWDOGPWVQUGVVJGſZVWTGCUC/CUVGTQT5NCXG
5NCXG5NCXG
Option „d.AbL” deactivates master/slave setting.
9.2 Slave control
6JKUHWPEVKQPCNNQYU[QWVQEQPVTQNVJGUNCXGUHTQOVJGOCUVGTŏUEQPVTQNRCPGNKPCOCUVGTUNCXGQRGTCVKQP
Select this function from the main menu and press [ENTER]$TQYUGVJGNKUVQHCNNEQPPGEVGFUNCXGU
œ5.%Œœ5.%Œ
by pressing [UP] or [DOWN]. Select the desired slave and press [ENTER]-button.The matching slave control panel is
available from the master control panel.
+HPQUNCXGKUEQPPGEVGFVQVJGOCUVGTOCUUCIGUœ5.%Œœ5.%Œœ5.%Œœ5.%ŒUVKNNTQWPFTGRGCV
Note6JKUHWPEVKQPKUCXCKNCDNGHTQOVJGOCUVGTſZVWTGQPN[
9.3 Fixture informations
7UGVJKUOGPWVQTGCFCPWUGHWNKPHQTOCVKQPCDQWVVJGſZVWTG
Po.ti. - Power on time. Select this submenu to read the number of operation hours.
totL - The function shows the total number of the operation hours since the ColorSpot 575 AT has been fabricated.
rSEt - The function shows the number of the operation hours that the ColorSpot 575 AT has been powered on
UKPEGVJGEQWPVGTYCUNCUVTGUGV+PQTFGTVQTGUGVVJKUEQWPVGTVQ[QWJCXGVQJQNF[UP] and [DOWN] and press
the [ENTER].
La.ti. - Lamp on time. Select this submenu to read the number of the operation hours with the lamp on.
totL - The function shows the total number of the operation hours with the lamp on since the ColorSpot 575 AT
has been fabricated.
rSEt - The function shows the number of the operation hours with the lamp on that the ColorSpot 575 AT has
DGGPRQYGTGFQPUKPEGVJGEQWPVGTYCUNCUVTGUGV+PQTFGTVQTGUGVVJKUEQWPVGTVQ[QWJCXGVQJQNF[UP] and
[DOWN] and press the [ENTER].
LA.St. - Lamp strikes. Select this submenu to read the total number of the lamp strikes.
totL - The function shows the total number of the lamp strikes since the ColorSpot 575 AT has been fabricated.
rSEt - The function shows the number of the lamp strikes since the counter was last reset. In order to reset this
EQWPVGTVQ[QWJCXGVQJQNF[UP] and [DOWN ] and press the [ENTER].
tEMP - Fixture temperatures5GNGEVVJKUUWDOGPWVQTGCFVJGſZVWTGVGORGTCVWTGU
u%2NGCUGPQVGVJCVVJGQWVUKFG
VGORGTCVWTGUJQWNFPQVGZEGGFu%
Cur.t. - %WTTGPVſZVWTGVGORGTCVWTGU.
boAr.%WTTGPVVGORGTCVWTGQPVJGOCKPDQCTFKPVJGDCUGQHVJGſZVWTG6GORGTCVWTGUDGNQYu%CTG
PQVETKVKECNu%CPFOQTGNGCFVQVJGNCORDGKPIUYKVEJGFQHHCPFVJGſZVWTGIQGUVQœNQYRQYGTOQFGŒ
$GHQTGUYKVEJKPIVJGNCORQPCICKP
CHVGTOKPWVGUTWPCVQVCNſZVWTGTGUGV
HEAd %WTTGPVVGORGTCVWTGQHVJGJGCFKPUKFG6GORGTCVWTGUDGNQYu%CTGPQVETKVKECNu%CPF
OQTGNGCFVQVJGNCORDGKPIUYKVEJGFQHHCPFVJGſZVWTGIQGUVQœNQYRQYGTOQFGŒ$GHQTGUYKVEJKPIVJG
NCORQPCICKP
CHVGTOKPWVGUTWPCVQVCNſZVWTGTGUGV
Hi.tE. - /CZKOWOſZVWTGVGORGTCVWTGU.
boAr. 6JGHWPEVKQPUJQYUVJGOCZVGORGTCVWTGQPVJGOCKPDQCTFUKPEGVJG%QNQT5RQV#6JCU
been fabricated.
HEAd 6JGHWPEVKQPUJQYUVJGOCZVGORGTCVWTGQHVJGJGCFKPUKFGUKPEGVJG%QNQT5RQV#6JCU
been fabricated.
rSEt - Maximum resetable temperatures.
boAr. 6JGHWPEVKQPUJQYUVJGOCZKOWOVGORGTCVWTGQPVJGOCKPDQCTFUKPEGVJGEQWPVGTYCUNCUVTGUGV
+PQTFGTVQTGUGVVJGEQWPVGTVQ[QWJCXGVQJQNF[UP] and [DOWN] and press the [ENTER].
21
HEAd 6JGHWPEVKQPUJQYUVJGOCZKOWOVGORGTCVWTGQHVJGJGCFKPUKFGUKPEGVJGEQWPVGTYCUNCUVTGUGV
+PQTFGTVQTGUGVVJGEQWPVGTVQ[QWJCXGVQJQNF[UP] and [DOWN] and press the [ENTER].
DM.In. - Readout of DMX values5GNGEVVJKUHWPEVKQPVQTGCF&/:XCNWGU
QHGCEJEJCPPGNTGEGKXGFD[VJGſZVWTG
PAn
a coarse pan movement
G.rot. CIQDQKPFGZKPICPFTQVCVKQP
F.PAn
CſPGRCPOQXGOGPV
F.G.ro. CſPGIQDQKPFGZKPI
tilt
a coarse tilt movement
Pris.
a prism
F.tilt
CſPGVKNVOQXGOGPV
P.rot. a prism rotation
SpEd
a pan/tilt speed
FroS. CHTQUVſNVGT
P.t.SE.
a pan/tilt macro selection
F.Fro. CſPGHTQUV
P.t.SP.
a pan/tilt speed
Iris
an iris
Func.
a special function
F.Iri.
CſPGKTKU
Zoom a zoom
Col.1
a colour wheel 1
F.Co.1 CſPGEQNQWTYJGGN
Foc.
a focus
Col.2
a colour wheel 2
F.Foc. CſPGHQEWU
F.Co.2
CſPGEQNQTYJGGN
Stro.
a shutter,strobe
S.Gob.
a static gobo wheel
dimr
a dimmer
F.S.Go. CſPGUVCVKEIQDQYJGGN F.dim. CſPGFKOOGT
r.Gob.
a rotating gobo wheel
VErS. - Software version. Select this function to read the software version of processors:
IC1.b./CKPRTQEGUUQTQPVJGOCKPDQCTFKPVJGſZVWTGDCUG
IC2.b.2CPRTQEGUUQTQPVJGOCKPDQCTFKPVJGſZVWTGDCUG
IC3.b.6KNVRTQEGUQTQPVJGOCKPDQCTFKPVJGſZVWTGDCUG
IC4.b.''RTQOQPVJGOCKPDQCTFKPVJGſZVWTGDCUG
IC1.L.2TQEGUUQTKPVJGNGHVCTOQHVJGſZVWTG
IC2.L.2TQEGUUQTKPVJGNGHVCTOQHVJGſZVWTG
IC1.r.2TQEGUUQTKPVJGTKIJVCTOQHVJGſZVWTG
IC2.r.2TQEGUUQTKPVJGTKIJVCTOQHVJGſZVWTG
9.4 Personality
Use this menu to to modify ColorSpot 575 AT operating behavior.
r.PAn - Pan reverse.Select this function to invert the pan movement.
r.tilt - Tilt reverse. Select this function to invert the tilt movement.
DM.Pr. - DMX preseting. Select this function to set desired effects assigning to the channels. Please refer to the chapter
œ&/:RTQVQEQNŒHQTFGVCKNFGUETKRVKQP
LA.Pr. - Lamp presetting5GNGEVVJKUOGPWVQEJCPIGVJGNCORœDGJCXKQWTŒ
LA.Au. 5GNGEVVJKUHWPEVKQPVQVWTPVJGNCORQPCWVQOCVKECNN[CHVGTUYKVEJKPIVJGſZVWTGQP
d.L.OF. - Select this function to switch off the lamp via DMX.
dM.On - This function allows you to strike the lamp automatically after 26 seconds if DMX signal is present on
VJGFCVCNKPM+HVJGKIPKVKQPKUWPUWEEGUUHWNN
GINCORKUVQQJQVVJGſZVWTGYKNNVT[VQKIPKVGVJGNCORCHVGTPGZV
s.This process will repeat until the lamp lights.
dM.OF. - This function allows you to switch Off the lamp automatically after 2 minutes if DMX signal is missing
on the data link.
LA.dE. .CORKIPKVKQPFGNC[6JKUHWPEVKQPCNNQYU[QWVQUGVVJGVKOGFGNC[
UDGHQTGVJGNCORYKNNDGKIPKVGF
6JKUUGVVKPIYKNNPQVCHHGEVUVCTVKPIVJGNCORFKTGEVHTQOVJGEQPVTQNRCPGN
OGPWœ.COR1P1HHŒ
En.Sn. - Switching on/of the lamp light sensor. Select this function to switch the lamp light sensor on or off.The option
œ1PŒKUHQTVJGUVCPFCTFQRGTCVKQP
Important: 6JGQRVKQPœ1HHŒKUHQTœGOGTIGPE[QRGTCVKQPŒQPN[KHVJGNCORNKIJVUGPUQTKUFGHGEVKXGCPF[QWYKNNYCKVHQT
a service intervertion! If the lamp light sensor is switched off and at switching the lamp on the electronics will still try to
KIPKVGVJGNCORWPVKNKVUJKPGU
GXGPYJGPVJGNCORKUFCOCIGFQTCDUGPVQPVJKUCEEQWPVUQOGGNGEVTQPKEURCTVUEQWNF
be damaged!
DiSP. - Display adjusting. This function allows you to change the display settings.
turn5GNGEVVJKUHWPEVKQPVQVWTPVJGFKURNC[D[u
d.On - This function allows you to keep the display on or to turn off automatically 2 minutes after last pressing any
button on the control panel.
d.Int.5GNGEVVJKUHWPEVKQPVQCFLWUVVJGFKURNC[KPVGPUKV[
OKPOCZ
bL.Co. - Blackout during movement correction. Select this function to enable the blackout during the head movement
EQTTGEVKQP
KHVJGOQXKPIJGCFNQUVKVUTKIJVRCPVKNVRQUKVKQPHQTCUJQTVOQOGPV
FEEd - Pan/Tilt feedback.This function allows to return the mowing head to the required pan/tilt position after changing
VJGRQUKVKQPD[GZVGTPCNHQTEG
GID[UVTQMG
$GECTGHWNVJG2CP6KNV(GGFDCEM1((KUPQVVJGUVCPFCTFQRGTCVKQPCPFVJGJGCFQHVJGſZVWTGECPDGFGOCIGF
Note:+HVJGHGGFDCEMYCUUYKVEJGFQHHVJGRCPVKNVRQUKVKQPKUEJCPIGFD[CPGZVGTPCNHQTEGCPFVJGHGGFDCEMKUUYKVEJGF
on again, the moving head might not to be synchronized with the DMX signal. You have to make a reset in order to synchronize the moving head with the DMX signal.
22
Mi.SE. - Microphone sensitivity5GNGEVVJKUHWPEVKQPVQCFLWUVVJGOKETQRJQPGUGPUKVKXKV[HTQO
OCZKOWOVQ
OKPKOWO+HVJGUGPUKVKXKV[KUEQTTGEVN[CFLWUVGFVJGWRRGTUGIOGPVQHVJGſTUVFKIKVDNKPMUKPVJGDCUUDGCV
'ZCORNGU
WPFGTGZKVGF
TKIJVNGXGN
WRRGTUGIOGPVDNKPMUXKCVJGDCUUTJ[VJO
QXGTGZKVGF
Fan.S. - Fan speed operating modes. By using this function you can choose 2 types of the fan speed operating modes.
Auto - The fans automatically raise their speed in order to control inside temperature of the head, if the tempeTCVWTGKPUKFGKPETGCUGUCDQWVEGTVCKPNGXGN
VJGNQYHCPURGGFTGFWEGUVJGEQQNKPIQHVJGNKIJVKPI6JKUE[ENGECP
repeat several times until the temperature inside is on a suitable level.
HIGH6JGEQQNKPIHCPUYQTMQPOCZURGGF
OCZEQQNKPI6JKUOQFGYGTGEQOOGPFHQTJKIJCODKGPVVGORGTCVWTG
u%CPFOQTG
P.t.Mo. - Pan/tilt movement mode. Use this menu to set the character of the pan/tilt movement.
ti.Mo. - Time mode. Pan and tilt will move with different speeds and they will come at the same time to end point
RCPCPFVKNVUGVUKVUQRVKOCNURGGF
SP.Mo. - Speed mode2CPCPFVKNVYKNNOQXGYKVJVJGUCOGURGGFCUCFLWUVGFD[VJGEJCPPGN
2CP6KNVURGGF
E.g. pan will come to the end point and wait for tilt, which has longer track.
A.blc. - Automatic blackout. Use this function if you wish to close the light output during effect changes.
P.t.M. - This function closes the light output during pan/tilt changes.
Col.M. - This function closes the light output during colour wheel 1/wheel 2 changes.
Gob.M. - This function closes the light output during gobo wheel 1/wheel 2 changes.
In.Po. - Init effect positions5GNGEVVJKUHWPEVKQPVQCFLWUVCNNGHHGEVUVQVJGFGUKTGFKPKVKCNRQUKVKQPU#HVGTUYKVEJKPIVJG
ſZVWTGQP
KH&/:KUPQVEQPPGEVGFCNNGHHGEVUYKNNOQXGVQKPKVKCNRQUKVKQPU7UGVJG[UP] and [DOWN] buttons to select
desired channel and press [ENTER]. Set the effect to the desired position using [UP] and [DOWN]DWVVQPUCPFEQPſTO
by pressing [ENTER]#HVGTJCXKPICFLWUVGFTGSWKTGFGHHGEVUUGNGEVœ5VQTŒVQUCXGCNNKPKVKCNXCNWGUVQVJGOGOQT[
dF.SE. - Default Settings5GNGEVVJKUQRVKQPVQTGUGVCNNſZVWTGRGTUQPCNKVKGUVQVJGFGHCWNVXCNWGU
9.5 Lamp On/Off
Use this option in order to switch on/off the lamp.It is also important to note, that the lamp is cold restrike type, that means,
that it has to be cold before striking.
9.6 Manual mode
Select this menu to call up presetted positions of channel effects or direct control channel effects.
PrE.C. - Presetted effect control. Select this menu to call up presetted positions of the channel effects.
Man.C. - Manual effect control. Select this menu to control effects by control buttoms on the control board.
PAn
a coarse pan movement
G.rot. CIQDQKPFGZKPICPFTQVCVKQP
F.PAn
CſPGRCPOQXGOGPV
F.G.ro. CſPGIQDQKPFGZKPI
tilt
a coarse tilt movement
Pris.
a prism
F.tilt
CſPGVKNVOQXGOGPV
P.rot. a prism rotation
SpEd
a pan/tilt speed
FroS. CHTQUVſNVGT
P.t.SE.
a pan/tilt macro selection
F.Fro. CſPGHTQUV
P.t.SP.
a pan/tilt speed
Iris
an iris
Func.
a special function
F.Iri.
CſPGKTKU
Col.1
a colour wheel 1
Zoom a zoom
F.Co.1 CſPGEQNQWTYJGGN
Foc.
a focus
Col.2
a colour wheel 2
F.Foc. CſPGHQEWU
F.Co.2
CſPGEQNQTYJGGN
Stro.
a shutter,strobe
S.Gob.
a static gobo wheel
dimr
a dimmer
F.S.Go. CſPGUVCVKEIQDQYJGGN F.dim. CſPGFKOOGT
r.Gob.
a rotating gobo wheel
9.7 Test sequences
7UGVJKUOGPWVQVQTWPCURGEKCNFGOQVGUVUGSWGPEGUYKVJQWVCPGZVGTPCNEQPVTQNNGTYJKEJYKNNUJQY[QWUQOGRQUUKbilities of using ColorSpot 575 AT.
Mod. 1 - Mode 16JKUOQFGKUUWKVCDNGHQTRTQLGEVKQPUQPVJGYCNNEGKNKPIQTITQWPFYKVJQWVCP[JGCFOQXGOGPV
Mod. 2 - Mode 2. This mode uses all ColorSpot 575 AT functions including pan/tilt movement and therefore is good for
CEQORNGVGKPVTQFWEVKQPQHVJGſZVWTG
23
9.8 Stand-alone setting
Use this menu to set options for stand-alone mode as a selection of the playing program,programming and modifying
current programs.
Audi - Music trigger. Select this function to enable the sound control of the running programs via the built-in microphone.
Auto - Presetting playback. This function allows you to select the program which will be played in the stand-alone
OQFGCHVGTUYKVEJKPIVJGſZVWTGQP5GNGEVGFRTQITCOYKNNDGRNC[GFEQPVKPWQWUN[KPCNQQR
d.Abl6JGQRVKQPFKUCDNGUœ#WVQŒHWPEVKQP
tESt - The option will start built-in test program.
PrG. 1 - The option will start created program No. 1
PrG. 2 - The option will start created program No. 2
PrG. 3 - The option will start created program No. 3
Note: +HVJGſZVWTGQRGTCVGUKPVJGEQPVTQNNGTOQFG
&/:EQPVTQNNGTKUEQPPGEVGFCPFCP[RTQITCOHTQOVJKUOGPWKU
UGNGEVGFKPVJKUECUGVJGſZVWTGYKNNPQVTGURQPFVQVJG&/:EQPVTQNNGTCHVGTUYKVEJKPIQPCPFYKNNRNC[UGNGEVGFRTQITCO
PLAY - Playing program. Select this menu to run a bilt-in program or the 3 freely-programmable programs in a loop.
tESt - The option starts built-in test program.
PrG.1 - The option starts created program No. 1
PrG.2 - The option starts created program No. 2
PrG. 2 - The option starts created program No. 3
Select the program you wish and press [ENTER]. The selected program starts running. By Pressing [ENTER] again is
possible to pause the program running.
Edit - Editing program. Select this menu to edit or create the program. The ColorSpot 575 AT has one built-in program
and the 3 free programs, each up to 99 steps. Each program step has a step time. Step time-the time, during which effects
last in the current step.
+HVJGſZVWTGKUUGVCUCOCUVGTVJGP[QWOC[GFKVCP[RTQITCOKPVJGUNCXGU;QWECPŏVGFKVRTQITCOUQPVJGUNCXGſZVWTGU
HTQOVJGKTEQPVTQNRCPGNUKHVJGOCUVGTſZVWTGKUUYKVEJGFQPCPFEQPPGEVGFVQVJGUNCXGU
GFKVKPIKURQUUKDNGD[VJGOCUVGT
EQPVTQNRCPGNQPN[
Procedure:
1. Press [UP] or [DOWN]VQUGNGEVVJGRTQITCO[QWYCPVVQGFKV
œ2T)Œœ2T)ŒCPFRTGUU[ENTER].
2. Press [UP] or [DOWN]VQUGNGEVVJGFGUKTGFſZVWTG
œ/#5Vőœ5.#őCPFRTGUU[ENTER]-button.
3. Press [UP] or [DOWN]VQUGNGEVVJGFGUKTGFRTQITCOUVGR
ő5VŒő5VŒCPFRTGUU[ENTER]-button.
4. Press [UP] or [DOWN] to select the desired item and press [ENTER]-button. Now you can edit by [UP] or [DOWN]
DWVVQPUVJG&/:XCNWG
HQTUGNGEVGFKVGO
P.End.
CVQVCNPWODGTQHVJGRTQITCOUVGRU
XCNWGThis value you must set before start programming
GIKH[QWYCPVVQETGCVGRTQITCOYKVJVJGUVGRUUGV2'PF
PAn
a pan movement
F.G.ro. CſPGIQDQKPFGZKPI
tilt
a tilt movement
Pris.
a prism
SpEd
a pan/tilt speed
P.rot. a prism rotation
P.t.SE. a pan/tilt macro selection
FroS. CHTQUVſNVGT
P.t..S.P. a pan/tilt macro speed
F.Fro. CſPGHTQUV
Func.
a special function
Iris
an iris
Col.1
a colour wheel 1
F.Iri.
CſPGKTKU
F.Co.1 CſPGEQNQWTYJGGN
Zoom a zoom
Col.2
a colour wheel 2
Foc.
a focus
F.Co.2 CſPGEQNQTYJGGN
F.Foc. CſPGHQEWU
S.Gob. a static gobo wheel
Stro.
a shutter,strobe
F.S.Go. CſPGUVCVKEIQDQYJGGN dimr
a dimmer
r.Gob.
a rotating gobo wheel
F.dim. CſPGFKOOGT
G.rot.
CIQDQKPFGZKPICPFTQVCVKQP
S.tim.
CUVGRVKOGXCNWGUGEQPFU
COPY. CEQR[KPIVJGEWTTGPVRTQIUVGRVQVJGPGZVRTQIUVGR+HVJGNCUVRTQIUVGRKUEQRKGFVQVJGPGZVRTQI
step, parameter „P.End”KUKPETGCUGFCDQWVQPGD[KVUGNH
GZEGRVUVGR
5. Press [ENTER]DWVVQPVQEQPſTOCFLWUVGFXCNWG
6. Press [MODE]DWVVQPUGNGEVPGZVRTQIUVGRCPFTGRGCVVJKURTQEGFWTG
UVGRU
9.9 Reset functions
6JKUQRVKQPGPCDNGUVJG%QNQT5RQV#6VQKPFGZCNNGHHGEVU
HWPEVKQPUCPFTGVWTPVQVJGKTUVCPFCTFRQUKVKQPU
24
9.10 Special functions
7UGVJKUOGPWHQTURGEKCNUGTXKEGUNKMGCFLWUVKPINCORQTCFLWUVKPIGHHGEVU
LA.Ad. - Lamp adjustment6JKUHWPEVKQPECPDGWUGFYJGP[QWOCMGVJGſPGCFLWUVOGPVQHVJGNCOR+H[QWUGNGEVVJKU
HWPEVKQPCNNGHHGEVUYKNNDGECPEGNGFUJWVVGTYKNNDGQRGPGFCPFVJGFKOOGTKPVGPUKV[YKNNDGUGVQPVQ$[WUKPIVJG
options „PAn, tilt, Foc.”[QWECPHQEWUVJGNKIJVQPCƀCVUWTHCEG
YCNNCPFRGTHQTOVJGſPGNCORCFLWUVOGPV
CodE - Code6JKUHWPEVKQPEQPVCKPUKFGPVKſECVKQPJGZCFGEKOCNEQFG
((((HQTVJGſZVWTGYJKEJKUWUGFHQTVJG
master/slave operation.
rdML --- Code6JKUOGPWKVGOUJQYUVJGſTUVRCTVQHVJG4&/KFGPVKſECVKQPEQFG
rdMH --- Code6JKUOGPWKVGOUJQYUVJGUGEQPFRCTVQHVJG4&/KFGPVKſECVKQPEQFG
AdJ. - Effect adjustment$[VJKUHWPEVKQP[QWECPECNKDTCVGCPFCFLWUVVJGGHHGEVUVQVJGKTUVCPFCTFTKIJVRQUKVKQPU&KUEQPGEVVJG&/:EQPVTQNNGTHTQOVJGſZVWTGCPFUGNGEV„AdJ.” menu. The display shows step by step effects by which you
ECPCFLWUVVJGſZVWTGVQVJGTGSWKTGFRQUKVKQPDGHQTGVJGHWPEVKQPECNKDTCVKQP
&/:EQPVTQNNGTOWUVDGFKUEQPPGEVGF9JGP
VJGRQUKVKQPKPIKUſPKUJGFUGNGEV„F.CAL.” and press [ENTER]:
1. Calibration via the control board
&KUEQPPGEV&/:EQPVTQNNGTHTQOVJGſZVWTG2TGUU[ENTER] and use [UP] and [DOWN] in order to display the following
items: „Col.1, Col.2, S.Gob., r.Gob.G.rot., Iris, dimr” for very smooth function calibration. Select one of them, press
[ENTER] and use the [UP] and [DOWN]KPQTFGTVQCFLWUVVJGKTTKIJVXCNWGHTQOVQ6JGPRTGUU[ENTER]VQEQPſTO
or [MODE] to cancel and return to the menu. This can be repeated for each calibration parameter if it is required. When
VJGECNKDTCVKQPKUſPKUJGFKVKUPGEGUUCT[VQWUGVJG „A.rES” function in order to write the calibration values to the memory
'241/CPFVQOCMGCTGUGVKPQTFGTVQEJGEMVJGPGYN[CFLWUVGFRQUKVKQPUQHVJGEQNQWTIQDQYJGGNUCPFFKOOGT9JGP
VJGTGUGVQHVJGſZVWTGKUſPKUJGFVJGFKURNC[YKNNUJQYVJG„F.CAL” message. Press [ENTER] to repeat the calibration
or [MODE] to return to the „AdJ.” menu.
2. Calibration via the external controller
%QPPGEVVJG&/:EQPVTQNNGTVQVJGſZVWTGRTGUU[ENTER] and the [UP] and [DOWN] buttons in order to display the following items: „Col.1, Col.2, S.Gob., r.Gob.G.rot., Iris, dimr”. Select one of them and press [ENTER].
Now you can calibrate this effect by your controller. The DMX calibration protocol is described in the table mentioned
below.
DMX calibration protocols:
Effect
œ%QNŒ%QNQWTYJGGN œ%QNŒ%QNQWTYJGGN œ5)QDŒ5VCVKEIQDQYJGGN
œT)QDŒ4QVCVKPIIQDQYJGGN
œ)TQVŒ)QDQTQVCVKQP
œ+TK5Œ+TKU
œFKOTŒ&KOOGT Mode 1
EJCPPGN
EJCPPGN
EJCPPGN
EJCPPGN
EJCPPGN
EJCPPGN
EJCPPGN
Mode 2
EJCPPGN
EJCPPGN
EJCPPGN
EJCPPGN
EJCPPGN
EJCPPGN
EJCPPGN
Mode 3 Mode 4
EJCPPGN
EJCPPGN
EJCPPGN
EJCPPGN
EJCPPGN
EJCPPGN
EJCPPGN
EJCPPGN
EJCPPGN
EJCPPGN
EJCPPGN
EJCPPGN
EJCPPGN
EJCPPGN
After having calibrated required effects, press [ENTER]VQEQPſTO
QT[MODE] to cancel and return to the menu without
reset by the „A.rES.”HWPEVKQPCPFWUGVJG„A.rES.”HWPEVKQPKPQTFGTVQYTKVGVJGECNKDTCVKQPXCNWGUVQVJGOGOQT[
''241/CPFVQOCMGCTGUGVKPQTFGTVQEJGEMVJGPGYCFLWUVGFRQUKVKQPUQHVJGEQNQWTIQDQCPFGHHGEVYJGGNU
10. Power down mode
6JKUOQFGQOKVUſZVWTGTGUGVCHVGTUYKVEJKPIVJGſZVWTGQPCPFNQYGTUOQVQTRQYGTUQHVJGſZVWTGœ2QYGTFQYPOQFGŒKU
WUGHWNKPURGEKCNECUGUGIKHVJGſZVWTGKUKPCƀKIJVECUGCPF[QWYCPVVQUGVKVU&/:CFFTGUUYKVJQWVVCMKPIKVQWVHTQO
VJGECUG6QGPVGTœ2QYGTFQYPOQFGŒRTGUUCPFJQNF[UP] and [DOWN] and at the same time switch on the Power
switch. The following message appears on the display: „P.d.Mo.”
0QY[QWECPUGVHGCVWTGUCPFDGJCXKQWTQHVJGſZVWTGD[WUKPI„A001” menu and „Pers.”OGPW+H[QWYCPVVQIQœPQTOCN
QRGTCVKQPOQFGŒGZGEWVGCſZVWTGTGUGV
Note: #NNOQVQTU
GZEGRVRCPCPFVKNVOQVQTUKPœ2QYGTFQYPOQFGŒCTGFGCEVKXCVGFCPFUYKVEJKPIVJGNCORQPHTQOVJG
control panel is blocked.
11. RDM
6JKUſZVWTGKUTGCF[HQT4&/QRGTCVKQP4&/
4GOQVG&GXKEG/CPCIGOGPVKUCDKFKTGEVKQPCNEQOOWPKECVKQPURTQVQEQN
for use in DMX512 control systems, it is the new open standard for &/:FGXKEGEQPſIWTCVKQPCPFUVCVWUOQPKVQTKPI
25
6JG4&/RTQVQEQNCNNQYUFCVCRCEMGVUVQDGKPUGTVGFKPVQC&/:FCVCUVTGCOYKVJQWVCFXGTUGN[CHHGEVKPIGZKUVKPI
PQP4&/GSWKROGPV$[WUKPICURGEKCNœ5VCTV%QFGőCPFD[EQORN[KPIYKVJVJGVKOKPIURGEKſECVKQPUHQT&/:VJG
4&/RTQVQEQNCNNQYUCEQPUQNGQTFGFKECVGF4&/EQPVTQNNGTVQUGPFEQOOCPFUVQCPFTGEGKXGOGUUCIGUHTQOURGEKſE
moving lights.
4&/CNNQYUGZRNKEKVEQOOCPFUVQDGUGPVVQCFGXKEGCPFTGURQPUGUVQDGTGEGKXGFHTQOKV
The list of commands for ColorSpot 575 AT is the following.
Parameter ID
Discovery command SET command
DISC_UNIQUE_BRANCH
*
DISC_MUTE
*
DISC_UN_MUTE
*
GET command
DEVICE_INFO
*
SUPPORTED_PARAMETERS
*
SOFTWARE_VERSION_LABEL
*
DMX_START_ADDRESS
*
*
IDENTIFY_DEVICE
*
*
DEVICE_MODEL_DESCRIPTION
*
MANUFACTURER_LABEL
*
DEVICE_LABEL
*
*
SENSOR_DEFINITION
*
SENSOR_VALUE
*
DISPLAY_INVERT
*
*
DISPLAY_LEVEL
*
*
PAN_INVERT
*
*
TILT_INVERT
*
*
DEVICE_RESET
*
DMX_PERSONALITY
*
*
DMX_PERSONALITY_DESCRIPTION
*
STATUS_MESSAGES
*
STATUS_ID_DESCRIPTION
*
LAMP_STATE
LAMP_ON_MODE
DEVICE_HOURS
LAMP_HOURS
1
*
*
*
*
*
2
*
2
.#/2A564+-'5
*
2
#PQVJGTQRVKQPUHQTVJKUEQOOCPF
QPN[HQT4QDGyUſZVWTGU
XCNWG2#4#/'6'4A#ZNCOR1((D[&/:XCNWGQP&/:EJCPPGN
XCNWG2#4#/'6'4A#ZNCOR1((KH&/:KUPQVRTGUGPV
2
...Commands relative resetable values
1
26
12. Error and information messages
HEAt
6JKUOGUUCIGCRRGCTUKH[QWVT[VQUYKVEJQPVJGNCORYKVJKPOKPWVGUCHVGTJCXKPIUYKVEJGFKVQHH
VJGNCORKUVQQJQV
6JGOGUUCIGYKNNCRRGCTQPVJGFKURNC[KHVJGNCORFQGUPŏVKIPKVGYKVJKPUGEQPFU6JG%QNQT5RQV#6YKNNUVQTGVJKU
KPHQTOCVKQPCPFCWVQOCVKECNN[KIPKVGVJGNCORYJGPVJGOKPWVGURGTKQFJCUGZRKTGF
Caution: 6JGOGUUCIGKUFKUCDNGFKHVJGNCORNKIJVUGPUQT
HWPEVKQPœ'P5PŒKUUYKVEJGF1HH
QPN[KHVJGNCORYCUVWTPGF
1HHCPF1PYKVJKPOKPWVGUVJGOGUUCIGœHEAtŒYKNNCRRGCT
LA.Er.
6JGKIPKVKQPQHVJGNCORYCUUGXGPVKOGUWPUWEEGUUHWN
VJGœHEAtŒOGUUCIGCRRGCTGFUKZVKOGUDGHQTGCPFVJGFKURNC[
UJQYUœLA.ErŒOGCPKPIVJCVVJGNCOREQWNFDGFCOCIGFQTGXGPOKUUGFQTVJGTGEQWNFDGCHCKNWTGQPVJGKIPKVQTQT
ballast. Please place or replace the lamp, check the ambient temperature or contact your dealer if the situation was not
caused by the lamp.
Caution:6JGOGUUCIGKUFKUCDNGFKHVJGNCORNKIJVUGPUQT
HWPEVKQPœ'P5PŒKUUYKVEJGF1HH
Mb.Er.
This messsage informs you that the main PCB does not communicate correctly with the Control Board.
C.I.Er. EQNQTYJGGNGTTQT
6JKU OGUUUCIG YKNN CRRGCT CHVGT VJG TGUGV QH VJG ſZVWTG KH VJG OCIPGVKEKPFGZKPI EKTEWKV OCNHWPEVKQPU UGPUQT HCKNGF QT
OCIPGVOKUUKPIQTVJGUVGRRKPIOQVQTKUFGHGEVKXG
QTKVUFTKXGTEKTEWKVQPVJGOCKP2%$6JGEQNQTYJGGNKUPQVNQECVGF
in the default position after the reset.
C.2.Er. EQNQTYJGGNGTTQT
6JKU OGUUUCIG YKNN CRRGCT CHVGT VJG TGUGV QH VJG ſZVWTG KH VJG OCIPGVKEKPFGZKPI EKTEWKV OCNHWPEVKQPU UGPUQT HCKNGF QT
OCIPGVOKUUKPIQTVJGUVGRRKPIOQVQTKUFGHGEVKXG
QTKVUFTKXGTEKTEWKVQPVJGOCKP2%$6JGEQNQTYJGGNKUPQVNQECVGF
in the default position after the reset.
r.G.Er. TQVCVKPIIQDQYJGGNGTTQT
6JGOGUUCIGYKNNCRRGCTCHVGTVJGTGUGVQHVJGſZVWTGKHVJGOCIPGVKEKPFGZKPIEKTEWKVOCNHWPEVKQPU
UGPUQTHCKNGFQTOCIPGV
OKUUKPIQTVJGUVGRRKPIOQVQTKUFGHGEVKXG
QTKVUFTKXGTEKTEWKVQPVJGOCKP2%$6JGTQVCVKPIIQDQYJGGNKUPQVNQECVGF
in the default position after the reset.
i.G.Er. TQVCVKPIIQDQKPFGZKPIGTTQT
6JGOGUUCIGYKNNCRRGCTCHVGTVJGTGUGVQHVJGſZVWTGCPFKHVJGOCIPGVKEKPFGZKPIEKTEWKVOCNHWPEVKQPU
UGPUQTHCKNGFQT
OCIPGVOKUUKPIQTVJGUVGRRKPIOQVQTKUFGHGEVKXG
QTKVUFTKXGTEKTEWKVQPVJGOCKP2%$6JGTQVCVKPIIQDQKUPQVNQECVGF
in the default position after the reset.
S.G.Er.
UVCVKEIQDQYJGGNGTTQT
6JKUOGUUCIGYKNNCRRGCTCHVGTVJGTGUGVQHVJGſZVWTGKHVJGOCIPGVKEKPFGZKPIEKTEWKVOCNHWPEVKQPU
UGPUQTHCKNGFQTOCIPGV
OKUUKPIQTVJGUVGRRKPIOQVQTKUFGHGEVKXG
QTKVUFTKXGTEKTEWKVQPVJGOCKP2%$6JGUVCVKEIQDQYJGGNKUPQVNQECVGFKP
the default position after the reset.
Ir.Er. KTKUGTTQT
6JKUOGUUCIGYKNNCRRGCTCHVGTVJGTGUGVQHVJGſZVWTGKHVJGOCIPGVKEKPFGZKPIEKTEWKVOCNHWPEVKQPU
UGPUQTHCKNGFQTOCIPGVOKUUKPIQTVJGUVGRRKPIOQVQTKUFGHGEVKXG
QTKVUFTKXGTEKTEWKVQPVJGOCKP2%$6JGKTKUKUPQVNQECVGFKPVJGFGHCWNV
position after its reset.
Ft.Er.
6JKUGTTQTOGUUCIGKPHQTOU[QWVJCVVJGſZVWTGYCUQXGTJGCVKPI
QEEWTGFKHVJGCODKGPVVGORGTCVWTGKUu%QTOQTGCPF
VJCVVJGVGORGTCVWTGUGPUQTUYKVEJGFQHHVJGNCOR6JGſZVWTGKUKP.QYRQYGTOQFGCPFVJGNCORECPPQVDGUYKVEJGF
QPCICKPWPVKNCTGUGVKUPQVGZGEWVGF
Fr.Er.
6JKUOGUUCIGYKNNCRRGCTKHVJGHTGSWGPE[QHVJGOCKPKUPQVUVCPFCTFQT*\6JKUOGUUCIGECPCRRGCTCUCTGUWNV
QHVJGKPVGTHGTGPEGFWTKPIVJGNCORUVCTVKPI
KHVJGNCORQTKIPKVGTKUQNFQTCUCTGUWNVQHVJGKPVGTHGTGPEGD[PGKIJDQWTKPI
devices. +PVJGUGECUGUVJGOGUUCIGFQGUPQVCHHGEVVJGſZVWTGQRGTCVKPI
Sn.Er.
This message appears if the lamp lighting sensor is failed.
PoEr
6JKUOGUUCIGYKNNCRRGCTKHVJGſZVWTGYCUUJQTVN[FKUEQPPGEVHTQOVJGOCKP
PA.Er. 2CP[QMGOQXGOGPVGTTQT
6JKUOGUUCIGYKNNCRRGCTCHVGTVJGTGUGVQHVJGſZVWTGKHVJG[QMGUOCIPGVKEKPFGZKPIEKTEWKVUOCNHWPEVKQP
UGPUQTUHCKNGF
QTOCIPGVOKUUKPIQTVJGUVGRRKPIOQVQTKUFGHGEVKXG
1TKVUFTKXKPI+%QPVJGOCKP2%$6JG[QMGKUPQVNQECVGFKPVJG
default position after the reset.
ti.Er. 6+.6JGCFOQXGOGPVGTTQT
6JKUOGUUCIGYKNNCRRGCTCHVGTVJGTGUGVQHVJGſZVWTGKHVJGJGCFUOCIPGVKEKPFGZKPIEKTEWKVOCNHWPEVKQPU
UGPUQTHCKNGF
QTOCIPGVOKUUKPIQTVJGUVGRRKPIOQVQTKUFGHGEVKXG
1TKVUFTKXKPI+%QPVJGOCKP2%$6JGJGCFKUPQVNQECVGFKPVJG
default position after the reset.
MA.Er. /CUVGTGTTQT
6JGOGUUCIGKPHQTOU[QWVJCVVJGſZVWTGYCUCFFTGUUGFCUCOCUVGTCPF&/:UKIPCNKUEQPPGEVGFVQKVUKPRWV&KUEQPPGEV
VJG&/:EQPVTQNNGTHTQOſZVWTGŏUKPRWVCPFCFFTGUUVJGſZVWTGCUVJGOCUVGTCICKP
t.M.Er. 6GORGTCVWTGOGCUWTKPIGTTQT
6JGOGUUCIGKPHQTOU[QWVJCVVJGEQOOWPKECVKQPDGVYGPVJGJGCFCPFVJGOCKPDQCTFKPVJGſZVWTGDCUGYCUEWVQHH
QT
VJGJGCFVGORGTCVWTGUGPUQTKUFGHGEVKXGCPFVJGNCORYCUCWVQOCVKECNN[UYKVEJGFQHH
27
6GEJPKECNURGEKſECVKQPU
Power supply:
'7OQFGN
75OQFGN
8QNVCIG8#%*\`
(WUG6#"8
8QNVCIG8#%*\`
(WUG6#"8
2QYGTEQPUWORVKQP8#
Lamp:
Philips MSR 575/2, 95V/575W GX-9,5
Optical System:
*KIJNWOKPQWUGHſEKGPE[INCUUTGƀGEVQT
- focus lens and multistep zoom lenses system
DGCOCPINGUuuu
#NNNGPUGUCTGCPVKTGƀGEVKQPEQCVGF
Beampath:
28
Colours:
Colour wheel 1: FKEJTQKEſNVGTUQRGP
Colour wheel 2: TGRNCEGCDNGŎ5.16.1%-ŏFKEJTQKEſNVGTU
KPENWFKPI-CPF78ſNVGTQRGP
Static gobo wheel:
TGRNCEGCDNGŎ5.16.1%-ŏDNCEMCPFYJKVGINCUUIQDQURNWUCPQRGPRQUKVKQPQWVUKFGFKCOGVGTOO
KOCIGFKCOGVGTOOCNWOKPKWOVJKEMPGUUOO
Rotating gobo wheel:
- 6 dichroic glass gobos and one glass gobo rotating in both directions at different speeds
)QDQKPFGZKPI
- Rotating gobo-wheel cont. rotation
/WNVKEQNQTFKEJTQKEINCUUIQDQUQWVUKFGFKCOGVGTOOVJKEMPGUUOOJKIJVGORGTCVWTGDQTQHNQCVQTDGVVGTINCUUKOCIGFKCOGVGTOO
)NCUUIQDQQWVUKFGFKCOGVGTOOOCZVJKEMPGUUOOJKIJVGORGTCVWTGDQTQƀQCVQTDGVVGTINCUU
- All rotating gobos are easily replaceable
Strobe:5VTQDGGHHGEVYKVJXCTKCDNGURGGF
OCZƀCUJGURGTUGEQPF
Dimmer:
5OQQVJFKOOGTHTQO
2TKUO(TQUVſNVGT
HCEGVRTKUO
TQVCVKPIKPDQVJFKTGEVKQPUCVFKHHGTGPVURGGFUECPDGTGRNCEGFYKVJCPQVJGTRTKUO
(TQUVſNVGT
5GRCTCVGXCTKCDNGHTQUVſNVGT
Focus/Zoom: - Remotely controllable via DMX
/QVQTK\GFOWNVKUVGR\QQOYKVJVJTGGFKHHGTGPVCRGTVWTGU
uuu
Iris:
/QVQTK\GF
UVGRNGUUN[CFLWUVCDNGKTKUHQTFKHHGTGPVDGCOFKCOGVGTU
Motors:
16 high quality stepping-motors controlled by microprocessors
Electronics:
- Addressing,special functions setting, effects calibration via control panel with 4-digit LED display
4GCFQWVſZVWTGCPFNCORWUCIGTGEGKXKPI&/:XCNWGUVGORGTCVWTGGVE
$WKNVKPCPCN[\GTHQTGCU[HCWNVſPFKPIGTTQTOGUUCIGU
- Remotely switching of the lamp
- Bilt-in demo sequences
- Black-out while head moving or gobo/color changing
- Silent fans cooling, remotely controllable speed of fans
- Self-resetable thermo-fuse
- Master/slave operation
- Digital serial input DMX-512, RDM support
EQPVTQNEJCPPGNURTGUGVVKPIU
EQPVTQNEJCPPGNU
Pan/Tilt:
2CPOQXGOGPVTCPIGu
6KNVOQXGOGPVTCPIGu
/CZ2CPURGGFuUGE
/CZ6KNVURGGFuUGE
2CPVKNVEQPVTQNCEEWTCE[uu
- 16 bit movement resolution
- Automatic Pan / Tilt position correction
- Remotely controllable speed of pan/tilt movement for easy programming
- Movement control:tracking and vector
Rigging:
5VCPFUFKTGEVN[QPVJGƀQQT
- Mounts horizontally or vertically with 2 Omega brackets
- 2 truss orientation
- Safety chain/cord attachment point
Temperatures:
/CZKOWOCODKGPVVGORGTCVWTGu%
/CZKOWOJQWUKPIVGORGTCVWTGu%
Min. distances:
29
/KPFKUVCPEGHTQOƀCOOCDNGUWTHCEGUO
/KPFKUVCPEGVQNKIJVGFQDLGEVO
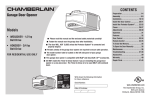
Dimensions (mm)
Weight (net):
- EU version: 32 kg
- US version: 36 kg
Accessories
#EEGUUQTKGUIQDQUGV
1OGICJQNFGT
RKGEGU
Optional accessories
(TQUVOQFWNG
14. Maintenance and cleaning
+VKUCDUQNWVGN[GUUGPVKCNVJCVVJGſZVWTGKUMGRVENGCPCPFVJCVFWUVFKTVCPFUOQMGƀWKFTGUKFWGUOWUVPQVDWKNFWRQPQT
YKVJKPVJGſZVWTG1VJGTYKUGVJGſZVWTGUNKIJVQWVRWVYKNNDGUKIPKſECPVN[TGFWEGF4GIWNCTENGCPKPIYKNNPQVQPN[GPUWTG
VJGOCZKOWONKIJVQWVRWVDWVYKNNCNUQCNNQYVJGſZVWTGVQHWPEVKQPTGNKCDN[VJTQWIJQWVKVUNKHG
#UQHVNKPVHTGGENQVJOQKUVGPGFYKVJCP[IQQFINCUUENGCPKPIƀWKFKUTGEQOOGPFGFWPFGTPQEKTEWOUVCPEGUUJQWNFCNEQJQN
or solvents be used!
DANGER !
Disconnect from the mains before starting any maintenance work
6JGHTQPVQDLGEVKXGNGPUYKNNTGSWKTGYGGMN[ENGCPKPICUUOQMGƀWKFVGPFUVQDWKNFKPIWRTGUKFWGUTGFWEKPIVJGNKIJVQWVRWV
very quickly. The cooling-fans should be cleaned monthly.
6JGIQDQUOC[DGENGCPGFYKVJCUQHVDTWUJ6JGKPVGTKQTQHVJGſZVWTGUJQWNFDGENGCPGFCVNGCUVCPPWCNN[WUKPICXCEWWOENGCPGTQTCPCKTLGV
6JGFKEJTQKEEQNQWTſNVGTUVJGIQDQYJGGNCPFVJGKPVGTPCNNGPUGUUJQWNFDGENGCPGFOQPVJN[
6JGTGCTGPQUGTXKEGCDNGRCTVUKPUKFGVJGFGXKEGGZEGRVHQTVJGNCORCPFVJGHWUG
2NGCUGTGHGTVQVJGKPUVTWEVKQPUWPFGTő(KVVKPI'ZEJCPIKPIVJGNCORŒ
Maintenance and service operations are only to be carried out by authorized dealers.
Replacing the fuse
+HVJGNCORDWTPUQWVVJGſPGYKTGHWUGQHVJGFGXKEGOKIJVHWUGVQQ1PN[TGRNCEGVJGHWUGD[CHWUGQHCOGV[RGCPFTCVKPI
Before replacing the fuse, unplug mains lead.
Procedure:
7PUETGYVJGHWUGJQNFGTQPVJGTGCTRCPGNQHVJGDCUGYKVJCſVVKPIUETGYFTKXGTHTQOVJGJQWUKPI
CPVKENQEMYKUG
4GOQXGVJGQNFHWUGHTQOVJGHWUGJQNFGT
+PUVCNNVJGPGYHWUGKPVJGHWUGJQNFGT
4GRNCEGVJGHWUGJQNFGTKPVJGJQWUKPICPFſZKV
5RGEKſECVKQPUCTGUWDLGEVVQEJCPIGYKVJQWVPQVKEG