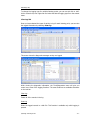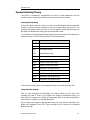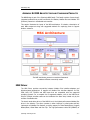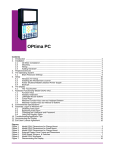
1
MBX Bridge Help Bridge Software for Modbus, Modbus Plus and Modbus TCP Networks Version 8.0 MBX Bridge Help MBX BRIDGE HELP MBX® Bridge for Modbus, Modbus Plus and Modbus TCP Networks Version 8.0 for Windows® 8/7/Vista/XP/Server 2012/Server 2008/Server 2003 Copyright © 1994-2014, Cyberlogic® Technologies Inc. All rights reserved. This document and its contents are protected by all applicable copyright, trademark and patent laws and international treaties. No part of this document may be copied, reproduced, stored in a retrieval system or transmitted by any means, electronic, mechanical, photocopying, recording or otherwise, without the express written permission of Cyberlogic Technologies Inc. This document is subject to change without notice, and does not necessarily reflect all aspects of the mentioned products or services, their performance or applications. Cyberlogic Technologies Inc. is not responsible for any errors or omissions in this presentation. Cyberlogic Technologies Inc. makes no express or implied warranties or representations with respect to the contents of this document. No copyright, trademark or patent liability or other liability for any damages is assumed by Cyberlogic Technologies Inc. with respect to the use of the information contained herein by any other party. Cyberlogic®, DHX®, MBX®, WinConX® and Intelligent • Powerful • Reliable® are registered trademarks and DirectAccess™, OPC Crosslink™, OPC Datacenter™, DevNet™ and C-logic™ are trademarks of Cyberlogic Technologies Inc. All other trademarks and registered trademarks belong to their respective owners. Document last revision date May 13, 2014 Cyberlogic Technologies Inc. -2- MBX Bridge Help TABLE OF CONTENTS Introduction ........................................................................................................5 Compatibility ........................................................................................................... 5 Blending MBX-Supported Networks ........................................................................... 6 What Should I Do Next?......................................................................................8 Learn How the Bridge Routes Messages .................................................................... 8 Read a Quick-Start Guide ......................................................................................... 8 Get Detailed Information on the Configuration Editor ................................................. 8 Troubleshoot a Problem ........................................................................................... 8 Get Information on Related Products ........................................................................ 8 Print a Copy of This Document ................................................................................. 8 Contact Technical Support ........................................................................................ 8 Routing Messages with the MBX Bridge .............................................................9 How Messages Are Routed ....................................................................................... 9 MBX Bridge Routing Records .................................................................................. 10 Filtering Incoming Messages ............................................................................... 11 Routing the Filtered Messages............................................................................. 13 Master Path Resource Management ........................................................................ 14 MBX Bridge Routing Examples ................................................................................ 15 Modbus Plus / Modbus Plus ................................................................................. 15 Modbus Plus / Ethernet....................................................................................... 16 Modbus to Modbus Plus ...................................................................................... 18 Modbus Plus to Modbus ...................................................................................... 19 Quick-Start Guide ..............................................................................................21 Creating Bridge Devices ......................................................................................... 22 Creating Routing Records ....................................................................................... 23 Saving and Backing Up Your Configuration .............................................................. 27 Starting the Bridge and Applying the Configuration .................................................. 28 Limiting Resource Usage ........................................................................................ 30 Configuration Editor Reference ........................................................................32 Routing Records Tab.............................................................................................. 32 Bridge Devices Tab ................................................................................................ 37 Diagnostics Tab ..................................................................................................... 40 File Menu .............................................................................................................. 46 Control Menu......................................................................................................... 47 Troubleshooting ................................................................................................49 Ethernet Loopback Test ......................................................................................... 49 Event Viewer ......................................................................................................... 52 MBX Bridge Server Event Log Messages .................................................................. 54 MBX Bridge Server Log File Messages ..................................................................... 55 Appendix A: Dynamic Routing ..........................................................................58 Types of Dynamic Routing...................................................................................... 58 Configuring Dynamic Routing ................................................................................. 58 Application Setup ................................................................................................... 59 Dynamic Routing Theory ........................................................................................ 60 Appendix B: MBX Architecture and Companion Products .................................61 MBX Driver ............................................................................................................ 61 Ethernet MBX Driver .............................................................................................. 62 Cyberlogic Technologies Inc. -3- MBX Bridge Help Serial MBX Driver ................................................................................................... 62 MBX Gateway Driver .............................................................................................. 63 Virtual MBX Driver ................................................................................................. 63 MBX Bridge ........................................................................................................... 64 MBX OPC Server .................................................................................................... 64 MBX SDK ............................................................................................................... 65 Cyberlogic Technologies Inc. -4- MBX Bridge Help INTRODUCTION The MBX Bridge combines the functionality of all hardware-based bridging products currently offered by Schneider Electric into a single software product. It allows you to bridge Modbus, Modbus Plus and Modbus TCP networks, seamlessly routing messages between all MBX-compatible devices. Schneider’s hardware bridge products, including the BM85 and BP85, are well-suited for many installations. However, due to the growing popularity of PCs and software applications in industrial environments, an increasing number of end users require software-based routing solutions in addition to dedicated hardware products. The MBX Bridge answers these demands by offering many key features and benefits. Because the MBX Bridge works with all MBX-compatible devices, it allows users to route messages in a wide variety of arrangements. These include configurations such as Modbus to Modbus Plus, Modbus Plus to Modbus Plus, Ethernet to Modbus Plus and Modbus Plus to Ethernet routing. A simple wizard-based editor allows you to easily configure the required routings. Configuration can be done online without stopping or restarting the routing software. The MBX Bridge operates transparently in the background, like a device driver, and allows other software to communicate concurrently over the same MBX devices and drivers. Software-based routing solution with MBX Bridge and other MBX components. Compatibility The MBX Bridge is implemented as part of the Cyberlogic MBX architecture, which is the foundation used in other Cyberlogic components such as the MBX Driver, Ethernet MBX Driver, Serial MBX Driver and MBX Gateway Driver. Therefore, the MBX Bridge is compatible with all of these drivers. Cyberlogic Technologies Inc. -5- MBX Bridge Help Blending MBX-Supported Networks The MBX driver family provides support for all Modicon networks through a common architecture, with identical programming interfaces. This means that an application that operates with one of the MBX family drivers will work with the rest of them as well. Thus, virtually all Modbus Plus compatible software programs can operate over all Modiconsupported networks with no code modifications. You will find a complete description of the MBX family in the Appendix B: MBX Architecture and Companion Products. Migration of existing installations to new hardware products does not require the user to discard working, proven software solutions. As depicted in the diagram below, a user can mix Modbus, Modbus Plus and Modbus TCP based hardware products in existing installations without losing software, network or integration investment. The MBX family of products includes: MBX Driver is Cyberlogic’s device driver for Modbus Plus interface adapters. Ethernet MBX Driver provides Modbus TCP communication. Serial MBX Driver provides Modbus RTU/ASCII communication. MBX Gateway Driver works with the other MBX drivers, giving access to Modbus, Modbus Plus and Modbus TCP networks from remote locations. Virtual MBX Driver works with the other MBX drivers to permit 16-bit legacy software to run in current Windows operating systems. MBX Bridge allows you to bridge any combination of Modicon networks by routing messages between MBX devices. MBX OPC Server connects OPC-compliant client software applications to data sources over all Modicon networks. MBX SDK is a software development kit for MBXAPI and NETLIB compliant development. Cyberlogic Technologies Inc. -6- MBX Bridge Help Cyberlogic Technologies Inc. -7- MBX Bridge Help WHAT SHOULD I DO NEXT? The links below will take you directly to the section of this manual that contains the information you need to configure, use and troubleshoot the MBX Bridge. Learn How the Bridge Routes Messages If you are not familiar with the way that the MBX Bridge routes messages, you should begin by reading Routing Messages with the MBX Bridge. Read a Quick-Start Guide First-time users of the MBX Bridge will want to read the Quick-Start Guide, which walks through a typical configuration session, step-by-step. Get Detailed Information on the Configuration Editor Experienced users who want specific information on features of the configuration editor will find it in the Configuration Editor Reference section. Troubleshoot a Problem If you have already configured the bridge, you should verify that it operates as expected. Refer to the Troubleshooting section for assistance. In case of communication problems, this section also provides problem-solving hints. Get Information on Related Products The MBX family consists of several well-integrated products, which provide connectivity for Modicon networks in distributed environments. For more information about these products, refer to Appendix B: MBX Architecture and Companion Products. Print a Copy of This Document The content of this document is also provided in PDF format. PDF files can be viewed using the Adobe Reader program, and can also be used to print the entire document. Contact Technical Support To obtain support information, open the Windows Start menu and go to Cyberlogic Suites, and then select Product Information. Cyberlogic Technologies Inc. -8- MBX Bridge Help ROUTING MESSAGES WITH THE MBX BRIDGE Schneider Electric provides a number of network solutions that allow communication to a variety of its own—as well as third party—hardware products. The main communication networks are Modbus, Modbus Plus and Modbus TCP (Ethernet). It is common to find combinations of these networks in use in the same industrial plant. In most cases, these networks must be linked together to allow cross-network communications. Hardware Solutions from Schneider Electric Schneider Electric provides a number of hardware products that allow users to bridge Modicon-brand industrial networks. For example, the Bridge/MUX (BM85) allows Modbus networks to be bridged to Modbus Plus networks. Bridge Plus (BP85) provides routing between two Modbus Plus networks. The Modbus Plus to Ethernet Bridge (174CEV20040) links Ethernet devices to a Modbus Plus network. These are dedicated products and are well-suited for many installations. Software Solution: the MBX Bridge The MBX Bridge combines the functionality of all hardware-bridging products currently offered by Schneider Electric into a single software product. It routes messages between all MBX compatible devices in a variety of inter-network arrangements. Configuration can be done online without stopping or restarting the routing software. The MBX Bridge operates transparently in the background, like a device driver, and allows other software to communicate concurrently over the same MBX devices and drivers. In most installations, the MBX Bridge is more flexible and cost effective than a dedicated hardware solution. How Messages Are Routed The MBX Bridge uses two methods to route messages. These are called static and dynamic routing. Static Routing The more common method is static routing. To implement this, the bridge allows you to create a table of routing records that specify how the messages are to be passed from one network to another. At runtime, the bridge identifies the proper record for an incoming message, and uses the information in that record to send the message to the intended destination. Most of the examples shown here are for static routing. Dynamic Routing With dynamic routing, the nodes that initiate messages must tell the bridge at runtime how to route them. For a detailed explanation of how to configure dynamic routing, refer to Appendix A: Dynamic Routing. Cyberlogic Technologies Inc. -9- MBX Bridge Help A typical MBX Bridge system is shown in the illustration above. The MBX Bridge Suite is installed on the PC and uses its network adapters and ports to route messages among the different networks. In this example, we will use static routing, so routing records configured in the bridge software tell it how to pass the messages. Suppose that the Quantum controller on the Ethernet network must communicate to the 984 on the Modbus Plus network. The Quantum unit would send its message to the bridge, which would receive it through its Ethernet MBX device (referred to as the source device). The routing record would tell the bridge how to use the IP address and Destination Index of the message to determine the proper final destination for the message, in this case, a particular node on the Modbus Plus network. The bridge would then send the message out through the MBX device associated with the PCI-85 module (called the destination device), with the appropriate Modbus Plus routing array for the desired 984 controller. In the same way, the response message will be routed from the 984 back to the Quantum controller. Furthermore, the routing records can be configured to allow communication to and from the Modbus network. They can also send messages through bridges and routers to other layers of compatible networks. Messages received from a given network may need to be routed to any one of two or more different destination networks, using different routing records. The bridge must be able to determine which routing record should be used for a given message. To do this, each routing record includes a source filter that allows the bridge to decide if that routing record should be used for a particular message. If the message matches the filter criteria, that record is used to route it to its destination, otherwise the remaining routing records are tried until a match is found. If no routing records match, the bridge returns an error response to the node that originated the message. MBX Bridge Routing Records The MBX Bridge functions as a message router between MBX-compatible devices. It can route both data (Data Slave) and programming (Program Slave) messages. Data Slave messages are automatically routed to Data Master Paths while Program Slave messages are routed to Program Master Paths. Cyberlogic Technologies Inc. - 10 - MBX Bridge Help An MBX device that can receive messages to be routed is called a source device. Messages received by source devices are routed to other MBX devices called destination devices. A given MBX device may be configured as a source device, a destination device or both. An exception to this is that Serial MBX Master devices can only be configured as destination devices and Serial MBX Slave devices can only be configured as source devices. A simple wizard-based editor creates a table of routing records that define how messages are to be routed. Routing records are grouped according to their source device. Each record contains a source section (Source Device, Slave Path, and Source Filter) and a destination section (Destination Device, Network Type, Destination Routing, and Timeout), as shown in the figure. Filtering Incoming Messages The source section defines a message filter, which determines what messages will be accepted from the source device for routing through the bridge. To be routed according to that record, an incoming message must match both the Slave Path and Source Filter criteria. Filter fields may contain a single value, a range of values or an asterisk. The asterisk indicates that any value is acceptable. Any command message that passes through the filter will be routed through the bridge as specified in the destination section. Otherwise, an error message is sent back. Slave Path The Slave Path field contains a single slave path number or a range of slave path numbers that are compared with the slave path used by the incoming message. An asterisk in a filter indicates that any slave path is acceptable. The same slave path can be used in multiple routing records. Cyberlogic Technologies Inc. - 11 - MBX Bridge Help Slave Path Field Entry Slave Paths Used 2 SP2 1-4 SP 1, SP2, SP3, SP4 * Any slave path This table shows examples of some Slave Path field values and the slave paths they specify for use. Slave Path numbers for the Ethernet source devices are based on the destination index numbers sent with each message. In the default configuration, a Slave Path number is directly mapped to the destination index value. For more information refer to the Ethernet MBX Driver help. Slave Path numbers for the Serial MBX Slave source devices are based on the destination address sent with each message. For more information refer to the Serial MBX Driver help. Source Filter The Source Filter consists of one to five fields, and each field corresponds to a byte in the routing array that is part of each received command message. The fields can each contain a number, a number range or an asterisk (*). When a command message is received that matches the Slave Path filter criteria, each byte in its routing array is compared against the corresponding Source Filter field. If the filter field contains a number, an exact match of a corresponding byte is required. For a number range, the corresponding byte must fall within the selected range. An asterisk in a filter field indicates that any value is acceptable. Source Filter Routing Addresses That Pass 2.1.0.0.0 2.1.0.0.0 2.1.*.0.0 2.1.0.0.0 to 2.1.255.0.0 2.1.0-63.0.0 2.1.0.0.0 to 2.1.63.0.0 2.1.*.*.* 2.1.0.0.0 to 2.1.255.255.255 *.*.*.*.* Any routing address This table shows examples of some Source Filter entries for a Modbus Plus source device. Note Ethernet and Modbus source devices use the same type of Source Filter expressions as used for Modbus Plus. However, the received routing array contains different address information. In the case of Ethernet, you can filter on the four-byte IP address. For Modbus, there is only one routing byte to filter, the destination node address. Cyberlogic Technologies Inc. - 12 - MBX Bridge Help Routing the Filtered Messages Messages that pass the Slave Path and Source Filter criteria will be routed through the bridge. They will be sent to the specified Destination Device using the Destination Routing. For messages that did not pass through these filters, an error reply is sent back. Note Since the bridge processes all routing records from top to bottom, the order of these records is important. There may be several records that match the Slave Path and Source Filter criteria for a given message. The first matching record will be used to determine the destination routing. Destination Routing The structure of the Destination Routing depends on the Network Type for the specified Destination Device. For Modbus Plus devices, it consists of five routing address bytes. For Ethernet devices, it is a four-byte IP address and a destination index. For Modbus devices, it is a single-byte Modbus address. Regardless of type, each byte is defined by an arithmetic expression. The arithmetic expressions take one of the following forms: operand operand + operand operand – operand where the permitted value for operand depends on the type of the source device. For Ethernet source devices, operand may be: A constant value. SP, the slave path used for the received message. DI, the destination index value of the received command message. IP1, IP2, IP3 or IP4, a byte of the source device’s IP address. For Modbus Plus source devices, operand may be: A constant value. SP, the slave path used for the received message. MB1, MB2, MB3, MB4 or MB5, a byte of the routing path as received in the command message. For Modbus source devices, operand may be: A constant value. SP, the slave path used for the received message. MB, the destination Modbus address as received in the command message. Cyberlogic Technologies Inc. - 13 - MBX Bridge Help Source Device Type Routing Destination Device Type Routing Resulting Address MB+ 1.2.3.4.5 MB+ 3.2.0.0.0 3.2.0.0.0 MB+ 7.2.15.13.0 E IP = 192.168.4.MB3 DI = MB4 192.168.4.15 DI = 13 MB+ 6.8.22.0.0 MB MB3-10 12 MB 9 MB+ 2.MB.0.0.0 2.9.0.0.0 MB 11 E IP = 192.168.43.MB DI = 0 192.168.43.11 DI = 0 E 10.67.7.1 DI = 5 MB DI+32 37 E 52.202.3.18 DI = 6 MB+ IP4.DI.IP1+IP3.26.0 18.6.55.26.0 This table shows examples of some Destination Routings and how they would route typical messages. In each case, device type E refers to an Ethernet device, MB to a Modbus device and MB+ to a Modbus Plus device. Master Path Resource Management The MBX Bridge uses data master and program master paths to route messages to their destinations. Some MBX devices have only a limited number of these paths available, and once these resources are exhausted, no additional communication over that device is possible. The MBX Bridge operates concurrently with other applications communicating over the same MBX devices, so it is possible for the bridge to interfere with their communication. To minimize this, the MBX Bridge intelligently manages its master path use. It does this by allowing the user to limit the number of master paths that the bridge may use for each destination device. For example, the PCI-85 allows a maximum of eight program master paths for all communications. If the user specifies that the bridge may use only two of these paths, then at least six will remain available for other applications. Some device types, such as Ethernet MBX, can support an unlimited number of paths. Therefore, the user can elect to impose no limits on path usage on these types of devices. Note Although the physical Modbus Plus adapter cards allow a maximum of eight data master paths, the MBX Driver removes this restriction. It allows up to 65,535 logical data master paths to share the eight physical data master paths on the adapter card. (Program master paths are still limited to a maximum of eight, however.) This technique is highly efficient and therefore most users should configure the MBX Bridge to use an unlimited number of data master paths. Users who are concerned with the amount of memory used by the bridge, or want to limit the loading on the network, may still wish to limit the maximum number of data master paths used. Cyberlogic Technologies Inc. - 14 - MBX Bridge Help Once a master path is acquired, the MBX Bridge caches it to improve performance. If the path is not used within a certain period of time, the MBX Bridge releases it back to the system for use with other applications, preventing resource hogging. MBX Bridge Routing Examples The following sections present examples of some typical applications for the MBX Bridge. These are simple configurations intended to demonstrate common uses for the bridge. Much more elaborate configurations are also possible. The examples given are: Modbus Plus / Modbus Plus Modbus Plus / Ethernet Modbus to Modbus Plus Modbus Plus to Modbus Modbus Plus / Modbus Plus In this example, there are two PCI-85 adapter cards configured as MBX device 0 and device 1. Each adapter card is connected to a separate Modbus Plus network. We will use slave path 1 to route messages between the two networks. The following configuration emulates the operation of a BP85. Source Device Slave Path Destination Filter Device Network Type Routing Timeout 0 1 *.*.*.*.* 1 Modbus Plus MB3.MB4.MB5.0.0 5000 1 1 *.*.*.*.* 0 Modbus Plus MB3.MB4.MB5.0.0 5000 When sending a message to the bridge, the first routing byte specifies the bridge node, and the second specifies the slave path number. Source routing bytes MB3 through MB5 identify the routing array for the destination network. Cyberlogic Technologies Inc. - 15 - MBX Bridge Help To see how this routing works, we will follow a case where a 984 controller at node address 20 on the Modbus Plus connected to the PCI-85 designated as Device 0 sends a message to the Compact 984 controller at node address 15 on the Modbus Plus connected to the PCI-85 designated as Device 1. 1. The originating node at Modbus Plus address 20 sends a message with 5.1.15.0.0 routing. The first two address bytes indicate that the message is addressed to the PCI-85 at node address 5 over slave path number 1. 2. The MBX Bridge receives the message on MBX Device 0 over slave path number 1. The message is accepted because it is on the specified slave path and passes the Source Filter criteria. The MBX Bridge shifts the routing bytes as specified in the Destination Routing, and sends the message to MBX Device 1 with the new routing 15.0.0.0.0. 3. The message is delivered to its destination at node address 15. The message is processed and the reply is sent back to the MBX Bridge, which passes it over to the original node at Modbus Plus address 20. Modbus Plus / Ethernet In this example, there is a PCI-85 adapter card configured as MBX device 0 and an Ethernet MBX device configured as MBX device 1. The MBX Bridge system has two Ethernet cards with IP addresses 84.0.21.100 and 205.167.7.65. Nodes 2 and 3 on the Modbus Plus network are BP85 routers connected to separate Modbus Plus networks. The following table shows a typical configuration for this type of setup. Cyberlogic Technologies Inc. - 16 - MBX Bridge Help Source Device Slave Path Destination Filter Device Network Type Routing Timeout 0 1 *.*.0.*.* 1 Ethernet IP = 84.0.21.MB4 DI = MB5 5000 0 1 *.*.1.*.* 1 Ethernet IP = 205.167.7.MB4 DI = MB5 5000 0 1 *.*.2.0.* 1 Ethernet IP = 10.0.0.10 DI = MB5 5000 0 1 *.*.2.1.* 1 Ethernet IP = 10.0.0.15 DI = MB5 5000 1 1-64 *.*.*.* 0 Modbus Plus DI.0.0.0.0 5000 1 65-128 *.*.*.* 0 Modbus Plus 2.DI-64.0.0.0 5000 1 129-192 *.*.*.* 0 Modbus Plus 3.DI-128.0.0.0 5000 To see how this routing works, we will examine two typical cases. Case 1 - Modbus Plus to Ethernet Routing In this case, the 984 controller at node address 20 on the Modbus Plus network sends a message to the Quantum controller at IP address 205.167.7.2 on the Ethernet network. 1. The originating node at address 20 sends a message with routing array 5.1.1.2.0. The first two routing bytes (MB1, MB2) address the message to the PCI-85 in the MBX Bridge system at node address 5, using slave path number 1. 2. The value of 1 in the third byte (MB3) causes the message to pass the Source Filter for the second routing record. 3. The Bridge routes the message to its destination. The routing record specifies that the message is to be sent to Ethernet MBX Device 1. The fourth Modbus Plus routing byte (MB4) sets the value of 2 for the last byte in the destination IP address and the fifth Modbus Plus routing byte (MB5) sets 0 as the destination index byte value. This results in a routing of IP address 204.167.7.2 with destination index 0. 4. The message is delivered to its destination. It is processed and the reply is sent back to the MBX Bridge, which passes it over to the original node at Modbus Plus address 20. Note This example uses only one of the four Modbus Plus to Ethernet routing records. The other records allow messages to be sent to other networks and nodes, including nodes not shown on the diagram. This indicates that the bridge has been configured to route messages to devices that are not shown, or to accommodate future expansion of the network. Cyberlogic Technologies Inc. - 17 - MBX Bridge Help Case 2 - Ethernet to Modbus Plus Routing In this case, the Quantum controller at IP address 205.167.7.2 on the Ethernet network sends a message to the 984 controller at node address 20 on the Modbus Plus network. In this example, we assume that the bridge’s Ethernet device uses the default Slave Path view, in which the Slave Path number is equal to the destination index value. (Refer to the Ethernet MBX Driver help for more information on Slave Path views.) 1. The originating node at IP address 205.167.7.2 sends a message with a routing of IP address 205.167.7.65 and destination index 20. 2. The MBX Bridge receives the message on MBX device 1 over data slave path number 20, as specified by destination index value. This matches the Device and Slave Path requirements of the fifth record in the table. Because the Source Filter is all asterisks, all messages will pass that requirement. 3. The Bridge routes the message to its destination. The routing record specifies that the message is to be sent to the PCI-85 designated as MBX Device 0. The destination index value is inserted as the first byte in the Modbus Plus routing array, with the other bytes set to 0, resulting in a routing of 20.0.0.0.0. 4. The message is delivered to its destination at node address 20. The message is processed and the reply is sent back to the MBX Bridge, which passes it over to the original node at IP address 205.167.7.2. Modbus to Modbus Plus This example assumes that there is a PCI-85 adapter card configured as MBX device 0 and a Serial MBX Slave device configured as MBX device 1. The following configuration emulates the operation of the BM85 Bridge/MUX. Cyberlogic Technologies Inc. - 18 - MBX Bridge Help Source Device Destination Slave Path Filter Device Network Type Routing Timeout 1 1-64 * 0 Modbus Plus MB.0.0.0.0 5000 1 65-128 * 0 Modbus Plus 2.MB-64.0.0.0 5000 1 129-192 * 0 Modbus Plus 3.MB-128.0.0.0 5000 1 193-256 * 0 Modbus Plus 4.MB-192.0.0.0 5000 To see how this routing works, we will examine the process by which the Modbus master sends a message to the 984 controller at node address 20 on the Modbus Plus network. In this example, we assume that the bridge’s Modbus slave device is configured so that messages sent to Modbus address 1 use slave path 1, those sent to Modbus address 2 use slave path 2, and so on. 1. The host computer sends a message to node address 20. 2. The MBX Bridge receives the message on MBX device 1 over slave path number 20, the same number as the destination node address value. This matches the Device and Slave Path requirements for the first routing record. The Source Filter is an asterisk, so all messages will pass that requirement. 3. The Bridge routes the message to its destination. The routing record specifies that it should be sent to the PCI-85 designated MBX device 0. The Modbus node address of the message is used as the first byte in the Modbus Plus routing array, with the remaining bytes set to 0. This results in a routing of 20.0.0.0.0. 4. The message is delivered to its destination at Modbus Plus node address 20. The message is processed and the reply is sent back to the MBX Bridge, which passes it over to the host computer. Modbus Plus to Modbus This example assumes that we have a PCI-85 adapter card configured as MBX device 0 and a Serial MBX Master device configured as MBX Device 1. Cyberlogic Technologies Inc. - 19 - MBX Bridge Help The following configuration allows routing from Modbus Plus nodes to Modbus slave nodes. Source Device Slave Path Destination Filter Device Network Type Routing Timeout 0 1 *.*.0.1-64.* 1 Modbus MB4 5000 0 1 *.*.1.1-64.* 1 Modbus MB4+64 5000 0 1 *.*.2.1-64.* 1 Modbus MB4+128 5000 0 1 *.*.3.1-64.* 1 Modbus MB4+192 5000 To see how this routing works, we will follow the case where the 984 controller at node address 20 on the Modbus Plus network sends a message to the 984 controller at node 100 on the Modbus network. 1. The originating node sends a message with 5.1.1.36.0 routing. The first two routing bytes (MB1, MB2) address the message to the MBX Bridge system’s PCI-85 at node address 5, using slave path number 1. 2. The values of 1 and 36 in the third and fourth routing bytes (MB3, MB4) cause the message to pass the Source Filter for the second routing record. 3. The Bridge routes the message to its destination. The routing record specifies that the message is to be sent to Modbus MBX device 1. The Routing field calculates the desired Modbus node address by adding 64 to the fourth byte in the Modbus Plus routing address, resulting in an address of 100 for this message. 4. The message is delivered to its destination at Modbus node address 100. The message is processed and the reply is sent back to the MBX Bridge, which passes it over to the original Modbus Plus node at address 20. Note The expressions used in the Routing field for the four records allow messages to be routed to all possible addresses on the Modbus network. Some Modbus Plus applications will restrict the routing array bytes to values in the range 0-64. By specifying 1, 2 or 3 as the third byte in the routing array, it is possible to stay within this restriction and still obtain any destination Modbus address over the range of 0-256 Cyberlogic Technologies Inc. - 20 - MBX Bridge Help QUICK-START GUIDE Before the MBX Bridge can be used, it must be properly configured. The configuration procedure involves creating two or more MBX devices and configuring routing records to route messages between them. To accomplish this, you must install the software, then run the MBX Device Configuration Editor to create the MBX devices the bridge will use. For information on this topic, refer to the help file for the drivers you wish to configure. After you have configured the drivers, you must run the MBX Bridge Configuration Editor to create the routing records. The following steps show a typical configuration session. Use it only as a guideline of how to configure the most common features. For detailed descriptions of all of the available features, refer to the Configuration Editor Reference section. For this procedure, we will present a simple Modbus Plus to Modbus Plus routing example. This example assumes that we have two PCI-85 dapter cards configured as MBX devices 0 and 1. Each adapter card is connected to a separate Modbus Plus network. We will use slave path 1 for routing messages between the two networks. We will configure the following two routing records: Source Device Slave Path Destination Filter Device Network Type Routing Timeout 0 1 *.*.*.*.* 1 Modbus Plus MB3.MB4.MB5.0.0 5000 1 1 *.*.*.*.* 0 Modbus Plus MB3.MB4.MB5.0.0 5000 This configuration closely emulates the operation of the BP85. Refer to the Modbus Plus / Modbus Plus routing example for a functional description of this configuration. The procedure is broken into several short segments: Creating Bridge Devices Creating Routing Records Saving and Backing Up Your Configuration Starting the Bridge and Applying the Configuration Cyberlogic Technologies Inc. - 21 - MBX Bridge Help Limiting Resource Usage Creating Bridge Devices The first step in configuring the MBX Bridge is to create the MBX devices that the bridge will use. The Auto Configuration Wizard will help you to do this. Caution! The MBX Bridge software routes messages between the MBX devices you have configured. Before you can configure the bridge, you must use the MBX Device Configuration editor to create the MBX devices that the bridge will use. 1. From the Windows Start menu, go to Cyberlogic Suites, then open the Configuration sub-menu, and then select MBX Bridge. Running the editor for the first time displays the above screen. Click Yes to have the editor automatically create Bridge devices for every MBX device that it can find. Cyberlogic Technologies Inc. - 22 - MBX Bridge Help 2. Next, the editor will ask if you want to create the default routings for the devices it found. Our desired configuration is not the default, so click No. When the Auto Configuration Wizard is done, it will open the MBX Bridge Configuration Editor and show the list of configured Bridge Devices. In this case, the editor identified two SA85 Modbus Plus devices. To continue, go to the Creating Routing Records section. Creating Routing Records In this section, you will create the records that define how the MBX Bridge will route messages between the MBX devices. The Routing Wizard will help you in this task. Cyberlogic Technologies Inc. - 23 - MBX Bridge Help 1. Select the Routing Records tab. This tab shows the routing records that have been configured for each of the bridge devices. Initially, of course, there are no routing records. 2. To create the first routing record, select MBX Device 0, then open the Edit menu, select Insert... and finally select Modbus Plus -> Modbus Plus. Cyberlogic Technologies Inc. - 24 - MBX Bridge Help The Modbus Plus to Modbus Plus Routing Wizard will open. On the first screen, you will enter the source parameters for the routing record. The Source Device field shows the device you selected in the previous step. This is a display-only field. 3. For the Slave Path Filter, select Single Path and then choose 1 as the First Path. 4. In the Modbus Plus Address Filter section, enter an asterisk for each of the three fields you can edit. The MB1 and MB2 fields are display-only and already set to a wildcard. This is because, in the case of Modbus Plus, the first routing byte always specifies the bridge’s node address, and the second byte always specifies the slave path number. Therefore no meaningful filtering can be done on these fields. 5. When you finish these entries, click Next >. Cyberlogic Technologies Inc. - 25 - MBX Bridge Help This screen allows you to edit the Destination parameters for the routing record. 6. Select MBX Device 1 as the desired Destination Device. 7. In the Modbus Plus Address fields, enter MB3, MB4, MB5, 0, 0 as shown in the desired configuration table we created at the start of this example. 8. The Timeout defaults to 5000 ms and can be left at that value. 9. Click Finish. The wizard creates the routing record and exits, returning you to the Routing Records tab. 10. Repeat the above procedure to create the second routing record, this time using MBX Device 1 as the source and MBX Device 0 as the destination. Cyberlogic Technologies Inc. - 26 - MBX Bridge Help 11. When you have finished, verify that the records look like this. To continue, go to Saving and Backing Up Your Configuration. Saving and Backing Up Your Configuration When the configuration is complete, you must save it to the disk. To protect the work that you put into configuring the MBX Bridge, we strongly recommend that you back up the configuration. 1. Open the File menu and select Save. Cyberlogic Technologies Inc. - 27 - MBX Bridge Help 2. Browse for the directory in which you want to store the configuration file. 3. Enter the File name you want to use for the configuration file, and then click the Save button. 4. You can now backup the configuration file using your normal data file backup procedure. To continue, go to Starting the Bridge and Applying the Configuration. Starting the Bridge and Applying the Configuration To begin routing messages, you must start the MBX Bridge and apply the configuration you just saved. Cyberlogic Technologies Inc. - 28 - MBX Bridge Help 1. The status display in the lower left corner of the screen indicates that the Bridge is not running. To start it, open the Control menu and choose Start Bridge. 2. Open the Control menu again to view the start and stop options. If Start on Boot is not checked, select it to have the MBX Bridge start when the system is booted. This is the mode that most users should choose. 3. Open the File menu and select Save & Update Bridge. This updates the MBX Bridge so that it will begin using the configuration you just saved. Caution! It is important to remember that just saving a configuration change does not update the configuration that is actually being used by the MBX Bridge. This allows you to make and save changes while the bridge is running, and then apply them after you are confident the changes are correct. To continue, go to the Limiting Resource Usage section. Cyberlogic Technologies Inc. - 29 - MBX Bridge Help Limiting Resource Usage By default, the MBX Bridge has no restrictions on the use of Data Master and Program Master paths it will use when routing messages. To minimize possible interference with other applications, the MBX Bridge can be limited to a maximum number of master paths. Refer to the Master Path Resource Management section for more information. For this example, we will set these limits to four PM paths. 1. Click the Bridge Devices tab and select MBX Device 0. 2. Open the Edit menu and select Edit... . Cyberlogic Technologies Inc. - 30 - MBX Bridge Help 3. The Bridge Device Configuration screen will open. From the Max. PM Paths dropdown box, select 4. 4. Click OK. MBX Device 0 is now limited to a maximum of four PM paths. 5. Repeat the procedure for the Device 1. This concludes the Quick-Start Guide. The MBX Bridge is now fully configured and ready to route messages. Cyberlogic Technologies Inc. - 31 - MBX Bridge Help CONFIGURATION EDITOR REFERENCE Before the MBX Bridge can be used, it must be properly configured. The configuration procedure involves creating two or more MBX devices and configuring routing records to route messages between them. To accomplish this, you must install the software, then run the MBX Device Configuration Editor to create the MBX devices the bridge will use. For information on this topic, refer to the help file for the drivers you wish to configure. After you have configured the drivers, you must run the MBX Bridge Configuration Editor to create the routing records. This section provides a detailed description of each of the MBX Bridge Configuration Editor features. If you are a new user and want a procedure to guide you through a typical configuration session, refer to the Quick-Start Guide. The MBX Bridge Configuration Editor consists of the three tabs: Routing Records Tab Bridge Devices Tab Diagnostics Tab In addition, two menus are of key importance: File Menu Control Menu The following sections provide complete descriptions of these tabs and menus. Routing Records Tab The MBX Bridge maintains a table of routing records that define how messages are routed. The Routing Records Tab lists all currently configured routing records. These records are grouped according to their source device. Each record contains a source section (Source Device, Slave Path, and Source Filter columns) and a destination section (Destination Device, Network Type, Destination Routing, and Timeout columns). Cyberlogic Technologies Inc. - 32 - MBX Bridge Help Source Device This column identifies the MBX Device that will receive command messages to be routed. The records are grouped by device, so the device is shown only once for each group. The check box allows you to enable or disable each record individually. If the box is not checked, the bridge ignores the record when routing messages. Slave Path The routing record may be applied only to messages routed through the slave paths specified in this column. The Slave Path column can contain a single slave path number or a range of slave paths. Each slave path can be used in multiple routing records. Source Filter The Source Routing Filter consists of one to five fields, each corresponding to a byte in the routing array or address that is part of each received command message. Each field can contain a number, a number range or an asterisk. When a command message is received on the selected slave path, each routing byte in its routing array or address is compared against the corresponding field in the Source Filter. Any command message that passes the filter will be routed as specified in the Destination Routing section. For details and examples of how source filtering works, refer to the Source Filter section. Destination Device The Destination Device column identifies the MBX Device to which messages will be routed. Cyberlogic Technologies Inc. - 33 - MBX Bridge Help Network Type This column identifies the type of network used by the destination device. Destination Routing The Destination Routing consists of up to five destination routing bytes, and each byte is defined by an arithmetic expression. The number of bytes and the form of the routing depends on the destination device’s network type. For details and examples of how the routing expressions work, refer to the Destination Routing section. Timeout (ms) This column specifies the reply message timeout in milliseconds. Creating a New Routing Record Select a Routing Record or a Device, and then select Insert from the Edit menu, or right-click a Routing Record or a Device and select Insert from the context menu. Caution! Routing records are always inserted following the selected record or device. Since the bridge processes all records from top to bottom, be sure that you insert the new record at the right spot, or move it later by using the Move Up or Move Down controls. The MBX Bridge Routing wizard will open. The screens you will see will depend upon the types of devices you are routing between, but will be similar for all types of devices. Here we will examine the Modbus Plus to Ethernet Routing screens. First, you will fill in the Source Filter information. Cyberlogic Technologies Inc. - 34 - MBX Bridge Help Source Device Specifies the MBX Device through which the messages will be received. This is a displayonly field. Slave Path Filter Designate the slave path or range of paths used for this routing record. If you need to use multiple slave paths that are not in a contiguous range, you must create multiple records, each with a single path or range of paths. Modbus Plus Address Filter Specifies the Modbus Plus addresses that will use this record. Messages that pass this filter (along with the Slave Path filter) will be routed by this record. For each of these fields, you may enter an address, an address range or an asterisk. The asterisk indicates that any value is acceptable. Note Modbus Plus source devices have a special condition in this filter. You cannot edit the first two fields because the first routing byte always specifies the bridge’s node address, and the second byte always specifies the slave path number. To filter based on these values change the Source Device or the Slave Path Filter instead. After completing the Source Filter information, click Next > to move to the Destination Routing section screen. Cyberlogic Technologies Inc. - 35 - MBX Bridge Help Destination Device Specifies the MBX Device through which the messages will be sent. Select the desired device from the drop-down list. IP Address / Mapped Address This selection allows you to designate whether you wish to specify the destination IP address here or provide an index (node address) into the IP address mapping table. The mapping table is configured within the Ethernet device. Refer to the Ethernet MBX Driver help for more information on configuring this table. IP Address Enter the IP address of the destination to which the message should be routed. You must use the syntax as described in the Destination Routing section. Destination Index Specify the destination index for the routed message. Again, you must use the syntax as described in the Destination Routing section. Timeout (ms) Enter the desired reply message timeout in milliseconds. Cyberlogic Technologies Inc. - 36 - MBX Bridge Help Deleting an Existing Routing Record Select the routing record that you want to delete and click the Delete button on the toolbar, or right-click the routing record and select Delete from the context menu. Editing an existing Routing Record Select the routing record that you would like to edit. Click the toolbar Edit button, or right-click the routing record and select Edit from the context menu. Moving an existing Routing Record The bridge processes all routing records from top to bottom. Therefore, the order of these records is important. To move an existing record, select the record that you would like to move. Click the toolbar Move Up or Move Down buttons, or right-click the routing record and select Move Up or Move Down from the context menu. You can also drag-and-drop the record with a mouse. Bridge Devices Tab The Bridge Devices Tab allows you to add, delete and edit the network devices used by the MBX Bridge. There are six columns on the tab. Name This is the descriptive name of the device. You may use any name that makes sense to you and the users of the bridge. MBX Device This is the device number that the MBX Bridge will use to identify the device for creating routing records. Cyberlogic Technologies Inc. - 37 - MBX Bridge Help Network Type This specifies whether the device is Modbus Plus, Ethernet, Modbus Master or Modbus Slave. Max. DM Paths Specifies the maximum number of data master paths that the device may use. Max. PM Paths Specifies the maximum number of program master paths that the device may use. Description You may use this field to provide an extra description of the device or the network it services. Automatic Configuration of Devices When you open the configuration editor for the first time, there are no devices configured. Open the Tools menu and select Auto Config to cause the editor to configure all of the MBX Devices it sees. Caution! The Auto Config feature creates bridge devices based on the MBX devices you have configured. Before you can use Auto Config to configure these devices, you must use the MBX configuration editor to create the MBX devices. Creating a New Bridge Device To create a device, open the Edit menu and select Insert..., or right-click in the record area and select Insert... from the context menu. The following screen will open. Cyberlogic Technologies Inc. - 38 - MBX Bridge Help Device Name Enter a descriptive name you wish to give to this device. Map to MBX Device Select the MBX device you wish to associate with this bridge device. You may select any of the devices on the drop-down box. If the MBX device you want to use is not configured, it will not appear on the list. In that case, click the Configure... button to launch the MBX Driver Configuration Editor, which will allow you to create the desired device. Network Type Select the type of network the device is connected to. Max. DM Paths This parameter allows you to limit the number of data master paths that the device will be permitted to use. Cyberlogic Technologies Inc. - 39 - MBX Bridge Help Note The MBX Driver allows a nearly unlimited number of simultaneous data master path transactions. The driver allows up to 65,535 logical DM paths to share the eight physical DM paths on the host interface adapter. Program master paths are still limited to a maximum of eight, however. This technique is highly efficient, so most users should configure the MBX Bridge to use an unlimited number of DM paths. Users who are concerned with the amount of memory used by the MBX Bridge may still limit the maximum number of DM paths. Max. PM Paths This parameter allows you to limit the number of program master paths that the device will be permitted to use. Description This optional field allows you to enter a more detailed description of the device. Editing a Bridge Device To edit an existing device, select it, open the Edit menu and select Edit..., or right-click and select Edit... from the pop-up menu. Deleting a Bridge Device To delete a device, select it, open the Edit menu and select Delete, or right-click and select Delete. If there are any routing records that use the device, you must delete those records before you will be permitted to delete the device. Diagnostics Tab The MBX Bridge includes a logger that records the activity taking place within the bridge. Logging is organized around listening points, which are defined as the combination of a source MBX device and a slave path. On the Diagnostics tab are three sub-tabs that allow you to select the listening points and data types you wish to log, and to view the logged data. Cyberlogic Technologies Inc. - 40 - MBX Bridge Help Configure Tab This tab allows you to select which listening points you want to log and what type of data will be logged for each. All listening points are shown on the screen. You may check the box on the left to enable logging for a listening point or uncheck the box to disable logging. You may also select the type of data to be logged, if any, for the point. View This column displays the name of the source device for the listening point. All devices on the bridge are displayed here. You cannot remove devices from the display, but you can collapse a device’s tree to reduce the display space it uses. Cyberlogic Technologies Inc. - 41 - MBX Bridge Help Enable Check Box When this box is checked, the logger will record the activity for the listening point. To enable or disable logging for multiple listening points, you can use ctrl-click or shift-click to select them, then right-click and select Enable or Disable from the context menu. Slave Path This column displays the slave path number for the listening point. It is a display-only field that cannot be edited. Listening Point ID This shows the unique identifier for the listening point as it will be recorded in the diagnostic activity log. It consists of the MBX device number and the slave path. Cyberlogic Technologies Inc. - 42 - MBX Bridge Help Logging Type You may choose to log Errors, All Activity (both traffic and errors), Traffic or None. To edit the Logging Type for a listening point, select the listening point, then click on its current Logging Type value. You may then select the desired logging type from the drop down box. You can also edit the Logging Type by right-clicking on a listening point and selecting Logging Type from the context menu. Cyberlogic Technologies Inc. - 43 - MBX Bridge Help To change the logging type for multiple listening points, you can use ctrl-click or shiftclick to select them, then right-click and select the desired logging type from the context menu. View Log Tab Once you have selected the types of activity to log for each listening point, you can view the logged information by selecting View Log. This screen shows the diagnostic messages as they are logged. While viewing the diagnostic information, the Tools/Diagnostics menu will give you control over some of the logging functions. The same functions are available as buttons on the tool bar. Clear Log Erases all of the records in the log. Save Log Saves the logged records to a disk file. This function is available only while logging is paused. Cyberlogic Technologies Inc. - 44 - MBX Bridge Help Pause Logging Suspends all logging, allowing you to examine records without having them scroll off the screen. Caution! Note You must pause the logging to save the log to disk. While logging is paused, only the displayed information is paused, but the bridge continues logging messages to the log file. Upon resuming logging, all messages buffered up in this file will be added to the display. However, very long pauses may cause the log file to overflow, in which case some data may be lost. Resume Logging Restarts the logging after you have paused it. Log Lines To Keep Allows you to set the maximum number of log records to keep, in the range of 1000 to 100,000 records. Once the limit is reached, the new records will overwrite the oldest records. Log File Size Allows you to set the maximum size of the log file, in the range of 1 to 10 GB. Once the file is full, the new records will overwrite the oldest records. View Statistics Tab This screen provides, for each listening point, a summary of the logged items. Cyberlogic Technologies Inc. - 45 - MBX Bridge Help File Menu After you create or modify a configuration, you must save it on the disk. In addition, if you use more than one configuration file, you must be sure that the MBX Bridge is running with the proper version of the correct file. You will use the File menu to manage these files. New Opens a new, blank configuration. Open... Allows you to open a previously-saved configuration file. Save Saves the configuration file you are currently editing, but does not update the configuration that the MBX Bridge is running. This allows you to edit and save a configuration without affecting the bridge operation. Save As... Allows you to specify the directory and name to use for saving the current configuration. Recent Files Opens a list of up to ten recently-used configuration files. Set Active Configuration... You can have many configuration files on the system, but only one can be the active configuration file that the MBX Bridge is using. When you install the Bridge software, the active configuration defaults to the file bMBX.cfg in a location that depends upon the Cyberlogic Technologies Inc. - 46 - MBX Bridge Help directory chosen for installation. If you wish to use a file with a different name or in a different location, you must specify this using Set Active Configuration... . When you select this item, this dialog box opens. It shows the name and location of the active file. To select another, click Browse... then locate the desired file and click OK. Save & Update Bridge When you make a change to the active configuration file, the changes will not immediately be applied to the MBX Bridge. To do that, you must select Save & Update Bridge from this menu or click the Save & Update Bridge button on the toolbar. This selection performs two functions: it saves the configuration change to the file on the disk and also applies it to the bridge so that messages will be routed according to the new configuration. If you do not want to apply the changes to the bridge, use Save or Save As... instead. Later, when you want to apply the changes, you can select Save & Update Bridge. Control Menu The Control Menu allows you to start and stop the MBX Bridge, either manually or automatically. Start Bridge If the MBX Bridge is not running, selecting this entry will start it. Cyberlogic Technologies Inc. - 47 - MBX Bridge Help Stop Bridge If the MBX Bridge is running, selecting this entry will stop it. Restart Bridge If the MBX Bridge is running, selecting this entry will stop it and then restart it. If the bridge is not running, it will start. Start on Boot When this entry is checked, the MBX Bridge is in automatic startup mode and will start when the system boots. You may still stop and start it manually using the other control items. Note Most users should enable the Start on Boot mode. Cyberlogic Technologies Inc. - 48 - MBX Bridge Help TROUBLESHOOTING The following sections describe the tools that are available to verify that the MBX Bridge is properly configured and operating. The Ethernet Loopback Test can help to determine if the bridge can receive Ethernet messages. The bridge may detect problems or other significant events and log them for viewing via the Windows Event Viewer. To assist you in interpreting these messages, we have included a list of MBX Bridge Server Event Log Messages and MBX Bridge Server Log File Messages. Ethernet Loopback Test You can use this test to determine if the bridge can receive messages from the Ethernet network. To do this, you will use the MBX Demo software to send a message to the bridge through its own Ethernet device. A second instance of MBX Demo will watch for incoming messages and will show whether or not they are received. 1. Open the Windows Start menu and go to Programs, then Cyberlogic Suites. 2. From there, open Diagnostics and finally MBX Demo. 3. Select [1] Set device number and then enter the number of the Ethernet MBX device you have configured. 4. You will be returned to the main screen. Verify that the device description is Ethernet MBX. 5. Select [4] Read slave data path messages. Cyberlogic Technologies Inc. - 49 - MBX Bridge Help 6. Enter a slave data path number. In this example, we entered slave path 4. 7. The display will change to this screen, and will show a series of T's to indicate that the software is timing out without receiving a message. 8. Leave this instance of MBX Demo running, and repeat steps 1 – 4 to open a second instance of MBX Demo. Cyberlogic Technologies Inc. - 50 - MBX Bridge Help 9. This time, select [2] Read selected node. 10. Enter the routing path, which is a destination index followed by an IP address. Use the slave path you selected in step 6 as the destination index, and the IP address of the bridge. 11. Enter a reference value, which is a register address to be read. The value here is not important, so you can use 40001. 12. Enter the length, or number of registers to be read. Again, the specific value is not important, so enter 1. Cyberlogic Technologies Inc. - 51 - MBX Bridge Help 13. Return to the first MBX Demo instance, and you will see the screen rapidly fill with + signs, indicating that the device is receiving messages. 14. Close both instances of MBX Demo. Event Viewer During startup and operation, the MBX Bridge may detect problems or other significant events. When a noteworthy event is detected, the driver sends an appropriate message to the Windows Event Logger. You can view these messages using the following procedure. 1. Open the Windows Start menu and go to Cyberlogic Suites, then open the Diagnostics sub-menu and select Event Viewer. 2. If you are looking for events relating to the MBX Bridge, select the Application branch from the Event Viewer tree, and look for entries with Cyberlogic - MBX Bridge (bMbxRpcS) in the Source column. Cyberlogic Technologies Inc. - 52 - MBX Bridge Help For events relating to the MBX Driver, select the System branch from the Event Viewer tree, and look for entries in the Source column named CLMBX or ClMbxPnP. For other types of events, select the Application branch from the Event Viewer tree, and look for entries in the Source column that begin with Cyberlogic. Caution! The Event Viewer does not clear itself after rebooting. Check the time stamps of the messages to be sure that you are not looking at an old error message. 3. Double-click on the desired entry to display a complete event message. 4. For detailed descriptions of error log messages, refer to the MBX Bridge Server Event Log Messages section. Cyberlogic Technologies Inc. - 53 - MBX Bridge Help MBX Bridge Server Event Log Messages bMBXApiM.DLL failed to load. Reinstall the product. A necessary DLL could not be loaded. This may indicate a corrupted installation. Repair the existing installation or remove and reinstall the software. MBX Bridge server is already running! Server start operation has been aborted. The driver could not start because another copy of it is already running. Cyberlogic MBX Bridge Server (<Version Number>) started. The driver successfully started. The driver’s version number may be requested if you call Cyberlogic Tech Support. Error opening the configuration file (<Config File>). The driver had trouble opening the configuration file. The most likely reason is that the configuration file has not been created yet. The MBX Bridge Configuration Editor creates the configuration file. Because the MBX Bridge can be configured on line, this is not a fatal error. No valid bridge records have been specified. There were no routing records in the configuration file. So, although the MBX Bridge started, no messages will be transferred. Unable to initialize global system resources. The driver was unable to allocate enough memory to start. Close other open applications or add more memory to the system, and then try to restart the driver. The bridge received the following error (<Error Number>, <Error Text>) when it tried to open the log file. The MBX Bridge was unable to open the log file. This is a promotional copy of the MBX Bridge. The bridge will operate for <Number of Hours> hours. This is a time-limited installation of the software. After the stop time, the driver will not allow any further I/O operations. This is a promotional copy of the MBX Bridge. The allowed operation time has expired. The MBX Bridge is shutting down. This is a time-limited installation of the software. The stop time has been reached or exceeded, so the driver will not allow any further I/O operations. Cyberlogic Technologies Inc. - 54 - MBX Bridge Help MBX Bridge Server Log File Messages <Listening Point>: Received the following error (<Error Number>, <Error Text>) while trying to open the source device. The MBX Bridge received an error when it tried to access the source MBX device. Verify that the source device is configured and accessible. <Listening Point>: Received the following error (<Error Number>, <Error Text>) while trying to open the source device. The MBX Bridge received an error when it tried to access the source MBX device. Verify that the source device is configured and accessible. <Listening Point>: Received the following error (<Error Number>, <Error Text>) while trying to open the slave path. The MBX Bridge was unable to open the slave path. Verify that no other application has the slave path open. Also verify the MBX source device has been configured, and the slave path number is valid for that device. <Listening Point>: Received the following error (<Error Number>, <Error Text>) while trying to read the slave path. The MBX Bridge received an error when it tried to wait for incoming messages on the slave path. <Listening Point>: Received the following error (<Error Number>, <Error Text>) while trying to receive a query on the slave path. The MBX Bridge received a message on the slave path. However, there was a problem retrieving the message from the MBX source device. <Listening Point>: Unable to find a destination for this source routing-<Routing Path>. A message was received on the slave path. However, the routing information in the message cound not be matched to a destination. If the message is valid and needs to be sent to a destination, run the MBX Bridge Configuration Editor to specify the destination. <Listening Point>: Unable to get a <Data/Program> master path on destination device <MBX Device Number>. Check the master-path-limits configuration of the bridge. A received message was targeted for the specified destination device, but no master path configuration for that device was found. Rerun the MBX Bridge Configuration Editor and go to the DM/PM Paths tab. Verify that the destination device is listed and apply the changes. <Listening Point>: Unable to open a <Data/Program> master path on Cyberlogic Technologies Inc. - 55 - MBX Bridge Help destination device <MBX Device Number>. The MBX Bridge was unable to get a master path on the destination device. Usually this means all master paths that are available to the bridge are in use. If possible, increase the number of master paths available to the bridge by closing any applications using master paths, or by running the MBX Bridge Configuration Editor and increasing the number of master paths the bridge is allowed to use. <Listening Point>: Received the following error (<Error Number>, <Error Text>) while trying to send the query to the destination device. The retransmission of the message to the destination device failed. <Listening Point>: Received the following error (<Error Number>, <Error Text>) while trying to get the results of the last transmission. The retransmission of the message to the destination device succeeded, but there was trouble retrieving the reply. <Listening Point>: Destination evaluated to an out-of-range Filter=<Filter Record>. Destination=<Destination Routing>. value. One or more of the destination routing bytes was not in the range of 0 – 255. <Listening Point>: Query received with the following source address: <Source Address>. Traffic Message. The MBX Bridge received a command query on a slave path. This message displays the routing information that came along with the command. <Listening Point>: <Query/Reply>--Bytes <Ending Byte Number>: <Bytes> <Starting Byte Number> - Traffic Message. This message displays the actual command queries and replies as hexadecimal bytes. <Listening Point>: Sending query to destination (Device <MBX Device Number>. Address: <Destination Address>). Traffic Message. The MBX Bridge is retransmitting the command it received to the destination device. <Listening Point>: Reply received from the destination. Traffic Message. The destination received the retransmitted command and has sent back a reply. Cyberlogic Technologies Inc. - 56 - MBX Bridge Help The log file was cleared. The MBX Bridge Configuration Editor’s View Log tab menu was used to clear the log file. Cyberlogic Technologies Inc. - 57 - MBX Bridge Help APPENDIX A: DYNAMIC ROUTING In addition to static message routing, the MBX Bridge permits dynamic routing of messages. When using dynamic routing, an application on an Ethernet node can specify at run-time which routing it wants to use. Note that dynamic routing is available only for messages initiated from the Ethernet side, and is limited to a single network on the destination side, typically Modbus Plus. Dynamic routing is supported by many Schneider applications, such as ProWORX programmer. Some applications refer to it as the SGATE.EXE routing. However, software developers can create new applications that use this feature. Those who wish to do so should read the Dynamic Routing Theory section. Types of Dynamic Routing There are two types of dynamic routing available, host-based and socket-based. Host-Based Dynamic Routing Host-based dynamic routing sets up the routing from an Ethernet node (IP address) to a destination network node. The MBX Bridge will route any message from that Ethernet node with destination index 0 to the specified destination node. The bridge maintains a cache of 25 host-based routing records, so up to 25 hosts may concurrently set up and use this mode of dynamic routing. If all 25 records are in use and another host attempts to establish an association, the new one will overwrite the record in the cache that has been idle for the longest time. Socket-Based Dynamic Routing Socket-based dynamic routing sets up the routing from a particular Ethernet socket (IP address and port) to a destination network node. The bridge will route any message from that Ethernet socket with destination index 254 to the specified destination node. The bridge maintains a cache of eight socket-based routing records, so up to eight sockets may concurrently set up and use this mode of dynamic routing. If all eight records are in use, the bridge will reject new requests until an opening exists. Configuring Dynamic Routing To set up for dynamic routing, open the Edit menu and select Dynamic Routing... . The Dynamic Routing dialog will open. Cyberlogic Technologies Inc. - 58 - MBX Bridge Help Enable Dynamic Routing If this box is checked, dynamic routing is enabled. If it is unchecked, dynamic routing is disabled and the rest of the fields on the screen are ignored. Source Device Select the Ethernet device to be used for dynamic routing. Remember that all messages must be initiated from an Ethernet network. Destination Device Select an MBX device to be used for dynamic routing. Remember that all messages can only be routed to a single network selected here. Timeout (sec) Select a timeout value in the range of 1 – 99999 seconds. The default is 15. If the timeout expires before the message can be routed, the bridge will discard the message and report a failure. Application Setup Dynamic routing is supported by many Schneider applications, such as ProWORX programmer. Some applications refer to it as the SGATE.EXE routing. In such a case, you would configure the application communications to use an Ethernet gateway of type SGATE.EXE, then specify the IP address of the MBX Bridge as the gateway IP address. On the MBX Bridge system, you would enable dynamic routing and select the source and destination devices as described above. No further configuration is needed. Specifically, there is no need to create routing records in the bridge. Cyberlogic Technologies Inc. - 59 - MBX Bridge Help Dynamic Routing Theory This section is intended for programmers who want to create applications that use dynamic routing. A typical user need not be concerned with these concepts. Setting Up the Routing As its name implies, dynamic routing is not part of the MBX Bridge’s fixed configuration. Instead, you will use runtime commands to set up the routing before you can use it. The command will specify whether you want to use host-based or socket-based routing, and will specify the Modbus Plus routing path to the destination node. The command is a Preset Multiple Registers query that must be sent to the bridge with a destination index of 255. Its format is shown in the following table. Byte Description 0x10 Function code: Preset Multiple Registers 0x00 0x00 Host-based routing or 0xFE Socket-based routing 0x00 0x03 0x06 Number of bytes that follow 0x05 Number of bytes that follow mb1 Destination routing path field 1 mb2 Destination routing path field 2 mb3 Destination routing path field 3 mb4 Destination routing path field 4 mb5 Destination routing path field 5 In this case, the routing path of the destination device is mb1.mb2.mb3.mb4.mb5. Using Dynamic Routing After you have configured the MBX Bridge for dynamic routing, you can send it the messages you want to route. If you configure the bridge for host-based routing, you must send the message to the bridge with destination index 0. All such messages from that host will be routed to the specified destination. If you configure the bridge for socket-based routing, you must send the message to the bridge with destination index 254. These messages will be routed to the specified Modbus Plus path. Cyberlogic Technologies Inc. - 60 - MBX Bridge Help APPENDIX B: MBX ARCHITECTURE AND COMPANION PRODUCTS The MBX Bridge is part of the Cyberlogic MBX family. This family consists of several wellintegrated products that provide connectivity for Modbus, Modbus Plus and Modbus TCP (Ethernet) networks in distributed environments. This section illustrates the layout of the MBX architecture. It includes a description of each MBX component along with suggested methods for employing them to support Modicon networks. The MBX architecture presents a consistent framework to address different connectivity needs. MBX Driver The MBX Driver provides connectivity between Modbus Plus interface adapters and Windows-based applications. It supports all Modbus Plus interface adapters for ISA, EISA, MCA, PCI, PCMCIA and USB buses that are compatible with the supported operating systems. For a complete list of supported adapters, refer to the MBX Driver help file. Multiple interface cards can be installed at the same time, limited only by the number of available slots. The kernel mode device driver of the MBX Driver is the highest-performance Modbus Plus driver in the industry. The driver operates in either interrupt or polled mode and fully implements all Modbus Plus features, providing support for Data Master/Slave, Program Master/Slave, Global Data and Peer Cop. The high-performance native API (MBXAPI) of Cyberlogic Technologies Inc. - 61 - MBX Bridge Help the MBX Driver takes advantage of the event-driven, multitasking, multithreaded features of Windows operating systems. The driver includes the MBX Gateway Server for remote access by the MBX Gateway Driver and is fully compatible with all other components of the MBX family. The MBX Driver is included in the following products: MBX OPC Enterprise Suite MBX OPC Premier Suite MBX OPC Server Suite MBX Bridge Suite MBX Driver Suite Ethernet MBX Driver The Cyberlogic Ethernet MBX Driver emulates Modbus Plus over the Modbus TCP protocol. This allows most Modbus Plus-compatible software to gain instant access to Modbus TCP-enabled devices without code modifications. It is compatible with all Ethernet cards supported by Windows. The driver includes the MBX Gateway Server for remote access by the MBX Gateway Driver and is fully compatible with all other components of the MBX family. The Ethernet MBX Driver is included in the following products: MBX OPC Enterprise Suite MBX OPC Premier Suite MBX OPC Server Suite MBX Bridge Suite MBX Driver Suite Serial MBX Driver The Serial MBX Driver provides connectivity to Modbus-compatible devices through standard serial COM ports. It supports both master and slave mode of communications for Modbus ASCII and Modbus RTU protocols. The driver includes the MBX Gateway Server for remote access by the MBX Gateway Driver and is fully compatible with all other components of the MBX family. Cyberlogic Technologies Inc. - 62 - MBX Bridge Help The Serial MBX Driver is included in the following products: MBX OPC Enterprise Suite MBX OPC Premier Suite MBX OPC Server Suite MBX Bridge Suite MBX Driver Suite (Some OEM versions do not include the Serial MBX Driver.) MBX Gateway Driver The MBX Gateway Driver lets applications use MBX devices on remote MBX Gateway Server nodes as though they were on the local system. The client system running the MBX Gateway Driver must be a Windows node connected over a standard LAN to another system running the MBX Gateway Server. It can then access the Modbus, Modbus Plus and Modbus TCP networks that are connected to the server node. For example, the MBX Gateway Driver provides complete MBX Driver functionality to the client node applications, including support for Data Master/Slave, Program Master/Slave, Global Data and Peer Cop. An interface adapter, such as a PCI-85 card, is not required on the client node. MBX Gateway Driver nodes can communicate with multiple remote servers and all Windows-compatible TCP/IP networks are supported. The MBX Gateway Driver is compatible with all other components of the MBX family. The MBX Gateway Driver is included in the following products: MBX OPC Enterprise Suite MBX OPC Premier Suite MBX OPC Server Suite MBX Bridge Suite MBX Driver Suite Virtual MBX Driver The Virtual MBX Driver enables 16-bit NETLIB/NetBIOS-compatible applications, such as Modsoft and Concept, to run concurrently with 32-bit applications on the same computer. It allows multiple 16-bit applications and multiple instances of a single 16-bit application to run under the latest Windows operating systems. If your computer uses Windows 7, Vista or the 64-bit edition of any Windows version, refer to Cyberlogic Knowledge Base article KB2010-02 Running 16-Bit Applications for important information on using the Virtual MBX Driver on your system. Cyberlogic Technologies Inc. - 63 - MBX Bridge Help The Virtual MBX Driver is fully compatible with all MBX components and requires at least one of these drivers to operate: MBX Driver Ethernet MBX Driver Serial MBX Driver MBX Gateway Driver The Virtual MBX Driver is included in the following products: MBX OPC Enterprise Suite MBX OPC Premier Suite MBX OPC Server Suite MBX Bridge Suite MBX Driver Suite MBX Bridge The MBX Bridge seamlessly routes messages between MBX-compatible devices. For example, the MBX Bridge can route messages between Ethernet and Modbus Plus networks, between Modbus and Modbus Plus networks or any other combination of the supported networks. Depending on the user’s needs, it requires one or more of the following drivers to operate: MBX Driver Ethernet MBX Driver Serial MBX Driver MBX Gateway Driver The MBX Bridge is included in the MBX Bridge Suite. MBX OPC Server The Cyberlogic MBX OPC Server connects OPC-compliant client applications to Modbus, Modbus Plus and Modbus TCP networks. It supports the latest OPC Data Access and OPC Alarms and Events specifications and uses the MBX drivers for connectivity to Modicon networks. The MBX OPC Server supports multiple, priority-based access paths for reliable, redundant communications. It also supports both solicited and unsolicited communications and uses an advanced transaction optimizer to guarantee minimum load on your networks. With only a couple of mouse clicks, the MBX OPC Server will automatically detect and configure the attached networks and node devices. Other noteworthy features include DirectAccess, Data Write Protection and Health Watchdog. Cyberlogic Technologies Inc. - 64 - MBX Bridge Help The MBX OPC Server is included in the following products: MBX OPC Enterprise Suite MBX OPC Premier Suite MBX OPC Server Suite MBX SDK Software developers can use the MBX Software Development Kit to provide connectivity to Modbus, Modbus Plus and Modbus TCP networks from their 32-bit C/C++ applications. The SDK supports two styles of interfaces, NETLIB and Cyberlogic's high-performance MBXAPI. The NETLIB interface is an excellent bridge for developers who would like to port their 16-bit applications to the latest Windows environments. Developers of new applications can use either the NETLIB or the MBXAPI interface. For a complete reference of all NETLIB library functions, refer to Modicon IBM Host Based Devices User's Guide, available from Schneider Electric (Order #890 USE 102 00). Since all MBX family drivers are built on the same MBX architecture, applications developed with the MBX SDK can be used with all MBX family drivers and can execute under all current Windows operating systems. Cyberlogic Technologies Inc. - 65 -