1
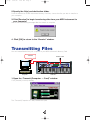
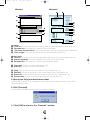
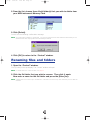
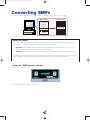
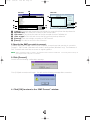
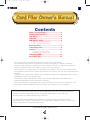
cf_e.qx
6/25/99
6:05 PM
Page 1
Contents
What is the Card Filer?..................................2
Starting the Card Filer ...................................3
Top display......................................................4
Menu Bar ........................................................4
MIDI Device Setup .........................................5
MIDI Port Setup (Windows).......................5
OMS Settings (Macintosh) ........................6
Receiving Files ...............................................7
Transmitting Files...........................................9
Controls ........................................................11
Deleting files and folders .........................11
Renaming files and folders......................12
Converting SMFs .........................................13
Error Messages............................................15
•
•
•
•
•
•
•
Click on the red-colored text to jump to the related item in this manual.
The software and this owner’s manual are exclusive copyrights of Yamaha Corporation.
Copying of the software or reproduction of this manual in whole or in part by any means is
expressly forbidden without the written consent of the manufacturer.
Yamaha makes no representations or warranties with regard to the use of the software and
documentation and cannot be held responsible for the results of the use of this manual and the
software.
Copying of the commercially available music sequence data and/or digital audio files is strictly
prohibited except for your personal use.
The company names and product names in this Owner’s Manual are the trademarks or
registered trademarks of their respective companies.
The screen displays as illustrated in this Owner’s Manual are for instructional purposes, and
may appear somewhat different from the screens which appear on your computer.
This owner’s manual assumes that you are already familiar with basic Windows/Macintosh
operation. If you are not,please refer to the owner’s manual which came with your
Windows/Mac OS software before using Card Filer.
For information about hardware requirements, the interconnection of devices and the
installation of the Card Filer software, refer to the separate “Installation Guide” as well as the
Owner’s Manual for the respective MIDI device.
©1999 Yamaha Corporation. All rights reserved.
1
cf_e.qx
6/25/99
6:05 PM
Page 2
What is the Card Filer?
With the Card Filer, you can receive and transmit data between your computer and your MIDI
instrument. You can also use it to manage the files stored on your MIDI instrument’s Memory Card
via your computer. The card filer can perform the following four functions.
Receive MIDI instrument Data
You can save your MIDI instrument’s Memory Card data on your computer (Page 8).
Receive
Memory Card
GAIN
LINE 1 MIC/LINE 2
A / D INPUT
L/MONO
PHONES
R
OUTPUT
1
2
FOOT
FOOT
INDIVIDUAL OUTPUT VOLUME CONTROLLER SUSTAIN
FOOT
SWITCH
IN
BREATH
TO HOST
OUT
HOST SELECT
THRU
MIDI
mLAN
CARD
POWER
MUSIC SYNTHESIZER
Realtime Control
Extended Plug-in System
VOLUME
FILTER
EFFECT
MEMORY
MODE
PORTAMENTO
CUTOFF
RESONANCE
REVERB
PHRASE CLIP
VOICE
PRE1
PRE2
1
DRUM
UTILITY
REC
SUSTAIN
EXIT
SYSTEM
JOB
A
B
C
1
B
C
D
E
F
G
H
ENTER
PLAY/
STOP
ON/
OFF
VEL RATE
INT
EXT
1
2
3
ELEMENT SELECT
2
3
QED
ARPEGGIO
4
1
2
3
ELEMENT ON/OFF
4
5
6
CONTROL
COM LFO
EFFECT
4
7
8
9
10
11
12
13
14
15
16
OSC
PITCH
FILTER
AMPLITUDE
LFO
EQ
PLG
2
DRUM
DEC/NO INC/YES
HOLD
PAN
EDIT
RELEASE
ARPEGGIO
2
CONTROL
CARD
PITCH
SEQ PLAY
DECAY
MIXER
1
A
CHORUS
ON/
OFF
ATTACK
SCENE
UP
MASTER
KEYBOARD
BANK
EG
OCTAVE
DOWN
EF
BYPASS
PERFORM
PLG1
GENERAL
PLG2
PROGRAM
PART
COMPARE
STORE
SHIFT
TEMPO
Computer
PAGE
PART/ELEMENT
DATA
CS6x etc...
Transmit MIDI instrument Data
You can transmit data from your computer to your MIDI instrument’s Memory Card (Page 9).
Transmit
Memory Card
GAIN
LINE 1 MIC/LINE 2
A / D INPUT
L/MONO
PHONES
R
OUTPUT
1
2
FOOT
FOOT
INDIVIDUAL OUTPUT VOLUME CONTROLLER SUSTAIN
FOOT
SWITCH
IN
BREATH
TO HOST
OUT
HOST SELECT
THRU
MIDI
mLAN
CARD
POWER
MUSIC SYNTHESIZER
Realtime Control
Extended Plug-in System
VOLUME
FILTER
EFFECT
MODE
PORTAMENTO
CUTOFF
RESONANCE
REVERB
PHRASE CLIP
VOICE
PRE1
PRE2
1
SUSTAIN
MIXER
CARD
JOB
SYSTEM
A
B
C
1
C
D
E
F
G
H
VEL RATE
Computer
ENTER
PLAY/
STOP
ON/
OFF
TEMPO
INT
EXT
1
2
3
ELEMENT SELECT
2
3
QED
ARPEGGIO
4
1
2
3
ELEMENT ON/OFF
4
5
6
CONTROL
COM LFO
EFFECT
4
7
8
9
10
11
12
13
14
15
16
OSC
PITCH
FILTER
AMPLITUDE
LFO
EQ
PLG
2
DRUM
DEC/NO INC/YES
HOLD
PAN
EDIT
RELEASE
ARPEGGIO
2
CONTROL
B
BANK
UTILITY
EXIT
SEQ PLAY
DECAY
SCENE
A
1
DRUM
REC
PITCH
ON/
OFF
ATTACK
UP
MASTER
KEYBOARD
CHORUS
EG
OCTAVE
DOWN
MEMORY
EF
BYPASS
PERFORM
PLG1
GENERAL
PLG2
PROGRAM
PART
COMPARE
STORE
SHIFT
PAGE
PART/ELEMENT
DATA
CS6x etc...
Manage Files on Memory Card
You can delete and rename files/folders on your MIDI instrument’s Memory Card using your
computer (Page 11).
Delete
Rename
abcd.mid
abcd.mid
2
efgh.mid
cf_e.qx
6/25/99
6:05 PM
Page 3
SMF Format Conversion
You can convert Standard MIDI Files on your computer from Format 1 to Format 0 so that they
can be played back on your MIDI instrument (Page 13).
SMF Format1
SMF Format0
1 Track
2 Track
3 Track
4 Track
1~16 Track
Exchange
16 Track
Starting the Card Filer
n You will get an error message if your computer’s MIDI driver has not been properly installed or if your computer and
MIDI instrument are not interconnected correctly. For details about Error Messages, see page 15.
Once you have connected your MIDI instrument to your computer and installed the Card Filer
software, you are ready to start using the Card Filer.
On Windows
Click [Start], go to Program Files → YAMAHA Card Filer → Card Filer and click the “Card Filer” icon.
On Macintosh
n If you are using the Card Filer on a Macintosh computer, open the “Chooser” from the Apple menu and turn off
“Apple Talk.”
Open the “YAMAHA Card Filer” folder and double-click the “Card Filer” icon.
3
cf_e.qx
6/25/99
6:05 PM
Page 4
Top display
When you start the Card Filer, the “top display” will appear as shown below.
1
2
3
4
1 Opens the “Receive” window where you can transfer data from your MIDI instrument’s Memory
Card to your computer, then save it.
2 Opens the “Transmit” window where you can transfer data from your computer to your MIDI
instrument.
3 Opens the “Control” window where you can delete and rename files/folders on your MIDI
instrument.
4 Opens the “SMF Convert” window where you can convert SMF files on your computer from
Format 1 to Format 0.
Menu Bar
File
Quits the Card Filer application.
Transfer
Same as the [Receive] button of the top display.
Same as the [Transmit] button of the top display.
Same as the [Control] button of the top display.
Same as the [SMF Convert] button of the top display.
Setup
Opens the “MIDI Port Setup” window
where you can specify your computer’s
“MIDI IN Port” and “MIDI OUT Port” used to
communicate with your MIDI instrument.
Help
Opens the Card Filer Manual PDF file.
Displays the Card Filer’s version, etc.
4
cf_e.qx
6/25/99
6:05 PM
Page 5
MIDI Device Setup
You will need to specify the MIDI device drivers through which your computer will
communicate with your MIDI instrument. Follow the procedure below.
n If you are using a Macintosh, refer to the section “OMS Settings” on page 6.
MIDI Port Setup (Windows)
1. Select “MIDI Port Setup” from the “Setup” menu.
The “MIDI Port Setup” dialog box is displayed.
2. Click on each of the “▼” buttons for the “MIDI IN Port” or “MIDI OUT
Port”, select the MIDI driver from the drop-down list that is displayed.
• If the MIDI instrument’s TO HOST terminal is connected directly to the computer’s serial port.
Select the “Yamaha CBX Driver” for the “MIDI IN Port”, and the “Yamaha CBX A Driver” for the
“MIDI OUT Port”.
• If the MIDI instrument’s MIDI ports are connected to the computer via a MIDI interface.
For both the “MIDI IN Port” and “MIDI OUT Port”, select the MIDI driver that is compatible with
the MIDI interface you are using.
n For information about how to install YAMAHA CBX Driver, refer to the README file in the “Mididrv” folder of the
included CD-ROM.
3. Click [OK].
5
cf_e.qx
6/25/99
6:05 PM
Page 6
OMS Settings (Macintosh)
The Card Filer software uses OMS (Open Music System) for MIDI input/output. To use the
Card Filer software, OMS must be installed beforehand.
n For information about installing OMS, refer to the separate Installation Manual.
About OMS
Card Filer uses the OMS (Open Music System) to transfer MIDI data to an external MIDI
device. OMS is a system extension that goes in the Mac OS System folder, designed to
manage the MIDI data stream (input & output) in a computer, to enable MIDI data transfer
between MIDI software and hardware attached to the computer. OMS is a de facto standard
of the MIDI environment under the Mac OS, and various music software manufacturers have
released OMS-compatible sequencer and other software.
OMS has the following merits:
• As OMS-compatible MIDI applications communicate with various MIDI devices via OMS, it
is no longer necessary for you to set up multiple MIDI drivers for those applications. Thus,
you can avoid conflicts between different drivers with the same purpose (MIDI control).
•
Once a Studio Setup is read in OMS, any OMS-compatible application will be aware of it,
even if you need to reconfigure the routing of the MIDI data stream or change the current
Studio Setup. OMS-compatible applications will commonly recognize the new
configuration.
•
You can have different Studio Setups to choose one from,to switch to a different MIDI
routing (patches between MIDI devices and software) fast and easily.
•
Every time the OMS Setup application is opened, any MIDI device connected to the
computer is automatically detected, and its icon appears with a current MIDI status
(channel number, port number, patches, etc.). Once devices are configured with OMS
Setup, however, you need not care too much about the status.
•
OMS can drive various MIDI interfaces, including the standard type (16 channels) and the
multi-port type (16 channels per port). If you use a multi-port type, you can control over 16
channels simultaneously via OMS.
n For more information about OMS features, see the READ ME file included with OMS.
Setting up OMS
Setup files for the CS6x, CS6R etc., have already been created for use with the Card Filer;
please use the appropriate file for your device. The following example is for the CS6x.
1. First, interconnect the “TO HOST” terminal of the CS6x and the Macintosh serial port, then
set the “Host Select” switch of the CS6x to “Mac.”
2. Double-click the “OMS Setup” icon in the “OMS Application” folder.
3. Choose “Open” from the “File” menu and select “CS6x-Modem” from within the “OMS
setup for YAMAHA” folder.
n If you are using a computer with no modem port (such as the Performa series), look in the “CS6x-Printer”
folder instead.
4. Choose “Make Current” from the “File” menu. The setup for your CS6x is now saved as
the current studio setup.
5. Choose “Quit” from the “File” menu to close OMS Setup.
n The Card Filer is not compatible with versions of OMS earlier than 2.0.
6
cf_e.qx
6/25/99
6:05 PM
Page 7
OMS Port Setup
Having set up OMS, you now need to start up the Card Filer and set the OMS ports.
1. First, start up the Card Filer by double-clicking its icon.
n If AppleTalk is enabled, you will get an alert message. Click “OFF.” It will take some time for AppleTalk to be
disabled.
2. Choose “OMS Port Setup” from the Card Filer’s “Setup” menu, then select the port
settings. In the following example, the tone generator is a CS6x and its settings are
applied to OMS.
MIDI In
Select “CS6x.”
MIDI Out
Select “CS6x.”
3. Click [OK] to close OMS Port Setup.
Receiving Files
You can save on your MIDI instrument’s Memory Card data on your computer.
Receive
Memory Card
GAIN
LINE 1 MIC/LINE 2
A / D INPUT
L/MONO
PHONES
R
OUTPUT
1
2
FOOT
FOOT
INDIVIDUAL OUTPUT VOLUME CONTROLLER SUSTAIN
FOOT
SWITCH
IN
BREATH
TO HOST
OUT
HOST SELECT
THRU
MIDI
mLAN
CARD
POWER
MUSIC SYNTHESIZER
Realtime Control
Extended Plug-in System
VOLUME
FILTER
EFFECT
MEMORY
MODE
PORTAMENTO
CUTOFF
RESONANCE
REVERB
PHRASE CLIP
VOICE
PRE1
PRE2
1
SUSTAIN
MIXER
CARD
JOB
SYSTEM
A
B
C
1
C
D
E
F
G
H
VEL RATE
Computer
PLAY/
STOP
ON/
OFF
TEMPO
INT
EXT
DRUM
PLG1
1
2
3
ELEMENT SELECT
2
3
QED
ARPEGGIO
4
1
2
3
ELEMENT ON/OFF
4
5
6
CONTROL
COM LFO
EFFECT
8
10
11
12
13
14
15
16
PITCH
FILTER
AMPLITUDE
LFO
EQ
PLG
STORE
SHIFT
PAGE
PART/ELEMENT
n You do not need to perform a bulk dump from your MIDI instrument.
4
7
9
OSC
GENERAL
PLG2
COMPARE
CS6x etc...
7
ENTER
2
DEC/NO INC/YES
HOLD
PAN
EDIT
RELEASE
ARPEGGIO
2
CONTROL
B
BANK
UTILITY
EXIT
SEQ PLAY
DECAY
SCENE
A
1
DRUM
REC
PITCH
ON/
OFF
ATTACK
UP
MASTER
KEYBOARD
CHORUS
EG
OCTAVE
DOWN
EF
BYPASS
PERFORM
DATA
PROGRAM
PART
cf_e.qx
6/25/99
6:05 PM
Page 8
1. Open the “Receive (Card → Computer)” window.
Click [Receive] in the top display.
The “Receive (Card → Computer)” window will open.
Windows
Macintosh
1
2
Computer
Computer
1
2
8
9
8
9
Memory Card
5
)
!
Memory Card
3
4
5
4
7
6
7
6
@
#
Computer
1 “Save in:”: Click this and choose the destination folder (to save to) from the drop-down list.
2 File/folder list: This shows the contents of the destination folder.
Memory Card
3 “Look in:”: Click this and choose the source folder (in the memory card) from the drop-down list.
4 [Refresh (Update)]: Click this to update the contents of the current folder.
5 File/folder list: This shows the contents of the source folder.
6 “File name (Receive files)”: This shows the name of the file selected from the File/folder list.
7 “Files of type:”: Click this and choose the file type from the drop-down list.
8 [Receive]: Click this to begin receiving the file.
9 [Cancel]: Click this to cancel the file transfer.
)
!
@
#
[Add]: Choose a file and click this to add it to the “Receive files” list.
[Add All]: Click this to add all files in the current folder to the “Receive files” list.
[Remove]: Choose a file and click this to remove a file from the “Receive files” list.
[Remove All]: Click this to remove all files from the “Receive files” list.
8
cf_e.qx
6/25/99
6:05 PM
Page 9
2. Specify the file(s) and destination folder.
From the bottom list of MIDI instrument Memory Card files, choose the files you wish to transfer to
your computer.
3. Click [Receive] to begin transferring data from your MIDI instrument to
your computer.
You will see the following message after the transfer is complete:
4. Click [OK] to return to the “Receive” window.
Transmitting Files
You can transmit data from your computer to your MIDI instrument’s Memory Card.
Transmit
Memory Card
GAIN
LINE 1 MIC/LINE 2
A / D INPUT
L/MONO
PHONES
R
OUTPUT
1
2
FOOT
FOOT
INDIVIDUAL OUTPUT VOLUME CONTROLLER SUSTAIN
FOOT
SWITCH
IN
BREATH
TO HOST
OUT
HOST SELECT
THRU
MIDI
mLAN
CARD
POWER
MUSIC SYNTHESIZER
Realtime Control
Extended Plug-in System
VOLUME
FILTER
EFFECT
MODE
PORTAMENTO
CUTOFF
RESONANCE
REVERB
PHRASE CLIP
VOICE
PRE1
PRE2
1
SUSTAIN
MIXER
B
C
D
E
F
G
H
BANK
CARD
JOB
SYSTEM
A
B
C
1
VEL RATE
PLAY/
STOP
ON/
OFF
TEMPO
Computer
The “Transmit (Computer → Card)” window will open.
EXT
DRUM
1
2
3
ELEMENT SELECT
2
3
QED
ARPEGGIO
4
1
2
3
ELEMENT ON/OFF
SHIFT
PAGE
4
5
6
CONTROL
COM LFO
EFFECT
4
7
8
9
10
11
12
13
14
15
16
OSC
PITCH
FILTER
AMPLITUDE
LFO
EQ
PLG
GENERAL
PLG2
STORE
PART/ELEMENT
1. Open the “Transmit (Computer → Card)” window.
Click [Transmit] in the top display.
INT
PLG1
COMPARE
CS6x etc...
9
ENTER
2
DEC/NO INC/YES
HOLD
PAN
EDIT
RELEASE
ARPEGGIO
2
CONTROL
UTILITY
EXIT
SEQ PLAY
DECAY
SCENE
A
1
DRUM
REC
PITCH
ON/
OFF
ATTACK
UP
MASTER
KEYBOARD
CHORUS
EG
OCTAVE
DOWN
MEMORY
EF
BYPASS
PERFORM
DATA
PROGRAM
PART
cf_e.qx
6/25/99
6:05 PM
Page 10
Windows
Macintosh
1
2
1
2
)
!
3
4
5
4
8
9
@
#
3
6
8
9
7
6
7
Computer
1 “Look in:”: Click this and choose the source folder (to send from) from the drop-down list.
2 File/folder list: This shows the contents of the source folder.
3 “File name (Transmit Files):”: This shows the name of the file selected from the File/folder list.
4 “Files of type:”: Click this and choose the file type from the drop-down list.
Memory Card
5 “Save in:”: Click this and choose the destination folder (to save to) from the drop-down list.
6 [Refresh (Update)]: Click this to update the contents of the current folder.
7 File/folder list: This shows the contents of the destination folder.
8 [Transmit]: Click this to begin transmitting the file.
9 [Cancel]: Click this to cancel the file transfer.
)
!
@
#
[Add]: Choose a file and click this to add it to the “Transmit files” list.
[Add All]: Click this to add all files in the current folder to the “Transmit files” list.
[Remove]: Choose a file and click this to remove a file from the “Transmit files” list.
[Remove All]: Click this to remove all files from the “Transmit files” list.
2. Specify the file(s) and destination folder.
From the top list of files on your computer, choose those that you wish to transfer to your MIDI
instrument Memory Card.
3. Click [Transmit].
You will see the following message after the transfer is complete.
4. Click [OK] to return to the “Transmit” window.
10
cf_e.qx
6/25/99
6:05 PM
Page 11
Controls
You can delete and rename files/folders in the MIDI instrument’s Memory Card using your
computer.
Delete
Rename
abcd.mid
abcd.mid
efgh.mid
Deleting files and folders
1. Open the “Control” window.
Click [Control] in the top display.
The “Control” window will open.
1 23
4
5
1 “Create New Folder” button: Click this to create a new folder within the current folder.
2 “Delete” button: Click this to delete the currently selected file or folder. (A confirmation
prompt will appear.)
3 “Refresh” button: Click this to update the contents of the current folder.
4 “All Folders” list: This shows the current folder and all sub-folders in the memory card.
Select a folder here to view its contents in the panel on the right.
5 “Open Folders” list: This shows the contents of the folder selected in the panel on the left.
11
cf_e.qx
6/25/99
6:05 PM
Page 12
2. From the list, choose those file(s)/folder(s) that you wish to delete from
your MIDI instrument Memory Card.
3. Click [Delete].
You will see the following confirmation message:
n You cannot delete a folder if it contains files. You must first remove the files from within the folder before you can
delete the folder itself. Empty folders will automatically be deleted.
4. Click [OK] to return to the “Control” window.
Renaming files and folders
1. Open the “Control” window.
Click [Control] in the top display. The “Control” window will open.
n For details about the “control” window, see page 11.
2. Click the file/folder that you wish to rename. Then click it again.
Now enter a name for the file/folder and press the [Enter] key.
n A folder name can consist of up to 8 characters. A file name can consist of up to 8 characters plus a 3-character
extension.
12
cf_e.qx
6/25/99
6:05 PM
Page 13
Converting SMFs
You can convert Standard MIDI Files on your computer from Format 1 to Format 0.
SMF Format1
SMF Format0
1 Track
2 Track
3 Track
4 Track
1~16 Track
Exchange
16 Track
What is an SMF?
The SMF (Standard MIDI File) is a type of file used to exchange song data between different
sequencers. There are two types of SMF: Format 0 and Format 1.
•
•
Format 0 : All data for all MIDI channels are combined into a single track. Files in this
format can be played back on the CS6x/CS6R/S80 etc...
Format 1 : There is more than one track, each containing data for multiple MIDI channels.
Therefore, you shoud use the SMF converter in the Card Filer program to convert your Format
1 SMF data to Format 0 before transfer to, and playback on, your MIDI instrument.
1. Open the “SMF Convert” window.
Click [SMF Convert].
The “SMF Convert” window will open.
13
cf_e.qx
6/25/99
6:05 PM
Page 14
Windows
1
Macintosh
1
2
2
3
4
1
2
3
4
5
6
5
6
6
5
4
“Look in:”: Click this and choose the source folder (to convert from) from the drop-down list.
File/folder list: This shows the contents of the current folder.
“File name:”: This shows the name of the file selected from the File/folder list.
“Files of type:”: Click this and choose the file type from the drop-down list.
[Convert]: Click this to begin converting to SMF format 0.
[Cancel]: Click this to cancel the file conversion.
2. Specify the SMF you wish to convert.
From the list of SMF Format 1 files on your computer, choose those that you wish to convert to
Format 0. SMF Format 1 filenames are shown in bold typeface (Windows only). The filenames of
SMF Format 0 and other files are shown in regular typeface.
n When converting an SMF to Format 0, the original Format 1 file will be overwritten. If necessary, make a backup of
your original Format 1 file prior to conversion.
3. Click [Convert].
You will see the following confirmation message:
Click [OK] and conversion will begin. You will see the following message after conversion:
4. Click [OK] to return to the “SMF Convert” window.
14
cf_e.qx
6/25/99
6:05 PM
Page 15
Error Messages
“The selected MIDI device is in use. Quit any applications currently using
the device.”
This message is displayed when the Card Filer starts up and the MIDI driver is currently being used
by another application. Click [OK], quit any applications that are using the MIDI driver, and start the
Card Filer again.
“Cannot find the MIDI device. Confirm the MIDI device settings.”
Refer to the README file included with the MIDI driver (YAMAHA CBX Driver), install the MIDI
driver, and select the correct COM port, etc.
OMS is not installed.
Install the OMS software and make the correct set it up according to the section “OMS settings
(Page 6).”
“Data transfer failed. Confirm the current connections (HOST SELECT
switch and others).”
Confirm the following and try the operation again.
•
Is the MIDI device properly connected to the computer?
If not, make the proper connections according to the instructions in the MIDI instrument’s
Owner’s Manual.
•
Is the MIDI device switched ON?
If not, switch the power ON.
•
Is the MIDI device’s HOST SELECT switch set correctly?
Make the correct the setting according to the instructions in the MIDI instrument’s Owner’s
Manual.
•
Is the device properly set up?
Refer to the README file included with the MIDI driver (YAMAHA CBX Driver), install the MIDI
driver, and select the correct MIDI driver.
•
Set up OMS according to the section “OMS settings (Page 6).”
“Data transfer is not possible in the current mode. Press the [EXIT]
button, etc., and designate a mode that allows data transfer”
“Failed to create “********.*** (File name)” The disk in the destination drive is full.”
The file could not be saved to the disk because the disk is full.
“Specify up to 8 letters for the file name and up to 3 for the extension.”
A folder name can consist of up to 8 characters. A file name can consist of up to 8 characters
plus a 3-character extension.
15