1
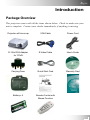
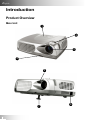
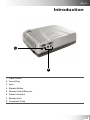
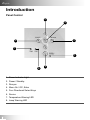
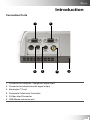
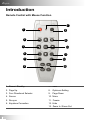
English Table of Contents Usage Notice Precautions ...................................................................................................... 2 Introduction Product Features .............................................................................................. 4 Package Overview ............................................................................................. 5 Product Overview .............................................................................................. 6 Main Unit ..................................................................................................... 6 Panel Control .............................................................................................. 8 Connection Ports ........................................................................................ 9 Remote Control with Mouse Function ...................................................... 10 Installation Connecting the Projector ................................................................................. 11 Powering On/Off the Projector ........................................................................ 12 Powering On the Projector ........................................................................ 12 Powering Off the Projector ....................................................................... 13 Adjusting the Projected Image ........................................................................ 14 Adjusting the Projector Height .................................................................. 14 Adjusting the Projector Focus .................................................................. 15 User Controls Panel Control & Remote Control ..................................................................... 16 On Screen Display Menus .............................................................................. 19 How to Operate .......................................................................................... 19 User’s Info ................................................................................................. 20 Image-I (Computer Mode) .......................................................................... 22 Image-II (Computer Mode) ......................................................................... 23 Image-I (Video Mode) ................................................................................. 24 Image-II (Video Mode) ............................................................................... 25 Language (Computer / Video Mode) ........................................................... 26 Management (Computer / Video Mode) ...................................................... 27 Appendices Troubleshooting .............................................................................................. 28 Changing the Lamp ......................................................................................... 31 Specifications ................................................................................................. 33 Compatibility Modes ....................................................................................... 34 1 English Usage Notice Precautions Follow all warnings, precautions and maintenance as recommended in this user guide to maximize the life of your unit. Warning- Do not look into the lens. The bright light may hurt your eyes. Warning- To reduce the risk of fire or electric shock, do not expose this product to rain or moisture. Warning- Please do not open or disassemble the product as this may cause electric shock. Warning- When changing the lamp, please allow unit to cool down, and follow all changing instructions. Warning- This product will detect the life of the lamp itself. Please be sure to change the lamp when it shows warning messages. Warning- After changing a new lamp please reset the lamp life from OSD menu. Warning- Before switching off the product, please keep the cooling fan running for a few minutes. Warning- When connecting the projector to the computer, please turn off the projector first. Warning- When the lamp reaches the end of its life, it will burn out and may make a loud popping sound. If this happens, the projector will not turn back on until the lamp module has been replaced. To replace the lamp, follow the procedures listed under “Changing the Lamp.” 2 English Usage Notice Do: Turn off the product before cleaning. Use a soft cloth moistened with mild detergent to clean the display housing. Disconnect the plug from power outlet if the product is not being used for a long period of time. Do not: Block the slots and openings on the unit provided for ventilation. Use abrasive cleaners, waxes or solvents to clean the unit. Operate under the following conditions: - Extremely hot, cold or humid environments. - In areas susceptible to excessive dust and dirt. - Near any appliance generating a strong magnetic field. - Place in direct sunlight. 3 English Introduction Product Features This product is an SVGA single chip 0.55" DLP TM projector. Its outstanding features include: True SVGA, 800 x 600 addressable pixels 4.5 lbs (2 kgs) compact design Single chip DLP™ technology Independent white-balance adjustment, for natural picture quality Digital zoom features PureProgressive™ processing technology for artifact-free film materials Full HDTV compatibility (480i/p, 1080i, 720p) NTSC/NTSC4.43/PAL/PAL-M/PAL-N/SECAM and HDTV compatible Fully functioning remote with optional mouse control User-friendly multilingual on screen display menu Advanced electronic keystone correction and high quality full digital functionality User-friendly control panel Luxurious carrying bag included When set to the smallest ratio, the projector can support up to SXGA and can fully support VGA and SVGA 150 watt user replaceable lamp Compatible with Apple Macintosh 4 English Introduction Package Overview This projector comes with all the items shown below. Check to make sure your unit is complete. Contact your dealer immediately if anything is missing. Projector with lens cap VGA Cable Power Cord D-15 to RCA-Adapter for YPbPr S-Video Cable User’s Guide Carrying Case Quick Start Card Warranty Card Battery x 2 Remote Control with Mouse Function 5 English Introduction Product Overview Main Unit 1 2 3 4 5 7 6 6 English Introduction 5 8 1. Panel Control 2. Focus Ring 3. Lens 4. Elevator Button 5. Remote Control Receiver 6. Power Connector 7. Elevator Foot 8. Connection Ports 7 English Introduction Panel Control 5 4 3 6 7 1 8 1. Power Indicator Light 2. Power / Standby 3. Re-sync 4. Menu On / Off ; Enter 5. Four Directional Select Keys 6. Source 7. Temperature Warning LED 8. Lamp Warning LED 8 2 English Introduction Connection Ports 1 6 2 5 4 3 1. Connector for computer / component signal input 2. Connector for external monitor signal output 3. Kensington™ Lock 4. Composite Video Input Connector 5. S-Video Input Connector 6. USB Mouse connector port 9 English Introduction Remote Control with Mouse Function 7 1 8 2 9 3 10 4 11 5 12 13 6 1. Power / Standby 7. LED 2. Page Up 8. Optimum Setting 3. Four Directional Selector 9. Page Down 4. Source 10. Menu 5. Re-sync 11. Freeze 6. Keystone Correction 12. Hide 13. Zoom In / Zoom Out 10 English Installation Connecting the Projector 6 4 2 5 3 6 1 1. VGA Cable 2. Power Cord 3. S-Video Cable 4. Composite Video Cable (optional) 5 USB Cable (to connect the USB mouse to a PC; optional) 6. HDTV/Component Video Cable (optional) To ensure the projector works well with your computer, please set the display mode on your graphics card to less than or equal to SVGA (800 x 600) resolution. Also ensure the refresh rate of the graphics card is compatible with the projector. Refer to the “Compatibility Modes” section on page 34 for more information. 11 English Installation Powering On/Off the Projector Powering On the Projector 1. Remove the lens cap. 2. Ensure that the power cord and signal cable are securely connected. 3. Turn on the lamp by pressing “Power/Standby” on the control panel.X The startup screen will be displayed for 20 seconds and the Power/Standby indicator will turn solid green. 4. Turn on the source (computer, notebook, or video player, etc.) The projector will automatically detect your source. If the projector displays “Searching...” please make sure the signal cables are securely connected. If connecting multiple sources at the same time, use the “Source” button on the remote control or projector control panel to select the desired input. Press the “Source” button repeatedly until the desired input is displayed. Turn on the projector first and then the computer. 1 Power/Standby 12 English Installation Powering Off the Projector 1. Press “Power/Standby” to turn off the projector lamp. The projector will display the message “Power off the lamp?” 2. Press “Power/Standby” again to confirm. Otherwise the message will disappear after 5 seconds. 3. “Power/Standby” indicator will turn green for approximatly 90 seconds. When the green light begins flashing, the projector has entered standby mode. If you wish to turn the projector back on, you must wait until the projector has completed the 90-second cooling cycle and has entered standby mode. Once in standby mode, simply press “Power/Standby” to restart the projector. 4. Disconnect the power cord from the electrical outlet and the projector. 5. Do not turn on the projector immediately following a power off procedure. If the “TEMP” indicator begins flashing the projector will display a “Fan Fail” warning. After a short period the “Power/Standby” indicator will flash green for about 90 seconds and the projector will automatically shut itself down. If this occurs please contact your local reseller or service center. If the “TEMP” indicator turns red it indicates the projector has overheated. The projector will display “Over Temperature. After a short period the “Power/Standby” indicator will turn green and the projector will automatically shut itself down. If this occurs please contact your local reseller or service center. If the “LAMP” indicator turns red and the “Power/Standby” indicator turns amber, the projector will automatically shut itself down. If this occurs please contact your local reseller or service center. 13 English Installation Adjusting the Projected Image Adjusting the Projector Height The projector is equipped with an elevator foot for adjusting the projector height. To raise the projector: 1. Press the elevator button X. 2. Raise the projector to the desired display angle Y, then release the button to lock the elevator foot into position. 3. Use Z to fine-tune tilt adjustment. To lower the projector: 1. Press the elevator button X. 2. Lower the projector then release the button Y to lock the elevator foot into position. 3. Use Z to fine-tune tilt-adjustment. 1 Elevator Button 3 Elevator fine-tune adjustment 2 Elevator Foot 14 English Installation Adjusting the Projector Focus To adjust the focus, simply rotate the focus ring until the image is clear. The projector will focus at distances from 4.0 feet to 39.4 feet (1.2m to 12m) Screen 29.4” 81.6” 133.8” 185.3” 237.5” 289.7” (Diagonal) Screen 23.5 x 17.7” 65.3 x 48.9” 107.1 x 80.3” 148.2 x 111.2” 190.0 x 142.5” 231.8 x 173.8” Size (WxH) Distance 4.0’ 11.1’ 18.2’ 25.2’ 32.3’ 39.4’ This graph is for reference only. 15 English User Controls Panel Control & Remote Control There are two options for controlling the projector: Remote Control and Panel Control. Panel Control Remote Control Remote Control Power / Standby Refer to the “Power On/Off the Projector” section on page 12-13. Optimum Setting Press “Optimum” to select Conference Mode or Cinema Mode. Source Press “Source” to cycle between VGA, S-Video, Composite, and Component sources. 16 English User Controls Four Directional Selectors These keys are used to control the direction operation on the OSD display. Page Up (Computer Mode only) Use this button to page up. This function is only available when the projector is connected to a computer via an USB cable. Page Down (Computer Mode only) Use this button to page down. This function is only available when the projector is connected to a computer via a USB cable. Menu Press “Menu” to launch the OSD menu and press key to select menu items. To exit the OSD, press “Menu” again. The projector will automatically save any changes you made. Freeze Press “Freeze” to pause the screen image. Keystone + / Adjusts image distortion caused by tilting the projector. (± 16 degrees) Re-sync When “Re-sync” is pressed, the projector will automatically synchronize with the source signal. Hide Pressing “Hide” will turn the entire screen black, a useful function for speakers who require a short pause in order to change their presentation materials. 17 English User Controls Use the Panel Control Power/Standby Refer to the ‘Power On/Off the Projector” section on page 12-13. Source Press “Source” to cycle through VGA, S-Video, Composite and Component sources. Re-Sync Automatically synchronizes the projector to the input source. Four Directional Select Keys Use to select items or make adjustments for your selection. Enter Confirm your selection of items. Press “Menu” to launch the OSD menu and press key to select menu items. To exit the OSD, press “Menu” again. The projector will automatically save any changes you made. 18 English User Controls OSD Menus How to Operate The projector has a multilingual OSD that allows you to make image adjustments and change a variety of settings. With a computer source, the OSD displayed is the “Computer OSD”. With a video source, the OSD displayed is the “Video OSD”. The projector will automatically detect the source. To launch the OSD menu, press “Menu” on the remote control or panel control. When the OSD is displayed, press E.g.: key to select main items. Image-I Image-II Language Management Image-I… While making selection on a particular page, press “ Menu / sub menu. “ key to go into the Press key to select the required item and adjust the settings by key. When a specified item is selected, the color of the item will change from yellowish brown to blue. E.g.: Brightness Contrast Color Temp. Zoom Keystone White segment Brightness... When using the keys to adjust parameters or select desired sub menu functions, confirm selections/modifications by pressing “ Menu / ” to revert back to the main menu. Only the keys are enabled now. To exit the OSD, press the “ Menu / “ button again. 19 English User’s Info Edits user preferences by OSD interface. Press "Menu" to enter "User's info." screen, you can edit as you wish. Edited User's info will display on lower left corner of the screen when projector is powered ON. 1. Use the to select "Line1" function, and then press the "Menu" button. You can input the character to line one. 2. Use the to select character, and then press "Menu" to confirm your selection. 3. Use the to select "Line2" function, and then press the "Menu" button. You can input the character to line two. 20 English 4. Procedure as Step.3. User’s Info 5. Press " " to save and exit the "User's info." menu. 6. The startup screen will display the new wording after restart the projector. Note: Each line can input 35 characters only. Once entering "User's info." menu can use remote control to operate only. Use "Del" to delete the previous character. Use "Space" to add a space. 21 English User Controls Computer Mode Image-I Brightness Adjusts the brightness of the image. Press to darken image. Press to lighten the image. Contrast The contrast controls the degree of difference between the lightest and darkest parts of the picture. Adjusts the contrast changes the amount of black and white in the image. Press to decrease the contrast. Press to increase the contrast. Color Temperature Adjusts the color temperature. The range is from “0” to “4”, the factory default is “2”. With the higher temperature, the screen looks colder; with the lower temperature, the screen looks warmer. Zoom Press Press to magnify an image up to a factor of eight times on the projection screen. to diminish the zoom in image. Lowest available setting is 1/2-size. Keystone (Keystone Correction) Adjusts image distortion caused by tilting projection. (±16 degrees) White Segment Use the white segment control to set the white peaking level of the DMD chip. “0” stands for minimal peaking, and “10” stands for maximum peaking. If you prefer a stronger image, adjust toward the maximum setting. For a smooth and more natural image, adjust toward the minimum setting. 22 English User Controls Computer Mode Image-II Frequency “Frequency” is for changing the display data frequency to match the frequency of your computer’s graphic card. When you experience a vertical flickering bar, use this function to make an adjustment. Tracking Choose “Tracking” to synchronize the signal timing of the display with that of the graphic card. When you experience an unstable or flickering image, use this function to correct it. 16:9/4:3 (Aspect Ratio) You can use this function to select your desired aspect ratio. H.Position (Horizontal Position) Press to move the image left. Press to move the image right. V.Position (Vertical Position) Press to move the image up. Press to move the image down. Reset Choose”Yes” to return the display parameters back to factory default. ”Reset” returns all settings in Image-I and Image-II to factory defaults. 23 English User Controls Video Mode Image-I Brightness Adjusts the brightness of the image. Press to darken the image. Press to lighten the image. Contrast The contrast controls the degree of difference between the lightest and darkest parts of the picture. Adjusts the contrast changes the amount of black and white in the image. Press to decrease the contrast. Press to increase the contrast. Color The color setting adjusts a video image from black and white to fully saturated color. Press to decrease the amount of color in the image. Press to increase the amount of color in the image. Tint The tint adjusts the color balance of red and green. Press to increase the amount of green in the image. Press to increase the amount of red in the image. Sharpness Adjusts the sharpness of the image. Press to decrease the sharpness. Press to increase the sharpness. White Segment Use the white segment control to set the white peaking level of DMD chip. “0” stands for minimal peaking, and “10” stands for maximum peaking. If you prefer a stronger image, adjust toward the maximum setting. For a smooth, more natural image, adjust toward the minimum setting. 24 English User Controls Video Mode Image-II Keystone Adjust image distortion caused by tilting the projector. (±16 degrees) 16:9/4:3 (Aspect Ratio) You can use this function to select your desired aspect ratio. Zoom You can use this function to adjust the screen to the most appropriate size or to enlarge a particular area. You can also use to change the area you want to enlarge. Color Temp. Adjusts the color temperature. The range is from “0” to “4”. The factory default is “2”. At a higher temperature, the image is cooler, at a lower temperature, the image is warmer. Reset Choose “Yes” to return the display parameters back to factory default. ”Reset” returns all settings in Image-I and Image-II to fatory defaults. 25 English User Controls Computer / Video Mode Language Language You can display the multilingual OSD menu. Use language. 26 and to select your preferred English User Controls Computer / Video Mode Management Menu Location Choose the Menu location on the display screen. Projection Front-Desktop The factory default setting. Rear-Desktop When you select this function, the projector reverses the image so you can project behind a translucent screen. Front-Ceiling When you select this function, the projector turns the image upside down for ceiling-mounted projection. Rear-Ceiling When you select this function, the projector reverses and turns the image upside down at same time. You can project from behind a translucent screen with ceiling mounted projection. Lamp Reminding Choose this function to show or to hide the warning message when the changing lamp message is displayed. The message will display up to 30 hours before end of life. Lamp Reset Reset the lamp setting only when the new lamp is replaced. 27 English Appendices Troubleshooting If you experience trouble with the projector, refer to the following. If the problem persists, please contact your local reseller or service center. Problem: No image appears on screen. Ensure all the cables and power connections are correctly and securely connected as described in the “Installation” section. Ensure the pins of connectors are not crooked or broken. Check if the projection lamp has been securely installed. Please refer to the “Changing the lamp” section. Make sure you have removed the lens cap and the projector is switched on. If you are using a Notebook PC: 1. Frist set computer resolution to recommend setting. 2. Switch the Notebook PC display to the “external display only” or “CRT only” mode. If you experience difficulty change resolutions or your monitor freezes, restart all the equipment and the projector. 28 English Appendices Problem: The screen of the notebook or PowerBook computer is not displaying your presentation. If you are using Notebook PC: Some Notebook PCs may deactivate their own monitor’s screen when a second display device is in use. Each of them has a different way to be reactivated. Refer to your computer documentation for detailed information. If you are using an Apple PowerBook: In Control Panels, open the PowerBook Display to select Video Mirroring “On”. Problem: Image is unstable or flickering Use “Tracking” to correct it. Change the monitor color setting from your computer. Problem: Image has vertical flickering bar Use “Frequency” to make an adjustment. Check and reconfigure the display mode of your graphic card to make it compatible with the product. Problem: Image is out of focus Adjust the Focus Ring on the projector lens. Make sure the projection screen is placed witin recommended range of 1.9 to 39.4 feet (0.6 m to 12 meters). 29 English Appendices Problem: The image is distorted when displaying 16:9 DVD. The projector itself will automatically detect 16:9 DVD and adjust the aspect ratio by digitizating to full screen with 4:3 default setting. If the image is still distorted, you will also need to adjust the aspect ratio by referring to the following: Please select 4:3 aspect ratio type on your DVD player if you are playing a 16:9 DVD. If you can select 4:3 aspect ratio type on your DVD player, please select 4:3 OSD function of the projector for your display. Problem: Image is reversed. Open “Menu” then select “Management” to adjust the projection. Problem: Lamp burns out or makes a popping sound When the lamp reaches its end of life, it will burn out and may make a loud popping sound. If this happens, the projector will not turn back on until the lamp module has been replaced. To replace the lamp, following the procedures in the “Changing the Lamp”. 30 English Appendices Changing the lamp The projector will detect the lamp life itself. It will show you a warning message “Lamp may fail soon! Replacement Suggested!” When you see this message, change the lamp as soon as possible. Make sure the projector has cooled down for at least 30 minutes before changing the lamp. 1 2 3 4 31 English Appendices Lamp Changing Procedure: 1. Turn off the power to the projector by pressing the Power/Standby button. 2. Allow the projector to cool down at least 30 minutes. 3. Disconnect the power cord. 4. Use screwdriver to remove the screw from the cover.X 5. Remove the cover.Y 6. Remove the 2 screws from the lamp module.Z 7. Pull out the lamp module.[• To replace the lamp module, reverse the previous steps. Warning: Lamp compartment is hot! Allow it to cool down before changing lamp! Warning: To reduce the risk of personal injury, do not drop the lamp module or touch the lamp bulb. The bulb may shatter and cause injury if it is dropped. 32 English Appendices Specifications Light Valve Lamp Number of Pixels Displayable Color Projection Lens Projection Screen Size Projection Distance Video Compatibility - H. Frequency V. Frequency Power Supply - Power Consumption Noise level I/O Connectors - - Weight Dimensions (W x H x D) - Environmental - Safety Regulation - Single Chip DLPTM Technology 150W User Replaceable Lamp 800 pixels(H) X 600 lines(V) 16.7M colors F/2.4 f=22.4mm with Electronic Reduction /Enlargement 29.4"~289.7" Diagonal 4.0~39.4 ft (1.2m~12m) NTSC/NTSC 4.43/PAL/PAL-M/PAL-N/SECAM and HDTV compatible Composite video & S-video capability 15kHz~70kHz horizontal scan 43Hz~85Hz vertical refresh Universal AC input 100~240V ; Input Frequency 50/60Hz 210 watts at normal operation 32dBA Power: AC power input socket Computer Input: One VGA computer input for VGA/ HDTV/ Component Video Computer Output One VGA computer output Video Input: One Composite video RCA input One S-Video input Remote Output One USB mouse output 4.5 lbs / 2 kgs With lens: 10.7 x 8.3 x3.4 inches / 272 x 211 x 86mm Operating Temperature: 10oC~ 40oC/50oF~104oF Humidity: 80% maximum Storage Temperature:-20oC~60oC/ -4oF~140oF Humidity: 80% maximum FCC Class B, CE Class B, VCCI-II, UL, cUL, TÜV, CCC, PSE 33 English Appendices Compatibility Modes Compatibility Resolution V-Sync [Hz] H-Sync [KHz] VGA 640x350 70 31.5 640x350 85 37.9 640x400 85 37.9 640x480 60 31.5 640x480 72 37.9 640x480 75 37.5 640x480 85 43.3 720x400 70 31.5 720x400 85 37.9 800x600 56 35.2 800x600 60 37.9 800x600 72 48.1 800x600 75 46.9 SVGA XGA 800x600 85 53.7 *1024x768 43.4 35.5 *1024x768 60 48.4 *1024x768 70 56.5 *1024x768 75 60.0 *1024x768 85 68.7 SXGA *1280x1024 60 63.98 MAC LC 13” 640x480 66.66 34.98 MAC II 13” 640x480 66.68 35 MAC 16” 832x624 74.55 49.725 MAC 19” *1024x768 75 60.24 MAC G4 640x480 60 31.35 iMac DV *1024x768 75 60 *Compression computer image. 34