1
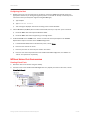
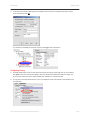
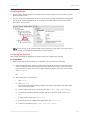
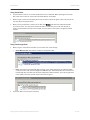
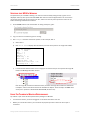
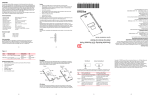
DATA CENTER How to Configure NPIV in a Microsoft Hyper-V Environment Designed for Windows System Administrators and Storage Administrators, this document provides guidelines for configuring Microsoft Hyper-V using N_Port ID Virtualization (NPIV) with a Brocade Host Bus Adapter (HBA). DATA CENTER TECHNICAL BRIEF CONTENTS Introduction........................................................................................................................................................................................................................................ 3 About NPIV ..................................................................................................................................................................... 3 Test Configuration........................................................................................................................................................................................................................... 4 Storage Considerations................................................................................................................................................................................................................. 4 Guest Files ..................................................................................................................................................................... 4 Virtual and Passthrough Disks ...................................................................................................................................... 5 Deployment....................................................................................................................................................................................................................................... 5 Installing and Configuring SCVMM................................................................................................................................ 5 Setting up Brocade Host Connectivity Manager .......................................................................................................... 5 Configuring the Host ...................................................................................................................................................... 6 NPIV and Virtual Port Configuration.......................................................................................................................................................................................... 6 Creating Virtual Ports..................................................................................................................................................... 6 Configuring Zoning......................................................................................................................................................... 7 Configuring Storage ....................................................................................................................................................... 8 Configuring the Host Disk.............................................................................................................................................. 8 For Virtual Disks ..................................................................................................................................................... 8 For Passthrough Disks ........................................................................................................................................... 9 Using NPIV.......................................................................................................................................................................................................................................... 9 Deploying Guests ........................................................................................................................................................... 9 Using Virtual Disks ...............................................................................................................................................10 Using Passthrough Disks .....................................................................................................................................10 Verifying that NPIV Is Working ..................................................................................................................................................................................................11 Using Top Talkers to Monitor Performance..........................................................................................................................................................................11 Setting Up NPIV with Brocade HCM and Microsoft Hyper-V 2 of 12 DATA CENTER TECHNICAL BRIEF INTRODUCTION This document is a guide to configuring Microsoft® Hyper-V using NPIV with a Brocade® Fibre Channel to PCIe Host Bus Adapter (HBA). It will help you understand what you need to consider before deploying this solution and how to implement and diagnose NPIV with Hyper-V. It is designed for Windows System Administrators and Storage Administrators. A basic understanding of how to use Windows, Microsoft System Center Virtual Machine Manager (SCVMM), Fibre Channel (FC) storage, and zoning is assumed. About NPIV NPIV stands for N_Port ID Virtulization. It provides a simple, high-availability capability. NPIV uses Host Bus Adapter (HBA) technology, which creates virtual HBA ports on hosts by abstracting the underlying physical port. This support enables a single physical Fibre Channel HBA port to function as multiple logical ports, each with its own identity. Each virtual machine can then attach to its own virtual HBA port and be independently zoned to a distinct and dedicated World Wide Port Name (WWPN). (http://technet.microsoft.com/en-us/library/cc764269.aspx)) For more information about NPIV and HBA technology, refer to your HBA vendor documentation. There are three options for High Availability (HA) in your Storage Area Network (SAN): Microsoft Clustering Services (MCS) Virtual Disk Service (VDS) NPIV Microsoft SCVMM determines how to migrate a machine based on the following criteria: If Clustering is enabled, it uses MCS to migrate the guest and re-configure the clustering storage. If Clustering is not enabled, it uses VDS to re-configure the storage to re-map that LUN to the new World Wide Name (WWN) of the target machine. If neither Clustering nor VDS is enabled, it uses NPIV to migrate the guest. If none of these options is available, it copies the data across the LAN. Using Microsoft Clustering Service with Hyper-V requires Windows 2008 Enterprise Edition. With NPIV, you can get nearly the same level of availability, but you can use Windows 2008 Standard. The advantage to Clustering is the automatic level of HA; without it, you must migrate a guest manually. Using NPIV allows for a SAN migration that is much quicker than a LAN-based migration. Virtual Disk Service provides the same capability. Setting Up NPIV with Brocade HCM and Microsoft Hyper-V 3 of 12 DATA CENTER TECHNICAL BRIEF TEST CONFIGURATION The test infrastructure, shown in Figure 2, included four servers: Windows Domain Controller (DC) Microsoft SQL Server, SCOM, and SCVMM server (referenced as the “management server”) on Windows 2008 Standard (64 bit) Two servers with Hyper-V on Windows 2008 Enterprise Edition (64 bit) All servers had patches applied that were available on 2/26/2009, with the Hyper-V servers having additional patches as recommended in Microsoft KB articles. Installed in the Hyper-V servers were Brocade 825 (dual ports) 8 Gbps Fibre Channel to PCIe HBAs with firmware version 1.1.0.1 and driver version 1.1.0.1 and Brocade Host Connectivity Manager (HCM) version 1.1.0.1. Each port was connected to a Brocade 5100 Switch with Fabric OS® (FOS) 6.1.1d. The storage used in the testing was a Hewlett-Packard MSA 2000; components in your production environment should be chosen to meet your company’s availability requirements.. Microsoft: SQL Server SCOM SCVMM Domain Controller Microsoft Hyper-V Brocade 825 Fibre Channel HBAs Microsoft Hyper-V Storage Brocade 5100 Figure 1. Solution architecture STORAGE CONSIDERATIONS If you are planning to deploy Hyper-V using NPIV with a Brocade HBA, consider the information in the next few sections. Guest Files Several files are associated with the guest in addition to the virtual disk (if you are using one): <vmguid>.bin file The .bin file is used to allocate enough space to store the contents of the memory for the Virtual Machine if it needs to be saved; it will be the size of memory defined for the child partition. <vmguid>.vsv file. The .vsv file is the saved state for devices. When a VM is rebooted, 20 MB is reserved for the .vsv. When the VM is placed into a saved state, this file can shrink or expand to 50 MB, depending on the number of devices configured for the VM. .VHD file. The VHD file is the file that stores the disk when you use a virtual disk. Setting Up NPIV with Brocade HCM and Microsoft Hyper-V 4 of 12 DATA CENTER TECHNICAL BRIEF Virtual and Passthrough Disks When you are using a virtual disk, the configuration files and the virtual disk file itself are all placed in the same LUN. So when you design the LUN, you need to take into account the memory (for the .bin file), .vsv files, and the size of the disk you want to use. Note that you will lose some disk space when you initialize the disk and change the disk to a Globally Unique Identifier (GUID) partition. When you want to use a passthrough disk, the configuration files and the disk data must be part of two separate LUNs (although both LUNs can use the same virtual port), so each guest requires at least two LUNs. When creating the LUN for the configuration files, you need to take into account the memory (for the .bin file) and the .vsv files. The LUN containing the data will completely used up with guest data. It is technically possible to put multiple configurations on one LUN using NPIV, however it is not recommended for two reasons: When you migrate a guest, there will not be two hosts writing to the same LUN at the same time. The same LUN will be listed in a disk manager several times (one for each virtual port used to access that LUN), which could be confusing. DEPLOYMENT Installing and Configuring SCVMM 1. Install the basic requirements for Hyper-V. 2. Apply the appropriate patches from the following Web site: http://technet.microsoft.com/en-us/library/dd430893.aspx 3. Install SCVMM. SCVMM manages the transfer of virtual ports among servers. Standard Virtual Machine Manager (VMM) does not interoperate with NPIV, so you will need to obtain an SCVMM license. Setting up Brocade Host Connectivity Manager 1. Firewall settings a) Install Brocade HCM on the SCVMM server. Do not install any drivers, just Brocade HCM. You can download the latest versions from: http://www.brocade.com/hba b) On each host, open the firewall port for Brocade HCM. If the firewall is enabled, follow these steps for each host participating in the SCVMM configuration. c) Launch Brocade HCM from the host server. At the bottom of the applet screen, you will see a window, and at the bottom of the window, the port number is displayed. Record this number (it may vary between machines). d) Launch the Windows Firewall with Advanced Security Control Panel. e) Create a new Inbound Rule, that is port based and allows the port used by Brocade HCM. f) Allow the connection. g) Choose the appropriate profile. As a general rule, you can safely check all three options. Setting Up NPIV with Brocade HCM and Microsoft Hyper-V 5 of 12 DATA CENTER TECHNICAL BRIEF Configuring the Host 1. 2. 3. Disable automount: turn off automount for the disks on each host. (VMM automatically mounts the appropriate volumes for you during the migration process. You should not attempt to manually mount volumes that have previously been migrated using Disk Manager.) a) Type: diskpart b) Type: Automount disable c) This message is displayed: “Automatic mounting of new volumes disabled” Install a MultiPath I/O (MPIO) driver for Fibre Channel SAN, even if you only have 1 port connected: a) Install the MPIO driver that ships with Windows 2008. b) Install the MPIO driver that is supplied by your storage vendor. On Brocade HCM on the SCVMM server, connect to each host that will participate in the SCVMM. Repeat these steps for each host in the SCVMM configuration: a) Launch Brocade HCM, and from the Discovery menu, choose Setup. b) Enter the host name of the server. c) Enter the port name to match the port number used above. d) Enter the user name and password for that host Brocade HCM configuration, the defaults are “admin” and “password” respectively. NPIV AND VIRTUAL PORT CONFIGURATION Creating Virtual Ports 1. Determine what server will host the guest initially 2. Connect to that server with Brocade HCM. Right-click on a physical port and from the menu, choose Virtual Port > Create. Setting Up NPIV with Brocade HCM and Microsoft Hyper-V 6 of 12 DATA CENTER 3. TECHNICAL BRIEF In the Virtual Port Creation dialog, enter the symbolic name and name of the guest that will be used to store the guest and click OK. You will see that the NPIV port has been created, and flagged with a special icon Configuring Zoning 1. On the Brocade 5100, create an alias and zone with that virtual port and storage, but do not to add the host WWN to the zone. The only two things in that zone will be the new NPIV port and the storage. You do not need to reboot the host to make the NPIV port available, but it must be zoned. 2. To copy any or all of the information for a port to the clipboard, select the attribute in the Properties tab and right-click. Setting Up NPIV with Brocade HCM and Microsoft Hyper-V 7 of 12 DATA CENTER TECHNICAL BRIEF Configuring Storage 1. On the storage, add the virtual port to the LUN that will contain the guest. You do not need to add the physical port to the LUN. 2. Once you have zoned and presented the LUN to the virtual port, at least two LUNS will be displayed on the virtual port in Brocade HCM. LUN 0, the controller, is listed first and then all of the other LUNS presented to the virtual port NOTE: You do not have to use a unique LUN ID. So if you have four virtual ports on one node and you have four LUNs, each LUN ID could be LUN ID 1 for each virtual port. Configuring the Host Disk Once storage and zoning are configured, you need to rescan the storage for the new LUN. For Virtual Disks 1. Bring the new LUN online and initialize it as a GPT disk. You can do this one of two ways a) Create a folder that will be used as a mount point for the virtual port LUN. A mount point is just a pointer to a partition of a LUN (the partition can be the whole LUN). It does not take up any disk space to create the mount point, only the space needed for a folder. In this case, create a folder called c:\hyperv1 OR b) Start diskpart from a command line: i. Type: rescan ii. Type: list disk (You will not see the new disk listed as Offline). Note that the disk ### and the LUN number are not the same numbers. iii. To select the disk you want to use for the guest, type: select disk [Disk Number] iv. To display the LUN ID and disk IK (to confirm that this is the correct disk), enter: detail disk v. To bring the disk online, type: online disk vi. To convert the disk to a GUID Partition Table (GPT), type: convert gpt vii. To create a new partition, type: create partition primary Setting Up NPIV with Brocade HCM and Microsoft Hyper-V 8 of 12 DATA CENTER TECHNICAL BRIEF viii. When you create a GPT partition, some space is offset so that the storage aligns to the correct block. This means that the primary partition is usually 2. To format the new partition, type: list partition To make sure that the second partition is the one you want: type: select partition 2 ix. To assign the partition to a mount point, the same mount point used earlier, type: assign mount=c:\hyperv1 Using a mount point is strictly is not required and is strictly for convenience. x. To format the disk, type: format FS=NTFS Label=hyperv1 QUICK This creates a new formatted partition with the label “hyperv1” using a Quick format. 2. Refresh the host that has the virtual port in SCVMM. For Passthrough Disks You need two LUNs per guest: one for the configuration files and on which to actually install the OS. If you plan on having additional drives, you do not need additional configuration LUNs. Make sure that the disk for the drive on which the OS is installed is offline. If the LUN has been previously used, convert it to a Master Boot Record (MBR) partition type. The LUN that is used for the configuration data should be formatted as a GPT disk and assigned a drive letter or mount point. USING NPIV Deploying Guests Follow the prompts until you get to the hardware configuration. You can then choose the type of disk you want. NPIV can be used on any type of disk, as long as they are using a LUN configured for NPIV. There are three kinds of disks: A virtual disk makes a file that contains the disk. If you use this method, you have a LUN of 12 GB, and the guest needs to be a little smaller than that because of the additional supporting files. A passthrough disk uses the actual LUN for the files. If you opened the LUN containing the guest, you would see the files. If you use a passthrough, you do not need another LUN to store the configuration files, but you do need an additional LUN. Advantages of the passthrough are that you can use the entire size of the LUN for the data and the disk is created more quickly. An existing disk uses an virtual disk that has already been created. Setting Up NPIV with Brocade HCM and Microsoft Hyper-V 9 of 12 DATA CENTER TECHNICAL BRIEF Using Virtual Disks For performance reasons, it is recommended that you use a fixed disk. When choosing the size of the disk, make sure to take into account the associated files for virtual disks. When you get to the screen prompting for the host on which to place the guest, make sure you pick the one that has the virtual port active. When you are prompted for a location for the files, click Browse and select the LUN created earlier. If you do not see it, you may need to refresh the disks or check the host to make sure the disk is online, and formatted. Note that in this example, no mount point or drive letter is assigned to the file location. Using Passthrough Disks When you get to the location of the files, you can select one of two settings: o Virtual Machine Path: The location of temp and configuration files o Disks: The location of passthrough disks you want to use. These disks must be marked as offline on the host server and must be configured as MBR disk type. GPT and dynamic will not work with a passthrough disk. If the disk was previously configured as GPT or dynamic, you must bring the disk online, which means that you will need to shut down the guest. These two disks must not be the same LUN. Setting Up NPIV with Brocade HCM and Microsoft Hyper-V 10 of 12 DATA CENTER TECHNICAL BRIEF VERIFYING THAT NPIV IS WORKING The quickest way to se if NPIV is working is to make sure that the LUN(s) being used by a guest are not displayed under any other ports in Brocade HCM. Also make sure that the physical hosts are not zoned to the storage and that only the virtual ports are. Also, make sure that only virtual ports have access to the LUN in the storage administration software. 1. From SCVMM, find the host and disk that are being used by the guest. 2. Log in to the host on which the guest is running. 3. Run diskpart and select the disk in question, in this example, disk 3. a) Select disk 3. b) Run detail disk to display disk information (note that the key data is the Target and LUN ID) Disk ID: 00000000 Type : FIBRE Bus : 0 Target : 1 LUN ID : 1 Read-only : No Boot Disk : No Pagefile Disk : No Hibernation File Disk Crashdump Disk : No. c) : No Launch Brocade HCM and click on the storage port for each virtual port until you find the target ID listed in the Binding Information section. Note the target ID (circled with a dashed red line) matches that target listed under the disk details in diskpart, and that the LUN # matches the LUN ID from diskpart. In this example, the WWN of the virtual port in question is 28:92:00:05:1E:65:8A:CB (circled in red). USING TOP TALKERS TO MONITOR PERFORMANCE. Top Talkers is part of the enhanced performance package from Brocade To launch the monitor, you must be logged in to the switch with admin user role. Before you can add the monitor, you must know the physical port that to which the virtual port is connected. Setting Up NPIV with Brocade HCM and Microsoft Hyper-V 11 of 12 DATA CENTER TECHNICAL BRIEF To get this detail, run the FOS CLI command nsShow on the switch. In this example, the source is the virtual port 28:92:00:05:1E:65:8A:CB (Physical Disk 3). nsShow displays a lot of detail, so to help find the information, use nsshow | more This displays the data one page at a time. In this example, these are the details for the source ID (the Hyper-V guest). Source ID ( Source PID) Source WWN (Physical disk 3) N 012303; 3;2f:bd:00:05:1e:65:8a:cb;20:00:00:05:1e:65:8a:cb; na FC4s: FCP PortSymb: [92] "Brocade-825 | 1.1.0.1 | F02-HP3 | Windows Server (R) 2008 Enterprise | Service Pack 1hyperv3" Fabric Port Name: 20:23:00:05:1e:58:1e:dc Permanent Port Name: 10:00:00:05:1e:65:8a:cb Port Index: 35 Share Area: No Port Number Device Shared in Other AD: No Redirect: No In order to understand how to set this up, you need to understand how perfTtMon works (Top Talkers). The I/O transferred is in terms of what the switch sees. In a server/storage configuration, the port is considered the ingress and the storage the egress. So by adding an ingress to the port number of a server, this is considered the writes from the server to the storage. If you added an egress on the port with the storage, this would be reads on the server. In this example, writes to the storage device from the server are shown. Perfttmon –add ingress 35 (the port with the virtual port). Perfttmon –show 35. By default, only a certain number of Top Talkers are listed at any one time. If there are several NPIV ports on a physical port, you will need to show more of the NPIV ports by running perfttmon –show 35 x (where x is any number). This command does not run continuously, you have to run it manually. This command samples once every 30 sec and then averages the values. The first time you run the command, you may see no data, which means either there is no data running, or that you need to wait longer for the data to be crunched. Src_WWN Dst_WWN MB/sec =========================================================================== 28:92:00:05:1e:65:8a:cb 20:70:00:c0:ff:d5:86:c7 2.784 2f:bd:00:05:1e:65:8a:cb 20:70:00:c0:ff:d5:86:c7 0.000 NOTE: Two ports are listed: the first one is the virtual port and the second is the other virtual port on that physical port. Since the physical port is not listed (nor zoned), no traffic is being used by the physical port. © 2009 Brocade Communications Systems, Inc. All Rights Reserved. 04/09 GA-TB-163-00 Brocade, the B-wing symbol, BigIron, DCX, Fabric OS, FastIron, IronPoint, IronShield, IronView, IronWare, JetCore, NetIron, SecureIron, ServerIron, StorageX, and TurboIron are registered trademarks, and DCFM and SAN Health are trademarks of Brocade Communications Systems, Inc., in the United States and/or in other countries. All other brands, products, or service names are or may be trademarks or service marks of, and are used to identify, products or services of their respective owners. Notice: This document is for informational purposes only and does not set forth any warranty, expressed or implied, concerning any equipment, equipment feature, or service offered or to be offered by Brocade. Brocade reserves the right to make changes to this document at any time, without notice, and assumes no responsibility for its use. This informational document describes features that may not be currently available. Contact a Brocade sales office for information on feature and product availability. Export of technical data contained in this document may require an export license from the United States government. Setting Up NPIV with Brocade HCM and Microsoft Hyper-V 12 of 12