1
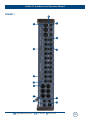
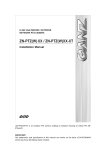
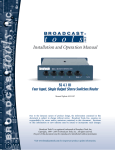
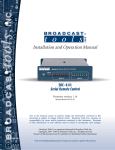
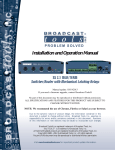
INC
®
Installation and Operation Manual
ProMix 12
Full-featured 12 Input Audio Mixing Console
Rev-RB
Manual Update: 10/28/08
Due to the dynamic nature of product design, the information contained in this
document is subject to change without notice. Broadcast Tools, Inc., assumes no
responsibility for errors and/or omissions contained in this document. Revisions
of this information or new editions may be issued to incorporate such changes.
Broadcast Tools® is a registered trademark of Broadcast Tools, Inc.
Copyright, 1989 - 2007 by Broadcast Tools, Inc. All rights reserved.
No part of this document may be reproduced or distributed without permission.
Visit www.broadcasttools.com for important product update information.
ProMix 12 Installation and Operation Manual
INTRODUCTION
Thank you for your purchase of a Broadcast Tools® ProMix 12 Fullfeatured 12 input audio mixing console (referred to as the ProMix 12 throughout this
manual). We’re confident that this product will give you many years of dependable
service. This manual is intended to give you all the information needed to install and
operate the Broadcast Tools® ProMix 12.
SAFETY INFORMATION
CAUTION!
Broadcast Tools®
Products, as with any
electronic device, can
fail without warning.
Do not use this product
in applications where a
life threatening condition
could result due to failure.
Only qualified personnel should install Broadcast Tools® products. Incorrect or
inappropriate use and/or installation could result in a hazardous condition.
Broadcast Tools, Inc., is unable to support NON-Broadcast Tools software, hardware or
NON-Broadcast Tools computer/hardware/software problems. If you experience these
problems, please research your hardware/software instruction manuals or contact the manufacturers technical support department.
NOTE:
This manual should be
read thoroughly before
installation and operation.
WHO TO CONTACT FOR HELP
If you have any questions regarding your product or you need assistance, please contact your distributor from whom you purchased this equipment.
If you would like more information about Broadcast Tools® products, you may
reach us at:
Broadcast Tools, Inc.
131 State Street
Sedro-Woolley, WA 98284-1540 USA
Voice: 360 . 854 . 9559
Fax: 866.783.1742
WEBSITE:
Visit our web site for
product updates and
additional information.
Internet Home Page: www.broadcasttools.com
E-mail:
[email protected]
THANK YOU FOR CHOOSING
BROADCAST TOOLS® BRAND PRODUCTS!
INTRODUCTION
e-mail: [email protected] v o i c e : 360.854.9559 fax: 866.783.1742
2
ProMix 12 Installation and Operation Manual
1.0 DESCRIPTION
The ProMix 12 is a full-featured audio mixing console ideally suited for the typical
broadcast studio or any similar application. It features inputs for 3 microphones and
9 stereo line sources, two stereo mixing buses, a “mix-minus” output, a mono output, and comprehensive cue and monitoring systems. Other functions include an
announce booth output with full duplex talkback, accurate audio level metering,
remote control of Microphone channels and remote-start facilities on all line input
channels.
2.0 INSTALLATION
(See Figure 1 for connectors and controls (x) referenced in the text.)
2.1
AUDIO CONNECTIONS
2.1.1 MICROPHONE INPUTS
The ProMix 12 has inputs for up to 3 microphones. Microphones should be lowimpedance professional units with balanced outputs. Dynamic microphones are
suggested. Powered condenser s can be used, although the console does not provide
phantom power. Connect microphones to the female XLR connectors (1) on the rear
of the console. The microphone plug should be wired as follows:
PIN 1: Ground
PIN 2: Hi
PIN 3: Lo.
2.1.2 MICROPHONE PROCESS INSERT
The ProMix 12 provides for the insertion of external processing equipment, e.g, a
microphone limiter or equalizer. External microphone processing equipment should
be interfaced via the T/R/S microphone process Insert jacks (2). These jacks provide a means of inserting processing gear just after the console’s microphone preamps, but before the microphone channel faders. The microphone preamp output
and return circuits are unbalanced, at a nominal level of –10dbm. Wire the mating
T/R/S plug as follows:
TIP:
To processor input (from microphone preamp output)
RING:
From processor output (to console fader input)
SLEEVE:
Ground.
NOTE: For the “R0, RA and RB” version of the console, internal shunt
(jumper JP1 (Mic-1), JP2 (Mic-2) or JP3 (Mic-3) must be removed on the I/O
circuit assembly (the bottom cover must be removed to access these jumpers).
WEBSITE:
Visit our web site for
product updates and
additional information.
DESCRIPTION
e-mail: [email protected] v o i c e : 360.854.9559 fax: 866.783.1742
3
ProMix 12 Installation and Operation Manual
2.1.3 LINE INPUTS
The ProMix 12 accommodates up to 9 stereo “line level” sources. Source equipment
can be either balanced or unbalanced, operating at either professional (+4dBm) or
consumer (-10dBm) levels. It is connected via the Line Input T/R/S jacks (3). The
upper jacks are for Left channel inputs; the lower jacks are for Right channel inputs.
Mating TRS plugs should be wired as followed:
Unbalanced sources: TIP:
RING:
SLEEVE:
Hi (or “hot” lead)
(leave unconnected)
Ground (or shield)
Balanced sources:
Hi
Low
Ground
TIP:
RING:
SLEEVE:
Note: The console terminates the Low input to ground via a 1K resistor. In
some cases, connecting the Low audio lead to Ground will produce a slightly
higher audio level. However, check the manual of the source equipment to be
certain grounding the Low output lead will not cause problems. It is generally OK to do so on older transformer-coupled outputs; active (transformerless)
outputs may or may not permit this.
2.1.4 USING A TELEPHONE HYBRID
If the console will be interfaced to a telephone hybrid (for broadcasting telephone
calls), the Receive (“caller”) output of the hybrid should be fed into Channel 4. This
is because the Mix Minus output of the console contains ALL line sources mixed to
the AUDITION bus, except for Channel 4. The” Audition-minus-caller” Mix Minus
output is normally fed back to the hybrid’s send input. The caller will therefore be
able to hear all program sources mixed on the Audition bus, minus him.
2.1.5 AIR MONITOR INPUT
The console provides a Monitor Air input (4) that can be used to feed an off-air monitor into the console’s Monitor system. This input is electrically identical to the
other Line channel inputs, and should be connected the same way. Any tuner or
demodulator can be used.
INSTALLATION
e-mail: [email protected] v o i c e : 360.854.9559 fax: 866.783.1742
4
ProMix 12 Installation and Operation Manual
2.1.6 MAIN MIX BUS OUTPUTS
The console’s six main mixing bus outputs appear on male XLR connectors (5). All
outputs are electronically balanced; each will drive a 600-ohm load. The nominal
level is +4dBm. Connect as follows:
PIN 1: Ground
PIN 2: Hi
PIN 3: Lo
Note: To feed an unbalanced load, connect to Pins 1 & 2 only. DO NOT
SHORT PIN 3 TO GROUND!
It is not necessary to terminate any console outputs.
2.1.7 MONITOR OUTPUT
The console’s Monitor outputs (6) are via a T/R/S jack. These outputs are unbalanced, and will drive 600-ohm loads. (Termination is not necessary.) The nominal
level is –10dBm. Connect the mating TRS plug as follows:
TIP:
Left Monitor output
RING:
Right Monitor output
SLEEVE
Ground
2.1.8 BOOTH OUTPUT
The console provides a secondary Booth monitor output (7) that can be used to drive
headphones worn by an announcer in an “announce booth”. This output, via T/R/S
jack, will drive headphones of 24 ohms or higher. (Termination is not necessary.)
The nominal output level is 0dBm. The mating TRS plus should be wired as follows:
TIP:
Left Booth output
RING:
Right Booth output
SLEEVE:
Ground
2.1.9 CUE/TALKBACK OUTPUTS
WEBSITE:
Visit our web site for
product updates and
additional information.
The console provides outputs to drive external amplified speakers for monitoring the
Cue bus and Talkback circuit (8). Using the Cue output is optional, as the Cue bus
can be monitored via the Monitor system (with the CueMix function) as well as via
the Phones output. The Talkback output must be connected to an external (amplified) speaker if this feature is to be used. The Cue and Talkback outputs are unbalanced and will drive 600-ohm loads to a nominal level of –10dBm. (Termination is
not necessary.) Inexpensive “computer speakers” are ideal for use with the Cue and
Talkback outputs (audio quality unimportant). The mating T/R/S plug should be
wired as follows:
TIP:
Cue output
RING:
Talkback output
SLEEVE:
Ground
INSTALLATION
e-mail: [email protected] v o i c e : 360.854.9559 fax: 866.783.1742
5
ProMix 12 Installation and Operation Manual
2.2
CONTROL INTERFACE
2.2.1 MICROPHONE 2 & 3 REMOTE CONTROL
The console provides for remote control of Microphone 2 and Microphone 3 via the
Microphone 2 & 3 Remote Control connector (9). This 15-pin D connector should
be wired according to Figure 2.
Note that “cough switches” for microphones 2 & 3 can be installed for use by the
console operator if these microphones will be used in the studio. If these cough
switches are not used, jumpers (see note below) must be installed as shown between
pins 9 & 10 and between pins 13 & 15. Mics 2 & 3 will not operate if these jumpers
are missing.
Cough switches can also be installed for remote use, as shown connected to the
remote ON switches. If the “cough switches” are not used, jumper wires must be
installed in their place (See note below).
NOTE: On version A & B, jumpers JP1 (Mic-1) and JP4 (Mic-2) may be
installed on the main circuit assembly (the bottom cover must be removed to
access these jumpers), eliminating the need to solder jumpers on the connector.
LEDs can be used to show “Microphone ON”; be sure to include the 1K resistors as
shown. (This value can be changed to set LED brightness.)
The Talkback function allows the booth announcer to talk directly to the console
operator (off-air) via the Talkback system.
The MUTE TALLY relay on pin 4 (ground is pins 1 & 5) provides a means of
switching external equipment when the monitor mutes. The relay contact goes to
ground when the monitor is muted. It can be used to operate “ON AIR” warning
light controllers, etc. Contact rateing are 30vdc @ 1amp or less. DO NOT
EXCEED THIS RATING. NEVER CONNECT THESE CIRCUITS TO A 110
VOLT AC LINE!
2.2.2 LINE CHANNEL REMOTE CONTROL
The console provides 9 momentary SPST switches than can used for “remote start”
of line channel source equipment, e.g, CD players, tape decks, etc. Interface to these
switches is via Line Channel Remote Starts connector (10), a 25-pin D connector.
WARNING: The maximum voltage that can be applied to Remote Start switches is
24vdc @ 100ma or less. DO NOT EXCEED THIS RATING. NEVER CONNECT
THESE CIRCUITS TO A 110 VOLT AC LINE! Connect the mating 25-pin D connector according to Figure 3.
INSTALLATION
e-mail: [email protected] v o i c e : 360.854.9559 fax: 866.783.1742
6
ProMix 12 Installation and Operation Manual
2.3
POWER INPUT
Plug the console’s external power supply into the Power jack (11). Do not use any
power supply not supplied with the console. The power supply is a “universal input”
type, and can be used with any AC input voltage between 100 and 250 VAC, either
50Hz or 60Hz. No changes to the power supply are needed. The AC mains cord
must have a connector appropriate for the AC socket being used.
3.0
3.1
ADJUSTMENTS AND SETUP
GAIN ADJUSTMENT
Each of the 3 microphone input channels has a GAIN adjustment (12) to optimize
the microphone preamp gain for the microphones being used. The gain can be varied over a 20dB range. Use a small screwdriver to adjust the gain trimmers as needed. Microphone gain is properly adjusted when the preamp output (accessible via
the TIP of the Microphone Process Insert (2) T/R/S jacks) is about –10dBm when
speaking into the microphone. To quickly set microphone gain, follow these steps:
1. Assign the microphone channel to the Program bus.
2. Set the microphone channel fader to –15db.
3. Speak into the microphone; set gain so that voice peaks read about 0VU on
the console VU meters.
3.2
MICROPHONE CHANNEL MONITOR MUTE PROGRAMMING
The console’s Monitor system can be programmed so that when Microphone 2
and/or Microphone 3 are on, the audio output from the Monitor system is muted. If
Microphone 2 or Microphone 3 is located in the same studio as the Monitor speakers, the Monitor system should mute to prevent acoustic feedback when the
Microphone is ON. Programming Microphone 2 and/or Microphone 3 to mute the
Monitor system is done by installing jumper wires on the Microphone 2 & 3 Remote
Control connector (9). See Figure 2. To enable Microphone 2 monitor mute, install
a jumper between pins 3 & 11(see note below). To enable Microphone 3 monitor
mute, install a jumper between pins 7 & 11 (see note below).
NOTE: On version A & B, jumpers JP2 (Mic-2) and JP3 (Mic-2) may be
installed on the main circuit assembly (the bottom cover must be removed to
access these jumpers), eliminating the need to solder jumpers on the connector.
WEBSITE:
Visit our web site for
product updates and
additional information.
SETUP
e-mail: [email protected] v o i c e : 360.854.9559 fax: 866.783.1742
7
ProMix 12 Installation and Operation Manual
3.3
TALKBACK MICROPHONE INPUT
The console includes a Talkback system that permits the console operator to speak
to an announcer who is wearing headphones connected to the Booth output. When
the TALKBACK button is pressed, the “normal” audio being fed to the Booth output is interrupted and is overridden by audio from the Talkback circuit. Because
Microphone 1 is normally used as the “console operator Microphone”, Microphone
1 is used to talk back to the Booth announcer. Another audio source can be substituted for Microphone 1 (e.g, an intercom output) if necessary. See Figure 2 (Section
2.2.1). The jumper between pin 12 and pin 8 should be removed. External Talkback
audio can be fed into pin 8 (ground is pins 1 or 5). This input is unbalanced; the
nominal input level should be about –10dBm.
3.4
LINE CHANNEL GAIN ADJUSTMENT
Each of the console’s nine Line channel inputs has an Input Sensitivity switch (13)
that must be set according to the source equipment being used with each Line channel input. These switches can be operated using the eraser-end of a pencil. There
are two settings: OUT and IN. Set the switches OUT for professional levels, e.g,
+4dBm or +8dBm; set switches IN for use with “consumer” equipment operating at
about –10dBv. (The Line channel inputs are bridging and will not load source
equipment.)
4.0
OPERATION (See Figure 4 for controls (x) referenced in the
text.)
Operation of the ProMix 12 is simple and straightforward. Audio sources can be
mixed to the Program and/or Audition buses. Line channels can be also be fed to
the Cue bus. The console’s outputs can be monitored via the Monitor system and
VU meters. The console operator can also use headphones, plugged into the Phones
output. A separate Booth output can feed headphones used by a booth announcer.
The console operator can talk to the booth announcer using the Talkback function;
the booth announcer can respond using the Talkback feature in the announce booth.
4.1
MICROPHONE INPUT CHANNELS
Microphone channels are turned on and off using the Microphone ON/OFF buttons
(1). When a Microphone is ON, the “ON” LED (4) will be illuminated. Microphone
audio can be assigned to the Program bus using the PGM button (2). The AUD button (3) assigns Microphone channel audio to the Audition bus. Both buses can be
used simultaneously. The relative mix level is determined by the FADER (5). The
“normal” position is –15dB, which yields 15dB of “in hand” gain. Microphone 1 is
pre-programmed to mute the Monitor system when Microphone 1 is on.
Microphones 2 and 3 can be user-programmed to mute the Monitor system if necessary. (See Section 3.2.)
e-mail: [email protected] v o i c e : 360.854.9559 fax: 866.783.1742
OPERATION
8
ProMix 12 Installation and Operation Manual
4.2
LINE INPUT CHANNELS
Line channels are assigned to the Program and/or Audition bus using the PGM buttons (2) and AUD buttons (3). Both buses can be used simultaneously. Line channels can be “previewed” by using the Cue bus. Pressing the CUE button (7) will
override other bus assignments, and send the audio to the Cue system (pre-fader).
The relative mix level of line sources is determined by the FADER (6). The “normal” position is -15dB, which yields 15 dB of “in hand” gain. Line channel source
equipment can be remotely started using the START button (8) directly below each
line channel fader.
4.3
MONITOR SYSTEM
The console’s main mix buses (PGM, AUD, and CUE) can be monitored via the
Monitor system. In addition, audio from an off-air monitor can be heard through
the Monitor system. A unique feature of the PROMIX 12 is the “CueMix” system,
whereby audio on the CUE bus can be heard through the Monitor system, providing
the console operator Cue bus audio that is superior then that coming from the traditional “cue speaker” found on most other consoles. Other Monitor functions
include the ability to switch the Monitor output to monaural (to check for phase
errors) and a DIM function that instantly lowers the Monitor output by 20dB.
Two buttons determine what is normally heard on the Monitor system. The
PGM/AUD button (9) selects either the Program or Audition bus. If the button is up,
the Program bus is heard; if the button is down, the Audition bus is heard, provided
that the BUS/AIR button (10) is up. If the BUS/AIR button (10) is down, the
PGM/AUD selection is overridden, and the audio source fed into the Monitor Air
input will be heard. This is normally fed with an off-air demodulator or tuner for
monitoring the station’s transmitted signal.
WEBSITE:
Visit our web site for
product updates and
additional information.
The Monitor system volume is adjusted using the Monitor FADER (11). The (external) monitor amplifier should be adjusted so that the Monitor system produces adequate volume with the Monitor fader set to about –15dB. The Monitor DIM button
(13) attenuates the monitor volume by 20dB.
The MONI MONO button (14) combines the Monitor output to monaural. This is
useful for checking mono compatibility of stereo signals. Note that this button
affects only the monitor audio; it has no effect on the main mix bus outputs.
4.4
CUE SYSTEM AND “QUEMIX”
One unique feature of the ProMix 12 is the CueMix system. This allows the console operator to listen to audio signals on the CUE bus through the main monitor
speakers, rather than the usual small ineffective “cue speaker” found on most broade-mail: [email protected] v o i c e : 360.854.9559 fax: 866.783.1742
OPERATION
9
ProMix 12 Installation and Operation Manual
cast consoles.
To use the CueMix feature (for example, to preview a track on a CD), follow these steps:
1.
Put the CD player’s line input channel in CUE mode by pressing it’s CUE
button (7).
2.
Turn the CueMix feature ON, by pushing the QMIX button (12) down. The
Monitor system will dim, reducing “normal” bus audio by 20dB; CUE bus
audio will be heard through the right monitor speaker. Adjust Cue audio
level using the CUE LEVEL control (24). Preview the source.
3.
Once the CD is “ready for air”, release the QMIX button and the CUE button
for the CD player channel. The Monitor system will return to normal operation.
The Cue system can also used in a “conventional” manner with the addition of an
external (amplified) cue speaker, connected via the CUE/TB output jack. (See
Section 2.9.) The audio level at this jack is controlled by the CUE LEVEL control
(24). This Cue audio output mutes whenever the Monitor system is muted.
The cue bus can also be heard via the console operators PHONES output. (See
Section 4.5)
4.5
PHONES OUTPUT
The console operator can monitor the console’s Monitor output via the PHONES jack
(15). Headphones of 24 to 600 ohms can be used. Do not use older 8-ohm headphones. The MONI/CUE button (16) determines what is heard through the headphones. If this button is up, the headphones will “follow” whatever audio source is
selected for the Monitor system. If the button is down, the headphones will monitor
the Cue bus. The headphone volume is adjusted with the PHONES control (17).
4.6
BOOTH OUTPUT
The console provides a secondary headphone output for use by an announcer in an
“announce booth”. The MONI/AUD button (18) determines what the booth
announcer hears. If the button is up, the announcer will hear the same audio heard
by the console operator via the Monitor system. If the MONI/AUD button (18) is
down, the announcer will hear the Audition bus output. This allows the Audition bus
to be used to create a special “announcer mix”. The Booth headphone level is
adjusted with the BOOTH control (19).
Use headphones with an impedance of 24 ohms or higher. Do not use older 8-ohm
headphones.
4.7
TALKBACK SYSTEM
The console includes a full-duplex Talkback system that allows the console operator to converse with the booth announcer, off-air. (To use the system in duplex
OPERATION
e-mail: [email protected] v o i c e : 360.854.9559 fax: 866.783.1742
10
ProMix 12 Installation and Operation Manual
mode, an external amplified speaker must be connected to the TB OUTPUT as
described in Section 2.9.) If the TALKBACK button (20) is pressed and held down,
the “normal” audio feeding the Booth output is overridden with audio from
Microphone 1 (the console operator’s Microphone). The booth announcer can
respond by pressing the remote TALKBACK button (connected per Figure 2; see
Section 2.2.1.) The console operator via the Talkback speaker will hear the
announcer’s Microphone. (One-way operation is possible without using the
Talkback speaker. The console operator can still speak to the announcer, however
the announcer cannot reply.)
4.8
MONO OUTPUT
The console includes a Mono output that provides a summed (L+R) signal of either
the Program or Audition bus. The MONO OUT: PGM/AUD button (21) determines
which bus is sent to the Mono output. If this button is up, the Program bus fed to
the Mono output; if it is down, the Audition bus is fed to the Mono output. The
Mono output is always at the same level at the Program and Audition bus outputs.
4.9
MIX-MINUS OUTPUT
The console’s Mix-Minus output is a monaural mix of all sources assigned to the
Audition bus, except for Line channel #4. This input should be used for the
“Receive” (caller) audio from a telephone hybrid. The Mix-Minus output is therefore the same as the Audition mix, minus the caller. This Mix-Minus signal is normally fed back into the hybrid’s “Send” input.
4.10
VU METERS
The ProMix 12 features accurate VU meters (23) to monitor the main bus output levels. Using the VU METER can meter either the Program or Audition bus:
PGM/AUD button (22). If the button is up, the Program bus is metered; if it is
down, the Audition bus is metered. Mix levels should be adjusted so most peaks
read about 0VU. The meters are calibrated so that 0VU equals +4dBm on the main
bus outputs.
WEBSITE:
Visit our web site for
product updates and
additional information.
OPERATION
e-mail: [email protected] v o i c e : 360.854.9559 fax: 866.783.1742
11
ProMix 12 Installation and Operation Manual
5.0
SPECIFICATIONS*
5.1
AUDIO INPUTS & OUTPUTS
MICROPHONE inputs:
MIC Process:
LINE inputs:
AIR input:
MAIN outputs:
CUE/TB outputs:
-60dBm to –40dBm, 10K, balanced
Post-preamp loop-thru: -10dBm, unbalanced
-10dBv or +4dBm, 10K, balanced or unbalanced
-10dBv or +4dBm, 10K, balanced or unbalanced
+4dBm, balanced. 600 ohm load. Max output: +24dBm
(Program, Audition, Monaural and Mix-Minus).
-10dBm nom, unbalanced. 600 ohm load. Max output: +20dBm
-6dBm nom, unbalanced. 24 ohm or higher load. Max output:
+20dBm
-6dBm nom, unbalanced. 24 ohm or higher load. Max output:
+20dBm
-10dBm, unbalanced. 5K load. Max output: +10dBm
5.2
AUDIO PERFORMANCE
Frequency response:
Microphone channel EIN:
Output noise:
Distortion:
Input headroom:
Output headroom:
Crosstalk:
20Hz-15kHz, +/- 0.5dB
-125dBm; 75dB S/N with 50dB preamp gain typical
75dB below nom output level, 1 Microphone channel on.
80dB below nom output level, 1 Line channel on.
.02% THD, IM at nom output level; ,01% at max level
30dB (pre fader)
20dB (post fader)
65dB @ 1kHz
5.3
POWER REQUIREMENTS
AC input:
Power supply:
Ground:
Approvals:
100 to 240 VAC, 25 watts.
Supplied switching supply
Chassis grounded to mains ground via power supply cable
UL, TUV/IEC, CSA, CE
5.4
PHYSICAL
Size:
Weight:
Options:
18’W x 10.5”D x 4”H
10 lbs
RA-PM, Rack mount adaptors.
MONITOR output:
BOOTH output:
PHONES output:
WEBSITE:
Visit our web site for
product updates and
additional information.
*Specifications subject to change without notice.
SPECIFICATIONS
e-mail: [email protected] v o i c e : 360.854.9559 fax: 866.783.1742
12
ProMix 12 Installation and Operation Manual
LIMITED WARRANTY
The term “Buyer” as used in this document refers to and includes both (but only) (a) any person or entity who acquires such an item for
the purpose of resale to others (i.e., a dealer or distributor of an item), and (b) the first person or entity who acquires such an item for
such person’s or entity’s own use.
Broadcast Tools warrants to each Buyer of any item manufactured by Broadcast Tools that the item will be free from defects in materials and workmanship at the time it is shipped by Broadcast Tools if the item is properly installed, used and maintained.
EXCLUSIVE REMEDIES
If Broadcast Tools is notified, in writing, of a failure of any item manufactured by Broadcast Tools to conform to the foregoing Limited
Warranty within one (1) year following the date of the Buyer’s acquisition of the item, and if the item is returned to Broadcast Tools in
accordance with Broadcast Tools’ instructions for confirmation by inspection of the defect (which at Broadcast Tools’ election may
include, without limitation, a requirement that the Buyer first obtain a Return Authorization number from Broadcast Tools, that the Buyer
furnish proof of purchase in the form of an invoice and/or receipt, and that the Buyer prepay all freight charges associated with any return
of the item to Broadcast Tools using such freight service as Broadcast Tools reasonably may specify), Broadcast Tools will repair or
replace the defective item, or will refund the purchase price paid by the Buyer for the item. Broadcast Tools shall have the exclusive
right to choose between these alternative remedies.
NO OTHER WARRANTIES OR REMEDIES
TO THE MAXIMUM EXTENT PERMITTED BY APPLICABLE LAW, BROADCAST TOOLS AND ITS SUPPLIERS DISCLAIM ALL OTHER
WARRANTIES, EITHER EXPRESS OR IMPLIED, INCLUDING BUT NOT LIMITED TO IMPLIED WARRANTIES OF MERCHANTABILITY OR FITNESS FOR A PARTICULAR PURPOSE; AND THE FOREGOING ALTERNATIVE REMEDIES SHALL BE EXCLUSIVE OF
ALL OTHER REMEDIES. THIS LIMITED WARRANTY GIVES YOU SPECIFIC LEGAL RIGHTS. YOU MAY HAVE OTHER RIGHTS,
WHICH VARY FROM STATE/JURISDICTION TO STATE/JURISDICTION.
N O L I A B I L I T Y FOR CONSEQUENTIAL D A M A G E S
TO THE MAXIMUM EXTENT PERMITTED BY APPLICABLE LAW, NEITHER BROADCAST TOOLS NOR ANY OF ITS SUPPLIERS
SHALL HAVE ANY LIABILITY FOR ANY SPECIAL, INCIDENTAL, INDIRECT, CONSEQUENTIAL OR PUNITIVE DAMAGES WHATSOEVER (INCLUDING, WITHOUT LIMITATION, ANY DAMAGES FOR LOST PROFITS, BUSINESS INTERRUPTION, LOSS OF DATA OR
INFORMATION, COST OF CAPITAL, CLAIMS OF CUSTOMERS, OR ANY OTHER PECUNIARY LOSS) ARISING OUT OF THE USE
OF OR THE INABILITY TO USE ANY ITEM SUPPLIED BY BROADCAST TOOLS, EVEN IF BROADCAST TOOLS HAS BEEN
ADVISED OF THE POSSIBILITY OF SUCH DAMAGES HAVE ANY LIABILITY FOR ANY SPECIAL, INCIDENTAL, CONSEQUENTIAL,
EXEMPLARY OR PUNITIVE DAMAGES. THIS LIMITATION OF LIABILITY APPLIES WHETHER A CLAIM IS ONE ALLEGING
BREACH OF A CONTRACT OR WARRANTY, NEGLIGENCE OR OTHER TORT, FOR THE VIOLATION OF ANY STATUTORY DUTY,
THE FAILURE OF ANY LIMITED OR EXCLUSIVE REMEDY TO ACHIEVE ITS ESSENTIAL PURPOSE, OR ANY OTHER CLAIM OF
ANY NATURE. BECAUSE SOME STATES AND JURISDICTIONS DO NOT ALLOW THE EXCLUSION OR LIMITATION OF LIABILITY
FOR INCIDENTAL OR CONSEQUENTIAL DAMAGES, THIS LIMITATION MAY NOT APPLY TO YOU.
Broadcast Tools, Inc.
131 State Street
Sedro-Woolley, WA 98284 • USA
360.854.9559 voice • 866.783.1742 fax
[email protected] e-mail
www.broadcasttools.com website
LIMITED WARRANTY
e-mail: [email protected] v o i c e : 360.854.9559 fax: 866.783.1742
13
ProMix 12 Installation and Operation Manual
FIGURE 1
12
1
2
3
9
13
10
4
5
6
7
8
e-mail: [email protected] v o i c e : 360.854.9559 fax: 866.783.1742
11
14
ProMix 12 Installation and Operation Manual
FIGURE 2
NOTE: Jumpers JP1, JP2, JP3, JP4 and
JP5 may be installed on the main circuit assembly (the bottom cover must
be removed to access these jumpers),
eliminating the need to solder jumpers
on the connector.
Relay contact grounded
when muted.
e-mail: [email protected] v o i c e : 360.854.9559 fax: 866.783.1742
15
ProMix 12 Installation and Operation Manual
FIGURE 3
e-mail: [email protected] v o i c e : 360.854.9559 fax: 866.783.1742
16
ProMix 12 Installation and Operation Manual
19
24
17 14 16 23
15
FIGURE 4
22
18
11
20
13
9
21
10
12
3
6
8
1
2
4
7
e-mail: [email protected] v o i c e : 360.854.9559 fax: 866.783.1742
5
17
ProMix 12 Installation and Operation Manual
FIGURE 5
e-mail: [email protected] v o i c e : 360.854.9559 fax: 866.783.1742
18
ProMix 12 Installation and Operation Manual
FIGURE 6
e-mail: [email protected] v o i c e : 360.854.9559 fax: 866.783.1742
19
e-mail: [email protected] v o i c e : 360.854.9559 fax: 866.783.1742
20
Insert
Level
SW
-10/+4
LEGEND
RT
LT
AIR Mon
XLR
SW
Level
CUE
SW
LED
SW
Off/On
-10/+4
Chan 4-12
RT
LT
Line Inputs
Chan 1-3
Trimmer
Mic-Pre
Date Modified: 05/16/07 Rev A & B
MIC
SW
AUD
SW
PGM
SW
AUD
SW
PGM
T/R/S 1/4”
SW
PGM
AUD
SW
VU Meter
SW
BUS
AIR
VU Meter
SW
QMix
Booth
Phones
CUE
SW
SW
SW
Talk
Back
(Minus Chan. 4)
Moni
MONO DIM
Balanced Output Stage
SW
Moni AUD
SW
Moni CUE
Moni
Level
Fader
AUD
SW
PGM
(MONO)
Copyright © 1989-2007 by Broadcast Tools, Inc. All Rights Reserved.
131 State Street, Sedro-Woolley, WA 98284 • 360.854.9559 • Fax 866.783.1742
Visit us online at www.broadcasttools.com
Rotary Pot
Fader
Fader
Functional Diagram
Full-Featured 12 Input Audio Mixing Console
ProMix 12
MM
MONO
Mix-Minus
Booth Out
Phones
Jack
CUE Out
Monitor Out
AUD
MONO
Unbalanced Output Stage
AUD
PGM
PGM
ProMix 12 Installation and Operation Manual