1
VEC-162B MultiReader
Instruction Manual
VEC-162 MultiReaderTM
SPECIFICATIONS:
Modes:
CW, RTTY, ASCII, AMTOR FEC
Shifts:
RTTY: 170 Hz, 425 Hz, 850 Hz
ASCII: 170 Hz
AMTOR FEC: 170 Hz
US RTTY 2125 Hz
European RTTY 1275 Hz
CW: Approximately 50 WPM max.
RTTY: 45, 50, 57, 75, 100
ASCII: 110
AMTOR FEC: 100
Must be EPSON or compatible
8000 characters volatile RAM
Straight key CW decoding
Mark Frequency:
Baud Rates:
Printer:
MessageSaver™:
Code Practice:
NOTE:
Reverse mode selectable
RTTY, ASCII, and AMTOR
for
NOTE: US or European frequency jumperselected.
CONNECTIONS:
POWER
A 12 VDC 300 milliamp power supply should be used with the VEC-162. The POWER jack accepts a 2.1 mm
coaxial plug with the center conductor positive and the sleeve negative. An optional DC supply, the AC-12, is
available from Vectronics. Connect your AC-12 Power Adapter or compatible DC supply, coaxial line with
shield ground, into the POWER jack on the rear of the VEC-162.
PRINTER PORT
A DB-25 connector is located on the VEC-162 for use with an EPSON compatible printer.
AUDIO INPUT
There are two methods of feeding audio into the VEC-162 Multi-Reader. The 3.5 mm mono jack, labeled
AUDIO INPUT, can be used with a cable, using the tip as audio and shield as ground. The 5-pin DIN jack can
be used with a cable using pin 4 as audio and pin 2 as ground. This connection scheme matches popular TNC
connections so that you may use ready-made TNC cables.
HAND KEY
A hand key may be used with the VEC-162 for CW code practice. Connect your hand key to the 3.5mm HAND
KEY jack on the rear, with the tip to the key and the shield to ground. To listen as you practice your code, place
the SPEAKER SELECT switch on the rear panel IN to the HANDKEY position. For normal operation, this
switch should be in the RADIO (OUT) position.
JUMPERS
Jumpers J6, J7, and J8, located inside on the right side of the unit, are for setting either the US or European
RTTY frequency shifts. The unit comes with pins 2 & 3 of each jumper shorted, for use with the US RTTY
shifts. If you require the European RTTY shifts, then short pins 1 & 2 of J6, J7, and J8.
1
VEC-162 MultiReader
Instruction Manual
BASIC OPERATION:
The VEC-162 MultiReaderTM is easy to operate. The push-button marked POWER controls the power to the
unit. After turning the unit ON, the VEC-162 will light the PWR LED and display a scrolling sign-on message
across the LCD. On the left side of the unit is a hole for LCD contrast adjustment. When the display shows the
SIGNAL SETUP prompt, the VEC-162 is ready for operation. All the VEC-162 requires for proper operation is
that you select the signal type that you wish to decode, the signal baud rate, along with tuning to the desired
signal on your radio. Some signals may require that you select the REVERSE function to properly decode the
desired signal. Once you properly tune your radio to the desired signal, the VEC-162 begins to display the
decoded signal information. If characters cannot be decoded, which is the case for some RTTY signals, an
underscore character ("_") will be scrolled for each undecoded character. If the unit is not decoding characters
correctly, check the format setting to confirm that it is correct.
MENU OPERATION:
The VEC-162 menu system consists of two front panel push-buttons labeled OPTION and SELECT along with
the LCD display. Pressing the OPTION button changes the option being displayed on the LCD. The available
OPTIONS within the VEC-162 operating system are shown below:
1.
2.
3.
4.
5.
6.
SIGNAL SETUP
BAUD RATE SETUP
PRINTER SETUP
RAM SETUP
REVERSE SETUP
PRACTICE KEY
Pressing the SELECT button executes the OPTION currently displayed on the LCD, and goes to a sub-menu.
Under each sub-menu are other selectable options. The options under the sub-menus are the actual mode
settings, such as OPERATING MODE, BAUD RATE, PRINTER ON/OFF, RAM PLAYBACK and RAM
SCROLLING, just to name a few.
For example, turn the unit ON, and wait a few seconds for the unit's sign-on message to finish. When the VEC162 finishes its sign-on message, it displays the first main menu option, SIGNAL SETUP. Pressing the
OPTION button displays the second main menu option, BAUD RATE SETUP. Pressing the SELECT button
now causes the VEC-162 to switch to the BAUD RATE SETUP sub-menu and display the first option, 45
BAUD. Pressing the SELECT button now tells the VEC-162 to select 45 baud as it's decode baud rate, and to
return to the main menu option, BAUD RATE SETUP. Pressing the OPTION button repeatedly will cause the
unit to scroll through the next main menu options, PRINTER SETUP, RAM SETUP, REVERSE SETUP, and
PRACTICE KEY and then back to the first main menu option, SIGNAL SETUP. Pressing the SELECT button
now tells the VEC-162 to switch to the SIGNAL SETUP sub-menu and display the first option, CW. Press the
OPTION button to switch the display to RTTY 170 and then press the SELECT button. The VEC-162 is now
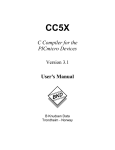
ready to decode 45 baud, 170 shift RTTY. Refer to Figure 1 for the VEC-162 MultiReader™ menu layout.
2
VEC-162B MultiReader
Instruction Manual
COPYRIGHT 19xx MFJ ENTERPRISES, INC.
RELEASE XXX
!
SIGNALSETUP
BAUDRATESETUP
PRINTERSETUP
RAMSETUP
REVERSESETUP
PRACTICEKEY
!
!
!
!
!
!
CW
RTTY 170
RTTY 425
RTTY 850
ASCII
AMTOR FEC
MAIN MENU
45 BAUD
50 BAUD
57 BAUD
75 BAUD
100 BAUD
MAIN MENU
PRINTERON/OFF
MAIN MENU
RAMPLAYBACK
SCROLLSLOWER
SCROLLFASTER
PRINTRAMON/OFF
CLEARRAM
MAINMENU
REVERSEON/OFF
MAINMENU
PRACTICEON/OFF
MAINMENU
VEC-162 MultiReader™ Menu Layout
Figure 1
MAIN MENU:
The main menu allows you to select the configuration sub-menus, so you can set-up the VEC-162 to decode the
various signals of which it is capable. There are six main menu OPTIONS:
1.
2.
3.
4.
5.
6.
SIGNAL SETUP
BAUD RATE SETUP
PRINTER SETUP
RAM SETUP
REVERSE SETUP
PRACTICE KEY
Press the OPTION button to change the menu options, then press the SELECT button to enable a sub-menu.
When the PRACTICE KEY option is displayed and you press the OPTION button, the VEC-162 returns to the
beginning of the main menu, SIGNAL SETUP.
SIGNAL SETUP
The SIGNAL SETUP sub-menu allows you to choose the type of signal that you want the VEC-162 to decode.
There are seven sub-menu selections:
1.
2.
3.
4.
5.
6.
7.
CW
RTTY 170
RTTY 425
RTTY 850
ASCII
AMTOR FEC
MAIN MENU
Press the OPTION button to change the sub-menu options. Once the signal type you want is displayed on the
LCD, press the SELECT button to begin decoding the type of signal you selected. When you press the
SELECT button again, the VEC-162 will exit signal decoding, and return to the SIGNAL SETUP sub-menu. If
you are in the RTTY mode, and the VEC-162 is not decoding the signal, you may have the signal baud rate set
improperly. In this case, you can press the OPTION button to exit decoding and go to the BAUD RATE SETUP
sub-menu. At the BAUD RATE SETUP sub-menu, you may select another baud rate setting, then return to the
SIGNAL SETUP sub-menu and re-enter the previous RTTY mode. To exit this sub-menu without selecting a
signal type, press the OPTION button until the display reads MAIN MENU, then press the SELECT button to
exit.
3
VEC-162 MultiReader
Instruction Manual
BAUD RATE SETUP
The BAUD RATE SETUP sub-menu allows you to choose the baud rate of the signal that you want the VEC-162
to decode. This only applies to RTTY signals. The selections in this sub-menu do not affect the CW, ASCII, or
AMTOR FEC modes. There are six selections under the BAUD RATE SETUP sub-menu:
1.
2.
3.
4.
5.
6.
45 BAUD
50 BAUD
57 BAUD
75 BAUD
100 BAUD
MAIN MENU
Press the OPTION button to change the sub-menu options, and press the SELECT button to select the baud rate
of the signal that you want to decode. The baud rate will be updated and the unit will return to the main menu.
To exit this sub-menu without changing the baud rate, press the OPTION button until the display reads MAIN
MENU, then press the SELECT button to exit.
PRINTER SETUP
This sub-menu allows you to enable or disable printing of received text to the EPSON or compatible printer
attached to your VEC-162. There are two sub-menu selections:
1. PRINTER ON/OFF
2. MAIN MENU
Press the OPTION button to change the sub-menu options, and press the SELECT button to change the printer
enable. If you press SELECT in the PRINTER ON/OFF option, the VEC-162 will toggle the printer enable. It
will display the current state for approximately one second then switch to the main menu. If the printer enable is
set to ON, then each received character is sent to the printer as soon as it is displayed. The printer will store the
characters in a buffer until it has received eighty characters, then the printer will print the buffered characters.
The printer will always store and print character in this manner. If the printer has an odd amount of character
such as 100, then the printer must be taken OFF LINE for the printer to print the remaining buffered characters.
The printer can be taken OFF LINE by pressing its ON LINE button. For further instruction on your printer,
please refer to your printer manual. To exit this sub-menu without changing the printer enable, press the
OPTION button until the display reads MAIN MENU, then press the SELECT button to exit.
RAM SETUP
This sub-menu allows you to view received data that was saved to the RAM buffer. There are six sub-menu
selections under the RAM SETUP sub-menu:
1.
2.
3.
4.
5.
6.
RAM PLAYBACK
SCROLL SLOWER
SCROLL FASTER
PRINT RAM ON/OFF
CLEAR RAM
MAIN MENU
Press the SELECT button while the RAM SETUP prompt is displayed on the LCD to display the first RAM
SETUP sub-menu, RAM PLAYBACK. Pressing the SELECT button now prompts the VEC-162 to begin
displaying all data received since being turned ON. The stored data will start scrolling from the beginning of the
buffer to the last received character. The last received character is followed by an "x" to denote the end of the
buffer. The RAM buffer has a storage capacity of only 8000 characters. If more than 8000 characters have been
received, only the last 8000 characters will be available for display. The display scroll rate may be modified by
pressing the SELECT button while in the SCROLL SLOWER or SCROLL FASTER selections. To stop
scrolling the view screen, press either the OPTION button or the SELECT button. Do the same to start the view
4
VEC-162B MultiReader
Instruction Manual
screen scrolling again. To exit before reaching the end of the buffer, press both the OPTION button and the
SELECT button at the same time.
Pressing SELECT while in PRINT RAM ON/OFF sub-menu enables printing of the RAM buffer to an EPSON
or compatible printer. The printer must be attached to the DB-25 female connector labeled PRINTER PORT on
the rear of the VEC-162. This feature is only for printing the RAM buffer characters being displayed during
RAM PLAYBACK. The PRINT RAM ON/OFF feature is not for "real-time" printing of characters received offthe-air. Pressing the SELECT button while in the CLEAR RAM sub-menu erases all characters currently in the
RAM buffer. In order to exit this sub-menu without changing the RAM options, press the OPTION button until
the display reads MAIN MENU, then press the SELECT button to exit.
REVERSE SETUP
This sub-menu allows you to enable or disable the REVERSE mode for RTTY, ASCII, AMTOR FEC. There are
two sub-menu selections under the REVERSE SETUP sub-menu:
1. REVERSE ON/OFF
2. MAIN MENU
Press the OPTION button to change the sub-menu options, then press the SELECT button to change modes. If
you press SELECT in the REVERSE ON/OFF option, the VEC-162 will toggle the reverse mode. It will display
the current state for approximately one second then switch to the main menu. If the reverse mode is set to ON,
then the VEC-162 will invert each bit received. To exit this sub-menu without changing the reverse mode, press
the OPTION button until the display reads MAIN MENU, then press the SELECT button to exit.
PRACTICE KEY
This sub-menu allows you to enable or disable the practice mode for the CW hand key. There are two sub-menu
selections under the PRACTICE KEY sub-menu:
1. PRACTICE ON/OFF
2. MAIN MENU
Press the OPTION button to change the sub-menu options, then press the SELECT button to enable the practice
session. If you press SELECT in the PRACTICE ON/OFF option, the VEC-162 will enter the hand key practice
mode. All keying performed through the HAND KEY jack will be decoded and displayed on the LCD. In
addition, the decoded data will be sent to the printer port, as well as recorded in the RAM for future review. To
listen to the code, place the SPEAKER SELECT switch beside the HAND KEY jack IN to the HAND KEY
position. For normal operation, this switch should be in the RADIO (OUT) position. To exit the practice mode,
press either the SELECT or the OPTION button. To exit this sub-menu without entering the practice mode,
press the OPTION button until the display reads MAIN MENU, then press the SELECT button to exit.
PROPER RADIO TUNING:
Proper tuning of your radio is critical to achieve optimum performance in any mode from your VEC-162. Also,
knowing what type of signal you are tuning in is very important. You do not want to try tuning in an AMTOR
FEC signal with the VEC-162 setup in the RTTY 170 mode ... this just will not work properly. An AMTOR FEC
signal sounds just like an RTTY 170 signal when listening to them both on the radio.
In this section we will explain the procedure for proper radio tuning for the different type signals that apply to the
VEC-162. However, it is still left up to the end user to ensure that the VEC-162 is setup for the same type of
signal that is being tuned in on the radio. So, if we are ready to go, then let’s get started.
5
VEC-162 MultiReader
Instruction Manual
TUNING IN A CW SIGNAL
First of all, scan the bands for a strong, clean signal. Remember, the signal must be the same type as what the
VEC-162 is setup for, in this case CW. If not, then the VEC-162 will not decode the signal properly.
There are a couple of different methods to tune in a CW signal on the radio, which are compatible with the VEC162. The first method is to use a NARROW CW filter in your radio, if your radio has such a filter. The filter
passband must be at 700 Hz, which is the center frequency of the CW demodulator in the VEC-162. The second
method is to use the Lower Side Band mode, or LSB on the radio. When using the LSB mode on the radio,
always start on the “higher side” of the desired signal, then tune the radio so the “pitch” of the signal goes down
in frequency.
Using a Narrow CW Filter
For maximum performance while in the CW mode, the DATA/CW switch on the front panel must be IN, to the
CW position. Please follow the steps below for tuning in a CW signal, if your radio has a NARROW CW filter:
1. Set the VEC-162 to the CW operating mode by using the OPTION and SELECT buttons.
2. Set the DATA/CW switch on the front panel to the CW position (the IN position).
3. Set the THRESHOLD control on the front panel fully clockwise. This sets up the demodulator for maximum
bandwidth.
4. Set the SPEAKER SELECT switch on the back panel to the OUT position. This allows the internal speaker
of the VEC-162 to be used to monitor the incoming CW audio signal.
5. Vary the VFO frequency dial on the radio until both the LOCK and DATA leds are flashing with the
incoming CW signal. The LOCK and DATA leds should be bright and flashing together. If either led is
dimly lit, but is still flashing with the other, then slightly vary the VFO dial until the dim led becomes
brighter, but still flashes together with the other. Once the leds are flashing together with the incoming signal,
vary the VFO dial slightly while watching the VEC-162 display until good CW copy is obtained.
6. Now with the VEC-162 decoding the incoming CW signal, turn the THRESHOLD control counter-clockwise
until the LOCK led “loses” the signal.
7. Fine tune the VFO dial on your radio until the LOCK led once again follows the incoming CW signal.
8. Repeat steps 6 and 7 until you have adjusted the THRESHOLD control to the absolute minimum setting
possible for good CW copy. With the bandwidth now set to the absolute minimum possible, the VEC-162 will
demodulate clean CW signals because the input circuit rejects noise that would otherwise interfere with the
decoding of the incoming signal.
Using the LSB Mode
Please follow the steps below for tuning in a CW signal, if you use the LSB mode in your radio:
1. Set the VEC-162 to the CW operating mode by using the OPTION and SELECT buttons.
2. Set the DATA/CW switch on the front panel to the CW position (IN position).
3. Set the THRESHOLD control on the front panel fully clockwise. This sets up the demodulator for maximum
bandwidth.
6
VEC-162B MultiReader
Instruction Manual
4. Set the SPEAKER SELECT switch on the back panel to the OUT position. This allows the internal speaker
of the VEC-162 to be used to monitor the incoming CW audio signal.
5. Starting on the higher side of the CW signal, vary the VFO frequency dial on the radio lower in frequency
until both the LOCK and DATA leds are flashing with the incoming CW signal. The LOCK and DATA leds
should be bright and flashing together. If either led is dimly lit, but is still flashing with the other, then
slightly vary the VFO dial until the dim led becomes brighter, but still flashes together with the other. Once
the leds are flashing together with the incoming signal, vary the VFO dial slightly while watching the VEC162 display until good CW copy is obtained.
6. Now with the VEC-162 decoding the incoming CW signal, turn the THRESHOLD control counter-clockwise
until the LOCK led “loses” the signal.
7. Fine tune the VFO dial on your radio until the LOCK led once again follows the incoming CW signal.
8. Repeat steps 6 and 7 until you have adjusted the THRESHOLD control to the absolute minimum setting
possible for good CW copy. With the bandwidth now set to the absolute minimum possible, the VEC-162 will
demodulate clean CW signals because the input circuit rejects noise that would otherwise interfere with the
decoding of the incoming signal.
This completes this section on Tuning in a CW Signal. Just keep in mind that there are a couple of things that
you must do to allow sucessful decoding of CW signals:
1. Make sure that the VEC-162 is setup in the CW mode.
2. Be sure to use the THRESHOLD control to help reject any noise that would interfere
with decoding the incoming signal.
TUNING IN RTTY/ASCII/AMTOR FEC SIGNALS
First of all, set the DATA/CW switch on the front panel OUT, to the DATA position. The VEC-162 is
calibrated for optimum RTTY performance with a MARK tone of 2125 Hz and a SPACE tone of either 2295,
2550, 2975 Hz for shifts of 170, 425, and 850 Hz, respectively. Optimum ASCII/AMTOR FEC performance
occurs with a MARK tone of 2125 Hz and a SPACE tone of 2295 Hz for a 170 Hz shift. Vary the frequency dial
on your radio until the LOCK LED is lit constantly. While keeping the LOCK LED lit, vary the frequency until
the DATA LED blinks with the audio tone shifts of the received signal. If the data is garbled, try changing baud
rates or REVERSE mode, or even the SIGNAL SETUP operating mode. This is because RTTY and AMTOR
FEC signals sound alike, and you may be trying to decode RTTY, with the VEC-162 set to the AMTOR FEC
mode, or vice versa.
7
VEC-162 MultiReader
Instruction Manual
CW ABBREVIATIONS:
73
88
ABT
AGN
ANT
BK
CPY
CQ
CUL
CU
DE
DX
ES
FB
FER
FREQ
GA
GE
GM
HR
HW
K
best regards
love and kisses
about
again
antenna
break
copy
general call to any station
see you later
see you
from
distance, rare station
and
fine business
for
frequency
good afternoon, go ahead
good evening
good morning
here
how
go ahead
MSG
NR
NW
OM
OP
R
RCVR
RIG
RST
SIGS
STN
TEMP
TKS
TNX
UR
U
WL
WT
WX
XCVR
XMTR
XYL
message
number
now
old man
operator
are, received, roger
receiver
equipment
readability, strength, tone report
signal
station
temperature
thanks
thanks
you are
you
well
watt
weather
transceiver
transmitter
wife
TECHNICAL ASSISTANCE:
If you have any problem with this unit first check the appropriate section of this manual. If the manual does not
reference your problem or your problem is not solved by reading the manual, you may call VECTRONICS at 601323-5800. You will be best helped if you have your unit, manual and all information on your station handy so
you can answer any questions the technicians may ask.
You can also send questions by mail to VECTRONICS, 1007 HWY 25 South, Starkville, MS 39759 or by
Facsimile (FAX) to 601-323-6551. Send a complete description of your problem, an explanation of exactly how
you are using your unit, and a complete description of your station.
8
VEC-162B MultiReader
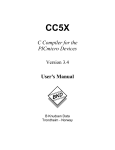
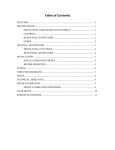
VEC-162 SCHEMATIC DIAGRAM:
9
Instruction Manual
VEC-162 MultiReader
Instruction Manual
VEC-162 SCHEMATIC DIAGRAM:
10