1
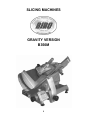
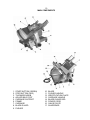
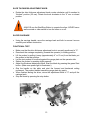
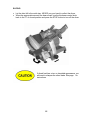
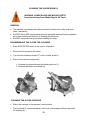
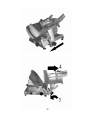
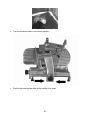
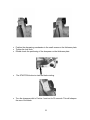
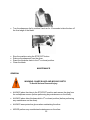
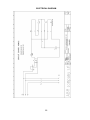
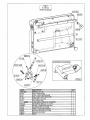
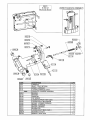
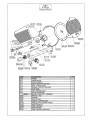
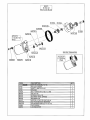
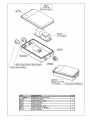
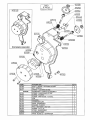
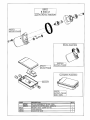
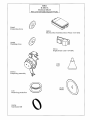
 INSTALLATION
USE AND
MAINTENANCE
MANUAL
B350M
GRAVITY FEED MANUAL SLICER
13-3/4”
NOTE:
This Manual contains important
safety instructions which must
be strictly followed when using
this Slicer.
THE BIRO MANUFACTURING COMPANY
1114 WEST MAIN STREET
MARBLEHEAD, OHIO 43440-2099 U.S.A.
MODEL B350M
Compliant to NSF/ANSI Standard 8: Commercial Powered Food Preparation
Equipment.
This machine was designed and built to slice food in compliance to the norms
of the 89/392-89/336 Directive and following amendments CE 91/368-93/4493/68 CE, EN 1974 directive 89-109.
#Material and objects destined to the food products contact directive (89/109
CEE) and subsequent modification (2002/72/CEE).
#EN 60204-1 Machines electrical equipments.
#EN 60335-2-64 Particular requisition for kitchen machines.
#UNI EN 1974 Machines for food industries-Slicing Machines
-Security and hygiene features.
1
SLICING MACHINES
GRAVITY VERSION
B350M
2
SAFETY TIPS
WARNING: SHARP BLADE AND MOVING PARTS!
To Avoid the Risk of Personal Injury, Follow These Safety Tips
When Installing, Using, Cleaning, or Otherwise Maintaining This
Slicer:
1.
This slicer uses an extremely sharp blade. ALWAYS keep your hands away
from the edge of this blade, at all times.
2.
NEVER use this slicer without reading this manual beforehand, without proper
training or when drowsy or not fully alert.
3.
ALWAYS install the slicer on solid level support and only to the
manufacturer’s instructions contained in this manual.
4.
ALWAYS connect the slicer to an AC wall socket using the three-pronged
plug provided. Use the ON-OFF to power the slicer. ALWAYS unplug the
slicer when cleaning or moving it.
5.
NEVER remove any guards except as provided in this manual.
6.
ALWAYS keep hands, arms, wrists, hair, loose clothing and jewelry clear of
all moving parts.
7.
ALWAYS STOP using the slicer and unplug it from the power source in any
case of unusual noise, incorrect movement, vibration or other abnormalities.
Consult your equipment repairman or manager IMMEDIATELY.
8.
ALWAYS keep Adjustment Thickness Knob in “0” mm position when not
using the slicer
9.
ALWAYS use non-slip, cut resistant gloves when using, cleaning or
maintaining the slicer.
10.
NEVER use the weight assembly to push the slicer carriage back and forth,
Use the (PUSH HANDLE) for this!
Additional warnings are contained throughout this manual. If any warning label
On the slicer comes off or becomes unreadable, Contact Biro for an immediate
replacement.
3
•
Warnings affecting your personal safety are indicated by:
WARNING
•
Cautions affecting the usefulness or life of the slicer are indicated by:
•
Environmental hazards or issues are indicated by:
4
TABLE OF CONTENTS
SAFETY TIPS ………………………………………………………………………… 3
TABLE OF CONTENTS.…………………………………………………………….... 5
FOREWARD …………………………………………………………………………... 6
SCOPE OF THIS MANUAL …………………………………………………..….. 6
GENEARL SAFETY RULES …………………………………………………….. 6
LIMITED WARRANTY ……………………………………………………………….. 7
DATA PLATE – COMFORMITY MARKS ………………………………………..…. 8
ENVIRONMENTAL CONDITIONS OF USE ……………………………………..… 8
UNPACKING AND INSTALLATION ……………………………………………..….. 9
OPENING THE BOX ………………………………………………………..……. 9
TECHNICAL DESCRIPTION AND PROPOSED CONDITIONS OF USE …….. 10
GENERAL DESCRIPTION …………………………………….……………….. 10
DIMENSIONS/MAIN TECHNICAL DATA …………………………………………. 10
MAIN COMPONENTS ………………………………………………………………. 11
INSTALLATION ……………………………………………………………………… 12
INSTALLING THE SLICER …………………………………………………...... 12
ELECTRICAL CONNECTION ………………………………….………………. 12
TEST THE CONTROLS …………………………………………………………….. 12
START AND STOP BUTTONS …………………………………………..……. 12
WARNING LABELS ……………………………………………………...……… 12
SLICE THICKNESS ADJUSTMENT KNOB ………………………………….. 13
SLICER CARRIAGE ……………………………….……………………………. 13
FUNCTIONAL TEST …………………………………………………………….. 13
USING THE SLICER ………………………………………………………………... 14
PRODUCTS THAT CAN BE SLICED …………………………………………. 14
PRODUCTS THAT MUST NOT BE SLICED …………………………………. 14
START AND STOP BUTTONS ………………………………………………… 14
SLICE THICKNESS AND ADJUSTMENT KNOB ……………………………. 14
SLICER CARRIAGE …………………………………………………………….. 14
SLICING ………………………………………………………………………….. 15
CLEANING THE SLICER B350M ………………………………………………….. 16
GENERAL ………………………………………………………………………… 16
DISASSEMBLING THE SLICER FOR CLEANING ………………………….. 16
CLEANING THE SLICER CARRIAGE ………………………………………… 16
SANITIZING INSTRUCTIONS …………………………………………………. 18
REASSEMBLE THE MACHINE …………………………………………………18
SHARPENING THE SLICER …………………………………………...…………….... 19
GENERAL ………………………………………………………………………… 19
MAINTENANCE ……………………………………………………………………...….. 22
GENERAL ………………………………………………………………………… 22
OPERATOR MAINTENANCE ………………………………………………………….. 23
TROUBLESHOOTING AND REMEDIES ……………………………………...……… 24
ELECTRICAL DIAGRAM ……………………………………………………………….. 25
5
FOREWARD
SCOPE OF THIS MANUAL
This manual contains information to install, use and service Biro Gravity Slicers for
food products. (Please see models in paragraph “Technical Description”). This
manual designed to permit users, and especially end users, to take the necessary
precautions and procedures to avoid injuring themselves or damaging the equipment
when using, cleaning or maintaining this slicer.
GENERAL SAFETY RULES
The slicer must only be operated by trained, authorized personnel. No one should
use this slicer before reading this manual carefully, and reviewing it contents with
his/her supervisor.
This slicer is designed to comply with all National Sanitation Foundation (“NSF”) and
American National Standards Institute (“ANSI”) requirements. However, you state or
municipality may have additional requirements which must be strictly followed when
using this slicer.
6
LIMITED WARRANTY:
WARRANTY: The BIRO Manufacturing Company warrants that the Model B350M
Gravity Feed Slicer will be free from defects in material and workmanship under
normal use and with recommended service. Biro will replace defective parts, which
are covered by this limited warranty, provided that the defective parts are authorized
for return, shipping charges prepaid, to a designated factory for inspection and/or
testing.
DURATION OF WARRANTY: The warranty period for all part covered by this
limited warranty is one (1) year from date of Inspection/Demonstration advised on
the returned Warranty Registration Card, or eighteen (18) months from original
factory ship date, whichever occurs first, except as noted below.
NOT COVERED BY WARRANTY: This limited warranty does not apply to
machines sold as used, rebuilt, modified, or altered from the original construction in
which the machine was shipped from the factory. (Water contaminated electrical
systems are no covered under this limited warranty.) BIRO is not responsible for
electrical connection of equipment, adjustments to switch components or any other
electrical requirements, which must be performed only by a certified electrician.
BIRO is also not responsible for service charges or labor required to replace any
part covered by this limited warranty or for any damages resulting from misuse,
abuse, lack of proper or recommended service.
EXCLUSION OF WARRANTIES AND LIMITATION OF REMEDIES: BIRO gives no
warranties other than those expressly stated in this limited warranty. THE IMPLIED
WARRANTY OF MERCHANTABILITY, THE IMPLIED WARRANTY OF FITNESS
FOR PROCESSING OF FOOD PRODUCTS, AND ALL OTHER IMPLIED
WARRANTIES ARE SPECIFICALLY EXCLUDED. BIRO IS NOT LIABLE FOR
CONSEQUENTIAL OR INCIDENTAL DAMAGES, EXPENSES, OR LOSSES. THE
REMEDIES PROVIDED IN THIS BIRO LIMITED WARRANTY ARE PURCHASER’S
SOLE AND EXCLUSIVE REMEDIES AGAINST BIRO.
REGISTRATION CARDS: You must sign, date and complete the warranty
registration card supplied with each machine. The warranty card must be returned to
The Biro Manufacturing Company for proper registration. If no warranty card is
returned to BIRO, the warranty period will begin from the date the machine is
originally shipped from the factory.
HOW TO GET SERVICE:
1. Contact the entity from whom your purchased the machine; or
2. Consult the yellow pages of the phone directory for the nearest authorized dealer;
or
3. Contact BIRO Mfg. Co. for the authorized service entity (250 plus worldwide) in
your area.
7
DATA PLATE – CONFORMITY MARKS
The machine has been constructed in compliance with the European Directive
89/392 and subsequent amendments. All parts used in the machine meet terms of
the Directive and the CE marks have been applied to substantiate this compliance.
The plate carrying the Manufacturer’s data, the machine data and the CE mark are
applied onto the machine base under the blade guard tie-rod knob.
ENVIRONMENTAL CONDITIONS OF USE
from 41oF to 104oF
- Temperature
- Relative Humidity
max 95%
8
UNPACKING AND INSTALLATION
WARNING: SHARP BLADE
To Avoid Risk of Personal Injury,
Keep Hands Away From Blade
While Unpacking Slicer.
OPENING THE BOX
On receipt, check packaging integrity. If packaging is ripped, torn or otherwise
disturbed, inform the shipping agent or your equipment dealer immediately.
To unpack the machine, proceed as follows:
•
•
•
Open the box, and remove the Installation, Use and Maintenance Manual.
Review the manual, particularly the sections on Unpacking and Installation,
before proceeding to the next step.
Cut the banding holding the machine to the internal wood support frame and lift
the machine out of the shipping box or container.
Check the box contents and make sure it corresponds to what is shown on the
external label.
DO NOT DISCARD ANY PACKAGING MATERIALS IN THE
ENVIRONMENT !
The packaging components (cardboard, polythene, and others)
are classified as normal solid urban waste and can be
disposed of without difficulty. However, for suitable recycling,
dispose of the packaging materials separately (differentiated
waste)
according to local regulations.
9
TECHNICAL DESCRIPTION AND
PROPOSED CONDITIONS OF USE
GENERAL DESCRIPTION
The machine is essentially made of a base supporting a circular blade mounted in a
tilted position. This blade is driven by an electric motor to slice food. The machine is
equipped with a carriage, a product tray and sliding tracks mounted under the base
top, parallel to the blade.
Slice thickness is adjusted by a gauge plate mounted in front of the blade. This plate
is moved traversaly with respect to the blade up to the desired slice thickness. When
the slicer is not in use or is being sharpened, the slice thickness knob must be in the
00 or closed position.
All the machine components are made of polished and anodized oxidized aluminum
alloy, stainless steel or food grade plastic material. The blade is driven by an electric
motor, powering a grooved belt.
The machine is started and stopped by control buttons provided with an auxiliary
circuit preventing accidental restarts after an outage.
DIMENSIONS / MAIN TECHNICAL DATA
BIRO MODEL B350M
GRAVITY SLICER
LEGEND
US
METRIC
MOTOR
1/2 hp
0.35 kw
BLADE DIAMETER
13-3/4”
350 mm
RPM
200
200
SLICE THICKNESS
0 – 1”
0 – 25 mm
MAX CUT ROUND
10”
250 mm
MAX CUT RECTANGLE
12-1/2” X 9”
320 mm X 230 mm
MACHINE LENGTH
18”
460 mm
MACHINE WIDTH
25-1/2”
650 mm
MACHINE HEIGHT
17-1/2”
440 mm
GROSS WEIGHT
121 lbs.
55 kg.
NET WEIGHT
106 lbs.
48 kg.
CARTON DIMENSION
28” X 32-1/2” X 24-1/2” 710 mm X 830 mm X 620 m
10
MAIN COMPONENTS
1.
2.
3.
4.
5.
6.
7.
8.
9.
START BUTTON (GREEN)
STOP BUTTON (RED)
THICKNESS KNOB
ADJUSTABLE FOOT
CARRIAGE SUPPORT
FRAME
CARRIAGE
BLADE GUARD
PUSHER
10.
11.
12.
13.
14.
15.
16.
17.
BLADE
PUSHER HANDLE
IDENTIFICATION PLATE
CARRIAGE HANDLE
BLADE GUARD ROD
POWER CORD
GAUGE PLATE
SHARPENER
11
INSTALLATION
INSTALLING THE SLICER
Position the slicer on a well-leveled, smooth dry area that is able to hold the weight
of the slicer. Make sure the installation area is open to the operator and free of any
obstacles that might interfere with the use of the slicer.
ELECTRICAL CONNECTION
Check to ensure the Start/Stop Button is in the Stop (Off) position and the slice
adjustment knob is set to “0” mm or closed. Insert the three-prong plug supplied with
the slicer into an approved socket that meets local building and electrical codes.
ALWAYS use the Start/Stop Button to operate the slicer. NEVER use a
wall mounted or other switch to turn the slicer on or off.
The user is responsible for the proper electrical connection to the slicer (supply line,
outlet, distribution panel, circuit breaker or fuse box, grounding, etc.).
Only use 110 volt 60 Hz power source at 15 amps
with the slicer.
TEST THE CONTROLS
START AND STOP BUTTONS
•
•
•
Press the green button (1) to start running the blade.
The power light turns on to indicate the machine works properly.
Press the red button to stop the blade (2).
WARNING LABELS
•
Check to ensure all labels supplied with the slicer are in place and properly
affixed to the machine.
12
SLICE THICKNESS ADJUSTMENT KNOB
•
Rotate the slice thickness adjustment knob counter-clockwise until it reaches its
“thickest” position (25 mm). Rotate the knob clockwise to the “0” mm or closed
position.
•
ALWAYS use the Start/Stop Button to operate the slicer. NEVER use a
wall mounted or other switch to turn the slicer on or off.
SLICER CARRIAGE
•
Using the carriage handle, move the carriage back and forth to ensure it moves
smoothly and without obstruction
FUNCTIONAL TEST
•
•
•
•
•
•
•
•
•
Make sure that the slice thickness adjustment knob is correctly positioned to “0”.
Draw back the carriage completely (towards the operator) to loading position.
Lift the pusher by pulling it away (approximately 4” or 10 cm) from the blade, put
the pusher in the rest position.
Lay the test product to be sliced against the gauge plate on the operator side.
Secure the pusher by exerting slight pressure.
Adjust the thickness adjustment knob, Start the blade by pressing the green Start
button. (Make sure power light is illuminated.)
Grip the handle on the plate and start the forward and backward cutting
movement. The product travels toward the gauge plate by gravity.
When finished testing the slicer, return the adjustment knob to “0” and pull the
carriage back.
Stop the blade by pressing the stop button.
13
USING THE SLICER
WARNING: SHARP BLADE AND MOVING PARTS!
Keep Hands Away From Blade Edge At All Times!
Review Safety Tips On Page
This Slicer.
Of This Manual Before Using
PRODUCTS THAT CAN BE SLICED
•
•
•
All types of cold cuts (raw, cooked, smoked).
Meat without bone (raw or cooked, at a temperature not less than 37.4o F (3o C).
Hard and semi-hard cheese cuts (obviously types that can be sliced such as
gruyere, mozzarella, etc).
PRODUCTS THAT MUST NOT BE SLICED
•
•
•
•
Frozen or deep-frozen foods.
Food containing bones (meat or fish).
Any other non-food products.
Soft cheeses.
START AND STOP BUTTONS
•
•
•
Press the green button (1) to start running the blade.
The power light turns on to indicate that the machine works properly.
Press the red button (2) to stop the blade
WARNING LABELS
•
Check to ensure all warnings supplied with the slicer are in place and properly
affixed to the machine.
SLICE THICKNESS AND ADJUSTMENT KNOB
•
Rotate the slice thickness adjustment knob counter-clockwise until it reaches the
thickness desired.
SLICER CARRIAGE
•
Using the handle, move the carriage back and forth to slice the product. If the
slicer carriage does not move smoothly and without obstruction, ????????
14
SLICING
•
•
Let the slice fall to the catch tray. NEVER use your hand to collect the slices.
When the appropriate amount has been sliced, turn the thickness control knob
back to the “0” or closed position and press the STOP button to turn off the slicer.
If sliced food has a torn or shredded appearance, you
will need to sharpen the slicer blade. See page for
instructions.
15
CLEANING THE SLICER B350M (1)
WARNING: SHARP BLADE AND MOVING PARTS!
Keep Hands Away From Blade Edge At All Times!
GENERAL
•
•
•
The machine must always be cleaned carefully at least once a day, and more
often if necessary.
ALWAYS follow NSF requirements and any applicable state and local regulations
as to the frequency and manner of cleaning and sanitizing.
ALWAYS use protective gloves when cleaning the slicer.
DISASSEMBLING THE SLICER FOR CLEANING
•
Place START/STOP switch in the stop or off position.
•
Disconnect the plug from the outlet.
•
Turn the slice thickness knob to 00 or the “closed” position.
•
Remove the various components.
¾ Unscrew (counterclockwise) the blade guard rod (1).
¾ Remove the blade cover blade (2).
CLEANING THE SLICER CARRIAGE
•
Return the carriage to the operator’s start position
•
Turn the knob (3) counterclockwise, until loose, the carriage will then drop back
for cleaning (4).
16
17
•
Clean the machine body and the blade using a damp cloth with water and
bidegradeable soapy detergent having 708 pH an at a temperature not below
+ 30o C.
SANITIZING INSTRUCTIONS ????
REASSEMBLE THE MACHINE REVERSING THE INSTRUCTIONS ABOVE
18
SHARPENING THE SLICER
GENERAL
WARNING: SHARP BLADE AND MOVING PARTS!
Keep Hands Away From Blade Edge At All Times!
•
•
•
Sharpen the blade periodically to ensure best slices.
ALWAYS follow NSF requirements and state and local regulations when cleaning
and sharpening the slicer.
ALWAYS wear protective gloves during sharpening process.
•
Clean the blade.
•
Assure the sharpener is in the zero position.
19
•
Turn the thickness knob to the 25mm position.
•
Position the meat gauge plate in the middle of its travel.
20
•
•
•
Position the sharpening mechanism in the small recess on the thickness plate.
Tighten the lock knob.
Double check the positioning of the sharpener on the thickness plate.
•
The START/ON button to start the blade rotating.
•
Turn the sharpener dial to Postion 1 and run for 30 seconds. This will sharpen
the rear of the blade.
21
•
Turn the sharpener dial to position 2 and run for 15 seconds to take the burr off
the front edge of the blade.
•
•
•
•
Stop the machine using the STOP/OFF button.
Remove the sharpener from the slicer.
Reset the thickness knob to the 00 or closed position.
Clean the blade.
MAINTENANCE
GENERAL
WARNING: SHARP BLADE AND MOVING PARTS!
To Avoid Serious Personal Injury:
•
ALWAYS place the slicer in the STOP/OFF position and remove the plug from
the outlet/power source (before performing any maintenance on the slicer).
•
ALWAYS place slicer thickness dial in 00 or closed position (before performing
any maintenance on the slicer).
•
ALWAYS wear protective gloves when maintaining the slicer.
•
NEVER perform any unauthorized maintenance on the slicer.
22
OPERATOR MAINTENANCE
The operator is permitted to perform ONLY the following maintenance on the
slicer:
•
Sharpen the blade reguarly, depending on duration of use and type of product
sliced.
•
ALWAYS make sure the slicer is cleaned and sanitized whenever used.
•
Lubricate the carriage sliding guides weekly as follows:
¾ Use only food grade lubricants. DO NOT USE VEGETABLE OILS
¾ Spread a small quantity of oil on the bar and move the assembly back and
forth 3 or 4 times.
¾ Lubricate the product grip sliding bar weekly.
¾ Clean as required to remove any excess oil.
The following maintenance operations are to be done only by BIRO or
personnel authorized by BIRO:
•
•
•
•
Replace the Blade;
Sharpening can be done only up to 0.5 inches of the blade diameter
value. Beyond this point, the BLADE MUST BE REPLACED ONLY by
personnel AUTHORIZED BY BIRO.
Replace motor transmission belt.
Replace electrical system components under machine frame.
Repair structural parts, or components under the frame.
23
TROUBLESHOOTING AND REMEDIES
The following table indicates the most common problems that may arise during slicing and
the suggested remedies:
Problem
Possible Cause
Remedy
The slicer does not start
When the green button
Pressed.
No power supply
The blade guard is not
correctly positoned.
Defective fuse, circuit
breaker or circuit.
Ensure the plug is
correctly inserted (in
the outlet).
Check the blade guard.
Called a qualified
electrician for technical
assistance.
The slicer does not start;
and there is continuous
buzzing noise.
The motor is running on
single-phase mode.
Press the red button
Immediately, remove
the power plug from
outlet and call a
qualified electrician for
technical assistance.
The slicer starts, but there
are vibrations. The motor
is very hot and there is a
bad smell.
Defective motor or
transmission.
Do not use machine.
Call for technical
assistance.
Under strain, the slicer
slows down or comes
to a stop.
Defective transmission.
Call for technical
assistance.
Excessive resistance to
product slicing, shredding
or tearing.
The blade is dull.
Sharpen the blade.
The slices are ragged
and/or shaped irregular.
The blade is dull.
The blade is excessively
worn out.
Sharpen the blade.
Call for technical
assistance.
Unsatisfactory blade
sharpening.
Worn sharpening stones.
Replace sharpening
stones. Call for
technical assistance.
The meat carriage
does not slide.
Guides are unsufficiently
lubricated.
Lubricate.
When the red button is
pressed the machine
does not stop.
Defective electrical
control circuit.
Press the red button
immediately, remove the
power plug from outlet.
Call for technical
assistance.
24
ELECTRICAL DIAGRAM
25