1
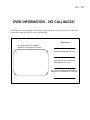
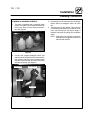
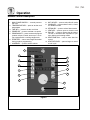
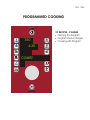
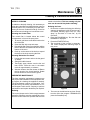
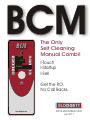
BCM
BCM
ON/OFF
TEMP
TIME
350
4:26
PROBE
PROG
HOT AIR
COMBI
STEAM
COMBI
STAGE
VENT
ALARM
FAN
START/STOP
www.blodgett.com
The Only
Self Cleaning
Manual Combi!
I-Touch
I-Startup
I-Sell
Get the P.O.
No Call Backs
ROCK STAR WORLD TOUR
July 2011
TRAINING LOGISTICS
You will be divided into 4 teams. All teams will have the opportunity to attend each of the
4 different BCM training sessions. The sessions include:
!
Installation
!
Operation
!
Programming
!
Maintenance
BCM
Installation
TIPS FOR YOUR CUSTOMERS
!
Warnings, shipping damage. DO NOT sign until you are sure there is no damage.
!
Always bring an extra operation manual.
!
Loading dock or lift gate?
!
Will the unit fit through the door?
!
Cross check the utility supply, gas, LP, electric, kW - amp load
!
Always sell the extended warranty
!
Start a file for the customer, include the following:
Oven information from the page in the operations manual
Name of chef or rep that performed the startup
Date of warranty expiration
Yes / No
OVEN INFORMATION - NO CALL BACKS!
The following can be found in the front of the operation manual. Be sure to fill out the
information and include it in your customer file.
Model/Modèl:
Your Service Agency's Address:
Adresse de votre agence de service:
Serial Number/Numéro de série:
Your appliance was installed by/
Installateur de votre four:
Your oven's installation was checked by/
Contrôleur de l'installation de votre four:
Yes / No
Installation
Final Check Lists
WARNING!!
Final check list must be performed by a
qualified installer only.
OVEN EXTERIOR
j Check that the oven has not been damaged
in transit (dents, scratches, etc.)
j Check/adjust the height and check that the
oven is placed level (horizontally)
j Check/adjust oven door
CONNECTIONS
j
j
j
j
j
j
j
j
j
j
j
Check for correct water connection
Turn on water supply
Check for leaks
Turn off water supply
Check and clean dirt filter
Turn on water supply again
Check hand shower
Check for correct electrical connection
Check connection to drip tray
Check for correct mounting of drip tray
Check for correct fall of hose from drip tray,
and check for leaks
j Check for correct exhaust and drain connecĆ
tion
j Clean the oven
j Apply steel oil
OVEN INTERIOR
j Check that filter housing is mounted correctly
j Check interior light
j Clean the oven
CONTROL
j Check and adjust, if necessary, each of the
preset values
j Heat up the oven at 480° F (249°C) for approxĆ
imately 5 minutes.
Yes / No
Installation
Plumbing Connections
WATER CONNECTION
3/4” hose. Permanent installations should be fitted
with a stop-tap and a non-return valve.
Blodgett BCM ovens have two water connections.
Both are located at the back of the unit.
D
D
DRAIN CONNECTION
1 connection for raw water for the condensation
jet (cold water).
1 connection for steam generation and the
Combi Wash jet in the oven chamber. Must
meet the requirements applying to water supplied to household appliances; however, hot
water with a temperature not exceeding 120˚F
(49˚C) can be used.
Quench
Blodgett ovens are equipped with a drain system
that removes surplus water from the oven chamber. This may be condensed water from the products, or it may occur when the oven chamber is
cooled down with cold water, or when the oven
chamber is cleaned.
WARNING!!
Connection must be carried out by an authorised plumber, to an open or closed
drain. The drain must never end directly
beneath the oven.
Steam
The drain must be of stainless steel or an equally
temperature-resistant material, have a diameter of
at least 2” (49 mm) and a fall of at least 3˚ or 5%.
Figure 3
WARNING!!
If the water temperature exceeds 70˚F
(21˚C), problems with regard to Combi
Optima calibration and cooling of the
oven may occur.
The water connection must be carried out
by an authorized plumber in accordance
with existing local codes.
Clogged up water filters and dirt in the solenoid valves are not covered by the warranty.
Figure 4
To facilitate cleaning and servicing, the oven
should be connected with an approved flexible
8
Yes / No
Installation
Plumbing Connections
CLEANING & DELIMING CHEMICAL
3. Insert the blue and red hoses into the proper
bottles. Red is for detergent, blue is for rinse
aid.
4. The last line is for the delimer. This is the tan
colored tube protroding from the bottom of the
oven. Cut the tubing to the proper length, if
needed, and place the tubing into the delime
bottle.
NOTE: If the tube is cut to length, remove the
stainless steel weight from the end of
the tube and reinsert.
1. The oven is supplied with a chemical bottle
holder. The holder can be affixed to either side
of the oven. Place it on the stand crossmember. See Figure 5.
Figure 5
2. Connect the supplied detergent tubes (red
and blue) to the underside of the oven near the
rear. Connect the blue hose to the fitting with
the blue sticker and the red hose to the fitting
with the red sticker. See Figure 6.
Red Sticker
Blue Sticker
Red Tube
Blue Tube
Figure 6
9
BCP & BCM ERROR CODES & CAUSES
Yes / No
3 - Generator Hot – Generator High Limit Thermostat Open(Opens at 275˚F) (Manual Reset under a cover at the bottom
of the control panel) (Check F1)
4 – Oven Hot - Oven High Limit Thermostat Open (Opens at 662˚F) (Manual Reset under a cover at the bottom of the
control panel) (Check F1)
5 – Fan Hot – Motor Thermal Limit Open (2 Gray Wires) (Opens at 320˚F) Wait 10 minutes and try again. If 5 appears
again, the cooling fans, motor bearings, or thermal switch within the motor failed. (Check F1 or for a 5vDC Short)
6 – Drain Hot – RTD Probe in Drain (100 Ohm Probe) reads over 167˚F for over 5 minutes. (Check Quench Water)
7 – Oven sensor Defect – RTD Probe in Generator (100 Ohm Probe) Shorted/Open
8 – Core Probe Missing – Control has an active Core (Meat) Probe. Deactivate both Core Probes or insert Core Probe in
the probe port on the control side.
9 – Gen Sensor Defect – RTD Probe in Generator (100 Ohm Probe) Shorted/Open
10 – Drain Sensor Defect - RTD Probe in Drain (100 Ohm Probe) Shorted/Open
11 – Water Shortage – Steam Generator could did fill in 5 minutes. (Check fill water or level sensor)
12 – SSR Hot – one of the two SSR Heat Sink Automatic Reset Snap Disks that are wired in series is Open (Open at 248˚F)
(Check F1 and Axial Air Flow)
13 – Generator > 265 – RTD Probe in Generator (100 Ohm Probe)reads over 265˚F.
14 – Fan Slow – Fan Hall Sensor (Brown, Black and Red Wires), Inverter or the Motor has failed or a wiring issue exists.
(Check Axial Air flow, Hall Effect, 5vDC short, Fan Motor, Freq Inverter)
16 – IO Board Hot – The IO Board senses a temperature above 140˚F. (Stops functioning - Check Axial Air flow)
19 –Internal Error–The control has sensed a failed process, restart the control.
20 – IO Com Error- Failure of communication between the CPU and IO Board.
21 – Invalid recipe – Indicates a recipe is programmed for a feature the oven does not have. (Boiler/Boilerless)
22 - Program Terminated – Power interrupted while a program was in progress and enough time elapsed that the
program cannot resume.
24 – Empty Error – Steam Generator water level sensor reads water 25 seconds after running the drain pump to drain
the boiler. (Check Drain Pump or Level Sensor)
25 – CombiOptima not Calibrated – Enter the Service Menu and run the calibration.
26 – CombiOptima Sensor Error – The Pressure sensor gives a reading outside the range of 0.5 - 4.5.
27 – CombiOptima calibr. Fault – Calibration could not be completed, Start calibration when the oven is cold and dry.
(Check Injection Nozzle)
28 – Main Alarm Error –No 24V signal to high limit board (Check High Limit board condition and power supply)
29 – Door Sensor Error – Wrong door sensor signal (5vDC Short [creating a signal < 10])
34 – Water Pressure Low – Water Pressure Switch (located on the larger solenoid assembly) is closed. (Opens at 36 PSI)
36 – No Detergent – Time Based detergent monitoring is disabled. (Disable Detergent Monitoring in menu)
38 – Detergent In Oven – Combi wash interrupted while the detergent was in the oven. Run Combi Wash in Step 0 to
clear detergent prior to inserting product.
39 – Insufficient Memory – The units memory is not sufficient for the current operation. (HAACP full, perform
download)
40 - IO Board Hot- The IO Board senses a temperature above 140°F. (Will keep working, but see 16)
41 – Main Alarm - Boiler Temp Rising without a call for boiler heat.
42 – Error in SW – Software Error.
Yes / No
For Gas Ovens
44-Dammper Error-Failure during initialization of exhaust at oven start-up. (Check for vent damper obstructions)
45-24V Error-24V missing or failure of main contactor output.
50-Switch On-Pressure switch on when gas-air control unit running (timeout 20 sec.)
51-Switch Off-Pressure switch not on when gas-air control unit running (timeout 20 sec.)
52-Gas Valve-Gas valve does not open (automatic gas burner control has failed (timeout 20 sec.))
53-No Fan RPM-Gas-air control unit does not revolve when pressure switch is on.
54-Fan Error-Gas-air control unit does not run at correct RPM just before ignition.
55-Gas Fail-Warning: Ignition failed.
56-Gas Error-Flame fails to occur after 3 attempts.
57-Gas Stop-Warning: Gas failure during operation.
BCM
Operation
Yes / No
Operation
Manual Control Description
1. MAIN POWER SWITCH - controls power to
the oven
2. TEMPERATURE KEY - press to set the cook
temperature
3. TIME KEY - press to set the cook time
4. PROBE KEY - press to activate core probe
5. PROGRAM KEY - press access and program
product recipes. Control stores up to 10 recĆ
ipe programs with 3 cooking stages each.
6. STAGE KEY - use to enter stage information
during product programming
7. ALARM KEY - press to silence alarms
8. HOT AIR KEY - press to select Hot Air mode
9. COMBI KEY - press to select Combi 1, Combi
2 or Retherm mode
10. STEAM KEY - press to select Steam mode
11. VENT KEY - press to open or close the vent
12. FAN KEY - press to change the fan speed.
The fan is reversible with 9 speeds for optiĆ
mum baking and roasting results
13. SELECTION DIAL - turn to enter data into
control
14. START/STOP KEY - press to begin or cancel
a cook cycle
1
2
8
3
9
10
4
11
5
12
6
7
13
14
Figure 8
12
Yes / No
Operation
Cooking Tips
PREHEAT
RETHERM MODE
485Ć575_F (250Ć300_C)
85Ć355_F (30Ć180_C)
Blodgett recommends always preheating the
oven before cooking.
D
Preheat is used to heat an empty oven. To set the
preheat mode, select the Hot Air key and enter a
temperature above 485°C (250°C). PREHEAT is
displayed. The time can be set to maximum of 15
minutes. The timer will not begin the countdown
until the desired preheat temperature has been
reached.
D
NOTE: Continuous operation is not available in
preheat.
HOT AIR MODE
D
D
The hot air operating mode can be used for
roasting, grilling, baking and gratinating.
Blodgett recommends that you keep the vent
open when roasting products at very high temĆ
peratures
It is possible to roast breaded products such as
breaded fish and breaded pork chops. For maxĆ
imum effect, use enameled cast iron pans or siliĆ
coneĆcoated baking sheets.
COMBI MODES
85Ć485_F (30Ć250_C)
D
D
STEAM MODE
85Ć250_F (30Ć120_C)
D
D
85Ć485_F (30Ć250_C)
D
D
COMBI 1 is recommended for the roasting of all
kinds of meat cuts. The pores of the meat close
quickly, which prevents the juice from leaving
the meat. For long roast times at 175Ć265°F
(80Ć130°C), COMBI STEAMING 1 helps reduce
shrinkage.
COMBI 2 is recommended for roasts that
should be wellĆdone, and if you want to use the
juice for gravy. At temperatures higher than
335°F (170°C), the crust of the meat becomes
nice and brown.
15
Retherm is a very gentle process and therefore
very suitable for reheating.
Use a core temperature probe to reach the perĆ
fect end temperature.
For the reheating of sousĆvide products, etc.,
follow the product reheating recommendations.
SousĆvide products should not be covered.
D
D
Blodgett recommends preĆsteaming the oven
for 8 minutes before loading product.
Steaming at 212°F (100°C is recommended for
all kinds of hard vegetables, rice and pasta.
Low temperature steaming at 85Ć211°F
(70Ć80°C) is recommended for fish.
Forced steaming at 250°F (120°C) is an aggresĆ
sive and very rapid process, which should be
used with care.
BCM
Programming
Yes / No
PROGRAMMED COOKING
ON/OFF
TEMP
TIME
350
4:26
PROBE
PROG
HOT AIR
COMBI
STEAM
COMBI
STAGE
VENT
ALARM
FAN
START/STOP
10 RECIPES, 3 STAGES
! Naming the Program
! Program Product Stages
! Cooking with Program
BCM
Maintenance
Yes / No
Maintenance
Cleaning & Preventative Maintenance
WEEKLY CLEANING
In addition to the daily cleaning, it is necessasry to
clean the control filter and behind the fan guard on
a weekly basis. This is necessary for proper funcĆ
tioning of the oven. Scale will build up on the fan
and heat source leading to a less efficient oven.
Cleaning the Control Filter
The control filter is located below the control
compartment, in front of the spray hose.
1. To remove, pull down on the black knob on the
left of the filter.
2. Clean the filter with soap and water.
3. Reinstall the filter. Press up on the filter until the
back of the knob is inserted into the hole in the
bottom of the oven.
4. Push up on the center of the knob to expand
the back of the knob securing the filter.
needs to be delimed. This is a warning only, the
oven can be used all day before deliming.
Deliming the Oven
1. Be sure the container delivering the deliming
agent to the appliance is full. Be sure to use a
nonĆdiluted deliming agent such as "Lime
Away" by EcoĆLabs or "Lime Out", by US
Chemical.
2. Press the PROGRAM key. Turn the dial until
DELIMING is displayed.
3. Press the START/STOP key.
4. The remainder of the process is automatic.
The control displays the deliming steps as
they occur.
Cleaning Behind the Fan Guard
1. Loosen the two screws and on the fan guard
(or baffle).
2. Swing the baffle forward.
3. Thoroughly spray cleaner onto the fan and
heat source. Place the oven in the steam
mode for approximately 10 minutes.
4. After ten minutes, rinse the cleaner off. Return
the fan guard to the closed position. Rotate
the two screws to secure the fan guard.
PREVENTIVE MAINTENANCE
The best preventive maintenance measures are
āthe p
ā roper iā nitial iā nstallation o
ā f tā he equipment and
a program for cleaning the appliance routinely.
The Oven/Steamer requires no lubrication. ConĆ
tact the factory, the factory representative or a loĆ
cal Blodgett Combi service company to perform
maintenance and repairs should they be required.
Deliming
The control keeps track of boiler usage between
descaling. When the oven has reached 95% of the
time the control warns the operator that the oven
17
Figure 9
5. The oven can be delimed at any time. Simply
turn the dial to the program DELIMING and
press the Start/Stop key.
Yes / No
Installation
Plumbing Connections
3. Insert the blue and red hoses into the proper
bottles. Red is for detergent, blue is for rinse
aid.
4. The last line is for the delimer. This is the tan
colored tube protroding from the bottom of the
oven. Cut the tubing to the proper length, if
needed, and place the tubing into the delime
bottle.
NOTE: If the tube is cut to length, remove the
stainless steel weight from the end of
the tube and reinsert.
CLEANING & DELIMING CHEMICAL
1. The oven is supplied with a chemical bottle
holder. The holder can be affixed to either side
of the oven. Place it on the stand crossmemĆ
ber. See Figure 5.
Figure 5
2. Connect the supplied detergent tubes (red
and blue) to the underside of the oven near the
rear. Connect the blue hose to the fitting with
the blue sticker and the red hose to the fitting
with the red sticker. See Figure 6.
Red Sticker
Blue Sticker
Red Tube
Blue Tube
Figure 6
9
Yes / No
Maintenance
Cleaning & Preventative Maintenance
DAILY CLEANING
Daily cleaning of your Combi oven is essential for
sanitation, and to ensure against operational diffiĆ
culties.
Cleaning the Exterior
1. The exterior of the appliance may be cleaned
and kept in good condition with a light oil. SatĆ
urate a cloth and wipe the appliance when it
is cold; wipe dry with a clean cloth.
WARNING!!
DO NOT spray the outside of the appliance
with water or clean with a water jet. CleanĆ
ing with a water jet can impregnate chloĆ
rides into the stainless steel, causing the
onset of corrosion.
Cleaning the Interior
NOTE: DO NOT use corrosive cleaners not inĆ
tended for oven cleaning on your Combi
oven.
Blodgett recommends the following products
for cleaning and rinsing of your Blodgett ComĆ
bi oven. If you choose to use products other
than what Blodgett recommends, please have
your suppler send us the MSDS sheet on the
proposed alternate so we can ensure it meets
our standards. Non approved products can
cause harm to your unit and can potentially
void your warranty.
Recommended oven cleaners:
Johnson Diversey Suma Nova LĆ6
Four, 1 gallon (3.78 litre) containers
Product code 57252280
One, 5 gallon (18.9 litre) container
Product code 57252100
Recommended Rinse Aid:
Johnson Diversey Suma Maro A8.8
Four, 1 gallon (3.78 litre) containers
Product code 57270280
One, 5 gallon (18.9 litre) container
Product code 57270100
16
1. Open the oven door.
2. Use the attached spray hose, located beneath
the control, to clean the front drip tray. Water
will run to the drain in the oven cavity.
Run the CombiWash automatic cleaning cycle
as follows:
1. Check that the oven cleaner and rinse agent
containers are both full.
2. Press the PROGRAM key. Turn the dial until
COMBIWASH is displayed.
3. CombiWash features four different cleaning
cycles. Press the STAGE key to select the deĆ
sired cleaning cycle.
Cycle 1 (44 minutes)
Cycle 2 (1 hour)
Cycle 3 (1 hour, 49 minutes)
Cycle 4 (2 hours, 38 minutes)
NOTE: Use cycle 1 or 2 after steaming and
roasting at low temperatures. Use
cycle 3 or 4 after steaming and roastĆ
ing at high temperatures.
4. Press the Start/Stop key to initiate the clean
cycle.
5. If the cavity temperature is above 175_F
(80_C), the oven will automatically enter cool
down. When the cavity is below 175_F (80_C)
the CombiWash cycle begins.
6. The control counts down the time remaining
in the wash cycle.
7. When the wash cycle is over, the oven autoĆ
matically switches to an energy saving standĆ
by mode.