1
LC-60E88UN
LiQUiD CRYSTAL TELEVIS~ON
T~:L~:VISEUR ACL
TELEVISOR CON PANTALLA
DE CRISTAL LiQUIDO
0 P E RATION MANUAl ...........................................................................................................................................................................................................
.,o~.;~ .............. .......
---
I.~
11245
~"~1
NYCE
D|GITAL I ....................................
IMPORTANT : Please
Pleaseread
read this operation
operation manual
manual before
before starting operating
IMPORTANT
operating tile
the equipment.
equipment.
iMPORTANT :Veuiiiez,irecemoded’emp,o,
avantdecommencerAuti,iserl’apparei,.
Veulliez lire ce mode d'emp!oi
avant de commencer a uti!iser I'apparel!.
IMPORTANTE
IMPORTANTE : Lea
Lea este
esle manual
manual de operaci6n antes de
de corn.enzar a operar el equipo.
Exhibit 50
LC-60E88UN
LIQUID CRYSTAL TELEVISION
ENGLISH
OPERATION MANUAL
IMPORTANT:
IMPORTANT:
lossor
ortheft, please record
recordthe
the
To aid reporting inin case ofofloss
thespace
spaceprovided.
provided.The
The
serial numbers
numbersininthe
TV’s model and serial
located at
atthe
therear ofofthe
theTV.
TV.
numbers are located
Model No.:
Serial No.:
Serial
No ..
IMPORTANT INFORMATION
WARNING: TO REDUCE THE RISK OF FIRE OR ELECTRIC SHOCK, DO
NOT EXPOSE THIS PRODUCT TO RAIN OR MOISTURE.
~
__
~~
__
,~
RISK OF ELECTRIC SHOCK
DO NOT OPEN
--- --
CAUTION:
REDUCE THE
CAUTION: TO
TO REDUCE
THE RISK
RISK OF
OF ELECTRIC
ELECTRICSHOCK,
SHOCK,
DO NOT
NOT REMOVE
REMOVECOVER
COVER (OR BACK).
NO USER-SERVICEABLE
NO
USER-SERVICEABLE PARTS INSIDE.
REFER
REFER SERVICING
SERVICINGTO
TO QUALIFIED
QUALIFIED SERVICE
SERVICE
PERSONNEL.
PERSONNEL.
CAUTION:
,~,
~ __
with arrow-head
arrow-head
The lightning flash with
triangle,
symbol, within an equilateral triangle,
to the
the
user to
is intended to alert the user
presence
of uninsulated
uninsulated"dangerous
"dangerous
presence of
voltage" within the product’s
enclosure that may be of sufficient
magnitude to
to constitute
constituteaarisk
riskofof
electric shock
shockto
topersons.
persons.
The exclamation point within
within aa
toalert
alertthe
theuser
user
triangle is intended to
nr"<:F'nr:p of
of important
important
to the presence
and maintenance
maintenance
operating and
instructionsininthe
the
(servicing) instructions
accompanying the
the product.
product.
literature accompanying
TO PREVENT ELECTRIC SHOCK, MATCH WIDE BLADE OF PLUG TO WIDE
SLOT, FULLY INSERT.
®1
IMPORTANT INFORMATION
WARNING: FCC Regulations state that any unauthorized changes or modifications to this equipment not expressly
approved by the manufacturer could void the user’s authority to operate this equipment.
CAUTION:
product satisfies FCC
FCC regulations when shielded cables and connectors
connectorsare
areused to connect thethe
other
This product
unitunit
to other
To prevent
preventelectromagnetic
electromagneticinterference
interference
with
electric
appliances
such
as radios
televisions,
use shielded
equipment. To
with
electric
appliances
such
as radios
andand
televisions,
use shielded
and connectors
connectorsfor
forconnections.
connections.
cables and
DECLARATIONOF
OFCONFORMITY:
CONFORMITY:
DECLARATION
SHARP LIQUID CRYSTAL TELEVISION,
TELEVISION, MODEL
MODEL LC-60E88UN
LC-60E88UN
This device complies with
conditions:
with Part
Part15
15of
ofthe
theFCC
FCCRules.
Rules.Operation isissubject totothe
thefollowing two
two
conditions:
(1) This
This device
device may not cause harmful
(1)
harmful interference,
interference, and
and(2) this
this device
devicemust
mustaccept
acceptany
anyinterference
interference
received,
interferencethat
thatmay
maycause
causeundesired
undesiredoperation.
nnA.<,t,r,n
received, including interference
RESPONSIBLE PARTY:
SHARP ELECTRONICS
ELECTRONICS CORPORATION
Sharp Plaza,
Plaza, Mahwah,
Mahwah, New
NewJersey
Jersey07495-1163
07495-1163
TEL:
TEL: 1-800-BE-SHARP
-800-BE-SHARP
For Business
http://www.sharpusa.com
For
Business Customers:
Customers: URL
URLh!![ljlYYYY_W~_?_h§Jll!L?-':;I.,~.9J:!l.
INFORMATION:
has been
been tested
testedand
andfound to comply with the
the
limits
a Class
B
device,
pursuant
to Part
of the
This equipment has
limits
forfor
a Class
B digital
device,
pursuant
to Part
15 of15the
FCCFCC
Rules. These limits
against
harmful
interference in a in
residential
installation.
This This
limits are
are designed
designedtotoprovide
providereasonable protection
protection
against
harmful
a residential
installation.
in accordance
equipment generates,
generates, uses
usesand
and can
canradiate
radiateradio
radiofrequency
frequencyenergy and,
and,if ifnot
not
installed
and
used
equipment
installed
and
used
in accordance
withwith
thethe
instructions, may cause
is isno guarantee that
interference
willwill
notnot
instructions,
cause harmful
harmful interference
interferenceto
toradio
radiocommunications. However,
However,there
there
that
interference
occur in
in aa particular installation.
installation.IfIfthis
thisequipment
equipmentdoes
does
cause
harmful
interference
radio
or
reception,
which
occur
cause
harmful
interference
to to
radio
or television
reception,
which
cancan
be be
determined
thetheinterference
byby
one
or or
more
of of
thethe
by turning
turning the
the equipment
equipmentoff
offand
andon,
on,the
theuser
userisisencouraged
encouragedtototry
trytotocorrect
correct
interference
one
more
determined by
measures:
following measures:
-- Reorient or
or relocate
relocate the
thereceiving
receivingantenna.
antenna.
--- Increase
Increase the
the separation between
betweenthe
theequipment
equipment
and
receiver.
and
receiver.
Connect the
the equipment into
intoan
an outlet
outleton
on aacircuit
circuitdifferent
differentfrom
fromthat
thattotowhich
whichthe
thereceiver
receiverisisconnected.
connected.
--- Connect
Consult the
the dealer
dealer or
or an
an experienced
experienced radio/TV
radiolTVtechnician
technicianfor
forhelp.
help.
-- Consult
"Note to CATV system installer: This reminder is provided to call the CATV system installer’s attention to Article 820-40 of the National
Electrical Code that provides guidelines for p~oper grounding and, in particular, specifies that the cable ground
shall
be connected
to the
ground
shall
be connected
to the
grounding system of the building, as close to the point of cable entry as practical."
This product utilizes tin-lead solder, and fluorescent lamp containing a small amount of
mercury. Disposal of these materials may be regulated due to environmental
considerations. For disposal or recycling information, please contact your local
authorities, the Electronic Industries Alliance: www.eiae.org, the lamp recycling
organization: www.lamprecycle.org or Sharp at 1-800-BE-SHARP
(For U.S.A. only)
This product qualifies for ENERGY STAR when "Home" is selected for "TV Location".
Setting "TV Location" to "Home" allows the TV to achieve an energy-saving status for household use.
Trademarks
¯.. Manufactured under
are
trademarks
of of
Dolby
under license
license from
from Dolby
DolbyLaboratories.
Laboratories.Dolby
Dolbyand
andthe
thedouble-D
double-Dsymbol
symbol
are
trademarks
Dolby
Laboratories.
Laboratories.
¯ "HDMI, the HDMI logo and High-Definition Multimedia Interface are trademarks or registered trademarks of HDMI
Licensing LLC."
¯ Products that have earned the ENERGY STAR® are designed to protect the environment through superior energy
efficiency.
efficiency .
¯.. LC'7;;tYr',
L C ~’ ~ ~ I’-, LLCFONT,
C F O N T, z~b~--~7.~~’ F. andandLC
LC logo mark are registered
'A(,lI"'tA'~'ritrademarks
trademarksofofSHARP
SHARP Corporation.
r.nlrnn,."tinn
I}L,:/-'7.:j·:;"l
This product isis embedded
embedded with
withLC
LCFont
Fonttechnology,
technology,which was
wasdeveloped bybySHARP
SHARPCorporation
Corporationfor
forclearly
displaying
other
fonts areare
used
for for
some
screen
pages,
too.
rli<,nl:"v,nn easy-to-read
easy-to-readcharacters
charactersononLCD
LCDscreens.
screens.However,
However,
other
used
some
screen
pages,
(~)- 2
DEAR SHARP CUSTOMER
you for
for your
your purchase of the Sharp Liquid CrystalTelevision.
Television.To
Toensure
ensure safetyand
andmany
many
years
Thank you
years
of trouble-free operation of your product, please read the Important Safety Instructions
Instructions carefullybefore
before
1<:1
using this
this urn""
product,
IIMPORTANT SAFETY INSTRUCTIONS
nrcm",,,,,
damage
Electricity is used to perform many useful functions, but it can also cause personal injuries and property
damage
if improperly handled. This product has been engineered and manufactured with the highest priority onon
safety.
safety.
However, improper use can result in electric shock and/or fire. In order to prevent potential danger,
danger,please
please
observe the following instructions when installing, operating and cleaning the product. ToTo
ensure
your
safety
ensure
your
safety
and prolong the service life of your Liquid Crystal Television, please read the following precautions
carefully
precautions
carefully
before using the product.
1)
1)
2)
2)
3)
3)
4)
4)
5)
5)
6)
6)
7)
7)
8)
8)
Read
instructions.
Read these instructions.
instructions.
Keep these instructions.
warnings.
Heed all warnings.
Follow all instructions.
instructions.
Do not use this
this apparatus near
nearwater.
water.
Clean only with dry cloth.
Do not block any ventilation openings.
Do
openings. Install
Install inin accordance
accordancewith
withthe
themanufacturer’s
manufacturer'sinstructions.
instructions.
Do not install near
stoves,
or or
other
apparatus
(including
Do
near any
any heat
heat sources
sourcessuch
suchas
asradiators,
radiators,heat
heatregisters,
registers,
stoves,
other
apparatus
(including
"mlnli1ti"r,,1
that produce heat.
heat.
amplifiers) that
Do not
not defeat the safety purpose of the polarized or grounding-type plug. A polarized plug has two blades
9) Do
9)
with one wider than the
the other. A grounding type plug has two blades and a third grounding prong. The
wide blade or the third prong are provided for your safety. If the provided plug does not fit into your outlet,
consult an electrician
electrician for
forreplacement ofofthe
theobsolete
ob:sol,ateoutlet.
10) Protect
at at
plugs,
convenience
receptacles,
10)
Protect the
the power
powercord
cordfrom
frombeing
beingwalked
walkedononororpinched
pinchedparticularly
particularly
plugs,
convenience
receptacles,
and the point where they
and
they exit from
from the
the apparatus.
11) Only
thethemanufacturer.
11)
Only use
use attachments/accessories
attachments/accessoriesspecified
",n",."l·,,,nbyby
manufacturer.
12) Use
tablespecified bybythe
themanufacturer,
manufacturer,ororsold
sold
12)
Use only with the
the cart,
cart, stand,
stand, tripod, bracket, orortable
with the apparatus. When
When aacart
cartis used, use caution when moving
movingthe
the
cart/apparatus
cart/apparatus
from tip-over.
combination to avoid injury from
13)
13)
Unplug this apparatus during lightning storms or when unused for long periods of time.
required when the apparatus hashas
been
14) Refer all servicing to qualified service
servicepersonnel.
personnel.Servicing is is
been
damaged in any way,
liquid
has
been spilled
or objects
or objects
way, such as
as power-supply cord
cordororplug
plugis damaged,
damaged,
liquid
has
spilled
have fallen into the apparatus, the apparatus
moisture,
does
notnot
operate
apparatushas
hasbeen
beenexposed
exposedtotorain
rainoror
moisture,
does
operate
normally, or has been dropped.
Additional
Safety Information
Information
Additional Safety
15)
productshould
shouldbe
beoperated
operatedonly
onlyfrom
fromthe
thetype
type
power
source
indicated
15) Power Sources-This
Sources--This product
ofof
power
source
indicated
on on
thethe
marking label.
label. If you
you are
are not sure
sure of
of the
the type of power supply to
to your
your home,
home, consult
consult your
yourproduct
productdealer
dealeror
or
marking
totothethe
local power company. For
For products
productsintended totooperate
operatefrom battery
batterypower,
power,ororother
othersources,
sources,refer
refer
operating instructions.
16) Overloading--Do not
cords,
or or
integral
convenience
receptacles
as as
thisthis
16)
notoverload
overloadwall
walloutlets,
outlets,extension
extension
cords,
integral
convenience
receptacles
of fire
fire or
or electric
electricshock.
shock.
can result in a risk of
17)
Object and
and Liquid
Liquid Entry--Never
Entry- Neverpush
pushobjects
objectsofofany kind
kindinto
intothis
thisproduct through openings asas
they
may
17) Object
they
may
dangerous voltage points
pointsor
orshort-out
short-outparts
partsthat could
could
result
Never
spill
touch dangerous
result
in a fire or electric shock. Never
spill
liquid of any kind on the product.
18)
fromthe
thewall
walloutlet
outletand
andrefer
referservicing
servicing
qualified
18) Damage Requiring Service--Unplug this product from
toto
qualified
service personnel under the following conditions:
a) When the AC cord or plug is damaged,
b) If liquid has been spilled, or objects have fallen into the product,
c) If the product has been exposed to rain or water,
d) If the product does not operate normally by following the operating instructions.
Adjust only those controls that are covered by the operating instructions as an improper adjustment
adjustment
technician
of other controls may result in damage and will often require extensive work by a qualified technician
to restore the product to its normal operation,
e) If the product has been dropped or damaged in any way,
way,and
and
f) When the product exhibits a distinct change in performance - this
indicates
a need
forfor
service.
this
indicates
a need
service.
19)
19) Replacement Parts--When replacement parts are required, be sure the service technician has used
replacement parts specified by the manufacturer or have the same characteristics as the original part.
Unauthorized substitutions may result in fire, electric shock, or other hazards.
20) Safety Check--Upon completion of any service or repairs to this product, ask the service technician to
perform safety checks to determine that the product is in proper operating condition.
21) Wall or ceiling mounting--When mounting the product on a wall or ceiling, be sure to install the product
according to the method recommended by the manufacturer.
®
3
IIMPORTANT SAFETY INSTRUCTIONS
¯.. Outdoor Antenna Grounding --- IfIfan
anoutside
outsideantenna
antennaisis
connected to
to the
thetelevision
television equipment,
equipment,be sure the
theantenna
grounded so
soas
asto provide
providesome
someprotection
protectionagainst
against
system is grounded
voltage surges and
and built-up static
staticcharges.
Article
81 810
of theof the National Electrical Code,
provides information with regard to proper grounding of the
mast and supporting structure, grounding of the lead-in wire
to an antenna discharge unit, size of grounding conductors,
location of antenna-discharge unit, connection to grounding
electrodes, and requirements for the grounding electrode.
[XAMPL[
EXAMPLE or
OFANT[NNA
ANTENNAGROUNDING
GROUNDINGAS
ASPeR
PER
NATIONAL
NATIONAL ELECTRICAL
ELECTRICAL CODE,ANSI/NFPA
ANSI/NFPA (0
70
ANENNA
ANTENNA
ANSI/NFPA 70 .... i I~,,.--~-" LEAD IN WIRE
ANleNNA
~"
GROUND ,..~J ~ [N..~ ANTENNA
DISCHARGE l!NII
~// CLAMP J./",,.~. IJ_ I ~NN DISCHARGE
UNIT
,(NEC SECTION
~ ~F~/-}~ (NEC SECTION 810 81020)
20)
~l ELECTRIC
I SERVICE
I
// /~ IGROUNDING
EQUIPMENT~ ~ /~ CONDUCTORS
L
mKlLJND
~.~,~===~’~ G ROU
N D CLAMPS
POVVEn
SEnvlCE GROUNDING
GnOUNDING
POWER SERVICE
eleCI
lelVi
ELECTRODE
SYSTEM
(NEC
Hi
(NEC AR,
ART 250, PART H)
NEC
NATIONALELECTRICAL
ELECTRICAL CODE
CODE
NEC NATIONAL
¯ Water and Moisture -- Do
kitchen
sink,
or or
Donot
notuse
usethis
thisproduct
productnear
nearwater
water- for
forexample,
example,near
neara abath
bathtub,
tub,wash
washbowl,
bowl,
kitchen
sink,
laundry tub; in a wet basement; or near a swimming pool; and
thethelike.
and
like.
¯ Stand -- Do not place the product on an unstable cart, stand,
stand,tripod
tripod
oror
table.
tablePlacing
.
the product on an unstable base
damageto the product. Use only a cart,
injuriesasaswell
wellasasdamage
can cause the product to fall, resulting in serious personal injuries
stand, tripod, bracket or table recommended by the manufacturer
soldwith
withthe
theproduct. When mounting the product
manufacturerororsold
on a wall, be sure to follow the manufacturer’s instructions. Use only
thethemounting
hardware recommended by the
only
mounting
manufacturer.
¯ Selecting the location -- Select a place with no direct sunlight and good ventilation.
¯ Ventilation -- The vents and other openings in the cabinet are designed for ventilation. Do not cover or block these vents
and openings since insufficient ventilation ,:san cause overheating and/or shorten 1:he iile of [he producL Do r o p ace
the product on a bed, sofa, rug or other similar surface, since they can block ventilation openings. This product is not
designed for built-in installation; do not place the product in an enclosed place such as a bookcase or rack, unless proper
ventilation is provided or the manufacturer’s instructions are followed.
¯ The Liquid Crystal panel used in this product is made of glass. Therefore, it can break when the product is dropped or
applied with impact. Be careful not to be injured by broken glass pieces in case the panel breaks.
¯ Heat -- The product should be situated away from heat sources such as radiators, heat registers, stoves, or other
producl:s (including ampiifiers) 1:hat prociuce heat.
~ The Liquid Crystai panei is a very high technology product with ~:,0~ 3,60U pixels, gMng you fine picture details.
Occasionaily, a few non-active pixels may appear on the screen as a fixed point of blue, green or red. Plea.so note that
this does not affect the performance of your product.
¯ Lightning -- For added protection for this television equipment during a lightning storm, or when it is left unattended and
unused for long periods of time, unplug it from the wall outlet and disconnect the antenna. This will prevent damage to
the equipment due to lightning and power-line surges.
¯ Power Lines -- An outside antenna system should not be located in the vicinity of overhead power lines or other electric
light or power circuits, or where it can fall into such power lines or circuits. When installing an outside antenna system,
extreme care should be taken to keep from touching such power lines or circuits as contact with them might be fatal.
¯ -[o prevent fire. never place any type of candle or fiames on the top or near the ]-V set.
, To prew;nt ,ire or .;h,:)c:k h..’~zard, cto no1: p ace the AC cc:,r,.J under the mv set or other heavy items.
¯ Do not display a still picture for a long time, as this could cause an afterimage to remain.
o To prevent fire or shock hazard, do not expose this product to dripping or splashing.
No objects filled with liquids, such as vases, should be placed on the product.
¯ Do not insert foreign objects into the product. Inserting objects in the air vents or other openings may
result in fire or electric shock. Exercise special caution when using the product around children.
.
Precautions when transporting the TV
¯ When transporting the TV, never carry it by holding or otherwise putting pressure onto the display. Be sure totoalways
always
carry the TV by two people holding it with two hands -- one hand on each side of the TV.
Caring
for the
the Cabinet
Cabinet
Caring for
¯6 Use a soft cloth (cotton, fls.n, ,el, ~.tc.) s.nd gentl~ MFe th~ ,sui face of ti ,e cabinet.
¯ Using a chemical cloth (wet/dry sheet type cloth, etc.) may deform the components of thethemain
unit
cabinet
or or
cause
main
unit
cabinet
cause
cracking.
¯ Wiping with a hard cloth or using strong force may scratch the surface of the cabinet.
~ If the: (;abinet is w~ry dirty, wipe with a soft: c:lc:,ti; (c:ollor], flannel, etD.) sc:,aked in neutral cietergent diluted with water and
and
thoroughly wrung out, and then wipe with
withaasoft dry cloth.
¯ The cabinet is primarily made of plastic. Avoid
Avoidusing
usingbenzene,
benzene,thinner,
thinner,and
andother
other
solvents,
solvents,
asas
these
these
may
may
deform
deform
thethe
cabinet and cause the paint to peel off.
¯ Do not apply insecticides or other volatile liquids.
Also, do not allow the cabinet to remain in contact with rubber or vinyl products forfor
a long
period
of of
time.
Plasticizers
time.
Plasticizers
a long
period
inside the plastic may cause the cabinet to deform and cause the paint to peel off.off.
.
.
@-44
IIMPORTANT SAFETY INSTRUCTIONS
, Caring
Caring for
for the
the Liquid
LiquidCrystal
Crystalpanel
panel
..¯ Turn
Turnoff
offthe main power and
andunplug the AC cord from the wall outlet before handling.
¯Gentiy wipe the surface of the display panel with a soft cloth (cotton, flannel, etc.).
To protect the display panel, do not use a dirty cloth, liquid cleaners, or a chemical cloth (wet/
~q ~
dry sheet type cloth, etc.). This may damage the surface of the display panel.
~~
¯ Wiping with a hard cloth or using strong force may scratch the surface of the display
panel.
display
panel.
~~
¯ Use a soft damp cloth to gently wipe the display panel when it is really dirty.
(It may scratch the surface of the display panel when wiped strongly.)
¯ If the display panel is dusty, use an anti-static brush, which is commercially available, to clean it. it.
~
~
~
~"
¯.. To avoid scratching
scratchingthe
theframe
frameororscreen,
screen,please use a soft, lint free cloth for cleaning. Approved cleaning cloths are
nr-.-,"I-\nr-available directly from Sharp inin single
forfor
available
single (00Z-LCD-CLOTH) or triple (00Z-LCD-CLOTH-3) packs. Call 1-800-BE-SHARP
ordering,oror VISIT http://www.sharpusa.com/SharpDirect.
ordering,
in mind:
Congratulations on
on your
yourpurchase!
purchase!As
Asyou
youenjoy
enjoyyour
yournew
newproduct,
product,please
please
keep
these
safety
Congratulations
keep
these
safety
tipstips
in mind:
THE ISSUE
THE
ISSUE
¯ -the home theater entertainment experience is a growing trend and larger flat panel displays
are popular purci;ases. However, flat panel displays are not
notalways supported or; the proper
stands or installed according to the manufacturer’s recommendations.
recommendations,
¯.. Flat panel displays that
shelves,
desks,
that are
are inappropriately situated
situatedonondressers, bookcases,
bookcases,
shelves.
desks.
speakers, chests
fallover
overand
andcause
causeinjury.
injury.
speakers.
chests or
orcarts may
mayfall
THIS MANUFACTURER
MANUFACTURERCARES!
CARES!
¯.. The consumer
consumer electronics
electronicsindustry
industryis committed
committed
making
home
to to
making
home
entertainment enjoyable
enjoyable
and safe.
safe.
TUNE
TUNE INTO
INTOSAFETY
SAFETY
¯ill One
recom,
mendations forfor
thethe
safe
installation
Onesize
sizedoes
does~,]OT fit all. Follow
r--oilo'vvthe
themanufacturer’s
rlianufacturer's
reCOn"'ltT1endations
safe
installation
and use of your flat panel display,
¯ Carefully read and understand all enclosed instructions for proper use of this product.
¯ Don’t allow children to climb on or play with furniture and television sets.
¯ Don’t place flat panel displays on furniture t~at can easily be used as steps, suc~ as a chest
of drawers.
drawers.
Rememberthat
thatchildren
childrencan
canbecome
become
excited
while
","tC'hmn
¯.. Remember
excited
while
watching
a program, especially on a
"larger than life" flat panel display. Care should
SI'10uici be taken to place ororinstall the display where it
cannot be pushed, pulled
pulled over,
over, or
orknocked
knockeddown.
down,
¯.. Care si;ould beDe
taken
t,:)toroute
all all
c,:)rds
and
cables conneel:ed
1:oto~he
so l:h~t
taken
routE?
cords
and
connected
thefl~t
flatpanel
paneidisplay
dispiay
1hat
they cannot be pulled
pulled or
or grabbed
grabbedby
bycurious
curiouschildren.
children.
WALL
TOTO
WALL
MOUNT
YOUR
FLAT
PANEL
DISPLAY,
ALWAYS:
WALL MOUNTING:
MOUNTING:IFIFYOU
YOUDECIDE
DECIDE
WALL
MOUNT
YOUR
FLAT
PANEL
DISPLAY,
ALWAYS:
¯ Use a mount that has been recommended
byby
the display
manufacturer
and/or
listed
by an
laboratory
(such
recormnended
display
manufacturer
and/or
listed
by independent
independent
laboratory
(such
as UL, CSA, ETL).
display
and
wall
mount
manufacturers.
¯ Follow all instructions supplied bybythethe
display
and
wall
mount
manufacturers.
youhave any doubts about your ability to10
yourflat
flalpanel display, contact your
your
¯.. Ififyou
safely install your
retailer about professionai
installation. .
installation
Makesure
surethat
thatthe
thewall
wallwhere
whereyou
youare
aremounting the
the
display
appropriate.
Some
wall
mounts
to be
¯.. Make
display
is isappropriate.
Some
wall
mounts
areare
notnot
designed to be
mounted to
to walls
walls with
withsteel
steelstuds
studsororold
oldcinder
cinderblock construction.
construction.
If areare
unsure,
contact
a nrr,tA'Q""nn,"'
If you
unsure,
contact
a professional
installer.
minimumofoftwo
twopeople
people
requiredforfor
installation,Flat
Flat
paneldisplays can be heavy.
heavy,
¯.. A minimum
are required
installation.
panel
CF~
~
,~ ........’°’~"~’°~’~
www.u:.org/ e y
Note: CEA is the preeminent
preeminent trade
trade association
associationpromoting growth
growthin inthe
the
$161
$161
billion
billion
Industry, More
r\/lor6 than 2,200 companies enjoy the benefits ofof
U.S. consumer electronics industry.
CEA membership, including legislative
legislativeadvocacy,
advocacy,market
market
research,
research,
technical training andand
mr,m"t>r,nand
andthe
thefostering
fostering
business
strategic
"""'t>r,nCh,r,Q
education, industry promotion
of of
business
andand
strategic
relationships.
,J
®
5
Contents
IMPORTANT
INFORMATION
IMPORTANT
INFORMATION ..................... 1
Trademarks
....................................... 2
2
Trademarks .......................................
DEAR
SHARP
CUSTOMER
....................... 3
3
DEAR SHARP
CUSTOMER
.......................
IMPORTANT
INSTRUCTIONS
........
IMPORTANTSAFETY
SAFETY
INSTRUCTIONS
........3-5
3-5
Supplied
Accessories
............................ 66
Accessories
............................
QUICK REFERENCE
QUICK
REFERENCE
QUICK
INSTALLATION
TIPS ................... 7
TIPS""""""""",
QUICK INSTALLATION
Usingthe
theRemote
Remote
Control
7
Control
UnitUnit
, , , , .................
,,,,,,
Preparation
Antennas
....................................... 8
Antennas""""""""""""""""""",
8
InstallingBatteries
Batteries inthe
theRemote
RemoteControl
ControlUnit"
Unit...88
Part Names
TV (Front) ...................................... 9
TV (Rear/Side) .................................. 9
Remote Control
Unit ........................... 10
Unit"""""""""""",,10
VIEW MODE ...............................
20
"""""""""",20
On-Screen Display Menu
On-Screen Display Menu Operation
, , , ,...........21
, , , , , " 21
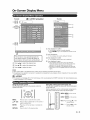
On-Screen
Menu Operation Buttons ...................... 21
Menu
21
MenuItems
Items ................................... 22
22
Menu
, , , , , , , , , , , , , , , , , , , , 23-24
Picture
PictureMenu
Menu ...............................
23-24
Audio
Audio Menu ................................... 25
25
Power
Menu,
25
Power Control
Menu .......................... 25
SetupM~u""""""""""""""",
Menu ................................ 26-29
26-29
OptionM~u""""""""""""""",
Menu ............................... 30-31
Menu,
, , , ,.........................
,,,,,
32-33
Digital Setup
Menu
32-33
Other Viewing Options
Presetting Remote Control Function ........... 34
Operating the Connected Equipment .......34-35
"""""""""""""""""",,9
Using AQUOS LINK
Controlling HDMI Equipment
Using AQUOS LINK ....................... 36-38
36-38
AQUOS LINK Menu ........................ 38-39
38-39
Introductionto
to Connections
Connections
Introduction
>-vc,,:m,Dnr',nn
H 0HD Images
...........
, , , , , , , , , " 11
11
Experiencing
......................
Types of Connection .......................... 11
11
Displaying an External Equipment Image ....... 11
1
Using a PC
40
Displaying a PC Image on the Screen .......... 40
Adjusting the PC Image ....................... 41
41
41
Setting Audio Input ............................ 41
PC Compatibility Chart ........................ 41
41
RS-232C Port Specifications .................. 42
Connecting to External Equipment
Connecting a Blu-ray Disc/DVD Player or
HD Cable/Satellite Set-top Box ........... 12-13
Connecting a VCR, Game Console,
Camcorder or Cable/Satellite Set-topBox""
Box .... 13
13
'nnn':"~T"-ln an
14
Connecting
anAudio
Audio Amplifier ................. 14
:r;nnp,~tlrln a PC
, , , , ,..............................
, , , , , , , , , , , , , , , , , , , , , , , " 15
15
Connecting
a PC
Watching TV
16
Turning On/Off the Power ..................... 16
Initial Installation
............................... 16
""""""""""""""",16
Direct
Direct Button
Button nn<>r<lfitl,n
Operation
Changing
Channels
.......................
Channels
"""
" " " " " " " ' " 17
17
Changing
Volume .......................... 17
Volume"""""""""""",,17
MUTE
" "......................................
" " " " " " " " " " " " " " " " , , 117
7
Sleep
Timer
Timer,
, , , ................................
, , , , , , , , , , , , , , , , , , , , , , , , , " 17
17
FLASHBACK
...............................
"""
" " " " " " " " " " " " , 117
7
SURROUND ............................... 17
SURROUND""""""""""""""",17
FREEZE .................................... 17
FREEZE""""""""""""""",
17
INPUT ......................................
17
INPUT"
""",17
AV
MODE .................................. 18
AV MODE
18
AUDIO
18
AUDIO ..................................... 18
POWER
SAVING ........................... 19
POWER
SAVING,
9
Ciosed Captions and Digital Closed Captions...119
Appendix
thethe
Stand,
, , , , ,...........................
,,,,,
43
Removing
Stand
43
Setting theTVTV
Wall
43
onon
thethe
Wall,
, , , ,.....................
,,,,,
43
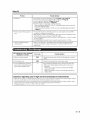
Troubleshooting
............................ 44-45
""""""""""""",,44-45
, , , ,..............
, , , , , , , 45
45
Troubleshooting- Error
- Error Message
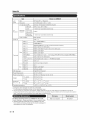
Specifications ................................. 46
46
Optional Accessory ............................ 46
46
Information on the Software License for
This Product ................................. 47
Callingforfor
Service
............................... 48
Service
...............................
LIMITEDWARRANTY
WARRANTY
............................ 48
............................
LIMITED
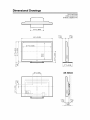
Dimensional Drawings
¯• The
dimensionaldrawings
drawingsfor
forthe
theLCD
LCDTVTVsetsetareareshown
shown
The dimensional
on the inside back cover,
cover.
Supplied Accessories
Make sure the following accessories are provided with the product.
Remote control
control unit
unit
Remote
1)
(x 1)
Page 7
size battery
battery
"AAA" size
(x 2)
Page 8
AC cord
cord
(x 1)
Page 77
Cable clamp
clamp
(x 1)
Page 77
Operation manual
manual
(x1)
(x
1)
[] Connection
guide (x
(x 1)
1)
II
Connection guide
¯• Always
Always use
use the
the AC
AC cord
cord supplied with
with the
the TV,
TV.
¯• The
from
thethe
actual
accessories,
The illustrations
illustrationsabove
aboveare
are for explanation purposesand
andmay
mayvary
varyslightly
slightly
from
actual
accessories.
6
QUICK REFERENCE
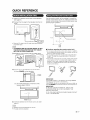
1 Attach
Attach your
your antenna
antenna to
to the
the back
back of
ofthe
the television.
television,
(See page
page 8.)
AC plug for
for the
the television
television into
into the
the AC
AC
22 Connect the AC
outlet.
Use the rernote
remote control unit by pointing it towards the
Use
remote control
rernote
control sensor
sensor on
on the
theTV. Objects between
betweenthe
the
remote control unit
rernote
unit and
and the
theremote
rernotecontrol
controlsensor
sensormay
rnay
prevent proper
proper operation.
IT
m)
Remote control sensor
o ii 7i
'----..,:r--c::J:
o,
¯.. Place
Placethe
the TV
TV close
close to
to the
the AC
AC outlet,
outlet, and
and keep
keep the
the power
power
plug within
plug
within reach.
TO PREVENT
PREVENT RISK
¯.. TO
RISKOF
OFELECTRIC
ELECTRIC SHOCK, DO NOT
TOUCH UN-INSULATED
UN-INSULATEDPARTS
PARTS
ANY
CABLES
TOUCH
OFOF
ANY
....,...,OLl:::'"
WITH
WITHTHE
THEAC
ACCORD
CORDCONNECTED.
CONNECTED.
3 Bundle the cords properly with the cable clamp,
~ _~,i
i~---~"
i ~i It~
30° _ _ :_ _
i’I "
~
30°
"~
~ Cautions regarding the
the remote
remotecontrol
controlunit
unit
II
..¯ Do
Donot
notexpose
exposethe
theremote
remotecontrol
controlunit
unittotoshock.
shock,InInaddition,
aclclition,
do not
not expose the
the remote
remotecontrol
controlunit
unittotoliquids,
liquids,and dodonot
not
with high humidity.
humidity,
place in an area with
..¯ Do not
notinstall
installor
orplace the remote
remotecontrol
controlunit
unitunder
unclerdirect
clirect
may cause
cause deformation
deformationofofthe
theremote
remote
sunlight. The heat may
control unit.
¯ The remote control unit may not work properly if the remote
control sensor on the TV is under direct sunlight or strong
lighting. In such cases, change the angle of the lighting
or the TV, or operate the remote control unit closer to the
remote control sensor.
first Iime,
tirne,
44 How Io turn or~ the television for the first
A) Press POWER on the television.
~
~~
........ , POWER
..........
POWER
B)
The POWER
POWER indicator on the front of the
B) The
television lights GREEN.
GREEN,
television
IMPORTANT:
IMPORTANT:
indicatoron
onthe
thetelevision
televisionshould
shouldlight
lightGREEN
GREEN
The POWER indicator
indicating you have
have power
power to
tothe
thetelevision.
television,
IfIf the
the television
television still
still does
cloes not
notlight
lightup,
up,
the POWER inclicator
indicator on the
press TV POWER on the remote control
control to
toturn
turnthe
thepower
poweron.
on,
IMPORTANT:
IMPORTANT:
IF THE UNIT DOES NOT POWER ON
9
0
UNPLUG THE
TELEVISION FROM
TELEVISION
FROM THE
THE OUTLET
OUTLETAND
ANDREPEAT
REPEATTHE
THE
INSTALLATION STEPS,
STEPS.
INSTALLATION
IF
IF YOU
YOU STILL
STILL ENCOUNTER
ENCOUNTERNO
NOPOWER,
POWER,PLEASE
PLEASE CONTACT
US AT
AT 1-800-BE-SHARP,
1-800-BE-SHARP.
US
i
POWER indicator
POWER
5 inse-~ the batteries into the rimote control unit. (See
page 8.)
¯ Speakers cannot be detached from
fromthe TV.
TV,
¯ TV angle cannot be adjusted.
®
7
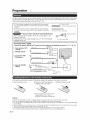
Preparation
To enjoy a clearer picture, use an outdoor antenna. The following is a brief explanation of the types of connections
that are used for a coaxial cable. If your outdoor antenna uses a 75-ohm coaxial cable with an F-type connector,
plug it into the antenna terminal at the rear of the TV set.
1 .A 75-ohm system is generally a round cable with F-type connector
that can easily be attached to a terminal without tools (Commercially
available).
~-F-type
"",'--","" connector
connector
(round)
~= 75-ohm coaxial cable (round)
to a 75-ohm terminal through a 300/75-ohm adapter (Commercially
~)OO-ohrri tVv'in-lead cable (flat)
available).
300-ohm
l:winqead cable (Ila~)
~ F-type connector
should
bebe
finger-tightened only, ~.~,~i.,\F type connector connector
connector
should
the RF cable to the TV set, do not
WhenconnectorCOnnectingwith tools.the RF cable to the TV set, do not tighten F-type
connector with tools,
tools are used, itit may cause
If tools
cause damage to your
yourTV
TVset.
set.(The breaking
75-ohm coaxial cable
of !ntern~!
internal circuit,
~of
ci[c~itz £tc:!
Connecting
AntennaCable
Cable
Cnnn,p;r.tinn Antenna
,.¯ Connect
Connect the
the antenna
antenna cable
cable to
to the
the TV
TV using
using one of the methods in the illustration
illustration as
as shown
shown ((~, (~, (~oror (~).
(~)Cable
Cablewithout
withoutaaCATV
CATV
converter
(~) VHF/UHF antenna
(~ Combination
CombinationVHF/
VHF/
UHF antenna
antenna
UHF
Cable ITVlead
V lend In
Cable
In
~7
"
"~,,,
t
5-ohm coaxial cable (round)
Home Antenna
terminal (75 ohm)
~ ~.~~
Coaxial cable
(commercially available)
Home Ant ....
t~er_~m~nal (75 ohm)
Coaxial cable
(commercially available)
...
75 ohm coaxial cable (round)
Separate
VHF/UHF
@ Separate
VHF/UHF
ANTENNAVHF
antenna
antenna
ANTENNA~ 300 ohm
L twin lead cable
t i°r 75 oh ..... ial cable
~r# J
To TV antenna
To TV antenna
terminal
terminal
If the remote control fails to operate TV functions, replace the
thebatteries
batteriesininthe
theremote
remotecontrol
controlunit.
unit.
1 Open the battery cover,
cover.
batteries
~ Close
"AM" size
size batteries
3
Close the battery cover.
cover,
2 Insert
Insert two "AAA"
(supplied with the
the product).
¯ Place the batteries with their terminals
corresponding to the (+) and (-)
indications in the battery compartment.
sLire
follow
instrLlctions
below,
Improper use of batteries can result in chemical leakage or explosion. BeBe
sure
to to
follow
thethe
instructions
below.
¯ Do not mix batteries of different types. Different types of batteries have
havedifferent
differentcharacteristics.
characteristics,
¯,. Do not mix
mix old
old and
and new
newbatteries. Mixing old and new batteries can shorten
the lifelife
of of
new
batteries or cause
chemical
leakage
or
chemical
shorten
new
in aiel
batteries,
old batteries.
¯ Remove batteries as soon as they are worn out. Chemicals that leak from batteries that come in contact with skin can cause a a
ras~. If you find any chemical leakage, wipe thoroughiy with a cloth.
¯ The batteries supplied with this product may have a shorter life expectancy due to storage conditions.
¯ If you will not be using the remote control unit for an extended period of time, remove batteries from it.
(~-88
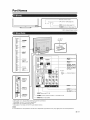
Part Names
";
Remote control
controlsensor
sensor
I
OPC sensor*
OPC
sensor" (See
(See page
page23.)
23.)
I
OPC indicator
indicator(See
(See page
page23.)
-"".-.,'"
,
/
POWER indicator
indicator (See
(See page
page 16.)
16.)
..I
*, OPC:
OPC: Optical Picture Control
*2
*2
POWER
D
__ _
AC
INPUT
ACINPUT
terminal
POWER
button
*3
MENU
MENU
button
INPUT
button
*1
Channel
Channel
INPUT 77 terminal
INPUT
terminal
(HOMI)
(HDMI)
Hi~ml ~i (~~
buttons
(CH,A,/V)
INPUT
terminal
INPUT 88 terminal
(HOMI)
(HDMI)
DIGITALAUDIO
AUDIO
DIGITAL
OUTPUT
OUTPUTterminal
terminal
= .........................................
AUDIO OUTPUT
OUTPUT
i
terminals
terminals
1 AN]’/CAB~E
+
ii~ !! buttons
Volume
Volume
buttons
buttons
(VOL
NOL +/-)
*1
"1
R-AUDIO-L/
iCOMPO- VIDEO gOMPO-
ANALOG ii RS-232C
INPUT 5
terminal
(HOMI)
(HDMI)
~,~,~o ~
INPUT 3
terminals
terminals
~I
~
SERVICE
SERVICE
terminal
" ’’~terminal
~ ...........Antenna/Cable inin
Auu~ol ~ AUDIO
~i
~ ~j
INPUT 1 terminals
,,,".~"""""""""""~"""""""""""~"""""""""""~"""""""""
terminals
INPUT 22 terminals
RS-232C
term inal
RS-232C terminal
INPUT 4 terminal (PC-IN)
terminal
(shared
INPUT
andINPUT
INPUT6)6)*4
*4
~AUDIO terminal
(shared
forfor
INPUT
4 4and
(HOMI)
-----------INPUT
INPUT66 terminal
terminal (HDMI)
, 1 See pages 11
11 to 15
15 and
and 36
36for
forexternal equipment connection.
"1
21 for
forbutton
buttonoperations.
nn,=>r!'1tlnrlQ
"2 See pages 16
16 and
and 21
*2
*3
See page 7 for connecting the AC cord.
"3 See
*4
'4 See page 41
41 for details on the PC
PC Audio
Audio Select function.
function.
Theillustrations
illustrationsininthis operation
¯.. The
purposes
and may
vary
slightly
from
the actual
operations.
operationmanual
manualare forforexplanation
explanation
purposes
may
vary
slightly
from
actual
operations.
®
9
Part Names
1
2
3
3
17
1
1
’ ":il
............TVAU~,OvC~
:
:i
~’
:
ii
o/sA~ ~o
i~~: ...............
SOL,--]~
RO~I:::
"~""~ ’: J ::i
i::~~
2
2
3
3
~
~.
~1
~’ ~" 1 9
.....................................
@
@
~
~
~
"’’:~’"’~
.....
~
5
5
6
6
"’’:~’"’~ i
[ ....
77
20
20
22
8
8
:iil ~(r~,~Y ~!Y,~UrE /iI
23
99 .......
~:i----:@ ~ ~Y ~, ~.~-23
10
10
24
24
~/~,~i~ i:
_______ii___.~_!~
~/ E~r
11 .............~"’""@
~~
25
~ @ .......!" .......... 26
26
27
~ ~’~i:-: ~’-i-:i-i ........... 28
29
29
:i~:~ ~ ~ @ ~-.::..~
~: i
30
~
15
:i :::
16
16
..............
i: .............
i::
if::
5
6
6
7
0-9:
Setthe
thechannel.
channel.(See
(Seepage
page17.)
17,)
0-9: Set
•, (DOT):
(DOT): (See pages17
pages 17and
and34.)
34)
INPUT: SelectaTV
Select a TV input
input source.
source, (TV,
\lV INPUT
INPUT1,1,INPUT
INPUT2,INPUT
INPUT
3, INPUT
INPUT 4,4, INPUT
INPUT5,5,INPUT
INPUT6,6,INPUT
INPUT 7,INPUT
INPUT
(See
pages
3,
8) 8)
(See
pages
11 11
and
17,)
and 17.)
9
POWER
SAVING:
Select
Powersettings.
Saving settings,
page
9 POWER SAVING:
Select
Power
Saving
(See(See
page
19.)
19
21
21
12
12
13
13
14
External equipment
operational
buttons:
Operate
the external
External
equipment
operational
buttons:
Operate
tile external
equipment.
equiplTent
8
8 VOL+/-:Setthevolume.(Seepage17.)
VOL +! -: Set the volulTe,
page 1
~
@
DISPLAY:
DISPLAY: Display
DisplHYthe
tilechannel
cilarmelinformation.
info(rf'Htion,
SOURCE POWER:
SOURCE
POWER:Turns
Tumsthe
thepower
powerofofthe
theexternal
extemal equipment
equiplTent
on and
and off.
off,
4
4
~
@
44-- ~
~~ 18
18
TV POWER:
POWER: Switch
Switchthe
theTV
TVpower
poweron
onororenter
enterstandby.
standby,(See
(Seepage
page
16,)
16.)
::~::
. :ii
still image,
10 FREEZE: Set tile
10
the still
image. Press
Press again
againtoto return
returntotoIlClrfflHI
normal
screen. (See
screen,
(See page
page 17.)
17,)
off the
the menu
rnenu screen.
screen,
11 EXIT: Turn off
11
Display tile
12
12 OPTION: Display
the AOUOS
AQUOSLINK
LINKMENU
MENUscreen,
screen.Tilis
Thisbutton
button
will
AQUOS LINK
LINK isis used.
used, (See
(See pages
pages 36
36to
to39
39
will function only when AQUOS
for details.)
details,)
STOP:
Stops
one
toucil
recording,
Tllisbutton
buttonwill
willfunction
function
13 REC
13
REC STOP:
Stops
one
touch
recording.
This
only when
wilen AQUOS LINK
LINK isis used.
used, (See
(See pages
pages36
36toto37 for
fordetails.)
details,)
only
SLEEP: Setthe
Set thesleep
sleeptimer.
tiiTer, (See
(See page
page 17.)
1
14 SLEEP:
SURROUND: Select
Select Surround
Surround settings.
settings, (See page
page 17.)
15 SURROUND:
16
AUDIO: Selects the
the MTS/SAP
MTS/SAP or
or the
theaudio
audiornode
modeduring
duringITultimulti16 AUDIO:
channel
audio broadcasts, (See page 18,)
channelaudiobroadcasts.(Seepage18.)
Switciles the
tile remote
remote control
controlfor
forTV,
TV, CBL/SAT,
CBUSAT, VCR,
VCR,
17
FUNCTION: Switches
17 FUNCTION:
tile current
current
DVD
ligilts up for the
DVD and
and AUDIO
AUDIO operation,
operation. Indicator lights
mode. (See
34 to
to35 for
fordetails.)
details,)
l!'Ode,
(See pages
pages 34
code registration
registration mode,
mode, you
you need
needto
topress
press
*, To enter the code
FUNCTION and
and DISPLAY
DISPLAY at
at the
the sametince,
time.
Wllerl this
tilis button
buttonisispressed,
pressed,some buttons
buttons(for
(for
18 LIGHT
18
LIGHT :~ : When
example, VOL+/Cl’liX/V)
on the
remote
control
exarl'ple,
VOL+!and
- and
CH,A,J\/)
orl the
relrote
controlunit
unitwill
will
light. The lighting will turn
light
turn off
offififno
nooperations
operationsare
areperformed
performedwithin
within
about 5 seconds.
seconds, This
This button
buttonisisused
usedfor
forperforming
performingoperations
operations
in in
low-light situations,
situations.
low-light
MODE: Select
Select the
tile screen
screensize. (See pages
pages 20
20and
Hnd40.)
40,)
19 VIEW MODE:
19
Jumps to
to a
a channel
channel after
20
ENT: Jumps
affer selecting
selectingwith
withthe
the0-9
0-g buttons,
buttons.
20 ENT:
21
FLASHBACK: Return to tile previous cilarmel or external input
l!'Ode,
(See page 17.)
17,)
mode. (See
22
22
23
24
25
25
CH/~/V: Select
thethe
channel.
CH/\IV:
Select
channel.(See
(Seepage
page17.)
17,)
MUTE: Mute
MUTE:
Mute the
tile sound.
sound, (See page
pHge 17.)
17,)
MENU:
Displaythe
themenu
menuscreen.
screen,(See
(Seepage
page21
21,)
MENU: Display
.)
~,/I1~/</1~,
on tile
the screen,
screen.
,.11;.1'
' / <111/"", ENTER:
ENTER: Select
Select a desired item
itell' on
26
RETURN: Return to the previous menu screen,
27
FAVORITECH
i ii
A, B,
A,
B, C,
C, D:
D:Select
Select44preset
presetfavorite
favoritechannels
cilannelsinin4 4different
different
categories. (See
.)
categories,
(Seepage
page31
31,)
::
While watching,
watching, you
pressing
While
you can
cantoggle
togglethe
theselected
selectedchannels
channelsbyby
pressing
A,
and D.
D,
A, B, C and
28 FAVORITE:
Setthe
thefavorite
favoritechannels.
channels,(See
(Seepage
page3131,)
FAVORITE: Set
.)
29 CC: Display
Display captions
captionsfrom
fromaaclosed-caption
closed-captionsource.
source,(See page
page
19,)
29
19.)
30 AV
MODE:
Select
audioororvideo
videosetting.
setting,
30
AV MODE:
Select
ananaudio
(When
STANDARD,
(When the
the input
input source
source isis TV,
TV, INPUT
INPUT 1,1,2 or 3: STANDARD,
MOVIE,
MOVIE, GAME,
GAME, USER,
USER,AUTO,
AUTO,DYNAMIC
DYNAMIC(Fixed),
(Fixed),DYNAMIC,
DYNAMIC.
When the
the input
input source
source is INPUT
INPUT 4,
4, 5, 6,
6, 7 or
or 8: STANDARD,
STANDARD,
When
MOVIE,
MOVIE, GAME,
GAME, PC,
PC, USER,
USER,AUTO,
AUTO,DYNAMIC
DYNAMIC(Fixed),
(Fixed),DYNAMIC)
DYNAMIC)
18,)
(See page 18.)
¯.. When
Whenusing
usingthe
theremote
remotecontrol
controlunit,
unit,point
pointit itatatthe
theTV.
TV,
O-10
10
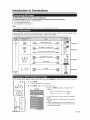
Introduction to Connections
An HDTV without an HD source is just an ordinary TV.
To enjoy HD images on the TV, you should get HD programming from
from the following:
¯ Over-the-air broadcasting via HD quality antenna
¯ HD cable/satellite subscription
¯ HD compatible external equipment
¯• For
ask your
yourcable/satellite
cable/satelliteservice
serviceprovider,
provider.
For information
information on
on updating
updating to
to HD
HD programming,
programming, ask
Image quality differs depending on the terminal used. To enjoy clearer images, check the output terminals of your
external equipment and use its appropriate terminals for higher quality images.
The illustrations of the terminals are for explanation purposes and may vary slightly from the actual products.
,--------, ~
[l-~-ll~ -
~
Q~:I.ItY ...... .--,m,
Quality
......
HDMI-certified cable
~~
I~.~
I~
" Page 12
DVI-HDMI conversion cable
~
LJVIOUI
~VlOUT
~
AUdiO
@
~
AUDIO
~,, ~ ~ ~
COmPONeNT ~
~ 3.5 mm stereo minijack cable
AV
AV cable
cable
AUDIG
Standard
Standard
Quality
Quality
~
Component videocable ~
(~ ~ ~L
VIDEO
~.,_1~----.__
’~
..
Page 12
12
~ Page
~
~
@,,~ ~,~
~_~
..
~ Page
Page 13
13
~^,JDIO
¯ Page
..
Page 13
13
~
~
To view external source images, select the input source by pressing INPUT on the remote control unit or on the TV.
INPUT FL~GI4BACK
00
val CH
s,~o~(~8 ,~E
~,~EEZE ,,IENU
1 Press INPUT,
INPUT,
¯" A list
list of selectable
selectable sources
sources appears,
appears,
select the
the input source.
2 Press INPUT
INPUT again to select
¯" Each
Each time
time INPUT
INPUT isis ncoc>c>c,rI
pressed, the
the input source
source
Example
Example
toggles.
INPUT1---+INPUT2 _ _
OC@9~
O
-
t
TvlNPUT11"
TV+- - - - -~- "-----~
- - INPUT2
- - .------~
-INPUT4
INPUT41NPUT3
¯" YOU
canalso
alsoselect
selectthe
the input source by pressing
You can
~/~.
¯ An image from the selected source automatically
displays.
¯ If the corresponding inputisisnot
not pluggedin,in,you
you
"
cannot change the input. Be
Be sure
sure to
to connect
connect the
the
equipment beforehand.
®
11
Connecting to External Equipment
You can connect many types of external equipment to your TV. To view external source images, select the input
source from INPUT on the remote control unit or on the TV. (See pages 11 and 17.)
For connecting the TV to external equipment, use commercially available cables.
¯ To protect equipment, always
alwaysturn
turnoff
off theTV
TVbefore
beforeconnecting
connecting any external equipment.
¯ Please read the relevant
relevantoperation
operationrnanual
manual(Blu-ray
(Blu-ray discplayer,
player, etc.) carefully before making connections.
.
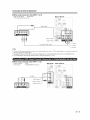
1= When using HDMI cable (INPUT 5, 6, 7 or 8):
]-i;e HD~/ll (Higt7 Definition ~/lultimedia Interface) terminal is an audio-video interface that enables a connection for audio and
video signals using a single cable. The HDMI terminal supports high-resolution video input.
¯.. Blu-ray disc player
player
..¯ DVD player
player
¯.. HD cable/satellite set-top
set-topbox
box
Rear of
of the
the TV
Side panel Rear
TV
HDMI-certified cable
~~
:::i :~: ’::;.,i
¯ To enjoy 10,.0g display .apability, con, .ect your ext~.rnai equipment using an HDMi-certified cabie or a component cable and
set the equipment to 1080p output.
¯ Supported Audio format: Linear PCM, sampling rate 32/44.1/48kHz.
32/44,1/48kHz,
.
cable (INPUT 6)."
III When using DVI-HDMI conversion
conversion cable
~=
¯ Blu-ray disc player
¯ DVD player
¯ HD cable/satellite set-top box
Rear
of TV
the TV
of the
Rear
DVI-HDMI conversion
conversion cablecable ~.
~ DVI-HDMI
~!i::::::::,::::::~:::::iiiiiiiiiiiiiiiiiiiiI Ornm
3.5
mm
stereo minijack cable
stereo
minijack
::::::::::::::::::::::::::::::::::::::::::::::::: .............
¯ When using a DVI-HDMI conversion
this
case,
in addition
to to
ananalog audio connection. In In
this
case,
in addition
conversion cable, you
youshould
shouldmake
makean
connecting aa DVI-HDMI
DVI-HDMI conversion cable
cable to
to the
theINPUT
INPUT66(HDMI) terminal, connect a Q 3.5 mm
rnrnstereo
stereominijack
rninijackcable to the
the
AUDIO terrninal
terminal and set "PC
"PC Audio
AudioSelect"
Select"toto"Input
"Input6 (HDMI)". (See page 41 .)
AUDIO
12
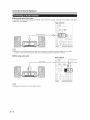
Connecting to External Equipment
When using Component cable (INPUT 1 or 2):
¯ Blu-ray disc player
¯ DVD player
¯ HD cable/satellite set-top box
Rear of
Rear
of the
the TV
TV
~ .............................................................
Audio cable
I iil=® ®LI@ ======================== II
AUDIO-L (White) .... :.:,~":?~~.
AUDIO-R (Red) ......::.::::::~;:::::.:.:.::: ......... .
~
Component video cable
(Green)
~--,@~ ......... Y (Green)
n;,,,~ ~ ...... P~ (Blue)
~----- P~ (Red)
(Red)
To enjoy 1080p d~splay capability, connect your external equipment using an HDMi-ce~ified cable or a component cable and
set the equipment to 1080p output.
See page 12 for connecting a Blu-ray disc player, DVD playerororananHO
HDcable/satellite
cable/satelliteset-top
set-topbox
boxtotothe
theHOMI
HDMIterminal.
terminal.
The GOMPONENT terminals take priority over the VIDEOterminal
terminal(INPUT
(INPUT1 only).
1 only).
When using Composite cable (INPUT 1 or 3):
¯- Game
Game console
console
¯-VCR
VCR
Camcorder
¯ Cable/Satellite set-topbox
box
-¯ Camcorder
Side panel Rear
TV
Rear of
of the
the TV
:: ...........
; ........
. .............................................................
AV cable
VIDEO
AUDIO-L
AUDIO-L (White)
(White) .----~ /
AUDIO-R (Red)
Q-13
®
13
Connecting to External Equipment
~= When using opticalfiber
fiber cable:
cable:
peMaudio
audio
is possible to output
ItIt is
output audio
audio through the
theDIGITAL
DIGITALAUDIO
AUDIOOUTPUT
OUTPUTterminal.
terminal. (See page 32 for details.) PCM
outputs from
from the
theterminal.
terminal.
outputs
Rear of the TV
¯ Depending on the connected equipment, audio
audiowill
willnot
notoutput
outputfrom
fromthe
the
DIGITAL
DIGITALAUDIO
AUDIOOUTPUT
OUTPUTterminal
terminalininHDMI
HDMI
1/48kHz.
kHz,
of the connected equipment
equipmentto PCM,
PCM,32/44.1/48
connection. In this case, set the audio formats of
iI11IIIWhen
cable:
When using audio
audio cable:
Rear of the TV
(Red)
Audio cable
function,
¯ See page
page30
30for
fordetails on
onthe Output
OutputSelect function.
14
~-L (White)
Connecting to External Equipment
Refer
41 for aa list
list of
of PC
PC signals compatible with the TV.
Refer to
to page 41
~I When
When usingHOMI
HDMI
cable (INPUT 5, 6, 7 or 8)."
Side panel Rear of the TV
II
cable
¯ Depending on the board, only video signals may be output. In this case~ in addition to connecting an HDMI-certified cable to the
INPUT 6 (HDMI) terminai, connect a ~d 3.5 mm stereo minijack cable to the AUDIO terminal and set "PC Audio Select" to "Input 6
(HDMI)". (See page 41 .)
¯ The HDMI terminals only
only support
supportdigital
digitalsignal.
~=When
When usingOVI-HOMI
DVI-HDMI conversion
conversioncable
cable (INPUT 6)."
II
the TV
TV
Rear of the
~~t~, , DVI-HDMI conversion cable ========================
¯.. When
When using a DVI-HDMI conversion
In In
this
case,
in addition
to to
conversion cable,
cable, you
youshould
shouldmake
makean
ananalog audio
audioconnection.
connection,
this
case,
in addition
connect
connecting
DVI-HDMIconversion
conversioncable
cabletotothe INPUT
INPUT
6
n'iinijacl<cable totothe
connecting a DVI-HDMI
6 (HDMI)
terminal, connect
a ’.~ 3.5 mm stereo minijack
AUDIO terminal
terminal and
and set
set "PC Audio Select"
page 41
41,).)
AUDIO
Select" to "Input
"Input66(HDMI)". (See page
~I When
When using analog RGB
RGB cable
cable (INPUT 4)."
II
Rear of the TV
~ ........
~1
~’ :
i ,,,
%
]!
’~
1=~ .........
I
:~J
mmstereo mini
minijack
cable
Q35’ mm
’’ack cable
Analog RGB cable
(D-sub 15-pin cable or VGA cable)
¯.. When
Whenusing
usingan
ananalog RGB cable, input the audio signal to the AUDIO
AUDIOterminal
terminalofofINPUT
INPUT4.4,
¯.. When
.)
Whenconnecting
connectingaaPC to the INPUT 4, set "PC Audio Select" to "Input
"Input4 4(PC)".
(PC)" (See
(Seepage
page41
41,)
Q - 15
®
15
Watching TV
Press POWER on the TV, or TV POWER on the remote control unit to
turn the power on.
¯ POWER indicator (Green): The TV is on.
¯ ]-he initial Installation
,-,,,,,,,,,,,",,cn sta(ts
the TV
TV powers on for the first time. It Itthe
starts when the
TV has been turned on
on before,
before, the
theInitial
Initial Installation will
will not
notbe
beinvoked.
invoked,For
For
changing the settings
settingsof
ofthe
theInitial
InitialInstallation,
Installation,perform
perform"EZ
"EZsetup" ononthe
theSetup
menu on page
page26.
Press
remote control
control unit
unit
Press POWER on the TV, or TV POWER on the remote
again to
to turn the power
power off.
Off,
r· .. ···· .... ···· .. ·······;·"······TV POWER
¯• The TV enters standby
standby and
and the
the image
imageon
onthe
thescreen
screendisappears.
disappears,
•¯ The
ThePOWER
POWER indicator
indicator on
on the
the TV
TV turns off.
off,
(On/Standby)
¯ If you are not going to use
use this
this TV
TV for
for aa long
long period
period of
oftime,
time, be
besure
suretotoremove
remove
the AC cord from the AC outlet.
¯ Weak electric power is still consumed even when the TV is turned off.
When you turn on the TV for the first time, it wiil
automatically memorize the broadcasting channels
available in the region where you live. Perform the
following steps before you press TV POWER on the
remote control unit.
unit.(See page 8.)
8,)
controlunit.
1. Insert the batteries into the remote control
Connect the antenna cable to
tothe
theTV.
TV, (See page 8.)
2. Connect
3. Plug
Plug inin the
the AC
AC cord
cord to the AC outlet. (See page 7.)
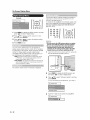
1110
i
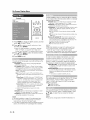
Location
TV Location
install the TV. This produc~ qualifies for ENERGY STAR in
Home mode default setting,
2 Press </, to select "Home" or "Store".
Press ENTER to enter the setting.
Home: "Power Saving" is set to "Advanced", and AV
MODE is set to "STANDARD".
Store: "Power SaviP, g" is set lo "Off=’ and AV MODE is set to
Picture
Reset:AV
AVMODE
MODEwill
willbe
beset toto"DYNAMIC
'DYNAMIC(Fixed)"
(Fixed;'
Picture Reset=
regardless of
"Off".
of whether
wiletherPicture
PictureReset isis"On"
'On'oror
'Off'If you
If
be reset
reset to
to "DYNAMIC
'DYNAMIC(Fixed)" if
select "On", AV MODE will be
there isis no
no operation
opemtion for
for30
30minutes.
n·inutes.When
When"Off"
'Off'isisselected,
selected,
AV MODE
MODE will
will be
be set to
to "DYNAMIC
"DYNAMIC (Fixed)".
AV
Feature
Demo:
When
is
settings
Feature Demo:
When
"On""On"
is selected,
after all all
thethe
settings
areare
completed, the
corr,pleted,
tile Feature
Feature Demo
Den,o screen
screenisisdisplayed
displayedififthere
thereisis
no operation
opemtion for
for several
several minutes.
n·inutes.
@-16
(~-16
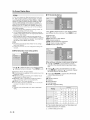
3 Press </l, to select "Air" or "Cable".
Press ENTER to enter the setting.
!I
Language (Language setting)
setting)
Select from
Spanish.
from among
among33languages:
languages:English,
English,French
Frenchand
and
Spanish,
",IT
to
select
the
desired
language
listed
on
the
Press
1 Press ~,/, to select the desired language listed on the
screen, and
and then
then press ENTER.
ENTER.
S8t.
be set.
iiiiiii:;iiii!i!:ili:iiii!:i!:iiiil
¯ ENERGY STAR quaiification is based on AV MODE "STANDARD".
IISrA~JD,L\r-1DII,
Air/Cable (Antenna setting)
setting}
Make sure what kind of
of connection
connectionisismade
madewith
withyour
yourTV
TV
selecting "Air"
"Air" or
or "Cable".
"Cable",
when selecting
CH
OH Search (Channel search)
Channel auto search
search makes
makesthe
theTV
TVlook
lookfor
forallallchannels
channels
the set
setarea.
area,
viewable inin the
4, When
selected in
in Antenna
Antenna setting:
4
When "Air"
"Air" is selected
Press <l1li/.,.
</l, totoselect
Press
select"Start",
"Start",and
andthen
thenpress
pressENTER.
When "Cable" is selected in Antenna setting:
setting:
Press ~,/, totoselect "Analog & Digital Search Start" to
search both analog and digital broadcasts, or to select
"Analog Search Start" to search only analog broadcasts,
and then press ENTER.
•¯ The
The Channel
Channel search
search will
will start
startautomatically.
, and
•¯ To
To exit the
theChannel
Channelsearch screen, select "Cancel", and
then press ENTER.
•¯ IfIfno channel is found,
found,confirm
contirmthe type ofofconnection
made with your
your TV
TV and
and try
try"EZ
"EZSetup"
Setup"again.
again,
(See page 26.)
¯ For changing the settings ofofthe
theInitial
Initial Installation,
Installation, perform
perform
"EZ setup" on the Setup menu on page 26.
Direct Button Operation
~~~
QQ~
@o~_@@@~
Allows you to set
set aa time
time when
when the
the TV
TV automatically
switches
I/ F~~(~ l/ switches to standby.
Press SLEEP.
SLEEP,
¯ The remairling Iirne dispJays when the sJeep timer has been sel,
¯ Each time you press SLEEP, the remaining time switches
sshown e,ow.
~~~
Off ~30~60 ~90 ~120
......... ~~
~u
~
I/ll~itl~( ’
,
You can chan~e channels bg ~ress~n~ ~NA/V or 0-9,
¯ (DO~.
Examples:
. When set, the t,me automat,callg sta~s count,n~ ~own.
¯ I~ gou want to a~iust the slee~ t~mer, gou can ~ress Skimp
twice then chan~e the t~me setting.
¯ When ~t ~s 5 m~nutes b~or~ th~ t~me ex#res, the rema~n~n~
¯ S~l~ct "0~" bg ~r~ss~n~ Skimp to cancel th~ sl~ t~mer.
¯ The ~/will enter standby when the remaining time reaches 0.
II
channel nlimber (e.g., Channel 5):
Press 5----~ ENT.
To select a 3-digit eha~n¢l
(¢.g.,
Cha~ne~
channel~umbcr
number
(e.g.,
Channel115}:
115):
Press 1 ~ 1 ~ 55~ENT,
~ ENT.
To select
select aa 4-d~git cha~nel ~umber [e.g., Cha~el 22.1):
Press
2 2 ~ 2 ~ ¯ (DO~ ~ 1 ~ENT.
Press
~;~:~;~:~;~;~;~
¯ When selecting a 1 -digit channel number, it is not
necessa~ to press 0 before the number.
there is no operation within a few seconds.
¯ If you push "0" by itself, nothing will happen,
¯ Complete the above steps within a few seconds.
¯ When you enter 0-9 and ¯ (DO~, channel selection will be
made if there is no operation within a few seconds,
Press FLASNBACK to switch to the previously tuned
channel.
toswitch
switchback
backto the
thecurrently
currently
¯ Press FLASNBAOK again to
tuned channel.
channel,
LA.::>nIDA'o."n.will
willnot
notwork
workif ifno
nochannel
channelhas
hasbeen
been
¯ FLASHBACK
after the
changed aRer
the TV
~ isisturned
turnedon.
on,
The surround function produces Surround effect from
the speakers. Each time you press SURROUND, the
mode changes between On and Off.
On: Makes it possible to enjoy natural, realistic surround
sound,
sound.
Off: Outputs the normal sound,
You can change the volume by pressing VOL+/- on
the TV
onthe
theremote
remotecontrol
controlunit.
unit.
~ ororon
¯• To
VOL+.
Toincrease the volume, press VOL+,
• To
¯ You can have the same settings by choosing "Surround"
on the menu items. (See page 25.)
VOL-
Allows you to capture and freeze a moving image that
you are watching.
Press FREEZE.
Audio status
status
Audio
iiiiiiiiiii::iiiiiiiiiiiiiiiiiiiiiiii[:iiiiiiiiiiii::::::iiiiiiiiiiiii:iiiiiiiiii::::i:::iiiiiiiiii
Speaker
Variable sound
Mute
¯ When "Output Select" is set to "Variable", the indicator on
the screen changes as shown below.
1
Mutes the current sound output,
output
Press
Press MUTE.
.
"
¯ "E~"
will be displayed ononthe
screen
3030minutes,
the
screenforfor
minutes,and
and
the sound is silenced.
moving image captured,
FREEZEagain
again to
tocancel the
thefunction.
function,
•¯ Press
Press FREEZE
~;~;~:::~::;~:.~;:.;~
¯ When this function
functionisisnot
notavailable,
available,"No
"Nodisplaying
displayingstill
still
image available."
available," will
will display.
aRer 3030minutes.
goesout
out
minutes,
•¯ The
Thestill
stillimage automatically goes
broadcast
•¯ IfIf you are using the freeze function and a broadcast
activates the V-CHIP BLOCK, the freeze function will
will be
canceled and a V-CHIP BLOCK message
messagewill
willappear.
appear,
pressing INPUT on the remote control unit or on the %L
1 Press INPUT.
¯ A list of selectable sources appears.
2 Press INPUT again or press &/~ to select the input
source,
¯ Within 30 minutes of pressing MUTE,
MUTE,mute
mutecan be
canceled by pressing VOL +/- or
or MUTE.
MUTE.
¯• Mute
Mutewill
willbe canceled a~er
after30
30minutes
minuteshave
havepassed.
passed,
However, the TV
~ will
willnot
notsuddenly
suddenlyoutput aaloud
loudsound
soundasas
However,
the volume level
level is set to 00 automatically.
¯ An image from the selected source automatically displays.
¯ Each time INPUT is pressed, the input source toggles.
¯ if the corresponding input is not plugged in, you cannot change
the input. Be sure to connect the equipment belorehand.
~;~:~;~;~
¯ See pages 11 to 15 and 36 for externa~ equipmer~[ eonnec[ic, n.
@-17
O-17
Direct Button
Button Operation
AV MODE gives you several viewing options to choose
from to best
best match
matchthe
thesurrounding environment
environmentofofthe
the
TV, which can vary due to factors
TV,
factors like
like room
room brightness,
type of program watched
watched or the
the type
type of image input
from external
external equipment,
Press AV
AV MODE.
MODE. Current
Press
CurrentAV
AVMODE
MODEdisplays,
¯• Press AV
MODE again before the mode displayed on the
AVMODE
screen disappears.
disappears.The mode changes as shown below:
Example:
When the input source is TV, INPUT 1, 2 or 3 terminals
STANDARD...,, MOVIE..~ GAME ...~ USER [TV]
DYNAMIC ~-""" DYNAMIC (Fixed)~-..... AUTO
Example:
When the
the input
input source
sourceisisINPUT
INPUT4,4,5,5,6,6,77oror88
When
terminals
STAN=DARD.=..~MOVIE....~GAME....~PC...~USER[ ...=e]
DYNAMIC
~-DYNAMIC
(Fixed)
_DYNAMIC (Fixed)
_ -~
- AUTO
STANDARD:
ForFor
a highly
defined inqage inina normal
STANDARD:
11iOhly
normal
lighting,
lighting.
MOVIE: For
MOVIE:
For a movie.
movie.
GAME:
GAME:Lowers image
imagebrightness
brightnessforforeasier
easierviewing.
viewing.
pc:
PC: For
For PC.
PC.
USER: Allows
USER:
Allowsthe user to
tocustomize
customizesettings as desired.
desired.
You can set the mode
You
mode for
for each
each input
inputsource.
source.
AUTO:
AUTO:Optimizes
Optimizesthe
theimage
imagequality
qualityautomatically
automaticallybased
based
signal.
on the room
room brightness
brightnessand
andimage
image
signal.
(Fixed}:Changes
Changesthe
the image
image and
and sound
DYNAMIC (Fixed):
Noadjustments
adjustments
factorypreset values. No
settings to the factory
are allowed.
allowed.
DYNAMIC: For
Fora clear-cut
clear-cutimage
imageemphasizing
emphasizino high
hiOh
DYNAMIC:
contrast, useful
useful for
for sports
sportsviewing.
viewing.
::i:i;~::ii%iii::i::ii
¯ You can
canselect
selectaadifferent
different AV
AV MODE
MODE item for each input
mode. (For example, select STANDARD for TV input and
DYNAMIC for INPUT 11.).)
¯• When
When you
you play
playgames,
games, "GAME"
"GAME" is
is recommended
recommended for
for AV
AV
MODE.
III
MTS/SAPstereo
stereomode
mode
i MTS/SAP
The TV has a feature that allows
allows reception of
ofsound
sound
other than the main
main audio
audio for the
the program.
program.This
Thisfeature
feature
is
Television Sound
Sound (MTS). The
The TV
TV
is called Multi-channel Television
MTS can
can receive
receive mono
monosound,
sound,stereo
stereosound
sound
with MTS
and Secondary Audio
Audio Programs (SAP). The
The SAP
SAP
TV station to
to broadcast
broadcastother
other
feature allows aa TV
information, which
which could be
beaudio in another language
or something completely different like weather
information.
information.
You can enjoy Hi-Fi
Hi-Fi stereo
stereo sound
soundor
orSAP
SAPbroadcasts
broadcasts
where available.
where
•¯ Stereo
broadcasts:View
Viewprograms
nrrlIlI'Clm."like live sporting
Stereo broadcasts:
shows and
and concerts
('nl~(,<'I't"in dynamic stereo sound.
events, shows
•¯ SAP
SAPbroadcasts:
broadcasts:Receive TV broadcasts in
in either MAIN
or SAP sound.
sound.
MAIN sound: The
The normal
normal program
programsoundtrack
soundtrack(either
(eitherinin
mono or
or stereo).
SAP sound: Listen
Listen to
to a second
secondlanguage,
lanouaoe,supplementary
supplementary
commentary or
or other
otherinformation.
information.(SAP
(SAPisismono
monosound.)
sound.)
commentary
stereo sound
sound is
is difficult
difficultto
to hear.
hear.
If stereo
manuallyswitching
switchingtotofixeci
¯ ©brain a clearer sound bybyrTlanually
mono-sound mode.
You can change
change MTS
MTS as
as shown
shownbelow
belowtotomatch
matchthe
thetelevision
television
broadcast signal.
broadcast
signal.
Press AUDIO
AUDIO tototoggle
toogiebetween
betweenaudio
audiomodes.
Examples: when
when receiving
receivingMTS
MTSand
andSAP
SAP
STEREO mode:
mode: STEREO_
STEREO~.....~ MONO
MONO
STEREO++SAP
SAPmode:
mode:ST(SAP)
ST(SAP) ~ SAP(ST)SAP(ST)’~,MONO
MONO
STEREO
¯t
=
MAIN
MAIN ++ SAP
SAPmode:
mode:MAIN-SAP
MAIN~.....~ SAP
MONO
MONO mode:
mode: MONO
Ex;"'mnl~";,,
~= Digital
broadcasting
audio
mode
DnJi:lIJGi:ll:ilIl19
audio
mode
The types of audio transmitted in a digital broadcast
broadcastinclude
include
In addition,
addition, itit
SURROUND as well as MONO and STEREO. In
multiple audio
audiotracks
trackstotoaccompany
accompany
a single
is possible for multiple
a single
video track.
Press
toogiebetween
betweenaudio
audiomodes.
modes.
Press AUDIO
AUDIO tototoggle
Example: when
when receiving
receiving Digital broadcasting
STEREO(Audio1)
(Audio1) "~ STEREO (Audio2)
SURROUND(Audio3)
(Audio3)~--'
t....== SURROUND
~=’’=1
FY<.m"I",·
¯ MTS only
onlyoperates
operateswhile
while inin TV
TV mode.
mode.
@-18
(~-18
Direct Button
Button Operation
rII~~~~.+i
Press
Allows you to set the Power Saving level in order to
decrease the power consumption and increase the
backlight lifespan.
Press POWER SAVING.
¯ Each time you press POWER SAVING, the mode changes
as shown below.
Off ~ Standard ,,~ Advanced
¯ You can have the same settings by choosing "Power
Saving" on the menu items. (See page 25.)
ee.
•¯ This will
will present the Closed Caption
Captioninformation
information
display.
display.
2 Press
PressCO
eewhile
whilethe
theClosed
ClosedCaption information
information
is is
still on the
the screen.
screen.
..
•¯ Press
Pressrepeatedly
repeatedlyuntil
untilyou
youselect
selectthe
thedesired
desiredclosed
closed
caption
caption service.
service .
Closed Caption
Your TV is equipped with an internal
internalClosed Caption
decoder. ItIt allows
allows you
you to
toview
viewconversations,
conversations,narration
narration
and sound
sound effects
effectsas
assubtitles
subtitleson your
yourTV.
TV.Closed
Closed
Captions are
are available
available on
onsome
someTV
TVprograms
programsand
andonon
some VHS home
home video
video tapes
tapes at
atthe
thediscretion
discretionofofthe
the
program
program provider.
Digital Closed Caption service is a new caption service
available only on digital TV programs (also at the
discretion ol the service provide,~). It is a more flexible
system than the original Closed Caption system,
because it allows for a variety of caption sizes and font
styles. When the Digital Closed Caption service is in
use, it will be indicated by the appearance of a 3-letter
abbreviation that also indicates the language of the
Digital Closed Captions: ENG (English), SPA (Spanish),
FRA (French) or other language codes,
Not all programs and VHS videotapes offer closed
captions. Please look for the "[~" symbol to ensure
that captions will be shown,
In the Closed Caption system, there can be more than
one caption service provided. Each is identified by its
own number. The "CC1" and "CC2" services display
subtitles of TV programs superimposed over the
program’s picture,
In the Closed Caption system, the "Text1"
"Text 1 " or
or "Text2"
"Text2"
services display text that is unrelated to the
theprogram
program
co,,,,r'oc
Theseservices
being viewed (e.g., weather or news). These
are also superimposed over the program currently
being viewed,
information
information
¯ Depending on the number of caption services in the
signal being received, you will see information such as
1/2 or 1/4 displayed.
!/2 means "ti;e Iirst ol two services".
Example:
has three
threeservices
services(Digital CC(ENG), CC1
CCl
If a program has
closed caption
captiondisplay will toggle ininthis
this
and Text1), the closed
sequence:
sequence:
I~!~,,,~1~1.,~.,,B
°
¯
•¯ The CO
CC button
buttonkeeps a record of the last service
selected
itsmemory.
memory.
selected inin its
the last
last closed caption mode (e.g. 1/3 ENG) you
IfIf the
selected is not available for the next program, or on
another channel, the closed caption service that is
available is automatically selected, and this service
appears in parentheses, e.g. "1/3(CC1)".
Closed Caption services that appear in parentheses
will not be stored in the CO button’s memory as your
last selected service. Only services that you have
selected with the CO button are stored.
Examples:
In a case where there are two closed caption
services provided (for instance, Digital CC(ENG)
and CC1), and Digital CC(ENG) is displayed
as your current selection, if Digital CC(ENG) is
not broadcast for the next program, the other
closed caption service, CC1, will be displayed in
parentheses.
A closed caption service
serviceappears
appearsininparentheses
n"rprlth"",,,'"
because the
the service
service you
youselected
selectedisisnot
notavailable
available
and a different
different service is displayed on
onyour
yourscreen.
screen.
"1/1
NG".
11 (CC 1)")" is d isplayed instead of "1/2/E
"1/2/ENG"
¯ When "Power Saving" is set to "Standard" or "Advanced",
the Power Saving leaf icon appears on the channel
information window. See page 25 for details of Power
Saving settings.
¯ See page 31 for detailed closed caption settings.
¯ When the program contains no closed caption, "--"
displays in the closed caption information.
¯ If the language code, e.g. "ENG", is not found on Digital TV
programs, "--" will be shown.
¯ Four kinds of closed caption service (CC1, CC2, Text1,
Text2) are potentially available, but a broadcast may
contain none or only some of these services at the
discretion of the program provider.
@-19
O-19
Direct Button
Button Operation
rII~~~~.+i
You can select
select the
the screen
screensize.
size,
fl
8
8
G:J 8
CD 0
(3 Gl!ID
!I
\,i
!/
Press VIEW
VIEW MODE,
MODE.
1 Press
¯• The View Mode menu
menu displays.
¯• The menu lists the View Mode options selectable for the type of video signal currently being received.
themenu.
menu,
VIEW MODE
MODEor
2
or A/V while the View Mode menu is displayed to select a desired item on the
2 Press VIE~N
•¯ You
You can
can sequentially
sequentiallyselect a View Mode that has its own aspect ratio.
!I11IIFor
programs
For4.’3
4:3 programs
Example: Screen size images
S.Stretch (Smart stretch)
Side Bar
Suitable for stretching
Suitable for viewing
viewing
stretching 4:3
4:3
",','''''"m0
conventional
conventional 4:3 programs in
in programs
to to
fill fillthe screen,
their normal format.
format.
Zoom
Suitable for viewing widewiele'
2,35:1 anamorphic
anamorphic
screen 2.35:1
in full screen.
screen,
DVDs in
Stretch
This mode is useful for i .78:1
DVDs. When viewing i .85:1
DVDs, stretch, mode will still show
very thi~l black bands ~t the top
and bottom of the screen.
~ For HD programs
Stretch: Suitable for
mode
willwill
stillstillshow
very
thin
black
bands
at
for viewing
viewing wide-screen
wide-screen1.78:1
1,78:1aspect ratio
ratioprogram,
program,stretch
stretch
mode
show
very
thin
black
bands
the top and bottom
bottom of
ofthe
the screen.
screen,
Detects the resolution of
ofof
pixels
onon
Dot by Dot (1080i/p only}:
only): Detects
of the
the signal
signal and
aneldisplays
elisplaysan
animage
imagewith
withthe
thesame
samenumber
number
pixels
the screen.
screen,
Full Screen
Screen (720p
receiving a 720p signal.
You can
can select
select "Full
"Full Screen" only when receiving
Full
(720p only}:
only): You
S.Stretch
Suitable forfor
stretching 4:3 programs to 10
fill rili
the screen,
S.Stretch(Smart stretch):
stretch):
Zoom:
in in
fullfullscreen.
Zoom:Suitable for
forviewing
viewingwide-screen
wiele-screen2.35:1
2,35:1aspect-ratio programs
programs
¯ When using Dot
bars
around
different
outer
portions
of the
screen.
Please
Dot by
byDot
DotororFull
FullScreen,
Screen,ititisispossible
possibletotosee
seenoise
noiseoror
bars
around
different
outer
portions
of the
screen,
Please
to correct
correct this.
this,
change view mode to
@-20
On-Screen Display Menu
l
Itemdisplayed in yellow
(~ Item
......................................................................................................................................................................................
•¯ This
Thisindicates the item currently
currentlyselected.
~[!~:~!~!~!!~;~.~.#~!!~...~.~..~!~!~.‘~.~;~‘;..~!~!~
•¯ Press
PressENTER
ENTERtotogo
gototothe
theadjustment
adjustmentscreen
screenforforthis
this
item,
T~heb
ar above is an operational guide for
i
~ the remote control. The bar will change in
accordance
Item
displayed
gray
accordance with (~)
each
menu
menu
setting in
screen.
j
in brackets
hr<lrl<otc
(~) Item in
•¯ This
Thisindicates
indicatesthe
thecurrent
currentsetting
settingfor
forthe
theitem.
item,
white
(~) Item displayed inin white
¯ This indicates that
that the
the item
itemcan
canbe
beselected.
selected,
•¯ This
Thisindicates that the item
itemcannot
cannotbe selected.
There are various reasons why
why the
the items
itemscannot
cannotbe
be
selected, but
follows:
butthe
themain
mainreasons
reasonsare
areasas
follows:
--Nothing is connected
-Nothing
connectedtotothe
theselected
selectedinput
inputterminal.
terminal.
---The
The function
function isis not
not compatible
compatiblewith
withthe
thecurrent
currentinput
input
signal.
Press </~ toto
selectthe
thedesired
desireditem.
item,
(~ Press
select
selectthe
thedesired
desireditem.
item,
(~) Press
Press &/~ totoselect
(~) Press
Press </~ totoadjust the
theitem.
item,
¯ Menu options
operating procedures are the same.
options differ
differinin the selected input
inputmodes, but
butthe
the
¯• The screens in
(some are enlarged, others cropped) and may vary slightly
in the
the operation
operationmanual
manualare
arefor
forexplanation
explanationpurposes
purposes
from the
the actual
actual screens.
screens,
LCFONT:
~ LCFONT:
¯ This product is embedded with
SHARP
forfor
clearly
displaying
easywithLC
LCFont
Fonttechnology,
technology,which
whichwas
wasdeveloped
developedbyby
SHARPCorporation
Corporation
clearly
displaying
LCDscreens.
to-read characters on LCD
Using the remote control
Use the following buttons on the remote control to
operate the menu.
O~~
E,~ ~~ .....
MENU:
Using the control panel of the main unit
You can also operate the menu with the control panel
of the main unit.
unit
Button operations on the control panel correspond to
ones on
on the
the remote
remotecontrol
controlas
asshown
shownbelow.
below,
the ones
~
!I
,
open or
orclose
closethe
themenu
menuscreen.
screen,
Press to open
INPUT: ENTER on
on the
the remote
remote
control.
'" IT on
on the
the
Cursor ~,/~
CHA,/V: Cursor
remote control.
control.
",IT
I <111/ ... : Press to select aa desired
desired item
itemon
onthe
thescreen
screenoror
~,/~/~/I,:
adjustaselecteditem.
adjust a
item,
Press to go to the next
next step
step or
or complete
complete the
the
setting,
RETURN: Press totoreturn
returntotothe
theprevious
previousstep.
MENU: MENU
MENU on
on the
the remote
remote
control.
VOL + 1-: Cursor <111/ ... on the
remote control.
control.
ENTER:
~L
~~
i!
VOL+/-:Curs°r~/’°nthe
@-
21
On-Screen
On-Screen Display Menu
¯• When
When AV
AV MODE
MODE is set
set to
to "AUTO",
"AUTO", part of the menu may not be displayed correctly or
or the
the setting
setting range
range of
of the
the menu
menu may
may be
be
changed.
changed,
¯• Some menu
menu items
items may
maynot
notbe displayed
displayeddepending
dependingononthe selected input source.
¯• When configuring a menu, be sure totoseiect the
theit;pu~ source according totothe menu items to be configured, if a me~;u is notnot
displayed, check whether
whether one
one of
ofthe
thefollowing
followingmay
maybe the source of the problem.
problem,
~1AATV
TV program is
is being viewed (TV).
~2
Audio andvideo
video are
are being inputted to
the TV from external analog equipment (INPUT
1,2 or 3).
'2 Audio
to the
(INPUT 1, 2 or 3),
~3
Audio and video are being
being inputted
inputted to
the TV
from a computer (INPUT 4).
" Audio and video
to
TV from
~4Audio
Audioand
andvideo
videoare
arebeing
being inputted
inputted to
to the
the TV
TV from
from external HDMI equipment (INPUT 5, 6, 7 or 8).
8),
Picture Menu
OPC .................................................
............................ ..
Backlight ..........................................
Contrast ...........................................
Contrast
..
Brightness ........................................
Color ................................................
Color"""""""""""""""
Tint ...................................................
Tint
"""""""""""""""
Page 23
Page 23
Page 23
Page 23
Page 23
Page 23
Page 23
Sharpness ........................................
Advanced
C.M.S.-Hue
...........................
C,M,S,-Hue..............
.. ...... .. Page 23
C.M.S.-Saturation
C,M,S,-Saturation .................
............ .. Page 23
C.M.S.-Value
Page 23
C,M,S,-Value .........................
...... ,
Color Temp .......................... Page 23
Fine Motion
Motion Advanced .......... Page 24
Fine
Active Contrast ..................... Page 24
Gamma Adjustment .............. Page 24
............................
Page 24
Level ..............
,
Black Level
Film Mode ............................. Page 24
Digital Noise Reduction ......... Page 24
3D-Y/C ................................. Page 24.3.4
Page 24
Monochrome ........................
.......... ,
Range ofOPC,
of OPC ....................... Page 24
Reset
Reset.................................................. Page 23
~ Audio
Audio Menu
Menu
Treble,
Treble ...............................................
,
Bass ...................................................
..
Balance ............................................
Surround ..........................................
...................... ..
Enhancer.................................
.............. ,
Bass Enhancer
Reset..................................................
Reset
Page 25
Page 25
Page 25
Page 25
Page 25
Page 25
Power Control Menu
Menu
Power Saving ...................................
Page 25
................ ,
No Signal Off .................................... Page 25
No Operation Off .............................. Page 25
@-22
1~Setup Menu
EZ Setup .......................................... Page 26
CH Setup ......................................... Page 26
Antenna Setup-DIGITAL ................... Page 26
Input Skip ......................................... Page 26
Auto Sync ........................................ Page 41
Input Label ....................................... Page 26
Parental CTRL ........................... Pages 27-29
Fine Sync ........................................ Page 41
Position ............................................ Page 27
Language ......................................... Page 27
Reset ................................................
Page 27
Reset.",
"'" ""'" ""'"
~ Option Menu
AQUOS LINK Setup .........................
Audio Only ........................................
Input Select
(for INPUT 1 only) ............................
HDMI Setup .....................................
PC Audio Select
Select ...............................
......
Auto Volume .....................................
Clear Voice .......................................
Output Select ...................................
Color System ....................................
Caption Setup ..................................
Digital Caption Info ...........................
Program Title Display ........................
Favorite CH ......................................
Game Play Time ...............................
Operation Lock Out ..........................
Channel Selecting Effect ...................
Demo Mode
Mode .....................................
Page 37
37
Page 30
30
Page 30
Page 30
Page 41
Page 30
Pace 30
Pace 30
Pace 31
Pace 31
Pace 31
Pace 31
Pace 31
Pace 31
Pace 31
Pace 30
Pace 31
~:~)~ D=g=tal Setup Menu
Audio Setup ..................................... Page 32
identificatk)n ..................................... Page 32
Software Update ....................... Pages 32-33
On-Screen
On-Screen Display Menu
Adjusts the picture to your preference with the
following picture settings.
Example
Example
I~ Picture
Automatically adjusts the brightness of the screen.
Off: The bright~;ess is fixed el: the vahJe .set in "Baoklight".
On: Automatically adjusts.
On: Display: Displays the OPC effect on the screen while
adjusting the brightness of the screen.
iil;:ii:ii!iii:i!i;:!iil;:!i;:iliil
]
¯ When set to "On", the Optical Picture Control (OPC)
senses the
the surrounding
surroundinglight and automatically adjusts
the backlight
backlight brightness.
brightness,Make sure nothing obstructs
the OPC
ope sensor,
sensor, which
whichcould
couldaffect its ability to sense
surrounding
surroundinglight.
¯• When
When set
set to "On: Display", OPC effect displays on the
screen while
while the OPC adjusts the screen brightness.
"On: Display", the
• When set to "On"
lights green.
green,
the TV lights
\\
OC~O
~E~,
1/
ope indicator on
This TV provides various advanced functions for
optimizing the picture quality.
C.M.S.
Press MENU to display the MENU screen, and then
iii(~i~iiMi~ib~iiS~t~iiiiiiiiiiiiiiiiiiiiiiiiiiiiiiiiiiiiiiiiiiii
press ~/I~ to select "Picture". ..................................................................................................................................................................................................................
Color tone is
is managed using the six-color adjustment
2 Press &/~r to select a specific adj[Jstment item.
setting.
¯ Select "Advanced" and then press ENTER to set
.IYI.".-nUle:This
Thisisisaastandard
standardtotoadjust
adjustthe
thecolor
coloreither
either
C.M.S.-Hue:
"C.M.S.-Hue", "C.M.S.-Saturation", "C.M.S.-Value",
more reddish
reddish or
ormore
morebluish
bluishinintone.
tone,
"Color Temp.", "Fine Motion Advanced", "Active
C.M.S.-Saturation:
C.M.S.-Saturation: Increases orordecreases the
Contrast", "Gamma Adjustment", "Black Level",
selectedcolor.
color,
saturation ofofaaselected
"Film Mode", "Digital Noise Reduction", "3D-Y/C",
C.M.S.-Value:
Ahigher value
value makes
makesthe
theimage
imagebrighter.
brighter,
C.M.S.-Value:
A
"Monochrome" or "Range of OPC".
A lower
lower value
value makes the image
imagedarker.
darker,
3 Press ~/~(or ~/I~) to select the desired setting,
and then press ENTER.
¯ For re,setting
resetting all adjustment
adjustment items
itemsto
tothe
thefactory
factorypreset
preset
4 Press MENU to exit.
"Reset",and
andthen
thenpress
values, press ",IT
~/~ toto
select "Reset",
ENTER.
:: :: :: :: S ~!e ~e ~::i t e = == == == == === == == == == == == == == == ~ b ~ t t ~ ~::b ~ t t ~ ~ :: :: :: :: :: :: :: :: ::
Backlight The screen dims i The screen
i brightens
Contrast
For less contrast i For more contrast
For a better white balance,
h::.l::.n,rp use color temperature
temperature
Brightness
For less
i For more
correction.
brightness
i brightness
High:
White with bluish
bluish tone
tone
Color
For less color
i For more color
Mid-High:
intensity
i intensity
Middle:
Middle:
Tint
Skin tones
i Skin tones
Mid-Low:
become reddish i become greenish
White with reddish
Low:
reddish tone
tone
Sharpness
For less
i For more
sharpness
i sharpness
White balance can be adjusted between a maximum of
• For resetting all Picture adjustment
adjustmentitems
itemstotothe
thefactory
factory
+30 and a minimum of -30 for each color temperature.
values, press
press ~/~ totoselect
preset values,
select"Reset",
"Reset",press ENTER,
ENTER,
R Gain ILO/HI}: -30 through +30
press ~/I~
<IiII/1I>totoselect "Yes", and
, andthen
thenpress ENTER.
G Gain (LO/HI): -30 through +30
B Gain (LO/HI): -30 through +30
1
¯ For resetting all adjustment
adjustment items
itemsto
tothe
thefactory
factorypreset
preset
values,
~/~ to select
"Reset",
values, press ",IT
select
"Reset",and
andthen
thenpress
press
ENTER.
@-23
O23
On-Screen
On-Screen Display Menu
Menu
Fine Motion Advanced
Fine Motion Advanced to view fast-action
fast -action video
video
Use Fine
more
more clearly.
High/Low: Select
High/Low:
Selectaalevel
levelfor
forobtaining
obtaining aaclearer
clearer image.
image,
Off: Normal
image,
Off:
Normal image,
Noise Reduction
Produces a clearer video image.
Auto: Automatically adjusts the level of noise reduction.
levelfor
forviewing
viewinga
High/Middle/Low: Select a desired level
clearer video image.
MotionAdvanced"
Advanced"may cause
causeimage
imagenoise.
noise,IfIfthis
this
¯ "Fine Motion
not available
duringPC
PC format
format
Noise Reduction"
occurs,turn
turn the
function "Off".
¯ "Digital Noise Reduction"
is notis available
during
function
input.
Active Contrast
3D-Y/C
contrastaccording
,,'-',~rw-rlir\r<toto
Automatically adjusts the image contrast
Provides
withminimal
minimaldot
dotcrawl
crawl
high quality images with
the scene.
scene,
and cross
cross color
colornoise.
noise,
On: Automatically
Automatically adjusts the image contrast,
contrast.
Slow:
Forstill
still images.
Slow: For
Off:
Noacljustment.
adjustment.
Off: No
Standard: Normal adjustment.
adjustment.
Gamma
Fast: For moving images,
Adjusts the differences
differences of
of picture tones
tonesbetween
betweenbright
availablefor
forinput
inputsignal
signalfrom
fromComposite
CompositeVideo
Video
¯ "3D-Y/C" isisavailable
parts and
and dark
darkparts.
parts,The
Theadjustment range
rangeofofthe
the
and analog
analog broadcasts
broadcasts(air
(airand
andcable).
cable),
gamma can be set to aamaximum
a minimum
maximumofof+2+2and
and
a minimum
of-2 by pressing ¯ or
or~,.
Monochrome
Black Level
iiB~¢~i~e~iiiiiiiiiiiiiiiiiiiiiiiiiiiiiiiiiiiiiiiiiiiiiiiiiiiiiiiiiiiiiiiiiiiiiiiiiiiiiiiiiiii
Adjusts on-screen black level to your preferred level.
High: The black level gets brighter.
Low: The black level gets darker.
iiiiii:ii:!iiiiiiiiiiiiiilliiil
Level"isisavailable
availablefor
forinput
inputsignal from Composite
¯ "Black Level"
Video, Component
Component480i
480iand
andanalog
analogbroadcasts
broad(::asts
(air and
cable),
Film Mode
ii~i~iM~d~ii(si2i~i~d~iiiiiiiiiiiiiiiiiiiiiiiiiiiiiiiiiiiiiiiiiiiiiiiiiiii
Automatically detects
detectsaafi~m-based
fiim-basedsource
source(originally
encoded
encoded at
at24
24frames/second),
frarne,,,/sf:;cond)analyzes it then recreates
each still film frame for high-definition picture quality.
Advanced(High)/Advanced(Low):
Select
clesirecllevel
Advanced(High}/Advanced(Low}:
Select
a adesired
level
to remove jerkiness from film contents.
Standard: s’~
~.,t~ut,>,
~* ~ analyzes, converts film source~
Off:
Normal viewing
viewing mode.
Off: Normal
mode,
~:~:~;~;~
¯ "Film Mode" does not
to
notfunction
function when
when you
you set AV
AV MODE
MODE to
"GAME".
"GAME",
¯• "Standard"
channel
display shows
"Standard"does
doesnot
notfunction
functionwhen
when
channel
shows
an input signal resolution
of 480p, 720p, oror1080p.
1
resolution of
¯ "Film Mode" isisnot
notavailable
availableduring PC format input.
@-24
(~)- 24
in monochrome.
monochrome,
For viewing a video in
monochrome,
On: For viewing inin monochrome.
Off: Normal color.
hnr1htlnp"", level
level range
range of
of the
the OPC
opesensor’s
sensor'sautomatic
automatic
The brightness
,,,,hnp,nt,, can
can be
beset
setaccording to your
yourpreferences.
adjustments
range of
ofthe
theOPC sensor
sensorcan
canbe
beset
settoto
The adjustment range
+ 16 and
and aa minimum
minimum of-16.
of -16,
a maximum of +16
Max.:-1
Max.: -15 through +16
Min,:-16
-16 through +15
Min.:
only when
when "OPC"
"OPC"
•¯ The
The "Range of OPC" settings are active only
is set to "On".
is
•¯ The
The m~imum
maximumsetting cannot be set to a smaller number
than the minimum setting.
¯ The minimum setting cannot be set to a bigger
number
bigger
number
than the maximum setting.
" Depending on the brightness ofthe surrounding light, the
OPC sensor might not operate if the adjustment range is is
small.
small.
On-Screen
On-Screen Display Menu
You can adjust the sound quality to your preference
with the following settings.
Example
[~ Audio
Power control setting allows you to save energy.
Example
[~ Power Control i
~’~)zE ~ ’~’~’ /l-~(~(~ !~) (~ (~)~ O 9 ~ ~F
1 Press MENU to display the MENU screen, and then
press ,/, to select "Power Control".
Press A/~r to select a specific adjustment item,
22 Press
and then press ENTER.
toselect
selectthe
thedesired
desiredsetting,
~rm~ 3 PreSSand 3
then’/’press(°r ENTER.’/’)to
!/" ~’~ ’~’~ C::3 rm ......
\i
~ ~~’
4 Press
Press MENU to
to exit.
exit.
~
1
1 Press MENU to display the MENU screen, and then
press ~/~ to select "Audio".
2 Press A/~r to select a specific adjustment item.
item.
•¯ Select "Surround"
"Surround"oror"Bass
"BassEnhancer"
Enhancer"and
andthen
thenpress
ENTER to
to set each
each item.
item.
select
desiredsetting,
3 Press
Press &/~r (or ~/~) to select
3
thethe
desired
and then press ENTER.
4 Press MENU to exit.
Treble
Bass
Balance
For weaker treble
For weaker bass
De,crease audio from
the right speaker
For stronger treble
For stronger bass
Decrease audio from
the left speaker
iii:ii:iii!iiii!i:!iii!!i!iiiil
¯ Audio menu is grayed out when "Output Select" is set to
"Variable". (See page 30.)
¯ For resetting all Audio adjustment items to the factory
preset values, press &/~ to select "Reset", press ENTER,
press ~/~ to select "Yes", and then press ENTER.
The surround function produces Surround effect from
the speakers.
possibletotoenjoy
enjoynatural,
natural,realistic
realisticsurround
surround
On: Makes ititpossible
sounci.
sound.
Off:
Outputs the
the normal sound.
Off: Outputs
sound.
This function allows
allows you
you to
toset
setthe
thePower
PowerSaving level
in order to decrease
in
decrease the
thepower
powerconsumption and
increase the backlight lifespan.
Standard: Optimizes power reduction based upon video
content. When set to "Standard", "~" appears on the
screen.
screen.
Advanced: Optimizes power
Advanced:
powerreduction
reductionbased upon
uponvideo
video
content and
and engages
engages OPC.
OPC. When
When set
set to
to "Advanced",
"Advanced",
thescreen.
"~" appears onon
the
Off:
work.
Off:This
Thisfunction
function does
does not work.
iiiiiii!iii!:iiii!ii!iiii!:iiii:i!
¯ "Power Saving" does
AV MODE
MODE
does not
notfunction
function when
when you
you set
setAV
to "AUTO" or "DYNAMIC (Fixed)".
(Fixed)".
differentPower
PowerSaving item
itemfor
foreach
•¯ You
You cannot
cannotselect a different
AV MODE.
MODE.
When "Power Saving" is set, the "OPC" settings for all
all AV
Modes will automatically change.
--If you set "OPC" to "On" when "Power Saving" is
is set
to "Standard", then the "Power Saving" setting will
will
change to "Advanced".
--When you change the "Power Saving" setting from
from
"Advanced" to "Off" or to "Standard", "OPC" will
will be
be set
set
--"AUTO" and "DYNAMIC (Fixed)" will remain set to "Off".
¯ When "Power Saving" is set to "Standard" or "Advanced",
the Power Saving leaf icon appears to the left of "OPC" in
the Picture menu screen.
¯ You can select Power Saving by pressing POWER
SAVING on the remote control unit. (See page 19.)
SURROUNDonon
canchoose
chooseSurround
Surroundby
bypressing SURROUND
¯ You can
unit(See page 17.)
control unit.
the remote control
setto
to
Select"isisset
¯• Audio
Audiomenu
menuisisgrayed
grayed out
outwhen "Output Select"
"Variable".
"Variable" (See
(See page
page 30.)
30.)
¯• For
Forsome
somediscs, setup may
maybeberequired on your DVD
refer to the operation manual of
player.
player. In this case, please refer
your DVD player.
player.
When set to "Enable", the power will automatically shut
down if there is no signal for 15 minutes.
This function allows you to enioy bass-enhanced sound.
On: Bass Enhancer function is on.
Off: Normal sound.
When set to "Enable", the power will automatically shut
down if there is no operation for 3 hours.
iil;.iiiii!!iiii!i;.!iil;.!i;.iiiil
¯ When it is 5 minutes before the power shuts down, the
remaining time will start to keep appearing every minute.
¯ "Disable" is the factory preset value.
¯ When a TV program finishe,s, 1:his Iuncl:ion may not operate.
¯ When it is 5 minutes before
before the
the power
powershuts
shutsdown,
down,the
the
¯ Audio menu
menu is grayedout
outwhen
when"Output
"Output Select"isis settoto
remaining timetime
willwill
start
to keep
appearing
every
minute.
start
to keep
appearing
every
minute.
pagepage
30.) 30.)
"Variable" (See
"Variable".
(See
¯ "Disable" is the factory
preset value.
factory
value.
@-25
On-Screen
On-Screen Display Menu
Example
w,~ oH
~ Setup
POWER
~ 0 8~
FREEZE
~ENLI
O~O
C@9
~R~T~,~
~F~’~’~ -~
AQUOS
AQUOS
1 Press MENU to display the MENU screen, and then
press ~/~- tO select "Setup".
does not
notmemorize
memorizeallallthe
thechannels
channels
If Initial
Initial Installation does
in your region, follow
in
follow the
the instructions
instructionsbelow
belowtotomanually
memorize
the channels.
channels.
memorize the
Air/Cable:
Air/Cable:Make
Makesure
surewhat
what kind
kind of
of connection is made
with your TV when selecting "Air" or "Cable".
"Cable".
CH
Search:Channel auto
autosearch makes the
theTV
TVlook
lookfor
for
CH Search:
channels viewable
viewableininthe set area.
all channels
CH Memory:
You
can
in each
each
CH
Memory:
You
canselect
selectthe
thechannels
channels to skip
skip in
ANALOG (Air), ANALOG
ANALOG (Cable),
(Cable), DIGITAL
DIGITAL(Air)
(Air)and
and
DIGITAL
DIGITAL(Cable).
On:
(Chcumel selection
selectiondisabled
disClUedusing
usingOH
CH
On: Skips
Skips channels. (Channel
A/V.)
Off:Does
Doesnot
not skip
skip channels.
Off:
channels. (Channel
(Channelselection
selectionenabled
enabledusing
using
CH/\lV·)
OHA/V.)
Remove
Scrambled
CH:
This
functionmakes the TV
TV
Remove Scrambled
CH:
This
function
look for
for and then delete
look
delete digital
digital cable
cablechannels
channelsthat
that
scrambled and
andso
sounavailable
unavailableininthe
theset
setarea.
area.The
The
are scrambled
process may take more
morethan
than20
20minutes.
minutes.
Yes: Star~s to remove scrambled channels.
No: This function does not work.
2 Press &/~ to select a specific adjustmerlt item,
and then press ENTER.
•¯ When
When you select
select "EZ
"EZ Setup", "CH Setup", "Parental
CTRL" or "Reset",
"Reset", you can enter the 4-digit secret
number here.
here. See
See page 27 for
forsetting
settinga secret number.
3 Press
Press &/~ (or ~/~) to select
select
desiredsetting,
thethe
desired
¯ See Initial Installation on page 16 for setting each item.
¯ If no channel is found, confirm the type of connection
made with your TV and try channel search again.
¯ If you select "Analog Search Start" and initiate the channel
search, the CH Memory for Cable Digital will be deleted.
4
4 Press MENU to exit.
In order to receive digital air broadcasts, you need
You can run EZ
EZ Setup again, even after setting up the
preset
preset channels.
channels.
Language: Select from among 3 languages (English,
Language:
(English,
French and
and Spanish).
TV Location:
or "Store"
"Store" for
for the location
Location:Select "Home" or
-rv, -[his product qualifies
where you pian to install the -rV,
for ENERGY STAR in Home mode default setting.
Home:
Home:"Power
"PowerSaving"
Saving"isis set
set to
to "Advanced",
'Advanced", and AV MODE is
'STANDARD'
set to "STANDARD".
Store: "Power
set to
to "Off"
AV MODE
MODE isis set
set toto
Store:
"Power Saving"
Saving" is
is set
"Off" and
and AV
"DYNAMIC
"DYNAMIC (Fixedj".
(Fixed)". Picture
Picture Reset
Reset and
and Feature
Feature DelTa
Demo can
can be
anten,qa configuration through Ihe "AnIenna SetupDIGITAL" screen. If necessary, adjust the direction of
the antenna to obtain the maximum signal strength.
Signal Strength: The signal strength of DIGITAL channel
is displayed. The signal information is based on the
current channel.
Channel Strength: Input the 2-digit channel number
to check the signal strength of the selected channel.
Make sure the signal is strong enough for each
channel.
¯• This function isis available
available for
for DIGITAL
DIGITAL (Air)
(Air) only.
Picture Reset:
Reset: AV
'DYNAMIC (Fixed)'
Picture
AV MODE
MODE will
will be
be set toto "DYNAMIC
(Fixed)"
regardless
of whether
whether Picture
Picture Reset
Reset isis "On"
"On" or
or"Off".
"Off".IfIfyou
you
regardless of
select "On",
'On', AV MODE will
(Fixed)"
will be reset to "DYNAMIC (Fixed)"
ifif there
there is
is no
no operation
opemtion for
for 30
30 minutes.
Il'inutes. When
When"Off"
"Off'isis
selected,
AV MODE
"DYNAMIC (Fixedj"
selected, AV
MODE will
will be
be set
set to
to "DYNAMIC
(Fixed)".
FeatureDemo:
Demo:
When
"On"
selected,after
afterallallthe
thesettings
settings
Feature
When
"On"
is isselected,
are completed,
are
completed, the
theFeature
FeatureDemo
Demoscreen
screenisisdisplayed
displayedif if
there isis no
tl1er8
no operation
operationfor
forseveral
s8vemlminutes.
minutes.
¯ ENERGY STAR quaiification
qualificalion is based on
on AM
AV MODE
"STANDARD".
Air/Cable:
Make sure what
what kind
kind of connection is made
Air/Cable: Make
when selecting
selecting "Air"
with your TV when
"Air" or "Cable".
CH
CHSearch:
Search:Channel
Channelauto
autosearch
searchmakes
makesthe
theTV
TVlook
lookfor
for
all
viewable inin the
theset area.
area.
all channels viewable
¯ See Initial Installation on page 16 for setting each item.
¯ If no channel is found,
found, confirm the type of connection
made with your TV and try "EZ Setup" again.
¯• If you
you select "Analog
"Analog Search
Search Start"
Start"and initiate the
thechannel
channel
search, the CH Memory
search,
Memoryfor
forCable
CableDigital
Digitalwill
willbe
bedeleted.
deleted.
@-26
(~- 26
This setting allows you to skip the HDMI or PC-IN Input
("Input 4 (PC)", "Input 5 (HDMI)", "Input 6 (HDMI)",
"Input 7 (HDMI)" and "Input 8 (HDMI)") on the Input
Selection operation.
Yes: Skips the input.
No: Does not skip input.
Lets you set the input terminal displayed when using
the INPUT SOURCE menu or channel display. Press
~/~/~/~ to select the new name for the input
mode.
mode.
¯ You cannot change labels ififthe
theINPUT
INPUTSOURCE
SOURCEisisTV.
TV.
On-Screen
On-Screen Display Menu
For adjusting a picture’s horizontal and vertical
position.
H-Pos.: Centers
H-Pos.:
Centers the
the image
image by
by moving
moving itit to
to the
the left
leftor
or
right.
V-Pos.: Centers the
the image
image by
bymoving
moving ititup
upor
ordown.
down,
::Secret
:: ::::::: N::
No.:: :: :: :: :: :: :: :: :: :: :: :: :: :: :: :: :: :: :: :: :: :: :: :: :: :: :: :: :: :: :: :: :: ::
Allows you to use a secret number to protect certain
settings from being accidentally changed.
¯ For resetting adjustments totothe factory preset values,
press A/V to select "Reset", and then press ENTER.
¯ When connecting a PC to the HDMI terminal, the image
position will be automatically adjusted. It cannot be
manually adjusted.
¯ The screen position variable ranges depend on the View
Mode or the signal type. The ranges can be seen on the
position-setting screen,
¯ Adjustments are stored separately according
accordingtotoinput
input
source,
source.
IMPORTANT:
IMPORTANT:
Three conditions
V-Chip (see
conditionsmust
mustbe
bemet
mettotoenable
enablethe
the
pages 28
28 to 29):
1. Secret No. is registered.
2. V-Chip/V-Chip (DTV Only) settings have been made.
¯ The "V-Chip (DTV Only)" will only be
be selectable
selectable when
when aa new
flew
rating system can be downloaded
in inthethe
nn\!,tnW'~nF'nvia
viadigital
digitalbroadcasting
broadcasting
U.S.
3.
"Status"isis set
set to
to "On".
"On",
3. "Status"
You can also select a language from the Setup menu.
Select from among 3 languages: English, French and
Spanish.
! New
NewSecret
SecretNo.
No.
You can set and change the
thesecret
secretnumber
numberby using
0-9,
0-9.
Input Secret
SecretNo.:
No,:When
Whenyou
you change the secret number,
Input
enter the aiel
If complex adjustments are made and the settings
cannot be restored to normal, you can reset the
settings to the factory preset values,
1 "Return to the factory preset values" displays on the
screen,
screen.
the Secret
Secret No"
No., input
the 4-digit
•¯ IfIf you
you have
have already
alreaely set the
input the
4-eligit
numberhere.
here,
secret number
2 Select
Select "Yes".
"Yes",
¯• "Now,
automatically, OK?"
OK?"displays
displayson
onthe
the
"Now, TV
TV will
will restart automatically.
screen.
3
secret
No,",
moves to "New Secret No.".
New Secret
New
SecretNo.:
No.:When
Whenyou
youset
setthe
thenew
newsecret
secretnumber,
number,
enter the new
new 4-digit secret
secretnumber
numberhere. The
Thecursor
cursor
moves to "Reconfir~,’n".
Reconfirm: Enter
Reconfirm:
Enterthe
thesame
same4-digit
!J-digitnumber
numberyou
youset
setinin
"New Secret No.".
No,"
II
Secret No.
No. Clear
! Secret
Clear
You can
number,
YOU
can clear
clear your
your secret number.
Yes: Your
Your secret number
numberis cleared.
No: Your
No:
Your secret number
numberis not cleared.
Select "Yes",
¯• "Now
"Now initializing..." displays on the screen and blinks.
After the
the reset has been completed, the power shuts
shutsoff
off
and then comes
anel
comes back
backon.
on,The screen will have returned
to its original
original settings,
settings,
Channel
will not be changeel,
¯• The
TheLanguage
Languagesettings will not
notbe
bechanged.
¯• The
TheSecret number
numbersettings will
willnot
notbe changed.
¯• The
bechanged.
TheTV
TVLocation
Location settings
settingswill
will not
notbe
¯ As a precautionary measure,
measure, make
makea note
noteof
ofyour
yoursecret
secret
number and keep ititininaafamiliar
familiarplace.
¯ If the secret number isiscleared,
cleared,the Status
Statussetting
"Off" "V-Chip"
"V-Chip" and
and "Status" will
will not
not
automatically sets to "Off".
be "tJl'tJc;lctUltJfrom
selectable from the
themenu.
menu,
Status
Used to enable
enable or
or disable
disable the
theparental control
controlfunction.
function,
function will
will not
notbe
beselectable
selectablefrom
fromthe
themenu
menuif if
This function
you do not
notfilSl
firstconfigu,~e your secret ,qumbe,~.
On: Enables Parental CTRL.
On:
Off:
CTRL,
Off: Disables Parental
Parental CTRL.
@-27
O27
On-Screen
On-Screen Display Menu
Menu
V-CHIP is an electronic filtering device built into your
TV. This tool gives parents a great degree of control
over broadcasts accessed by their children. It allows
parents to select programs judged suitable for child
viewing while blocking ones judged not suitable. It
does so automatically once you activate the V-CHIP
feature in your TV. "V-Chip" and "Status" will not be
selectabie from the menu if you do not first cc, nfigure
your secret number.
number.
TheU.S.
U,S, has
has two
tworating systems for
for viewing
viewing content:
content: TV
TV
¯• The
Parental Guidelines
Parental
Guidelines and movie
movieratings.
ratings,
¯• The
TheTV
TVParental
Parental Guidelines
Guidelines work
workininconjunction
conjunctionwith
withthe
the
V-CHIP to
to help parents screen out
outinappropriate
inappropriatetelevision
television
V-CHIP
shows
from their children.
children,
shows from
¯• Movie
Movieratings
ratingsare
areused
usedfor
fororiginal movies rated by the
Motion Picture Association
Association of America (MPAA) as watched
for television.
television, The
The V-CHIP can
can
on cable TV and not edited for
block MPAA-rated
MPAA-rated movies.
movies,
also be set to block
iiiiii:ii:!iii:iiiiiiiiiiiiiiiil
automaticallyenters "Block"
"Block"for
forany
anyratings
¯ The setting automatically
below your
below
your selection.
selection,
Siatlmksi~) nc,[
not set
set to
to"On",
IIC)n the
theconfiguration
coniigura1ionsel:tir~gs
m~ttin£lSwill
vvill
¯• IfIiStatus
not work.
work,
II TV Parental Guidelines
Example
Press A/~r to adjust the item
Press
itemto your
yourdesired position.
"iii"
is blocked.
blocked, Press
Press MENU
MENUtotoexit.
exit.
"lit" indicates the item is
Suggested age
age
TV-V: All
All children.
children,
TV-Y:
TV-Y7:
TV-V7: Directed
Directed to older
olderchildren.
children,
TV-G:
TV-G: General
General audience.
audience,
TV-PG:
TV-PG: Parental
Parental Guidance
Guidance suggested.
TV-14:
TV-14: Parents
Parents strongly cautioned.
cautioned,
TV-MA: Mature audience only.
TV-MA:
ll
,
Example
~I MPAA (Voluntary movie rating system)
Example
Press
theitem
itemtotoyour
yourdesired
desiredposition.
Press A/~r to adjust the
"iiJI"
indicates the item
item is
is blocked.
blocked, Press
Press MENU
MENUtotoexit.
exit.
"a" indicates
G: General
ages admitted,
admitted,
G:
General audiences,
audiences. All ages
PG: Parental
suggested, Some material
materialmay
maynot
notbe
be
PC:
Parental guidance suggested.
suitable for children,
children,
PG-13: Parents
Parentsstrongly cautioned.
cautioned,Some
Somematerial
materialmay be
PC-13:
inappropriate
for children under
under13.
13,
inappropriate for
Restricted, Under
Under117 requires accompanying parent oror
R: Restricted.
adult guardian (age varies in some jurisdictions).
NC-17:
NC-17:No one 1 7 and under admitted.
X:
o!cJer rating
with NC-177bu~
but may
rnaybe
be
X: )(X isis an old~,r
ra,tingthat
that is unifiE?d
unified wil:h
encoded in
in the
the data
dataof
ofolder
oldermovies.
movies,
When setting an individual content-based rating item:
1 Press ¯ or ENTER to access blocked content
items from the currently selected age-based rating
item,
item.
2
Press&/~r toto
select
individualitem,
item,and
andthen
then
2 Press
select
ananindividual
cprnnllPn Repeat
press ENTER to
to unblock
unblockitit("tit" isisremoved).
the same
same steps
stepsfor
forthe
theother
otheritems.
items,
to to
register after
allallindividual
3 Press ¯ ororRETURN
RETURN
after
content rating items
itemsare
areset.
Content
FV: Fantasy violence,
violence.
Violence,
V: Violence.
S:
S: Sexual
Sexual situation,
situation.
L: Adult language.
D: Sexually suggestive dialog.
¯ Voluntary movie
movierating
ratingsystem
systemonly
onlyuses
usesan
anage-based
age-based
rating. ...... S LiD
rating,
Content
TV-Y7 i X ~ j ~
iiiiiiiiiiiiiiiiiiiiiiiiii TV-14 i
iiiiiiiiiiiiiiiiiiiiiiiiii TV-MA j
XX
X j X XJ
[] ’ The content rating can be set, but this rating is not
normally broadcast by TV stations.
X ’ Content rating can be set.
@-28
On-Screen
On-Screen Display Menu
Canadian Rating Systems (Canadian English ratings
and Canadian French ratings)
onthe
the
¯ The TV rating systems in Canada are based on
Canadian Radio-Television and Telecommunications
Telecommunications
Commission
(CRTC) policy
policyon
onviolence
violenceinintelevision
television
Commission (CRTC)
programming.
¯ While violence is the most important content element to
be rated, the structure developed takes into consideration
other program content like language, nudity, sexuality and
mature themes.
mature
¯• When
When setting the V-CHIP on the Canadian system
system you
you
can choose
choose either
eitherthe
theCanadian
CanadianEnglish
Englishratings
ratingsororthe
the
Canadian French
French ratings.
ratings,
~ICanadian
Canadian English Ratings
II
Example
Press A/V totoadjust the
Press
theitem
itemtotoyour
yourdesired
desiredposition,
"iii"
item is
is blocked.
blocked, Press
Press MENU
MENUto exit.
"~" indicates the item
E:
E: Exempt:
Exempt: Includes
Includes news,
news,sports,
sports,documentaries
documentariesand
andother
other
videos,
and
information programming;
programming;talk
talkshows,
shows,music
music
videos,
variety programming.
C:
C: Children: Intended for younger children
children under
underthe
theage of 8
years. Pays careful attention to themes
themes that
thatcould
couldthreaten
their sense of
of security
securityand
andwell-being.
C8+: Children
Children over
over 88 years
years old:
old: Contains no
noportrayal
portrayal
violence as the preferred, acceptable, or
of violence
or only
only way
way
to resob, ie conflict; nor encourage chiidren to imitate
dangerous acts
acts which
which they
theymay
maysee
seeon
onthe
thescreen.
screen,
G: General: Considered
forall
all age groups.
groups,
G:
Considered acceptable for
Appropriate
Appropriate viewing
viewing for
for the
the entire family,
family, contains
containsvery
very little
little
violence, physical, verbal
verbal or
or emotional.
emotional.
PG: Parental Guidance: Intended for a general audience,
audience, but
but
may not be suitable for
for younger children (under
(underthe
theage ofof8)8)
issues.
because itit could
could contain controversial
controversialthemes
themesoror
issues,
14+: Over
Over 14
14 years:
years: Could
Couldcontain
containthemes
themeswhere
whereviolence
violence
is one of the dominant
dominant elements ofofthe storyline,
storyline,but
butit it
must be integral to the development ofofplot
plotororcharacter.
Language usage could be
be profane and
andnudity
nuditypresent
present
context of
of the
the theme,
theme,
within the context
18+: Adults: Intended
18years and older
olderand
Intended for
for viewers
viewers 18
might contain depictions
depictionsofofviolence,
violence,which
whichwhile
whilerelated
relatedtoto
the development of
of plot,
plot, character
characterororthemes,
themes,are
areintended
intended
for adult
adult viewing.
viewing, Could
Couldcontain
containgraphic
graphiclanguage
languageand
and
portrayals of sex and nudity,
nUdity,
=~Canadian
CanadianFrench
French Ratings
II
Example
Press A/V to adjust the
Press
theitem
itemto your
yourdesired position.
"lit"
indicatesthe
theitem
item isblocked,
blocked. Press
Press MENU
MENU totoexit.
"iii"
indicates
exit.
E: Exempt programming.
E:Exempt~rrln,,'mmir
G:
contains minimal
minimaldirect
direct
G: General:
General: All ages
ages and children, contains
violence, but may
may be
be integrated
integrated into
into the
theplot
plotininaahumorous
humorous
unrealisticmanner.
manner,
or unrealistic
8ans+:
8ans+:General
General but
butinadvisable
inadvisable for
for young children:
children: May
May
be viewed by a wide public audience, but could
couldcontain
contain
scenes disturbing to children under
under88who
whocannot
cannot
andreal situations.
situations,
distinguish between imaginary and
Recommended for viewing with parent.
parent.
13ans+: Over 13 years: Could contain
containscenes
scenesof
offrequent
frequent
violent scenes and therefore recommended
recommendedfor
forviewing
viewingwith
with
parent.
16ans+: Over
16years:
years: Could
Couldcontain
containfrequent
frequentviolent
violentscenes
scenes
Over 16
intense violence.
violence,
and intense
18ans+: Over
18years: Only
Only for
for adult
adult viewing.
viewing, Could contain
contain
18ans+:
Over18
frequent violent
violent scenes
scenes and
and extreme
extremeviolence.
violence,
i How
II
Howto
totemporarily release
release the
the V-CHIP
V-CHIP BLOCK
BLOCK
When the V-CHIP
V-CHIP BLOCK
BLOCK isis working and censors a
broadcast, "V-CHIP
"V-CHIP HAS
HAS BEEN
BEEN ACTIVATED." displays.
1 Press
PressENTER
ENTERwhile
whilethe
theV-CHIP
V-CHIPisisworking,
","cIne,,' and
then the
the secret
secretnumber
numbersetting menu displays.
this
2 Input the 4-digit secret number by using 0-9. AtAtthis
time V-CHIP BLOCK temporarily releases.
H Reactivating the
the temporarily
nn"",~iil" released
releasedV-CHIP
V-CHIP
II
BLOCK
BLOCK
reactivate the
the temporarily
+m"",~",,";" released
You can reactivate
released V-CHIP
V-CHIP
as shown
shownbelow.
below,
BLOCK as
•¯ Select
Select"Status"
"Status"setting from the Parental CTRL menu to
BLOCK. (See page 27.)
reactivate BLOCK,
•¯ Select "V-Chip"
"V-Chip" setting ("MPAA", "TV Guidelines", "Can.
English Ratings" or "Can. French Ratings") from the
English
Parental CTRL to reactivate
reactivate BLOCK,
BLOCK. (See pages 28 to 29.)
Parental
TV power.
power,
•¯ Switch
Switch off
off the
the TV
iii:.!iiiiii!i!:i!i:.!iii:.!i!:iiiil
¯• Performing
Performing any of the three above will activate the V-CHIP
BLOCK,
BLOCK.
@-29
O29
On-Screen
On-Screen Display Menu
Example
~ Option
Auto/COMPONENT/VIDEO
OO
voL o~
~o,,.~ 0 0~E
x~
FP~E~ ~,~
~@8
~8" ~8r’’~
~ "~"’~ -~
CD @ ~:~::~
1 Press MENU to display the MENU screen, and then
press ~/~, to select "Option".
2 Press ~/~ to select a specific adjustment item and
and
then press ENTER.
3 Press
thethe
desired
setting,
to select
desired
Press l/y (or ~/~-) to select
and then press ENTER.
4 Press MENU to exit.
If the image does not come in clearly from the external
equipment connected to INPUT 1, you may need to
change the input signal type setting from the list below:
¯ If the selected signal type isisincorrect,
incorrect,images
imagesare
arenot
not
withoutany
anycolor.
color,
displayed at all or are displayed without
¯ Refer to your external equipment operation
operationmanual
manual for
forthe
the
signal type.
¯ If you set INPUT 1 to "Auto", the TV will
will autornatically
automatically
select the input signal.
¯ Setting INPUT 1 signal selection to "Auto" when other
rn'Onl',rT",nwill result in the following
equipment isis connected
equipment
connection priority.
priority,
INPUT 11::
COMPONENT VIDEO
(~ COMPONENT
VIDEO
(~ VIDEO
VIDEO
To watch
watch an
an HDMI
HDMI or PC-IN
PC-INequipment image, select
"INPUT5", "INPUT6",
"INPUT5",
"INPUT6", "INPUT?"
"INPUT7" or
or "INPUT8" from
SOURCE menu
menu using INPUT
INPUT SOURCE
INPUT on
on the
the remote
remote
the TV.
TV,
control unit or on the
Auto View:
Enable: To use View
View Mode
Mode based on signal
includingan
anHDMI
HDMIsignal.
recognition, including
Disable: No function,
function.
~:~:~:~:~:~:~:~:~:~:~::.
¯ Refer to
to your
your external equipment
equiprnent operation
operationmanual
manualfor
forthe
the
type,
signal type.
¯ When connecting a DVI-HDMI conversion adapter/cable to
the HDMI terminal, the image may not come in clearly.
• Skip this step for "Audio Only'
When listening to music
musicfrom
fromaamusic
musicprogram,
program,you
you
can turn the
and enjoy audio
audioonly.
the screen
screen off
offand
On: Audio
Auelio is
is output
output without
withoutscreen
screenimage,
image,
anel audio
auelioare
areoutput.
output.
Off: Both
Off:
Both screen
screen images and
ii~ii:iiiiiiii~iii::iiil
screenimage
imagewill
willreturn
returntotonormal
norrnalwhen
whena button
button
¯ The screen
(except those for
for audio adjustment, such as VOL, MUTE,
MUTE,
AUDIO)isispressed.
pressed,
SURROUND, AUDIO)
Different sound sources
sourcessometimes
sometimesdodonot
nothave
have
thethe
same loudness
its its
loudnesslevel,
level,such
suchasasa aprogram and
and
commercial breaks.
breaks, The
TheAutomatic
AutomaticVolume Control
Control
commercial
(Auto Volume) reduces this problem by equalizing
levels,
levels.
This function emphasizes speech against background
noise for greater clarity.
@-30
Fixed: Sound via
via speaker
speakerisisadjusted
adjustedwith
withVOL+
VOL+/- on
+ / - on
onthe TV.
TV,
the remote control
controlunit
unitororVOL
VOL+/Sounel via
via the
the AUDIO
AUDIO OUTPUT
OUTPUT terminal
terminal isis not
not
Sound
QUlu;:".au,v and
anel outputs atata aconsistent
consistent
level.
adjustable
level.
Variable: Sound via the AUDIO
AUDIO OUTPUT
OUTPUT terminal
terminal is
/ - ononthe
theremote
remotecontrol
controlunit
unitor
or
adjusted with
with VOL
VOL++/TV,
onthe
the TV.
VOL+/- on
via speaker
speakerisismuted.
muted,
Sound via
You can select whether to use transition effects when
changing channels.
Yes: A tranJtion< =~.ffect is used ~’,,hep, the channel is chan.qed.
No:
No: No function,
function.
On-Screen
On-Screen Display Menu
Select the video signal system compatible with your
equipment from the list below:
Auto/NTSC/PAL-M/PAL-N
ii:ii~iii:i:ii:iiii:ii~ii::~:;:ii!::!~i::~::i!!!!;:i~!
¯ "Color System" can
canonly
onlybe
beset
setfor
forthe
theINPUT
INPUT11VIDEO
VIDEO and
and
INPUT 3.
¯• IfIfyou
you have
have already
already set the Secret
Secret No., input the 4-digit
secret number
secret
number here.
here. See
See page
page27
27for
forsetting aasecret
number.
number.
This function allows you to adjust the closed
caption screen appearance to suit your preference.
YOU can adjust 7 items: "Caption Size", "Font
Style", "Foreground Color", "Foreground Opacity",
"Background Color", "Background Opacity" and
"Character Edge".
Example:
Selectable
Selectable items available
available for
for "Font
"FontStyle"
Style".
bv broadcasting
n((y"lr""TIrYj station or
Default:
Default: ]-he font specified by
default font.
Type 0: Proportional font used in the MENU screen.
with serifs,
Type 1:
1: Monospaced with
Type 2:
2: Proportionally spaced
spaced with
withserifs,
serifs.
withoutserifs.
serifs.
Type 3:
3: Monospaced without
Type 4:
4: Proportionally spaced without
withoutserifs.
Type 5: Casual font type.
type.
Type 6:
font type.
type.
6: Cursive font
Type7:7:Small
Small capitals.
capitals.
Type
ili:ii:;.iiiii!iiiii:iil;.i;.!iiiiii
¯ For resetting adjustments to the factory preset values,
press A/Y to select "Reset", and then press ENTER.
¯ The default value depends on the broadcasting station.
This function allows viewing of digital closed caption
information for the digital broadcast program being
viewed.
viewed,
ii:?i!iiiiii:ii!:.!iiiii
¯ This list
or or
external
listisisnot
notdisplayed
displayedfor
foranalog
analogbroadcasts
broadcasts
external
This function locks
locks the
the operation buttons on the TV
and the remote control.
control.
Off:No
Noadjustment.
adjustment.
Off:
RC
ControlLock:
Lock:All
Allbuttons
buttonson
on the
the remote
remote control
RC Control
control are
locked.
on the
the TV,
TV,except
except
Button Control
Control Lock:
Lock: All
All buttons
buttons on
POWER, are locked.
iiiiiii~:;ii:ii~iiiiiii;:!I
¯ To unlock the buttons on the remote control by using the
control panel of the main unit (see page 21 ):
and
pressVOL
VOL +/+/- totoselect "Option".
"Option".
press
(~ Press
Press CH!X/V
CH/\/\/totoselect
select"Operation
"Operation Lock
Lock Out",
Out", and
and
then press INPUT.
INPUT.
(~ Press
Press CHA/V
CH/\/Vtotoselect "Off",
"Off",and then
thenpress INPUT.
INPUT.
Press MENU
MENU to
to exit.
exit.
(~ Press
MENU on
on the
the
TV, press MENU
•¯ To unlock
unlock the
the buttons
buttons on
on the
the TV,
remote control,
control, and
remote
and then
then select
select "Off" in "Operation Lock
Out".
This function allows you to program 4 favorite
channels, in 4 different categories. By setting the
favorite channels in advance, you can select your
favorite channels easily.
To register your favorite channel:
channel:
Select "Register" and then
then press ENTER.
ENTER.Press
Press A/T /.,./
¯II>totoselect
selectthe
theposition
positionininthe
thecategory,
category,and
andthen
thenpress
press
ENTER to
to register.
register.
To delete your favorite
favorite channel:
channel:
Select "11 Data Clear"
Select"
Clear" and
and then
then press
pressENTER.
ENTER.Press
Press
~,/~/,/¯
to select
thethe
channel
you
A
/T / .,./11>
to
channel
youwant totodelete,
delete, and
and
Select "Yes"
"Yes" and
andthen
thenpress ENTER.
ENTER.
then press ENTER. Select
To delete all the favorite channels, select
select "All
"All Data
Data Clear".
Clear".
¯ Before setting the channel, select the channel you
youwant
wanttoto
register as a favorite channel.
¯ You can display the "Favorite CH" screen by pressing
FAVORITE on the remote control.
audio/video.
informationisisnot
notincluded
includedininCC1,
CC 1,CC2,
CC2,Text1,1,oror
¯ This information
Text2, and
Text2,
and is
is not
not displayed
displayedinina list.
list.
Select the OH display when changing channels for
digital broadcasting.
"Program Info."" displays.
displays.
Yes: "Program
NO="Program
"Program Info."
Info." does not
No:
notdisplay,
display.
You can select the image from several types of demo
mode.
240Hz Demo/10 bit Demo/Feature Demo/Auto Play
If you select
select "Auto
"Auto Play",
Play", you
you need
needto
to set
set playback
playback type.
type.
Continuous:
r.nnti'lIIn .. ,,' Play
PIHY Demos
Dewos continuously.
continuously.
10
10 min.:
min.:Play
PlayDemos
DelTosevery
every10
10minutes.
ITinutes.
20 rain.:
min.: Play
PlayDemos
DelTosevery
every20
20minutes.
ITinutes.
20
i:.i:.iiiii;i~i:.::.iiiii:.i~
function will
when you
EXIT
remote control unit.
unit.
settoto"Feature
"FeatureDemo",
Demo",pressing
pressing
•¯ When
When "Demo
"DemoMode"
Mode"isisset
FREEZE pauses/restarts demo.
ric,,~or,ri'r,non
oninput
input
¯ "Demo Mode" may not be selected depending
signal type.
time isis displayed
displayedevery
every30
30minutes
minuteswhen
when
On: The elapsed time
may
automaticallycanceled
canceleddepending
depending
you switch
switchtoto GAME
GAMEmode
modeininexternal
external
input
mode.
¯ "Demo Mode" may
be automatically
input
mode.
on input
signal type.
type.
Off:No
No
adjustment,
on input
signal
adjustment.
This function
function displays the elapsed game time so you
not lose
lose track
trackof
ofthe
thetime.
time.To display the
theelapsed
do not
before starting
time, select "GAME" for the AV MODE
MODE before
the
the game.
@- 31
On-Screen
On-Screen Display Menu
Example
Example
’ iii~ Digital Setup1 1/
This function allows software updates by inserting a
On the
TV’with the
device
USB memory
deVice
tile update file into tb, e
F’~2~ ~’~’J /tSERVICE terminal
SERVICE terminal on the TV.
....
~@ g
F~ ~~,~,
To check for the
the availability of a software update, visit
http://www.sharpusa.com/products/support/. If you
have any questions, please call 1-800-BE-SHARP
(800-237-4277).
®®©®
1 Press MENU to display the MENU screen, and then
press </~, to select "Digital Setup".
2 Press &/~ to select a specific adjustment item,
item,
and then press ENTER.
select
thedesired
desiredsetting,
3 Press &/~ (or </~) to select
the
and then press ENTER.
4 Press MENU to exit.
~
@@ @
Q~~
(~) ~,,~,~
OO
~
__~~
(~ ’~’~" ~
iiii::i::ii!i:iiii!ii::iiiii:.ii::i!:ii:ii:]iil
•¯ Do
Do not
notremove
removethe
theUSB
USBmemory
memorydevice
deviceor
orunplug
the AC cord while the software is being up'[latea .
You oan output digital audio to an AV ampiifieroror
You
similar device
terminal
similar
device whose
whose DIGITAL
DIGITALAUDIO
AUDIOINPUT
INPUT
terminal
DIGITAL AUDIO
is connected
connected to the DIGITAL
AUDIOOUTPUT
OUTPUTterminal
terminal
on the
the TV.
TV. Please
Pleaseselect
selectan
anaudio
audiooutput
outputformat
format
compatible with the
the audioformat
formatofofthe
the programyou
you
are watching and the
the equipment connected.
¯• Be
n.,,,.. ~.ti,,
Be sure
sure to
to properly follow the whole procedure
described
described below,
below, step
step by
by step. Otherwise, for
example, the
the "IV
TV cannot
cannot read the data
dataininthe USB
USB
memory device
updating
will
memory
deviceand
andsoftware
software
updating
willfail.
fail.
Illsel'tthe
theUSB
USBmemory
memorydevice with
with tb, e updatefife
1 Insert
fiie
terminal on
on the
the TV.
TV.
into the SERVICE
SERVICE terminal
optical output
output terminal
terminal outputs
PCM: The optical
outputs audio
audio signal
in peM
PCM form.
form. IfIf your
your digital
digitalaudio
audiosystem
systemdoes
doesnot
not
in
support Dolby Digital,
select "PCM".
Digital, select
Dolby Digital: The optical
optical output
output terminal
terminaloutputs
outputsaudio
audio
signal
signal inin Dolby
Dolby Digital
Digitalform.
form.ItItreproduces
reproducessound
soundfrom
from
surround program
program of
of digital.
digital.
surround
The current version of the TV software is displayed.
2
2 Press MENU to display the MENU screen, and
then press ~/~ to select "Digital Setup".
then
and then
Press &/~ to select
select"Software
"Software Update",, and
33 Press
press
press ENTER.
ENTER.
¯• IfIf you
you have
havealready
alreadyset
setthe
theSecret
SecretNo.,
No.,gogototostep
step4.4.
::’::~ Digital Setup
0-9.
0-9.
4 Input the 4-digit secret number by using
[ :!ii::::i!i: Digital Setup
@-32
(~- 32
]
On-Screen
On-Screen Display Menu
Menu
7 Press
ENTER
5 Press
PressENTER
ENTER
start
""""I/,n"the
thedata
datainInthe
the
5
to to
start
checking
7 Press
ENTER
to start updating.
USBmemory
memory
device.
¯ The screen becomes dark for a while until the update
USB
device
screen can be displayed. Please wait for the update
screen to appear. Do not unplug the AC cord.
6 During the
thedata
datachecking,
"h""I<,n" "Checking" blinks.
Example
¯.. The current version of the TV software and
and the
the version
version
of the update file on the USB ~,-nemory device are
displayed. To update the TV software with the update
Example
:::::::::::::::::::::::::::::::::::
¯ Do not remove the USB memory device or unplug
the AC cord while the software is being updated.
88 When the software is successfully updated, a
screen is
IS displayed indicating that the update
process isIS completed.
process
After this screen is
IS displayed, the TV automatically
turns off and then
then turns
turns on
on again.
again
Example
¯ If the USB memory device is not properly installed or
the co~’rect update file cannot be found on the USB
memory device, an error message is displayed.
Chec:k the file on the USB memory ,.Jevice, anct 1:her1
reinsert the USB memory device correctly.
~
If the update has failed, check the file innthe USB
memory device and try Software
Software Update
Updateagain.
again.
After the
the screen
screen shown
shown below
below is displayed,press
press
99 After
ENTER.
ENTER
10oRemove
device.
Removethe
the USB
USB memory
memory device.
Q- 33
®
33
Other Viewing Options
You can
can operate the
the connected AV products (AV
receiver, cable
receiver,
cable box,
box, SAT tuner,
tuner, DTV,
DTV, VCR,
VCR, DVD,
DVD, LD)
using the presetting manufacturer
manufacturerfunction
functionofofyour
your
remote control unit.
~3
SOURCE
11 ,uuui+,uc~~j,~"J ~
2 ······ ..,....,.. ·,!'¥l
3 ,uuui"u"c~
4 ........;·:.. ".. ·,~;;l
1
1 SOURCE
SOURCE POWER
POWER
~~~
6
Q
•¯ Turns the connected
connected equipment
equipmentpower
poweron
onand
andoff.
off,
2
•¯ Starts
Starts recording.
recording,(VCR)
(VCR)
~i
5
4
¯ Pressing quickly once takes you to the start of the chapter
currently playing. Each time you press it, you move back
to the start of the previous chapter. (DVD)
Q
O ~]
~
___~"~""’~,~!
~ ~ ~ ~;~)~
O ~ ~1 1
1
VOL CH
,,/;) ~ ........12
~ib
~14
50-9
5 0-9 (CBL/SAT), ¯ (DOT) (SAT)
¯• Press a button (or buttons) that
thatcorresponds
correspondstotothe
the
channel that
that you wish to watch.
channel
watch,
6
¯ Starts playback.
playback, (VCR,
(VCR, DVD)
DVD)
7
¯ Rapidly advances the tape and
andallows
allowspicture
picturesearch.
(VOR)
¯ Hold down to fast forward. (DVD)
811
811
Sets pauses and still
still pictures.
pictures,(VCR,
(VCR,DVD)
DVD)
•¯ Sets
(~) ~ @ @
9
codes
Presetting manufacturer codes
j;;J .."",,,.iI'iI'inn
1
Press FUNCTION
FUNCTION until
Press
until the
the LED
LED for
for your
your device
lights up.
11 FLASHBACK
press
22 After the LED for your device lights up, press
FUNCTION and
DISPLAY
at at
thethe
same
FUNCTION
and
DISPLAY
sametime
timetoto
enter the code
LEDwill
will
code registration mode. The
TheLED
blink,
3 Press 0-9 to enter the manufacturer code. (See
3 Press 0-9 to enter the manufacturer code,
page 35.)
13 MENU
page
nono ionger
ik:Jhts
* Preset re, ode is finished once theLED
LED
lights
up.
up,
4
4 After
Afterregistering the
thecode,
code,the
theLED
LEDwill
willstop
stopblinking
then turn off
(If you perform an
off after
after one second. (If
incorrect operation, the
the LED
LED will
will blink
blink quickly then
turn off.)
34
¯ Rewinds the tape and allows picture search.
search,(VCR)
(VCR)
¯ Hold down to go in reverse. (DVD)
3 REC
REC
,:.:::;:;;;::=~;ucTiu,uu,
Q
To operate the
the connected
connectedequipment, press
press
FUNCTION
"'.,,....,.'I,..~. to
to select
select the
the LED
LED for
for your
your device.
device, (VCR,
AUDIO,
The
AUDIO, CBL/SAT (cable converter) or DVD.) The
LED lights up, and the remote
LED
remote control unit button will
will
as follows.
follows,
function as
totoselect
•¯ When
Whenyou
youoperate
operateVCR
VCRororDVD,
DVD,press
pressINPUT
INPUT
selectthe
the
to your
your device.
device,
terminal
terminal connected to
•¯ CABLE
CABLEand SAT
SATcannot
cannotbe selected at the
thesame time.
time,
¯ Stops the tape transport. (VCR)
¯ Playback stops when pressed. With some DVD players,
pressing the button twice may open the disc tray. (DVD)
10
10
¯• Pressing quickly once takes you
you to
to the
the start of the next
chapter. Each time you press it, you
you move
moveahead to the
start of the next
next chapter.
chapter, (DVD)
11 FLASHBACK
¯• Press to switch
switch between
betweenthe
thecurrent
currentchannel
channeland
andthe
the
channel you were watching
watching immediately before.
before,Some
Some
do not
notpreset FLASHBACK. (CBL)
(CBL)
manufacturers do
12 CHA/V
12
¯ Press CHA ororCHV
toto
tune
in intotoa higher
CH\/
tune
higherororlower
lower
channel. (CBL)
¯ Press to select the channel of
of the
the TV
TV tuner
tuner on
on the
the VCR.
VCR
(VCR)
¯• When
When this button
DVDmenu
menuwill
willdisplay.
display,
buttonisispressed, the DVD
(DVD)
(DVD)
14 &/~/~/~,,ENTER
ENTER
14
¯ &/~/~/~,: Press
thethe
button
to to
select
items
Press
button
select
itemson
onthe
theSAT
SAT
screen, (SAT)
GUIDE screen
screen or SAT MENU screen.
Press the button
button to
toselect items on the DVD menu
menu
screen. (DVD)
¯ ENTER: Press totoactivate the selected function.
function, (SAT,
DVD)
Other Viewing Options
Manufacturer
Manufacturer codes
codes
VCR BRAND
Akai
Audio
Broksonic
Canon
Capehart
Craig
Curtis Mathis
Daewoo
DBX
Dynatech
Emerson
Fisher
Funai
G.E.
Goldstar
Hitachi
Instant Replay
JC Penney
JVC
Kenwood
LIoyds
Magnavox
Magnin
Marantz
Memorex
Minolta
Mitsubishi
Montgomery Ward
Multitech
NEC
NEe
Panasonic
Pentax
Philco
Philips
Pioneer
QUASAR
RCA
Realistic
Samsung
Sanyo
Scott
Sears
Sharp
Shintom
Sony
Sound Design
Sylvania
Tatung
Teac
Teac
Teknika
Teknika
Thomas
Thomas
TMK
TMK
T()siliba
Toshiba
Video r~~~,,~l,
Video
Concepts
Yamaha
Yamaha
Zenith
Zenith
REMOTE CONTROL CODE
NUMBER
25, 26, 37
15, 22, 30
32
04
34
10, 31
04
34
15, 22, 30
29
21, 32, 35
09, 10, 11
28, 29
04
24
06, 47
04
04, 06, 24, 30
04,06,24,30
15
15, 41,42, 53
14,
4,15
15
29
29
04,05,08
04, 05, 08
31
31
30
04,10,24,29
04, 10, 24, 29
06
17, 18, 39, 40, 48
02, 43
29
15, 22, 30
04, 44, 45, 49, 50
05, 06
04, 06
04, 05, 08
46
46
04
04
06,07,33,51
06, 07, 33, 51
01,02,10,24
01, 02, 10, 24
2~i,
23, 31
0,14,52
10,
14, 52
20
06, 11,24
01, 02, 03
36
12, 13, 38
29
05, 08
DVD/BD/LD BRAND
Denon
Denon
JVC
,lve
Kenwood
Kenwood
Magnavox
Marantz
Mitsubishi
Panasonic
Philips
Pioneer
Proscan
RCA
Samsung
Sharp
Sony
Toshiba
Yamaha
Zenith
REMOTE CONTROL CODE
NUMBER
02
09
21
04.
04
06
02,
22
02,22
04, 23
08,11,20
08,
11,20
03
03,
03,24
24
07, 122
01, 1
01,10
05,
05,25
25
04
02
04
1
15
5) 29
15,
27,
27, 29
29
29
21
21
19,20
19,
20
30
30
5, 29, 30
15,
6
16
CATV/SAT BRAND
Anvision
Anvision
Cable Star
Eagle
General Instrument
Generallnstrurnent
Jerrold
Jerrold
Magnavox
Motorola
NEC
Oak Sigma
Panasonic
Philips
Pioneer
Pioneer
Randtek
Randtek
RCA
~~CA
Scientific Atlanta
Sony
Viewstar
Zenith
REMOTE CONTROL CODE
NUMBER
NUMBER
04, 05
04, 05
05
05
02,03,07,
2,13,14,
02,
03, 07, 12.
13, 14,
19, 22
19,22
02,
02,03,07,12,13,14,
03, 07, 12, 13, 14,
22, 31, 32, 33, 34, 35,
22,31,32,33,34,35,
36, 37, 38, 39,
39, 40
04, 05, 09, 14, 17, 18,
18,
20, 21,24.25
, 24. 25
20,
47
47
42
42
8
8
16,23
16, 23
04,05,09,
5,17,1
04,
05, 09, 15,
17, 18,
20, 21,24,
, 24, 25
20,
0, 29,
08, 10,
08,
29, 30,43*,46
43* 46
04, 05
16,27,
16, 27, 44*,
44", 45'
45*
01,26
28
28
5,118,
04, 05, 09, 15,
17, 18
20,21,24
20,
21,24, 25
06,41
06,
41
with'* are SAT
¯ Numbers marked with
SAT codes, all
all others are
CATV codes.
CATV
codes.
AUDIO BRAND
Sharp
REMOTE CONTROL CODE
NUMBER
01
Q- 35
®
35
Using AQUOS LINK
What’s AQUOS LINK?
¯ Using the HDMI CEC (Consumer Electronics Control) protocol, with AQUOS LINK you can interactively operate
compatibie system equip~,’nent (Blu.-ray disc equipment, AV ampiifier, DVD).
* By connecting AQIjOS LINK-coFnpatible devices with HDMi-certified cables to the TV, you can control a
recorder or AV amplifier using the remote control of the TV.
¯ AQUOS LINK allows you to operate the HDMI-connected equipment with one remote control.
Example*
i’~’~
¯
~.~
~
HDMI-certified cable
(commercially available)
+
;======;:1
¯
/
1+ <If)o------(Jl. ................."'11
Optical fiber cable
(colYlrl'erci81ly
8V8i18ble)
AQUOS
LINK-compatible
available)
AQUOS
LINK-compatible (commercially
Audio system
system
Audio
I
/
HDMI-cer~ified
cable
HDMI-certified cable
You
-* You
can use the INPUT 5.~
6, 7 or 8 terminal.
(cOIYlrl'erci81Iy available)
8V8i18ble)
(commercially
BD Player
AQUOS BO
TV
¯•
¯
¯
¯•
Point the
the remote
remote control
controltoward
towardthe
theTV,
TV,not
nottotoconnected
connectedHOMI
HDMI equipment.
Point
Video noise may occur depending on the type of
of HDMI
I-iDMI ,cable used. Make sure
to use an HDMI-certified cable=
Up to 3 pieces of HDMI recording equipment and one AV amplifier can be connected usip, g th, is system.
These operations
operationsaffect
affectthe
the HDMI equipmentselected
selectedasasthethecurrent
currentinput
input
source.
If the
equipment
does
operate,
source.
If the
equipment
does
notnot
operate,
tumturn
on on
the equipment
equipment and
and select
selectthe
theappropriate
appropriateinput
inputsource
sourceusing
usingINPUT.
INPUT.
the
~
7; ~p,~ %,°
.%.~, %° ~..,,o~,
SOURCE
~
~
~
~
~
~
LIGHT
@
~
~
INPUT
~0
YOU
canoperate
operateAQUOS
AQUOS LINK-compatibledevices
deviceswith
withthe
theremote
remotecontrol
control
You can
unit when
when the
the FUNCTION
FUNCTION of the
remote
control
unit is set
to TV.
unit
of the
remote
control
is set
to TV.
REC STOP
and
when AQUOS
AQUOSLINK
LINKisis
REC
STOP
andOPTION
OPTIONbuttons
buttonswill
willfunction
function only when
used.
I[]
11II One Touch
Play
While the
the TV
TV is inin standby mode, it automatically turns on
on and plays back
back the
the
image from
from the
the HOMI
HDMI source.
source,
I[]
11II One
One Touch
Touch
POWER
SAnG 8 0M~E
...........
~~g
~ ~~"
®®@@
Recording
Press
Press REC
REC while
while you
you are
are viewingaabroadcast
broadcastreceived
receivedwith
withthe
theAQUOS
AQUOS
_(y"nnClTlnIIP recorder.
LINK-compatible
recorder. The
The AQUOSLINK
LINK automatically recognizesthethe
connected HOMI
HDMI device
deviceand
andstarts
starts recording.
connected
[] Single remote control
The AQUOS
AQUOS LINK
LINK automatically recognizesthe
theconnected
connectedHOMI
HDMIdevice
deviceand
and
you can control the
the TV
TV and
and the
the devices
devices as
asifif using auniversal
universal remote control.
I[]
11II Control
Control the
the AQUOS
AQUOS
Set the
the
Set
LINK-compatible audio
audiosystem
system
-rr,mnCltlhllp audio
volume of
of AQUOS
AQUOS LINK-compatible
audiosystem.
system.
¯• The
The above
above description is an exampleofofthe
theAQUOS
AQUOS LINKfunction.
function.
¯• The
The steps
steps inin "AQUOS LINK Setup"ononpage
page3737need
needtotobebecompleted
completedbeforehand.
beforehand.
¯• Refer
Refer to
to this
this operation
operation manual
manualand
andthe
theoperation
operationmanual
manualofofthe
theAQUOS
AQUOSLINK
LINKdevice
devicetotobebeused
usedwith
withthis
thisTV.TV.
36
Using AQUOS LINK
AQUaS
devices are
connected, this function
function allows
allows you
you to set
setthe
therecorder
recorder
for recording when
when you
you press
pressREC
RECon
onthe
theTV’s
TV'sremote
remote
control unit.
unit.
._~ ~~
display the MENU screen, and then
1 Press MENU
MENUtoto
1
press
press </~, totoselect "Option".
Press A/V totoselect
Press
selectthe
therecorder
recorderfor
forrecording.
Example
Press A/V totoselect
select"AQUOS
"AQUaSLINK
LINK Setup", and
22 Press
then press ENTER.
item,
and
3 Press ~/~ to seiecta specific ilern,
and
the,q press
ENTER.
to select
desiredsetting,
4 Press
thethe
desired
Press ~/~ (or </, ) to select
and then press ENTER.
5 Press MENU to exit.
AQUOS LINK Control
iiA~UOSi~iiNKi~t
disable AQUOS
AQUaS LINK
LINK
Select AQUaS
AQUOS LINK Control to disable
function even when an
an AQUOS
AQUaS LINK-compatible HDMI
H OM I
device is connected to
to the
the TV.
TV, This
This function
function prevents
prevents
the device from starting to
to operate
operate unexpectedly.
Enable: You
You can
can operate
operate AQUaS
AQUOS LINK-compatible
LINK-compatible
Enable:
equipment.
Bisable: AQUOS LINK function does not work.
iiii!:ii;,i;.:il;ii:;iiiiil
Example : when
when..,nlnn"..,tinn
connecting AQUOS LINK-compatible
Example:
recorder via
via AQUOS LINK-compatible Audio
recorder
system
When an AQUOS
AQUaS LINK-compatible
LINK-compatible audio
audiosystem or
or
other equipment is
is connected
connected between
betweenthe
theTV
TVand
and
recorder, "Sub"
"Sub" isis displayed.
displayed,
Auto Power On
If this
this is
is activated,
activated, the One
ane Touch Play function
function isis
enabled,
Yes: While the TV is in standby mode, it automatically
turnSsource.On and plays back the image from the HDMI
source,
work,
No:
No: This
This function
function does not work.
This function allows easy one-touch recording of the
program being viewed on the TV to AQUOS LINKcompatible equipment with a recording function by
simply pressing REC on the remote control.
8
8
(~J G
(~ (~)
~c (~ 0(~ 0
(~j ~ @
(3
(3 Gif!D
|II1~ ~/! I~(~ ~(~° ~(~3 i
!I
Itil"~’’°
Prepare
Prepare the
the connected
connected AQUaS
AQUOSLINK-compatible
LINK-compatible
recorder for recording.
recording. Check
Check the
the following
following items.
items.
•¯ Make
Make sure that the
the antenna
antennacable
cable isis connected.
connected,
¯ Check that
that there is sufficie~,t
sufficient availabie space on the
,ormrlinn
media(HDD,
(HOD, DVD,
DVD, etc.).
etc,),
recording media
¯ On the TV, use
use "AQUaS
"AQUOS LINK
LINK Setup" and "Selecting
Recorder" to select the equipment
equipmentfor recording.
¯• By default, the recorder
recorder connected
connectedto
toINPUT
INPUT55is selected
for recording.
recording,
PressREC
RECtotostart
startrecording.
rprnrrllnn
1 Press
¯ When you are wewing
viewing a broadcast received
receivedwith
with
the AQUOS LINK-compatible
LINK-compatible recorder
recorder selected inin
"Selecting Recorder",
Recorder", recording to
"Selecting
to the
the AQUOS
AQUaS recorder
recorder
of the broadcast
broadcastbeing
beingviewed starts.
¯• When
When you are viewing
viewing a broadcast received
received with
with
equipment other
other than
than the
the AQUOS
AQUaS LINK-compatible
LINK-compatible
recorder selected
"SelectingRecorder"
Recorder"ororother
other
selected inin "Selecting
external input equipment,
equipment, pressing
pressingREC
RECon
onthe
theremote
remote
control does not
not start recording.
recording,
2 Press
PressREC
RECSTOP
STOPto stop
stoprecording.
Q- 37
®
37
Using AQUOS LINK
AQUOS LINK allows you to operate the HDMI-
GEl)
w
CfjJ
EEl
@
\'1..,
:/
Press ¯ to start playing back a title.
¯ The last played program is played back. You can use the
following buttons during broadcast viewing.
SOURCE
POWER
Turns the power of the HDMI connected
devices on and off.
~t1~
Hold down to go in reverse.
~
Starts playback.
V°L I~l~
’~’-
~
Hold down to fast forward.
[]
||
~
Playback stops.
Sets pauses and still pictures.
Pressing quickly once takes you to the start
of the it,
chapter
currently
playing.
Each
timeof
you press
you move
back
to the
start
the previous chapter.
O~O
~O~
=~ ~- ~ "~~°"
~ ,~,T~.
~:~°~ ~ ~’~:~]
Pressing quickly once takes you to the start
~
it, you move ahead to the start of the next
chapter.
¯ The buttons !’~I~t/11~ do not function with the following
Bin-ray disc players currently available,
- BD-HP20U, BD-HPSOU
You can call
call up
up the
the AQUOS
AQUOS LINK-compatible
recorder’s EPG
EPG and
and preset
presettimer recordings using the
recorder's
TV's
control,
1 Press
MENU
PressOPTION
OPTIONtotodisplay the
theAQUOS
AQUOS LINK
LINK MENU
screen.
~ Press
select
"Recorder
2
Press ~/~ to to
select
"RecorderEPG",
EPG",and
andthen
then
press ENTEFI.
ENTER.
¯• The recorder’s
recorder's EPG
EPG isisdisplayed.
displayed.
3 Select
Selectthe
theprogram
program to
to record.
record.
¯• You
You can use",IT
~,/~/~/I,,
and
1<l1li/11>,ENTER,
ENTER,RETURN,
RETURN, EXIT
EXIT and
the coloured buttons.
buttons.
¯• This function works
an AQUOS
AQUOS LINK-compatible
LINK-compatible
works only
only when
when an
connected.
recorder is connected.
¯• Refer
Refer to
to the operation manual
manual of
ofthe
therecorder
recorderfor
fordetails.
details.
(~- 38
38
Using AQUOS LINK
This section explains how to play back a title in the
AQUOS LINK-compatible equipment.
1 Power on the AQUOS LINK-compatible equipment,
and select appropriate external input.
2 Press
Press OPTION
OPTION to
to display the AQUOS
AQUOS LINK
LINK MENU
MENU
screen,
screen.
menu/titlelist",
list", and
and then
3 Press A/V to select "Top menu/title
press ENTER.
¯ The title list datafrom
fromthe
theconnected
connectedAQUOS
AQUOSLlNKLINKdisplays,
compatible equipment displays.
4 Select
thetitle
titlewith
with ~,/~’/</,,, and
andthen
then press ¯
Select the
to start
to
start playback.
ili~:ii~’iiiiiiiiii~:iii~’i!’!iiiiii
¯• This
AQUOS LINK-compatible
LINK-compatible
This function
function works
works only
only when AQUaS
connected.
equipment is connected,
You can switch the media (HDD or DVD) for playback
or recording on the AQUOS LINK-compatible recorder,
1 Press
Press OPTION
OPTION to display the AQUOS
AQUOS LINK
LINKMENU
MENU
screen,
select"Media
"Media change",
rh,,,n,,o", and then
then
Press &/~ totoselect
22 Press
press
press ENTER.
3
Select the desired media such as DVD or HDD,
¯• The Media
Media type
type toggles
toggles each
each time
time you
you press
pressENTER
ENTER inin
"Media change",
change",
"Media
¯• Select the media
mediatoto be operated by the player.
1 Press OPTION to display the
LINKMENU
MENU
the AQUOS
AQUOS LINK
screen,
screen.
2 Press
Press A/V totoselect
select"Sound
"Soundmode
mode change",
f'h'">n"o", and
and
then press ENTER.
time you pressENTER.
ENTER.
•¯ The
The sound
sound mode
mode changes
changes each time
manual of
of the
the AQUOSLlNKLINK•¯ Refer
Refer to the operation manual
compatible audio system for details.
compatible
details,
You can call
call up
up aa setup
setup menu
menu from
from the
the connected
connected
AQUOS
AQUOS LINK-compatible equipment.
1 Press OPTION to display the AQUOS LINK MENU
screen,
screen.
menu",and
and then
then press
press
2 Press &/~ to select "Setup menu",
ENTER.
¯ The setup menu of
of the
the AQUOS
AQUOS LINK-compatible
equipment is displayed.
iiiii:ii:iiiiii!:iiii:iiii!iiiiiiii
of the
the equipment
equipment (recordingororinin
Depending on the status of
•¯ Depending
standby mode, etc), the setup menu
menu will
will not
not be displayed.
¯• The setup
setup menu
menu will not
not be
be displayedwith
withthe
the player
player
BD-HP20U currently
currently available,
available.
BD-HP20U
If multiple HDMI devices are connected in a daisy
chain, you can specify which device to control here.
LINKMENU
MENU
AQUOS LINK
1 Press OPTION to display the AQUOS
screen,
You can select to listen to the TV sound only from the
AQUOS LINK-compatible audio system and manually
change its
its sound
sound mode,
mode.
1 Press
AQUOS LINK
LINK MENU
Press OPTION
OPTION to
to display the AQUOS
screen.
screen,
2 Press A/V to select "By AQUOS
AQUOSAUDIO
AUDIO SP",
SP", and
then press ENTER.
¯• The
The sound
sOLind from
from the TV speaker is muted and only the
sound
sound from
from the
the AQUaS
AQUOS LINK-compatible audio system
is
is audible,
audible.
¯• You
canuse
useVOL+/You can
VOL+/- and
and MUTE.
MUTE,
Select "By AQUOS
AQUOS SP",
SP", and
and then
then press
press ENTER
ENTER to
to
Select
listen to the TV sound,
listen
sound.
"Modelselect", and then
2 Press &/~ to select "Model
press ENTER. The
The HDMI
HDMIdevice
device toggles each time
you press ENTER.
ENTER,
Q- 39
®
39
Using a PC
You can select
select the
the screen
screensize.
size,
II
8
B
G 8
CD QD
B @l)
!/
\11
!/
Press VIEW
1 Press
VIEW MODE,
MODE.
¯• The
The View Mode menu
menu displays.
¯• The menu lists the View Mode options
optionsselectable
selectablefor
forthe
thetype
typeofofvideo
videosignal
signalcurrently
currently
being
received,
being
received.
2 Press
PressVIEW
VIEWMODE
MODEororA/f while
while
View
Mode
menu
is
to select
a desired
item
menu,
2
the the
View
Mode
menu
is displayed
to select
a desired
item
onon
thethe
menu.
¯• You can sequentially select a View Mode that
that has
has its
its own
own aspect
aspectratio.
ratio,
¯ Connect the
the PC
PCbefore
beforemaking
makingadjustments.
adjustments,(See
(Seepage 15.)
15,)
¯ .C;",I",'·I"hl"
size may
may vary
vary with
with input
inputsignal
signaltype.
type,
Selectable screen size
Example: Screen size images
,------------------------------------------,-----------------------------------------,-----------------------------------------,-----------------------------------------,
signal
Normal
Zoom
Dot by
by Dot
Dot
Dot
Input signal
Stretch
4:3
1\:3
Input signal
Keeps the original
aspect ratio in a full
screen display,
Stretch
i©i. ©
16:9
O- 40
40
For viewing
widescreen
programs. The top
and bottom of the
image is cropped,
1
Dot by Dot
An image fuily fills the Detects the resoiution
screen,
ol tile signal a~,d
dispiays an irnage with
the same number of
pixels on the screen,
An image fully fiils th, e
screen,
Delects the resolution
ef the signal and
displays an image with
tb, e same number of
pixels o,q the screen,
Using ape
a PC
\:
1/
PressMENU
MENUto display the MENU screen, and then
1 Press
press </~, totoselect the Setup ororOption menu.
menu.
¯• For
For adjusting
adjusting "Auto
"Auto Sync."
Sync." or "Fine
"Fine Sync.", select the
Setup menu.
menu.
¯• For setting "PC Audio Select",
Select", select the Option menu.
2 Press
PressA/V to select a specific adjustmerlt itern,
and then press ENTER to set each item.
3 Press A/V (or ,/,) to select or adjust the
thedesired
desired
setting, and then press ENTER.
For automatically adjusting the PC image.
Yes: Auto Sync. starts and "Now adjusting the image."
displays,
No: This function does not work.
Determines whether the AUDIO terminal is used for
INPUT 4 (PC-IN) or INPUT 6 (HDMI).
Input 4 (PC}: Select this item when the audio signal is
input via the INPUT 4 (PC-IN) terminal using an analog
RGB cable (D-sub 15-pin cable or VGA cable).
Input 6 (HDMI}: Select this item
itemwhen
whenthe
theaudio
audiosignal
is input via the INPUT
INPUT 66 (HDMI)
(HOMI) terminal using
using a DVIHDMI conversion cable.
iiiiiiiiiii!:iiii:i!ii!i!iiiiii
¯ When "PC
"PC Audio Select"
Select" is
is set
set to
to "Input
"Input66(HDMI)",
(HOMI)", sound
sound
will not be produced ififyou use only an HDMi-certified
cable to connect HDMI-compatible equipment.
equipment.To
Toproduce
produce
sound, you
you should
shouldmake
makean
ananalog
analogaudio
audioconnection.
connection.
¯• IfIf you
you want
want to connect
connect HDMI-compatible
HOM I-compatibleequipment
equipmentusing
using
o~;ly
an HDM!-cm1ified
I-tDMi-c:ertifiedcable,
cable, set "PC Audio Select" to
only an
"Input 4L1 (PC)".
(PC)"
It is necessary to set the PC correctly to display XGA
and WXGA signal.
Resolution
¯ When "Auto
successful,"Completed"
"Completed"displays.
displays.If If
"AutoSync."
Sync."isissuccessful,
not, "Auto Sync." failed.
not.
failed.
¯• "Auto
"AutoSync." "may
mayfail
fail even
even ifif "Completed"
"Completed" displays,
¯• "Auto
fail ififthe computer
computerimage has low
"AutoSync." may fail
resolution, has
resolution,
has unclear
unclear(black)
(black)edges,
edges,ororis moved while
executing"Auto
"Auto
Sync.". ...............................................
executing
Sync."
Besure
sureto
toconnect
connectthe
thePC
PCto
tothe TV
TV and
and switch
switch ititon
on before
before
¯• Be
starting
"Auto
Sync.". Sync.".
starting
"Auto
Ve!1ical
i Horizontal
Hori~onta~ Vertical
VESA
VESA
Frequency Frequency Standard
=
31.5 kHz
kHz
70 Hz
i 31.5
60 Hz
i 31.5 kHz
O
0
VGA
VGA
640 x 480 i 37.9
kHz
72 Hz
37.9 kHz
O
0
~i37.5
37.5 kHz
kHz
75
Hz
O
0
------------------35.1 kHz
56 Hz
i--~-~--~
.......~-~-~
.............-0(~ .......
i 37.9
O
37.9 kHz
kHz
60 Hz
0
SVGA
600x 600 ~ 48.1 kHz 72 Hz
SVGA 800800
O
48.1 kHz
72 Hz
0
46.9 kHz
75 Hz
0
60 Hz
i 48.4 kHz
O
0
Ordinarily you can easily adjust the picture as necessary
XGA
1024
x 768 i 56.5
1
kHz
70 Hz
O
0
Sync.". In some
to change image position using
56.5 kHz
O
75 Hz
0
cases, however, manual adjustment is needed to
i 60.0 kHz
_1_
_ _8_
_0_kHz
_ _x_60
__
WXGA
O
WXGA
1360_2_
x 768
47.7
kHz
0 _2_ _ _4_ _ _ k _ _6_ _4_
optimize the image.
Hz_1_ _0_
i 47.7
H-Pos.: Centers the image
by moving
to or
the left or ...._S___X__G___A__
it to theit left
by moving
SXGA
1280 x 1024 .......
64.0 kHz
60 Hz
0
_6___0____H__z_
__O__
.......
.............
SXGA+
1400 xx 1050
60 Hz
0
right.
SXGA+ 1400
1050 i65.3
65.3kHz
kHz 60
Hz
O
V-Pos.: Centers the image by moving it up or down.
UXGA
75.0kHz
kHz------------------60
O
UXGA 1600
1600 xx 1200
1200 i 75.0
60 Hz
Hz ------------------0
Cloek: Adjust ~/hen the imag~ fiickers
\lvithwith vertical ............................................................................................................
1080p 1920
67.5kHz
kHz 60
1080p
1920xx 1080
1080 i 67.5
60Hz
Hz
stripes.
Phase: Adjust
Phase:
Adjust when
when characters
characters have
have low
low contrast
contrastor
or
VGA and XGA are registered trademarks of International
when 1:he imacje flk;kers,
Business Machines Corp.p.
ii:i!ti!i;.ii.i;::;:iiiiiiii
¯ For resetting all "Fine Sync." adjustment items to the factory
preset values, press ~,/~ to select "Reset", and then press
ENTER.
ENTER.
¯ It is not necessary to adjust the "Clock" or "Phase" when a
digital signal is being input, so it cannot be selected.
¯ The default cursor position may not be in the center,
because the screen position variable ranges may be
asym metrical.
asymmetrical.
¯• The
onthe
theView
View
Thescreen
screenposition
positionvariable
variableranges
rangesdepend
dependon
Mode or
Mode
or the
the signal
signal type.
type. The ranges can be seen on
onthe
position-setting screen.
position-setting
screen.
720 x 400
Q- 41
®
41
Using a PC
I11II PC
PC control
control of
of the
the TV
TV
[]
¯ Attach
Attach an
an RS-232C
RS-232Ccable
cablecross-type (commercially
II
available) to the supplied Din/D-Sub RS-2320 for the
connections.
This operation
operation systemshould
should beused
usedby
by a person
personwho
who isis
*• This
computers.
accustomed to using
using computers,
~
I11II Communication
Communication conditions
conditions
Set the RS-232C
onthe
thePC
PCtoto
RS-232C communication
communication settingson
match
the TV's
~’s communication
match the
communication conditions,
conditions,
The TV's
~’s communication
The
communicationsettings are
areas
asfollows:
follows:
9,600 bps
9,600
bps
8 bits
~i~~ 8 bits
..............................................
None
1 bit
None
format
I[]
11II Command
Command format
EightASCII
ASCIIcodes
codes++CR
CR
Eight
r-X-Tl--X-Z-1--~X-l--~--:-1-TcT-r-x-z--r-~x-T-:C:-l-----71
Command 4-digits: Command. The text of four characters.
Parameter 4-digits: Parameter 0-9, x, blank, ?
~ Parameter
Input the pa1ameter values, aiigning left, and fil~ with
blank(s) for the remainder. (Be sure that 4 values are
input for the parameter.)
When the input parameter is not within an adjustable
range, "ERR" returns. (Refer to "Response code format".)
Any numerical value can replace the "x" on the table.
I0IIII
~ Oo~unioation procedure
Send the control commands from the PC via the RS-.
232C connector.
~he , k~ operates acc~rd~ng to the received command
and sends a response message to the PC.
Do not send multiple commands at the same time.
Wait until the PC receives the OK response before
sending the next comr~sand.
When "?" is input for some
I-I Io I I
va u pond .
RF!!!':nlol'1l!'::e code
~ Response
code format
format
Normal response
Problem
Normal
response
Problem response
response (communication
(communication
error or incorrect
incorrect command)
command)
Return code (0DH)
(DOH)
Return code
code (0DH)
"-~ Return
I11II Command
Command table
~
. Commands not indicated here are not guaranteed to operate.
CONTROL ITEM
COMMAND ~ARAME~R
CONTROL CONTENTS
AV MODE SELECTION
A ~ V ~M ~ D * ~
~ ~
0: (%ggl9} I STANDARD 2: MOVIE 3: GAME 4: USER Although it .....
h .........~is toggle operation in inside.
VIEWMODE
W~I~D~E *i
i i
0:£oggle)[A~,l:SideBar[A~,2:S.Stretch[AV] 0: A~hough it ....h .........it is toggle operation in inside.
8: Dot by Dot [PC] [AV], 9: Full Screen [A~
I(DIGITAL)
,
~ ~~
D ~: C =: 2 ~ L
~~
DIC~I ~1
(0 999)
*~*~*~* (06383)
~CH DOWN C ~: H :: D ::W x :: =~ =~ The channel num~er cf %z I
8: [PC] Avail~le except when UXGA is being input.
[A~ Only avail~le when 1080i/p is being input.
9: Only available when 720p is being input.
Front half of DIGITAL CABLE CHANN EL NO. (Designate major channel)
DIGITAL Cable ~wo Pa~ numbers, 3 digit plus 3 digit)
Rear h~f of DIGITAL CABLE CHANNEL NO. (Designate minor channel)
DIGITAL Oable (One Pa~ numbers, 5digit, more than l 0,000)
If it is not ~ display, it will input switch to ~ (same function as CHV)
. I~ an underbar (_)appears
a~ears in
in the ~arameter
parameter column, enter a s~ace.
. I~ an asterisk (~) a~ears, enter
under
CONTNOk
brackets
under
CONTROL CONTENTS,
therange indicated in brackets
enteraavalu~
valueininthe
. Ang numerical valu~ can
can replace
r~lac~ the
the"x" on
on the
thetable.
42
Appendix
¯ Before detaching (or attaching) the stand, unplug the AC cord.
¯ Do
usingan
anoptional
optionalwall
wallmount
mountbracket
brackettotomount
mountit.it.
Donot
notremove
remove the
the stand
stand from the TV unless
unless using
Before attaching/detaching the
the stand
stand
Before
¯ Before performing work, make sure to turn off the TV.
1
2
2
Unfasten the
the four
four screws used to secure the
the stand
stand inin Detach
thethe
stand
from
thethe
TV.TV,
Unfasten
Detach
stand
from
place.
¯ To attach the stand, perform the above steps in reverse order.
¯" This
This TV
TV should
shouldbe
bemounted
mountedon
onthe
thewall
wall onlywith
withthe
thewall
wallmount
mountbracket
bracket
AN-52AG4
The
of other
AN-52AG4
'''' (SHARP).
.." ....,... , The
useuse
of other
and may cause serious injuries,
wall mount brackets may result in an unstable installation
installation and
¯ Installing the TV requires specialskill
skillthat
thatshould
should onlybebenl!'!lrfnrm,l!'!d
performed by qualified service personnel, Customers
should not
not attempt to do
do thework
workthemselves.
themselves, SHARP bears no responsibility for improper mounting or
should
mounting that
that results
results in
in accident
accident or
or injury.
injury,
mounting
Using an optional bracket to mount the TV
¯ You can ask a qt~alified sen/ice professional about using an optional AN-52AG4 bracket to mot~nt
mountthe TVTVonOilthe wall.
wall.
¯ Carefully read the instructions that come with the bracket before beginning work.
the wall
wall
Hanging on the
AN-52AG4 wall
wall mount
mount bracket.
bracket.
(See the bracket instructions for details.)
Vertical
Vertical mounting
mounting
About setting
setting the
the TV
TV angle
angle
About
AN-52AG4
AN-52AG4 ~,. The center of the display:
1 63/64 inches (50.0 ram) above
the" f" position.
*" Refer to the operation manual of
Angular mounting
Angular
mounting
¯ Detach the cable clamp on the rear of the
theTV
TVwhen
whenusing
usingthe
theoptional
optionalmount
mountbracket.
bracket.
Q- 43
®
43
Appendix
Problem
Possible
Possible Solution
Solution
¯• No
No power
power
TV POWER
POWER on
on the
the remote
remotecontrol
controlunit.
unit...~,Page
Page 16
16
•¯ Check
Check ifif you pressed TV
IfIf the
up,up, press
POWER
on the TV,
the indicator
indicatoron
onthe
theTV
TVdoes
doesnotnotlight
light
POWER on
TV.
•¯ Is
Is the AC cord
cord disconnected?
disconnected? ,~
.. Page
Page77
¯• Has
Has the
the power
power been
been turned
turnedon?
on?~i,
"" Page
Page16
16
~ Unit cannot be operated.
¯ E~ernal influences such as lightning, static electricity, may cause improper
operation, In this case, operate the unit after first turning off the power of the TV
TVoror
unplugging the AC cord and replugging it in after 1 or 2 minutes.
¯ Remote control unit does not
operate.
¯ Is the FUNCTION set correctly? Set it to the TV setting position.
¯ Are batteries inserted with polarity (+, -) aligned? ,~ Page 8
¯ Are batteries worn out? (Replace with new batteries.)
¯ Are you using it under strong or Iluorescent ligh~ing?
¯ is a fluorescent light illuminated near the remote control
control
sensor’?
¯• Is
Is "RC
"RC Control
Control Lock" selected in "Operation Lock
~ Page
Lock Out"?
Out"?"
Page31
31
¯ Picture is cut off/with sidebar
screen.
¯ Is the image position correct? ,~ Page 27
¯ Are screen mode adjustments such as picture size made correctly? ,~ Pages 20 and 40
¯ Strange color, light color, or color
misalignment
¯ Adjust the picture tone. ~t, Pages 23 and 24
¯ Is the room too bright? The picture may look dark in a room that is too
toobright.
bright.
¯• Power
suddenlyturned
turnedoff.
off,
Powerisissuddenly
17
•¯ Is
Is the
the sleep
sleep timer
timer set?
set? ~
..Page 17
¯• Check
Check the
the power control settings. ~,
.. Page
Page 25
25
¯• The unit’s
vent
or or
Removeany
anyobjects
objectsblocking
blocking
vent
unit's internal
internal temperature
temperaturehas increased. Remove
clean,
clean.
¯• No
Nosound
sound
Is connection
connection to
to other
other components
componentscorrect?
correct?~,
...Pages
Pages11
11toto1515and
and3636
•¯ Is
¯• Is
Is the volume
volume too
too low? ...
~ Page
Page17
17
¯• Is
Is "Variable"
"Variable" selected
selected in
in "Output Select"? ,~
.. Page
Page 30
30
¯• Have
Have you
you pressed MUTE
.. Page
Page17
17
MUTE on
on the
theremote
remotecontrol
controlunit?
unit?=~
¯• Check the audio
audio output
outputofofthe
theconnected
connectedexternal
externalequipment.
equipment.IsIsthe
thevolume
volurnetoo
too
low or
or muted?
muted?
¯• When
When external
external equipment is connected via an HDMI cable, you may need to
cc:,nfigure 1:he auctio 1:o be output through the HDMI c:able.
¯ When audio is not output from external equipment connected to the INPUT 4 or
INPUT 6 terminal, check the "PC Audio Select" setting. ~, Page 41
, Even when external equipment is connected using an HDMI-ce~ified cabie, an audio
cable connection may be required depending on the type of equipment and the
meciia being played bac:k. In this case, in additic:,n 1:o conne,:~’l:ing an HDMI-certified
cable to the INPUT 6 (HDMI) terminal, connect a ~ 3.5 mm stereo minijack cable to
the AUDIO terminal and set "PC Audio Select" to "Input 6 (HDMI)". ~ Page 41
, When connecting a PC via an HDMi-c:erl:ified cable, check the following:
- is the audio output d the PC configured correctly? Check the audio output
settings and output audio format in Sound Properties on the PC.
Only PCM format audio can be output. Compressed audio (with a sampling rate
of 32kHz, 44.1 kHz, or 48kHz) and DTS format audio cannot be output.
- Depending on the board, only video signals may be output. In this case, in
addition to connecting an HDMl-certified cable to the INPUT 6 (HDMi) terminal,
connect a @ 3.5 mm stereo minijack cable to the AUDIO terminal and set "PC
Audio Select" to "Input 6 (HDMI)". ~ Page 41
¯ If you are using a DVI-HDMI conversion cable to connect external equipment to the
the
TV, check the following:
- Is an audio cable connected? The DVI-HDMI conversion cable is for
forvideo
videoonly.
only,
Connect a @ 3.5 mm stereo mini jack cable to listen to the audio.
- Is INPUT 6 being used? When the TV is connected to another HDMI terminal, the
audio and video are not output together even if a @ 3.5 mm stereo minijack cable
is connected to the shared AUDIO terminal for INPUT 4 and INPUT 6.
- Is "Input 4 (PC)" selected in "PC Audio Select"? ,~ Page 41
(~- 44
44
Appendix
Problem
¯• No
No picture
picture
Possible
Possible Solution
Solution
•¯ Is
Is connection
connection to other
other components
components correct?
correct? ~
..Pages
Pages11
11toto15
15and
and3636
•¯ Is
Is correct
correct input
inputsignal
signal source
source selected
selected after
afterconnection?
connection?~..Page
Page3030
•¯ Is
Is the
the correct
correct input selected?
selected? ,~
.. Pages 11
11 and
and17
17
~ Page 30
•¯ Is
Is "On"
"On" selected in "Audio Only"?
Only"?"
30
¯ If the PC image is not
not displayed, check
checkthe following:
- When connecting aa laptop PC
PC to
to the
the TV,
TV, check
checkthat display
displayoutput
outputmode
modeofofthe
the
PC
extemal monitor.
PC is set to external
- Check
signal
being
input?
Check the
the resolution
resolution setting
settingon
onthe
thePC.
PC,IsIsa non-compatible
non-compatible
signal
being
input?
~ Page
..
Page 41
41
¯• Picture
• To
enjoy
images
from
extemal
equipment,
required
HOMI
Picture quality
quality of
of HO
HD programs
programs isis ¯ To
enjoy
HDHO
images
from
external
equipment,
youyou
areare
required
to to
setset
upup
HDMI
poor,
connection
or component
connection,
poor.
connection
or component
connection.
¯• IfIf the
content isis not
not of
ofHD
HDquality,
quality, HD
HDimages
imagescannot
cannotbe
bedisplayed.
displayed,Check
Check
the program content
HDimages.
images,
that the
the program you are viewing provides
providesHD
¯• The
-the HD cable/satellite set-top box ~,~ay need to be configured totooutput HD images
cable/satellite,
via cable/satellite.
¯• The
The cable/satellite broadcast may not support a signal resolution of 1080p.
¯• The
TheTV
TVsometimes
sometimesmakes
makesaa
cracking
cracking sound,
sound,
The example of an error message
displayed on a screen
slightly expands and
•¯ This
This isis not
notaamalfunction.
malfunction,This
Thishappens
happenswhen
whenthe
thecabinet
cabinet
contracts according
according to
tochange
changeinintemperature.
temperature,This
Thisdoes
doesnot
notaffect the TV’s
performance.
performance,
Error code
Possible Solution
¯ Failed to receive broadcast.
E202
¯ Check the antenna cable. Check that the antenna is correctly
setup.
¯ No broadcast now.
E203
¯ Check the broadcast time in the program guide.
¯• An
Anincompatible
incompatibleaudio
audiosignal has
been received. Change the output
output
device audio settings
settings to
to PCM.
PCM,
--
¯ This message is displayed when an audio format other than
PCM is input. (Dolby Digital and DTS audio formats are not
not
supported.)
- Set the audio output format
HOMI
format of
of connected
connected external
external HDMI
equipment to PCM.
- Refer to the operation
operation manual
manual of
ofthe external
externalequipment
equipmentfor
for
setting details.
details,
Cautions regarding use in high and low temperature environments
¯• INI'len
When the unit is used inina low
lowtemperature space (e.g, room, office), the picture may lea’v’e trails or appear slightly delayed.
malfunction, and
andthe
theunit
unitwill
willrecover
recoverwhen the
thetemperature
temperature
returns
normal.
This is not aa malfunction,
returns
to to
normal.
¯• Do
Do not leave
near
a
leave the unit in a hot or cold location.
location, Also,
Also, do
donot
notleave
leavethe
theunit
unitininaalocation
locationexposed totodirect
directsunlight
sunlightoror
near
heater, as this may cause the
malfunction.
heater,
the cabinet
cabinetto
todeform
deformand
andthe Liquid
LiquidCrystal
Crystalpanel toto
Storage temperature:
temperature: -;j
- 4°F
OF to ++140°F
1;j()GF (( -20°C
20 GCtoto++60°C)
60 GC)
Q- 45
®
45
Appendix
Item
LCD
LCD
panel
panel
TV
TV
Function
Function
i Audio out
i Terminals
Terminals
Model: LC-60E88UN
Model:
LC-60E88UN
60"
60" Class
Class(60
(601/32"
'/~.:-" Diagonal)
Diagonal)
Size
Resolution
Resolution
pixels (1,920
(1
1,OSO)
2,073,600 pixels
×X1,080)
TV-standard(CCIR)
(CCIR)
TV-standard
! VHF/UHF
CATV
! CATV
Receiving Digital Terreslriai
Channel
Broadcast (SVSB)
Digital cable~
(6~/256 QAM)
Audio multiplex
multiplex
American TV Standard ATSC/NTSC System
VHF
VHF 2-13ch, UHF 14-69ch
1+69ch
1-135ch
(non-scrambledchannel
channelonly)
only)
1-135ch (non-scrambled
2-69ch
1-135ch
(non-scrambledchannel
channelonly)
only)
1-135ch (non-scrambled
BTSC System
System
10W Xx 2
2
10W
INPUT 11
AV
AV in,
in, COMPONENT
COMPONENT inin
INPUT 2
COMPONENT in
connector),
ANALOG RGB (PC) in (15-pin mini D-sub female connector),
INPUT L14
Audio in (O 3.5 mm stereo jack)
INPUT 6
HDMI in with HDCP,
HDCP, Audio
Audio inin (O
(0 3.5
3,5mm
mmstereo
stereojack)
jack)
INPUT 7
HOMI
HOCP
HDMI in with HDCP
Rear
Rear I-IN-P-U-T-S----+-H-D-M-I-in-'-N-it-h-H-D-C-P-----------------------1
INPUT 8
HDMI in with HDCP
ANT/CABLE
75 ~ Unbalance, F Type × 1 for Analog (VHF/UHF/CATV) and Digital (AIR/CABLE)
ANT/CABLE
Audio in (O 3.5 mm stereo jack)
AUDIO
L2,1GITALAUDIO OUTPiJTT Optical
Optical Digital
Digital audio
audio output
output xX 11(PCM/Dolby
(PCM/DolbyDigital)
Digital)
OUTPUT
Side
RS-232C
RS-232C
9-pin D-sub male
male connector
connector
INPUT 3
AVin
AV in
INPUT 5
SERVICE
Software
"nTTw,"rR
language
¯ OSD
OSD language
HDMI in with HDCP
update
update
English/French/Spanish
¯ English/French/Spanish
Power Requirement
Power
Power Consumption
Consumption
TV + stand
TV
Weight
TV only
only
DimensioK2
Dimension 2
0N Xx H
H X
D)
(W
x D)
Audio
Audio out
AC
AC 1120 V,
V, 60
60 Hz
Hz
(OA W Standby with AC 120 V)
390 W (0.4
V)
92.6 Ibs./42.0
kg
92,6
Ibs.l42,0 kg
81.6 Ibs./37.0 kg
TV + stand
~ 29/
56 5/8 × ,~,
.’84 x 17 9/18 inch
only
TV only
56 ~/s x 35 "/64 x 4 4~/64 inch
+ 32°F to + 104°F (0°C to + 40°C)
Operating temperature
temperature
Emergency
mArrlO,n{'\ alert
alert messages
messagesvia
viaCable
Cableare
areunreceivable.
unreceivable,
~2 The dimensional drawings are
shown on the inside back cover.
are shown on the inside back cover,
¯ As Dart of policy of ~.ontii ,uou~ impi o.em~nt, SHARP reseP~’~s ti ,e right to ~,-nake design and specification changes for
product improvement without prior notice. I i;e performar;ce specificatior; figures indicated are nominal values of production
units. There may be some deviations from these values in individual units.
The listed optional
nntl(')ln,,1 accessory
accessoryisisavailable
availablefor
forthe
theLiquid
Crystal Television.
Please purchase it atatyour nearest
nearestshop.
Television, Please
¯ Additional optional
bebeavailable in inthethenear
optionalaccessories may
may
near
readthe
thenewest
newestcatalogue
catalogueforfor
future,
future. When purchasing, please read
compatibility and check the availability.
compatibility
availability,
(~- 46
46
Part name
Model number
Wall mount bracket
bracket
AN-52AG4
Appendix
~= Software composition
The software included in this product is comprisedofof various software components whose individual copyrights
are held by SHARP or by third parties.
=~ Software developed bySHARP
SHARP and
and open
open source
source software
software
The r'rn,\Ir1'nn"rQ
copyrightsfor
forthe
thesoftware
softwarecomponents
componentsand
andvarious
various
relevant
documents
included
relevant
documents
included
withwith
thisthis product
thatthat
were
thethe Copyright Act, international
were developed or
or written
written bySHARP
SHARPare
areowned
owned bySHARP
SHARPand
andareare protected by
treaties, and
and other
other relevant
relevantlaws,
laws.This
This productalso
alsomakes
makesuse
use
distributed
software and software
treaties,
of of freely
distributed
software
components whose
whose copyrights are
are held
held bythird
third parties.These
Theseinclude
includesoftware
software
components
covered by a GNU
components
covered
or other
license
General Public
General
Public License
License (hereafter GPL), aGNU
GNULesser
LesserGeneral
GeneralPublic
PublicLicense
License (hereafter LGPL)
or other
license
agreement.
=~ Obtainingsource
source code
code
II
Some of the
the open
open source
source software
software licensors requirethe
the distributor to provide the source code with
executable
thethe
executable
software
GPL and LGPL
LGPLinclude
includesimilar
similar requirements.ForFor information on obtaining the source code
software components. GPL
the open
open source
source software
softwareand
andfor
for obtainingthe
theGPL,
GPL,LGPL,
LGPL,and
andother
otherlicense
license
agreement information, visit the
for the
Qr1l'ppmp
following website:
website:
http ://www.sharpusa.com/g pl
We are
are unable to answer any questions about the source code for the open source software.
The
source code for
We
The
source
software components whose
whose copyrights are held by SHARP is not distributed.
the software
i Acknowledgements
II
The following open source software components are included in this product:
The
¯ linux kernel/busybox/glibc/zlib/libpng/libjpeg/mtd-utils/U-Boot/device-mapper
i Software Copyrights
libjpeg
This software
software isis copyright©©1991
1991-1998,
Thomas G.Lane,
Lane.
This
-1998, Thomas
Portions of
Portions
of this
this software
softwareare
arebased
basedininpart
part onthe
thework
workofofthe
thenr<,o>ncmr<
IndependentJPEG
JPEG Group.
CLEARING THE
CLEARING
THESECRET
SECRETNUMBER
NUMBER
IfIf you
thethe following procedure.
you forgetthe
thesecret
secretnumber,
number,clear
clearthe
thesecret
secretnumber
number using
Select an
an item
item from
from the
the list
listbelow
below to displaythe
thesecret
secretnumber
number inputscreen,
screen. (For operatingthe
theon-screen
on-screen
1 Select
1
display menu, see page 21
21,).)
¯ "EZ Setup", "CH Setup", "Parental CTRL" or "Reset" on the Setupmenu,
menu.
¯ "Color System" on the Option menu.
¯ "Software Update" on the Digital Setup menu.
2
themessage
messageappears
appears on
screen.
2 Press
Pressand
andhold
holdboth
bothCH/’X and
andVOL
VOL+ +ononthe
theTV
TVsimultaneously until
until the
thethe
screen,
Thesecret
secretnumber
number
The
is is I I I I I ¯
¯ As a precautionary
note of
of your
your secret number
number above,
above, cut
cut itit from
from this manual,
manual,and
and keepititinin a safe place.
precautionary measure, make a note
Q- 47
®
47
Calling for Service
For location of the nearest Sharp Authorized Service, or to obtain productliterature,
literature,Clv'vC,"'::>Co'
accessories,
supplies,
'::>U'lJfJllt''''
, or or
customer assistance, please call 1-800-BE-SHARP.
LIMITED WARRANTY
WARRANTY
CONSUMER LIMITED WARRANTY
SHARP ELECTRONICS
ELECTRONICSCORPORATION
CORPORATIONwarrants
warrantstotothe
thefirst
firstconsumer
consumer purchaser thatthis
this Sharp
Sharp brand
brand Liquid Crystal Display product (the
"Product"), when
and
materials,
and agrees that it will, at its option,
"Product"),
when shipped ininits
itsoriginal
originalcontainer,
container,will
willbe
befree
freefrom
fromdefective workmanship
workmanship
and
materials,
repair the defect or
orreplace
replacethe
thedefective
defectiveProduct
Productoror
part
thereof
with
a or remanufactured
or remanufactured
either repair
part
thereof
with
a new
equivalent at no charge to the
purchaser for
for parts
partsor
orlabor
laborfor
forthe
theperiod(s)
period(s)
forth
below.
setset
forth
below.
theserial
serialnumber
number
model
number
affixed
Product
This warranty does not apply to any appearance items of the Product or if ifthe
or model
number
affixed
to to
thethe
Product
hashas
been
with.This
Thiswarranty
warranty
does
cover
installation
or signal
reception
been removed, defaced, changed, altered or tampered with.
does
notnot
cover
installation
or signal
reception
problems. ThisThis
limited warranty
warranty will
warranty
is meant
solely
limited
will not
not apply if the Product has been or
orisisbeing
beingused
usedininaacommercial
commercialsetting
settingororapplication;
application;this
this
warranty
meant
solely
non-commercial,household use
useofofthe
theProduct
Productbybyconsumers
consumersinintheir
their
home
residence.
intend
already
use
this
Product
for the non-commercial,
home
ororresidence.
If you intend
to to
or or
already
use
this
Product
commercialsetting, there
thereare
arewarranties
warranties
available
cover
your
Product,
terms
of which
commercial purposes
purposesororininaacommercial
for commercial
available
toto
cover
your
useuse
of of
thisthis
Product,
thethe
terms
of which
maymay
vary.
contact 1-888-GO-SHARP
vary. Please
Please contact
1-888-GO-SHARPfor
forfurther
furtherinformation.
In
enforce your rights under this limited warranty, you should
should
follow
steps
forth
below.
must
be able
to provide
In order
order to enforce
follow
thethe
steps
setset
forth
below.
You must
be able
to provide
proofproof
of of
purchase to
purchase.
purchase
to the
the servicer, which proof must include the date of of
purchase.
"f-'IJ,,,.. au,,,,,state
statelaw,
law,the
the
warranties
forth
in lieu
exclusive
of,other
all other
warranties,
To the extent permitted by applicable
warranties
setset
forth
areare
in lieu
of, of,
andand
exclusive
of, all
warranties,
express or or
implied. Sn"ICifir"llv
Specifically ALL
ALL OTHERWARRANTIES
WARRANTIESOTHER
OTHER
THAN
THOSE
SET
FORTH
ABOVE
EXCLUDED,
EXPRESS AND
THAN
THOSE
SET
FORTH
ABOVE
AREARE
EXCLUDED,
ALL ALL
EXPRESS
THE
WARRANTIES
OF MERCHANTABILITY,
FITNESS
FOR USE,
FITNESS
FOR A PARTICULAR
IMPLIED WARRANTIESINCLUDING
INCLUDING
THE
WARRANTIES
OF MERCHANTABILITY,
FITNESS
FORAND
USE,
AND FITNESS
FOR A PARTICULAR
IF, IF,
UNDER
APPLICABLE
STATE
LAW, LAW,
IMPLIED
WARRANTIES
MAY NOT
BE
PURPOSE
EXCLUDED.
PURPOSEARE
ARESPECIFICALLY
SPECIFICALLY
EXCLUDED.
UNDER
APPLICABLE
STATE
IMPLIED
WARRANTIES
MAYVALIDLY
NOT VALIDLY
BE
DISCLAIMED
THE
DURATION
OF SUCH
IMPLIED
WARRANTIES
IS LIMITED
TO THETO THE PERIOD(S)
FROM THE
DATETHE
OF DATE OF
DISCLAIMEDOR
OREXCLUDED,
EXCLUDED,
THE
DURATION
OF SUCH
IMPLIED
WARRANTIES
IS LIMITED
FROM
PURCHASE
THIS
WARRANTY
GIVES
YOUYOU
SPECIFIC
LEGAL
RIGHTS.
YOU YOU
MAY MAY ALSO HAVE
OTHER
RIGHTS
PURCHASESET
SETFORTH
FORTHBELOW.
BELOW.
THIS
WARRANTY
GIVES
SPECIFIC
LEGAL
RIGHTS.
OTHER
RIGHTS
WHICH VARY FROM
FROM STATE
STATETO
TOSTATE.
STATE.
given herein
herein shall
shall be
bethe
thesole
soleand
andexclusive
exclusive
warranties
The warranties given
warranties
granted by Sharp and shall be the sole and exclusive remedy
available to the
the purchaser
purchaser and
and only for
forthe
thetime
timeperiods set
set
forth
available
forth
herein. No other representations or promises made by anyone are
permitted. Correction
Correction of defects,
defects, in
in the
the manner
manner and for the period of time described herein, shall constitute complete fulfillment of all
Sharp to
to the
thepurchaser with respect to the Product, and shall constitute full satisfaction of all claims,
liabilities and
and responsibilities of Sharp
whether based
based on
oncontract,
contract,negligence, strict
strict
whether
liability or otherwise. Sharp does not warrant nor shall Sharp be liable, or in any way
responsible, for
for Products
Products which have been subject to abuse (including, but not limited to, improper voltage), accident, misuse, negligence,
lack of reasonable care, alteration, modification, tampering, misuse, improper operation or maintenance or any damages or defects in the
"jj,Amntc,ri
Product which were caused by repairs ororattempted
repairs performed by anyone other than a Sharp authorized servicer. Nor shall Sharp
be liable or in any way responsible for any
any incidental or
orconsequential
consequential economic
economicororproperty damage. Some states do not allow limits on
or on
on remedies for breach
breachinincertain
certaintransactions;
transactions;ininsuch
suchstates,
states,
limits
warranties or
thethe
limits
herein may not apply.
THIS LIMITED WARRANTY IS VALID
VALID ONLY
ONLY IN
INTHE
THE FIFTY
FIFTY (50)
(50)UNITED
UNITEDSTATES,
STATES,THE
THEDISTRICT
DISTRICTOF
OFCOLUMBIA
COLUMBIAAND
ANDPUERTO
PUERTORICO,
RICO.
Model
SpecificSection
Section
Model Specific
Your Product
& Description:
ProductModel
ModelNumber
Number
& Description:
LC-60E88UN
LC-60E88UN LCD
LCDColor
ColorTelevision
Television
have this
this information
informationavailable
availablewhen
whenyou
youneed
needservice
service
your
(Be sure
sure to have
forfor
your
Product.)
WarrantyPeriod
Periodfor
forthis
this
Product:
Warranty
Product:
(1) year
year parts and labor
One (1)
labor from
from the
thedate
dateofofpurchase.
purchase.
Additional Exclusions from
Warranty Coverage (if any):
In order for the Product
Product to
tobe
beserviced,
serviced,the
theProduct
Productmust
mustbebereadily available
non-standard
installation,
to the servicer,
servicer, free
free and
and clear
clearofofany complex
complexoror
non-standard
or other
otherencumbrance
encumbrancewhich would
would
unreasonably
interfere
with
mounting or
unreasonably
interfere
with
servicing the Product.
service,
theProduct
Productafter
after
service,
Product. The
The Servicer
Servicer will
willremount
remountthe
ornon-standard
non-standardinstallainstallasuch remounting isis not
not into
intoaacomplex or
provided that such
materials required to remove and/or reinstall a
tion. Any additional labor and materials
Product above and beyond the
theforegoing are not covered by this warranty,
may result in additional charges and are the responsibility of the consumer.
Image Retention
Retention resulting
resulting from a fixed image being displayed for long
periods of time
time isisnot covered
coveredby this Limited Warranty (see Operation
Manual on how
how to
toprevent
preventthis).
this).
Where to Obtain Service:
From a Sharp Authorized Servicer located inin the
From
the United
UnitedStates.
States.To
Tofind
findthe
the
of the nearest
nearestSharp
SharpAuthorized
AuthorizedServicer,
Servicer,please
pleasecall
callSharp
Sharp
free
location of
tolltollfree
at 1-800-BE-SHARR
1-800-BE-SHARP.
What to
to do
doto
toObtain
ObtainService:
Service:
What
Sharp Authorized
Authorized Servicer
Servicertotoobtain
obtainininhome
home
service
Contact your Sharp
service
forfor
thisthis
product. The Servicer
remove
thethe
Servicerwill
willcome
cometotoyour location
locationand
andif necessary
if necessary
remove
unit for repair at
you once
at the
theServicer’s
Servicer's facility and
and return
returnthe
theset
settoto
once
sure to
to have
have Proof
ProofofofPurchase
Purchase
available.
completed. Be sure
available.
TO
OROR
PURCHASE
ACCESSORIES
ANDAND
EXTENDED
WARRANTIES,
CALL 1-800-BE-SHARP
TO OBTAIN
OBTAINPRODUCT
PRODUCTINFORMATION
INFORMATION
PURCHASE
ACCESSORIES
EXTENDED
WARRANTIES,
CALL 1-800-BE-SHARP
OR
ORVISIT
VISITwww.sharpusa.com
www.sharpusa.com
48
Dimensional Drawings
Unit: inch (mm)
Unit~: pouce (mm)
Unite:
Unidad: pulgada (mm)
Unidad:
[,~~[__
24 21/32 (626) ~
45/ 64
4 45/64
1
(119)
5116
5 5/16
5/ 8 (1438)
56 5/8
(135)
52 17/32 (1334)
L~
L~ L~
L~
17 9/16 (446)
15 3/4 (400)
AN-52AG4
.....
4 45/64
i2 41/64
(119) =
(67)
7 21/64i
(186)
SHARP
SHARP ELECTRONICS CORPORATION
Sharp Plaza, Mahwah, New Jersey 07495-1163
07495-1163
SHARP CORPORATION
Printed in Mexico
Imprim~ au Mexique
Impreso en M~xico
TINS-E580WJZZ
10P03-MX-NM