1
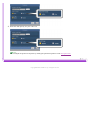
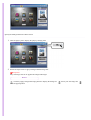
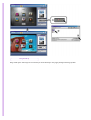
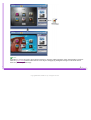
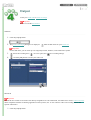
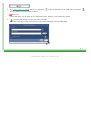
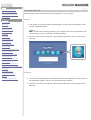
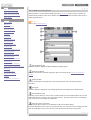
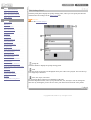
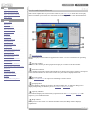
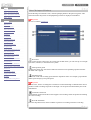
Tutorial
Reference
Copyright © 2002, PIXELA Corp. All rights reserved.
Create a Video CD!
ImageMixer with VCD (IMxVCD) is an authoring application for creating Video CD movies.
After adding your movies, you can create the movie buttons for the menu screen displayed when the Video CD is played. Design
your own menu screen with custom movie button settings, background images, and music.
The movie buttons are assigned selection numbers. You can play the selection button content by using the remote control of your
playback device. For example, to play movie assigned to number [1] on the menu screen, press [1] on your remote control. (Actual
operation varies depending on your playback device.)
Follow these steps to create your own Video CD.
Important
Be sure to read the Precautions.
Macintosh users cannot directly record Video CDs using IMxVCD. On a Macintosh, use IMxVCD to create a Video CD image
that is compatible with the CD burning application Toast by Roxio, Inc. To use Toast for Video CD recording, refer to the separate
instructions.
Reference
For feature details, please read the Reference section.
Add Your Movies
First, launch IMxVCD and add the movies to be recorded on your Video CD. The movies you add will
be displayed as movie buttons on the menu screen when you play the Video CD.
Customize the Menu
Apply a layout design, background image, and music to the menu screen displayed when the Video CD
is played.
Preview the Video CD
Check the results of your authoring by playing a preview.
Output
Record the content you have authored on a Video CD, or prepare a Video CD image for recording.
Copyright © 2002, PIXELA Corp. All rights reserved.
Add Your Movies
The movies you add will be displayed on the Layout environment as movie buttons. You can add
multiple movies for movie buttons until the capacity indicator bar is full -- up to 6 on single menu
screen.
Important
When the number of movies reaches 97 for a single project, no more can be added.
1. Launch ImageMixer.
Windows
Click [Start], go to [Programs]-[PIXELA]-[ImageMixer], and select [ImageMixer with VCD].
Note
If you created a shortcut during installation, you can double-click on the [ImageMixer with VCD] shortcut icon on your
desktop to launch ImageMixer.
Macintosh
Double-click on the [ImageMixer with VCD] icon in the [ImageMixer] folder installed on your hard disk.
2. When the mode selector is displayed, click the [IMxVCD] button at the far right.
3. After ImageMixerVCD (IMxVCD) is launched, the Start Screen is displayed. Click the [Video CD] button.
4. When the Layout environment screen is displayed, drag and drop your
movies directly from desktop to the Layout
environment screen.
The movies that you add here to the Layout environment screen will be displayed as movie buttons on the menu
screen.
To add multiple movies, repeat step 3.
Note
Windows users can add movies through Windows Explorer.
You can also specify movies to add in the dialog box displayed after clicking the [Add Movie] button in the Layout
environment screen.
Copyright © 2002, PIXELA Corp. All rights reserved.
Customize the Menu (1)
Preferences
Style Settings
❍
❍
Apply a style to the menu screen
Specify the background for the menu screen
Customize the Movie Button Labels
❍
❍
Rename the movie buttons
Modify the movie button font settings
Title Settings
❍
❍
Rename the menu screen title
Modify the menu screen title font settings
Copyright © 2002, PIXELA Corp. All rights reserved.
Customize the Menu (2)
Preferences
1. On the Navigation Bar, click the [Preference] button to display the [Preference] dialog box.
2.
Click the [Browse...] button.
In Windows, select the folder for your IMxVCD/DVD project.(Macintosh
Click the [OK] button.
users select the workspace hard disk for your project).
3. Select the [Video/TV format:] for your Video CD .
4. Select the disk capacity for your Video CD.
Note
You can adjust the preference anytime by clicking the [Preference] button on the Navigation Bar.
Copyright © 2002, PIXELA Corp. All rights reserved.
Customize the Menu (3)
Style Settings
Apply a Style to the Menu Screen
1. Click the [Style:] tab to display the [Style:] settings panel.
2. Click to select from the [Style Category]. The style template is displayed.
3. Click the style template to apply the style.
Your selected style will be applied to the Layout environment screen.
Specify the Background for the Menu Screen
1. Click the [Style:] tab to display the [Style:] settings panel.
2. Follow the steps below to apply a background still image file.
Important
Only still images file can be applied as background images.
Browse
Click the [Apply background image] button to display the dialog box.
Click the [Open] button.
Select your still image file.
Drag and Drop
Drag and drop the still image file icon directly from the desktop to the [Apply background image] button.
Note
In Windows, you can also apply the background image by dragging and dropping the image from Windows Explorer.
Click the [Apply BGM] button and follow the same steps as for applying background images to add audio files as
music for your background image.
Copyright © 2002, PIXELA Corp. All rights reserved.
Customize the Menu (4)
Customize the Movie Button Labels
Rename the Movie Button Labels
1.
Click the [Movie Buttons] tab.
2.
Select a movie button shown in the Layout environment screen to display a text box with the current button label.
Click the [Text] tab to display the Movie Buttons settings panel.
Enter the new movie button label.
Modify the movie button font settings
1.
Click the [Movie Buttons] tab.
Click the [Text] tab.
2.
3.
Select a movie button.
Select the label font, size, and style from the dropdown menu.
Click the font color preview box to display the color palette.
button label.
Click the [OK] button.
Select your preferred color for the movie
Copyright © 2002, PIXELA Corp. All rights reserved.
Customize the Menu (5)
Title Settings for the Menu Screen
Rename the menu screen title
1. Click the [Title] tab to display the [Title] settings panel.
2. The current menu screen title is displayed in the text box. Enter the new title.
Modify the menu screen title font settings
1. Click the [Title] tab to display the [Title] settings panel.
2. From the dropdown menus, select your preferred title font, size, and style.
3.
Click the font color preview box to display the color palette.
Click the [OK] button.
Select your preferred color for the title.
Copyright © 2002, PIXELA Corp. All rights reserved.
Preview the Video CD
Play a preview to check the results of your authoring.
To play a preview, click the [Preview/Output] button on the Navigation Bar.
The Selection Numbers match the control button numbers, and they correspond to the selection numbers on the remote control
of the Video CD playback device.
For example, clicking button [1] of the [Preview] panel will play the movie of selection number [1] on the current menu screen.
Clicking button [3] of the [Preview] panel will play the movie of selection number [3] on the current menu screen.
If there are multiple menu screens, click the
between menu screens.
[Previous] button or the
[Next] button in the [Preview] panel to switch
Copyright © 2002, PIXELA Corp. All rights reserved.
Output
Create your Video CD or Video CD image.
Important
Be sure to read the Precautions.
Windows
1. Click the [Output] button.
2. The [Video CD Output] dialog box is displayed.
Enter the disk name for your Video CD.
Important
For the disk name, you can enter up to 30 single-byte letters, numbers, or the underscore symbol.
3.
Select the recording drive,
4.
Click the [OK] button to create your Video CD.
the write speed, and
the recording settings.
Macintosh
Important
Macintosh users cannot record Video CDs directly using IMxVCD. On a Macintosh, use IMxVCD to create a Video CD image
that is compatible with the CD burning application Toast by Roxio, Inc. To use Toast for Video CD recording, refer to the
separate instructions.
1. Click the [Output] button.
2. The [Create Video CD Output] dialog box is displayed.
Enter the disk name for the Video CD to be created.
Specify a folder to save the Video CD image.
Important
For the disk name, you can enter up to 30 single-byte letters, numbers, or the underscore symbol.
3.
Click the [OK] button to create your Video CD image.
The Video CD image created will be saved as a file called [Cdimage] in the specified folder.
Copyright © 2002, PIXELA Corp. All rights reserved.
Tutorial
Step 1: Add Your Movies
Getting Started
Step 2: Customize the Menu
Step 3: Preview the Video CD
Step 4: Output
Reference
Thank you for using ImageMixer with VCD (IMxVCD).
This manual will help you make the most of IMxVCD. To ensure correct use, be sure to read
this manual.
Check the ReadMe.txt file (for Windows) or Read Me First (for Macintosh) for any latebreaking news that we could not include here.
Getting Started
Before Use
Important Notices
IMxVCD Functions
User Environment
Homepage
The latest information on ImageMixer can be found on our home page:
http://www.imagemixer.com/
Before Use
Precautions
Uninstallation
Software and User's Guide Precautions
Launching IMxVCD
Exiting IMxVCD
●
Start Screen/Elements
Navigation Bar
●
●
Layout environments/Elements
Style Settings Panel
●
Movie Button Settings Panel
Title Settings Panel
Preview and Output/Elements
Preview Panel
●
●
●
Video CD Output (Windows)
●
Video CD Image Output (Macintosh)
Preferences
User Interface Notes
●
Supported File Formats
Glossary
●
Compatible Recording Drives
●
●
The appearance or specifications of this software is subject to change for
improvement without notice.
Be advised that we cannot be held liable for the effects of using this software.
We cannot in any way be held liable for bodily injury or property damage arising
from use in devices or systems requiring a high level of reliability, such as healthcare
devices or systems.
Be advised that the use of recorded images and video may be prohibited regardless of
the purpose or application.
Enjoy your recordings of images, audio, performances, exhibitions, and the like for
private use. Other unauthorized use is prohibited under copyright law.
Unauthorized reproduction of all or part of this manual is prohibited.
We have taken all possible measures for accuracy in preparing the content of this
manual. However, if you happen to notice any inaccuracies, please contact us.
This manual does not include basic operating instructions for Windows and
Macintosh computers. The basic user tasks for this software, such as windows
operations, are based on general Windows and Macintosh tasks.
Most screenshots used for examples in this manual are from the Windows
environment. There may be a slight difference in screen appearance between
Windows and Macintosh environments. In some cases, the image fit may be inexact.
The company and product names used in this software and manual are the trademarks
or registered trademarks of their respective companies. No symbols such as ® or ™
are used in this manual.
This manual identifies caution items with this symbol: [
Important]. Helpful
items for your consideration are marked with [
Note] and [
Browse*] is used
to refer you to other pages with additional information.Click the hyperlinks to jump
to pages with related content.
In this manual, the symbol [
] instructs you to click; [
click, and [ ] is for drag and drop.
] indicates to double-
Trademark Notice
●
●
●
Windows ® is a registered trademark of Microsoft Corporation in the U.S. and/or
other countries.
Windows refers to the Microsoft ® Windows ® Operating System.
Macintosh is a trademark of Apple Computer, Inc., registered in the U.S. and other
countries.
Other company and product names used in this manual are the trademarks or
registered trademarks of their respective companies.
Caution
1. All rights for the manual and software application (hereafter, "this product")
developed by PIXELA Corporation and recorded on the installation CD-ROM are the
property of PIXELA Corporation.
2. Unauthorized reproduction of all or part of this product is strictly prohibited.
3. This product is subject to change without notice.
4. PIXELA Corporation does not offer any warranty for this product. In no event shall
PIXELA Corporation be liable for any consequential, incidental, special, or
exemplary damages arising from defects of this product, whether or not PIXELA
Corporation may have been advised that any such damages might or could occur.
Similarly, PIXELA Corporation shall in no way be held liable for any costs required
to restore or recreate the user's computer programs or data after use of this product.
All rights to the image data (including illustrated characters) recorded on the CDROM are protected by copyright law. Unauthorized sale, rental, transmission, or
reproduction by any third party without the written permission of the copyright
holder is prohibited. Be advised that actions that violate the copyright law are
punishable under law. PIXELA Corporation hereby grants you the use of the image
data on the CD-ROM exclusively for personal use. You may not reproduce the image
data on the CD-ROM for commercial use. Furthermore, you may not modify or adapt
the data in part for commercial use.
Content distributed by
Copyright © 2002, PIXELA Corp. All rights reserved.
Tutorial
Step 1: Add Your Movies
Important Notices
Step 2: Customize the Menu
Step 3: Preview the Video CD
Before installing IMxVCD, please read the following software licensing agreement. By
installing IMxVCD, you agree to the conditions presented below.
Step 4: Output
Software Licensing Agreement
Reference
Getting Started
Before Use
Important Notices
IMxVCD Functions
By following the following conditions of this software licensing agreement (hereafter,
"agreement"), you are hereby granted nonexclusive, nontransferable rights to use this
software program (hereafter, "program"), the manual, and accessories by PIXELA
Corporation.
User Environment
Precautions
Conditions
Uninstallation
Launching IMxVCD
Exiting IMxVCD
Start Screen/Elements
●
●
Navigation Bar
You are granted nonexclusive rights to install this program for use on one computer,
these rights do not extend to third parties.
You may make one copy of this software in machine-readable format solely for backup purposes, provided you reproduce the copyright notice in its original form.
Layout environments/Elements
Style Settings Panel
Restrictions
Movie Button Settings Panel
Title Settings Panel
●
Preview and Output/Elements
Preview Panel
●
Video CD Output (Windows)
Video CD Image Output (Macintosh)
Preferences
●
You may not use this software on a network. Use on multiple computers on a
network requires you to obtain separate agreements from PIXELA Corporation for
each computer.
You may not sublicense, transfer, distribute, lend, or otherwise make this program
available for use by a third party or cause it to be used by a third party.
You may not modify, adapt, decompile, reverse engineer, or disassemble this
software in whole or part. Furthermore, you may not cause a third party to perform
these acts.
User Interface Notes
Supported File Formats
Glossary
Termination
Compatible Recording Drives
This agreement is automatically terminated and PIXELA Corporation may take other legal
action if you reproduce this program or accessories in whole or part without authorization or
if you violate any of the above conditions. In the event of termination of this agreement, you
must return this program, the accessories, and all copies to PIXELA Corporation.
Warranty and Liability
No warranty express or implied is granted for this software or accessories with regard to its
merchantability or its suitability or fitness for your particular purposes. Furthermore,
PIXELA Corporation does not warrant the functions of this product to meet your
requirements, nor is this product warranted to operate consistently and without errors.
In no event shall PIXELA Corporation be liable for any loss or damage whatsoever, whether
direct or indirect, connected with the use of this program, nor be liable for any disputes
between you and a third party arising directly from use of this program or related to its use.
Copyright © 2002, PIXELA Corp. All rights reserved.
Tutorial
Step 1: Add Your Movies
IMxVCD Functions
Step 2: Customize the Menu
Step 3: Preview the Video CD
Create your own Video CDs!
Step 4: Output
Reference
Getting Started
Before Use
Important Notices
IMxVCD is authoring software for creating Video CDs that conform to the standards
described below. Video CD is an abbreviation for Video Compact Disc. Stated simply, a
Video CD is a recording of video images (in MPEG-1 format, similar in quality to VHS or
videotapes) and audio data produced by a recording drive. Video CDs can be played on
compatible computers and DVD players.
IMxVCD Functions
User Environment
Precautions
Uninstallation
Launching IMxVCD
Exiting IMxVCD
Start Screen/Elements
Navigation Bar
Standards of Video CD Created with IMxVCD
IMxVCD creates Video CD and Video CD images that conform to the Video
CD Ver2.0 standard. This standard offers advantages such as playback
control functions, which allow users to access menus to choose the playback
order.
It supports the common TV signal formats NTSC and PAL.
The image bitrate is 1.15 Mbps, and the resolution is 352x240 pixels (30 fps)
for NTSC and 352x288 pixels (25 fps) for PAL. The audio format is MPEG1 (Layer 2) at 224 kbps, in 1 stereo or 2 mono channels.
Layout environments/Elements
Style Settings Panel
Movie Button Settings Panel
Title Settings Panel
Preview and Output/Elements
Preview Panel
Using IMxVCD to Create Video CDs (for Windows)
In the past, the main recording method involved creating a Video CD image
and then using CD recording software to record it. Now you can use
IMxVCD for direct recording with devices such as CD-R drives that support
Video CD burning. There's no need for CD recording software. Right after
authoring, you're ready to record.
Video CD Output (Windows)
Video CD Image Output (Macintosh)
Preferences
User Interface Notes
Supported File Formats
Glossary
Compatible Recording Drives
Copyright © 2002, PIXELA Corp. All rights reserved.
Tutorial
Step 1: Add Your Movies
User Environment
Step 2: Customize the Menu
Step 3: Preview the Video CD
Note that even if your operating environment meets the requirements for IMxVCD, we
cannot guarantee that all functions will be available.
Step 4: Output
Reference
Getting Started
Windows
Before Use
Important Notices
IMxVCD Functions
User Environment
Precautions
Uninstallation
Launching IMxVCD
Exiting IMxVCD
Compatible Operating Systems
IBM PC/AT-compatible computers (running DOS/V) with one of the following preinstalled
OS: Microsoft ® Windows ® 98, Windows ® 98 Second Edition, Windows ® 2000
Professional, Windows ® Millennium Edition, Windows ® XP Home Edition, Windows ®
XP Professional
Processors
Intel Pentium ® MMX ®, 200 MHz and faster (Recommended: Pentium ® III, 800 MHz and
faster)
Start Screen/Elements
Navigation Bar
Required Software
DirectX 8.0a or later
Layout environments/Elements
Style Settings Panel
Movie Button Settings Panel
Title Settings Panel
Preview and Output/Elements
Preview Panel
Video CD Output (Windows)
Video CD Image Output (Macintosh)
Preferences
User Interface Notes
Supported File Formats
Glossary
Memory
64 MB or more (Recommended: 128 MB or more)
Hard Disk Capacity
When you create a Video CD, three times more memory is required than the size of the Video
CD.
Display
A video card with 4 MB of VRAM (video memory)
Resolution of 800×600 dots or more set at High Color (16-bit color for 65,000 colors)
Direct Draw driver-compatible
Important
Normal operation is unavailable at resolutions under 800×600 dots and with less than 256
colors.
Compatible Recording Drives
Sound
A 16-bit stereo sound card and speakers
Other Requirements
●
●
●
This software uses DirectX technology. Before use, make sure that DirectX is
installed on your computer.
Creating a Video CD requires a user environment supporting a recording device and
recording software as described separately.
Installing and using this software in Windows ® 2000 Professional requires
PowerUser or Administrator privileges.In Windows ® XP, it requires Administrator
privileges
Macintosh
Compatible Models
PowerMacG4, PowerBookG4, PowerBookG3, iBook, iMac, and the eMac series with a
PowerPCG3/400, Power PCG4/400 or later processor running MacOS9.0.4 or later. Does not
run in Mac OS X or Mac OS X: Classic.
Memory
Application operating memory of 64 MB or more (recommended: 128 MB or more)
Hard Disk Capacity
When you create a Video CD image, three times more memory is required than the size of the
Video CD.
Display
Resolution of 800×600 dots or more set at 32,000 colors or more
Important
Normal operation is unavailable at resolutions under 800×600 dots and with less than 256
colors.
Other Requirements
●
●
User environment with QuickTime4 or later
Creating a Video CD requires a user environment supporting a recording device and
the CD burning application Toast by Roxio, Inc. as described separately.
Precautions
Checklist for Correct IMxVCD Operation
●
●
●
●
●
●
●
●
●
●
●
Before using IMxVCD to create a Video CD, make sure that your recording drive is
working normally.
The operating environment recommended by the recording drive manufacturer is
required to burn Video CDs. Be sure to follow the manufacturer's instructions and
note the caution items.
Use the CD-ROM media recommended by the manufacturer.
Ensure that no software or drivers are installed that might interfere with Video CD
creation.
To create a Video CD, you must use one of the recording drives described separately.
We cannot guarantee operation in Video CD creation for models not listed among the
verified recording drives.
Certain models of playback devices cannot play Video CDs created by recording
drives.
For Windows users, we recommend that your hard disk be set to DMA transfer
mode.
Disk creation can be affected screen savers, system agents, and other timed software,
as well as other memory-resident running during Video CD creation. Before creating
your disk, exit all applications except IMxVCD.
Ensure that you have sufficient hard disk capacity available. Extremely limited
memory capacity prevents normal Video CD creation.
Video CDs cannot be burned correctly using prerecorded CD-ROMs or disks that are
damaged or dirty.
Copyright © 2002, PIXELA Corp. All rights reserved.
Tutorial
Step 1: Add Your Movies
Uninstallation
Step 2: Customize the Menu
Uninstall IMxVCD following the steps below.
Step 3: Preview the Video CD
Step 4: Output
Reference
Windows
Getting Started
Before Use
Important Notices
IMxVCD Functions
User Environment
Precautions
Uninstallation
Launching IMxVCD
1. Click [Start], go to [Settings], and select [Control Panels].
2. Double-click [Add/Remove Programs].
3. Select "ImageMixer with VCD " from the list and click the [Delete] button.
A dialog box is displayed to verify deletion.
4. Click the [OK] button.
The program will be uninstalled.
5. When the dialog box is displayed for completion of uninstallation, click the [Finish]
button.
6. The folder [Program Files]-[Pixela]-[ImageMixer] is deleted.
Exiting IMxVCD
Start Screen/Elements
Macintosh
Navigation Bar
Layout environments/Elements
Style Settings Panel
Movie Button Settings Panel
1. Locate the file "IMx_VCDVPreferenceFolder" in the [Default Settings] folder in the
[System Folder]. Drag it to the Trash.
2. Drag the [ImageMixer] folder from the hard disk to the Trash.
Title Settings Panel
Preview and Output/Elements
Preview Panel
Video CD Output (Windows)
Video CD Image Output (Macintosh)
Preferences
User Interface Notes
Supported File Formats
Glossary
Compatible Recording Drives
Copyright © 2002, PIXELA Corp. All rights reserved.
Tutorial
Step 1: Add Your Movies
Launching IMxVCD
Step 2: Customize the Menu
Follow the steps below to launch IMxVCD after installation on your computer.
Step 3: Preview the Video CD
Step 4: Output
Reference
Windows
Getting Started
Before Use
1. Click [Start], go to [Programs]-[Pixela]-[ImageMixer VCD], and select [ImageMixer with
Important Notices
VCD] to launch ImageMixer.
IMxVCD Functions
Note
If you created a shortcut during installation, you can double-click on the [ImageMixer with
VCD] shortcut icon on your desktop to launch ImageMixer.
User Environment
Precautions
Uninstallation
Launching IMxVCD
2. When the mode selector is displayed, click the [IMxVCD] button at the far right to launch
IMxVCD.
Exiting IMxVCD
Start Screen/Elements
Navigation Bar
Layout environments/Elements
Style Settings Panel
Movie Button Settings Panel
Title Settings Panel
Preview and Output/Elements
Preview Panel
Video CD Output (Windows)
Video CD Image Output (Macintosh)
Preferences
User Interface Notes
Supported File Formats
Macintosh
Glossary
Compatible Recording Drives
1. You can also launch ImageMixer by double-clicking on the [ImageMixer with VCD] icon in
the [ImageMixer] folder created on your hard disk during installation.
2. When the mode selector is displayed, click the [IMxVCD] button at the far right to launch
IMxVCD.
Exiting IMxVCD
To quit IMxVCD, follow the steps below.
Windows
On the Navigation Bar,
click the [Quit] button. Or,
click the [Close] button to quit IMxVCD.
in the IMxVCD application window,
Macintosh
On the Navigation Bar,
click the [Quit] button. Or,
on the menu bar, click the [File] and
select [Quit]. You can also quit IMxVCD by holding the [Command] key while pressing [Q] key.
Copyright © 2002, PIXELA Corp. All rights reserved.
Tutorial
Step 1: Add Your Movies
Start Screen/Elements
Step 2: Customize the Menu
Step 3: Preview the Video CD
After IMxVCD is launched, the first screen displayed is the "Start Screen". The elements of
the "Start Screen" are described below.
Step 4: Output
Reference
Getting Started
Before Use
Important Notices
IMxVCD Functions
User Environment
Precautions
Uninstallation
Launching IMxVCD
Exiting IMxVCD
Start Screen/Elements
Navigation Bar
Layout environments/Elements
Style Settings Panel
Movie Button Settings Panel
Title Settings Panel
Preview and Output/Elements
Navigation Bar
Remains displayed in the IMxVCD application window. Use it to switch between operating
modes.
Preview Panel
Video CD Output (Windows)
Video CD Image Output (Macintosh)
Preferences
[Video CD] button
Click this button to switch to Video CD Output mode. Video CDs are created under VCD
Ver2.0 standards, enabling you to use the remote control of the playback device to control
playback operations.
User Interface Notes
Supported File Formats
Glossary
[DVD Video] button
Click this button to switch to DVD Video output mode.
This function is unsupported in the current version. Please upgrade to use this function.
Compatible Recording Drives
[Open Project] button
Click this button to display a dialog box for selection of a saved project file. Open projects
you have saved during authoring to continue working on them. Choose from files with the
extension [*.pvd].
Help window
When you move the cursor over buttons and other items, this Help window displays
explanations.
Copyright © 2002, PIXELA Corp. All rights reserved.
Tutorial
Step 1: Add Your Movies
Navigation Bar
Step 2: Customize the Menu
Step 3: Preview the Video CD
The Navigation Bar remains displayed in the IMxVCD application window. Use it to switch
between operating modes.
Step 4: Output
Reference
Getting Started
Before Use
Important Notices
IMxVCD Functions
User Environment
[Start] button
Click this button to display the Start Screen.
The Start Screen is the first screen displayed after you launch IMxVCD.
Precautions
Uninstallation
Launching IMxVCD
Exiting IMxVCD
[Layout environment] button
Click this button to display the Layout environment screen.
This screen is for designing movie buttons and backgrounds displayed on the menu screen
during playback of your Video CD
Start Screen/Elements
Navigation Bar
Layout environments/Elements
[Preview/Output] button.
Click this button to display the Preview/Output screen.
Use it to check the results of your authoring or to create Video CDs or Video CD images.
Style Settings Panel
Movie Button Settings Panel
Title Settings Panel
[Help] button
Click this button display the Help file (this document).
Preview and Output/Elements
Preview Panel
Video CD Output (Windows)
[Preference] button
Click this button to display the [Preference] dialog box. Use it to specify your desired
IMxVCD preferences.
Video CD Image Output (Macintosh)
Preferences
User Interface Notes
Supported File Formats
[Save Project] button
Click this button to save your current authoring work as a project file. During authoring, you
can save your work anytime as a project. The next time you open the saved project file, you
can continue working on it from the state of authoring at the time of saving.
Glossary
Compatible Recording Drives
[Quit] button
Click this button to exit IMxVCD.
Copyright © 2002, PIXELA Corp. All rights reserved.
Tutorial
Step 1: Add Your Movies
Layout environments/Elements
Step 2: Customize the Menu
Step 3: Preview the Video CD
Use the menu layout functions to design the menu screen displayed when you play a Video
CD. The elements of the "Layout environment screen" are described below.
Step 4: Output
Reference
Getting Started
Reference
Refer to the Tutorial (Step1) .
Before Use
Important Notices
IMxVCD Functions
User Environment
Precautions
Uninstallation
Launching IMxVCD
Exiting IMxVCD
Start Screen/Elements
Navigation Bar
Layout environments/Elements
Style Settings Panel
Movie Button Settings Panel
Title Settings Panel
Preview and Output/Elements
Preview Panel
Video CD Output (Windows)
Video CD Image Output (Macintosh)
Preferences
Navigation Bar
Remains displayed in the IMxVCD application window. Use it to switch between operating
modes.
User Interface Notes
Supported File Formats
Glossary
Layout environment
Add movies to the layout. The menu screen displayed when you play your Video CD will
match this Layout environment screen.
Compatible Recording Drives
Movie buttons
Each movie that you add will be displayed as a movie button. You can change how the movie
buttons are arranged by using Apply Style Template. You can arrange up to 6 movie buttons
on a single menu screen.
Selection Numbers
These numbers correspond to the selection numbers on the remote control of the playback
device for the Video CD. For example, when you press [2] on the remote control, the movie
of selection button [2] will be played.
[Previous Menu] button
Click this button to display the menu before the current menu. Only displayed when there is a
previous menu screen.
[Next Menu] button
Click this button to display the menu after the current menu. Only displayed when there is
another menu screen following the current screen.
[Add Movie] button
Click this button to display a dialog box for selection of movie files to be added as movie
buttons.
Important
You can continue adding movies until the capacity indicator bar is full. However, when the
number of movies reaches 97 for a single project, no more can be added.
Note
You can also drag and drop movies to add them to the Layout environment.
Settings panel
The Settings panel displays the settings for the Style, the movie buttons, and the Title.
Capacity indicator
The indicator displays the total memory requirement for the movies in your project with
respect to your CD-ROM media. The capacity level required increases with each movie you
add.
Important
When the bar is full, no more movies can be added.
Help window
When you move the cursor over buttons and other items, this Help window displays
explanations.
Copyright © 2002, PIXELA Corp. All rights reserved.
Tutorial
Step 1: Add Your Movies
Style Settings Panel
Step 2: Customize the Menu
Click the [Style:] tab to display the [Style:] settings panel for selection of a style template.
Step 3: Preview the Video CD
Step 4: Output
Reference
Reference
Refer to the Tutorial (Step 2) .
Getting Started
Before Use
Important Notices
IMxVCD Functions
User Environment
Precautions
Uninstallation
Launching IMxVCD
Exiting IMxVCD
Start Screen/Elements
Navigation Bar
Layout environments/Elements
Style Settings Panel
Movie Button Settings Panel
Title Settings Panel
Preview and Output/Elements
Preview Panel
Video CD Output (Windows)
Video CD Image Output (Macintosh)
Preferences
User Interface Notes
Supported File Formats
Glossary
Compatible Recording Drives
[Style:] tab
Click this button to display the [Style:] settings panel. Use the [Style:] settings panel to
design menus, specify the background, and customize other style settings for the menu
screen.
[Style Category] menu
Select your desired style category from this dropdown menu. You can switch between style
templates by selecting them from this menu.
Style Templates
Displays the [Style Category] menu selection as a template. Click the template thumbnail to
apply the style.
[Apply Sound] button
For combining audio files (such as background music) with the background image of the
menu screen.
Click this button to display a dialog box for selection of audio files to apply. If audio files are
already applied when you click this button, a dialog box will be displayed allowing you to
remove them. By removing the audio files, you can add different ones.
You can also apply audio files by dragging the icons directly from your desktop and dropping
them on the button. If audio files already exist, a dialog box is displayed allowing you to
overwrite them.
[Apply background image] button
For applying a background image to the menu screen.
Click this button to display a dialog box for selection of still image files to apply. If image
files are already applied when you click this button, a dialog box will be displayed allowing
you to remove them. By removing the still image files, you can add different ones.
You can also apply still image files by dragging the icons directly from your desktop and
dropping them on the button. If audio files already exist, a dialog box is displayed allowing
you to overwrite them.
Copyright © 2002, PIXELA Corp. All rights reserved.
Tutorial
Step 1: Add Your Movies
Movie Button Settings Panel
Step 2: Customize the Menu
Step 3: Preview the Video CD
Step 4: Output
"Movie buttons"s are the buttons displayed on the menu screen when you play a Video CD.
The Selection Numbers of the movie buttons correspond to the buttons on the remote control
of the playback device.
Reference
Getting Started
Before Use
Reference
Refer to the Tutorial (Step 2) .
Important Notices
IMxVCD Functions
User Environment
Precautions
Uninstallation
Launching IMxVCD
Exiting IMxVCD
Start Screen/Elements
Navigation Bar
Layout environments/Elements
Style Settings Panel
Movie Button Settings Panel
Title Settings Panel
Preview and Output/Elements
Preview Panel
Video CD Output (Windows)
Video CD Image Output (Macintosh)
[Movie Buttons] tab
Click this button to display the [Movie Buttons] settings panel.
Preferences
User Interface Notes
Supported File Formats
Selection Numbers
Indicates the Selection Number assigned to the movie button in the Layout environment
screen.
Glossary
Compatible Recording Drives
[Delete] button
Deletes movie buttons selected in the Layout environment screen. Deletion cannot be
cancelled.
[Text] tab
Click this button to display the text settings panels for customizing movie button labels.
Movie Button Label
Normally, the file name of a movie file you add is used as its movie button label, but you can
change the name by entering a new one in this text box. The source file name is not changed.
You can enter up to 63 single-byte characters.
Font, Size, Style, and Color
For specifying these respective text attributes of the movie button labels.
From the dropdown menus, select your preferred font, size, and style.You can change the font
color by clicking the preview box to select your desired color from the color palette.
Copyright © 2002, PIXELA Corp. All rights reserved.
Tutorial
Step 1: Add Your Movies
Title Settings Panel
Step 2: Customize the Menu
Step 3: Preview the Video CD
Click the [Title] tab to display the [Title] settings panel, where you can specify the title and
customize the text settings for the menu screen title.
Step 4: Output
Reference
Getting Started
Reference
Refer to the Tutorial (Step 2) .
Before Use
Important Notices
IMxVCD Functions
User Environment
Precautions
Uninstallation
Launching IMxVCD
Exiting IMxVCD
Start Screen/Elements
Navigation Bar
Layout environments/Elements
Style Settings Panel
Movie Button Settings Panel
Title Settings Panel
Preview and Output/Elements
Preview Panel
Video CD Output (Windows)
[Title] tab
Click this button to display the [Title] settings panel.
Video CD Image Output (Macintosh)
Preferences
User Interface Notes
Supported File Formats
Glossary
Compatible Recording Drives
Title
Enter the menu screen title to be displayed when your Video CD is played. You can enter up
to 63 single-byte characters.
Font, Size, Style, and Color
For specifying these respective text attributes of the title.
From the dropdown menus, select your preferred font, size, and style. You can change the
font color by clicking the preview box to select your desired color from the color palette.
Copyright © 2002, PIXELA Corp. All rights reserved.
Tutorial
Step 1: Add Your Movies
Preview and Output/Elements
Step 2: Customize the Menu
Step 3: Preview the Video CD
This section explains how to preview the results of your authoring to check how it will play
when recorded on your Video CD. The Video CD recording process is also described below.
Step 4: Output
Reference
Getting Started
Before Use
Important Notices
IMxVCD Functions
User Environment
Precautions
Uninstallation
Launching IMxVCD
Exiting IMxVCD
Start Screen/Elements
Navigation Bar
Layout environments/Elements
Style Settings Panel
Movie Button Settings Panel
Title Settings Panel
Preview and Output/Elements
Navigation Bar
Remains displayed in the IMxVCD application window. Use it to switch between operating
modes.
Preview Panel
Video CD Output (Windows)
Preview window
Check how the content you have prepared will play on a Video CD in this window.
Video CD Image Output (Macintosh)
Preferences
User Interface Notes
Supported File Formats
Glossary
Compatible Recording Drives
Selection Numbers
These numbers match the control button numbers in the [Preview] panel, and they correspond
to the selection numbers on the remote control for your Video CD playback device.
[Preview] panel
Displays Control Buttons for a preview simulating a remote control.
[Output] button
Click this button to display the [Video CD Output] dialog box. A different dialog box is
displayed depending on whether you are a Windows or Macintosh user.
Capacity indicator
The indicator displays the total memory requirement for the movies in your project with
respect to your CD-ROM media.
Help window
When you move the cursor over buttons and other items, this Help window displays
explanations.
Copyright © 2002, PIXELA Corp. All rights reserved.
Tutorial
Step 1: Add Your Movies
Preview Panel
Step 2: Customize the Menu
Step 3: Preview the Video CD
Step 4: Output
The movie buttons of the Video CD you have prepared have Selection Numbers that will be
accessible from the remote control of the playback device. The preview is displayed by
simulating the remote control operation.
Reference
Getting Started
Before Use
Reference
Refer to the Tutorial (Step 3) .
Important Notices
IMxVCD Functions
User Environment
Precautions
Uninstallation
Launching IMxVCD
Exiting IMxVCD
Start Screen/Elements
Navigation Bar
Layout environments/Elements
Style Settings Panel
Movie Button Settings Panel
Title Settings Panel
Preview and Output/Elements
Preview Panel
Video CD Output (Windows)
Video CD Image Output (Macintosh)
Preferences
User Interface Notes
Supported File Formats
Glossary
Compatible Recording Drives
Buttons [1] to [6]
Click one of these buttons to play the movie with the corresponding Selection Number. For
example, clicking the [2] button in the [Preview] panel will play the movie in the position of
selection number [2].
[Previous] button
Click this button to play the previous movie or display the previous menu screen.
[Play] button
Click this button to restore play after pausing or stopping.
[Next] button
Click this button to play the next movie or display the next menu screen.
[Pause] button
Click this button to stop play momentarily.
[Return] button
Click this button to return to the menu screen with the movie button corresponding to the
movie that is currently playing.
[Stop] button
Click this button to stop play.
Important
These control buttons may not necessarily match the operations of the remote control for the
playback device.
For example, in some cases the playback device requires you to press [1] and then [Play] for
playback. Consult the manual for the playback device remote control.
Copyright © 2002, PIXELA Corp. All rights reserved.
Tutorial
Step 1: Add Your Movies
Video CD Output (Windows)
Step 2: Customize the Menu
Step 3: Preview the Video CD
On the Writing environment screen, click the [Output] button in the [Preview] panel. This
section describes the [Video CD Output] dialog box that is displayed in Windows.
Step 4: Output
Reference
Getting Started
Important
Be sure to read the Precautions.
Before Use
Important Notices
IMxVCD Functions
User Environment
Precautions
Uninstallation
Launching IMxVCD
Exiting IMxVCD
Start Screen/Elements
Navigation Bar
Layout environments/Elements
Style Settings Panel
Movie Button Settings Panel
Title Settings Panel
Preview and Output/Elements
Preview Panel
Video CD Output (Windows)
Video CD Image Output (Macintosh)
Preferences
User Interface Notes
Disc name
Enter a name for the Video CD to be created. For the disk name, you can enter up to 30 singlebyte letters, numbers, or the underscore symbol.
Add operation guide
Clicking this check box will insert a IMxVCD-created screen explaining operations before
the Video CD is played.
Supported File Formats
Glossary
Compatible Recording Drives
Speed Selection
Choose the Video CD recording speed from the dropdown menu. For example, [2x] indicates
double speed and [4x] is for quad-speed.
Important
In some cases, slower recording drives such those connected through a USB interface cannot
produce normal recordings at speeds set too high. Use the speed recommended by the CD-R
manufacturer.
CD-R Drive Selection
The dropdown menu lists the drives that support CD recording. Select the preferred recording
drive for recording.
Write & Simulation
From the dropdown menu, choose whether to perform a recording test before recording.
Copyright © 2002, PIXELA Corp. All rights reserved.
Tutorial
Step 1: Add Your Movies
Video CD Image Output (Macintosh)
Step 2: Customize the Menu
Step 3: Preview the Video CD
On the Writing environment screen, click the [Output] button in the [Preview] panel. This
section describes the [Video CD Output] dialog box that is displayed for Macintosh users.
Step 4: Output
Reference
Getting Started
Before Use
Important Notices
Important
Be sure to read the Precautions.
Macintosh users cannot directly record Video CDs using IMxVCD. On a Macintosh, use
IMxVCD to create a Video CD image that is compatible with the CD burning application
Toast by Roxio, Inc. To use Toast for Video CD recording, refer to the separate instructions.
IMxVCD Functions
User Environment
Precautions
Uninstallation
Launching IMxVCD
Exiting IMxVCD
Start Screen/Elements
Navigation Bar
Layout environments/Elements
Style Settings Panel
Movie Button Settings Panel
Title Settings Panel
Preview and Output/Elements
Preview Panel
Video CD Output (Windows)
Video CD Image Output (Macintosh)
Preferences
User Interface Notes
Supported File Formats
Glossary
Compatible Recording Drives
Disc name
Enter a name for the Video CD image to be created. For the disk name, you can enter up to 30
single-byte letters, numbers, or the underscore symbol.
Saving the Video CD Image
The Video CD will be created from the current project. Click the [Browse•E button to specify
a folder for saving.
Important
The Video CD image created will be saved as a file called [Cdimage] in the specified folder.
If the folder contains Video CD image files with the same name, numbers will be added to
distinguish new files in the order they are created, such as [Cdimage1], [Cdimage2],
[Cdimage3].
Add operation guide
Clicking this check box will insert a IMxVCD-created screen explaining operations before
the Video CD is played.
Copyright © 2002, PIXELA Corp. All rights reserved.
Tutorial
Step 1: Add Your Movies
Preferences
Step 2: Customize the Menu
Use it to specify your desired IMxVCD preferences.
Step 3: Preview the Video CD
Step 4: Output
Reference
Getting Started
Before Use
Important Notices
IMxVCD Functions
User Environment
Precautions
Uninstallation
Launching IMxVCD
Exiting IMxVCD
Start Screen/Elements
Navigation Bar
Layout environments/Elements
Style Settings Panel
Movie Button Settings Panel
Working Folder (Windows)/Workspace (Macintosh)
Specify the folder or hard disk for your working with IMxVCD. Insufficient memory can lead
to performance problems, so choose a hard disk with the greatest capacity available.
Title Settings Panel
Preview and Output/Elements
Preview Panel
Video CD Output (Windows)
Video CD Image Output (Macintosh)
Preferences
User Interface Notes
Video/TV format
Select a format Video format for the Video CD you create.
You can choose between NTSC and PAL formats. NTSC is the format generally used for
television broadcasts in the U.S., Japan, and elsewhere. NTSC images consist of 525 scanning
lines, and the replay rate is 30 frames per second.
PAL is the format generally used for television broadcasts in Europe, China, and elsewhere.
PAL images consist of 625 scanning lines, and the replay rate is 25 frames per second.
Supported File Formats
Glossary
NTSC
Japan, United States of America, Canada, South Korea, Taiwan, Chile,
Philippines, Peru, and Mexico
PAL
Argentina, United Kingdom, Italy, India, Indonesia, Australia, Austria,
Netherlands, Canary Islands, North Korea, Greece, Kenya, Saudi
Arabia, Singapore, Switzerland, Sweden, Spain, Thailand,
Czechoslovakia, China, Denmark, Turkey, Germany, Nigeria, New
Zealand, Norway, Pakistan, Finland, Brazil, Belgium, Poland, Portugal,
Hong Kong, Malaysia, South Africa, and the former Yugoslavia region
Compatible Recording Drives
CD-R Type
Select the disk capacity.
User Interface Notes
IMxVCD displays dialog boxes such as the one depicted below.
means [OK] or [Yes]
means [Cancel] or [No]
Supported File Formats
IMxVCD supports the following file formats.
●
●
●
AVI
QuickTime Movie (Macintosh only)
MPEG-1 (Windows only)
Copyright © 2002, PIXELA Corp. All rights reserved.
Tutorial
Step 1: Add Your Movies
Glossary
Step 2: Customize the Menu
Step 3: Preview the Video CD
Step 4: Output
DVD Video
High-quality digital recordings of video and audio on read-only media Images are generally
encoded in MPEG-2 format for recording. For playback on commercial DVD players.
Reference
Getting Started
Before Use
Important Notices
IMxVCD Functions
User Environment
MPEG
MPEG, an abbreviation for Moving Picture Experts Group, is an international data
compression standard for digital video and hi-fi audio. MPEG-1 is used for Video CD
playback that rivals VHS tapes in quality. MPEG files are smaller than DV (digital video)
files, an advantage which enables longer recordings and has made them a standard format for
Internet use. MPEG-2, used for DVD and digital satellite broadcasts, offers excellent image
and sound quality.
Precautions
Uninstallation
Launching IMxVCD
Exiting IMxVCD
Start Screen/Elements
Navigation Bar
Layout environments/Elements
Style Settings Panel
Movie Button Settings Panel
Title Settings Panel
Video CD
A format combining audio and visual data for recording on a single CD-ROM format.
The video data is compressed for recording using MPEG-1 encoding for a resolution of
352×240 pixels. The frame rate is 24 or 29.97 frames per second. The audio format is MPEG1 Layer 2.
Video CDs or Video CD images created using IMxVCD offer the same playback control as
DVD Video. They can be played with commercial Video CD players or Video CDcompatible DVD players.
authoring
The process of preparing a video disk. Authoring involves menu creation and specifying the
content and navigation settings.
Preview and Output/Elements
Preview Panel
content
The video files used for authoring. Sometimes referred to simply as movies.
Video CD Output (Windows)
Video CD Image Output (Macintosh)
Preferences
thumbnail
A smaller version of image files that is used for templates and other purposes. Thumbnails
offer an at-a-glance view to identify the files you are using.
User Interface Notes
Supported File Formats
Glossary
Compatible Recording Drives
disk image, Video CD image, Video CD image
A disk image is an image produced from various file structures. A Video CD image is an
image produced from a file structures conforming to the Video CD Ver2.0 standard.
video disk
A general term for Video CDs and DVD Videos created using IMxVCD. Sometimes simply
referred to as a disk.
Video/TV format
Two kinds of video format are NTSC and PAL.
NTSC is the format generally used for television broadcasts in the U.S., Japan, and
elsewhere. NTSC images consist of 525 scanning lines, and the replay rate is 30 frames per
second. PAL is the format generally used for television broadcasts in Europe, China, and
elsewhere. PAL images consist of 625 scanning lines, and the replay rate is 25 frames per
second.
NTSC
Japan, United States of America, Canada, South Korea, Taiwan, Chile,
Philippines, Peru, and Mexico
PAL
Argentina, United Kingdom, Italy, India, Indonesia, Australia, Austria,
Netherlands, Canary Islands, North Korea, Greece, Kenya, Saudi
Arabia, Singapore, Switzerland, Sweden, Spain, Thailand,
Czechoslovakia, China, Denmark, Turkey, Germany, Nigeria, New
Zealand, Norway, Pakistan, Finland, Brazil, Belgium, Poland, Portugal,
Hong Kong, Malaysia, South Africa, and the former Yugoslavia region
project
The work you have prepared during authoring is called a project. When you author using
IMxVCD, you can save your work at any time as a project file. The next time you open the
saved project file, you can continue working on it from the state of authoring at the time of
saving.
Movie buttons
Buttons that are used to play video disks. You can create them by adding movies in the
Layout environment screen.
In Video CD Output mode, the movie buttons Selection Numbers correspond to the buttons
of the remote control of the playback device. During playback of the Video CD, they can be
selected with the remote control number keys to control playback .
menu, menu screen
The screen displayed during Video CD playback is called a menu or menu screen. With
IMxVCD, you can customize the menu screen using the Layout environment screen. You can
prepare multiple menu screens and arrange up to 6 movie buttons on a single menu screen.
Selection Numbers
The numbers indicated for the movie buttons as displayed in Video CD Output mode on the
Layout environment screen or Writing environment Screen. These numbers correspond to the
selection number on the remote control of the playback device for the Video CD.
For example, pushing [1] on the remote control will play the movie corresponding to
selection number [1] on the menu screen currently displayed. Pressing [3] on the remote
control will play the movie for selection number [3].
Copyright © 2002, PIXELA Corp. All rights reserved.
Tutorial
Step 1: Add Your Movies
Compatible Recording Drives
Step 2: Customize the Menu
Step 3: Preview the Video CD
Step 4: Output
Reference
Getting Started
The CD-R and other disk drives listed below have been verified for use with IMxVCD. (As
of Wednesday, June 5, 2002.)
We do not guarantee the performance of drives not listed here in creating Video CDs.
Furthermore, we do not guarantee all functions of these drives.
We will keep you informed of any additions in the future through updates on the Pixela
website.
Before Use
Important Notices
IMxVCD Functions
Manufacturer
I-O Data
User Environment
Precautions
Uninstallation
Launching IMxVCD
Exiting IMxVCD
Start Screen/Elements
Navigation Bar
Layout environments/Elements
Style Settings Panel
Movie Button Settings Panel
Title Settings Panel
Preview and Output/Elements
Preview Panel
Video CD Output (Windows)
Video CD Image Output (Macintosh)
Preferences
User Interface Notes
Supported File Formats
Glossary
Compatible Recording Drives
ADTEC
iiyama
AOpen
ST_Trade_Corporation
Drive Model
CDRW-RB6424G
CDR-TX624 series
CDR-TX624 series
CDRW-RX6424 series
CDRW-AB84G
CDRW-AB428
CDRWD-AB6424G
CDR-AB220PD
CDRW-SX1210B
CDRW-SB1210B
CDRW-SB8220
CDRW-SX8220 series
CDRW-YX88
CDRW-YB88
CDRW-i64/USB/1394
CDRW-i1210B/USB/1394
CDRW-i1610B/USB/1394
CDRWD-i1210J/USB
CRWDP-i8A/US2
CDRW-iE24J
CRWP-i24B/US2
CDRWD-AB1210J
CDRWD-RX1210J
CDRW-SX124G
CDRW-SB124G
CDRW-SX124BG
CDRW-SB124BG
CDRW-AB124B
CDRW-AB1210B
CDRW-AB1610B
CDRW-SX1610B
CDRW-SB1610B
CRWD-AB20J
CDRW-SX24B
CDRW-SB24B
CDRW-AB24J
CDRW-AB24B
CDRW-AB32B
DVDRW-AB4.7P
DVDRR-AB4.7
AD-RW446U/PW1
AD-RW446U/PW2
AD-RW6416/V
AD-RW820/V
AD-RW1610UF/PWG
AD-RW2410B
AVENUE MPX-710
CRW1232
CRW1232A
CRW1232PRO
CRW1632
CRW2040
CRW2440
DVR-103
DCR-111R
DVRW-AT4
Verified Firmware Version
1.3
1.0p
1.0p
1.3
1.1
2.0D
1.6
2.0k
1.03
1.03
1.1
1.1
1.0a
1.0a
1.9
1.3
1.07
1.23
8.41
1
1.2
1.28
1.28
2.21
2.21
3.27
1.2
1.3
6.32
1.29
A078
1.05
1.1B
1.0b
1.05
6.32
100E
1.22
1.01
1.2
1.44
1.26
1.2
NEC
NEC_VALUESTAR
LG
Caravelle
CREATIVE
CyQ've
SAMSUNG
GENERIC
Sony
Century
WPI
TDK
NEC ODX658
NR-7500A
NR-7700A
NR-7800A
NR-7900A
NR-7800B
NR-8400A
NR-8500A
CB-2100A
VT900/1D
VT950/1D
VT970/1D
VT100/1A
CED-8041B
CED-8042B
RW-4416 series
RW-6424DA/K
RW-8424S series
CD-RW121032
RW1210E
CRW-DVD
SW204
SW408B
SM304B
SM308B
SM-408B
CRD-RW1
CRD-RW2
CRD-BP2
CRD-BP3
CRD-BP4
CRD-BP5
CRD-BP900P
CRD-BP1300P
CRD-BP1400P
CRD-BP1500P
CRD-BP1600P
CRD-BP1700P
CDU928E
CRX50A
CRX55A
CRX75A
CRX75U
CRX76A
CRX76U
CRX10U
CRX100E
CRX120E
CRX140E
CRX160E
CRX175E
CRX500E
CRX700E
CRX800E
CRX1600S
CEN658KIT
CEN-CDR820A-EXT/AT
CDRW-8432i
ICD4012A
PCD8824U2
1.02
1.06
1.01
1.26
1.23
1
1.21
1.5
1.03
1.04
1.04
1.04
1.04
1.01
1.05
1.0f
1.6
1.0j
LC56
LC56
1.6
BS14
bd19
T100
T200
1.1
1.28
2.21
1.03
3.27
6.32
1.01
1.1n
1.0e
1.0a
2.0a
2.0a
2.0a
2.0a
2.0b
1.0j
1.0j
1.0p
1.1a
1.0g
1.0a
2.0a
1.0a
1.0a
1.02
1.05
E10k
1t01
N1B1
Teac
Toshiba
TORiSAN
NOVAC
Pioneer
Hagiwara
Panasonic
MC-R5220EK
CD-R6240S series
CD-R624SK series
CD-R56S
CD-R58S
CD-W4432EKB
CD-W24E
CD-W28E
CD-RW280PU
CD-W216E
CD-W54E
CD-W58E
CD-W512SB
CD-W512E
CD-RW512EKB
CD-W512EB
CD-W516EB
CD-W524EB
CD-W540E
CD-RW540EKB
DW-28E
SD-R1002
SD-R1102
SD-R1202
SD-R2002
SD-R2102
SD-R2212
SR-C8002
SR-C8102
CDW-U4424
NV-CR330P
NV-DW340
DVR-103
DVR-A03-J
DVR-A04-J
DCR-111
HBC-CRW8432A
HBC-CRW4XU
HBC-CRW8XUG
HBC-CRW448UG
HBC-RWD4424A
CW-7503
CW-7582
CW-7585
CW-7586B
CW-8121
CW-8571
LK-RW7585T series
LK-RW7585UZ
LK-RC8571TZ
LK-RC8571UZ
LK-RV8185AZ
KXL-RW20AN
KXL-RW21AN
KXL-RW30AN
KXL-CB10AN
KXL-RW10AN-S
UJDA310
UJDA320
UJDA330
UJDA330A
UJDA340
UJDA710
UJDA720
UJDD410
LF-D321JD
LF-D340JD
2.0k
1.0p
1.0p
1.0p
1.0f
1.1B
1.0A
1.0A
1.1B
1.0A
1.0A
1.0E
2.0B
2.0B
1.0B
1.0A
1034
1012
1023
1Q24
1008
1011
1008
200A
1
1
1.44
1.44
1.2
1.26
1.04
1.04
2.0B
1.1B
1034
1.05
1.05
1.04
1.04
1.04
1.08
1J39
1J44
BH43
1.23
1.02
1.02
K001
1.1
1.23
1S20
1Z32
1.1
1
A078
A078
PHILIPS
Pixela
Hitachi LG Data Storage
Plextor
BENQ
Mitsubishi
Mitsumi
MIRAI_TECHNOLOGY
Melco
CDD4201
CDD4401
CCD4801
428CDRW
4424CDRW
8432CDRW
241240CDRW
321240CDRW
PH162180AEP
PH1621809EP
PIX-DVRR/FW1
PIX-DVRR/AT1
GCE-8160B
GCC-4120B
GCC-4080N
PX-W4220T series
PX-W124TS
PX-W412C
PX-W8220T
PX-W8432T
PX-W1210TA/BS
PX-W1210TS
PX-W1610TA/BS
PX-S88T
PX-S88TU
PX-W2410TA/BS
PX-W2410TU/BS
PX-W4012TA/BS
PX-320A/BS
CRW3210P
CRW4012P
MK4416Y
MK426Y
MKRW124S
MKRWT4BP
CR-4804TE
CR-48x5TE
CR-4808TE
CR-48x9TE
CR-48xATE
SDR-1500-M
CDS-28N
CDRW-S4220 series
CDRW-S4224W series
CDRW-S8220 series
CDRW-I8432FB
CDRW-IL8432
CDRW-S4432
CDRW-I4224FB
CDRW-I4432FB
CDRW-446USB
CDRW-S8432 series
CDRW-S124
CDRW-S124FB
CDRW-B88USB
CRWU-PB88
CRWI-B1210FB
CRWS-SB1210
CRWU-B1210
CRWiF-B1210
CRWU2-B1210
CRWS-SB1610
CRWI-B1610FB
CRWU2-B1610
CRWiU-B1610H
CRWSU-B1610H
CDRW-1210USB
CRWI-J1210FB
CDRW-J1210USB
CDRW-J1610SU
CDRW-J1610IU
CDRW-J1610U2
CDRW-J2410IU
CDRW-J2410U2
Z023
1.21
1.1
2.0D
1.2A
1.0c
1.0c
A078
A078
1.2
1.04
1.04
1.07
1.04
1.05
1.09
2.0B
1.03
1
1.02
1.02
1
B.KW
V.MW
1.0f
1.0g
1.28
2.21
2.6c
1.8A
1.1A
1.0c
6.32
1.1n
1.04
2.03
1.05
1.07
1.09
2.23
1.0j
1.1
1.3B
2.3
1.07
1.07
2.0B
1.07
3
1.01
1.07
1.22
3.1
1
1.02
2.0G
1.22
1.2
OS0B
OS0B
OS0B
1.0g
1.0g
Yamaha
LITE-ON
RADIUS
Ricoh
Logitec
DVRAM-FB
CRW-16FB
CRW-24FB
CRW-24IU
CRW-24SU
CRW-24U2
CRW-32FB
CRW-32IU
CRW-32U2
CRW-S32FB
CRW-40FB
CRWD-20U2
CRWD-16FB
CDR200 series
CDR400 series
CDR401
CRW2216E
CRW4260
CRW4416S series
CRW4416E
CRW6416S series
CRW8424S series
CRW8424E
CRW8824E
CRW8824S series
CRW2100E-VK
CRW2100IX-VK
CRW2200E
CRW2200UX-VK
CRW3200E-VK
CRW3200UX-VK
CRW3200SX
LTR-12101B
LTR-16102B
FWS05020 Slim Line CDRW
4x4x24
MP7040A series
MP7060A series
MP7060S series
MP7063A
MP7080A
MP7083A
MP7120A
MP7125A
MP7163A
MP7200A
MP7320A
MP9060A
MP9120A
MP9200A
MP5120A
MP5125A
LCW-RW8416 series
LCW-RW9820 series
LCW-RW3624/P/PC
LCW-RW8616 series
LCW-RW8824 series
LCW-5820 series
LCW-RD648 series
LCW-RW3624AK
LCW-S4424AK
LCW-R6424DV series
LCW-Z4408/U
LCW-R6406U
LCW-S4406U
LCW-Y8824 series
LCW-R8432F
LCW-R6432
LCW-P1210BF
LCW-R1210S
LCW-R1210AK
LCW-R1210F
LCW-R1210DV
LCW-R1210DVAK
LCW-T1210BSU
A078
1.2
1.0g
1.0g
1.0g
1.0g
1.01
3p34
1.0n
1.0g
1.0h
1.0h
1.0q
1.0f
1.0b
1.0b
1.0j
1.0e
1.0a
1.0a
1.0H
1.0N
1.0B
1.0E
1
1
1
LS22
OS0B
1.15
1.3
1.8
1.3
1.9
1.1
1.1
1.1
B006
1.6
1.2
1.2
1.29
1.0f
1.05
1.3
1.0b
1.0j
1.05
2.0k
1.3
1.0j
1.6
2642
1.9
1.0j
1.0a
1.1
1.9
2.0B
1.1
1.1
1.1
1.2
1.2
2.0E
LCW-T1210BU
LCW-T1210BAK
LCW-E1210BU
LCW-E1210BSU
LCW-E1210BAK
LCW-E24U2
LCW-E24SU2
LCW-E24FU2
LCW-Y1610AK
LCW-Y1610F
LCW-PN8424SU
LCW-T1610BSU
LCW-T1610BAK
LCW-T1610BFU
LCW-PT8824BU
LCW-R2010BAK
LCW-Y2010BSU
LCW-Y2010BFU
LCW-G2410BAK
LCW-G2410BFU
LCW-G2410BSU
LCW-R2010DVAK
LCW-R2010DVSU
LCW-R2010DVFU
LCW-WINU
LCW-PTU2
LCW-PEDVU2
LCW-S24U2
LCW-S24SU2
LCW-S24FU2
LCW-S24AK
LCW-R20U2
LCW-R20FU2
LCW-R32AK
LCW-R32U2
LCW-R32SU2
LCW-R32FU2
LCW-T40AK
LCW-T40U2
LCW-T40FU2
LDR-214AK
LDR-214F
LDR-216AK
LDR-216FU2
LDR-N106AK
LDR-N106FU2
LDR-258AK
LDR-258FU2
Copyright © 2002, PIXELA Corp. All rights reserved.
2.0E
2.0B
1.01
1.01
1.01
1.23
1.23
1.23
1.0F
1.0G
1
1.0B
1.0A
1.0B
1.0c
6.32
6.32
6.32
1
1
1.1
1.9
1.07
1.0g
1.0g
1.0g
1.0g
1.3
1.3
1.44
1.44
1.2
1.2
1.29
1.29
1.06
1.06