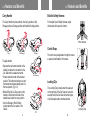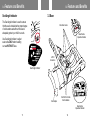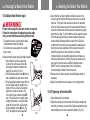
1
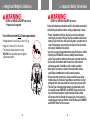
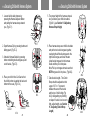
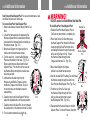
WARNING
Carefully read and understand all instructions and warnings in this
manual. Failure to properly use this Infant Car Seat increases the
risk of SERIOUS INJURY or DEATH in a sudden stop or crash.
KEEP INSTRUCTIONS FOR FUTURE USE.
Store this manual in the pocket provided on the back of the seat.
Infant Car Seat
STOP
If you experience any difficulty in using this product, please contact our
customer service department at 1-800-328-7363 between the hours of
8:00 A.M. and 4:30 P.M. Pacific Standard Time for assistance. Please have
your model number and manufacturing date available when you call. This
information can be found on a small sticker on the bottom of the product.
OWNER’S MANUAL
Para instrucciones en Español, conéctese a
www.babytrend.com o llamar al: 1-800-328-7363.
Convenience through innovation and thoughtful design
Baby Trend, Inc.
1607 S. Campus Ave.,
Ontario, CA 91761
1-800-328-7363
(8:00am ~ 4:30pm PST)
www.babytrend.com
CS0301A0113
Convenience through innovation and thoughtful design
www.babytrend.com
Copyright © 2013, Baby Trend, Inc.
E32IN0113U
Table of Contents
Table of Contents
1.0 General Warnings...........................................................................3
2.0 Registration Information................................................................6
3.0 Features and Benefits....................................................................7
3.1 Adjustable Back WITH Harness System................................................ 7
3.2 Base..................................................................................................... 12
4.0 Preparing Car Seat for Use..........................................................14
4.1 Assembling the Car Seat..................................................................... 14
5.0 Height and Weight Limitations....................................................15
6.0 Important Safety Information......................................................16
6.1 About your child .................................................................................. 17
6.2 About your vehicle................................................................................ 17
6.3 About this Car Seat.............................................................................. 18
6.4 About use as a carrier.......................................................................... 20
7.0 LATCH Attachment System.........................................................22
8.0 Selecting a Vehicle Seat Location...............................................23
8.1 Overall Considerations in Selecting a Location................................... 23
8.2 Check that the Vehicle Seat Meets the Following
Requirements....................................................................................... 25
9.0 Vehicle Seat Belts.........................................................................26
9.1 SAFE Vehicle Seat Belt Systems......................................................... 26
9.2 Locking Clip Installation....................................................................... 29
9.3 UNSAFE Vehicle Seat Belt Systems................................................... 30
10.0 Securing Car Seat in Your Vehicle..................................................32
10.1 Preparation for Installation in Vehicle................................................. 32
10.2 Base Installation with LATCH System................................................ 33
10.3 Base Installation with Vehicle Belt..................................................... 35
10.3.1 Initial Positioning............................................................................. 36
10.3.2 WITH Vehicle Lap/Shoulder Belt..................................................... 37
10.3.3 WITH Vehicle Lap Belt only............................................................ 37
10.3.4 Tighening Vehicle Seat Belt............................................................ 37
10.4 Adjust Base Recline into Desired Position......................................... 39
10.5 Attach Car Seat to Base..................................................................... 40
10.6 Car Seat Only Installation without Base............................................. 41
10.6.1 Initial Positioning............................................................................. 41
10.6.2 WITH Vehicle Lap/Shoulder Belt..................................................... 42
10.6.3 WITH Vehicle Lap Belt only............................................................ 42
10.6.4 Adjust Seat Recline Angle............................................................... 43
10.6.5 Tighening Vehicle Seat Belt............................................................ 44
11.0 Securing Child with Harness System..................................................45
11.1 Securing Your Child with Harness System......................................... 45
11.2 Adjusting Harness Strap Height......................................................... 50
11.3 Adjusting the Crotch Strap Length..................................................... 51
12.0 Final Safety Check......................................................................52
13.0 Additional Information...............................................................53
13.1 Care & Maintenance.......................................................................... 52
13.2 Using Your Car Seat with a Baby Trend Stroller................................ 55
Airplane Use.............................................................................................. 56
Replacement Parts ................................................................................... 56
1
2
1.0 General
Warnings
1.0 General
WARNINGS TO PARENTS AND CAREGIVERS
WARNING
Proper use is required! Even if using this car seat seems
easy to figure out, it is very IMPORTANT TO FOLLOW THE
INFANT CAR SEAT AND VEHICLE OWNER’S MANUALS!
•Failure to follow these instructions and Car Seat labels can result in a
child striking the vehicle’s interior during a sudden stop or crash.
- Your child’s safety depends on proper installation and use
of this car seat. Read and understand all information in this
owner’s manual and product labels before using this car seat.
- Improper use of the car seat can result in serious
injury or death from a sudden stop or crash.
•DO NOT use accessories or parts other than those provided by Baby
Trend. Use of accessories or parts from other manufacturers could
alter the performance and safety of the car seat.
•DO NOT use this car seat if it has been in a crash, it must be replaced.
A crash can cause unseen damage and using it again could result in
serious injury or death.
•DO NOT use car seat if it is damaged or missing parts.
No car seat can guarantee protection from injury in every situation,
but proper use helps reduce the risk or serious injury or death.
3
Warnings
The ultimate safety of your child depends on the proper and secure
installation of the Car Seat in your vehicle. Proper installation
requires that you read and understand this entire manual and
your vehicle’s owner’s manual before placing your child in the
seat. DO NOT allow others to install or use this Car Seat unless
they completely understand its proper installation and use.
Your child’s safety depends on you:
1. Choosing the best location within your vehicle for the Car Seat.
Seating positions with Active Frontal Air Bags must be avoided.
2. Adjust the harness shoulder strap height to be at or just below
the top of your child’s shoulders.
3. Adjust harness length to snugly adjust the harness straps
around your child.
4. This Car Seat is ONLY to be used in a vehicle in the
rear-facing position.
5. Proper use and routing of the seat belts in your vehicle is
essential for proper installation.
6. LATCH must be secured or vehicle seat belt must be tightly
adjusted and stay tightly adjusted around car seat.
4
1.0 General
Warnings
2.0
WARNING
Proper recline angle for seat back recline is required.
Follow the instructions for adjusting recline angle
using car seat with base and using without base.
- Too upright can cause a young infant’s head
to fall forward and restrict breathing.
- Too reclined can cause ejection in a sudden stop or crash.
When using the car seat WITH the base, always adjust the base recline
into the most reclined position, position #1, for children under 3 months
of age or unable to hold head up unassisted. For infants that can hold
their head upright unassisted, any of the four base recline adjustment
positions may be used.
When using the car seat WITHOUT the base, follow the instructions
and use the Seat Angle Indicator on the side of the car seat to adjust
the seat recline angle.
5
Registration Information
REGISTER YOUR CAR SEAT
Please complete the following information. The model number and
manufactured in (date) can be found on a label on the bottom of the Car
Seat.
Model Number: ___________________
Manufactured in: __________________
Purchase Date: ___________________
Please fill out the prepaid registration post card attached to the straps and
mail it today.
Child restraints could be recalled for safety reasons. You must register this
restraint to be reached in a recall. Send your name, address, email address if
available, and the restraint’s model number and manufacturing date to:
Baby Trend, Inc., 1607 S. Campus Avenue, Ontario, CA 91761 or
call 1-800-328-7363 or register online at: http://www.babytrend.com/
registration.html. For recall information, call the U.S. Government’s
Vehicle Safety Hotline at 1-888-327-4236 (TTY: 1-800-424-9153), or go to
http://www.NHTSA.gov.
If You Need Help
Please contact our Customer Service Department with any questions
concerning your child restraint. When you contact us, please have the model
and manufactured in (date) ready. The model number and manufactured in
(date) can be found on a white label located on the bottom of the car seat.
USA Toll Free: 1-800-328-7363
8:00 a.m. to 4:30 p.m. (PST) Monday - Friday
or www.babytrend.com
6
3.0
Features and Benefits
3.0
Features and Benefits
3.1 Adjustable Back WITH Harness System
Harness Slots
Carry Handle
Canopy
Adjustable Back
Seat Pad
Canopy
Adjuster Knob
Seat Angle
Indicator
Handle
Release
Button
Harness
Straps
Harness Clip
Buckle
Vehicle Belt
Path/Hook
without base
Locking Clip
(stored on side
of seat pad)
Harness Adjuster
Strap
Harness
Belt
Owner’s
Manual
Holder
Base/Stroller
Hook
Belt Adjuster Plate
Harness Adjuster
Strap
Lock Bar
Harness Adjuster
Button
7
8
3.0
Features and Benefits
3.0
Features and Benefits
Carry Handle
Build-in Safety Harness
The Carry Handle has four positions: the Carry position, a MidStorage position, a Storage position and the Non-Rocking position.
Front adjust 5-point Safety Harness, adjust
the harness with a push of a botton.
5-Point Harness
Crotch Strap
Carry
Mid-Storage
Storage
To adjust handle:
•Depress the two buttons located on the
handle just above the connection to the
Car Seat shell to release the handle.
•Slowly rotate the handle to the desired
position. The buttons should pop out and
the handle should automatically lock into
the new position. (Fig. 9-1)
•Before lifting the Car Seat, push on the
handle to check that both sides of the
handle have locked into carry position.
•Use the Storage or Non-Rocking
position when the Car seat is in the
vehicle.
9
The crotch strap is adjustable in length to ensure
a safe and comfortable fit for harness.
Non-Rocking
Locking Clip
The Locking Clip is stored under the seat pad
on the right side of the Car Seat and is used to
securely install the Car Seat with certain types
of vehicle lap/shoulder combination belts.
9-1
Locking Clip
10
3.0
Features and Benefits
3.0
Seat Angle Indicator
Features and Benefits
3.2 Base
The Seat Angle Indicator is used to ensure
that the seat is installed at the proper degree
of recline when used without the base to
adequately protect your child in a crash.
Attachment Locks
Base Recline
Adjustment Handle
Use Seat Angle Indicator to adjust
seat recline ONLY when installing
car seat WITHOUT Base.
LATCH
Connectors
Seat Angle Indicator
Belt Adapter
Belt Path for Vehicle
Belt Installation
Base Recline
Adjustment Indicator
11
12
3.0
Features and Benefits
4.0
Your Car Seat base can be installed with either
the LATCH attachment system or with vehicle
belt. When available, LATCH is the recommended
method of securing the Car Seat in the vehicle.
Vehicle
Beth Path
4.1 Assembling the Car Seat
Attaching the Canopy
Slip the canopy stays through
the sleeves on the canopy.
Vehicle Belt Path Latch Connectors
LATCH
relese button
Preparing Car Seat for Use
Latch Connectors
The canopy is attached by inserting the ends
of the canopy plastic stays into the female
fittings found on the inside of the handle hub.
Base Recline Adjustment Indicator
The Base has 4 adjustable recline positions.
Base Recline Adjustment Handle
The Base Recline Adjustment Handle
raises and lowers the rear of the Base
in order to obtain the proper angle of
recline for proper installation of the
Car Seat when using the Base.
13
Base Recline
Adjustment Indicator
Adjustment Handle
14
5.0 Height
and Weight Limitations
WARNING!
DEATH or SERIOUS INJURY can occur
- Proper use is required
Your child must meet ALL these requirements:
•Weight between 5 and 32 lbs (2.2 and 14.5 kg)
•Height is 32 inches (81.3 cm) or less
•The Harness Straps must be at or just
BELOW child’s shoulders when in highest
adjustment position
15
6.0
Important Safety Information
WARNING!
DEATH or SERIOUS INJURY can occur:
Failure to follow these instructions and Car Seat labels can result in
child striking the vehicle’s interior during a sudden stop or crash.
•Proper installation of the Car Seat in your vehicle and proper
securing of your child in the Car Seat are essential to ensure the
safety of your child. Your child can be injured in a sudden stop or
crash if not properly secured in the Car Seat or if the Car Seat is
not properly installed in the vehicle.
•Use only in a rear-facing position when using Car Seat in a vehicle.
•Children have STRANGLED in loose or partially buckled harness
straps. Fully restrain the child even when carrier is outside the vehicle.
•Secure this child restraint with the vehicle’s child restraint
anchorage system if available or with a vehicle seat belt.
•Never put a Car Seat in a vehicle front seat location unless
specifically recommended in vehicle owner’s manual.
•Do not place this restraint in a vehicle seat that has an active
frontal air bag. If a frontal air bag inflates it can hit the Car Seat
with great force and cause death or serious injury to your child.
•This Car Seat is designed and tested to accommodate a child
of a specific range of WEIGHT and HEIGHT. Using the Car Seat
for a child whose weight or height is outside of these limits
will increase the risk of death or serious injury in the event of a
sudden stop or crash (see Section 5.0 of this manual for WEIGHT
and HEIGHT limits for this car seat).
16
6.0 Important
Safety Information
•DO NOT use accessories or parts other than those provided by Baby
Trend, Inc. Use of accessories or parts from other manufacturers
could alter the performance and safety of the Car Seat.
•This Car Seat is certified for use in Motor Vehicles and Aircraft
and conforms to all applicable Federal motor vehicle safety
standards.
•This Car Seat is certified for use on Aircraft WITHOUT the Base.
No car seat can guarantee protection from injury in every situation,
but proper use helps reduce the risk of serious injury or death.
6.1 About your child
•Special needs children, such as pre-term babies, may suffer
difficulties in using this Car Seat. The seat recline angle in this
Car Seat may not be appropriate for Special Needs babies. If
your child has special needs or any breathing difficulties, please
discuss your child’s needs and travel in Car Seats with your
pediatrician, or other competent health care provider, to ensure
the safety of your child.
•DO NOT dress your child in bulky clothing or other garments that
will hinder the harness from being properly latched between your
child’s legs and belts being snugly adjusted around your child.
•Never leave your child unattended, even for a moment.
6.2 About your vehicle
•Proper installation of the Car Seat in your vehicle and proper
securing of your child in the Car Seat are essential to ensure
17
6.0
Important Safety Information
the safety of your child. Quick turns, sudden stops, or other
maneuvers in avoiding a crash, as well as a crash, can injure
your child if not properly secured in the seat or if the seat is not
properly installed in the vehicle.
- LATCH attachment must be secured or vehicle seat belt must
be tightly adjusted and stay tightly adjusted around car seat.
- Harness must be snugly adjusted around your child.
•Not all vehicle seat belts or seating locations can be used with
this Car Seat. Read vehicle owner’s manual and “Vehicle Seat
Belts” section in this manual.
•Some vehicles do not have any safe location where this Car
Seat to be securely installed. In addition, many vehicles do not
have seat belt systems that will adequately hold this Car Seat in
the required position. Please refer to both this manual and your
vehicle owner’s manual for complete information for proper, safe
installation of this Car Seat.
6.3 About this Car Seat
•This Car Seat is constructed of plastic that can deform over time
if left with any object in the seat while stored. DO NOT leave
heavy objects in the Car Seat while not in use. DO NOT store
the seat in the trunk of your car with heavy objects on it or with
pressure on the Car Seat from the trunk lid.
•Replace the Car Seat and Base after a vehicle crash of any kind. A
crash, even a minor crash, can cause undetectable damage to the Car
Seat or Base that may cause the Seat or Base to fail in a subsequent
crash. DO NOT use the Car Seat if it is damaged or broken.
18
6.0 Important
Safety Information
•DO NOT use Car Seat if it is damaged or is missing parts.
•Never combine this Car Seat or Base with any other Car Seat
or Base from any other manufacturer. If you are in need of an
additional Base, please contact your local dealer or Baby Trend
to obtain one.
•Never leave the Car Seat or Base unsecured in your vehicle even
when not occupied. An unsecured seat or base can fly through
the vehicle in the event of a crash, sudden stop or sharp turn and
cause serious injury to the driver, who may then loose control
of the vehicle, or to other passengers. When not in use, either
remove the seat and or base from the vehicle or make sure
that both are securely belted to the vehicle according to these
instructions.
•The Car Seat may become very hot if left in direct sunlight. Your
child may suffer burns from hot components. Always check the
Car Seat for hot surfaces that may come into contact with your
child before placing your child in the Car Seat. We suggest that
you cover the Car Seat with a blanket or towel if it will be subject
to direct sunlight while you are away from the vehicle.
•Discontinue use of the Car Seat and Base after six (6) years from
the date of manufacture. The date of manufacture can be found
on the label located on the underside of the Car Seat or Base.
When discarding an out of date seat, please ensure that someone
finding the seat will be unable to use it. We suggest that you
disable the seat by removing the pad and harness and discarding
the pieces at different times.
19
6.0
Important Safety Information
6.4 About use as a carrier
WARNING
Never leave child unattended.
SUFFOCATION HAZARD: Infant carrier can roll over on soft
surfaces and suffocate child, NEVER place carrier on beds, sofas,
or other soft surfaces.
STRANGULATION HAZARD:
- Child can strangle in loose restraint straps. Never leave child in
carrier when straps are loose or undone.
- Children have STRANGLED in loose or
partially buckled harness straps. Fully restrain
the child even when carrier is used outside the
vehicle.
FALL HAZARD: Child’s movement can slide
carrier. Never place carrier near edges of
counter tops, tables, or other elevated surfaces.
Never Leave Your Child Unattended, even if they are asleep. Very
often when you arrive at your destination you will find that your
child has fallen asleep in the Seat. Do not leave the child unattended, even for a minute. Your child can tip or move the carrier
by their movements, kicking or grabbing on to their surroundings.
If the carrier tips over, your child can suffocate from the surface
that the seat is on as well as from the pressure on their chest from
the safety harness. In addition, if the carrier is placed too upright,
the child’s head can fall forward and cause the child to have difficulty breathing.
20
6.0 Important
Safety Information
WARNING!
To avoid death or serious injury from suffocation, falls
and other hazards:
•Always place the carrier on a firm and level surface. Never place
the carrier on soft or plush surfaces such as a bed, comforter,
couch, sofa, chair, etc. The carrier has a very high possibility of
tipping over if placed on a soft or plush surface.
•Fall hazard: Child’s movements can slide carrier. Never place the
carrier near the edge of high surfaces such as tables, counter tops,
shelves, or other elevated surfaces. To prevent falls, stay within
arm’s reach whenever the carrier is not on the floor or ground.
•Child can strangle in loose safety harness straps. Never leave
child in carrier when straps are loose or undone. Always use the
safety harness as instructed in this manual when the child is in
the carrier.
•Before lifting the carrier with the handle, check that the handle
is firmly locked into position. The carrier will pivot about an
unlocked handle and can result in injury to your child.
•Strings and cords can cause strangulation:
- DO NOT place items with string around a child’s
neck, such as hood strings, pacifier cords, etc.
- DO NOT suspend strings on or over carrier.
- DO NOT attach strings to toys.
- DO NOT place the carrier near a window where cords
from blinds or drapes can strangle a child.
•Carrier use:
- Rocker use: Handle in mid-storage or storage position.
- Non-Rocking use: Handle in non-rocking position.
21
7.0
LATCH Attachment System
LATCH ATTACHMENT SYSTEM
Lower Anchors and Tethers for Children (LATCH) System is
designed to make installation of child Car Seats in motor
vehicles easier by requiring child restraints to be installed without
using the vehicle’s seat belt system. Since September 1, 2002, at
least two rear seating positions of all cars, mini vans and light trucks
come equipped LATCH systems which include lower child restraint
anchor points located between a vehicle’s seat cushion and seat
back, and top tether anchors. Also on September 1, 2002, all child
restraints will have two attachments which will connect to the vehicle’s
lower anchor points and top tethers (on forward-facing car seats).
Together, the lower anchors and upper tethers make up the LATCH
system. Read your vehicle owner’s manual for exact locations,
identification and requirements for use with a child restraint.
ONLY use LATCH to secure your child
Vehicle Top
restraint in a seating position recommended
Tether Anchors
by the vehicle manufacturer.
Refer to the vehicle owner’s manual for
the vehicle’s top tether anchor locations.
They should be identified by one of
the symbols shown in Fig. 22-1.
Latch Lower
Anchors
22
22-1
8.0 Selecting
a Vehicle Seat Location
SELECTING THE BEST VEHICLE LOCATION
WARNING!
DEATH or SERIOUS INJURY can occur:
• IMPROPER PLACEMENT OF THE CHILD RESTRAINT
INCREASES THE RISK OF SERIOUS INJURY OR DEATH.
WARNING
Not every location within an automobile may be safe for the installation of
this Car Seat. Car Seat must be tightly secured and remain tightly secured
at all time. Some automobiles have no seating position installation of a Car
Seat. Improper placement or use of a car seat that is not tightly secured in
a vehicle will increase the risk of death or serious injury.
Please follow the instructions in this manual and in your vehicle owner’s
manual carefully to ensure proper location and installation of this Car Seat.
If you are uncertain about the proper location of the Car Seat within the
vehicle, contact your vehicle manufacturer directly or through their dealer
before using this Car Seat. You are also invited to call Baby Trend at1-800328-7363 for additional information or assistance.
8.1 Overall Considerations in Selecting a Location
•According to accident statistics, children are safer when properly
restrained in rear vehicle seating positions, rather than front seating
23
8.0
Selecting a Vehicle Seat Location
positions. Whenever possible, this Car
Seat should be secured in the rear center,
seating position. The rear seat directly
behind the front seats NOT in a third row
rear seat. (Fig 24-1)
24-1
•ONLY place in a forward-facing vehicle
seat. DO NOT place this Car Seat in any
vehicle seat that faces to the rear.
(Fig 24-2)
•DO NOT place this Car Seat in any vehicle
seat that faces to either side of the vehicle.
(Fig. 24-3).
24-2
•We recommend that you use the center
rear seat position as the safest location
for the Car Seat. In addition, whenever
possible, have an adult ride in the rear
with the child in order to monitor the child.
Note: LATCH system may not be available
in the center rear seat position. Install
24-3
with a vehicle seat belt if LATCH is not
available.
•If the driver is the only adult in the vehicle and the child requires
constant monitoring, then a vehicle front seating position may be used
if there is no passenger side Active Air bag and all of the following
requirements are met for this location.
24
8.0 Selecting
a Vehicle Seat Location
8.2 Check that the Vehicle Seat Meets the Following
Requirements
WARNING
DO NOT place rear-facing child
seat on front seat with air bag.
DEATH OR SERIOUS INJURY can
occur. The back seat is the safest
place for children 12 and under.
•NEVER place this Car Seat in a vehicle seating location that has an
Active Air Bag! Active Air Bags inflate with great force! An inflating
Air Bag can strike a Car Seat with enough force to cause death or
serious injury to your child. If your vehicle is equipped with a front
passenger side Active Air bag, please refer to the vehicle’s owner’s
manual for additional information about Active Air bags and child Car
Seat installation.
•DO NOT use this Car Seat in a vehicle that has a vehicle seat back
that does not lock into place. A seat back that folds forward must have
a latch or locking mechanism to prevent it from flying
forward and striking the child in a sudden stop or accident.
•Please review your vehicle owner’s manual to determine the best
location for the Car Seat or to determine if any locations are unsafe for
Car Seat installation. If you do not have the vehicle owner’s manual
25
9.0
Vehicle Seat Belts
or the owner’s manual does not address child Car Seat installation,
please contact the vehicle manufacturer to obtain this information
before using this Car Seat.
VEHICLE SEAT BELT REQUIREMENTS
WARNING!
DEATH or SERIOUS INJURY can occur:
THE CAR SEAT MUST BE TIGHTLY SECURED BY THE VEHICLE SEAT
BELT AT ALL TIMES. A VARIETY OF VEHICLE SEAT BELT SYSTEMS
ARE AVAILABLE IN VEHICLES. SOME OF THESE VEHICLE SEAT
BELT SYSTEMS ARE NOT SAFE FOR USE WITH THE CAR SEAT.
Even newer vehicles can have seat belts systems that are NOT
safe for use with the Car Seat. These systems may look safe but
their method of operation precludes their use with the Car Seat.
If you are unsure if the vehicle seat belt is safe for use with the
Car Seat, check the vehicle owner’s manual or contact the vehicle
manufacturer, or your vehicle dealer for additional information.
9.1 SAFE Vehicle Seat Belt Systems
The following vehicle seat belt systems CAN BE
USED with the Car Seat provided that all of the other
requirements prescribed in these instructions, including
26
9.0 Vehicle
Seat Belts
9.0
seat position, secure installation and all instructions
provided by your vehicle owner’s manual are followed.
Lap Belts (Manually Adjusted)
A lap belt that is manually adjusted and
will remain tightly adjusted around the
Car Seat while the vehicle is in motion
is suitable for use with the Car Seat. Pulling
the belt through the buckle after the buckle is
fastened tightens this type of seat belt. (Fig 27-1)
Lap Belts with Automatic Locking
Retractor (ALR)
A lap belt that cannot be lengthened once
it is fastened is suitable for use with the
Car Seat. These seat belts often have an
automatic locking retractor (ALR) that
will allow the belt to be lengthened but
once fastened, must be unbuckled and
allowed to retract fully before allowing the
belt to be lengthened again. (Fig 27-2)
Combination Lap/Shoulder Belt with
Locking Latch Plate
A lap/shoulder combination seat belt
with a latch plate that locks the lap
belt into position is suitable for use
with the Car Seat. Once this type of
27
27-1
27-2
Vehicle Seat Belts
seat belt is fastened, the latch plate
prevents the lap belt from loosening.
This combination seat belt does not
require a Locking Clip. (Fig 27-3)
Note: The belt is tightened by pulling
hard on the shoulder belt while pushing
down hard on the Car Seat.
Combination Lap/Shoulder Belt with Sliding
Latch Plate
A lap/shoulder combination belt system with
a latch plate that can slide freely along the
belt (Fig 28-1) is suitable for use with the
Car Seat if it includes a lockable retractor or
a Locking Clip (Fig 28-2) MUST be used to
secure the lap belt into position to prevent
loosening Use the Locking Clip provided with
the Car Seat as instructed (See section 9.2).
Locking clip is stored on side of seat pad.
Please refer to your vehicle owner’s manual
for additional information on locking this
style of seat belt. This style of belt MUST be
locked to prevent movement of the Car Seat.
27-3
28
28-1
Locking clip
28-2
9.0 Vehicle
Seat Belts
9.0
Vehicle Seat Belts
9.2 Locking Clip Installation
9.3 UNSAFE Vehicle Seat Belt Systems
Locking Clip is located on side of Seat Pad.
1. Route vehicle lap belt through vehicle belt
path on base or car seat and buckle vehicle
seat belt.
2. Tighten the buckled seat belt around the Car
Seat by pulling upward on the shoulder belt
while pushing down hard on the Car Seat or
base.
3. While maintaining downward pressure
on the Car Seat, squeeze the vehicle
shoulder belt and lap belt together just
above the buckle to prevent it from moving.
Unbuckle the vehicle seat belt, being careful
to prevent movement of the buckle.
4. Secure the vehicle shoulder belt to the lap
belt by installing the Locking Clip 1/2” from
the buckle. (Fig 30-2)
5. Re-buckle the seat belt and check that the
seat belt is tightly adjusted and stays tightly
adjusted around the Car Seat. Pull firmly on
the lap belt to ensure that the Locking Clip is
locking the lap belt and remains very tight.
Test installation to make sure Car Seat is secure.
If NOT secure, additional belt tightening is
required. Repeat steps above until secure.
DO NOT use the following types of seat belt systems with the Car Seat.
These belt systems will not hold the Car Seat securely in place at all times.
In addition, the Locking Clip provided with this product will NOT make these
belt systems safe to use. NEVER USE unsafe vehicle belts systems!
29
Note: LATCH can be used IN PLACE OF the following
unsafe vehicle seat belts systems if your vehicle
is equipped with LATCH anchorage system.
1/2” (1.25cm)
30-2
Lap Belts with Emergency Locking Retractor (ELR)
DO NOT use a lap belt that stays loose after installed
and locks only in a crash or sudden stop. These lap
belts utilize an Emergency Locking Retractor (ELR)
and are often found in combination with motorized
shoulder belts. Because these belts will allow the Car
Seat to move about on the vehicle seat, the chance
of the Car Seat being out of the proper position in
a crash is very high. Accordingly, DO NOT use the
Car Seat with this type of seat belt system. Please
see your vehicle’s dealer or owner’s manual for
information on converting this seat belt system to one
that is acceptable for use with a Car Seat. (Fig 31-1)
Combination Lap/Shoulder Belt
with Retractor
DO NOT use a lap/shoulder belt system if the
lap belt and shoulder belt each have retractors
30
31-1
31-2
9.0 Vehicle
Seat Belts
10.0 Securing
10.1 Preparation for Installation in Vehicle
at one end. This type of seat belt system will not
adequately restrain the Car Seat. (Fig 31-2)
WARNING!
Passive Restraint – Lap or Shoulder Belt
Mounted on Door
DO NOT use a seat belt that is connected to the
door in any way. These types of seat belts are
designed to automatically surround the occupant
when the door is closed. This type of seat belt will
NOT adequately restrain the Car Seat. (Fig 32-1)
Passive Restraint – Lap Belt with Motorized
Shoulder Belt
DO NOT use a shoulder belt that moves
along a track. These systems typically move
to surround the occupant when the door is
closed. This type of belt system will NOT
adequately restrain the Car Seat. (Fig 32-2)
Lap Belts Forward of Seat Crease
DO NOT use a seat belt that is anchored on the
seat more than 2 inches forward of the crease
between the seat bottom and the seat back.
This type of seat belt anchors the Car Seat
too far forward and the Car Seat will not be
safely restrained in the vehicle. (Fig 32-3)
31
Car Seat in Your Vehicle
DEATH or SERIOUS INJURY can occur:
FAILURE TO PROPERLY SECURE THE CHILD RESTRAINT IN
YOUR VEHICLE INCREASES THE RISK OF SERIOUS INJURY
OR DEATH IN THE EVENT OF A SUDDEN STOP, SHARP TURN
OR CRASH.
32-1
32-2
32-3
1. Make sure you have selected an acceptable location for the
Car Seat as instructed in section SELECTING THE BEST
VEHICLE LOCATION for the Car Seat on page 23.
2. Check again for any Active Frontal Air bags. DO NOT use any
location that has an active frontal air bag or is adjacent to an
Active Air bag such that, when deployed, the Active Air bag
may come into contact with the Car Seat. Many passenger
side Frontal Air bags are designed to deploy to protect the
passenger side as well as the center front seating position.
Please see the Active Air bag warnings in your vehicle owner’s
manual to help determine unsafe locations in the vehicle.
3. If the front seat position is used, slide the vehicle seat as far to
the rear as possible to prevent the Car Seat from striking the
dash in a crash. If the rear seat position is used, slide the vehicle
seat directly in front of the Car Seat forward enough to prevent
the Car Seat from striking the vehicle seat back in a crash.
32
10.0 Securing
Car Seat in Your Vehicle
10.2 Base Installation with LATCH System
WARNING!
•LATCH CONNECTORS ON CAR SEAT MUST BE SECURED ONTO
VEHICLE LOWER ANCHORAGES
•NEVER CONNECT MORE THAN ONE LATCH CONNECTOR TO A
VEHICLE LOWER ANCHOR UNLESS SPECIFICALLY ALLOWED IN
VEHICLE OWNER’S MANUAL
•FAILURE TO INSTALL CAR SEAT AT CORRECT SEAT RECLINE
ANGLE CAN CAUSE DEATH OR SERIOUS INJURY.
•BASE MUST BE PROPERLY RECLINED. INFANTS UNDER 3
MONTHS OF AGE OR UNABLE TO HOLD THEIR HEAD UPRIGHT
UNASSISTED MUST USE RECLINE POSITION # 1.
- TOO UPRIGHT CAN LEAD TO BREATHING DIFFICULTIES
FOR CHILDRED UNDER 3 MONTHS OF AGE OR NOT
ABLE TO HOLD THEIR HEAD UPRIGHT UNASSISTED.
When available, LATCH is the recommended method
of securing the Car Seat in the vehicle.
Preparation for installation with LATCH
1. Remove Belt Adapter from base.
2. Locate a LATCH seating position and
locate the LATCH anchorages in the
vehicle seat. (See Section 7.0 LATCH
Attachment System for more information)
3. If vehicle seat back is adjustable, adjust into the upright
position or the position or the position specified in the
vehicle owner’s manual for use with a Car Seat.
33
10.0
Securing Car Seat in Your Vehicle
Attach the Lower LATCH Connectors
1. Locate the LATCH anchors in the
vehicle seat. (Fig. 22-1) Once
located, secure the LATCH
Connectors to the vehicle LATCH
lower anchorages by pushing the
Base toward the rear of the vehicle.
Listen for the “click” and check
that both connectors are securely
attached to the lower anchorages by
pulling on the Base. (Fig. 34-1)
IMPORTANT: Always make sure the
LATCH Connectors are securely
connected to the vehicle lower
anchorages.
Note: If brace contacts vehicle seat
back before LATCH is connected
to vehicle anchors, adjust brace
into the vertical position and
then secure latch connectors.
34-1
2. Adjust Base into desired recline
position. (see Section 10.4)
3. Push on brace and rear of
base to secure the base into
the vehicle seat. (Fig. 34-2)
34-2
34
10.0
Securing Car Seat in Your Vehicle
To Remove Base
Disconnect LATCH Lower Connectors.
To disconnect the LATCH Connectors:
1. Push base toward LATCH connectors and while
pushing on the base, press the LATCH Release
Button on one of the LATCH Connectors (Fig 351) and pull base away from the vehicle anchors.
2. Repeat on oppositie side.
3. Attach the Belt Adapter onto LATCH
Connectors when not in use.
10.0
LATCH
relese button
35-1
10.3 Base Installation with Vehicle Belt
WARNING!
DEATH or SERIOUS INJURY can occur:
•FAILURE TO PROPERLY SECURE YOUR CHILD IN THE CHILD
RESTRAINT INCREASES THE RISK OF SERIOUS INJURY OR
DEATH IN THE EVENT OF A SHARP TURN, SUDDEN STOP
OR CRASH.
•VEHICLE LAP BELT MUST STAY TIGHTLY ADJUSTED TO CHILD
RESTRAINT AT ALL TIMES. IF VEHICLE BELT DOES NOT STAY
TIGHT, READ VEHICLE OWNER’S MANUAL AND “VEHICLE SEAT
BELT REQUIREMENTS” SECTION IN THIS MANUAL.
•FAILURE TO INSTALL CAR SEAT AT CORRECT SEAT RECLINE
ANGLE CAN CAUSE DEATH OR SERIOUS INJURY.
35
Securing Car Seat in Your Vehicle
• BASE MUST BE PROPERLY RECLINED. INFANTS UNDER 3
MONTHS OF AGE OR UNABLE TO HOLD THEIR HEAD UPRIGHT
UNASSISTED MUST USE RECLINE POSITION # 1.
•WHEN INSTALLING BASE WITH VEHICLE SEAT BELT, BELT
ADAPTER MUST BE USED AND POSITIONED BEHIND LAP BELT
ON BOTH SIDES.
10.3.1 Initial Positioning
1. Make sure the Belt Adapter is on
the LATCH Connectors. (Fig. 36-1)
2. If vehicle seat back is adjustable,
adjust into the upright position
or the position or the position
specified in the vehicle owner’s
manual for use with a Car Seat.
36-1
3. Place the Base in the rear-facing
position in a forward facing vehicle
seat with Belt Adapter contacting
vehicle seat back as shown in Fig.
36-2. Note: If brace contacts vehicle
seat back before Belt Adapter
contacts vehicle seat back, adjust
Brace into vertical position and then
place Base on vehicle seat with Belt
Adapter contacting vehicle seat back.
36-2
4. Adjust Base recline into desired recline position. (see Section 10.4)
36
10.0
Securing Car Seat in Your Vehicle
10.0
10.3.2 WITH Vehicle Lap/Shoulder Belt
3. Push on brace and rear of base to secure
the base. (Fig. 38-1, 38-2)
1. To attach base with Vehicle Lap/Shoulder
Belt: slide the vehicle lap seat belt into the
belt slot openings, position vehicle shoulder
belt against vehicle seat back and buckle
vehicle seat belt as shown in Fig. 37-1.
37-1
10.3.3 WITH Vehicle Lap Belt only
1. To attach Base with Vehicle Lap Belt only:
slide the vehicle lap belt into the belt
slot openings, and buckle vehicle
belt as shown in Fig. 37-2.
10.3.4 Tighening Vehicle Seat Belt
37-2
1. Check that lap belt is not twisted.
2. Tighten the vehicle lap belt around the Base by pushing down
hard with your hand or knee in the middle of the Base. Then pull
the vehicle seat belt to tighten.
Note: For more information on how to tighten the belt for
your vehicle seat belt system, see Section 8.0 Selecting
the Best Vehicle Seat Location and Section 9.1 SAFE
Seat Belt Systems, or your vehicle owner’s manual.
37
Securing Car Seat in Your Vehicle
Lap/Shoulder Belt
38-1
Lap Belt only
38-2
4. Check that the Base is tightly installed and secure in the vehicle
by performing the following test every time you use the Car Seat.
Firmly push down and side to side on the head end of the Car
Seat to make sure that the vehicle seat belt does not loosen at
all and that the vehicle seat belt is fastened very tightly around
the Car Seat / Base. If you find that the vehicle seat belt loosens
or that the seat easily moves or rotates downward, please see
section entitled Selecting the Best Location for the Car Seat
to determine if the position you have selected is adequate and
check that you have completed all of the steps in the section
entitled Securing the Car Seat or Base in the Vehicle.
If vehicle belt does not stay tightly adjusted around base, see
vehicle seat belts section. A locking clip may be needed or you
may need to move the base to a different seating location.
DO NOT use this seating location if the Car Seat does
not remain tightly installed in the vehicle seat!
38
10.0
Securing Car Seat in Your Vehicle
10.0
10.4 Adjust Base Recline into Desired Position
WARNING!
Seat MUST be in position #1, Most Reclined position,
for children under 3 months of age or unable to hold
their head up unassisted.
The Inertia has (4) recline positions. For your
child’s safety, the Car Seat must be properly
reclined when installed in the vehicle.
To adjust Base recline position:
Squeeze Base recline adjustment handle
and push down on front of Base to desired
position and release recline adjustmet
handle. (Fig. 39-1) Check that Base is locked
in position. Check the Base Recline Position
Indicator for desired position. (Fig. 39-2)
Note: Recline position #1 must be used with
infants under 3 months of age or infants that
cannot hold their head upright unassisted.
(Fig. 39-2) DO NOT use Seat Angle Indicator
when using base.
39
39-1
39-2
Securing Car Seat in Your Vehicle
10.5 Attach Car Seat to Base
1. Check that nothing is on top of the base
or anything that will interfere with the
proper latching of the Car Seat to the
Base.
2. Place the Car Seat onto the Base and
push down until the Car Seat locks
securely to the Base and you hear a
click. (Fig. 40-1)
3. Pull upward on the Car Seat to check
40-1
that the Car Seat is securely locked onto the
base. If the Car Seat does not securely lock onto the Base, the Car
Seat will provide No Protection for your child. DO NOT use the Car
Seat with the Base if it does not securely lock onto the Base. Please
call Baby Trend at 1-800-328-7363 for assistance.
4. Move Carry Handle into the storage or non-rocking position.
WARNING
• Failure to properly recline the Car Seat on the vehicle seat
increases the risk of death or serious injury.
• These instructions must be carefully followed to ensure proper
recline angle for the Car Seat.
- If the Car Seat is positioned too upright, the child’s head may
drop forward and result in breathing problems.
- If the Car Seat is too reclined, excessive force may be exerted on
the child’s shoulders and neck in a crash.
40
10.0
Securing Car Seat in Your Vehicle
10.6 Car Seat Only Installation without Base
WARNING!
•VEHICLE SEAT BELT MUST BE PROPERLY ROUTED AND
REMAIN TIGHTLY ADJUSTED AROUND CAR SEAT AT ALL TIMES.
•FAILURE TO INSTALL CAR SEAT AT CORRECT SEAT RECLINE
ANGLE CAN CAUSE DEATH OR SERIOUS INJURY.
•CAR SEAT MUST BE PROPERLY RECLINED.
- Too upright can cause a young infant’s head
to fall forward and restrict breathing.
- Too reclined can cause ejection in a sudden stop or crash.
10.6.1 Initial Positioning
1. Park your vehicle on a level surface so that the level indicator located
on the left side of the Car Seat will properly indicate the proper angle
of recline of the seat.
10.0
Securing Car Seat in Your Vehicle
3. Place the Car Seat in the rear-facing
position in a forward facing vehicle seat
as shown in Fig. 42-1. The Child must
face the rear of the vehicle and Car Seat
must be placed in a vehicle seat that
faces forward.
42-1
10.6.2 WITH Vehicle Lap/Shoulder Belt
1. To attach Car Seat with Vehicle Lap/
Shoulder Belt: Slide the vehicle
lap belt into the belt slot openings,
buckle vehicle seat belt, and place
vehicle shoulder belt against vehicle
seat back as shown in Fig. 42-2.
42-2
10.6.3 WITH Vehicle Lap Belt only
2. If vehicle seat back is adjustable, adjust into the upright position or
the position or the position specified in the vehicle owner’s manual
for use with a Car Seat.
41
1. To attach Car Seat with Vehicle Lap Belt
only: Slide the vehicle lap belt into the
belt slot openings and buckle vehicle
seat belt as shown in Fig. 42-3.
42-3
42
10.0
1.0 General
SecuringWarnings
Car Seat
in Your Vehicle
10.0
10.6.4 Adjust Seat Recline Angle
WARNING!
Proper recline angle for seat back recline is required.
Follow the instructions for adjusting recline angle
using car seat with base and using without base.
- Too upright can cause a young infant’s head
to fall forward and restrict breathing.
- Too reclined can cause ejection in a sudden
stop or crash.
Adjust seat recline angle using Seat Angle Indicator:
1. Check that the Car Seat is level side
to side on the vehicle seat. Check the
Seat Angle Indicator that matches the
weight of your child. (Fig. 43-1)
2. If the Seat Angle Indicator shows NO red, the
seat is installed at the proper level of recline.
3. If the Seat Angle Indicator shows ANY red,
the Car Seat is either too upright or too
reclined. If the Car Seat is too reclined
adjust the Car Seat as shown in Fig.
43-2 until the level indicator shows NO
red. If the Car Seat is too upright, place
a tightly rolled towel, or car seat noodle,
under the foot end of the Car Seat until
the level indicator shows NO red. (Fig.
43-3) Re-tighten the vehicle seat belt.
43
43-1
43-2
Securing
2.0 Registration
Car Seat in Your
Information
Vehicle
4. Check that the Car Seat is tightly installed and secure in the
vehicle by performing the following test every time you use the
Car Seat. Firmly push down and side to side on the head end
of the Car Seat to make sure that the vehicle seat belt does not
loosen at all and that the vehicle seat belt is fastened very tightly
around the Car Seat. If you find that the vehicle seat belt loosens
or that the seat easily moves or rotates downward, please see
section entitled Selecting the Best Location for the Car Seat
to determine if the position you have selected is adequate and
check that you have completed all of the steps in the section
entitled Securing the Car Seat or Base in the Vehicle.
If vehicle belt does not stay tightly adjusted around base, see
vehicle seat belts section. A locking clip may be needed or you
may need to move the base to a different seating location.
DO NOT use this seating location if the Car Seat does
not remain tightly installed in the vehicle seat!
5. Recheck that Car Seat is properly reclined.Readjust recline if
necessary.
6. Adjust Carry Handle into the storage or non-rocking position.
10.6.5 Tighening Vehicle Seat Belt
43-3
1. Check that lap belt is not twisted.
2. Tighten the vehicle lap belt around the Car Seat by pushing down
hard with your hand on one side of the Car Seat and then the other
side and pulling on the vehicle seat belt to tighten. (Fig. 45-1)
44
11.0 Securing Child with Harness System
11.0
Note: For more information on how to
tighten the belt for your vehicle seat
belt system, see Section 8.0 Selecting
the Best Vehicle Seat Location and
Section 9.1 SAFE Seat Belt Systems,
or your vehicle owner’s manual.
Securing Child with Harness System
WARNING
45-1
Children have STRANGLED in
loose or partially buckled harness
straps. Fully restrain the child
even when carrier is used outside
the vehicle.
11.1 Securing Your Child with Harness System
WARNING!
DEATH or SERIOUS INJURY can occur:
PROPER INSTALLATION AND USE IS REQUIRED! FAILURE TO
PROPERLY SECURE YOUR CHILD IN THE CHILD RESTRAINT
INCREASES THE RISK OF SERIOUS INJURY OR DEATH IN
THE EVENT OF A SHARP TURN, SUDDEN STOP OR CRASH.
•Failure to properly adjust the harness straps on your child
increases the risk of death or serious injury in the event of a
sudden stop or crash. Follow the instructions very closely to
ensure that the harness straps are properly adjusted to fit your
child at all times. Your child will grow very rapidly! Please check
the fit of the harness straps every time you use the Car Seat.
•Snugly adjust harness provided with the Car Seat around child.
•Prevent ejection - Shoulder strap height must be at
or just below child’s shoulders.
45
•Do not use accessories such as strap covers, blankets, cushions,
or padding under harness straps or child unless provided by
Baby Trend.
•Do not use Car Seat with harness straps loose or unbuckled.
Harness straps MUST be snug and positioned over shoulders
and thighs of child.
In a crash, the Car Seat provides NO protection for your child
unless the harness straps are properly secured and installed
according to these instructions. Make sure that the harness straps
are properly adjusted and secured whenever using the Car Seat.
IMPORTANT: Adjust the harness snugly every time you place
your child in the Car Seat and AVOID bulky clothing.
Both the harness height and crotch belt length are adjustable. Always
properly adjust to fit your child as indicated in this section.
46
11.0 Securing Child with Harness System
11.0
5. The proper height of the harness straps is
at or just below your child’s shoulders.
(Fig 48-1) (see Section 11.2 Adjusting
Harness Strap Height)
1. Loosen built-in safety harness by
pressing the Harness Adjuster Button
and pulling the harness straps toward
you. (Fig 47-1)
2. Open Harness Clip by pressing button and
sliding apart. (Fig 47-2)
47-1
3. Unbuckle Harness Buckle by pressing
button and sliding buckle tongues up and
out of buckle. (Fig 47-3)
47-2
4. Place your child in the Car Seat so that
the child’s bottom is against the back and
bottom of the seat. (Fig. 47-4)
47-3
Correct
Incorrect
47-4
47
Securing Child with Harness System
6. Place harness straps over child’s shoulders
and put the two buckle tongues together,
overlaying the left buckle tongue onto the
right buckle tongue, and insert the two
joined buckle tongues into the harness
buckle until they click into place.
Note: Pull up on tongues to make sure that
BOTH tongues click into place. (Fig 48-2)
7. Check buckle height - The Crotch
Strap should be adjusted so that
a gap of 1/2” to 1” is present
between the ears of the buckle
and the top of child’s thigh (Fig
48-3), disregarding any clothing
or diaper. If buckle is too low or to
high, adjust height. (see Section
11.3 Adjusting Crotch Strap
Length)
48
48-1
48-2
buckle
thigh
48-3
11.0 Securing Child with Harness System
11.0
11.2 Adjusting Harness Strap Height
8. Check that the straps are not twisted and
lie flat over the shoulders.
The Car Seat includes a sliding Adjustable Back that will adjust
the height of the harness straps as the back is adjusted.
9. Tighten the harness straps to snugly
adjust harness around child by pulling
the Harness Adjuster Strap at the front of
the Car Seat as shown. (Fig 49-1)
10. Connect the Harness Clip and
position the Harness Clip at the middle
of the child’s chest, level with the
armpits.
1. The proper height of the harness
straps is at or just below your child’s
shoulders.
49-1
12. Check Harness Straps - Make sure the straps are flat and snug
against the child’s shoulders and thighs.
NOTE: A snug strap should not allow any slack. It lies in a relatively
straight line without sagging. It does not press on the child’s flesh or
push the child’s body into an unnatural position.
Removing Your Child from Harness System
1. Open Harness Clip by pressing button and sliding apart.
2. Unbuckle the Harness Buckle by pressing the red button.
3. Press the Harness Adjuster Button and pull outward on the
straps to loosen.
4. Slide the harness straps off the child’s shoulders and arms.
5. Remove your child.
49
Securing Child with Harness System
2. Rotate the knob behind the seat back
to raise or lower the moving seat back
and harness straps.
- To adjust the seat back height,
turn the moving back adjuster
knob behind the seat clockwise to
increase the seat back height and
counter clockwise to decrease the
seat back height. Each half turn will
raise or lower the slots 1/2”.
- Knob must remain in vertical position
after adjustment. (Fig. 50-1) DO
NOT use the Car Seat with the
Harness adjusted above the child’s
shoulders as the child will not be
held securely in a sharp turn, sudden
stop, or crash.
50
Knob handle must
be vertical
50-1
11.0 Securing Child with Harness System
12.0 Final
Safety Check
11.3 Adjusting the Crotch Strap Length
12.0 FINAL SAFETY CHECKS
1. Lift up on the crotch strap pad and you will see
the crotch strap anchor clip riding in a slot in
the crotch strap cavity in the car seat shell.
Pull outward on the metal clip, while feeding
the crotch strap webbing downward, until the
crotch strap metal clip is removed from the slot.
DO NOT attempt to completely remove the
crotch strap from the Car Seat. (Fig. 51-1)
1. If your child is already in the Car Seat, check that the harness is
properly fitted and snugly adjusted as instructed in the section 11.1
Securing Your Child with Harness System.
2. Check that LATCH connectors are securely attached or vehicle seat
belt is tightly adjusted around base.
3. Place handle in storage or non-rocking position after installing in the
vehicle.
2. Adjust the length of the Crotch Strap to the
desired length. For small children, the length
of the Crotch Strap is shortened by wrapping
additional strap material around the metal clip.
For larger children, the length is increased by
unwrapping material from around the metal
clip. (Fig 51-2)
3. Reinsert the Crotch Strap metal clip into the
slot in the Crotch Strap cavity while pulling
upward on the Crotch Strap buckle. Check that
the Crotch Strap metal clip is completely seated
all the way down in the slots before using the
Car Seat. (Fig 51-3)
4. Push the Crotch Strap buckle back up through
the slot in the Seat Pad and return the Seat Pad
to its original position on the seat shell.
51
51-1
13.0 ADDITION INFORMATION
13.1 Care & Maintenance
51-2
51-3
Vehicle seat: Use a child restraint mat, towel or other cloth to protect
vehicle seat upholstery. Continuous use of a child restraint may cause
damage to an unprotected vehicle seat.
Car Seat – Plastic and Metal components: Clean with mild soap and
cold water. DO NOT use bleach or harsh detergents.
Buckle Adjuster and LATCH Connectors: Wipe clean with damp cloth
ONLY. If buckle/LATCH connectors will not securely lock, DO NOT use
this child restraint. DO NOT use lubricants of any kind on any of the
components of the Car Seat and Base, including the buckle and LATCH
system.
Harness Straps: Spot clean with damp cloth or replace. DO NOT
immerse straps in water. The straps may weaken and not perform as
designed.
52
13.0 Additional
Information
Seat Pad and Head Support Pad: For care and maintenance, read
and follow instructions on fabric tags.
To remove Seat Pad / Head Support Pad:
1. Remove the harness shoulder straps from the Car
Seat.
2. Loosen the harness straps by depressing the
Harness Adjuster Button located below the flap
just ahead of the Harness Buckle and pulling on
the harness straps. (Fig. 53-1)
3. Move Head Support into highest position to
remove and re-thread harness straps.
4.Turn the seat over. Locate the Belt Adjuster
Plate near the bottom of the seat. (Fig. 53-2)
53-1
Remove both Harness Straps from the Belt
Adjuster Plate. From the front of the seat, pull
the Harness Straps through the shoulder area
slots and seat pad.
A
5. Unthread the shoulder strap from the
B
Harness-tie and Buckle Tongues, leaving
A
the Buckle Tongues in the Buckle. Be sure
B
to note how they are threaded to assist in
reassembling.
6. Carefully remove the Head Support Pad then
53-2
adjust the Adjustable Back to its lowest position.
7. Carefully remove the Sead Pad, do not unthread
the lower portion of the harness from the Car Seat.
8. For care and maintenance see fabric tag.
53
13.0 Additional
Information
WARNING!
DO NOT use the Car Seat Without the Seat Pad.
To install Seat Pad / Head Support Pad:
1. Reinstall Seat Pad /Head Support Pad on
Car Seat only when fabric is completely dry.
2. Place Seat Pad on Car Seat then place
the Head Support Pad, thread the Harness
straps through the Seat Pad bottom slots
and pulling the Buckle through the opening
at the rear of the flap on Pad. Thread
the Harness Straps through Buckle
Tongues and Harness-Tie. (Fig. 54-1)
Harness-Tie
Buckle Tongues
54-1
3. Move Head Support into highest
position to re-thread harness straps.
4. Use the included Belt Threading Tool and thread
the Harness straps through the slots in the
Seat Pad and Head Support Pad. (Fig. 54-2)
5. From the rear of the Car Seat, pull
the Harness Straps through the Slots
until you have enough strap to reach
the Belt Adjuster Plate. (Fig. 54-3)
6. Reassemble the Harness Straps to the Belt
Adjuster Plate. Do the left Harness Strap first,
54
Belt Threading Tool
54-2
A
A
B
54-3
13.0 Additional
Information
13.0 Additional
followed by the right Harness Strap. Check that Harness Straps
are completely within the Belt Adjuster Plate loop (Fig. 55-1). You
have two adjustment positions on the harness. Use Position A for
a smaller child, and Position B for a larger child. If using Position
A, loop B must be on top of the Belt Adjuster Plate. (Fig. 55-2)
A
A
B
55-1
B
55-2
7.Inspect the Harness Straps from the front and rear to ensure
that they are not twisted. Twisted straps can prevent proper
tightening of the Harness and thus may not adequately
restrain your child in a sharp turn, sudden stop or crash.
Before using the Car Seat, please pull on the Harness Straps
from the front to ensure that they are securely re-attached.
AIRPLANE USE
This child restraint is certified for use in Aircraft ONLY without the base.
This Car Seat must be secured without the Base in an airplane
in the same manner as it is used in an automobile. Please
check with the airline in advance to determine their policies
regarding the use of Car Seats aboard the airplane. The Car
Seat must be used in only a forward facing airplane seat. Please
ask the flight attendant for assistance in placement of the Car
Seat. Please follow these instructions for proper installation
and perform the Final Safety Check as instructed herein.
REPLACEMENT PARTS
If You Need Help or Replacement Parts, please call our
Customer Service Department at 1-800-328-7363 between the
hours of 8:00 am and 4:30 pm, Pacific Standard Time, Monday
through Friday or visit us online at www.babytrend.com
13.2 Using Your Car Seat with a Baby Trend Stroller
Please see the stroller owner’s manual for information on the use of the
Car Seat with the Baby Trend stroller.
55
Information
56