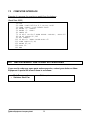
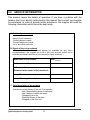
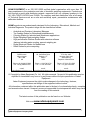
1
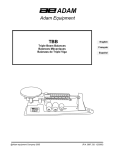
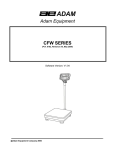
Adam Equipment
ADK SERIES
for USA
(P.N. 2693, Revision F7, November 2005)
@Adam Equipment Company 2005
@Adam Equipment Company 2005
CONTENTS
1.0
INTRODUCTION............................................................................................................3
2.0
SPECIFICATIONS .........................................................................................................3
3.0
INSTALLATION..............................................................................................................4
3.1
3.2
3.3
3.4
3.5
4.0
4.1
4.2
5.0
5.1
5.2
5.3
5.4
5.5
LOCATING THE BALANCE........................................................................................4
UNPACKING YOUR BALANCE..................................................................................4
SETTING UP THE BALANCE.....................................................................................5
SHIPPING PROTECTION ..........................................................................................5
VOLTAGE SELECTION .............................................................................................6
OPERATING THE BALANCE ........................................................................................6
CALIBRATION............................................................................................................7
CALIBRATION CHECK ..............................................................................................8
WEIGHING ....................................................................................................................9
SIMPLE WEIGHING ...................................................................................................9
WEIGHING-IN ............................................................................................................9
WEIGHING-OUT ......................................................................................................10
DEVIATION WEIGHING. ..........................................................................................10
BELOW PAN WEIGHING .........................................................................................10
6.0
CARE AND MAINTENANCE........................................................................................11
7.0
RS-232C INTERFACE .................................................................................................12
7.1
7.2
7.3
RS-232C SPECIFICATIONS ....................................................................................12
DATA OUTPUT MODES...........................................................................................12
COMPUTER INTERFACE ........................................................................................14
8.0
REPLACEMENT PARTS AND ACCESSORIES .........................................................14
9.0
SERVICE INFORMATION ..........................................................................................15
@Adam Equipment Company 2005
@Adam Equipment Company 2005
2
1.0 INTRODUCTION
ADK series offers high-quality and high-capacity precision balances that deliver
accurate results.
This manual covers models ADK-10 and ADK-20. This series of balances is the
product of years of research, design, development and in-field testing. Every
care has been taken during the manufacturing process of these durable
balances to ensure that they will perform accurately and reliably for many years.
The balances have under-hook for below weighing as an option.
2.0 SPECIFICATIONS
ADK 10
ADK 20
Capacity
10 Kg
20 Kg
Readability
0.1 g
0.1 g
Resolution
0.1 g
0.1 g
Repeatability (S.D.)
0.1 g
0.1 g
Linearity
±0.2 g
±0.2 g
Temp. Coefficient
10 ppm/ºC
10 ppm/ºC
Calibration Mass
10 Kg
20 Kg
Common Specifications:
Power
Operating Temperature
Pan Size
Overall Size
Weight
230V / 115V
5ºC to 30ºC / 41°F-86°F
300 x 340 mm
11.8 x 13.4 inches
314 x 460 x 164 mm.
12.4 x 18.1 x 6.5 inches
18 Kg / 39.6 lb
@Adam Equipment Company 2005
3
3.0 INSTALLATION
3.1
3.2
LOCATING THE BALANCE
•
The balances should not be placed in a location
that will reduce the accuracy.
•
Avoid extremes of temperature. Do not place in
direct sunlight or near air conditioning vents.
•
Avoid unsuitable tables. The table or floor must
be rigid and not vibrate.
•
Avoid unstable power sources. Do not use near
large users of electricity such as welding
equipment or large motors.
•
Do not place near vibrating machinery.
•
Avoid high humidity that might cause
condensation. Avoid direct contact with water. Do
not spray or immerse the balances in water.
•
Avoid air movement such as from fans or opening
doors. Do not place near open windows or airconditioning vents.
•
Keep the balances clean. Do not stack material
on the balances when they are not in use.
UNPACKING YOUR BALANCE
Remove the balance from the carton carefully. It is recommended to keep the
packaging materials for storing or transporting again, if necessary. In the carton
you should find this balance together with:
9 Pan
9 Pan support
9 This instruction manual
@Adam Equipment Company 2005
4
3.3
3.4
SETTING UP THE BALANCE
•
The balance should be placed on a firm and stable surface.
•
The balance must be levelled. Level the balance by turning the
adjustable feet until the bubble in the level indicator on the balance
comes into the circle completely.
•
Place the pan support and the pan on the balance.
•
Plug in the power supply.
SHIPPING PROTECTION
This ADK balance has protection for the weighing mechanism that must
be removed before the balance is used.
Shipping Protection
Weigh below
Attachment
ADK BALANCE
•
To remove the shipping protection, remove the pan then place the
balance on the table upside down.
•
Remove the cover over the protection screw by loosening 2 screws.
•
Remove the protection screw, place in a safe place in case it is
needed for shipping the balance again. Replace the cover.
@Adam Equipment Company 2005
5
3.5
VOLTAGE SELECTION
• This balance now includes a switch to select the mains voltage.
Verify the switch is set to the correct voltage for your area.
• The switch is located on the back panel under a small cover.
Remove the cover on the rear of the balance.
• Remove the cover by removing the small screws on the cover. Do
not remove the screws on either side of the cover.
• Select either 115V or 230V as required. The 115V position is for
power supplies from 110 - 120VAC and the 230V position is for
voltages of 220 – 240VAC.
RS-232 connector
4.0
110/220V Select
Fuse
1/2A
On/Off
OPERATING THE BALANCE
•
To get the most from the balance, it should be warmed up for at
least one hour.
•
Don't use sharp articles (such as a pencil) to touch the keys. Use
your finger only.
•
Always place samples to be weighed on the pan gently. Never drop
them on the pan.
•
To weigh a magnetic material, a shield should be put on the pan to
keep the magnetic material 3~5cm away from the pan or you can
use the below pan weighing mode.
@Adam Equipment Company 2005
6
4.1
CALIBRATION
•
Calibration Mass required:
•
Press the [On/Off] switch in the rear of the balance to turn the
balance on.
•
Display will show a self-check mode.
•
After about 5 seconds, zero will be displayed.
•
Warm up at least one hour before calibrating.
•
Make sure that nothing is on the pan.
•
Press [Tare] key to zero the display.
•
Display will show “ 0.0” - If the display is not zeroed, press the
[Tare] key again.
•
Press the [Cal] key.
•
Display will show “CAL 0.0”
•
If necessary press [Tare] again and then press [Cal].
•
Place the calibration mass on to the pan gently (Take ADK-20 for
example).
•
Press [Cal] again.
•
The display will show “C20000.0” and then “CAL End” will be displayed.
•
Remove the mass from the pan gently.
•
Display will show “0.0”. The balance now comes into weighing mode.
•
Note: if “no CAL” is displayed during calibration, it means that the
balance can't be calibrated.
@Adam Equipment Company 2005
7
ADK-10: 10kg
ADK-20: 20kg
4.2
•
Check if the calibration mass is wrong. Try calibrating the balance
again using a correct calibration mass.
•
If it is still a problem then check if the value displayed is much more
or less than the actual weight. If the difference is more than 2% of
the calibration weight value, adjust the span potentiometer as shown
below.
•
Remove the plastic plug on the right hand side of the balance. There
is a hole through which you will find an adjustable potentiometer.
Use a small screwdriver to adjust the value displayed. To increase
the value displayed, turn the screw on the potentiometer clockwise.
To decrease the value displayed, please turn the screw anticlockwise.
•
When the value displayed is approximately the actual weight, press
the [Cal] key to calibrate the balance again.
CALIBRATION CHECK
•
To verify whether the balance is calibrated or not, place the
calibration mass on to the centre of the pan gently when 0.0g is
displayed.
•
It is calibrated if the correct weight is displayed. Remove the weight
from the pan.
•
If the value displayed is more or less than ± 0.1g from the standard
repeat the calibration procedure.
@Adam Equipment Company 2005
8
5.0 WEIGHING
5.1
5.2
SIMPLE WEIGHING
•
Make sure nothing is on the pan.
•
Place a sample on to the centre of the pan gently when "0.0g" is
displayed.
•
Record the weight displayed when the stability indicator appears.
•
Remove the sample.
•
When a container is to be used, the weight can be tared. Place an
empty container on to the pan. The weight of the container will be
displayed. Use [Tare] to cancel the weight, “0.0g" will be displayed.
•
Place the sample to be weighed in to the container. The weight of
the sample will be displayed.
•
Record the value displayed when the stability indicator appears.
•
Remove all items on the pan.
WEIGHING-IN
To add material until the weight reaches a target
•
Place an empty container on to the pan. The weight of the container
will be displayed.
•
Press the [Tare] key to cancel the weight.
•
Fill the sample into the container. The weight of the sample will be
displayed as it fills the container.
•
Stop filling when the target weight is reached.
•
If required press the [Tare] key to cancel the total weight.
•
Repeat with the second material.
@Adam Equipment Company 2005
9
5.3
WEIGHING-OUT
To remove a certain amount of material from a full container
5.4
•
Place a container with sample in it onto the pan. The weight of all
things on the pan will be displayed.
•
Press [Tare] to cancel the weight, "0.0g" will be displayed.
•
Take material out of the container.
•
The negative weight of the sample taken out will be shown.
•
Stop when the target is reached.
DEVIATION WEIGHING.
To measure the difference between a reference weight and an unknown
weight
5.5
•
Place a weight or a sample as a reference on to the pan. The weight
of the reference will be displayed.
•
Press [Tare] to cancel the weight, "0.0g" will be displayed.
•
Remove the reference weight and place a part for comparison on the
pan.
•
The difference between the comparison and reference weight will be
displayed either in positive or in negative value.
BELOW PAN WEIGHING
If you intend to determine specific gravity or to weigh a sample immersed
in a special liquid or atmosphere, you need below weighing.
An optional weighing underhook is available for this purpose.
PREPARATION
@Adam Equipment Company 2005
10
•
Under the balance you will find a cover with two screws on it.
•
Remove the cover by unscrewing the two screws, you will find a post
for installing the underhook.
•
Fasten the underhook to the weighing mechanism.
•
Hang a wire through the hole
•
Place the balance on a table with a hole in it or on a stand specially
designed for under-hook weighing, and let the wire hang through the
hole.
•
Suspend a suitable container on the other end of the wire or attach
the sample directly to the wire.
•
If necessary recalibrate the balance with underhook and wire in
place.
•
Now you can operate with below pan weighing.
6.0 CARE AND MAINTENANCE
CAUTION
•
Do not use a sharp object (such as a pencil) to touch the keys.
•
Do not let objects fall onto the pan- this may damage the weighing
system.
•
Don't place a weight beyond the range of the balance on the pan.
•
Don't dissemble the balance without permission.
•
Do not expose your balance to extreme moisture or dust over long
periods.
•
It is better to cover your balance after use.
@Adam Equipment Company 2005
11
•
Keep your balance clean and dry.
•
Don't use solvents to clean the balance.
•
Protect the internal parts from liquid spills and excessive dust.
CLEANING
•
Unplug the power before cleaning.
•
Do not use any aggressive cleaning agents (solvents or similar
agents).
•
Use a piece of wet cloth with mild detergent (soap)
•
Be careful that no liquid enters the balance housing. After cleaning,
wipe down the balance with a piece of soft dry cloth.
7.0 RS-232C INTERFACE
This RS-232C interface is compatible with most RS-232C interfaces as found on
printers and PC’s.
7.1
RS-232C SPECIFICATIONS
Transmission
Data Format
Data bits
Parity
Stop bit
Code
Connector
7.2
Asynchronous transmission, unidirectional.
Baud rate : 9600
8 bits
None
1 bit
ASCII
DB-25P
Pin 1
Case Ground
Pin 2
Data Output
Pin 5
CTS, to RTS on PC or Printer
Pin 6
DSR to DTR on PC or Printer
Pin 7
Signal Ground
DATA OUTPUT MODES
@Adam Equipment Company 2005
12
1. AUTO OUTPUT MODE
When the balance is connected to a printer or a computer and it is turned on, the data in the
balance will be output continuously unless you the balance, the printer or the computer is
turned off.
2. PRINT KEY MODE
In the condition of print key mode, when the [Print] key is pressed, one group of data will be
output.
SETTING OF OUTPUT MODES
Press [Print] for about 4 seconds•
It will be in the Auto output mode when “Print 1” is displayed.
•
It will be in Print key output mode when “Print 2” is displayed- in this case every time
[Print] key is pressed, data output will be done once.
Note:
When in Auto output mode, if the [Print] key is pressed for 4 seconds it will switch over to the
Print key mode.
When in Print key output mode, if the [Print] key is pressed for 4 seconds it will switch over to
the Auto output mode.
DATA FORMAT
WS, +1234.5678 g <CR> <LF>
WU, + 1222.5645 g<CR> <LF>
WS = stable
WU = unstable
<CR> = carriage return
<LF> = line feed
@Adam Equipment Company 2005
13
7.3
COMPUTER INTERFACE
Example of a program for receiving a weight from the balance
(Baud Rate: 9600)
10
20
30
40
50
60
70
80
90
100
110
120
130
140
8.0
CLS
OPEN "COM1:9600,N,8,1,CS,DS" AS#1
OPEN "SCRN:" FOR OUTPUT AS#2
PRINT "1. START"
PRINT "2. STOP"
INPUT A%
IF A%<1 OR A%>2 THEN PRINT "AGAIN"; :GOTO 60
ON A% GOSUB 90,140
B$= INKEY$
IF B$="2" THEN CLOSE:GOTO 60
LINE INPUT #1,X$
PRINT #2,X$
GOTO 90
END
REPLACEMENT PARTS AND ACCESSORIES
If you need to order any spare parts and accessories, contact your dealer or Adam
Equipment. A partial list of such items is as follows•
•
Main Power cord
Stainless Steel Pan
@Adam Equipment Company 2005
•
Printer, etc.
14
9.0
SERVICE INFORMATION
This manual covers the details of operation. If you have a problem with the
balance that is not directly addressed by this manual then contact your supplier
for assistance. In order to provide further assistance, the supplier will need the
following information which should be kept ready:
A. Details of your company
-Name of your company:
-Contact person’s name:
-Contact telephone, e-mail,
fax or any other methods:
B. Details of the unit purchased
(This part of information should always be available for any future
correspondence. We suggest you to fill in this form as soon as the unit is
received and keep a print-out in your record for ready reference.)
ADK ______
Model name of the balance:
Serial number of the unit:
Software revision number
(Displayed when power is first turned on):
Date of Purchase:
Name of the supplier and place:
C. Brief description of the problem
Include any recent history of the unit. For example:
-Has it been working since it’s delivered
-Has it been in contact with water
-Damaged from a fire
-Electrical Storms in the area
-Dropped on the floor, etc.
@Adam Equipment Company 2005
15
WARRANTY INFORMATION
Adam Equipment offers Limited Warranty (Parts and Labour) for the components failed due
to defects in materials or workmanship. Warranty starts from the date of delivery.
During the warranty period, should any repairs be necessary, the purchaser must inform its
supplier or Adam Equipment Company. The company or its authorised Technician reserves
the right to repair or replace the components at the purchaser’s site or any of its workshops
depending on the severity of the problems at no additional cost. However, any freight
involved in sending the faulty units or parts to the service centre should be borne by the
purchaser.
The warranty will cease to operate if the equipment is not returned in the original packaging
and with correct documentation for a claim to be processed. All claims are at the sole
discretion of Adam Equipment.
This warranty does not cover equipment where defects or poor performance is due to
misuse, accidental damage, exposure to radioactive or corrosive materials, negligence,
faulty installation, unauthorised modifications or attempted repair or failure to observe the
requirements and recommendations as given in this
User Manual.
Repairs carried out under the warranty does not extend the warranty period. Components
removed during the warranty repairs become the company property.
The statutory right of the purchaser is not affected by this warranty. The terms of this
warranty is governed by the UK law. For complete details on Warranty Information, see the
terms and conditions of sale available on our web-site.
@Adam Equipment Company 2005
16
Manufacturer’s Declaration of Conformity
This product has been manufactured in accordance with the harmonised European standards,
following the provisions of the below stated directives:
Electro Magnetic Compatibility Directive 89/336/EEC
Low Voltage Directive 73/23/EEC
Adam Equipment Co. Ltd.
Bond Avenue
Denbigh East Estate
Milton Keynes, MK1 1SW
United Kingdom
FCC COMPLIANCE
This equipment has been tested and found to comply with the limits for a Class A digital device,
pursuant to Part 15 of the FCC Rules. These limits are designed to provide reasonable protection
against harmful interference when the equipment is operated in a commercial environment. The
equipment generates, uses, and can radiate radio frequency energy and, if not installed and used in
accordance with the instruction manual, may cause harmful interference to radio communications.
Operation of this equipment in a residential area is likely to cause harmful interference in which case
the user will be required to correct the interference at his own expense.
Shielded interconnect cables must be employed with this equipment to insure compliance with the
pertinent RF emission limits governing this device.
Changes or modifications not expressly approved by Adam Equipment could void the user's authority
to operate the equipment.
@Adam Equipment Company 2005
ADAM EQUIPMENT is an ISO 9001:2000 certified global organisation with more than 30
years experience in the production and sale of electronic weighing equipments. Products are
sold through a world wide distributor network -supported from our company locations in the
UK, USA, SOUTH AFRICA and CHINA. The company and their distributors offer a full range
of Technical Services such as on site and workshop repair, preventative maintenance and
calibration facilities.
ADAM’s products are predominantly designed for the Laboratory, Educational, Medical and
Industrial Segments. The product range can be classified as follows:
−
−
−
−
−
Analytical and Precision Laboratory Balances
Top Loading Scales for Educational establishments
Counting Scales for Industrial and Warehouse applications
Digital Weighing/Check-weighing Scales
High performance Platform Scales with extensive software
features including parts counting, percent weighing etc.
− Digital Electronic Scales for Medical use
− Retail Scales for price computing
Adam Equipment Co. Ltd.
Bond Avenue
Milton Keynes
MK1 1SW
UK
Adam Equipment Inc.
26, Commerce Drive
Danbury, CT
06810
USA
Adam Equipment S.A. (Pty) Ltd.
P.O. Box 1422
Kempton Park 1620
Johannesburg
Republic of South Africa
Phone:+44 (0)1908 274545
Fax: +44 (0)1908 641339
Phone: +1 203 790 4774
Fax: +1 203 792 3406
Phone +27 (0)11 974 9745
Fax: +27 (0)11 392 2587
e-mail:
[email protected]
e-mail:
[email protected]
e-mail:
[email protected]
© Copyright by Adam Equipment Co. Ltd. All rights reserved. No part of this publication may be
reprinted or translated in any form or by any means without the prior permission of Adam
Equipment.
Adam Equipment reserves the right to make changes to the technology, features,
specifications and design of the equipment without notice.
All information contained within this publication was to the best of our knowledge timely, complete
and accurate when issued. However, we are not responsible for misimpressions which may result
form the reading of this material.
The latest version of this publication can be found on our Website.
Visit us at www.adamequipment.com
@Adam Equipment Company 2005