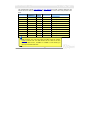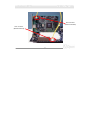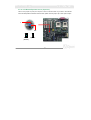
1
Hardware Installation BIOS Setup Utility SCSISelect™ Utility 1 Glossary & Technical support A Open Housing Instruction Online Manual Fortress 7100 DOC. NO. : DX34PU-OL-E0110B Fortress 7100 Online Manual Copyright© 2001 AOpen Incorporated All Rights Reserved. AOpen Fortress 7100 User’s Guide Changes may be made periodically to the information in this publication without obligation to notify any person of such revision or changes. Such changes will be incorporated in new editions of this manual or supplementary documents and publications. This company makes no representations or warranties either expressed or implied, with respect to the contents hereof and specifically disclaims the implied warranties of merchantability or fitness for a particular purpose. No part of this publication may be reproduced., stored in a retrieval system, or transmitted, in any form or by any means, electronic, mechanical, photocopy, recording, or otherwise, without the prior written permission of Aopen Incorporated. All brand and product names mentioned in this manual are trademarks and/or registered trademarks of their respective companies. A Open 2 Fortress 7100 Online Manual Important Safety Instructions 1. Read these instructions carefully. Save these instructions for future reference. 2. Follow all warnings and instructions marked on the product. 3. Do not use this product near water. 4. Do not place this product on an unstable cart, stand, or table. The product may fall, causing serious damage to the product. 5. Slots and openings in the cabinet and the back or bottom are provided for ventilation; to ensure reliable operation of the product and to protect it from overheating, these openings must not be blocked or covered. The openings should never block by placing the product on a bed, sofa, rug, or other similar surface. This product should never be placed near or over a radiator or heat register, or in a built-in installation unless proper ventilation is provided. 6. This product should be operated from the type of power indicated on the marking label. If you are not sure of the type of power available, consult your dealer or local power company. 7. This product is equipped with a 3-wire grounding-type plug, a plug having a third (grounding) pin. This plug will only fit into a grounding-type power outlet. This is a safety feature. If you are unable to insert the plug into the outlet, contact your electrician to replace your obsolete outlet. Do not defeat the purpose of the grounding-type plug. 8. Do not allow anything to rest on the power cord. Do not locate this product where persons will 3 A Open Fortress 7100 Online Manual walk on the cord. 9. If an extension cord is used with this product, make sure that the total ampere rating of the equipment plugged into the extension cord does not exceed the extension cord ampere rating. Also, make sure that the total rating of all products plugged into the wall outlet does not exceed 15 amperes. 10. Never push objects of any kind into this product through cabinet slots as they may touch dangerous voltage points or short out parts that could result in a fire or electric shock. Never spill liquid of any kind on the product. 11. Do not attempt to service this product yourself, as opening or removing covers may expose you to dangerous voltage points or other risks. Refer all servicing to qualified service personnel. 12. Unplug this product from the wall outlet and refer servicing to qualified service personnel under the following conditions: a. When the power cord or plug is damaged or frayed b. If liquid has been spilled into the product c. If the product has been exposed to rain or water d. If the product does not operate normally when the operating instructions are followed. Adjust only those controls that are covered by the operating instructions since improper adjustment of other controls may result in damage and will often require 4 A Open Fortress 7100 Online Manual extensive work by a qualified technician to restore the product to normal condition. e. If the product has been dropped or the cabinet has been damaged f. If the product exhibits a distinct change in performance, indicating a need for service 13. Replace the battery with the same type as the product's battery we recommend. Use of another battery may present a risk of fire or explosion. Refer battery replacement to a qualified serviceman. 14. Warning! The battery could explode if not handled properly. Do not recharge, disassemble or dispose of it in fire. Keep it away from children and dispose of my used battery promptly. Use only the proper type of power supply cord set (provided in your keyboard/manual accessories box) for this unit. It should be a detachable type: UL listed/CSA certified, type SVT/SJT, rated 6A 125V minimum, VDE approved or its equivalent. Maximum length is 15 feet (4.6 meters). 5 A Open Fortress 7100 Online Manual CD-ROM Safety Warning DANGER INVISIBLE RADIATION WHEN OPEN. AVOID EXPOSURE TO BEAM. CLASS 1 LASER PRODUCT APPAREIL A LASER DE CLASSE 1 LASER KLASSE 1 LOUKAN 1 LASERLAITE PRODUIT LASER CATEGORIE 1 6 A Open Fortress 7100 Online Manual Caution on Lithium Batteries CAUTION: Danger of explosion if battery is incorrectly replaced. Replace only with the same or equivalent type recommended by the manufacturer. Discard used batteries according to the manufacturer’s instructions. FCC Class B Radio Frequency Interference Statement Note: This equipment has been tested and found to comply with the limits for a Class B digital device, pursuant to Part 15 of FCC Rules. These limits are designed to provide reasonable protection against harmful interference in a residential installation. This equipment generates, uses, and can radiate radio frequency energy and, if not installed and used in accordance with the instructions, may cause harmful interference to radio communications. However, there is no guarantee that interference will not occur in a particular installation. If this equipment does cause harmful interference to radio or television reception, which can be determined by turning the equipment off and on, the user is encouraged to try to correct the interference by one or more of the following measures: 1. Reorient or relocate the receiving antenna. 7 A Open Fortress 7100 Online Manual 2. Increase the separation between the equipment and receiver. 3. Connect the equipment into an outlet on a circuit different from that to which the receiver is connected. 4. Consult the dealer or an experienced radio/television technician for help. Notice 1: The changes or modifications not expressly approved by the party responsible for compliance could void the user's authority to operate the equipment. Notice 2: Shielded interface cables, if any, must be used in order to comply with the emission limits. 8 A Open Fortress 7100 Online Manual About this Manual Purpose This user’s guide aims to give you the information you need to operate the system properly and tells you how to install internal components. Manual Structure This user’s guide consists of four chapters. Chapter 1 Fortress 7100 Housing (SV320) This chapter describes the housing and all its major components. It contains instructions for upgrade options and installation procedures. Chapter 2 Fortress 7100 Motherboard (DX34Plus-U) This chapter describes the motherboard and all its major components. It contains the motherboard layout, jumper settings, cache and memory configurations, and information on other internal devices. Chapter 3 BIOS Setup Utility This chapter gives information about the system BIOS and tells how to configure the system by changing the settings of the BIOS parameters. Chapter 4 SCSI Select Configuration Utility This chapter gives information about the SCSI Select utility and tells how to configure the SCSI configuration by changed the settings of the SCSI parameters. 9 A Open Fortress 7100 Online Manual Conventions The following conventions are used in this manual: Text entered by user , , , etc…. Represents text input by the user. Represent the actual keys that you have to press on the keyboard. NOTE Gives bits and pieces of additional information related to the current topic. CAUTION Gives precautionary measures to avoid possible hardware or software problems. IMPORTANT Reminds you to take specific actions relevant to the accomplishment of procedures. 10 A Open Fortress 7100 Online Manual What’s in this manual Fortress 7100 …….………………………………………………………………………………………….1 IMPORTANT SAFETY INSTRUCTIONS ................................................................................................ 3 CD-ROM SAFETY WARNING .......................................................................................................... 6 CAUTION ON LITHIUM BATTERIES .................................................................................................... 7 FCC CLASS B RADIO FREQUENCY INTERFERENCE STATEMENT ........................................................ 7 ABOUT THIS MANUAL ..................................................................................................................... 9 CONVENTIONS ............................................................................................................................ 10 WHAT’S IN THIS MANUAL ................................................................................................................11 CHAPTER 1 HOUSING INSTRUCTION (SV320) ......................................................................... 24 1.1 INTRODUCTION ...................................................................................................................... 24 1.2 STANDALONE SYSTEM ........................................................................................................... 25 1.3 FEATURES ............................................................................................................................ 26 1.3.1 Front Panel ................................................................................................................... 26 1.3.2 Rear Panel .................................................................................................................... 27 1.3.3 Internal Structure........................................................................................................... 28 11 A Open Fortress 7100 Online Manual 1.4 OPENING THE HOUSING PANELS ............................................................................................. 29 1.4.1 Front Panel ................................................................................................................... 29 1.4.2 Left Panel...................................................................................................................... 30 1.5 INSTALLING DEVICE DRIVES.................................................................................................... 31 1.5.1 3.5-inch Device Drive .................................................................................................... 31 1.5.2 5.25-inch Device Drives ................................................................................................ 33 1.6 INSTALLING HOT-SWAP CAGES ............................................................................................... 35 1.6.1 Installing a HSC5 Hot-Swap Cage................................................................................. 35 1.6.2 Installing and Removing a HSC5 Hard Disk Drive Tray.................................................. 38 1.6.3 HSC5 LVD SCSI Backplane Board................................................................................ 39 1.6.4 HSC5 Jumpers and Connectors .................................................................................... 40 1.7 INSTALLING AND REMOVING A HOT-SWAPPABLE REDUNDANT POWER SUPPLY MODULE ............... 43 1.8 INSTALLING AN EXTERNAL REDUNDANT SYSTEM FAN (OPTIONAL).............................................. 46 1.9 INSTALLING A MOTHERBOARD ................................................................................................. 48 1.10 INSTALLING AN EXPANSION CARD .......................................................................................... 49 CHAPTER 2 HARDWARE INSTALLATION .......................................................................................... 50 12 A Open Fortress 7100 Online Manual 2.1 OVERVIEW ............................................................................................................................ 50 2.2 FEATURE HIGHLIGHT.............................................................................................................. 51 CPU....................................................................................................................................... 51 Chipset .................................................................................................................................. 51 Memory.................................................................................................................................. 51 Expansion Slots ..................................................................................................................... 52 SCSI On-board ...................................................................................................................... 52 Ultra DMA 33/66/100 Bus Mater IDE...................................................................................... 53 Intel 82559 LAN controller...................................................................................................... 53 Power Management/Plug and Play ........................................................................................ 54 Hardware Monitoring Management ........................................................................................ 54 Super Multi-I/O....................................................................................................................... 54 2.3 MOTHERBOARD MAP ............................................................................................................. 55 2.4 BLOCK DIAGRAM ................................................................................................................... 56 2.5 CONNECTORS AND JUMPERS .................................................................................................. 57 2.6 HARDWARE ........................................................................................................................... 59 13 A Open Fortress 7100 Online Manual 2.6.1 CPU Installation ............................................................................................................ 60 2.6.2 CPU & Housing Fan Connector..................................................................................... 61 2.6.3 SW1 CPU Frequency Switch (For Intel® engineer sample CPU only) ........................... 62 2.6.4 DIMM Socket ................................................................................................................ 64 2.6.5 ATX Power Connector and AGP Pro Power Connector ................................................. 65 2.6.6 CNX2 Redundant SPS Connector................................................................................. 66 2.6.7 IDE and Floppy Connector ............................................................................................ 67 2.6.8 68-pin Ultra3 SCSI Connector ....................................................................................... 70 2.6.9 CN6 Front Panel Connector .......................................................................................... 71 2.6.10 WKUP1 WOM (Zero Voltage Wake on Modem) .......................................................... 72 2.6.11 CN9 WOL (Wake on LAN) ........................................................................................... 75 2.6.12 CN10 Event & HDD Fail LED Connector ..................................................................... 77 2.6.13 CN16 BP (Backplane) Connector (Works with Hot-Swap Cage-HSC5 or HSC6 Only). 78 2.6.14 CN23 & CN24 SCSI LED Connector (For SCSI/RAID Card Only) ............................... 79 2.6.15 JP3 & JP3X SCSI Channel Terminator Control............................................................ 80 2.6.16 JP4 Buzzer/Speaker Select (Optional) ........................................................................ 81 14 A Open Fortress 7100 Online Manual 2.6.17 PC99 Color Coded Back Panel ................................................................................... 82 2.6.18 Low ESR Capacitor ..................................................................................................... 83 CHAPTER 3 BIOS SETUP UTILITY ............................................................................................. 84 3.1 ENTERING SETUP .................................................................................................................. 85 3.2 SYSTEM INFORMATION ........................................................................................................... 87 3.2.1 Processor...................................................................................................................... 88 3.2.2 Processor Speed........................................................................................................... 88 3.2.3 CPU/SDRAM BUS Frequency....................................................................................... 88 3.2.4 Level 1 Cache ............................................................................................................... 88 3.2.5 Level 2 Cache ............................................................................................................... 89 3.2.6 Diskette Drive A ............................................................................................................ 89 3.2.7 Diskette Drive B ............................................................................................................ 89 3.2.8 IDE Primary Channel Master......................................................................................... 89 3.2.9 IDE Primary Channel Slave........................................................................................... 90 3.2.10 IDE Secondary Channel Master .................................................................................. 90 3.2.11 IDE Secondary Channel Slave .................................................................................... 90 15 A Open Fortress 7100 Online Manual 3.2.12 Total Memory............................................................................................................... 90 3.2.13 Serial Port 1 ................................................................................................................ 91 3.2.14 Serial Port 2 ................................................................................................................ 91 3.2.15 Parallel Port ................................................................................................................ 91 3.2.16 PS/2 Mouse ................................................................................................................ 91 3.3 PRODUCT INFORMATION ......................................................................................................... 92 3.3.1 Product Name ............................................................................................................... 93 3.3.2 System S/N................................................................................................................... 93 3.3.3 Main Board ID ............................................................................................................... 93 3.3.4 Main Board S/N............................................................................................................. 93 3.3.5 System BIOS Version.................................................................................................... 93 3.3.6 SMBIOS Version ........................................................................................................... 94 3.4 DISK DRIVES ......................................................................................................................... 95 3.4.1 Floppy Drives ................................................................................................................ 96 3.4.2 IDE Drives..................................................................................................................... 96 3.5 ONBOARD PERIPHERALS ...................................................................................................... 100 16 A Open Fortress 7100 Online Manual 3.5.1 Serial Ports 1 and 2..................................................................................................... 101 3.5.2 Parallel Port ................................................................................................................ 102 3.5.3 Onboard Device Settings ............................................................................................ 105 3.6 POWER MANAGEMENT ......................................................................................................... 109 3.6.1 Power Management Mode ...........................................................................................110 3.6.2 Power Switch < 4 sec...................................................................................................112 3.6.3 System Wake-up Event................................................................................................112 3.7 BOOT OPTIONS ....................................................................................................................115 3.7.1 Boot Sequence ............................................................................................................116 3.7.2 Fast Boot .....................................................................................................................116 3.7.3 Silent Boot....................................................................................................................117 3.7.4 Num Lock After Boot ....................................................................................................117 3.7.5 Memory Test ................................................................................................................118 3.7.6 Release All Blocked Memory........................................................................................118 3.8 DATE AND TIME ....................................................................................................................119 3.8.1 Date ............................................................................................................................ 120 17 A Open Fortress 7100 Online Manual 3.8.2 Time............................................................................................................................ 120 3.9 SYSTEM SECURITY .............................................................................................................. 121 3.9.1 Supervisor Password .................................................................................................. 122 3.9.2 User Password............................................................................................................ 123 3.9.3 Disk Drive Control ....................................................................................................... 124 3.9.4 Processor Serial Number ............................................................................................ 125 3.10 SYSTEM EVENT LOG .......................................................................................................... 126 3.10.1 System Event Logging .............................................................................................. 127 3.10.2 Events Control........................................................................................................... 128 3.10.3 Event Process........................................................................................................... 130 3.11 LOAD DEFAULT SETTINGS ................................................................................................... 131 3.12 ABORT SETTINGS CHANGE ................................................................................................. 132 CHAPTER 4 SCSISELECT™ UTILITY....................................................................................... 133 Settings for the SCSI Controller and All Devices .................................................................. 133 Individual Settings for SCSI Drives....................................................................................... 134 When to Use the SCSISelect™ Utility .................................................................................. 135 18 A Open Fortress 7100 Online Manual 4.1 RUNNING THE SCSISELECT™ UTILITY.................................................................................. 136 4.2 UTILITY OPTIONS ................................................................................................................. 137 4.2.1 Configuring Channel A ................................................................................................ 138 4.3 CONFIGURE/VIEW HOST ADAPTER SETTINGS MENU ............................................................... 140 4.3.1 Host Adapter SCSI ID ................................................................................................. 141 4.3.2 SCSI Parity Checking.................................................................................................. 143 4.3.3 Boot Device Options ................................................................................................... 145 4.3.4 Boot Channel Options ................................................................................................. 146 4.3.5 Boot SCSI ID Options.................................................................................................. 148 4.3.6 Boot LUN Number Options.......................................................................................... 149 4.3.7 Boot LUN Number....................................................................................................... 150 4.4 ADVANCED CONFIGURATION OPTIONS ................................................................................... 155 4.4.1 Host Adapter BIOS...................................................................................................... 156 4.4.2 Display <Ctrl-A> Message During BIOS Initialization................................................... 156 4.4.3 Extended BIOS Translation for DOS Drives > 1 GByte ................................................ 156 4.4.4 Support Removable Disks Under BIOS as Fixed Disks ............................................... 157 19 A Open Fortress 7100 Online Manual 4.4.5 BIOS Support for Bootable CD-ROM........................................................................... 158 4.4.6 BIOS Support for Int13 Extensions.............................................................................. 159 4.5 SCSI DISK UTILITIES ........................................................................................................... 160 4.5.1 Format Disk................................................................................................................. 162 4.5.2 Verify Media ................................................................................................................ 163 4.6 DISK DRIVES OVER 1 GBYTE ............................................................................................... 164 4.6.1 Extended Translation................................................................................................... 164 4.6.2 DOS 1 GByte Limit...................................................................................................... 164 4.7 WHEN TO USE THE EXTENDED TRANSLATION ......................................................................... 166 4.7.1 with DOS 5.0 and above ............................................................................................. 166 4.7.2 drives with mixed partitions ......................................................................................... 166 4.7.3 Using FDISK ............................................................................................................... 166 GLOSSARY................................................................................................................................ 167 AC97 ....................................................................................................................................... 167 ACPI (ADVANCED CONFIGURATION & POWER INTERFACE)........................................................... 167 AGP (ACCELERATED GRAPHIC PORT) ........................................................................................ 168 20 A Open Fortress 7100 Online Manual AMR (AUDIO/MODEM RISER)..................................................................................................... 168 AOPEN BONUS PACK CD........................................................................................................... 168 APM ........................................................................................................................................ 169 ATA/66..................................................................................................................................... 169 ATA/100................................................................................................................................... 169 BIOS (BASIC INPUT/OUTPUT SYSTEM) ....................................................................................... 170 BUS MASTER IDE (DMA MODE) ................................................................................................. 170 CODEC (CODING AND DECODING)............................................................................................. 170 DIMM (DUAL IN LINE MEMORY MODULE) .................................................................................... 171 ECC (ERROR CHECKING AND CORRECTION) ............................................................................... 171 EDO (EXTENDED DATA OUTPUT) MEMORY ................................................................................. 171 EEPROM (ELECTRONIC ERASABLE PROGRAMMABLE ROM) ....................................................... 172 EPROM (ERASABLE PROGRAMMABLE ROM) ............................................................................. 172 EV6 BUS .................................................................................................................................. 172 FCC DOC (DECLARATION OF CONFORMITY) ............................................................................... 173 FC-PGA .................................................................................................................................. 173 21 A Open Fortress 7100 Online Manual FLASH ROM ............................................................................................................................. 173 FSB (FRONT SIDE BUS) CLOCK ................................................................................................. 174 I2C BUS ................................................................................................................................... 174 P1394...................................................................................................................................... 174 PARITY BIT ................................................................................................................................ 174 PBSRAM (PIPELINED BURST SRAM) ........................................................................................ 175 PC100 DIMM........................................................................................................................... 175 PC133 DIMM........................................................................................................................... 175 PDF FORMAT............................................................................................................................ 176 PNP (PLUG AND PLAY)............................................................................................................... 176 POST (POWER-ON SELF TEST) ................................................................................................. 176 RDRAM (RAMBUS DRAM)........................................................................................................ 177 RIMM ...................................................................................................................................... 177 SDRAM (SYNCHRONOUS DRAM).............................................................................................. 177 SIMM (SINGLE IN LINE MEMORY MODULE) ................................................................................. 178 SMBUS (SYSTEM MANAGEMENT BUS) ........................................................................................ 178 22 A Open Fortress 7100 Online Manual SPD (SERIAL PRESENCE DETECT) ............................................................................................. 178 ULTRA DMA/33......................................................................................................................... 179 USB (UNIVERSAL SERIAL BUS) .................................................................................................. 179 VCM (VIRTUAL CHANNEL MEMORY) ........................................................................................... 179 ZIP FILE ................................................................................................................................... 180 TROUBLESHOOTING................................................................................................................ 181 TECHNICAL SUPPORT ............................................................................................................. 185 PART NUMBER AND SERIAL NUMBER ........................................................................................... 187 PRODUCT REGISTRATION ........................................................................................................... 188 HOW TO CONTACT US................................................................................................................ 189 23 A Open Fortress 7100 Online Manual Chapter 1 Housing Instruction (SV320) 1.1 Introduction This installation guide describes the features of the SV320 housing and tells you how to install the basic system components such as disk drives, a motherboard, or expansion boards. If you receive a complete system, the basic components are already installed. 24 A Open Fortress 7100 Online Manual 1.2 Standalone System The SV320 housing is both standalone and rackmount system housing. stabilize the housing when standalone. 25 Rotate the feet outward to A Open Fortress 7100 Online Manual 1.3 Features 1.3.1 Front Panel Key lock Panel Door 26 A Open Fortress 7100 Online Manual 1.3.2 Rear Panel COM port Outlets Hot-Swap Redundant Power Supply Housing Fan Expansion Slots SCSI Expansion Slots (Optional) 27 A Open Fortress 7100 Online Manual 1.3.3 Internal Structure Hot-swap Redundant Power Supply Housing Fan Expansion Card Slots 5.25-inch Drive Bays 3.5-inch Drive Bay Back-plane Board Power Switch Power LED Hot-Swap Cage (SCSI) Hard Disk Drive LED System Status LED (reserved) Removable Hard Disk Drive Trays 28 A Open Fortress 7100 Online Manual 1.4 Opening the Housing Panels 1.4.1 Front Panel Key lock To open the front panel, use the key to unlock and then pull the panel as shown in the illustration above. 29 A Open Fortress 7100 Online Manual 1.4.2 Left Panel To remove the left panel: 1. Use a screwdriver to remove the two front screws. for later use. Keep them in a safe place 2. Pull the panel handle out and use it to remove the left panel from the housing. Left panel Screw Left Panel Handle 30 A Open Fortress 7100 Online Manual 1.5 Installing Device Drives Turn off the power switch and unplug the power cord before installing or removing diskette drives. 1.5.1 3.5-inch Device Drive To install 3.5-inch device drives: 1. Open the front panel of the housing. information on opening the housing panel. 2. Detached the 3.5-inch drive frame (2 pieces) from the housing by removing two screws. Keep the screws for later use. 3. Attached the drive frames to the 3.5-inch drive securing it with four screws as shown below. 31 See section 1.4.1 for more A Open Fortress 7100 Online Manual 4. Insert the drive into the drive bay and secure it with two screws. 5. Connect the diskette drive cables and close the housing panels. 32 A Open Fortress 7100 Online Manual 1.5.2 5.25-inch Device Drives You may install a CD-ROM, digital-audio tape (DAT), hard disk, diskette drive or any other 5.25-inch device into the drive bay. To install 5.25-inch devices: 1. Open the front panel. housing panel. See section 1.4.1 for more information on opening the 2. Detached the 5.25-inch drive frame (2 pieces) from the housing by removing two screws. Keep the screws for later use. 3. Attached the drive frames to the 5.25-inch device drive securing it with four screws as shown below. 33 A Open Fortress 7100 Online Manual 4. Insert the drive into the drive bay and secure it with two screws. 5. Connect the signal and power cables to the drive and close the housing panels. 34 A Open Fortress 7100 Online Manual 1.6 Installing Hot-Swap Cages The SV320 system housing comes with one HSC5 hot-swap cage. The HSC5 hot-swap cage box includes the following components: • • • One hot-swap cage (with back plane board attached) Five hard disk drive tray One SCSI terminator 1.6.1 Installing a HSC5 Hot-Swap Cage To install the hot-swap cage into the housing: 1. Open the front panel and remove the left panel of the housing. See section 1.4.1 for more information on opening the housing panels. 2. Insert the hot-swap cage into the housing and secure the hot-swap cage with two screws as shown below. 35 A Open Fortress 7100 Online Manual We suggest you use the lower three 5.25” bays. 3. Locate the LVD SCSI cable and remove the terminator located at the end of the LVD SCSI cable. 36 A Open Fortress 7100 Online Manual 4. Attach the power cable and the LVD SCSI cable to the backplane board. The LVD SCSI cable can be connected to either onboard SCSI channel A or B (channel B recommended), or RAID card to form a RAID configuration. Power connector SCSI Terminator Connect to the system power supply Connect to either onboard SCSI channel A or B (channel B recommended) or RAID card LVD SCSI cable 37 Remove the terminator and connect to the HSC5 hot-swap cage A Open Fortress 7100 Online Manual 1.6.2 Installing and Removing a HSC5 Hard Disk Drive Tray To remove and install a HSC5 Hard Disk Drive Tray: 1. Use your finger to release the drive tray and then pull it out. 2. Remove all jumpers on the hard disk and place it on the tray. Secure it with four screws. 3. Insert the tray into the hot-swap cage with the lever still extended. properly inserted before closing the lever. 38 Make sure that the drive is A Open Fortress 7100 Online Manual 1.6.3 HSC5 LVD SCSI Backplane Board The HSC5 LVD SCSI hot-swap cage supports five 1-inch SCA SCSI hard drives in one channel. The SCA connector design allows for the addition and removal of SCSI drives without shutting down the system. Backplane Features The backplane board has the following major features: • “Hot-swap” feature that allows replacement of hard drives even when the system is still on. • • Indicates hard disk drive failure through a front panel board LED on cage. Supports ultra-2 SCSI SCA (Single Connector Attachment) disk drives. SCSI ID strapping that allows SCSI HDD ID configuration through the backplane switches, instead of configuring the individual drive IDs. 39 A Open Fortress 7100 Online Manual 1.6.4 HSC5 Jumpers and Connectors Jumper Setting Function JP1 Short/Open Terminator Power Source Both from Backplane and Host Only from Host SW1 & SW2 Reserved 40 A Open Fortress 7100 Connector Online Manual Description CN1 SCSI 68-pin connector - Out CN2 Slot 1 CN3 Slot 2 CN4 Slot 3 CN5 Slot 4 CN6 Slot 5 CN7 Front panel LED connector (reserved) CN8 SCSI 68-pin connector - In CN9 Reserved CN10 HDD fault LED connector (reserved) JP2 FAN connector 1 JP3 Power connector JP4 Power connector JP5 Reserved 2 S1 Slot 1 ID switch 41 A Open Fortress 7100 1 Online Manual Connector Description S2 Slot 2 ID switch S3 Slot 3 ID switch S4 Slot 4 ID switch S5 Slot 5 ID switch For HSC5 power loading requirement, please use independent power connectors to connect HSC5. If there is more than one connector on the same wire, those additional connectors should not be used. 2 Please remove all jumpers on each SCSI hard drive before installing. on the backplane board (S1~S5) to configure the hard drive? ID. 42 Use the switches A Open Fortress 7100 Online Manual 1.7 Installing and Removing a Hot-swappable Redundant Power Supply Module The power subsystem consists of two hot-swappable power supply module bays that allow the installation of two 337-watts power supply modules in a hot-swappable redundant configuration. A redundant power configuration enables a fully-configure system to continue running even if one power supply fails. The SV320 comes with one hot-swappable redundant power supply installed. To install a hot-swappable redundant power supply, please follow the steps as shown below. 43 A Open Fortress 7100 1. Online Manual Insert the power supply into the housing. Make sure that the power supply is properly inserted. 2. Secure the power supply with a screw. 44 A Open Fortress 7100 Online Manual To remove a hot-swappable redundant power supply, please follow the steps as shown below. 1. Using a flat-head screwdriver, turn the screw counter clockwise to loosen the power supply. 2. Push the metal lock towards the power supply as shown below and gently pull out the power supply using the metal handle. The power supply subsystem should supply a minimum of 337-Watts to the whole system. If you only have one power supply or if you have two power supplies and are planning to remove both of them, remember to turn off the power first and disconnect the power cord from the electrical outlet. 45 A Open Fortress 7100 Online Manual 1.8 Installing an External Redundant System Fan (Optional) An additional external redundant fan can be installed behind the system housing. This allows the system to operate properly even though the internal housing fan failed. To install an external redundant fan: 1. Open the front panel and remove the left panel of the housing. See section 1.4.1 for more information on opening the housing panels. 2. Use the screwdriver to push open the plastic peg located below the internal system fan module. 3. Insert the redundant fan into the fan cage and attach the fan cage to the system housing with four screws as shown below. 46 A Open Fortress 7100 Online Manual Redundant Fan Screw 4. Insert the fan cable into the peg hole and attach the cable to the motherboard. The fan can be connected to the motherboard fan connector CN26 or CNX7. 47 A Open Fortress 7100 Online Manual 1.9 Installing a Motherboard The housing accommodates various motherboard sizes. You can rearrange the stand-offs on the motherboard plate to fit the board that you wish to install. Motherboard Align the motherboard holes to the pegs with the external ports facing the rear of the housing. Secure the board with eight screws. 48 A Open Fortress 7100 Online Manual 1.10 Installing an Expansion card To install an expansion card: 1. Remove an expansion slot bracket cover. Save the screw to secure the expansion card. 2. Align an expansion board with the open slot and insert the golden fingers into the expansion bus connector. 3. Secure the board with the screw. 49 A Open Fortress 7100 Online Manual Chapter 2 Hardware Installation 2.1 Overview Thank you for choosing AOpen DX34Plus-U. The DX34Plus-U is Intel® Socket 370 motherboard (M/B) based on the ATX form factor featuring the VIA VT82C694T chipset. As high performance chipset built in the M/B, the DX34Plus-U can support Intel® Socket 370 series Pentium III™ or FC-PGA Celeron™ series processor and 100/133 CPU Front Side Bus (FSB). In the AGP performance, it supports AGP 1X/2X/4X/PRO mode and pipelined spilt-transaction long burst transfer up to 1066MB/sec. The maximum SDRAM memory size can be up to 1.5GB. The DX34Plus-U also has on-board Adaptec AIC-7899G dual channel Wide/Ultra3 SCSI controller that provides the highest data transformation between interfaces up to 160MB/s. Now, enjoy all features from AOpen DX34 Plus-U. 50 A Open Fortress 7100 Online Manual 2.2 Feature Highlight CPU Supports single/dual Intel® FC-PGA Pentium III 550MHz~1.26GHz with 66/100/133MHz FSB (Front Side Bus) designed for Socket 370 technology. Chipset Uses the high performance the VIA® VT82C694T chipset in DX34Plus-U. This chipset contains the various controller inclusive 32-bit Accelerated Graphics Port (AGP), 32-bit PCI bus and 64-bit advanced high performance DRAM. Because of its powerful features, CPU Front Side Bus (FSB) of DX34Plus-U can operate easily at 100 and at 133MHz This chipset also supports Ultra DMA 33/66/100 EIDE, USB and keyboard/ PS2 Mouse interface plus RTC/CMOS on chip. Memory Provides three 168-pin DIMM system memory sockets that support up to 1.5GB of PC-133 compliant SDRAM (Synchronous Dynamic Random Access Memory). You may install 32, 64, 128, 256, 512MB and 1GB with ECC (Error Checking and Correction) SDRAM DIMM modules into each socket. 51 A Open Fortress 7100 Online Manual Expansion Slots Including five 32-bit PCI and one AGP Pro slots. The PCI local bus throughput can be up to 132MB/s. The Intel® AGP Pro specification provides a new level of video display sophistication and speed. The AGP Pro video cards support data transfer rates up to 1066MB/s. As DX34 Plus-U include one AGP Pro expansion slot for a bus mastering AGP graphics card. For AD and SBA signaling, DX34 Plus-U can supports 133MHz 2X/4X mode. SCSI On-board The dual channel Adaptec AIC-7899G chip host adapter delivers Ultra160/m SCSI data transfer rates which doubles the Ultra3 SCSI data transfer rate of up to 160MB/s. With two channels, it delivers a total of 320MB/s bandwidth. In addition, the AIC-7899 features a 66MHz, 64bit PCI interface that supports zero wait-state memory which also operates on 33MHz, 32bit PCI buses. It supports up to 15 devices on a 12 meters cable (or 25 meters in a point to point configuration), making it ideal for both clustering and RAID configurations. 52 A Open Fortress 7100 Online Manual Ultra DMA 33/66/100 Bus Mater IDE Comes with an on-board PCI Bus Master IDE controller with two connectors that supports four IDE devices in two channels, supports Ultra DMA 33/66, PIO Modes 3 and 4 and Bus Master IDE DMA Mode 4, and supports Enhanced IDE devices. Intel 82559 LAN controller Another cost-effective feature for network solution is the integration of Intel 82559 10/100 Mbps Fast Ethernet controller which supports: 1. Advanced Configuration and Power Interface (ACPI) 1.20A based power management. 2. Wake on Magic Packet. 3. Wake on interesting packet. 4. Advanced System Management Bus (SMB) based manageability. 5. Wired for Management (WfM) 2.0 compliance. 6. IP checksum assist. 7. PCI 2.2 compliance. 8. PC99 compliance. 53 A Open Fortress 7100 Online Manual Power Management/Plug and Play The DX34 Plus-U supports the power management function that confirms to the power-saving standards of the U.S. Environmental Protection Agency (EPA) Energy Star program. It also offers Plug-and-Play which helps save users from configuration problems, thus making to system more user-friendly. Hardware Monitoring Management The DX34 Plus-U additional feature includes hardware support for ASM (Advanced Server Management). ASM detects problems in CPU thermal condition, CPU working voltage detection (±12V/±5V/ 3.3V/1.5V), and PCI bus utilization calculation. It also detects if the CPU fan or the chassis fan malfunctions. Super Multi-I/O The DX34 Plus-U provides two high-speed UART compatible serial ports and one parallel port with EPP and ECP capabilities. UART2 can also be directed from COM2 to the Infrared Module for the wireless connections. 54 A Open Fortress 7100 Online Manual 2.3 Motherboard Map Ethernet Connector (RJ45) PC 99 Back Panel WOL Connector Intel 82559 10/100 LAN Controller Low ESR Capacitor Dual CPU Sockets AGP Pro Slot 32 Bit PCI Slot x 5 CPU #1 VIA Apollo Pro 133A Chipset CPU #2 Thermal Sensor Connector CPU Fan Connector 4Mbit Flash BIOS VIA Apollo Pro 133A Chipset PC-133 DIMM Slot x 3 SCSI HDD LED Connector SSI ATX Power Connector Adaptec Ultra3 SCSI Controller AGP Pro Power Connector System Fan Connector ATA/66/100 IDE Connector Redundant SPS Connector Dual Channel Ultra3 SCSI Connector Front Panel Connector BP (Backplane) Connector 55 A Open Fortress 7100 Online Manual 2.4 Block Diagram CPU CPU x2 100/133MHz FSB (Socket 370) AGP VGA Card PCI Card x 5 AGP Pro Bus North Bridge VIA 694T 66/100/133 Memory Bus DIMM x3 DIMM DIMM PCI Bus ATA 100 IDE Bus SCSI Controller LAN Controller Clock Generator HDD/CDROM South Bridge VIA 686B USB 4Mb BIOS ROM Floppy ISA Bus PS2 Keyboard/Mouse Serial port and Printer port 56 A Open Fortress 7100 Online Manual 2.5 Connectors and Jumpers The table below lists the different connectors or jumpers on the motherboard and their respective functions. Connector CN6 Function Front panel connector CN9 WOL (Wake On LAN) connector CN10 Event LED connector CN11 FDD connector CN13 I2C connector CN15 System fan connector CN16 BP (Backplane) connector CN17 IDE 1 Connector (Primary) CN18 AGP Pro Slot CN20 IDE 2 connector (Secondary) CN22 SCSI channel B connector CN25 SCSI channel A connector CN26 System fan connector DM1 to 3 DIMM slot 57 A Open Fortress 7100 Connector Online Manual Function JP1 CPU 2 fan connector JP2 CPU 1 fan connector JP3X SCSI channel A terminator jumper JP4 SCSI channel B terminator jumper PCI 1 to 5 32-bit PCI slot PWR1 ATX power supply connector U3 CPU 2 socket U20 CPU 1 socket WKUP1 WOM (Wake On Modem) connector 58 A Open Fortress 7100 Online Manual 2.6 Hardware This chapter describes jumpers, connectors and hardware devices of this motherboard. Note: Electrostatic discharge (ESD) can damage your processor, disk drives, expansion boards, and other components. Always observe the following precautions before you install a system component. 1.Do not remove a component from its protective packaging until you are ready to install it. 2.Wear a wrist ground strap and attach it to a metal part of the system unit before handling a component. If a wrist strap is not available, maintain contact with the system unit throughout any procedure requiring ESD protection. 59 A Open Fortress 7100 Online Manual 2.6.1 CPU Installation CPU Pin 1 and cut edge 1. Pull up the CPU socket level and up to 90-degree angle. 2. Locate Pin 1 in the socket and look for a (golden) cut edge on the CPU upper interface. Match Pin 1 and cut edge. Then insert the CPU into the socket. 3. Press down the CPU socket level and finish CPU installation. Note: If you do not match the CPU socket Pin 1 and CPU cut edge well, it may damage the CPU. CPU socket level 60 A Open Fortress 7100 Online Manual 2.6.2 CPU & Housing Fan Connector Plug in the CPU fan cable to the 3-pin CPU FAN connector and housing fan cable to the Housing Fan connector. CPU fan connector Sensor +12V GND GND +12V Sensor System fan connector Note: Some CPU fans do not have sense pin, so that cannot support fan monitoring. GND +12V Sensor 61 A Open Fortress 7100 Online Manual ® 2.6.3 SW1 CPU Frequency Switch (For Intel engineer sample CPU only) When you are using the Intel® engineer sample CPU with DX34 Plus-U, the SW1 allows you select the CPU ratio from 2 to 9.5. You can adjust the SW1 to get the correct CPU working ratio and frequency. ON OFF 1 SW1 Warning: We strongly recommend you do not overclocking your CPU and system for get more system reliability. 62 A Open Fortress 7100 Online Manual You can setup the correct CPU working frequency and ratio by the setting table as shown below: Bit1 Bit2 Bit3 Bit4 On On On On Off On On On Coppermine Coppermine D-Step Ratio 100Mhz 133Mhz Ratio FSB 133Mhz On X2 200 266 X4 533 On On X2.5 250 333 X9.5 1266 Off On X3 300 400 X8.5 1133 Off Off On X3.5 350 466 X9 1200 On On On Off X4 400 533 Reserved Reserved On Off On Off X4.5 450 600 Reserved Reserved On On Off Off X5 500 667 Reserved Reserved On Off Off Off X5.5 550 733 X5.5 733 Off On On On X6 600 800 X6 800 Off Off On On X6.5 650 866 X6.5 866 Off On Off On X7 700 933 X7 933 Off Off Off On X7.5 750 1000 X7.5 1000 Off On On Off X8 800 1066 X8 1066 Off Off On Off X8.5 850 1133 Reserved Reserved Off On Off Off X9 900 1200 Reserved Reserved Off Off Off Off X9.5 950 1266 X2 266 63 A Open Fortress 7100 Online Manual 2.6.4 DIMM Socket This motherboard has three 168-pin DIMM sockets that allow you to install PC100 or PC133 memory up to 3.0GB. The DX34 Plus-U supports not only SDRAM but also VCM and Registered DRAM. DIMM 3 DIMM 2 DIMM 1 Tip: The driving capability of new generation chipset is limited due to the lack of a memory buffer (to improve performance). This makes DRAM chip count an important factor to take into consideration when you install DIMMs. Unfortunately, there is no way that the BIOS can identify the correct chip count; you need to calculate the chip count by yourself. 64 A Open Fortress 7100 Online Manual 2.6.5 ATX Power Connector and AGP Pro Power Connector The DX34 Plus-U uses Intel® SSI (Server System Infrastructure) type 24-pin ATX power connector. The 6-pin AGP Pro Power connector provides extra +5V and +3.3V power for AGP Pro VGA card. Make sure you plug in the right direction. +12V +5V 5VSB +5V GND -5V COM COM +5V COM COM COM +5V 6 PS-ON COM COM +3.3V -12V +3.3V +3.3V Standard ATX Power Connector 1 GND GND GND +5V +3.3V +3.3V AGP Pro Power Connector 65 A Open Fortress 7100 Online Manual 2.6.6 CNX2 Redundant SPS Connector The Redundant SPS connector provides the signal to hardware monitoring module if it had fail. Present 1 2 I C CLK Fan 1 Fail PS 1 Fail PS_ON PS 3 Fail Fan 3 Fail 2 I CDA Present 3 GND 66 13 1 14 2 PS 2 Fail Fan 2 Fail Present 2 5VSB A Open Fortress 7100 Online Manual 2.6.7 IDE and Floppy Connector Connect 34-pin floppy cable and 40-pin ATA66 or ATA33 IDE cable to floppy connector FDC and IDE connector IDE1, IDE2. Pin1 of cable is normally marked with red color. Be careful of the pin1 orientation. Wrong orientation may cause system damage. Primary Master (1st) FDD Connector Primary Slave (2nd) IDE1 (Primary) ATA/66 IDE Connector Pin 1 IDE2 (Secondary) Secondary Master (3rd) Secondary Slave (4th) 67 A Open Fortress 7100 Online Manual IDE1 is also known as the primary channel and IDE2 as the secondary channel. Each channel supports two IDE devices that make a total of four devices. In order to work together, the two devices on each channel must be set differently to Master and Slave mode. Either one can be the hard disk or the CDROM. The setting as master or slave mode depends on the jumper on your IDE device, so please refer to your hard disk and CDROM manual accordingly. Warning: The specification of the IDE cable is a maximum of 46cm (18 inches), make sure your cable does not exceed this length. Tip: For better signal quality, it is recommended to set the far end side device to master mode and follow the suggested sequence to install your new device. Please refer to above diagram. 68 A Open Fortress 7100 Online Manual This motherboard supports Ultra DMA/33 or Ultra DMA/66/100 mode. Following table lists the transfer rate of IDE PIO and DMA modes. The IDE bus is 16-bit, which means every transfer is two bytes. Mode Clock 33MHz PCI Clock Count Cycle Time Data Transfer Rate PIO mode 0 30ns 20 600ns (1/600ns) x 2byte = 3.3MB/s PIO mode 1 30ns 13 383ns (1/383ns) x 2byte = 5.2MB/s PIO mode 2 30ns 8 240ns (1/240ns) x 2byte = 8.3MB/s PIO mode 3 30ns 6 180ns (1/180ns) x 2byte = 11.1MB/s PIO mode 4 30ns 4 120ns (1/120ns) x 2byte = 16.6MB/s DMA mode 0 30ns 16 480ns (1/480ns) x 2byte = 4.16MB/s DMA mode 1 30ns 5 150ns (1/150ns) x 2byte = 13.3MB/s DMA mode 2 30ns 4 120ns (1/120ns) x 2byte = 16.6MB/s UDMA/33 30ns 4 120ns (1/120ns) x 2byte x2 = 33MB/s UDMA/66 30ns 4 120ns (1/120ns) x 2byte x4 = 66MB/s Note: ATA/100 uses both rising edge and falling edge but doubles UDMA/33 transfer rate. The data transfer rate is 4 times of the PIO mode 4 or DMA mode 2, 16.6MB/s x4 = 66MB/s. To use ATA/66, you need special ATA/66 IDE cable. 69 A Open Fortress 7100 Online Manual 2.6.8 68-pin Ultra3 SCSI Connector The DX34Plus-U provides two 68-pin Ultra Wide/Ultra 2/3 SCSI connectors for 16-bit or 16-bit differential SCSI devices. 68-pin SCSI Ultra3 Connectors 70 A Open Fortress 7100 Online Manual 2.6.9 CN6 Front Panel Connector Attaching such as power LED, speaker, reset switch, power switch connector, etc.… to corresponding pins. ATX Power Switch Power LED 1 21 2 22 HDD LED +5V GND PWR LED +5VSB GND +5V HDD LED HDD LED +5V 71 Chassis Intrusion Switch Reset Switch RST S/W INT S/W 1 21 2 22 GND GND A Open Fortress 7100 Online Manual 2.6.10 WKUP1 WOM (Zero Voltage Wake on Modem) This motherboard implements special circuit to support Wake On Modem, both Internal modem card and external box modem are supported. Since Internal modem card consumes no power when system power is off, it is recommended to use an internal modem. To use internal modem, connect 4-pin cable from RING connector of modem card to the WOM connector on the motherboard. 1 +5V Standby NC RING GND Pin 1 72 A Open Fortress 7100 Online Manual WOM by External BOX Modem Traditional Green PC suspend mode does not really turn off the system power supply, it uses external box modem to trigger MB COM port and resume back to active. Serial Port (Modem Side) Pin 1 Serial Port (Motherboard Side) 73 A Open Fortress 7100 Online Manual WOM by Internal Modem Card With the help of the ATX soft power On/Off, it is possible to have a system totally power off, and wakeup to automatically answer a phone call as an answering machine or to send/receive a fax. You may identify whether or not your system is in true power off mode by checking to see if the fan of your power supply is off. Both an external box modem and an internal modem card can be used to support Modem Wake Up, but if you use an external modem, you have to leave your box modem on. WOM Connector (Modem Card Side) WOM Connector (Motherboard Side) 74 A Open Fortress 7100 Online Manual 2.6.11 CN9 WOL (Wake on LAN) This feature is very similar as Wake On Modem, but it goes through local area network. To use Wake On LAN function, you must have a network card with chipset that supports this feature, and connect a cable from LAN card to motherboard WOL connector. The system identification information (probably IP address) is stored on network card and because there is a lot of traffic on the Ethernet, you need to install a network management software, such as ADM, for the checking of how to wake up the system. Note that, at least 600mA ATX standby current is required to support the LAN card for this function. +5VSB LID GND 75 A Open Fortress 7100 Online Manual WOL Connector (Ethernet Card Side) WOL Connector (Motherboard Side) 76 A Open Fortress 7100 Online Manual 2.6.12 CN10 Event & HDD Fail LED Connector The DX34 Plus-U BIOS supports the system monitored event logs recording function. If there is any event happens or hard disk fails when you operate your system, the Event & HDD fail LED will keep flash to warn you. 1 Sensor +5VSB 77 A Open Fortress 7100 Online Manual 2.6.13 CN16 BP (Backplane) Connector (Works with Hot-Swap Cage-HSC5 or HSC6 Only) The BP connector provides the signals of backplane to ASM (Advanced Server Management) software monitoring program, such as storage category, HDD fault, fan present, fan fault. Pin 1 1 GND N/C I2C CLK I2CDA 78 A Open Fortress 7100 Online Manual 2.6.14 CN23 & CN24 SCSI LED Connector (For SCSI/RAID Card Only) The 4-pin SCSI LED connector can be connected to the SCSI hard disk control card activity LED connector. Read or write activity by devices connected to the SCSI card will cause the LED lighting up. + CN23 + - CN24 + + - 79 A Open Fortress 7100 Online Manual 2.6.15 JP3 & JP3X SCSI Channel Terminator Control The JP3/JP3X allows you to enable or disable the on-board SCSI Channel A and B terminator control function. The SCSI Channel A is controlled by JP3, the Channel B is controlled by JP3X. JP3X JP3 1 ON OFF (Default) 80 A Open Fortress 7100 Online Manual 2.6.16 JP4 Buzzer/Speaker Select (Optional) There is one jumper cap over pin1 and pin2 of JP4 for internal buzzer. If you want to use external case-mounted speaker instead of internal buzzer, please remove jumper cap to short pin2 and pin3. 1 JP4 1 Buzzer 1 Speaker (Default) 81 A Open Fortress 7100 Online Manual 2.6.17 PC99 Color Coded Back Panel The onboard I/O devices are PS/2 Keyboard, PS/2 Mouse, serial ports COM1 and COM2, Printer, USB, RJ45 LA. The view angle of drawing shown here is from the back panel of the housing. SPP/ECP/EPP Print Port PS/2 Mouse Connector USB Connector PS/2 Keyboard Connector PS/2 Keyboard: PS/2 Mouse: USB Port: Parallel Port: COM1 Port: RJ45 LAN Connector COM 2 Port COM 1 Port For standard keyboard, which is using a PS/2 plug. For PC-Mouse, which is using a PS/2 plug. Available for connecting USB devices. To connect with SPP/ECP/EPP printer. To connect with pointing devices, modem or others serial devices. 82 A Open Fortress 7100 Online Manual 2.6.18 Low ESR Capacitor The quality of low ESR capacitor (Low Equivalent Series Resistor) during high frequency operation is very important for stability of CPU power. The location of where to put these capacitors is another knowhow that requires experience and detail calculation. 83 A Open Fortress 7100 Online Manual Chapter 3 BIOS Setup Utility Most of system had already configured by the manufacturer or the dealer. There is no need to run BIOS setup program when starting the computer unless you get a run setup program message. The setup program loads configuration values into the battery-backed nonvolatile memory called CMOS RAM. This memory area is not part of the system RAM. If you repeatedly receive Run Setup messages, the battery may be bad. In this case, the system cannot retain configuration values in CMOS. Ask a qualified technician for assistance. The system will reboot immediately after you exit Setup. 84 A Open Fortress 7100 Online Manual 3.1 Entering Setup To enter Setup, press the DELETE key. You must press DELETE while the system is booting. This key does not work during any other time. The Setup Utility Main Menu appears: 85 A Open Fortress 7100 Online Manual The system supports two BIOS Utility levels: Basic and Advanced. If you are an advanced user, you may want to check the detailed configuration of your system. Detailed system configurations are contained in the Advanced Level. To view the Advanced Level, press . The asterisk (*) mark indicates that the parameter appears only when you are in the Advanced Level. The parameters on the screens show default values. These values may not be the same as those in your system. The grayed items on the screens have fixed settings and are not user-configurable. Use the arrow keys Use and to move around the Setup Utility screen. to move to the next page or to return to the previous page if the setup screen has more than one page available. Use Press , , “+” or “-” to select the options if they are available. to return to the Main menu. 86 A Open Fortress 7100 Online Manual 3.2 System Information The following screen appears if you select System Information from the Main menu: The System Information menu shows the current basic configuration of your system. The sections below explain the parameters. 87 A Open Fortress 7100 Online Manual 3.2.1 Processor The Processor parameter specifies the type of processor currently installed in your system. The system supports Intel Pentium II and Pentium III processors. 3.2.2 Processor Speed The Processor Speed parameter specifies the speed of the processor currently installed in your system. 3.2.3 CPU/SDRAM BUS Frequency This parameter specifies the currently FSB (Front Side Bus) frequency of the CPU/SDRAM. 3.2.4 Level 1 Cache This parameter specifies the first-level or the internal fast accessed memory (i.e., the memory integrated into the CPU) size, and whether it is enabled or disabled. 88 A Open Fortress 7100 Online Manual 3.2.5 Level 2 Cache This parameter specifies the second-level cache memory size that comes with the CPU. The available cache size is 256/512 KB. 3.2.6 Diskette Drive A This parameter specifies the system’s current diskette drive A settings. 3.2.7 Diskette Drive B This parameter specifies the system’s current diskette drive B settings. 3.2.8 IDE Primary Channel Master This parameter specifies the current configuration of the IDE device connected to the master port of the primary IDE channel. 89 A Open Fortress 7100 Online Manual 3.2.9 IDE Primary Channel Slave This parameter specifies the current configuration of the IDE device connected to the slave port of the primary IDE channel. 3.2.10 IDE Secondary Channel Master This parameter specifies the current configuration of the IDE device connected to the master port of the secondary IDE channel. 3.2.11 IDE Secondary Channel Slave This parameter specifies the current configuration of the IDE device connected to the slave port of the secondary IDE channel. 3.2.12 Total Memory This parameter specifies the total amount of onboard memory. The memory size is automatically detected by BIOS during the POST. If you install additional memory, the system automatically adjusts this parameter to display the new memory size. 1st Bank/2nd Bank/3rd Bank 90 A Open Fortress 7100 Online Manual The 1st Bank, 2nd Bank, and 3rd Bank parameters indicate the type and size of DRAM installed in DIMM sockets 1, 2, and 3 respectively. The “None” setting indicates that there is no DRAM installed. For the location of the DIMM sockets, refer to section 2.3 or 2.4. 3.2.13 Serial Port 1 This parameter shows the serial port 1 address and IRQ setting. 3.2.14 Serial Port 2 This parameter shows the serial port 2 address and IRQ setting. 3.2.15 Parallel Port This parameter shows the parallel port address and IRQ setting. 3.2.16 PS/2 Mouse The BIOS utility automatically detects if there is a pointing device connected to your system. If there is, this parameter displays the “Installed” setting. Otherwise, this is set to “None”. 91 A Open Fortress 7100 Online Manual 3.3 Product Information The Product Information contains the general data about the system, such as the product name, serial number, BIOS version, etc. This information is necessary for troubleshooting (may be required when asking for technical support). The following shows how the Product Information screen appears: 92 A Open Fortress 7100 Online Manual 3.3.1 Product Name This parameter specifies the official name of the system. 3.3.2 System S/N This parameter specifies the system’s serial number. 3.3.3 Main Board ID This parameter specifies the motherboard’s identification number. 3.3.4 Main Board S/N This parameter specifies the motherboard’s serial number. 3.3.5 System BIOS Version This parameter specifies the version of the BIOS utility. 93 A Open Fortress 7100 Online Manual 3.3.6 SMBIOS Version This parameter specifies the version of the SMBIOS version. 94 A Open Fortress 7100 Online Manual 3.4 Disk Drives Select Disk Drives to input configuration values for disk drives. The following screen shows the Disk Drives menu: 95 A Open Fortress 7100 Online Manual 3.4.1 Floppy Drives To enter the configuration value for the first floppy drive, highlight the Floppy Drive A parameter. Press or , key to view the options and select the appropriate value. Drive A/Drive B None These items select the floppy drive type. The available settings and types supported by the motherboard are listed to the left. 360KB 5.25" 1.2MB 5.25" 720KB 3.5" 1.44MB 3.5" 2.88MB 3.5" Follow the same procedure to configure floppy drive B. Choose “None” if you do not have a second floppy drive. 3.4.2 IDE Drives To configure the IDE drives connected to your system, select the parameter that represents the channel and port where the desired hard disk to configure is connected. The options are: IDE Primary Channel Master This option lets you configure the hard disk drive connected to the master port of IDE channel 1. 96 A Open Fortress 7100 Online Manual IDE Primary Channel Slave This option lets you configure the hard disk drive connected to the slave port of IDE channel 1. IDE Secondary Channel Master This option lets you configure the hard disk drive connected to the master port of IDE channel 2. IDE Secondary Channel Slave This option lets you configure the hard disk drive connected to the slave port of IDE channel 2. The following screen appears if you select any of the IDE Drive parameters: 97 A Open Fortress 7100 Online Manual Device Detection Mode Device Detection Mode Auto (Default) Manual None If you select “Manual”, you need to fill in all remaining field, such as Cylinder, Head, and Sector on this selected item. If the item “Auto” is selected, the items will remain “0”. And when the system boot up, system will detect the hard disk and configure it automatically. “None” means there is no device in the channel. Device Type This parameter shows which type of IDE drive currently used. Cylinder This parameter specifies the number of cylinders of your hard disk, and is automatically set depending on your Type parameter setting. Head This parameter specifies the number of heads of your hard disk, and is automatically set depending on your Type parameter setting. 98 A Open Fortress 7100 Online Manual Sector This parameter specifies the number of sectors of your hard disk, and is automatically set depending on your Type parameter setting. Size This parameter specifies the size of your hard disk, in MB. Hard Disk LBA Mode Hard Disk Block Mode Auto (Default) Disabled This function enhances disk performance depending on the hard disk in use. If you set this parameter to “Auto”, the BIOS utility automatically detects if the installed hard disk drive supports the Block Mode function. If supported, it allows data transfer in blocks (multiple sectors) at a rate of 256 bytes per cycle. To disregard the feature, change the setting to “Disable”. 99 A Open Fortress 7100 Online Manual 3.5 Onboard Peripherals The Onboard Peripheral Configuration allows you to configure the onboard communication ports and the onboard devices. Selecting this option displays the following screen: 100 A Open Fortress 7100 Online Manual 3.5.1 Serial Ports 1 and 2 Serial Port 1 & 2 Enabled (Default) These parameters allow you to enable or disable serial ports 1 and 2. Disabled 3.5.1.1 Base Address Base Address Serial Port 1: This item allows you to assign address and interrupt for the board serial port. 3F8h (Default) 3E8h 2E8h Serial Port 2: 2F8h (Default) 2E8h 3E8h 101 A Open Fortress 7100 Online Manual 3.5.1.2 IRQ IRQ Serial Port 1: 4 (Default), 11 This function lets you assign an interrupt for serial ports 1 and 2. The options for serial ports 1 are IRQ 4 and 11. The options for serial port 2 are IRQ 3 and 10. Serial Port 2: 3 (Default), 10 The Base Address and IRQ parameters for each port are configurable only if the port is enabled. 3.5.2 Parallel Port Parallel Port Enabled (Default) This parameter allows you to enable or disable the parallel port. Disabled 3.5.2.1 Base Address 102 A Open Fortress 7100 Base Address 378h (Default) Online Manual This item allows you to assign address and interrupt for the board serial port. 3BCh 278h 3.5.2.2 IRQ IRQ 7 (Default), 5 This function lets you assign an interrupt for the parallel port. The options are IRQ 5 and 7. The Base Address and IRQ parameters are configurable only if Parallel Port is enabled. If you install an add-on card that has a parallel port whose address conflicts with the onboard parallel port, a warning appears on the screen. Check the parallel port address of the add-on card and change the address to one that does not conflict. 103 A Open Fortress 7100 Online Manual 3.5.2.3 Operation Mode Operation Mode EPP (Default) Bi-Directional This item lets you set the parallel port mode. The mode options are Standard, Bi-directional, EPP (Enhanced Parallel Port) and ECP (Extended Parallel Port). Standard ECP Setting Function Standard Parallel Port (Standard) Allows normal speed one-way operation Bi-directional (Bi-directional) Allows normal speed operation in a two-way mode Parallel Port Enhanced Parallel Port (EPP) Allows bi-directional parallel port operation at maximum speed Extended Capabilities Port (ECP) Allows parallel port to operate in bi-directional mode and at a speed higher than the maximum data transfer rate 104 A Open Fortress 7100 Online Manual 3.5.2.4 ECP DMA Channel ECP Mode Use DMA 3 1 (Default) This item becomes active only if you select Extended Capabilities Port (ECP) as the operation mode. It allows you to assign DMA channel 1 or DMA channel 3 for the ECP parallel port function (as required in Windows 95). 3.5.3 Onboard Device Settings The Onboard Device Settings menu allows you to configure the onboard communication ports and the onboard devices. Selecting this option from the Onboard Peripherals menu displays the following screen: 105 A Open Fortress 7100 Online Manual 3.5.3.1 Floppy Disk Controller Floppy Controller Disk Enabled (Default) This parameter lets you enable or disable the onboard floppy disk controller. Disabled 3.5.3.2 IDE Controller IDE Controller Both (Default) Primary Set this parameter to “Primary” to enable only the primary IDE controller; “Both” to enable both primary and secondary IDE controllers; or “Disabled” to disable all IDE controllers. Disabled 3.5.3.3 PS/2 Mouse Controller PS/2 Mouse Controller Enabled (Default) This parameter enables or disables the onboard PS/2 mouse controller. Disabled 106 A Open Fortress 7100 Online Manual 3.5.3.4 USB Host Controller USB Controller Host Enabled (Default) Disabled This parameter lets you enable or disable the USB controller on board. When enabled, it activates the USB function of the system. When disabled, it deactivates the function. 3.5.3.5 USB Legacy Mode USB Legacy Mode Enabled Disabled (Default) This parameter lets you enable or disable the USB controller on board. When enabled, it activates the USB function of the system. When disabled, it deactivates the function. 3.5.3.6 On-board Audio Chip On-board Chip Audio Enabled (Default) Disabled This parameter lets you enable or disable the on-board audio chip. When enabled, it activates the audio function of the system. When disabled, it deactivates the function. 107 A Open Fortress 7100 Online Manual 3.5.3.7 On-board SCSI On-board SCSI Enabled (Default) Disabled This parameter lets you enable or disable the SCSI controller on board. When enabled, it activates the SCSI function of the system. When disabled, it also deactivates the function. 3.5.3.8 Onboard Ethernet Chip On-board Ethernet Chip Enabled This parameter allows you to enable or disable the onboard network feature. Disabled (Default) 108 A Open Fortress 7100 Online Manual 3.6 Power Management The Power Management menu allows you to configure the system power-management feature. The following screen shows the Power Management parameters and their default settings: 109 A Open Fortress 7100 Online Manual 3.6.1 Power Management Mode Power Management Mode Enabled (Default) Disabled This parameter allows you to reduce power consumption. When this parameter is set to “Enabled”, you can configure the IDE hard disk and system timers. Setting it to “Disabled” deactivates the power-management feature and its timers. 3.6.1.1 IDE Hard Disk Standby Timer IDE Hard Disk Standby Timer Off (Default) 1 to 15min This parameter allows the hard disk to enter standby mode after inactivity of 1 to 15 minutes, depending on your setting. When you access the hard disk again, allow 3 to 5 seconds (depending on the hard disk) for the disk to return to normal speed. et this parameter to “Off” if your hard disk does not support this function. 110 A Open Fortress 7100 Online Manual 3.6.1.2 System Sleep Timer System Timer Sleep Off (Default) 120, 110, 100…20, 15, 10, 5, 2min This parameter sets the system to the lowest power-saving mode after a specified period of inactivity. Any keyboard or mouse action or any activity detected from the IRQ channels resumes system operation. 3.6.1.3 Sleep Mode Sleep Mode Standby Suspend (Default) This parameter lets you specify the power-saving mode that the system will enter after a specified period of inactivity. The options are “Standby” and “Suspend” modes. This parameter becomes configurable only if the System Sleep Timer is enabled. Any keyboard or mouse action, or any enabled monitored activities occurring through the IRQ channels resume system operation. 111 A Open Fortress 7100 Online Manual 3.6.2 Power Switch < 4 sec. Power Switch < 4 Sec. Suspend Power Off (Default) When set to ”Power Off”, the system automatically turns off when the power switch is pressed for less than 4 seconds. When set to ”Suspend”, the system enters the suspend mode when pressed for less than 4 seconds. 3.6.3 System Wake-up Event The system wake-up event allows the system to resume operation when the modem ring indicator is enabled. 3.6.3.1 Modem Ring Indicator Modem Indicator Ring Enabled When “Enabled” any fax/modem activity wakes up the system from suspend mode. The default setting is “Disabled”. Disabled (Default) 3.6.3.2 PCI Power Management 112 A Open Fortress 7100 PCI Power Management Enabled (Default) Online Manual This item allows you to enable or disable the PCI power management function. Disabled 3.6.3.3 RTC Alarm RTC Alarm Enabled This item allows you to set a certain time on a certain day to wake-up the system from suspend mode. Disabled (Default) Resume Day Resume Day This item is displayed when you enable the “RTC Timer” option. 1 to 31 Here you can specify what date you want to wake up the system. For example, setting to 15, the system will wake up on the 15th day of every month. Resume Time 113 A Open Fortress 7100 Online Manual Resume Time hh:mm:ss This item is displayed when you enable the RTC Wake Up Timer option. Here you can specify what time you want to wake up the system. 3.6.3.4 Restart On AC/Power Failure Restart On AC/Power Failure Enabled Disabled (Default) A traditional ATX system should remain at power off stage when AC power resume from power failure. This design is inconvenient for a network server or workstation, without an UPS, that needs to keep power-on. The system will remain power-off if you select “Disabled”. Selecting “Enabled” to enable system automatically power-on after power failure. 114 A Open Fortress 7100 Online Manual 3.7 Boot Options This option allows you to specify your preferred setting for boot up. The following screen appears if you select Boot Options from the Basic Configuration menu: 115 A Open Fortress 7100 Online Manual 3.7.1 Boot Sequence This parameter allows you to specify the boot search sequence during POST. • • 1st. The system checks this drive first. 2nd. The system then checks this drive if it can not boot from the 1st specified drive. • • 3rd. If the 1st and 2nd searches fail then it boots from this drive. 4th. If the 1st, 2nd, and 3rd searches fail then it boots from this drive. BIOS will display an error message if the drive(s) specified is not bootable. 3.7.2 Fast Boot Fast Boot Auto (Default) This parameter allows the system to boot faster by skipping some POST routines. Disabled 116 A Open Fortress 7100 Online Manual 3.7.3 Silent Boot Silent Boot Enabled (Default) Disabled This parameter enables or disables the Silent Boot function. When set to ”Enabled”, BIOS is in graphical mode and displays only an identification logo during POST and while booting. After booting the screen displays the operating system prompt (such as DOS) or logo (such as Windows 95). If any error occurs while booting, the system automatically switches to the text mode. Even if your setting is ”Enabled”, you may also switch to the text mode while booting by pressing when you see the “Press DELETE key to enter setup” message on the screen. When set to “Disabled”, BIOS is in the conventional text mode where you see the system initialization details on the screen. 3.7.4 Num Lock After Boot Num Lock After Boot Enabled (Default) This parameter allows you to activate the Num Lock function upon booting. Disabled 117 A Open Fortress 7100 Online Manual 3.7.5 Memory Test Memory Test When set to ”Enabled”, this parameter allows the system to Enabled perform a RAM test during the POST routine. When set to “Disabled”, the system detects only the memory size and Disabled (Default) bypasses the test routine. 3.7.6 Release All Blocked Memory Release All Blocked Memory Enabled When set to “Enabled”, this parameter allows system to bypass testing the defective memory banks detected earlier. Disabled (Default) 118 A Open Fortress 7100 Online Manual 3.8 Date and Time The real-time clock keeps the system date and time. After setting the date and time, you do not need to enter them every time you turn on the system. As long as the internal battery remains good (approximately seven years) and connected, the clock continues to keep the date and time accurately even when the power is off. 119 A Open Fortress 7100 Online Manual 3.8.1 Date Date ww:mm:dd:yy or Highlight the items on the Date parameter and press to set the date following the weekday-month-day-year format. Valid values for weekday, month, day, and year are: • • • • Weekday: Sun, Mon, Tue, Wed, Thu, Fri, Sat Month: Jan, Feb, Mar, Apr, May, Jun, Jul, Aug, Sep, Oct, Nov, Dec Day: 1 to 31 Year: 1980 to 2079 3.8.2 Time Time Highlight the items on the Time parameter and press or to set the time following the hour-minute-second format. hh:mm:ss Valid values for hour, minute, and second are: • • • Hour 00 to 23 Minute 00 to 59 Second 00 to 59 120 A Open Fortress 7100 Online Manual 3.9 System Security The Setup program has a number of security features to prevent unauthorized access to the system and its data. The following screen appears if you select System Security from the Main menu: 121 A Open Fortress 7100 Online Manual 3.9.1 Supervisor Password Supervisor Password None (Default) This item can prevent unauthorized access to the BIOS utility. The “Present” setting allows you to set a setup password. Present 1. Enable the Supervisor Password parameter in the System Security menu by pressing the ENTER key. The Supervisor Password windows will appear as shown above. 122 A Open Fortress 7100 2. Online Manual Type a password. The password may consist of up to seven characters. Be very careful when typing your password because the actual characters do not appear on the screen. 3. Press the ENTER key. Re-type the password to verify your first entry then press ENTER key again. 4. Highlight the “Set or change password” option and press ENTER key. 5. Press the ESC key to return the System Security screen. 6. Press the ESC key to exit setup. The Exit Setup screen will appear. 7. Choose “Yes” to save your setting and exit Setup. Your password will be saved to CMOS. 8. If you want to remove the password, please select “Disabled” to disable this function. 3.9.2 User Password User Password None (Default) Present This item can secure your system against unauthorized use. Once you set this password, you have to type it whenever you boot the system. This item is available when only Supervisor Password is set. 123 A Open Fortress 7100 Online Manual 3.9.3 Disk Drive Control The disk drive control features allow you to control the floppy drive or the hard disk drive boot function to prevent loading operating systems or other programs from a certain drive while the other drives are operational (under DOS mode only). The table below lists the drive control settings and their corresponding functions. Floppy Drive Setting Description Normal Floppy drive functions normally Write Protect All Sectors Disables the write function on all sectors Write Protect Boot Sector Disables the write function only on the boot sector Hard Disk Drive Setting Description Normal Hard disk drive functions normally Write Protect All Sectors Disables the write function on all sectors Write Protect Boot Sector Disables the write function only on the boot sector 124 A Open Fortress 7100 Online Manual 3.9.4 Processor Serial Number Processor Number Serial Enabled (Default) Disabled The Pentium III processor incorporates an individual serial number in each chip that can identify individual CPUs. When enable this option, CPUs can be identified by processor serial number. Disable this option to deactivate this feature. 125 A Open Fortress 7100 Online Manual 3.10 System Event Log The system event log enables you to record and monitor events that occurs in your system like system temperature, fan stops, and others. This feature allows you to specify the appropriate settings for your system’s event handling. Selecting the option displays the following screen: 126 A Open Fortress 7100 Online Manual 3.10.1 System Event Logging This option allows you to record monitored events that occur during the operation of your system. 3.10.1.1 Event Logging Event Logging Enabled (Default) This item allows you to enable or disable the system event logging function. Disabled 3.10.1.2 Clear Event Logs Clear Event Logs Enabled Disabled (Default) This item allows you to enable or disable the system event logs clearing function. Please enable it if you want to clear the event log whenever the event log area is full 3.10.1.2 Event Log BIOS Version Event Log BIOS Version This parameter specifies the version of the Event Log BIOS. 127 A Open Fortress 7100 Online Manual 3.10.1.3 Total Number of Event Logs Total Number of Event Logs The currently number of events located in the event log area. 3.10.1.4 Available Space for Event Logs Available Space for Event Logs The percentage of space that is still available for logging system events. 3.10.1.5 View Event Logs View Event Logs Opens the system event log file for viewing. 3.10.2 Events Control This parameter monitors the following events and logs them into the event log file if there is a change in status. 128 A Open Fortress 7100 Online Manual 3.10.2.1 Temperature/Voltage/Fan Temperature/Volt age/ Fan Enabled (Default) Enable or disable the monitoring of the system’s temperature, voltage, and CPU fan. Disabled 3.10.2.2 ECC ECC Enabled (Default) Disabled ECC or Error-Correcting Code tests the accuracy of data as it passes in and out of memory. This parameter enables or disables the monitoring of this function. 3.10.2.3 PCI PCI Enabled (Default) Disabled PCI or Peripheral Component Interconnect is a 32-bit bus that can run at clock speeds of 33 MHz. This parameter monitors the activity of this bus when set to enabled. 129 A Open Fortress 7100 Online Manual 3.10.3 Event Process 3.10.3.1 Action After Critical Event Action After Critical Event NMI (Default) Power Cycle This parameter allows you to select the action after BIOS finds a critical event. The critical events include multiple bits ECC error and PCI device error. Reset 3.10.3.2 POST Error Stop Post Error Stop Enabled (Default) Disabled BIOS checking the bad CPUs and memory modules during POST. When this parameter is enabled, BIOS will stop POST operation whenever it finds a bad CPU or memory. Otherwise, if disabled the system will continue running. 130 A Open Fortress 7100 Online Manual 3.11 Load Default Settings Use this option to load the default settings for the optimized system configuration. When you load the default settings, some of the parameters are grayed-out with their fixed settings. These grayed parameters are not user-configurable. The following dialog box appears when you select Load Default Settings from the main menu: Select “Yes” to load the default settings. Select “No” to ignore the message and return to the BIOS utility. 131 A Open Fortress 7100 Online Manual 3.12 Abort Settings Change Use this option to disregard your changes to the BIOS and reload your previous settings. The following dialog box appears when you select Abort Settings Change from the main menu: Select “Yes” to disregard your changes and reload your previous settings. After reload, the main menu appears on screen. Select “No” to ignore the message and return to the BIOS utility. 132 A Open Fortress 7100 Online Manual Chapter 4 SCSISelect™ Utility The SCSISelect™ utility allows you to change SCSI controller settings without opening the system or changing jumpers. The table below lists the settings that you can change using the SCSISelect™ utility and the default value for each setting. Some settings apply globally to the SCSI controller and all SCSI devices on the bus. Other settings apply individually to each device on the bus. Settings for the SCSI Controller and All Devices Item Host Adapter SCSI ID * Default 7 SCSI Parity Checking Enabled Host Adapter SCSI Termination Enabled Boot Device Option 0 (zero) Host Adapter BIOS* Enabled Some settings are valid only if the host adapter BIOS is enabled. 133 A Open Fortress 7100 Online Manual Support Removable Disks under BIOS as Hard Disks Boot only Extended BIOS Translation for DOS Drives > 1 GB Enabled Display <Ctrl-A> Message During BIOS Initialization Enabled Multiple LUN Support Disabled BIOS Support for Bootable CD-ROM Item BIOS Support for Int13 Extensions Enabled Default Enabled Support for Ultra SCSI Speed Disabled Individual Settings for SCSI Drives Item Initiate Sync Negotiation * Default Yes Maximum Sync Transfer Rate 160MB/sec. Enable Disconnection Yes Send Start Unit SCSI Command* No Initiate Wide Negotiation Yes Some settings are valid only if the host adapter BIOS is enabled. 134 A Open Fortress 7100 Online Manual When to Use the SCSISelect™ Utility Use the SCSI Select utility if you need to do any one of the following: • • • Change any of the default values listed in the SCSI Controller and All Devices Table. Check and/or change SCSI device settings that may conflict with those of other devices. Perform low-level formatting on new SCSI disk devices. 135 A Open Fortress 7100 Online Manual 4.1 Running the SCSISelect™ Utility A screen message giving the option to access the SCSISelect™ utility appears after the BIOS and POST routine. To start the utility, press system reset: + A when the following message appears during power-on or Press <Ctrl> <A> for SCSISelect Utility! Your screen may show the key sequence as Key> instead of + A. + <Hot + A. The correct sequence is 136 A Open Fortress 7100 Online Manual 4.2 Utility Options When the SCSI Select utility detects that the AIC-7899 SCSI controller is in the system, it displays the following Options menu: Adaptec AIC-7899 SCSISelect (TM) Utility v2.10 You have an AIC-7899 SCSI host adapter in your system. Move the cursor to the bus:device:channel of the one to be configured and press <Enter> <F5> - Toggle color/monochrome Bus:Device:Channel 02:09:A 02:09:B Arrow keys to move cursor, <Enter> to select option, <Esc> to exit (*=default) 137 A Open Fortress 7100 Online Manual 4.2.1 Configuring Channel A The following screens appear if you select Channel A: If you choose to configure Channel B, a similar SCSI Utility Screen will appear. The only difference is the I/O Port Address: A000h for Channel A A400h for Channel B Adaptec AIC-7899 SCSISelect (TM) Utility v2.10 AIC-7899 at Bus:02h Device:09h Channel: A Would you like to configure the host adapter, or run the SCSI disk utilities? Select the option and press <Enter>. Press <F5> to switch between color and monochrome modes. Options Configure/View Host Adapter Settings SCSI Disk Utilities Arrow keys to move cursor, <Enter> to select option, <Esc> to exit (*=default) 138 A Open Fortress 7100 Using and and then press Online Manual to make selections in the SCSISelect™ utility. Press at any time to return to the previous menu. You can press to toggle the display between color and monochrome modes. This feature may not work with some kinds of monitors. 139 A Open Fortress 7100 Online Manual 4.3 Configure/View Host Adapter Settings Menu The Configure/View Host Adapter Settings menu lists three settings under SCSI Bus Interface Definitions and three additional options. Adaptec AIC-7899 SCSISelect (TM) Utility v2.10 AIC-7896 at Bus:02h Device:09h Channel:A Configuration SCSI Bus Interface Definitions Host Adapter SCSI ID ………………………………..7 SCSI Parity Checking ………………………………Enabled Host Adapter SCSI Termination……………………..Enabled Additional Options Boot Device Options………….…………………Press <Enter> SCSI Device Configuration……………………..Press <Enter> Advanced Configuration Options………………Press <Enter> BIOS Information Interrupt (IRQ) Channel………………………………..11 I/O Port Address………………………………………...A000h Arrow keys to move cursor, <Enter> to select option, <Esc> to exit (*=default) 140 A Open Fortress 7100 Using and Online Manual to select a parameter. possible settings for the parameter. Press Press to display a pop-up menu with a list of at any time to return to the previous menu. SCSI controller default settings are marked with an asterisk (*) throughout the selection submenus. 4.3.1 Host Adapter SCSI ID This parameter allows you to change the host controller SCSI ID. The following screen shows the available IDs used for the AIC-7899. The default setting is SCSI ID 7, which has the highest priority on the SCSI bus. We recommend that you keep the default setting since most system applications run only in this setting. 141 A Open Fortress 7100 Online Manual Adaptec AIC-7899 SCSISelect (TM) Utility v2.10 AIC-7899 at Bus:02h Device:09h Channel:A Configuration SCSI Bus Interface Definitions 0 1 Host Adapter SCSI ID ………………………………….7 2 SCSI Parity Checking ………………………………...Enabled 3 4 Host Adapter SCSI Termination……………………….Enabled 5 Additional Options 6 *7 …..……….Press <Enter> Boot Device Options………………… 8 BIOS Information 9 Interrupt (IRQ) Channel………………………………..11 10 11 Arrow keys to move cursor, <Enter> to select option, <Esc> to exit (*=default) Each device on the SCSI bus, including the SCSI controller, must be set to a unique SCSI ID. The SCSI ID serves two purposes. It uniquely identifies each SCSI device on the bus, and it determines 142 A Open Fortress 7100 Online Manual the device’s priority on the bus during the arbitration phase. The arbitration phase determines which device controls the bus when two or more devices request for the use of it. Using and then press to select the SCSI ID if you need to change it. Press at any time to return to the previous menu. 4.3.2 SCSI Parity Checking Select this option to enable or disable the SCSI parity checking function on the SCSI controller. The screen below displays the selections. The default setting is “Enabled”. The SCSI controller always checks parity when reading from the SCSI bus to verify the correct transmission of data from the SCSI devices. You should disable the SCSI Parity Checking parameter if any of the installed SCSI devices do not support SCSI parity. Most currently available SCSI devices support this feature. 143 A Open Fortress 7100 Online Manual Adaptec AIC-7899 SCSISelect (TM) Utility v2.10 AIC-7899 at Bus:02h Device:09h Channel:A Configuration SCSI Bus Interface Definitions Host Adapter SCSI ID …………………………………..7 SCSI Parity Checking ………………………………...Enabled Host Adapter SCSI Termination………………………..Enabled * Enabled Additional Options Disabled Boot Device Options…….………………………..Press <Enter> SCSI Device Configuration………………………Press <Enter> Advanced Configuration Options………………..Press <Enter> BIOS Information Interrupt (IRQ) Channel………………………………..11 I/O Port Address………………………………………...A000h Arrow keys to move cursor, <Enter> to select option, <Esc> to exit (*=default) Using and then press to select options. Press at any time to return to the previous menu. 144 A Open Fortress 7100 Online Manual 4.3.3 Boot Device Options This parameter shows the target ID of your boot device. The default setting is 0 (zero). We recommend that you keep the default setting since most system applications run only in this setting. Below is the Boot Device Configuration menu screen. Adaptec AIC-7899 SCSISelect (TM) Utility v2.10 AIC-7899 at Bus:02h Device:09h Channel:A Configuration SCSI Bus Interface Definitions Host Adapter SCSI ID …………………………………7 Boot Device Configuration Select SCSI peripheral from which to boot. To view peripheral by ID# select "SCSI Disk Utilities" from previous menu. Boot Channel…………………………………………..A First Boot SCSI ID……………………………………………0 ------Option Listed Below Has NO EFFECT if MULTI LUN Support is Disabled-----BIOS Information Interrupt (IRQ) Channel………………………………..11 145 A Open Fortress 7100 Online Manual 4.3.4 Boot Channel Options This parameter lets you choosing boot the system from SCSI channel A or B first. The default setting is A (zero). We recommend that you keep the default setting since most system applications run only in this setting. Below is the Boot Device Configuration menu screen. Adaptec AIC-7899 SCSISelect (TM) Utility v2.10 AIC-7899 at Bus:02h Device:09h Channel:A Configuration SCSI Bus Interface Definitions Device Configuration ………7 Host Adapter SCSBoot I ID ………………………… First Select SCSI peripheral from which to*A boot. FirstUtilities" from previous menu. To view peripheral by ID# select "SCSIBDisk Boot Channel………………………………………… First BIOS Information Interrupt (IRQ) Channel………………………………..11 Arrow keys to move cursor, <Enter> to select option, <Esc> to exit (*=default) 146 A Open Fortress 7100 Online Manual 147 A Open Fortress 7100 Online Manual 4.3.5 Boot SCSI ID Options This parameter lets you choosing the SCSI ID of SCSI device to be a boot device. The default setting is 0 (zero). We recommend that you keep the default setting since most system applications run only in this setting. Below is the Boot Device Configuration menu screen. Adaptec AIC-7899 SCSISelect (TM) Utility v2.10 AIC-7899 at Bus:02h Device:09h Channel:A Configuration SCSI Bus Interface Definitions * 0 1 iguration Device Conf Host Adapter SCSI Boot ID …………… ……………………7 Select SCSI peripheral from which to boot. 2 3 To view peripheral by ID# select "SCSI Disk Utilities" from previous menu. 4 Boot Channel………………………………………… First 5 BIOS Information 6 Interrupt (IRQ) Channel………………………………..11 7 8 148 A Open Fortress 7100 Online Manual 4.3.6 Boot LUN Number Options Adaptec AIC-7899 SCSISelect (TM) Utility v2.10 AIC-7899 at Bus:02h Device:09h Channel:A Configursation SCSI Bus Interface Definitions * 0 Boot Device Configuration Host Adapter SCSI ID …………………………………7 1 Select SCSI peripheral from which to boot. 2 To view peripheral by ID# select "SCSI Disk Utilities" from previous menu. 3 Boot Channel………………………………………… First 4 BIOS Information 5 Interrupt (IRQ) Channel………………………………..11 6 Arrow keys to move cursor, <Enter> to select option, <Esc> to exit (*=default) 149 A Open Fortress 7100 Online Manual 4.3.7 Boot LUN Number LUN (Logic unit number) can support more devices, like RAID box or RAID card. 4.3.7.1 SCSI Device Configuration This parameter allows you to configure details of each SCSI device on the SCSI bus. The screen shows a column of information for each SCSI ID, even if some SCSI IDs are not assigned to a device. To configure a specific SCSI device, you need to know which SCSI ID it uses. See the SCSI Disk Utilities later in this section for instructions on how to determine the SCSI ID used by a device. 150 A Open Fortress 7100 Online Manual Adaptec AIC-7899 SCSISelect (TM) Utility v2.10 SCSI Device Configuration SCSI Device ID #0 #1 #2 #3 #4 #5 #6 #7 --------------------------------------------------------------------------------------------------------------Sync Transfer Rate (MB/Sec).160.0 160.0 160.0 160.0 160.0 160.0 160.0 160.0 Initiate Wide Negotiation………Yes Yes Yes Yes Yes Yes Yes Yes Enable Disconnection………….Yes Yes Yes Yes Yes Yes Yes Yes Send Start Unit Command…….Yes Yes Yes Yes Yes Yes Yes Yes Enable Write Back Cache…..…N/C N/C N/C N/C N/C N/C N/C N/C -------------Options Listed Below Have NO EFFECT if the BIOS is Disabled------------BIOS Multiple LUN Support…...No No No No No No No No Include in BIOS Scan………..…Yes Yes Yes Yes Yes Yes Yes Yes SCSI Device ID #8 #9 #10 #11 #12 #13 #14 #15 --------------------------------------------------------------------------------------------------------------Sync Transfer Rate (MB/Sec)…….80.0 80.0 80.0 80.0 80.0 80.0 80.0 80.0 Initiate Wide Negotiation…………..Yes Yes Yes Yes Yes Yes Yes Yes Enable Disconnection……………..Yes Yes Yes Yes Yes Yes Yes Yes Send Start Unit Command………..Yes Yes Yes Yes Yes Yes Yes Yes Enable Write Back Cache…………N/C N/C N/C N/C N/C N/C N/C N/C -------------Options Listed Below Have NO EFFECT if the BIOS is Disabled------------BIOS Multiple LUN Support………..No No No No No No No No Include in BIOS Scan………………Yes Yes Yes Yes Yes Yes Yes Yes Arrow keys to move cursor, <Enter> to select option, <Esc> to exit (*=default) 151 A Open Fortress 7100 Using or Online Manual to move between options, then press to display a pop-up menu with a list of values. Using or to select a value, then press . 4.3.7.2 Sync Transfer Rate This option determines the maximum synchronous data transfer rate that the SCSI controller can support. The SCSI controller supports rates up to the Fast Wide SCSI maximum of 80.0 MB per second. The default value is 80.0. In most cases, you can use the maximum value of 80.0. However, if the SCSI controller is not set to negotiate data transfer (i.e., Initiate Sync Negotiation is set to No), the value selected here is the maximum rate that the SCSI controller accepts from the device during negotiation. This is a standard SCSI protocol. Some older SCSI-1 devices do not support Fast SCSI data transfer rates. This may cause the system to operate erratically or hang if the transfer rate is too high. 152 A Open Fortress 7100 Online Manual 4.3.7.3 Initiate Wide Negotiation This option allows communication between all devices (lower 8-bit or upper 8-bit) on the wide (16-bit) SCSI bus. When set to Yes, each device can connect on the bus. When set to No (disabled), communication can only occur on the lower eight bits of the 16-bit SCSI bus. The default setting is Yes. 4.3.7.4 Enable Disconnection This option determines whether the SCSI controller allows a SCSI device to disconnect from the SCSI bus (sometimes called Disconnect/Reconnect). Disconnect/Reconnect allows the SCSI controller to perform other operations on the SCSI bus while the SCSI device is temporarily disconnected. When set to Yes, the SCSI device may disconnect from the SCSI bus. The SCSI device, however, may choose not to disconnect, even if permitted by the SCSI controller. When set to No, the SCSI device is not allowed to disconnect from the SCSI bus. The default setting is Yes. Keep this item set to Yes if two or more SCSI devices are connected to the SCSI controller. This can optimize SCSI bus performance. If only one SCSI device is connected to the SCSI controller, set this item to No to achieve better system performance. 153 A Open Fortress 7100 Online Manual 4.3.7.5 Send Start Unit Command This option determines whether the Start Unit Command (SCSI command 1B) is sent to the SCSI device (most devices do not require this). Enabling this item reduces the load on the system power supply by allowing the SCSI controller to power up SCSI devices one at a time upon booting. Otherwise, all the devices power up at the same time. Most devices require you to set a jumper before they can respond to this command. When set to Yes, the Start Unit Command is sent to the SCSI device at system boot. When set to No, each SCSI device powers up in the normal procedure. The Send Start Unit Command setting is valid only if the host adapter BIOS is enabled. If this option is enabled for more than one SCSI device, the Start Unit Command is sent first to the device with the lowest SCSI ID. When this device responds to the SCSI controller, the Start Unit Command is sent to the next highest SCSI ID with a setting of Yes. The process continues until all supported devices respond to the SCSI controller. If many drives are set to Yes for Send Start Unit Command, the boot time varies depending on how long it takes each drive to spin up. 154 A Open Fortress 7100 Online Manual 4.4 Advanced Configuration Options Selecting the Advanced Configuration Options displays a screen as shown below. Do not change the settings of the items under this parameter unless it is absolutely necessary. Adaptec AIC-7899 SCSISelect (TM) Utility v2.10 AIC-7899 at Bus:02h Device:09h Channel:A Configuration Advanced Configuration Options SCSI Bus Interface Definitions Reset SCSI Bus at IC Initialization………………………………..Enabled Host Adapter SCSI ID …………………………………7 Display <Ctrl><A> Message During BIOS Initialization………...Enabled Extended BIOS Translation for DOS Drives > 1 Gbyte…………Enabled Verbose/Silent Mode………………………………………………..Verbose ------------Options Listed Below Have NO EFFECT if the BIOS is Disabled-----------BIOS Information Host Adapter BIOS………………………………………………….Enabled Interrupt (IRQ) Channel………………………………..11 Support Removable Disks Under BIOS as Fixed Disks………...Boot Only I/O Port Address………………………………………...A000h Arrow keys to move cursor, <Enter> to select option, <Esc> to exit (*=default) 155 A Open Fortress 7100 Using Online Manual or to move between options, then press to display a pop-up menu with a list of options. Using or to select an option, then press . 4.4.1 Host Adapter BIOS This option enables or disables the SCSI controller BIOS. The default setting is Enabled. The SCSI controller BIOS must be enabled if you want the system to boot from a SCSI hard disk drive connected to the SCSI controller. Several SCSISelect™ options cannot be used unless the SCSI controller BIOS is enabled. 4.4.2 Display <Ctrl-A> Message During BIOS Initialization This option allows entering the SCSISelect™ utility during BIOS initialization. The default setting is Enabled. 4.4.3 Extended BIOS Translation for DOS Drives > 1 GByte This option allows you to enable or disable extended translation for SCSI hard disks with a capacity greater than 1 GB. This is valid only if the SCSI controller BIOS is enabled. The default factory 156 A Open Fortress 7100 Online Manual setting is Enabled. When enabled, this option uses the following translation schemes: • • SCSI hard disks < 1 GB use a translation scheme of 64 heads, 32 sectors per track SCSI hard disks > 1 GB use a translation scheme of 255 heads, 63 sectors per track See the section Disk Drives Over 1 GB” in this chapter, for more information on this option. This option should be left disabled for most operating systems except DOS. 4.4.4 Support Removable Disks Under BIOS as Fixed Disks This option allows you to control which removable-media drives are supported by the SCSI controller BIOS. This is only valid when the SCSI controller BIOS is enabled. The default setting is Boot Only. The following choices are available: • Boot Only - Only the removable-media drive designated as the boot device is treated as a hard disk drive. 157 A Open Fortress 7100 • Online Manual All Disks - All removable-media drives supported by the BIOS are treated as hard disk drives. • Disabled - No removable-media drives are treated as hard disk drives. In this case, software drivers are needed because the drives are not controlled by BIOS. Support for removable-media drives means that the SCSI controller BIOS allows use of a removable-media drive as if it is a hard disk drive. It does not mean that you can remove the disk media during operation. If a removable-media SCSI device is controlled by the SCSI controller BIOS, do not remove the media while the drive is powered-on or you may lose data! 4.4.5 BIOS Support for Bootable CD-ROM When enabled, this option allows you to use a bootable CD-ROM device to directly load an operating system. The default setting is Enabled. 158 A Open Fortress 7100 Online Manual 4.4.6 BIOS Support for Int13 Extensions This option allows access to attached SCSI devices through BIOS Int13 functions. The default setting is Enabled. 159 A Open Fortress 7100 Online Manual 4.5 SCSI Disk Utilities When you select SCSI Disk Utilities from the Options menu, the SCSISelect™ Utility scans the SCSI bus and lists all SCSI devices installed on the SCSI bus. The list shows the individual SCSI IDs assigned to each device on the SCSI bus. Adaptec AIC-7899 SCSISelect (TM) Utility v2.10 Scanning SCSI ID:0 : LUN Number:0 Arrow keys to move cursor, <Enter> to select option, <Esc> to exit (*=default) 160 A Open Fortress 7100 Online Manual Adaptec AIC-7899 SCSISelect (TM) Utility v2.10 AIC-7899 at Bus:02h Device:09h Channel:A Select SCSI Disk and press <Enter> SCSI ID #0: No device SCSI ID #1: No device SCSI ID #2: No device SCSI ID #3: No device SCSI ID #4: No device SCSI ID #5: No device SCSI ID #6: No device Arrow keys to move cursor, <Enter> to select option, <Esc> to exit (*=default) Select a disk device to display a small menu window. Verify Media. 161 From this menu, select Format Disk or A Open Fortress 7100 Using or Online Manual to move between options, then press to display a pop-up menu with a list of values. Using or to select a value, then press . 4.5.1 Format Disk The Format Disk utility performs a low-level format on disk devices. Most SCSI disk devices are preformatted and do not need to be formatted again. The Adaptec Format Disk utility is compatible with the vast majority of SCSI disk drives. Run it on hard disk drives or removable-media drives that were previously used with a non-Adaptec SCSI controller. A low-level format destroys all data on the drive. Be sure to back up your data before performing this operation. You cannot abort a low-level format once it is started. 162 A Open Fortress 7100 Online Manual 4.5.2 Verify Media The Verify Media utility scans the selected device’s media for defects. If the utility finds bad blocks, it prompts you to reassign them. If you select Yes, those blocks will no longer be used. You can press Media utility. at any time to abort the Verify Disk 163 A Open Fortress 7100 Online Manual 4.6 Disk Drives Over 1 GByte 4.6.1 Extended Translation Adaptec SCSI controllers have always supported the full range of disk drive capacities under all major operating systems. As disk drives have recently grown beyond 1 GB in formatted capacity, they have run up against the DOS 1024-cylinder limit. To continue its support for all SCSI disk drive capacities under DOS, Adaptec has included an extended translation scheme for the AIC-7896 SCSI controllers. This feature supports disk drives of up to 8 GB capacity under DOS. The section Extended BIOS Translation for DOS Drives > 1 GB explains how to change the setting of this option. Most operating systems leave this option disabled. 4.6.2 DOS 1 GByte Limit All current versions of DOS are limited to 1024 cylinders per drive. The standard translation scheme for SCSI host controllers, using 64 heads and 32 sectors, gives a maximum capacity of 1 GB. To eliminate the 1-GB limit, Adaptec’s extended translation feature uses 255 heads and 63 sectors, extending the disk drive capacity limit under DOS to 8 GB. 164 A Open Fortress 7100 Online Manual If you have already partitioned a large hard disk drive with one translation method, conversion to another method erases the data on the drive. Be sure to back up your disk drive prior to any change in the translation method. 165 A Open Fortress 7100 Online Manual 4.7 When to Use the Extended Translation 4.7.1 with DOS 5.0 and above NetWare 386 (version 3.0 and above) and some versions of UNIX that do not share the 1024 cylinder limit of DOS do not require extended translation to support large disk drives and should not be enabled. 4.7.2 drives with mixed partitions Use standard translation (not extended translation) on drives formatted with two or more partitions for different operating systems. Partitions for UNIX and NetWare can be larger than 1 GB when using standard translation. 4.7.3 Using FDISK To install a new disk, or to re-partition an existing disk, use the FDISK DOS utility as you normally would. The cylinder size increases to 8 MB when you enable extended translation. The size of the partition you request must therefore be a multiple of 8 MB. If you request a partition size that is not a multiple of 8 MB, FDISK rounds up to the nearest whole multiple of 8 MB. 166 A Open Fortress 7100 Online Manual Glossary AC97 Basically, AC97 specification separates sound/modem circuit to two parts, digital processor and a CODEC for analog I/O they are linked by AC97 link bus. Since digital processor can be put into motherboard main chipset, the cost of sound/modem onboard solution can be reduced. ACPI (Advanced Configuration & Power Interface) ACPI is the power management specification of PC97 (1997). It intends to save more power by taking full control of power management to operating system and bypass BIOS. The chipset or super I/O chip needs to provide standard register interface to operating system (such as Windows 98). This is a bit similar as the PnP register interface. ACPI defines ATX momentary soft power switch to control the power state transition. 167 A Open Fortress 7100 Online Manual AGP (Accelerated Graphic Port) AGP is a bus interface targeted for high-performance 3D graphic. AGP supports only memory read/write operation and single-master single-slave one-to-one only. AGP uses both rising and falling edge of the 66MHz clock, for 2X AGP, the data transfer rate is 66MHz x 4byte x 2 = 528MB/s. AGP is now moving to 4X mode, 66MHz x 4byte x 4 = 1056MB/s. AOpen is the first company to support 4X AGP motherboards by both AX6C (Intel 820) and MX64/AX64 (VIA 694x), started from Oct 1999. AM AMR (Audio/Modem Riser) The CODEC circuit of AC97 sound/modem solution can be put on motherboard or put on a riser card (AMR card) that connects to motherboard through AMR connector. AOpen Bonus Pack CD A disc bundled with AOpen motherboard product, there are motherboard drivers, Acrobat Reader for PDF online manual and other useful utilities. 168 A Open Fortress 7100 Online Manual APM Unlike ACPI, BIOS controls most APM power management functions. AOpen Suspend to Hard Drive is a good example of APM power management. ATA/66 ATA/66 uses both rising edge and falling edge but doubles UDMA/33 transfer rate. The data transfer rate is 4 times of the PIO mode 4 or DMA mode 2, 16.6MB/s x4 = 66MB/s. To use ATA/66, you need special ATA/66 IDE cable. ATA/100 ATA/100 is a new IDE specification under developing. ATA/100 uses both rising edge and falling edge as ATA/66 but clock cycle time is reduced to 40ns. The data transfer rate is (1/40ns) x 2 bytes x 2 = 100MB/s. To use ATA/100, you need special 80-wire IDE cable, the same as ATA/66. 169 A Open Fortress 7100 Online Manual BIOS (Basic Input/Output System) BIOS is a set of assembly routine/program that reside in EPROM or Flash ROM. BIOS controls Input/output devices and other hardware devices of motherboard. In general, to provide hardware independent portability, operation system and drivers is required to access BIOS without directly access hardware devices. Bus Master IDE (DMA mode) The traditional PIO (Programmable I/O) IDE requires the CPU to involve in all the activities of the IDE access including waiting for the mechanical events. To reduce the workload of the CPU, the bus master IDE device transfers data from/to memory without interrupting CPU, and releases CPU to operate concurrently while data is transferring between memory and IDE device. You need the bus master IDE driver and the bus master IDE HDD to support bus master IDE mode. CODEC (Coding and Decoding) Normally, CODEC means a circuit that can do digital to analog conversion and also the analog to digital conversion. It is part of AC97 sound/modem solution. 170 A Open Fortress 7100 Online Manual DIMM (Dual In Line Memory Module) DIMM socket has total 168-pin and supports 64-bit data. It can be single or double side, the golden finger signals on each side of PCB are different, that is why it was called Dual In Line. Almost all DIMMs are made by SDRAM, which operate at 3.3V. Note that some old DIMMs are made by FPM/EDO and only operate at 5V. Do not confuse them with SDRAM DIMM. ECC (Error Checking and Correction) The ECC mode needs 8 ECC bits for 64-bit data. Each time memory is accessed, ECC bits are updated and checked by a special algorithm. The ECC algorithm has the ability to detect double-bit error and automatically correct single-bit error while parity mode can only detect single-bit error. EDO (Extended Data Output) Memory The EDO DRAM technology is actually very similar to FPM (Fast Page Mode). Unlike traditional FPM that tri-states the memory output data to start the pre-charge activity, EDO DRAM holds the memory data valid until the next memory access cycle, that is similar to pipeline effect and reduces one clock state. 171 A Open Fortress 7100 Online Manual EEPROM (Electronic Erasable Programmable ROM) Also known as E2PROM. Both EEPROM and Flash ROM can be re-programmed by electronic signals, but the interface technology is different. Size of EEPROM is much smaller than flash ROM, AOpen motherboard uses EEPROM for jumper-less and battery-less design. EPROM (Erasable Programmable ROM) Traditional motherboard stores BIOS code in EPROM. EPROM can only be erased by ultra-violet (UV) light. If BIOS has to be upgraded, you need to remove EPROM from motherboard, clear by UV light, re-program, and then insert back. EV6 Bus EV6 Bus in the technology of Alpha processor from Digital Equipment Corporation. EV6 bus uses both rising and falling clock edge to transfer data, similar as DDR SDRAM or ATA/66 IDE bus. EV6 Bus Speed = CPU external bus clock x 2. For example, 200 MHz EV6 bus is actually using 100 MHz external bus clock, but the equivalent speed is 200 MHz. 172 A Open Fortress 7100 Online Manual FCC DoC (Declaration of Conformity) The DoC is component certification standard of FCC EMI regulations. This standard allows DIY component (such as motherboard) to apply DoC label separately without a shielding of housing. FC-PGA FC means Flip Chip, FC-PGA is a new package of Intel for Pentium III CPU. It can plug into SKT370 socket, but require motherboard to add some signals on socket 370. That is, the motherboard needs to be redesigned. Intel is going to ship FC-PGA 370 CPU and phase out slot1 CPU. Flash ROM Flash ROM can be re-programmed by electronic signals. It is easier for BIOS to upgrade by a flash utility, but it is also easier to be infected by virus. Because of increase of new functions, BIOS size is increased from 64KB to 256KB (2M bit). AOpen AX5T is the first board to implement 256KB (2Mbit) Flash ROM. Now flash ROM size is moving to 4M bit on AX6C (Intel 820) and MX3W (Intel 810) motherboard. 173 A Open Fortress 7100 Online Manual FSB (Front Side Bus) Clock FSB Clock means CPU external bus clock. CPU internal clock = CPU FSB Clock x CPU Clock Ratio I2C Bus See SMBus. P1 P1394 P1394 (IEEE 1394) is a standard of high-speed serial peripheral bus. Unlike low or medium speed USB, P1394 supports 50 to 1000Mbit/s and can be used for video camera, disk and LAN. Parity Bit The parity mode uses 1 parity bit for each byte, normally it is even parity mode, that is, each time the memory data is updated, parity bit will be adjusted to have even count "1" for each byte. When next time, if memory is read with odd number of "1", the parity error is occurred and this is called single bit error detection. 174 A Open Fortress 7100 Online Manual PBSRAM (Pipelined Burst SRAM) For Socket 7 CPU, one burst data read requires four QWord (Quad-word, 4x16 = 64 bits). PBSRAM only needs one address decoding time and automatically sends the remaining QWords to CPU according to a predefined sequence. Normally, it is 3-1-1-1, total 6 clocks, which is faster than asynchronous SRAM. PBSRAM is often used on L2 (level 2) cache of Socket 7 CPU. Slot 1 and Socket 370 CPU do not need PBSRAM. PC100 DIMM SDRAM DIMM that supports 100MHz CPU FSB bus clock. PC133 DIMM SDRAM DIMM that supports 133MHz CPU FSB bus clock. 175 A Open Fortress 7100 Online Manual PDF Format A file format for electronic document, PDF format is independent from platform, you can read PDF file under Windows, Unix, Linux, Mac … with different PDF reader. You can also read PDF file by web browser such as IE and Netscape, note that you need to install PDF plug-in first (Included in Acrobat Reader). PnP (Plug and Play) The PnP specification suggests a standard register interface for both BIOS and operating system (such as Windows 95). These registers are used by BIOS and operating system to configure system resource and prevent any conflicts. The IRQ/DMA/Memory will be automatically allocated by PnP BIOS or operating system. Currently, almost all the PCI cards and most ISA cards are already PnP compliant. POST (Power-On Self Test) The BIOS self test procedure after power-on, sometimes, it is the first or the second screen shown on your monitor during system boot. 176 A Open Fortress 7100 Online Manual RDRAM (Rambus DRAM) Rambus is a memory technology that uses large burst mode data transfer. Theoretically, the data transfer should be high than SDRAM. RDRAM is cascaded in channel operation. For Intel 820, only one RDRAM channel is supported, 16-bit data per channel, and this channel may have maximum 32 RDRAM devices, no matter how many RIMM sockets. RIMM 184-pin memory module that supports RDRAM memory technology. A RIMM memory module may contain up to maximum of 16 RDRAM devices. SDRAM (Synchronous DRAM) SDRAM is one of the DRAM technologies that allows DRAM to use the same clock as the CPU host bus (EDO and FPM are asynchronous and do not have clock signal). It is similar as PBSRAM to use burst mode transfer. SDRAM comes in 64-bit 168-pin DIMM and operates at 3.3V. AOpen is the first company to support dual-SDRAM DIMMs onboard (AP5V), from Q1 1996 177 A Open Fortress 7100 Online Manual SIMM (Single In Line Memory Module) SIMM socket is only 72-pin, and is only single side. The golden finger signals on each side of PCB are identical. That is why it was called Single In Line. SIMM is made by FPM or EDO DRAM and supports 32-bit data. SIMM had been phased out on current motherboard design. SMBus (System Management Bus) SMBus is also called I2C bus. It is a two-wire bus developed for component communication (especially for semiconductor IC). For example, set clock of clock generator for jumper-less motherboard. The data transfer rate of SMBus is only 100Kbit/s, it allows one host to communicate with CPU and many masters and slaves to send/receive message. SPD (Serial Presence Detect) SPD is a small ROM or EEPROM device resided on the DIMM or RIMM. SPD stores memory module information such as DRAM timing and chip parameters. SPD can be used by BIOS to decide best timing for this DIMM or RIMM. 178 A Open Fortress 7100 Online Manual Ultra DMA/33 Unlike traditional PIO/DMA mode, which only uses the rising edge of IDE command signal to transfer data. UDMA/33 uses both rising edge and falling edge, the data transfer rate is double of the PIO mode 4 or DMA mode 2. 16.6MB/s x2 = 33MB/s USB (Universal Serial Bus) USB is a 4-pin serial peripheral bus that is capable of cascading low/medium speed peripherals (less than 10Mbit/s) such as keyboard, mouse, joystick, scanner, printer and modem. With USB, the traditional complex cables from back panel of your PC can be eliminated. VCM (Virtual Channel Memory) NEC’s Virtual Channel Memory (VCM) is a new DRAM core architecture that dramatically improves the memory system’s ability to service multimedia requirements. VCM increases memory bus efficiency and performance of any DRAM technology by providing a set of fast static registers between the memory core and I/O pins. Using VCM technology results in reduced data access latency and reduced power consumption. 179 A Open Fortress 7100 Online Manual ZIP file A compressed file format to reduce file size. To unzip file, run shareware PKUNZIP (http://www.pkware.com/) for DOS and other operating system or WINZIP (http://www.winzip.com/) for windows environment. 180 A Open Fortress 7100 Online Manual Troubleshooting Start Turn off the power and unplug the AC power cable, then remove ove all of the add-on cards and cables, including VGA, IDE, FDD, COM1, COM2 and printer. Make sure if all jumper settings are correct. Next 181 A Open Fortress 7100 Online Manual Continue Install the VGA card. Then connect your monitor and keyboard. Turn on the power Yes and check if the power supply and CPU fan work properly. No The problem is probably caused by power supply or motherboard failure. Please contact your reseller or local distributor for repairing. Next A Open 182 Fortress 7100 Online Manual Continue No Check if there is display? Perhaps your VGA card or monitor is defective. Yes Press <Ctrl> and <Alt> key at the same time, hold them and then press <Del> to reboot the system. No Check if the system reboots? It is very possible that your keyboard is defective. Yes Next 183 A Open Fortress 7100 Online Manual Continue During system rebooting, press <Del> to enter BIOS setup. Choose “Load Setup Default”. Turn off the system and re-connect IDE cable. Check if the system can reboot successfully? No The problem should be caused by the IDE cable or HDD itself. Yes Re-install operatiing system such as Windows 98. End A Open 184 Fortress 7100 Online Manual Technical Support Dear Customer, Thanks for choosing AOpen products. To provide the best and fastest service to our customer is our first priority. However, we receive numerous emails and phone-calls worldwide everyday, it is very hard for us to serve everyone on time. We recommend you follow the procedures below and seek help before contact us. With your help, we can then continue to provide the best quality service to more customers. Thanks very much for your understanding! AOpen Technical Supporting Team 1 2 Online Manual: Please check the manual carefully and make sure the jumper settings and installation procedure are correct. http://www.aopen.com.tw/tech/download/manual/default.htm Test Report: We recommend to choose board/card/device from the compatibility test reports for assembling your PC. http://www.aopen.com.tw/tech/report/default.htm 185 A Open Fortress 7100 Online Manual 3 FAQ: The latest FAQ (Frequently Asked Questions) may contain a solution to your 4 Download Software: Check out this table to get the latest updated BIOS/utility and 5 News Group: Your problem probably had been answered by our support engineer or 6 Contact Distributors/Resellers: We sell our products through resellers and problem. http://www.aopen.com.tw/tech/faq/default.htm drivers. http://www.aopen.com.tw/tech/download/default.htm professional users on the news group. http://www.aopen.com.tw/tech/newsgrp/default.htm integrators. They should know your system configuration very well and should be able to solve your problem more efficiently than us. After all, their attitude of service is an important reference for you if next time you want to buy something else from them. A Open 186 Fortress 7100 7 Online Manual Contact Us: Please prepare detail system configuration and error symptom before contacting us. The part number, serial number and BIOS version are also very helpful. Part Nu mber and Serial Number um The Part Number and Serial number are printed on bar code label. You can find this bar code label on the outside packing, on ISA/CPU slot or on component side of PCB. For example: P/N: 91.88110.201 is part number, S/N: 91949378KN73 is serial number. 187 A Open Fortress 7100 Online Manual Product Registration Thank you for choosing AOpen product. AOpen encourages you to spend few minutes in completing the following product registration. To register your product will ensure the high quality of services from AOpen. After the registration, you will: • Have opportunities to play online slot machine and win a prize from AOpen by accumulating your bonuses for later prize exchange. • • • • • • • Be upgraded to gold membership of Club AOpen program. Receive email notification about product safety alerts. Its purpose is to alert consumers quickly and conveniently when products contain technical issues. Receive email notification about latest product's announcements. Be able to personalize your AOpen web pages. Receive e-mail notification about latest BIOS/Driver/Software release information. Have opportunities to participate special product promotional programs. Enjoy higher service priority to receive technical assistance provided by AOpen specialists worldwide. • Be able to join the discussions of web-based news groups. AOpen makes sure that the information you provide is encrypted, so that it cannot be read or intercepted by other people or companies. Further, AOpen will not disclose any of information you submitted under any conditions. Please consult our online privacy policy for further information on our company policy. A Open 188 Fortress 7100 Online Manual How to Contact Us Please do not hesitate contact us if you have any problem about our products. Any opinion will be appreciated. Pacific Rim AOpen Inc. Tel: 886-2-2696-1333 Fax: 886-2-8691-2233 Europe AOpen Computer b.v. Tel: 31-73-645-9516 Fax: 31-73-645-9604 China Germany AOpen Computer GmbH. Tel: 49-2102-157700 Fax: 49-2102-157799 艾尔鹏国际上海(股)有限公司 Tel: 49-2102-157700 Fax: 49-2102-157799 America AOpen America Inc. Tel: 1-510-498-8928 Fax: 1-408-922-2935, 1-408-432-0496 Web Site: http://www.aopen.com.tw E-mail: Send us email by going through the contact form below. English http://www.aopen.com.tw/tech/contact/techusa.htm Japanese http://aojp.aopen.com.tw/tech/contact/techjp.htm Chinese http://w3.aopen.com.tw/tech/contact/techtw.htm German http://www.aopencom.de/tech/contact/techde.htm French http://aofr.aopen.com.tw/tech/contact/techfr.htm Simplified Chinese http://www.aopen.com.cn/tech/contact/techcn.htm 189 A Open