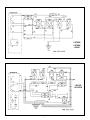
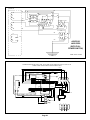
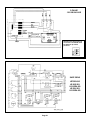
1
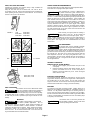
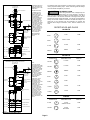
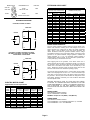
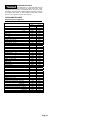
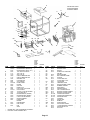
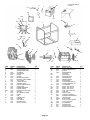
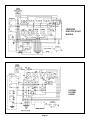
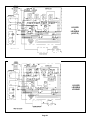
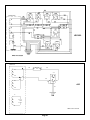
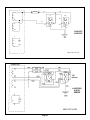
VOLT
master
America ®
ENGINE DRIVEN GENERATOR SET OWNER’S MANUAL
GASOLINE AND DIESEL
CONTRACTOR SERIES
LR30 THROUGH LR180 (WITH IDLER SYSTEMS)
DIESEL SERIES
LR50 THROUGH LR130 (NO IDLER SYSTEMS)
STANDARD DUTY SERIES
A25 THROUGH A60 SERIES (NO IDLER SYSTEMS)
LA50 THROUGH LA60 SERIES (NO IDLERS SYSTEMS)
LR70 THROUGH LR105 SERIES (NO IDLERS SYSTEMS)
THREE PHASE SERIES
LR50 THROUGH LR180 SERIES (GASOLINE AND DIESEL NO IDLER SYSTEMS)
LIQUID PROPANE(LP) AND NATURAL GAS(NG) SERIES
LR105 THROUGH LR150’s SERIES
SAFE GEN SERIES
LR70 THROUGH LR150’s SERIES
INDEX
PAGE
SAFETY PRECAUTIONS
PRE START
FUEL AND FILLING FUEL
OIL FILLING
BREAK IN
INITIAL STARTING OF DIESEL
ENVIRONMENT
MUFFLER/SPARK ARRESTER
UNIT GROUNDING
ELECRIC START
BATTERY
STOPPING THE ENGINE
APPLYING ELECTRIC LOADS
DISCONNECTING ELECTRIC LOADS
RECEPTACLE UTILIZATION
FULL POWER SWITCH
VENTILATION
2
3
3
3
3
3
3
4
4
4
4-5
5
5
5
5
5
5
INDEX
HIGH/LOW TEMPERATURE
IDLER OPERATIONS
OPERATING SAFE GENS
OPERATING LP/NG
INSTALLATION
INFREQUENT/OUT OF SERVICE
WATTAGE REQUIREMENTS
EXTENSION CORDS/RECEPTACLE
SCHEMATICS
OPERATING THREE PHASE
TRANSPORTING UNITS
POWER REQUIREMENTS
PARTS DIAGRAMS
WIRING DIAGRAMS
ORDERING PARTS
WARRANTY
Page 1
PAGE
6
6
6
6
6-7
7
7
8-9
8
9
10
10
11-19
20-30
31
31
2593-CON
REV 05/09
MOVING PARTS CAN CAUSE SEVERE PERSONAL
INJURY OR DEATH
Safety Precautions
Before operating the generator set, read the Owner’s Manual and
become familiar with it and your equipment. Safe and efficient
operation can be achieved only if the equipment is properly operated
and maintained. Many accidents are caused by failure to follow
fundamental rules and precautions.
•
•
•
The following symbols found throughout this manual, alert you to
potentially dangerous conditions to the operator, service personnel or
the equipment.
This symbol warns of immediate
! DANGER hazards, which if not avoided, will result
in severe personal injury or death.
•
•
This symbol refers to a hazard or
! WARNING
unsafe practice, which if not avoided,
could result in severe personal injury or
death.
!
CAUTION
ELECTRICAL SHOCK CAN CAUSE SEVERE PERSONAL
INJURY OR DEATH
This symbol refers to a hazard or
unsafe practice, which if not avoided,
might result in minor or moderate injury
or product or property damage.
•
The engine exhaust from this product
! DANGER contains chemicals known to the state
of California to cause Cancer, Birth
Defects or other reproductive harm.
•
•
Fuels, electrical equipment batteries, exhaust gases and moving parts
present potential hazards that could result in severe personal injury.
Take care in following these recommended procedures.
•
FUELS AND FUMES ARE FLAMMABLE:
Fire, explosion and severe personal injury can result from improper
practices. When transporting generator set, always close the fuel shut
off valve located beneath the bottom of the fuel tank.
•
•
•
•
•
•
DO NOT fill fuel tanks with the engine running. Fuel contact
with the engine or exhaust is a potential fire hazard. Let the
engine cool down before removing gas cap.
DO NOT SMOKE OR ALLOW AN OPEN FLAME near the
generator set or fuel tank.
DO NOT store or transport the generator wet without first
removing the fuel from the tank.
DO NOT SMOKE while servicing batteries. Lead acid
batteries emit a highly explosive hydrogen gas that can be
ignited by electrical arcing or by smoking.
DO NOT mix lubricating oil with gasoline.
When refueling always wait until the unit has cooled down
before opening/removing the fuel cap.
•
•
•
Disconnect starting battery before removing protective
shields or touching electrical equipment.
Use rubber
insulated mats placed on dry wood platforms over floors that
are metal or concrete when around electrical equipment. Do
not wear wet damp clothing (particularly wet shoes) or allow
skin surfaces to be damp when handling electrical
equipment.
Use extreme caution when working on electrical
components. High voltages can cause injury or death. DO
NOT tamper with interlocks.
Follow all applicable state and local electrical codes. Have
all electrical installations performed by a qualified licensed
electrician. Tag open switches to avoid accidental closure.
DO NOT CONNECT GENERATOR SET DIRECTLY TO
ANY BUILDING ELECTRICAL SYSTEM.
Hazardous
voltages can flow from the generator set into the utility line.
This creates a potential for electrocution or property
damage. Connect only through an approved device and
after building main switch is open. The National Electrical
Code and Canadian Standards Association require an
approved switch device between the generator set and the
utility power. Consult a licensed electrician in regard to
emergency power use.
DO NOT use the generator set in rain, snow, sleet or wet
ground conditions.
GENERAL SAFETY PRECAUTIONS
•
•
EXHAUST GASES ARE DEADLY
•
Before performing any maintenance on the generator set,
disconnect the spark plug wire (and the starting battery
negative cable on electric start models) to prevent accidental
starting.
Keep hands away from moving parts
Do not wear loose clothing or jewelry while servicing any
part of the generator set. Loose clothing and jewelry can
become caught in moving parts. Jewelry can short out
electrical contacts and cause shock or burning.
Make sure that fasteners on the generator set are secure.
Tighten supports and clamps, keep guards in position over
fans, drive belts and heat shields, etc.
If adjustment must be made while the generator set is
running, use extreme caution around hot manifolds and
moving parts, etc.
Engine exhaust contains CARBON MONOXIDE, a
dangerous, invisible gas that you cannot smell that is
potentially lethal. Avoid carbon monoxide inhalation by
operating the generator set outdoors where exhaust gases
can be discharged directly into the open air. Use a batterypowered carbon monoxide detector when running generator.
Do not operate the generator set in any type of enclosure
that could allow exhaust gases to accumulate such as inside
garages, crawl spaces or inside vehicles of any type. Using
a fan and opening doors or windows does NOT provide
enough fresh air. Direct exhaust gas away from areas
where people are gathered and away from building or
enclosures. If you start to feel sick, dizzy or weak while
using generator, shut it off and get fresh air immediately.
See a doctor. You may have carbon monoxide poisoning.
Do not operate the generator set in an enclosed
compartment such as found in recreational vehicles or
enclosed trucks (even with the tail gate open). All warranties
are voided if the unit is operated in an enclosed area.
Operate only in well-ventilated area.
•
•
•
•
•
Page 2
Have a fire extinguisher nearby. Maintain extinguisher
properly and become familiar with is use. Extinguisher rated
ABC by the NFPS is appropriate for all applications. Consult
the local fire department for the correct type of extinguisher
for various applications.
Benzene and lead, found in some gasoline, have been
identified by some state and federal agencies as causing
cancer or reproductive toxicity. When checking, draining or
adding gasoline, take care not to ingest, breathe the fumes,
or contact gasoline.
Used engine oils have been identified by some state or
federal agencies as causing cancer or reproductive toxicity.
When checking or changing engine oil, take care not to
ingest, breathe the fumes or contact used oil.
Remove all unnecessary grease and oil from the unit.
Accumulated grease and oil can cause overheating and
engine damage and present a potential fire hazard.
DO NOT store anything on the generator set such as oilcans, oily rages, chains, wooden blocks etc. A fire could
result or operation could be adversely affected. Keep the
generator set clean and dry at all times.
DO NOT work on this equipment when mentally or physically
fatigued, or after consuming alcohol or any drugs.
Never remove radiator cap or radiator reservoir cap while
engine is hot or running. Severe burns or injury can occur by
escaping steam or hot engine coolant.
PRESTART OPERATION
BREAK IN & CONTINUOUS OPERATION/LOAD
APPLICATION FOR DIESELS ONLY
Before starting the engine, read the engine manual for the proper type
oil type and volume and fuel type.
After the engine operates properly, it is strongly recommended to
ALWAYS have an electrical load of at LEAST 25% of the nameplate
rating on the generator when operating the unit. Operating the engine
without an electrical load for prolonged periods of time (one hour or
more) will eventually cause damage to the diesel engine (sometimes
called wet stacking which is NOT covered by the engine
manufacturer’s warranty) or damage to the rings, fuel oil entering the
lubricating oil and excessive vibration. Breaking in the diesel engine
can require 5 to 10 hours of operation. It is extremely important to
have electrical loads of at least 25% to 50% of the rated capacity of the
generator’s nameplate rating to have the valves properly seat. Be sure
to change the oil and oil filter after several hours of initial operation. All
oil and fuel filters should be changed every 250 hours of operation and
air filters as often as necessary depending on the environment. Dirty
filters WILL cause erratic operation, dark exhaust fumes and erratic
voltage from the generator. Consult the engine owner’s manual for
complete engine operation. If the diesel engine does not stop when the
start/stop switch is turned off, the oil in the engine sump has been over
filled and the engine is using over pressurized sump oil as fuel. To
stop the engine with this condition you must block the air intake flow
which will stop the engine. Eventually the engine will consume the
excess sump oil and stop on it's own but this could take some time. If
this situation has occurred, you must check the air filter as pressurized
oil has gone through the engine breather and saturated the air filter.
The air filter MUST be replaced before restarting the engine.
FUEL AND FILLING FUEL
On all gasoline powered models use unleaded gasoline of at least 87
octane rating. On all diesel powered units fill with diesel fuel No2
(DF2) in normal ambient temperatures or NO1 (DF1) in cold weather.
JP5 or JP8 turbine fuel may be used on diesel powered units only with
slight engine de-rations. The fuel shut off valve is located on the
bottom of the fuel tank. Be sure that the valve is turned counter
clockwise (the open position) to permit the flow of fuel from the tank.
OIL FILLING INSTRUCTIONS
Fill the oil sump or to the full mark on the dipstick (if applicable).
(Figure 1) Pour slowly to avoid air bubbles. To avoid engine damage
always check for full oil level before starting engine. Crankcase
pressure can blow hot engine oil out the fill tube causing severe burns,
always stop the engine before removing the oil cap. Do not overfill the
oil level on 13, 16, 18, 20, 23, 25 and 31 HP gasoline engines and all
diesel engines, as damage will occur. Engine damage due to low oil
level is NOT covered by the engine manufacturer’s warranty. For
gasoline engine refill with API Class SG or SH oil (also SG/CD,
SG/CE, SH/CD or SH/CE) having an SAE viscosity grade appropriate
for the temperatures as indicated below. For diesel engines, see the
engine manual for the proper oil selection.
OIL VISCOSITY
VS. TEMPERATURE
EXPECTED AMBIENT
TEMPERATURES
32° F (0° C) and Higher
10° F to 100° F -12° C to 38° C
0° F to 80° F -18° C to 27° C
-20° F to 50° F -28° C to 10° C
!
SAE
Viscosity Grade
30
CAUTION
This generator set should only be operated by a
responsible adult.
To start the engine:
1. Disconnect all loads to start the engine.
2. Fully open the fuel valve if the engine is so equipped. The
valve is located under the unit-mounted fuel tank of the
engine or under the fuel tank on all LR units.
3. Adjust the carburetor choke as necessary for temperature
conditions. Cold starting requires a full choke. L/P and N/G
fueled engines do not require a choke. There is no choke on
all diesel powered generator sets.
4. The engine may be equipped with a rope recoil starter or
electric starter.
Start the engine by referring to the
paragraph in the engine manual for the applicable starter.
15W-40
10W-30
10W-40
5-W30
OIL FILLING FOR DIESELS
Fill the oil sump with lubricating oil with 15W30 multigrade for warm
weather and 5W30 for cold weather. Oil capacity for the LR50/60EL
models with the 15LD400 engine is 1.26 quarts and for the LR130EL
with the 25LD425 engine is 1.9 quarts (without filter). Check the
dipstick each time fuel is added to maintain the proper levels of
lubricating oil. IMPORTANT Do not overfill with oil or damage will
occur to the engine.
Maintain the oil level within the
minimum/maximum lines of the dipstick. Engines overfilled MUST be
drained until the oil level is at the above noted levels.
STARTING ELECTRIC START DIESELS WITHOUT A
BATTERY
All contractor diesel welder/generators and three phase and some
medium duty units are equipped with either low oil volume or low oil
pressure shut down systems. Insufficient oil volume or pressure will
cause the engine to stop. See engine manual for complete details.
The models LR50EL and LR60EL are electric start models with
auxiliary recoil starters. If a battery is not available, the red or black
lever near the fuel pump MUST be in the up position to start and to
stop the engine turn the red or black lever to the down position.
Without a battery, the key start/stop switch will NOT stop the engine
and you MUST use the red or black lever. When using the electric
start switch to start and stop the engine and a 12 volt battery is
installed, the red or black lever MUST be in the down position at all
times.
BREAK IN PROCEDURE
INITIAL STARTING OR UNIT RUN OUT OF FUEL ON
DIESELS ONLY
LOW OIL SHUT DOWN
Controlled break in with the proper grade of lubricating oil helps to
ensure satisfactory service from the generator set. During the first 2-3
hours of operation, do not apply heavy electrical loads to the
generator. Oil should be changed after the first 3 hours of operation.
The oil changes should then be scheduled at the recommended times
shown in the engine manual. Two cylinder air cooled diesel powered
units MUST be run with at least 25% load at all times or damage to the
engine may occur. Oil should be drained when the engine is still
slightly warm.
Air pockets in the fuel line will cause difficulty in engine starting and
normal operation when fueling the unit for the first time or the unit is
run out of fuel. It is strongly recommended to manually pump the
pump lever 20 plus times before starting to release the air pockets.
Models LR50EL and LR60EL have clear fuel filters and air pockets can
be visually observed. Even one air bubble will cause erratic engine
operation. ALL air pockets must be pumped out to operate properly.
The model LR130EL has a solid metal fuel filter and air pockets cannot
be observed in this model. Always avoid running a diesel out of fuel or
near the bottom of the fuel tank as air pockets may be induced causing
erratic operation of the engine. Once all diesels have been initially
started and the engine runs smoothly, there is no need to bleed out air
pockets in future starting of the unit.
For units operating on liquid propane L/P or natural gas N/G, see
addendum instruction sheets for proper installation and operation.
Page 3
DUST, DIRT, RAIN AND SNOW
SPARK ARRESTER REQUIREMENTS
Operating the generator set in extreme dusty or dirty conditions will
seriously affect the life of the engine.
Keep the unit clean and do not allow snow, rain, dust or dirt to
accumulate on the unit. Remove all oil deposits and accumulated dirt.
When operating the unit, protect it from the elements. Do not use this
product in rain, snow or wet locations.
Some generator sets have either internal or external spark arresters.
Some units are not equipped with spark arresters.
FIGURE 1
11HP
16HP TWIN
18HP TWIN
If the generator set is used in a National Park,
any forest covered land, grass covered land, or
the state of California, a spark arrester MUST be
installed and in working order to comply with California Section 4442
and 4443. A USDA Forestry Department approved spark arrester kit is
offered as optional by the engine manufacturer. When installed, the
spark arrester must be firmly attached to the muffler and the screen
must be kept clean and unplugged for proper operation. Contact your
local engine manufacturer’s distributor for more information. Engine
company distributors are listed in the yellow pages under engines
gasoline or gasoline engines. Even with the spark arrester installed,
extreme care must still be used if the engine is operated in an area of
dry forest covered brush or dry grass, which could catch fire from the
engine heat or an accidental spark.
! WARNING
20HP TWIN
23HP TWIN
31HP TWIN
Avoid touching hot engine parts and rotating or
parts of the unit. All fan guards and
! WARNING moving
protective covers must be kept in place. Loose
jackets, neckties, shirtsleeve etc should not be worn while starting or
operating this generator because of the danger of being caught in
moving parts. Hot engine parts and mufflers/manifolds can cause
severe burns.
5HP
! DANGER
OIL DRAIN
PLUG
All generator sets must be externally grounded.
All generator sets are grounded internally to an
external ground on the frame. OSHA, the National Electrical Code and
most state and local codes require an additional external ground rod
pounded into the soil and securely connected to the external ground on
the generator set. Only three or four prong plugs must be used with
each receptacle on the unit. Use only 3 prong extension cords. It is
recommended to use #10 copper stranded wire from the generator to
the external ground rod. The ground rod and wire are not provided
with the generator set.
OIL
LEVEL
5HP
8,11 &13HP
OIL DRAIN PLUG
OIL LEVEL
GENERAL OPERATION
MANUAL RECOIL START MODELS
OIL DRAIN, OIL FILL
1.
2.
OIL FILTER
(OPTIONAL)
16HP, 18HP, 20HP
23HP, 25HP, 31HP
With the choke engaged, grasp the starter and pull out the
cord rapidly.
Repeat if necessary with the choke slightly opened. Do not
pull the recoil starter out too far or let is snap back or
damage to the recoil starter may occur. When the engine
starts, close the choke.
ELECTRIC START MODELS
On all gasoline engines, engage the choke and turn the key until the
engine starts. Close the choke once the engine starts. Diesel powered
and LP/NG units do not have chokes. Do not keep cranking the
engine for more than 15 seconds at a time if the engine does not start.
All electric start models have a charging circuit for the battery.
OIL DRAIN
PLUG
BATTERY
WET CONDITIONS
The customer must supply the starting battery. Battery cables and a
battery tray are installed on the generator set. All batteries must be 12
volts DC. For all gasoline models through and including LR150’s a
type U1 300 cold cranking amps battery is required (5.0” max width).
For the model series LR180 and all diesel models a type 24BCI, 26BCI
or 34/78 12 volt DC battery of at least 400 or more cold cranking amps
is required (6 7/8” max width).
Use extreme care to avoid a lethal shock hazard
if this unit is operating outdoors during periods of
visible moisture (rain or snow) or near standing
water. Service the air cleaner at least every 25 to 30 hours if operating
in extremely dusty or dirty conditions. Change the oil in the crankcase
at least every 50 hours of operations (see engine manual for more
details).
! DANGER
! DANGER
UNIT GROUNDING
MUFFLER
! WARNING
The muffler on this generator is only designed
for outdoor portable applications.
Do not
operate indoors under any conditions. Never operate a generator set
with a worn or defective muffler or exhaust manifold. A defective
muffler and manifold must be replaced. Never operate the generator
set without a muffler. Do not touch the muffler when hot or severe
burns will occur. Do not extend exhaust lines or use other than the
engine manufacturers recommended muffler.
Page 4
Use extreme care not to tilt the generator set
with the battery installed. Tipping could cause
severe eye damage and skin burns.
! DANGER
When connecting battery cables, the negative
(green) cable must not be connected and
should not be touching anything. First connect the positive (red) cable
and then connect the negative (green). When disconnecting battery
cables, first disconnect the negative (green) cable making sure it is not
touching anything and then disconnect the positive (red) cable.
Keep generator load within the receptacle and
generator nameplate rating. Overloading may
!
shorten generator life and could cause internal
generator damage. Do not exceed the receptacle ampere rating. The
complete ratings of the generator can be found on the nameplate of
the generator. The total output ampere rating on the generator
nameplate refers to the highest voltage the unit is equipped to
produce. On 120/240 volt units, this would be 240 volts. To determine
the 120 volt amperage rating double the amperage provided in the
nameplate. The nameplate ampere rating on load items to be powered
by this generator can be misleading if they are large power tools or
electric motors. These items will require 2-3 times the ampere rating
shown on their nameplates to get them started. Do not increase
engine speed to get more output from the generator. Engines operate
at 3600 RPM (for 60 hertz) and 3000 RPM (for 50 hertz). Racing the
engine could cause damage to the generator with excessive voltage
and damage to items being powered.
CAUTION
.
Battery installation and service – Be sure battery
! DANGER connections are of the correct polarity. All
electric start units use negative ground. The Red
cable is positive and the green cable is negative. Battery acid will
cause severe eye damage and skin burns. Safety glasses, gloves and
an apron must be worn when servicing lead acid batteries. Flush
immediately with water and call a physician if contact with battery acid
occurs. When connecting or disconnecting battery cables, the engine
must not be running or cranking. Batteries give off an explosive gas
when being charged. A spark or open flame could result in an
explosion. The charging circuit is operational during engine cranking
and running. The charging circuit is not designed to recharge a dead
battery but only maintain the charge in the battery. Provisions must be
made to keep the battery fully charged if the generator will not be
frequently run as in a permanent installation or if the battery is to be
stored for a long period of time or if it is located in an unheated room to
prevent the battery from freezing. If a trickle charger is going to be
used during periods of no generator operation, be sure to disconnect
the trickle charger before starting the generator set. Check the battery
cells with a hydrometer. The specific gravity reading should be
approximately 1.280 at 80 degrees F. If one or more cells are low on
water, add distilled water, not electrolyte and recharge. Do not use
hydrant or well water. Keep the battery case clean and dry. An
accumulation of moisture will lead to more rapid discharge and battery
failure. Keep the battery terminals clean and tight. After making
connections, coat the terminals with a light application of petroleum
jelly or grease to retard corrosion. Accidental ground out of the battery
terminal by tools, gasoline cans or when installing or removing battery
cables could cause a spark, which might result in a battery gas
explosion or fire. An open flame or lit cigarette will have the same
effect. Battery terminals and connections must be tight. When
installing the battery cables, always connect the negative cable last.
When disconnecting the battery cables, always disconnect the
negative cable first. (Figure 2)
Disconnecting the load
!
CAUTION
!
CAUTION
The generator set is inherently self-regulating and
its output automatically adjusts to the load. The
generator will not be damaged if it is operated at no load condition
except air-cooled diesel powered units. The engine governor will
compensate for load variations. It is desirable to gradually reduce the
load if possible. Voltage sensitive items such as TV’s, computers,
amplifiers, etc should be removed first.
RECEPTACLE UTILIZATION
Do not exceed the amperage rating on the outlet
receptacles. This will cause receptacles burnouts
and could cause internal damage to the generator. The operator must
realize that this generator is not an unlimited source of power and heed
generator and receptacles ratings. The nameplate ratings can be
obtained through a combination of the receptacles or a single
receptacle if the generator and/or the receptacle ampere rating is not
exceeded. Some 125 volt plugs on items to be powered from the
generator must be of the 3 prong grounded type. Only 3 wire
extension cords and 3 wire or double insulated power tools should be
used with the generator. Do not overload the generator. Some
straight blade 125 volt receptacles are ground fault circuit interrupter
protected. Twist lock receptacles are not ground fault circuit interrupter
equipped.
Consult the National Electrical Code, Underwriters
Laboratories and/or the Canadian Standards Association Code for
ground fault protection requirements for temporary installations or
usage.
STARTER BUTTON
*RED WIRE FROM
ALTERNATOR MUST
BE CONNECTED IN
ORDER TO CHARGE
BATTERY DURING
OPERATION
FULL POWER SWITCH (LR50/55/60 MODELS)
Always place the full power toggle switch on the control panel in the up
(120 volt) position when only using 120 volt devices to obtain the full
power of the generator. When the full power switch is in the up
position (marked 120 volts), the generator windings are connected in a
parallel mode making all of the output of the generator 120 volts and
the 240 volt receptacle is not functional. If 240 volts is required, place
the switch in the down position (120 and 240 volts). The 240 volt
receptacle now has the full power of the generator. Each 120 volt
receptacle has only ½ of the normal power. It is recommended to
remove all electrical loads before changing the switch to either
position. The position of the switch affects the reading of the
voltmeter. In the up position the volt-meter will read 120 volts and in
the down position the meter will read 240 volts.
12 VOLT DC BATTERY
32 AMPERE HOUR (MINIMUM)
*RED
FIGURE 2
Proper storage and care is necessary to insure proper engine starting.
Never allow the battery to remain discharged.
! DANGER
STOPPING THE ENGINE
GENERATOR VENTILATION OPERATION
Adequate ventilation must be provided for safe
efficient operation. The exhaust products of the
engine contains invisible carbon monoxide which is poisonous and can
cause death. Operate only outdoors and NEVER indoors. Operation
in small compartments will cause the engine to over heat, generator
windings will over heat and all warranties are voided. Mounting the
generator in an enclosed compartment such as an RV or in the back
end of a truck is prohibited and can cause death and damage to the
equipment.
For all models gradually remove the load from the generator. To stop
the engine, turn off the key or switch off until the engine comes to a
complete stop. On all diesel models you must keep pressure on the
stop lever until the engine comes to a complete stop.
APPLYING ELECTRIC LOADS
Allow the engine to reach normal operating temperature (2 – 3
minutes) before connecting any load to the generator. Connect the
load be inserting the plugs into the proper receptacles. The load
should be applied gradually. If the load consists of large electric
motors, they should be individually started with the largest motor first.
Smaller loads can then be applied.
Page 5
The mounting of the LP and NG generators are identical to the
gasoline units.
HIGH TEMPERATURE OPERATION
Be sure airflow to and from generator is not obstructed. Keep the
generator as free from dirt as possible. Engine housing must be
properly installed and undamaged.
There is no need to use a choke to start either the LP or NG units. DO
NOT adjust the KN regulator as it has been preset. Be sure to check
all connections for leaks with soap and water and stop any leaks. All
LP and NG units are derated as the LP or NG fuel reduces engine out
put slightly versus gasoline.
LOW TEMPERATURE OPERATION
To aid in cold weather starting, use the correct SAE oil. Use only fresh
unleaded gasoline. Diesel engine use No2 diesel in normal weather
and No1 in cold weather. If possible, keep the generator set in a warm
location until needed and they move the unit outside and immediately
start the engine.
Operate only in well ventilated area. LP gas is heavier than air and
may settle in low places. Avoid cutting or welding near fuel lines or
tanks. When servicing shut off all fuel lines, eliminate all possible
outside sources of ignition and utilize qualified LP and or NG
personnel. See connection drawing for the location for the flexible fuel
line.
IDLER OPERATION
All LR Contractor units feature an easy idle that slows the engine
speed down when there is no electrical load on the generator. Diesel
powered units, medium duty A, LA and LR units and three phase units
do not have a low idling system. The generator set should be started
with the idler switch in the off position. After the engine has warmed
up (2-3 minutes), turn the idler switch to the on position. The engine
speed will decrease if there is no load on the generator. On some
models there is a time delay of about 10 to 12 seconds before the
engine will idle down. When an electrical load is applied, the engine
speed will automatically return to normal operation and produce the
rated voltage. A battery MUST be connected to the engine for the idler
to work on all 7000, 8000, 10000, 12000, 15000 and 18000 watt
models.
!
CAUTION
OPERATING SAFE GENS
Start the engine and verify that the volt meter
reads 240 volts. The ground fault sensing module on the control panel
should have a green light illuminated. All receptacles 120 and 240
volts will be operating. If a ground fault occurs on any receptacles, a
red light will be illuminated on the ground fault sensing module and the
main circuit breaker will trip showing a red switch with all the power to
all receptacles cut off. To correct the ground fault, with the engine
running, remove all loads to all receptacles, push reset on the ground
fault sensing module and push the main circuit breaker to ON (red
should not be showing on the main circuit breaker). If the ground fault
continues with no load on the generator, consult an authorized service
station. If the ground fault occurs again with a load plugged into any
receptacle, disconnect the load, reset the ground fault sensing module
and the main circuit breaker and try a different load into any
receptacle. With this other load and no ground fault occurring the
ground fault is in the original extension cord or load and must be
corrected or replaced before using this generator set.
It is recommended to regularly, at least once a month, start the
engine, press test on the ground fault sensing module and then press
reset and push the main circuit breaker to ON.
!
INSTALLATION
Indoor installations are prohibited.
The
generator does not have output capacity to power your entire home.
Most home utility commercial electric service is in excess of 100 amps
at 240 volts, which is in excess of the generator set. Because of this,
only key items can be powered during a utility power outage up to the
ampere rating of the generator. Installing and wiring a stand by
generator is NOT a do it yourself project. Consult a licensed
electrician or electrical contractor.
FROM MAIN
POWER LINE
TO MAIN
FUSE PANEL
WHITE
BLACK
RED
NORMAL
WHITE
RED
BLACK
OFF
LP AND NG OPERATION
!
CAUTION
Liquid propane(LP) and natural
gas(NG)operation OUTDOOR OPERATION
ONLY, all installations must be done by a qualified electrician or
contractor and MUST comply with all national and local codes,
standards and regulations. This is not a do it yourself project!
All units have a special vapor fuel carburetor for LP or NG operation
with a vacuum safety shut down and an electric solenoid fuel shut
down. All incoming fuel supplies, both LP and NG must have a
primary fuel regulator with output of 11 inches of water column
pressure. The regulator on the generator is a secondary regulator.
Fuel pressures too high or too low will cause problems with the
generator set. There must be a manual fuel shut off valve within sight
of the generator set. The flexible fuel line included with the generator
set MUST be used as vibration occurs and will cause solid fuel pipe
connections to break if the flexible fuel line is not used. The incoming
fuel line is recommended to be 1.0 inches. The actual fuel connections
on the generator set are 3/4” NPT. Do not have the incoming fuel line
near the engine muffler or manifold for safety.
After all fuel line connections have been made but before the flexible
fuel connection is connected to the hard fuel pipe connections,
ventilate the area, be sure there are no open flames, no smoking, no
pilot lights and turn on the fuel line for about 5 to 10 seconds to blow
out any pipe tape or pipe dope out of the lines. Be sure to wear
protective glasses. This will prevent dirt from entering the fuel
regulator on the generator set. Do not remove the cover from the
solenoid valve until you are ready to make pipe connections.
CAUTION
GENERATOR
RED
BLACK
WHITE
FROM
GENERATOR
TYPICAL MANUAL TRANSFORMER SWITCH
(CUSTOMER SUPPLIED)
FIGURE 3
GENERATOR AND UTILITY POWER ISOLATION METHODS
If utilizing existing home circuits to power the
emergency load provide a positive means of
insuring that the commercial power and portable
generator is never fed to the load at the same time. Never connect the
generator output to any live home electric circuit(s). The usual means
of providing this isolation is to incorporate a suitably rated double pole
double throw manual transfer switch UL listed. Figure 3 The National
Electrical Code, the state of California, most state and local codes and
Canadian Hydro requires an isolation switch between the generator
and the utility line. A potential hazard exists during a power outage if
the generator output is connected to the dead home circuits and no
means is provided to isolate the home circuits from the commercial
! DANGER
Page 6
•
utility power source. Repair personnel working to restore service to
normal will open a switch between the main power supply and the
location they are working. The repairman has every reason to believe
that the line he is working on is electrically dead. If the home circuits
are not isolated, the generator output will back feed through the home
circuit up to the utility line and the repairman will be electrocuted when
he attempts repairs. If normal power and the generator are not
isolated and the normal power is suddenly restored while the generator
is operating, severe damage to the generator will occur and possibly
damage and or a fire to the home.
Add the watts required for starting electric motors with the
watts required for all other loads and you now known the
size generator you need to operate your loads. Always start
the largest size motor first and then the next smallest.
SUGGESTED HOME STANDBY INSTALLATION
A typical installation with an outdoor connection box, cord set and
manual transfer switch is shown in figure 4. The installation of the
outdoor connection box and manual transfer switch must be performed
by a licensed electrician or contractor. Store the generator in a warm
and dry location. During a utility power failure, carry the generator
outdoors to a flat, dry location such as a driveway or walk way. Use a
connection box and cord set as shown to connect your 240 volts from
the generator to the home. Turn off the lights and appliances that were
on before the utility failure. This prevents a possible overloading of the
generator. Start the engine, wait 2-3 minutes for the engine to warm
up and then throw the manual transfer switch to the generator position.
You may then apply various electrical loads being careful not to
exceed the capacity of the generator. When the utility power is
restored, throw the manual transfer switch to the normal position. Your
home circuits are now being powered by the utility. Disconnect the
cord set from the generator and shut the generator down. Service the
engine as required.
INFREQUENT SERVICE
If the generator set is used infrequently, extended shut down periods
can result in difficult engine starting. If let to stand in the engine for a
long time (over 6 months) gasoline will tend to form a varnish like
substance which will clog up to the fuel system and the carburetor.
The result will be a hard start engine. Check with your local engine
manufacturer dealer for their recommendation of a gasoline additive to
prevent varnish formation. To eliminate hard starting, run the
generator at least 10 minutes every 4 to 6 weeks. This will insure that
the engine seals will not dry out and cause oil leaks and compression
problems. The use of a fuel additive such as Sta-Bil or any other
equivalent will minimize the formation of gum deposits. Capacitors
tend to slowly discharge over prolonged periods of time. See the web
site www.voltmaster.com for flashing capacitors.
EMERGENCY CIRCUIT ISOLATION METHOD
A.
OUT OF SERVICE PROTECTION
If the generator set will be out of service for 6 months or longer, the
following is recommended:
•
Run the unit until it reaches normal operating temperature
(about 10 minutes) and shut it down
•
Drain the fuel from the carburetor bowl
•
Drain the oil from the engine base while the engine is still
warm. Fill with fresh oil.
•
Remove the spark plug(s), pour 1 oz of engine oil into the
cylinder(s), crank the engine slowly and replace the spark
plug(s) but do not tighten
•
Service the air cleaner
•
Plug the exhaust outlet to prevent moisture, bugs and dirt.
•
Clean off dirt and grease
•
Put a cover over the unit and store avoiding extreme heat or
cold.
•
Before restarting, remove protective cover, remove spark
plug(s), crank the engine slowly, replace the spark plug(s)
and tighten them.
B.
WATTAGE REQUIREMENTS
When determining the generator load, it is critical for you to decide
what equipment and or appliances you want to run at the same time.
The following steps will help you determine what size load this
generator can power. Electric motors present a special problem when
figuring the proper generator size.
•
Make 2 lists, one of the electric motors and the other of all
lights, small appliances etc that must be powered by the
generator. For stand by emergency service you should
include only essential equipment (refrigerator, sump pump,
water pump, heat) that must be kept in service.
•
Enter the watts required to operate each item (except
motors). This wattage can usually be found on the appliance
nameplate. If the wattage is not listed, you can determine
the wattage by multiplying the voltage times the amperage,
which equals wattage for single-phase equipment.
•
Electric motors usually require 3 – 4 times nameplate rating
to start (locked rotor current). For example, if the electric
motor nameplate states 10 amps at 120 volts the 10 A X 120
V = 1200 running watts. This would mean that you would
need about 30 amps on one 120 volt circuit to start this
motor. Electric motors will require different starting amps
depending on the application. VOLTS X AMPS = WATTS
•
Air compressors, circular saws, ½” drills, submersible
pumps, well pumps, inverters, air conditioners, hot air roof
welders etc require very heavy electric motor starting
amperage.
These devices require at least 3 times
nameplate ratings or more to start. Some motors such as
hair dryers, food mixers, etc require very little above the
nameplate ratings to start.
One method is to have the emergency circuits (important
items to be powered in a power outage) grouped together
and rewired into a separate junction box (this emergency
circuit must not exceed the ampere rating of the generator)
and connected to the generator by a cord set or directly
wired to the generator. The manual transfer switch with an
ampere rating equal to the ampere rating of the emergency
circuit, would then be connected between the home load
center panel and the emergency circuit junction box figure 5.
With this method it will be difficult to accidentally over load
the generator. During a power outage, start the generator
(with no load) and then place the manual transfer switch in
the generator position. The generator will now power the
emergency circuit. When the normal power is restored the
manual transfer switch should be placed in the normal
position after the generator is shut down. The emergency
circuit will now be powered by the utility power.
Another method is the TOTAL CIRCUIT ISOLATION
METHOD. If the emergency circuit are not or cannot be
rewired together in a separate junction box (figure 6) you will
have to select the circuits and appliances to be powered by
the generator. Caution must then be used to prevent the
overload of the generator. The manual transfer switch
ampere rating must be equal to the ampere rating of the
normal incoming utility service. During a power outage start
the generator with no load. All items in the home should be
turned off. Place the manual transfer switch in the generator
position. Selected emergency items can then be turned on.
Be sure these items don’t overload the generator. The
emergency items left on home circuits will now be powered
by the generator. When the normal power is restored, the
manual transfer switch is placed in the normal position and
the generator is shut down. The home electric circuits will
now be powered by the utility power source.
*MANUAL TRANSFER SWITCH POSITION DETERMINES WHICH POWER SORCE,
UTILITY OR STANDBY GENERATOR WILL FEED INTO THE DISTIBUTION PANEL
ELECTRIC
WATT-HOUR
METER
INCOMING
UTILITY
HIGH LINE
TO HOME
ELECTRIC CIRCUIT
INCOMING
UTILITY
POWER LINE
OUTDOOR
CONNECTION
BOX
DISTRIBUTION
(FUSE) PANEL
CONNECTION
CORD SET
MANUAL
TRANSFER SWITCH
FIGURE 4
Page 7
EMERGENCY CIRCUIT ISOLATION METHOD
TO POWER LINE
MASTER SWITCH
The following chart gives examples of various types of motors in both
running amps and starting amps. These charts are guides but always
check the actual nameplate of your motors.
* AMPERE RATING MUST
EQUAL OR EXCEED THE
AMPERE RATING OF THE
EMERGENCY
DISTRIBUTION PANEL
WATT-HOUR METER
TO RANGE
TO WATER
HEATER
TO AIR CONDITIONER
POWER RETURN
SIGNAL LIGHT
AND SWITCH
!
** AMPERE CAPACITY
NOT TO EXCEED THE
GENERATOR RATING.
ONLY THESE ITEMS WILL
BE POWERED BY
STANDBY GENERATOR.
IF ELECTRICIAN SIZES
THE LOAD PROPERLY,
THE GENERATOR CAN’T
BE OVERLOADED. ALL
WIRING MUST CONFORM
TO NATIONAL ELECTRIC
CODES AND ALL STATE
AND LOCAL CODES.
CONSULT A QUALIFIED,
LICENSED ELECTRICIAN.
THE ILLUSTRATION TO
THE SIDE ASSUMES
120/240 VOLT SINGLE
PHASE ELECTRIC
SERVICE IS BEING
SUPPLIED BY THE
UTILITY.
CAUTION
EXTENSION CORDS
When using extension cords, voltage drops can
cause damage to equipment being run by the generator. #12 wire is
rated at 20 amps maximum and with a 100 foot extension cord, there
will be at least a 7 volt decrease. Extension cords longer than 100 feet
will have even larger voltage decreases. It is strongly recommended to
always use #10 wire extension cords which are rated at 30 amps, The
useful life of your generator and the equipment you operate will
decrease when using #12 extension cords. See the extension cord
chart.
RECEPTACLES AND PLUGS
120 VOLTS
RECEPTACLE
REQUIRED PLUG
PART NO.
5-15R
5-15P
5266
5-20R
5-20P or 5-15P
-
L5-15R
L5-30P
6004
CS6370
CS6361
3498
MANUAL TRANSFER
SWITCH*
(SHOWN IN NORMAL
POSITION)
TO STANDBY
ALTERNATOR
TO LIGHTS
TO REFRIGERATOR
TO LIGHTS
TO SUMP PUMP
TO LIGHTS
TO FURNACE BLOWER
EMERGENCY
DISTRIBUTION
PANEL
240 VOLTS
FIGURE 5
RECEPTACLE
TOTAL CURCUIT ISOLATION METHOD
EMERGENCY CIRCUIT ISOLATION METHOD
TO POWER LINE
MASTER SWITCH
WATT-HOUR METER
POWER RETURN
SIGNAL LIGHT
AND SWITCH
TO STANDBY
ALTERNATOR
TO RANGE
TO WATER
HEATER
MANUAL TRANSFER
SWITCH*
(SHOWN IN NORMAL
POSITION)
DISTRIBUTION (FUSE)
PANEL
REQUIRED PLUG
PART NO.
L14-20R
L14-20P
2454
L14-30R
L14-30P
6005
CS6369
CS6365
3262
6-15R
6-15P
2020
6-20R
6-20P
-
14-50R
14-50P
2746
14-60R
14-60P
3901
NOTE:
WITH THIS SYSTEM,
CAUTION MUST BE USED
TO PREVENT OVERLOAD
OF THE GENERATOR
DURING UTILITY POWER
FAILURE, ALL LOADS IN
THE DISTRIBUTION
PANEL MUST BE
INDIVIDUALLY TURNED
OFF. ONLY CERTAIN
ITEMS CAN BE TURNED
BACK ON DURING
GENERATOR
OPERATION. THESE
ITEMS SHOULD BE
SPECIFIED BY YOUR
ELECTRICIAN SO AS NOT
TO OVERLOAD THE
GENERATOR. ALL
WIRING MUST CONFORM
TO THE NATIONAL
ELECTRIC CODE AND
ALL STATE AND LOCAL
CODES. CONSULT A
QUALIFIED, LICENSED
ELECTRICIAN. THE
ILLUSTRATION TO THE
SIDE ASSUMES 120/240
VOLT SINGLE PHASE
ELECTRIC SERVICE IS
BEING SUPPLIED BY THE
UTILITY.
3 PHASE
RECEPTACLE
TO AIR CONDITIONER
TO LIGHTS
TO REFRIGERATOR
TO LIGHTS
TO SUMP PUMP
TO LIGHTS
TO FURNACE BLOWER
15-15R
L16-20R
FIGURE 6
TYPICAL MOTOR WATTAGE
Page 8
REQUIRED PLUG
PART NO.
15-50P
208/250 VOLTS
3563
16-20P
480 VOLTS
3561
RECEPTACLE
CS81-65
CS81-65C
REQUIRED PLUG
PART NO.
15-50P
480 VOLTS, 50A
3908
EXTENSION CORD CHART
CONTINUOUS LOAD
(use either Amps or Watts below)
MINIMUM GAUGE (AWG)
WATTS
14-60P
208/240 VOLTS, 60A
14-60R
3909
SCHEMATIC DIAGRAMS
LR30 SERIES, A25 SERIES, A30 SERIES
MAIN PHASE
T1
EXCITER
T5
T2
CAPACITOR
120V
T3
AMPS
@120 volts
@240 volts
0-50 feet
50-100 feet
100-150 feet
2
3
4
5
6
8
10
12
14
16
18
20
22
25
30
35
40
50
60
240
360
480
600
720
960
1200
1440
1680
1920
2160
2400
2640
3000
3600
4200
4800
6000
7200
480
720
960
1200
1440
1920
2400
2880
3660
3840
4320
4800
5280
6000
7200
8400
9600
12000
14400
22
22
20
18
18
16
16
16
14
14
14
12
12
12
10
10
8
6
4
20
18
16
16
16
14
12
12
12
10
10
10
10
10
8
8
6
4
2
18
16
16
14
14
12
12
10
10
10
8
8
8
6
6
4
2
2
T8
THREE PHASE OPERATION
All three phase generators operate similarly as single phase units.
Please note that when checking the no load voltage on any three
phase generator, the voltage will be about 10% below nameplate
rating. When a load is placed on the three phase generator, the
reactor transformer inside the generator activates and the voltage
immediately increases to the proper rated voltage of the three phase
generator. If an optional automatic voltage regulator is installed the
voltage regulation is +/- 1½%. The automatic voltage regulator is
required if relays, electric controls, etc. are used with a 3-phase motor.
A three phase plug is included with each unit.
T4
LR50 SERIES, LR55 SERIES, LR60 SERIES, LR70 SERIES,
LR80 SERIES, LR105 SERIES, LR150 SERIES, LR180 SERIES
A50/55/60 SERIES, LA50/55/60 SERIES
MAIN PHASE
T1
When applying load to the generator, if the electric motor runs in
reverse direction than the motor is supposed to operate, you must stop
the generator, remove the electric load from the generator and then
reverse two of the electric motor leads on the terminal strip of the
motor. Restart the generator, apply the electric motor load and the
direction of the electric motor should be operating properly.
EXCITER
T5
120V
T2
CAPACITOR (S)
240V
T3
T8
On all three phase generators there is a three phase circuit breaker
rated to the amperage load of each unit. If the circuit breaker trips
under load, you must remove some of the load to prevent over loading
the generator. All three phase circuit breakers are designed for motor
load starting permitting momentary over load conditions associated
with three phase motors.
120V
T4
NATIONAL ELECTRICAL CODE, ALL STATE AND LOCAL CODES.
IN CANADA, ALL CONNECTIONS MUST CONFORM TO CSA AND
HYDRO REQUIREMENTS. CONSULT A LICENSED ELECTRICIAN.
THE ILLUSTRATION TO THE SIDE ASSUMES 120/240 VOLT
SINGLE PHASE ELECTRIC SERVICE IS BEING SUPPLIED BY THE
UTILITY.
ELECTRIC MOTOR CHART
Approximate current requirements
STARTING WATTS
UNIVERSAL
MOTOR
SPLIT
PHASE
MOTOR
HORSEPOWER
RUNNING
WATTS
1/6
1/4
1/3
1/2
3/4
1
1 1/2
2
3
5
NOTE:
275
400
600
850
1200
400
500
850
1050
1700
450
600
950
1350
1950
600
750
1300
1800
2600
850
1000
1900
2600
X
1000
1250
2300
3000
X
1600
1750
3200
4200
X
2000
2350
3900
5100
X
3000
X
5200
6800
X
4800
X
7500
9800
X
For pumps, air compressors, air conditioners, inverters add
at least 25% to starting current.
(sm. appliance)
INDUCTION
MOTOR
CAPACITOR
MOTOR
SINGLE PHASE
THE FORMULA FOR WATTAGE IS:
VOLTS X AMPERAGE = WATTAGE
EXAMPLE: 120(VOLTS X 10(AMPS) = 1200 (WATTS)
THREE PHASE
THE FORMULA FOR WATTAGE IS:
VOLTS X AMPERAGE X 1.732 X POWER FACTOR(USUALLY .8) = WATTAGE
VOLTS X AMPERAGE X 1.732 X = VOLT AMPERAGE
Page 9
!
CAUTION
TRANSPORTING UNITS
All models with an “L” as the first letter have fuel
tanks with a shut-off valve located on the bottom of the tank. When
moving the unit, it is always recommended to turn the shut-off valve
(clockwise). This will prevent accidental spillage of fuel from the tank to
the carburetor float. Some “A” series models with fuel tanks mounted
directly on the engines do not have shut-off valves.
APPROXIMATE POWER
Requirements for Equipment
WATTAGE REQUIREMENTS
Battery charger, 10 amps
Compressor (see motor charts) -3/4 HP
-1 HP
-2 HP
-3 HP
Drill -1/4”
-3/8”
-1/2”
-1”
Welder 100 amps DC
Floodlight
Grain cleaner, 1/4 HP
Grain elevator, 3/4 HP
Grinders (by motor size)
Heater radiant portable
Heater portable liquid fuel -50,000 btu
-100,000 btu
-150,000 btu
Impact wrench -1/2”
-3/4”
-1”
Milk cooler
Mixer, 3 ½ cubic feet
MotorsBelt sander
Disc sander
Orbital sander
Chain saw
6” circular saw
7 ¼” circular saw
8 ½” circular saw
10” circular saw
Jig saw
Cutoff saw
Screwdriver
Soldering iron or gun
Sump pump
Water pump submersible -3000 gph
-5000 gph
-10000 gph
-15000 gph
Water pump non submersible -3000 gph
-5000 gph
-10000 gph
-15000 gph
Starting
Running
1900
2500
3600
4800
400
650
900
1250
-1000
3000
200
850
1100
1800
2400
300
475
750
1000
3600
1000
650
1400
-675
1260
1875
750
900
1400
1800
2300
1300
225
420
625
600
750
1200
1100
1000
2600
2600
2600
3400
2200
2600
3000
3900
400
3500
800
1300
1750
2500
3750
5000
2250
2850
4100
5250
1200
1200
1200
1200
950
1200
1500
2000
300
2500
550
150
400
500
650
1000
1500
600
750
1100
1600
Page 10
PARTS EXPLOSION
LR30H, LR30K, LR30R
H
G
F
OO
KK
J
O
PP
LL
MM
E
D
C
QQ
NN
Y
K
L
W
M
X
B
A
PP
N
R
Q
Z
P
AA
T
JJ
S
SS
RR
UU
FF
GG
C
D
E
F
G
H
J
K
L
M
N
O
P
Q
R
S
T
U
V
W
X
Y
PART#
2333
2034
3274-E
3528
2368
1028
3298
3267
3312
3308
3326
2024
1011
1069
3310
2604
2605
2607
2620
2609
2610
2611
2148
DD
TT
HH
ITEM
A
B
BB
DESCRIPTION
120V, 20A DUPLEX GFI
IDLER SWITCH
IDLER MODULE
FRONT PANEL
ASSEMBLY RETAINER
1/4-20 X 1-1/2 SCREW
GAS CAP
FUEL TANK 3 GALLON
HEAT SHIELD
FRAME
HOUR METER
VOLTMETER
RECPT DUPLEX 120V 20A
CIRCUIT BREAKER 20A
CONTROL BOX BACK
END COVER
STATOR BOLT
BEARING BRACKET
STATOR
COVER
SCREW
WASHER
FAN BRACKET
ENGINE BRACKET
ENGINE 5.5 HP HONDA
ENGINE 6 HP ROBIN
EE
CC
QTY
1
1
1
1
4
6
1
1
1
1
1
1
1
1
1
1
4
1
1
1
4
4
1
1
1
1
ITEM
Y
Z
AA
BB
CC
DD
EE
FF
GG
HH
JJ
KK
LL
MM
NN
OO
PP
QQ
RR
SS
TT
UU
Page 11
PART#
3371
2216
1020
2612
2614
3190
3287
2613
3316
2899
1027
2980
3081
1024
3313
2641
2145
2178
2567
2938
DESCRIPTION
ENGINE 6 HP KOHLER
BUMPER WITH STUD
5/16-18 KEPS NUT
FAN
ROTOR
DIODE WITH VARISTER
BALL BEARING
ROTOR SCREW
ROTOR WASHER
ROTOR NUT
CUP
IDLER BRACKET
1/4-20 X 1/2 SCREW
1/4-20 KEPS
IDLER SOLENOID
PIANO WIRE
GROUND LUG
CONTROL BOX BRACKET
CAPACITOR 10mf
CAPACITOR 25mf
GROUNDING STRAP
MOUNTING FOOT (SMALL)
COVER (DUPLEX)
QTY
1
3
6
1
1
2
1
1
1
1
1
1
2
4
1
1
1
1
1
1
1
1
1
N
PARTS EXPLOSION
LR50/55/60 SERIES
LR50/60EL SERIES
L
M
Q
R
P
K
O
RR
S
SS
U
Z
OO
J
H
A
G
F
E
B
V
D
C
NN
LL
Y
DD
CC
BB
KK
JJ
W
PP
QQ
YY
FF
TT
X
AA
EE
VV
GG
UU
HH
ZZ
ITEM
A
B
C
D
E
F
G
H
J
K
L
M
N
O
P
Q
R
S
T
U*
V
W
X
Y
*
**
PART#
2034
3274-E
2182
2333
1117
1100
1069
1112
1024
3326
2024
3319-PH
3309
3298
3481
3268
3319-H
1028
1027
3226
3549
2810
2980
3081
3327
3329
3331
DESCRIPTION
IDLER SWITCH
IDLER MODULE (RECOILS)
IDLER MODULE (ELEC. ST.)
120V 20A GFI DUPLEX
120V, 30A T/L
240V, 20A T/L
CIRCUIT BREAKER 20A
CIRCUIT BREAKER 30A
GROUND LUG
HOUR METER
VOLT METER
FRONT PANEL
FRAME
GAS CAP
DIESEL CAP
FUEL TANK 5 GALLONS
HEAT SHIELD
1/4-20X1-1/2 ALLEN SCREW
1/4-20 KEPS NUT
IDLER BRACKET (HONDA)
IDLER BRACKET (ROBIN)
8-32X1/2 ALLEN SCREW
IDLER SOLENOID
PIANO WIRE
ENGINE
FAN BRACKET
FAN COVER
FAN
SHIM
LR50/60
LR55R,
LR55V,
LR55RE,
LR55H
LR50/60EL
QTY
1
1
1
2
1
1
4
1
1
1
1
1
1
1
1
1
2
2
1
1
2
1
1
1
1
1
1
1
QTY
2
1
1
4
1
1
1
1
1
1
1
1
1
1
1
1
1
1
ITEM
Z**
Z
AA
BB
CC
DD
EE
FF
GG
HH
JJ
KK
LL
MM
NN
OO
PP**
QQ**
RR
SS
TT
UU
VV
WW
XX
YY
ZZ
ENGINE WILL VARY DEPENDING ON MODEL
ELECTRIC START MODELS ONLY
Page 12
PART#
2937-B
3538
3333
3190
3338
3337
3347
2145
1134
3281
3184
3344
3282
3342
2178
2035
2315
2314
3319-B
3319-R
3319-F
1002
3404
2216
2903
1094
3530
3546
3538
DESCRIPTION
BATTERY TRAY
BATTERY TRAY
ROTOR
DIODE WITH VARISTER
SEE BB
ROTOR SCREW
BALL BEARING 40MM
STATOR
CAPACITOR 25mf
CAPACITOR 31.5mf
TOP COVER
TERMINAL STRIP
ROTOR SCREW COVER
RUBBER GROMET
END COVER
GROUND STRAP
FULL POWER SWITCH
BATTERY CABLES, GREEN
BATTERY CABLES, RED
CONTROL BOX BACK
CONTROL BOX BRACKET
MOUNTING FOOT
CHANNEL
MOUNT SET
BUMPER
SHOCK MOUNT
HOLD DOWN STRAP
12 VOLT BATTERY CABLES
MOUNTING PLATE
DC PLUG
LR50/60
LR55R,
LR55V,
LR55RE,
LR55H
LR50/60EL
QTY
1
1
2
2
1
1
1
1
1
1
1
1
1
1
1
1
1
1
1
1
1
1
2
1
1
-
QTY
1
1
2
2
1
1
1
1
1
1
1
1
1
1
1
1
1
1
1
1
1
4
1
1
1
1
1
E
PARTS EXPLOSION
LR70EHI, LR70REI, LR80EI,
LR105EI, LR105EHI, LR105KE
F
D
HHH
B
G
A
GGG
R
T
JJJ
C
H
K
L
M
S
U Q
V
W
X
BB
AA
Z
O
P
OO
NN
N
CCC
MM
DD
Y
CC
ZZ FF
R
S
T
U
V
W
X
Y
Z
AA
BB
CC
DD
EE
FF
GG
GG
HH
JJ
PART#
3289-B
3329-B
3285
3298
2922
2937D
2937
2476
1020
2024
3326
1024
1101
1117
2333
1069
1112
2882
3220
2034
3632
2024
3326
1024
1101
1117
2333
1069
1112
2034
2182
WW
2980
3007
3270
2665
3266
3330
3329
3327
3328
3331
JJ
YY
DESCRIPTION
BRACKET
CONTROL BOX
FRONT PANEL 70&80
GAS CAP
FUEL TANK 8 GALLONS
DEFLECTOR
ROLL CAGE FRAME
BUMPER 70D
5/16-18 KEPS NUT
VOLTMETER
HOUR METER
GROUND LUG
RECPT 240V 30A T/L
RECPT 120V 30A T/L
RECPT 120V 20A GFI
CIRCUIT BREAKER 20A
CIRCUIT BREAKER 30A
CIRCUIT BREAKER 40A
RECPT 240V, 50A
SWITCH
FRONT PANEL 105
VOLT METER
HOUR METER
GROUND LUG
RECPT 240V 30A T/L
RECPT 120V 30A T/L
RECPT 120V 20A GFI
CIRCUIT BREAKER 20A
CIRCUIT BREAKER 30A
SWITCH
IDLER MODULE
LINKAGE ARM
SOLENOID
SOLENOID BRACKET
IDLER BRKT HONDA 18
IDLER BRKT VANGUARD 18
IDLER BRKT HONDA 13
FAN GUARD 10
FAN GUARD 70&80
FAN BRACKET 70&80
FAN BRACKET 105
FAN 70&80
SAFE
GEN
ITEM
JJ
KK
LL
MM
NN
1
1
1
OO
PP
QQ
RR
SS
TT
UU
VV
WW
XX
YY
ZZ
AAA
BBB
CCC
2
PART#
3332
3334
3335
3337
2615
3348
3345
2145
1134
3281
3184
3344
3342
3343
3282
2178
3339
3340
3190
2315
2314
2544
2539
2852
3081
3281
DDD
EEE
FFF
GGG
HHH
JJJ
KKK
LLL
MMM
NNN
OOO
OOO
OOO
PPP
QQQ
Page 13
2903
2937-B
1094
3028
3827
1100
3506
3812
3864
3825
3826
3828
3850
RR
SS
LL
DDD
EEE
GG
QTY
1
1
1
1
1
1
1
4
12
1
1
1
1
1
2
2
2
2
1
1
1
1
1
1
1
1
2
2
2
1
1
1
1
1
1
1
1
1
1
1
1
1
QQ
EE
XX
ITEM
A
B
C
D
E
F
G
H
J
K
L
M
N
O
P
Q
PP
VV UU
KK
BBB
AAA
J
CCC
TT
DESCRIPTION
QTY
FAN 105
1
ROTOR 7&8
1
ROTOR 105
1
BALL BEARING 40MM 70&80
1
BALL BEARING 52MM 105
1
STATOR 70&80
1
STATOR 105
1
CAPACITOR 25mf 7&8
2
CAPACITOR 31.5mf 105
2
TOP COVER
1
TERMINAL STRIP
1
ROTOR SCREW COVER
1
END COVER 70&80
1
END COVER 105
1
RUBBER GROMMET
1
GROUND WIRE
1
ROTOR SCREW 70&80
1
ROTOR SCREW 105
1
VARISTER SEE WW
2
DIODE WITH VARISTER
2
FAN INSERT
1
BATTERY CABLE GREEN
1
BATTERY CABLE RED
1
ENGINE HONDA 13HP
1
ENGINE VANGUARD 18HP
1
ENGINE HONDA 20HP
1
LINKAGE WIRE
1
MOUNTING FOOT 70&80
1
MOUNTING FOOT 105
1
HEX SCREW
1
KEPS NUT
1
SHOCK MOUNTS
1
BATTERY TRAY
1
HOLD DOWN STRAP
1
DEFLECTOR (HONDA)
1
GFI SENSOR
RECPT 20A , 240V
RECPT 50A, 240V,
CIRCUIT BREAKER 20A, 2P
CIRCUIT BREAKER 30A, 2P(LR70)
CIRCUIT BREAKER 40A, 2P(LR105)
CIRCUIT BREAKER 50A, 2P(LR150)
FRONT PANEL
RECPT 120V, 20A
SAFE
GEN
1
1
1
1
1
1
1
1
3
B
A
PARTS EXPLOSION
LR 150V
PP
C
RR
QQ
D
CC
E
OO
ZZ
KK
F
AA
II
JJ
YY
Z
LL
MM
NN
EE
H
BB
I
GG
J
HH
DD
K
X
S
W
V
U
T
L
M
R
ITEM
A
B
C
D
E
F
G
H
I
J
K
L
M
N
O
P
Q&R
S
T
U
V
W
X
Y
Z
PART#
3295
3296
2980
2937-D
2937
3490
2314
2315
3281
1135
3184
3344
3343
3282
3341
3190
3346
2615
3336
3332
3328
1002
3330
1024
3497
DESCRIPTION
IDLER BRACKET
SUPPORT BRACKET
SOLENOID BRACKET
SOLENOID
HEATSHIELD
FRAME
ENGINE
BATTER CABLE RED
BATTERY CABLE GREEN
TOP COVER
CAPACITOR 35mf
TERMINAL STRIP
ROTOR SCREW COVER
END COVER
RUBBER GROMMET
ROTOR SCREW
DIODE WITH VARISTER
STATOR
BALL BEARING 52MM
ROTOR
FAN
FAN BRACKET
CHANNEL
FAN GUARD
GROUND WIRE
RECPT 120V 50A
QTY
1
1
1
1
1
1
1
1
1
1
1
1
1
1
1
1
2
1
1
1
1
1
2
1
1
1
ITEM
AA
BB
CC
DD
EE
FF
GG
HH
II
JJ
KK
LL
MM
NN
OO
PP
QQ
RR
SS
TT
UU
VV
WW
XX
YY
ZZ
Page 14
N
Q
O
PART#
3220
3015
2034
2182
3289
2476
2178
3326
1069
1112
2024
2333
1117
1101
2922
3298
3492
3491
3289
3257
2340-H
2383
1020
2536
3257
2937
1094
DESCRIPTION
RECPT 240V 50A
CIRCUIT BREAKER 50A
SWITCH
IDLER MODULE
KEPS NUT
HEX SCREW
MOUNTING FOOT
SHOCK MOUNT
GROUND STRAP
HOUR METER
CIRCUIT BREAKER 20A
CIRCUIT BREAKER 30A
VOLT METER
RECPT 120V 20A GFI
RECPT 120V 30A T/L
RECPT 240V 30A T/L
FUEL TANK 8 GALLON
FUEL CAP
FRONT PANEL
CONTROL BOX BACK
CONTROL BOX BRACKET
LIFTING HOOK
BAR CLAMPQ
5/16-18 X 2 HEX SCREW
5/16-18 KEPS NUT
5/16 WASHER
LIFTING HOOK
BATTERY TRAY
HOLDN DOWN STRAP
QTY
1
1
1
1
1
1
1
4
1
1
2
3
1
2
1
1
1
1
1
1
1
1
8
8
8
8
1
1
1
PARTS EXPLOSION
LR 130EL
PP
OO
QQ
RR
B
LL
E
NN
KK
F
II
C
JJ
Y
H
BB
AA
Z
EE
I
GG
J
HH
DD
K
X
S
W
V
U
T
L
M
R
ITEM
A
B
C
E
F
G
H
I
J
K
L
M
N
O
P
Q&R
S
T
U
V
W
X
Y
Z
PART#
3678
3446
3538
2937-D
3290-F
3685
2314
2315
3281
1135
3184
3344
3343
3282
3341
3190
3346
2615
3336
3332
3328
3330
1024
3497
DESCRIPTION
SHOCK MOUNT
SWITCH BRACKET
BATTERY TRAY ASSY
HEAT SHIELD
FRAME
ENGINE
BATTER CABLE RED
BATTERY CABLE GREEN
TOP COVER
CAPACITOR 35mf
TERMINAL STRIP
ROTOR SCREW COVER
END COVER
RUBBER GROMMET
ROTOR SCREW
DIODE WITH VARISTER
STATOR
BALL BEARING 52MM
ROTOR
FAN
FAN BRACKET
FAN GUARD
GROUND LUG
RECPT 120V 50A
QTY
2
1
1
1
1
1
1
1
1
1
1
1
1
1
1
2
1
1
1
1
1
2
1
1
ITEM
AA
BB
DD
EE
FF
GG
HH
II
JJ
KK
LL
MM
NN
OO
PP
QQ
RR
UU
VV
WW
Page 15
N
Q
O
PART#
3220
3015
3289
3635
2178
3326
1069
1112
2024
2333
1117
1101
2922
3481
3518-F
3518-B
2900
2383
1020
2536
DESCRIPTION
RECPT 240V 50A
CIRCUIT BREAKER 50A
KEPS NUT
HEX SCREW
MOUNTING FOOT
SHOCK MOUNT
GROUND STRAP
HOUR METER
CIRCUIT BREAKER 20A
CIRCUIT BREAKER 30A
VOLT METER
RECPT 120V 20A GFCI
RECPT 120V 30A T/L
RECPT 240V 30A T/L
FUEL TANK 8 GALLON
CAP DIESEL
FRONT PANEL
CONTROL BOX BACK
CONTROL BOX BRACKET
5/16-18 X 2 HEX SCREW
5/16-18 KEPS NUT
5/16 WASHER
QTY
1
1
1
1
1
2
1
1
2
3
1
2
1
1
1
1
1
1
1
8
8
8
PARTS EXPLOSION
A25, A25RC,
A30H-GFI, A30R-GFI
B
N
M
K
G
A&C
E
F
ZO
P
P
X
L
J
H
Q
B
AA
Z
S
CC
D
W
T
V
ITEM
A
B
C
D
E
F
G
H
J
K
L
M
N
O
P
PART#
2333
3308-NR
1011
1069
2604
2605
2607
2620
2609
2610
2611
2216
1020
DESCRIPTION
120V, 20A DUPLEX *
FRAME
RECPT, DUPLEX 120V, 20A
CIRCUIT BREAKER, 20A
END COVER
STATOR BOLT
BEARING BRACKET
STATOR
COVER
FAN BRACKET
WASHER
ENGINE BRACKET
ENGINE 5.5 HP HONDA
BUMPER W/STUD
5/16-18 KEPS NUT
R
U
QTY
1
1
1
1
1
1
1
1
1
1
4
1
1
3
6
ITEM
Q
R
S
T
U
V
W
X
Y
Z
AA
BB
CC
* ON A30H-GFI AND A30R-GFI ONLY
Page 16
PART#
2612
2614
3190
3287
2613
1024
2641
2178
2567
DESCRIPTION
FAN
ROTOR
DIODE W/VARISTER
BALL BEARING, 40MM
ROTOR SCREW
ROTOR WASHER
ROTOR NUT
CUP
SCREW
GROUND LUG
CAPACITOR 10mf
GROUND STRAP
MOUNTING FOOT
QTY
1
1
2
1
1
1
1
1
4
1
1
1
1
PARTS EXPLOSION
A50/55/60 SERIES
LA50/55/60 SERIES
EEE
CCC
DDD
GGG
FFF
HHH
T
S
U
TT
R
UU
VV
V
W
WW
P
RR
SS
XX
F
B
C
H
J
K
X
O
ZZ
M
N
G
V
E
MM
S
A
AAA
V
Z
Y
AA
HH
Z
T
D
KK
SS
V
Z
AA
MM
AA
BB
JJ
FF
GG
DD
EE
T
CC
T
ITEM
A
B
C
D
E
F
G
H
J
K
M
N
P
Q
R
S
T
U
V
W
X
Y
Z
AA
PART#
2621
1069
1011
1100
2622
2623
2606
2607
2624
2625
2630
2631
2626
2627
2610
2627
1022
1010
1020
1028
1043
1027
1041
1017
1002
1008
1007
DESCRIPTION
COVER
CIRCUIT BREAKER 20A
RECPT 120V 20A
RECPT 250v 20A T/L
STATOR BOLT A50
STATOR BOLT A60
GROUND SCREW
BEARING BRACKET
STATOR SCREW A50-60HZ
STATOR SCREW A60-60HZ
STATOR SCREW A50-50HZ
STATOR SCREW A60-50HZ
COVER FOR STATOR A50
COVER FOR STATOR A60
WASHER
NUT
FAN BRACKET
3/8-16 X 1-1/8 SCREW
3/8 LOCKWASHER
FINGER GRABBER
5/16-18 KEPS NUT
1/4-20 X 1-1/2 HEX NUT
HANDLE
1/4-20 KEPS NUT
3/8 NUT
ENGINE
CHANNEL
BUMPER
SPACER
A50
LA50
A60
LA55/60
QTY
1
2
1
1
4
1
1
1
1
1
4
4
1
4
4
2
5
5
1
5
1
1
1
3
3
QTY
1
2
1
1
4
1
1
1
1
1
4
4
1
4
4
2
5
5
5
1
1
3
3
ITEM
BB
CC
DD
EE
FF
GG
HH
JJ
KK
MM
NN
PP
QQ
RR
SS
UU
VV
WW
XX
YY
ZZ
AAA
BBB
CCC
DDD
EEE
FFF
GGG
HHH
* ELECTRIC START MODELS ONLY
Page 17
PART#
1102
2612
2613
2628
2629
3190
3287
2145
1134
2617
1182
2668
3309
2216
1020
1018
1072
2315*
2314*
1027
1009
1001
1046
2635
1042
3268
3298
3319-H
3309
1094*
2937*
DESCRIPTION
5/16-18 HEX SCREW
FAN
ROTOR SCREW
ROTOR A50
ROTOR A60
DIODE W/VARISTER
BALL BEARING 40MM
CAPACITOR 20mf
CAPACITOR 31.5mf
TY RAP
5/16-18 X ¾ HEX SCREW
MOUNTING FOOT
FRAME
BUMPER WITH STUD
5/16-18 KEPS NUT
8-32 X 1/2 PHILLIPS
8-32 KEPS NUT
BATTERY CABLE GREEN
BATTERY CABLE RED
1/4-20 KEPS NUT
STARTER SWITCH
SWITCH BRACKET
1/4-20 X 1 HEX SCREW
ENGINE BRACKET
HANDLE BRACKET
FUEL TANK
GAS CAP
HEAT SHIELD
FRAME
HOLD DOWN STRAP
BATTERY TRAY
A50
LA50
A60
LA55/60
QTY
2
1
1
1
2
1
1
1
1
1
1
3
7
6
6
1
1
1
1
1
1
1
1
1
1
1
1
1
1
QTY
2
1
1
1
2
1
1
1
1
1
1
3
7
6
6
1
1
1
1
1
1
1
1
1
1
1
1
1
F
D
E
PARTS EXPLOSION
LR 70 EH, LR 70 RE, LR 80 E,
LR 105 E, LR105 EH
LP/NG
HHH
G
B
A
GGG
C
T
OO
L
M
Q
AA
P
NN
PP
N
O
Z
RR
MM
X
JJJ
Y
HH
XX
ZZ
QQ
LL
KK
FFF
GG
AAA
SS
VV
WW
JJ
YY
ITEM
A
B
C
D
E
F
G
H
J
L
M
N
O
P
Q
T
X
Y
Z
AA
GG
HH
JJ
KK
LL
PART#
3282-B
2879
3280
3298
2922
2937-D
2937
2476
1020
3506
1024
1101
1117
1011
1069
1112
2882
3284
1101
1117
1011
1069
1112
3275
3330
3327
3328
3331
3332
3334
3335
3337
3287
DESCRIPTION
BRACKET
CONTROL BOX
FRONT PANEL 105
GAS CAP
FUEL TANK 8 GALLONS
DEFLECTOR
ROLL CAGE
BUMPER 70D
5/16-18 KEPS NUT
RECPT 240V 30A T/L
GROUND LUG
RECPT 240V 30A T/L
RECPT 120V 30A T/L
RECPT 120V 20A
CIRCUIT BREAKER 20A
CIRCUIT BREAKER 30A
CIRCUIT BREAKER 40A
FRONT PANEL
RECPT 240v 30 T/L
RECPT 120V 30A T/L
RECPT 120V 20A
CIRCUIT BREAKER 20A
CIRCUIT BREAKER 30A
FAN GUARD
FAN GUARD 105
FAN BRACKET
FAN BRACKET 105
FAN
FAN 105
ROTOR
ROTOR 105
BALL BEARING 40MM
BALL BEARING 52MM 105
DDD
GG
LR70EH
LR70RE
LR80E
LR105E
LR105EH
QTY
1
1
1
1
1
1
4
12
1
1
1
2
2
2
2
1
1
1
2
2
2
1
1
1
1
1
QTY
1
1
1
1
1
1
1
4
12
1
1
1
1
2
2
2
2
1
1
2
2
2
2
2
1
1
1
1
1
CCC
TT
EEE
ITEM
MM
NN
OO
PP
QQ
RR
SS
TT
UU
VV
WW
XX
YY
ZZ
AAA
CCC
DDD
EEE
FFF
GGG
HHH
JJJ
KKK
LLL
MMM
NNN
Page 18
PART#
3348
3345
2145
1134
3281
3184
3344
3342
3343
3282
2178
3344
3339
3340
3190
2315
2314
3282-B
3281-M
2903
2937-B
1094
1002
3776
3708
2478-K
3744
DESCRIPTION
STATOR
STATOR 105
CAPACITOR 25mf
CAPACITOR 31.5mf 105
TOP COVER
TERMINAL STRIP
ROTOR SCREW COVER
END COVER
END COVER 105
RUBBER GROMMET
GROUND WIRE
ROTOR SCREW 70
ROTOR SCREW 80
ROTOR SCREW 105
SEE WW
DIODE W/VARISTER
FAN INSERT
BATTERY CABLE GREEN
BATTERY CABLE RED
ENGINE
MOUNTING FOOT
MOUNTING FOOT 105
HEX SCREW
KEPS NUT
SHOCK MOUNT
BATTERY TRAY
HOLD DOWN STRAP
U CHANNEL
SOLENOID 12V DC
FUEL LINE
REGULATOR
REGULATOR BRACKET
LR70EH
LR70RE
LR80E
LR105E
LR105EH
QTY
1
2
2
1
1
1
1
1
1
1
1
2
2
1
1
1
1
1
4
4
1
1
1
1
QTY
1
1
1
1
1
1
1
2
2
1
1
1
1
1
4
4
1
1
1
2
LP/
NG
1
1
1
1
PARTS EXPLOSION THREE PHASE
LR 50 SERIES 208/480, LR 80 208/480
LR 120 SERIES 208/480
LR 180 SERIES 208/480
2
A
25
B
5
4
24
70
104
27
9
39
15
17
107
14
71
ITEM
1
2
4
5
8
9
14
15
19
24
25
27
29
39
40
41
71
75
DESCRIPTION
END COVER
TOP COVER
TRANSFORMER
TERMINAL STRIP
STATOR
FAN BRACKET
ROTOR
FAN
BALL BEARING 6203-2Z-C3
AUXILIARY TERMINAL STRIP
RECTIFIER
VARISTER
ROTOR SCREW
FAN GUARD
FIXING RING
BRUSH HOLDER W/BRUSHES
SLIP RING
RUBBER GROMMET
8
F
40
L
K
QTY
1
1
1
1
1
1
1
1
1
1
1
1
1
2
1
1
1
1
1
75
19 29
M
G
D
C
J
SPECIFY THE EXACT MODEL OF THE GENERATOR TO OBTAIN CORRECT PART NUMBER.
F
ITEM
A
B
C
D
E
PART #
3540
3541
3289
3319-H
3268
F
H
J
K
3289
3481
2937-B
3538
3309
3319
2922
L
M
N
2937-D
2937
3762
G
DESCRIPTION
FRONT PANEL 208V
FRONT PANEL 480V
ANGLE BRACKET
CONTROL BOX BACK
FUEL TANK 5 GALLON
(LR50 SERIES)
GAS CAP
DIESEL CAP
BATTERY TRAY (GAS)
BATTERY TRAY (DIESEL)
FRAME (LR50 SERIES)
HEAT SHIELD (LR50 SERIES)
FUEL TANK 8 GALLON (LR80/120
SERIES)
DEFLECTOR (LR 80/120 SERIES)
FRAME (LR 80/120 SERIES)
AUTOMATIC VOLTAGE
REGULATOR(OPTIONAL
EXCEPT ON 240V)
QTY
1
1
1
1
1
H
E
1
1
1
1
1
1
1
G
1
1
1
Page 19
LR30H
LR30R
LR50/55/60
RECOIL START
MODELS
Page 20
LR50/55/60
LR50/55/60
ELECTRICSTART
START
ELECTRIC
MODELS
MODELS
LR70EHI
LR70REI
LR80EI
Page 21
LR105EI
&
LR105EHI
(4 GFI’S)
LR105EI
LR105EHI
LR105KE
Page 22
LR150V
LR150K
LR150EH
(no idler)
LR180V
Page 23
LR50EL
&
LR60EL
LR50EL
& LR60EL
DIESEL WITH
LOAD CELL
Page 24
LR130EL
GENERATOR
12B
T1
12B
20A
120V
T2
20A
12W
T3
12W
A25
12G
T4
5
GND
CAP
6
WIRE: 105°C UL/CSA
Page 25
GENERATOR
12B
12B
20A
T1
120V
GFI
120V
GFI
12W
T2
20A
12W
20A
T3
12W
12W
12G
12G
T4
A30H-GFI
A30R-GFI
5
GND
CAP
10mf
6
WIRE: 105°C UL/CSA
LA50/55/60
A50/60
SERIES
Page 26
LR70RE
LR70EH
LR80E
LR105E
LR105EH
Page 27
GENERATOR
12W
12B
T1
12B
20A
12B
12W
T2
20A
10B
12W
12B
30A
T3
12W
240V
12G
12B
12W
12B
20A
T4
12B
120V
12B
5
20A
12W
8B
CAP
12G
8
A50/55/60
LA50/55/60
(WITH FULL
POWER SWITCH)
WIRE: 105°C UL/CSA
GND
W IRING DIA GRA M F O R LR50, LR80, LR120 A ND LR180 SERIES 120 /208-277 /480 VO LTS
T HRE E PHASE CO MPO UND W O UND G ENERAT O RS
BLACK
GREEN
RED
FUSE
OPT ION AL
BLUE
+12
BLUE
GREEN
YELLOW
W2
U2
V2
U1
V1
W1
RED
RED
RED
YELLOW
RED
BLACK
GENERATOR
RED
RED
R EGU LATOR
DELTA CONNECTIO N
+
SDR
182/18
GREEN
YELLOW
YELLOW
+
-
W2
U1
Page 28
U2
V1
V2
W1
CIRCUIT BREAKERS
LR50H
18 AMPS
LR50L
18 AMPS
LR80E
30 AMPS
LR120E
40 AMPS
LR120EL
40 AMPS
GENERATOR
THREE PHASE 120/208 VOLT
LR50H, LR50L, LR80E
LR120E, LR180V
8B LINE
3POLE
CIRCUIT
BREAKER
8W
8B
8B
LINE
8B
8B
8W
20A
LINE
8B
20A
50AMP
250V
L15-50R
120V
12B
20A
8W
12B
12G
10G
10W
GND
GENERATOR
CIRCUIT BREAKERS
LR50H
10 AMPS
LR50L
10 AMPS
LR80E
10 AMPS
LR120E
18 AMPS
LR120EL
18 AMPS
Page 28
12B LINE
3POLE
CIRCUIT
BREAKER
12W
12B
WIRE: 105°C UL/CSA
12B
LINE
12B
12B
THREE PHASE
480 VOLTS
12W
12B
LINE
20AMP
480V
L15-50R
12W
LR50H, LR50L
LR80E, LR120E
LR120EL
LR180V
(480V-50A, CS8169)
12G
12W
WIRE: 105°C UL/CSA
GND
Page 29
3-PHASE
120-208/240 AVR
480 Volts has identical wiring
connections as 208/240 Volts
but different dip switch
positions.
SAFE GENS
LR70EH-SG
LR105E-SG
LR105EH-SG
LR150V-SG
LR150EH-SG
Page 30
GENERAL INFORMATION
Instructions for ordering parts
For parts or service, contact either the factory or the dealer/distributor from whom you purchased this equipment for the name of the nearest authorized
Service Station.
1. To avoid errors or delay in filling parts orders, always use part numbers and description along with the model and serial number on the unit.
2. Do not order by reference number or group number.
3. Give the part number, description and quantity.
4. State definite shipping instructions. Any claim for loss or damage to your unit in transit should be filed promptly against the transportation
company making the delivery. Shipments are complete unless the packing list indicates items are back ordered.
Prices are not listed in the owner’s manual but are on the web site www.voltmaster.com. This product is equipped with an engine that is not covered by
the warranty. This engine is covered by the engine manufacturer’s warranty. Your nearest engine service center is listed in the Yellow pages under
“Engines-Gasoline” or “Gasoline Engines”
FOR SERVICE OR PARTS CONTACT THE FACTORY AT:
Wanco/Voltmaster
5870 Tennyson Street
phone 800 730 3927 or 303-427-5700
fax 303-427-5725
www.voltmaster.com
TWO YEAR LIMITED WARRANTY
LR CONTRACTOR UNITS WITH IDLING SYSTEMS, DIESEL SERIES, SAFE GENS, WELDERS AND THREE PHASE SERIES
This warranty extends to the original purchaser only. The generator sold is warranted to the original purchaser for a period of two (2) years from the
original purchase date. The manufacturer warrants the generator sold to be free from defects in material and workmanship if properly installed, serviced
and operated within the name plate rating under normal conditions according to the manufacturer’s instructions.
DISCLAIMERS
This warranty does not apply to any items which must be repaired or replaced due to normal wear, which have been subject to misuse, negligence,
accident or which have been repaired, altered by others outside of the manufacturer’s factory unless authorized in writing by the manufacturer. The
manufacturer makes no warranty with respect to the engine components not of it’s manufacture. They are subject to the warranties of their
manufacturers. Under no circumstances will the manufacturer be liable for any consequential damage or expense of any kind, including loss of profits
not for the fitness of the product for any specific application or purpose. Any implied warranties are limited in duration to the above two (2) year period.
Some state do not allow limitations on how long an implied warranty lasts, so the above limitation may not apply to you. Some states do not allow the
exclusion or limitation of incidental or consequential damages, so the above limitation or exclusion may not apply to you. This warranty gives you
specific legal rights, and you may also have other rights which vary from state to state.
PERFORMANCE
The manufacturer’s obligation under this warranty is limited to correcting without further charge at its factory or authorized service station any part or
parts which shall be returned transportation charges prepaid, and which upon examination shall disclose to the manufacturer’s satisfaction to have been
originally defective. Other than transportation charges, no charge will be made for such repair, adjustment and or replacement. This remedy is
expressly in lieu of all other remedies, and is the purchaser’s sole and exclusive remedy hereunder. NO WARRANTY REGISTRATION CARD IS
NECESSARY TO OBTAIN WARRANTY. YOU MUST SAVE THE ORIGINAL PURCHASE RECEIPT. A PROOF OF PURCHASE DATE WILL BE
REQUIRED TO OBTAIN WARRANTY.
ONE YEAR LIMITED WARRANTY
ALL MEDIUM DUTY A, LA AND LR UNITS (NO IDLER SYSTEMS)
This warranty extends to the original purchaser only. The generator sold is warranted to the original purchaser for a period of one (1) year from the
original purchase date. The manufacturer warrants the generator sold to be free from defects in material and workmanship if properly installed, serviced
and operated within nameplate rating under normal conditions according to the manufacturer’s instructions.
DISCLAIMERS
This warranty does not apply to any items which must be repaired or replaced due to normal wear, which have been subject to misuse, negligence,
accident or which have been repaired, altered by others outside the manufacturer’s factory unless authorized in writing by the manufacturer. The
manufacturer makes no warranty with respect to the engine components not of its manufacture. They are subject to the warranties of their
manufacturers. Under no circumstances will the manufacturer be liable for any consequential damage or expense of any kind, including loss of profits
not for the fitness of the product for any specific application or particular purpose. Any implied warranties are limited in duration to the above one (1)
year period. Some state do not allow limitations on how long an implied warranty lasts, so the above limitation may not apply to you. Some states do
not allow the exclusion or limitation of incidental or consequential damages, so the above limitation or exclusion may not apply to you. This warranty
gives you specific legal rights, and you may have other rights which vary from state to state.
PERFORMANCE
The manufacturer’s obligation under this warranty is limited to correcting without further charge at its factory or authorized service station any part or
parts which shall be returned transportation charges prepaid, and which upon examination shall disclose to the manufacturer’s satisfaction to have been
originally defective. Other than transportation charges, no charge will be made for such repair, adjustment and or replacement. This remedy is
expressly in lieu of all other remedies, and is the purchaser’s sole and exclusive remedy hereunder. NO WARRANTY REGISTRATION CARD IS
NECESSARY TO OBTAIN WARRANTY. YOU MUST SAVE THE ORIGINAL PURCHASE RECEIPT. A PROOF OF PURCHASE DATE WILL BE
REQUIRED TO OBTAIN WARRANTY.
Page 31