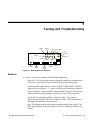
1
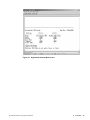
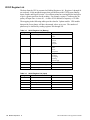
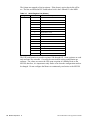
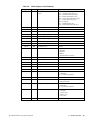
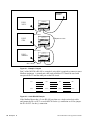
MUCM Mitsubishi UPS Application Manual
MUCM Modbus/Mitsubishi
UPS
Installation and Programming Manual
This Manual describes the MUCM application for interfacing a Mitsubishi UPS to a Modbus serial network.
Effective: 01 December, 2005
Niobrara Research & Development Corporation
P.O. Box 3418 Joplin, MO 64803 USA
Telephone: (800) 235-6723 or (417) 624-8918
Facsimile: (417) 624-8920
www.niobrara.com
Modbus and Momentum are registered trademarks of Modicon, Inc.
Brand and product names mentioned in this document are trademarks or registered
trademarks of their respective companies.
Subject to change without notice.
© Niobrara Research & Development Corporation 2002-2005. All Rights Reserved.
Contents
1 Introduction ......................................................................................................................... 5
2 Installation ............................................................................................................................. 7
Module Installation ......................................................................................................... 7
Software Installation ....................................................................................................... 8
Serial Connections to the MUCM .................................................................................. 8
Port 1 to 9-pin UPS ................................................................................................. 8
Port 1 to 25-pin UPS ............................................................................................... 8
Port 2 to Modbus Network ...................................................................................... 9
Loading the Applications into the MUCM ................................................................... 10
FWLOAD MUCM Firmware Update. .................................................................. 10
QLOAD MUCM_MITSU_APP1 ......................................................................... 11
Terminal Setup ............................................................................................................. 12
3 Modbus Operation ........................................................................................................ 15
UPS Device Types ........................................................................................................ 15
2033C Register List ...................................................................................................... 16
2033D, 7011A, and 9800AD Register List .................................................................. 21
2033A and 9700 Register List ...................................................................................... 26
4 Examples ............................................................................................................................... 35
Example 1 ..................................................................................................................... 35
5 Testing and Troubleshooting ................................................................................. 39
Switches ........................................................................................................................ 39
MUCM Lights .............................................................................................................. 40
Testing the UPS Connection ........................................................................................ 41
Testing the Modbus Connection ................................................................................... 41
Figures
Figure 2-1 MUCM to 9-pin UPS RS-232 (MU1 Cable) .............................................................. 8
3
Figure 2-2
Figure 2-3
Figure 2-4
Figure 2-5
Figure 2-6
Figure 2-7
Figure 4-1
Figure 4-2
Figure 4-3
Figure 5-1
Figure 5-2
MUCM to 25-pin UPS RS-232 (MU17 Cable) .......................................................... 9
MUCM to 4-wire Modbus Slaves ................................................................................ 9
MUCM to 2-wire Modbus Slaves ................................................................................ 9
FWLOAD ................................................................................................................... 10
QLOAD of MUCM_MITSU_APP1 ........................................................................... 11
Hyperterminal Setup Main Screen .............................................................................. 13
Example 1 Layout ....................................................................................................... 36
4-wire RS-485 Example ............................................................................................. 36
2-wire RS-485 Example ............................................................................................. 37
MUCM Lights and Switches ...................................................................................... 39
ZAPREG32 Screen .................................................................................................... 42
Tables
Table 2-1 MUCM Port Default Settings ...................................................................................... 12
Table 3-1 UPS Protocol List ......................................................................................................... 15
Table 3-2 2033C Register List (Battery) ...................................................................................... 16
Table 3-3 2033C Register List (Input) ......................................................................................... 16
Table 3-4 2033C Register List (Output) ....................................................................................... 17
Table 3-5 2033C Register List (Alarms) ...................................................................................... 18
Table 3-6 2033C Register List (UPS Setup) ................................................................................ 19
Table 3-7 2033C Register List (UPS Setup) ................................................................................ 20
Table 3-8 MUCM Setup Register List ......................................................................................... 21
Table 3-9 2033D, 7011A, 9800AD Register List (Battery) ......................................................... 22
Table 3-10 2033D, 7011A, 9800AD Register List (Input) ......................................................... 22
Table 3-11 2033D, 7011A, 9800AD Register List (Output) ........................................................ 22
Table 3-12 2033D, 7011A, 9800AD Register List (BYPASS) ................................................... 23
Table 3-13 2033D, 7011A, 9800AD Register List (Alarms) ..................................................... 23
Table 3-14 2033D, 7011A, 9800AD Register List (UPS Setup) ............................................... 24
Table 3-15 2033D, 7011A, 9800AD Register List (UPS Setup) ............................................... 25
Table 3-16 MUCM Setup Register List ....................................................................................... 26
Table 3-17 2033A, 9700 Register List (Battery) .......................................................................... 27
Table 3-18 2033A, 9700 Register List (Input) ............................................................................ 27
Table 3-19 2033A, 9700 Register List (Output) ......................................................................... 27
Table 3-20 2033A, 9700 Register List (BYPASS) ..................................................................... 28
Table 3-21 2033A, 9700 Register List (Alarms) ......................................................................... 29
Table 3-22 2033A, 9700 Register List (Alarms) ......................................................................... 30
Table 3-23 2033A, 9700 Register List (Alarms) .......................................................................... 31
Table 3-24 2033A, 9700 Register List (Alarms and Status) ....................................................... 32
Table 3-25 2033A, 9700 Register List (Status) ........................................................................... 33
Table 3-26 MUCM Setup Register List ....................................................................................... 34
Table 4-1 Example 1 Settings ....................................................................................................... 35
4
1
Introduction
The Niobrara MUCM is a Modicon Momentum® compatible module that is capable
of running multiple applications for performing communication translations between
serial protocols. This document covers an application that allows Modbus serial masters to gather data from a Mitsubishi Uninterruptible Power Supply (UPS).
Support is provided for Mitsubishi 2033A, 2033C, 2033D, 7011A, 9800AD models.
UPS data is presented as Modbus Holding Registers (4x). Analog values are stored as
16-bit integers and alarm values are stored as bits of 16-bit registers. The MUCM
may be configured as a Modbus RTU (default) or Modbus ASCII slave. The Modbus
Slave Address (default=1), baud rate (default=9600), data bits (default=8), and parity
(default=EVEN) may all be configured from the RS-485 Modbus port or through a
built-in terminal server on the RS-232 port.
Although the MUCM hardware supports a communications tophat, this communication option is not used in this application. In most installations, it is advisable to cover
the opening where a tophat would normally connect to protect the exposed circuit
board. NR&D part number METH-001 is an inexpensive empty tophat case sold for
this purpose.
Only one of the two application areas are used for this data concentrator application:
MUCM_MITSU_APP1.qcm is compiled and loaded into application area 1 of the
MUCM.
Port 1 of the MUCM is RS-232 and is to be connected to the UPS. The Niobrara
MU1 cable is usually used for the connection to the UPS 9-pin RS-232 port. The
Niobrara MU17 cable or the MU1 with an SD013 adapter may be used to connect to a
25-pin port of the UPS. Port 2 of the MUCM is RS-485 and is to be connected to the
Modbus network. The Niobrara SC912 cable is handy for testing the Modbus RS-485
connection from a PC.
The MUCM contains its own power supply and needs a minimum 6W source of 9 to
30 Volts, AC or DC. An ideal 12VAC transformer is available from NR&D as part
number TR121-ST.
MUCM Mitsubishi UPS Application Manual
1 Introduction 5
2
Installation
Installation of the MUCM should go quickly, with the necessary materials. The following items are necessary:
• MUCM
• MU1 cable (or equivalent can be built; see Figure 2-1)
• Power source for MUCM (use NR&D part TR121-ST or available power)
• Cabling between MUCM and Modbus Master may be built or purchased
• Cabling between MUCM and UPS equipment may be built or purchased. The
MU1 cable may be used to connect to the UPS 9-pin RS-232 port on models
2033C, 2033D, 7011, and 9800AD. The SD013 9-25 pin adapter may be used
with the MU1 cable, or the MU17 cable may be used to connect the MUCM to the
25 pin port on Models 2033A and 9700.
• PC with terminal emulator, or terminal with RS-232 port.
The following may be used:
• DIN rail for mounting
• Empty Momentum tophat plastic to close MUCM case (NR&D part METH-001)
Module Installation
1
Mount the MUCM on a DIN rail, or mount as desired using screws through the
two holes provided. The DIN rail or mounting screws should be Earth-grounded
for the MUCM serial ports’ transient suppression.
2
Supply power to the MUCM; NR&D’s TR121-ST may be used, or any available
power source of minimum 6W 9-30 Volts AC or DC.
MUCM Mitsubishi UPS Application Manual
2 Installation 7
Software Installation
The application files for the MUCM are included in the
MUCM_MITSU_SETUP.EXE file. This self-extracting file is included on the standard NR&D software CD and is also available at www.niobrara.com.
It is required that the MUCM_SETUP.EXE file also be installed on the computer to
ensure that QLOAD and FWLOAD are properly installed.
Serial Connections to the MUCM
Port 1 to 9-pin UPS
Port 1 of the MUCM is RS-232 so a simple 3-wire cable is required to connect to the
UPS. In general, the UPS’s Tx signal will connect to the MUCM’s Rx, and the UPS’s
Rx signal will connect to the MUCM’s Tx. Signal ground must run from the UPS to
the MUCM, and each device will have its RTS and CTS handshaking pins shorted together.
Mitsubishi UPS models 2033C, 2033D, 7011, and 9800AD use a standard 9-pin RS232 serial port and thus the Niobrara MU1 cable may be used. For other standard connections, see the MUCM manual, or contact NR&D’s technical support.
MUCM
DB9S (female)
Tx
2
Rx
3
SG
5
RTS
7
CTS
8
4
6
Figure 2-1 MUCM to 9-pin UPS RS-232 (MU1 Cable)
Port 1 to 25-pin UPS
Port 1 of the MUCM is RS-232 so a simple 3-wire cable is required to connect to the
UPS. In general, the UPS’s Tx signal will connect to the MUCM’s Rx, and the UPS’s
Rx signal will connect to the MUCM’s Tx. Signal ground must run from the UPS to
the MUCM, and each device will have its RTS and CTS handshaking pins shorted together.
Mitsubishi UPS models 2033A, and 9700 use a 25-pin RS-232 serial port and thus the
Niobrara MU1 with the SD013 adapter or the MU17 cable may be used. For other
standard connections, see the MUCM manual, or contact NR&D’s technical support.
8 Installation
2
MUCM Mitsubishi UPS Application Manual
MUCM
DB25P (male)
Tx
3
Rx
2
SG
7
RTS
4
CTS
5
6
8
20
Figure 2-2 MUCM to 25-pin UPS RS-232 (MU17 Cable)
Port 2 to Modbus Network
Port 2 of the MUCM is RS-422/485 so a simple 4-wire cable is required to connect to
most Modbus equipment. Twisted pair cable should be used.
Master
MUCM
Other Slave
Tx+
IN+
IN+
Tx-
IN-
IN-
Rx+
OUT+
OUT+
RX-
OUT-
OUT-
Shield
Shield
Shield
Figure 2-3 MUCM to 4-wire Modbus Slaves
2-wire RS-485 slaves are supported by the MUCM by jumpering the TX+ and RX+
together to make the (+) connection and the TX- and RX- together for the (-) connection.
MUCM
Other Slave
Master
Tx+
+
+
Tx-
-
-
Rx+
RXShield
Figure 2-4 MUCM to 2-wire Modbus Slaves
A physical connection must be made from the personal computer to the MUCM in order to download the applications. This link is a serial connection from a COM port on
the personal computer to the RS-232 port on the MUCM. The Niobrara MU1 cable
may be used for this connection. This cable is shown in Figure 2-1.
MUCM Mitsubishi UPS Application Manual
2
Installation 9
Loading the Applications into the MUCM
NOTE: If the MUCM were ordered with the part number MCP-104 then the latest
Mitsubishi application is already loaded. These steps may be skipped.
The MUCM is rapidly evolving so be sure to upgrade the firmware in the module before loading the latest version of MUCM_MITSU_APP1.QCC. Most likely the
QCOMPILE.EXE has been updated so be sure to use the newest version. The
MUCM-001 and MUCM-002 use different firmware files: MUCM1.FWL (or
MUCM1.QCC) is for the MUCM-001; MUCM.FWL (or MUCM.QCC) is for the
MUCM-002. Firmware upload is as follows:
FWLOAD MUCM Firmware Update.
Firmware upload is as follows:
1
Move the yellow RUN/LOAD switch near the power connector to LOAD.
2
Only the 3 light should be on.
3
Connect the PC to QUCM Port 1 with a MU1 cable.
4
Locate the and start the program FWLOAD.EXE. There is a start menu item under "Start, Programs, Niobrara, MUCM, Apps, Mitsubishi, FWLOAD MUCM
Firmware".
5
Click on the Browse button and select MUCM.FWL for an MUCM-002 or
MUCM1.FWL for an MUCM-001.
6
Select the PC’s serial port (COM1).
7
Press START to begin the download process. If difficulty is experienced in completing the download, try marking the Slow box and pressing start again.
8
When the download is completed, move the yellow LOAD/RUN switch back to
RUN.
Figure 2-5 FWLOAD
10 Installation
2
MUCM Mitsubishi UPS Application Manual
QLOAD MUCM_MITSU_APP1
Figure 2-6 QLOAD of MUCM_MITSU_APP1
1
Application Switch 1 (left) must be in HALT.
2
Start QLOAD.EXE There is a start menu item for this operation: "Start, Programs, Niobrara, MUCM, Apps, Mitsubishi, QLOAD Mitsubishi App1".
3
Click on the Browse button and select the file MUCM_MITSU_APP1.qcc.
4
Select the Application 1 Radio Button.
5
Verify that the Modbus Serial tab is selected.
(1) The PC’s com port is selected (COM1).
(2) The baud rate is set for 9600.
(3) The Modbus Drop is set to 255.
(4) The ASCII button is NOT checked.
(5) The 8 bits button is selected.
(6) The parity is set for EVEN.
6
Press the Start Download button. QLOAD will open a progress window to show
the status of the download.
7
After downloading the application, Move Switch 1 to RUN. The RN1 light
should be on.
8
The MUCM defaults to Auto-Detect the UPS. If it finds an SEC device it will
turn on the green light 1. A Mitsubishi protocol UPS will result in light 1 turned
off.
NOTE: The position of switch 2 is now ignored by the MUCM application. The specific UPS must be set in the terminal setup routine.
Connect the UPS to MUCM port 1 and the Modbus Master to MUCM port 2. The
default settings for the MUCM are shown in Table 2-1. These settings may be modified by using a terminal on MUCM port 1 with switch 1 in MEM PROT or by writing
Modbus registers from the RS-485 port.
MUCM Mitsubishi UPS Application Manual
2
Installation 11
Table 2-1
MUCM Port Default Settings
Setting
Port 1 Value
Port 2 Value
Protocol Mode
2033A UPS
Modbus RTU
Baud Rate
9600
9600
Parity
Auto Select for UPS
EVEN
Data Bits
8
8
Stop Bits
1
1
Modbus Slave Address
N/A
1
The MUCM will answer Modbus RTU requests on its RS-485 port that are directed to
its Modbus Slave Address only if it can communicate with the UPS. If the MUCM is
not able to communicate with the UPS then it will not respond to queries to the slave
address.
The MUCM will respond to queries directed to a special Modbus slave address of 254,
even if it cannot communicate with the UPS. This special address allows modification
of the MUCM port parameters for trouble-shooting.
Terminal Setup
The setup parameters may be inspected and modified by connecting a terminal or
emulator such has Hyperterminal to MUCM port 1 with an MU1 cable.
1
Connect the PC to the MUCM port 1 with the MU1 cable.
2
Move switch 1 to MEM PROT on the MUCM. All four user lights will come on.
3
Start Hyperterminal. This program is usually in Start, Programs, Accessories,
Communications, Hyperterminal. Make sure the connection is for the proper
COM port at 9600, N, 8, 1 and VT100 emulation.
Pressing ESC or Enter on the keyboard should bring up a screen as shown in Figure
2-7. Pressing the "P" key will allow the ports to be edited. Each entry to edit is adjusted by pressing the space bar. When the correct entry is selected then press the Enter key. Pressing the ESC will back out without changing the parameter. Pressing the
"W" key will write the setup to FLASH. The keys are not case sensitive.
12 Installation
2
MUCM Mitsubishi UPS Application Manual
Figure 2-7 Hyperterminal Setup Main Screen
MUCM Mitsubishi UPS Application Manual
2
Installation 13
3
Modbus Operation
The Mitsubishi MUCM application uses Port 2 for Modbus communication. Port 2 is
RS-485 and may be connected as a 4-wire multidrop slave or 2-wire multidrop slave.
By default, Port 2 is set for Modbus RTU Slave, 9600 baud, 8 data bits, EVEN parity,
and Slave Address 1.
The MUCM will always answer Modbus messages directed to slave address 255 or
254.
The MUCM will briefly light the green led 2 when any valid Modbus message is received on the RS-485 port. If the message is intended for the MUCM then the green
led 2 will stay on slightly longer and the yellow tx2 light will come on as the MUCM
replies if the UPS is online. If the UPS is not responding to the MUCM then the
MUCM will not respond and will turn on the red light 4 for 1 second. If a parity or
framing error is detected in the received message then the red light 4 will come on for
1/4 second.
UPS Device Types
The following Mitsubishi devices are supported by the MUCM. The device type must
be set in the setup terminal emulator accessed by setting the RS-232 switch to MEM
PROT.
Table 3-1
UPS Protocol List
UPS Model
Protocol
2033A
MIT
2033C and 2033D
SEC
7011A
SEC
9700 Series
MIT
9800AD
SEC
MUCM Mitsubishi UPS Application Manual
3 Modbus Operation 15
2033C Register List
The data from the UPS is presented as Holding Registers (4x). Registers 1 through 66
are read only 16-bit unsigned integers that provide data on the UPS System, Battery,
Input, Output, and Bypass circuits. Several data points have an implied decimal place
to give a greater precision for the reading. For example, register 17 indicates the frequency of Input Line A times 0.1. A value of 599 indicates a frequency of 59.9Hz.
The mapping in the following tables provides data for 3-phase models. UPS models
that provide fewer phases will have the unused values set to zero. The number of
phases may be checked by reading registers 500 through 502.
Table 3-2
Register
Notes
UPS Device Type
Integer Value
1=SEC
4x0002
Battery Condition
Integer Value
0=Good
1=Weak
2=Replace
4x0003
Battery Status
Integer Value
0=OK
1=Low
2=Depleted
4x0004
Battery Charge
Integer Value
0=Floating
1=Charging
2=Resting
3=Discharging
4x0005
Seconds on Battery
Seconds
4x0006
Estimated Minutes Remaining
Minutes
4x0007
% Battery Charge Left
0-100%
Register
3
Measurement
4x0001
Table 3-3
16 Modbus Operation
2033C Register List (Battery)
2033C Register List (Input)
Measurement
Notes
4x0014
Input Line Bads
Count
4x0016
Input Frequency
x0.1 Hz
4x0022
Input Voltage
x0.1 VAC
4x0025
Input Current
x0.1 A
4x0029
Input Power
W
MUCM Mitsubishi UPS Application Manual
Table 3-4
2033C Register List (Output)
Register
Measurement
Notes
4x0032
Output Source
Integer Value
0=Normal
1=On Battery
2=On Bypass
3=Reducing
4=Boosting
5=Other
4x0036
Output Voltage
x0.1 VAC
4x0039
Output Current
x0.1 A
4x0045
Output Power
W
4x0048
Output % Load
0-100%
4x0051
Output Frequency
x0.1 Hz
MUCM Mitsubishi UPS Application Manual
3
Modbus Operation 17
The Alarms are mapped as bits in registers. If the alarm is active then its bit will be
set. The bits are labeled in IEC format where bit 0 is the LSB and 15 is the MSB.
Table 3-5
2033C Register List (Alarms)
Register
Bit
Description
4x0067
0
Temperature Alarm
1
Input Bad Alarm
2
Output Bad Alarm
3
Overload Alarm
4
Bypass Bad Alarm
5
Output Off Alarm
6
UPS Shutdown Alarm
7
Charger Failure Alarm
8
System Off Alarm
9
Fan Failure Alarm
10
Fuse Failure Alarm
11
General Fault Alarm
12
Awaiting Power Alarm
13
Shutdown Pending Alarm
14
Shutdown Imminent Alarm
15
Reserved
The UPS configuration is stored in registers 500 through 652. Some registers are read
only and some are writeable. Care must be exercised on writing configuration parameters. The values are sent to the UPS upon reception of a Modbus write to the
MUCM, therefore, it is important to only send a write when the configuration needs to
be changed. Do not configure the Master to continuously send writes to the MUCM.
18 Modbus Operation
3
MUCM Mitsubishi UPS Application Manual
Table 3-6
2033C Register List (UPS Setup)
Register
R/W
Measurement
4x0499
R
Read Only Bitmap of pending writes
to UPS
Bit 0 = Auto Reboot [503]
Bit 1 = Nominal Setting [504-517]
Bit 2 = Shutdown After Delay [518]
Bit 3 = Reboot with Duration [519]
Bit 4 = Action taken at Shutdown [520]
Bit 5 = Startup After Delay [521]
Bit 6 = Test [522]
Bit 7 = UPS Baud Rate [523]
Bit 8 = UPS Identification [524-555]
4x0500
R
Number of Input Lines
1-3
4x0501
R
Number of Output Lines
1-3
4x0504
RW
Nominal Input Voltage
Volts
4x0505
RW
Nominal Input Frequency
x0.1 Hz
4x0506
RW
Nominal Output Voltage
Volts
4x0507
RW
Nominal Output Frequency
x0.1 Hz
4x0508
RW
Nominal VA Rating
VA
4x0509
RW
Nominal Output Power
W
4x0510
RW
Low Battery Time
Minutes
4x0511
RW
Audible Alarm
Integer Value
1=Disabled
2=Enabled
3=Muted
4=Disabled until Low Battery
4x0512
RW
Low Voltage Transfer Point
Volts
4x0513
RW
High Voltage Transfer Point
Volts
4x0514
RW
Battery Installed Month
1-12
4x0515
RW
Battery Installed Day
1-31
4x0516
RW
Battery Installed Year
xxxx
4x0517
RW
Nominal Battery Life
Days
4x0518
RW
Shutdown After Delay
-1 = Abort
0 = Immediate
>0 = Seconds until shutdown
4x0519
RW
Reboot with Duration
>0 = Seconds after shutdown
4x0520
RW
Action Taken at Shutdown
1=UPS Output OFF
2=UPS System OFF
4x0521
RW
Startup After Delay
-1 = Abort
0 = Immediate
>0 = Seconds until shutdown
4x0522
RW
Test
-1 = Abort
0 = No Effect
1 = General Test
2 = Battery Test
3 = Deep Test
4x0523
RW
UPS Baud Rate
1200, 2400, 4800, 9600, or 19200
MUCM Mitsubishi UPS Application Manual
Notes
3
Modbus Operation 19
Table 3-7
2033C Register List (UPS Setup)
Register
R/W
4x0524
4x0555
RW
4x05556
Measurement
Notes
Identification String
Packed ASCII
R
Test Results
Integer Value
0 = No Tests Performed
1 = Test Passed
2 = Test In Progress
3 = General Test Failed
4 = Battery Test Failed
5 = Deep Test Failed
4x0557
4x0588
R
Test Results String
Packed ASCII
4x0589
4x0604
R
UPS Manufacturer String
Packed ASCII
4x0605
4x0636
R
UPS Model String
Packed ASCII
4x0637
4x0652
R
UPS Software Version String
Packed ASCII
The MUCM serial port setup is stored in registers 653 through 676. Some of these
registers are read only while some may be altered by sending writes to the MUCM.
Care must be exercised when modifying these values because the serial ports will
change their settings immediately and possibly cause a loss of communications.
Note: New values are stored to FLASH upon completion of the Modbus Write. Do
not allow the Master to continuously send writes to the MUCM.
20 Modbus Operation
3
MUCM Mitsubishi UPS Application Manual
Table 3-8
MUCM Setup Register List
Register
R/W
Measurement
Notes
4x0653
4x0668
RW
MUCM Application Revision String
Packed ASCII
4x0669
RW
MUCM Port 1 Mode
Integer Value
0 = Auto Detect
1 = SEC
2 = MIT
(default = 0)
4x0670
RW
MUCM Port 1 Baud Rate
1200, 2400, 4800, 9600, 19200
(default = 9600)
4x0671
R
MUCM Port 1 Parity
0 = NONE
1 = EVEN
SEC always uses NONE
MIT always uses EVEN
4x0672
RW
MUCM Port 2 Mode
5 = Modbus RTU Slave
6 = Modbus ASCII Slave
(default = 5)
4x0673
RW
MUCM Port 2 Baud Rate
1200, 2400, 4800, 9600, 19200
(default = 9600)
4x0674
RW
MUCM Port 2 Parity
0 = NONE
1 = EVEN
(default = EVEN)
4x0675
RW
MUCM Port 2 Modbus Slave Address
1-254 (default = 1)
Always responds to address 255.
4x0676
RW
MUCM Port 2 Data Bits
7 (valid for Modbus ASCII only)
8 (valid for RTU or ASCII)
(default = 8)
2033D, 7011A, and 9800AD Register List
The data from the UPS is presented as Holding Registers (4x). Registers 1 through 66
are read only 16-bit unsigned integers that provide data on the UPS System, Battery,
Input, Output, and Bypass circuits. Several data points have an implied decimal place
to give a greater precision for the reading. For example, register 17 indicates the frequency of Input Line A times 0.1. A value of 599 indicates a frequency of 59.9Hz.
The mapping in the following tables provides data for 3-phase models. UPS models
that provide fewer phases will have the unused values set to zero. The number of
phases may be checked by reading registers 500 through 502.
MUCM Mitsubishi UPS Application Manual
3
Modbus Operation 21
Table 3-9
Register
2033D, 7011A, 9800AD Register List (Battery)
Measurement
Notes
4x0001
UPS Device Type
Integer Value
1=SEC
4x0003
Battery Status
Integer Value
0=OK
1=Low
2=Depleted
4x0004
Battery Charge
Integer Value
0=Floating
1=Charging
2=Resting
3=Discharging
4x0005
Seconds on Battery
Seconds
4x0007
% Battery Charge Left
0-100%
4x0008
Battery Voltage
x0.1 VDC
Table 3-10
Register
2033D, 7011A, 9800AD Register List (Input)
Measurement
Notes
4x0014
Input Line Bads
Count
4x0016
Input Frequency
x0.1 Hz
4x0022
Input Voltage
x0.1 VAC
Table 3-11 2033D, 7011A, 9800AD Register List (Output)
Register
22 Modbus Operation
3
Measurement
Notes
4x0032
Output Source
Integer Value
0=Normal
1=On Battery
2=On Bypass
3=Reducing
4=Boosting
5=Other
4x0036
Output Voltage Phase A-N
x0.1 VAC
4x0037
Output Voltage Phase B-N
x0.1 VAC
4x0038
Output Voltage Phase C-N
x0.1 VAC
4x0039
Output Current Phase A
x0.1 A
4x0040
Output Current Phase B
x0.1 A
4x0041
Output Current Phase C
x0.1 A
4x0045
Output Power
W
4x0048
Output % Load Phase A
0-100%
4x0049
Output % Load Phase B
0-100%
4x0050
Output % Load Phase C
0-100%
4x0051
Output Frequency
x0.1 Hz
MUCM Mitsubishi UPS Application Manual
Table 3-12
2033D, 7011A, 9800AD Register List (BYPASS)
Register
Measurement
Notes
4x0057
Bypass Voltage Phase A-N
x0.1 VAC
4x0058
Bypass Voltage Phase B-N
x0.1 VAC
4x0059
Bypass Voltage Phase C-N
x0.1 VAC
4x0060
Bypass Current Phase A
x0.1 A
4x0061
Bypass Current Phase B
x0.1 A
4x0062
Bypass Current Phase C
x0.1 A
4x0063
Bypass Power Phase
W
4x0066
Bypass Frequency
x0.1 Hz
The Alarms are mapped as bits in registers. If the alarm is active then its bit will be
set. The bits are labeled in IEC format where bit 0 is the LSB and 15 is the MSB
Table 3-13
2033D, 7011A, 9800AD Register List (Alarms)
Register
Bit
Description
4x0067
0
Temperature Alarm
1
Input Bad Alarm
2
Output Bad Alarm
3
Overload Alarm
4
Bypass Bad Alarm
5
Output Off Alarm
6
UPS Shutdown Alarm
7
Charger Failure Alarm
8
System Off Alarm
9
Fan Failure Alarm
10
Fuse Failure Alarm
11
General Fault Alarm
12
Awaiting Power Alarm
13
Shutdown Pending Alarm
14
Shutdown Imminent Alarm
15
Reserved
The UPS configuration is stored in registers 500 through 652. Some registers are read
only and some are writeable. Care must be exercised on writing configuration parameters. The values are sent to the UPS upon reception of a Modbus write to the
MUCM, therefore, it is important to only send a write when the configuration needs to
be changed. Do not configure the Master to continuously send writes to the MUCM.
MUCM Mitsubishi UPS Application Manual
3
Modbus Operation 23
Table 3-14
24 Modbus Operation
2033D, 7011A, 9800AD Register List (UPS Setup)
Register
R/W
Measurement
4x0499
R
Read Only Bitmap of pending writes
to UPS
Bit 0 = Auto Reboot [503]
Bit 1 = Nominal Setting [504-517]
Bit 2 = Shutdown After Delay [518]
Bit 3 = Reboot with Duration [519]
Bit 4 = Action taken at Shutdown [520]
Bit 5 = Startup After Delay [521]
Bit 6 = Test [522]
Bit 7 = UPS Baud Rate [523]
Bit 8 = UPS Identification [524-555]
4x0500
R
Number of Input Lines
1-3
4x0501
R
Number of Output Lines
1-3
4x0502
R
Number of Bypass Lines
0-3
4x0504
RW
Nominal Input Voltage
Volts
4x0505
RW
Nominal Input Frequency
x0.1 Hz
4x0506
RW
Nominal Output Voltage
Volts
4x0507
RW
Nominal Output Frequency
x0.1 Hz
4x0508
RW
Nominal VA Rating
VA
4x0509
RW
Nominal Output Power
W
4x0511
RW
Audible Alarm
Integer Value
1=Disabled
2=Enabled
3=Muted
4=Disabled until Low Battery
4x0514
RW
Battery Installed Month
1-12
4x0515
RW
Battery Installed Day
1-31
4x0516
RW
Battery Installed Year
xxxx
4x0520
RW
Action Taken at Shutdown
1=UPS Output OFF
2=UPS System OFF
4x0522
RW
Test
-1 = Abort
0 = No Effect
1 = General Test
2 = Battery Test
3 = Deep Test
4x0523
RW
UPS Baud Rate
1200, 2400, 4800, 9600, or 19200
3
Notes
MUCM Mitsubishi UPS Application Manual
Table 3-15
2033D, 7011A, 9800AD Register List (UPS Setup)
Register
R/W
4x0524
4x0555
RW
4x05556
Measurement
Notes
Identification String
Packed ASCII
R
Test Results
Integer Value
0 = No Tests Performed
1 = Test Passed
2 = Test In Progress
3 = General Test Failed
4 = Battery Test Failed
5 = Deep Test Failed
4x0557
4x0588
R
Test Results String
Packed ASCII
4x0589
4x0604
R
UPS Manufacturer String
Packed ASCII
4x0605
4x0636
R
UPS Model String
Packed ASCII
4x0637
4x0652
R
UPS Software Version String
Packed ASCII
The MUCM serial port setup is stored in registers 653 through 676. Some of these
registers are read only while some may be altered by sending writes to the MUCM.
Care must be exercised when modifying these values because the serial ports will
change their settings immediately and possibly cause a loss of communications.
Note: New values are stored to FLASH upon completion of the Modbus Write. Do
not allow the Master to continuously send writes to the MUCM.
MUCM Mitsubishi UPS Application Manual
3
Modbus Operation 25
Table 3-16 MUCM Setup Register List
Register
R/W
Measurement
Notes
4x0653
4x0668
RW
MUCM Application Revision String
Packed ASCII
4x0669
RW
MUCM Port 1 Mode
Integer Value
0 = Auto Detect
1 = SEC
2 = MIT
(default = 0)
4x0670
RW
MUCM Port 1 Baud Rate
1200, 2400, 4800, 9600, 19200
(default = 9600)
4x0671
R
MUCM Port 1 Parity
0 = NONE
1 = EVEN
SEC always uses NONE
MIT always uses EVEN
4x0672
RW
MUCM Port 2 Mode
5 = Modbus RTU Slave
6 = Modbus ASCII Slave
(default = 5)
4x0673
RW
MUCM Port 2 Baud Rate
1200, 2400, 4800, 9600, 19200
(default = 9600)
4x0674
RW
MUCM Port 2 Parity
0 = NONE
1 = EVEN
(default = EVEN)
4x0675
RW
MUCM Port 2 Modbus Slave Address
1-254 (default = 1)
Always responds to address 255.
4x0676
RW
MUCM Port 2 Data Bits
7 (valid for Modbus ASCII only)
8 (valid for RTU or ASCII)
(default = 8)
2033A and 9700 Register List
The data from the UPS is presented as Holding Registers (4x). Registers 1 through 66
are read only 16-bit unsigned integers that provide data on the UPS System, Battery,
Input, Output, and Bypass circuits. Several data points have an implied decimal place
to give a greater precision for the reading. For example, register 15 indicates the frequency of Input times 0.1. A value of 599 indicates a frequency of 59.9Hz.
26 Modbus Operation
3
MUCM Mitsubishi UPS Application Manual
Table 3-17 2033A, 9700 Register List (Battery)
Register
Measurement
Notes
4x0001
UPS Device Type
Integer Value
2=MIT
4x0007
% Battery Charge Left
0-100%
4x0008
Battery Voltage
x0.1 VDC
4x0009
Battery Current
x0.1 A
4x0011
Discharge Time
Hours
4x0012
Discharge Time
Minutes
4x0013
Discharge Time
Seconds
Table 3-18
2033A, 9700 Register List (Input)
Register
Measurement
Notes
4x0014
Input Line Bads
Count
4x0015
Input Frequency
x0.1 Hz
4x0019
Input Voltage Phase A-B
x0.1 VAC
4x0020
Input Voltage Phase B-C
x0.1 VAC
4x0021
Input Voltage Phase C-A
x0.1 VAC
4x0022
Input Voltage Phase A-N
x0.1 VAC
4x0023
Input Voltage Phase B-N
x0.1 VAC
4x0024
Input Voltage Phase C-N
x0.1 VAC
4x0025
Input Current Phase A
x0.1 A
4x0026
Input Current Phase B
x0.1 A
4x0027
Input Current Phase C
x0.1 A
Table 3-19
2033A, 9700 Register List (Output)
Register
Measurement
Notes
4x0033
Output Voltage Phase A-B
x0.1 VAC
4x0034
Output Voltage Phase B-C
x0.1 VAC
4x0035
Output Voltage Phase C-A
x0.1 VAC
4x0036
Output Voltage Phase A-N
x0.1 VAC
4x0037
Output Voltage Phase B-N
x0.1 VAC
4x0038
Output Voltage Phase C-N
x0.1 VAC
4x0039
Output Current Phase A
x0.1 A
4x0040
Output Current Phase B
x0.1 A
4x0041
Output Current Phase C
x0.1 A
4x0042
Output Peak Current Phase A
x0.1 A
4x0043
Output Peak Current Phase B
x0.1 A
4x0044
Output Peak Current Phase C
x0.1 A
4x0051
Output Frequency
x0.1 Hz
4x0052
Output Power
0.1 W
4x0053
Output Power Factor
x0.01%
4x0092
Output Current Phase N
x0.1 A
MUCM Mitsubishi UPS Application Manual
3
Modbus Operation 27
Table 3-20
Register
2033A, 9700 Register List (BYPASS)
Measurement
Notes
4x0054
Bypass Voltage Phase A-B
x0.1 VAC
4x0055
Bypass Voltage Phase B-C
x0.1 VAC
4x0056
Bypass Voltage Phase C-A
x0.1 VAC
4x0057
Bypass Voltage Phase A-N
x0.1 VAC
4x0058
Bypass Voltage Phase B-N
x0.1 VAC
4x0059
Bypass Voltage Phase C-N
x0.1 VAC
4x0066
Bypass Frequency
x0.1 Hz
The Alarms are mapped as bits in registers. If the alarm is active then its bit will be
set. The bits are labeled in IEC format where bit 0 is the LSB and 15 is the MSB.
Unused bits are forced to zero.
28 Modbus Operation
3
MUCM Mitsubishi UPS Application Manual
Table 3-21
2033A, 9700 Register List (Alarms)
Register
Bit
Code
4x0068
Fault 1
(Bits 0-15)
1
UF007
Converter Input Current Sensor Abnormal
2
UF105
DC Voltage Sensor Circuit Abnormal
5
UF102
DC Undervoltage
6
UF103
DC Overvoltage
11
UF216
Inverter Output Current Sensor Abnormal
12
UF201
Inverter Output Overvoltage +15%
13
UF202
Inverter Output Undervoltage -15%
0
UF306
UPS Control Power Circuit Error
3
UF301
UPS Control Microprocessor Circuit Error
5
UF305
UPS Control Circuit Error
10
UF203
Inverter Output Overcurrent
12
UF302
UPS Control Microprocessor Circuit Error
13
UF303
UPS Control Microprocessor Circuit Error
4x0069
Fault 1
(Bits 16-31)
Description
15
UF304
UPS Control Microprocessor Circuit Error
4x0070
Fault 2
(Bits 0-15)
2
UF216
Sensor Abnormal
4x0071
Fault 2
(Bits 16-31)
None
None
Reserved, No alarms
4x0072
Fault 3
(Bits 0-15)
0
UF003
Converter Abnormal
1
UF212
Fan Power Source Abnormal
2
UF107
CB2 Abnormal
3
UF214
Cooling Fan Thermal Relay Abnormal
5
UF213
Inverter or Converter Overtemperature
4x0073
Fault 3
(Bits 16-31)
MUCM Mitsubishi UPS Application Manual
9
UF307
UPS Control Circuit Error
11
UF209
52C Abnormal (Not Closed)
12
UF210
52C Abnormal (Not Open)
13
UF106
DC Capacitor Abnormal
15
UF255
52C Abnormal
3
UF309
Inverter Output Voltage Sensed before 52C Closed
4
UF401
52S Abnormal (Not Closed or Closed without command)
5
UF402
52S Abnormal (Not Opened or Open without command)
6
UF215
Frequent Overload
3
Modbus Operation 29
Table 3-22
Bit
Code
Description
4x0074
Fault 4
(Bits 0-15)
0
UF053
Input Contactor CB1 not Open under correct
sequence
1
UF052
Input Circuit Breaker CB1 Tripped
2
UF257
52C Abnormal, did NOT Open after manual
transfer to bypass.
3
UF451
52S Abnormal NOT closed, or closed with
no manual transfer command.
4
UF153
CB2 DC Circuit Breaker Tripped
5
UF154
CB2 Abnormal
9
UF158
Battery Liquid Level Low
10
UF157
Battery Overtemperature
11
UF156
CB2 Tripped (after prolonged battery
overtemperature 2Hr)
13
UF256
Output Voltage Abnormal outside +/- 5%
15
UF352
Control Power Supply Abnormal
0
FU159
DC Ground Fault
2
UF160
DC Circuit Sensor Abnormal
3
UF351
DC Control Fuse Blown
4
UF151
DC Voltage Abnormal, DC Buss does not
return to Float after power restored (24Hr)
5
UF152
DC Voltage Abnormal, DC Buss does not
return to Equalize after power restored
(24Hr)
9
UF162
DC Circuit Abnormal
11
UF356
UPS Control Circuit Error
12
UF357
"Inverter Start" Switch Abnormal
13
UF358
"Inverter Stop" Switch Abnormal
14
UF359
"Inverter Operation" Switch Abnormal
15
UF360
"Bypass Operation" Switch Abnormal
4x0076
Fault 5
(Bits 0-15)
0
UF255
52C Abnormal, Opened during Inverter Load
Supply
2
UF355
UPS Control Circuit Error
4x0077
Fault 5
(Bits 16-31)
None
None
4x0078
Fault 6
(Bits 0-15)
1
UA802
4x0079
Fault 6
(Bits 16-31)
None
None
4x0075
Fault 4
(Bits 16-31)
30 Modbus Operation
2033A, 9700 Register List (Alarms)
Register
3
Reserved, No alarms
AC Input Frequency Out of Range
Reserved, No alarms
MUCM Mitsubishi UPS Application Manual
Table 3-23 2033A, 9700 Register List (Alarms)
Register
Bit
4x0080
Fault 7
(Bits 0-15)
0
UF056
Converter Input Current Overload
1
UF058
Cooling Fan Abnormal (Converter Circuit)
2
UF057
Converter Overtemperature
3
UF362
UPS Control Circuit Error
4
UF161
CB2 Tripped (DC Voltage Abnormal) DC
Buss does not return to Float after power
restored (48Hr)
5
UF254
88C Abnormal - Fan AC Source Abnormal
during Inverter Operation
6
UF059
Converter Abnormal, Preliminary Charge
Impossible
4x0081
Fault 7
(Bits 16-31)
4x0082
Fault 8
(Bits 0-15)
MUCM Mitsubishi UPS Application Manual
Code
Description
7
UF060
Converter Abnormal
8
UF363
Voltage Adjust Error
9
UF258
Frequent Overload
8
UF806
Inverter Overload > 100%
9
UF807
Inverter Overload > 110%
10
UF808
Inverter Overload > 125%
11
UF809
Inverter Overload > 150%
12
UF810
Inverter Overload, Momentary Overcurrent
while load powered by inverter
13
UF836
Converter Overload
0
UA823
CB1 OFF, AC Input Contactor OPEN
1
US824
CB2 OFF, DC Contactor OPEN
2
UA826
CB101 OFF, Control Breaker Opened
During Inverter Load Supply.
5
UA819
Remote Start Button Abnormal
6
UA820
Remote Stop button Abnormal
7
UA812
Bypass Voltage Out of Range +-20%
8
UA817
Emergency Stop Activated
9
UA827
52C Not Permitted, Transfer Permitted
switch open
10
UA830
AC Input Undervoltage
11
None
12
UA803
AC Input Phase Rotation Error
13
UA805
Ambient Temperature Abnormal HIGH
14
UA804
Battery DC Precharge Circuit Abnormal
15
UA801
AC Input Voltage Out of Range - Fell below
-18% threshold.
Manual Bypass Switch ON
3
Modbus Operation 31
Table 3-24
Bit
4x0083
Fault 8
(Bits 16-31)
0
UA811
Bypass Voltage Out of Range +/-15%
1
NONE
Transfer Failure (Load Stop)
2
UA813
Bypass Phase Rotation Error
3
UA814
Bypass Frequency Out of Range
4
UA816
Extended Bypass Operation (10 minutes)
5
UA831
Emergency Bypass Switch ON
6
UA822
Generator Operation (Transfer to Bypass not permitted)
8
UA832
Interrupted Transfer to Bypass
9
UA821
UPS Stopped (Transfer Inhibited, Bypass Voltage out of
range)
10
UA835
UPS Stopped (Transfer Inhibited, Inverter Asynchronous)
11
UA804
Battery Abnormal
4x0084
Status 1
(Bits 0-15)
4x0085
Status 1
(Bits 16-31)
32 Modbus Operation
2033A, 9700 Register List (Alarms and Status)
Register
3
Code
Description
0
Inverter is operating and powering the load
1
Ex. Alarm, Minor Fault
2
Inverter Running
3
Inverter S/S, Inverter is Started from Local or Remote
4
Battery Operation 1, 3 minute alarm time delay after battery
backup
5
Battery Low Voltage, near depletion due to prolonged AC
Fail
6
Overload, UPS Output Capacity Exceeded
7
Overload, (Level Reached)
8
Enable to Remote Operation
9
Remote Operation
10
Battery Depletion, Shutdown Imminent
11
Battery Abnormal, Overtemperature or Low Liquid Level
12
Converter Operation, 1=Running
13
Battery Operation 2, UPS in Battery Backup Mode
14
CB1 1=Closed
15
CB2 1=Closed
0
Converter is operating and supplying Inverter
1
Battery Operation 3, No alarm time delay after battery
backup initiated
2
52C 1=Closed
3
AC Input Abnormal, Voltage or Frequency out of range
4
Equalize Charge, UPS in Equalize Mode
5
Output Overload, (Inverter Stop)
6
Test Mode
7
Output Switch Abnormal, 52S or 52C Abnormal
8
Battery Charge
MUCM Mitsubishi UPS Application Manual
Table 3-25
2033A, 9700 Register List (Status)
Register
Bit
Description
4x0086
Status 2
(Bits 0-15)
0
CB1 Alarm
1
CB2 Alarm
2
52C Alarm
4x0087
Status 2
(Bits 16-31)
NONE
Reserved
4x0088
Status 3
(Bits 0-15)
0
Synchronism, Inverter is synchronized to external source
1
Asnychronism, Inverter is in the free running mode
2
Voltage Equalize Answer, DC Voltage reached equalizing voltage level
5
52S 1=Closed
6
CB3 1=Closed
7
Bypass Operation, Load powered via static Bypass Line
8
Bypass Input Abnormal, Voltage or Frequency Out of Range
10
Bypass Abnormal
12
Synchronism 2
13
Load Supply, Load powered by UPS (Inverter or Bypass)
14
Generator Operation, 1=UPS on Generator
4x0089
Status 3
(Bits 16-31)
NONE
4x0090
EX Status
(Bits 0-15)
0
Direction of Battery Current (1=Discharge, 0=Charging)
1
Battery Floating
2
Input Power Failure Detection
3
Input Power Failure
4x0091
EX Status
(Bits 16-31)
NONE
Reserved
Reserved
The MUCM serial port setup is stored in registers 653 through 676. Some of these
registers are read only while some may be altered by sending writes to the MUCM.
Care must be exercised when modifying these values because the serial ports will
change their settings immediately and possibly cause a loss of communications.
Note: New values are stored to FLASH upon completion of the Modbus Write. Do
not allow the Master to continuously send writes to the MUCM.
MUCM Mitsubishi UPS Application Manual
3
Modbus Operation 33
Table 3-26 MUCM Setup Register List
34 Modbus Operation
Register
R/W
4x0653
4x0668
RW
MUCM Application Revision String
Packed ASCII
4x0669
RW
MUCM Port 1 Mode
Integer Value
0 = Auto Detect
1 = SEC
2 = MIT
(default = 0)
4x0670
RW
MUCM Port 1 Baud Rate
1200, 2400, 4800, 9600, 19200
(default = 9600)
4x0671
R
MUCM Port 1 Parity
0 = NONE
1 = EVEN
SEC always uses NONE
MIT always uses EVEN
4x0672
RW
MUCM Port 2 Mode
5 = Modbus RTU Slave
6 = Modbus ASCII Slave
(default = 5)
4x0673
RW
MUCM Port 2 Baud Rate
1200, 2400, 4800, 9600, 19200
(default = 9600)
4x0674
RW
MUCM Port 2 Parity
0 = NONE
1 = EVEN
(default = EVEN)
4x0675
RW
MUCM Port 2 Modbus Slave Address
1-254 (default = 1)
Always responds to address 255.
4x0676
RW
MUCM Port 2 Data Bits
7 (valid for Modbus ASCII only)
8 (valid for RTU or ASCII)
(default = 8)
3
Measurement
Notes
MUCM Mitsubishi UPS Application Manual
4
Examples
Example 1
Figure 4-1 shows system with three UPSs to be connected to a Modbus master. UPS
1 is a 2033C, UPS 2 is a 9700, and UPS 3 is a 9800AD. Each UPS has its own
MUCM connected via an MU1 RS-232 cable. The Modbus RTU Master has an RS485 port and is configured for 19200 baud, 8 data bits, 1 stop bit and NONE parity.
Each MUCM is configured as shown in Table 4-1.
Table 4-1
Example 1 Settings
Parameter
MUCM 1
MUCM 2
MUCM 3
Port 1
Port 2
Port 1
Port 2
Port 1
Port 2
Run
Ignored
Run
Ignored
Run
Ignored
2033C
UPS
Modbus
RTU
9700 UPS
Modbus
RTU
9800AD
UPS
Modbus
RTU
Baud Rate
9600
19200
9600
19200
9600
19200
Parity
Mem/Run/Halt Switch
Protocol Mode
Auto
NONE
Auto
NONE
Auto
NONE
Data Bits
8
8
8
8
8
8
Stop Bits
1
1
1
1
1
1
N/A
1
N/A
2
N/A
3
Slave Address
MUCM Mitsubishi UPS Application Manual
4 Examples 35
Modbus
Master
MUCM
Modbus Drop = 1
UPS 1
2033C
TSX Momentum
Universal Communications
170 UCM 200 00
M
e
mR H
1
2
3
4
Rx1 Tx1 Rn1 Pwr
Rx2 Tx2 Rn2 Ready
Niobrara R&D Corporation
9-30 VDC or AC
RS-232
RS-485
Tx Rx GND RTS CTS Tx+ Tx- Rx+ Rx- GND
M
e
mR H
Run/Load
MU1 Cable
MUCM
Modbus Drop = 2
UPS 2
9700
TSX Momentum
Universal Communications
170 UCM 200 00
M
e
mR H
1
2
3
4
RS-485 Cable
Rx1 Tx1 Rn1 Pwr
Rx2 Tx2 Rn2 Ready
Niobrara R&D Corporation
9-30 VDC or AC
RS-232
RS-485
Tx Rx GND RTS CTS Tx+ Tx- Rx+ Rx- GND
M
e
mR H
Run/Load
MU1 Cable
MUCM
Modbus Drop = 3
UPS 3
9800AD
TSX Momentum
Universal Communications
170 UCM 200 00
M
e
mR H
1
2
3
4
Rx1 Tx1 Rn1 Pwr
Rx2 Tx2 Rn2 Ready
Niobrara R&D Corporation
9-30 VDC or AC
RS-232
RS-485
Tx Rx GND RTS CTS Tx+ Tx- Rx+ Rx- GND
M
e
mR H
Run/Load
MU1 Cable
Figure 4-1 Example 1 Layout
Port 2 of the MUCM is RS-485 so a simple 4-wire cable is required to connect to most
Modbus equipment. A twisted pair cable such as Belden 8723 should be used with
one pair on the TX and the other pair on the RX circuit.
Master
MUCM 1
MUCM 2
MUCM 3
Tx+
IN+
IN+
IN+
Tx-
IN-
IN-
IN-
Rx+
OUT+
OUT+
OUT+
RX-
OUT-
OUT-
OUT-
Shield
Shield
Shield
Shield
Figure 4-2 4-wire RS-485 Example
If the Modbus Master has a 2-wire RS-485 port then use a single twisted pair cable
and jumper the IN+ to OUT+ at each MUCM for the (+) connection as well as jumper
the IN- to OUT- for the (-) connection.
36 Examples
4
MUCM Mitsubishi UPS Application Manual
Master
MUCM 1
MUCM 2
MUCM 3
+
IN+
IN+
IN+
-
IN-
IN-
IN-
OUT+
OUT+
OUT+
OUT-
OUT-
OUT-
Shield
Shield
Shield
Shield
Figure 4-3 2-wire RS-485 Example
MUCM Mitsubishi UPS Application Manual
4
Examples 37
5
Testing and Troubleshooting
Light 1
Light 3
RX1 TX1
RN1
Pwr
Ready
Light 2
Run/Load
Light 4
RN2
RX2
Switch 1
Port 1
RS-232
Port 2
RS-485
TX2
Switch 2
Power
Figure 5-1 MUCM Lights and Switches
Switches
• Switch 1 controls the running of the Mitsubishi application.
— Mem Prot - The far left position forces the unit to enable the configuration terminal server on the RS-232 port or set the RS-485 port to debug mode.
For the terminal setup mode set Switch 2 to RUN or MEM PROT. The RN1
light will be on and lights 1, 2, 3, and 4 will all be on to indicate the terminal
server is enabled. Connect an MU1 cable to the RS-232 port to a PC and run a
terminal emulator (Hyperterminal) at 9600,N,8,1, with VT100 emulation.
For the RS-485 port debug mode set Switch 2 to Halt. Then connect
Hyperterminal to the RS-485 mode at 9600,N,8,1 with VT100 emulation for
debugging data from the UPS connection.
— Run - The middle position is the normal running setting for this switch. The
RN1 light should be on and other lights may be on or flashing to indicate operation.
MUCM Mitsubishi UPS Application Manual
5 Testing and Troubleshooting 39
— Halt - The right position of this switch halts the application. Move to this position when loading new versions of the application with qload.
• Switch 2 is ignored by the MUCM.
• The Run/Load switch is used for loading firmware into the MUCM with
FWLOAD. Normally, this switch is in RUN but is moved to LOAD before starting the download. Light 3 is ON when the switch is in LOAD.
MUCM Lights
The MUCM has several lights to give indication of activity of the application and serial ports.
• The Pwr light is green and indicates that the MUCM is powered and booted.
• The Ready light is green and indicates that the MUCM is communicating with a
tophat adaptor. This light will not be on because the a tophat is not used.
• The green RN1 light indicates that the application is running. This lights should
be on when the switch 1 is in RUN or MEM PROT. If the switch is in a run position but the RN1 light is off then qload the application.
• The green RN2 light indicates that an application 2 is running. This light should
always be off in the Mitsubishi application.
• The yellow Tx1 light indicates that the MUCM RS-232 port is transmitting data.
This light should normally be quickly flashing as the MUCM polls the UPS.
• The yellow Rx1 light indicates that the MUCM RS-232 port is receiving data.
This light should normally be quickly flashing as the MUCM polls the UPS.
• The yellow Tx2 light indicates that the MUCM RS-485 port is transmitting data.
This light should normally be occasionally flashing as the Modbus Master polls
the MUCM.
• The yellow Rx2 light indicates that the MUCM RS-485 port is receiving data.
This light should normally be occasionally flashing as the Modbus Master polls
the MUCM. This light may flash without the Tx2 light as the Modbus Master
polls other devices on the RS-485 network.
• Light 1 is a green light controlled by the application. If light 1 is on but light 3 is
off the MUCM is communicating with the UPS and the device is SEC If lights 1,
2, 3, and 4 are all on then the unit is in the configuration terminal server mode.
• Light 2 is a green light controlled by the application. Light 2 should come on
briefly with each Modbus message that is received by the MUCM. This light will
flash very quickly if the message is not intended for the MUCM. It will be on
briefly longer if the MUCM processes the message. If lights 1, 2, 3, and 4 are all
on then the unit is in the configuration terminal server mode. If lights 2 and 3 are
on then the unit is in the RS-485 port debug terminal server mode.
• Light 3 is a red light controlled by the application. Light 3 indicates an error in
the communication with the UPS. If lights 1, 2, 3, and 4 are all on then the unit is
in the configuration terminal server mode.
40 Testing and Troubleshooting
5
MUCM Mitsubishi UPS Application Manual
• Light 4 is a red light controlled by the application. Light 4 indicates an error in
the Modbus RS-485 communication. If the MUCM detects a parity or framing error on the RS-485 port then it will turn on light 4 for 250mS. If the MUCM receives a Modbus message for the UPS but the UPS is not responding then the
MUCM will turn on light 4 for 1 second. If lights 1, 2, 3, and 4 are all on then the
unit is in the configuration terminal server mode. If lights 2 and 3 are on then the
unit is in the RS-485 port debug terminal server mode.
Testing the UPS Connection
Hyperterminal and an RS-232<>RS-485 converter may be used to verify the data from
the UPS.
1
Connect the PC to the MUCM RS-232 port with an MU1 cable.
2
Start Hyperterminal and set it for 9600 baud, 8 data bits, 1 stop bit, NONE parity.
3
Move switch 1 to MEM PROT to set the MUCM for setup terminal server. Lights
1, 2, 3, and 4 should come on.
4
Press the "p" key to edit the ports.
5
Press the space bar to select port 2, then press Enter.
6
Press the space bar to select "Debug Server" and press Enter.
7
Press Enter until the port settings are finished. Make note of the baud rate and
parity of port 2.
8
Now move switch 1 to RUN. The 1, 2, 3, and 4 lights should go out and then the
2 and 4 lights should come on.
9
Disconnect the RS-232 cable from the PC and connect it back to the UPS. The
MUCM should start communicating with the UPS and the 3 light should not be
blinking. The tx2 light should be blinking with each blink of the tx1 light.
10 Connect the PC to the RS-485 port of the MUCM through an RS-232<>RS-485
converter.
11 Adjust the settings of Hyperterminal to match the baud rate and parity of the
MUCM port 2. Data from the UPS should start appearing in the Hyperterminal
screen.
12 When finished with the debugging, set port 2 back to Modbus RTU Slave through
the setup server.
Testing the Modbus Connection
The program ZAPREG32.EXE may be used to quickly test the Modbus settings on the
MUCM.
1
Connect the Niobrara SC912 cable or other RS-232<>RS-422 converter to the
MUCM port 2 and the serial port of the PC. The SC912 external power supply
must be used.
2
Open a Command Prompt and change directories to the location where the
mitsubishi.zip file was extracted. On most Windows systems do a Start, Programs, Accessories, Command Prompt.
MUCM Mitsubishi UPS Application Manual
5
Testing and Troubleshooting 41
3
From the command line enter the following:
>zapreg32 com1:9600,e,8,1 254 -b
where com1: is the PC’s com port, 9600,e,8,1 are the settings of the MUCM’s RS485 port, 254 is a special drop number that the MUCM will respond to whether it
is talking to the UPS or not, and the -b tells zapreg to use Modbus RTU.
A screen like Figure 5-2 should appear. The left column is the Holding Register
number, the data is shown in the HEX, SIGNED, and UNSIGNED columns. The
arrow keys and Page UP/Down may be used to move around. Values may be entered directly and the change occurs when the Enter key is pressed.
When finished verifying that the communication is good, press ESC and the program will exit.
To verify that the UPS data is present, substitute the Modbus Slave address (default=1) for the 254 in the command line above. If the MUCM is talking to the UPS
then the UPS data will be displayed. If the MUCM is not talking to the UPS then
"Read Reply Timeout" will be displayed on zapreg.
Figure 5-2
42 Testing and Troubleshooting
ZAPREG32 Screen
5
MUCM Mitsubishi UPS Application Manual