1
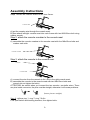
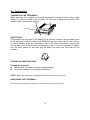
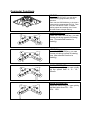
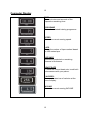
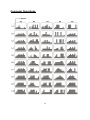
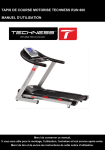
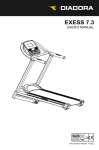
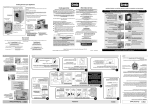
CF-1306 Treadmill Manual
Contents
Page
Implied Warranty
1
General Safety Instructions
2
Special Safety Precautions
3
Assembly
4
Unpacking & Assembly
5
Assembly Diagram (1)
6
Parts List (1)
7
Assembly Diagram (2)
8
Assembly Instructions
9
Initial Use
10
Training Monitor
11
Maintenance
16
Important Notes
19
Trouble Shouting
20
General Fitness Tips
21
Warm Up / Stretching exercises
22
Thank you
Thanks for purchasing this product. The product will help you exercise your muscles
in the correct way and to improve your fitness – and all this in a familiar environment.
Implied Warranty
The importer of this machine assures that this device was manufactured from high
quality materials.
Prerequisite for the implied warranty is the proper setup in accordance with the
operating instructions. Improper use and /or incorrect transportation can render the
warranty void.
The implied warranty is for 2 years, beginning with the date of purchase. If the device
you acquired is defective, please contact our Customer Service (Inset page) within
the guarantee period of 24 months as of purchase date. The warranty applies to the
following parts (as far as included in the scope of delivery): Frame, cable, electronic
devices, foam, wheels. The guarantee does not cover:
•
•
•
•
Damage effected by outer force
Intervention by unauthorised parties
Incorrect handling of the product
Non-compliance of the operating instructions
Wear parts and expendable items are also not covered(such as running belt) .
The device is only intended for private use. The warranty does not apply to
professional usage.
Spare parts can be ordered from Customer Services (Inset page) as needed.
Please make sure you have the following information on hand when ordering spare
parts.
•
•
•
•
•
Operating instructions
Model number (located on the cover sheet of these instructions)
Description of attachments
Attachment number
Proof of purchase with purchase date
Please do not send the device to our firm without being requested to do so by our
Service team. The costs of unsolicited shipments will be borne by the sender.
1
General safety instructions
A great deal of emphasis was placed on safety in the design and manufacture of this
fitness device. Still, it is very important that you strictly adhere to the following safety
instructions. We cannot be held liable for accidents that were caused due to
disregard.
To ensure your safety and to avoid accidents, please read through the
operating instructions thoroughly and attentively before you use the sports
device for the first time.
1) Consult your GP before starting to exercise on this device. Should you want to exercise
regularly and intensively, the approval of your GP would be advisable. This is especially
true for users with health problems.
2) We recommend that handicapped people should only use the device when a qualified
carer is present.
3) When using the fitness device, wear comfortable clothing and preferably sports or aerobic
shoes. Avoid wearing loose clothing which could get caught in the moving parts of the
device.
4) Stop exercising immediately should you feel unwell or if you feel pain in your joints or
muscles. In particular, keep an eye on how your body is responding to the exercise
programme. Dizziness is a sign that you are exercising too intensively with the device. At
the first signs of dizziness, lay down on the ground until you feel better.
5) Ensure there are no children nearby when you are exercising on the device. In addition,
the device should be stowed in a place that children or house pets cannot reach.
6) Ensure that only one person at a time uses the fitness device.
7) After the sports device has been set up according to operating instructions, make sure all
screws, bolts and nuts are correctly fitted and tightened. Use only attachments
recommended and/or supplied by the importer.
8) Do not use a device that is damaged or unserviceable.
9) Always place the device on a smooth, clean and sturdy surface. Never use near water
and make sure there are no pointed objects in the direct vicinity of the fitness device. If
necessary, place a protective mat (not included in scope of delivery) to protect your floor
underneath the device and keep a free space of at least 0.5 m around the device for
safety reasons.
10) Take care not to put your arms and legs near moving parts. Do not place any material in
openings in the device.
11) Use the device only for the purposes described in these operating instructions. Use only
attachments recommended by the manufacturer.
2
Special Safety Precautions
• Power source:
•
Choose a place in reach of a socket when placing the treadmill.
•
Always connect the appliance to a socket with a grounded circuit and no
other appliances connected to it. It is recommended not to use any
extension cords.
•
A FAULTY GROUNDING OF THE APPLIANCE CAN CAUSE THE RISK
OF ELETRICAL SHOCKS. ASK A QUALIFIED ELECTRICIAN TO CHECK
THE SOCKET IN CASE YOU DO NOT KNOW IF THE APPLIANCE IS
GROUNDED APPROPRIATELY. DO NOT MODIFY THE PLUG
PROVIDED WITH THE APPLIANCE IF IT IS NOT COMPATIBLE WITH
YOUR SOCKET. ASK A QUALIFIED ELECTRICIAN TO INSTALL A
SUITABLE SOCKET.
•
Sudden voltage fluctuations can seriously damage the treadmill. Weather
changes or switching on and off other appliances can cause peak voltages,
over-voltage or interference voltage. To limit the danger of damage to the
treadmill, it should be equipped with an over-voltage protective device (not
included).
•
This appliance is designed for use with ~220 - ~240 Volt rated voltage.
•
Keep power cord away from the carrying roller. Do not leave the power cord
below the striding belt. Do not use the treadmill with a damaged or worn out
power cord.
•
Unplug before cleaning or engaging in maintenance work. Maintenance
should only be done by authorised service technicians, unless otherwise
stated by the manufacturer. Ignoring those instructions would automatically
void the warranty.
•
Inspect the treadmill before every use to make sure that every part is
operational.
•
Do not use the treadmill outdoors, in a garage or under any kind of canopy.
Do not expose the treadmill to high humidity or direct sunlight.
•
Never leave the treadmill unattended.
Make sure the striding belt is always tense. Start the striding belt before stepping on
it.
3
Assembly
•
Before starting with the assembly of this fitness device, carefully read through
the set up steps as of page 9 We also recommend that you view the assembly
drawing prior to assembly (page 7).
•
Remove all packaging material and place the individual parts on a free
surface. This will provide you with an overview and will simplify assembly.
•
Use the parts list (page 5) to check that all components have been supplied.
Dispose of the packaging material only after the trainer is fully assembled.
•
Please consider that there is always the risk of injury when using tools and
carrying out technical activities. Please proceed with care when assembling
the device.
•
Make sure you have a hazard-free working environment and do not, for
example, leave tools lying around. Deposit the packaging material in such a
way that it does not pose a danger. Foil/plastic bags are a potential risk of
suffocation for children!
•
Take your time when viewing the drawings and then assemble the device
according to the series of illustrations.
•
The device must be carefully assembled by an adult person. If necessary,
request aid from another technically talented person.
4
Unpacking & Assembly
WARNING!: Use extreme caution when assembling this treadmill. Failure to do so
could result in injury.
NOTE: Each step number in the assembly instructions tells you what you will be
doing. Read and understand all instructions thoroughly before assembling the
treadmill.
UNPACK AND VERIFY THE CONTENTS OF THE BOX:
z Lift up and remove the box that surrounds the Treadmill.
z Check the following items are present. If any of the parts are missing, contact with
the dealer.
MAIN BODY
CONSOLE MASTS
CONSOLE CROSSBAR
HARDWARE KIT
CONSOLE
HARDWARE KIT
M8x15 HEX HEAD BOLT 14pcs
Washer 14 pcs
SAFETY KEY
Lubricant for running
deck
5
Allen wrench 1 pcs
Assembly Diagram (1)
Most of the displayed parts in this diagram are shipped pre-assembled.
For spare parts, please do always specify parts numbers used on this diagram or in
the following parts list.
6
Parts List (1)
ITEM
1
DESCRIPION
Base frame
QTY
1
ITEM
41
DESCRIPION
Side rein
QTY
2
2
Adjustable pad
2
42
Rubber washer
8
3
Base frame cover
2
43
4
spring slice
2
44
Right end cover
1
5
Screw M4*15
2
45
wheel
2
6
Front wheel set
2
46
Screw M4*15
8
7
Left limiting backet
1
47
Moving wheel
2
8
Hex head bolt M8*12
1
48
Hex head bolt M8*35
2
9
Spring
1
49
Incline frame
1
10
Main frame
1
50
Cennct frame
1
11
Fuse
1
51
Peiling
2
12
Power switch
1
52
C-CLIP
2
13
Power cord
1
53
Hex head bolt M8*55
2
14
controller
1
54
Screw M8*35
8
15
filter
1
55
Air shock
1
16
Transformer
1
56
Washer
2
17
Screw M4*25
2
57
Incline motor
1
18
Screw M4*15
4
58
Hexagon screw M10*55
1
19
Nut M4
4
59
Hexagon screw M10*120
1
20
connect wire set
1
60
Nut M10
2
21
22
23
Motor
Fixing bracket motor
Hex head bolt M8*80
1
1
2
61
62
63
Washer
Hex head bolt M8*15
Left console mast
4
20
1
24
14
64
Right console mast
1
25
Skidproof washer
Columnar Hexagon M8*12
2
65
Console mast crossbar
1
26
Hex head bolt M8*25
4
66
Console frame
1
27
Washer
16
67
Handle cover
2
28
Nut M8
16
68
handle
2
29
Sping Washer
2
69
Hand pulse set
2
30
Drive belt
1
70
Handle end cover
2
31
Running belt
1
71
Console cover
1
32
Running deck
1
72
Console
1
33
Front roller
1
73
Console up cover
1
34
Rear roller
1
74
Console down cover
1
35
Columnar Hexagon M8*40
Columnar Hexagon M8*25
1
75
Safety key
1
36
1
76
Keystroke
3
37
Columnar Hexagon M8*60
2
77
Keystroke pcb
1
38
Screw M4*15
2
78
Keystroke pcb
1
39
Fixing bracket ,side rein
2
79
Connect wire
1
40
Motor cover
1
80
Screw M4*15
25
7
Left end cover
1
Assembly Diagram (2)
console
Handle bar
Console crossbar
Console mast
Main body
Rear roller
Motor cover
Moving wheel
8
Assembly Instructions
Step 1:attach the console masts to the base frame.
Console mast
A;)put the console wire through the console mast .
B:)then attach left/right console mast into main frame with two M8X15mm bolt using
washer wrench.
Step 2: attach the console crossbar to the console mast
A) assemble the console crossbar to the console mast with four M8x15mm bolts and
washer each side.
Console crossbar
Step 3: attach the console to the console mast
Console
Console mast
A) connect the wire from the console to the wire in the right console mast.
B) assemble the console to the console mast with two M4x15mm bolts and
wrench.(do not tighten the bolts)
ATTENTION: be careful when you connect the two console—controller wires. There
are pins inside connector, the pins must be straight, otherwise it will cause problems.
(Insure pins are straight)
Step 4: tighten step 1, step 2 ,step 3 bolts.
First open switch and working machine, then tighten bolts.
9
Use Instruction
TURNING ON THE TREADMILL:
Make sure that the treadmill is correctly connected to power source. Open on/off
switch (1), turn it ON and it will be light. You will hear a signal tone and the LED
screen of the Computer will light up.
1
SAFETY KEY:
The treadmill will only work if the safety key is properly locked in the provided notch
of the computer. Inset the safety and attach the clip onto waist part of your clothes.
In case of trouble, where it is necessary to turn of the motor immediately, simply push
out the safety out of the console by pulling the rope. To turn the treadmill on again,
turn the main switch off and then put the safety key back into the notch on the
console.
FOLDING UP INSTRUCTIONS
Folding the treadmill:
z The treadmill can folded for space-saving storage.
z To fold the treadmill, lift the plate up and lock.
NOTE: make sure that the locking bolt is locked in place correctly. UNFOLDING THE TREADMILL:
Pull out the locking bolt and fold the treadmill slowly and carefully down.
10
Training Monitor
Front View
UP
DOWN
FAN ON/OFF
FAST
SLOW
Technical Specifications
Time
Speed
incline
Distance
Calories
Pulse
Program
00:00-99:59 Min
0.0-22 km/h
0-20 %
0.00-99.9 km
0-999 KCAL
70-200 / Min
P1-P6
Computer Functions
START:
Press the START-KEY to begin your
exercise.
STOP
Press the stop button to pause the
training. Press the START-KEY to
continue working.
11
Computer Functions
SELECT
Press the SELECT-KEY you can enter
preset training programmes (P2-P6)
selection.
Then use the UP/DOWN key to choose a
preset training programme (P2-P6), Then
you can use SELECT-KEY to select
training speed and training time. Press
the start button to begin training.
FAST/SLOW keys
Press the FAST/SLOW key, you can
choose a training speed or training
time. (The selected function is
flashing).
UP/DOWN keys
press the UP/DOWN key, you can
choose a training incline or training
time .(the selected function is
flashing)
QUICK SPEED KEY:
press the speed-key you can quickly
set the speed from 4 , 8 , 12 ,
16km/h.
QUICK INCLINE KEY:
press the incline-key you can quickly
set the incline from 0%,5%,
10%,15%.
12
Computer Display
TIME
Shows minutes and seconds of the
elapsed or remaining time.
PROGRAME
Shows the selected training programme.
SPEED
Shows the current running speed.
LAPS
Shows the number of laps reached based
on 400 metres laps.
DISTANCE
Shows the completed or remaining
distance in kilometres.
HEART RATE
To show the current heart rate, touch both
pulse sensors with your palms.
256
CALORIES:
Shows estimated use of calories at the
time of display.
Calories
4.5
INCLINE:
Shows the current running INCLINE
Elevation
13
Computer Operations
CHOOSING A PROGRAMME (P2-P6)
1.
2.
3.
4.
5.
6.
7.
open ON/OFF switch.
press SELECT to enter preset programmes (P2-P6)
press FAST/SLOW or UP/DOWN to select programme p2-p6
press SELECT to enter levels setting
press FAST/SLOW or UP/DOWN to select levels L1-L10
press SELECT to enter time setting
press FAST/SLOW or UP/DOWN to set time
P2
Pre-set time: 30minutes
Pre-set level: L1, Segment: 20 segments
PROGRAM setting
Press FAST/SLOW to access P2~P6
LEVEL setting
Press SELECT into LEVEL selection
Press FAST/SLOW into L1~L10
TIME setting
Press SELECT again into time setting
The TIME shows 30 minutes
Press FAST/SLOW to set time
Press START to run
Press FAST to increase speed
Press SLOW to decrease speed
Press UP to increase incline
Press DOWN to decrease incline
P3
Pre-set time: 35minutes
Pre-set level: L1,Segment: 20 segments
PROGRAM setting
Press FAST/SLOW to access P2~P6
LEVEL setting
Press SELECT into LEVEL selection
Press FAST/SLOW into L1~L10
TIME setting
Press SELECT again into time setting
The TIME shows 30 minutes
Press FAST/SLOW to set time
Press START to run
Press FAST to increase speed
Press SLOW to decrease speed
Press UP to increase incline
Press DOWN to decrease incline
P4
Pre-set time: 40minutes
Pre-set level: L1,Segment: 20 segments
PROGRAM setting
Press FAST/SLOW to access P2~P6
LEVEL setting
Press SELECT into LEVEL selection
Press FAST/SLOW into L1~L10
TIME setting
Press SELECT again into time setting
The TIME shows 30 minutes
Press FAST/SLOW to set time
Press START to run
Press FAST to increase speed
Press SLOW to decrease speed
Press UP to increase incline
Press DOWN to decrease incline
P5
Pre-set time: 45minutes
Pre-set level: L1,Segment: 20 segments
PROGRAM setting
Press FAST/SLOW to access P2~P6
LEVEL setting
Press SELECT into LEVEL selection
Press FAST/SLOW into L1~L10
TIME setting
Press SELECT again into time setting
The TIME shows 30 minutes
Press FAST/SLOW to set time
Press START to run
Press FAST to increase speed
Press SLOW to decrease speed
Press UP to increase incline
Press DOWN to decrease incline
P6
Pre-set time: 50minutes
Pre-set level: L1,Segment: 20 segments
PROGRAM setting
Press FAST/SLOW to access P2~P6
LEVEL setting
Press SELECT into LEVEL selection
Press FAST/SLOW into L1~L10
TIME setting
Press SELECT again into time setting
The TIME shows 30 minutes
Press FAST/SLOW to set time
Press START to run
Press FAST to increase speed
Press SLOW to decrease speed
Press UP to increase incline
Press DOWN to decrease incline
15
Computer Operations
16
Maintenance
TREADMILL MAINTENANCE
Proper maintenance is very important to ensure a faultless and operational condition
of the treadmill. Improper maintenance can cause damage to the treadmill or shorten
the life of the product.
All parts of the treadmill must be checked and tightened regularly. Worn out parts
must be replaced immediately.
BELT ADJUSTMENT
You may need to adjust the running belt during the first few weeks of use. All running
belts are properly set at the factory. It may stretch of be off center after use.
Stretching is normal during the break-in period.
ADJUSTING THE BELT TENSION:
If the running belt feels as though it is “slipping” or hesitating when you plant you foot
during a run, the tension on the running belt may have to be increased.
TO INCREASE THE RUNNING BELT TENSION:
1. Place 8mm wrench on the left belt tension bolt. Turn the wrench clockwise 1/4
turn to draw the rear roller and increase the belt tension.
2. Repeat STEP 1 for the right belt tension bolt. You must be sure to turn both bolts
the same number of turns, so the rear roller will stay square relative to the frame.
3. Repeat STEP 1 and STEP 2 until the slipping is eliminated.
4. Be careful not to tighten the running belt tension too much as you can create
excessive pressure on the front and rear roller bearings. An excessively
tightened running belt may damage the roller bearings that would result in
bearing noise from the front and rear rollers.
TO DECREASE THE TENSION ON THE RUNNING BELT, TURN BOTH BOLTS
COUNTER-CLOCKWISE THE SAME NUMBER OF TRUNS.
CENTRING THE RUNNING BELT
When you run, you may push off harder with one foot than with another. The severity
of the deflection depends on the amount of force4 that one foot exerts in the relation
to the other. This deflection can cause the belt to move off- centre. This deflection is
normal and the running belt will centre when no body is on the running belt. If the
running belt remains consistently off-centre, you will need to centre the running belt
manually.
Start the treadmill without anyone on the running belt, press FAST-key until speed
reached 6kph.
1. Observe whether the running belt is toward the right or left side of the deck.
z If toward the left side of the deck, using wrench, turn the left adjustment bolt
clockwise 1/4 turn and the left adjustment bolt counter clockwise 1/4.
z
If toward the right side of the deck, turn the right adjustment bolt clockwise
1/4 turn and the left adjustment bolt counter clockwise 1/4.
z
If the belt is still not centre, repeat the above step until the running belt is on
centre.
2. After the belt is centre, increase the speed to 16kph and verify that it is running
smoothly. Repeat the above steps if it is necessary.
If the above procedure is unsuccessful in resolving the off-centre, you may need to
increase the belt tension.
LUBRICATION
The treadmill is factory-lubricated. However, it is recommended to check the
lubrication of the treadmill regularly, to ensure an optimal operation of the treadmill. It
is usually not necessary to lubricate the treadmill in the first year or the first 500
hours of operation.
After every 3 months of operation, lift the sides of the treadmill and feel the surface of
the belt, as far as possible. If traces of silicon spray are found, lubrication is not
necessary. In case of a dry surface refer to the following instructions.
Only use oil free silicon spray.
Application of lubricant on the belt:
z
z
z
z
Position the belt so that the seam is located in the middle of the plate.
Insert the spray valve in the spray head of the lubricant container.
Lift the belt at one side and hold the spray valve in a distance to the front end of
striding belt and plate. Start at the front end of the belt. Lead the spray valve in
direction of the back end. Repeat this process on the other side of the belt. Spray
each side for about 4 seconds.
Wait 1 minute to let the silicon spray spread, before starting the machine.
CLEANING:
Regular cleaning of the striding belt ensures a long product life.
•
Warning: The treadmill must be turned off to avoid electrical shocks. The
power cord must be pulled out of the socket, before starting the cleaning or
maintenance.
18
•
After each training: Wipe the console and other surfaces with a clean soft
and damp cloth to remove sweat residues.
Caution: Do not use any abrasives or solvents. To avoid damage to the computer,
keep any liquids away. Do not expose the computer to direct sunlight.
•
Weekly: To make the cleaning easier it is recommended to use a mat for the
treadmill. Shoes can leave dirt on the striding belt that can fall beneath the
treadmill. Clean the mat under the treadmill once a week.
STORAGE:
Store you treadmill in a clean and dry environment. Ensure the master power switch
is off and is un-plugged from the electrical wall outlet.
Important notes
•
The device corresponds to current safety standards. The device is only
suitable for home use. Any other use is impermissible and possibly even
dangerous. We cannot be held liable for damages that were caused by
improper usage.
•
Please consult your GP before starting your exercise session to clarify
whether you are in suitable physical health for exercising with this device. The
doctor’s diagnosis should be the basis for the structure of your exercise
programme. Incorrect or excessive training could be harmful to your health.
•
Carefully read through the following general fitness tips and the exercise
instructions. If you have pain, shortness of breath, feel unwell or have other
physical complaints, break off the exercise immediately. Consult a doctor
immediately if you have prolonged pain.
•
This fitness device is not suitable for professional or medical use, nor may it
be used for therapeutic purposes.
19
Trouble Shooting
TROUBLE SHOOTING GUIDE:
SYMPTOM
CAUSE
SOLUTION
Show E0
Not equip Safety key
Please equip the Safety key
Show E1
Speed feedback equipment err
Show E2
Motor or Motor drive err
Show E3
The error of Speed over limit
Please check Speed feedback equipment
and 10-pin cable or contact special service
Please check PIN cable or contact special
service
Adjust Speed feedback equipment or
contact special service
TROUBLESHOOTING YOUR TREADMILL:
This treadmill is designed to be reliable and easy to use. However, if you experience
a problem, please reference the trouble shooting guide listed below:
PROBLEM: The console does not light up.
SOLUTION: Verify that the power cord is plugged in properly to the outlet, and the
treadmill switch is turned on.
PROBLEM: The treadmill circuit breaker trips during a workout.
SOLUTION: Verify that the treadmill is plugged into a dedicated 20amp circuit.
*Note: No extension cord.
PROBLEM: The treadmill shuts off when elevating.
SOLUTION: Verify that there is enough slack in the power cord to reach to the wall
outlet during elevation.
PROBLEM: The running belt does not stay centre during a workout.
SOLUTION: Verify that the treadmill is on a level surface. Verify that the belt is
properly tightened. (Refer to belt adjustment)
PROBLEM: The treadmill makes a clicking noise towards the front of the machine
while walking or running on it.
SOLUTION: For optimum use, the treadmill needs to be level.
20
General fitness tips
Start your exercise programme slowly, i.e. one exercise unit every 2 days. Increase
your exercise session week by week. Begin with short periods per exercise and then
increase these continually. Start slowly with the exercise sessions and don’t set
yourself impossible targets. In addition to these exercises, do other forms of exercise
such as jogging, swimming, dancing and/or cycling.
Always warm up thoroughly before exercising. To do so, carry out at least five
minutes of stretching or gymnastic exercises to avoid muscle strains and injuries.
Check your pulse regularly. If you do not have a pulse measuring instrument, ask
your GP how you can measure your heart rate effectively. Determine your personal
exercise frequency range to achieve optimal training success. Take into account both
your age and your level of fitness. The table on page 16 will give you a reference
point for determining the optimal exercise pulse.
Make sure you breathe regularly and calmly when exercising.
Take care to drink enough while exercising. This ensures that the liquid requirement
of your body is satisfied. Consider that the recommended drinking amount of 2-3
litres per day is strongly increased through physical strain. The fluid you drink should
be at room temperature.
When exercising on the device always wear light and comfortable clothing as well as
sports shoes. Do not wear any loose clothing that could tear or become caught in the
device whilst exercising.
Exercises for your personal work-out
How high or low should your heart rate be during exercises?
Your GP can give your more information on the current guidelines.
Heat rate frequency range 50-75%
Maximum heart rate frequency
(beats per minute)
100%
- ideal training pulse 20 years
100-150
200
25 years
98-146
195
30 years
95-142
190
35 years
93-138
185
40 years
90-135
180
45 years
88-131
175
50 years
85-127
170
55 years
83-123
165
60 years
80-120
160
65 years
78-116
155
70 years
75-113
150
COPYRIGHT(c) 1997 AMERICAN HEART ASSOCIATI0N
21
Age
Warm-up / stretching exercises
A successful exercise session begins with warming up exercises and ends with
exercises for cooling down and relaxing. These warming up exercises prepare your
body for the subsequent demands made upon it. The cooling down / relaxation
period after the exercise session ensures that you do not experience any muscular
problems. In the following you will find stretching exercise instructions for warming up
and cooling down. Please pay attention to the following points:
NECK EXERCISES
Tilt your head to the right and feel the tension in your neck. Slowly drop your head
down to your chest in a semi-circle and then turn your head to the left. You will feel a
comfortable tension in your neck again.
You can repeat this exercise alternately several times.
1
EXERCISES FOR THE SHOULDER AREA
Lift the left and right shoulders alternately, or lift both shoulders simultaneously.
2
ARM STRETCHING EXERCISES
Stretch the left and right arms alternately towards the ceiling. Feel the tension in your
left and right side. Repeat this exercise several times.
3
EXERCISES FOR THE UPPER THIGH
Support yourself by placing your hand on the wall, then reach down behind you and
lift up your right or left foot as close to your buttocks as possible. Feel a comfortable
tension in your front upper thigh. Maintain this position for 30 seconds if possible and
repeat this exercise 2 times for each leg.
4
INSIDE UPPER THIGH
Sit on the floor and place your feet in such a way that your knees are facing
outwards. Pull your feet as close as possible to your groin. Now press your knees
carefully downwards. Maintain this position for 30-40 seconds if possible.
5
TOUCH TOES
Bend your trunk slowly forwards and try to touch your feet with your hands. Reach
down as far as possible to your toes. Maintain this position for 20-30 seconds if
possible.
6
EXERCISES FOR THE KNEES
Sit on the floor and stretch out your right leg. Bend your left leg and place your foot
on your right upper thigh. Now try to reach your right foot with your right arm.
Maintain this position for 30-40 seconds if possible.
7
EXERCISES FOR THE CALVES/ACHILLES TENDON
Place both hands on the wall and support your full body weight. Then move your left
leg backwards and alternate it with your right leg. This stretches the back of the leg.
Maintain this position for 30-40 seconds if possible.
8
24