1
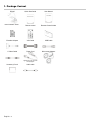
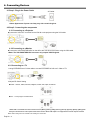
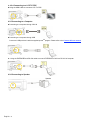
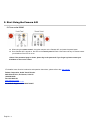
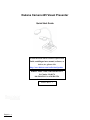
Dukane Camera 445 Visual Presenter Quick Start Guide To download the latest version of Quick Start Guide, multilingual user manual, software, or driver, etc., please visit http://www.dukane.com/audiovisual/produc ts Dukane Audio Visual, 2900 Dukane Drive “Downloads” St. Charles, IL 60174 866.280.4298 Fax: 630.584.5156 http://www.dukcorp.com/ 090107-Rev 1.1 English - 1 1. Package Content DC445 Quick Start Guide User Manual Remote control Remote Control Holder Extender Adapter VGA Cable USB Cable C-Video Cable Power Cord Microscope Adapter Base Installation Guide & Download Card Appearance may vary with country/region. Accessory Pouch English - 3 Audio cable 2. System Diagram PC Projector Monitor Monitor PC Speaker SD Card LCD TV PC Television 3. Mounting the Camera 445 on a Desktop Stand. 1. Please set up the DIP Switch settings first. Refer to chapter 5 “DIPSwitch Settings” in the DC265 user manual. 2. Please refer to the Base Installation Guide for installation instructions for all parts in the User Manual. English - 4 4. Connecting Devices 4.1 Step 1: Plug in the Power Outlet AC Outlet <Note> Appearance of power cord may vary with countries/regions. 4.2 Step 2: Connecting the components 4.2.1 Connecting to a Projector Connect the VGA OUT on the 445 to the VGA IN on the projector using the VGA cable. 4.2.2 Connecting to a Monitor Connect the VGA PASSTHROUGH on the 445 to the VGA IN on the monitor using the VGA cable. <Note> The VGA PASSTHROUGH connector only outputs VGA IN signals. 4.2.3 Connecting to a TV 1.Using EXTENDER and C-Video cable to connect EXTENDER of 445 to a C-Video of TV. 2. Adjust DIP Switch Setting NTSC:America, Taiwan, Panama, Philippine, Canada, Chile, Japan, and Mexico. PAL:Country/region not listed above: <Note> OSD is not available in C-Video. Functions such as [Menu] / [Rotate] / [PAN] / [Source] / [Record] / [Capture] / [Delete] / [PBP] / [Slide Show] are not functional on control panel and the remote control. <Note> VGA output is not supported once C-Video output is enabled. 3. DIP Switch setting will not be available until restarting the Camera 445. English - 5 4. 4.2.4 Connecting to a LCD TV/ PDP Using the HDMI cable to connect a LCD TV/ PDP 4.2.5 Connecting to a Computer Connecting to a computer through VGA IN Connecting to a computer through USB Connect to USB port then install the supplied queue TM program. Please refer to the Camera 445 user manual 電腦 Using the EXTENDER and RS-232 cable to connect EXTENDER of 445 to a RS-232 of computer. 4.2.6 Connecting to Speaker Speaker English - 6 5. Start Using the Camera 445 5.1 Turn on the DC265 When using the remote control, aim at the receptor on the Camera 445, and press the power button. Once Camera 445 is turned on, the LED on the control panel will flash a few times and stay lit. Please contact your distributor if the LED is not on. <Note> If the password page is shown, please key in the password. If you forget it, please contact your distributor or the service center. *For detailed menu function introduction and operation instructions, please refer to the user manual. Dukane Corporation, Audio Visual Division 2900 Dukane Drive, St. Charles, IL 60174 1.866.280.4298 Fax: 630.584-5156 www.dukcorp.com/av www.conveyclassrooms.com For 24-Hour Support call: 1.800.676.2487 English - 7