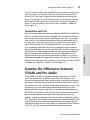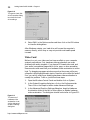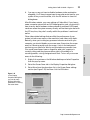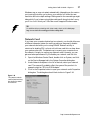
1
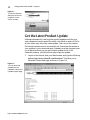
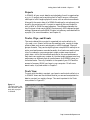
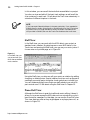
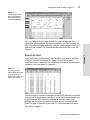
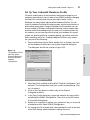
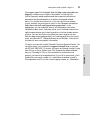
Getting Started with SONAR — Chapter 2
11
2
Getting Started
with SONAR
Now that you have a basic understanding of the technology involved in
making music with computers, I think you’ll find working with SONAR
more enjoyable. Ready to get started? This chapter will do the following:
䊳 Tell you how to obtain the latest product update
䊳 Explain the importance of registering your software
䊳 Give you a quick tour of SONAR’s major features
䊳 Show you how to make a number of adjustments to your computer
system to improve its performance
䊳 Let you know where to look for help, if problems arise
What Version of SONAR Do You Have?
Since Cakewalk has decided to give a new name to its flagship product
and start it off with a new version number (although the program is based
on its predecessor, Pro Audio 9), you are more than likely working with
SONAR 1.0. Of course, you still might not be using the latest version.
Cakewalk is constantly fixing and improving the software. Any problems
that you may experience might easily be remedied with an update. To
find out exactly what version you’re using, start SONAR, and click on
Help > About Cakewalk. A dialog box similar to Figure 2.1 then appears,
displaying your exact version number. You should then check to see
whether a more recent update is available.
http://www.muskalipman.com
CHAPTER 2
䊳 Explain the differences between SONAR and Pro Audio
12
Getting Started with SONAR — Chapter 2
Figure 2.1
The About Cakewalk
dialog box shows the
program’s current
version number.
Get the Latest Product Update
Although automatically receiving new product updates would be nice,
most companies (except maybe Microsoft) can’t afford to send out CDs to
all their users every time they create updates. That’s one of the reasons
the Internet has become such a wonderful tool. Sometimes the answer to
your problem is just a download away. Cakewalk provides a support area
on its Web site where you can get the latest updates for all of the
Cakewalk products. Just follow these steps to get the updates:
1.
Figure 2.2
You can download
updates from the
Cakewalk Patches and
Updates support page.
http://www.muskalipman.com
Log on to the Internet, start your Web browser, and type the following
address: http://www.cakewalk.com/download/. This takes you to
Cakewalk’s Downloads page, as shown in Figure 2.2.
Getting Started with SONAR — Chapter 2
13
2.
In the section labeled Downloads, click on Patches & updates.
3.
In the Patches & updates section, click on the line that says “Get the
latest patch or update for your Cakewalk product.” You then see a
directory of folders. Double-click the SONAR folder to open it.
3.
If more than one update is available, simply compare your current
version with the updates listed and select the appropriate one. For
instance, if you have SONAR 1.01, you’ll want the update that
upgrades version 1.01 to the current version.
4.
Create a temporary folder on your Windows desktop and download
the update file to that folder.
5.
Run the file, and your software is upgraded. That’s all there is to
upgrading.
NOTE
Register Your Software
Do you think registering your software is important? If not, think again.
First and foremost, if you don’t register your software, Cakewalk won’t
provide you with technical support. You’ll be sorry if you run into a
problem that causes you to lose some of your precious work, and the only
thing between you and your sanity is the people at Cakewalk. If you’re a
techno-wizard, and this situation doesn’t worry you, that’s great. But
there’s something else you may not have thought about. What if your
hard drive crashes, and you need to reinstall all your software
applications, including SONAR? And at the same time, what if you can’t
find the jewel case that your SONAR CD came in? Yes, the jewel case, not
the CD. Why is it significant? Because the jewel case has a little sticker
with a very important number printed on it—your CD-KEY. Without that
number, you can’t install SONAR. So, now who you gonna call? Yeah,
that’s right. By the way, your product serial number is important, too.
http://www.muskalipman.com
CHAPTER 2
Think you’ve found a bug? Just because a software product is released to the
public doesn’t mean it’s perfect. Improvements are always being made. That’s
why updates become available. If you have a problem with SONAR on a
regular basis and you can reproduce that problem by performing the same
steps each time, you may have found a bug in the software. Before you go
spreading any rumors, first tell a friend about it and see whether he or she can
reproduce the problem on his or her computer system. If so, then you should
drop an e-mail to Cakewalk at [email protected] and let the people
there know about the problem. The staff may already be aware of the bug and
be working on a fix for it. But then again, they may not, and although your
diligence won’t make you famous, you’ll feel good knowing that you may
have saved your fellow SONAR users from a lot of frustration. Really, you will.
14
Getting Started with SONAR — Chapter 2
Remember to send in that registration card! And just to be safe, you might
want to check with Cakewalk to make sure your information is on file.
You just do the following:
1.
Find your CD jewel case and look on the back to make sure your CDKEY is printed there.
2.
Find your product serial number, either by looking on the detachable
part of your registration card or by starting SONAR and selecting
Help > About Cakewalk.
3.
Call Cakewalk at 888-CAKEWALK or 617-441-7870 (USA) and make
sure that you’re registered. Also check to see that your correct
address and phone number are in the system.
Now you can rest easy in knowing that help is just a phone call or
e-mail away.
TIP
To prevent yourself from losing your CD-KEY or serial number, you might
want to write them on your SONAR CD. Be sure to use an indelible pen and
write the numbers on the top (the side with the printed material) of the CD.
Don’t write on the shiny side. You also might want to write down the numbers
in a second location, just in case. I like to keep track of all the serial numbers
for my software applications in a simple text file. I have a list containing the
names, CD-KEYs (if available), and serial numbers of all the important
software installed on my computer system. I also include the current version
number and company contact information for each product. Then, if I ever run
into a problem, I just refer to the list. By the way, you might also want to print
the text file each time you update it. If your hard drive crashes, the text file
won’t do you any good since you won’t be able to access it.
Take a Quick Tour of SONAR
Because SONAR is such a powerful application, you can use it for a
variety of different tasks. They include composing music, developing
computer game music and sounds, producing compact discs, creating
audio for the World Wide Web, and even scoring films and videos.
SONAR provides a number of features to support all these endeavors
and more. As a matter of fact, you can use SONAR as the central piece
of “equipment” in your studio because it allows you to control all your
music gear from your computer via on-screen control panels. However
you decide to use SONAR, you’ll find plenty of flexibility and power in
the tools provided.
http://www.muskalipman.com
Getting Started with SONAR — Chapter 2
15
Projects
In SONAR, all your music data for a single body of work is organized as
a project. A project can be anything from a Top 40 song or a 30-second
radio spot to a full-length symphonic score, such as a movie soundtrack.
Along with the music data, all of SONAR’s settings for a single work are
stored in the project as well. A project is saved on disk as a single file
with a .WRK or .BUN file name extension. The difference between the
two file types is that a work (WRK) file stores only MIDI data and project
settings, whereas a bundle (BUN) file also includes any audio data within
a project. (For more information, see Chapter 4.)
Tracks, Clips, and Events
Track View
To work with the data in a project, you have to use the tools called views
in SONAR. Views are like windows that let you see and manipulate the
data in a project in a variety of ways. The most important is the Track
view, shown in Figure 2.3
Figure 2.3
The Track view is the
main window used to
work with a project
in SONAR.
http://www.muskalipman.com
CHAPTER 2
The music data within a project is organized into units called tracks,
clips, and events. Events, which are the smallest units, consist of single
pieces of data, such as one note played on a MIDI keyboard. Clips are
groups of events. They can be anything from a simple MIDI melody to an
entire vocal performance recorded as audio. And tracks are used to store
clips. For example, a pop song project might contain seven tracks of
music data—six for the instruments and one for the vocal performance.
Each track can contain any number of clips that might represent one long
performance or different parts of a performance. And SONAR gives you
unlimited tracks. The only limitation is the speed of your CPU and the
amount of memory (RAM) you have in your computer. I’ll talk more
about tracks, clips, and events in Chapter 7.
16
Getting Started with SONAR — Chapter 2
In this window, you can see all the tracks that are available in a project.
You also can view and edit all the basic track settings, as well as all the
clips contained in each track. I’ll talk about the Track view extensively in
a number of different chapters in the book.
NOTE
If you have used Cakewalk software in the past, particularly if you upgraded to
SONAR from Pro Audio, Guitar Studio, or Home Studio, then you’ll notice that
the Audio view is no longer available. Actually, the Audio view features are
still provided in SONAR, but now the Track view doubles as the Audio view.
Staff View
In the Staff view, you can work with the MIDI data in your project as
standard music notation. By selecting one or more MIDI tracks in the
Track view and opening the Staff view, you can see your music just as if
it were notes on a printed page, as in Figure 2.4
Figure 2.4
In the Staff view, you
can see and edit your
MIDI data as standard
music notation.
Using the Staff view, you also can edit your music as notation by adding,
changing, or deleting notes. Special notation functions such as dynamics
markings, percussion parts, and guitar chord symbols are included, too.
You can notate anything from a single one-staff melody to an entire 24part musical score. I’ll talk about using the Staff view in Chapter 13.
Piano Roll View
Although the Staff view is great for traditional music editing, it doesn’t
allow you to access expressive MIDI data, such as note velocity or pitch
bend controller messages. For that data, you can use the Piano Roll view.
This view displays notes as they might appear on a player-piano roll, as
shown in Figure 2.5.
http://www.muskalipman.com
Getting Started with SONAR — Chapter 2
17
Figure 2.5
The Piano Roll view
gives you access to
both note and MIDI
controller messages.
You can change note pitch and duration by simply dragging on the
rectangular representations. But more importantly, you can view and edit
MIDI controller messages graphically with the mouse instead of having to
deal with raw numbers. For more details about the Piano Roll view, see
Chapter 7.
If you really want precise control over the data in your project, the Event
List view is the tool for the job. The Event List view shows each
individual event in a track (or the entire project) as special keywords and
numbers in a list, as shown in Figure 2.6.
Figure 2.6
For really precise
editing tasks, the Event
List view gives you
access to the individual
events in a project.
Using this view is similar to looking at the raw MIDI data that is recorded
from your MIDI keyboard or controller. You can edit the characteristics of
single notes and MIDI controller messages by typing in data. You’ll
probably use the Piano Roll view more often, but it’s nice to know the
Event List view is available if you need it. I’ll talk more about the Event
List view in Chapter 7.
http://www.muskalipman.com
CHAPTER 2
Event List View
18
Getting Started with SONAR — Chapter 2
Loop Construction View
One of the new features in SONAR, the Loop Construction view, gives
you an easy way to create your own sample loops. These loops, which
are digital audio clips designed to be played over and over again, can be
used to construct entire songs. While you’re working with the Loop
Construction view, you see the sound wave of your loop, as in Figure 2.7.
Figure 2.7
The Loop Construction
view is a special editing
tool for creating sample
loops.
Not only does the Loop Construction view allow you to create your own
sample loops, but you can even use ACID-compatible loops, like the
loops found in Sonic Foundry’s ACID software. In Chapter 9, I’ll get into
more detail about the Loop Construction view.
Console View
When you’re ready to mix all your MIDI and audio tracks down to a
single stereo file, you can use the Console view. This tool is made to look
and function like a real recording studio mixing console, as you can see
in Figure 2.8.
Figure 2.8
The Console view
looks and functions
similar to a real
recording studio
mixing console.
http://www.muskalipman.com
Getting Started with SONAR — Chapter 2
19
You can use the Console view to adjust the panning and volume for each
track in a project. As a matter of fact, you can use the Console view in
place of the Track view for adjusting track settings and recording new
tracks. And just like on a real mixing console, you can monitor volume
levels via on-screen meters and mute and solo individual or groups of
tracks. I’ll talk more about the Console view in Chapter 6, Chapter 11,
and Chapter 12.
StudioWare and CAL
Examine the Differences between
SONAR and Pro Audio
Since SONAR is based on the same programming code as Pro Audio,
you’ll notice that many of SONAR’s features are the same as in Pro
Audio, but there are many new features as well. Among the key features
that make up SONAR are new WavePipe software synthesizers—called
DX instruments or DXi—DirectX 8 audio effects automation, a new Loop
Construction view for creating and manipulating audio loops, and a
redesigned Track view for more efficient recording and editing sessions.
SONAR’s new WavePipe 2.0 technology not only gives you better audio
recording and playback performance, but it also allows you to use
software synthesizers similar to the ones you find in Steinberg’s Cubase
VST application. The SONAR soft synths use the latest Microsoft DirectX
technology, giving you responsive playback when using WDM drivers
and output through DirectX audio effects. And because SONAR supports
DirectX 8, you can now automate individual effects parameters.
http://www.muskalipman.com
CHAPTER 2
Two of the most advanced features provided by SONAR are StudioWare
and CAL (Cakewalk Application Language). Even though these features
seem complicated, they’re actually quite easy to use. Sure, if you really
want to dive in and master these features, they can get complex, but for
the most part, they are accessible to even the most timid user. What’s
more, when you start using StudioWare and CAL, you won’t want to
stop. Separately, StudioWare allows you to design on-screen panels to
manipulate MIDI data and control your MIDI gear, and CAL allows you to
create macros or small programs so that you can automate the different
tasks you perform within SONAR. You can use StudioWare and CAL
together to build your own editing tools within SONAR. You can even
create programs that will make music automatically for you. These two
features alone have quite a bit of power, so I’ll talk a lot more about them
in Chapter 14, Chapter 15, Chapter 16, and Chapter 17.
20
Getting Started with SONAR — Chapter 2
As I mentioned earlier, the new Loop Construction view lets you create
and edit your own sample loops. You can then stretch, pitch-shift, and
adjust the tempo of the loops just like in Sonic Foundry’s ACID software.
And if you already have a collection of ACID loops, SONAR will let you
load up and work with those as well.
The Track view has been changed significantly. Not only does it provide
the functions of the old Track view, but it doubles as an audio editor
by providing the functions of the old Audio view, too. In addition, the
Track view gives you access to many of the same controls for each track
in your project that you would find in the Console view, including signal
level meters. Suffice it to say, you’ll be spending a lot of time with the
Track view.
If you don’t understand some of the things I’ve been talking about here,
don’t worry. I’ll be going over all of the features found in SONAR in
detail throughout the remaining chapters.
Set Up Your System for
Better Performance
Cakewalk specifies a system with a 400 MHz processor and 64 MB of
random access memory (RAM) as the basic requirements to run SONAR.
Of course, you also need a Windows-compatible MIDI interface and/or
sound card. If your computer system lives up to (or surpasses) these
specifications, simply installing SONAR is more than likely all you’ll
need to do to get up and running with the software. If you really want to
get the best performance from SONAR, however, you can make a number
of adjustments to your computer system that will allow you to squeeze as
much power out of it as possible. Depending on your computer’s
specifications, these changes may even allow you to play back a few more
simultaneous digital audio tracks or apply more real-time effects. (See
Chapter 11 for more information.)
Microprocessor
You can’t do much to tweak your computer’s central processing unit
(CPU), aside from maybe upgrading it to a newer chip or buying a whole
new computer system. Suffice it to say, the newer and faster your CPU,
the better your computer system and SONAR will perform. From oldest
to newest, the order of available chips goes something like this:
http://www.muskalipman.com
Getting Started with SONAR — Chapter 2
21
Pentium, Pentium with MMX, Pentium Pro, Pentium II, Pentium III, and
Pentium 4 (being the latest at the time of this writing).
Of course, although having the best chip available is nice, that doesn’t
mean you need it. You can also get away with using different brands such
as AMD or Cyrix, but they tend to be less powerful. For instance, the
AMD K6 is similar to a Pentium with MMX at the same clock speed.
Also, a Cyrix chip is usually less powerful than a standard Pentium
running at a speed of about two-thirds of the Cyrix. Recently, however,
AMD has come out with new chips that compare in performance with
the Pentium. These include the Athlon and Duron. You still need to be
careful here, though, because some sound cards are not compatible with
AMD processors. Be sure to check for compatibility issues before you
purchase a new computer system or sound card. Basically, you can apply
more real-time effects at once with a more powerful CPU. SONAR will
run more smoothly as well.
TIP
If you would like to test just how much of your CPU power is used when
you perform different tasks with your computer, Windows provides a
nifty utility called the System Monitor. Just follow these steps to use it:
1.
Click the Start button and choose Programs > Accessories > System
Tools > System Monitor to see if the System Monitor is installed. If
the System Monitor isn’t installed, open the Windows Control Panel,
double-click on Add/Remove Programs, and select the Windows
Setup tab in the Add/Remove Programs Properties dialog box. Then
select Accessories from the list, click on the Details button, select
System Monitor from the resulting list, and click on the OK buttons
to close the dialog boxes. Windows then installs the System Monitor.
http://www.muskalipman.com
CHAPTER 2
If you’re really adventurous, you can try overclocking your CPU, but I
wouldn’t recommend it. (Overclocking means making the CPU run faster
than its rated speed.) If you’re not careful, you could end up destroying
your computer system. But with the right tweaks, it is sometimes possible to
make your computer run faster. You might even be inclined to building your
own PC. If you’re interested, check out this article posted at Prorec.com:
http://www.prorec.com/prorec/articles.nsf/articles/
E674C87E2991AA3F862568E9006D7D10.
22
Getting Started with SONAR — Chapter 2
2.
Open the System Monitor by clicking the Start button and then
selecting Programs > Accessories > System Tools > System Monitor.
The program should look similar to Figure 2.9.
3.
Select Edit > Add Item. In the resulting dialog box, click on Kernel in
the Category list. Then click on Processor Usage in the Item list, and
click the OK button.
4.
Depending on the current settings, you may see a line chart, bar
chart, or numerical chart. You can select the different displays via the
View menu.
Figure 2.9
The Windows System
Monitor accessory
monitors your CPU
usage.
Now, as you use your computer, the System Monitor will continuously
show the changes in your CPU power usage.
System Memory (RAM)
You probably already know this point, but the more memory you have
installed in your computer, the better. This is especially true for large
applications such as SONAR. Even though Cakewalk lists 64 MB in the
system requirements, you would be better off with 128 MB of RAM. Not
only does increased memory allow your system to run more smoothly, it
makes the system run faster, too. With more RAM available, Windows is
less likely to have to access virtual memory.
Virtual Memory
To fool your computer into thinking it has more RAM than it really does,
Windows uses part of your hard disk space as virtual memory. Every time
you start your system, Windows creates a “swap file” on your hard drive.
This “swap file” grows and shrinks as you perform different tasks with
your computer. Whenever you try to use more RAM than is installed in
your system, Windows stores the excess data in the “swap file.” For
example, if you have 32 MB of RAM in your system, and you run four
http://www.muskalipman.com
Getting Started with SONAR — Chapter 2
23
different programs at once that each take up 16 MB of RAM, technically,
two of those applications shouldn’t be able to run. However, Windows
simply uses virtual memory to handle that extra 32 MB load. Because
virtual memory uses your hard disk for storage, and your hard disk
provides much slower access than your system’s RAM, all that “swap
file” processing makes your computer run more slowly. That’s why your
system runs faster with more RAM installed.
Hard Disk Drive
Aside from your upgrading to a new hard drive, one Windows tweak
might get you a little more speed from your current drive. It’s a setting for
DMA access for your hard drive controller. This setting gives your hard
drive direct access to your computer’s memory. This way, the data doesn’t
have to be processed by the CPU first and thus provides a bit more speed.
If your hard drive supports DMA, you can activate it like this:
1.
2.
3.
Open the Windows Control Panel, double-click on System, and click
on the Device Manager tab in the System Properties dialog box.
Under Disk Drives in the list of devices, select your hard disk drive.
It might read something like “Generic IDE Disk.”
Click on the Properties button, and then click on the Settings tab in
the hard disk drive’s Properties dialog box. The dialog box should
look similar to Figure 2.10.
http://www.muskalipman.com
CHAPTER 2
The speed of your hard drive is one of the single most important factors
in determining how many audio tracks you’ll be able to use during
playback with SONAR. Hard drives can be connected to a computer
using different types of interfaces: SCSI, IDE, and E-IDE. In terms of
performance, SCSI is better than IDE, but a good E-IDE drive can be
almost as good as SCSI. A few specifications to look out for are average
seek time (which should be as low as possible, preferably 9 milliseconds
or less), rotation speed (which should be as high as possible, the average
being 5,400 rpm), and sustained data transfer rate (which should also be
as high as possible, with at least 5 MB per second being a good start). One
other factor to avoid is hard disk controller cards that connect via an ISA
expansion slot inside your computer. A PCI-based connection is much
better. By the way, using the System Monitor, you can test your hard drive
performance the same way you can test CPU usage (explained earlier).
24
Getting Started with SONAR — Chapter 2
Figure 2.10
This generic hard disk
drive Properties dialog
box shows the hard
drive settings.
4.
Select DMA in the Options section and then click on the OK buttons
to close the dialog boxes.
After Windows restarts, your hard drive will access the computer’s
memory directly, which may or may not provide a noticeable speed
increase.
Video Card
Believe it or not, your video card can have an effect on your computer
system’s performance. First, hardware video acceleration can cause
problems with audio playback. If you have a PCI-based video card, and
your audio is sometimes plagued with clicks, pops, or other anomalies,
these sounds could mean that your hardware video acceleration is set too
high. Try dragging a program window around on the screen while your
computer is playing digital audio tracks. Does this action affect the audio?
If so, you can try reducing or disabling hardware video acceleration to
remedy the problem. To do so, just follow these steps:
1.
Open the Windows Control Panel and double-click on System.
2.
In the System Properties dialog box, click on the Performance tab.
Then click on the Graphics button under Advanced Settings.
3.
In the Advanced Graphics Settings dialog box, drag the Hardware
Acceleration slider to the left, to either reduce or disable hardware
video acceleration. The dialog box should look similar to Figure 2.11.
Figure 2.11
The amount of
hardware video
acceleration is set
via the Advanced
Graphics Settings
dialog box.
http://www.muskalipman.com
Getting Started with SONAR — Chapter 2
4.
25
You may or may not have to disable hardware video acceleration
altogether. You’ll have to experiment to see what works best for your
system. After you set the slider, click the OK buttons to close the
dialog boxes.
After Windows restarts, your new settings will take effect. If you have a
newer computer system with an AGP-based graphics card, you shouldn’t
have to worry about hardware video acceleration problems. AGP-based
cards can access the system memory directly without having to deal with
the PCI bus; thus, they don’t usually exhibit the problems I mentioned
earlier.
1.
Right-click anywhere on the Windows desktop and select Properties
from the pop-up menu.
2.
Select the Screen Saver tab in the Display Properties dialog box.
3.
Select None from the drop-down list in the Screen Saver settings
section (see Figure 2.12) and then click the OK button.
Figure 2.12
In the Display
Properties dialog box,
you can set many
different Windows
parameters, including
the screen saver.
http://www.muskalipman.com
CHAPTER 2
Other video-related settings that can affect the performance of your
system include screen savers, video resolution, and video color depth.
Basically, when you’re doing any processor-intensive work with your
computer, you should disable your screen saver. Even when the screen
saver isn’t showing anything on the screen, it sits in the background
monitoring your system for activity and thus takes up processor time.
Plus, some screen savers have no regard for what your computer is
currently doing, and they become active right in the middle of a
recording session, ruining that great vocal track. To turn off your screen
saver, do the following:
26
Getting Started with SONAR — Chapter 2
Video resolution and video color depth affect how precise your computer
monitor displays graphics. A higher color depth means more colors will
be displayed, and a higher resolution means the sharper the image will
be. But the higher the resolution and the higher the color depth, the
harder your computer has to work. High settings can slow down your
computer quite a bit, especially if you have an older CPU and an older
video card. Your best bet is to use a resolution of 800⳯600 and a depth of
256 colors. You really don’t need anything more than that, although using
a higher resolution allows you to fit more MIDI/audio tracks on the
screen at once. A higher resolution is also nicer when you’re working
with music notation. You can experiment with higher settings to see how
they affect your system. Reducing the color depth is more important than
reducing the resolution, though. To change the color depth and
resolution, do the following:
1.
Right-click anywhere on the Windows desktop and select Properties
from the pop-up menu.
2.
Select the Settings tab in the Display Properties dialog box.
3.
From the drop-down list in the Colors section (see Figure 2.13), select
256 Colors. Then drag the slider in the Screen Area section to the left
until it reads 800 by 600 pixels. After you’ve set the slider, click the
OK button.
Figure 2.13
In the Display
Properties dialog box,
you can set many
different Windows
parameters, including
the video resolution
and color depth.
http://www.muskalipman.com
Getting Started with SONAR — Chapter 2
27
Windows may or may not restart automatically (depending on the version
you’re using), but when you’re done, your monitor will show the new
resolution and color depth settings. Getting used to the new settings might
take awhile if you’ve been using higher settings all along, but don’t worry,
you’ll live. And I think you’ll like how much snappier Windows reacts.
TIP
For additional tips on dealing with video cards, check out this Web page:
http://www.cakewalk.com/Support/VideocardTips.html.
Network Card
1.
Open the Windows Control Panel, double-click on System, and click
on the Device Manager tab in the System Properties dialog box.
2.
Under Network Adapters in the list of devices, select your network
card. The name will probably reflect the name of the product. An
example might be “EZ-Link USB Adapter.”
3.
Click on the Properties button to open your network card’s Properties
dialog box. The dialog box should look similar to Figure 2.14.
Figure 2.14
This sample network
card Properties dialog
box shows the status
of the device.
http://www.muskalipman.com
CHAPTER 2
If you have your computer hooked up to a network, you should either use
a different computer system for audio recording or temporarily disable
your network card when you’re using SONAR. Network activity is
notorious for stealing CPU cycles at critical times, and this can slow down
your system quite a bit. The easiest way to remove your computer from
the network is simply to unplug your network cable. However, you can
get even better performance if you disable your network card like this:
28
Getting Started with SONAR — Chapter 2
4.
Select Disable in this hardware profile in the Device usage section
and then click on the OK button to close the dialog box.
Windows disables your network card without your having to restart.
Then you can simply close the System Properties dialog box, and you’re
done.
Sound Card
As far as sound cards are concerned, there are a couple of things that you
should know. PCI-based sound cards perform much better than older
ISA-based sound cards. The newer PCI-based cards usually include more
advanced audio circuitry, which is designed to take more of the audio
processing workload off your computer’s CPU. It’s also nice to have a
card that supports the DirectSound features of Microsoft’s DirectX
technology. This type of card provides greater application compatibility
and sometimes better performance, too.
In addition, SONAR supports a new Microsoft technology called WDM
(Windows Driver Model). If you have a sound card that has WDM drivers,
SONAR will give you much better performance in terms of audio latency.
Basically, latency is a form of audio delay that occurs when a software
program like SONAR can’t “communicate” with your sound card fast
enough while processing audio data, which results in an audible delay.
This only occurs with features that use real-time processing though. In
SONAR, these include input monitor and real-time DXi performance. I’ll
talk more about latency in Chapter 3, input monitoring in Chapter 6, and
DXis in Chapter 10. In the meantime, when looking for a sound card, be
sure to ask the manufacturer if the card comes with WDM drivers. If not,
that’s okay, but you won’t get the proper performance from the input
monitoring or real-time DXi performance features in SONAR.
TIP
For a list of sound card manufacturers who currently support (or plan
to support in the future) WDM technology, check out this Web page:
http://www.cakewalk.com/Products/SR/WDM.html.
TIP
For really in-depth technical information about WDM, check out this Web
page: http://www.microsoft.com/HWDEV/desinit/wdm.htm.
http://www.muskalipman.com
Getting Started with SONAR — Chapter 2
29
NOTE
One of the most common questions I get from readers is, “what sound card
should I buy?” There are so many different sound cards on the market,
providing so many different features, that I can’t simply recommend one or
the other. I can, however, tell you what features to look for so that you can
make an educated choice.
If you want to be able to record more than one audio track at once, you’ll
need a card with multiple audio connections. Most average sound cards
internally mix all of their audio sources down to one stereo signal, but other,
higher-end (more expensive) cards let you record each device separately on
its own discreet stereo channel. This capability is much more desirable in a
music recording studio, but not everyone needs it. You’ll also want to look for
a card with full-duplex capabilities. This means the card can record and play
back audio simultaneously. This is opposed to a half-duplex card, which can
perform only one function at a time.
A good quality audio signal is something that everybody desires. During
recording, the sampling rate (which I talked about in Chapter 1) plays a big
part in the quality of the audio signal. Suffice it to say, the higher the
sampling rate that a sound card can handle, the better the sound quality. The
sampling rate of a CD is 44.1 kHz (44,100 samples per second) and all sound
cards on the market support this. Professional cards can hit 48 kHz or higher.
Bit resolution (which I also talked about in Chapter 1) is a factor in
determining digital sound quality as well. The more bits you have to
represent your signal, the better it will sound. The CD standard is 16 bits,
which is supported by all sound cards. Some cards (again, mostly high-end)
go up to 20, 22, or even 24 bits.
http://www.muskalipman.com
CHAPTER 2
I’ve already mentioned that you should look for a PCI-based, DirectXcompatible sound card. You should also be aware of the types of connections
that sound cards supply. The typical sound card provides a number of
different audio inputs and outputs including line level, microphone level,
and speaker. Line level inputs and outputs are used to transfer sound from
cassette decks, radios, electronic keyboards, or any other standard audio
device. Microphones generate a very small audio level by themselves, so they
need a special input of their own, which is connected to an internal
preamplifier on the sound card. Speakers also need their own special
connector with a built-in amplifier in order to produce a decent amount of
volume. Some high-end sound cards also offer digital inputs and outputs.
These special connectors let you attach the sound card directly to compatible
devices such as some CD players and DAT (digital audio tape) decks. Using
these connections gives you the best possible sound, because audio signals
stay in the digital domain and don’t need to be converted into analog signals.
You should also be aware that connectors come in a variety of forms. Lowcost cards usually provide the same 1/8-inch jacks used for headphones on
boom boxes. For better quality, there are 1/4-inch, RCA, or XLR jacks.
Connections can also be balanced or unbalanced. Balanced connections
provide shielding to protect the audio signal against RFI (radio frequency
interference). Unbalanced connections don’t provide any type of protection.
30
Getting Started with SONAR — Chapter 2
NOTE (Continued)
Two other measurements you need to look out for are signal-to-noise ratio and
frequency response. As with the other measurements mentioned here, the
higher the better. Since all electronic devices produce some amount of noise,
the signal-to-noise ratio of a sound card tells you how much higher the signal
strength is compared to the amount of internal noise made by the sound
card. The bigger the number, the quieter the card. A good signal-to-noise
measurement is about 90 dB or higher. Frequency response is actually a
range of numbers, which is based on the capabilities of human hearing.
The frequency response of human hearing is approximately 20 Hz to 20 kHz.
A good sound card will encompass at least that range, maybe even more.
If you want to purchase a sound card with a built-in MIDI synthesizer, there
are a number of additional features you should know about. Early sound
cards sported synthesizers based on FM (frequency modulation) synthesis.
Unfortunately, this method wasn’t much of a step up from the basic beeps
and boops of a PC speaker. Even though FM works well with organ and belltype sounds, it fails miserably when trying to portray any other type of
instrument. Fortunately, today’s sound cards use a technology called
wavetable synthesis. This process can provide some very realistic sounds.
The reason for this realism lies in the fact that a wavetable synthesizer plays
back pre-recorded real-life instruments and sounds. When the synthesizer
receives a MIDI “note-on” message, instead of creating a sound electronically
from scratch (as with FM), it plays back a small digital recording, which can
be anything from the sound of a piano to the effect of ducks quacking. The
only drawback to wavetable synthesis is that the samples need to be kept
small since they are stored in RAM (random access memory) or ROM (read
only memory). Suffice it to say, the bigger the wavetable RAM or ROM your
card comes with, the better. A good number to look for is about 2 MB.
You’ll also want to take into account the degree of playback control over the
wavetable samples that a card provides. All sound cards today support
General MIDI (GM), which is a set of guidelines specifying 128 pre-set sounds
that all GM-compatible synths must have and the memory location (or MIDI
program number) of those sounds. This ensures that if a sound card is told to
play program number 37, it will always call up a slap electric bass sound
rather than a soprano saxophone. Unlike professional synthesizers, however,
GM doesn’t support any kind of sound parameter programming. That’s where
the GS and XG formats come in. The Roland GS format expands on the GM
standard by offering additional sounds along with sound-programming
control over a few synthesis parameters. Yamaha’s XG format goes even
further by requiring three separate effects processors, more than a dozen
programmable synthesis parameters (such as the brightness of a sound), and
more than 100 sets of 128 sounds each. So be sure to get a card that supports
GS, XG, or both.
By following these guidelines, and taking some time to research your
purchase, you should be able to find the right sound card to fit your needs.
Good luck!
http://www.muskalipman.com
Getting Started with SONAR — Chapter 2
31
Set Up Your Cakewalk Hardware Profile
Of course, making many of the previously mentioned changes to your
computer system every time you want to use SONAR and then changing
them back for normal system use can be a major hassle. Luckily,
Windows includes a handy feature called Hardware Profiles. You can
think of Hardware Profiles as Windows presets, similar to synthesizer or
audio effects gear presets. Using the Hardware Profiles feature, you can
store a number of Windows configuration settings under a unique name
and then recall those settings when you start your computer system. So,
for instance, you can have a profile to set up your hardware for normal
system use, another profile for computer gaming, yet another profile for
audio recording, and so on. Creating Hardware Profiles is very simple,
too; you just do the following:
1.
Open the Windows Control Panel, double-click on System, and click
on the Hardware Profiles tab in the System Properties dialog box.
The dialog box should look similar to Figure 2.15.
2.
More than likely a default profile called “Original Configuration” will
be listed. This configuration holds your current system settings. Click
on it to select it.
3.
Click on the Copy button to make a copy of the Original
Configuration profile.
4.
In the Copy Profile dialog box, type a new name for the new profile—
something like SONAR Configuration. Then click on the OK buttons
to close both dialog boxes.
5.
Restart your computer. At startup, your system will ask you to choose
a hardware profile. Select SONAR Configuration.
6.
Go through the list of tweaks that I described earlier, such as the hard
drive DMA setting, video acceleration setting, and so on.
CHAPTER 2
Figure 2.15
The Hardware Profiles
tab of the System
Properties dialog box
shows the different
hardware
configurations.
http://www.muskalipman.com
32
Getting Started with SONAR — Chapter 2
Now, the next time you start Windows, you can choose a system
configuration to fit your needs for that computing session. The only
setting from the list of tweaks that isn’t saved in a Hardware Profile is the
screen saver setting. You have to change it manually each time. Yeah, I
know it’s a bummer. Personally, I always leave the screen saver disabled.
If I know I’m going to be away from the computer for more than fifteen
minutes, I just turn off the monitor.
TIP
With all this talk about computer system specifications, I thought you might be
interested to know about the computer system I use to run SONAR. I picked
all of the components myself and had Aberdeen, Inc. (www.aberdeeninc.com)
build the base system for me. The system components are as follows:
䊳 ABIT BE6-II Pentium III ATX motherboard
䊳 Intel Pentium III processor 700 MHz w/256 K L2
䊳 Pentium III heatsink with cooling fan
䊳 256 MEG SDRAM 168-pin DIMM PC100 memory
䊳 Promise Ultra66 PCI IDE Controller
䊳 Teac 3.5 1.44 MB floppy drive
䊳 WD Expert WD205BA hard drive 20.5 GB 9ms 7200rpm Ultra/66
䊳 Addtronics Super Tower ATX 8x5.25/3x3.5 300W ATX
I added the following components myself:
䊳 Creative Encore 6X PC-DVD drive
䊳 Ricoh MP7060A CD-RW drive
䊳 Diamond Stealth III S540 video card
䊳 Sound Blaster Live! sound card
In addition, I usually use a high-end audio interface for recording, but
because I review many different products for Electronic Musician magazine,
this component changes from time to time.
Find Help When You Need It
Cakewalk provides a number of ways for you to find help when you’re
having a problem with SONAR. The two most obvious places to look are
the user’s guide and the SONAR Help file. Actually, these two sources
contain basically the same information, but with the Help file, you can
perform a search to find something really specific. At the first signs of
trouble, you should go through the included troubleshooting information.
If you can’t find an answer to your problem there, then you can pay a
visit to the Cakewalk Web site.
http://www.muskalipman.com
Getting Started with SONAR — Chapter 2
33
The support page of the Cakewalk Web site (http://www.cakewalk.com/
Support/) contains a ton of helpful information, including FAQs
(lists of frequently asked questions and their answers) and technical
documents that provide details on a number of Cakewalk-related
topics. You should check them first. If you still can’t find an answer
to your problem, the next place to look is in the Cakewalk newsgroups
(http://www.cakewalk.com/Support/newsgroups.html). In the
newsgroups, you can trade tips, advice, and information with other
Cakewalk product users. And many times, you’ll find that someone has
had the same problem you’re having, and he or she has already found a
solution. You can also find a very active Discussion area on my own
Web site (http://www.garrigus.com/). Isn’t sharing great? Also, be sure to
check out Appendix D, “Cakewalk Resources on the Web,” at the end of
this book for even more helpful information.
http://www.muskalipman.com
CHAPTER 2
Of course, you can also contact Cakewalk Technical Support directly. You
can either e-mail your questions to [email protected], or you can
call 617-441-7891 (USA). Currently, the hours are Monday through Friday
from 10 a.m. to 6 p.m. Eastern time. Tech Support also offers extended
hours on Thursday till 10 p.m. But remember, to receive technical
support, you have to be a registered user. If you call or send e-mail, you’ll
be asked for your serial number. As I said before, remember to send in
that registration card! You’ll be a much happier camper, er…Cakewalker.