1
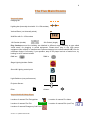
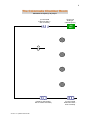
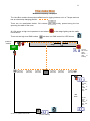
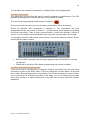
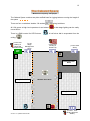
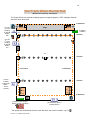
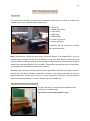
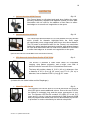
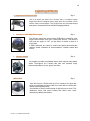
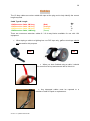
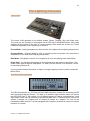
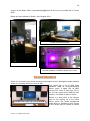
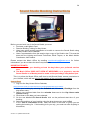
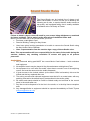
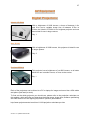
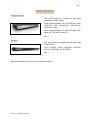
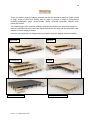
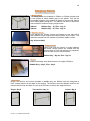
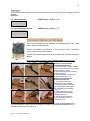
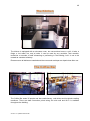
The University of Exeter Music Office 2 List of Contents Part One – A Guide to Using the Building’s Facilities 1 List of Contents 2 Introduction 4 Floor Plans (including location of Fire Alarms & Fire Extinguishers) 5 The Foyer 6 The Five Main Rooms: 8 Colonnade Chamber Room 9 Broadwood Theatre Space 10 Juke Box Bar 11 Cabaret Space 13 Frank Oliver 14 The 24-Hour Area – The Amp Room & the Jam Jar 16 Lighting Equipment: 17 Dimmer Racks and Patch Unit 17 Lanterns 18 Lighting Effects 19 Cables 20 Lighting Consoles 21 Sound Studio 1 22 Sound Studio 2 23 Sound Studio Booking Instructions 24 Sound Studio Rules 26 AV Equipment 27 Digital Projectors 27 DVD Players 28 Staging Stock list and quantities Version 1.2. Updated 19/09/14 MB 29 30 3 Transportation & Storage 31 Assembly 32 Transporting the staging between floors in Kay House 33 How to Book the Staging 33 Access Equipment 34 FIRE SAFETY guidelines applicable to everyone 35 Kitchen/Coffee Bar 40 Closing the Building 41 Using the Kay House Booking System 42 Part Two – How to Hire the Music Office’s Gear & Instruments 45 List of Contents 46 Introduction 47 Rhythm Instruments 48 Drum Kits 47 Keyboards 49 Guitars 50 Brass Instruments 51 String Instruments 51 Woodwind Instruments 51 Percussion Instruments 51 Technical Gear 52 How to Book Gear and Instruments 54 Reservation 54 Confirmation 56 Pick-up and Drop-off 56 How to Contact Us Version 1.2. Updated 19/09/14 MB 57 4 Introduction Welcome to the Music Office’s handbook on how to use the numerous facilities within Kay House Duryard. We have tried to include as much useful information in the handbook as possible. The equipment available may change, but the working methods will not, as they are best practices and are in place to ensure the safety of musicians, actors, technicians and audience members alike. We encourage you to use this handbook as a point of reference when using the building and the equipment available within it. Even if you are hiring the equipment to use elsewhere outside of the building, this guide will ensure you know how to book the equipment and use it safely. You may find that not every page or section is relevant to you, your group or your society; please refer to the List of Contents on Pages 3 and 46 to see the full extent of the information available. The two sections that are relevant to EVERYONE who uses Kay House are the FLOOR PLANS on Page 5 and the FIRE SAFETY section on page 35. Please feel free to suggest additions to the handbook or any pertinent changes for new policies, practices, etc. Kay House is a fantastic resource for you; the students that are passionate about music. Please continue to make good use of the building, the equipment and the Music Office staff who are here to support you. Thank you. Version 1.2. Updated 19/09/14 MB 5 Floor Plans FIRE EXIT FIRE EXIT Gear Store FIRE EXIT Student PC & Printer FIRE EXIT FIRE EXIT Female WC Male WC FIRE EXIT FIRE EXIT Sound Studio 1 FIRE EXIT Studio 2 Version 1.2. Updated 19/09/14 MB Stage Management Store 6 The Foyer The Foyer contains the controls for the Fire and Intruder Alarm, which are located on the wall to the left of the main entrance. Door Alarm On/Off Switch Plant Extension Button Fire Alarm Control Panel Fire Alarm Layout Map Building Training Guidelines Fire Alarm Call Point Emergency Door Release Button Control Panel Keys Door Release Button Intruder Alarm Panel – used to set & unset the alarm Fire Precaution Log Book Heating and cooling - There are two systems in the building, radiator heating and air handling. They are both controlled by the Plant Extension Button. In the summer the radiator system is off altogether, but the air handling is able to heat or cool the building as needed. The Plant Extension Button is used to control the Air Handling System. A single touch-sensitive pushbutton is used to select the required extension between 1 and 6 hours (selectable in stages of 1 hour). Version 1.2. Updated 19/09/14 MB 7 Winter Schedule If a room is too cold: The radiators will have been on between 3pm and 4.30pm to provide a low level preheat. Outside these times, please use the Plant Extension Button to add the number of hours you need, and check that the radiators are on in the room you are using. If a room is too hot / airless: Please do not open the windows unless what you are doing is silent! Instead, activate the plant extension by the front door, turn down the radiators in the room you are using, and switch the Air handling wall switch on in the room you are using. Summer Schedule (radiators are off) If a room is too hot or too cold: Use the Plant Extension Button beside the front door to activate the number of hours you need. Turn on the Air Handling wall switch in the room you are using. The Air Handling system is designed to heat a cold room to approximately 20°. If the room is warmer than this, the Air Handling will exchange with external air to provide cooling and ventilation. However it does not cool the air as such, so you could consider turning on the ventilation the previous evening to cool the building overnight, or closing the blinds in the Frank Oliver the previous day for shade. The Passenger Lift The Passenger Lift is in place to assist those with mobility difficulties and should not be used as a means of transporting tech equipment. Why not? The Passenger Lift is a ‘moving 4th wall type lift’, i.e. there is no internal door and the wall of the lift shaft is exposed during movement. In order to prevent harm to passengers, the interior of the lift is fitted with sensors that will cause the lift to stop if anything comes into contact with the moving wall. If any unaccompanied goods put into the lift fall against the wall the lift will stop and will remain stuck between floors. This requires a Lift Engineer to be called at great expense, which will be reimbursed from the society or individual who misused the left. Please use the Goods Lift for moving gear and equipment. Remember: In the event of an emergency evacuation, i.e. when the fire alarm sounds, DO NOT use the lift. The Toilet Facilities Located to the left of the main entrance Version 1.2. Updated 19/09/14 MB Located at the base of the stairs 8 The Five Main Rooms Key to all plans Hanging bar Lighting bar (internally wired with 12 x 15A sockets) Vertical Boom (not internally wired) 40 41 42 Wall Box with 3 x 15A sockets 13A Socket (double) 13A Socket (single) Plug Sockets around the building are labelled in different ways, including a type called “clean earth” for plugging in sound equipment. Please don’t plug in any high power equipment (like kettles) or transformers & phone chargers into sockets labelled CE; look for a different socket. Conversely, if your speaker, amp or CD player has lots of mains hum, try looking for a CE socket instead. DMX out DMX in Stage Lighting Isolator Switch Sound & Lighting control point Light Switches (non-performance) Projector Screen Pillar Column Key to Health & Safety Signs Location of nearest Fire Extinguisher Location of nearest Fire Exit Location of nearest Fire Alarm FIRE EXIT Location of nearest Emergency Call Point Version 1.2. Updated 19/09/14 MB Location of nearest Exit (non-Fire) 9 The Colonnade Chamber Room Maximum occupancy: 30 people (To the World Instrument Store – door is locked) (To the rear landing & Cabaret Space) FIRE EXIT (Leads to rear landing. Exit to outside via stairs) Version 1.2. Updated 19/09/14 MB (To the Central Instrument Store – door is locked) 10 The Broadwood Theatre Space Maximum occupancy: 100 people The Broadwood contains one plain scaffold bars for rigging lanterns and one bar as a back drop hanging position There are four un-switched, double 13A sockets spanning the width of the room. All 13A power at high level operates via an isolator turned off/on. There are two high level DMX outlets evenly spaced along the bar so that stage lighting can be easily and there is a DMX control for LED fixtures (Entrance to the Gear Store) (Leads to outside) FIRE EXIT (To the Gallery) (To the Foyer) (Leads to outside) (To the Coffee Bar) Version 1.2. Updated 19/09/14 MB 11 The Juke Box Maximum occupancy: 100 people The Juke Box contains three plain scaffold bars for rigging lanterns set in a T-shape and one bar as a back drop hanging position There are six unswitched double 13A sockets spanning the width of the room. All 13A power at high level operates via an isolator turned off/on. There are two high level DMX outlets evenly spaced along the bar so that stage lighting can be easily and there is a DMX control for LED fixtures (Leads to outside) Stage FIRE EXIT (To the All Hours Gear Return – door is locked) (To the 24-Hour Area – door is locked from bar side) Bar Area (To the Foyer – door is locked from bar side) Version 1.2. Updated 19/09/14 MB (To the Gallery) 12 The Juke Box also contains a rehearsal PA, rehearsal Drum Kit and Lighting Rig. Juke Box Lighting Rig The lighting rig in the Juke Box Bar may be used for rehearsals or performances. The LED lights are linked together to create quick easy colour washes or chases. First, ensure the stage lighting isolator switch is turned on. This can be found in the store room by the stage (contact Music Office for access). Ensure the Showtec LED Commander is switched on. The Commander has been programmed with pre-set colours on Scenes 1 – 4 (which can be mixed together by pressing more than one button). There is also a pre-set Chase (1) which runs through a variety of colours. You can adapt the speed and fade of this sequence using the sliders on the right. To manually control the RGB colours, press Fixture 1 and use the sliders on the left. Ensure that the Dimmer slider is raised. Both the LED Commander and the Stage Lighting Isolator Switch MUST be turned off after use. Please talk to the Music Office before programming any scenes or chases. Juke Box Rehearsal PA and Drum Kit These are set up for convenience of rehearsal. However they MUST only be used when permission is given by the Music Office. There are restrictions on when these can be used due to other activities taking place in the building. The PA should always be turned off after use, and the drum kit should be kept tidily on the stage. You can of course remove these items when putting on a performance/event in the Juke Box, but they should be returned afterwards. Version 1.2. Updated 19/09/14 MB 13 The Cabaret Space Maximum occupancy: 200 people The Cabaret Space contains two plain scaffold bars for rigging lanterns running the length of the space There are four unswitched. double 13A sockets along both bars. All 13A power at high level operates via an isolator turned off/on. so that stage lighting can be easily There is a DMX control for LED fixtures. A half mirror ball is suspended from the ceiling. (To the rear landing & Colonnade Chamber Room) To the Stage Management Store (To the rear landing & Goods Lift) (To the Gear Store) FIRE EXIT Linoleum Floor Area Carpeted Area Wooden Floor Area Carpeted Area st Version 1.2. Updated 19/09/14 MB (To the 1 floor landing & Sound Studio) 14 The Frank Oliver Recital Hall Maximum occupancy: 220 people The Frank Oliver has a theatre lighting system to support generic, LED, intelligent fixtures and a full size mirror ball PLAIN BAR #4 (To the st 1 Floor Landing & Sound Studio #2) Stage 40 41 42 TP5 TP6 37 38 39 FIRE EXIT TP4 (Leads to outside) LX BAR #3 25 26 27 28 29 30 31 32 33 34 35 36 19 20 21 22 23 24 (To the st 1 Floor Landing & Sound Studio #1) TP3 TP2 LX BAR #2 13 14 15 16 17 18 PLAIN BAR #2 PLAIN BAR #3 TP1 (To the Central Instrument Store – door is locked) LX BAR #1 01 02 03 04 05 06 07 08 09 10 11 45 48 44 47 43 46 12 PLAIN BAR #1 FIRE EXIT (Leads to rear landing. Exit to outside via stairs) (To the Music Office / Lighting Store) The space has 48 dimmed circuits, each with their own circuit number, e.g. 01 Version 1.2. Updated 19/09/14 MB 15 Internally Wired Lighting Bars Each of the three overhead lighting bars is internally wired with 12 channels (12 x 15A sockets ) and one 13A technical power socket (TP) The middle lighting bar has an additional 13A technical power socket in the centre for connection to the mirror ball. A DMX outlet is located at the auditorium left end of each bar Bar #1 – channels 1-12 & TP1 Bar #2 – channels 13 – 24, TP2 & TP3 Bar #3 – channels 25 – 36 & TP4 Wall Boxes There are four wall boxes, each containing three 15A circuits 45 44 43 The two onstage wall boxes also contain a DMX outlet and a 13A technical power socket. DMZ 40 41 42 TP5 Stage Left Box – channels 37-39 & TP6 Stage Right Box – channels 40-42 & TP5 Auditorium Left Box – channels 43-45 Auditorium Right Box – channels 46-48 Plain Bars Plain Bar 1 - Rear of Hall bar to hang backdrops / curtains Plain Bars 2 & 3 - Front to back side bars for flexible lantern positions Plain Bar 4 - Upstage bar to hang backdrops / curtains Vertical booms positioned on each side wall for cross lighting Version 1.2. Updated 19/09/14 MB 16 The 24-Hour Area Amp Room The Amp Room provides a significantly soundproof environment in which to practice live amplified music and contains the following setup; 1 x Drum Kit 2 x Guitar Amp (60w) 1 x Amp (50w) 1 x Bass amp 1 x Mixing Desk 2 x Vocal microphone 2 x Active speakers Drummers will be required to provide their own drumsticks. Note: Noise levels - Whilst the Amp Room has some degree of soundproofing, it is by no means totally insulated. As the room is adjacent to the Juke Box, users of the Amp Room may be asked to lower the volume of their playing if the sound level of their practice session disturbs an event taking place in the Juke Box. Cooperation amongst all users of Kay House is essential in the successful running of the building. Booking limits - All users of the Amp Room will be permitted to book no more than 9 hours of practice time per week (Sunday to Saturday, inclusive). The maximum duration of any one session booked in a week will be 3 hours, i.e. you may book 3 sessions of 3 hours duration each, but a practice session of 4 hours duration will not be approved. Acoustic Practice Room (Jam Jar) The Jam Jar room is a small, informal practice room containing an upright piano. This room is for acoustic practice only. Version 1.2. Updated 19/09/14 MB 17 Lighting Equipment Sound Studio 2 houses the lighting mains distribution, the dimmers and the switches for the 13A high level sockets (not the 13A at ground level) for the lighting rig in the Frank Oliver Recital Hall, Mains Distribution Board 32A power feeds Zero88 Dimmer Zero88 Dimmer Zero88 Dimmer Zero88 Dimmer Cord Patch Unit Switch plate Cord Patch Unit: All of the 15A sockets in the Frank Oliver are wired back to a 15A cord patch unit, so you can manually choose which sockets are paired. This gives you more flexibility to pair lanterns or use single sockets per channel. The patch tails are approximately 2m in length and are terminated in standard 15A plugs. The tails are held in the front tray when not in use. Switch Plate: Contains the switches for the 13A technical power sockets positioned on the lighting bars and wall boxes. These are numbered as TP1, TP2, etc. Zero88 Dimmer Packs: Each pack contains 6 dimming channels, with 10 Amps per channel. Each pack has DMX addressing and each channel is patchable. A MCB (Miniature Circuit Breaker) is on each pack to protect the cable downstream of the device against overloads and short circuits, preventing damage to cables, equipment and YOU! Version 1.2. Updated 19/09/14 MB 18 Lanterns Selecon Acclaim 650W Fresnel Qty: 10 The Fresnel beam is soft-edged and used when lighting the stage blending seamlessly together with adjacent beams for even area illumination with no need for the addition of frost filters to soften hard edges or to smooth out irregularities or hot spots. Selecon Acclaim 650W PC Qty: 10 The narrow spot achieved with PCs is near parallel and very efficient which is ideal for dramatic highlights, while the flood angle will comfortably cover a large stage area from a short throw distance. The PC beam is well-defined and, like the Fresnel, one used when lighting the stage blending seamlessly together with adjacent beams for even area illumination with no need for the addition of frost filters to soften hard edges or to smooth out irregularities or hot spots. (All Fresnels and PCs include Barn Doors and Colour Frames) ETC Source 4 Junior Zoom Profile 250/50o 575W Qty: 6 The Source 4 provides a clean white beam for unequalled imaging, crisp pattern projection, and a bright, even field. A dichroic reflector removes 90% of infrared heat from beam. The lamp will provide a beam of 13.2 ft. (4.2 m) in diameter, from a distance of 30 ft. (9 m) @ 25° zoom, and 17.8 ft. (5.4 m) in diameter, from a distance of 20 ft. (6 m) @ 50 ° zoom. (Includes ‘M’ size Gobo holder and Iris Diaphragm) ShowTec LED Par 64 Qty: 9 The Showtec LED Par 64 Short is a Par 64 that mixes red, green & blue LED light to create additional colours. Due to the use of LED's, the lifetime is extremely long and the power consumption is very low. The Showtec LED Par 64 contains 153 LED's (51 x red, 51 x green and 51 x blue). It can be controlled by 6 DMX channels (RGB and pre-programmed chases and colours) automatically by its builtin processor or music-controlled by its internal microphone. Version 1.2. Updated 19/09/14 MB 19 Lighting Effects American DJ Pinspot LED Qty: 1 This is a bright 3W white LED Pinspot with a 12-degree beam angle fitted and a 6-degree beam angle lens also included, which can be easily interchanged. The pinspot has very low heat output and power consumption and Includes hanging bracket. Sunray Tri LED DMX Effect Light Qty: 1 The Sunray mixes red, green & blue LED light to create 34 crisp, bright colour beams from one 3-Watt LED source. The beam is cast over an angle of 138o, so the effect is similar to that of a mirror ball. 3 DMX channels are used to control the light’s dimmer/strobe, rotation (either clockwise & anti-clockwise), rotation speed and colour. Varytec Impact Qty: 2 The Impact is a DMX controllable device with a space filling beam effect. Throughout its 6 lenses this item can produce many beams and patterns in red, green and blue. Mirror Ball Qty: 1 Use the Source 4 Profile with an Iris to create a pin-spot and point one towards the mirror ball from each side to create that classic disco lighting effect. A multitude of mirrors reflect spots of light all over a room. The additional mirror ball motor makes this effect even more dazzling by adding movement. Version 1.2. Updated 19/09/14 MB 20 Cables The 15 Amp cables are colour coded with tape at the plug end to help identify the correct length required: Cable Type & Length 15A Extension Cable, 2M long 15A Extension Cable, 3M long 15A Extension Cable, 5M long 15A Extension Cable, 10M long (Red) (Orange) (Yellow) (Green) Qty 10 8 10 6 There are numerous extension cables & 3 & 4-way blocks available for use with 13A equipment. When taping a cable to a lighting bar, use PVC tape only; gaffa or duck tape should not be used for this purpose. YES NO When you have finished using a cable, it should be wound into a loop and secured with a Velcro tie. Any damaged cables must be reported to a member of staff for repair or replacement. Version 1.2. Updated 19/09/14 MB 21 The Lighting Consoles Jester 12/24 The Jester 12/24 operates in four distinct modes: Preset, Program, Run and Super User. The mode you are currently in is displayed via an LED next to the MODE button, and is also indicated on the monitor in the form of a colour change. Each mode has its own use. These modes are explained in the following four sections. Preset Mode - nothing programmed, direct control of the lights with everything operated live; Program Mode - Program Mode is used to record scenes and chases into memories or submasters on the desk, and modifying stored data; Run Mode - Run Mode is used to run a sequence of cues and playing back submasters; Super User - for adjusting the settings of the desk and save and load your show files. This mode is also used to alter the DMX patch, i.e. when you use channel 1 on the desk, it could be controlling Dimmer 49. If you would like further information or help on using the lighting console, please contact the Music Office. ShowTec LED Commander The LED Commander is a 19" Rack mounted DMX controller, suitable for controlling all LED and conventional lighting fixtures. The desk is a versatile, light controller which can control the LED PAR Cans. It can control up to 8 different groups of fixtures simultaneously. It has eight faders which can be patched to the desired DMX value. Furthermore the unit has 16 scenes (8 scenes on 2 pages) and 16 chases (8 chases on 2 pages). The unit can be interfaced by MIDI protocol. It is also equipped with 2 Auxiliary channels to connect to smoke machine or a strobe. Version 1.2. Updated 19/09/14 MB 22 Sound Studio 1 Kay House offers two Sound Studios. The main studio space is Studio 1, which is located between the Frank Oliver and Cabaret, with the latter being the main live room. To book the studio you must have Kay House Building Training and also have been shown around the studio by a member of the Music Office staff. You can then use the studio to record bands, ensembles, solo artists or work on your own music projects. Patch Bay to Cabaret Space Mic Stands Mixing Console and Computer Coiled Cables Outboard Rack Gear Shelving Keyboard Locked Cabinet (Leads to Central Instrument Store – Should remain locked) The studio is well equipped with top of the range equipment, including an iMac running both Pro Tools 11 and Logic Pro X. Other gear available for use includes: Midas Venice F32 Mixing Console This desk offers 24 mono and 4 mono/stereo inputs. The Midas boasts a magnificent 4-band EQ with two full parametric mids, and top A/D conversion. Outboard Rig We are aware that a lot of students will be used to working with home studios, using laptops to produce recordings. We try to offer an alternative to supplement this way of working with a host of outboard signal processors. Students are welcome to work ‘in the box’ but we encourage them to explore the world of ‘outboard’ and the different sound you can achieve by this method. Microphones We have a wide variety of microphones for use in the studio, and pride ourselves on having a stock of both industry standard and some lesser known top quality microphones. Please Version 1.2. Updated 19/09/14 MB st (Leads to 1 Floor Landing) 23 enquire to the Music Office ([email protected]) for an up-to-date list of current stock. Below are some photos of Studio 1 as of August 2014. A view of the control desk A selection of outboard gear The Live Room – Cabaret Space. This has different acoustic qualities in different areas of the room Sound Studio 2 Studio 2 is a smaller room aimed at mixing and computer music, although the audio interface allows for recording within the room as well. This studio has a set of KRK Rokit speakers, ideal for mixing/composing dance music. It again has an iMac running Pro Tools 11 and Logic Pro X, so you can easily move sessions from Studio 1 into Studio 2 and vice versa. Studio 2 is also home to the dimmer rack for the lighting rig in the Frank Oliver, which can create background noise when on. Because of this, access to the studio may be limited at certain times. Version 1.2. Updated 19/09/14 MB 24 Sound Studio Booking Instructions Before you can book use of the Sound Studio you must: Purchase a valid Music Card Receive Building Training for Kay House Have been given booking permission to be able to reserve the Sound Studio using the Kay House Online Calendar Have a representative from the session sign a copy of the Studio rules. This must be done with the Lighting and Sound Technician, David Thynne, or the Music Artistic Coordinator, Alex Hawker. Please contact the Music Office by emailing [email protected] for further information if you do not have the above requirements. IMPORTANT POINTS: You must make your booking at least the day before your preferred session time. The Music Office DOES NOT OPEN AT WEEKENDS, so a request to use the Sound Studio on a Monday must be made on the preceding Friday before 5pm. This is to allow the Music Office staff time to add Sound Studio access permission to your UniCard, which will last only for the duration of the one booking requested; How to Book 1. Log-in to the Kay House Online Calendar; https://intranet.exeter.ac.uk/music/rooms_booking/Web/index.php?redirect 2. Make your booking by selecting the Schedule tab, followed by Bookings from the drop-down menu; 3. Select your preferred date from the calendar icon next to the Kay House main spaces heading; 4. Scroll down to the date you have selected; 5. On the row labelled R1 Sound Studio, click on the preferred start time of your booking; 6. Select the end time of your booking using the drop-down menu next to End; 7. In the Title of reservation section, enter the name of the band or group you are making the booking for. If the booking is for you only, you need not enter anything in this section; Version 1.2. Updated 19/09/14 MB 25 8. In the Description of reservation section, enter a brief outline of what your booking is for, e.g. recording, DJ mixing, etc.; 9. Click on the Create button; 10. Inform the Music Office you have made the booking by emailing [email protected] (Please DO NOT send your request to any other Music Office email address other than this one) Remember the IMPORTANT POINTS listed above; 11. Please include a full list of all individuals who will be present in the Sound Studio during the time of the booking or confirm you will be the sole user. Your booking will not be processed if this information is missing; 12. If you will be running cables from the Sound Studio to the Frank Oliver Hall during your booking and require double swipe access to keep the Sound Studio door open, please include this request in your email; 13. You will receive an email confirming your booking has been approved and the relevant access permissions have been added to your UniCard. Swipe card access to the Sound Studio will be added only to the UniCard of the person requesting the booking. No other participant in the session will have swipe card access to the Sound Studio during the duration of your booking; 14. When the time of your booking arrives, use your swipe card to gain access to the Sound Studio as normal; 15. At the end of your session, please deactivate the double swipe facility if it has been used, leave the room tidy in readiness for the next booking and report any faulty equipment to the Lighting and Sound Technician at the [email protected]. Remember: This process MUST be followed for EACH individual booking made. Thank you for your cooperation. Version 1.2. Updated 19/09/14 MB 26 Sound Studio Rules The Sound Studio can be booked free of charge to all Music Card holders. In return, we ask you to abide by the following set of rules, to ensure that the studio remains a top-quality, well equipped facility that is readily available to students at the University of Exeter. Failure to abide by these rules will result in your access being withdrawn or restricted for future bookings. This is entirely at the discretion of the Music Office staff. Before you can book use of the Sound Studio you must: Purchase a valid Music Card Receive Building Training for Kay House Have been given booking permission to be able to reserve the Sound Studio using the Kay House Online Calendar Have a representative from the session sign a copy of these Studio rules. Note: This representative will have responsibility for the state of the studio during the session; however, any resulting restriction of access will apply to all present personnel. Studio Rules 1. ALL personnel taking part MUST be current Music Card holders – both musicians and engineers. 2. No amplified music may be played in Kay House between midnight and 7am. 3. No equipment is to ever leave the studio, other than to record in one of the adjoining rooms, and must be returned to the studio afterwards. 4. If given access to the locked cabinet (at the Music Office’s discretion) this must be locked and the key replaced after use. 5. The mixing console and outboard equipment must be left in a neutral state, with any patching returned to the default layout (as described in the studio guide). 6. All cables and stands should be coiled or folded neatly and returned to the correct place in the studio after use. 7. Any litter must be disposed of in the bin in the studio, or in the Kay House reception area. 8. Any damages/faults to equipment should be reported immediately to David Thynne ([email protected]). Version 1.2. Updated 19/09/14 MB 27 AV Equipment Digital Projectors: Hitachi CP-RX94 With a brightness of 2600 lumens, a throw of between 1.0m and 6.1m and a variable image size of between 0.76m to 5.08m, the Hitachi CP-RX94 is our brightest projector and one best suited for use in large venues. Qty: 1 Acer X1160 With a brightness of 2000 lumens, this projector is ideal for use in larger spaces. Qty: 2 Proxima DP5610 This projector has a brightness of just 500 lumens, so is better suited for use in smaller rooms, or close to the screen. Qty: 1 Each of the projectors can be linked to a PC or laptop for image and sound via a VGA cable and phono jack lead (in stock) To find out the which projector you should use, please refer to the projection calculator on this website, which will help you determine the throw range, image size, audience positioning and ideal amount of room lighting required for optimum performance: http://www.projectorcentral.com/Acer-X1160-projection-calculator-pro.htm Version 1.2. Updated 19/09/14 MB 28 DVD Players Phillips DVP3111 This DVD player is a simple set that plays practically any disc format. Video Playback Media: CD, CD-R/CD-RW, Video CD/SVCD, DVD, DVD-R/-RW, DVD+R/+RW, DVD-Video, DivX Audio Playback Media: CD, MP3-CD, MP3-DVD, WMA-CD, CD-R/RW, Audio CD Qty: 2 Toshiba This DVD player is compatible with a wide range of disc types: CD-R, CD-RW, DVD-R, DVD+RW, DVD-RW, DVD+R, DVD-ROM, CD, DVD-R DL Qty: 1 Both DVD models can be connected to a digital projector. Version 1.2. Updated 19/09/14 MB 29 Staging There is a plentiful supply of staging modules that can be assembled easily to create a small or large, single or multi-level seating area or stage to present a range of performances including assemblies, plays, music recitals, shows, musicals, speeches, catwalk show, bands and events. The lowest height of the modules (300mm) matches the height of the permanent stages in both the Juke Box Bar and in the Frank Oliver Recital Hall, so these can be extended by the addition of some staging modules. Here are a few examples of designs that are possible using the staging modules available. Multi-level Split level Tiered levels Catwalk Flat layout (carpeted) Version 1.2. Updated 19/09/14 MB Flat layout (uncarpeted) 30 Staging Stock Metal frames The metal frames are available in 500mm or 300mm heights and in two finishes of either dabble grey or zinc plated. They can be connected together using plastic tie plates to prevent the frames from drifting apart during use. The frames can also be fitted one onto another to achieve varying height levels. 500mm: 300mm: Dabble Grey - 16, Zinc - Qty 16 Dabble Grey - 35, Zinc - Qty 36 Wooden decks Deck panels are 750mm square and coated on one side with a slip resistant acrylic lacquer and carpet panels on the other. The decks are placed onto the frames to provide a stable surface. Qty 46 (reversible) Bridge pieces These hook onto the frames to span between two decks. Bridge pieces are coated with the lacquer finish on one side and are not carpeted, which means they are not reversible. Dabble Grey - Qty 23, Zinc - Qty 10 Steps Double tread step units allow access to a height of 500mm. Dabble Grey - Qty 2, Zinc - Qty 2 Handrails Single, two-section and corner handrails in dabble grey are 900mm high are designed to form a safety barrier at the edge of the staging. The sections connect together and into the frames without nuts and bolts, so are quick and easy to add to the stage structure. Single: Qty 4 Version 1.2. Updated 19/09/14 MB Two-section; Qty 10 Corner: Qty 4 31 Chair stops These are placed along the backs of the decks to prevent chair legs from slipping off the staging. Quantities: For use with Decks: Dabble Grey - 16, Zinc - 18 For use with Bridge Pieces: Dabble Grey: 16, Zinc - 15 Transportation & Storage There are 4 storage trolleys available for transporting both the metal frames and the wooden decks. Position the decks to the bottom of the spiral in order to keep the centre of gravity of the stack lower. You will find that stacking frames with the legs down will minimise stack heights. Secure the frames together using a ratchet strap before moving: Ratchet Tie Down Buckle Tightening Instructions 1. From the bottom, thread webbing through slot in centre spool of closed ratchet (figures 1 and 2) 2. Pull webbing through, removing the slack (figure 3) 3. Start ratcheting—raising and lowering handle (figure 4) Ratchet Tie Down Buckle Release Instructions 1. To release, pull & hold release tab on top assembly to override ratcheting function (figure 6)2. Open ratchet until it is completely open and flat (figure 7) 3. Grab webbing from nonfixed side and pull to release webbing (figure 8) 4. Pull and hold release tab on top assembly to close ratchet (figure 9) Proper threading/tightening of ratchet straps is critical. Insure all straps are properly threaded/tightened and free of damage or wear prior to each use. Version 1.2. Updated 19/09/14 MB 32 Assembly First, ensure the surface upon which the staging is to be constructed is level. Then set the frames next to one another If using the bridge decks, these are hooked into place in-between adjacent frames on each side Plastic tie plates are placed over the top of the frames keeping them in place. Ties plates are not needed to secure a bridge deck to a frame. Different levels can be created with lower frames, higher levels by stacking one frame on another, and then held in place with tie plates. Lightweight decks are then placed onto the frame to form a robust structure, and then bungs fill the frame holes. Version 1.2. Updated 19/09/14 MB 33 Transporting the staging between floors in Kay House When moving the staging units between floors in Kay House, please DO NOT USE THE PASSENGER LIFT; USE THE GOODS LIFT ONLY. How to book the staging The staging can be booked using the online booking system explained on Page 54 of this Handbook. Please note: Staging training must be received before the staging equipment can be borrowed. Please contact the Music Office ([email protected]) for further details of how to obtain this mandatory training. Version 1.2. Updated 19/09/14 MB 34 Access Equipment In the Music Office there is a set of Zarges ZAP Z600 steps that provide a telescopic platform for working at a height of up to 4.30m. Please see the illustration for details. A full step-by-step guide to assembling and using the ladder is attached to the frame, which must be read prior to use. Please do not remove the instructions from the frame and notify the Music Office if they are in any way damaged or are not present. NOTES: Before using the steps for the first time, please contact the Music Office to receive training on how to use the steps correctly and safely. When rigging any item of lighting, sound or set at height, it is ESSENTIAL that the stabilisers are extended to add support to the ladder. It also ESSENTIAL the person rigging does not do so alone. There must be another person standing at the base of the ladder in order to help move and stabilize it, as well as to help pass items up to the person standing on the platform. Baggy or loose fitting trousers can snag on a ladder and cause you to fall. Please ensure you dress appropriately. All tools taken into the platform should be secured / tethered to the person standing at the top of the ladder Nothing should be left unattended either in the platform or in the tool tray. Version 1.2. Updated 19/09/14 MB 35 Fire Safety When performing in Kay House your society should have a designated person to coordinate the production within the performance space. Ideally, this person will be involved from the rehearsal stage through to the live performances, where they will be on hand to deal with any emergencies or issues that may hinder the show. Consequently, they should have a full understanding of all of the technical and artistic elements of the production. The following guidelines will be indispensable to anyone filling this role in Kay House. Dressing Rooms Spaces designated as dressing rooms are areas of intense activity during rehearsals and performances, so great care must be taken in ensuring the space remains safe at all times. Electrical items such as hair straightening tongs must not be placed on flammable surfaces and most definitely not on the top of a piano should there be one stored in the room. Drinks must be kept in sealed containers, such as water bottles, beakers, etc. Cups and mugs are not permitted. Any spillages must be wiped up immediately. To prevent trip hazards, costumes and performers’ own clothes must be stored neatly, ideally on wardrobe rails and not left on the floor. Any tables and chairs used in the dressing room must be placed away from escape routes and fire exits. Flames and Flammable Liquids Naked flames or flammable liquids are not permitted onstage or backstage during a performance. Furnishings, fabrics and decorative features Furnishings, fabrics and decorative features (which include drapes and artificial foliage) need to be of materials which are not combustible, or need to have been treated with a suitable flame retardant or fireproofing solution. Drapes and set dressing should not be placed in front of fire exit routes or fire exit doors. Smoke detectors and water sprinklers on the ceiling must be uncovered, also. The set and any items of set dressing are to be retained within the performance space leaving the entrance lobby, the Gallery Space, the stairwells and the landings must be accessible. Get-in routes From the rear of the building: At the rear of the building there are two disabled parking bays, which must be kept clear at ALL times to avoid incurring a parking penalty. Adjacent to the bays is a single parking space that will accommodate most minibuses, vans and small trucks. From here there is level access into the Juke Box Bar, or a ramp leading up to the Gallery Fire Exit. Option one: Through Juke Box Fire Exit (double doors - 1.70m width / 1.96 height) and through the Juke Box entrance (1.46m width / 1.96 height. Access to the 1 st floor is via the flight of 18 stairs (1.32m width / 2.16m height clearance). Version 1.2. Updated 19/09/14 MB 36 Option two: Through the Gallery Fire Exit (1.72m width / 1.96m height) and then up the stairs. From the front of the building: At the side of the building, opposite the All Hours Entrance, there are two parking bays designated for users of Kay House. From here there is a short flight of steps leading down to a pathway that runs along the front of the building to the main entrance Option three: Through the main entrance (1.71m width / 1.96m height) into the Foyer, through the Gallery Space door (1.46m width / 1.96m height) and up the stairs (dimension as above) The dimensions of the doors leading into the Frank Oliver Recital Hall are: Rear door (next to the Music Office): 1.46m width / 1.96m height Front door (stage end): 1.52m width / 1.96m height Lasers These are NOT be used in Kay House. Pyrotechnics Kay House does not hold a license for the use of pyrotechnics, so these are NOT to be used. Seating The seating available in Kay House consists of a number of lightweight seats made from aluminium and plastic that can be interlocked in rows and folded and then stacked when not in use. Regardless of which room you use in Kay House, escape routes, i.e. aisles, should be designed so that in the event of a fire they are capable of enabling the occupants to evacuate the whole building. The width of an aisle must not be wider than the width of the fire exit it leads to. If the audience is less than 60, the gangway width must be at least 900mm wide. If the audience is more than 60, the gangway width must be at least 1100mm wide. There should be no projections which would diminish the clear width of the gangway. Seating should be securely located in position to avoid gangways and exits being obstructed by displaced and overturned seats, especially in a hurried evacuation. When seats are secured together, it should not be possible to separate them, nor for a row to ‘snake”, merely by pushing one or more seats in a row. As far as the moveable seating available in Kay House is concerned, the seats should be secured together via the interlocking mechanism on the front legs in lengths of not fewer than four seats. When not in use, the chairs should be stacked on the trolley as shown in the photo. Suspending the chairs at an angle ensures the trolley fits through the double doors of all rooms on the first floor. Version 1.2. Updated 19/09/14 MB 37 Strobe / Flashing Lights Strobes and flashing lights can cause epileptic seizures, so a notice informing the audience of the use of strobe/flashing lighting during a performance, MUST be displayed in the foyer and an announcement MUST be made in the auditorium before a performance begins. Fire Exits and Fire Assembly Point Fire Exits MUST remain visible and MUST NOT be obscured by any piece of set, lantern, or seating. There MUST be a clearance of 1M square around each Fire Exit. A Fire Assembly Point for Kay House has been provided for the building in a safe location away from the premises. The location is between Avon House and Duryard House, and is shown below. Kay House Duryard House Avon House Staying safe This is all about protecting yourself and your mates, or your colleagues. Get to know your alternative ways out of the building. If you have a friend or colleague with special assistance needs, consider their needs should an evacuation become necessary. For further guidance on the process for Personal Emergency Evacuation Plans (PEEP’s) contact the fire team. Keep escape routes clear, and although it seems obvious -do not interfere with anything provided for your safety, including fire extinguishers, fire alarms, fire call points or smoke detectors-believe it or not it still happens and doing so would be considered as criminal damage. Don’t bring in or use unauthorised items of equipment. Failure to follow emergency procedures may result in the withdrawal of your music card. Version 1.2. Updated 19/09/14 MB 38 Emergency action Get to know the ways out of the building, these are shown on page 5. General information can be found on notices near Fire Alarm call points Actions on discovery of a fire If you discover a fire, YOU must: Move away from the fire Raise the alarm by shouting fire and using the nearest fire alarm call point. Close the door to the room as you leave if possible to contain the outbreak Call the fire service from a safe place by dialling 999 or 112. (You may nominate someone else to do this if you are taking other emergency action, like following shut down procedures, fighting the fire, or assisting the injured.) Tell them the address of the building, which is Kay House Duryard, Lower Argyll Road, Exeter EX4 4RG Tell them what details you have of the location of the fire – where is it, what is it, and what have you done about it- room, floor etc., what is on fire, any persons or hazardous materials involved, any action being taken. If you have been trained to use extinguishers or fire blankets then you may attempt to fight the fire in accordance with your training, but do not take excessive personal risks Leave the building by the nearest exit and report to the person in charge at the assembly point. Since you are the discoverer of the fire you have important information and you should pass this to the Estate Patrol as soon as possible-give this action priority, do not delay to carry out other actions. If they are not already in attendance phone Estate Patrol and pass the information to them on ext. 2222 on an internal phone or 01392 72 2222 on a mobile phone. Note:- when phoning the emergency services, or Estate Patrol it is always helpful to give your name and location- This makes it easier to find you later, you may have important information or you may need assistance yourself if the situation deteriorates. Version 1.2. Updated 19/09/14 MB 39 Action on Hearing an Alarm When you hear the fire alarm or you are told to evacuate by a fire marshal or member of Estate Patrol you and everyone else in the building must: If you have a specific role in an evacuation e.g. Fire marshal, or assisting a disabled person-carry out that role. Evacuate the building as quickly as possible, using the nearest safe exit. You may take what you may need with you-coat, keys, handbag, money etc. in case you are unable to return for some time, but only if this will not delay your evacuation. It is prudent to consider where you keep these items so that you can collect them on your way out in an emergency Close all doors in the area before leaving but not if this will endanger you, or hinder your escape. Report to the designated assembly point. You will find this on the fire action notice placed by fire alarm call points. Pass any information you consider relevant to person in charge at the assembly point. Follow the directions of the Emergency Services or Estate Patrol. The fact that the Fire Alarm has been silenced is NOT a signal that you may return into the building. is Version 1.2. Updated 19/09/14 MB 40 The Kitchen The kitchen is equipped with a microwave oven, two conventional ovens, a grill, 4 hobs, a fridge, a hot water urn, and a kettle. It can be used by any musician, cast member, technician or member of staff rehearsing or performing in the building, but it is not to be treated as a student refectory. Please ensure all dishes are washed and the ovens and worktops are wiped clean after use. The Coffee Bar The Coffee Bar seats 35 people and has confectionary, cold drinks and hot drinks vending machines. There are data connection points along the side wall and Wi-Fi is available throughout the building. Version 1.2. Updated 19/09/14 MB 41 Closing the Building ALL ROOMS Please leave all rooms Clean and Tidy using the bins provided. If continually fail to keep rooms tidy after leaving you will not be granted future access to Kay House. Checking ALL doors and windows. This is not just the doors and windows of the spaces your group has used. Anyone closing the building must check all the windows and doors of every space that has been unlocked while your users were in the building. Walking round the Top Floor Frank Oliver Recital Hall - Check windows behind radiators, especially the hardto-see one next to the Fire Escape. Roll blinds up far enough to check the top windows too. Lean against the Fire Escape to check it is shut. Music Office Store – Must be locked, If not, please secure it using the master key. Rear Hallway - Check behind the blinds to confirm the windows are shut. Central Instrument store - Swipe in if you are authorized to do so and check that all three inner doors are locked with the thumb-turn. If you do not have access to the CIS, please check each set of doors individually from the doors of the adjoining rooms; Colonnade room, Cabaret Space, Frank Oliver Recital Hall Colonnade Room - Check windows, behind blinds. World Instrument Store - Must be locked, If not, please secure it using the master key. Rear upstairs Fire Escape - Most easily forgotten, lean against this and check it is shut. Green (Tea) Room – Enter via the Cabaret Space and check the door leading to the rear corridor is locked. Cabaret Space - Check windows AND Exit via the large double doors leading to the right hand side landing. Walk down the stairs and check the door leading into the 24-hour access area is locked with the thumb turn Walking round the Ground Floor Coffee Bar - Windows top and bottom, lean against the External Terrace door Broadwood Theatre Space – Check the windows top and bottom and the two doors to the terrace are locked. Gallery - Windows behind the staircase, lean against the Fire Exit Kitchen – Check the Fire Exit door is locked with the thumb-turn Tech Store - Must be locked, If not, please secure it using the master key. The Juke Box - Check windows behind blinds and the Fire Escape. Juke Box Bar - Go behind the bar and check that both doors are locked. The most important one is that leading into the 24 Access Areas. Toilets - Please make a quick check of each cubicle/urinal to ensure there are no blockages. Version 1.2. Updated 19/09/14 MB 42 Using the Kay House Booking System The online booking calendar for Kay House can be found at https://intranet.exeter.ac.uk/music/rooms_booking/Web/ Please note: All Music Card holders can book use of the Amp Room and the Jam Jar in the 24-hour area, but in order to be able to book any of the rooms within the main part of Kay House you must receive Building Training first. This is compulsory for any individual and a society or group may nominate one of more members to attend on their behalf. Please contact the Music Office ([email protected] / 01392 723042) to register for the next training date. Step 1: Follow the link above and enter your university username and password: If you have not used the system before you will need to click on the “create an account” link just underneath the log in button. To simply see which rooms are in use please click “view schedule.” Step 2: The home page/control pane Version 1.2. Updated 19/09/14 MB 43 On this page, you can see your upcoming reservations. Depending on when you bought your music card, you may not have access to all the rooms straight away. Please e-mail [email protected] with the rooms you would like to be granted permissions to and we will sort this out for you as soon as possible. Step 3: Click on the ‘Schedule’ link at the top of your screen to be taken to the Kay House Main Spaces bookings page. Blue denotes that the booking has been approved, and orange is a booking that is still pending approval (if you cannot book these rooms there will be red hash marks across the calendar). Step 4: To book a practice room, find the date and room you want, and then click on the square of the time you would like to start your practice. This should pop up: Version 1.2. Updated 19/09/14 MB 44 Select a start and end time from the drop-down menus and please make sure that you personalise the reservation title as this is what appears on the booking calendar. For example you should put “Piano Ensemble Rehearsal” instead of just “rehearsal.” To book extra instruments (e.g. Petrof piano, sound systems and staging) click on accessories and select how many of each item you would like. Press click create at the bottom right and your reservation will come up in orange in the slot you asked for, pending approval by one of the booking co-ordinators. To delete your reservation, just click on it again and scroll down to the delete button at the bottom. Once your booking has been confirmed, the reservation will turn blue and you will be sent a confirmation e-mail. Please book a decent time in advance – this will help us ensure everything goes smoothly and also it will reduce the risk of you not getting a booking during busier periods. Just a note: Please be considerate when using these rooms, and leave them in a tidy state for the next user. Sometimes INTO use the building for exams, or other societies perform concerts, so if large instruments and chairs are left out then start times will be affected. Don’t forget – if you are the last user of the main spaces during the day then check all exterior windows and doors are closed and un-swipe the doors with card readers if they are on Double Swipe. Version 1.2. Updated 19/09/14 MB 45 University of Exeter Music Part 2 How to hire the Music Office’s gear & instruments Alex Hawker & David Thynne ay House5 Version 1.2. Updated 19/09/14 MB 46 List of Contents Part Two – How to Hire the Music Office’s gear & instruments 45 List of Contents 46 Introduction 47 Rhythm Instruments 48 Drum Kits 48 Keyboards 49 Guitars 50 Brass Instruments 51 String Instruments 51 Woodwind Instruments 51 Percussion Instruments 51 Technical Gear 52 How to Book Gear and Instruments 54 Reservation 54 Confirmation 56 Pick-up and Drop-off 56 How to Contact Us Version 1.2. Updated 19/09/14 MB 57 47 Introduction Part Two of this Handbook introduces you to the wide ranging stock of instruments and technical equipment the Music Office has available for loan all Music Card holders to borrow at no additional charge to the £15 annual membership fee. Our instruments are micro-chipped against the possibility of theft and the technical equipment is engraved for identification. We ask students who are borrowing any item for an extended time to list it on their residence contents insurance as if it was their own. This guide will talk you through some of our instruments and hire gear, but please bear in mind that not all the stock will be available all year round, and our stock is constantly being updated. On Page 54 you will find a step-by-step guide to the process of making an instrument or equipment booking and collecting the items requested. Version 1.2. Updated 19/09/14 MB 48 Rhythm Instruments Drum Kits DRUM KIT A Premier - Artist Birch Cornwall House Music Store Full Drum Kit, with cases Hi-hat, Crash and Ride Small kick drum, ideal for Jazz DRUM KIT B CB Drums Kay House Gear Store Full Drum Kit, with cases Hi-hat, Crash and Ride DRUM KIT E Premier – Olympic Kay House Gear Store Full Drum Kit with cases Hi-hat, Crash and Ride DRUM KITS C & D Pearl Rhythm Traveller Kay House Central Instrument Store Travel Drum Kit, with cases Hi-hat, Crash and Ride Ideal for practice or tight stages! Version 1.2. Updated 19/09/14 MB 49 Keyboards Digital Pianos Korg SP170 88 keys 10 voices Yamaha P60 88 keys 10 voices Yamaha P105 88 keys 14 voices Lightweight Electric Keyboards Yamaha PSR300 61 keys 100 voices Split/dual/rhythm function Yamaha YPP35 61 keys 8 voices Synthesizers Roland Juno DI 61 keys 1000+ voices Mic input for vocoder effects Build and edit sound patches MIDI Controllers M-Audio 88ES 88 keys Pitch-bend and Modulation USB & MIDI connectivity Version 1.2. Updated 19/09/14 MB 50 Guitars Bass Guitars PureTone Harley Benton Upright Electric Electric Guitars PureTone (x2) Electro-Acoustic Guitars Fender CD60ce Gear4Music (x2) Steel-String Acoustic Guitars Fender CD60 Nylon-String Acoustic Guitars Yamaha C40 Dulcet Hokada ¾ size Version 1.2. Updated 19/09/14 MB 51 Brass Instruments The Music Office has a variety of brass instruments, including: Alto Trombone, Baritone Horn, Bass Trombone, Cornet, Euphonium, Flugel Horn, French Horn, Tenor Horn, Trombone, Trumpet and Tuba! String Instruments The Music Office has a variety of string instruments, including: Cello, Double Bass, Viola and Violin. Woodwind Instruments The Music Office has a variety of woodwind instruments, including: Alto Clarinet, Alto Flute, Alto Sax, Bari Sax, Bass Clarinet, Bass Flute, Bassoon, Clarinet, Contra-Bassoon, Cor Anglais, Flute, Oboe, Piccolo and Tenor Sax! Percussion Instruments The Music Office also has a wide variety of percussion instruments, both orchestral and world, from timpani to agogo! Tamborims Spring Drums Temple Blocks Wooden Agogo Wood Blocks Agogos Claves Cowbells Please enquire at the Music Office for more details on any of the instruments we stock. Hand Bells Sleigh Bells Maracas Shekere Beaters Version 1.2. Updated 19/09/14 MB Cabasa 52 Technical Equipment Amps We have a variety of guitar and bass amps to hire, from small combos for practice in a small room to larger amplifiers suitable for the stage. Some of our stock includes: Roland Cube Guitar Amp Fender Rumble 30 Bass Amp Harley Benton Guitar Amp Microphones Our microphones for hire include a mixture of dynamic and condenser mics, suitable for most live situations. Some of our stock includes: Shure SM58 Rode M5 AKG Rhythm Pack Mixers At the heart of any PA system is the mixing desk. We have a range of mixing desks in various sizes, suitable for a small acoustic act up to a full Big Band. Some of our stock includes: Allen & Heath Wz 14:4:2 Version 1.2. Updated 19/09/14 MB Behringer Eurodesk SL 2442 FXPro 53 Outboard We also have sets of outboard equipment to use with desks that don’t have built in effects. These include reverb units, equalisation and compression. Speakers We have a wide selection of active and passive speakers to hire. Some of our stock includes: Mackie SRM450 RCF ART 312-A D&B C690 Peripherals We also have a wide selection of leads, stands and other peripherals that can be added to your booking. Version 1.2. Updated 19/09/14 MB 54 How to Book Gear and Instruments Reservation You can book most equipment http://spa.exeter.ac.uk/musicoffice/chronos/. using our online booking system: To access this site you must have a valid Music Card. When prompted, you should sign on to the University’s Single Sign On Service, using your University username and password. From the homepage click ‘Equipment & Instruments’ & ‘Request Equipment or Instruments’. This will bring up the first screen: Here, you should select the dates that you wish to sign out/in your gear/instruments. Please note, gear can only be collected and returned on Mondays, Wednesdays and Fridays. So, for a concert on a Tuesday, you must sign out your gear by the Monday etc. Once you have chosen your dates, click ‘Proceed to Catalogue using the above dates’. Version 1.2. Updated 19/09/14 MB 55 This will take you to the catalogue: Here you can either browse the stock by category, or use the search bar. For this example I am going to book 2 x Condenser Mic Tbone SC140. Once I have found the equipment in ‘Sound – Microphones’ I click on ‘Add to Wish list’ This will add the item to the column on the right. Be sure to change the quantity if necessary and then click ‘Update List’. Once you have found all of the items you require, click on “Done? Click to upload and save” on the right hand column. Version 1.2. Updated 19/09/14 MB 56 This will bring up another window with your order, where you need to add the name of the project or event (e.g. The Devonshire’s Gig at Firehouse). Be sure to check the quantity and enter the name of the event and then click Store This Wish List. This will generate a receipt and confirmation of your request. Confirmation The above requesting procedure does not mean your booking has been approved by the Music Office. Once we receive this request, we will wait for you to come into the office in Cornwall House to arrange the collection and drop-off times. Once we have spoken to you to arrange a mutually convenient time, you will receive an email confirming the booking, the times and the equipment. Pick-up and Drop-off It is essential that you keep to the times stated, and you must notify the Music Office should you need to change these times at all. Once the gear has been dispatched you will be expected to return the gear at the time agreed, without being reminded. Failure to do so may result in future bookings being declined. Version 1.2. Updated 19/09/14 MB 57 How to Contact Us Please contact the Music Office if you would like more information about any of our activities or facilities. Music Manager Music Artistic Coordinator Mark Barretto Alex Hawker Phone: +44 (0) 1392 723814 Phone: +44 (0) 1392 725941 Email: [email protected] Email: [email protected] Arts & Culture Administrator for Music Lighting & Sound Technician Clare Greenall David Thynne Phone: +44 (0) 1392 723813 Phone: +44 (0) 1392 725942 Email: [email protected] Email: [email protected] General enquiries Room Bookings Phone: +44 (0) 1392 723042 Phone: +44 (0) 1392 723042 Email: [email protected] Email: [email protected] Version 1.2. Updated 19/09/14 MB The Music Office - supporting student music