1
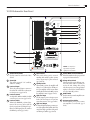
Instruction Manual
10 CSB Corner Subwoofer
2
Safety Precautions
10 CSB Corner Subwoofer
Safety Precautions
Table of Contents
2
3
4
5
CAUTION: To reduce the risk of electric shock, do not remove the
cover (or back). No user serviceable parts inside. Refer to qualified personnel.
WARNING: To reduce the risk of fire or electric shock, do not expose
this appliance to rain or moisture. This device generates a small amount
of heat. Make sure nothing blocks the ventilation of the amplifier.
5
5
5
5
6
6
7
7
The lightning flash with arrowhead, within an equilateral triangle, is
intended to alert the user to the presence of uninsulated
“dangerous voltage” within the product’s enclosure that
may be of sufficient magnitude to constitute a risk of
electrical shock to persons.
7
8
8
The exclamation point within an equilateral triangle is
intended to alert the user to the presence of important
operating maintenance (servicing) instructions in the
literature accompanying the appliance.
9
9
9
10
10
9
9
10
11
11
11
Model 10 CSB
10 CSB Subwoofer Rear Panel
Features
Connecting Your Subwoofer
Low-Level Connection
Adding a Second Sub
High-Level Connection
High-Level Output
Example 1: Subwoofer Line Out/Low Level In
Example 2: Sub Out/Low Level In, Two Subs
Example 3: Preamp Line Out/Low Level In for 1 Subwoofer
Example 4: Preamp Line Out/ Low Level In for Stereo
Subwoofers
Example 5: Preamp Line Out/Low Level In Dual Mono Subs
Example 6: Speaker Out/High Level In for 1 Subwoofer
Example 7: Speaker Our/High Level In for Stereo
Subwoofers
Placement
System Initial Set Up
Subwoofer Tuning Without an SPL Meter or Test Tones
How Much is Enough?
Using the Low Pass Frequency Crossover Control
The Phase Control
A Word About Bass, Center Channel Modes
and System Set Up
Care of Your Subwoofer
Painting the Cabinet
Specifications
Subwoofer Troubleshooting Guide
Model 10 CSB
Corner Subwoofer
For Future Reference
Record your serial numbers and date of purchase here:
Model Number
Serial Number
Date of Purchase
The serial number is found on the back panel.
Copyright © 2006 Atlantic Technology International.
Specifications are those in effect at the time of printing. Atlantic Technology reserves
the right to change specifications or designs at any time without notice.
Congratulations on your purchase of an Atlantic Technology 10 CSB Corner subwoofer. The special design of this product allows it to be placed
unobtrusively in the corner of your room, minimizing its visual impact.
The unique shape of the subwoofer’s cabinet combined with corner placement also provides the maximum amount of bass reinforcement, so your
subwoofer will deliver optimum performance.
This subwoofer uses an extremely high-performance driver with an oversized voice coil for low distortion, vented voice coil and vented basket for
extremely high power handling and high-excursion, and a low-resonance
cone for exceptionally deep response.
The built-in low-noise amplifier has a linear power supply and preamp,
coupled to a Class-D PWM output stage. This compact high-efficiency
amplifier provides great sound with minimal heat and easy hookup in
any system.
Subwoofer Rear Panel
3
Instruction Manual
10 CSB Subwoofer Rear Panel
Figure 1
1
2
STATUS
LEVEL
L/MONO
MIN
3
LOW
LEVEL
MAX
RIGHT
4
FREQ
NORMAL
50
BYPASS
160
OFF AUTO
PHASE
0
5
LOWPASS
6
ON
STDBY
7
INPUT
8
180
HIGH
LEVEL
9
OUTPUT
+
110-120V
RIGHT
-
+
L/MONO
10
220-240V
11
CAUTION
RISK OF ELECTRIC SHOCK
DO NOT OPEN
POWER
12
-
ON
WARNING: SHOCK HAZARD-DO NOT OPEN
AVIS:RISQUE DE CHOC ELECTRIQUE-NE PAS OUVRIR
OFF
WARNING
TO REDUCE THE RISK OF FIRE OR ELECTRIC SHOCK, DO NOT EXPOSE
THIS APPLICANCE TO RAIN OR MOISTURE. NO USER SERVICEABLE
PARTS INSIDE. REFER SERVICING TO QUALIFIED SERVICE PERSONNEL
13
FUSE 115,T2AL/250V
FUST 230V,T1.25AL/250V
1
Variable Level Control
6
Use this control to set the level of bass
desired
2
This will be green for "on" condition,
amber for "standby"
3
7
Low Pass Control
An adjustable (40Hz to 140Hz) @ 18dB/
octave low-pass crossover. (pgs 5 and 9)
5
8
When in the NORMAL position, adjustment of the crossover can be made by
the Crossover Control. If being fed a prefiltered or THX signal, place the switch at
the BYPASS position. (pgs 5 and 9)
9
High Level Output
If using the high level input, you may connect your right and left satellites here. This
output has a high-pass filter to help avoid
overdriving of satellites. (pgs 5 and 8)
Product Model and Serial Number
Write this number in the space provided
on page 2 for future reference.
11
Voltage Select Switch
Voltage switch for use in different countries. This switch will be set when you
receive the unit. Change this setting
only when you are sure your application
requires it. For US, the switch should be
set to the 110-120V position.
12
High Level Input
Use this input if your receiver/processor
lacks a line-level output, or if you have
some other reason to do so. (pgs 5 and 8)
Low Pass Switch
10
Standby Switch
When in ON position, the amplifier will
always be on. When in the AUTO position, the amplifier will be in Automatic
Standby Mode. When in the OFF position,
the amplifier is muted. (pages 5 and 9)
Low Level Input
This is the preferred input to connect to
the subwoofer or LFE line out from your
receiver/processor. (pgs 5 and 6)
4
Phase Control
This switch allows precise acoustic
matching with satellite speaker systems
whose output may be phase reversed.
(pgs 5 and 10)
Status LED
NOTE: Your amplifier's
appearance may differ
slightly from illustration
110- 120VAC~ 60Hz
220- 240VAC~ 50Hz
180WATTS
On/Off Switch
Use this switch to turn the amplifier completely on or off.
13
AC Input and Fuse Holder
Use the included power cord to connect
your amplifier to a wall outlet. (pgs 5
and 6)
4
Features
10 CSB Corner Subwoofer
Features
Your Atlantic Technology powered subwoofer has been engineered using
the latest technology and finest components available. It features:
■
■
Sealed enclosure design for low distortion and deep bass output
High-current amplifier
The output stage of this amplifier is a highly efficient PWM switching
type capable of very high current delivery for exceptional driver control and cool operation. It has been precision matched and equalized
to our rugged drivers. Together they deliver powerful, controlled bass
with great articulation and authority.
■
■
■
■
NOTE: If you are using a surround Processor/Receiver that includes
its own filtered subwoofer output (or a THX Certified Processor/
Receiver), we strongly recommend that you set the crossover control to the Bypass position.
An AC cord power input socket and fuse holder
Your subwoofer comes supplied with a heavy-duty detachable power
cord.
■
Voltage Selector
Easily accessible with a screwdriver tip.When changing voltage setting
also change fuse accordingly.
An adjustable (50Hz to 160Hz) @ 18dB per octave LowPass crossover
The steep upper end roll-off slope of 18dB per octave allows for much
better bass integration with the satellite speakers while making the
woofer less localizable.
Automatic standby operation, LED indicator
Automatic standby features signal sensing turn-on with 10-15 minute
turn-off delay. There’s a multi-color LED status indicator that lets you
know when the unit is on or in standby. Automatic Standby can be
defeated by placing the rear mounted switch in the ON position.
A useful in room working frequency range of 25Hz to 150Hz
Many subwoofers offer specifications that look great on paper,
but in real world use deliver less than promised. Atlantic Technology subwoofers are over-designed to ensure that they will deliver
their rated performance in your room, when properly placed and
adjusted.
A Phase rotary control (0-180º)
This switch allows precise acoustic matching with satellite speaker
systems whose output may be phase reversed. This control also allows
you to compensate for unusual room acoustics that occur when the
woofer is physically separated from the main speakers. Be sure to try
the Phase control across its range when you set up your subwoofer.
Even if you’ve simply changed the built-in crossover settings it’s a
good idea to recheck the phase control since the crossover and phase
controls acoustically interact with each other. Pay particular attention
to the transition of bass from the woofer to the satellites, listening for
smooth and well defined bass throughout the range.
Sealed enclosure woofer designs are inherently low in distortion, and
deliver deep smooth bass response with a gradual and predictable
roll-off below resonance. As with all Atlantic Technology subwoofers,
we have paid close attention to providing accurate musical bass reproduction along with terrific special effects.
■
Two low level inputs, two high level inputs with highpass outputs
Either input may be used with either mono or stereo feed. This allows
great flexibility of installation method and hookup. Highpass filter
at high level output reduces bass overdriving of satellites, preserving clarity.
A long-throw composite cone driver with a vented motor structure and an oversized high temperature, 4-layer voice coil
This powerful driver has a very stiff cone that acts like a piston
throughout its operating range. Its massive magnetic motor assembly and high temperature component parts deliver exceptional performance and reliability.
■
■
■
Designed and built to meet all current UL/CSA and European
safety requirements
Connections
Instruction Manual
Connecting Your Subwoofer
The Atlantic Technology 10 CSB is simple to hook up, offering several
connection methods for maximum flexibility. Study the system diagrams
starting on the next page. Once you have found the example which most
closely matches your system, hook up your subwoofer(s) as shown in
that diagram.
Low-Level Connection
In most cases, we suggest using the low-level (RCA jack) subwoofer line
out or preamp output if your receiver/processor has one. Simply connect
your subwoofer with high quality shielded cables as shown in the diagrams. Use the diagram that best suits your connection requirements.
Adding a Second Sub
Use the supplied y-adapter to connect the cable from the second sub. This
may be located at either end of the first sub's input cable.
High-Level Connection
Alternately, you may use the high-level (speaker) inputs. We recommend
that you connect your new Subwoofer(s) using high quality wire of 16
gauge or larger. There are many respected manufacturers in the audio
industry that specialize in speaker wire and interconnect cables suitable
for your new system. Please consult your audio/video dealer for more
specific information.
High-level Output
When using the high level inputs, connect your front left and right speakers here. This method is primarily intended for systems without a built-in
crossover or a dedicated subwoofer output. The signal that comes from
the High-level Output jacks is high-pass filtered to avoid overdriving these
speakers with deep bass. The characteristics of this filter are designed for
maximum compatibility with Atlantic speakers.
WARNING: To prevent risk of electrical shock or damage to your
equipment, always unplug all component AC cords before proceeding with speaker and component connections! The last step in
wiring your system should be plugging in the AC cords!
5
6
Connections
10 CSB Corner Subwoofer
Example 1: Subwoofer Line Out/Low Level In
This is the simplest, most common connection.
STATUS
�������
���
L/MONO
LOW
LEVEL
MAX
RIGHT
NORMAL
BYPASS
160
LOWPASS
Subwoofer
OFF AUTO
Receiver/Processor
ON
STDBY
Example 2: Sub Out/Low Level In, Two Subs
180
2A. Y-Adapter located at Receiver/Processor
INPUT
STATUS
�������
���
L/MONO
HIGH
LEVEL
LOW
LEVEL
MAX
Y-Adapter
RIGHT
OUTPUT
GHT
-
-
Subwoofer 1
+
L/MONO BYPASS
NORMAL
160
STATUS
LOWPASS
L/MONO
MAX
OFF AUTO
ON
RIGHT
180
Subwoofer 2
CAUTION
BYPASS INPUT
NORMAL
160
Receiver/Processor
LOW
LEVEL
STDBY
RISK OF ELECTRIC SHOCK
DO NOT OPEN
LOWPASS
2B. Y-Adapter located at one Subwoofer
RNING: SHOCK HAZARD-DO NOT OPEN HIGH
QUE DE CHOC ELECTRIQUE-NE PAS OUVRIR
STATUS
OFF AUTO
WARNING
LEVEL
ON
STDBY
L/MONO
OUTPUT
THE RISK OF FIRE OR ELECTRIC SHOCK, DO NOT EXPOSE
CANCE 180
TO RAIN OR MOISTURE. NO USER SERVICEABLE
LOW
E. REFER
SERVICING TO QUALIFIED SERVICE PERSONNEL
MAX
GHT
-
-
+
Y-Adapter
�������
���
LEVEL
L/MONO
RIGHT
INPUT
Subwoofer 1
NORMAL
160
STATUS
BYPASS HIGH
LEVEL
LOWPASS
L/MONO
OUTPUT
-
-
OFF AUTO
+
MAX
CAUTION
L/MONO
GHT
ON
RISK OF ELECTRIC SHOCK
DO NOT OPEN
LOW
LEVEL
STDBY
RIGHT
180
RNING: SHOCK
HAZARD-DO
Subwoofer
2 NOT OPEN
QUE DE CHOC ELECTRIQUE-NE PAS OUVRIR
NORMAL
BYPASS INPUT
160
WARNING
LOWPASS
HIGH
THE RISK OF FIRE OR ELECTRIC SHOCK, DO NOT EXPOSE
CANCE TO RAIN OR MOISTURE. NO USER SERVICEABLE
LEVEL
E. REFER SERVICING TO QUALIFIED SERVICE PERSONNEL
OFF AUTO
CAUTION
RISK OF ELECTRIC SHOCK
DO NOT OPEN
ON
STDBY
OUTPUT
Receiver/Processor
Connections
Instruction Manual
Example 3: Preamp Line Out/Low Level In for 1 Subwoofer
This arrangement is for owners of stereo receivers/amplifiers with Preamp outputs.
�
STATUS
N
LOW
LEVEL
MAX
RIGHT
NORMAL
�
BYPASS
160
�
���
���
L/MONO
����
��
�
LOWPASS
Subwoofer
OFF AUTO
Receiver/Processor
ON
STDBY
Example 4: Preamp Line Out/ Low Level In for Stereo Subwoofers
180
Note that the L/MONO input is used on both subwoofers.
INPUT
�
STATUS
N
MAX
RIGHT
N
HIGH
L/MONO
LEVEL
LOW
LEVEL
OUTPUT
RIGHT
-
-
L/MONO
NORMAL
Y-Adapter
BYPASS
160 STATUS
�
����
��
�
Y-Adapter
LOWPASS
L/MONO
MAX
���
���
+
Subwoofer 1
�
OFF AUTO
ON
180
LOW
LEVEL
STDBY
RIGHT
Receiver/Processor
CAUTION
Subwoofer 2
RISK OF ELECTRIC SHOCK
DO NOT OPEN
NORMAL
BYPASS INPUT
160
WARNING: SHOCK HAZARD-DO NOT OPEN LOWPASS
ISQUE DE CHOC ELECTRIQUE-NE PAS OUVRIR
Example 5: Preamp
Line Out/Low Level In Dual Mono Subs
HIGH
OFF AUTO
STATUS
WARNING
ON
LEVEL
�
-
N
MAX
RIGHT
-
LOW
Y-Adapters
LEVEL
+
L/MONO
RIGHT
INPUT
Subwoofer 1
NORMAL
BYPASS
160 STATUS
HIGH
LEVEL
LOWPASS
L/MONO
OUTPUT
-
-
OFF AUTO
+
N
MAX
CAUTION
L/MONO
RIGHT
RISK OF ELECTRIC SHOCK
DO NOT OPEN
180
ON
LOW
LEVEL
STDBY
RIGHT
WARNING: SHOCK
HAZARD-DO
Subwoofer
2 NOT OPEN
ISQUE DE CHOC ELECTRIQUE-NE PAS OUVRIR
NORMAL
160
BYPASS INPUT
WARNING
LOWPASS
HIGH
CE THE RISK OF FIRE OR ELECTRIC SHOCK, DO NOT EXPOSE
PLICANCE TO RAIN OR MOISTURE. NO USER SERVICEABLE
LEVEL
SIDE. REFER SERVICING TOOFF
QUALIFIED
SERVICEON
PERSONNEL
AUTO
CAUTION
STDBY
�
���
���
CE THE RISK OF FIRE OR ELECTRIC SHOCK, DO NOT EXPOSE
STDBY
L/MONO
OUTPUT
PLICANCE TO RAIN OR MOISTURE. NO USER SERVICEABLE
180
SIDE. REFER
SERVICING TO QUALIFIED SERVICE PERSONNEL
Y-Adapter
Receiver/Processor
�
����
��
�
Y-Adapter
7
STATUS
LEVEL
L/MONO
8
Connections
MIN
LOW
LEVEL
MAX
10 CSB Corner Subwoofer
RIGHT
Example
6: Speaker Out/High Level In for 1 Subwoofer
FREQ
This is the most common method
for connecting
NORMAL
BYPASS a subwoofer to a system without a dedicated subwoofer line
out or preamp
outputs.
50
160 The signal that comes from the High-Level Output jacks is hi-pass filtered to prevent
LOWPASS
overdriving the satellites with deep bass frequencies.
OFF AUTO
PHASE
ON
STDBY
0
180
�
�
INPUT
HIGH
LEVEL
OUTPUT
+
-
RIGHT
-
+
L/MONO
Receiver/Processor
Subwoofer
Right
Speaker
Left
Speaker
STATUS
20-240V
STATUS
LEVEL
LEVEL
L/MONO
MIN
MAX
CAUTION
LOW
LEVEL
MIN
NORMAL
RIGHT
This is the most common method for connecting 2 subwoofers to a system without a dedicated subwoofer line
out or BYPASS
Preamp outputs. Note that the L/MONO High Level input is
NORMAL
LOWPASS
used 50on both160left and right subwoofers.
FREQ
BYPASS
WARNING:
SHOCK HAZARD-DO NOT OPEN
50
160
LOWPASS
AVIS:RISQUE DE CHOC ELECTRIQUE-NE
PAS OUVRIR
OFF
WARNING
OFF AUTO
PHASE
LOW
MAX
LEVEL
Example 7: Speaker Out/High
Level In for Stereo Subwoofers
RIGHT
RISK OF ELECTRIC SHOCK
DO NOT OPEN
FREQ
L/MONO
ON
OFF AUTO
PHASE
STDBY
TO REDUCE THE RISK OF FIRE OR ELECTRIC SHOCK,
DO NOT EXPOSE
THIS 0
APPLICANCE
180TO RAIN OR MOISTURE. NO USER SERVICEABLE
PARTS INSIDE. REFER SERVICING TO QUALIFIED SERVICE PERSONNEL
STDBY
0
180
INPUT
INPUT
HIGH
LEVEL
0VAC~ 6 0 H z
0VAC~ 5 0 H z
WATT S
+
RIGHT
-
+
+
L/MONO
110-120V
220-240V
Left
Speaker
CAUTION
RISK OF ELECTRIC SHOCK
DO NOT OPEN
R
OFF
110- 1 2 0 VA C~6 0 H z
220-240VAC ~5 0 H z
1 8 0WAT T S
RIGHT
-
-
+
L/MONO
Left Subwoofer
Right
Speaker
OFF
WARNING
TO REDUCE THE RISK OF FIRE OR ELECTRIC SHOCK, DO NOT EXPOSE
THIS APPLICANCE TO RAIN OR MOISTURE. NO USER SERVICEABLE
PARTS INSIDE. REFER SERVICING TO QUALIFIED SERVICE PERSONNEL
FUSE 115,T2AL/250V
FUST 230V,T1.25AL/250V
Receiver/Processor
You can connect to the High-level inputs by removing 1/2" of insulation from each wire end,
CAUTION
twisting the strands
of wire together and placing the wire into the appropriate terminal's
hole on the rear of the subwoofer while pushing the adjacent latch as illustrated. Be careful
WARNING: SHOCK HAZARD-DO NOT OPEN
AVIS:RISQUE
DE CHOC
ELECTRIQUE-NE
OUVRIR
that
no stray
strands
of wirePAS
touch
across connections.
WARNING
It is important
to observe polarity while making speaker connections: red (+) terminals
on the amplifier to red (+) on the speaker, black (–) on the amplifier to black (–) on the
speaker. Look carefully at the wires you are using and note that one of the wires in each
pair will be marked by either the conductor color, printing on the wire jacket, a ridge on
one side of the wire jacket, or a thread intertwined with the wire strands. By convention,
the marked wire is connected to the red (+) terminal.
RISK OF ELECTRIC SHOCK
DO NOT OPEN
POWER
WARNING: SHOCK HAZARD-DO NOT OPEN
AVIS:RISQUE DE CHOC ELECTRIQUE-NEON
PAS OUVRIR
�
OUTPUT
Right Subwoofer
220-240V
�
HIGH
LEVEL
OUTPUT
-
ON
TO REDUCE THE RISK OF FIRE OR ELECTRIC SHOCK, DO NOT EXPOSE
THIS APPLICANCE TO RAIN OR MOISTURE. NO USER SERVICEABLE
PARTS INSIDE. REFER SERVICING TO QUALIFIED SERVICE PERSONNEL
110 -12 0VAC~6 0Hz
22 0-2 40VAC~50Hz
18 0WATTS
Placement
9
Instruction Manual
Placement
use the level control on the rear panel of the sub to make this adjustment.
If you decide not to use an SPL meter try to set all the speaker levels the
same using the Test Tones. Of course, this will be more difficult without
the meter, especially for the subwoofer.
Subwoofer Tuning Without an SPL Meter
or Test Tones
Start by listening with the subwoofer Crosscontrol set at around 100Hz (midpoint) or in the Bypass
position if you’re
LEVEL
L/MONO
using a THX Certified processor or unit with
LOW
a built-in crossover. Set
the phase control to
MIN
MAX
LEVEL
0º, and the VariableRIGHT
Level Control (Figure
6) to the minimum position. Play some music that you know has good
FREQ
bass
content, and turn the level control up until you just start to hear the
NORMAL
BYPASS
subwoofer working. Now, from
your normal
listening position, deter50
mine whether
the160
subwoofer is playing loudly enough
and filling in the
LOWPASS
bass frequencies of the music evenly. If adjustment is necessary, start
by changing the setting in theOFF
processor
or with the level control if your
AUTO ON
PHASE
processor
lacks a subwoofer level adjustment.
over
STATUS
STDBY
As you listen,
adjust
0
180the phase control for image "solidity" during those
frequencies/musical notes which are shared with the satellites.
How Much is Enough?
Place the subwoofer in the corner of the room flush up against the walls,
as shown.You will still obtain perfectly acceptable results even if there is a
2 or 3-inch distance between the subwoofer cabinet and the walls because
of decorative baseboard wall molding or other obstruction.
If using a single sub, either front corner is usable, however, try to avoid
placement next to an open doorway, as this may cause excessive loss of
bass energy. Also, try to avoid placement against a heater. The high temperatures may trigger the sub's protective circuitry resulting in temporary loss of output. Extreme high temperatures may result in damage
to the sub.
INPUT
Sometimes people prefer more bass impact for movies, but using this
setting for music can result in overpowering and HIGH
unnatural bass reproLEVEL
duction.You may wish to determine both a video level and an audio level
if you find yourself falling into this camp. Remember however, the most
OUTPUT
common error people make when setting up their system is to play the
subwoofer
-too loudly.
+ (and surrounds)
+ Of course, the Home Theater
Police will RIGHT
not arrest you for L/MONO
this act. But should you desire the most
accurate overall reproduction,
STATUSa well balanced sound from lowest bass to
highest
Enjoy.
LEVEL treble is the best way to get it. Have fun. Experiment.
L/MONO
LOW
UsingMIN
the Low
Pass Frequency Crossover
Control
MAX
LEVEL
System Initial Set Up
110-120V
The Phase Control and
Low Pass Frequency
RIGHT
Control work together to define the behavior of the subwoofer in the frequency range
CAUTION
NORMAL
BYPASS
where
the sub
and satellites play simulta160
neously.
LOWPASS
220-240V
When setting up a complete home theater we strongly recommend that
you use a Sound Pressure Level meter. Radio Shack®
has a good one
POWER
that is very affordably priced (approximately $40-50). To use this meter,
turn on your system, put the Processor/Receiver in the Test Mode and
ON
OFF
set its main volume control to 0dB. Sit in the prime listening position, set
the SPL meter to the 70dB scale, Slow Response, and C Weighting. Now,
holding the meter pointed up and in front of you, let the system cycle
its test tone from speaker to speaker and set every speaker to the same
level, typically 75dB, using the individual level settings in the Processor/
Receiver. As tempting as it may be to set the subwoofer and/or surround
speakers higher than 75dB, listen again after calibration and see if you
can acclimate to these levels. Try watching several different movies and
keep in mind that the goal is to have a system that sounds like you’re
actually “in the movie.”
FREQ
RISK OF ELECTRIC SHOCK
DO NOT OPEN
50
WARNING: SHOCK HAZARD-DO NOT OPEN
The goal
is to optimize
theELECTRIQUE-NE
performancePAS
of the
system by ensuring that
AVIS:RISQUE
DE CHOC
OUVRIR
the
subwoofer
and
satellites
produce
a
cohesive
and well integrated
OFF
AUTO
ON
PHASE
sound “picture.”WARNING
STDBY
TO REDUCE THE RISK OF FIRE OR ELECTRIC SHOCK, DO NOT EXPOSE
0
180
APPLICANCE
TO
RAIN
OR MOISTURE.
NO processors
USER SERVICEABLE
Most THIS
surround
sound
receivers
and
offer a choice of several
PARTS INSIDE. REFER SERVICING TO QUALIFIED SERVICE PERSONNEL
crossover frequencies, typically between 80 Hz and 120 Hz. If yours does,
we recommend using the 100Hz setting when using
small speakers such
INPUT
as those in the System 1200 or 2200. Consult your electronics owner's
manual for more details.
HIGH
Higher crossover frequencies pass more signals to LEVEL
the sub, but can sound
boomy and may be more easily localized to the subwoofer. Higher crossOUTPUT
11 0 - 1 2 0 VA C ~ 6 0 H z
FUSE 115,T2AL/250V
2 4 0 VAand
C ~ 5 0 H z over frequencies may be suitable, however, when using very small satelFor the subwoofer, begin with the processor's
calibration set2 2to0 -1zero,
FUST 230V,T1.25AL/250V
8 0 WAT T S
lites that +have no real
performance.
Settings lower than
- low frequency
+
RIGHT
L/MONO
10
Setup
10 CSB Corner Subwoofer
80Hz should be employed if you are using larger speakers that have
extended bass response. This way, the subwoofer will only reproduce the
very lowest bass frequencies that are in the range where the large main
speakers begin to roll off.
It’s generally undesirable to have the main speakers and the subwoofer
STATUS
overlap too much. Larger
speakers means a lower Low-pass crossover
LEVEL
L/MONO crossover frefrequency, smaller speakers means a higher Low-pass
quency. Consult the manufacturer’s specified low
frequency response
LOW
MAX
LEVELLow-pass setting
for yourMIN
main speakers
to determine the appropriate
RIGHT
on your subwoofer. In the end, however, a little time
spent experimenting
will generally result in dramatically better bass response.
FREQ
The Phase Control
50
NORMAL
BYPASS
160
LOWPASS
A subwoofer operating
out of phase with
the rest of the system won’t provide optiOFF low
AUTO
ON performance. Also, the
mum
frequency
PHASE
subwoofer's phase can
be affected by room
STDBY
acoustics. Since there is variation in the
0
180
industry regarding phase, a control that will
adjust the phase of the subwoofer is provided on
the amplifier panel.
INPUT
Listen to a monaural musical source with strong bass content. (For
example, you can use the mono switch on an FM tuner or preamp, or
HIGH
use a Y-connector on the outputs of one of your source
LEVEL components to
get a mono signal.)
OUTPUT
Experiment with the position of the phase control
to get the smoothest bass. +Careful listening
will
reveal
the
correct
setting.
In particular,
+
there will beRIGHT
a more integratedL/MONO
transition between the satellites and the
subwoofer when they are properly phased.
A Word About Bass, Center Channel Modes
and System Set Up
20-240V
Many surround processors and receivers feature a “Wide” and “Normal”
mode for the center channel speaker. Atlantic Technology recommends
that the center channel be operated in the “Normal” mode when using
a powered subwoofer.CAUTION
The center channel speaker will sound more
dynamic and the intelligibility of the system will generally be improved
when in the
“Normal”
mode.
WARNING:
SHOCK
HAZARD-DO NOT OPEN
RISK OF ELECTRIC SHOCK
DO NOT OPEN
OFF
AVIS:RISQUE DE CHOC ELECTRIQUE-NE PAS OUVRIR
With discrete digital 5.1, 6.1, or 7.1 channel systems (Dolby Digital, DTS,
etc.) many controllers
provide a Bass Management option, which lets you
WARNING
TO REDUCE
THE RISK
OF FIRE
OR ELECTRIC
DO NOT
EXPOSE
set the
front and
rear
speakers
in SHOCK,
a limited
bandwidth
(Small) or full
THIS APPLICANCE TO RAIN OR MOISTURE. NO USER SERVICEABLE
rangePARTS
(Large)
mode.
When
using
a
subwoofer
with
Atlantic
Technology
INSIDE. REFER SERVICING TO QUALIFIED SERVICE PERSONNEL
speakers we recommend setting such a controller to the Small position
for all the speakers in the system, with one exception.
When using the high level input connected to your receiver/amplifier's left and right speaker outputs, set the "speaker size" for these left
and right channels to "large." This will deliver full-range signals to the
subwoofer. The left and right speakers are then connected to the sub's
0VAC ~ 6 0 H z
0VAC ~ 5 0 H zhigh level outputs, which have filtering to remove deep bass and therefore
0WATT S
avoid overdriving these speakers.
Care of Your Subwoofer
The 10 CSB is constructed from Medium Density Fiberboard. MDF is a
non-resonant material ideal for speaker system enclosures. To clean the
cabinet you may use a soft cloth either dry or slightly dampened with
clean water. Be careful not to wet the cabinet or allow any water to enter
the cabinet seams. Avoid placing your speakers in direct sunlight or near
a source of heat that may, over time, damage the finish.
IMPORTANT: Save Your Boxes! If you can do so, save the carton,
packing pieces and plastic bags that came with your subwoofer.
They will be useful in case you move or have to ship your
subwoofer for any reason. In any case, save all packing materials
until you are certain that the system has suffered no damage in
shipment. If you find such damage, either visible or internal, contact your dealer immediately for the proper return procedure.
Specifications
11
Instruction Manual
Painting the Cabinets
STATUS
LEVEL
L/MONO
MIN
LOW
LEVEL
MAX
RIGHT
FREQ
NORMAL
50
BYPASS
160
LOWPASS
OFF AUTO
PHASE
ON
STDBY
0
180
INPUT
HIGH
LEVEL
OUTPUT
+
110-120V
RIGHT
-
-
+
L/MONO
220-240V
CAUTION
RISK OF ELECTRIC SHOCK
DO NOT OPEN
POWER
ON
OFF
WARNING: SHOCK HAZARD-DO NOT OPEN
AVIS:RISQUE DE CHOC ELECTRIQUE-NE PAS OUVRIR
WARNING
TO REDUCE THE RISK OF FIRE OR ELECTRIC SHOCK, DO NOT EXPOSE
THIS APPLICANCE TO RAIN OR MOISTURE. NO USER SERVICEABLE
PARTS INSIDE. REFER SERVICING TO QUALIFIED SERVICE PERSONNEL
Specifications
The cabinet may be painted to
blend in even better with your
room’s décor. First, clean the cabinet, using an appropriate cleaner
such as non-ammonia Windex®
or diluted Simple Green®. Then
use a coat of primer, such as
Glidden® interior/exterior Gripper® or Rust-Oleum® Rusty
Metal Primer. Be sure to follow
the primer’s instructions.
For the finish coat, we recommend using a latex water-based paint. You
may use a brush, pad, roller, or spray paint, depending on the type of
finish effect desired. For best results apply two light coats of the final
color. Make sure the first coat is completely dry before applying the second coat.
Type
Sealed enclosure, down-firing
Bass driver
10” (254mm) long-throw
Frequency response
30-250Hz, +/- 3dB
Amplifier power
180 RMS
Peak output
106dB in 2000 cu.ft.
Dimensions (WxHxD)
22 x 19½ x 12”
559 x 496 x 305mm
Weight
35 lbs (16 kg)
Specifications are those in effect at the time of printing. Atlantic Technology reserves the right to change specifications or designs at any time
without notice.
IMPORTANT: Please don’t get paint on the amplifier. Also, don’t
paint the driver recess area of the cabinet or risk getting any paint
on the acoustical foam or the driver itself, as this may seriously
degrade the unit’s performance and void the warranty.
During painting, please protect these areas with paper and masking (painter’s) tape. For best results, remove while the paint is still
wet.
Subwoofer Troubleshooting Guide
Once your subwoofer is set up, you should have many years of maintenance free enjoyment from your system. However, if you should encounter a
problem, refer to the following guide to help you find the solution. If a problem persists, you should contact your local authorized Atlantic Technology dealer.
Problem
Possible Cause
Possible Solution
No bass output
AC power cord unplugged or
plugged into a non-working outlet.
Plug into a working outlet.
Input cables not securely
connected or defective.
Check all connections, then try another
input cable.
Receiver/Processor's sub-out is muted,
due to incorrect configuration of speaker
setup menu.
Check that receiver/processor is configured
so that all speakers are set to "small" and
sub is "on."
Input cable not securely connected
or defective.
Check all connections, then try another
input cable.
Ground loop through antenna or
cable TV system input.
Test by disconnecting antenna and/or cable
system input leads. If hum goes away, install
isolation balun(s) at that point.
Audible buzz or hum
343 Vanderbilt Avenue Norwood, MA 02062 (781) 762-6300 www.atlantictechnology.com
015-0610-A