1
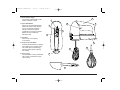
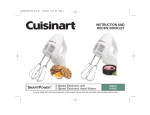
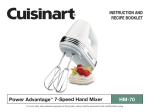
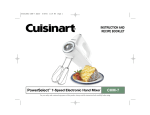
02CU13047 HTM-9LB IB
6/30/03
3:58 PM
Page 1
INSTRUCTION AND
RECIPE BOOKLET
SMARTPOWER COUNTUP® 9-Speed Electronic Hand Mixer
HTM-9LB Series
For your safety and continued enjoyment of this product, always read the instruction book carefully before using.
02CU13047 HTM-9LB IB
6/30/03
3:58 PM
TABLE OF CONTENTS
Important Safeguards....................... Page 2
Introduction ...................................... Page 3
Features and Benefits...................... Page 3
Use and Care................................... Page 5
SmartPower CountUp Timer .......... Page 5
®
Quick Reference Chart .................... Page 6
Recipes ............................................ Page 6
Warranty ..........................................Page 19
IMPORTANT
SAFEGUARDS
When using an electrical appliance,
basic safety precautions should always
be followed, including the following:
1. READ ALL INSTRUCTIONS.
2. To protect against risk of electrical
shock, do not put the hand mixer or
cord in water or other liquid. If hand
mixer or cord falls into liquid, unplug
the cord from outlet immediately. Do
not reach into the liquid.
3. To avoid possible accidental injury,
close supervision is necessary
when any appliance is used by or
near children.
2
Page 2
4. Unplug from outlet when not in use,
before putting on or taking off parts,
and before cleaning.
5. Avoid contact with moving parts.
Keep hands, hair, clothing, as well
as spatulas and other utensils away
from beaters during operation to
reduce risk of injury to persons,
and/or damage to the mixer.
6. Remove beaters from the mixer
before washing.
7. Do not operate any appliance with a
damaged cord or plug or after the
appliance has malfunctioned or has
been dropped or damaged in any
way or is not operating properly.
Return the appliance to the nearest
Cuisinart Repair Center for
examination, repair, mechanical
or electrical adjustment.
8. The use of attachments or
accessories not recommended by
Cuisinart may cause fire, electrical
shock, or risk of injury.
9. Do not use outdoors or anywhere
the cord or mixer might come into
contact with water while in use.
10. Do not let cord hang over the edge
of the table or countertop or touch
hot surfaces.
11. To avoid damage to cord and
possible fire or electrocution hazard,
do not let cord contact hot surfaces,
including hot gas or electric burner
on a stove.
12. Do not use this hand mixer for other
than intended use.
13. The chef's whisk should be used
without other attachments.
SAVE THESE
INSTRUCTIONS
FOR HOUSEHOLD
USE ONLY
NOTICE:
This appliance has a polarized plug (one
prong is wider than the other). As a safety
feature, this plug will fit into a polarized
outlet only one way. If the plug does not fit
fully into the outlet, reverse the plug. If it
still does not fit, contact a qualified electrician. Do not modify the plug in any way.
02CU13047 HTM-9LB IB
6/30/03
3:58 PM
INTRODUCTION
Following a recipe has never been easier.
The SmartPower CountUp® Hand Mixer is
intended to make cooking more convenient
and more precise. Built with the same
powerful motor as our other hand mixers,
the CountUp® includes a timer which
keeps track of your mixing time, so you're
not straining to read the oven clock or
your wristwatch covered in flour.
Whether you're making a quick cake mix for
an after-school party or treating friends to
decadent chocolate mousse brownies, the
Cuisinart® SmartPower CountUp® Hand
Mixer will serve you well. Its superior mixing
performance and state-of-the-art features
spoil you for any other mixer. Super-sized
beaters power through heavy cookie dough
and vegetable purees. They also produce
smooth, fine-textured egg whites for light
desserts. The SmartPower CountUp® Hand
Mixer is built with the same commitment to
the home cook as all other fine Cuisinart®
kitchen products.
Page 3
speeds quickly while you are mixing. If
you want to skip speeds, just hold the
button down and speeds will quickly
change.
FEATURES
AND BENEFITS
1.
SmartPower CountUp® Timer
Keeps track of the time so you don't
have to. When you turn on the hand
mixer, CountUp® starts the clock. The
time is displayed in the viewing window
on the top of the handle. Great for
following recipes that list mixing times.
6.
7.
2.
ON/OFF Switch
One-step power switch allows you to
turn hand mixer on or off in a single
operation. Rubber button for better feel,
wet or dry.
3.
4.
Automatic Feedback
No need for a power boost. An
electronic feedback mechanism
automatically feeds in extra power when
needed. It assures that the hand mixer
will not bog down, even when mixing
heavy loads.
5.
Touchpad Speed Control
Select from 9 speed settings. Press the
touchpad button marked "+", located to
the right, to increase speed. Press the
button marked "-", located to the left, to
decrease speed. Allows you to change
Smooth Start®
When the mixer is turned on, the
beaters start spinning very slowly to
prevent ingredients from splattering.
8.
3 Low Mix Speeds
No other hand mixer has lower mix
speeds, for greater control when
folding or mixing dry ingredients.
220 Watts of Power
Powerful enough to easily cut through a
double batch of cookie dough or butter
right out of the refrigerator.
LCD Speed & Running Time Display
Digital speed settings are easy to read.
Speed setting shows up in the same
window as the running time displayed
by the SmartPower CountUp® Timer.
9.
Maximum Comfort
Balanced to do more work for you.
The shape of this hand mixer allows
maximum power and balance.
Stress-free grip provides unparalleled
comfort and control, even during
extended mixing.
10. Exclusive Rotating Swivel Cord
Unique swivel cord can be
positioned for comfort with right
or left-handed use.
11. Spatula Included
3
02CU13047 HTM-9LB IB
6/30/03
3:58 PM
Page 4
12. Beater Release Trigger
9.
Conveniently located trigger for easy
ejection of beaters or whisk.
2.
12.
13. Super-Sized Beaters
Extra-long, extra-wide stainless steel
beaters for superior, faster aerating,
mixing, and whipping. Designed
without a center post to prevent
ingredients from clogging up beaters.
Beaters are easy to clean and
dishwasher safe.
14.
1.
6.
5.
14. Heel Rest
Allows mixer to rest squarely
on countertop.
10.
15. Professional Chef's Whisk
Professional stainless steel 3" diameter
whisk adds volume to whipped cream
and creates stiff, fine-textured egg
whites. Provides superior whipping
and aerating.
16. Easy to Clean
The SmartPower CountUp® Hand Mixer
has a smooth, sealed base. It wipes
clean instantly.
13.
10.
11.
4
15.
02CU13047 HTM-9LB IB
6/30/03
3:58 PM
USE AND CARE
Always unplug the hand mixer from the
electrical outlet when not in use.
Instructions for First Time Use:
Remove the clear rectangular label that
covers the speed and time display
Window on the handle. Until the small
label is removed, you will not be able to
see the speed and time display.
Turning Hand Mixer On/Off:
Plug hand mixer into outlet. Press ON/OFF
switch to turn hand mixer ON. Hand mixer
will immediately begin to mix on Speed 1.
To turn hand mixer off, press ON/OFF
switch again. ON/OFF switch will pop up.
Page 5
and read the time. The time will remain in
the time display window for 1-2 seconds
after you turn off the hand mixer.
Wait for the time display window to go blank
before turning the hand mixer on again.
Changing Speeds:
Select from 9 speed settings. Press the
button marked "+", located to the right, to
increase speed. Press the button marked
"-", located to the left, to decrease speed.
Allows you to change speeds quickly while
you are mixing. If you want to skip speeds,
just hold the button down and speeds will
change more quickly.
Collar
2. Hold professional chef's whisk at
stem end, and insert into either hole.
Push whisk in until it clicks.
DO NOT PUSH WHISK IN FROM WIRE
END, AS YOU MAY DAMAGE WIRES.
Cleaning and Removing
Super-Sized Beaters and
Professional Chef's Whisk:
1. Before cleaning the SmartPower
CountUp® Hand Mixer, set the
power switch to OFF and unplug it
from the wall outlet. Pull up on the
beater release trigger and remove
Larger
Hole
Inserting Super-Sized Beaters:
1. Unplug hand mixer and set the power
switch to the OFF position.
Operating the CountUp® Timer:
Just press the ON/OFF switch to turn the
hand mixer ON. The CountUp® timer starts
automatically when you start the hand mixer.
And it stops automatically when you press
the ON/OFF switch to turn the hand mixer
OFF. All you have to do is watch the timer
2. Insert beater with collar into larger
hole. Push beater in until it clicks into
place. Insert the beater with no collar
into smaller hole. Push beater in until
it clicks into place.
Inserting Professional Chef's Whisk:
1. Unplug hand mixer and set the power
switch to the OFF position.
(Up position, not depressed.)
the beaters or chef's whisk from the
hand mixer. Wash the beaters or
whisk after each use in hot soapy
water or in a dishwasher.
2. NEVER PUT THE MOTOR HOUSING IN
WATER OR OTHER LIQUID TO CLEAN.
Wipe it with a damp cloth or sponge.
Do not use abrasive cleansers, which
could scratch the surface.
5
02CU13047 HTM-9LB IB
6/30/03
3:58 PM
Page 6
RECIPES
QUICK
REFERENCE CHART
Mixing Techniques
The SmartPower CountUp Hand Mixer
should always be set on the lowest
speed when you start mixing.
®
NOTE: The professional chef's whisk
attachment is used only for light
whipping. See speeds 5 and 7-9
below. For all other mixing tasks,
use the super-sized beaters. The
chef's whisk should be used
without other attachments.
Speed 1
• Ultra-slow mixing to combine dry
ingredients without spatter.
• Fold delicate creams and egg whites
into batters.
• Start mixing frostings.
• Stir sauces and gravies.
• Mix muffins/pancakes.
Speed 2
• Add nuts, chips, dried fruit to cookie
doughs/batters.
• Add dry ingredients to batters/doughs.
• mash potatoes/squash.
• Cream cold (but not frozen) butter
and sugar.
Speed 3
• Cream softened butter and sugar.
• Start mixing cake mixes.
• Add dry ingredients alternately with
liquid ingredients.
6
Speed 4
• Add eggs to batters/doughs.
Speed 5
• Whip potatoes/squash.
• Whip cream (with professional
chef's whisk).
• Complete beating butter
cream frostings.
• Mix thin batters.
Speed 6
• Complete beating cake mixes.
• Beat whole eggs.
With Professional Chef's Whisk
Attachment:
Speed 7
• Add sugar to whipped egg whites.
Speed 8
• Beat egg yolks until thick and light.
Speed 9
• Whip egg whites.
Mixing Tips:
• Always read entire recipe and measure
all ingredients before beginning the
mixing process.
• For best results, do not measure flour
directly from the bag. Pour into a
container or bowl, scoop out the flour
and level with the back of a knife or
spatula. For flour stored in a container,
stir before measuring.
• Cream cheese, butter or eggs combine
more thoroughly at room temperature.
• Remove butter for recipe first and cut
into 1/2-inch pieces, then measure out
remaining ingredients for recipe. This
will hasten the warming process. Do
not warm butter for baking in a
microwave unless instructed to do so.
Microwaving can melt butter; melted
butter will change the final product.
• The best cheesecakes are made
when the eggs and cream cheese are
at a similar room temperature. While the
Cuisinart hand mixer can easily mix
cold cream cheese, the trick is not to
add too much air, which can cause
cracking.
• For best results, use heavy cream, cold
from the refrigerator, for whipped cream.
02CU13047 HTM-9LB IB
6/30/03
3:58 PM
Page 7
• For best results, whip egg whites in a
spotlessly clean stainless steel or glass
mixing bowl. If available, use a copper
mixing bowl.
assemble, and cook the ingredients
once they have been gathered from the
refrigerator and cupboard and placed
on the counter.
• Chocolate chips, nuts, raisins, etc. can
be added using speeds 1 or 2 of your
hand mixer.
Nutritional analysis are based on number of servings indicated. If a recipe
produces a range of servings, they are
based on the highest serving yield for
that particular recipe.
• To separate eggs for any recipe, break
them one at a time into a small bowl,
gently remove yolk, then transfer egg
whites to spotlessly clean mixing bowl.
If a yolk breaks into the egg white,
reserve that one for another use. Just a
drop of egg yolk in the white will prevent
the whites from whipping properly.
• To achieve the best volume with egg
whites, the mixing bowl and chef’s
whisk attachment or beaters must be
spotlessly clean and free of any fat, oil,
etc. (Plastic bowls are not recommended for whipping egg whites.) The
presence of any trace of fat or oil will
prevent the egg whites from increasing
in volume. Wash bowl and attachments
thoroughly before beginning again.
• Occasionally ingredients may stick to
the sides of the mixing bowl. When this
occurs, turn mixer off and scrape the
sides of the bowl with a rubber spatula.
Recipe Notes:
Preparation times are estimates and are
based on the time it takes to prepare,
SWEETS
Nutmeg Muffins
These tasty muffins are just right for a
holiday bread basket.
bowl. Mix on speed 2 for 30 seconds
to combine and break up brown sugar;
reserve.
Place the eggs into a second bowl.
Beat on speed 3 until slightly foamy, 30
seconds. While mixing on speed 3, add
the milk and melted butter; mix for 15
seconds. Pour over the dry ingredients,
and use speed 1 to fold in until the
ingredients are just moistened. Scoop
into the prepared muffin cups. Bake in
the preheated oven 18 to 20 minutes for
regular muffins, 14 to 16 minutes for
mini muffins, until lightly browned and
springy to touch in the center. Serve
warm with Maple Orange Butter.
(Muffins may be made ahead and
frozen; thaw and warm before serving.)
Nutritional information per serving
(1 regular or 2 mini muffins):
Calories 155 (29% from fat) • carb. 22g • pro. 5g •
fat 5g • sat. fat • chol. 46mg • sod. 208mg •
calc. 141mg • fiber 1g
Preparation: 10 – 15 minutes, plus baking time.
Makes 12 regular or 24 mini muffins
2
3
1
1/2
1/4
2
1
1/4
Cooking spray
cups unbleached all-purpose flour
tablespoons brown sugar, packed
tablespoon baking powder
teaspoon freshly grated nutmeg
teaspoon salt
large eggs
cup evaporated skimmed milk
(not reconstituted), or whole milk
cup unsalted butter, melted
and cooled
Preheat the oven to 375° F. Spray 12
regular or 24 mini muffin cups.
Place the flour, brown sugar, baking
powder, nutmeg, and salt in a medium
Maple Orange Butter
Maple Orange Butter also makes
a great spread for pancakes, waffles,
biscuits or scones.
Preparation: 5 minutes or less.
Makes 3/4 cup
1/2
2
cup unsalted butter,
room temperature
tablespoons maple syrup
(not pancake or sugar syrup)
zest of 1 orange, finely chopped
7
02CU13047 HTM-9LB IB
6/30/03
3:58 PM
Use speed 4 to beat butter in a mixing
bowl until light and fluffy, about 1
minute. Add maple syrup and orange
zest; beat on speed 4 for 1 minute
longer until fluffy and completely combined.
Nutritional information per serving (1 tablespoon):
Calories 76 (88% from fat) • carb. 2g • pro. 0g
• fat 8g • sat. fat 5g • chol. 21mg • sod. 1mg
• calc. 6mg • fiber 0g
Variation:
For Lemon Honey Butter, substitute honey
for the maple syrup and lemon zest for the
orange zest.
Double Chocolate Walnut
Brownie Drops
Great bite-sized brownies.
Preparation: 10 – 15 minutes, plus baking time.
Makes 26 (may be doubled)
2
ounces unsweetened chocolate,
chopped
1-1/2 cups all-purpose flour
1/2
teaspoon baking powder
1/2
teaspoon salt
8
tablespoons unsalted butter,
cut in 8 pieces
1/2
cup granulated sugar
1/2
cup brown sugar, firmly packed
1
large egg
1-1/2 teaspoons vanilla extract
2/3
cup mini chocolate morsels
2/3
cup chopped walnuts
Powdered sugar for garnish
8
Page 8
Melt the chocolate in a double boiler
over hot water or in a microwave
according to manufacturer’s directions.
Let cool. Preheat oven to 350° F. Line
baking sheets with parchment or nonstick baking liner sheets.
Place the flour, baking powder and salt
in a medium bowl; mix on speed 1 for
20 seconds to combine. Reserve.
Place the butter and sugars in a medium bowl. Mix on speed 2 for 30 seconds, then mix on speed 4 until light
and fluffy, 2 minutes. Add the egg and
vanilla, mixing on speed 3 until combined, 20 seconds. Add melted, cooled
chocolate; mix 20 seconds on speed 1.
Add flour mixture; mix on speed 1 until
combined, 30 seconds. Add chocolate
morsels and walnuts; mix on speed 1 to
blend, 10 seconds.
Scoop out dough in 1-1/2 tablespoon
amounts onto prepared baking sheets.
(For ease, speed and uniformity, you
may use an ice cream scoop.) Bake in
the preheated 350° F oven for 10 to 12
minutes. Let cool on pans 2 minutes,
then transfer to a wire rack to cool completely. Just before serving, dust lightly
with powdered sugar if desired.
Nutritional information per serving:
Calories 151 (48% from fat) • carb. 18g • pro. 2g
• fat 8g • sat. fat 4g • chol. 18mg • sod. 59mg •
calc. 15mg • fiber 1g
Oatmeal Monster Cookies
A traditional Cuisinart favorite, these yummy
oatmeal cookies are loaded with mix-ins.
Preparation: 10 – 15 minutes, plus baking time.
Makes 60 cookies
2
1-1/2
1
1-1/3
cups all-purpose flour
teaspoons baking soda
teaspoon salt
cups unsalted butter,
cut in tablespoon sized pieces
1-1/3 cups granulated sugar
1-1/3 cups light brown sugar,
firmly packed
2
large eggs
3
tablespoons milk
2
teaspoons vanilla extract
3
cups quick cooking oats
2/3
cup coarsely chopped pecans,
almonds or walnuts
2/3
cup semi-sweet chocolate morsels
2/3
cup “white” chocolate morsels
2/3
cup almond brickle bits
(may substitute coconut)
2/3
cup M&M® Chocolate Mini
Baking Bits
2/3
cup raisins or dried tart cherries
Preheat oven to 350° F. Line baking
sheets with parchment paper or nonstick baking liners. Combine flour, baking soda and salt in a small bowl. Mix
on speed 1 to combine, 10 seconds.
In a large mixing bowl, cream butter
and sugars on speed 3 until light and
fluffy, about 1 minute. Add eggs, milk
02CU13047 HTM-9LB IB
6/30/03
3:58 PM
and vanilla; increase to speed 4 and
beat until well blended, about 1 minute.
Add flour mixture to creamed mixture;
beat on speed 2 until well mixed. Add
oats in two additions; beat on speed 2
after each addition until well blended.
Add nuts and beat on speed 2 until just
blended. Add chocolate morsels, brickle
bits, M&M’s®, and raisins; continue to
beat on speed 2 until blended, about 30
to 40 seconds.
Drop by rounded tablespoons (1-1/2
tablespoons – may use an ice cream
scoop) onto the prepared baking
sheets, two inches apart. Bake in preheated 350° F oven until golden, about
10 to 12 minutes. Cool on pan for 2 to 3
minutes, then transfer to a wire rack to
cool completely.
Nutritional information per cookie:
Calories 165 (40% from fat) • carb. 23g • pro. 2g •
fat 7g • sat. fat 4g • chol. 18mg • sod. 91mg •
calc. 25mg • fiber 1g
Lemon Lime Sugar Cookies
These old fashioned, crackly sugar cookies
are flavored with lemon and lime for a
refreshing change.
Preparation 10 -15 minutes, plus baking time.
Makes 50 cookies (3-1/2 pounds cookie dough)
4
2
1/2
1/2
cups all-purpose flour
teaspoons baking soda
teaspoon salt
cup (1 stick) unsalted butter,
cut in 8 pieces
Page 9
1/2
cup vegetable shortening
2-1/2 cups granulated sugar, divided
1/2
cup Lyle’s Golden Syrup
(may use light corn syrup)
2
large eggs
zest of 1 lemon (bitter white pith
removed), finely chopped
zest of 1 lime (bitter white pith
removed), finely chopped
1
teaspoon lemon extract
1
teaspoon lime extract
Preheat oven to 350° F. Line baking
sheets with parchment.
Place the flour, baking soda, and salt in
a medium bowl. Use speed 1 to blend
and aerate, 20 seconds. Reserve.
Place the butter and 2 cups of the
sugar in a large bowl. Use speed 1 to
blend, 30 seconds. Cream until light
and fluffy using speed 4, 1-1/2 minutes.
Add syrup, eggs, and zests. Mix on
speed 3 for 30 to 40 seconds until
smooth. Add extracts; mix on speed
2 for 30 seconds.
Using 1-1/2 tablespoons of dough,
shape into round balls and dip in
remaining sugar to coat. (For ease and
speed, use an ice cream scoop.)
Arrange balls on parchment lined baking sheet, 2-1/2 inches apart. Press
each ball gently with the bottom of a flat
glass. Bake in preheated 350° F oven
for 10 to 12 minutes, until crackled and
just beginning to turn golden. Remove
from oven; let cool on baking sheet for
2 to 3 minutes, then transfer to a wire
rack to cool completely. Store between
sheets of waxed paper in an airtight
container.
Nutritional information per cookie:
Calories 116 (31% from fat) • carb. 19g • pro. 1g •
fat 15g • sat. fat 2g • chol. 13mg • sod. 72mg •
calc. 5mg • fiber 0g
Meringue Kisses
Light as a cloud, these little kisses are just
the thing when the sweet tooth bites.
Preparation: 15 – 20 minutes, plus baking and
resting times.
Makes 36
2
4
4
1/8
3/4
1
2
tablespoons butter, melted
tablespoons powdered sugar
large egg whites
teaspoon cream of tartar
cup granulated sugar
(superfine is best)
teaspoon vanilla or almond extract
ounces chopped semi-sweet or
bittersweet chocolate (1/8-inch chop)
Preheat oven to 225° F. Line 2 baking
sheets with parchment paper. Brush the
parchment lightly with the melted butter,
then dust with powdered sugar, shaking
off excess sugar.
Place the egg whites and cream of tartar in a medium mixing bowl. Use the
chef’s whisk, and start mixing the egg
whites and cream of tartar on speed 1,
increasing gently to speed 7. Whip until
soft peaks form, 1-1/2 to 2 minutes
(depending on temperature of egg
9
02CU13047 HTM-9LB IB
6/30/03
3:58 PM
whites). Sprinkle sugar 1 tablespoon at
a time over egg whites and beat on
speed 6 after each addition, until stiff
peaks form and mixture is shiny but not
dry, about 4 minutes total. Add the
vanilla and beat on speed 1 to blend
in, 10 seconds.
Using a clean rubber spatula, fold in
chopped chocolate. Drop by rounded
tablespoons onto prepared baking
sheets, or gently place meringue mixture in a large pastry bag fitted with a
3/8-inch plain tip and pipe out “kisses”.
Bake in preheated oven for 1-1/2 hours;
do not open. Turn off oven and let sit
in warm oven for an additional 1-1/2
hours to dry out. Transfer to a wire
rack to cool completely. Store in an
airtight container.
Nutritional information per “kiss”:
Calories 26 (19 from fat) • carb. 5g • pro. 0g
• fat 1g • sat. fat. 0g • chol. 0mg • sod. 8mg
• calc. 1mg • fiber 0g
Tip: Meringues are best when made on a
dry day.
To make “nests” for mousse:
Draw 3-inch circles on the underside of
parchment sheet. Butter and dust with
powdered sugar. Pipe concentric circles of
meringue into the 3-inch rounds. Pipe
another 2 circles on the outermost edge
of the meringues. Bake as directed, but
increase the baking and resting time to
2 hours. Makes 4.
10
Page 10
Raspberry Mascarpone Mousse
For an elegant dessert, serve this raspberry
mousse in stemmed goblets or martini
glasses, or spoon into meringue nests.
Preparation: 15 – 20 minutes active time;
30 minutes inactive.
Makes 8 - 12 servings
12
ounces fresh or frozen raspberries
(not in juice)
2/3
cup granulated sugar envelope
(1/4-ounce/1 tablespoon) gelatin
1/4
cup cold water
8
ounces mascarpone cheese*
1/4
cup powdered sugar
1-1/4 cups heavy cream
fresh raspberries and mint leaves
for garnish
chocolate cookie crumbs for garnish
Combine the raspberries and granulated sugar in a 2-quart saucepan. Bring
to a boil over medium high heat, about
6 minutes. Stir to dissolve sugar. Using
a fine mesh strainer (chinois) set over
medium bowl, strain, pressing as much
of the liquid as possible, until just the
seeds remain. Discard the seeds.
Sprinkle the gelatin over the cold water.
Let stand 5 minutes or longer to soften.
Stir the softened gelatin into the raspberry sauce. Cool until slightly thickened, about 30 minutes.
Place the mascarpone and powdered
sugar in a medium bowl. Beat on speed
3 for 2 minutes, until smooth and
creamy. Stir in the cooled raspberry
mixture using speed 1 until thoroughly
combined, about 30 seconds. Place the
heavy cream in a chilled medium bowl.
Whip using the chef’s whisk on speed
4 until the cream holds stiff peaks. Use
a spatula to fold the whipped cream
into the raspberry mascarpone mixture.
Cover and keep chilled until ready
to serve.
Spoon or pipe into stemmed glasses
or meringue nests. Garnish with fresh
raspberries and a mint leaf, or crush
several chocolate sandwich cookies and
use the crumbs to “dust” the mousse.
Nutritional information per serving:
Calories 239 (67% from fat) • carb. 17g • pro. 2g
fat 18g • sat. fat 10g • chol. 57mg • sod. 20mg
• calc. 43mg • fiber 0g
*May substitute cream cheese if mascarpone
is unavailable. The mousse will have more of
a cheesecake flavor.
Apple Cranberry Coffee Cake
This versatile cake can be served as a
breakfast or brunch cake, or warmed for
dessert and topped by a scoop of vanilla
ice cream or softly whipped cream.
Preparation: 15 minutes, plus baking time.
Makes 18 – 24 servings
3
3/4
cups sliced apples*
(peel, core, quarter apples, cut into
1/8-inch slices)
Juice of 1 lemon
cup brown sugar, firmly packed
tablespoon ground cinnamon
02CU13047 HTM-9LB IB
1/2
2
1
3/4
2
1
4
2
1/2
6/30/03
3:58 PM
teaspoon freshly grated nutmeg
cups all-purpose flour
tablespoon baking powder
teaspoon salt
cups granulated sugar
cup unsalted butter, cut into
1/2 - inch pieces
large eggs
teaspoons vanilla extract
cup dried cranberries
(may substitute dried cherries,
blueberries or raisins)
Page 11
30 minutes before cutting.
* About 1-1/2 pounds apples before trimming.
Nutritional information per serving (24 pieces):
Calories 253 (31% from fat) • carb. 56g • pro. 3g •
fat 9g • sat. fat 5g • chol. 75mg • sod. 151mg
• calc. 31mg • fiber 2g
Key Lime Cream Pie
Tart and refreshing, the perfect
summer dessert.
Preheat oven to 350° F. Lightly coat a
13 x 9 x 2-inch rectangular baking pan
(15 cup) with cooking spray.
Preparation: 15 – 20 minutes, plus chilling time.
Makes 12 servings
Place the apples, lemon juice, brown
sugar, cinnamon, nutmeg, and dried
cranberries in a medium bowl. Toss
gently to combine; reserve.
2
Place the flour, baking powder, and salt
in a medium bowl. Mix on speed 1 to
blend and aerate, 15 seconds; reserve.
Place the sugar and butter in a large
bowl. Mix on speed 3 to cream until
well blended, 1 minute. Add eggs and
vanilla; mix on speed 3 until smooth
and creamy, about 50 seconds. Add the
flour mixture; mix on speed 1 until combined and smooth, 1 minute. Batter will
be very thick. Spread 2/3 of the batter
in the prepared pan. Evenly with the
apple and cranberry mixture. Spoon the
remaining batter randomly over the top
of the apples. Bake in the preheated
oven for 55 to 60 minutes, until a tester
inserted in the center comes out clean.
Cool in pan on a wire rack for at least
Cooking spray
cups fat-free vanilla yogurt
(without cornstarch or gelatin)
1-1/4 cups sugar
1/2
cup key lime juice
2
teaspoons unflavored gelatin
1/3
cup cold water
1
large egg white
1-1/2 cups graham cracker crumbs (about
14 whole graham crackers)
2
tablespoons unsalted butter, melted
and cooled
2
teaspoons finely chopped lime zest
2/3
cup heavy cream
Lightly coat a 9-inch pie plate with cooking spray. Preheat oven to 350° F.
Place yogurt in a yogurt strainer or a
sieve lined with a coffee filter; set over
a bowl to drain until it measures 1-1/2
cups, about 1 hour.
In a 3–quart saucepan, combine the
sugar and lime juice over medium high
heat and let come to a boil. Continue to
cook until the mixture registers 239° F
on a candy thermometer (soft ball
stage), about 3 to 5 minutes. Transfer
to a stainless steel bowl. Sprinkle the
gelatin over the cold water and let soften for 5 minutes. Stir into the hot sugar
mixture until dissolved. Allow to cool,
about 1 hour. While the sugar syrup
cools, make the crust.
Use the chef’s whisk to beat the egg
white on speed 7 until frothy, about
25 seconds. Using speed 1, stir in the
graham cracker crumbs and butter
until crumbly in appearance, about
10 seconds. Press the graham cracker
mixture firmly into the bottom and sides
of the prepared pie plate. Bake in the
preheated 350° F oven for 10 minutes;
cool completely on a rack.
Use the chef’s whisk to blend the
reduced yogurt and zest into the cooled
sugar syrup on speed 1 until smooth,
about 30 seconds. Chill for 30 minutes.
Use the chef’s whisk to beat the heavy
cream on speed 5 until moderately stiff,
about 50 to 60 seconds. Using a large
rubber spatula, fold the whipped cream
into the chilled yogurt mixture. Spoon
into the prepared crust. Chill at least 4
hours before serving.
Nutritional information per serving:
Calories 243 (30% from fat) • carb. 39g • pro. 4g •
fat 8g • sat. fat 4g • chol. 24mg • sod. 120mg
• calc. 69mg • fiber 0g
11
02CU13047 HTM-9LB IB
6/30/03
3:58 PM
Classic Yellow Cake
This is the basic yellow cake everyone
remembers and loves, and is nearly as
simple as making one from a package. Pair
with Chocolate Fudge Frosting to make a
great cake for any occasion.
Preparation: 10 – 15 minutes, plus baking and
cooling times.
Makes two eight or nine–inch layers or one 13
x 9–inch rectangular cake
1-3/4
2
1/4
1/2
1-1/3
3
2/3
1
cups all-purpose flour
teaspoons baking powder
teaspoon salt
cup unsalted butter, cut in 16 pieces
cups granulated sugar
large eggs
cup evaporated fat free milk (not
reconstituted) or whole milk
tablespoon vanilla extract
Preheat oven to 350° F. Prepare baking
pan(s). Lightly butter or spray two 8 or
9-inch round cake pans with cooking
spray; cut rounds of parchment to fit the
bottoms of the pans and place in pans;
butter or spray again. Or line 24 standard muffin cups with cupcake liners,
or lightly coat a 13 x 9 x 2-inch pan with
cooking spray.
Place flour, baking powder, and salt in a
medium bowl. Mix, using speed 1 for 15
seconds to combine and aerate.
Reserve.
Place butter and sugar in a large mixing
bowl. Mix on speed 1 for 40 seconds,
12
Page 12
then cream on speed 3 for 2-1/2 minutes, until light and fluffy. Add eggs one
at a time, mixing on speed 2 for 20 seconds after adding each egg. Add flour
mixture, milk, and vanilla on speed 1;
mix until blended and smooth, 1 minute.
Divide batter evenly among prepared
pans. Bake in preheated oven until a
cake tester comes out clean when
inserted in the center of the pan: 30 to
32 minutes for 8-inch layers; 25 to 28
minutes for 9-inch layers; 30 to 35
minutes for a 13 x 9-inch cake.
Cool in pan for 10 minutes; loosen
sides of cake from pans with a thin
knife, then remove from pans and place
on a wire rack; remove parchment. Cool
completely before frosting.
Nutritional information per serving
(cake with frosting):
Calories 594 (37% from fat) • carb. 93g • pro. 6g •
fat 26g • sat. fat 15g • chol. 97mg • sod. 207mg •
calc. 87mg • fiber 3g
To assemble layer cakes:
Place 1 cake layer on plate. Spread 1/3 of
frosting over cake. Top with second layer;
spread remaining frosting over top and sides
of cake. Allow cake to stand 2 hours before
serving. (Can be prepared 1 day ahead.
Cover and refrigerate. Bring to room temperature before serving.)
Variation:
24 Cupcakes: Place paper liners in 24 regular muffin cups. Divide the batter among the
prepared cups. Bake in the preheated 350° F
oven for 18 to 20 minutes. Remove from the
pans and cool on a wire rack completely
before frosting.
Chocolate Fudge Frosting
This recipe makes 3-3/4 cups frosting,
enough to generously frost a two-layer cake
or a rectangular cake; cut recipe in half if
making cupcakes.
Preparation: 10 minutes.
5
5
cups powdered sugar
ounces unsweetened chocolate,
melted and cooled
2
ounces semi-sweet chocolate,
melted and cooled
1/2
cup unsalted butter, cut into 8 pieces
2
teaspoons vanilla extract
1/4
teaspoon salt
10 - 12 tablespoons milk or cream
Place all ingredients except the milk
in a large bowl. Beat on speed 1 for
2 minutes. Add 8 tablespoons of
the milk and beat on speed 4 for 4
minutes until smooth and fluffy,
adding the remaining milk as
needed for spreadability.
Sunshine Chiffon Cake
Made with oil rather than butter or
shortening, chiffon cakes are moist and
light in texture. With flecks of fresh citrus,
this one is good on its own, or served
with sliced fresh fruit.
02CU13047 HTM-9LB IB
6/30/03
3:58 PM
Preparation: 15 minutes or less baking time 60
– 70 minutes.
Makes 16 servings
2-1/4
1-1/2
1
1/4
1
cups cake flour
cups granulated sugar, divided
tablespoon baking powder
teaspoon salt
tablespoon finely chopped
lemon zest
1
tablespoon finely chopped
orange zest
1/2
cup orange juice
1/4
cup fresh lemon juice
1/4
cup frozen orange juice concentrate,
thawed, not reconstituted
1/2
cup flavorless vegetable oil
1-1/2 teaspoons vanilla extract
1/2
teaspoon almond extract
2
large eggs yolks
7
large egg whites
1/4
teaspoon cream of tartar
powdered sugar for dusting
Preheat oven to 325° F. Cut a ring of
parchment to fit the top of a 10-inch
angel food pan and place it in the pan.
Place the flour, 1-1/4 cups of the sugar,
baking powder, and salt in a large mixing bowl. Mix on speed 1 to blend and
aerate, 10 seconds. Make a well in the
center of the flour mixture. Place the
zests, juices, oil, orange juice concentrate and extracts and mix on speed
3 for 30 seconds; scrape the bowl.
Add the yolks and mix on speed 3 for
30 seconds longer; scrape the bowl
Page 13
and reserve.
Place the egg yolks and cream of tartar
in a second bowl (stainless, glass or
copper, not plastic). Use the chef’s
whisk to beat on speed 7 until soft
peaks form, about 1-1/2 minutes. After
soft peaks form, add the remaining
1/4 cup of sugar 1/2 tablespoon at a
time, until the egg whites are stiff and
shiny, but not dry, 3 to 4 minutes. Stir 1
cup of the egg whites into the reserved
batter, then gently fold the remaining
egg whites into the batter, 1/3 at a time.
Gently spoon into the prepared pan and
bake in the preheated oven for 60 to 70
minutes, until a cake tester comes out
clean when tested. Invert the pan
immediately onto a wire rack and let the
cake cool completely in the pan upside
down on the rack. Run a long thin knife
around the outer and tube edges of the
pan and turn the cake out of the pan
onto the rack; remove parchment. Dust
with powdered sugar before serving.
Nutritional information per serving:
Calories 214 (31% from fat) • carb. 34g • pro. 3g •
fat 8g • sat. fat 1g • chol. 27mg • sod. 160mg •
calc. 60mg • fiber 0g
Preparation: 20 minutes, plus baking times.
Makes 12 – 16 servings
Cooking spray
2
tablespoons instant espresso powder
1/2
cup half-and-half
3
tablespoons unsalted butter,
cut in 1/2-inch pieces
2-1/2 cups granulated sugar, divided
3/4
cup all-purpose flour
1/4
cup unsweetened cocoa
1/2
teaspoon cinnamon
1/4
teaspoon baking powder
1/8
teaspoon salt
1
large egg yolk
16
ounces cream cheese (regular),
at room temperature
16
ounces low-fat cream cheese,
at room temperature
4
large eggs *
2
tablespoons cornstarch
2
teaspoons vanilla extract
Chocolate curls for garnish, optional
In a small bowl dissolve the espresso
powder in the half-and-half; reserve.
Preheat oven to 350° F. Lightly coat a
9 x 3 inch springform or cheesecake
pan with cooking spray.
Cappuccino Cheesecake
It will be difficult for coffee lovers to
resist this luscious, creamy cappuccino
cheesecake in a cinnamon scented
chocolate cookie crust.
Place the butter and 1/4 cup of the
sugar in a medium bowl. Mix on speed
3 to cream, 1-1/2 minutes. Add flour,
cocoa, cinnamon, baking powder, and
salt; mix on speed 1 until combined,
30 seconds. Add egg yolk and mix on
speed 1 until crumbly, 15 seconds.
13
02CU13047 HTM-9LB IB
6/30/03
3:58 PM
Press into bottom of prepared pan.
Bake in preheated 350° F oven for 10
minutes, until slightly puffed (crust may
have cracked appearance, which is normal). Place on a rack to cool. When the
pan is cool to touch, wrap a sheet of
aluminum foil around the bottom and
sides of the pan so that it comes up at
least 2 inches.
Place cream cheeses and sugar in a
large mixing bowl. Beat on speed 2 until
combined and smooth, 2 minutes.
Using speed 1, add eggs, one at a time,
mixing for 15 seconds after each addition. Scrape the bowl. Add cornstarch;
mix on speed 1 for 20 seconds. Scrape
the bowl. Add half-and-half mixture and
vanilla extract, mix on speed 2 until
smooth and completely combined. Pour
the mixture over the cooled crust. Place
the pan in a larger aluminum pan and
place in the oven; add enough hot
water to the outer pan so that it is
1/2 inch deep. Bake in the preheated
350° F oven for 60 to 70 minutes, until
the cheesecake is pulling away from
the sides of the pan; the center will be
jiggly. Remove from the oven, remove
the foil and let cool completely on a
rack. Refrigerate at least 4 hours before
serving. Garnish with chocolate curls
if desired.
Nutritional information per serving (16 servings):
Calories 368 (48% from fat) • carb. 41g • pro. 8g •
fat 20g • sat. fat 12g • chol. 116mg • sod. 290mg •
calc. 89mg • fiber 1g
Page 14
Variation:
After the cheesecake is mixed, add 3
ounces each chopped white and bittersweet
chocolate using speed 1; mix for 15 seconds
to combine.
sugar, 1 tablespoon unsweetened cocoa,
and 1 teaspoon vanilla in mixing bowl. Whip
as directed.
*Warm cold eggs safely before using by
placing in a bowl of hot (not boiling) water
for 10 minutes. They will incorporate more
easily into your mixture.
SAVORIES
Sweetened Freshly
Whipped Cream
Sweetened whipped cream is the perfect
finish for just about any dessert, or spoon
a dollop over coffee or hot chocolate.
Preparation: less than 5 minutes.
Makes 2 cups
1-1/4 cups heavy cream, chilled
2
tablespoons granulated sugar
1-1/2 teaspoons vanilla extract
Place the cream, sugar, and vanilla in a
medium stainless or glass mixing bowl.
Using the chef’s whisk, beat on speed
4 until whipped to desired thickness –
about 45 seconds for softly whipped
cream, about 1 minute for stiffly
whipped cream.
Nutritional information per serving (2 tablespoons):
Calories 70 (86% from fat) • carb. 2g • pro. 0g • fat
7g • sat. fat 4g • chol. 25mg • sod. 7mg •
calc. 12mg • fiber 0g
Variation:
Cocoa Whipped Cream: Place 1-1/4 cups
heavy cream, 3 tablespoons granulated
14
Herbed Cheese
Instead of purchasing expensive herb
flavored cheeses, you can easily
prepare your own.
Preparation: 10 minutes or less.
Makes about 2 cups
8
ounces cream cheese
(low-fat or regular), cut into 8 pieces
5
ounces chevre or other goat cheese
(soft type, not aged)
1
clove garlic, peeled and minced
1
tablespoon finely minced shallot or
green onion
1
tablespoon finely chopped
fresh parsley
1
teaspoon herbs de Provence
1/2
teaspoon kosher salt
1/4
teaspoon white pepper
dash hot sauce, to taste
Place all ingredients in a medium bowl.
Mix on speed 3 for 1 minute, then
increase speed to speed 5 to whip for
an additional 2 minutes until light and
fluffy. Allow to stand at least 30 minutes
before serving to allow flavors to blend.
Transfer to a resealable container and
refrigerate. Remove from refrigerator
02CU13047 HTM-9LB IB
6/30/03
3:58 PM
15 minutes before serving to soften.
Serve with crackers, pita or bagel chips.
It also makes a good topping for a
baked potato.
Page 15
30 minutes or longer to allow flavors to
blend before serving.
Nutritional analysis per serving (2 tablespoons),
made with low-fat products:
Calories 54 (52% from fat) • carb. 4g • pro. 2g • fat
3g • sat. fat 2g • chol. 7mg • sod. 111mg •
calc. 43mg • fiber 0g
Nutritional information per serving (2 tablespoons,
made with low-fat cream cheese):
Calories 58 (69% from fat) • carb. 1g • pro. 3g • fat
4g • sat. fat 3g • chol. 9mg • sod. 156mg •
calc. 35mg • fiber 0g
Roasted Red Pepper and
Sun-dried Tomato Dip
Serve this dip with crackers, bagel chips
or pita chips. For a change, try it as a
spread on sandwiches, or as a topping
for baked potatoes.
Preparation: 10 minutes or less.
Makes 2 cups
8
1/2
1
1/3
1
1
1/2
1/8
ounces cream cheese
(low-fat or regular), cut into 8 pieces
cup sour cream (low-fat or regular)
roasted red pepper, cut into
1-inch pieces
cup chopped sun-dried tomatoes
(not oil packed)
tablespoon chopped fresh parsley
clove garlic, chopped
teaspoon basil
teaspoon freshly ground black pepper
Combine all ingredients in a medium
bowl. Mix on speed 3 until well blended
and smooth, 2 minutes. Mix on speed 4
to lighten, 1 minute. Transfer to a
resealable container and refrigerate for
Chevre & Kalamata Tartlets
Simple to prepare, these little tartlets will be
a hit hors d’oeuvre at your next gathering.
Preparation: 20 minutes, plus baking time.
Makes 24 tartlets
3
ounces cream cheese, cut in
1/2 - inch pieces
4
ounces (1 stick) unsalted butter
cut in 1/2 - inch pieces
1
cup all-purpose flour
1/2
teaspoon herbs de Provence
1/4
teaspoon freshly ground
black pepper
1
large egg
5-1/2 ounces chevre
3
tablespoons whole milk or
half-and-half
1
teaspoon all-purpose flour
1/4
teaspoon kosher salt
9
pitted kalamata olives (30g),
drained and chopped
Preheat oven to 350° F. Have ready 24
mini muffin cups.
Place the cream cheese, butter, 1 cup
flour, herbs de Provence, and pepper in
a medium bowl. Combine on speed 1
until the mixture forms a ball, about 1
minute. Divide the dough into 24
pieces, each about 1-1/2 teaspoons.
Roll into balls, then use the palms of
your hand to flatten into discs, about 21/2 inches in diameter. Press into the
bottom and sides of the muffin cups.
Spoon about 1/4 teaspoon of the
chopped olives into each pastry cup.
Reserve.
Using the same bowl, place the egg,
chevre, milk, flour, and salt in the bowl.
Blend on speed 2 until smooth and
creamy, about 2 minutes. Spoon the filling into the pastry cups, using about 11/2 teaspoons per cup.
Bake in the preheated oven for 22 to 24
minutes, until the crust is golden and
crispy and the tops are puffed and lightly golden. Let cool in pan 2 minutes,
then gently lift out and cool 5 minutes
on a wire rack before serving. May be
made ahead and served at room temperature or slightly rewarmed.
(Rewarming in a microwave is not recommended.)
Nutritional information per tartlet:
Calories 98 (71% from fat) • carb. 5g • pro. 3g • fat
8g • sat. fat. 5g • chol. 28mg • sod. 97mg •
calc. 38mg • fiber 0g
Basic Vinaigrette
The perfect topping for a crisp green salad,
15
02CU13047 HTM-9LB IB
6/30/03
3:58 PM
you can easily vary it by changing the flavor
of the oil or vinegar, or by adding herbs.
Preparation: 10 minutes or less.
Makes about 2 cups
1
2
1/2
1/2
1/4
1
1/2
clove garlic, peeled and
finely minced
tablespoons Dijon-style mustard
cup wine vinegar or lemon juice
teaspoon kosher salt
teaspoon freshly ground pepper
cup vegetable oil
cup extra virgin olive oil
Place the garlic, mustard, vinegar, salt,
and pepper in a medium bowl. With the
chef’s whisk attachment, beat on speed
3 until well blended, 30 seconds. With
the mixer running, add the oils in a slow
steady stream, about 1-1/2 minutes;
continue to mix until totally blended.
(If vinaigrette is made ahead and
separation occurs, mix on speed
3 using chef’s whisk until blended.)
Nutritional information per serving (1 tablespoon):
Calories 92 (98% from fat) • carb. 1g • pro. 0g • fat
10g • sat. fat 1g • chol. 0mg • sod. 54mg •
calc. 1mg • fiber 0g
Creamy Blue Cheese Dressing
This version is much lower in fat than
traditional blue cheese dressings. Try it as
a dip for celery the next time you serve
buffalo-style wings.
Preparation: 10 minutes or less.
Makes about 2 cups dressing
16
Page 16
1
1/2
1
1/2
1/3
3/4
1/2
1/4
3
clove garlic, peeled and chopped
ounce shallot, peeled and chopped
cup nonfat yogurt
cup lowfat buttermilk
cup low-fat mayonnaise
teaspoon dry mustard
teaspoon Worcestershire sauce
teaspoon white pepper
ounces crumbled blue cheese
Dash hot sauce – to taste
Place the garlic, shallot, buttermilk,
yogurt, mayonnaise, dry mustard,
Worcestershire, and pepper in a
medium bowl. Mix using speed 3 until
smooth and creamy, 30 to 40 seconds.
Add the crumbled blue cheese and hot
sauce. Mix using speed 3, for 20 to 30
seconds longer. Let stand for 30 minutes before using to allow flavors to
develop. Cover and refrigerate all
unused portions. Keeps for 1 week.
Nutritional information per serving (4 teaspoons):
Calories 27 (54% from fat) • carb. 1g • pro. 1g • fat
1g • sat. fat 0g • chol. 2mg • sod. 47mg •
calc. 29mg • fiber 0g
Garlic & Chive Mashed Potatoes
Old fashioned comfort food at its best.
For basic mashed potatoes, omit the
garlic and chives.
Preparation: 20 minutes or less, plus cooking
time for potatoes.
Makes 7 cups (12 servings)
3
4-6
2
1
3/4
1/2
3
1/2
1/4
pounds russet or Yukon
gold potatoes
cloves garlic, peeled and halved
teaspoons kosher salt, divided
teaspoon white wine vinegar
cup whole milk
cup half-and-half
tablespoons unsalted butter
cup (1/4 ounce) chopped
fresh chives
teaspoon freshly ground white or
black pepper
Peel the potatoes and cut in 1/2-inch
slices. Place the potatoes, garlic, 1 teaspoon kosher salt, and wine vinegar in
a 3-3/4 quart saucepan* and cover with
cold water by 1 inch. Cover loosely and
bring to a boil over high heat, then
reduce heat to medium high and boil
gently until potatoes are tender but not
falling apart, about 15 to 18 minutes.
While potatoes are cooking, combine
milk, half-and-half, butter, and chives in
a 1-1/2 quart saucepan. Simmer over
low heat until butter is completely
melted. Keep warm.
Drain the cooked potatoes and garlic,
return to the saucepan, and place over
low heat for 1 minute. Remove from the
heat, and use speed 2 to whip the potatoes and garlic until somewhat smooth,
about 30 seconds. While still mixing,
add the hot milk and butter mixture, and
mix until well blended, about 30 seconds. Mix on speed 4 until fluffy, about
1 minute. Add the remaining salt and
pepper; mix to blend, 15 seconds.
Scrape down sides of pan with rubber
02CU13047 HTM-9LB IB
6/30/03
3:58 PM
spatula as necessary. Transfer the
potatoes to a warm serving bowl and
sprinkle with the remaining chopped
chives. Serve immediately.
Nutritional information per serving:
Calories 149 (28% from fat) • carb. 24g • pro. 3g •
fat 5g • sat. fat 3g • chol. 14mg • sod. 185mg •
calc. 42mg • fiber 2g
*Do not use nonstick cookware with the
hand mixer.
Tip: For a “lighter” everyday version, use
evaporated fat-free milk (not reconstituted) in
place of the milk and half-and-half.
Souffléd Sweet Potatoes with
Praline Topping
For easy entertaining, you may prepare the
potatoes ahead of time. Make the topping
just before putting them into the oven.
Preparation: 20 – 25 minutes, plus cooking and
baking times.
Makes 8 - 12 servings
Cooking spray
3-1/2 pounds sweet potatoes or yams,
peeled, cut in 1/2-inch slices
zest of 1 lemon, finely chopped
2
tablespoons fresh lemon juice
1/2
cup brown sugar (light or dark),
firmly packed, divided
5
tablespoons butter, room
temperature, divided
Page 17
1/2
3
1-1/2
1/2
1/3
1/2
1/4
2/3
cup evaporated fat-free milk
large eggs
teaspoons kosher salt, divided
teaspoon freshly ground pepper
cup half-and-half
teaspoon cinnamon
teaspoon freshly grated nutmeg
pinch cayenne
cup coarsely chopped pecans
heat until sugar is dissolved. Stir in the
pecans and simmer until slightly thickened. Spread this mixture over the
sweet potatoes in the casserole.
Bake the preheated 350°F oven for 25
to 30 minutes, until heated through and
lightly browned on top. Serve hot.
Nutritional information per serving (12 servings):
Calories 308 (32% from fat) • carb. 49g • pro. 5g •
fat 11g • sat. fat 4g • chol. 69mg • sod. 212mg •
calc. 76mg • fiber 6g
Preheat the oven to 350°F. Coat an
8-cup shallow casserole/baking dish
with cooking spray.
Place the sweet potatoes in a 3-3/4
quart saucepan and cover with cold
water by 1 inch. Bring to a boil over
high heat, reduce heat to medium and
cook until potatoes are fork tender,
about 15 to 18 minutes. Drain and
transfer to a large bowl. Add lemon zest
and juice. Mash potatoes on speed 2
until smooth, about 40 seconds. Add
half the brown sugar and 2 tablespoons
of the butter; mix until well blended,
about 40 seconds. Add the evaporated
fat-free milk; mix on speed 4 until blended, 30 seconds. Mix in the eggs one at
a time on speed 4 until smooth and
blended, 30 seconds. Add 1 teaspoon
of the salt and the pepper; mix on
speed 1 for 30 seconds.
Transfer the sweet potato mixture to the
prepared baking dish and spread evenly. Place the remaining butter in a 1-1/2
quart sauce pan and melt over medium
heat. Stir in the remaining brown sugar,
half-and-half, remaining salt, cinnamon,
nutmeg, and cayenne. Stir over medium
Spinach & Feta Stuffed Shells
Flecks of spinach blend with feta and ricotta
cheeses to make this stuffing for jumbo
pasta shells. Use your own favorite tomato
sauce, homemade or jarred, as the topping.
Preparation: 15 – 20 minutes, plus 30 – 35
minutes baking.
Makes 6 servings (5 stuffed shells per serving)
36
1/2
1/4
1
1-1/2
1-1/2
1
1
8
1/4
3
jumbo pasta shells
tablespoon extra virgin olive oil
cup finely chopped onion or shallot
clove garlic, minced
teaspoons basil
teaspoons oregano
package (10 ounces) frozen chopped
spinach, thawed
pound regular or part-skim
ricotta cheese
ounces feta cheese, crumbled
teaspoon freshly ground
black pepper
cups tomato sauce
17
02CU13047 HTM-9LB IB
2-3
6/30/03
3:58 PM
(homemade or purchased)
tablespoons freshly grated Reggiano
Parmesan cheese
Cooking spray
In a 5-quart stockpot, cook the pasta
shells in boiling salted water according
to package instructions. (Cook extra
shells in case of breakage.) Drain, rinse
and set aside on a sheet pan lined with
plastic wrap.
In an 8-inch skillet, heat the oil over
medium heat. Add the onion, garlic and
herbs; cook until softened and fragrant,
2 to 3 minutes. Transfer to a medium
(3-quart) bowl and allow to cool for 5
minutes. Place the thawed spinach in
a clean kitchen towel and squeeze the
liquid from the spinach; discard the
liquid (you will have about 3/4 cup
chopped spinach).
Add the spinach, ricotta, feta and
pepper to the onion mixture in the bowl.
Mix on speed 2 for 30 seconds, then
increase to speed 4 and mix for
1-1/2 minutes.
Stuff each cooked shell with about 1-1/2
tablespoons of the spinach mixture.
Preheat oven to 375° F. Lightly coat a
13 x 9 x 2-inch (or equivalent) baking
dish with cooking spray. Spoon 1 cup of
the tomato sauce into the dish and
spread evenly in the bottom. Arrange
the shells, open side up. Spoon an
additional 2 cups of the sauce evenly
over the shells. Cover loosely with foil
and bake in the preheated 375° F oven
for 30 to 35 minutes, until hot and bub-
18
Page 18
bly. Remove from oven and sprinkle
with Parmesan. Let rest 5 minutes
before serving.
Nutritional information per serving:
Calories 452 (37% from fat) • carb. 51g • pro. 16g •
fat 18g • sat. fat 8g • chol. 49mg • sod 821mg •
calc. 458mg • fiber 3g
Tip: Measure out filling using an ice cream
scoop—it is 1-3/5 tablespoons, just the perfect amount to fill each jumbo shell.
Three Cheese Soufflé
Full of rich, cheese flavor, this soufflé makes
a wonderful supper or brunch.
Preparation: 25 – 30 minutes, plus baking time.
Makes 8 servings
Unsalted butter for dish
cup grated Reggiano Parmesan
cheese, divided
1/4
cup unsalted butter
5
tablespoons all-purpose flour
1-1/4 cups evaporated fat-free milk
(not reconstituted)
1/4
cup dry white vermouth
pinch cayenne
pinch freshly ground nutmeg
6
large egg yolks
3/4
cup grated imported Gruyère cheese
1/2
cup grated sharp white
cheddar cheese
1
teaspoon kosher salt
1/4
teaspoon freshly ground pepper
8
large egg whites
1/4
teaspoon cream of tartar
1/2
Arrange rack in lower third of oven; preheat oven to 400° F. Generously butter
a 10-cup soufflé dish (you may also use
eight 1-1/4 cup individual soufflé dishes), and sprinkle with half the
Parmesan.
Melt butter in a 2-3/4 quart saucepan
over medium heat. Stir in flour and cook
stirring constantly without browning,
until the mixture bubbles, about
1 minute. Slowly whisk in milk, then
wine. Cook until thickened, whisking
constantly, about 2 to 3 minutes; stir in
cayenne and nutmeg. Remove from
heat and transfer to a large bowl.
Combine yolks, salt and pepper in a
small bowl, insert standard beaters, and
mix on Speed 1 until smooth, 30 seconds. While mixing on speed 1, add
yolk mixture to sauce all at once and
mix until well blended, 20 seconds. Stir
in cheeses on speed 1, 20 seconds.
Place egg whites and cream of tartar in
a large stainless or glass mixing bowl.
Using the chef’s whisk, beat on speed 7
until stiff peaks form, about 2-1/2 minutes. Use a rubber spatula to stir 1 cup
of the beaten egg whites into the
cheese sauce, then gently fold the
remaining egg whites into the mixture,
1/3 at a time. Gently spoon the soufflé
mixture into the prepared dish(es).
Smooth over the top. Place in the hot
400° F oven and immediately reduce
the heat to 375° F. Bake the soufflé
until puffed and golden, about 45 to 50
minutes for the large soufflé and 25 to
30 minutes for individual soufflés. The
02CU13047 HTM-9LB IB
6/30/03
3:58 PM
centers will be just barely set and
creamy. Sprinkle with chopped fresh
chives and serve immediately.
Nutritional information per serving:
Calories 280 (61% from fat) • carb. 9g • pro. 16g •
fat 19g • sat. fat 10g • chol. 203mg • sod. 445mg •
calc. 370mg • fiber 0g
Cuisinart® SmartPower
CountUp® 9-Speed
Electronic Hand Mixer
Limited ThreeYear Warranty
This warranty supersedes all previous
warranties on the Cuisinart®
SmartPower CountUp® 9-Speed
Electronic Hand Mixer. This limited
warranty is available to consumers
only. You are a consumer if you own
a Cuisinart® SmartPower CountUp®
9-Speed Electronic Hand Mixer which
was purchased at retail for personal,
family or household use. Except as
otherwise required under applicable
state law, this warranty is not available
to retailers or other commercial
purchasers or owners.
Page 19
We warrant that your Cuisinart®
SmartPower CountUp® 9-Speed
Electronic Hand Mixer will be free of
defects in materials and workmanship
under normal home use for three years
from the original date of purchase.
We suggest you complete and return
the enclosed warranty registration card
promptly to facilitate verification of the
date of original purchase. However,
return of the warranty registration card
is not a condition of this warranty and
does not eliminate the need for the
consumer to maintain the original
receipt of purchase.
If your hand mixer should prove to be
defective within the warranty period, we
will repair it (or, if we think it necessary,
replace it) without charge to you.
To facilitate the speed and accuracy of
your return, please also enclose $7.00
for shipping and handling of the product. (California residents need only
supply a proof of purchase and should
call 1-800-726-0190 for shipping
instructions.) Please also be sure to
include a return address, daytime
phone number, description of the
product defect, product serial number
and any other information pertinent to
the product's return. Please pay by
check or money order.
Your Cuisinart® SmartPower CountUp®
9-Speed Electronic Hand Mixer has
been manufactured to the strictest
specifications and has been designed
for use with authorized Cuisinart®
accessories and replacement parts.
This warranty expressly excludes any
defects or damages caused by
accessories, replacement parts or
repair service other than those which
have been authorized by Cuisinart.
This limited warranty does not cover
any damage caused by accident,
misuse, shipment or other than ordinary
household use.
This warranty excludes all incidental or
consequential damages. Some states
do not allow the exclusion or limitation
of these damages, so these exclusions
may not apply to you.
To obtain warranty service, please
call our Consumer Service Center at
1-800-726-0190, or write to:
Cuisinart
150 Milford Road
East Windsor, NJ 08520
If you have any questions about the
safety features of your Cuisinart®
SmartPower CountUp® 9-Speed
electronic Hand Mixer, please call us,
toll-free, at 800-726-0190.
19
02CU13047 HTM-9LB IB
6/30/03
Coffeemakers
3:58 PM
Page 20
Food
Processors
Toaster Ovens
Blenders
Cookware
Ice Cream
Makers
Cuisinart offers an extensive assortment of top quality products to make life in the
kitchen easier than ever. Try some of our other countertop appliances and
cookware, and Savor the Good Life®.
www.cuisinart.com
© 2002 Cuisinart
Cuisinart® is a registered
trademark of Cuisinart
150 Milford Road
East Windsor, NJ 08520
Printed in China
02CU13047
IB-4050