1
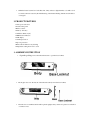
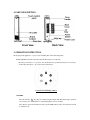
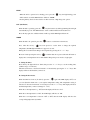
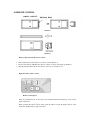
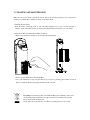
 Contact Details Please note that some of the contact details on this PDF document may not be current. Please use the following details if you need to contact us: Telephone: 0844 879 3588 Email: [email protected] The customer support section of our website also features a wide range of information which may be of use to you and is available 24 hours a day. It includes: • Operating and installation instructions • Easy ‘How to use’ guides for storage heaters • Service and repairs • Where to buy our products • Literature downloads • Heating requirement calculator Visit ‐ www.dimplex.co.uk/support A division of GDC Group Ltd
Millbrook House Grange Drive Hedge End Southampton SO30 2DF
www.dimplex.co.uk
Registered No: 1313016 England
VAT GB 287 1315 50004
EEE Producer Registration Number –
WEE/GE0057TS
Paper from sustainable sources
Installation and Operating instructions
Model: Studio G DXSTG25 Ceramic Tower Heater
IMPORTANT:
08/51280/0 Issue 0
THESE INSTRUCTIONS SHOULD BE READ CAREFULLY AND RETAINED
FOR FUTURE REFERENCE
1. IMPORTANT SAFETY WARNINGS
•
•
The appliance must only be used as described in the instructions for use! Use for any other purpose
is forbidden! Any damage resulting from improper use and non-observance of the safety
information will invalidate any liability and warranty!
All liability is disclaimed for any frost damage caused by a heating capacity that is insufficient for
the room size, bad heat insulation of the room, incorrect use or force majeure (e.g. power failure).
•
•
•
•
Only connect the appliance to A.C. mains as specified on the rating plate!
Never touch live parts! Danger to life!
Never operate the appliance with wet hands! Danger to life!
The appliance must be placed in a way that the control elements cannot be touched by persons who
are in a bath, shower, or any other water-filled receptacle.
•
Do not use the appliance in rooms with bath, shower or swimming pool or in the vicinity of wash
basins or water connections!
Do not expose the appliance to rain or other moisture! The appliance is not for outdoor use. The
appliance must only be stored indoors!
Never use the appliance if the appliance or cord is damaged. Risk of injury!
Check the power cord regularly for damage.
If the power cord or the appliance is damaged to the extent that electrical parts are exposed,
disconnect it immediately from the mains and consult your retailer or manufacturer!
•
•
•
•
•
•
•
•
•
•
•
•
•
•
•
•
•
•
•
•
•
Improper repairs can expose the user to considerable danger.
The appliance may only be opened up and repaired by authorized qualified personnel.
Do not store or use any flammable materials or sprays in the vicinity of the appliance when the
appliance is in use. Fire hazard!
Do not use the appliance in flammable atmospheres (e.g. in the vicinity of combustible gases or
spray cans)! Explosion and fire hazard!!
The appliance should not be used in areas which are a fire risk, such as garages, stables, or wooden
sheds.
Important! Do not insert any foreign objects into the appliance openings! Risk of injury (electric
shock) and damage to the appliance!
The appliance air inlet and outlet openings must not be obstructed in any way!
Do not touch the air outlet grill whilst in operation or immediately after use. Risk of burns!
WARNING: IN ORDER TO AVOID OVERHEATING, DO NOT COVER THE HEATER.
The appliance is not intended for use by young children or infirm persons without supervision!
Young children should be supervised to ensure that they do not play with the appliance!
Attention! To avoid any danger due to unintentionally resetting the thermal cut-out, the appliance
must not be supplied via a timer.
The appliance is not suitable for animal breeding purposes!
The instruction leaflet belongs to the appliance and must be kept in a safe place. When changing
owners, the leaflet must be surrendered to the new owner!
Disconnect from mains when not in use or cleaning.
It is not recommended to use an extension cord.
Do not locate the heater immediately below a socket-outlet.
When the heater is turned on for the first time, it may release a slight, harmless odor. This odor is
a normal occurrence caused by the initial heating of the internal heating elements and should not
occur again.
•
2. PRODUCT FEATURES
•
•
•
•
•
•
•
•
•
•
•
2 heat power selections
Touch control panel
Remote control
Timer (1-12 hours)
Oscillation function (76°)
LED function indicators
LCD display
Overheat protection
Tip-over protection
Removable air filter for easy cleaning
Temperature setting from 15°C to 35°C
3. ASSEMBLY INSTRUCTION
•
Open the packing, remove the unit and unscrew to open the base locknut.
•
Fit the glass base onto the bottom of the unit and securely screw the base locknut.
•
The unit is now assembled and should be placed upright; always ensure it is placed on a flat floor
or surface for use.
4. PARTS DESCRIPTION
5. OPERATING INSTRUCTION
Firstly, plug in the appliance to a power source matching that on the units rating label.
Power switch (located below the removable air filter at the rear of the unit)
Press the power button to “I” position. You should hear a beep sound; the heater is now ready for
use. Pressing the button to “0” position turns off the heater.
Control Panel and display window
STANDBY
Press the standby “
” key, the power indicator light will turn ON. The heater begins operation
at low heat power - (LED indicator on the heating function shows “LOW”).
Press this key again and all functions will stop. The LED indicator turns off and the unit is back
in standby mode.
HEAT
When the unit is operated at low heating power, press the “
” key, the high heating power
will be turned on, and the LED indicator will show “HIGH”.
Pressing this key allows for the selection of either low heat or high heat power options.
OSC (Oscillation)
When the unit is operating, press the “
” key, the heater body will begin turning left and right
automatically up to 76°. The LED indicator of this oscillation function will be turned on.
Press this key again, the oscillation function will stop and the LED light will turn off.
MODE
When the unit is in operation, press the “
Note: when the set key “
” button to set the timer or thermostat.
” has been pressed to set the timer or change the required
temperature, the LED light will flicker for approx 5 seconds.
During this 5 second interval changes can be inputted by pressing the “+” or “-” keys.
However if after pressing the set key “
“ no further buttons are pressed the unit will return to
display the room temperature and to make further changes the process needs to begin again.
A: Setting the timer:
Press the key, the light will show “0 H”, then press the “+” or “-“keys to set the working time,
(within a range of 1-12 hours).
The time can increase or decrease in intervals of 1 hour/each by pressing the “+” or “-“keys. The
display will show the final time you have set.
B: Setting the thermostat:
When the timer has been set (if desired), press the “
” again. The LED displays 25℃, now
you can adjust the thermostat to your required temperature setting. The temperature setting is
increased or decreased in intervals of 1°C/each press of the “+” or “-“keys. The display will show
the final temperature you have set. Range 15 - 35°C)
When the room temperature is ≤ -10℃, the LCD display will show as “LO”
When the room temperature is > 40°C, the LCD display will show as “HI”.
When the room temperature is between -10℃ to 40℃, then the LCD display will show the
corresponding temperature by number.
6. REMOTE CONTROL
(Picture 1)
(Picture 2)
Battery replacement in the remote control
•
•
•
Slide out the battery holder at the rear of remote control. (Picture 1)
Insert a 3V Li battery (CR 2032) into the tray of the door, battery text facing up. (Picture 2)
Slide the battery holder back into the remote control; it is now ready for use.
Operation of the remote control
Remote control panel
There are six function keys on the remote control and their functions match those on the control
panel of the heater.
When operating the remote control, always point the remote towards the display window of the
heater; the signal distance is approx. 6 meters.
7. CLEANING AND MAINTENANCE
Make sure the power switch is turned off and the plug is disconnected from the power socket before
cleaning or any maintenance. Otherwise, it may cause electric shock.
1. Cleaning the unit surface:
Clean the surface with damp cloth (or add some mild detergent). Do not use corrosive detergent or
solvent to clean, such as Petrol, Tina, etc. Never wash the unit directly with water or a soaked cloth.
2. Clean the air filter (recommended monthly, if required)
• Remove the air filter for cleaning as shown in the following diagram.
• Do not use any chemicals for cleaning the filter.
• Use a soft cloth/duster to wipe away the dust. If you use water for cleaning, please make sure the air
filter is completely dried before placing the filter back into the unit.
Recycling: For electrical products sold within the European Community. At the end of
the electrical products useful life it should not be disposed of with household waste.
Please recycle where facilities exist.
Check with your Local Authority or retailer for recycling advice in your country.
8. After sales service
Your product is guaranteed for one year from the date of purchase. Within this period, we undertake to repair
or exchange this product free of charge provided it has been installed and operated in accordance with these
instructions.
Your rights under this guarantee are additional to your statutory rights, which in turn are not affected by this
guarantee. Should you require after sales information or assistance with this product please go to
www.gdcgroup.co.uk or ring our helpdesk on 0845 604 2330 (UK) or 01 842 4833 (R.O.I).
Please retain your receipt as proof of purchase.
CE This appliance complies with European Safety Standard EN 60335-2-30, and European Electromagnetic
Compatibility (EMC) EN 55014, EN 60555-2 and EN 60555-3. These cover the essential requirements of EEC
Directives 2006/95/EC and 2004/108/EC
Dimplex
Millbrook House
Grange Drive
Hedge End
Southampton
S030 2DF
SO30 2DF
A division of GDC Group Ltd,
Website: www.gdcgroup.co.uk
Customer Services UK:
Fax:
Email;
0845 604 2330
01489 773050
[email protected]
Republic of Ireland
01. 842 4833
[c] GDC Group Ltd
All rights reserved. Material contained in this publication may not be reproduced in whole or in part, without prior permission in
writing of GDC Group Limited.